google cloud print setup - konica minolta · pdf filetroubles hoot ... konica minolta, ... to...
TRANSCRIPT
Google Cloud Print Setup
User’s Guide
[INDEX]
1. Before Use ...................................................................................................................................................................... 3 1-1. Settings for Enabling Local Printing .......................................................................................................................... 3
1-1-1. Bonjour Settings ................................................................................................................................................ 3 1-1-2. SSL Settings for WebDAV Server Funtion ......................................................................................................... 3 1-1-3. Quick Security Settings ...................................................................................................................................... 3
1-2. Web Browser Setting ................................................................................................................................................ 4 1-2-1. Proxy Setting ..................................................................................................................................................... 4
2. Device Registration ......................................................................................................................................................... 5 2-1. Registering from Local Network ............................................................................................................................... 5 2-2. Registering from Application ................................................................................................................................... 11
3. Operating Procedure of the Application ......................................................................................................................... 18 3-1. Confirmation of Registration Status ........................................................................................................................ 18 3-2. Sign in .................................................................................................................................................................... 19 3-3. Administrator Settings Screen ................................................................................................................................ 20
3-3-1. Registering ...................................................................................................................................................... 21 3-3-1-1. If the device has not been registered ........................................................................................................ 21 3-3-1-2. If the device has been registered .............................................................................................................. 22
3-3-2. Setting ............................................................................................................................................................. 23 3-3-3. Proxy Setting ................................................................................................................................................... 24 3-3-4. Log ................................................................................................................................................................... 25
3-4. Printing ................................................................................................................................................................... 26 3-4-1. Printing through Google Cloud Print ................................................................................................................ 26 3-4-2. Local Printing ................................................................................................................................................... 30
3-5. Deletion of Device .................................................................................................................................................. 33 3-5-1. Deleting with this application ........................................................................................................................... 33 3-5-2. Deleting through Google Cloud Print management web page ......................................................................... 33
4. Troubleshoot ................................................................................................................................................................. 36 4-1. Required Options.................................................................................................................................................... 36 4-2. Confirmation of Network Settings ........................................................................................................................... 36 4-3. Confirmation of IP Filtering Setting ......................................................................................................................... 36 4-4. Confirmation of IWS Setting ................................................................................................................................... 37 4-5. Restrictions when Fiery is installed ......................................................................................................................... 37 4-6. Restrictions at Setting Authentication Method ........................................................................................................ 37
5. Frequently Asked Questions ......................................................................................................................................... 37 6. Copyright / License Information / Trademarks ............................................................................................................... 38
6-1. Google Cloud Print™ Setup ................................................................................................................................... 38 6-2. Tempita ................................................................................................................................................................... 38 6-3. JsonCpp ................................................................................................................................................................. 38
1

Trademarks and registered trademarks
Trademark acknowledgments
KONICA MINOLTA, KONICA MINOLTA logo are registered trademarks or trademarks of KONICA MINOLTA, INC.
Google, Google Cloud Print and Google Drive are trademarks of Google Inc.
All other company and product names are either trademarks or registered trademarks of their respective companies.
Services provided by Google
Access the following URL for services provided by Google.
This document describes Google Cloud Print.
h
h
ttp://www.google.com/about/products/
Google Cloud Print
Access the following URL for Google Cloud Print.
ttp://www.google.com/cloudprint/learn/
Summary of this application
Google Cloud Print Setup is such an application that is used to link services provided by Google Cloud Print with the MFP.
Using services provided by Google Cloud Print enables you to register a machine on the Cloud, delete a machine
registered on Cloud, also enables you to check and control the service status.
Reminder
The dialog boxes that appear in this document may differ from those that appear on your computer and MFP, depending
on the installed devices and specified settings.
The explanation of this application in this manual and all screen images are as of September, 2014.
These may be changed without prior notice.
Note
Unauthorized reproduction, translation or duplication of this document, whether in its entirety or in part, is strictly
prohibited.
The contents of this document are subject to change without notice.
Copyright © 2014 KONICA MINOLTA, INC. All rights reserved.
2
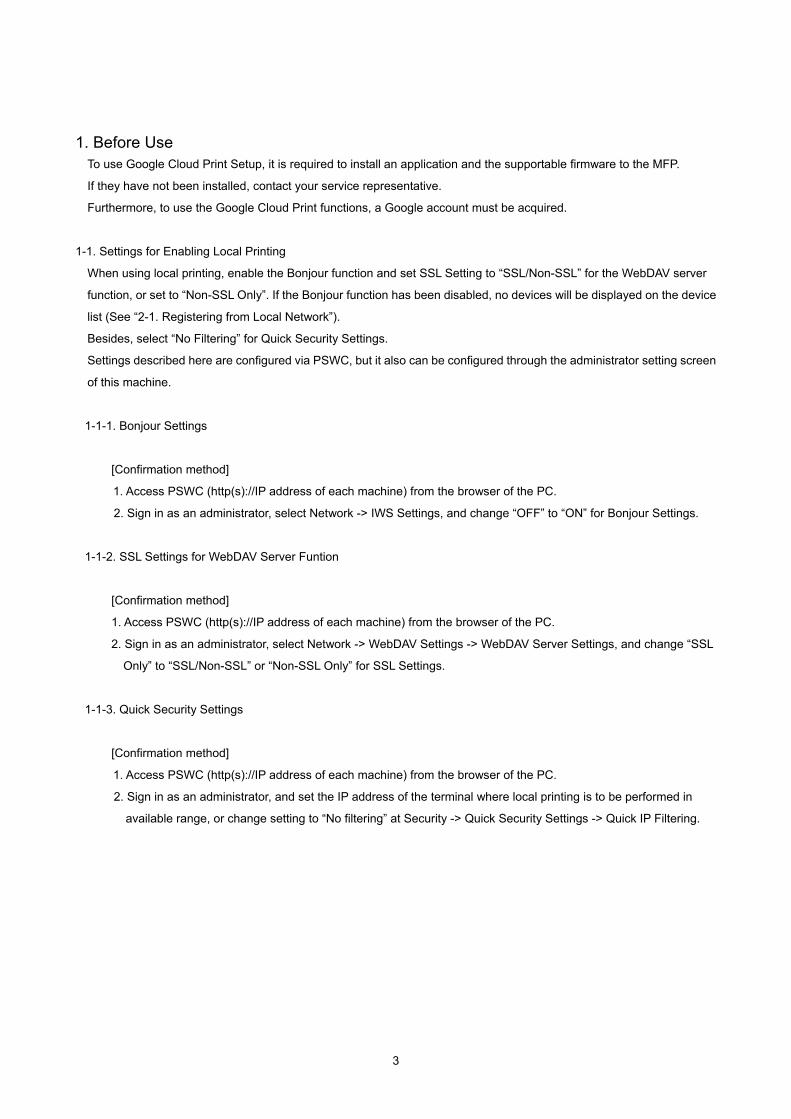
1. Before Use To use Google Cloud Print Setup, it is required to install an application and the supportable firmware to the MFP.
If they have not been installed, contact your service representative.
Furthermore, to use the Google Cloud Print functions, a Google account must be acquired.
1-1. Settings for Enabling Local Printing
When using local printing, enable the Bonjour function and set SSL Setting to “SSL/Non-SSL” for the WebDAV server
function, or set to “Non-SSL Only”. If the Bonjour function has been disabled, no devices will be displayed on the device
list (See “2-1. Registering from Local Network”).
Besides, select “No Filtering” for Quick Security Settings.
Settings described here are configured via PSWC, but it also can be configured through the administrator setting screen
of this machine.
1-1-1. Bonjour Settings
[Confirmation method]
1. Access PSWC (http(s)://IP address of each machine) from the browser of the PC.
2. Sign in as an administrator, select Network -> IWS Settings, and change “OFF” to “ON” for Bonjour Settings.
1-1-2. SSL Settings for WebDAV Server Funtion
[Confirmation method]
1. Access PSWC (http(s)://IP address of each machine) from the browser of the PC.
2. Sign in as an administrator, select Network -> WebDAV Settings -> WebDAV Server Settings, and change “SSL
Only” to “SSL/Non-SSL” or “Non-SSL Only” for SSL Settings.
1-1-3. Quick Security Settings
[Confirmation method]
1. Access PSWC (http(s)://IP address of each machine) from the browser of the PC.
2. Sign in as an administrator, and set the IP address of the terminal where local printing is to be performed in
available range, or change setting to “No filtering” at Security -> Quick Security Settings -> Quick IP Filtering.
3
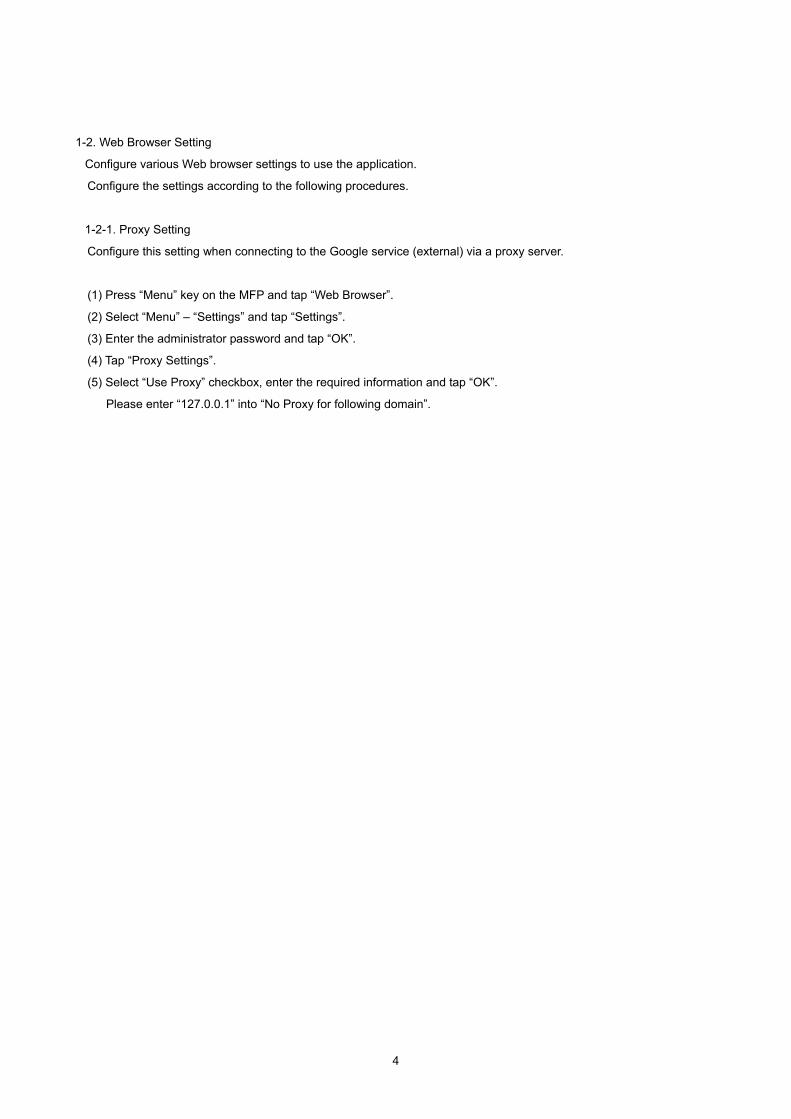
1-2. Web Browser Setting
Configure various Web browser settings to use the application.
Configure the settings according to the following procedures.
1-2-1. Proxy Setting
Configure this setting when connecting to the Google service (external) via a proxy server.
(1) Press “Menu” key on the MFP and tap “Web Browser”.
(2) Select “Menu” – “Settings” and tap “Settings”.
(3) Enter the administrator password and tap “OK”.
(4) Tap “Proxy Settings”.
(5) Select “Use Proxy” checkbox, enter the required information and tap “OK”.
Please enter “127.0.0.1” into “No Proxy for following domain”.
4
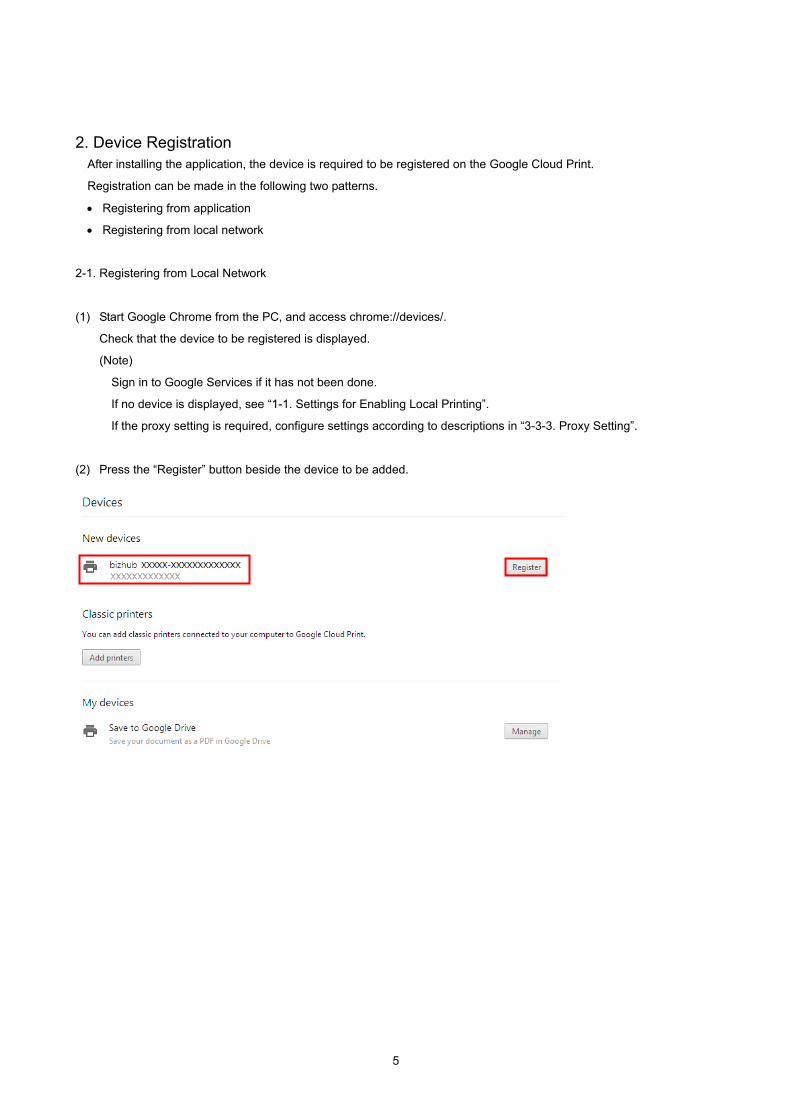
2. Device Registration After installing the application, the device is required to be registered on the Google Cloud Print.
Registration can be made in the following two patterns.
• Registering from application
• Registering from local network
2-1. Registering from Local Network
(1) Start Google Chrome from the PC, and access chrome://devices/.
Check that the device to be registered is displayed.
(Note)
Sign in to Google Services if it has not been done.
If no device is displayed, see “1-1. Settings for Enabling Local Printing”.
If the proxy setting is required, configure settings according to descriptions in “3-3-3. Proxy Setting”.
(2) Press the “Register” button beside the device to be added.
5

(3) When a dialog message for confirming registration appears, select “Register”.
If Google Cloud Print described in “3-3-2. Setting” is OFF, the printer is failed to be registered.
6

(4) Check the status when adding printer.
7

(5) Start the Google Cloud Print Setup application on MFP, and tap “Setting”.
(6) Enter the administrator password registered on the MFP, then tap “Sign in”.
8
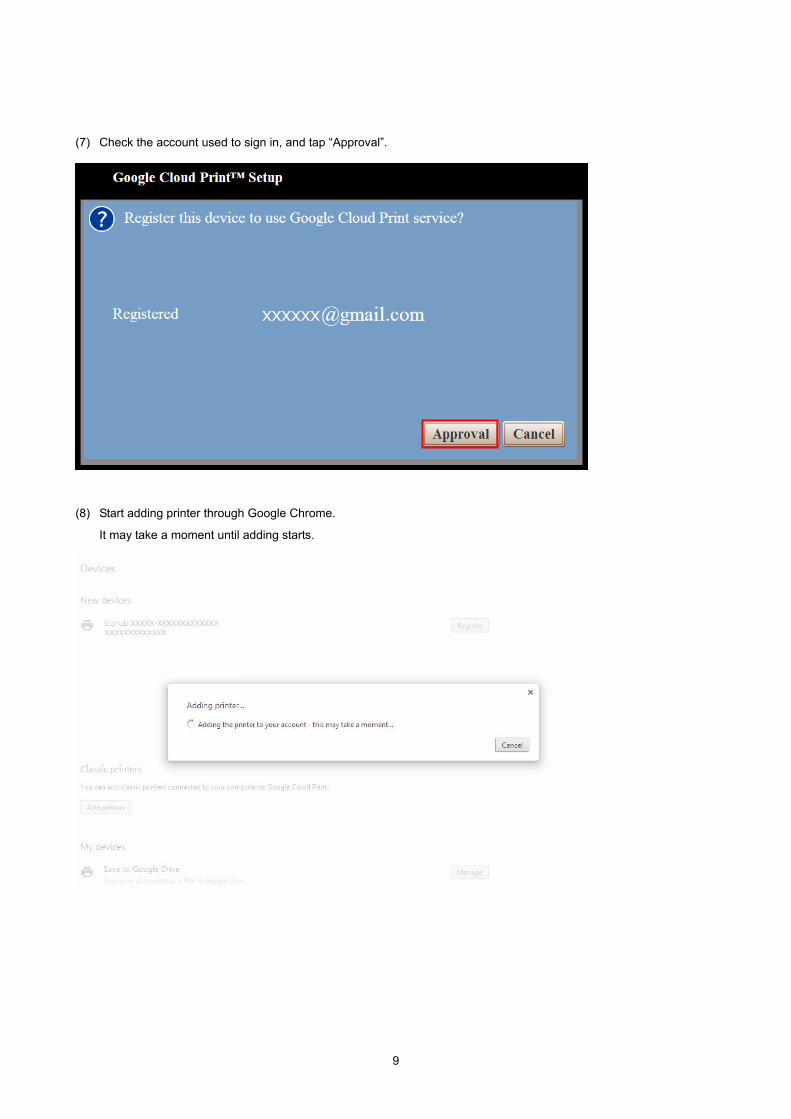
(7) Check the account used to sign in, and tap “Approval”.
(8) Start adding printer through Google Chrome.
It may take a moment until adding starts.
9

(9) The device disappears from the new devices field, and the device added to my devices appears.
After that, press “Manage” to check if the desired device has been registered, then finish device registration.
The following screen appears after pressing the “Manage” button.
10
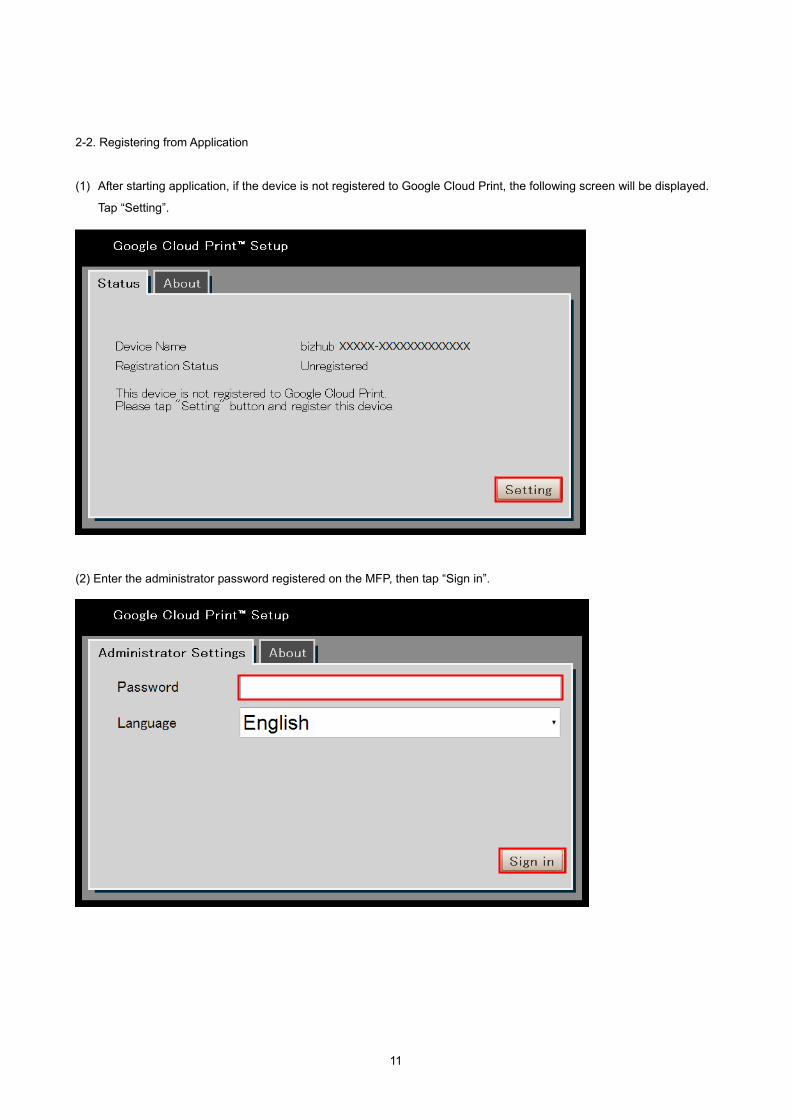
2-2. Registering from Application
(1) After starting application, if the device is not registered to Google Cloud Print, the following screen will be displayed.
Tap “Setting”.
(2) Enter the administrator password registered on the MFP, then tap “Sign in”.
11

(3) To connect with the external Google Cloud Print through the proxy server, tap “Proxy Setting”.
If Proxy Setting is not required, tap “Skip” and go to step (6).
(Note)
Depending on the MFP and version of the application, values that have been specified in "1-2-1. Proxy Setting" will
be set automatically.
In that case, steps from (3) to (5) will be skipped so proceed to step (6).
(4) Settings shown here are required for connecting with the external Google Cloud Print through the proxy server.
Enter the required information, then tap “Save”.
If proxy authentication is required, enter the user name and password.
12

(5) The setting completion screen appears. Tap “Close”.
(6) Tap the “Register” tab and tap “Show” to display the Google authentication registration screen.
The device name can be edited as necessary.
If the screen is displayed after skipping Proxy Setting, the “Register” tab is selected by default.
13
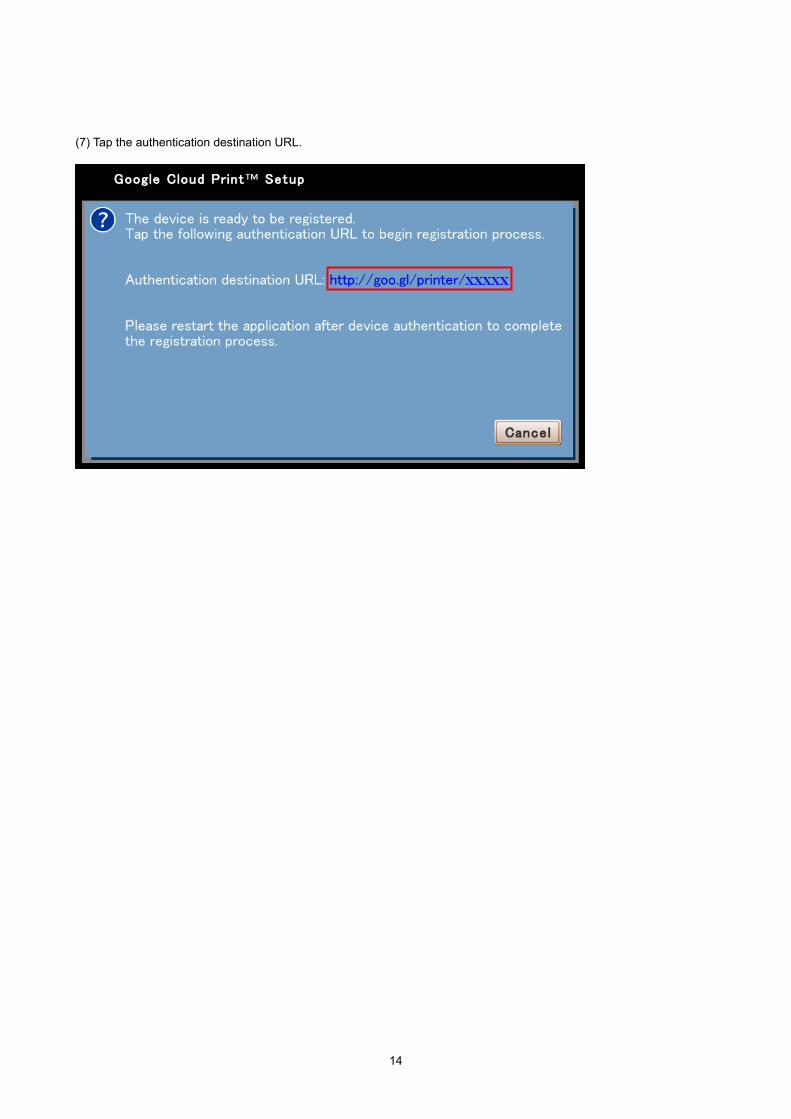
(7) Tap the authentication destination URL.
14

(8) Tap “Finish printer registration”.
Sign in to Google Services if it has not been done.
(9) Device registration to Google Cloud Print is complete.
When the following screen appears, press “Menu” on this machine and restart the application from APP.
15

(10) After restarting the application, the following screen will be displayed.
Tap “Close” and check that the MFP has been registered.
(11) When the following screen appears, the registration on MFP is complete.
16
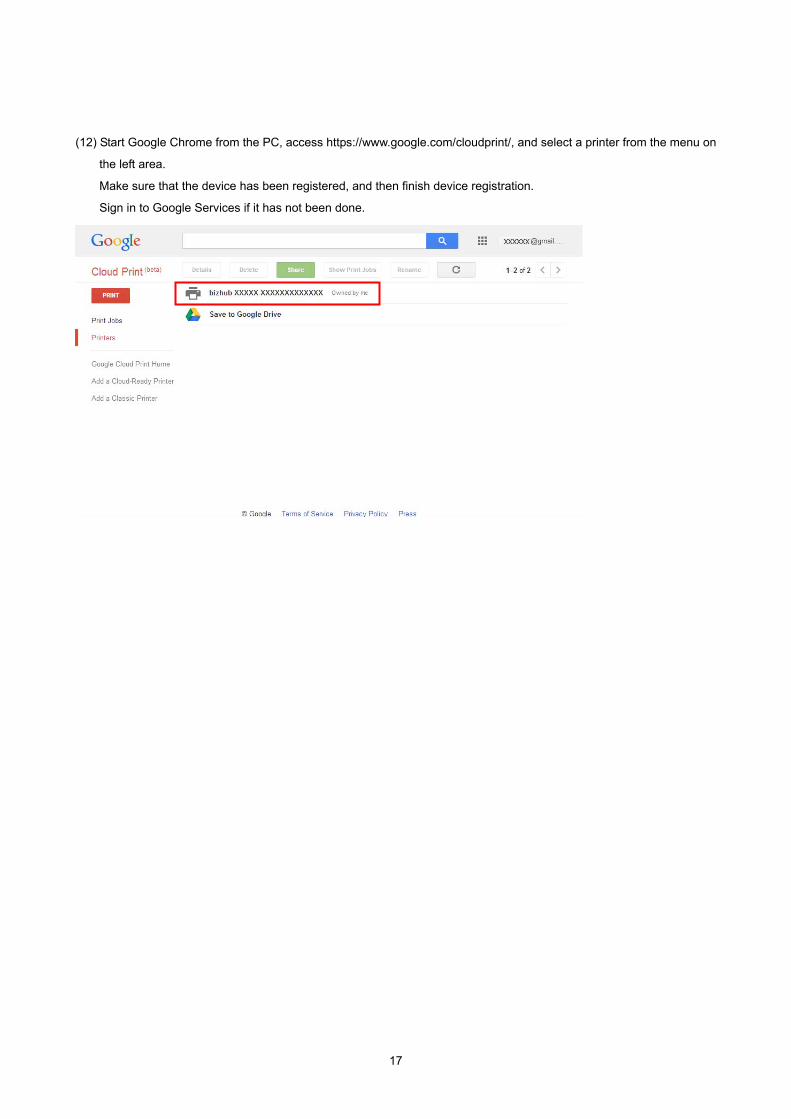
(12) Start Google Chrome from the PC, access https://www.google.com/cloudprint/, and select a printer from the menu on
the left area.
Make sure that the device has been registered, and then finish device registration.
Sign in to Google Services if it has not been done.
17
3. Operating Procedure of the Application This chapter describes the operating procedure of the application.
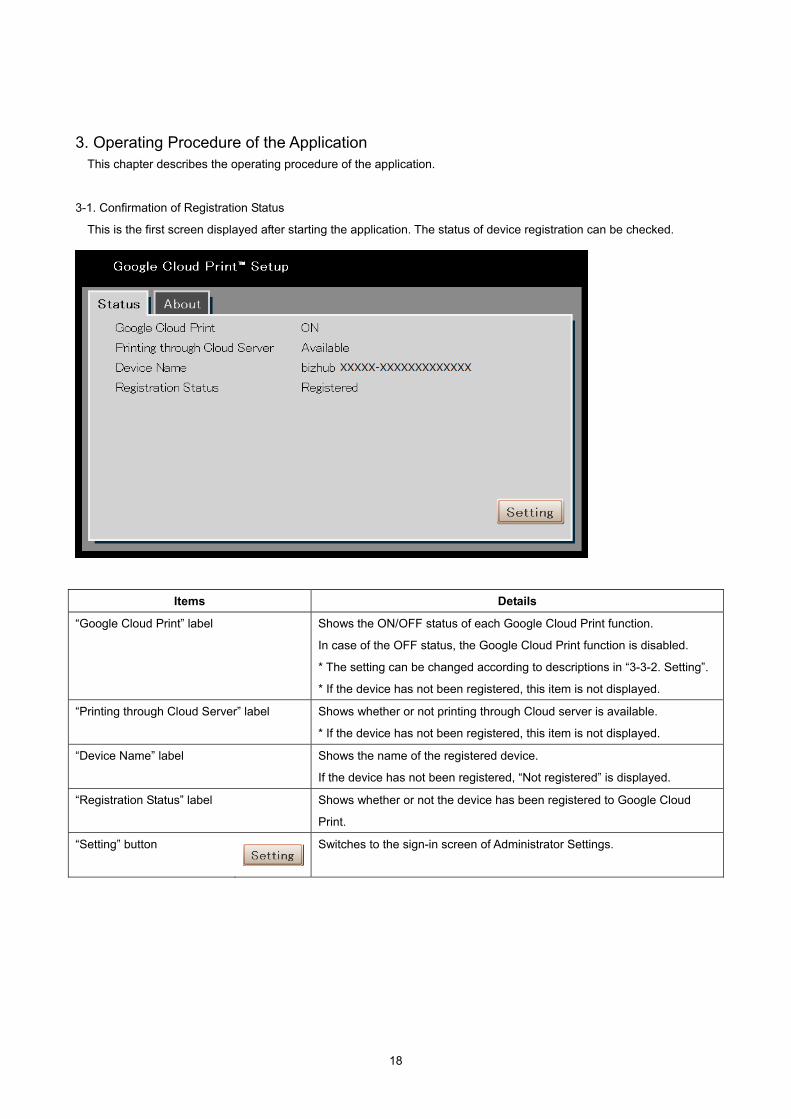
3-1. Confirmation of Registration Status
This is the first screen displayed after starting the application. The status of device registration can be checked.
Items Details
“Google Cloud Print” label Shows the ON/OFF status of each Google Cloud Print function.
In case of the OFF status, the Google Cloud Print function is disabled.
* The setting can be changed according to descriptions in “3-3-2. Setting”.
* If the device has not been registered, this item is not displayed.
“Printing through Cloud Server” label Shows whether or not printing through Cloud server is available.
* If the device has not been registered, this item is not displayed.
“Device Name” label Shows the name of the registered device.
If the device has not been registered, “Not registered” is displayed.
“Registration Status” label
Shows whether or not the device has been registered to Google Cloud
Print.
“Setting” button
Switches to the sign-in screen of Administrator Settings.
18

3-2. Sign in
This is the sign-in screen of Administrator Settings. The following functions are available.
• Function that enables the user to sign in to the administrator setting function of the application using the
administrator password registered on the MFP
• Function that enables the user to switch languages used at the application.
Items Details
“Password” textbox Enter the administrator password registered on this MFP.
“Language” dropdown list Specify the language of the application.
“Sign in” button
Sign in with the entered administrator password.
If you succeed in sign-in, the Administrator Settings screen will be
displayed.
19
3-3. Administrator Settings Screen
This is the screen to configure administrator settings. The following functions are available.
• Registration: Function that enables the user to register/delete devices on/from Google Cloud Print
• Setting: Function that enables the user to configure each setting of Google Cloud Print
• Proxy Setting: Function that enables user to connect with the external Google Cloud Print through the proxy server
• Log: Function that enables user to print an exception trace log
Button used in common on each setting screen
Items Details
“Sign out” button
Log out from the Administrator Settings screen.
After logout, go to the screen where the application has been started
(“3-1. Confirmation of Registration Status”).
20

3-3-1. Registering
If the device has not been registered, a screen for registering the device name will be displayed.
If the device has been registered, the device name and the account of who registered the device will be displayed, and
the button for deleting the device will also be displayed.
3-3-1-1. If the device has not been registered
Items Details
“Device Name” textbox Enter the device name to be registered.
“Show” button
Go to the authentication destination URL screen.
* For details, see “2-2. Registering from Application”.
21

3-3-1-2. If the device has been registered
Items Details
“Device Name” textbox Shows the registered device name.
* Disable to input.
“Delete” button
Delete the registered device.
22
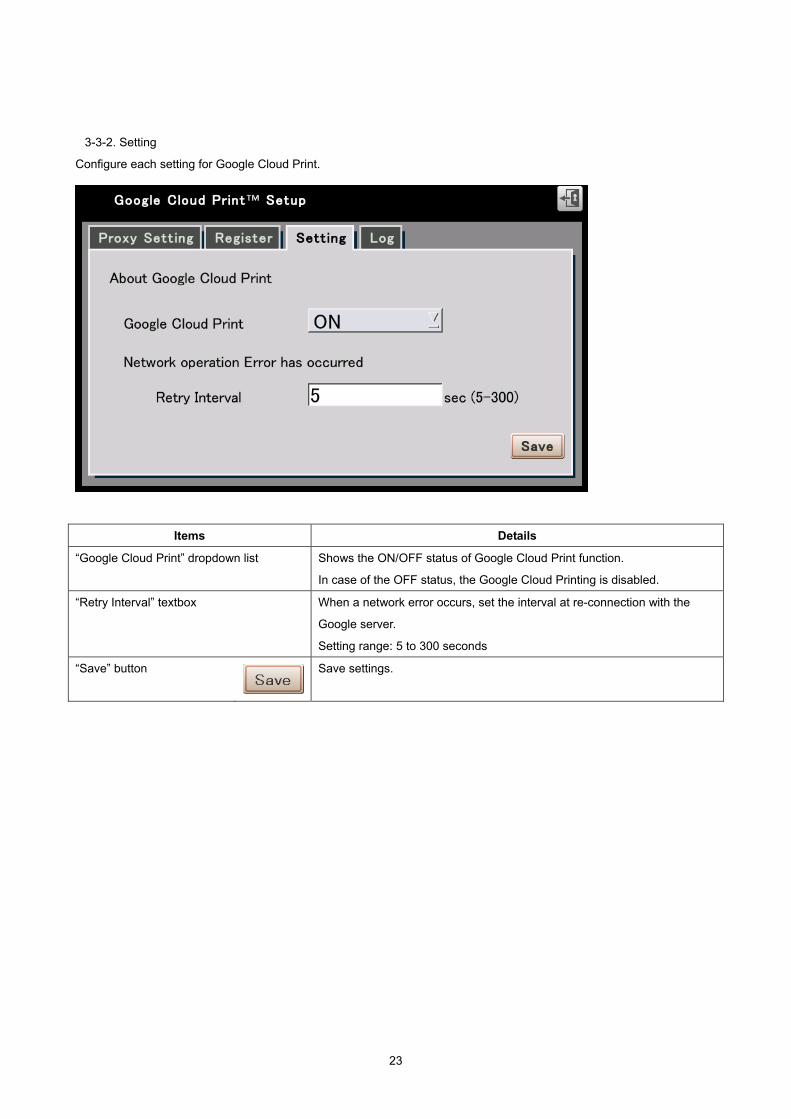
3-3-2. Setting
Configure each setting for Google Cloud Print.
Items Details
“Google Cloud Print” dropdown list Shows the ON/OFF status of Google Cloud Print function.
In case of the OFF status, the Google Cloud Printing is disabled.
“Retry Interval” textbox When a network error occurs, set the interval at re-connection with the
Google server.
Setting range: 5 to 300 seconds
“Save” button
Save settings.
23

3-3-3. Proxy Setting
Proxy Setting is configured to connect with the external Google Cloud Print through the proxy server.
Items Details
“Server Address” textbox Enter the address of the proxy server.
“Port Number” textbox Enter the port number of the proxy server.
“User Name” textbox Enter the user name when the proxy authentication is required.
“Password” textbox Enter the password when the proxy authentication is required.
“Save” button
Save settings.
24
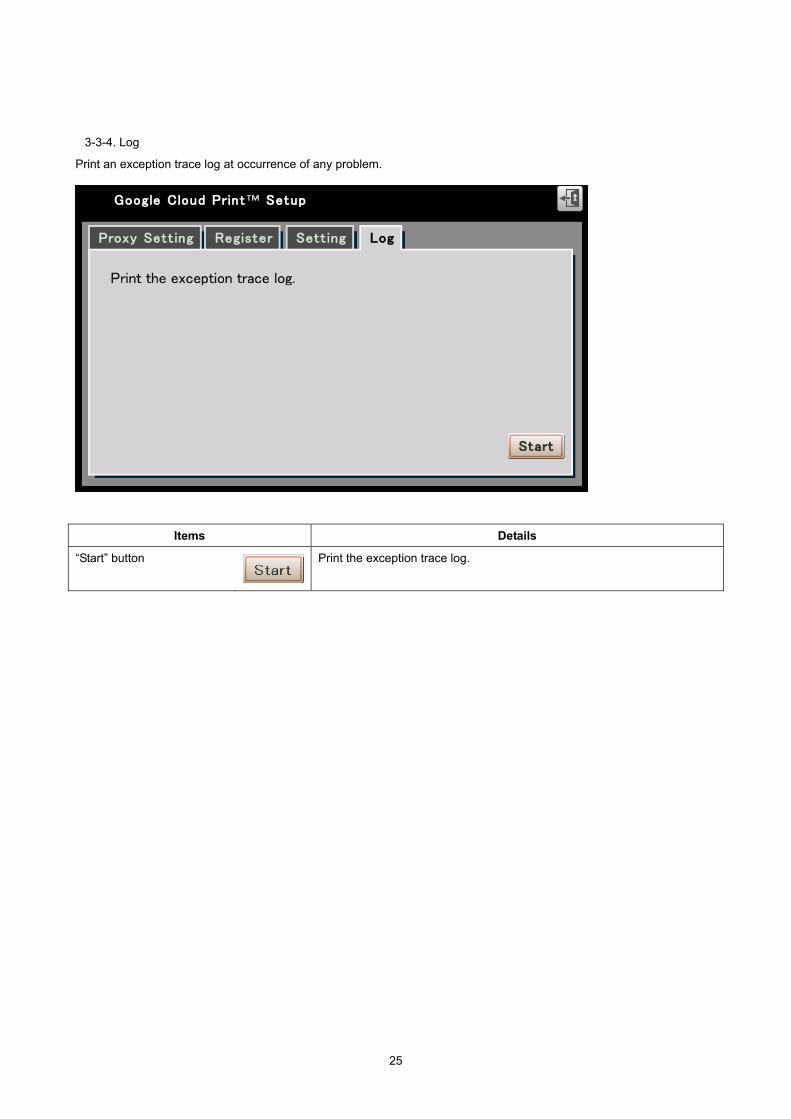
3-3-4. Log
Print an exception trace log at occurrence of any problem.
Items Details
“Start” button
Print the exception trace log.
25

3-4. Printing
Document saved on Google Cloud can be printed.
Also, in a local network environment where the terminal cannot be connected with Google Cloud, printing can also be
performed through Google Chrome without using any driver.
(Note)
Device registration must be completed.
All screen images in this document are captured from Google Chrome on the PC, so that they can only be used as
reference.
3-4-1. Printing through Google Cloud Print
Access the device through the Google Cloud Print to print.
As an example, it shows the method to upload a file to the Google Cloud Print and print it.
(1) Sign in by accessing the Google Cloud Print management web page (https://www.google.com/cloudprint/) from the
terminal.
(2) After sign-in, Cloud Print information linked with the account will be displayed.
Select “PRINT” and “Upload file to print".
26
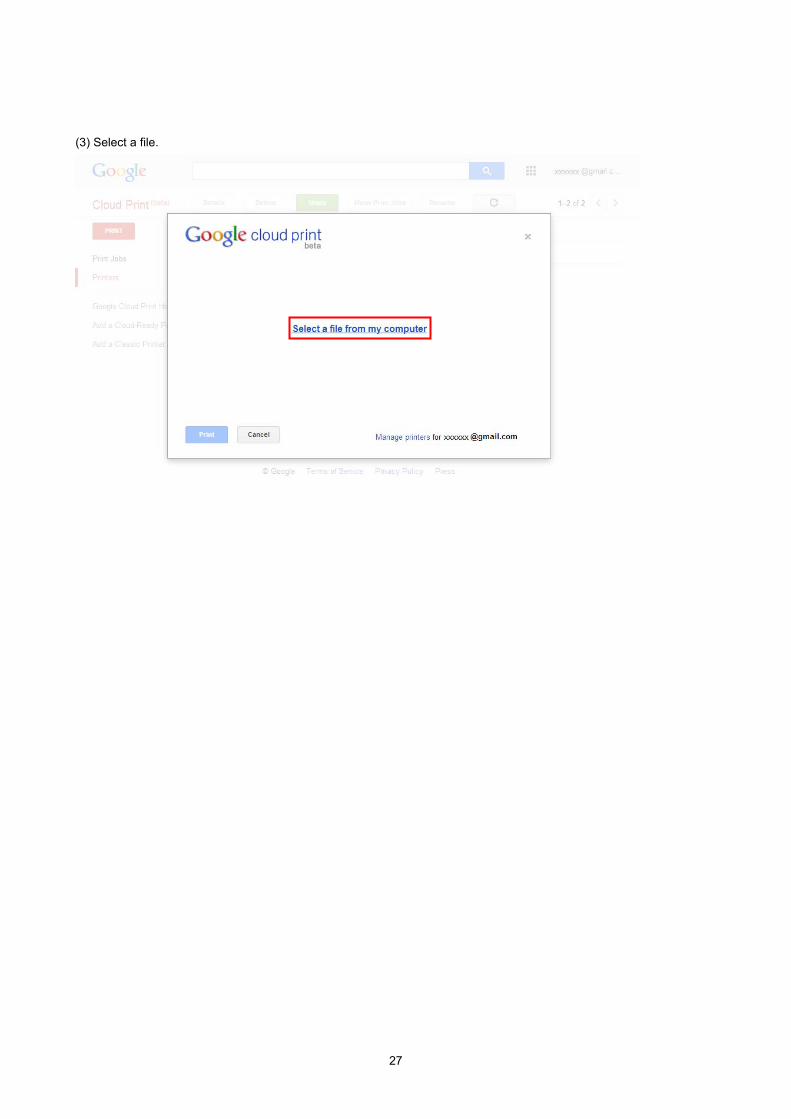
(3) Select a file.
27
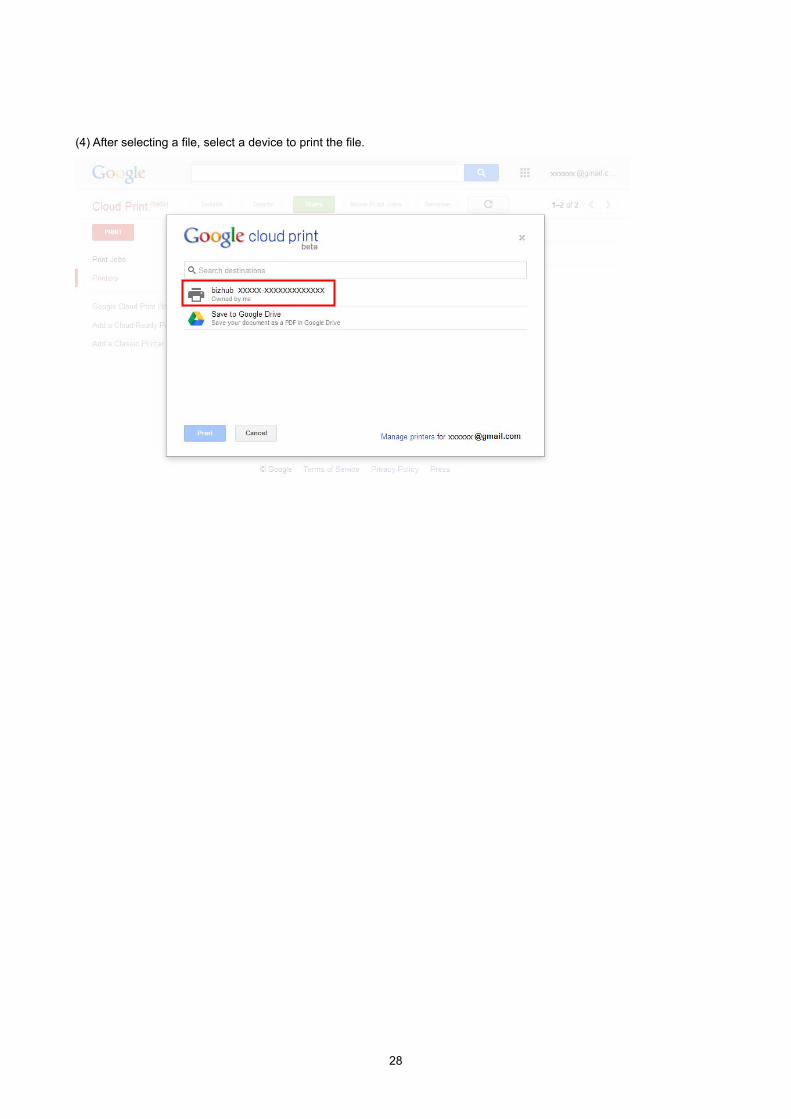
(4) After selecting a file, select a device to print the file.
28
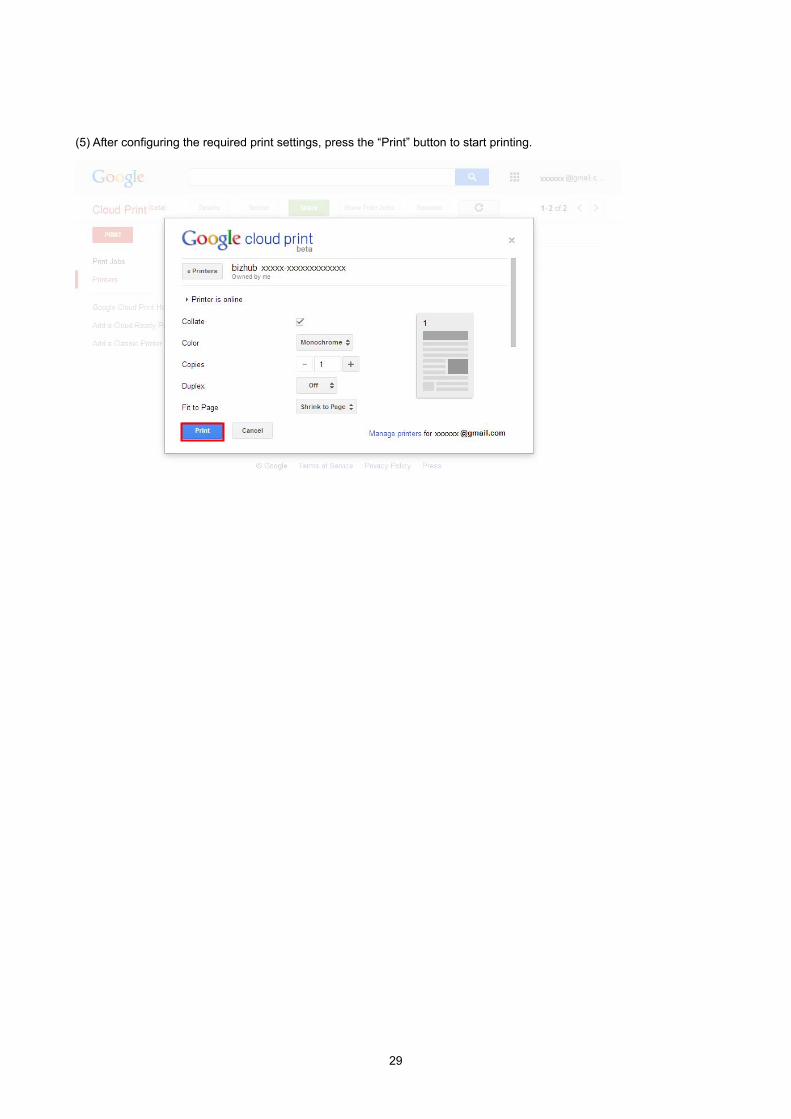
(5) After configuring the required print settings, press the “Print” button to start printing.
29
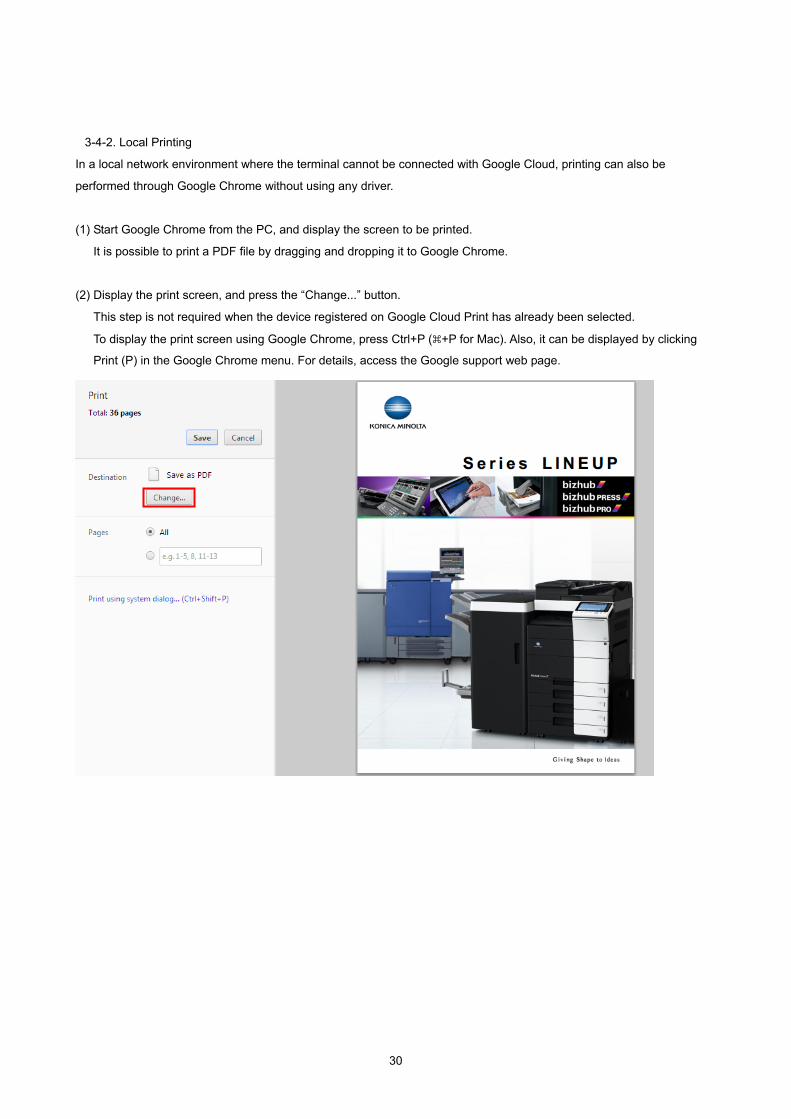
3-4-2. Local Printing
In a local network environment where the terminal cannot be connected with Google Cloud, printing can also be
performed through Google Chrome without using any driver.
(1) Start Google Chrome from the PC, and display the screen to be printed.
It is possible to print a PDF file by dragging and dropping it to Google Chrome.
(2) Display the print screen, and press the “Change...” button.
This step is not required when the device registered on Google Cloud Print has already been selected.
To display the print screen using Google Chrome, press Ctrl+P (⌘+P for Mac). Also, it can be displayed by clicking
Print (P) in the Google Chrome menu. For details, access the Google support web page.
30
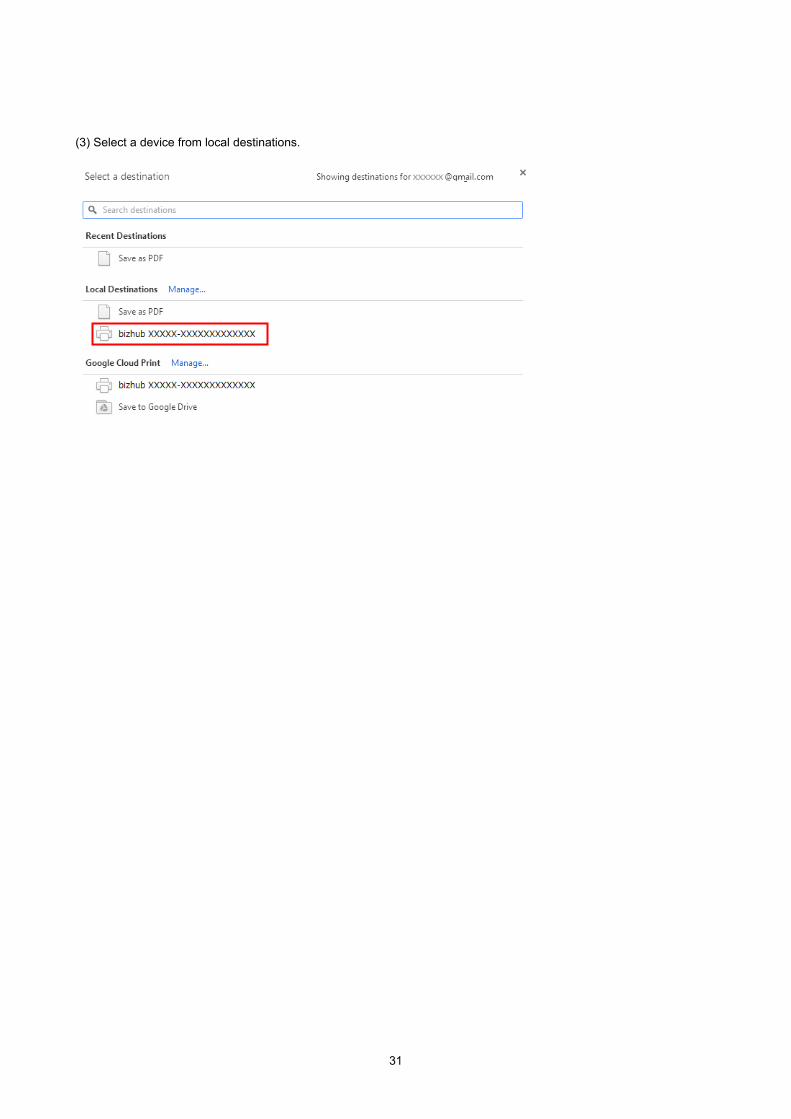
(3) Select a device from local destinations.
31
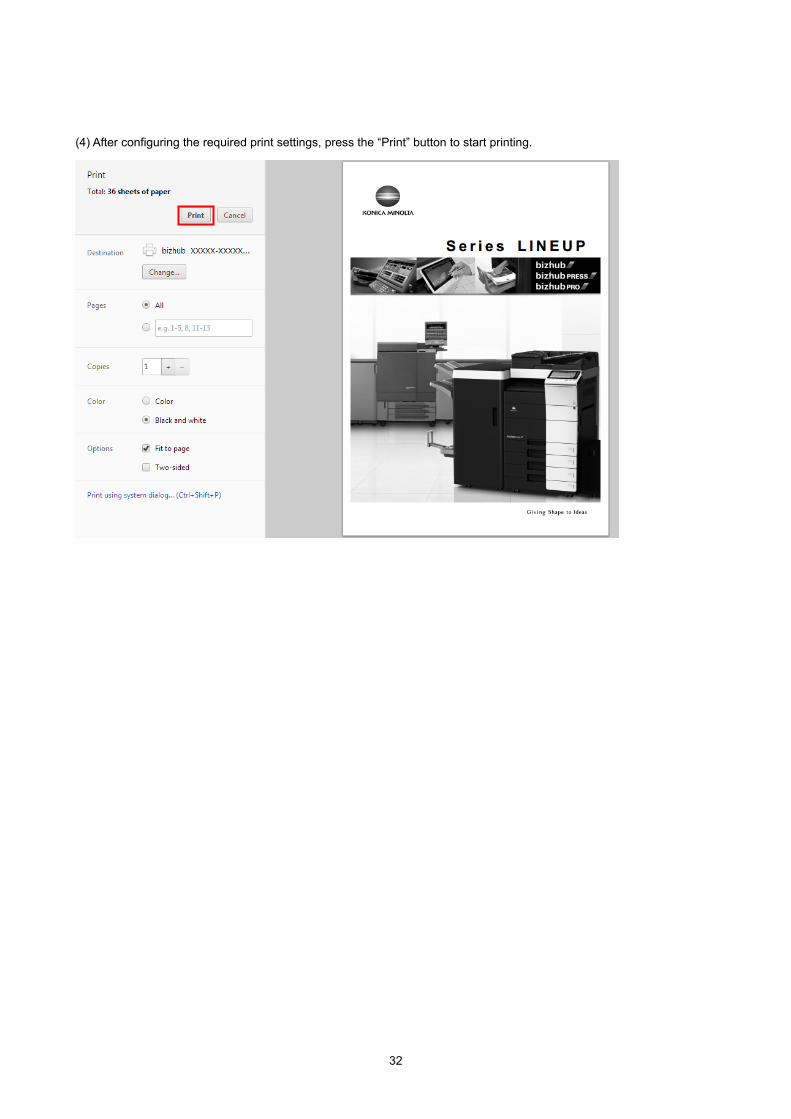
(4) After configuring the required print settings, press the “Print” button to start printing.
32

3-5. Deletion of Device
This function is used to delete the registered devices. Deletion can be made in the following two patterns.
• Deleting with this application
• Deleting through Google Cloud Print management web page
3-5-1. Deleting with this application
The screen described in “3-3-1-2. If the device has been registered” is displayed, tap “Delete” button to start deleting.
3-5-2. Deleting through Google Cloud Print management web page
(1) Access the Google Cloud Print management web page (https://www.google.com/cloudprint/) from the terminal, and
then press “Printers”.
Sign in to Google Services if it has not been done.
33
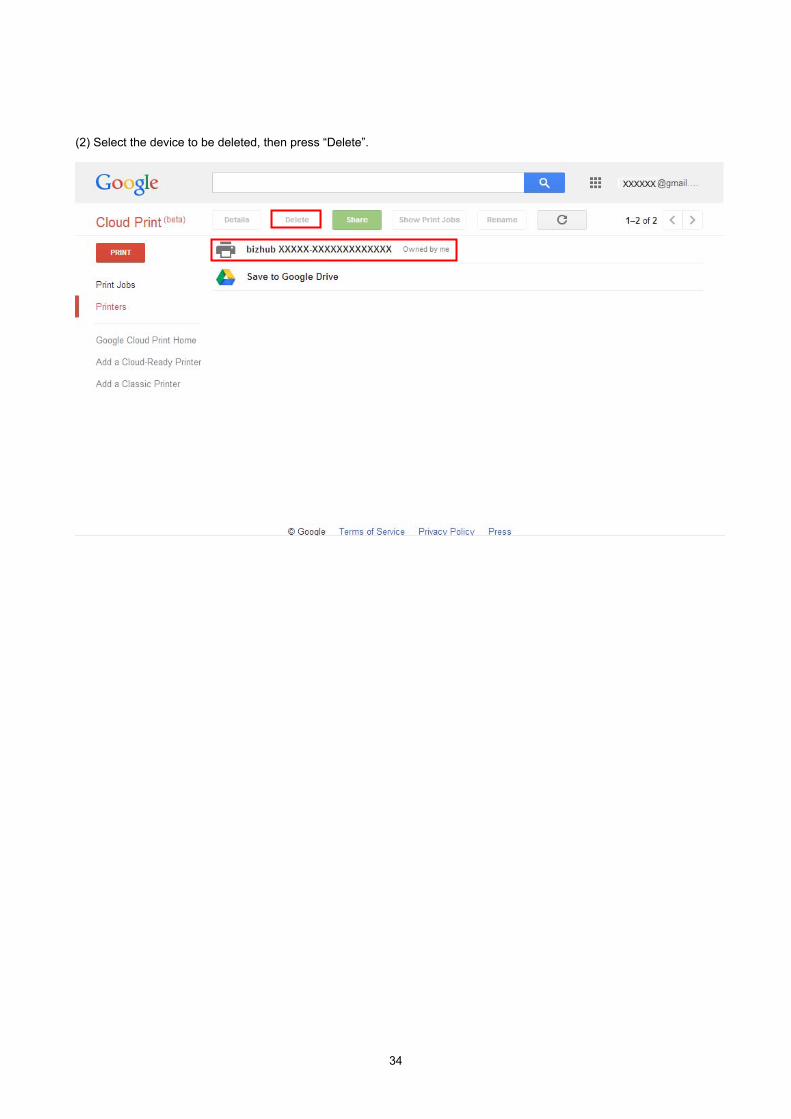
(2) Select the device to be deleted, then press “Delete”.
34

(3) Press “OK” to delete the device.
35
4. Troubleshoot
4-1. Required Options
The following option is required to use the application.
Without installing the option, you cannot use the application.
• Web browser function (LK-101 v3) in the i-Option license kit
[Confirmation method]
1. Press the Menu key on the machine to open the Menu screen.
2. Tap the Utility button to open the Utility screen.
3. Tap the Administrator Settings button to open the Administrator Settings screen.
On this screen, enter the administrator password.
4. Tap the License Settings button to open the License Settings screen.
5. Tap the List of Enabled Functions button to open the List of Enabled Functions screen.
6. Confirm that “Web browser” is displayed on the list of function names.
4-2. Confirmation of Network Settings
Confirm with the network administrator that the following hosts and ports are available.
• www.google.com: 80, 443
• talk.google.com: 5222
When using a proxy server, make sure that the proxy server port is open.
4-3. Confirmation of IP Filtering Setting
If the IP filtering setting is enabled, then configure so that the IP address “127.0.0.1” is available.
Settings described here are configured via PSWC, but it also can be configured through the administrator setting screen
of this machine.
[Confirmation method]
1. Check the administrator setting screen of the MFP for that if setting has been configured to enable
communication from the PC in the network.
2. Access PSWC (http(s)://IP address of each machine) from the browser of the PC.
3. Sign in as an administrator, and select Network -> TCP/IP Setting -> IPv4 Filtering.
4. If IP Filtering (Permit Access) is enabled,
add the IP address “127.0.0.1” to [Set].
5. If IP Filtering (Deny Access) is enabled,
and the IP address “127.0.0.1” is included in [Set], delete the IP address.
36
4-4. Confirmation of IWS Setting
If IWS Settings is disabled, set up so that IWS Settings is enabled.
Settings described here are configured through PSWC, but it also can be configured through the administrator setting
screen of this machine.
[Confirmation method]
1. Access PSWC (http(s)://IP address of each machine) from the browser of the PC.
2. Sign in as an administrator, select Network -> IWS Settings, and change “OFF” to “ON” for IWS Settings.
3. If the Connect IWS Apps to Network settings is “Restrict”, change it to “Allow”.
4-5. Restrictions when Fiery is installed
This application cannot scan when Fiery is installed.
Remove Fiery as necessary.
4-6. Restrictions at Setting Authentication Method
When setting authentication method (Device authentication or External server authentication), it is required to permit a
public user.
5. Frequently Asked Questions Depending on the specifications of Google Cloud Print, the document to be printed may differ from that has been
expected.
For details of Google Cloud Print (including methods for printing and sharing a printer, troubleshooting, and etc.), see the
following support web page for Google.
https://support.google.com/cloudprint/?rd=1
37

6. Copyright / License Information / Trademarks
6-1. Google Cloud Print™ Setup
Copyright (C) 2014 KONICA MINOLTA, INC.
All Rights Reserved.
6-2. Tempita
Tempita Software License
Copyright (c) 2008 Ian Bicking and Contributors
Permission is hereby granted, free of charge, to any person obtaining a copy of this software and associated
documentation files (the “Software”), to deal in the Software without restriction, including without limitation the rights to use,
copy, modify, merge, publish, distribute, sublicense, and/or sell copies of the Software, and to permit persons to whom the
Software is furnished to do so, subject to the following conditions:
The above copyright notice and this permission notice shall be included in all copies or substantial portions of the
Software.
THE SOFTWARE IS PROVIDED “AS IS”, WITHOUT WARRANTY OF ANY KIND, EXPRESS OR IMPLIED, INCLUDING
BUT NOT LIMITED TO THE WARRANTIES OF MERCHANTABILITY, FITNESS FOR A PARTICULAR PURPOSE AND
NONINFRINGEMENT.
IN NO EVENT SHALL THE AUTHORS OR COPYRIGHT HOLDERS BE LIABLE FOR ANY CLAIM, DAMAGES OR
OTHER LIABILITY, WHETHER IN AN ACTION OF CONTRACT, TORT OR OTHERWISE, ARISING FROM, OUT OF OR
IN CONNECTION WITH THE SOFTWARE OR THE USE OR OTHER DEALINGS IN THE SOFTWARE.
6-3. JsonCpp
Copyright (c) 2007-2010 Baptiste Lepilleur
Permission is hereby granted, free of charge, to any person obtaining a copy of this software and associated
documentation files (the “Software”), to deal in the Software without restriction, including without limitation the rights to use,
copy, modify, merge, publish, distribute, sublicense, and/or sell copies of the Software, and to permit persons to whom the
Software is furnished to do so, subject to the following conditions:
The above copyright notice and this permission notice shall be included in all copies or substantial portions of the
Software.
38

39
THE SOFTWARE IS PROVIDED “AS IS”, WITHOUT WARRANTY OF ANY KIND, EXPRESS OR IMPLIED, INCLUDING
BUT NOT LIMITED TO THE WARRANTIES OF MERCHANTABILITY, FITNESS FOR A PARTICULAR PURPOSE AND
NONINFRINGEMENT.
IN NO EVENT SHALL THE AUTHORS OR COPYRIGHT HOLDERS BE LIABLE FOR ANY CLAIM, DAMAGES OR
OTHER LIABILITY, WHETHER IN AN ACTION OF CONTRACT, TORT OR OTHERWISE, ARISING FROM, OUT OF OR
IN CONNECTION WITH THE SOFTWARE OR THE USE OR OTHER DEALINGS IN THE SOFTWARE.

http://konicaminolta.com
© 2014 KONICA MINOLTA, INC.
2016. 1 4343-PS523-02