go ren,oorl iroetatkyrtuol tolcoort res - dental … · and cdc guidelines is vital to an effective...
TRANSCRIPT

Go Green, Go Online to take your course
This course has been made possible through an unrestricted educational grant. The cost of this CE course is $59.00 for 4 CE credits. Cancellation/Refund Policy: Any participant who is not 100% satisfied with this course can request a full refund by contacting PennWell in writing.
Earn
4 CE creditsThis course was
written for dentists, dental hygienists,
and assistants.
Instrument Sterilization in DentistryA Peer-Reviewed Publication Written by Eve Cuny, RDA, MS and Helene Bednarsh, RDH, MPH
PennWell is an ADA CERP Recognized Provider
PennWell is an ADA CERP recognized provider ADA CERP is a service of the American Dental Association to assist dental professionals in identifying quality providers of continuing dental education. ADA CERP does not approve or endorse individual courses or instructors, nor does it imply acceptance of credit hours by boards of dentistry.Concerns of complaints about a CE provider may be directed to the provider or to ADA CERP at www.ada.org/goto/cerp.

2 www.ineedce.com
Educational ObjectivesUpon completion of this course, the clinician will be able to do the following:1. Follow an appropriate process for the segregation,
cleaning and sterilization of re-usable items, and for the appropriate disposal of single-use items.
2. Understand the various cleaning and sterilization devices available in the United States, as well as the various methods by which they sterilize and clean instruments.
3. Select the correct materials used in preparing instru-ments prior to sterilization, package instruments appropriately for sterilization and ensure correct storage of sterile instruments.
4. Understand the various tests that are available to ensure the sterility of instruments, and what these tests can be used for and will show.
AbstractEffective and efficient infection control in the dental of-fice is essential for the safety of patients and to ensure that productivity does not suffer. Infection control programs all include the cleaning and sterilization of reusable dental instruments and devices. Care must be taken by the dental healthcare professional to ensure that all instruments are cleaned prior to sterilization, and that this is carried out in a safe manner to avoid injury and puncture wounds. Use of closed-system cassettes reduces the risk to dental healthcare professionals when executing infection control programs. When using ultrasonic cleaners, washers and sterilizers, it is important to always follow the manufactur-er’s instructions. It is also important to consult with the manufacturer of dental instruments and devices as needed to ensure complete sterilization and to avoid damage to these items. Assurance of sterility of instruments and devices can be obtained through the use of one of several tests, and these tests must be performed regularly to ensure that the sterilizer is sterilizing all instruments and devices and that these are safe for use on patients.
IntroductionToday’s busy dental practices face a serious challenge: to maintain or increase productivity while ensuring that patient safety remains a top priority. At times, these may seem like incompatible goals. Advances in dental process-ing equipment, however, have empowered practices to develop safer processes while realizing efficiencies and ultimately, saving money.
A cleaning and sterilization process that meets ADA and CDC guidelines is vital to an effective infection control program.1 Streamlining of this process requires an under-standing of proper methods, materials, and devices. Many methods of instrument reprocessing are available. Use of a complete system that encompasses and fulfills all ele-
ments that are critical maximizes efficiency and minimizes risks. Closed cassette systems provide a more efficient and safer way to process, sterilize and organize instruments in a dental office (Figure 1) — these eliminate manual steps during instrument reprocessing such as hand scrubbing and time-consuming sorting of instruments, thereby im-proving safety and increasing efficiency.
Figure 1
Transport of instruments to the sterilization areaMost dental offices have a designated area for instrument reprocessing that is separate from the dental treatment room. This is ideal, since cleaning, sterilizing and storing instruments in the same room where the delivery of patient care is provided increases the risk of cross-contamination. The removal and disposal of single-use sharps such as needles, blades, orthodontic wires and glass must be done at the point of use, typically in the dental treatment room.
Some instruments and materials are single-use only. Single-use items should be segregated in the operatory, and those that are sharp or otherwise pose a risk of injury must be discarded into a sharps container (Figure 2). Items without risk, such as a saliva ejector, can be thrown into the trash. Finally, the tray or cassette of reusable instruments is taken to the cleaning and sterilization area for processing.
Figure2

www.ineedce.com 3
To prevent accidental injury with the contaminated instruments, special handling should be used to transport the instruments to the cleaning and sterilization area.2 The Centers for Disease Control and Prevention (CDC) states that, “Contaminated instruments should be handled care-fully to prevent exposure to sharp instruments that can cause percutaneous injury. Instruments should be placed in an appropriate container at the point of use to prevent percutaneous injuries during transport to the instrument processing area.” In addition, the Occupational Safety and Health Administration (OSHA) says, “The person handling the instruments through removal, cleaning, packaging and sterilization needs to use heavy-duty gloves to help prevent injury with sharp contaminated instru-ments.” Although heavy-duty gloves (utility gloves) may feel more awkward than examination gloves, they provide extra protection while handling instruments during the cleaning, rinsing, drying, packaging and sorting proce-dures that take place during instrument reprocessing.3 The fine tactile sensitivity needed during dental procedures is not necessary during instrument cleaning and steriliza-tion; therefore, heavy-duty gloves pose no problem in this regard. Additionally, nitrile utility gloves are available in a variety of sizes, allowing a more secure fit.
CleaningUsing mechanical means of instrument cleaning rather than hand scrubbing should minimize handling of instru-ments.4 If procedures are used whereby hand scrubbing is necessary, heavy-duty (utility) gloves, mask, eyewear and gown should always be worn while cleaning.5 Minimize the risk of puncture injury by scrubbing only one instrument at a time while holding it low in the sink.
Use of a system utilizing locked cassettes eliminates the need to sort, handle and hand scrub individual instruments — reducing the risk of infection from contaminated instru-ments — and results in savings of, on average, five minutes during instrument reprocessing, as well as fewer damaged instruments, since the instruments are locked in position during reprocessing (Figure 3). As with any standardized procedure, a standardized instrument reprocessing proto-col also results in easy staff training and cross-training.
In general, three classifications of mechanical clean-ing devices are available for the dental office. They are the ultrasonic cleaner, instrument washer and instrument washer/disinfector.
Ultrasonic cleaning devicesAn ultrasonic cleaner uses sound waves, that are outside the human hearing range to form oscillating bubbles, a process called cavitation. These bubbles act on debris to remove it from the instruments. Some manufacturers also use intermittent or sweeping sound waves to help improve the device’s cleaning ability and to decrease the
potential for hot spots in the ultrasonic bath. Specialized detergent formulations are available for the solutions in ultrasonic machines. When selecting a cleaning agent to use in the ultrasonic cleaner, always consider the ef-fect on materials and instruments. Household products are inappropriate because they cause pitting, corrosion, rust or other damage to instruments, and potentially to the ultrasonic chamber. Therefore, it is best to follow the manufacturer’s instructions, thereby choosing a solution that is compatible with the unit and the instruments. The procedure for cleaning the instruments in the ultrasonic cleaner is as follows: • Suspendinstrumentsintheultrasonicbathusinga
rack or basket fitted to the unit.• Donotlayinstrumentsdirectlyonthebottomofthe
ultra sonic cleaner, as this can interfere with cleaning and cause damage to instruments and the ultrasonic machine.
• Avoidoverloadingtheultrasonicdevice,sincethatcould inhibit its cleaning ability.
It is important to follow the manufacturer’s instructions for the ultrasonic cleaning cycle.
In general, the timer is activated for three to six min-utes for loose instruments and ten to twenty minutes for instrument cassettes, and the timing is adjusted as nec-essary. While the ultrasonic device is running, the lid or cover should be kept on to reduce the release of aerosol and spatter into the area from the ultrasonic cleaner. Routinely replacing the cleaning solution in the ultrasonic machine is important, and is necessary at least once a day, more often with heavy usage.
Instrument washersInstrument washers use high-velocity hot water and a detergent to clean instruments. Widely used for decades in hospitals and large facilities as part of the central steriliza-tion process, these devices have recently become available for the dental office. These devices require personnel to
Figure 3

4 www.ineedce.com
either place instruments in a basket or to use instrument cassettes during the cleaning and drying cycles. Instru-ment washers for dental offices come in two different designs. One is a counter-top model. This type does not require professional installation. The other type is built-in and resembles a kitchen dishwasher (Figure 4). It func-tions much the same as the counter-top model, but it has a larger capacity and requires professional installation. Some models have the ability to dry the instruments after wash-ing, some do not.
Figure 4
Instrument washers/thermal disinfectorsThese devices may look like the instrument washers de-scribed above; however, there is one important difference. The high temperature of the water and chemical additives in these devices cleans and disinfects the instruments. The significance of this lies in how personnel can handle the instruments after the process. Upon removal from a ther-mal disinfector, instruments can be more safely handled, and if the dental healthcare professional were to sustain a puncture injury, it would not require the follow-up that a contaminated exposure requires.
All instrument washers and thermal disinfectors use either a detergent or a water-softening agent. It is possible for the pH of some of these chemicals to be incompatible with certain metals in dental instruments. For specific recommendations, the manufacturer of the dental instru-ments and the manufacturer of the instrument washer should be consulted.
Instrument washers and thermal disinfectors are approved medical devices that have been rigorously tested to meet Food and Drug Administration (FDA) requirements for safety and efficacy of medical devices; household dishwashers are not appropriate for use in a dental office.
Instrument examination and careCleaning instruments, provides a good opportunity to ex-amine, replace or remove damaged instruments; lubricate items such as handpieces6; and otherwise prepare instru-ments for sterilization. Instruments must be dry before packaging — if drying was not part of the cleaning process, time must be taken to dry the instruments completely. High-quality metal dental cassettes specially designed to withstand high temperatures are preferred for use with steam and chemical vapor sterilizers. Most sterilizers on the market today offer a cassette rack, which helps to prevent over-loading in the sterilizer, thereby reducing the risk of ineffective sterilization and ultimately of infection and cross-infection.
PackagingPackaging used for instruments and cassettes prior to sterilization includes wrap, paper pouches, plastic pouches, combination paper/plastic pouches and nylon tubing. Sterilization packaging is specifically designed to allow penetration of heat, steam or vapor and then to seal the sterilized instruments inside the package for sterile storage (Figure 5). After sterilization, instruments should remain in packages until use. Different materials are appropriate for different types of sterilizers.7, 8 Unless otherwise specified, all packaging is single use only. Us-ing tape to reseal previously used packaging material may inhibit its ability to continue to function as intended by the manufacturer.
SterilizationParameters such as time, pressure and temperature vary according to the type of sterilizer, materials being sterilized and individual models within sterilizer brands. General sterilization parameters for each type of sterilizer appear in Table 1. The first step in determining the settings for the sterilizer is to refer to the manufacturer’s instructions. Sterilizers are medical devices, requiring clearance by the Food and Drug Administration before manufacturers may offer them for sale. The FDA requires rigorous testing to ensure an adequate margin of safety in each cycle type described in the instructions. Failing to follow the instruc-tions of the manufacturer is ill advised, since it may result in inadequate sterilization of the instruments or devices in the sterilizer. It is never appropriate to use a household device, such as a toaster oven, for sterilization of dental instruments, devices, or equipment.
Steam autoclavesSteam autoclaves are the most commonly used type of heat sterilizer in dental practices. Two types of processes em-ploy steam under pressure. The difference between the two is the manner in which the machine evacuates the air from the sterilization chamber and then introduces the steam.
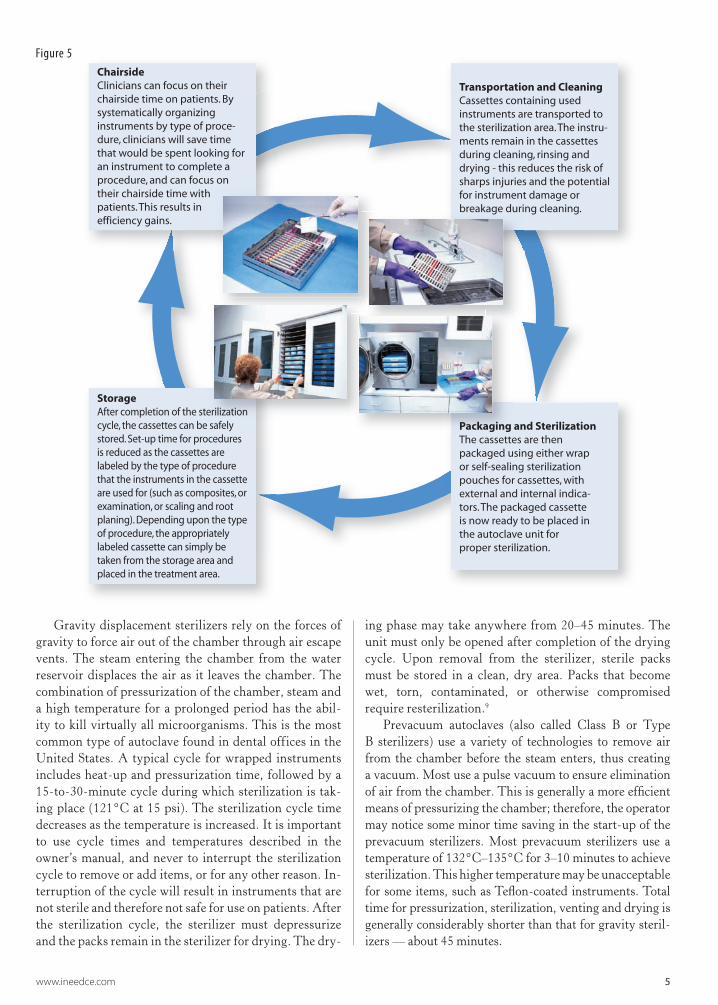
ChairsideClinicians can focus on their chairside time on patients. By systematically organizing instruments by type of proce-dure, clinicians will save time that would be spent looking for an instrument to complete a procedure, and can focus on their chairside time with patients. This results in efficiency gains.
StorageAfter completion of the sterilization cycle, the cassettes can be safely stored. Set-up time for procedures is reduced as the cassettes are labeled by the type of procedure that the instruments in the cassette are used for (such as composites, or examination, or scaling and root planing). Depending upon the type of procedure, the appropriately labeled cassette can simply be taken from the storage area and placed in the treatment area.
Transportation and CleaningCassettes containing used instruments are transported to the sterilization area. The instru-ments remain in the cassettes during cleaning, rinsing and drying - this reduces the risk of sharps injuries and the potential for instrument damage or breakage during cleaning.
Packaging and SterilizationThe cassettes are then packaged using either wrap or self-sealing sterilization pouches for cassettes, with external and internal indica-tors. The packaged cassette is now ready to be placed in the autoclave unit for proper sterilization.
www.ineedce.com 5
Gravity displacement sterilizers rely on the forces of gravity to force air out of the chamber through air escape vents. The steam entering the chamber from the water reservoir displaces the air as it leaves the chamber. The combination of pressurization of the chamber, steam and a high temperature for a prolonged period has the abil-ity to kill virtually all microorganisms. This is the most common type of autoclave found in dental offices in the United States. A typical cycle for wrapped instruments includes heat-up and pressurization time, followed by a 15-to-30-minute cycle during which sterilization is tak-ing place (121°C at 15 psi). The sterilization cycle time decreases as the temperature is increased. It is important to use cycle times and temperatures described in the owner’s manual, and never to interrupt the sterilization cycle to remove or add items, or for any other reason. In-terruption of the cycle will result in instruments that are not sterile and therefore not safe for use on patients. After the sterilization cycle, the sterilizer must depressurize and the packs remain in the sterilizer for drying. The dry-
ing phase may take anywhere from 20–45 minutes. The unit must only be opened after completion of the drying cycle. Upon removal from the sterilizer, sterile packs must be stored in a clean, dry area. Packs that become wet, torn, contaminated, or otherwise compromised require resterilization.9
Prevacuum autoclaves (also called Class B or Type B sterilizers) use a variety of technologies to remove air from the chamber before the steam enters, thus creating a vacuum. Most use a pulse vacuum to ensure elimination of air from the chamber. This is generally a more effi cient means of pressurizing the chamber; therefore, the operator may notice some minor time saving in the start-up of the prevacuum sterilizers. Most prevacuum sterilizers use a temperature of 132°C–135°C for 3–10 minutes to achieve sterilization. This higher temperature may be unacceptable for some items, such as Tefl on-coated instruments. Total time for pressurization, sterilization, venting and drying is generally considerably shorter than that for gravity steril-izers — about 45 minutes.
Figure 5

6 www.ineedce.com
Dry-heat sterilization (convection and static air)Dry-heat sterilization employs high temperatures for ex-tended periods to achieve sterilization of instruments. The method of heat circulation in dry-heat sterilizers is usually convection, which helps to ensure that the heat circulates throughout the sterilization chamber during the process. Mechanical convection is more effective; the sterilizer con-tains a fan or blower that continually circulates the heated air to maintain a uniform temperature throughout the chamber. Most commercially available dry-heat sterilizers on the market today are of this type.
The higher temperature of a dry-heat sterilizer means that paper will scorch and plastic will melt. Specialized packaging material is available for dry-heat sterilizers. Most handpieces will not tolerate the higher tempera-tures of a dry-heat sterilizer. Mechanically driven hand-pieces that contain turbines and bearings are susceptible to damage at higher temperatures. The manufacturer’s instructions should be checked for compatibility of in-struments, devices, and materials with the unit and the handpiece manufacturer’s instructions should be followed for preparation of the handpiece prior to sterilization and for sterilization itself.
Unsaturated chemical vapor sterilizationUnsaturated chemical vapor sterilization relies upon the use of a proprietary chemical that contains formaldehyde,
alcohol and other inert ingredients, instead of water, to produce a vapor to promote the sterilization. Use of this proprietary chemical also results in the vapor having less humidity and therefore being less corrosive to sensitive instruments than if water were used.
Sterility assuranceAll the efforts that go into the preparation of instruments are futile if the sterilization process itself is not successful. There is no way of seeing that instruments are sterile by simply observing the sterilizers and packs, even though a chemical or mechanical indicator may have changed. An indicator such as autoclave tape may change color when exposed to heat, but there is a possibility that the heat was not present for the proper length of time or that there was inadequate pressure. Indicators that go on the outside of the packs are useful for identifying processed and unprocessed packs. Failure of sterilization can occur due to mechanical malfunction of the sterilizer or due to operator error. There are several methods to provide assurance of sterility.
Operator errorIt is common to rely upon the automated functions of the sterilizer to tell the DHCP if there is a problem with the sterilization process. Most sterilizers have a system to notify the operator of mechanical malfunction, but steril-izers cannot notify the operator whether the contents of the instrument packs or cassettes are sterile or not. Operator
Table 1. Methods of Heat Sterilization
METHOD STERILIZING CONDITIONSa ADVANTAGES DISADVANTAGES/
PRECAUTIONSBIOLOGICAL
MONITORING
Steam:
Gravity displacement
Pre-vacuum
15–30 min at 250°F
3.5–10 min at 270°F
• Time efficient• Good penetration• Can be used with packaged
items• Ability to process wide range
of materials without destruction
• Corrosion of nonstainless steel metal items• May not use closed containers• Possible deposits from using hard water• May leave instruments wet at end of cycle• May damage heat-sensitive plastics and
rubber items• May dull certain sharp items
Geobacillus stearothermophilus(formerly known as Bacillus stearothermophilus)
Unsaturated Chemical Vapor
20 min at 270°F • Time efficient• No corrosion or rust• Items dry after cycle
• Special solutions required• Solutions may result in hazardous waste• Adequate ventilation required• Items must be thoroughly dried before processing• May damage heat-sensitive plastics• Do not use closed containers• May not be appropriate for handpiecesb
Geobacillus stearothermophilus(formerly known as Bacillus stearothermophilus)
Dry Heat
Static Air 60–120 min at 320°F
• No corrosion or rust• Does not dull cutting edges• Items dry after cycle• Closed containers may be used
if spore test is used to confirm appropriate kill
• May damage heat-sensitive plastic and rubber items
• Items must be thoroughly dried before processing• Long cycle time• May not be appropriate for handpiecesb
Bacillus atrophaeus (formerly known as Bacillus subtilis)
Forced Air (convection)
12 min at 375°F • Time efficient• No corrosion or rust• Does not dull cutting edges• Items dry after cycle
• May damage plastic and rubber items • Items must be thoroughly dried before processing• May damage heat-sensitive items• May not be appropriate for handpiecesb
Bacillus atrophaeus (formerly known as Bacillus subtilis)
Adapted from: Miller CH, Palenik CJ. Sterilization, disinfection, and asepsis in
dentistry. In: Block SS, ed. Disinfection, Sterilization, and Preservation. 5th ed. Philadelphia, Pa: Lippincott Williams & Wilkins; 2001:1053.
a Cycle times do not include warm-up times, and may vary with the brand of sterilizer; follow the manufacturer’s instructions for sterilizing conditions.
b Check with handpiece manufacturer.

www.ineedce.com 7
error in loading the sterilizer could result in failure to ster-ilize all the packs in spite of the proper time, temperature and/or pressure. It is important to avoid overloading the sterilizer or loading packs and cassettes on top of one another; use of a cassette system helps to reduce operator error due to overloading. The heat and/or steam must be able to circulate throughout the chamber and between the packs or cassettes for successful sterilization.
Chemical indicatorsChemical indicators indicate the presence of certain condi-tions during the sterilization cycle, such as the presence of heat and steam.10 There are five classifications of indicators recognized by the FDA, and it is important to note that it is now recommended that all packs or cassettes include internal and external indicators.
Class 1 — Process Indicators. These are placed on the outside of packs and are useful in determining which packs have been properly processed versus those that have not. Class 1 process indicators include autoclave tape and the color change indicators embedded on the outside of steril-ization packaging materials.
Class 2 — Bowie-Dick Indicators. These show the pass/fail in prevacuum sterilizers. This test is conducted daily with the chamber empty, during the first cycle of the sterilizer, and is available as a kit from commercial steril-ization monitoring companies.
Class 3 — Temperature-Specific Indicators. These react to one of the critical parameters of sterilization and indicate exposure to a specific value such as temperature or psi.
Class 4 — Multi-parameter Indicators. These react to two or more of the critical parameters in the same manner as Class 3 indicators.
Class 5 — Integrating indicators. These are designed to react to all critical parameters of sterilization cycles. When used properly, integrating indicators may serve as the basis for the release of processed items, excluding implants. It is important to follow the manufacturer’s specific instruc-tions for use regarding a test challenge pack.
Biological monitoringThe use of biological monitors (spore tests) is the most reliable method to validate that the sterilizer is functioning and that the sterilization of instruments is effective (Figure 6). These monitors consist of paper strips or vials impreg-nated with bacterial spores that are specifically resistant to the sterilization process. New spore tests have been developed that enable completion of biological monitoring in-office and yield results in as little as 24 hours. These tests allow quick remediation and validate proper infection control procedures without a long lag time during which the sterilization procedure may have become ineffective but is not known. It is recommended that biological moni-
toring be conducted at least weekly11 and with every load that includes an implantable device.
Figure 6
ResourcesU.S. Department of Labor, Occupational Safety and Health Administration. 29 CFR Part 1910.1030. Occupational exposure to bloodborne pathogens; needlesticks and other sharps injuries; final rule. Federal Register. 2001;66:5317–5325. As amended from and includes 29 CFR Part 1910.1030. Occupational exposure to bloodborne patho-gens; final rule. Federal Register. 1991;56:64174–64182. Available at: http://www.osha.gov/SLTC/dentistry/in-dex.html.CDC. Guidelines for Infection Control in Den-tal Health-Care Settings — 2003.
References1. www.cdc.gov/mmwr/preview/mmwrhtm/rr5217a1.htm.
Accessed August 2006.2. www.osha.gov/SLTC/dentistry/index.html. Accessed August
2006.3. Greene VW. Microbiological contamination control in hospitals.
1. Perspectives. Hospitals 1969;43:78–88.4. CDC. Guidelines for environmental infection control in
health-care facilities: recommendations of CDC and the Healthcare Infection Control Practices Advisory Committee (HICPAC). MMWR 2003;52(No. RR-10). Oper Dent. 2005 Jan–Feb;30(1):16–25.
5. www.osha.gov/SLTC/dentistry/index.html. Accessed August 2006.
6. Monagahn DM et al. The performance of air-turbine handpieces in general dental practice. Compend Contin Educ Dent. 2004;25(1 Suppl):24–29.
7. Association for the Advancement of Medical Instrumentation, American National Standards Institute. Good hospital practice: steam sterilization and sterility assurance. ANSI/AAMI ST46-1993. Arlington, VA: Association for the Advancement of Medical Instrumentation, 1993.
8. Rutala WA, Weber DJ. Choosing a sterilization wrap for surgical packs. Infect Cont Today. 2000;4:64–70.
9. Rosa AC et al. Effects of handling and storage on sterile dental instruments. Acta Odontol Latinoam. 2001;14(1–2):35–39.
10. Association for the Advancement of Medical Instrumentation. Chemical indicators—guidance for the selection, use, and interpretation of results. AAMI Technical Information Report No. 25. Arlington, VA: Association for the Advancement of Medical Instrumentation, 1999.
11. www.cdc.gov/mmwr/preview/mmwrhtm/rr5217a1.htm Accessed August 2006.

8 www.ineedce.com
AUThOR PROfIlES:
Eve Cuny, MSEve Cuny is the Director of Environmental Health and Safety and Assistant Professor in the Department of Pathology and Medicine at the University of the Pacific School of Dentistry. She has consulted with the Centers for Disease Control and Prevention, American Dental Association, California OSHA, California Dental Board and other agencies on issues related to safety and infection control in dentistry. She has presented over 100 continuing education programs throughout the world and published numerous articles and textbooks. Ms. Cuny is also founder and managing partner of Eve Cuny Consultants, LLC, a consulting group specializing in product evaluation, pro-fessional writing and other services to the dental profession and industry.
helene Bednarsh, RDh, MPhMs. Bednarsh is the Director of HIV Dental for the Boston Public Health Commission and has participated in local, regional, national and international programs on infection control and HIV/AIDS. She is a member of the American Public Health Association and served on the Oral Health
Section Council, the American Association of Public Health Dentistry. She served on the Editorial Board of the American Dental Hygienists Association and the Mas-sachusetts Dental Hygienists Association. Ms. Bednarsh was active with the Massachusetts Public Health Associa-tion, serving on the planning committee for dentistry and as secretary. She is a member of OSAP and has served on the Board. She was a member of the ADA/DAAC special workgroup on the Management of Occupational Exposure to Bloodborne Pathogens and Evaluation of Occupational Exposure to TB. She is a member of the ADA Wellness Committee/Peers Network for issues related to HIV/AIDS. Ms. Bednarsh co-chairs the Dental Workgroup of the Boston AIDS Consortium.
DisclaimerThe authors of this course have no commercial ties with the sponsors or the providers of the unrestricted educa-tional grant for this course.
Reader feedbackWe encourage your comments on this or any PennWell course. For your convenience, an online feedback form is available at www.ineedce.com.

www.ineedce.com 9
Questions
1. Cleaning, sterilizing and storing instru-ments in the room where the delivery of patient care is provided _________:a. Is idealb. Saves timec. Increases the risk of cross-contaminationd. a and b
2. Removal and disposal of single-use sharps must be done:a. Dailyb. Twice dailyc. In the sterilization aread. At the point of use
3. Heavy-duty (utility) gloves should be used while:a. Handling instruments during cleaning, rinsing,
drying, packaging and sorting proceduresb. Treating patientsc. Disposing of sharpsd. All of the above
4. The risk of puncture injury while scrub-bing instruments can be minimized by:a. Scrubbing instruments low in the sinkb. Scrubbing quicklyc. Scrubbing only one instrument at a timed. a and c
5. Hand scrubbing of instruments can be avoided by:a. Using a locked cassette systemb. Using a regular dishwasherc. Sending out instruments to a specialized
cleaning serviced. None of the above
6. Types of mechanical cleaning devices available for the dental office include:a. Ultrasonic scalersb. Ultrasonic cleanersc. Instrument washers/disinfectorsd. b and c
7. Ultrasonic cleaners form________that act(s) on debris:a. Frothb. Oscillating bubblesc. Emulsionsd. None of the above
8. The sound waves used in various ultrasonic cleaners can be:a. Continual b. Sweepingc. Intermittentd. All of the above
9. The cleaning solution used in ultrasonic cleaners should be replaced:a. Weeklyb. Always once a dayc. At least daily, and more often with heavy usaged. If there is time
10. Instrument washers for instruments use ____________to clean instruments.a. Tepid waterb. High-velocity hot water c. Detergentd. b and c
11. Sterilization packaging is designed to allow the penetration of________:a. Airb. Microbesc. Heat, steam or vapord. Detergent
12. Using a standardized protocol including the use of cassettes enables_____:a. Time savingsb. Easy staff trainingc. Less damage of instrumentsd. All of the above
13. The following vary by type of sterilizer:a. Timeb. Pressurec. Temperatured. All of the above
14. Prior to clearing a sterilizer, the FDA requires rigorous testing to ensure:a. An adequate margin of safetyb. Manufacturers are spending as much money as
possible on testingc. Patients are never lated. a and b
15. Interrupting the autoclave cycle will:a. Speed up sterilizationb. Result in instruments not being sterilec. Make no differenced. a and c
16. The two types of steam autoclaves available are:a. Gravity displacement autoclaves and
prevacuum autoclavesb. Gravity displacement cleaners and
presterilized autoclavesc. Prevacuum autoclaves and ultrasonic devicesd. a and c
17. The most common type of autoclave found in the United States is the:a. Gravity displacement autoclaveb. Prevacuum autoclavec. Disinfector autoclaved. None of the above
18. Instruments in packs that become wet, torn or contaminated after sterilization require:a. Sterile gauze over the damaged area of the packb. Resterilizationc. Both a and bd. None of the above
19. Use of convection in dry-heat sterilizers helps ensure that:a. The heat circulates throughout the
sterilization chamberb. Energy is not wastedc. Double packaging is possibled. All of the above
20. Most prevacuum autoclaves use temperatures of:a. 99 °Cb. 120 °C – 130 °Cc. 132 °C – 135 °C d. Any of the above
21. Compatibility of instruments, devices and materials with dry-heat sterilization should be checked by:a. Trying out one instrument first to see if it is OKb. Checking the manufacturer’s instructions c. a and bd. None of the above
22. The proprietary chemical used in unsaturated chemical vapor sterilization contains:a. Alcoholb. Formaldehydec. Inert ingredientsd. All of the above
23. Failure of sterilization can occur due to:a. Mechanical malfunction of the sterilizerb. Operator errorc. Poor judgmentd. a and/or b
24. Most sterilizers have a system to:a. Notify the operator of a malfunctionb. Notify the operator that instruments are not sterilec. Ensure that the time cycle gets longer the more
instruments are loaded ind. None of the above
25. There are ______classifications of chemi-cal indicators recognized by the FDA:a. Threeb. Fivec. Sixd. No
26. Class 1 process indicators ____________:a. Are useful to determine which instruments to place
in the sterilizerb. Are useful to determine which packs have been
properly processedc. Are placed on the outside of packsd. b and c
27. It is now recommended that both ______and _______ indicators be used.a. Integral and digitalb. External and internalc. At least two of the indicators be used each timed. None of the above
28. Class 3 indicators are ________:a. Temperature-specific indicatorsb. Chemically-deficient indicatorsc. Alcohol indicatorsd. None of the above
29. Class 5 integrating indicators are designed to: __________a. React to only one critical parameterb. React to all critical parametersc. Serve as the basis for sterilizationd. a and c
30. Biological monitors are also known as____________:a. Spore testsb. Probiotic testsc. Biomechanical testsd. All of the above
ANSWER SHEET
Instrument Sterilization in Dentistry
Name: Title: Specialty:
Address: E-mail:
City: State: ZIP:
Telephone: Home ( ) Office ( )
Requirements for successful completion of the course and to obtain dental continuing education credits: 1) Read the entire course. 2) Complete all information above. 3) Complete answer sheets in either pen or pencil. 4) Mark only one answer for each question. 5) A score of 70% on this test will earn you 4 CE credits. 6) Complete the Course Evaluation below. 7) Make check payable to PennWell Corp.
Educational Objectives1. Follow an appropriate process for the segregation, cleaning and sterilization of re-usable items, and for the appropriate
disposal of single-use items.
2. Understand the various cleaning and sterilization devices available in the United States, as well as the various methods
by which they sterilize and clean instruments.
3. Select the correct materials used in preparing instruments prior to sterilization, package instruments appropriately for
sterilization and ensure correct storage of sterile instruments.
4. Understand the various tests that are available to ensure the sterility of instruments, and what these tests can be used
for and will show.
Course EvaluationPlease evaluate this course by responding to the following statements, using a scale of Excellent = 5 to Poor = 0.
1. Were the individual course objectives met? Objective #1: Yes No Objective #3: Yes No
Objective #2: Yes No Objective #4: Yes No
2. To what extent were the course objectives accomplished overall? 5 4 3 2 1 0
3. Please rate your personal mastery of the course objectives. 5 4 3 2 1 0
4. How would you rate the objectives and educational methods? 5 4 3 2 1 0
5. How do you rate the author’s grasp of the topic? 5 4 3 2 1 0
6. Please rate the instructor’s effectiveness. 5 4 3 2 1 0
7. Was the overall administration of the course effective? 5 4 3 2 1 0
8. Do you feel that the references were adequate? Yes No
9. Would you participate in a similar program on a different topic? Yes No
10. If any of the continuing education questions were unclear or ambiguous, please list them.
___________________________________________________________________
11. Was there any subject matter you found confusing? Please describe.
___________________________________________________________________
___________________________________________________________________
12. What additional continuing dental education topics would you like to see?
___________________________________________________________________
___________________________________________________________________
PLEASE PHOTOCOPY ANSWER SHEET FOR ADDITIONAL PARTICIPANTS.
AGD Code 148
For immediate results, go to www.ineedce.com and click on the button “take tests Online.” answer sheets can be faxed with credit card payment to (440) 845-3447, (216) 398-7922, or (216) 255-6619.
�Payment of $59.00 is enclosed. (Checks and credit cards are accepted.)
If paying by credit card, please complete the following: MC Visa AmEx Discover
Acct. Number: _______________________________
Exp. Date: _____________________
Charges on your statement will show up as PennWell
Mail completed answer sheet to
Academy of Dental Therapeutics and Stomatology,A Division of PennWell Corp.
P.O. Box 116, Chesterland, OH 44026 or fax to: (440) 845-3447
AUTHOR DISCLAIMERThe authors of this course have no commercial ties with the sponsors or the providers of the unrestricted educational grant for this course.
SPONSOR/PROVIDERThis course was made possible through an unrestricted educational grant. No manufacturer or third party has had any input into the development of course content. All content has been derived from references listed, and or the opinions of clinicians. Please direct all questions pertaining to PennWell or the administration of this course to Machele Galloway, 1421 S. Sheridan Rd., Tulsa, OK 74112 or [email protected].
COURSE EVALUATION and PARTICIPANT FEEDBACKWe encourage participant feedback pertaining to all courses. Please be sure to complete the survey included with the course. Please e-mail all questions to: [email protected].
INSTRUCTIONSAll questions should have only one answer. Grading of this examination is done manually. Participants will receive confirmation of passing by receipt of a verification form. Verification forms will be mailed within two weeks after taking an examination.
EDUCATIONAL DISCLAIMERThe opinions of efficacy or perceived value of any products or companies mentioned in this course and expressed herein are those of the author(s) of the course and do not necessarily reflect those of PennWell.
Completing a single continuing education course does not provide enough information to give the participant the feeling that s/he is an expert in the field related to the course topic. It is a combination of many educational courses and clinical experience that allows the participant to develop skills and expertise.
COURSE CREDITS/COSTAll participants scoring at least 70% (answering 21 or more questions correctly) on the examination will receive a verification form verifying 4 CE credits. The formal continuing education program of this sponsor is accepted by the AGD for Fellowship/Mastership credit. Please contact PennWell for current term of acceptance. Participants are urged to contact their state dental boards for continuing education requirements. PennWell is a California Provider. The California Provider number is 3274. The cost for courses ranges from $49.00 to $110.00.
Many PennWell self-study courses have been approved by the Dental Assisting National Board, Inc. (DANB) and can be used by dental assistants who are DANB Certified to meet DANB’s annual continuing education requirements. To find out if this course or any other PennWell course has been approved by DANB, please contact DANB’s Recertification Department at 1-800-FOR-DANB, ext. 445.
RECORD KEEPINGPennWell maintains records of your successful completion of any exam. Please contact our offices for a copy of your continuing education credits report. This report, which will list all credits earned to date, will be generated and mailed to you within five business days of receipt.
CANCELLATION/REFUND POLICYAny participant who is not 100% satisfied with this course can request a full refund by contacting PennWell in writing.
© 2008 by the Academy of Dental Therapeutics and Stomatology, a division of PennWell
10 www.ineedce.com