gn009 application note - gansystems.com · gan systems –3 introduction • gan systems’e-hemts...
TRANSCRIPT

GaN Systems – 1
GN009 Application NotePCB Layout Considerations with GaN E-HEMTs
January 18, 2019

GaN Systems – 2
Overview
• This guide provides an overview of the good engineering practice for PCB layout of designs using GaN Systems’ embedded GaNPX® packaged E-HEMTs.
• Layout guidelines are introduced for the following four circuit configurations
1) Isolated gate driver circuit for single GaN E-HEMTs
2) Isolated gate driver circuit for paralleled GaN E-HEMTs
3) Half-bridge Booststrap gate driver circuit
4) EZDriveSM circuit
• With optimum board layout combined with low GaNPX® package inductance, GaN E-HEMTs exhibit optimum switching performance

GaN Systems – 3
Introduction
• GaN Systems’ E-HEMTs have very low packaging inductance, while enablingultra-low inductance PCB power loops.
• Good engineering practice of layout techniques are required to minimizeparasitic inductance and fully utilize the benefit of GaN Systems’ E-HEMTs.
• This application note shows key steps to design an optimal PCB layout with GaNto maximize converter performance.

GaN Systems – 4
• GaN E-HEMTs switch much faster than Si MOSFETs, and require proper engineering consideration of PCB layoutdesign to minimize parasitic inductances.
• Parasitic inductances can cause higher overshoot voltages, ringing/oscillation, EMC issues, which can lead tooverstressing the E-HEMTs.
Example of an unsuccessful design caused by unbalanced quasi-common source inductance
Example of clean switching waveforms when goodPCB layout practices are used (400 V/240 A DPT)
Motivation
VDS
Inductor Current
400V / 48A

GaN Systems – 5
Step 1: Prepare the schematics and identify the components of each critical loop
• Isolated gate driver circuit for single GaN HEMTs
• Isolated gate driver circuit for paralleled GaN HEMTs• Half-bridge Bootstrap gate driver circuit• EZDriveSM circuit
Step 2: Place the components according to the design priority and current direction
• Put components as close as possible
• According to the current direction, set the component in sequence• If there is a conflict for minimizing all the loops, refer to the priority listed on slide
7/8/9/10.
Step 3: Connect the components optimally to achieve low parasitics with fluxcancellation techniques
PCB Layout Steps

GaN Systems – 6
Step 1: Prepare the schematics and identify the components of each critical loop
• Isolated gate driver circuit for single GaN HEMTs
• Isolated gate driver circuit for paralleled GaN HEMTs• Half-bridge Bootstrap gate driver circuit• EZDriveSM circuit
Step 2: Place the components according to the design priority and current direction
• Put components as close as possible
• According to the current direction, set the component in sequence• If there is a conflict for minimizing all the loops, refer to the priority listed on slide
7/8/9/10.
Step 3: Connect the components optimally to achieve low parasitics with fluxcancellation techniques
PCB Layout Steps

GaN Systems – 7
Isolated gate driver circuit for single GaN HEMT
Priority Critical Loops ComponentsCritical Loops Design Rule
1 Power Commutation loop Q1,Q2,CBUS
As small as possible
2a LS Gate Driver loop (turn-on) C5,U1,Rgon,Q2
2b LS Gate Driver loop (turn-off) C7,U1,Rgoff,Q2
• High-side isolated gate drive design issymmetric as Low-side, not shown in thediagram
• Priority of HS gate driver loop is same as LS
CBUS
Q1
Q2
U1
GaN Enhancement-mode HEMT Half Bridge
EN
GNDI
VI
VDDI
VDD
VO+
VO-
GNDA
Rgon
ISO DC/DC
VIN
GND
+VO
0V
VCC PS1
0V
GD_GND
VDD
C5 GD_GND
GD_GND
C7
VEE
RPull_down
Low-side isolated gate drive design
VDD
VEE
GD_GND
PWM_IN
0V
VC
CEN
Rgoff
PGND
VIN+

GaN Systems – 8
Isolated gate driver circuit for paralleled GaN HEMTs
• High-side isolated gate drive design is symmetric as Low-side, not shown in the diagram• Priority of HS gate driver loop is same as LS • Distributed gate and source resistance RG1/ RG2 and RS1/ RS2 needs to be separated
Priority Critical Loops ComponentsCritical Loops Design Rule
1aQuasi-common source
loop (high-side)Q3, Q4
As small and symmetric for
each of paralleled devices as possible
1bQuasi-common source
loop (low-side)Q1, Q2
2 Power Commutation loopCBUS, Q3/Q4,
Q1/Q2
3aLS Gate Driver loop
(turn-on)
C5, U1, RGL, RG1/Q1/RS1, RG2/Q2/RS2
3bLS Gate Driver loop
(turn-off)
C7, U1, RG1/Q1/RS1, RG2/Q2/RS2

GaN Systems – 9
CBUS
Q1
Q2
U1PE29101
IN
RDHL
LSB
LSGpu
LSGpd
LSS
Rgon_LS
VCC_6V
GND
PWM_IN
EN
Rgoff_LS
PGND
VIN+
HSB
HSGpu
HSGpd
HSS
Rgon_HS
Rgoff_HS
VDD
GND
RDLH
EN
RDHL
RDLH
GND
VDDsync
0
VCC_6V
DNI
HSS
HSBDBOOT
CBOOT
RBOOT
DNIZener
C1
Half-bridge Bootstrap Gate Driver Circuit (Non-isolated)
Priority Critical Loops ComponentsCritical Loops
Design Rule
1 Power Commutation loop Q1, Q2, CBUS
As small as possible
2aHS Gate Driver Loop
(turn-on)DBOOT, RBOOT, CBOOT,
U1, Rgon_HS, Q1
2bHS Gate Driver Loop
(turn-off)Q1, Rgoff_HS, U1
2cLS Gate Driver Loop
(turn-on)C1, U1, Rgon_LS, Q2
2dLS Gate Driver Loop
(turn-off)Q2, Rgoff_LS, U1
• Use above table to identify critical loop, components and priority
Example driver
GaN Systems – 10
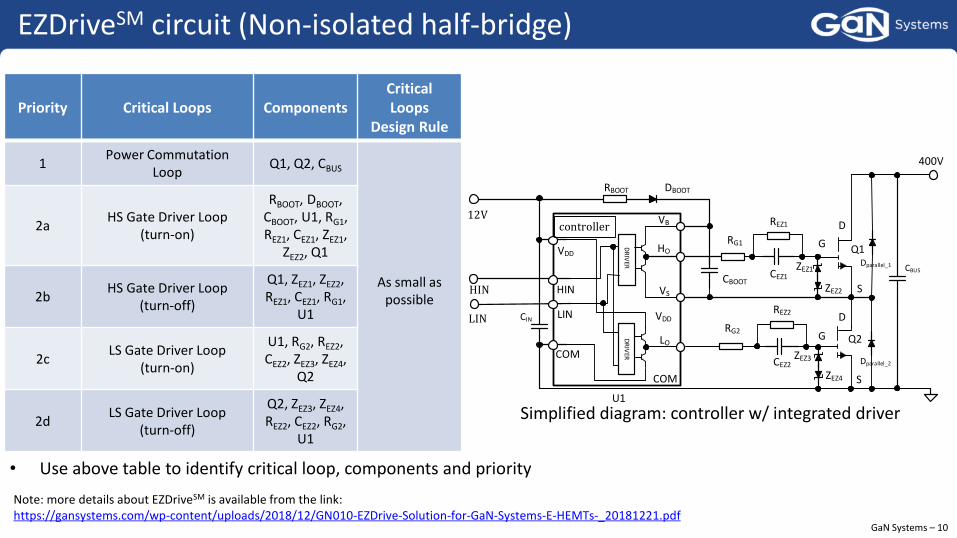
EZDriveSM circuit (Non-isolated half-bridge)
Priority Critical Loops ComponentsCritical Loops
Design Rule
1Power Commutation
LoopQ1, Q2, CBUS
As small as possible
2aHS Gate Driver Loop
(turn-on)
RBOOT, DBOOT, CBOOT, U1, RG1, REZ1, CEZ1, ZEZ1,
ZEZ2, Q1
2bHS Gate Driver Loop
(turn-off)
Q1, ZEZ1, ZEZ2, REZ1, CEZ1, RG1,
U1
2cLS Gate Driver Loop
(turn-on)
U1, RG2, REZ2, CEZ2, ZEZ3, ZEZ4,
Q2
2dLS Gate Driver Loop
(turn-off)
Q2, ZEZ3, ZEZ4, REZ2, CEZ2, RG2,
U1
• Use above table to identify critical loop, components and priority
Simplified diagram: controller w/ integrated driver
HO
VS
LO
VB
COM
LIN
VDD
HIN
CIN
400V
HIN
LIN
RBOOT DBOOT
RG1
RG2
CBOOT
12V
Dparallel_2
REZ1
REZ2
CEZ1
CEZ2
ZEZ1
ZEZ3
ZEZ2
ZEZ4
VDD
DR
IVER
DR
IVER
COM
Q1
D
G
S
D
G
S
Dparallel_1
Q2
CBUS
U1
controller
Note: more details about EZDriveSM is available from the link:https://gansystems.com/wp-content/uploads/2018/12/GN010-EZDrive-Solution-for-GaN-Systems-E-HEMTs-_20181221.pdf

GaN Systems – 11
PCB Layout Steps
Step 1: Prepare the schematics and identify the components of each critical loop
• Isolated gate driver circuit for single GaN HEMTs
• Isolated gate driver circuit for paralleled GaN HEMTs• Half-bridge Bootstrap gate driver circuit• EZDriveSM circuit
Step 2: Place the components according to the design priority and current direction
• Put components as close as possible
• According to the current direction, set the component in sequence• If there is a conflict for minimizing all the loops, refer to the priority listed on slide
7/8/9/10.
Step 3: Connect the components optimally to achieve low parasitics with fluxcancellation techniques

GaN Systems – 12
CBUS
Q1
Q2
U1
GaN Enhancement-mode HEMT Half Bridge
EN
GNDI
VI
VDDI
VDD
VO+
VO-
GNDA
Rgon
ISO DC/DC
VIN
GND
+VO
0V
VCC PS1
0V
GD_GND
VDD
C5 GD_GND
GD_GND
C7
VEE
RPull_down
Low-side isolated gate drive design
VDD
VEE
GD_GND
PWM_IN
0V
VC
C
EN
Rgoff
PGND
VIN+
Step 2.1: Power commutation loops (Top-side cooling)
Example: Isolated gate driver circuit w/ single GaN HEMT
• Place components as close together as possible
Priority Critical Loops ComponentsCritical Loops Design Rule
1 Power Commutation loop Q1,Q2,CBUS
As small as possible
2aLS Gate Driver loop
(turn-on)C5,U1,Rgon,Q2
2bLS Gate Driver loop
(turn-off)C7,U1,Rgoff,Q2
Side view Q1/Q2 PCB
CBUS capacitors
Q1
Q2
Top-side cooled devices(GaN HEMT Q1/Q2 are on the bottom side of PCB)
Component Placement
CBUS capacitors

GaN Systems – 13
Step 2.2: Gate Driver Circuit Loop (Top-side cooling)Example: Isolated gate driver circuit w/ single GaN HEMT • Locate drivers close to the gate
• Use/create kelvin source for driver return
CBUS
Q1
Q2
U1
GaN Enhancement-mode HEMT Half Bridge
EN
GNDI
VI
VDDI
VDD
VO+
VO-
GNDA
Rgon
ISO DC/DC
VIN
GND
+VO
0V
VCC PS1
0V
GD_GND
VDD
C5 GD_GND
GD_GND
C7
VEE
RPull_down
Low-side isolated gate drive design
VDD
VEE
GD_GND
PWM_IN
0V
VC
C
EN
Rgoff
PGND
VIN+
Priority Critical Loops ComponentsCritical Loops Design Rule
1 Power Commutation loop Q1,Q2,CBUS
As small as possible
2aLS Gate Driver loop
(turn-on)C5,U1,Rgon,Q2
2bLS Gate Driver loop
(turn-off)C7,U1,Rgoff,Q2
Side viewQ1/Q2
PCB
Gate driver
U1
U2
Q2
Q1Top-side cooled devices
(GaN HEMT Q1/Q2 are on the bottom side of PCB)
Component Placement
CBUS capacitors
Rgon
Rgoff
C5
C7
CBUS capacitors

GaN Systems – 14
CBUS
Q1
Q2
U1
GaN Enhancement-mode HEMT Half Bridge
EN
GNDI
VI
VDDI
VDD
VO+
VO-
GNDA
Rgon
ISO DC/DC
VIN
GND
+VO
0V
VCC PS1
0V
GD_GND
VDD
C5 GD_GND
GD_GND
C7
VEE
RPull_down
Low-side isolated gate drive design
VDD
VEE
GD_GND
PWM_IN
0V
VC
C
EN
Rgoff
PGND
VIN+
Step 2.1: Power commutation loops (Bottom-side cooling)Example: Isolated gate driver circuit w/ single GaN HEMT • Place components as close together as possible
Priority Critical Loops ComponentsCritical Loops Design Rule
1 Power Commutation loop Q1,Q2,CBUS
As small as possible
2aLS Gate Driver loop
(turn-on)C5,U1,Rgon,Q2
2bLS Gate Driver loop
(turn-off)C7,U1,Rgoff,Q2
Bottom-side cooled devicesGaN HEMT Q1Q2/caps on the same side of PCB
PCB
Q1/Q2
Side view
CBUS capacitors
Component Placement
CBUS capacitors

GaN Systems – 15
Step 2.2: Gate Driver Circuit Loop (Bottom-side cooling)Example: Isolated gate driver circuit with single GaN HEMT • Locate drivers close to the gate
• Use/create kelvin source for driver return
CBUS
Q1
Q2
U1
GaN Enhancement-mode HEMT Half Bridge
EN
GNDI
VI
VDDI
VDD
VO+
VO-
GNDA
Rgon
ISO DC/DC
VIN
GND
+VO
0V
VCC PS1
0V
GD_GND
VDD
C5 GD_GND
GD_GND
C7
VEE
RPull_down
Low-side isolated gate drive design
VDD
VEE
GD_GND
PWM_IN
0V
VC
C
EN
Rgoff
PGND
VIN+
Priority Critical Loops ComponentsCritical Loops Design Rule
1 Power Commutation loop Q1,Q2,CBUS
As small as possible
2aLS Gate Driver loop
(turn-on)C5,U1,Rgon,Q2
2bLS Gate Driver loop
(turn-off)C7,U1,Rgoff,Q2
U1
U1
U2
C5Rgon
C7Rgoff Bottom-side cooled devices
(gate driver/GaN HEMT/caps on the same side of PCB)
Q1/Q2
PCB
Gate driver
Side view
CBUS capacitors
Component Placement
CBUS capacitors

GaN Systems – 16
Step 1: Prepare the schematics and identify the components of each critical loop
• Isolated gate driver circuit for single GaN HEMTs
• Isolated gate driver circuit for paralleled GaN HEMTs• Half-bridge Bootstrap gate driver circuit• EZDriveSM circuit
Step 2: Place the components according to the design priority and current direction
• Put components as close as possible
• According to the current direction, set the component in sequence• If there is a conflict for minimizing all the loops, refer to the priority listed on slide
7/8/9/10.
Step 3: Connect the components optimally to achieve low parasitics with fluxcancellation techniques
PCB Layout Steps

GaN Systems – 17
Top View
Components
Top layer of PCB
Bottom layer of PCBSide View
Via
Step 3.1: Introduction - Magnetic Flux Cancellation for Lower Inductance
• When two adjacent conductors are located close with opposite current direction, magnetic fluxgenerated by two current flows will cancel each other.
• This magnetic flux canceling effect can lower the parasitic inductance.
• Arrange the layout so that high-frequency current flows in opposite direction on two adjacent PCBlayers.
Q1
Q2
Q1Q2

GaN Systems – 18
• Connect the components with Flux-cancelling traces, see below example of top-side cooled devices and bottom-side cooled devices.
Step 3.2: Connect the components with Flux-cancelling traces
Example: Top-side cooled devices(GaN HEMT is on the bottom side of PCB)
Top view Bottom view
Q1
Q2
Gate
Driver
Gate
Driver
VIN+
PGND
PGND
VSW
TOP LAYER
LAYER 2PGND
PGND VSW VIN+
GaN E-HEMTs
PGND
Decoupling
Caps
LAYER 3
LAYER 4
Use layer 2 as groundreturn (4-layer PCB)
Top view
Side view
Flux-cancelling traces
Example: Bottom-side cooled devices(gate driver/GaN HEMT/caps on the same side of PCB)
Side view
PGND
VIN+
PGND
VSW
PGND

GaN Systems – 19
DUT: 4 x GS66516T in parallel. Freewheeling: 4 x GS66516T in parallel
Vds_DUT(C1)
Freewheeling
DUT4 x GS66516T
iL(C2)
VGS=-5V
Double Pulse Test
Vds_DUT(C1:100V/div)
iL(C2:100A/div)
• Using good engineering practice for PCB layout in designs where GaN Systems’ E-HEMTs are paralleled,current balancing and clean switching can be achieved. Hard switched is possible to full rated current.
• This example demonstrates ~200V VDS margin on a 400V/240A hard-switching test
L=50uH Hard switching on/off
Vspike=52V
iOFF =240A
Measurement Setup: Lecroy WaveSurfer 10M Oscilloscope, HVD3106 Differential Probe(C1), CWT-3LFB mini Rogowski Coil(C2)
On: dv/dt=19.5V/nS Off: dv/dt=59.6V/nS
Experimental Example: 400V/240A DPT Hard-switching Test
Test conditions VBUS = 400 V IDS_ON = 231 A IDS_OFF = 240 AVGS = +6.8 V/-5 V RG_ON = 4.55 ΩRG_OFF = 1.25 Ω

GaN Systems – 20
Summary
• Due to faster switching speed of GaN E-HEMTs, good engineering practice for PCB layouttechniques are required to minimize parasitic inductance and fully utilize these advanceddevices.
• Optimizing the PCB layout is important to achieve the maximum performance capabilityof GaN based designs. With optimum board layout combined with low GaNPX® packageinductance, GaN Systems’ E-HEMTs exhibit peak switching performance.

GaN Systems – 21
www.gansystems.com • North America • Europe • Asia