giza documentation - read the docs documentation, release 1.0 welcome to this shortsphinxtutorial....
TRANSCRIPT
Giza DocumentationRelease 1.0
Carsten Ehbrecht
Sep 10, 2017

Contents
1 What is Sphinx? 3
2 Installing Sphinx 5
3 First Steps with Sphinx 7
4 Using reStructuredText 11
5 Showing Source Code 15
6 ReadTheDocs and Sphinx 17
7 Going Further into Sphinx 19
8 Useful Links 21
9 Sphinx AutoAPI Index 23
Python Module Index 25
i

ii

Giza Documentation, Release 1.0
Welcome to this short Sphinx tutorial. This tutorial is a concise summary of other Sphinx tutorials and will give youa quick overview of what Sphinx can do for you. If you want to know about the Sphinx details then have a look atUseful Links and at one or the other tutorial.
Note: Of course a tutorial about Sphinx is written in Sphinx. You can clone this tutorial from GitHub and it is hostedon ReadTheDocs.
Contents 1

Giza Documentation, Release 1.0
2 Contents

CHAPTER 1
What is Sphinx?
From http://sphinx-doc.org:
• Sphinx is a tool that makes it easy to create intelligent and beautiful documentation.
• It was originally created for the new Python documentation, and it has excellent facilities for the documentationof Python projects, but C/C++ is already supported as well.
Warning: ... a great tool that actually makes programmers want to write documentation!
Sphinx Philosophy
Sphinx is a documentation generator. This means it takes plain-text files in reStructuredText format and transformes itinto HTML, PDF, and any other output format.
reST -> Sphinx -> HTML (PDF, eBook, ...)
So as a user of Sphinx, your main job will be writing these text files with reStructuredText which is similar to Wikilanguages like Markdown.
Sphinx Advantages
• Documents are written as plain text files.
• Output formats will be generated by Sphinx: HTML, PDF, eBook.
• Markup language used (reST) is similar to Wiki languages (Markdown, Textile, ...).
• Layouts can be replaced, many default layouts available.
• Writer concentrates on content, layout and output comes from Sphinx.
3

Giza Documentation, Release 1.0
• Autogenerating documentation from source code.
• Syntax highlighting for many formats (Python, XML, ...).
• Cross-references to parts of the documenation (sections, code, glossary, ...) and automatic indices.
• Version control (GitHub) can be used for collaborative work and keeping track of different document versions.
• The documentation is part of the source code repository.
Examples on Sphinx
• https://docs.python.org/2.7/
• http://bokeh.pydata.org/en/latest/
• https://docs.djangoproject.com/en/1.9/internals/contributing/writing-documentation/
• http://docs.geotools.org/
• http://docs.geoserver.org/latest/en/user/
• http://ryan-roemer.github.io/sphinx-bootstrap-theme/
• http://cppformat.github.io/latest/
• http://doc.mapbender3.org/index.html
4 Chapter 1. What is Sphinx?

CHAPTER 2
Installing Sphinx
You can install Sphinx from PyPI with pip:
$ pip install sphinx
Or install it with conda:
$ conda install sphinx
5

Giza Documentation, Release 1.0
6 Chapter 2. Installing Sphinx

CHAPTER 3
First Steps with Sphinx
Prepare the tutorial demo (optional)
To see a Sphinx example you can clone this tutorial from GitHub:
$ git clone https://github.com/cehbrecht/quick-sphinx-tutorial.git
Setup the conda environment which includes the Sphinx package with some extensions:
$ cd quick-sphinx-tutorial$ conda env create -f environment.yml$ source activate giza
Or use pip to install the Sphinx packages:
$ pip install -r requirements.txt
Getting Started
Create docs folder:
$ mkdir docs$ cd docs
Create the sphinx skeleton:
$ sphinx-quickstart
> Root path for the documentation [.]:> Separate source and build directories (y/n) [n]: y> Name prefix for templates and static dir [_]:> Project name: Giza
7

Giza Documentation, Release 1.0
> Author name(s): Mac Pingu> Project version: 0.1> Project release [0.1]:> Project language [en]:> Source file suffix [.rst]:> Name of your master document (without suffix) [index]:> Do you want to use the epub builder (y/n) [n]:> autodoc: automatically insert docstrings from modules (y/n) [n]:> doctest: automatically test code snippets in doctest blocks (y/n) [n]:> intersphinx: link between Sphinx documentation of different projects (y/n) [n]: y> todo: write "todo" entries that can be shown or hidden on build (y/n) [n]: y> coverage: checks for documentation coverage (y/n) [n]:> imgmath: include math, rendered as PNG or SVG images (y/n) [n]:> mathjax: include math, rendered in the browser by MathJax (y/n) [n]:> ifconfig: conditional inclusion of content based on config values (y/n) [n]:> viewcode: include links to the source code of documented Python objects (y/n) [n]: y> githubpages: create .nojekyll file to publish the document on GitHub pages (y/n)→˓[n]:> Create Makefile? (y/n) [y]:> Create Windows command file? (y/n) [y]:
Your file system should now look similar to this:
mypackage- src- docs
- Makefile- make.bat- build- sources
- conf.py- index.rst
Building docs
Let’s build our docs into HTML to see how it works. Simply run:
# Inside top-level docs/ directory.$ make html
This should run Sphinx in your shell, and output HTML. At the end, it should say something about the documentsbeing ready in build/html. You can now open them in your browser by typing:
$ firefox build/html/index.html
Change the Look
You can change the look of the generated documents by setting the html_theme setting in your conf.py. Goahead and set it like this:
html_theme = 'sphinxdoc'
8 Chapter 3. First Steps with Sphinx

Giza Documentation, Release 1.0
If you rebuild your documentation, you will see the new theme:
$ make html
Note: Have a look at the Builtin themes.
Check the Links
Sphinx can check if the links in your document are valid:
$ make linkcheck
3.5. Check the Links 9

Giza Documentation, Release 1.0
10 Chapter 3. First Steps with Sphinx

CHAPTER 4
Using reStructuredText
After using sphinx-quickstart you have the index.rst file which contains the content:
=====================Quick Sphinx Tutorial=====================
.. image:: https://travis-ci.org/cehbrecht/quick-sphinx-tutorial.svg?branch=master:target: https://travis-ci.org/cehbrecht/quick-sphinx-tutorial:alt: Travis Build
Welcome to this short `Sphinx`_ tutorial. This tutorial is a concisesummary of other Sphinx tutorials and will give you a quick overviewof what Sphinx can do for you. If you want to know about the Sphinxdetails then have a look at :ref:`appendix` and at `one`_ or the`other`_ tutorial.
.. note:: Of course a tutorial about Sphinx is written in `Sphinx`_. Youcan clone this tutorial from `GitHub`_ and it is hostedon `ReadTheDocs`_.
.. toctree:::maxdepth: 1
introinstallfirststepsrstcodertdadvancedappendix
.. _GitHub: https://github.com/cehbrecht/quick-sphinx-tutorial
.. _one: http://gisellezeno.com/tutorials/sphinx-for-python-documentation.html
.. _other: https://sphinx-tutorial.readthedocs.org/
11

Giza Documentation, Release 1.0
.. _ReadTheDocs: http://quick-sphinx-tutorial.readthedocs.org/en/latest/
You can create other files here for additional documentation. Once you have created them, then you can include themin the table of contents in index.rst.
Play with reStructuredText (reST) Syntax
reStructuredText takes a bit of practice. Go over to http://rst.ninjs.org, which is a live preview.
To get started with the reST syntax, you can read the reStructuredText Primer in the Sphinx docs.
Warning: reST is extended by Sphinx Markup Constructs to manage metadata, indexing, and cross-references.
Note: The cheatsheet gives an overview of reST and the Sphinx markup extensions.
Quick reST example
An example for reStructuredText:
====================ReST Quick Reference====================
Underline titles with punctuation=================================
.. _rst_example:
ReST example markup-------------------
*Italic* **bold** ``name`` ``function()`` ``expression = 3 + 3```Hyperlink <http://en.wikipedia.org/wiki/Hyperlink>`_ `Link`_
.. _Link: http://en.wikipedia.org/wiki/Link_(The_Legend_of_Zelda)
.. image:: images/python-logo.png
.. A comment block starts with two periods, can continue indented.
A paragraph is one or more lines of un-indented text, separatedfrom the material above and below by blank lines.
“Block quotes look like paragraphs, but are indented withone or more spaces.”
| Because of the pipe characters, this will become one line,| And this will become another line, like in poetry.
termDefinition for the “term”, indented beneath it.
another term
12 Chapter 4. Using reStructuredText
Giza Documentation, Release 1.0
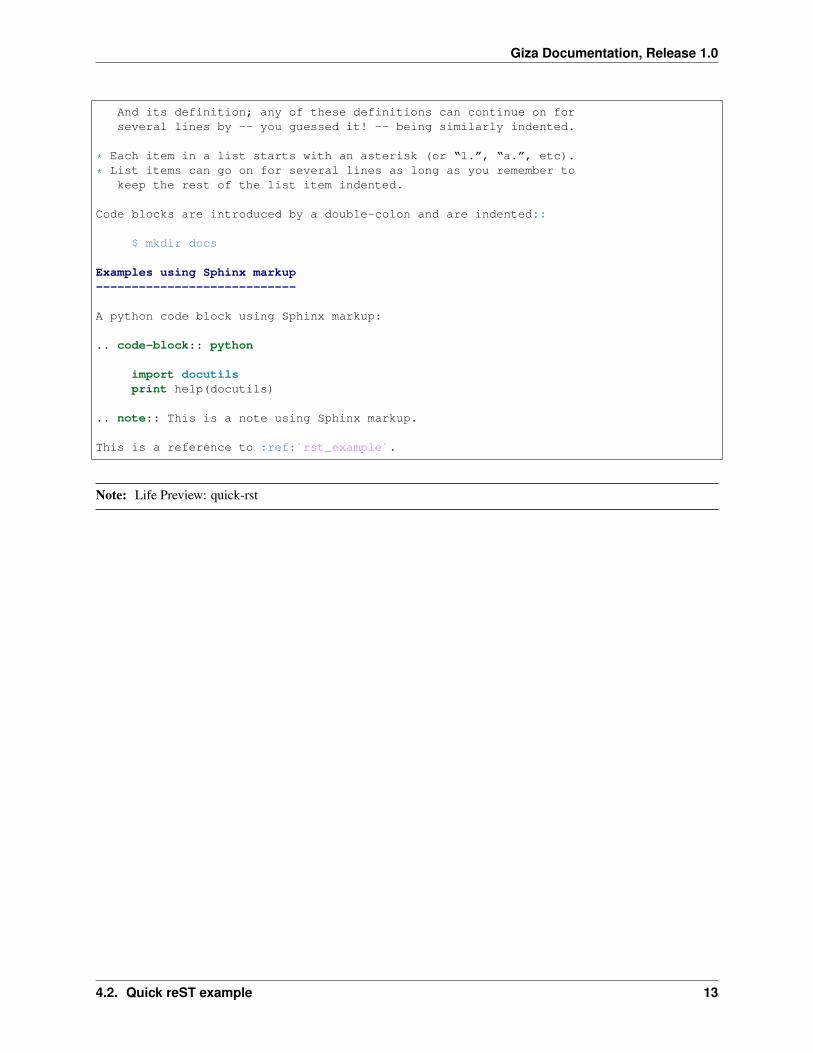
And its definition; any of these definitions can continue on forseveral lines by -- you guessed it! -- being similarly indented.
* Each item in a list starts with an asterisk (or “1.”, “a.”, etc).
* List items can go on for several lines as long as you remember tokeep the rest of the list item indented.
Code blocks are introduced by a double-colon and are indented::
$ mkdir docs
Examples using Sphinx markup----------------------------
A python code block using Sphinx markup:
.. code-block:: python
import docutilsprint help(docutils)
.. note:: This is a note using Sphinx markup.
This is a reference to :ref:`rst_example`.
Note: Life Preview: quick-rst
4.2. Quick reST example 13

Giza Documentation, Release 1.0
14 Chapter 4. Using reStructuredText

CHAPTER 5
Showing Source Code
Using a code block
Show a Python code block with highlighted lines:
.. code-block:: python:linenos::emphasize-lines: 3,5
def some_function():interesting = Falseprint 'This line is highlighted.'print 'This one is not...'print '...but this one is.'
And this is how it looks like:
1 def some_function():2 interesting = False3 print 'This line is highlighted.'4 print 'This one is not...'5 print '...but this one is.'
Include Source Code
Include source code from a file and show only a part of it:
.. literalinclude:: ../../giza/__init__.py:language: python:linenos::lines: 11-26
15

Giza Documentation, Release 1.0
And here is how it looks like:
1 def calc_square(number, verbosity):2 """3 Calculate the square of a given number.4
5 :param number: An integer number.6 :param verbosity: An integer value for output verbosity.7 :return: The square of number.8 """9 answer = number**2
10 if verbosity >= 2:11 print "the square of {} equals {}".format(number, answer)12 elif verbosity >= 1:13 print "{}^2 == {}".format(number, answer)14 else:15 print answer16 return answer
Use Sphinx autoapi
sphinx-autoapi is a tool to make API docs. It depends on parsing, instead of importing code.
First you need to install autoapi:
$ pip install sphinx-autoapi
Then add it to your Sphinx project’s conf.py:
extensions = ['autoapi.extension']
# Document Python Codeautoapi_type = 'python'autoapi_dir = '../src'
AutoAPI will automatically add itself to the last TOCTree in your top-level index.rst.
This is needed because we will be outputting rst files into the autoapi directory. This adds it into the global TOCTreefor your project, so that it appears in the menus.
Note: Life Preview of Giza autoapi
16 Chapter 5. Showing Source Code

CHAPTER 6
ReadTheDocs and Sphinx
The powerful and popular Read The Docs service lets you configure your GitHub repository so that every time youpush a new version of your software, the documentation gets automatically rebuilt and made available at:
https://readthedocs.org/projects/<project-name>/
Last but not least, once you’ve written your documentation you have to put it somewhere for the world to see! Readthe Docs makes this quite simple, and is free for all open source projects.
• Register for an account at https://readthedocs.org
• Click the Import Project button
• Add the URL for a specific repository you want to build docs for
• Sit back and have a drink while Read the Docs does the rest.
It will:
• Pull down your code
• Install your requirements.txt
• Build HTML, PDF, and ePub of your docs
• Serve it up online at http://<projectname>.readthedocs.org
Note: View the project page for this tutorial on ReadTheDocs
Read the Docs Features
Read the Docs gives you a number of additional features.
• You can add Versions to your project for each tag & branch.
• You can alerts for when your doc build fails
17

Giza Documentation, Release 1.0
• You can search across the full set of docs
Note: View this tutorial on ReadTheDocs
18 Chapter 6. ReadTheDocs and Sphinx
CHAPTER 7
Going Further into Sphinx
Automatic build with travis
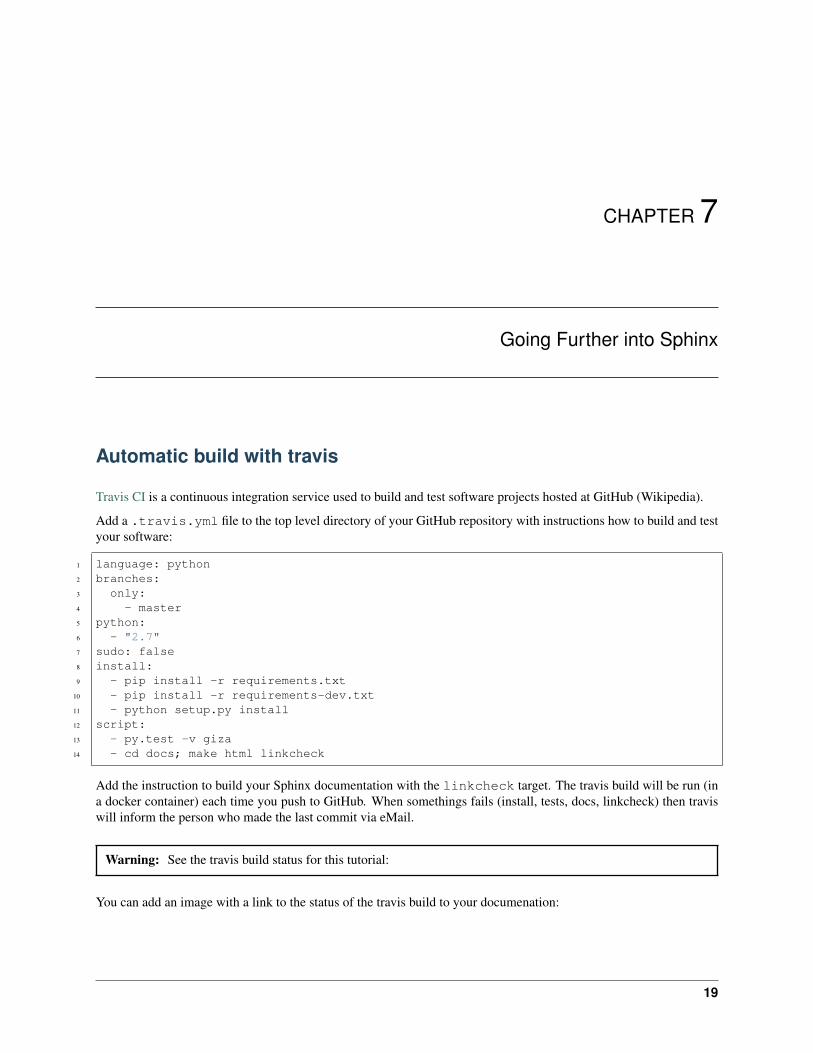
Travis CI is a continuous integration service used to build and test software projects hosted at GitHub (Wikipedia).
Add a .travis.yml file to the top level directory of your GitHub repository with instructions how to build and testyour software:
1 language: python2 branches:3 only:4 - master5 python:6 - "2.7"7 sudo: false8 install:9 - pip install -r requirements.txt
10 - pip install -r requirements-dev.txt11 - python setup.py install12 script:13 - py.test -v giza14 - cd docs; make html linkcheck
Add the instruction to build your Sphinx documentation with the linkcheck target. The travis build will be run (ina docker container) each time you push to GitHub. When somethings fails (install, tests, docs, linkcheck) then traviswill inform the person who made the last commit via eMail.
Warning: See the travis build status for this tutorial:
You can add an image with a link to the status of the travis build to your documenation:
19

Giza Documentation, Release 1.0
.. image:: https://travis-ci.org/my-orga/my-repo.svg?branch=master:target: https://travis-ci.org/my-orga/my-repo:alt: Travis Build
Configure theme for rtd
$ pip install sphinx_rtd_theme
Or:
$ conda install sphinx_rtd_theme
on_rtd = os.environ.get('READTHEDOCS', None) == 'True'
if on_rtd:html_theme = 'default'
else: # only import and set the theme if we're building docs locallyimport sphinx_rtd_themehtml_theme = 'sphinx_rtd_theme'html_theme_path = [sphinx_rtd_theme.get_html_theme_path()]
on_rtd is whether we are on readthedocs.org, this line of code grabbed from docs.readthedocs.org
Use Sphinx for GitHub Pages
Include the extension githubpages:
extensions = ['sphinx.ext.githubpages']
This extension creates .nojekyll file on generated HTML directory to publish the document on GitHub Pages.
See also: http://gisellezeno.com/tutorials/sphinx-for-python-documentation.html
20 Chapter 7. Going Further into Sphinx

CHAPTER 8
Useful Links
Documentation
• Sphinx Documentation
• Python Guide - Documentation
• Read the Docs Documentation
Restructured Text
• Sphinx reStructuredText Primer
• Sphinx Markup Constructs
• Restuctured Text and Sphinx
• Online reStructuredText editor
Sphinx Tutorials
• Sphinx Guide - Tutorial
• Sphinx for Python
• Sphinx Tutorial by Erich Olscher
• Sphinx Tutorial at PyCon
21

Giza Documentation, Release 1.0
22 Chapter 8. Useful Links

CHAPTER 9
Sphinx AutoAPI Index
This page is the top-level of your generated API documentation. Below is a list of all items that are documented here.
giza
Summary
This is a Python demo for the Sphinx tutorial.
This demo has an implementation of a Python script called giza which calculates the square of a given number.
giza.calc_square(number, verbosity)Calculate the square of a given number.
Parameters
• number – An integer number.
• verbosity – An integer value for output verbosity.
Returns The square of number.
giza.main()A small wrapper that is used for running as a CLI Script.
Examples:
$ giza 2> 4
$ giza -v 3> 3^2 == 9
$ giza -vv 4> the square of 4 equals 16
23

Giza Documentation, Release 1.0
giza.tests
giza.tests.test_giza
giza.tests.test_giza.test_calc_square()
24 Chapter 9. Sphinx AutoAPI Index
Python Module Index
ggiza, 23giza.tests, 24giza.tests.test_giza, 24
25
Giza Documentation, Release 1.0
26 Python Module Index
Index
Ccalc_square() (in module giza), 23
Ggiza (module), 23giza.tests (module), 24giza.tests.test_giza (module), 24
Mmain() (in module giza), 23
Ttest_calc_square() (in module giza.tests.test_giza), 24
27