gis tutorial for arcgis pro 2.8, sample chapter
TRANSCRIPT

CHAPTER 1Introducing ArcGIS LEARNING GOALS
• Get an introduction to ArcGIS.
• Get an introduction to the ArcGIS Pro user interface.
• Learn to navigate maps.
• Work with tables of attribute data.
• Get an introduction to symbolizing and labeling maps.
• Work with side-by-side 2D and 3D maps.
• Publish a map to ArcGIS Online.
• Configure maps in ArcGIS Online.
• Use ArcGIS Explorer on a mobile device.
IntroductionArcGIS is an integrated collection of GIS software packages and apps developed by Esri that work seamlessly across desktop computers, the internet, and mobile devices. The tutorials in this first chap-ter will familiarize you with some major components of this software: ArcGIS Pro, ArcGIS Online, and ArcGIS Explorer. You’ll use additional ArcGIS apps and packages in other chapters.
ArcGIS Pro, the major software taught in this book, is a 64-bit desktop GIS application that uses a ribbon interface for 2D and 3D map authoring, analysis, and web publishing. The interface makes relevant tools visible and available for whatever work you’re doing in GIS. ArcGIS Online is Esri’s cloud solution for interactive web mapping and spatial data sharing. Maps that you create in ArcGIS Pro can be published to ArcGIS Online. Then, once in ArcGIS Online, maps can be accessed in web browsers and in mobile-device apps. ArcGIS Explorer is a simple interactive viewer for your online maps.
In this chapter, you will work with a finished map that has the locations of urgent health care clinics in Allegheny County, Pennsylvania. These clinics are federally qualified health centers (FQHCs) that provide subsidized health care for underserved populations and MedExpress clinics that provide private health care. In part, both FQHCs and MedExpress centers are low-cost alterna-tives to hospital emergency rooms. You will examine the finished map’s components while navigat-ing through user interfaces and around mapped features. In the process, you’ll learn that both the
GISTPro2-8.indb 5GISTPro2-8.indb 5 6/21/21 2:24 PM6/21/21 2:24 PM
Part
1
Chapter
1
Tutorial
1
6 Chapter 1: Introducing ArcGIS GIS Tutorial for ArcGIS Pro 2.8
Open the Tutorial 1-1 projectThis book’s tutorials have prebuilt projects that you open and use or modify to complete lessons. So you’ll start by opening ArcGIS Pro and opening a project.
1. Browse to go.esri.com/GISTforPro2.8Data to download the tutorial data for the book, which is
hosted in the group GIS Tutorial for ArcGIS Pro 2.8 (Esri Press). Download and extract the files
to C:\.
2. Start ArcGIS Pro on your computer.
3. Sign in with your ArcGIS account user name and password.
4. Click Open Another Project, browse on your computer to C:\EsriPress\GISTforPro\Chapter1\
Tutorials, and double-click Tutorial1-1.aprx. If you don’t see the Open Another Project link, you can widen the ArcGIS Pro window. The project opens and displays a map, Health Care Clinics, which includes 14 symbolized map layers. You can turn layers on and off by selecting and clearing the check boxes next to their names. Only one layer is selected, Population Density. You’ll select more momentarily. If you do not see the Contents pane, you’ll open that pane in the next step.
5. If the Contents pane is open, click the Close button in the upper-right corner of the pane.
6. On the View tab, go to the Windows group, and click Contents to open the Contents pane. The Contents pane normally docks on the left. Optionally, you can float any pane (you will open sev-eral other panes later in this chapter) by right-clicking the top of the pane and clicking Float or by clicking and dragging the top of the pane outward. You can experiment by right-clicking the top of the pane and clicking Dock to redock the Contents pane on the left.
publicly funded and private-sector urgent health care clinics are well located in interesting spatial patterns.
Tutorial 1-1: Overview of ArcGIS ProBefore starting work on your computer, review key terminology for ArcGIS Pro projects and spatial data.
• A project is a file, with the extension .aprx, that contains one or more maps and related items. For example, you’ll open project Tutorial1-1.aprx in ArcGIS Pro after this introduction. The project has two maps, Health Care Clinics and Health Care Clinics_3D, plus other project items.
• A project has a home folder of your choice. The home folder of Tutorial1-1.aprx is Chapter1\Tutorials. If you installed this book’s data on the C drive of your computer, the location of the Tutorial1-1.aprx project is C:\EsriPress\GISTforPro\Chapter1\Tutorials\Tutorial1-1.aprx.
• A file geodatabase is a folder, with the extension .gdb, that stores one or more feature classes, rasters, and other related files. Although there are many other file formats for storing spatial data, the file geodatabase is a preferred Esri format. The data used in Tutorial1-1.aprx is in the file geodatabase Chapter1.gdb, stored in the Chapter1\Tutorials folder on your computer. A project does not store spatial data used to make maps but instead stores connections to spatial data, such as a file geodatabase, that is stored elsewhere on your computer, ArcGIS Online, or other locations.
• A feature class is composed of spatial data and is the basic building block of GIS for stor-ing features that can be graphically displayed on a map. Feature classes have corresponding attribute data for each feature. For example, Chapter1.gdb has a feature class named FQHC that has point locations for all FQHCs in Allegheny County, along with attribute data includ-ing the FQHC name and address. Chapter1.gdb has many more feature classes, one of which is Municipality, which has boundaries for all municipalities in the county (including the city of Pittsburgh). Yet another feature class is Streets, which has centerlines for all streets in the county.
• A raster dataset (or raster) is the other major type of spatial data for mapping. Quite often, a raster is a stored image made up of pixels—square areas with assigned colors so small that you can’t see them individually until you zoom in close. In general terms, a raster is a rectangular table with numbers in cells (the pixels), with cells referenced to geographic coordinates. For images, the stored numbers correspond to assigned colors.
• A map layer is a feature class or raster as visualized in a map, and a map is a composition of map layers overlaying each other. You choose and symbolize the layers to serve a given purpose.
It’s important to understand that an ArcGIS Pro project is a file that stores your maps, but the spatial data (feature classes and rasters) that maps contain is stored elsewhere on your computer, a local area network, or in the cloud on the internet.
GISTPro2-8.indb 6GISTPro2-8.indb 6 6/21/21 2:24 PM6/21/21 2:24 PM

7
Part
1
Chapter
1
Tutorial
1
GIS Tutorial for ArcGIS Pro 2.8Chapter 1: Introducing ArcGIS
Open the Tutorial 1-1 projectThis book’s tutorials have prebuilt projects that you open and use or modify to complete lessons. So you’ll start by opening ArcGIS Pro and opening a project.
1. Browse to go.esri.com/GISTforPro2.8Data to download the tutorial data for the book, which is
hosted in the group GIS Tutorial for ArcGIS Pro 2.8 (Esri Press). Download and extract the files
to C:\.
2. Start ArcGIS Pro on your computer.
3. Sign in with your ArcGIS account user name and password.
4. Click Open Another Project, browse on your computer to C:\EsriPress\GISTforPro\Chapter1\
Tutorials, and double-click Tutorial1-1.aprx. If you don’t see the Open Another Project link, you can widen the ArcGIS Pro window. The project opens and displays a map, Health Care Clinics, which includes 14 symbolized map layers. You can turn layers on and off by selecting and clearing the check boxes next to their names. Only one layer is selected, Population Density. You’ll select more momentarily. If you do not see the Contents pane, you’ll open that pane in the next step.
5. If the Contents pane is open, click the Close button in the upper-right corner of the pane.
6. On the View tab, go to the Windows group, and click Contents to open the Contents pane. The Contents pane normally docks on the left. Optionally, you can float any pane (you will open sev-eral other panes later in this chapter) by right-clicking the top of the pane and clicking Float or by clicking and dragging the top of the pane outward. You can experiment by right-clicking the top of the pane and clicking Dock to redock the Contents pane on the left.
GISTPro2-8.indb 7GISTPro2-8.indb 7 6/21/21 2:24 PM6/21/21 2:24 PM

Part
1
Chapter
1
Tutorial
1
8 Chapter 1: Introducing ArcGIS GIS Tutorial for ArcGIS Pro 2.8
2. Click the Streets basemap to add the basemap to your map. The Population Density map covers most of the Streets basemap. Because the areas of the basemap that are visible outside of Allegheny County do not match Population Density, or otherwise add useful information, you will remove the basemap for now.
3. If necessary, scroll to the bottom of the Contents pane, right-click World Street Map, and click
Remove.
YOUR TURNThe Your Turn assignments in this book will ask you to repeat the steps just completed, but with
some modifications. These assignments will help you retain the workflows in the steps. Often,
you will need to complete the Your Turn assignments so you can use their results in the next
tutorial steps, so do not skip Your Turn assignments.
For this Your Turn assignment, add and remove several basemaps of your choice. You will
notice that some basemaps, such as the light- and dark-gray canvases, add a labeling layer at
the top of the Contents pane. When you remove the last basemap, remove the labeling layer, if
necessary.
7. On the Map tab, in the Navigate group, click the Full Extent button . Clicking the Full Extent button zooms the map to the full extent of the data. If the map was zoomed in to a small area, clicking the Full Extent button would display the entire map.
8. On the Project tab, click Save As, browse to Chapter1\Tutorials, and save as Tutorial1-1YourName
.aprx (substitute your name for YourName). You’ll generally save provided projects this way, so that if you make a major mistake, you can start again with the original project.
Add and remove a basemapA basemap is a layer that helps orient the map user to the location. Map designers place additional feature classes on top of a basemap to provide specific information for visualization, analysis, or solv-ing a problem. Although you can create your own basemap, Esri provides the basemaps that you’ll use in this book from the Esri web portal, ArcGIS Online. By default, projects created using ArcGIS Pro have the topographic basemap added to the bottom of the Contents pane. Additional basemaps are available.
1. On the Map tab, in the Layer group, click Basemap. You will see a variety of basemaps—avail-able basemaps will depend on licensing. Many of the maps you’ll build in this book will use the Light Gray Canvas basemap because you’ll reserve color for feature classes that are the subject of the map. Basemaps in the background will provide spatial context for the locations of subject features.
GISTPro2-8.indb 8GISTPro2-8.indb 8 6/21/21 2:24 PM6/21/21 2:24 PM

9
Part
1
Chapter
1
Tutorial
1
GIS Tutorial for ArcGIS Pro 2.8Chapter 1: Introducing ArcGIS
2. Click the Streets basemap to add the basemap to your map. The Population Density map covers most of the Streets basemap. Because the areas of the basemap that are visible outside of Allegheny County do not match Population Density, or otherwise add useful information, you will remove the basemap for now.
3. If necessary, scroll to the bottom of the Contents pane, right-click World Street Map, and click
Remove.
YOUR TURNThe Your Turn assignments in this book will ask you to repeat the steps just completed, but with
some modifications. These assignments will help you retain the workflows in the steps. Often,
you will need to complete the Your Turn assignments so you can use their results in the next
tutorial steps, so do not skip Your Turn assignments.
For this Your Turn assignment, add and remove several basemaps of your choice. You will
notice that some basemaps, such as the light- and dark-gray canvases, add a labeling layer at
the top of the Contents pane. When you remove the last basemap, remove the labeling layer, if
necessary.
7. On the Map tab, in the Navigate group, click the Full Extent button . Clicking the Full Extent button zooms the map to the full extent of the data. If the map was zoomed in to a small area, clicking the Full Extent button would display the entire map.
8. On the Project tab, click Save As, browse to Chapter1\Tutorials, and save as Tutorial1-1YourName
.aprx (substitute your name for YourName). You’ll generally save provided projects this way, so that if you make a major mistake, you can start again with the original project.
Add and remove a basemapA basemap is a layer that helps orient the map user to the location. Map designers place additional feature classes on top of a basemap to provide specific information for visualization, analysis, or solv-ing a problem. Although you can create your own basemap, Esri provides the basemaps that you’ll use in this book from the Esri web portal, ArcGIS Online. By default, projects created using ArcGIS Pro have the topographic basemap added to the bottom of the Contents pane. Additional basemaps are available.
1. On the Map tab, in the Layer group, click Basemap. You will see a variety of basemaps—avail-able basemaps will depend on licensing. Many of the maps you’ll build in this book will use the Light Gray Canvas basemap because you’ll reserve color for feature classes that are the subject of the map. Basemaps in the background will provide spatial context for the locations of subject features.
GISTPro2-8.indb 9GISTPro2-8.indb 9 6/21/21 2:24 PM6/21/21 2:24 PM

Part
1
Chapter
1
Tutorial
1
10 Chapter 1: Introducing ArcGIS GIS Tutorial for ArcGIS Pro 2.8
Move feature classes in the Contents pane
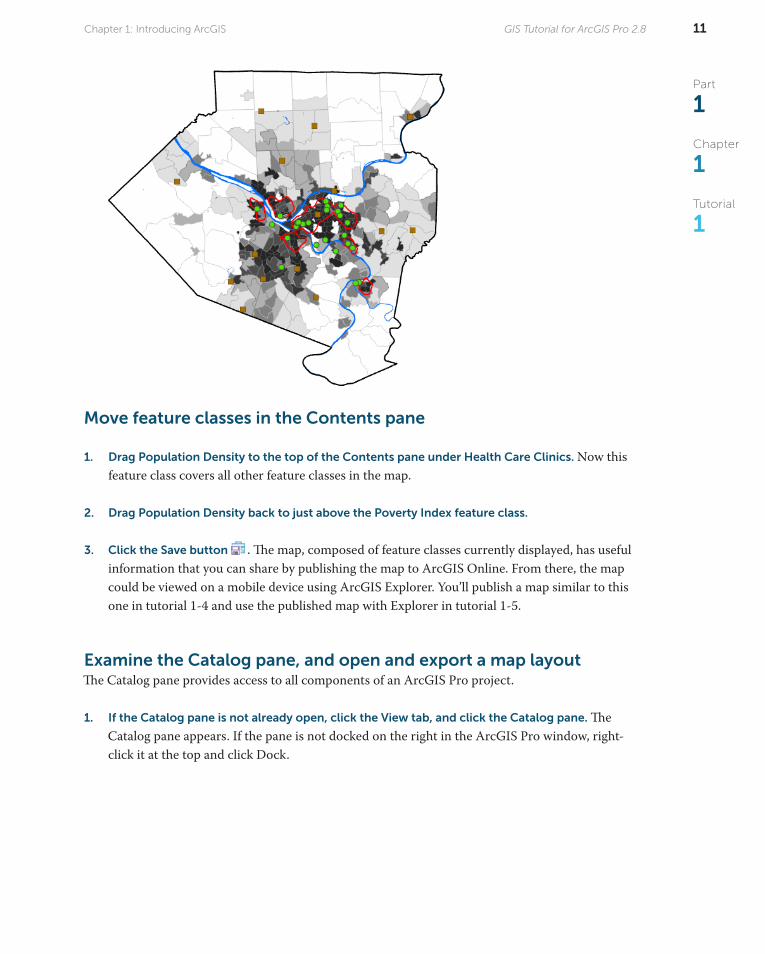
1. Drag Population Density to the top of the Contents pane under Health Care Clinics. Now this feature class covers all other feature classes in the map.
2. Drag Population Density back to just above the Poverty Index feature class.
3. Click the Save button . The map, composed of feature classes currently displayed, has useful information that you can share by publishing the map to ArcGIS Online. From there, the map could be viewed on a mobile device using ArcGIS Explorer. You’ll publish a map similar to this one in tutorial 1-4 and use the published map with Explorer in tutorial 1-5.
Examine the Catalog pane, and open and export a map layout The Catalog pane provides access to all components of an ArcGIS Pro project.
1. If the Catalog pane is not already open, click the View tab, and click the Catalog pane. The Catalog pane appears. If the pane is not docked on the right in the ArcGIS Pro window, right-click it at the top and click Dock.
Turn layers on and off The order of drawing by ArcGIS Pro is from the bottom up in the Contents pane. So feature classes that cover areas, such as Population Density, must go on the bottom, and other feature classes that could be covered up, such as FQHC Clinic points, must go higher up and on top of other feature classes.
1. In the Contents pane, scroll down to see the legend for Population Density. The check mark on the left of Population Density indicates that the feature class is turned on. This feature class rep-resents persons per square mile in 2010 by census tracts in numeric classes, with uniform widths of 1,000 people per square mile. Census tracts are statistical areas intended to represent neigh-borhoods with about 4,000 people, although population tracts can vary widely in population.
2. Continuing in the Contents pane, select the small boxes on the left of MedExpress Clinics,
FQHC Clinics, and Poverty Risk Area. The three feature classes you just turned on are the subject of this map and show the locations of urgent health care clinics relative to poor areas. Right away, you can see that the subsidized FQHCs are concentrated in high-population density (urban) and poverty risk areas, whereas the private-sector MedExpress clinics are mostly spread out in low-population density areas (suburbs). Areas inside the Poverty Risk Area polygons have high proportions of poor populations.
3. Turn on feature classes that provide the spatial context of where subject features are located:
Allegheny County, Pittsburgh, Rivers and Water Features, and Streets. Streets, an important spatial context feature class, will not display until the map is zoomed in to a small area (you’ll learn about zooming later in this chapter). There are too many detailed streets for viewing at full extent. Next, to make the point that ArcGIS Pro draws from the bottom up in the Contents pane, you’ll temporarily drag Population Density up the pane to cover other feature classes.
GISTPro2-8.indb 10GISTPro2-8.indb 10 6/21/21 2:24 PM6/21/21 2:24 PM
11
Part
1
Chapter
1
Tutorial
1
GIS Tutorial for ArcGIS Pro 2.8Chapter 1: Introducing ArcGIS
Move feature classes in the Contents pane
1. Drag Population Density to the top of the Contents pane under Health Care Clinics. Now this feature class covers all other feature classes in the map.
2. Drag Population Density back to just above the Poverty Index feature class.
3. Click the Save button . The map, composed of feature classes currently displayed, has useful information that you can share by publishing the map to ArcGIS Online. From there, the map could be viewed on a mobile device using ArcGIS Explorer. You’ll publish a map similar to this one in tutorial 1-4 and use the published map with Explorer in tutorial 1-5.
Examine the Catalog pane, and open and export a map layout The Catalog pane provides access to all components of an ArcGIS Pro project.
1. If the Catalog pane is not already open, click the View tab, and click the Catalog pane. The Catalog pane appears. If the pane is not docked on the right in the ArcGIS Pro window, right-click it at the top and click Dock.
Turn layers on and off The order of drawing by ArcGIS Pro is from the bottom up in the Contents pane. So feature classes that cover areas, such as Population Density, must go on the bottom, and other feature classes that could be covered up, such as FQHC Clinic points, must go higher up and on top of other feature classes.
1. In the Contents pane, scroll down to see the legend for Population Density. The check mark on the left of Population Density indicates that the feature class is turned on. This feature class rep-resents persons per square mile in 2010 by census tracts in numeric classes, with uniform widths of 1,000 people per square mile. Census tracts are statistical areas intended to represent neigh-borhoods with about 4,000 people, although population tracts can vary widely in population.
2. Continuing in the Contents pane, select the small boxes on the left of MedExpress Clinics,
FQHC Clinics, and Poverty Risk Area. The three feature classes you just turned on are the subject of this map and show the locations of urgent health care clinics relative to poor areas. Right away, you can see that the subsidized FQHCs are concentrated in high-population density (urban) and poverty risk areas, whereas the private-sector MedExpress clinics are mostly spread out in low-population density areas (suburbs). Areas inside the Poverty Risk Area polygons have high proportions of poor populations.
3. Turn on feature classes that provide the spatial context of where subject features are located:
Allegheny County, Pittsburgh, Rivers and Water Features, and Streets. Streets, an important spatial context feature class, will not display until the map is zoomed in to a small area (you’ll learn about zooming later in this chapter). There are too many detailed streets for viewing at full extent. Next, to make the point that ArcGIS Pro draws from the bottom up in the Contents pane, you’ll temporarily drag Population Density up the pane to cover other feature classes.
GISTPro2-8.indb 11GISTPro2-8.indb 11 6/21/21 2:24 PM6/21/21 2:24 PM
Part
1
Chapter
1
Tutorial
1
12 Chapter 1: Introducing ArcGIS GIS Tutorial for ArcGIS Pro 2.8
4. At the upper right of the Catalog pane, click the Auto Hide button to temporarily hide the
pane. You can restore and hide the Catalog pane as needed by clicking the Catalog button.
5. On the Layout tab, in the Navigate group, click the Full Extent button . Next, you’ll export the map as an image file.
6. On the Share tab, in the Output group, click Export Layout, and change File Type to JPEG.
7. Change the file name to HealthClinics and save to Chapter1\Tutorials. Set 300 DPI (dots per
inch) for Resolution, and click Export. Open the output image file in a photo viewer (double-click HealthClinics.jpg). At 300 DPI, this is a high-quality image that you could print or insert into a Microsoft Word document or Microsoft PowerPoint presentation. For use in a website or mobile device, the recommended resolution is much lower (72 DPI) to keep file sizes small and loading times fast.
8. Close the Export Layout pane and close the FQHC and MedExpress Clinics tab to close the lay-
out, and click the Save button to save your project.
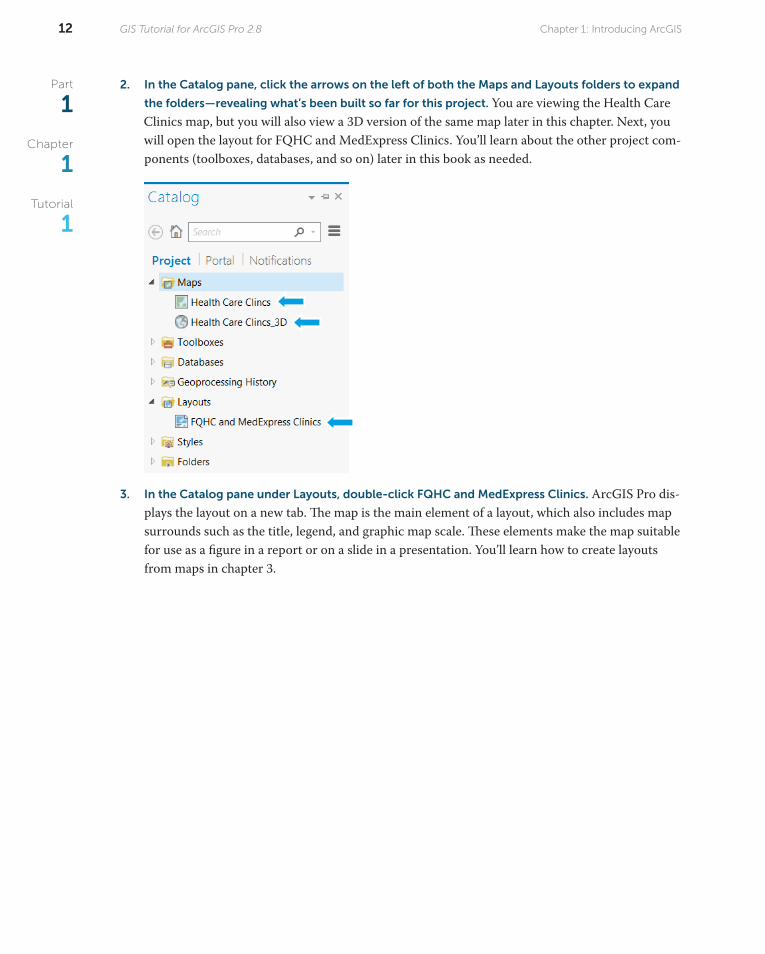
2. In the Catalog pane, click the arrows on the left of both the Maps and Layouts folders to expand
the folders—revealing what’s been built so far for this project. You are viewing the Health Care Clinics map, but you will also view a 3D version of the same map later in this chapter. Next, you will open the layout for FQHC and MedExpress Clinics. You’ll learn about the other project com-ponents (toolboxes, databases, and so on) later in this book as needed.
3. In the Catalog pane under Layouts, double-click FQHC and MedExpress Clinics. ArcGIS Pro dis-plays the layout on a new tab. The map is the main element of a layout, which also includes map surrounds such as the title, legend, and graphic map scale. These elements make the map suitable for use as a figure in a report or on a slide in a presentation. You’ll learn how to create layouts from maps in chapter 3.
GISTPro2-8.indb 12GISTPro2-8.indb 12 6/21/21 2:24 PM6/21/21 2:24 PM

13
Part
1
Chapter
1
Tutorial
1
GIS Tutorial for ArcGIS Pro 2.8Chapter 1: Introducing ArcGIS
4. At the upper right of the Catalog pane, click the Auto Hide button to temporarily hide the
pane. You can restore and hide the Catalog pane as needed by clicking the Catalog button.
5. On the Layout tab, in the Navigate group, click the Full Extent button . Next, you’ll export the map as an image file.
6. On the Share tab, in the Output group, click Export Layout, and change File Type to JPEG.
7. Change the file name to HealthClinics and save to Chapter1\Tutorials. Set 300 DPI (dots per
inch) for Resolution, and click Export. Open the output image file in a photo viewer (double-click HealthClinics.jpg). At 300 DPI, this is a high-quality image that you could print or insert into a Microsoft Word document or Microsoft PowerPoint presentation. For use in a website or mobile device, the recommended resolution is much lower (72 DPI) to keep file sizes small and loading times fast.
8. Close the Export Layout pane and close the FQHC and MedExpress Clinics tab to close the lay-
out, and click the Save button to save your project.
2. In the Catalog pane, click the arrows on the left of both the Maps and Layouts folders to expand
the folders—revealing what’s been built so far for this project. You are viewing the Health Care Clinics map, but you will also view a 3D version of the same map later in this chapter. Next, you will open the layout for FQHC and MedExpress Clinics. You’ll learn about the other project com-ponents (toolboxes, databases, and so on) later in this book as needed.
3. In the Catalog pane under Layouts, double-click FQHC and MedExpress Clinics. ArcGIS Pro dis-plays the layout on a new tab. The map is the main element of a layout, which also includes map surrounds such as the title, legend, and graphic map scale. These elements make the map suitable for use as a figure in a report or on a slide in a presentation. You’ll learn how to create layouts from maps in chapter 3.
GISTPro2-8.indb 13GISTPro2-8.indb 13 6/21/21 2:24 PM6/21/21 2:24 PM

Part
1
Chapter
1
Tutorial
1
14 Chapter 1: Introducing ArcGIS GIS Tutorial for ArcGIS Pro 2.8
Tutorial 1-2: Navigate ArcGIS ProMap reading in GIS depends on varying location and scale (where and how far you are zoomed in) and using the attribute data of spatial features. You can zoom in to any part of a map, drag (pan) the map to a different location, and zoom back out. You can set some feature classes to display only when they are zoomed in to a certain scale and beyond, such as streets, and you can clear the display for other feature classes. You can go to preset locations and scales using spatial bookmarks. You can read the attribute data of any feature by clicking the feature to get a pop-up window. Last, you can search for features by using attribute values such as the name of a street.
Open the Tutorial 1-2 project
1. Click the Project tab.
2. Click Open and browse to Chapter1\Tutorials.
3. Open Tutorial1-2.aprx, and save the tutorial as Tutorial1-2YourName.aprx in Chapter1\Tutorials.
4. Click Full Extent to zoom in on the map.
Use a pop-up window
1. Click the Map tab on the ribbon, and click the Explore button .
2. On the map, click the MedExpress Clinic farthest to the left (west) to see a pop-up window with
attribute data for that feature. Click the pop-up’s website hyperlink, and when you finish, close
your browser.
3. Drag the pop-up away from your map.
4. Point to each of the buttons on the lower right of the pop-up window to read what they do,
and click the Zoom To This Feature button several times. The map centers and zooms in on the
YOUR TURNTurn on the FQHC Buffer and MedExpress Buffer feature classes. The buffers are one-mile radius
circles constructed with health care clinics at their centers. The rationale for choosing a one-mile
buffer radius is that this radius is commonly used to determine accessibility to grocery stores in
urban areas. You can assume that what works for grocery store accessibility also works for health
care facilities. Notice that the buffers are partly transparent so that you can see the population
density below them. Next, open the layout. ArcGIS Pro automatically adds the newly displayed
feature classes to the layout’s map and legend. As stated earlier, the FQHCs appear well located
within poverty and densely populated areas, whereas the MedExpress facilities are mostly scat-
tered in suburbs surrounding Pittsburgh. Why do you think these patterns exist? When finished,
close the layout and save your project.
GISTPro2-8.indb 14GISTPro2-8.indb 14 6/21/21 2:24 PM6/21/21 2:24 PM