girls who code at home
TRANSCRIPT
Girls Who Code At HomeStand Up for Mother Nature
2
Activity Overview
Materials➔ Paper➔ Pencils, Pens, or Markers➔ Online Scratch or Offline Scratch➔ Sample PSA Code ➔ Sample PSA Code Extended Project ➔ Stand Up for Mother Nature Reference
Guide
Learning GoalsBy the end of this activity you will be able to...
❏ describe an issue that is having a negative impact on the environment.
❏ create a Public Service Announcement to inform others about the environmental issue and possible solutions.
❏ create a Scratch program that includes backdrops, text, events, and sound.
Around the world we take time on April 22 to celebrate Earth Day and reflect on the beauty and wonder of our planet! This year, after consulting with over 190 countries, the Earth Day Network has declared that the theme for Earth Day 2021 is “Restore Our Earth”. With this focus, scientists, businesses and governments are looking towards future technologies that can restore our ecosystems, wildlife populations, and oceans around the globe.
Prior Knowledge➔ No prior knowledge necessary!
In this activity, we will stand up for mother nature by creating a Public Service Announcement, or PSA, to teach others about an environmental issue and provide potential solutions as part of the #RestoreOurEarth campaign. In this activity, you will learn how to plan and program a PSA for your selected audience with Scratch. You will consider what makes a PSA impactful and choose an environmental issue that’s important to you. Before you draft your story and start writing the code we recommend checking out the featured Woman in Tech Spotlight, Mónica Abarca, whose career focuses on green technology and air quality.

3
Women in Tech Spotlight: Mónica Abarca
ReflectBeing a computer scientist is more than just being great at coding. Take some time to reflect on how Mónica and her work relates to the strengths that great computer scientists focus on building - bravery, resilience, creativity, and purpose.
Share your responses with a family member or friend. Encourage others to read more about Mónica to join in the discussion!
Have you ever wondered about the quality of the air you’re breathing? Entrepreneur and mechatronics engineer Mónica Abarca did and she was struck that the information wasn’t readily available to her. What started as her graduation project transformed into her first start up, a Peruvian based company called qAIRa. As founder and CEO of qAIRa, Mónica works to raise public awareness on the impacts of air pollution on human health as well as share data about the quality of air in communities.
With a passion for robotics, Mónica developed drone technologies to monitor air quality using a number of sensors such as ones for
BRAVERY
As an entrepreneur, you don’t always know how your project will go. When Mónica decided to begin her first start up she didn’t have funding, a team, or any assurance that things were going to work out. How do entrepreneurs show bravery in their work?
Image Source: Executives Technology
CO2 and particulate matter. The drones then take the data collected to create air pollution maps that educate others. Knowing that more than 4.2 million deaths are caused by air pollution every year (according to the World Health Organization), Mónica and her team are driven to propel their green technology forward and be, as they like to call themselves, the guardians of the air.
Want to learn more about Mónica and her work?● Watch this video to see Mónica’s drone in action! ● Read this UNICEF article on qAIRa and how they are monitoring air quality from illegal mining areas
in Peru. ● Read this article spotlighting Mónica in WIPO’s Women in Green series.

4
Step 1: What is a PSA? (5 mins)➔ You may not have heard of the acronym PSA before, but there’s a good chance you’ve
already seen one on your television or overheard a PSA on the radio! A PSA, or Public Service Announcement, is a message for the public that aims to raise awareness or change behavior towards a particular cause.
PSAs are distributed without charge and can be as short as 10 seconds or as long as a couple minutes. Writers generally choose words and images that they believe will make an emotional impact on the viewer in the hopes that they will connect to the cause. Common PSA topics include wearing a seat belt, anti-smoking or vaping, and protecting endangered species.
Review PSA Exemplars (4 min)In order to help you visualize what a PSA looks like, watch the examples below. While watching, consider the following questions:➔ What do you notice about the video? ➔ How does it make you feel?➔ Do you think this message is impactful? Why or why not?
PSA Exemplar Your Thoughts
Teenage Stress
No Kid Hungry
Water Consumption

5
Step 2: Choosing your Topic & Audience (10 mins)
Tip: Keep our Earth Day 2021 theme in mind while deciding. What topics will align to the #RestoreOurEarth
movement?
Now it’s time for you to join in on the #RestoreOurEarth movement! You’ll start by selecting both a topic and a target audience. Take 5-10 minutes to begin planning your PSA and answer the guiding questions in the spaces below.
PSA writers thoughtfully choose the words, facts, images, and sometimes music that will best meet their audience. Their goal is to connect with the listener on a deeper level and inspire them to take action toward their cause.
Guiding Question Your Plans
What environmental issue is important to you? Brainstorm a list and choose one! Maybe there is an issue that directly affects your neighborhood or maybe you’ve heard of an environmental problem that others are experiencing elsewhere.
What is the main problem?
How is the problem negatively affecting planet Earth?
Who is your audience? Who are you trying to make an impression on? This might be fellow classmates, the general public, or family members in different states. It’s important to know your audience as you’ll want to tailor the delivery of your message to what will speak to them.

6
If you are having trouble coming up with ideas, explore the list of environmental issues below.
➔ Climate Change/Global Warming ➔ Air Pollution ➔ Water Pollution ➔ Carbon Footprints ➔ Endangered Species ➔ Reusable vs. Non-Reusable Energy ➔ Sustainability ➔ Fracking
Step 2: Choosing your Topic & Audience (cont.)
Step 3: Research Your Cause (15 mins)Now that you have your topic and audience you’re almost ready to create your PSA! Before you get planning, it’s important to research your topic and consult reliable resources. Your PSA will have four main criteria:
Use the planning template on the next page to research and record the information you’ll need for your PSA. Don’t forget to keep track of your sources! We’ll make sure to give them credit at the end of your project.
Check your ideas with the example in the Reference Guide on pg 2.
❏ Shares an environmental issue related to the #RestoreOurEarth movement.
❏ Includes at least two persuasive facts or statistics to support your message.
❏ Incorporates mood invoking music.❏ Concludes with a call to action or next step for the viewer to
consider.
Tip: Print out the following page so that you can easily reference this
later!

7
Step 3: Research your Cause (cont.)
Use the planning template below to research and record the information you’ll need for your PSA. Don’t forget to keep track of your sources! We’ll make sure to give them credit at the end of your project.
Check your ideas with the example in the Reference Guide on pg 3-4.
Criteria Your Response Source(s)
Environmental Issue
Persuasive Fact #1
Persuasive Fact #2
Additional Persuasive Facts (optional)
Mood Evoking Music We’ll pick the actual music when we start coding in Scratch, but for now, describe the kind of music you’re looking for.
Call to Action

8
Step 4: Draft your PSA by Creating a Storyboard (15 mins)
For this activity, we recommend you take 10-15 minutes to sketch or write out the major scenes of your PSA using a storyboard. As you plan your PSA, you can use our storyboard and planning template on the following page while you think about these questions.
➔ How will your PSA start and share the problem? ➔ When will your PSA provide your persuasive facts about the issue?➔ How will the PSA end and share the call to action?
Before you start writing any code, it's a good idea to take some time to sketch out what you want to create. A storyboard is a graphic organizer that is used to plan out the visuals of a narrative or storyline, such as a PSA. Most PSAs begin as a paper storyboard.
The number of scenes for your PSA is up to you! Just make sure to have enough to properly share your message. For each scene that you sketch out below, consider:
➔ What is the visual or image that I want displayed in this scene? What scenery or backdrop will I want for this part? Where does it take place?
➔ What text will accompany it? ➔ Are there any other special effects I want in this scene? (e.g. - music,
sprites, voice over, etc.)

9
Step 4: Draft your PSA by Creating a Storyboard ( (cont.)
Text: _______________________________________
____________________________________________
____________________________________________
Special Effects: ____________________________
Text: _______________________________________
____________________________________________
____________________________________________
Special Effects: ____________________________
Text: _______________________________________
____________________________________________
____________________________________________
Special Effects: ____________________________
Text: _______________________________________
____________________________________________
____________________________________________
Special Effects: ____________________________

10
Step 4: Draft your PSA by Creating a Storyboard ( (cont.)
Check your ideas with the example in the Reference Guide on pg 5-6.
Text: _______________________________________
____________________________________________
____________________________________________
Special Effects: ____________________________
Text: _______________________________________
____________________________________________
____________________________________________
Special Effects: ____________________________
Text: _______________________________________
____________________________________________
____________________________________________
Special Effects: ____________________________
Text: _______________________________________
____________________________________________
____________________________________________
Special Effects: ____________________________

11
Step 5: Create a New Scratch Project and Navigate the Interface (10 mins)
1. Sign up or login into Scratch.In order to save your work on Scratch’s online platform you’ll need to create an account if you don’t already have one. Follow the instructions on the sign up form to create an account. If you are under 13, you’ll need your parent’s email address to sign up. If you don’t want to create an account you can also download and use the offline version of Scratch 3.0.
2. Create a New Project.From the home page click Create to create a new project!
Give your PSA a specific name.
3. Explore the Scratch interface. If you are new to Scratch take a few minutes to explore the Scratch interface. You can also watch this Getting Started tutorial from Scratch!
Scratch is a free programming platform and block-based programming language developed by MIT that allows you to program interactive stories, games, animations.

12
Step 6: Call to Action! Program Your PSA (15-40 mins)
Add any sprites or backdrops you may want from the library by clicking on the sprite or backdrop icons in the bottom right hand corner of the editor. If you found images online that you want to use in your project, you can hover over the sprite or backdrop icons and select 'Upload Sprite' or 'Upload Backdrop'.
2. Choose an event block for your first scene. Scratch is an event-based programming language, which means that the code is run or triggered by different events. For example the When __ key is pressed or when mouse moved blocks can trigger scripts to run whenever that event takes place. In Scratch, event blocks are found in the Events menu. In many projects the event When Green Flag Clicked is used to start most programs.
1. Add backdrops and/or sprites. For your PSA you will need to decide on the background for each scene and add any sprites that you need for your project. Luckily you’ve already started to think this through in your storyboard. Make sure to have your storyboard next to you as you are programming in Scratch. PSAs don’t always have a narrator, so you can decide if you want to add any sprites or not. In our example project, we decided to use both sprites and backdrops for our PSA.

13
Step 6: Call to Action! Program Your PSA (cont.)
Let’s try this in your project!● Select your first background or main sprite and add the starting event block to your scripts
area to tell the code when to run. ● In your next step, you will attach more code to the bottom of this block. In Scratch, all
blocks must be connected to an event block so that the computer knows when to run the code. If you eventually have code on multiple sprites or backdrops then you will need to add an event block to each one.
● See the two examples of event blocks we used on our sprite and background in the sample project below. Notice that you can use the same event block more than once.
3. Add text to the backdrop or sprites in your first scene. Look back at your planning notes and focus on just your first scene. See what text (if any) you planned for this scene only and add it to your project in one of two ways:
a. Add text directly to the backdrop by clicking on the Backdrops tab, selecting the backdrop you want to edit, and choosing the text button.

14
Step 6: Call to Action! Program Your PSA (cont.)
b. Alternatively, if you chose to add sprites to your PSA, you can use the say or think blocks from the Looks menu to add the text to your code. Select your sprite and add the block. Edit the text box to share your message for that scene.
Using your storyboard to guide you, write the rest of the code for the first scene of your PSA. You might use a combination of blocks from the Looks and or Motion menus including the Say __ for 2 secs or the Switch backdrop to __ blocks to have your backgrounds and/or sprites share their part of the PSA. Remember that you can add your code directly to the background or to the sprite. Always double check which one is selected when you’re adding blocks to the Code Area.
4. Test your first scene. Now that you have the first part of your PSA built, test it out by clicking the green flag or setting off whatever event you used to start your project. While you test your project, ask yourself these questions:
● Does it work as you expected?● Do all the actions happen in the right order?
If not, make adjustments and debug your code before moving on. Some common reasons your project may not be working as expected could include:
● The order of your code blocks, or sequence of your code is not correct.● You are missing events that start your scripts or code, or the events used don’t
happen in the right order.● The timing of your code may be off, think about if this is because of the events used,
the type of say block used, or if you need to add wait blocks to adjust the time.

15
Step 6: Call to Action! Program Your PSA (cont.)
5. Add additional scenes.Once you have the first scene of your PSA working, continue to use your storyboard to build out your program and tell the rest of your #RestoreOurEarth message. Think about using new backdrops or adding additional sprites to enhance your story. You can use the Switch backdrop to __ block from the Looks menu to change the backdrop that is displayed or move onto the next scene. Be sure to test your project as you add new scenes!
6. Add sounds to your sprites or backdrops.PSAs often have emotion evoking background music or sound effects. Explore options in the Sounds menu to add music or sound effects to your project. Scratch already has sounds available for you to use in their sound library or you can record or upload your own sounds! You can also test out the Record a Sound tutorial on Scratch.
You’ll notice that the sounds in the library don’t play for very long. In order to have the song play for your entire PSA you’ll need to use a repeat block from the Control menu. Repeat blocks tell the program to run the code inside of it for a certain number of times. In this example below from our sample project, the repeat block is playing the Emotional Piano sound 10 times and then it will stop. This will cover the length of the entire PSA. Notice how there is another event block, When Green Flag Clicked, at the start of the code to tell the music when to begin.

16
Step 6: Call to Action! Program Your PSA (cont.)
Let’s try this in your project!● Choose a sound from the Sounds menu or record your own. ● Remember to select either your backdrop or a sprite to add the code play sound __
until done block to. Click the down arrow in the text box to change the text to your sound if you do not automatically see it.
● Place your sound block inside a repeat block and tell it how many times to play. ● Add an event block and test your code. Make adjustments if it doesn’t play as long as
you’d like it to!
7. Close out your PSA.All PSAs must come to an end, so don’t forget to add an ending with a call to action for yours! Refer back to your planning notes to include the action steps you suggest your audience takes to make an impact. Additionally, this might be a good time to double check the rubric we shared earlier to make sure you’re not forgetting anything.
❏ Shares an environmental issue related
to the #RestoreOurEarth movement.
❏ Includes at least two persuasive facts
or statistics to support your message.
❏ Incorporates mood invoking music.
❏ Concludes with a call to action or next
step for the viewer to consider.
#RestoreOurEarth PSA Checklist
17
Step 6: Call to Action! Program Your PSA (cont.)
8. Test your PSA from start to finish. If at first you don’t succeed, try again! Run your program as many times as you need to check that your code on all the scenes and/or sprites in your PSA are working as planned. Remember that the order of your code blocks are very important. If something is happening too soon or too late, check the sequence of your blocks. It can be helpful to talk through your code with a friend or watch the code blocks as your program is running. Your blocks will light up in the code area when they are being executed. Persistence is a computer scientist's best friend, so don’t give up and keep on tweaking your code to make your PSA just the way you envisioned it!
If you are having trouble getting started, try remixing the sample code project linked below and edit the blocks, background, and text for your particular PSA topic.
➔ #RestoreOurEarth PSA Sample Code
Don’t forget to check your code with the Reference Guide on pg 7.
Step 7: Extensions (Optional 5-30 min)
There are so many ways you can take your PSA to the next level! We recommend you explore the resources under the Ideas tab on Scratch. Here are a few more ideas to get you started:
● Lengthen your PSA.Think about what additional facts or persuasive statistics you could add to your PSA. Try adding additional background images from the web that reinforce your message along with your new facts. Don’t forget to give credit to the source!
18
Step 7: Extensions (cont.)
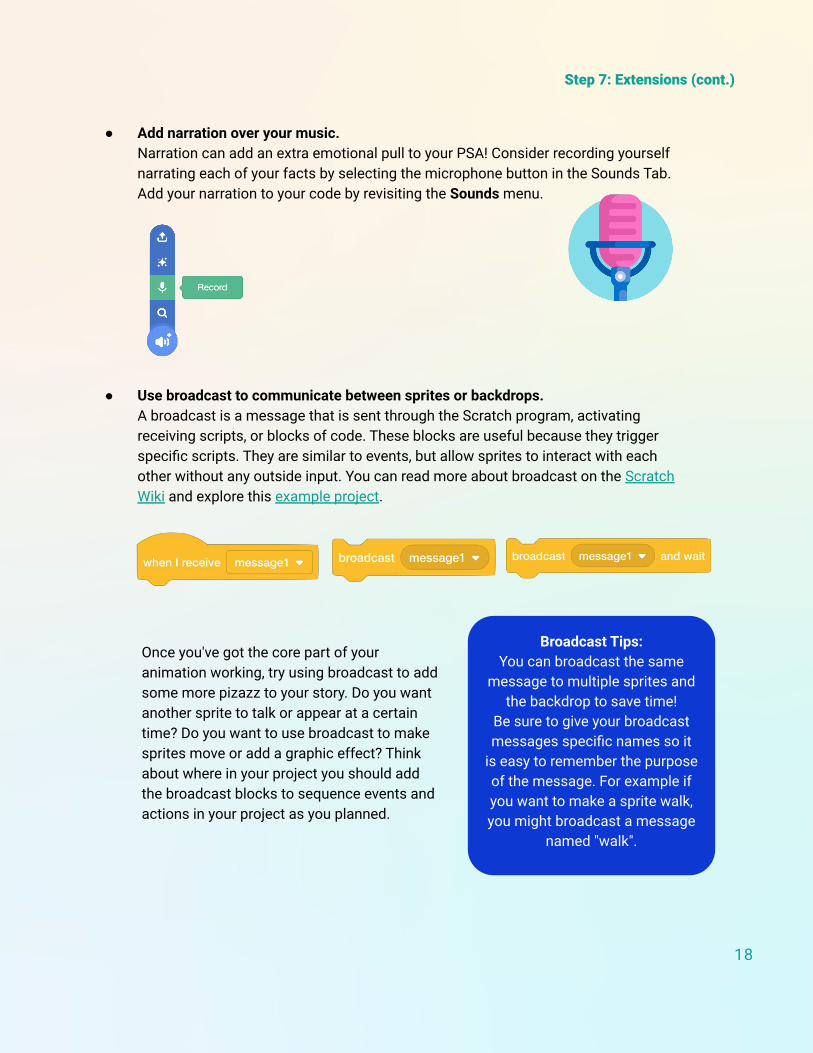
● Add narration over your music. Narration can add an extra emotional pull to your PSA! Consider recording yourself narrating each of your facts by selecting the microphone button in the Sounds Tab. Add your narration to your code by revisiting the Sounds menu.
● Use broadcast to communicate between sprites or backdrops. A broadcast is a message that is sent through the Scratch program, activating receiving scripts, or blocks of code. These blocks are useful because they trigger specific scripts. They are similar to events, but allow sprites to interact with each other without any outside input. You can read more about broadcast on the Scratch Wiki and explore this example project.
Broadcast Tips:You can broadcast the same
message to multiple sprites and the backdrop to save time!
Be sure to give your broadcast messages specific names so it
is easy to remember the purpose of the message. For example if you want to make a sprite walk, you might broadcast a message
named "walk".
Once you've got the core part of your animation working, try using broadcast to add some more pizazz to your story. Do you want another sprite to talk or appear at a certain time? Do you want to use broadcast to make sprites move or add a graphic effect? Think about where in your project you should add the broadcast blocks to sequence events and actions in your project as you planned.

19
Step 7: Extensions (cont.)
● Add movement to the sprites in your story.
Try repeating that sequence until you find something you like. You can also try out the Animate A Character tutorial in Scratch to learn how to animate your sprites.
● Add graphic effects to your sprites or backdrop.Under the Looks menu you can find many different graphical effects blocks. Try experimenting with blocks like change size by_ or change color effect by _ to see what happens. We recommend checking out the Add Effects and Make It Spin tutorials on Scratch.
Take a look at the extended project sample code below to see these extension features in action!
#RestoreOurEarth PSA Extended Project
Consider having your sprites move around the stage to add interest. Try using the move __ steps block or glide _ secs to x:_ y:_ block from the Motion menu to have your sprites move. If you used a sprite from the Scratch library you can see if it has multiple costumes available to use. You can create the appearance of walking by combining move blocks with the next costume or switch costume to _ blocks.
20
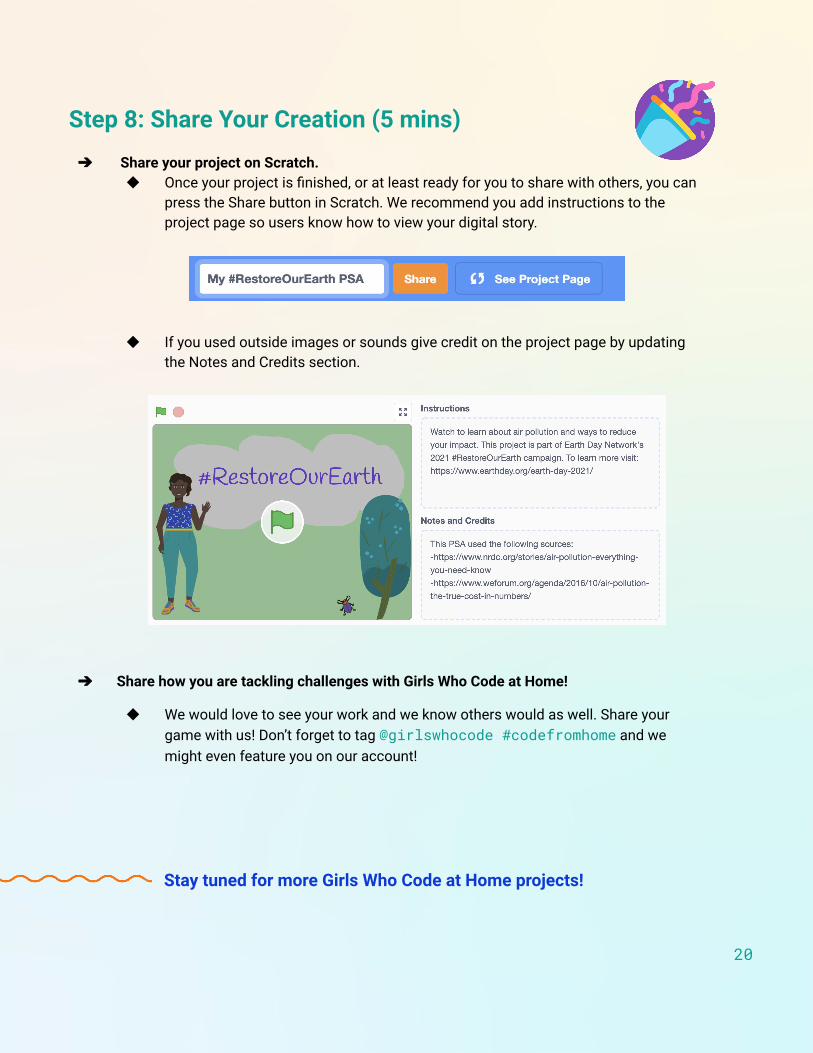
Step 8: Share Your Creation (5 mins)
➔ Share your project on Scratch.◆ Once your project is finished, or at least ready for you to share with others, you can
press the Share button in Scratch. We recommend you add instructions to the project page so users know how to view your digital story.
◆ If you used outside images or sounds give credit on the project page by updating the Notes and Credits section.
➔ Share how you are tackling challenges with Girls Who Code at Home!
◆ We would love to see your work and we know others would as well. Share your game with us! Don’t forget to tag @girlswhocode #codefromhome and we might even feature you on our account!
Stay tuned for more Girls Who Code at Home projects!