gigabit pci network card user manual€¦at startup, these windows operating systems automatically...
TRANSCRIPT

GIGABIT PCINETWORKCARD USERMANUAL MODEL 522328
INT-522328-UM-ML1-0609-06
ENGLISH DEUTSCH ESPAÑOL FRANÇAISPOLSKIITALIANO
2 ENGLISH
Gigabit PCI Network Card • User Manual EnglishThank you for purchasing the INTELLINET NETWORK SOLUTIONS™ Gigabit PCI Network Card, Model 522328. For specifications, go to www.intellinet-network.com.
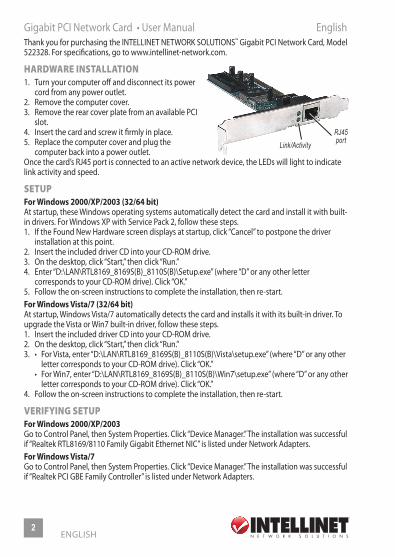
HARDWARE INSTALLATION 1. Turn your computer off and disconnect its power cord from any power outlet. 2. Remove the computer cover. 3. Remove the rear cover plate from an available PCI slot. 4. Insert the card and screw it firmly in place. 5. Replace the computer cover and plug the computer back into a power outlet.Once the card’s RJ45 port is connected to an active network device, the LEDs will light to indicate link activity and speed.
SETUP For Windows 2000/XP/2003 (32/64 bit) At startup, these Windows operating systems automatically detect the card and install it with built-in drivers. For Windows XP with Service Pack 2, follow these steps. 1. If the Found New Hardware screen displays at startup, click “Cancel” to postpone the driver installation at this point. 2. Insert the included driver CD into your CD-ROM drive. 3. On the desktop, click “Start,” then click “Run.” 4. Enter “D:\LAN\RTL8169_8169S(B)_8110S(B)\Setup.exe” (where “D” or any other letter corresponds to your CD-ROM drive). Click “OK.” 5. Follow the on-screen instructions to complete the installation, then re-start. For Windows Vista/7 (32/64 bit) At startup, Windows Vista/7 automatically detects the card and installs it with its built-in driver. To upgrade the Vista or Win7 built-in driver, follow these steps. 1. Insert the included driver CD into your CD-ROM drive. 2. On the desktop, click “Start,” then click “Run.” 3. • For Vista, enter “D:\LAN\RTL8169_8169S(B)_8110S(B)\Vista\setup.exe” (where “D” or any other letter corresponds to your CD-ROM drive). Click “OK.” • For Win7, enter “D:\LAN\RTL8169_8169S(B)_8110S(B)\Win7\setup.exe” (where “D” or any other letter corresponds to your CD-ROM drive). Click “OK.”4. Follow the on-screen instructions to complete the installation, then re-start.
VERIFYING SETUP For Windows 2000/XP/2003 Go to Control Panel, then System Properties. Click “Device Manager.” The installation was successful if “Realtek RTL8169/8110 Family Gigabit Ethernet NIC” is listed under Network Adapters. For Windows Vista/7 Go to Control Panel, then System Properties. Click “Device Manager.” The installation was successful if “Realtek PCI GBE Family Controller” is listed under Network Adapters.
RJ45 portLink/Activity
DEUTSCH 3
Gigabit PCI Netzwerkkarte • Handbuch DeutschVielen Dank für den Kauf des INTELLINET NETWORK SOLUTIONS™ Gigabit PCI Netzwerkkarte, Modell 522533. Die Spezifikationen finden Sie auf www.intellinet-network.com.
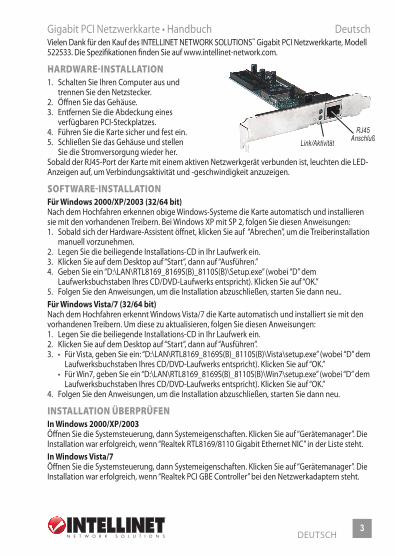
HARDWARE-INSTALLATION 1. Schalten Sie Ihren Computer aus und trennen Sie den Netzstecker. 2. Öffnen Sie das Gehäuse. 3. Entfernen Sie die Abdeckung eines verfügbaren PCI-Steckplatzes. 4. Führen Sie die Karte sicher und fest ein. 5. Schließen Sie das Gehäuse und stellen Sie die Stromversorgung wieder her.Sobald der RJ45-Port der Karte mit einem aktiven Netzwerkgerät verbunden ist, leuchten die LED-Anzeigen auf, um Verbindungsaktivität und -geschwindigkeit anzuzeigen.
SOFTWARE-INSTALLATION Für Windows 2000/XP/2003 (32/64 bit) Nach dem Hochfahren erkennen obige Windows-Systeme die Karte automatisch und installieren sie mit den vorhandenen Treibern. Bei Windows XP mit SP 2, folgen Sie diesen Anweisungen: 1. Sobald sich der Hardware-Assistent öffnet, klicken Sie auf “Abrechen”, um die Treiberinstallation manuell vorzunehmen. 2. Legen Sie die beiliegende Installations-CD in Ihr Laufwerk ein. 3. Klicken Sie auf dem Desktop auf “Start”, dann auf “Ausführen.” 4. Geben Sie ein “D:\LAN\RTL8169_8169S(B)_8110S(B)\Setup.exe” (wobei “D” dem Laufwerksbuchstaben Ihres CD/DVD-Laufwerks entspricht). Klicken Sie auf “OK.” 5. Folgen Sie den Anweisungen, um die Installation abzuschließen, starten Sie dann neu.. Für Windows Vista/7 (32/64 bit) Nach dem Hochfahren erkennt Windows Vista/7 die Karte automatisch und installiert sie mit den vorhandenen Treibern. Um diese zu aktualisieren, folgen Sie diesen Anweisungen: 1. Legen Sie die beiliegende Installations-CD in Ihr Laufwerk ein. 2. Klicken Sie auf dem Desktop auf “Start”, dann auf “Ausführen”. 3. • Für Vista, geben Sie ein: “D:\LAN\RTL8169_8169S(B)_8110S(B)\Vista\setup.exe” (wobei “D” dem Laufwerksbuchstaben Ihres CD/DVD-Laufwerks entspricht). Klicken Sie auf “OK.” • Für Win7, geben Sie ein “D:\LAN\RTL8169_8169S(B)_8110S(B)\Win7\setup.exe” (wobei “D” dem Laufwerksbuchstaben Ihres CD/DVD-Laufwerks entspricht). Klicken Sie auf “OK.”4. Folgen Sie den Anweisungen, um die Installation abzuschließen, starten Sie dann neu.
INSTALLATION ÜBERPRÜFEN In Windows 2000/XP/2003 Öffnen Sie die Systemsteuerung, dann Systemeigenschaften. Klicken Sie auf “Gerätemanager”. Die Installation war erfolgreich, wenn “Realtek RTL8169/8110 Gigabit Ethernet NIC” in der Liste steht. In Windows Vista/7 Öffnen Sie die Systemsteuerung, dann Systemeigenschaften. Klicken Sie auf “Gerätemanager”. Die Installation war erfolgreich, wenn “Realtek PCI GBE Controller” bei den Netzwerkadaptern steht.
RJ45 AnschlußLink/Aktivität

4ESPAÑOL
Tarjeta de Red Gigabit PCI • Manual del usuario EspañolGracias por comprar el Tarjeta de Red Gigabit PCI de INTELLINET NETWORK SOLUTIONS™, modelo 522328. Para más especificaciones, visite www.intellinet-network.com.
INSTALACION TARJETA 1. Apague el ordenador, desconecte la alimentacion. 2. Rumueva la tapa de la PC. 3. Remueva la cubierta trasera de la ranura PCI disponible. 4. Inserte la tarjeta y fijela firmemente. 5. Coloque de nuevo la tapa de la PC y enchufe de nuevo la alimentacion.Una vez que el puerto RJ45 de la tarjeta se conecta a un dispositivo de red activa, el LED se ilumina para indocar acatividad de la conexión y la velocidad.
CONFIGURACION / INSTALACION DE DRIVER Para Windows 2000/XP/2003 (32/64 bit) Al iniciar, estos sistemas operativos Windows detectaran automaticamente la tarjeta instalara driver incluido en el sistema. Para Windows XP con Service Pack 2, siga estos pasos. 1. Si en la pantalla se muestra Nuevo hardware encontrado al iniciar, clic “Cancelar” para posponer la instalación del driver en este punto. 2. Inserte el CD de drivers incluido en su unidad de CD-ROM 3. En el escritorio, haga clic “Inicio,” despues clic en “Ejecutar.” 4. Teclee “D:\LAN\RTL8169_8169S(B)_8110S(B)\Setup.exe” (donde “D” ó cualquier otra letra corresponda a su unidad CD-ROM). Haga Clic “Aceptar.” 5. Siga las intrucciones en pantalla para completar la instalación, entonces reinicie. Para Windows Vista/7 (32/64 bit) Al iniciar, Windows Vista/7 detectara e instalará automaticamente el driver de la tarjeta. Para actualizar los controladores de Vista ó Win7, siga estos pasos. 1. Inserte el CD de Drivers incluido en su unidad de CD-ROM. 2. En el escritorio, haga clic “inicio,” despues clic en “ejecutar.” 3. • Para Vista, teclee “D:\LAN\RTL8169_8169S(B)_8110S(B)\Vista\setup.exe” (donde “D” ó cual quier otra letra corresponda a su unidad CD-ROM). Haga Clic “Aceptar.” • Para Win7, enter “D:\LAN\RTL8169_8169S(B)_8110S(B)\Win7\setup.exe” (donde “D” ó cual quier otra letra corresponda a su unidad CD-ROM). Haga Clic “Aceptar.” 4. Siga las intrucciones en pantalla para completar la instalación, entonces reinicie.
PARA VERIFICAR LA INSTALACION DEL DRIVER Para Windows 2000/XP/2003 Vaya al panel de control, Propiedades de sistema. Haga Clic “Administrador de dispositivos.” La instalación fue correcta si “Realtek RTL8169/8110 Family Gigabit Ethernet NIC” esta listada en Adaptadores de red. Para Windows Vista/7 Vaya al panel de control, Propiedades de sistema. Haga Clic “Administrador de dispositivos.” La instalación fue correcta si “Realtek PCI GBE Family Controller” esta listada en Adaptadores de red.
Conector RJ45
Link/Act
FRANÇAIS5
Carte réseau Gigabit PCI • Manuel de l’utilisateur FrançaisMerci d’avoir acheté l’INTELLINET NETWORK SOLUTIONS™ Carte réseau Gigabit PCI, modèle 522328. Vous trouvez les spécifications sur www.intellinet-network.com
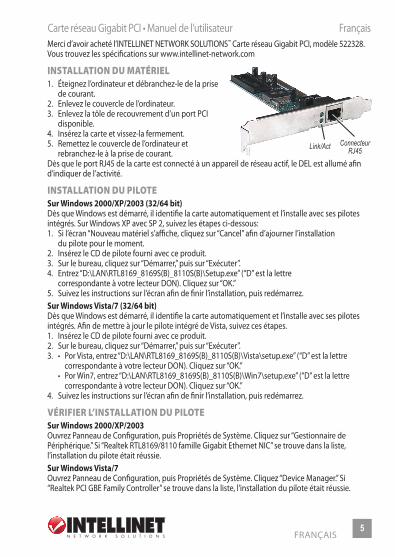
INSTALLATION DU MATÉRIEL 1. Éteignez l’ordinateur et débranchez-le de la prise de courant. 2. Enlevez le couvercle de l’ordinateur. 3. Enlevez la tôle de recouvrement d’un port PCI disponible. 4. Insérez la carte et vissez-la fermement. 5. Remettez le couvercle de l’ordinateur et rebranchez-le à la prise de courant.Dès que le port RJ45 de la carte est connecté à un appareil de réseau actif, le DEL est allumé afin d’indiquer de l’activité.
INSTALLATION DU PILOTE Sur Windows 2000/XP/2003 (32/64 bit) Dès que Windows est démarré, il identifie la carte automatiquement et l’installe avec ses pilotes intégrés. Sur Windows XP avec SP 2, suivez les étapes ci-dessous: 1. Si l’écran “Nouveau matériel s’affiche, cliquez sur “Cancel” afin d’ajourner l’installation du pilote pour le moment. 2. Insérez le CD de pilote fourni avec ce produit. 3. Sur le bureau, cliquez sur “Démarrer,” puis sur “Exécuter”. 4. Entrez “D:\LAN\RTL8169_8169S(B)_8110S(B)\Setup.exe” (“D” est la lettre correspondante à votre lecteur DON). Cliquez sur “OK.” 5. Suivez les instructions sur l’écran afin de finir l’installation, puis redémarrez. Sur Windows Vista/7 (32/64 bit) Dès que Windows est démarré, il identifie la carte automatiquement et l’installe avec ses pilotes intégrés. Afin de mettre à jour le pilote intégré de Vista, suivez ces étapes. 1. Insérez le CD de pilote fourni avec ce produit. 2. Sur le bureau, cliquez sur “Démarrer,” puis sur “Exécuter”. 3. • Por Vista, entrez “D:\LAN\RTL8169_8169S(B)_8110S(B)\Vista\setup.exe” (“D” est la lettre correspondante à votre lecteur DON). Cliquez sur “OK.” • Por Win7, entrez “D:\LAN\RTL8169_8169S(B)_8110S(B)\Win7\setup.exe” (“D” est la lettre correspondante à votre lecteur DON). Cliquez sur “OK.” 4. Suivez les instructions sur l’écran afin de finir l’installation, puis redémarrez.
VÉRIFIER L’INSTALLATION DU PILOTE Sur Windows 2000/XP/2003 Ouvrez Panneau de Configuration, puis Propriétés de Système. Cliquez sur “Gestionnaire de Périphérique.” Si “Realtek RTL8169/8110 famille Gigabit Ethernet NIC” se trouve dans la liste, l’installation du pilote était réussie. Sur Windows Vista/7 Ouvrez Panneau de Configuration, puis Propriétés de Système. Cliquez “Device Manager.” Si “Realtek PCI GBE Family Controller” se trouve dans la liste, l’installation du pilote était réussie.
Connecteur RJ45Link/Act

6POLSKI
Karta sieciowa PCI Ethernet Gigabit • Instrukcja użytkownika PolskiDziękujemy za zakup karty sieciowej Gigabit Ethernet INTELLINET NETWORK SOLUTIONS™, model 522328. Pełną specyfikację produktu znajdziecie Państwo na stronie www.intellinet-network.com.
PODŁĄCZENIE URZĄDZENIA 1. Wyłącz komputer, a następnie odłącz zasilanie.2. Otwórz obudowę komputera.3. Usuń metalową zaślepkę z tyłu komputera osłaniającą slot PCI.4. Umieść kartę sieciową w wolnym slocie PCI, a następnie używając śrubki przykręć ją do obudowy komputera.5. Zamknij obudowę komputera i podłącz zasilanie.Gdy port RJ-45 karty jest połączony z innym aktywnym urządzeniem sieciowym, diody sygnalizacyjne zapalą się, aby wskazywać aktywność połączenia oraz szybkość działania.
INSTALACJA STEROWNIKA Dla systemów Windows 2000/XP/2003 (32/64 bity) Podczas startu system automatycznie wykryje nowo podłączoną kartę i zainstaluje ją używając sterowników systemowych. Dla systemu Windows XP z Service Pack 2 wykonaj następujące czynności:1. Gdy po uruchomieniu systemu pojawi się okno kreatora znajdowania nowego sprzętu, należy wcisnąć przycisk „Anuluj”.2. Umieść dołączoną płytę CD w napędzie CD/DVD komputera.3. Wciśnij polecenie „Start”, a następnie „Uruchom”.4. W oknie „Uruchom” wpisz: „D:\LAN\RTL8169_8169S(B)_8110S(B)\Setup.exe” (gdzie „D” jest literą przypisaną do napędu CD/DVD). Wciśnij przycisk „OK”.5. Postępuj zgodnie z wyświetlanymi instrukcjami w celu zakończenia instalacji sterownika, następnie zrestartuj komputer. Dla systemów Windows Vista/7 (32/64 bity) Podczas startu Windows Vista/7 automatycznie wykryje nowo podłączoną kartę i zainstaluje ją używając sterowników systemowych. Aby zaktualizować sterownik, wykonaj następujące czynności:1. Umieść dołączoną płytę CD w napędzie CD/DVD komputera.2. Wciśnij polecenie „Start” oraz „Uruchom”, a następnie w oknie wpisz:3. • Dla systemu Windows Vista — „D:\LAN\RTL8169_8169S(B)_8110S(B)\Vista\setup.exe” (gdzie „D” jest literą przypisaną do napędu CD/DVD). Wciśnij przycisk „OK”. • Dla systemu Windows 7 — D:\LAN\RTL8169_8169S(B)_8110S(B)\Win7\setup.exe (gdzie „D” jest literą przypisaną do napędu CD/DVD). Wciśnij przycisk „OK”.4. Postępuj zgodnie z wyświetlanymi instrukcjami w celu zakończenia instalacji sterownika, następnie zrestartuj komputer.
WERYFIKACJA INSTALACJI STEROWNIKA Przejdź do Panelu Sterowania, a następnie wyświetl właściwości systemu. Przejdź na zakładkę „Sprzęt” i wyświetl „Menadżera urządzeń”. Jeśli urządzenie jest wylistowane w polu Karty sieciowe jak poniżej, oznacza to, że sterownik został zainstalowany prawidłowo: • Dla Windows 2000/XP/2003 — „Realtek RTL8169/8110 Family Gigabit Ethernet NIC” • Dla Windows Vista/7 —„Realtek PCI GBE Family Controller”
Gniazdo port
Link/Aktywność

ITALIANO 7
Scheda di rete PCI Gigabit • Manuale d’istruzione ItalianoGrazie per aver acquistato la scheda di rete PCI Gigabit INTELLINET NETWORK SOLUTIONS™, Modello 522328. Per ulteriori specifiche, visita il sito www.intellinet-network.com.
INSTALLAZIONE DELL’HARDWARE 1. Spegnere il computer e scollegare il cavo di alimentazione da qualsiasi presa di corrente.2. Rimuovere il coperchio del computer.3. Rimuovere il coperchio posteriore dallo slot PCI disponibile.4. Inserire la scheda e fissarla saldamente con le viti.5. Rimettere a posto il coperchio del computer e connetterlo alla presa di corrente.Appena la porta RJ45 della scheda è collegata ad una periferica di rete attiva, i LED si illumineranno ad indicare l’attività di connessione e la velocità.
SETTAGGIO Per Windows 2000/XP/2003 (32/64 bit) All’avvio, questi sistemi operativi automaticamente rilevano la scheda e la installano con i driver incorporati. Per Windows XP con Service Pack 2, seguire i seguenti passaggi.1. Se all’avvio appare sullo schermo che è stato rilevato un nuovo Hardware, cliccare “Cancel” per posticipare l’installazione dei driver a questo punto.2. Inserire il CD incluso con i driver nel CD-ROM.3. Sul desktop, cliccare “Start,” quindi cliccare “Run.”4. Inserire “D:\LAN\RTL8169_8169S(B)_8110S(B)\Setup.exe” (dove “D” o una qualsiasi altra lettere corrisponde al vostro CD-ROM). Cliccare “OK.”5. Seguire le istruzioni che compaiono sullo schermo per completare l’installazione, quindi riavviare. Per Windows Vista/7 (32/64 bit) All’avvio, Windows Vista/7 automaticamente rileva la scheda e la installano con i driver incorporati. Per aggiornare i driver incorporati di Vista o Win7, seguire questi passaggi.1. Inserire il CD con i driver incluso nel vostro CD-ROM.2. Sul desktop, cliccare “Start,” quindi cliccare “Run.”3. • Per Vista, inserire “D:\LAN\RTL8169_8169S(B)_8110S(B)\Vista\setup.exe” (dove “D” o una qualsiasi altra lettera è la designazione del vostro CD-ROM). Cliccare “OK.” • Per Win7, inserire “D:\LAN\RTL8169_8169S(B)_8110S(B)\Win7\setup.exe” (dove “D” o una qualsiasi altra lettera è la designazione del vostro CD-ROM). Cliccare “OK.”4. Seguire le istruzioni che compaiono sullo schermo per completare l’installazione, quindi riavviare.
VERIFICA DEL SETTAGGIO Andare al Pannello di Controllo, quindi Proprietà di Sistema. Cliccare “Gestione Periferica.” • Per Windows 2000/XP/2003 — L’installazione è avvenuta con successo se la periferica “Realtek RTL8169/8110 Family Gigabit Ethernet NIC” è elencata sotto Adattatori di Rete. • Per Windows Vista/7 — L’installazione è avvenuta con successo se la periferica “Realtek PCI GBE Family Controller” è elencata sotto Adattatori di Rete.
Connettore RJ45Link/Act

8
WASTE ELECTRICAL & ELECTRONIC EQUIPMENTDisposal of Electric and Electronic Equipment
(applicable in the European Union and other European countries with separate collection systems)
ENGLISH
This symbol on the product or its packaging indicates that this product shall not be treated as household waste. Instead, it should be taken to an applicable collection point for the recycling of electrical and electronic equipment. By ensuring this product is disposed of correctly, you will help prevent potential negative consequences to the environment and human health, which could otherwise be caused by inappropriate waste handling of this product. If your equipment contains easily removable batteries or accumulators, dispose of these separately according to your local requirements. The recycling of materials will help to conserve natural resources. For more
detailed information about recycling of this product, contact your local city office, your household waste disposal service or the shop where you purchased this product. In countries outside of the EU: If you wish to discard this product, contact your local authorities and ask for the correct manner of disposal.
DEUTSCH
Dieses auf dem Produkt oder der Verpackung angebrachte Symbol zeigt an, dass dieses Produkt nicht mit dem Hausmüll entsorgt werden darf. In Übereinstimmung mit der Richtlinie 2002/96/EG des Europäischen Parlaments und des Rates über Elektro- und Elektronik-Altgeräte (WEEE) darf dieses Elektrogerät nicht im normalen Hausmüll oder dem Gelben Sack entsorgt werden. Wenn Sie dieses Produkt entsorgen möchten, bringen Sie es bitte zur Verkaufsstelle zurück oder zum Recycling-Sammelpunkt Ihrer Gemeinde.
ESPAÑOL Este símbolo en el producto o su embalaje indica que el producto no debe tratarse como residuo doméstico. De conformidad con la Directiva 2002/96/CE de la UE sobre residuos de aparatos eléctricos y electrónicos (RAEE), este producto eléctrico no puede desecha se con el resto de residuos no clasificados. Deshágase de este producto devolviéndolo a su punto de venta o a un punto de recolección municipal para su reciclaje.
FRANÇAIS Ce symbole sur Ie produit ou son emballage signifie que ce produit ne doit pas être traité comme un déchet ménager. Conformément à la Directive 2002/96/EC sur les déchets d’équipements électriques et électroniques (DEEE), ce produit électrique ne doit en aucun cas être mis au rebut sous forme de déchet municipal non trié. Veuillez vous débarrasser de ce produit en Ie renvoyant à son point de vente ou au point de ramassage local dans votre municipalité, à des fins de recyclage.
ITALIANO
Questo simbolo sui prodotto o sulla relativa confezione indica che il prodotto non va trattato come un rifiuto domestico. In ottemperanza alla Direttiva UE 2002/96/EC sui rifiuti di apparecchiature elettriche ed elettroniche (RAEE), questa prodotto elettrico non deve essere smaltito come rifiuto municipale misto. Si prega di smaltire il prodotto riportandolo al punto vendita o al punto di raccolta municipale locale per un opportuno riciclaggio.POLSKI
Jeśli na produkcie lub jego opakowaniu umieszczono ten symbol, wówczas w czasie utylizacji nie wolno wyrzucać tego produktu wraz z odpadami komunalnymi. Zgodnie z Dyrektywą Nr 2002/96/WE w sprawie zużytego sprzętu elektrycznego i elektronicznego (WEEE), niniejszego produktu elektrycznego nie wolno usuwać jako nie posortowanego odpadu komunalnego. Prosimy o usuniecie niniejszego produktu poprzez jego zwrot do punktu zakupu lub oddanie do miejscowego komunalnego punktu zbiórki odpadów przeznaczonych do recyklingu.

9
WARRANTY INFORMATION
ENGLISH — For warranty information, go to www.intellinet-network.com/warranty.DEUTSCH — Garantieinformationen finden Sie hier unter www.intellinet-network.com/warranty.ESPAÑOL — Si desea obtener información sobre la garantía, visite www.intellinet-network.com/warranty.FRANÇAIS — Pour consulter les informations sur la garantie, rendezvous à l’adresse www.intellinet-network.com/warranty.POLSKI — Informacje dotyczące gwarancji znajdują się na stronie www.intellinet-network.com/warranty.ITALIANO — Per informazioni sulla garanzia, accedere a www.intellinet-network.com/warranty.
EN MÉXICO: Póliza de Garanttía INTELLINET — Datos del importador y responsable ante el consumidor IC Intracom México, S.A. de C.V. • Av. Interceptor Poniente # 73, Col. Parque Industrial La Joya, Cuautitlán Izcalli, Estado de México, C.P. 54730, México. • Tel. (55)1500-4500 La presente garantía cubre este producto por 3 años contra cualquier defecto de fabricación en sus materiales y mano de obra, bajo las siguientes condiciones:1. Todos los productos a que se refiere esta garantía, ampara su cambio físico, sin ningún cargo para el consumidor.2. El comercializador no tiene talleres de servicio, debido a que los productos que se garantizan no cuentan con reparaciones, ni refacciones, ya que su garantía es de cambio físico.3. La garantía cubre exclusivamente aquellas partes, equipos o sub-ensambles que hayan sido instaladas de fábrica y no incluye en ningún caso el equipo adicional o cualesquiera que hayan sido adicionados al mismo por el usuario o distribuidor.Para hacer efectiva esta garantía bastará con presentar el producto al distribuidor en el domicilio donde fue adquirido o en el domicilio de IC Intracom México, S.A. de C.V., junto con los accesorios contenidos en su empaque, acompañado de su póliza debidamente llenada y sellada por la casa vendedora (indispensable el sello y fecha de compra) donde lo adquirió, o bien, la factura o ticket de compra original donde se mencione claramente el modelo, número de serie (cuando aplique) y fecha de adquisición. Esta garanttía no es válida en los siguientes casos: Si el producto se hubiese utilizado en condiciones distintas a las normales; si el producto no ha sido operado conforme a los instructivos de uso; o si el producto ha sido alterado o tratado de ser reparado por el consumidor oterceras personas.

10
REGULATORY STATEMENTSFCC Class B
This equipment has been tested and found to comply with the limits for a Class B digital device, pursuant to Part 15 of Federal Communications Commission (FCC) Rules. These limits are designed to provide reasonable protection against harmful interference in a residential installation. This equipment generates, uses and can radiate radio frequency energy, and if not installed and used in accordance with the instructions may cause harmful interference to radio communications. However, there is no guarantee that interference will not occur in a particular installation. If this equipment does cause harmful interference to radio or television reception, which can be determined by turning the equipment off and on, the user is encouraged to try to correct the interference by one or more of the following measures:• Reorient or relocate the receiving antenna.• Increase the separation between the equipment and the receiver.• Connect the equipment to an outlet on a circuit different from the receiver.• Consult the dealer or an experienced radio/TV technician for help.
CE / R&TTE
ENGLISH
This device complies with the requirements of the R&TTE Directive 1999/5/EC.
DEUTSCH
Dieses Gerät enspricht der Direktive R&TTE Direktive 1999/5/EC.
ESPAÑOL Este dispositivo cumple con los requerimientos de la Directiva R&TTE 1999/5/EC.
FRANÇAIS Cet appareil satisfait aux exigences de la directive R&TTE 1999/5/CE.
POLSKI
Urządzenie spełnia wymagania dyrektywy R&TTE 1999/5/EC.
ITALIANO
Questo dispositivo è conforme alla Direttiva 1999/5/EC R&TTE.


Copyright © INTELLINET NETWORK SOLUTIONS
INTELLINET NETWORK SOLUTIONS™ offers a complete line of active and passive networking products. Ask your local computer dealer for more information or visit www.intellinet-network.com.
All products mentioned are trademarks or registered trademarks of their respective owners.
INTELLINET NETWORK SOLUTIONS™ bietet ein vollständiges Sortiment aktiver und passiverNetzwerkkomponenten. Für weitere Informationen wenden Sie sich bitte an Ihren Händler oder
nutzen Sie die Webseite www.intellinet-network.com.
Alle erwähnten Produkte sind registrierte Marken und Eigentum Ihrer jeweiligen Besitzer.
INTELLINET NETWORK SOLUTIONS™ ofrece una línea completa de productos de red activa y pasiva. Pregunte a su distribuidor para obtener mayor informacion o visite:
www.intellinet-network.com.
Todos los productos mencionados son marcas comerciales o marcas registradas de sus respectivos propietarios.
INTELLINET NETWORK SOLUTIONS™ offre un assortiment complet de produits de réseau actifs et passifs. Pour plus d’informations veuillez contacter votre commerçant ou utiliser la page d’accueil
www.intellinet-network.com.
Tous les produits mentionnés sont des marques commerciales ou des marques déposées de leurs propriétaires respectifs.
INTELLINET NETWORK SOLUTIONS™ to kompletna linia aktywnych oraz pasywnych komponentów sieciowych. Poproś lokalnego dealera o więcej informacji lub odwiedź stronę
www.intellinet-network.com.
Wszystkie nazwy handlowe i towarów są nazwami i znakami towarowymizastrzeżonymi odpowiednich firm odnośnych właścicieli.
INTELLINET NETWORK SOLUTIONS™ offre una linea completa di prodotti di rete attivi e passivi. Chiedi maggiori informazioni al tuo rivenditore di computer o visita il sito
www.intellinet-network.com.
Tutti i prodotti sopracitati sono marchi di fabbrica o marchi registrati depositati dai proprietari.