getting to know the labdisc android version
TRANSCRIPT
Getting to Know the Labdisc
Android version
www.globisens.com

How to…. Set up the Labdisc from the Labdisc Menu ............................................................................................................................. 1
Pair your Labdisc with an Android Tablet via Bluetooth ......................................................................................................... 1
Connect the Labdisc to an Android Tablet Using a Bluetooth Connection............................................................................. 2
Set up the Labdisc from the Globilab Menu Using a Bluetooth Connection .......................................................................... 2
Download Your Data ............................................................................................................................................................... 3
Clear the Labdisc Memory ...................................................................................................................................................... 3
Use the Globilab Software (Android Tablet) ........................................................................................................................... 4
The Menu/Tool Bar ............................................................................................................................................................. 4
Open Data Files ............................................................................................................................................................... 4
Save ................................................................................................................................................................................. 4
Export .............................................................................................................................................................................. 4
Statistics .......................................................................................................................................................................... 4
Set up .............................................................................................................................................................................. 4
Run/Stop ......................................................................................................................................................................... 4
Download ........................................................................................................................................................................ 4
Mathematical Functions ................................................................................................................................................. 4
Activities .......................................................................................................................................................................... 4
Working On A Smaller Screen ............................................................................................................................................. 5
Other Software Features..................................................................................................................................................... 5
Zoom ............................................................................................................................................................................... 5
Marker ............................................................................................................................................................................. 5
Annotate ......................................................................................................................................................................... 5
Display Options ............................................................................................................................................................... 5
Use the Labdisc Sensors .......................................................................................................................................................... 6
Accelerometer ................................................................................................................................................................. 6
Air Pressure ..................................................................................................................................................................... 6
Ambient Temperature Sensor ......................................................................................................................................... 6
Barometric Pressure Sensor ............................................................................................................................................ 7
Colorimeter ..................................................................................................................................................................... 7
Conductivity Sensor ........................................................................................................................................................ 7
Current Sensor ................................................................................................................................................................ 7
Dissolved O2 Sensor ........................................................................................................................................................ 7
Distance/Motion Sensor ................................................................................................................................................. 8
External Temperature Sensor ......................................................................................................................................... 8
GPS (Global Positioning Satellite) Sensor ........................................................................................................................ 8

Heart Rate Sensor ........................................................................................................................................................... 8
Humidity Sensor .............................................................................................................................................................. 8
Infrared Sensor ................................................................................................................................................................ 9
Light Sensor ..................................................................................................................................................................... 9
Microphone ..................................................................................................................................................................... 9
pH Sensor ........................................................................................................................................................................ 9
Sound Sensor .................................................................................................................................................................. 9
Thermocouple ................................................................................................................................................................. 9
Turbidity Sensor ............................................................................................................................................................ 10
UV Sensor ...................................................................................................................................................................... 10
Voltage .......................................................................................................................................................................... 10
Available External Sensors ................................................................................................................................................ 10
Dymo Wireless Force & Accelerometer ........................................................................................................................ 10
Voltage Sensor .............................................................................................................................................................. 11
CO2 Sensor .................................................................................................................................................................... 11
Heart Rate/Pulse ........................................................................................................................................................... 11
Respiration .................................................................................................................................................................... 11
Current .......................................................................................................................................................................... 11
Magnetic Field ............................................................................................................................................................... 12

How To…
1
Set up the Labdisc from the Labdisc Menu
1. Turn on the Labdisc by pressing the On/Off key.
2. Rotate the Labdisc plastic ring to expose the sensors. Connect any external sensors that you might be using (pH, Dissolved O2, Conductivity, Thermocouple, External Temperature, Force/Accelerometer, Heart Rate, Current, Voltage or Magnetic Field).
3. Select Sensors - Press Scroll key to open the sensor menu. Press the Select key to open the Set Up
menu and then choose the Set Sensor icon using the Select key again. Select the sensors that you wish to use by pushing the buttons on the perimeter of the Labdisc. Some buttons control more than one sensor. Push the button multiple times to scroll through the available options. When the sensor(s) that you
want is/are highlighted push the Escape key to return to the set up menu. Note: Some buttons can only activate one sensor at a time because of the external connections needed by the sensors
4. Set Sampling Rate - Press the Escape key to return to the previous menu and use the scroll key to
move to the Sampling Rate icon and push the Select key . Use the Scroll key to move through
the options. Use the Select key to choose the rate at which you want to select samples. Press the Select key to confirm your choice. Options include manual, 1/second, 10/second, 100/second, 1000/second and 25000/second. The rate of collection by some sensors is limited and so you may not see all of the options for
every sensor. Note if you choose to sample manually, skip Step #5.
5. Set the Number of Samples - Press the Escape key to leave the previous menu and use the scroll key
to move to the Number of Samples icon and push the Select key. Use the Scroll key to choose the number of samples you wish to collect. Options include 10, 100, 1000, 10000. Press the Select key
to confirm your choice. Press the Escape key three times (3x) to exit the set up menu
6. Begin Collecting Data - When you are ready, press the Select key to begin the data collection.
Pair your Labdisc with an Android Tablet via Bluetooth 1. Download the Globilab app from the Google Play Store.
2. Using your Settings menu, make sure that Bluetooth is enabled on your tablet. Set your tablet to be visible to all devices and scan for available Bluetooth devices.
3. Turn on your Labdisc. Press and hold the Scroll key until you hear a long beep and the screen reads BT Pairing
4. From the tablet’s list of devices, select your Labdisc. Make sure that the four digit code on the back of the Labdisc matches the one you have selected on your tablet and use the pairing code 1234 to pair your Labdisc to your tablet.
5. When you see your Labdisc listed under Paired devices, you’re ready to go!

How To…
2
Connect the Labdisc to an Android Tablet Using a Bluetooth Connection
1. Open the GlobiLab software and turn on the Labdisc by pressing the On/Off key.
2. When using a Bluetooth connection between the Labdisc and computer, make sure that your Labdisc has been paired with your computer. (see above) You will only have to do this the first time you use your Labdisc with a computer.
3. From the Globilab menu select “Connect Labdisc”. This menu may be in different places on different tablets. It may be a column of three small boxes to the far right at the top of the screen or it may be a small menu at the bottom of the screen; near the back arrow or home button.
4. Select the Labdisc that you want to connect to from the pop up menu. Make sure the 4 digit code matches the one on the back of the Labdisc.
Set up the Labdisc from the Globilab Menu Using a Bluetooth Connection
1. Press the “Logger Setup” button to get the Logger Setup window. Different sensors will show for different models of Labdisc, depending on what sensors are available. If you are using a Globisens brand external sensor attached to the Universal Adapter port, it will show up in the set up menu after you have attached it. If you are using a sensor from another company, you will need to select it from the dropdown menu.
2. Tap the check box next to the sensor name to select it. Tap again to deselect it
3. Slide your finger up and down next to Rate to select the sample frequency.
4. Slide your finger up and down next to Samples to select the number of samples you wish to collect.
5. Tap back on the main screen to exit the Setup window.

How To…
3
Download Your Data 1. Make sure your Labdisc is connected to your tablet and that it is not running/collecting data.
2. Touch the download button to download the last data collection into the Globilab software. This will allow you to select from a list of prior data collections. Touch the data set that you wish to download. Save the data
collection by touching the save button. Be sure to clearly label your data collection so that you will not confuse it with the other data collections.
Clear the Labdisc Memory 1. Make sure your Labdisc is connected to your tablet and that it is not running/collecting data.
2. From the Globilab menu select “Clean Labdisc”. This menu may be in different places on different tablets. It may be a column of three small boxes to the far right at the top of the screen or it may be a small menu at the bottom of the screen; near the back arrow or home button. The pop up window will ask you to confirm deletion. Touch “yes.
You cannot clear the Labdisc memory directly from the Labdisc.
You must be connected to a computer, iPad or tablet.
How To…
4
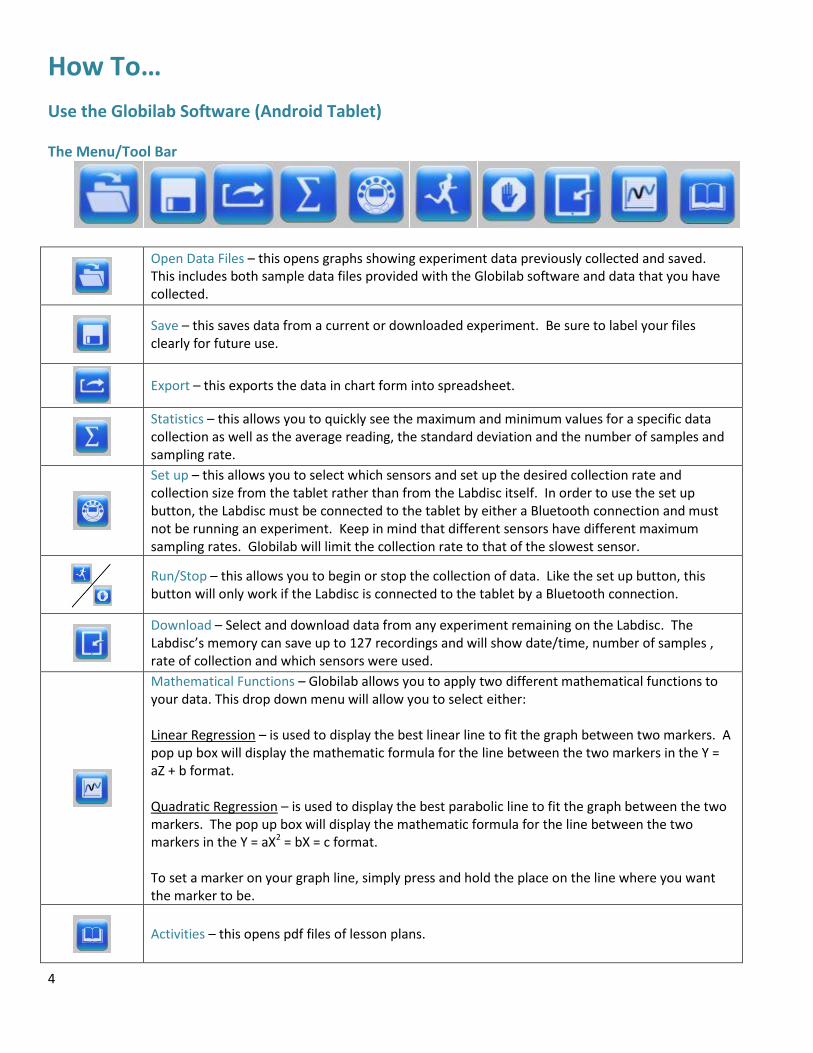
Use the Globilab Software (Android Tablet) The Menu/Tool Bar
Open Data Files – this opens graphs showing experiment data previously collected and saved. This includes both sample data files provided with the Globilab software and data that you have collected.
Save – this saves data from a current or downloaded experiment. Be sure to label your files clearly for future use.
Export – this exports the data in chart form into spreadsheet.
Statistics – this allows you to quickly see the maximum and minimum values for a specific data collection as well as the average reading, the standard deviation and the number of samples and sampling rate.
Set up – this allows you to select which sensors and set up the desired collection rate and collection size from the tablet rather than from the Labdisc itself. In order to use the set up button, the Labdisc must be connected to the tablet by either a Bluetooth connection and must not be running an experiment. Keep in mind that different sensors have different maximum sampling rates. Globilab will limit the collection rate to that of the slowest sensor.
Run/Stop – this allows you to begin or stop the collection of data. Like the set up button, this button will only work if the Labdisc is connected to the tablet by a Bluetooth connection.
Download – Select and download data from any experiment remaining on the Labdisc. The Labdisc’s memory can save up to 127 recordings and will show date/time, number of samples , rate of collection and which sensors were used.
Mathematical Functions – Globilab allows you to apply two different mathematical functions to your data. This drop down menu will allow you to select either: Linear Regression – is used to display the best linear line to fit the graph between two markers. A pop up box will display the mathematic formula for the line between the two markers in the Y = aZ + b format. Quadratic Regression – is used to display the best parabolic line to fit the graph between the two markers. The pop up box will display the mathematic formula for the line between the two markers in the Y = aX2 = bX = c format. To set a marker on your graph line, simply press and hold the place on the line where you want the marker to be.
Activities – this opens pdf files of lesson plans.

How To…
5
Working On a Smaller Screen When working with tablet with a screen 7 inches or smaller, some of the buttons will “slide” out of sight in a “sliding drawer” which can be viewed using a left to right swipe from the edge of the screen. Closing the drawer is done with a right to left swipe.
Other Software Features Many actions that are completed using the menu buttons on the computer are done using the touch screen capabilities on the tablet. Zoom –enlarge/reduce a section of the graph using a two finger pinch or push motion. You can stretch/shrink the graph from side to side, from top to bottom or on a diagonal enlarging/reducing the graph while maintaining the same proportions. There is a reset arrow at the upper right of the screen.
Marker –set markers on your graph by touching the anywhere along a data line. In addition to the marker, a pop up bubble with the specific value at that point is added. You can move the marker along the line by touching and sliding the marker along the line. The values within the bubble will change as you move the marker. You can also relocate the bubble by touching and dragging it anywhere within 360 degrees of the marker. To remove a marker, touch and hold the marker and select “delete” from the pop up window. You may wish to zoom in/enlarge the screen before doing this, as the touch needs to be directly on the marker. Only two markers can be set on the screen at one time.
Annotate – add labels to your graph to explain what is happening on the graph by touching and holding on the screen, anywhere that is not on the data line. A pop up bubble is placed on the screen. To add text (or to delete an annotation), press and hold on the bubble. To move the text portion of an annotation, press and drag the bubble anywhere within 360 degrees of its insertion point. You can also lengthen/shorten the leader to the text by dragging the text bubble closer to/further from the insertion point. To move the entire annotation, press and drag from the tip of the insertion point. At this point in time, it is not possible to add an image to an annotation using Globilab on an Android tablet.
Display Options – are found in the upper right hand corner of the screen and allow you to select the format for data display. These include: Line graph – if there is data of more than one type displayed, you can choose which lines to view by tapping on the legend in the upper right hand corner. In the pop up box, you can select line color, format (line or individual data points) or choose to hide a particular set of data.
How To…
6
Bar graph –bar graphs will show data from only one sensor at a time. To change which data is displayed tap on the legend in the upper right hand corner. In the pop up box, you can select which set of data to display or change the color of the data currently displayed.
Table –shows data that in a chart format. This can be used to view exact measurements for every collection.
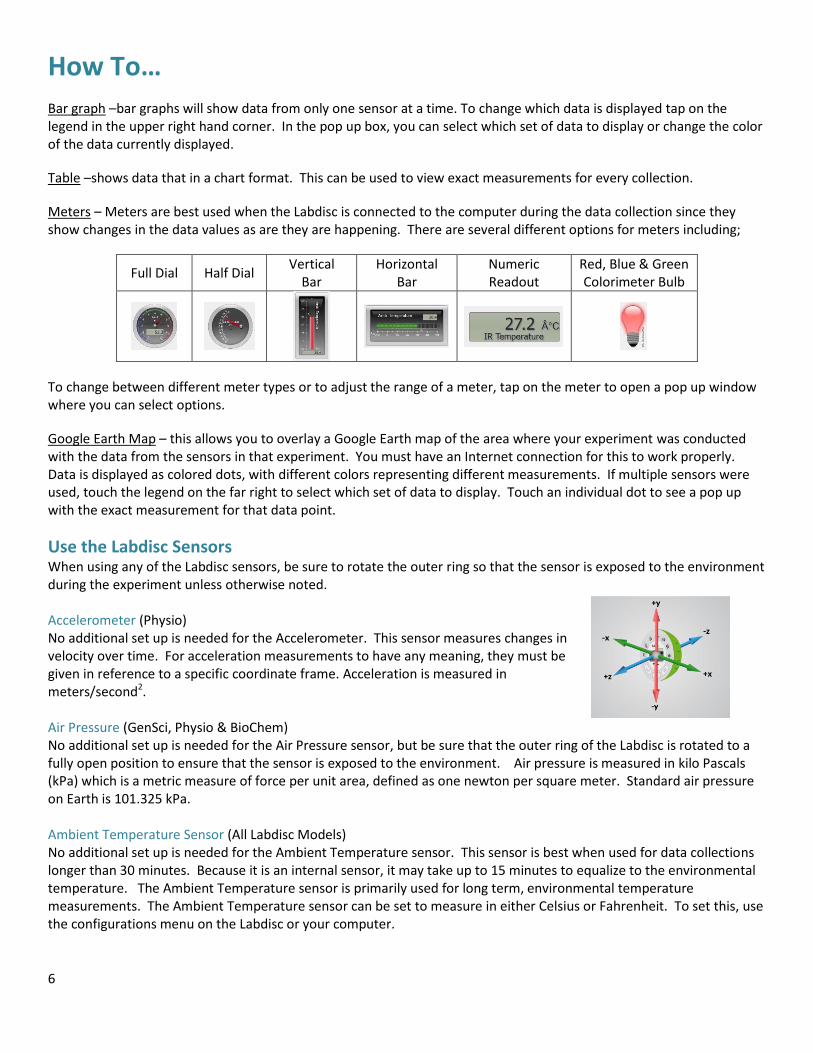
Meters – Meters are best used when the Labdisc is connected to the computer during the data collection since they show changes in the data values as are they are happening. There are several different options for meters including;
Full Dial Half Dial Vertical
Bar Horizontal
Bar Numeric Readout
Red, Blue & Green Colorimeter Bulb
To change between different meter types or to adjust the range of a meter, tap on the meter to open a pop up window where you can select options.
Google Earth Map – this allows you to overlay a Google Earth map of the area where your experiment was conducted with the data from the sensors in that experiment. You must have an Internet connection for this to work properly. Data is displayed as colored dots, with different colors representing different measurements. If multiple sensors were used, touch the legend on the far right to select which set of data to display. Touch an individual dot to see a pop up with the exact measurement for that data point.
Use the Labdisc Sensors When using any of the Labdisc sensors, be sure to rotate the outer ring so that the sensor is exposed to the environment during the experiment unless otherwise noted. Accelerometer (Physio) No additional set up is needed for the Accelerometer. This sensor measures changes in velocity over time. For acceleration measurements to have any meaning, they must be given in reference to a specific coordinate frame. Acceleration is measured in meters/second2. Air Pressure (GenSci, Physio & BioChem) No additional set up is needed for the Air Pressure sensor, but be sure that the outer ring of the Labdisc is rotated to a fully open position to ensure that the sensor is exposed to the environment. Air pressure is measured in kilo Pascals (kPa) which is a metric measure of force per unit area, defined as one newton per square meter. Standard air pressure on Earth is 101.325 kPa. Ambient Temperature Sensor (All Labdisc Models) No additional set up is needed for the Ambient Temperature sensor. This sensor is best when used for data collections longer than 30 minutes. Because it is an internal sensor, it may take up to 15 minutes to equalize to the environmental temperature. The Ambient Temperature sensor is primarily used for long term, environmental temperature measurements. The Ambient Temperature sensor can be set to measure in either Celsius or Fahrenheit. To set this, use the configurations menu on the Labdisc or your computer.

How To…
7
Barometric Pressure Sensor (Enviro & BioChem) No additional set up is needed for the Barometer, but be sure that the outer ring of the Labdisc is rotated to a fully open position to ensure that the sensor is exposed to the environment. Barometric pressure is measured in millibars (mb). Standard sea level pressure is 1013.23 mb Colorimeter (BioChem & Enviro) Before each use, calibrate the colorimeter with the solvent you will use during the experiment to help minimize experimental error. To calibrate, fill the cuvette ¾ full with solvent (often distilled water) and place the cuvette in the output. Press and hold the colorimeter button on the Labdisc until you hear a long beep. When finished the calibration, remove the cuvette from the colorimeter. To take a data reading, fill the cuvette ¾ full with solution from the sample. Be sure to ALWAYS hold the upper part of the cuvette to avoid leaving fingerprints on the cuvette. Insert the cuvette into the appropriate space and, keeping the top of the cuvette pointed upwards; rotate the outer protective ring shut over the cuvette. Conductivity Sensor (BioChem) Prior to first use, soak the conductivity sensor in distilled water for 30 minutes. Connect the probe to the Labdisc and dip in a 0.1 M KCl solution or other standard with known value. The cell portion of the probe must be fully immersed in the known solution. Stir with the probe to remove any air bubbles trapped within the cell chamber. No air bubbles can be present when measuring. If a 0.1 KCl solution is used to calibrate the meter adjust the meter reading according to the standard value printed on the bottle. After calibration, rinse the probe thoroughly with distilled water. Submerge the end of the probe in the solution being measured, being sure to completely submerge the cell membrane. Shake the probe well to remove any air bubbles trapped within the cell chamber and check the readout for the solutions conductivity. While the conductivity probe does not tell you which specific ions are present in the sample, it does quickly confirm the total concentration of ions in that sample. Do not touch the probe’s cell surface with any hard object. If the cell surface becomes contaminated, soak the probe cell portion in a light detergent and a mile acid for about 15 minutes each and then rinse thoroughly with distilled water. The Conductivity Probe is used to measure the ability of a solution to conduct electrical current. This is done by measuring the concentration of dissolved solids which have been ionized in a polar solution like water. Conductivity is measured in micro-Siemens (mS). Current Sensor (GenSci & Physio or External Sensor on any Labdisc) Rotate the outer ring of the Labdisc to expose the Current Sensor connection port and plug the smaller end of the banana cables into the appropriate ports (red: red, black: black). When using the Current sensor with a GenSci, Enviro or BioChem Labdisc, plug the external sensor into the external sensor micro USB port and then plug the smaller end of the banana cables into the appropriate ports on the external sensor. Wait for the Current sensor to auto calibrate and show a zero reading before beginning data collection. Labdisc measures electrical current in Amperes or Amps (A). Dissolved O2 Sensor (BioChem & Enviro) Prior to first use, unscrew the membrane module at the bottom of the electrode. Rinse the membrane module with distilled water and blot dry. Completely fill the membrane module with dissolved oxygen electrolyte solution for Galvanic DO Probes. Rinse the internal anode/cathode element with distilled water and blot dry. Screw the membrane module onto the end of the electrode being careful not to over tighten. Rinse with distilled water. Attach the Dissolved O2 sensor to the input bracket by inserting and turning ¼ turn. Use an aquarium pump to bubble air through 100 ml of water in a 150 ml beaker to completely saturate the water with oxygen, stirring gently with the DO sensor. Keep the sensor at a 20◦ angle to avoid trapping air bubbles in the sensor. After 20 minutes, hold the Labdisc DO2 key down for 3 seconds until you hear a long chirp. The Labdisc should read 8.25 mg/l with is the reading for water saturated with oxygen at room temperature. To use, insert the sensor into the liquid sample and stir slowly and continuously until the value on the Labdisc stays constant. Dissolved O2 is measured in milligrams per liter (mg/l)

How To…
8
Distance/Motion Sensor (GenSci & Physio) The distance sensor is used to measure distance between or the change in distance between the Labdisc and an object. The distance sensor has a viewing angle of +/-15 degrees, so when using it (especially with moving objects) be sure that there are no other objects within that viewing field that might interfere with the distance reading. The distance sensor is located on bottom of the Labdisc with a round plastic door covering it. Be sure to fully open the door before beginning data collection with the distance sensor. The distance sensor measures distance in meters. External Temperature Sensor (All Labdisc models) Plug the External Temperature sensor into the outlet in the Labdisc and insert the tip (at least 2cm) into the item/area where temperature is being measured. The External Temperature sensor is suitable for taking environmental temperatures as well as the temperature of liquids and loosely packed solids like soil or sand. The External Temperature sensor can be set to measure in either Celsius or Fahrenheit. . To set this, use the configurations menu on the Labdisc or your computer. The External Temperature sensor is also available as an external sensor, which allows for the collection of two different temperature readings simultaneously. The external sensor is plugged into the Universal USB port and then the Temperature Probe is plugged into the sensor. GPS (Global Positioning Satellite) Sensor (GenSci, Enviro & BioChem) No additional set up is needed to use the GPS sensor. GPS unit is located behind the housing of the Humidity sensor. It can be used to measure location or speed of movement over a large area. The GPS sensor can also be used to position other collected data onto a Google Earth map, providing accurate information about where the data was collected. The GPS sensor will report the longitude/latitude, speed/course and time/date of the data collected. Heart Rate Sensor (BioChem or External Sensor on any Labdisc) The ear clip has an IR light source on one side and a light detector on the other side. Blood flowing through the body changes the skin IR transparency, which is measured by this sensor. The ear clip should be placed on the soft section of the ear lobe (an earring hole may interfere with the senor). You can also attach the sensor clip to the tip of the index finger or the webbing between the thumb and index finder. If a clear pulse is not observed in the first 5 seconds of measurement, the IR intensity will be increased and check again for 5 seconds. If a pulse is still not registered, the IR intensity will increase to the maximum intensity. At this point, if there is not pulse detected, it may mean that the clip is connected improperly. For each pulse, the Labdisc will produce a short beep. There are two possible configurations for the Heart Rate sensor. On the Biochem Labdisc, the Heart Rate sensor is internal. Plug the ear clip into the port on the Labdisc and place the clip onto your ear lobe. The clip will measure both the overall heart rate and the individual waveforms of each heartbeat. After a pulse is detected, the Labdisc will count 16 pulses and then start to display the heart rate in beats per minute (bpm). When using the external heart rate sensor with a GenSci, Enviro or Physio Labdisc, plug the external sensor into the external sensor micro USB port and then plug the ear clip into the external sensor. In this format, the clip will measure the individual wave forms of each heartbeat, but will not show a graph line indicating the overall heart rate. Humidity Sensor (Enviro, BioChem & GenSci) No additional set up is needed for the Humidity sensor, but be sure that the outer ring of the Labdisc is rotated to a fully open position to ensure that the sensor is exposed to the environment. It is used to measure the amount of water vapor

How To…
9
in the air expressed as a percentage of the amount needed for saturation at that same temperature. Humidity is measured as a percentage value comparing these two. Infrared Sensor (Enviro) No additional set up is needed for the IR sensor, but be sure that the outer ring of the Labdisc is rotated to a fully open position to ensure that the sensor is exposed to the environment. An infrared sensor infers temperature from a portion of the thermal radiation emitted by the object being measured. IR by measured as the heat that is radiated off of objects. IR temperatures are measured in Celsius degrees. Light Sensor (GenSci, BioChem & Physio) No additional set up is needed for the light sensor, but be sure that the outer ring of the Labdisc is rotated to a fully open position to ensure that the sensor is exposed to the environment. Do not point the light sensor directly at the sun. This sensor measures the brightness of light in lux. One lux is equal to one lumen per square meter. It is used as a measure of the intensity, as perceived by the human eye, of light that hits or passes through a surface. Microphone (GenSci & Physio) There is no additional set up needed to use the Microphone sensor, but be sure that the outer ring of the Labdisc is rotated to a fully open position to ensure that the sensor is exposed to the environment. The Microphone measures sound wave forms in voltage and typically records at a very fast rate of 25,000 samples per second. pH Sensor (Enviro, GenSci & BioChem) Attach the pH sensor to the input bracket by inserting and turning ¼ turn. The pH meter will measure the H ion activity in a solution. The pH sensor is factory calibrated and under normal conditions does not require any calibration. If you need to calibrate this sensor; insert the Labdisc pH electrode into a 7.0pH buffer and wait for the pH reading to stabilize. Press and hold the pH key for 3 seconds, until you hear a long beep sound and the pH sensor is calibrated and will show a reading between 6.95pH to 7.05pH. To take a pH measurement with the sensor, completely insert the tip into the liquid sample without touching the sides of the container. After each measurement the pH probe should be cleaned with distilled water. Always keep the wash bottle and distilled water close at hand. If you don’t have a wash bottle you will need a syringe of at least 10 ml in order to clean the sensor properly. When not in use, the pH sensor should be stored in the buffer solution. The pH sensor measures the number of Hydrogen ions in a solution and is measured on the pH scale of 0 to 14 with readings in the 0 to 6.9 range being considered basic/alkaline and readings in the 7.1 to 14 range being considered acidic. Readings of 7 are considered to be neutral – neither acidic nor alkaline. Sound Sensor (Enviro) There is no additional set up needed to use the Sound sensor, but be sure that the outer ring of the Labdisc is rotated to a fully open position to ensure that the sensor is exposed to the environment. The Sound sensor measures sound level in decibels. With the Sound sensor, you typically use 10/second as the sampling rate. Thermocouple (BioChem) Rotate open the outer ring to expose the thermocouple outlet. Firmly push the plug of the sensor into the Labdisc with the wider prong of the plug to the right. The thermocouple is used to measure temperatures in situations that might not be well suited to a thermometer. Thermocouples have a wider range of temperature measurement; as much as -200◦C to +2500◦C. Because they are small and have low thermal capacity, they offer a rapid response. Thermocouples are robust and are not prone to self-heating and are safe. The thermocouple measures temperature in Celsius degrees.

How To…
10
Turbidity Sensor (BioChem & Enviro) Calibrate the turbidity sensor by placing a cuvette full of 1000 NTU turbidity standard into the sensor. Press and hold the turbidity key for 3 seconds until a long beep is heard. To use the sensor, fill the cuvette to a 75% volume with the samples and measure the turbidity, being sure the cuvette is dry outside. Insert the cuvette into the appropriate space and, keeping the top of the cuvette pointed upwards; rotate the outer protective ring shut over the cuvette. UV Sensor (Enviro) Be sure that the outer ring of the Labdisc is rotated to a fully open position to ensure that the sensor is exposed to the environment. Point the UV sensor directly at the light source for which you wish to measure UV rays. The Ultraviolet sensor measures UV levels with the UVI or Ultraviolet Index. The UV Index is designed as a linear scale, directly proportional to the intensity of UV radiation that causes sunburn. An index of 0 corresponds to zero UV irradiation, while an index of 10 corresponds roughly to midday summer sun with a clear sky. Measurements greater than 11 are quite common in summer at low latitudes, high altitudes, or in areas with above-average ozone layer depletion. Voltage (Physio or External Sensor on any Labdisc) Rotate the outer ring of the Labdisc to expose the Voltage Sensor connection port and plug the smaller end of the banana cables into the appropriate ports (red to red, black to black). When using the Voltage sensor with a GenSci, Enviro or BioChem Labdisc, plug the external sensor into the external sensor micro USB port and then plug the smaller end of the banana cables into the appropriate ports on the external sensor. Wait for the Voltage sensor to auto calibrate and show a zero reading before beginning data collection. Labdisc measures Voltage in volts. The volt (V) is the unit of measurement for the electric potential difference between two points.
Available External Sensors Some of these sensors come built in on various Labdisc models but are available as external sensors for use with other Labdisc models. Dymo Wireless Force & Accelerometer This sensor allows for wired (via USB) or wireless (via Bluetooth) communication of data relating to force and acceleration. If using Bluetooth communication (recommended for all motion/acceleration activities), you will need to pair the Dymo with your computer the first time you use the sensor. To do this, turn on the Dymo using the on/off button. Press and hold the Bluetooth button for 3 seconds to enable Bluetooth communication. You will see the blue
light flash 3x. Then right click on the Bluetooth icon in the lower right corner of the Globilab window and click on “Find More Labdiscs and sensors.” When the “add a device” window pops up, select your Dymo using the last 4 digits from the sticker on the back of the Dymo to identify it. Use 1234 as the pairing code and click “next.” Then right click the Bluetooth icon again and select the Dymo that you just paired. To use the Dymo, press the on/off key. The LED will flash green and the device will be on. To start data collection, push the on/off button again (a 3 second hold on the on/off button will turn the Dymo off). When you are finished your data logging, push the on/off button again to stop logging. You can also use the start/stop button in the Globilab software to start/stop your data logging. If you wish to Zero Force Offset, turn the Dymo off. Remove any weights from the sensor. Disconnect it from the Globilab software. Turn the sensor on again and press both the Bluetooth *and* the On/Off keys simultaneously until the Bluetooth LED is a constant blue. A flashing red light indicates that the battery is low (if unplugged) or charging (if plugged in). Acceleration is measured in meters/second2. Force is measured in Newtons (N). A Newton is unit of force needed to move a 1 Kg mass at the rate of 1 m/sec2. Since F=ma, 1N=1 kg*m/s2.

How To…
11
Voltage Sensor When using an external voltage sensor with a GenSci, Enviro or BioChem Labdisc, plug the external sensor into the external sensor micro USB port and then plug the smaller end of the banana cables into the appropriate ports (red/red, black/black). When using the Voltage sensor with a GenSci, Enviro or BioChem Labdisc, plug the external sensor into the external sensor micro USB port and then plug the smaller end of the banana cables into the appropriate ports on the external sensor. Wait for the Voltage sensor to auto calibrate and show a zero reading before beginning data collection. Voltage is measured in volts (V), the unit of measurement for the electric potential difference between two points External Temperature Sensor When using an External Temperature sensor with any Labdisc model, plug the external sensor into the external sensor micro USB port and then plug the Temperature Probe is plugged into the sensor. Since all Labdisc models come with an External Temperature sensor built-in, the USB connected External Temperature sensor can be used to measure the temperature of two substances simultaneously. The External Temperature sensor can be set to measure in either Celsius or Fahrenheit. To set this, use the configurations menu on the Labdisc or your computer. CO2 Sensor When using a CO2 sensor with any Labdisc model, plug the external sensor into the external sensor micro USB port. The first time the CO2 is used, you will need to connect the Labdisc to its AC/DC adapter and allow the CO2 sensor to run for 24 hours, to reach calibration. After that, run the CO2 sensor for at least an hour before starting your experiment. The power consumption of the CO2 sensor is rather high, so it is recommended that you have the Labdisc plugged into the external power supply when using this sensor. Otherwise Labdisc battery will be empty in several hours and it will stop working. Heart Rate/Pulse When using an External Heart Rate sensor with a GenSci, Enviro or Physio Labdisc, plug the external sensor into the external sensor micro USB port and then plug the ear clip into the external sensor. Place the clip on the fleshy part of the ear lobe, in a small “pinky” finger or on the webbing of skin between the thumb and index finger. With an External Heart Rate sensor, the clip will measure the individual wave forms of each heartbeat, but will not show a graph line indicating the overall heart rate. The pulse waveform will be measured in Volts (V). Respiration Prior to using the Respiration sensor with any Labdisc model, wash the silicon mouthpiece and dry well before installing it on the Respiration probe. Then connect the Respiration sensor to the Micro USB socket. Turn on the Labdisc. If the airflow through the Respiration sensor is within ±10% around zero, the Respiration sensor will auto calibrate and show a zero reading. Have students insert the mouthpiece and begin breathing through the Respiration probe. Respiration is measured in liters per minute (L/min). Current When using the External Current sensor with an Enviro or BioChem Labdisc, plug the external sensor into the external sensor micro USB port and then plug the smaller end of the banana cables into the appropriate ports (red to red, black to black). When using the Current sensor with a GenSci, Enviro or BioChem Labdisc, plug the external sensor into the external sensor micro USB port and then plug the smaller end of the banana cables into the appropriate ports on the external sensor. Wait for the Current sensor to auto calibrate and show a zero reading before beginning data collection. Labdisc measures electrical current in Amperes or Amps (A).

How To…
12
Magnetic Field When using the Magnetic Field sensor with any Labdisc model, plug the external sensor into the external sensor micro USB port and use the probe’s switch to select the Earth’s magnetic field range. Use ±0.2 mT for measuring the Earth’s magnetic field or any other very weak field. Use ±10 mT for measuring the magnetic field near wires carrying current, inside coils and for constant magnetic fields. Magnetic fields are measures in militesla (mT) units.