getting started with swipe checkout
TRANSCRIPT

Getting Started with Swipe Checkout

What’s Inside
Hi! So you’re all signed up as a Swipe Checkout merchant and the way you sell online is going to be easier than ever before. In this guide we are going to give you the basics on how to get started with and use Swipe Checkout to grow your business. Simple, no headaches.
In this guide you will learn how to:
• Create transactions • View transactions • Create and manage invoices • Manage your customers • View reports • Settle transactions • Manage products
If you have any questions contact our help centre.
Let’s get started

Viewing and Creating Transactions
Viewing transactions
To view and create your transactions, navigate to the Transactions tab. The Dashboard lists current transactions for the day. To view past transactions or export transaction records click Reports Centre.

Creating a manual transaction
Click Create Transaction.
Complete the required fields:
• Item Description • Transaction Amount (No less than $1) • Credit Card Number (Valid or Test) • Card Type (Visa or Master Card) • Name on Card (Same as on Credit Card) • Expiry Date (Same as on Credit Card) • CVV Number (Back side of Credit Card) • Email Address (To receive transaction receipt)
Click Process Transaction to complete the manual transaction.

Finding transactions
To view a particular transaction click Transaction Search. There are three types of searchable transaction methods:
• Manual (Merchant Web App) • Manual (Android / iOS device) • Payment Gateway (Website Hosted Payment)
You can filter search results by the following:
• Date • Transaction ID • Last 4 digits of CC • Card Type • Customer Email • Customer Mobile Number • Transaction Status (All, Accepted, Declined
or Pending)

Creating and Viewing Invoices
To set up and manage your invoices navigate to the Merchant Tools tab, click E-invoices. To create a new invoice click New E-invoice.
Please note: Swipe creates a payment gateway for the customer to pay. Swipe does not create the invoice. You must first upload a pre-defined invoice in PDF format to create an E-Invoice with Swipe.


Once your invoice is created the E-invoice is sent to the customer’s email address.

The invoice will look like this. Customers can then click the links to download and pay the invoice.

Viewing Reports
Navigate to the Transactions tab and click Reports Centre and select the type of report you would like to run. To specify your own search criteria use Transaction Search. To search by card type click Transactions by Card Type. Select the date range and click Run this Report.

To search by date click Transactions by Date then select the date range, click Run this Report.

To run a sales report for a specified time period click Averages and Sales and select the date range, then click Run this Report.
This report shows you:
• Total sales and sale value • Average transactions value

Settling Transactions
To view your upcoming settlements navigate to Transactions and click Settlements. Transactions occurring on day1 will show up in your merchant account on day 4. If the transaction occurred over the weekend, these transactions are treated as if they occurred on a Monday and will show up in your merchant account on Thursday.

Settlements of funds into your bank account
Settlements are processed within 2 working days unless a transaction is under investigation, is being audited or verified. For all transactions that take place between 6pm & midnight (NZST), funds will take up to 3 working days to appear in your account (so on the morning of the fourth working day).
You can export your reports of your settlement history by clicking Export to CSV.
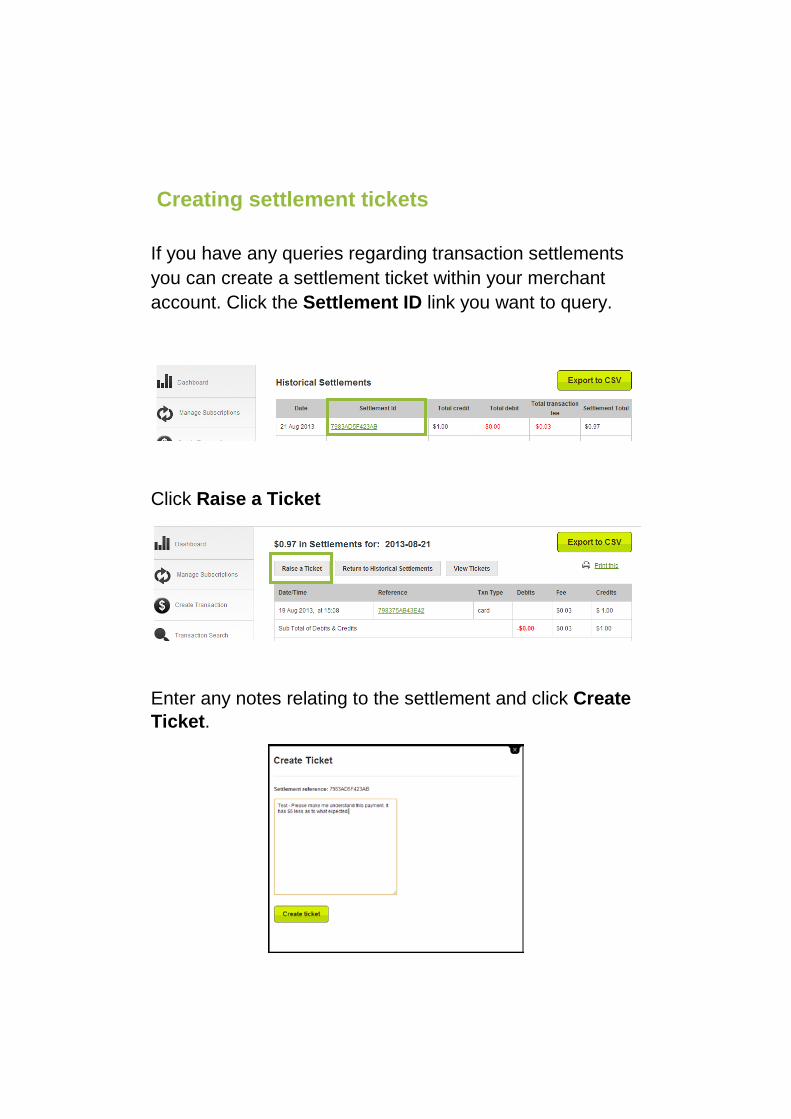
Creating settlement tickets If you have any queries regarding transaction settlements you can create a settlement ticket within your merchant account. Click the Settlement ID link you want to query.
Click Raise a Ticket
Enter any notes relating to the settlement and click Create Ticket.

Great! You have now created a response ticket. This response ticket is displayed below the corresponding Settlement ID and an email has been sent to the Swipe Investigation Team for investigation.

Managing Your Products
Navigate to the Merchant Tools tab and click Manage Products from the side menu. In this section you can create and manage your products.

Creating a new product
To create a new product, click New Product.
Complete the required fields.

Click Create new Product.

Paste the generated HTML code into your website to create a image based button.

Your payment page will look like this.

Your transaction approval page will look like this.

This is our test account. Your customers will receive a receipt like this below.

Managing your products
You can search for products using the Lookup button.

Viewing and editing product details
To view a product report click on the Product ID or Product Name.
Quickly edit product information by clicking the pencil or delete products by clicking the cross.

Your product report will look like this. To edit product information click Edit Product.

Managing Your Customers
To manage your customers navigate to the Customers tab.
From this page you can:
• View facts related to your customer database • Lookup customer records • Manually add new customers to your database • Import customers to your database

To manually add a new customer click Create Contact
To bulk import customers click Import Contacts. Select a CSV file to upload and click Upload File.