getting started with raspberry pi · once your pi has restarted it should boot directly into the...
TRANSCRIPT

Getting Started with Raspberry Pi

2
Raspberry Pi is a trademark of the Raspberry Pi Foundation. This manual is copyright of Premier Farnell UK Limited, 2018. All rights reserved. No part of this manual may be reproduced in whole or part in any manner or form or in any media without prior written consent of the copyright owner.
The Raspberry Pi™ is a low cost, credit-card sized computer, geared towards enabling people of all ages to explore computing and programming in languages like Scratch and Python. It runs Linux based operating systems from an SD card and is capable of doing everything a typical computer can do, from browsing the internet, to making spreadsheets, playing games and word-processing.
Additionally, the Raspberry Pi™ has the ability to interact with the outside world, and has been used in a wide array of digital projects, from home media centers and arcade gaming systems, to autonomous robots and automated drip irrigation systems.
Note: This guide is meant to serve as a general overview. All components mentioned may not be included in your kit. All of these components and more can be found at Newark.com.
Cover illustration courtesy of the Raspberry Pi Foundation.
What’s InsideUnpacking ................................................................. 3 Hooking it All Up ...................................................... 4 Operating Systems ................................................. 6 Installation, Logging In and Updating ................. 8 Configuration ..........................................................12 Installing Software Packages .............................13 Scratch ....................................................................16 Python .....................................................................19 Interfacing with Components .............................22 Building a Media Center .......................................29 Retro Gaming with Raspberry Pi ........................33 Add-Ons ...................................................................37

UnpackingIncluded in this kit are a Raspberry Pi board, case, power supply, and microSD card. To get up and running, you’ll also need to find a USB mouse and keyboard, an HDMI cable, and a monitor or TV with an HDMI input.
When looking at the Pi, you may notice some ports and components that look familiar, and some that may not. The illustration to the right helps point out the major ports and components on the board.
1
1
2
354
6
7
8
1. USB Ports 2. Ethernet Port 3. 4 Pole 3.5mm Audio Jack 4. Camera Ribbon Connector
5. HDMI Port 6. Micro USB Power Jack 7. Display Ribbon Connector 8. GPIO Pins
3

4
Hooking It All UpOnce everything is unpacked, slide the pre-loaded microSD card out of the SD card adapter and insert it into the slot in the bottom of the Raspberry Pi (1). Don’t force it; it only fits one way. The metal contacts on the microSD card should face the board.
Next, connect the mouse and keyboard into the USB ports on the Pi (2). It doesn’t matter which USB ports are used.
USB
1
2
3
4
Raspberry Pi 2014
Raspberry Pi 2 Model B V1.1
GPIO
DISPLAY
CAMERA
C97
USB
USB
ETHERNET
J10
J11
J12
Q4R6
R47 R48 R4 R50
C98
U13
D3C106
C100C163
C101R44R41
FB7R47
R33R32
R35R34R39
C57
D4J3
R62R60R61R49
C61
C60R36C90
C58
U1 C65R7
D1R20
Q6
J3
J4
R52
Made in the UK
R15 R56R55
L7L6L5L4
R51R54
RUN
ACTPWR
L1C56
U9
Q2 Q5
R5 U4
C7U16
C162 L3
C54
D5
C216C213
C224
C230C211
C233C218C227C231
C220
U17FB6 C70
C78 FB5
R78
C200 C235
C217C219
C228 C212 C221
C226
C222
L2
HDM�
A��
PWR �N
R14
R22
R21
R24R23
C64
R10C55
C62 R37
C53
R19R18
U10
U2
U11
J7
C59R17
R16C87C86
C89C88
C99
R13
CA
Q2
DISPLAYJ4
RU
D4 C55U10
U101
R7 3J3
C64
PIOGR5R5
C2
J12
53 GPIO
C657
D1R20
Q6RUN
R24R23
RUN
G

5
Grab the HDMI cable and slide it into the HDMI connector on the board (3), then into the HDMI port on the TV or monitor. Turn the TV/monitor on and select the correct input (HDMI).
Finally, connect the power supply into the micro USB port on the Pi (4), then into the wall. You’ll see the Raspberry Pi start to boot! The small LEDs illuminate on the board, and things will begin to happen on the screen.
USB
1
2
3
4
Raspberry Pi 2014
Raspberry Pi 2 Model B V1.1
GPIO
DISPLAY
CAMERA
C97
USB
USB
ETHERNET
J10
J11
J12
Q4R6
R47 R48 R4 R50
C98
U13
D3C106
C100C163
C101R44R41
FB7R47
R33R32
R35R34R39
C57
D4J3
R62R60R61R49
C61
C60R36C90
C58
U1 C65R7
D1R20
Q6
J3
J4
R52
Made in the UK
R15 R56R55
L7L6L5L4
R51R54
RUN
ACTPWR
L1C56
U9
Q2 Q5
R5 U4
C7U16
C162 L3
C54
D5
C216C213
C224
C230C211
C233C218C227C231
C220
U17FB6 C70
C78 FB5
R78
C200 C235
C217C219
C228 C212 C221
C226
C222
L2
HDM�
A��
PWR �N
R14
R22
R21
R24R23
C64
R10C55
C62 R37
C53
R19R18
U10
U2
U11
J7
C59R17
R16C87C86
C89C88
C99
R13
CA
Q2
DISPLAYJ4
RU
D4 C55U10
U101
R7 3J3
C64
PIOGR5R5
C2
J12
53 GPIO
C657
D1R20
Q6RUN
R24R23
RUN
G
If installing a Raspberry Pi into a case, make sure to remove the SD card before doing so. Installing the Pi into a case with the SD card installed may damage the SD card.

6
Operating SystemsLike most computers, the Raspberry Pi can run on several different operating systems. The included card comes pre-installed with NOOBS, or New Out Of the Box Software. NOOBS makes several operating systems available, which are listed below.
If not connected to a network, only Raspbian and LibreELEC are shown in the list of operating systems. If you’re new to the Raspberry Pi, we recommend selecting
LibreELEC is a fast and user-friendly Kodi Entertainment
Center distribution
Lakka is a lightweight Linux distro that transforms the Pi into a full
blown retro gaming console.
OSMC is a fast and feature filled open source media
center
The Foundation’s official supported operating system

7
Raspbian, as it’s the Raspberry Pi Foundation’s recommended OS, and is the operating system on which the rest of this guide will be written, unless noted.
To access other operating systems, connect to a network. This can be done by plugging a network cable into the Ethernet port on the Pi, or connecting to a wifi network by clicking the “Wifi networks” button, selecting your network and entering your credentials. Once connected, additional operating systems are shown.
Recalbox is an open source retro gaming console for
Raspberry Pi
Screenly is the most popular digital signage platform for
the Raspberry Pi
Windows 10 IoT Core utilizes the rich, extensible Universal Windows Platform (UWP) API for building great solutions.
ThinLinx is a 60-day trial of ThinLinx’s Debian-based
thin client

8
Installation, Logging In and UpdatingSelect the checkbox next to the operating system you’d like, select your language from the dropdown at the bottom of the screen, and click “Install”. After some time, the operating system will have been installed. Click “OK” on the prompt and the Pi will reboot.
Once your Pi has restarted it should boot directly into the desktop. Earlier versions prompted you to log in via the command line. If you’re prompted to log in, use Username: pi, Password: raspberry. When you hit the enter key, you will see Pi@raspberry ~ $. Type “startx” to launch the desktop.

9
Take a look around and you’ll see things look pretty standard. Look through the menus to find different programs and utilities. Under the start menu (the “Raspberry Pi” icon at the top left), you’ll see directories for Programming, Internet, Games, and Accessories. Additionally, you’ll see shortcuts in the top navigation bar to a web browser, folders, the terminal, Mathematica and Wolfram.
Shift
Shift

10
Now that you’ve launched, it’s a good idea to update your operating system, but before we can update, we’ll need to connect to the internet.
Connecting to the InternetIf you didn’t connect before installing your operating system, connect via a wired network by simply plugging in an ethernet cable to the Pi’s ethernet connector, or connect wirelessly by clicking the icon and entering your network credentials. Once connected, you’ll see or in the top right of your screen.
Note: Even though you’ve already installed an operating system, other OSs continue to stay on the card. By holding when booting, you can return to the installation interface. This allows you to switch to a different operating system.
Shift
Shift
Shift
Shift
Shift
Shift
Shift
Shift

11
Once connected, open the terminal by clicking the black terminal icon in the menu bar.
Type:
sudo apt-get update
and press enter. Type “Y” if prompted.
Next, type:
sudo apt-get upgrade Any updates will download and install. Again, type “Y” if prompted. This can take a few minutes, depending on how many updates need to be performed.
It’s a good practice to update every so often by following the process above.
Shift
Shift

12
ConfigurationThere are a number of options that can be changed within the Raspberry Pi’s configuration. To access them, open a terminal and type sudo raspi-config. Here is a list of the more important options:
expand_rootfs – by default, Raspbian will only create a 2GB file system. Use this option to expand the file system on larger cards.
overclock – get extra performance at no extra cost by overclocking your Pi. Beware though, extra speed means extra heat, which can affect stability of your board.
boot_behavior – change whether your Pi boots into the graphical environment or a text environment.
Shift
Shift

13
Installing Software PackagesIf you’re used to Windows, you may be used to each program having its own installer, which gets the appropriate files and puts them into the appropriate places. Linux is a bit different, in that programs are installed as packages through a package manager.
There are two ways to install packages. Both require a network connection.
Package Administration via Command LineThe most rudimentary method of administering packages is via the command line. Open a terminal and type:
apt-cache search arduino
This will return a list of packages pertaining to Arduino, the microcontroller.

14
To install a package, use:
sudo apt-get install arduino
In some cases, you’ll be notified that other packages, known as dependencies, are needed. Agree to install these dependencies by typing “Y” if prompted.
To delete a package, type
sudo apt-get purge arduino
Package Administration via Synaptic Package ManagerSynaptic is a package that features a user interface, making it easier to browse and install other packages. Install ‘Synaptic Package Manager’ by entering:

15
sudo apt-get install synaptic
Confirm that you’d like to install when prompted by typing “Y” and pressing enter. Once installed, it can be found under > Preferences > Synaptic Package Manager. If it prompts for a password, use raspberry.
Within Synaptic Package Manager, you can browse packages by category and choose to install new or update existing packages. Select the packages you’d like to install or update and click “Apply”. Some of our favorites are gimp, arduino, and fritzing.
Shift
Shift

16
ScratchThe Raspberry Pi features several coding environments that cater to different languages and demographics. Scratch and Scratch 2 are block-based editors that are both powerful and easy to use. Not only can programs be written to do things within the Scratch editor, but programs can also interface with components outside the Raspberry Pi via the Pi’s GPIO pins.
Open Scratch via > Programming > Scratch 2 and get familiar with the interface. On the left, you’ll see the screen where your code will be executed. Below the screen, you’ll see a library of sprites. Only the cat will be present, but other sprites can be added, such as images and graphics.
Shift
Shift

17
In the center resides the libraries of code blocks which are used to build a program. Finally, on the right is a blank area where code will be assembled.
Go ahead and try it. Grab the block with your mouse from the Motion library and drag it to the blank area on the right. Now see what it does by double clicking on the code block. The cat will move 10 steps, or pixels. Try changing the value in the code block from 10 to -10. Double clicking the block now will make the cat back up 10 steps.
In this case, we’re only executing one command, but the beauty of coding is that many commands can be assembled together to form a program! Try replicating the code on the next page in the Scratch editor. All blocks are color-coded, and correspond to a library, so they should be easy to find.

18
In this instance, the code is waiting for a trigger. When the green flag is clicked (above the cat), the code below will execute, and continue to execute until the space bar is pressed. Try putting together different code blocks to make the cat do different things.
This has only “scratched” the surface of what can be done. Learn more about programming with Scratch at these resources:
raspberrypi.org/documentation/usage/scratch/
scratch.mit.edu

19
PythonUnlike Scratch, Python must be coded by hand, using typed words. The Pi comes with Python 2 and Python 3 installed. Python 3 is recommended, while Python 2 is provided for legacy applications.
Open > Programming > Python 3 (IDLE). IDLE (Integrated Development and Learning Environment) gives you a REPL (Read-Evaluate-Print-Loop) which is a prompt to which you can enter Python commands.
Shift
Shift
Code File
Shell

20
The window opened by default is called the Shell. In the Shell, commands can be entered and executed by hitting the enter key.
Try typing the line below and pressing enter:
print(“Hello world”)
The Shell is fun to play around with, but programs should be written in a Code file, which allows you to save, close and reopen them. Open a new Code window by going to File > New, or hitting Ctrl + N. Go ahead and save the empty file by going to File > Save As. Name your file something and end it with “.py”.
Now, in the file, type:
print(“Hello world”)
Save the file (Ctrl + S). To execute the code, press the F5 key. In the Shell window, you’ll see ====RESTART===== followed by the output of the code you’ve written.

Where some languages use curly brackets to group bits of code together, Python relies on indents. Here is an example of a for-loop.
for i in range(4): print(“Yes”) print(“No”)
See how the lines within the loop are indented?
Mastering Python won’t happen overnight, but that’s what makes it exciting. To learn more about Python coding principals, like using if, then statements, for loops, functions, and more, visit these resources:
python.org/doc/
raspberrypi.org/documentation/usage/python/
Note: In the code examples moving forward, you may see lines that begin with a “#”. These are comments, and are not executed as code. They’re there to explain what’s going on. You don’t need to type them into your files, but if you did, they wouldn’t affect how the code runs. Because code can get pretty cryptic, it’s helpful to put comments in your code that explain what’s going on, both for others and for youself!
21
#Import the Python libraries needed import RPi.GPIO as GPIO import time
A Comment on Comments

Interfacing with ComponentsWe’ve learned a little bit about how to write programs in two different languages. Now let’s take it to the next level and explore what makes the Pi really exciting; interfacing with the outside world.
We’ve identified the GPIO pins on the Pi in the first section of this book, but what do they do? There are a total of 40 GPIO pins on the Pi. Some provide voltage. Some are ground pins. Some transmit analog signals, and some transmit digital signals. The chart to the left identifies the name of each pin, along with the Broadcom (GPIOXX) and Board (in black) pin numbers. Using this information, we can reference the pins we need in our code.
22
01 3.3v03 GPIO2 SDA05 GPIO3 SCL07 GPIO4
11 GPIO17 09 GND
13 GPIO2715 GPIO2217 3v319 GPIO10 MOSI21 GPIO9 MISO23 GPIO11 SCLK25 GND27 ID_SD29 GPIO531 BVM633 GPIO1335 GPIO1937 GPIO2639 GND
USB Ports
5V 025V 04GND 06TXD GPIO14 08
GPIO18 12RXD GPIO15 10
GND 14GPIO23 16GPIO24 18GND 20GPIO25 22CE0 GPIO8 24CE1 GPIO7 26ID_SC 28GND 30GPIO12 32GND 34GPIO16 36GPIO20 38GPIO21 40

23
Here is a list of common components used in our code on the next few pages. Some of these may look familiar.
A. Resistor - Resists voltage, reducing current flow to the value of the resistor. Different valued resistors have different colored lines on the body. B. Capacitor - These store potential energy, which help to eliminate voltage drops in a circuit. Some caps are directional. C. LED - LEDs, or light emitting diodes, come in different colors and a few sizes. Current goes through these in only one direction, so orientation is important. D. Photoresistor - Also known as a light sensor. Changes resistance based on varying light levels. E. Jumper wires - These come in male to male, female to female, and male to female, and are used to build connections. They fit perfectly over the GPIO pins and into breadboard holes.
Breadboards are the foundation on which temporary circuits are built. Power rails (on each side), are connected to one another the length of the board, and are perfect for allowing access to ground and power where needed. Terminal strips are connected in a row. The channel down the middle separates the sides, and is sized to accommodate DIP ICs. The blue shading illustrates how each set of terminals are connected above.
A B C D EPower Rails Terminal Strips

24
1 5 10 15 20 25 30
1 5 10 15 20 25 30
ABCDE
FGHIJ
Turning on an LEDThe most basic exercise we can do is to turn on an LED using Python code. Start by opening a new code window in Python and saving it as LED.py.
Next, grab these components: •Breadboard •LED •Resistor (220 ~ 470 ohm should work) •Two male-female jumper wires
To avoid accidental shorts, power down the Pi, and assemble the components like in the diagram to the right, connecting the ground wire to board pin 39 and the power wire to board pin 40.
Note: on an LED, the shorter leg and/or flat side is negative and long leg/round side is positive.

25
Next, we need to write the code to run the LED. Turn on the Pi, open the Python 3 editor, then open a new code window (Ctrl + N) and save it as LED.py in your home directory, /home/pi/. Write the code to the right in the LED.py file. You don’t need to write the comments in red; just the code in blue.
Next, save the file again, and press F5 to run the program. If everything is hooked up correctly, your LED should illuminate for 5 seconds, then turn off.
Try making some edits to the code. Can you make the LED stay on longer? What about making it blink a few times instead of just once?
#Import the Python libraries needed import RPi.GPIO as GPIO import time #Set the GPIO mode to Broadcom pin #numbers, not Board pin numbers GPIO.setmode(GPIO.BCM) #Set the LED GPIO number LED = 21 #Set the LED GPIO pin as an output GPIO.setup(LED,GPIO.OUT) #Turn the GPIO pin on GPIO.output(LED,True) #Wait 5 seconds time.sleep(5) #Turn the GPIO pin off GPIO.output(LED,False)
#Clean up GPIO.cleanup()
LED.py

26
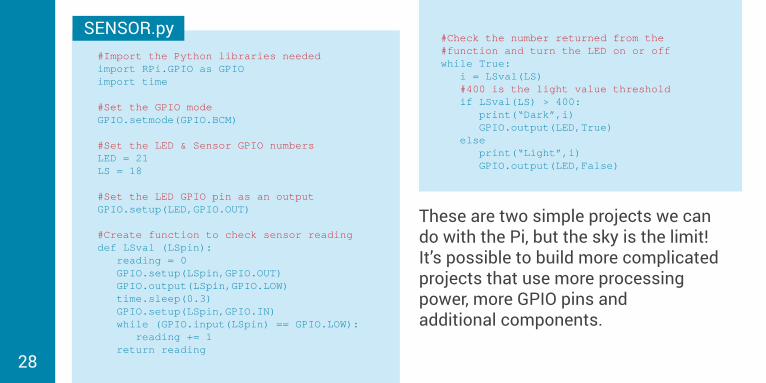
Reading a Light SensorWe’ll piggyback on the previous experiment by adding a light sensor. We’ll measure light levels. If it gets dark, we’ll turn the lights on! In addition to the components we’re already using, grab the components:
•Light Sensor •Capacitor 1uF, 50V •Two more male-female jumper wires
Power down the Pi, and assemble the components like in the diagram on the right. The LED portion stays the same, but we’re adding the capacitor and light sensor. Next, create a new code file called
To make accessing
the GPIO pins on the
Pi easier, some prefer the use of a
GPIO breakout board. A GPIO breakout board
connects to the Pi’s GPIO pins with a ribbon cable. On
the other end is a PCB with pins that are spaced perfectly to fit
over the channel in the center of a breadboard. It also provides power and ground to the power rails on each side of the breadboard.

27
SENSOR.py. Type the code on the next page into the SENSOR.py file. Some of the code will look the same as the LED.py file.
Once saved, press F5 to run your code. If it’s working correctly, you’ll see output in the Shell stating whether the sensor determined if it’s light or dark outside, along with the light-level reading, as a number. Cover the sensor with your hand. The screen should state it’s “Dark”, and the LED should illuminate. Try changing the light level at which the LED illuminates by changing “400” to another number.
1 5 10 15 20 25 30
1 5 10 15 20 25 30
ABCDE
FGHIJ
Note: on a capacitor, the shorter leg is negative and the longer leg is positive. The negative side of the capacitor may also have a line on
the casing.
28
#Import the Python libraries needed import RPi.GPIO as GPIO import time #Set the GPIO mode GPIO.setmode(GPIO.BCM) #Set the LED & Sensor GPIO numbers LED = 21 LS = 18 #Set the LED GPIO pin as an output GPIO.setup(LED,GPIO.OUT) #Create function to check sensor reading def LSval (LSpin): reading = 0 GPIO.setup(LSpin,GPIO.OUT) GPIO.output(LSpin,GPIO.LOW) time.sleep(0.3) GPIO.setup(LSpin,GPIO.IN) while (GPIO.input(LSpin) == GPIO.LOW): reading += 1 return reading
#Check the number returned from the #function and turn the LED on or off while True: i = LSval(LS) #400 is the light value threshold if LSval(LS) > 400: print(“Dark”,i) GPIO.output(LED,True) else print(“Light”,i) GPIO.output(LED,False)
SENSOR.py
These are two simple projects we can do with the Pi, but the sky is the limit! It’s possible to build more complicated projects that use more processing power, more GPIO pins and additional components.
29
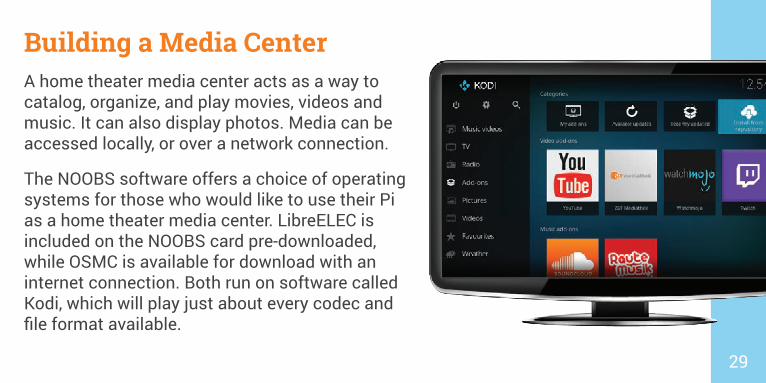
Building a Media CenterA home theater media center acts as a way to catalog, organize, and play movies, videos and music. It can also display photos. Media can be accessed locally, or over a network connection.
The NOOBS software offers a choice of operating systems for those who would like to use their Pi as a home theater media center. LibreELEC is included on the NOOBS card pre-downloaded, while OSMC is available for download with an internet connection. Both run on software called Kodi, which will play just about every codec and file format available.
30
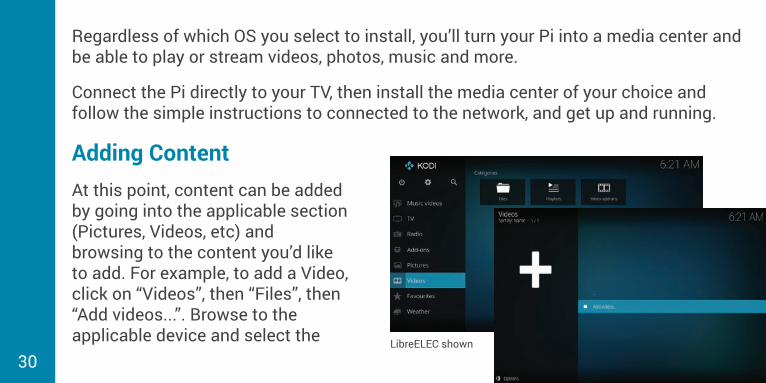
Regardless of which OS you select to install, you’ll turn your Pi into a media center and be able to play or stream videos, photos, music and more.
Connect the Pi directly to your TV, then install the media center of your choice and follow the simple instructions to connected to the network, and get up and running.
Adding ContentAt this point, content can be added by going into the applicable section (Pictures, Videos, etc) and browsing to the content you’d like to add. For example, to add a Video, click on “Videos”, then “Files”, then “Add videos...”. Browse to the applicable device and select the LibreELEC shown

31
files you’d like to add. It’s possible to have media from multiple sources, such as local storage, network file sharing, or internet streams.
Using a RemoteWhile Kodi supports mouse, keyboard, and even touch controls, the main method of controlling Kodi is around a remote control. The most popular controllers are wireless RF remotes, which can include a keyboard and touchpad, but Kodi can also be controlled by game controllers, smartphones, and some standard TV remotes.
The remote for your HDTV may automatically be detected so it might be worth it to try hitting a few buttons to see.

32
Add-OnsAdd-ons are packages that add features and functions not normally included with Kodi. Add-ons are developed by people on Team Kodi and third-parties.
To find and install an add-on, go into “Add-ons” from the main menu, then select “Install from repository”. Drill down through the type of add-on you like, then select the “Install”. Add-ons can also be updated and disabled from this section.
More information, including complete documentation, can be found at these resources:
kodi.wiki
libreelec.tv
osmc.tv

Retro Gaming with Raspberry PiToday’s video games are better than ever. The graphics and processing speed provide an experience that’s truly amazing, but there’s a soft spot for the games that started it all. One of the more popular uses for the Raspberry Pi is to run an emulator that allows ROMs of vintage games to be played.
Lakka_RPi2 is a lightweight Linux distribution that transforms your Raspberry Pi into a full blown retro gaming console. It will work with virtually any video game released to any home console prior to and including Nintendo 64, and all portable
33

34
consoles released prior to and including Sony PSP. It also supports the use of most wired video console controllers.
Once installed, the Pi will boot directly to Lakka. To navigate the menu, use a USB game controller or the arrow, enter and backspace keys on your keyboard.
Configuring Your ControllerWhile Lakka will try to match your controller to a preexisting configuration, all button assignments can be customized. Controller configuration can be found under the settings menu, under “Input”.
Ensure you set the “Menu Toggle Gamepad Combo” to a button combination that your
35
controller supports. This will allow you to exit games from your controller without relying on a keyboard.
Adding ROMs (Games)ROMs can be accessed in a number of ways, including via network sharing, but the most straightforward way is to load ROMs onto a USB drive, then scan the drive within Lakka.
Once you’ve loaded ROMs onto your USB drive, plug it into the Pi’s USB port. Within Lakka, navigate to the (+) on the right end of the menu and select “Scan Directory”. Select the USB drive, and then select “<Scan this Directory>”.
It’s recommended to keep ROMs zipped, and it’s best practice to sort ROMs into sub-folders by system – i.e. “Atari – 2600”, “Sega – 32X”.

36
Text across the bottom of the screen will notify you as games are found and added.
Once finished, the games added will appear under a controller icon pertaining to the relevant console, all the way to the right in the main menu. Select the game by pressing enter or “A” on your controller. To exit a game, press F1 or ESC on your keyboard, or use the “Menu Toggle Gamepad Combo” buttons you assigned earlier.
More information, including FAQs and documentation can be found at lakka.tv.
Note: Due to licensing reasons, ROMs are not supplied. Please inform yourself of any licensing restrictions before downloading or making copies of games.

Add-OnsThere are literately hundreds of add-on accessories for the Raspberry Pi which help to extend its functionality. Many connect to the Pi by sliding over the header pins. These are called HATs (Hardware Attached on Top). Others connect via ribbon connectors or USB ports.
While we can’t detail every accessory ever made for the Pi, there are a few official Raspberry Pi accessories which we’ll outline below.
CameraThe Raspberry Pi camera comes in two versions; a standard version, and a NoIR version, which is an infrared-sensitive camera. Both take still pictures up to 3280 x 2464 pixels, and video up to 1080p at 30fps.
37
Standard NoIR

38
To install either camera, attach the ribbon cable into the CSI port on top of the Raspberry Pi. Next, enable the camera in > Preferences > Raspberry Pi Configuration. Under the “Interfaces” tab, select the “Enabled” radio button next to “Camera”.
Take a picture using the following command, via the terminal, where cam.jpg is the file name:
raspistill -o cam.jpg
Take a video using this command, where vid.h264 is the file name:
raspivid -o vid.h264
Note: Files saved using the same name will overwrite existing files.
Shift
Shift

39
Images and videos will be saved in /home/pi by default.
There are a multitude of options available to change how the camera behaves, such as adjusting sharpness, contrast, ISO, exposure, flipping images, previewing images, and more. A full list of these can be viewed at raspberrypi.org/documentation/raspbian/applications/camera.md.
Sense HATWe mentioned HATs earlier, and the Sense HAT is a fine example. It was made especially for the Astro Pi mission, and was launched to the International Space Station in December 2015. The Sense HAT extends the Pi’s capability by including a RGB LED matrix, a five-button joystick, gyroscope, accelerometer, magnetometer, temperature sensor, barometric pressure sensor, and humidity sensor.

To install the Sense HAT, simply shut down your Pi and then slide it down over the GPIO pins. Once the Pi is powered back on, you’ll see the LED matrix on the Sense HAT illuminate.
The Raspberry Pi Foundation has been kind enough to include the Python libraries necessary to interface with the Sense HAT. To import the Sense HAT libraries into your Python project, open a new Code file and type the following:
from sense_hat import SenseHat sense = SenseHat()
This imports the Sense HAT library and instantiates a Sense HAT object, which is necessary to interface with the HAT.
After typing the code above, try adding a code snippet from the next two pages to interact with the Sense HAT.
5
ESSENTIALS
[ Chapter One ]
In 2015, The Raspberry Pi
Foundation built two space-hardened Raspberry Pi units to run student code on board the International Space Station (ISS). This initiative was part of Astro Pi, an annual science and coding competition where student-written code is sent to the ISS. These modules consisted of a Raspberry Pi B+, as well as the Sense HAT in a custom enclosure.
Visit astro-pi.org to learn more about this initiative!
40

#Scrolls Hello World across the LED matrix screen sense.show_message(”Hello World”)
#Sets the top left pixel to a specific RGB #color, in this case, blue sense.set_pixel(0, 0, [0, 0, 255]) #Returns a temperature reading in degrees C temp = sense.get_temperature() #Rounds to the nearest tenth of a degree temp = round(temp, 1) print(temp) #Returns a pressure reading in millbars pressure = sense.get_pressure() #Rounds to the nearest tenth of a degree pressure = round(pressure, 1) print(pressure)
41
What’s really cool is that you don’t have to buy a Sense HAT to tinker with the HAT’s features! Under > Programming, there is a Sense HAT Emulator.
Once open, under File > Open Example, you can open one of several example Python files. Run the Python file by pressing F5. Interact with the sliders and buttons in the emulator to see how the HAT reacts.
Shift
Shift

42
More documentation on the Sense HAT can be found via these references:
github.com/raspberrypilearning/ astro-pi-guide
projects.raspberrypi.org/en/ projects/getting-started-with-the-sense-hat
#Returns a relative humidity reading as a percentage humidity = sense.get_humidity() #Rounds to the nearest tenth of a degree humidity = round(humidity, 1) print(humidity) #Prints changes in pitch, roll, yaw while True: o = sense.get_orientation() p = o[“pitch”] r = o[“roll”] y = o[“yaw”] pitch = round(pitch, 1) roll = round(roll, 1) yaw = round(yaw, 1) print(“pitch {0} roll {1} yaw {2}”.format(p, r, y))
#Prints inputs made to the joystick while True: for event in sense.stick.get_events(): print(event.direction, event.action)
43
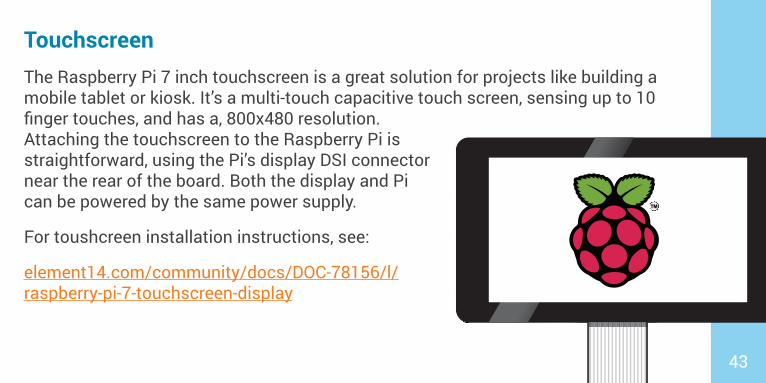
TouchscreenThe Raspberry Pi 7 inch touchscreen is a great solution for projects like building a mobile tablet or kiosk. It’s a multi-touch capacitive touch screen, sensing up to 10 finger touches, and has a, 800x480 resolution. Attaching the touchscreen to the Raspberry Pi is straightforward, using the Pi’s display DSI connector near the rear of the board. Both the display and Pi can be powered by the same power supply.
For toushcreen installation instructions, see:
element14.com/community/docs/DOC-78156/l/ raspberry-pi-7-touchscreen-display

44
PoE HATThe latest addition to the official accessory offering, the PoE HAT enables one of the Pi’s newest features – Power over Ethernet. Previously, the Raspberry Pi was powered via the Micro USB connector near the rear of the board. With the addition of this HAT, the Pi3 Model B+ can be powered over an Ethernet cable, while at the same time transferring data. Utilizing PoE can be beneficial in instances where a power plug isn’t available, such as security camera installations.
To install the PoE HAT, simply slide it over the GPIO pins on the Pi, just like with the Sense HAT. While the PoE HAT doesn’t require any special software to work, an 802.3AF compliant injector, router, or switch is needed, which injects power through the Ethernet cable and into the Pi.

45
Additional ResourcesOne of the great things about the Raspberry Pi is the huge community and amout of support. There are literally thousands of websites featuring projects around the Pi. Some of our favorite resources are below.
projects.raspberrypi.org/
hackster.io/raspberry-pi
element14.com/raspberry-pi

46
Notes

47
Established in 2009, the element14 Community is the industry standard for electronics collaboration. It has popular technical blogs, videos and webinars that provide information on the latest in electronics trends such as the Internet of Things and Wireless Technologies. It also hosts the popular Ben Heck Show. It is a place where you can:
CONNECT with a community of thousands of engineers and innovators from all over the world.
LEARN about the very latest in new technology from industry experts, suppliers, independent sources and user reviews.
CREATE and source your next electronics project with access to 24/7 community support to tackle tough project challenges.
INSPIRE and be Inspired; build your next project and help others to create a better connected world.
CommunityCONNECT. LEARN. CREATE. INSPIRE.
element14.com

www.element14.com83-20180UG Revision 2018.02.14