getting started with qp-nano - state machines & tools … open the blinky project in keil...
TRANSCRIPT
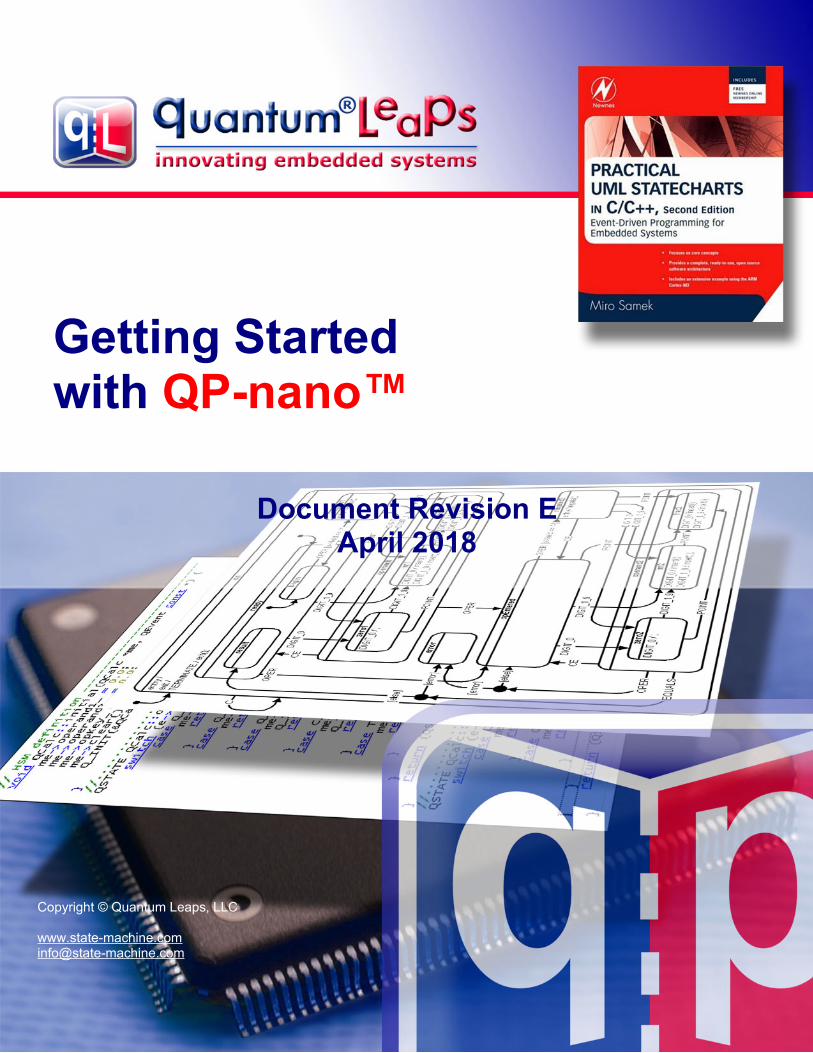
Getting Startedwith QP-nano™
Document Revision EApril 2018
Copyright © Quantum Leaps, LLC
Copyright © Quantum Leaps, LLC. All Rights Reserved.
Table of Contents
1 Introduction .................................................................................................................................................... 1
2 Obtaining and Installing QP-nano and QTools ............................................................................................ 2 2.1 Downloading QP-nano ............................................................................................................................. 2 2.2 Downloading QTools ................................................................................................................................ 2 2.3 Installing QP-nano ................................................................................................................................... 3 2.4 Installing QTools ...................................................................................................................................... 4
3 Building and Running the Blinky Example .................................................................................................. 5 3.1 Blinky on Windows with MinGW (GNU C/C++ for Windows) ................................................................... 6 3.2 Blinky on Tiva LauchPad with Keil/ARM (Keil uVision) ............................................................................ 7 3.3 Blinky on Tiva LauchPad with IAR (IAR EWARM) ................................................................................... 8 3.4 Blinky on Tiva LauchPad with GNU-ARM (Makefile Project) ................................................................... 9
4 The Blinky State Machine and Code ............................................................................................................. 12
5 Creating Your Own QP-nano Projects .......................................................................................................... 14
6 Next Steps and Further Reading About QP™ and QM™ ............................................................................ 14
7 Contact Information ....................................................................................................................................... 15
i
Legal Disclaimers
Information in this document is believed to be accurate and reliable. However, Quantum Leaps does not give any representations or warranties, expressed or implied, as to the accuracy or completeness of such information and shall have no liability for the consequences of use of such information.
Quantum Leaps reserves the right to make changes to information published in this document, including without limitation specifications and product descriptions, at any time and without notice. This document supersedes and replaces all information supplied prior to the publication hereof.
All designated trademarks are the property of their respective owners.
Copyright © Quantum Leaps, LLC. All Rights Reserved.
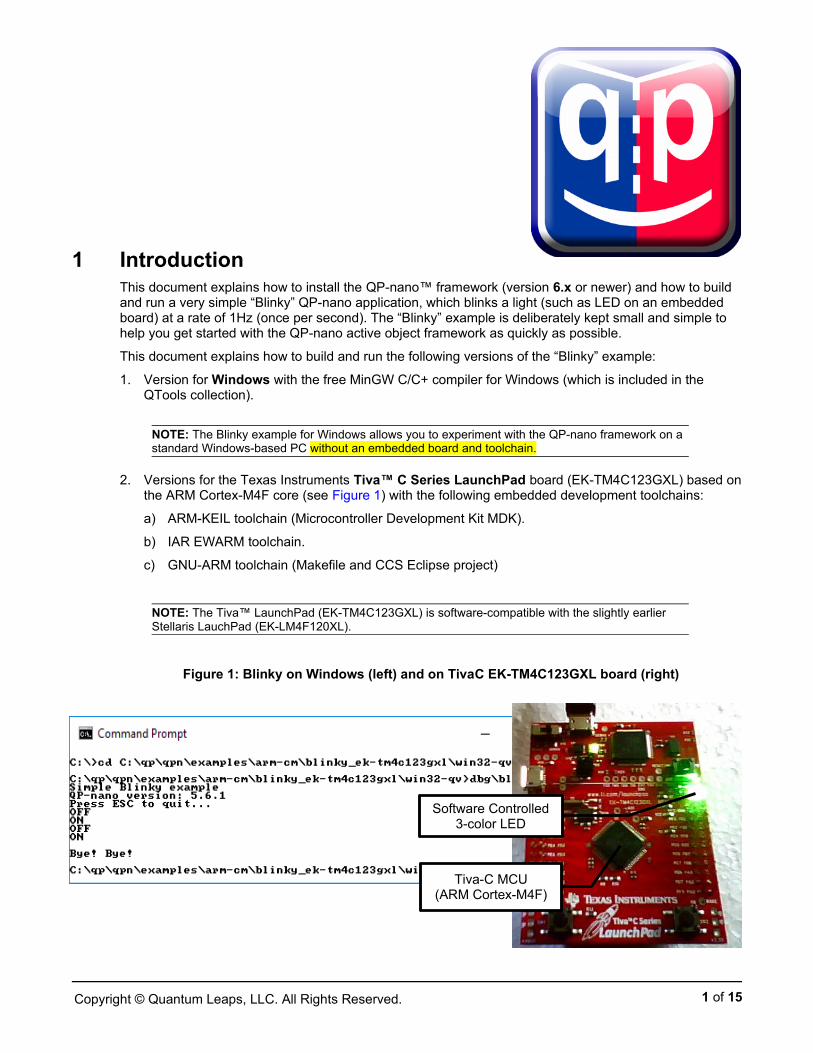
1 IntroductionThis document explains how to install the QP-nano™ framework (version 6.x or newer) and how to build and run a very simple “Blinky” QP-nano application, which blinks a light (such as LED on an embedded board) at a rate of 1Hz (once per second). The “Blinky” example is deliberately kept small and simple to help you get started with the QP-nano active object framework as quickly as possible.
This document explains how to build and run the following versions of the “Blinky” example:
1. Version for Windows with the free MinGW C/C+ compiler for Windows (which is included in the QTools collection).
NOTE: The Blinky example for Windows allows you to experiment with the QP-nano framework on a standard Windows-based PC without an embedded board and toolchain.
2. Versions for the Texas Instruments Tiva™ C Series LaunchPad board (EK-TM4C123GXL) based onthe ARM Cortex-M4F core (see Figure 1) with the following embedded development toolchains:
a) ARM-KEIL toolchain (Microcontroller Development Kit MDK).
b) IAR EWARM toolchain.
c) GNU-ARM toolchain (Makefile and CCS Eclipse project)
NOTE: The Tiva™ LaunchPad (EK-TM4C123GXL) is software-compatible with the slightly earlier Stellaris LauchPad (EK-LM4F120XL).
Figure 1: Blinky on Windows (left) and on TivaC EK-TM4C123GXL board (right)
1 of 15
Software Controlled3-color LED
Tiva-C MCU(ARM Cortex-M4F)
Copyright © Quantum Leaps, LLC. All Rights Reserved.
Application NoteGetting Started with QP-nano™
state-machine.com/qpn
2 Obtaining and Installing QP-nano and QToolsThis section describes how to download and install the QP-nano framework and QTools, the latter being acollection of various open source tools for working with QP, such as the QSPY host application for processing the QS software traces. The QTools collection for Windows, contains additionally the GNU make and the GNU C/C++ compiler (MinGW), which you can use to build the Blinky example.
2.1 Downloading QP-nano
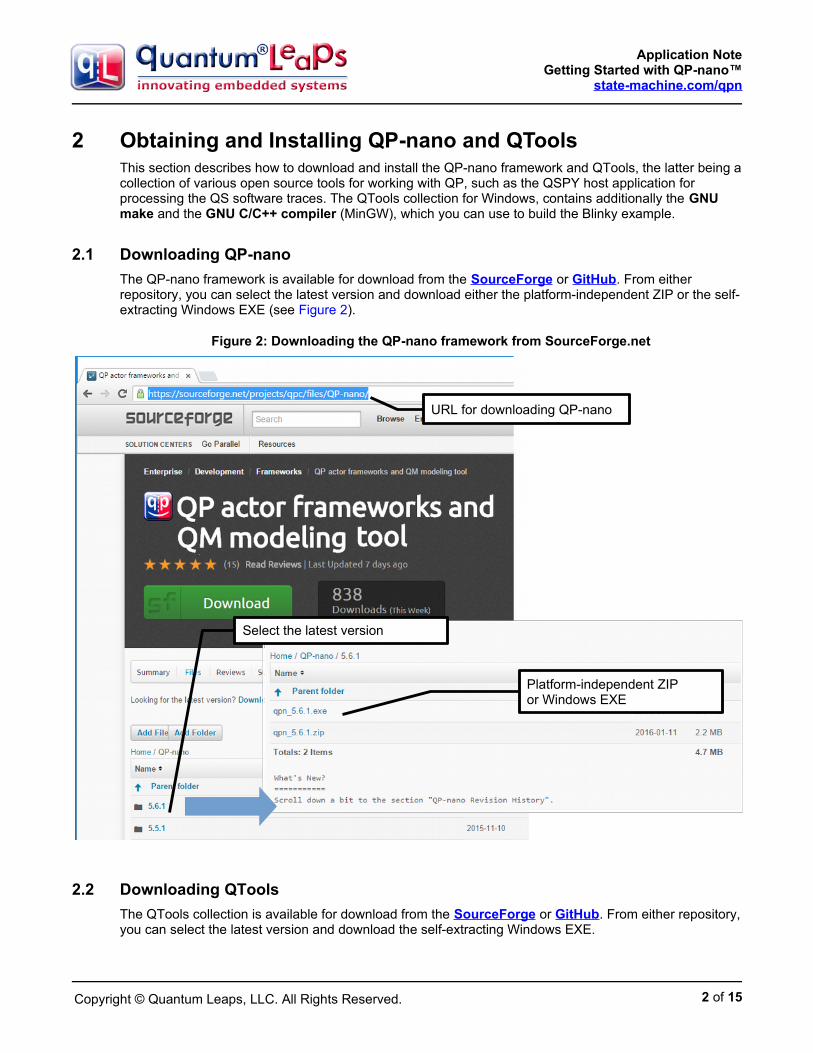
The QP-nano framework is available for download from the SourceForge or GitHub. From either repository, you can select the latest version and download either the platform-independent ZIP or the self-extracting Windows EXE (see Figure 2).
Figure 2: Downloading the QP-nano framework from SourceForge.net
2.2 Downloading QTools
The QTools collection is available for download from the SourceForge or GitHub. From either repository,you can select the latest version and download the self-extracting Windows EXE.
2 of 15
URL for downloading QP-nano
Platform-independent ZIPor Windows EXE
Select the latest version
Copyright © Quantum Leaps, LLC. All Rights Reserved.
Application NoteGetting Started with QP-nano™
state-machine.com/qpn
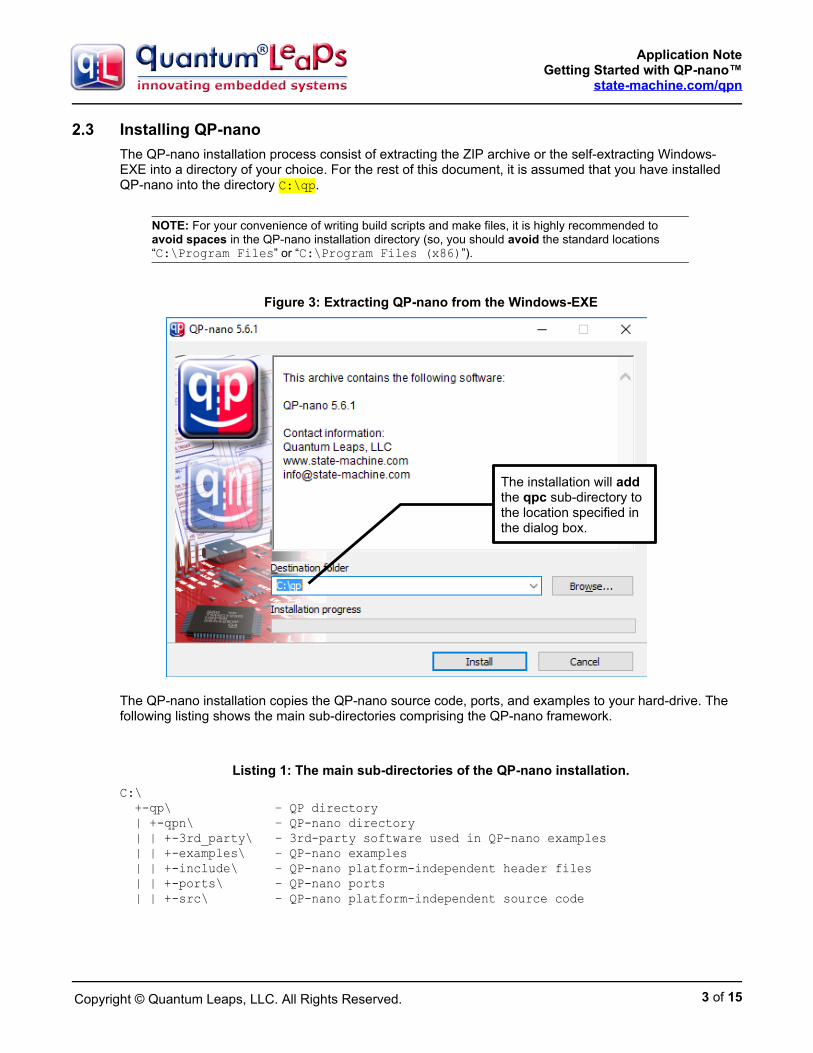
2.3 Installing QP-nano
The QP-nano installation process consist of extracting the ZIP archive or the self-extracting Windows-EXE into a directory of your choice. For the rest of this document, it is assumed that you have installed QP-nano into the directory C:\qp.
NOTE: For your convenience of writing build scripts and make files, it is highly recommended to avoid spaces in the QP-nano installation directory (so, you should avoid the standard locations “C:\Program Files” or “C:\Program Files (x86)”).
Figure 3: Extracting QP-nano from the Windows-EXE
The QP-nano installation copies the QP-nano source code, ports, and examples to your hard-drive. The following listing shows the main sub-directories comprising the QP-nano framework.
Listing 1: The main sub-directories of the QP-nano installation.
C:\ +-qp\ – QP directory | +-qpn\ – QP-nano directory | | +-3rd_party\ – 3rd-party software used in QP-nano examples | | +-examples\ – QP-nano examples | | +-include\ – QP-nano platform-independent header files | | +-ports\ – QP-nano ports | | +-src\ – QP-nano platform-independent source code
3 of 15
The installation will add the qpc sub-directory to the location specified in the dialog box.
Copyright © Quantum Leaps, LLC. All Rights Reserved.
Application NoteGetting Started with QP-nano™
state-machine.com/qpn
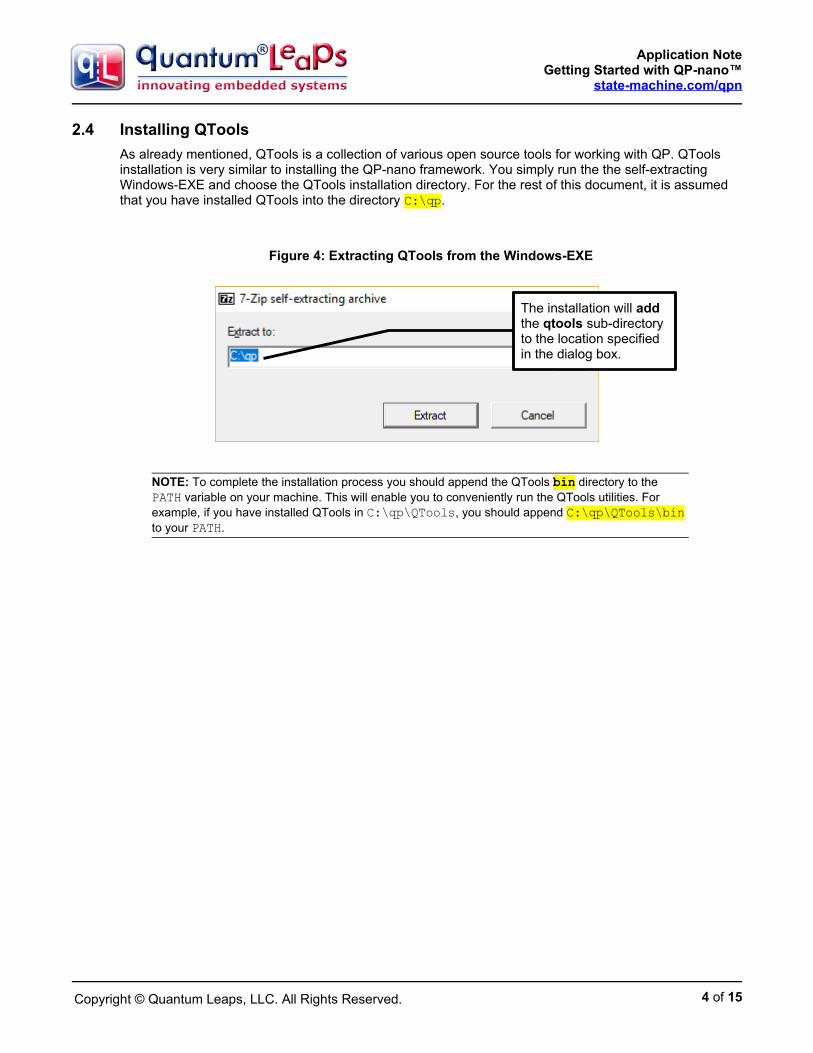
2.4 Installing QTools
As already mentioned, QTools is a collection of various open source tools for working with QP. QTools installation is very similar to installing the QP-nano framework. You simply run the the self-extracting Windows-EXE and choose the QTools installation directory. For the rest of this document, it is assumed that you have installed QTools into the directory C:\qp.
Figure 4: Extracting QTools from the Windows-EXE
NOTE: To complete the installation process you should append the QTools bin directory to the PATH variable on your machine. This will enable you to conveniently run the QTools utilities. For example, if you have installed QTools in C:\qp\QTools, you should append C:\qp\QTools\bin to your PATH.
4 of 15
The installation will add the qtools sub-directory to the location specified in the dialog box.
Copyright © Quantum Leaps, LLC. All Rights Reserved.
Application NoteGetting Started with QP-nano™
state-machine.com/qpn
3 Building and Running the Blinky ExampleThis section explains how to build and run the Blinky QP-nano example on various platforms.
NOTE: The QP-nano applications can be built in the following three build configurations:
Debug - this configuration is built with full debugging information and minimal optimization. When the QP framework finds no events to process, the framework busy-idles until there are new events to process.
Release - this configuration is built with no debugging information and high optimization. Single-stepping and debugging is effectively impossible due to the lack of debugging information and optimized code, but the debugger can be used to download and start the executable. When the QP framework finds no events to process, the framework puts the CPU to sleep until there are new events to process.
5 of 15
Copyright © Quantum Leaps, LLC. All Rights Reserved.
Application NoteGetting Started with QP-nano™
state-machine.com/qpn
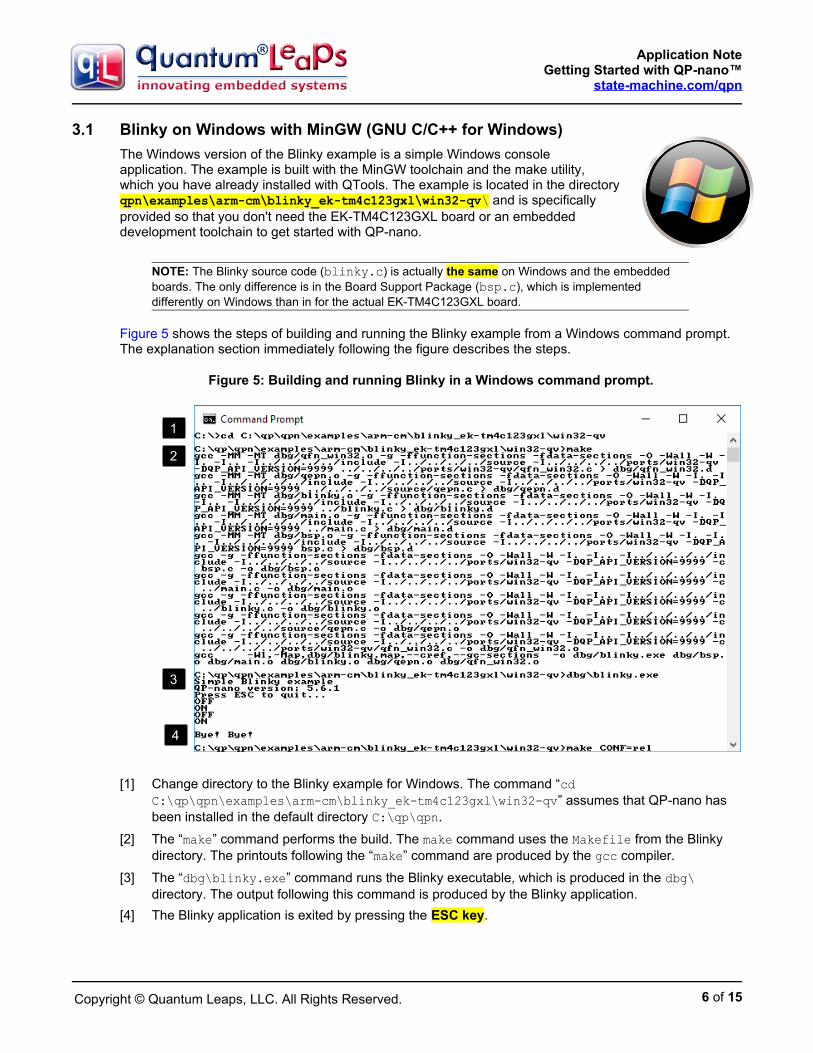
3.1 Blinky on Windows with MinGW (GNU C/C++ for Windows)
The Windows version of the Blinky example is a simple Windows consoleapplication. The example is built with the MinGW toolchain and the make utility,which you have already installed with QTools. The example is located in the directoryqpn\examples\arm-cm\blinky_ek-tm4c123gxl\win32-qv\ and is specificallyprovided so that you don't need the EK-TM4C123GXL board or an embeddeddevelopment toolchain to get started with QP-nano.
NOTE: The Blinky source code (blinky.c) is actually the same on Windows and the embedded boards. The only difference is in the Board Support Package (bsp.c), which is implemented differently on Windows than in for the actual EK-TM4C123GXL board.
Figure 5 shows the steps of building and running the Blinky example from a Windows command prompt. The explanation section immediately following the figure describes the steps.
Figure 5: Building and running Blinky in a Windows command prompt.
[1] Change directory to the Blinky example for Windows. The command “cd C:\qp\qpn\examples\arm-cm\blinky_ek-tm4c123gxl\win32-qv” assumes that QP-nano has been installed in the default directory C:\qp\qpn.
[2] The “make” command performs the build. The make command uses the Makefile from the Blinky directory. The printouts following the “make” command are produced by the gcc compiler.
[3] The “dbg\blinky.exe” command runs the Blinky executable, which is produced in the dbg\ directory. The output following this command is produced by the Blinky application.
[4] The Blinky application is exited by pressing the ESC key.
6 of 15
1
2
3
4
Copyright © Quantum Leaps, LLC. All Rights Reserved.
Application NoteGetting Started with QP-nano™
state-machine.com/qpn
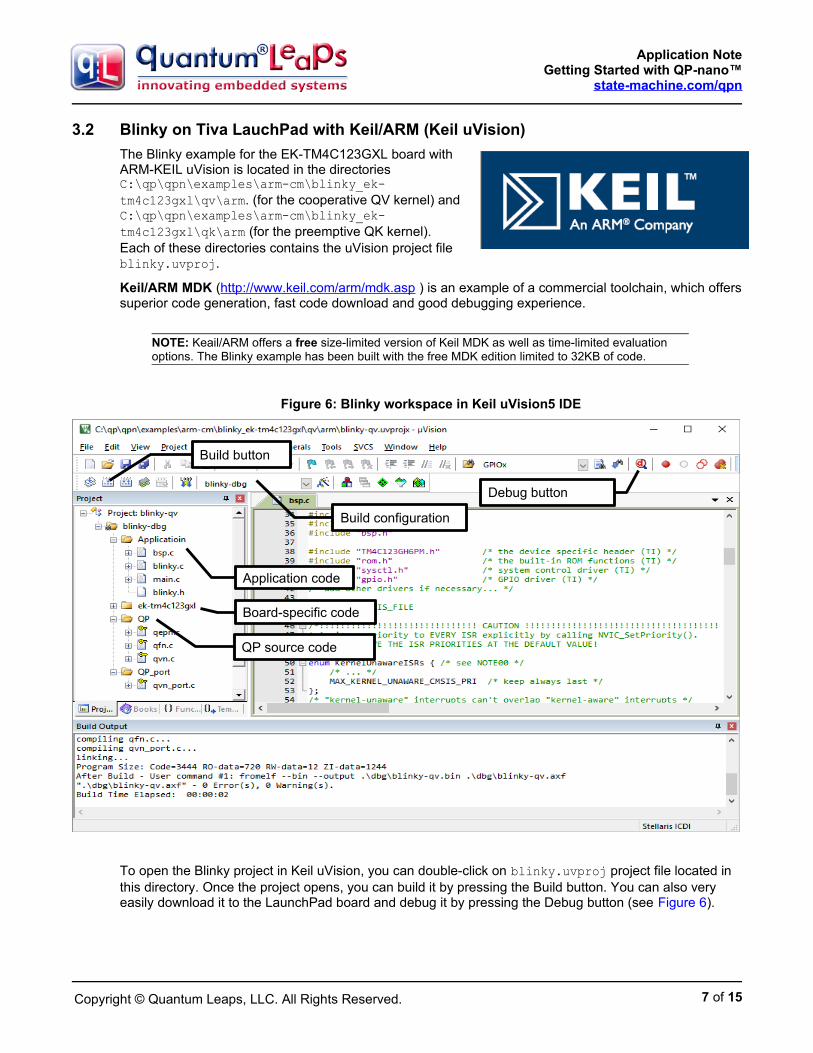
3.2 Blinky on Tiva LauchPad with Keil/ARM (Keil uVision)
The Blinky example for the EK-TM4C123GXL board withARM-KEIL uVision is located in the directories C:\qp\qpn\examples\arm-cm\blinky_ek-tm4c123gxl\qv\arm. (for the cooperative QV kernel) andC:\qp\qpn\examples\arm-cm\blinky_ek-tm4c123gxl\qk\arm (for the preemptive QK kernel).Each of these directories contains the uVision project file blinky.uvproj.
Keil/ARM MDK (http://www.keil.com/arm/mdk.asp ) is an example of a commercial toolchain, which offerssuperior code generation, fast code download and good debugging experience.
NOTE: Keail/ARM offers a free size-limited version of Keil MDK as well as time-limited evaluation options. The Blinky example has been built with the free MDK edition limited to 32KB of code.
Figure 6: Blinky workspace in Keil uVision5 IDE
To open the Blinky project in Keil uVision, you can double-click on blinky.uvproj project file located in this directory. Once the project opens, you can build it by pressing the Build button. You can also very easily download it to the LaunchPad board and debug it by pressing the Debug button (see Figure 6).
7 of 15
Build configuration
Build button
Debug button
Application code
Board-specific code
QP source code
Copyright © Quantum Leaps, LLC. All Rights Reserved.
Application NoteGetting Started with QP-nano™
state-machine.com/qpn
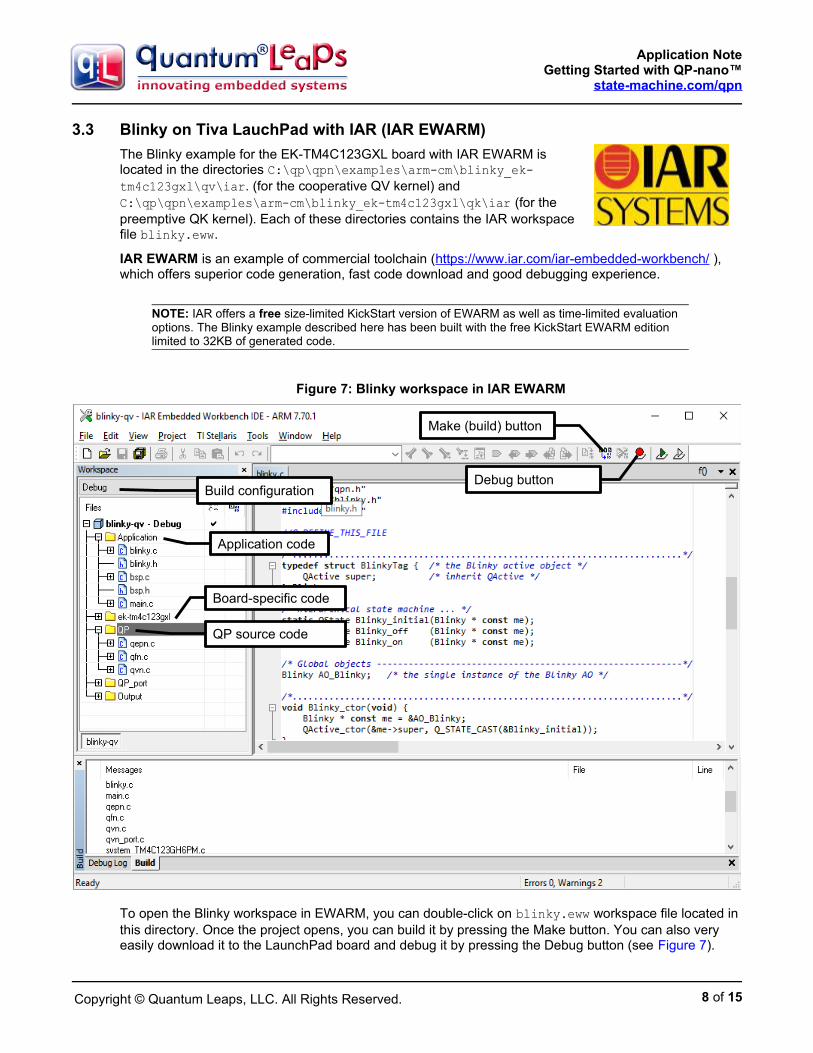
3.3 Blinky on Tiva LauchPad with IAR (IAR EWARM)
The Blinky example for the EK-TM4C123GXL board with IAR EWARM islocated in the directories C:\qp\qpn\examples\arm-cm\blinky_ek-tm4c123gxl\qv\iar. (for the cooperative QV kernel) and C:\qp\qpn\examples\arm-cm\blinky_ek-tm4c123gxl\qk\iar (for thepreemptive QK kernel). Each of these directories contains the IAR workspacefile blinky.eww.
IAR EWARM is an example of commercial toolchain (https://www.iar.com/iar-embedded-workbench/ ), which offers superior code generation, fast code download and good debugging experience.
NOTE: IAR offers a free size-limited KickStart version of EWARM as well as time-limited evaluation options. The Blinky example described here has been built with the free KickStart EWARM edition limited to 32KB of generated code.
Figure 7: Blinky workspace in IAR EWARM
To open the Blinky workspace in EWARM, you can double-click on blinky.eww workspace file located in this directory. Once the project opens, you can build it by pressing the Make button. You can also very easily download it to the LaunchPad board and debug it by pressing the Debug button (see Figure 7).
8 of 15
Build configuration
Make (build) button
Debug button
Application code
Board-specific code
QP source code
Copyright © Quantum Leaps, LLC. All Rights Reserved.
Application NoteGetting Started with QP-nano™
state-machine.com/qpn
3.4 Blinky on Tiva LauchPad with GNU-ARM (Makefile Project)
The Blinky example for the EK-TM4C123GXL board with GNU-ARM is located in thedirectories C:\qp\qpn\examples\arm-cm\blinky_ek-tm4c123gxl\qv\gnu. (forthe cooperative QV kernel) and C:\qp\qpn\examples\arm-cm\blinky_ek-tm4c123gxl\qk\gnu\ (for the preemptive QK kernel). Each of these directoriescontains the Makefile for building the application from the command-line.
The GNU-ARM toolchain used in these Makefiles is now part of the QTools collection for Windows. It has been downloaded and adapted from (http://gnutoolchains.com/arm-eabi/ ). This pre-built toolchain is an example of an open-source toolchain, which offers acceptable code generation, but no support for code download or debugging. To get these features, you would need to use IDE's (typically based on Eclipse), such as TI Code Composer Studio (CCS), Atollic TrueSTUDIO, and many others.
NOTE: The gnu\ sub-directory contains project files for TI Code Composer Studio (CCS) that you can immediately import into the CCS Eclipse-based IDE.
Figure 8: Building and Blinky in the Command Prompt Window
NOTE: For the Makefile to work, you need to adjust the Makefile to provide the location of the GNU-ARM toolchain on your machine.
[1] Change directory to the Blinky example for EK-TM4C123GXL board with GNU. The command “cd C:\qp\qpn\examples\arm-cm\blinky_ek-tm4c123gxl\qv\gnu” assumes that QP-nano has been installed in the default directory C:\qp\qpn.
[2] The “make” command performs the actual build. The make command uses the Makefile from the Blinky directory. The printouts following the “make” command are produced by the GNU-ARM compiler/linker.
[3] The “make CONF=rel” command performs the build for the Release configuration The provided Makefiles support the following build configurations:
Table 1 Make targets for the Debug and Release build configurations
Build/Clean command
makemake clean
make CONF=relmake CONF=rel clean
9 of 15
1
2
3
Copyright © Quantum Leaps, LLC. All Rights Reserved.
Application NoteGetting Started with QP-nano™
state-machine.com/qpn
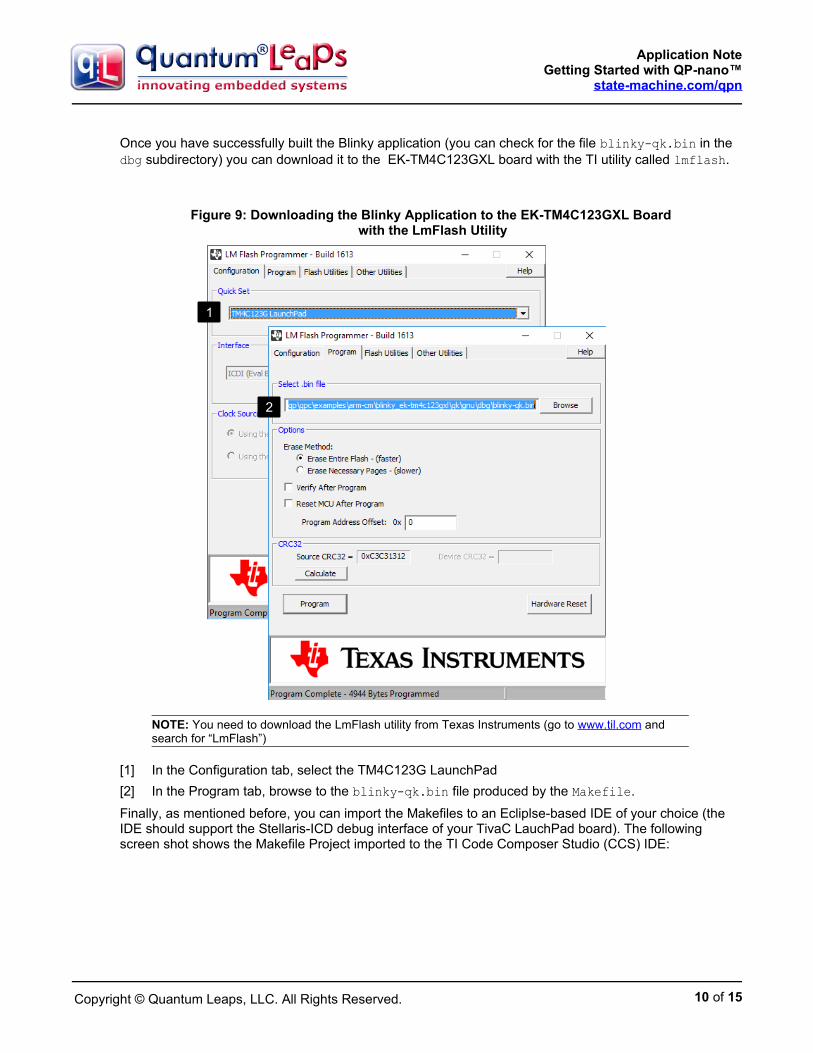
Once you have successfully built the Blinky application (you can check for the file blinky-qk.bin in the dbg subdirectory) you can download it to the EK-TM4C123GXL board with the TI utility called lmflash.
Figure 9: Downloading the Blinky Application to the EK-TM4C123GXL Board with the LmFlash Utility
NOTE: You need to download the LmFlash utility from Texas Instruments (go to www.til.com and search for “LmFlash”)
[1] In the Configuration tab, select the TM4C123G LaunchPad
[2] In the Program tab, browse to the blinky-qk.bin file produced by the Makefile.
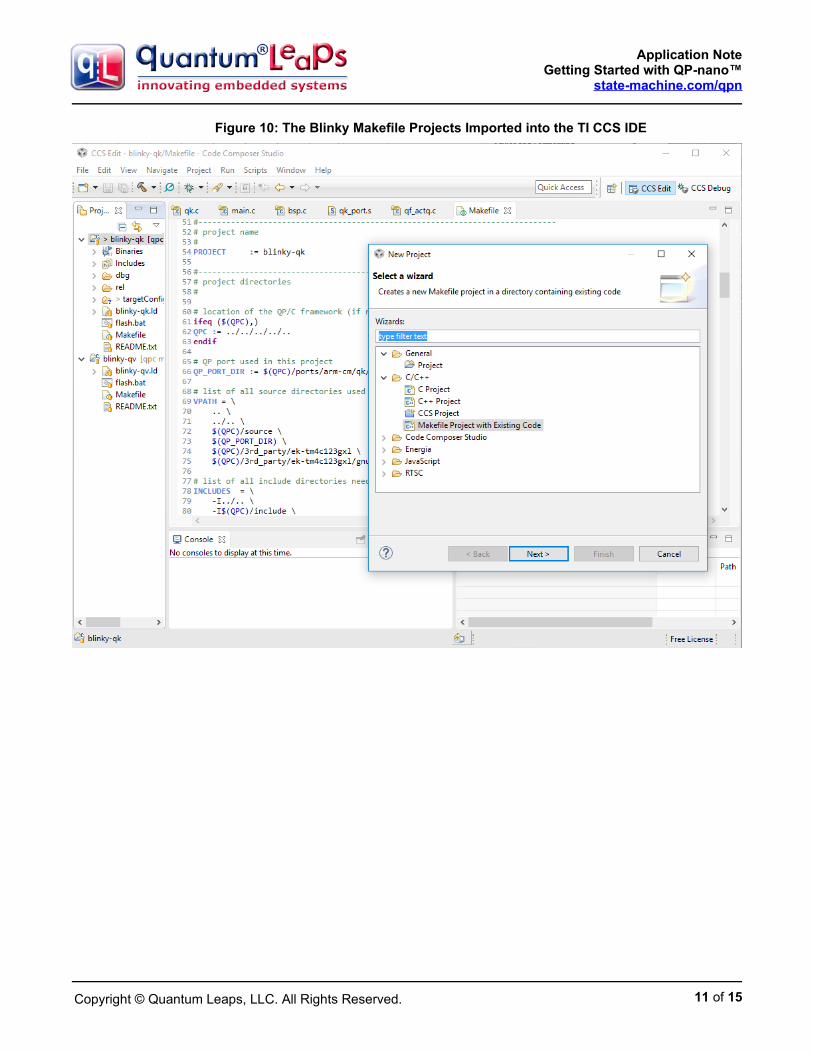
Finally, as mentioned before, you can import the Makefiles to an Ecliplse-based IDE of your choice (the IDE should support the Stellaris-ICD debug interface of your TivaC LauchPad board). The following screen shot shows the Makefile Project imported to the TI Code Composer Studio (CCS) IDE:
10 of 15
1
2
Copyright © Quantum Leaps, LLC. All Rights Reserved.
Application NoteGetting Started with QP-nano™
state-machine.com/qpn
Figure 10: The Blinky Makefile Projects Imported into the TI CCS IDE
11 of 15
Copyright © Quantum Leaps, LLC. All Rights Reserved.
Application NoteGetting Started with QP-nano™
state-machine.com/qpn
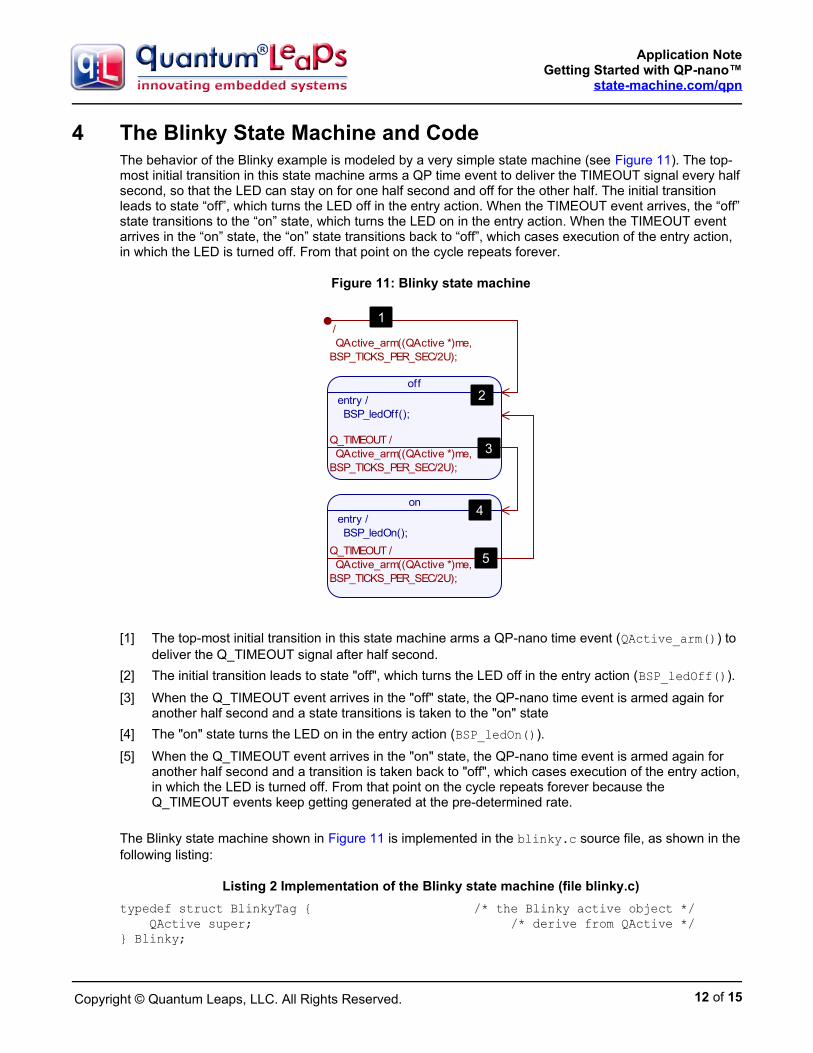
4 The Blinky State Machine and CodeThe behavior of the Blinky example is modeled by a very simple state machine (see Figure 11). The top-most initial transition in this state machine arms a QP time event to deliver the TIMEOUT signal every halfsecond, so that the LED can stay on for one half second and off for the other half. The initial transition leads to state “off”, which turns the LED off in the entry action. When the TIMEOUT event arrives, the “off”state transitions to the “on” state, which turns the LED on in the entry action. When the TIMEOUT event arrives in the “on” state, the “on” state transitions back to “off”, which cases execution of the entry action, in which the LED is turned off. From that point on the cycle repeats forever.
Figure 11: Blinky state machine
[1] The top-most initial transition in this state machine arms a QP-nano time event (QActive_arm()) to deliver the Q_TIMEOUT signal after half second.
[2] The initial transition leads to state "off", which turns the LED off in the entry action (BSP_ledOff()).
[3] When the Q_TIMEOUT event arrives in the "off" state, the QP-nano time event is armed again for another half second and a state transitions is taken to the "on" state
[4] The "on" state turns the LED on in the entry action (BSP_ledOn()).
[5] When the Q_TIMEOUT event arrives in the "on" state, the QP-nano time event is armed again for another half second and a transition is taken back to "off", which cases execution of the entry action,in which the LED is turned off. From that point on the cycle repeats forever because the Q_TIMEOUT events keep getting generated at the pre-determined rate.
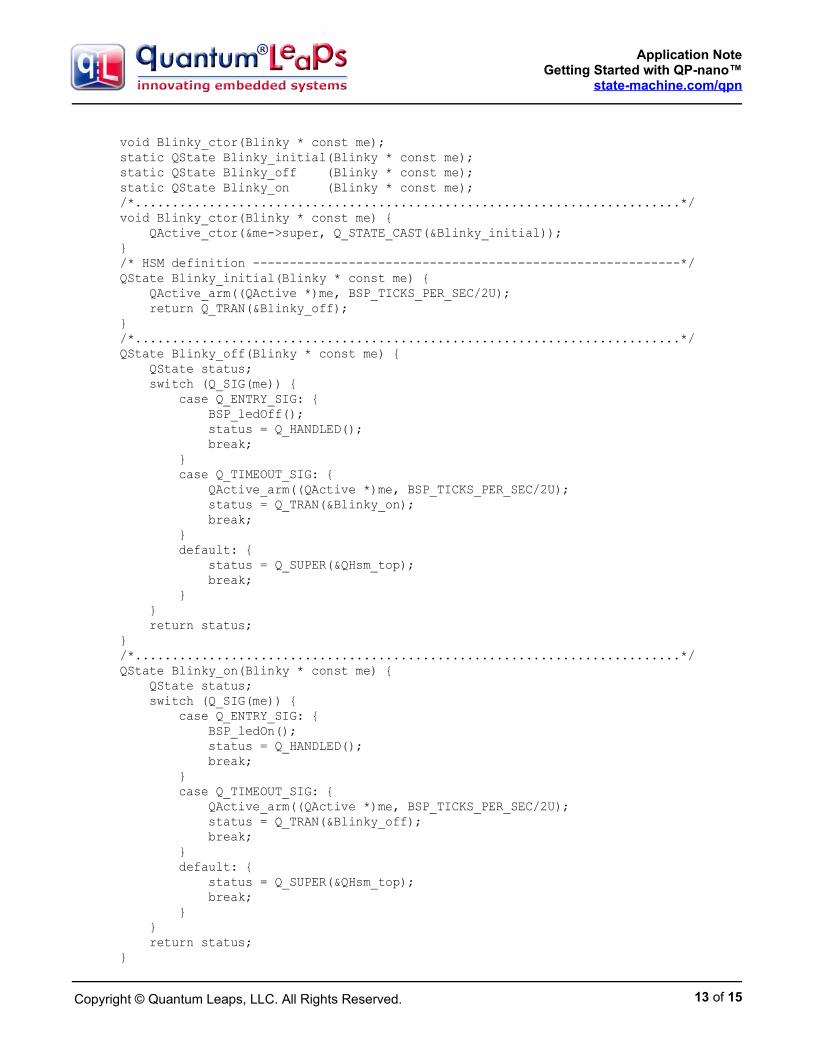
The Blinky state machine shown in Figure 11 is implemented in the blinky.c source file, as shown in thefollowing listing:
Listing 2 Implementation of the Blinky state machine (file blinky.c)
typedef struct BlinkyTag { /* the Blinky active object */ QActive super; /* derive from QActive */} Blinky;
12 of 15
off
entry / BSP_ledOff();
on
entry / BSP_ledOn();
/ QActive_arm((QActive *)me, BSP_TICKS_PER_SEC/2U);
Q_TIMEOUT / QActive_arm((QActive *)me, BSP_TICKS_PER_SEC/2U);
Q_TIMEOUT / QActive_arm((QActive *)me, BSP_TICKS_PER_SEC/2U);
1
2
3
4
5
Copyright © Quantum Leaps, LLC. All Rights Reserved.
Application NoteGetting Started with QP-nano™
state-machine.com/qpn
void Blinky_ctor(Blinky * const me);static QState Blinky_initial(Blinky * const me);static QState Blinky_off (Blinky * const me);static QState Blinky_on (Blinky * const me);/*..........................................................................*/void Blinky_ctor(Blinky * const me) { QActive_ctor(&me->super, Q_STATE_CAST(&Blinky_initial));}/* HSM definition ----------------------------------------------------------*/QState Blinky_initial(Blinky * const me) { QActive_arm((QActive *)me, BSP_TICKS_PER_SEC/2U); return Q_TRAN(&Blinky_off);}/*..........................................................................*/QState Blinky_off(Blinky * const me) { QState status; switch (Q_SIG(me)) { case Q_ENTRY_SIG: { BSP_ledOff(); status = Q_HANDLED(); break; } case Q_TIMEOUT_SIG: { QActive_arm((QActive *)me, BSP_TICKS_PER_SEC/2U); status = Q_TRAN(&Blinky_on); break; } default: { status = Q_SUPER(&QHsm_top); break; } } return status;}/*..........................................................................*/QState Blinky_on(Blinky * const me) { QState status; switch (Q_SIG(me)) { case Q_ENTRY_SIG: { BSP_ledOn(); status = Q_HANDLED(); break; } case Q_TIMEOUT_SIG: { QActive_arm((QActive *)me, BSP_TICKS_PER_SEC/2U); status = Q_TRAN(&Blinky_off); break; } default: { status = Q_SUPER(&QHsm_top); break; } } return status;}
13 of 15
Copyright © Quantum Leaps, LLC. All Rights Reserved.
Application NoteGetting Started with QP-nano™
state-machine.com/qpn
5 Creating Your Own QP-nano ProjectsPerhaps the most important fact of life to remember is that in embedded systems nothing works until everything works. This means that you should always start with a working system and gradually evolve it,changing one thing at a time and making sure that it keeps working every step of the way.
Keeping this in mind, the provided QP-nano application examples, such as the super-simple Blinky, or a bit more advanced DPP or “Fly 'n' Shoot” game, allow you to get started with a working project rather thanstarting from scratch. You should also always try one of the provided example projects on the same evaluation board that it was designed for, before making any changes.
Only after convincing yourself that the example project works "as is", you can think about creating your own projects. At this point, the easiest and recommended way is to copy the existing working example project folder (such as the Blinky example) and rename it.
After copying the project folder, you still need to change the name of the project/workspace. The easiest and safest way to do this is to open the project/workspace in the corresponding IDE and use the Save As... option to save the project under a different name. You can do this also with the QM model file, whichyou can open in QM and "Save As" a different model.
NOTE: By copying and re-naming an existing, working project, as opposed to creating a new one from scratch, you inherit the correct compiler and linker options an other project settings, which will help you get started much faster.
6 Next Steps and Further Reading About QP™ and QM™This quick-start guide is intended to get the QP-nano installed and running on your system as quickly as possible, but to work with QP-nano effectively, you need to learn a bit more about active objects and statemachines. Below is a list of links to enable you to further your knowledge:
Key Concepts behind QP frameworks and QM modeling tool (http://www.state-machine.com/doc/concepts.html )
QP-nano Reference Manual (http://www.state-machine.com/qpn )
QM Reference Manual (http://www.state-machine.com/qm )
QP Application Notes (http://www.state-machine.com/doc/an.html)
QP Articles (http://www.state-machine.com/doc/articles.html)
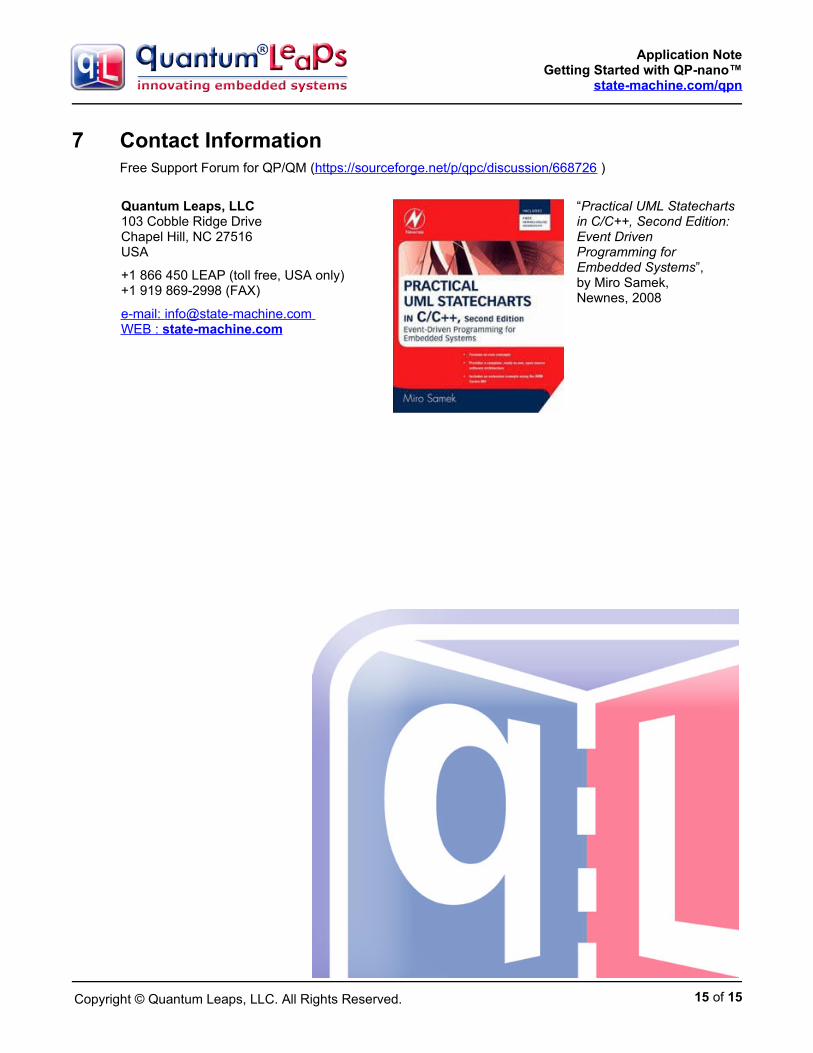
Book “Practical UML Statecharts in C/C++, 2nd Edition” [PSiCC2] and the companion web-page to the book (http://www.state-machine.com/psicc2/ )
Free Support Forum for QP/QM (https://sourceforge.net/p/qpc/discussion/668726 )
"State Space" Blog (http://embeddedgurus.com/state-space/ )
14 of 15
Copyright © Quantum Leaps, LLC. All Rights Reserved.
Application NoteGetting Started with QP-nano™
state-machine.com/qpn
7 Contact InformationFree Support Forum for QP/QM (https://sourceforge.net/p/qpc/discussion/668726 )
Quantum Leaps, LLC103 Cobble Ridge DriveChapel Hill, NC 27516USA
+1 866 450 LEAP (toll free, USA only)+1 919 869-2998 (FAX)
e-mail: [email protected] WEB : state-machine.com
“Practical UML Statechartsin C/C++, Second Edition: Event Driven Programming for Embedded Systems”,by Miro Samek,Newnes, 2008
15 of 15