getting started with creativestudio - gammill...
TRANSCRIPT

Getting Started with CreativeStudio™
Copyright © 2009 Gammill, Inc. | All Rights Reserved

CreativeStudio™ User Manual
by Patricia C. Barry for Gammill, Inc.
CreativeStudio™ is a registered trademark of Gammill, Inc.AutoSketch™ is a registered trademark of Autodesk

All rights reserved. No parts of this work may be reproduced in any form or by any means - graphic, electronic, ormechanical, including photocopying, recording, taping, or information storage and retrieval systems - without thewritten permission of the publisher.
Products that are referred to in this document may be either trademarks and/or registered trademarks of therespective owners. The publisher and the author make no claim to these trademarks.
While every precaution has been taken in the preparation of this document, the publisher and the author assume noresponsibility for errors or omissions, or for damages resulting from the use of information contained in this documentor from the use of programs and source code that may accompany it. In no event shall the publisher and the author beliable for any loss of profit or any other commercial damage caused or alleged to have been caused directly orindirectly by this document.
Getting Started with CreativeStudio™
Copyright © 2009 Gammill, Inc. | All Rights Reserved

Getting Started with CreativeStudio™4
Table of Contents
Foreword 7
Part I Introduction 9
................................................................................................................................... 101 Technology Basics
.......................................................................................................................................................... 10Equipment
.......................................................................................................................................................... 12Terminology
.......................................................................................................................................................... 14Navigating
.......................................................................................................................................................... 16Keyboard Shortcuts
................................................................................................................................... 172 Computer Skills
.......................................................................................................................................................... 17'Explore' Folders
.......................................................................................................................................................... 23'Explore' Files
Part II Main Screen Layout 28
................................................................................................................................... 281 Title Bar
................................................................................................................................... 282 Command Bar
.......................................................................................................................................................... 29File Command
.......................................................................................................................................................... 29Edit Command
.......................................................................................................................................................... 30View Command
.......................................................................................................................................................... 31Tools Command
.......................................................................................................................................................... 32Help Command
................................................................................................................................... 353 Tool Bar
................................................................................................................................... 394 Work Area
.......................................................................................................................................................... 40Project Information
.......................................................................................................................................................... 41Preview Area (CAD Screen)
.......................................................................................................................................................... 42Property Window
......................................................................................................................................................... 43Project Details - Yellow Frame
......................................................................................................................................................... 46Pattern Details - Blue Frame
......................................................................................................................................................... 48Selected Pattern Details - Magenta Frame
......................................................................................................................................................... 50Process Details - Gray Frame
......................................................................................................................................................... 54Inheriting Settings
................................................................................................................................... 545 Keypad Window
................................................................................................................................... 566 Status Bar
................................................................................................................................... 567 Task Bar
Part III Planning the Quilting 58
................................................................................................................................... 581 Quilt Projects
.......................................................................................................................................................... 59Origin Point
.......................................................................................................................................................... 60Project Names
................................................................................................................................... 622 Quilt Groups
.......................................................................................................................................................... 62Creating a Quilt Group
.......................................................................................................................................................... 62Removing a Quilt Group
................................................................................................................................... 643 Quilt Patterns
.......................................................................................................................................................... 65Single Block Patterns
.......................................................................................................................................................... 65Continuous Patterns
.......................................................................................................................................................... 66Point To Point Patterns
5Contents
5
Copyright © 2009 Gammill, Inc. | All Rights Reserved
................................................................................................................................... 674 Quilt Pattern Setup and Edit
.......................................................................................................................................................... 71Setup Mode
.......................................................................................................................................................... 76Edit Mode
................................................................................................................................... 795 Quilt Pattern Creating
.......................................................................................................................................................... 79Right Click Options
Part IV Quilting the Quilt - Which CS Feature To use 84
................................................................................................................................... 841 Phase 1 - Basting
.......................................................................................................................................................... 84Securing the Quilt using Baste
.......................................................................................................................................................... 87Securing the Quilt using Regulated_Sewing
.......................................................................................................................................................... 91Stitch in the Ditch using Point_to_Point-Line
................................................................................................................................... 952 Phase 2 - Blocks
.......................................................................................................................................................... 95Define the Block using Boundary
.......................................................................................................................................................... 96Stitch a Single Pattern using Pattern_To_Boundary
.......................................................................................................................................................... 98Stitch Multiple Patterns using Repeat_Patterns
.......................................................................................................................................................... 102Stitch Partial Patterns using Trim-Outside
.......................................................................................................................................................... 105Stitch a Composite Pattern
.......................................................................................................................................................... 108Creating Text Blocks
................................................................................................................................... 1113 Phase 3 - Borders
.......................................................................................................................................................... 112Corners using Border_Corner
.......................................................................................................................................................... 115Borders - Butted
.......................................................................................................................................................... 118Borders - Mitered
.......................................................................................................................................................... 121Borders with Corner Squares
.......................................................................................................................................................... 124Borders with Custom Corners
.......................................................................................................................................................... 126Side Borders
.......................................................................................................................................................... 128Sashings using Point_To_Point - Pattern
................................................................................................................................... 1334 Phase 4 - Backgrounds
.......................................................................................................................................................... 133Background Fillers using Trim - Inside
.......................................................................................................................................................... 140Pantographs using Edge_To_Edge
.......................................................................................................................................................... 143E2E Alternating Patterns
.......................................................................................................................................................... 147E2E Concatonating Patterns
................................................................................................................................... 1515 Record Mode
................................................................................................................................... 1536 Restart
.......................................................................................................................................................... 153Thread Break Restarts
.......................................................................................................................................................... 155Manual Stops and Restarts
................................................................................................................................... 1577 Utility Functions
.......................................................................................................................................................... 157Set Defaults
.......................................................................................................................................................... 160Set Origin
.......................................................................................................................................................... 161Oil Stitcher Routine
.......................................................................................................................................................... 161Calibrate Stitcher Motor
Part V Quick Reference Sheets 163
................................................................................................................................... 1631 QuickRef Icons
................................................................................................................................... 1652 Quick Ref Regulated
................................................................................................................................... 1673 Quick Ref P2P Line
................................................................................................................................... 1694 Quick Ref P2P Pattern
................................................................................................................................... 1715 Quick Ref Single Block
................................................................................................................................... 1736 Quick Ref Composite Blocks
................................................................................................................................... 1757 Quick Ref Text Blocks

Getting Started with CreativeStudio™6
................................................................................................................................... 1768 Quick Ref Borders and Corners
................................................................................................................................... 1789 Quick Ref Trim Inside
................................................................................................................................... 17910 Quick Ref Trim Outside
................................................................................................................................... 18011 Quick Ref Edge To Edge
................................................................................................................................... 18312 Quick Ref Record
................................................................................................................................... 18413 Quick Ref Restart
Index 185

Foreword
7Foreword
Copyright © 2009 Gammill, Inc. | All Rights Reserved
Gammill, Inc. is fortunate to have had a host of experiencedprofessionals assist us with the development of CreativeStudio™. Thecombined efforts of these individuals have produced an amazing pieceof software which is truly "feature rich" .
Gammill & Statler wish to thank Patricia Barry of By Design Quilting,www.PatBarryQuilts.com for her exceptional work on the manual aswell as the entire Statler Stitcher team who have contricuted tocountless hours towrards the development of CreativeStudio™.
We also wish to thank the following individuals who have digitizedpatterns photographed for this manual.
Anita Schackelford, Thimbleworks www.anitaschackelford.com Anne Bright, Simply Continuous, www.annebright.com Debra Geissler, Designs by Deb, www.debrageissler.com Kim Diamond, Sweet Dreams Quilt Studio, www.sweetdreamsquiltstudio.com Todd Brown, Legacy Quilting, www.legacyquilting.com Tammy Finkler, TKQuilting, www.tkquilting.com

Part I

9
Copyright © 2009 Gammill, Inc. | All Rights Reserved
Introduction
1 Introduction
Thank you for choosing CreativeStudio™ from Statler Stitcher®.
A complete ‘Help’ system has been created to support the Statler Stitcher®CreativeStudio™ software meaning the ‘help’ information is accessible in electronicformat as well as printed. The electronic format is sometimes referred to as ‘online’help but at no time is this help system connected to the Internet, the World WideWeb or any other network. The electronic format is a database of information that has been linked into theCreativeStudio™ software and is accessible at any time during quilting. The helpsystem can be accessed by using the ‘Help’ command at the top of each CS screen.Just click on the word ‘Help’ and another window will appear that presents theinformation and helps you look for the topic of interest. The CreativeStudio™ help system was written for quilters by a professional quilterand explains each key feature in a quilting context. The first section covers somecomputer skills that quilters may need to review. The second section describes themain screen. The third section discusses planning a quilt and explains howCreativeStudio™ can collect and save all of the planned details together for futurereference. Section four details how to execute the planned quilt using the CSfeatures. Section five contains Quick Reference cards which can be printed and keptclose to the Statler Stitcher if needed. The key features of CreativeStudio™ are presented in the same way they might beexecuted (Baste, Blocks, Borders, Backgrounds). Utility features (Restart, Defaults,etc) are toward the end of the manual. An extensive index was created to helppeople search for topics of interest.
Links have been used in the Help system, and are denoted by keywords displayed inblue, and underlined. If using the electronic format, clicking on one of the links willtake you directly to that place in the electronic format that explains the keyword inmore detail. If using the printed format, a document icon is printed just following the link. This icon contains a number which is the page number containing the keywordexplanation.
Color has been used to differentiate certain details that apply to different patternsand processes. It is highly recommended that this manual be printed in color, totake full advantage of the instruction. Suggestions for enhancements to the softwareand the User Manual can be sent to [email protected]
Again, thank you for choosing CreativeStudio™ from Statler Stitcher®, a division ofGammill, Inc.

Getting Started with CreativeStudio™10
1.1 Technology Basics
This manual was written for people who are comfortable using a computer (with amouse and keyboard) that is running Micosoft Windows. The Windows XP operatingsystem was used when this manual was written. Other Windows operating systemsshould be similar. As a refresher, we have listed some of the basic concepts used.
1.1.1 Equipment
The Statler Stitcher system comes with the following computer equipment:
Computer CPU is the main processing unit. This looks like many other computersand has all the Statler Stitcher software already loaded on it. Don't add any othersoftware to this computer, especially any internet access software. The software hasbeen loaded for optimal performance and any other software packages will inhibitthe responsiveness.
There is a special 'key' that is required by the Statler Stitcher software, called a 'dongle'. If the dongle is not attached to the computer CPU, the software will notoperate the stitcher.
Controller (also called a 'Mod') controls the motors. This box contains thetechnology to translate the computer software instructions into commands that movethe sewing head. There are different versions of these controllers, and each ismarked with a letter or number. THIS IS IMPORTANT! Although you may only referto this when downloading software, it is important to know which controller versionyou are using. On newer models, there is a small switch box with 2 switches (red andgreen) that controls the power supply to the stitcher and the controller.
Monitor (or screen) displays the instructions. The monitor looks and acts just likemost other monitors. Some have the speakers attached, and some don't. All of theStatler Stitcher instructions will be displayed on this screen. Responses to theinstructions can be given using the mouse, the keyboard or the keypad (on thesewing head).
Desktop is a nice name for the first computer screen that appears on the monitorafter the computer is turned on. It shows a bunch of icons, each of which has a

Technology Basics
11
Copyright © 2009 Gammill, Inc. | All Rights Reserved
Introduction
Equipment
specific purpose. The icons have names and double clicking an icon will initiate thatpurpose, task or program.
A 6-button keypad on the Statler Stitcher sewing head. Like the mouse andkeyboard, these keys are also programmed to respond to (or interact with) theinstructions on the monitor. Using the keypad eliminates the need to move from thequilt to the computer every time instructions are executed.
Cables (lots of them) are required for all the parts to work together. This makes thesystem look complicated but the engineers have designed the cables so they areunique (one cable only fits into one connection) or color coded (like the mouse &keyboard cables) or they are very well labeled (X, Y, Z connections).
Mouse and Keyboard are used to respond to (or interact with) the instructions onthe monitor.
Additional equipment:Surge Protectors are highly recommended for the computer and controller.
Universal Power Supply (UPS) is a good idea for people who experience frequentpower outages. The UPS is like a backup battery that prevents damage to acomputer component when the electricity fluctuates significantly. Contact StatlerStitcher technical support team to check the power specs for the UPS.
Thumb drive (also called Jump Stick, Travel Drive or Removable Disk Drive) is aform of removable media. It is a disk drive, used when copying files from the homecomputer to the Statler computer. It is much easier than using floppy diskettes (toosmall) or burning CDs (too slow). Files are copied from the source (home) computerto the thumb drive, and then from the thumb drive to the destination (Statler)computer.
54

Getting Started with CreativeStudio™12
1.1.2 Terminology
Terminology - Be sure you understand the following terms and concepts becausethey are used throughout the manual.
"Power Up" means to turn on the Controller, Stitcher and then turn on the computerCPU. Be sure the monitor and the speakers are on also. It takes a minute, but the'Desktop" screen will appear on the monitor.
"Power down" means to turn everything off. Don't just turn off the power! Exit'gracefully' by saving your work (save the project), exiting CS (click on the exit "X"),turning off the computer (click on the Start button, choose Turn Off Computer) andthen turning off the power to the monitor, speakers, controller and Stitcher.
“Click” refers to using the computer mouse to choose something on the screen bypressing the left mouse button quickly. If it is a command button, this executes thecommand. If it is a pattern or boundary, it selects it. Clicking on any of the quiltingicons will initiate that technique.
“Press” refers to pressing a button on the keypad located on the stitcher head. Eachkeypad button corresponds to a command to be executed. Sometimes the terms ‘press’ and ‘click’ are used interchangeably.
“Select” means to choose. If using the mouse, this is a single click. If using thekeypad, this is pressing a button.
“Highlight” and “Select” are used interchangeably because selecting an objectgenerally highlights it.
A “dialog box” (aka ‘window’) contains instructions, questions or descriptiveinformation about something. CS uses dialog boxes to group information thatbelongs together, like the dimensions of a pattern. A “dropdown box” is a dialog box that appears when a command is selected andthere are choices associated with the command. The choices appear in a box whichis usually just below the command so the association is clear.
A “popup box” is a dialog box that appears when the system needs to ask a

Technology Basics
13
Copyright © 2009 Gammill, Inc. | All Rights Reserved
Introduction
Terminology
question or give instructions. It can ‘pop up’ anywhere on the screen.
“Properties” (also called details) are descriptive pieces of information.
“Object” is a catch-all term for anything that can be described. It is a very general(but techy) term that could mean a million things, so CS tries to avoid it by usingmore specific terms.
“Tool Tips” are little boxes that pop-up and give the name or a short description ofsomething. To look for tool tips, hold the cursor over an icon for a couple secondsand see if the tip appears. Not all objects have tool tips, but most icons do.
“CAD Screen” also called the Preview Area, is the big, white, open area where theimages of the patterns will appear.
“Quilt Group” is a term used to describe an area of the quilt top to be quilted. Quiltgroups contain all the information (boundaries, reference points, sizing, positioning)needed to stitch a particular area of the quilt. It has its own Preview area so thepatterns can be checked before being stitched. Some quilts have only one quiltgroup and others have dozens; it depends on the quilt.
“Project” is technically a computer file but figuratively is more like a file folder thatcontains all the patterns, quilt groups, preview areas and notes needed to completea whole quilt.
"Removable Media" is a device that holds computer files and can be movedfrom one computer to another. It makes copying files from one computer to anothervery easy.
"Thumb Drive" is another name for removable media.
"UR" is an abbreviation for Upper Right. Similarly, UL is upper left, LL is lower left,LR is lower right. These abbreviations are used often when defining boundaries - aconcept to be explained soon!.
Tip: This is a tip for people who know Precision Stitch. Some
features work differently in CS than in PS. To avoid
frustration, these Precision Stitch p.s. (post script) notes have
been added. Someday they will go away.
Tip: These are tips that explain how to use the software to resolve
real life quilting issues. After all, this is about quilting !
62
58
11

Getting Started with CreativeStudio™14
1.1.3 Navigating
Navigating can be done with the mouse, the keyboard or the keypad (on the stitcher)but most of it is done using the mouse.
“Click" means to quickly press (and let go of) the left mouse button.
"Double click" means to click twice in rapid succession. Double clicking on a filewill open it. Double clicking on a folder will open it too, displaying the contents of thatfolder.
"Drill down" means to open folders starting from the top level, working down onelevel at a time. This can be done using double clicks or by clicking once on a special"+" icon. (Examples in the next section).
"Right click" means to quickly press (and let go of) the right mouse button. Rightclicking some objects will make a dialog box appear. The dialog box containsproperties (which are details or characteristics) that describe the object.CreativeStudio™ uses right-clicking to make it faster to change a pattern's settingsor characteristics.
"Drag" means to press the left button, hold it down and move the mouse.Positioning the cursor over something on the screen (an object of some kind) anddragging it will generally move it from one place to another.
“Scroll” generally applies to text rather than an image (but not always). It means tomove the text on the screen so you can see what is before or after the current linesof text. CreativeStudio™ uses scrolling to navigate dialog boxes. Or, if Scroll barsappear on the right edge of the screen or dialog box, you can move up by clicking onthe up arrow, and down by clicking on the down arrow. There is a bar between thesetwo arrows which shows your relative position in the dialog box.
“Scrolling” can often be done using the mouse instead of commands. To scroll up,roll forward on the mouse roller (away from you). To scroll back, roll backwards.
12
12

Technology Basics
15
Copyright © 2009 Gammill, Inc. | All Rights Reserved
Introduction
Navigating
“Zoom” means to change the size of an object on the screen by getting closer (zoomin) or farther away (zoom out). Zooming generally applies to images instead of text(not always).
“Zooming” can often be done using the mouse roller instead of commands. Roll itforward to zoom in, and backward to zoom out. Zooming is used in the previewareas.
“Panning” generally applies to the screen images instead of text. It means to movethe image on the screen in any direction without changing the size, scale orproportion. Press and hold the mouse roller wheel and move the mouse. The cursorshape becomes a hand. Notice the pink cuff on the hand icon? Nice work Matt!Panning will be used in CreativeStudio™ in the preview areas.
“Hovering” means to hold the cursor over an icon or other object for a coupleseconds, and see if a little box appears that gives the name or a short description ofthat object.
"Selecting files" means to choose. Usually this will also highlight the object. Whenworking with files, a single click will select a file. Double clicks open the file.
To select more than one file at a time, use the control key (Ctrl). Click on the firstfile, then press and hold the Ctrl key while clicking on the rest of the files that need tobe selected. When done, release the Ctrl key and all the files will be highlighted andcan be copied, moved or deleted together.
To select a group of files that are all contiguous, use the Shift key (Shift). Click onthe first file, then press and hold the Shift key while clicking on the last file. Whendone, release the Shift key and all the files between the first and last will behighlighted and can be copied, moved or deleted together.
Tip: Techniques (with an icon) can be initiated using the keypad
instead of the mouse. To do this, press the MODE button until the
desired icon is highlighted, and then Press OK to begin the
technique.

Getting Started with CreativeStudio™16
1.1.4 Keyboard Shortcuts
Sometimes there are keyboard key-combinations that will execute a commandwithout having to use the mouse. The combinations require pressing two keys at thesame time, like pressing the shift key with a letter key to produce a capital letter. TheControl key (abbreviated Ctrl or Ctl) and a letter are the most common combinations.Some examples of keyboard shortcuts are below:
Note: the check mark ( ü ) is short for 'click'.
KeySeq Is the same as: What it will do:
Ctrl+N üFile, üNew Project Create a new project.
Ctrl+O üFile, üOpen Project Open an existing project
Ctrl+S üFile, üSave Project Save the current project
Ctrl+Z üEdit, üUndo Reverse the most recent command
Ctrl+Y üEdit, üRedo Re-execute the command – or undo the undo
Esc Escape from a command sequence
Ctrl+ü Selects multiple items
Del Delete the highlighted text
¯¬ ®
Navigate up / down / left / right

Computer Skills
17
Copyright © 2009 Gammill, Inc. | All Rights Reserved
Introduction
1.2 Computer Skills
The Statler Stitcher CreativeStudio™ manuals assume that the quilter has beenexposed to computer systems and is familiar with basic computer skills and terms.However, since many computer systems are similar (but different) a brief overview ofthose computer skills is included here.
One of the most powerful virtues of a computer is its flexibilty. Unfortunately, that canalso be a detriment because there are several ways to do the same thing, and thatcan cause confusion. The methods used in this text are NOT the only way to performcertain tasks. There are faster methods so if anyone is using a different techniquebut gets the same results, that is just fine!
1.2.1 'Explore' Folders
Folders and files are stored on a computer much the same as they would be storedin an office. By arranging them in a hierarchical structure, folders and files can bestored and retrieved easily. The term 'Path' is used to describe how to find them. Example: C:\All Statler Patterns\Patterns Precision Stitch\Alpha_old-z.qli
(1.) Your computer is like the office. (2.) C: Disk Drive is one of the file cabinets (3.) Patterns Precision Stitch is one of the drawers in the cabinet(4.) Stick Alphabet is a folder in the drawer (5.) Alpha_old-z is a file in the folder(6.) .qli is the file type.
1. Your Computer holds all the files needed to run the Statler Stitcher.
2. Disk drive C: is like the file cabinet. It is a physical space that holds folders andfiles.
Disk Drives use letters to differentiate them.A: is usually a floppy disk driveC: is usually the computer's fixed hard disk driveD: is usually the computer's CD driveE, F, G, H, etc. are used as needed. They might refer to a network disk drive, a
thumb drive, a digital camera card drive or other removable disk drive. 3. The file drawer contains file folders that are similar in nature. (Patterns PrecisionStitch)
4. The file folder(s) group items that go together. (Alphabets)
5. The filename is (hopefully) a descriptive name. For example: alpha_old-z is (hopefully) a pattern of the letter Z. There are no rules regarding assigning names to files but keeping them simple andclear is a good idea. Filenames are usually listed in alphabetical order so if there are

Getting Started with CreativeStudio™18
two files that go together, it is wise to name them so they will be sorted together. EX: daisy_block.qli, daisy_border.qli, daisy_panto.qli, daisy_triangle.qli
6. File Extensions indicate which programs can read them. Most word processingsoftware can read a file extension of .txt (short for text) or .rtf (short for rich textformat) or .doc (short for document). Word processors can't read a file extension of .qli (short for quilt language), .jpg (short for a picture file), .skf (short for sketch file) or.dxf (short for CAD drawing file) or.pat (short for pattern file).
Statler Stitchers recognize .qli and .dxf and .pat file extensions, and very little else.
Tip: Statler has included hundreds of quilting patterns, all with
the file extension of ".qli". In addition to this, Statler has provided us
with multiple versions of these same files so we can make changes to
them if needed (using the Autosketch software). The following folders
contain the additional versions:
C:\Patterns PrecisionStitch DXFC:\Patterns PrecisionStitch JPGC:\Patterns PrecisionStitch SKF
Looking at Folders Windows Explorer makes it easy to view and manage files and folders. Click on theStart button (on the task bar in the lower left corner of the screen) and a pop-up boxappears. Click on "Explore" to begin working with the files.
1) Right Click on Start 2) Click on Explore 3) Look for the C: drive The screen appears with two panes. Single click the folder name (in the left pane) toselect it and display the contents of the folder (in the right pane). Use the icons tonavigate the folders and files.
14

Computer Skills
19
Copyright © 2009 Gammill, Inc. | All Rights Reserved
Introduction
'Explore' Folders
Drill down and back up using clicks and the icons. The drill-down path is shownon the left (how to get to the selected folder, Stick Alphabet). The lowest detail levelis listed on the right (what is inside the selected Stick Alphabet folder).
Searching Folders and FilesThe "Search" function is used to find specific files and folders.Right Click on the Start button (on the task bar in the lower left corner of thescreen). The same pop-up box appears but this time click on "Search" to beginlooking for the files.
Let's look for a Daisy pattern. A very helpful animated character will guide youthrough the process. Since we are looking for a daisy pattern, we might start bysearching for a pattern file with the word 'daisy' in the name. There could be otherdaisy pattern files that don't use the word 'daisy' in the name but this is a good placeto start.
14 17
14
12

Getting Started with CreativeStudio™20
1) Right Click on Start 2) Click on Search 3) Click on All Files and Folders
4) Type in some (or all) of the file name, as prompted. 5) Tell the system where to start looking, by selecting the correct folder name asprompted. Click on "Search" when ready.
14
12

Computer Skills
21
Copyright © 2009 Gammill, Inc. | All Rights Reserved
Introduction
'Explore' Folders
All the files with the word 'daisy' that were found in the Precision Stitch folder arelisted.If you need to search more, let the dog help! If this is what you wanted toknow, jot down the path so you can find the file in the correct folder usingCreativeStudio.
Creating a New Folder The Statler Stitcher comes with hundreds of patterns already loaded. In addition,there are dozens more that were provided by different Statler pattern designers.These bonus patterns are stored in separate file folders which identify the designer. It is a good idea to create a separate file folder for your own patterns. This separatesthe patterns you have purchased from the ones that came with your system. Whennew software versions are released, the patterns are often updated and re-releasedtoo. If you put your personal pattern collection in the same file folders as the Statlercollection, it is possible to write over your personal patterns.
First, use Windows Explorer to find the C: drive. Looking at the folders tells usthat the standard pattern files are stored on the C: drive so that is where we will putour new folder. C:\MyPatterns
17
18

Getting Started with CreativeStudio™22
The following steps show how to create a new folder:1) Right Click on the Start button. 2) Click on Explore .3) Look for the C: drive. Click once on the "Local Disk (C:)" to select it.
4) Click on the Command bar's "File" command.5) Click on "New" on the drop down box .6) Click on "Folder" on the next drop down box .7) Type the name of the new folder: "My Patterns" and press the enter key.
For practice, create another file folder called "My Projects". Use exactly the samesteps, just a different file name. CreativeStudio uses special files called Project filesto hold all the information required for a quilt. These files can be named and savedfor future use. By putting them all into a new folder called My Projects, they will beeasy to find later.
Tip: Consider creating additional folders for your best customers.
These would be subfolders of C:\My Projects and would include the
customer's name in the folder name. Then, save all their projects
inside their own folder.
14
12
12

Computer Skills
23
Copyright © 2009 Gammill, Inc. | All Rights Reserved
Introduction
'Explore' Files
1.2.2 'Explore' Files
The Statler Stitcher computer comes pre-loaded with all the software and files inplace, but at some time we all need to add, copy, move or delete some of our files.There are several 'right' ways to manage files so if there is a method you know andare comfortable with, use it. Windows Explorer is used here because it is easy touse.
As described earlier, files have a path (the disk drive, folder and subfolders), afilename (hopefully it is descriptive) and a type called a file extension .CreativeStudio can read the following types of files:
.qli is the Quilting Language format that Statler Stitcher recognizes.
.dxf is a format used by CAD systems (like Autosketch) that the Statler recognizes
.pat is a Pattern File that has been encrypted to run only on a specific Statlermachines.
At some time, additional patterns will be purchased and will need to be moved to thefolder containing your personal files; C:\My Patterns. The new files will exist onsome type of removable media (like a thumb drive ) and Windows Explorer canhelp copy them to their new folder.
First, insert the thumb drive (removable media generally need a USB port) andopen up Windows Explorer . Search the folder structure and find theremovable media.
In this example, the thumb drive has been given the letter "F" but each computer canbe different so it might be E, F, G, H, or some other letter. The example shows thethumb drive has two folders that will be used for copying files to/from the homecomputer (Laptop) and the Statler. These folders are named: CopyLaptopToStatlerand CopyStatlerToLaptop. Using descriptive names for files and folders will makethis process much easier.
Copying FilesWe know where the files are (source is F:\CopyLaptopToStatler) and where theyneed to be placed (destination is C:\My Patterns). Windows Explorer is used here
18
17
17 18
11
11
18 19

Getting Started with CreativeStudio™24
too.
1) Click on the source folder, and the content will be displayed in the right windowpane.2) Select the files to be copied.3) Right click the selected (highlighted) files 4) Click Copy
5) Click on the destination folder.6) Right click the highlighted destination folder 7) Click Paste. Now click on the destination folder and the files should appear in theright window pane.
Tip: Copying or moving can also be done by dragging the group of
files to the destination. If the source and destination are in the same
path, the files are copied. If they are in different paths, they are
moved.
Rename FilesThe new files in this example have names that are more like product codes thanpattern file names, so change them to something you can recognize. Again,Windows Explorer makes this easy.
15
14

Computer Skills
25
Copyright © 2009 Gammill, Inc. | All Rights Reserved
Introduction
'Explore' Files
Managing Recorded Files One of the outstanding features of CreativeStudio is the ability to use the stitcher tocreate an original design by recording the motions for stitching that design andsave them so it can be used repeatedly. CS will automatically name the pattern fileand save it to a folder on your computer. The path is: C:\Patterns Recorded\RecordedQLI_yyyyMondd_hhmmss.qli. This looks scary but it is really very logical. The new pattern file needs a name that isunique, and the current date and time make it unique. A pattern recorded on St. Patrick'sDay, shortly after noon might be named C:\Patterns Recorded\RecordedQLI_2008Mar17_120345.qli. It can be found in the folder C:\Recorded Patterns.
If a fish pattern had been recorded on St. Patrick's Day and it turned out so well that it issure to be used again, it is a good idea to rename the recorded file, giving it a descriptivename. Then it should be moved from the 'Patterns Recorded' folder into 'My Patterns' folder.Using the steps above.
Buying Pattern Files Statler Stitcher owners seem to share an appreciation for beauty and perfection.This is one of the reasons we tend to build a stash of patterns. Finding the perfectmotif for a quilt is fun and stitching it out is very satisfying. So, building a stash ofpatterns is bound to happen. Each designer has a style of their own, so try patternsfrom multiple designers, and collect all their pattern catalogs too ! They are reallyinspirational. When ready to place an order, here is what to do:
1. Logon to their website and view their catalogs. Most catalogs have shopping cartfunctions, so you can be adding patterns to your shopping cart as you find them.When you are done shopping, follow the instructions for checking out and paying forthe patterns. Each designer does this a little differently so follow their directionscarefully. One of the steps is to give your name, address and email address. Thedesigner will either email the patterns to you or tell you how to download themyourself.
2. When you get your patterns save them to your home computer first. (Thisassumes that your home computer has internet access, a firewall and virus securitysoftware.) All new files should be received by (and saved on) your home computerso it can check them for viruses, etc. The Statler Stitcher should never be connectedto a network or to the internet.
151

Getting Started with CreativeStudio™26
3. Frequently the patterns will arrive in a zipped file folder, which means it has beencompressed so it takes less space and can be sent to you faster. It is easy to unzip afolder. Just like Windows Explorer, right click the zipped folder and follow theinstructions. There is a wizard that will help explain the process.
4. Now copy the files to your Statler Stitcher computer.
Moving Files Many people use the terms 'copy' and 'move' interchangeably because they are sosimilar. When files are copied from one place (source) to another (destination), theoriginal files on the source remain. When files are moved from one place (source) toanother (destination) the original files are deleted.
The previous section described how to copy files from a Removable Media to afolder on the Statler computer. Copying files from the home computer to the Statlercomputer works exactly the same, but it takes two steps. The first step is to copy ormove files from the home computer to the removable media, and the second is tocopy or move the files from the removable media to the Statler computer. Easy !
Downloading new versions of the software. The Statler Stitcher is a stand-alone system which means it should NOT beconnected to the internet or have any other graphics software loaded on thecomputer. This guarantees that the CS software can run at peak performance andanti-virus software is not needed. Screen Savers should NOT be used either.
Use a different computer (your home computer) to access the internet whendownloading files. All software upgrades are announced on the Statler Stitcherwebsite and on several internet discussion groups. Current owners can downloadnew versions of the software from the site www.StatlerStitcher.com. It requiressome setup so call the Statler Stitcher Tech Support people first.
When there is a new version of the software issued, the Statler Tech Support peoplealways create a manual on how to download and install the new software. So,download this manual first and read it thoroughly before attempting to download newsoftware yourself.
If you have no desire to ever download software, Statler (and most patterndesigners) will copy the software to a CD and mail it to you. There will always be afee for this extra service, so call first and ask about the process.

Part II

Getting Started with CreativeStudio™28
2 Main Screen Layout
This section is dedicated to understanding the main CreativeStudio™ (CS) screen.The top section has all the tools and commands needed; Title Bar, Command Bar,Tool Bar. The center section is the main working area. It is divided into three distinctareas; Project information, Details and the Preview area. At the bottom of the screenis the Status Bar and the Task Bar. Each area will be discussed in more detail later,when they are used to describe the quilting process.
2.1 Title Bar
The Title Bar is a standard feature in most software products. It displays the title ofthe software program being used and the name of the file currently being used. ForCS, the file is a project.
Title Bars also contain three important icons. Minimize will shrink the screen, making it a button on the task bar. Re-size will change the screen size (Full Screen or Partial Screen) Exit is the quick way to close the software (Also called "X-it" meaning click on the
"X").
2.2 Command Bar
The Command Bar is the second line of the screen. Click on any of the words,and a drop-down box appears, showing the choices for that command.

Command Bar
29
Copyright © 2009 Gammill, Inc. | All Rights Reserved
Main Screen Layout
File Command
2.2.1 File Command
The File commands are used to organize and save your work. CS uses ‘projects’ tocollect, hold, preview and save the patterns and layout you choose for your quilt.Projects are described in detail later in this text so at this point, consider them to bea file folder that holds all the details about a quilt. Click on the command “File” to seethe options.
New Project - is used when starting a new quilt. (Ctrl+N is the keyboard shortcut).Open Project - is used when the project already exists. (Ctrl+O is the keyboardshortcut).Save Project - saves all of the elements of the project together using the currentproject name. Save Often! (Ctrl+S is the keyboard shortcut).Save Project As - saves all of the elements of the project together AND lets you giveit a different name. Exit CreativeStudio - will close the software, just like the Quick Exit icon.
Tip: The default project name is “My Quilt Project”. Although it is
possible to add patterns to this and save it, it is not advisable. So,
always provide your own project names. Consider using a naming
convention that somehow identifies the quilt; perhaps by date,
customer, style, event or some other combination of methods.
2.2.2 Edit Command
CS provides the ability to undo (or redo) the previous command, so if a commandstep is made by mistake, it can be immediately corrected. If you backup too far,Redo will “Undo the Undo” or go forward again. This does not apply to measurementchanges, just commands.
Store Undo will store the current state (this is for the techie people). Undo will reverse the previous command.Redo will re-execute the previous command.

Getting Started with CreativeStudio™30
2.2.3 View Command
CS can include (or exclude) certain windows which contain some of the operatingdetails.
View Project Explorer means to display a dialog box that lists the details of thecurrent project. Generally this means showing all of the patterns chosen for thecurrent project.
View Property Window means to display a dialog box that itemizes the properties ofthe object currently selected. In non-techy terms, properties means details describingthe item selected. So, viewing the property window means to display the details ofthe highlighted object.
View Keypad Window means to display an image of the keypad mounted to yoursewing head. The image on the screen is 'grayed out' which means it can't beclicked with the mouse. It just serves as a reminder by displaying what the currentfunctions are for the keypad on the stitcher.
2.2.4 Tools Command
The tools listed here are used as needed, to customize the quilting process. Thetools may be used frequently or not, but they affect how the system operates. Thissection describes briefly what they do. If needed, more detail is included in othersections of the manual.
Technical Support- There are many mechanical, electrical, and numeric settings thatare required to run CS. Some of the settings are defaults that can be changed to suitthe quilter’s preferences. These default settings are defined in the ControllerDefinition Form and are explained in detail in the chapter on Utility Functions.
Technical Support also covers Diagnostics - which are metrics that are used to rundiagnostic tests. The Diagnostics are considered a Restricted Area - Do not modify
157

Command Bar
31
Copyright © 2009 Gammill, Inc. | All Rights Reserved
Main Screen Layout
Tools Command
any of the values without the explicit instructions from one of the Statler Stitchersupport staff.
Set Origin - The origin point is a new variable in CS. All graphics products need anorigin but CS’s ability to set a unique origin point enables the projects to berepeatable, across machines. The repeatable origin allows recovery from accidental(or end of the night) power shutdowns. It also means that projects can be created fora whole quilt and the project can be sold / shared to others, just like a single patternis sold / shared in PS. (Utility Functions).
Oil Stitcher – This is a special routine that is an optional part of the regularcleaning and maintenance. It runs the sewing head motor at varying speedsbackwards so the oil has a chance to penetrate some places that are otherwise hardto reach. New machines and certain climates may require this to be done morefrequently. See Utility Functions for complete details.
Calibrate Stitcher Motor - Calibrating the stitcher motor guarantees stitchingaccuracy. This does not need to be done often but can be performed as needed. It isrequired when CS is first installed, after loading new software versions or performingany significant technical maintenance. (see Utility Functions)
Current Session Settings: The following settings are inherited from the defaultsettings. Changes made here apply only to the current session:
Laser OFF (or ON) - The laser light is automatically turned on during certainfunctions, but it can be turned on (or off) manually. If CS needs the laser light on, itwill turn it on automatically.
Needle OFF (or ON) - The needle can be turned OFF when a pattern is beingchecked for proper positioning. By turning the needle off and the laser light on, CScan move through the pattern and the light shows where the stitch line would appear.This is like a rehearsal. Once the path is correct, turn the needle ON and use theRestart function to repeat the motions, and stitch it out.
Stitch in Points OFF (or ON) - When the Stitch in Points is set ON, the sewing headwill take an extra stitch in every point it encounters. This enhances some patterns bymaking the point more precise.
Thread Break Detect OFF (or ON) - When the Thread Break detector is ON, thethread break sensor on the sewing head is enabled. This sensor is usually a cylinderthat is included in the thread path and it rotates when stitching. If it stops rotatingwhen stitching, CS assumes that the top thread has broken and CS will stop stitchingand show a Thread Break message. Tie Offs OFF (or ON) - Tie Offs are the tiny stitches that are made at the beginningand the end of a pattern or a line of stitching. They serve to knot the threads so thestitches will not easily come out.
Display Grid - Choosing to display a grid will change the look of the preview area. It
160
161
161

Getting Started with CreativeStudio™32
can look like graph paper with very fine lines and it is helpful when planning patternpositioning.
Grid Size - Choose the distance between the grid lines that helps you plan thedesigns effectively. If precise pattern placement is important, the grid size might beset to a quarter inch (0.25) but if the pattern is very large scale, the grid size might bebetter at one inch.
Tip: Any changes you make to these settings will affect the
current session only. When you shut down the system and restart it,
the settings return to their default values. To change defaults, see
the Configuration Form in the Utilities section.
2.2.5 Help Command
Help is an integrated system that provides information about CreativeStudio. Helpcan be derived by viewing the Table of contents, by using the Index of key words, bysearching for key phrases. "About..." will display the software version numbers, theController serial number and the Security Key (dongle) serial number. The StatlerStitcher Software License Agreement is included too.
This new ‘Help’ window will look very familiar to people who have used other helpsystems. It is a split screen that allows navigating by topic on the left, and fullexplanations of the selected topic on the right. It is possible to search for somethingby browsing the table of contents, by browsing the index, or by doing a search for aword or series of words. Many of the screens also have a Help icon “Help ?” which is a context sensitiverequest for help. Click-on this icon once, then move to the object on the screen thatis not understood and click again. A short explanation appears or the help systemopens allowing search capabilities. Help - Using the Table of Contents.

Command Bar
33
Copyright © 2009 Gammill, Inc. | All Rights Reserved
Main Screen Layout
Help Command
The Table of Contents provides a convenient way to scan the content of the manualquickly. The table of contents can be expanded to display all levels or compressed toshow just the major sections. Any time a title is highlighted in the table of contents onthe left, the text associated with that title appears on the right.
Help - Using the Index.
The Index provides a convenient way to look for a word and any variations of thatword. For example, typing in a general term like the word 'Repeat' would point to theplace in the index that would precede repeat pattern icon, repeat pattern setup,repeat setting details, repeats and rows, etc. Highlighting a word and clicking'Display' will show the detail on the right. If a word appears more than once, a listwill be presented and you will be asked to make a choice before the detail is shownon the right.
Help - Using the Search feature.
The search function will search the entire CS User Manual database looking for amatch. Instead of displaying all of the matches, CS displays a list of titles (sectiontitles) and locations (chapter names) to help you choose the right match. Click on'Display' to show the actual text from the CS User Manual.
Help - About your Statler Stitcher System.
Some day you are going to call the Support Team and they are going to ask you

Getting Started with CreativeStudio™34
what version of software you are running and what Controller Mod you have. Theseare good things to know, and it is probably a good idea to write down this informationsomewhere accessible - perhaps on the first page of this printed user manual.
Tip: Every Statler Stitcher controller has a serial number assigned
to it. Similarly, every new style security key (dongle) has a serial
number also. Pattern designers are encrypting purchased patterns
with the serial numbers to prevent patterns from being 'shared'
inappropriately. So, don't be surprised if you are asked for your
controller serial number when you are buying a new pattern.
Help - Statler Stitcher Software License Agreement.
Like all proprietary software companies, Statler Stitcher has certain terms you agreeto when you buy and install the CreativeStudio software. Basically it says that Statlerhas done its due diligence in providing a world class software program, and that theuser (you) promise not to do anything illegal with it. How's that for simple!

Tool Bar
35
Copyright © 2009 Gammill, Inc. | All Rights Reserved
Main Screen Layout
2.3 Tool Bar
The icons displayed on the Tool Bar (also called tool strip) represent unique quiltingfeatures. The features can be initiated by using the mouse (to click the icon) orpressing the Mode button on the keypad until the icon is highlighted, and thenpressing Select on the keypad. Each of the quilting features (represented by icons)is described briefly here, and in more depth later when they are used in context.
Tip: Holding the cursor over the icon (called hovering) will display
the name of the icon in a ‘tool tip’. Using the keypad to select an icon
will display the name of the icon in the center of the Command Bar.
Boundary Icon - Clicking on this icon will initiate a series ofprompts, asking for the points that define the bounded area. Boundaries may haveas few as 3 points (triangle) or may have hundreds (unlimited actually) of points. Theboundary can be any shape but is always a closed area and is limited in physicalsize since the sewing head is used to define the points. The maximum size of theboundary depends on the length of the table and the size of the sewing head.Boundaries are used for placing patterns and for general reference. The concept ofthe boundary is also used in specific functions like Trim and Edge-to-Edge.
Pattern to Boundary Icon - Clicking on this icon will move theselected pattern into the selected boundary. If the pattern and/or boundary is notselected (highlighted), CS will display a reminder. Numerous boundaries can bedefined for one quilt group which makes it easy to place different patterns together tosee how they look.
Quilt Icon -This icon initiates the stitching process, and is used in
95
96
67

Getting Started with CreativeStudio™36
conjunction with all the other icon features. The sewing head will move to the startpoint of the first pattern, take a single stitch and show a prompt to pull up the bobbinthread. Clicking OK/Select will begin the stitching, starting with the tie-off stitches (ifenabled). When the quilting is done, CS will again show a prompt to pull up thebobbin thread, and click OK when done. The OK indicates the successful completionof the task. Clicking Stop means the task was not completed successfully.
Edge-To-Edge Continue Icon - is a subset of Edge-to-Edge
and it is not used until the first portion of the quilt is complete and hasbeen rolled. (The Edge-to-Edge feature determined the pattern sizes, repeats, rows,placement and stitched the first section). Edge-to-Edge Continue will prompt for theboundary of the next section, and will provide prompts for completing that section. Itis used multiple times, until the quilt is done.
Point to Point Icon - This function is extremely powerfulbecause it allows patterns (or lines) to be placed in very specific positions. (click on
the arrow on the right side to display the choices). It will stitcha line or pattern between every pair of sequential (contiguous) points. It is very usefulwhen making composite designs and when working on an area of the quilt that maynot be perfectly aligned (like borders, sashings, and flying geese). Points areidentified by moving the sewing head to the point on the quilt, and pressing theOK/Select button. Selecting two points will define one line or pattern; three pointsdefines two patterns, ten points defines nine patterns, etc.
Repeat Pattern Icon - This function will use the pattern beinghighlighted, prompt for a reference point and allow you to specify multiple repeatsand/or rows. It does not require a boundary but usually a boundary is helpful whenplacing multiple patterns. It is very similar to the Edge-to-edge settings but moreflexible especially with composite design elements.
Border Corner Icon - This function is extraordinarily usefulwhen joining corner patterns with border patterns because it allows the patterns(corners first, then borders) to be selected, placed and previewed before stitching.Each pattern can be ‘tweeked’ to fit the space exactly, and the settings are saved astheir own Quilt Group.
141
167
98
111

Tool Bar
37
Copyright © 2009 Gammill, Inc. | All Rights Reserved
Main Screen Layout
Edge To Edge Icon - The Edge-to-Edge function works with
E2E Continued. The first steps perform the calculations and resize thepattern if needed so that the repeated pattern fits the quilt exactly. The E2E functionwill prompt for the first boundary (which is the first section to be quilted) and the totalquilt length. It uses these dimensions to suggest the number of rows and repeatsneeded to complete the quilting. Modifications are possible, and CS will adjust thecounts (rows and repeats) and the pattern proportion (pattern length and height) ifneeded to fit the total quilt. Use Edge To Edge Continue after rolling the quilt thefirst time.
Trim Icon - The Trim function uses boundaries to define a space,and then will trim away the excess quilting pattern.
The trim can be done to the pattern inside or outside of the bounded area somake that choice first using the arrow to the right of the icon. This function allowspatterns to be used as background fillers, behind some other pattern or applique.
Measure Icon - The measure function will help obtain exactmeasurements for the area you choose. It prompts for the beginning and endingpoint of a line, and then displays the measurement of the absolute height, absolutewidth, the actual length (which is the diagonal) and it gives the angle (number ofdegrees of rotation) of the defined line. This utility will allow multiple measurementsto be taken consecutively, so press Cancel to exit the measure function.
Restart Quilting Icon - The Restart function is used wheneverthe machine stops by itself (thread break) or the Stop button is pressed. The processcan begin stitching at exactly the spot where the stitching stopped (great if youneeded to press the Stop button) or it can be adjusted to restart at any other point(great if the bobbin ran out and the thread break sensor didn’t detect a breakimmediately). It is possible to define the restart point using the sewing head & thequilt top, or the mouse and the computer screen.
Regulated Sewing Icon There are several modes for stitchingwith the stitch regulator (Original, Plus, Smooth). To choose a mode, click on thearrow to the right of the icon and a drop-down box appears with the following:
180
178
178 179
71
153
165

Getting Started with CreativeStudio™38
* Original refers to the original stitch regulator action, which did not keep the needlerunning around the corner. Its design was based on people who upgraded fromnon-stitch regulated machines, and pause at points or corners then continue quiltingwithout taking much time to get back up to speed. * Plus is designed to keep the needle running at points or corners. This guaranteesa sharp point, like the Gammill Plus machine. * Smooth has a different power curve (needle up/down speed) for people who don’tpause at points, but do slow down going into the point and coming out of it.
Constant Speed Icon -When constant sewing is started, theneedle starts stitching, and it is up to the quilter to move the sewing head smoothlyand consistently. The quilter’s motion determines the stitch length, not the sewinghead. This function is preferred by some when doing micro-stipple backgrounds incustom quilting. Most of the rest of us use constant sewing only when we arewinding bobbins using the on-board bobbin winder.
Baste Icon - is special because it is designed for stitching slowlyand it will not push / stretch the fabric. It is essentially individual long single stitchesdone continuously. Stitch length can be as long as 4 inches.
View All Icon - is a fast way to zoom out far enough to see all theboundaries and patterns in the current quilt group. This is also used by quilters wholike to see the grid background behind all boundaries and patterns.
Group All Patterns Icon is a fast way to treat all patterns as oneentity. This is useful when trying to adjust the positioning of all patterns in aboundary. Also very useful when rotating or flipping the group of patterns.
Help ? Icon is context sensitive help. Just in case you haveforgotten the purpose of some icon, you can click on the Help?, the cursor turns intoa question mark, which can be moved to the icon in question. By clicking again, adialog box will appear that will briefly explain the icon.

Work Area
39
Copyright © 2009 Gammill, Inc. | All Rights Reserved
Main Screen Layout
2.4 Work Area
Work Area is divided into three distinct parts - like panes within this window.
Project information is also known as the Project Explorer.
Properties window will list the settings and other details.
Preview Area is also called the CAD Screen by techy types. The images of thequilting designs appear here.

Getting Started with CreativeStudio™40
2.4.1 Project Information
Projects collect and hold the information needed to do a whole quilt. Technically aproject is a file but thinking of them as a notebook or as a folder is sometimes easier.Every pattern chosen for this project is listed. The file name and a thumbnail sizeimage are included. The Project Information box can be ever-present, or can be‘docked’ by clicking on the pushpin icon (which then creates a tab on the left side ofthe screen).
Throughout the quilting process, the Project icons can be used.
Save Project - saves the project file. If a name has not been given to thefile, CS will prompt for one.
Add Pattern - initiates the process of looking, previewing and choosing apattern for this project.
Delete pattern - will remove a pattern from this project.
Check Project Properties - will display some of the project details in theProperties window.
Add Quilt Group - will create a new tab, prompt for a name for the tab, andcreate a preview area for the new quilt group tab.
Remove Quilt Group - will delete the current tab. CS will ask forconfirmation before deleting the tab because it can't be retrieved.
60
68
71
43
62
62

Work Area
41
Copyright © 2009 Gammill, Inc. | All Rights Reserved
Main Screen Layout
Preview Area (CAD Screen)
2.4.2 Preview Area (CAD Screen)
The Preview Area – (also called the CAD window by techies) is the big, whitearea where the images of the patterns and boundaries appear. Each quilt group(tab) gets its own preview area, where the images can be adjusted. Images that aredisplayed in the preview area will be exactly what will be quilted.
Every quilt has at least one quilt group, and custom quilts will have many. Some ofthe CS features need a quilt group of their own, so they are created automatically.
It is possible to select multiple patterns and position them in the Preview area to seehow they work together. Not only do you see how the patterns work together, but thepattern size / scale can be previewed also.
Tip: Use the first tab (called Quilt Group) to preview your patterns
together. This is a fast and easy way to audition patterns with the
customer. When the patterns are chosen and previewed, save the
project (with the customer's name) so all the details are readily
available when it is time to "Quilt As Desired".
62

Getting Started with CreativeStudio™42
2.4.3 Property Window
Properties (aka settings) are the details that define how (and what) the sewinghead will stitch. These details may apply to a project (yellow frame), a pattern (blue frame), or a selected pattern (magenta frame). The frame around the detailsarea is color coded to help differentiate between which details are being displayed.
Settings can also apply to a process. Several important quilting features (EdgeTo Edge , Repeat Patterns and Border/Corner ) require a series of steps andadditional information. Process settings provide the extra information.
43 46
48
50 50 50
50

Work Area
43
Copyright © 2009 Gammill, Inc. | All Rights Reserved
Main Screen Layout
Property Window
2.4.3.1 Project Details - Yellow Frame
Project Details - appear in the Property Window and are framed with a yellow line,just like the Project Information box is framed in yellow. The Title Bar specifies“Project Details” and includes the project name. If no patterns are selected yet, theProject Details box shows the current default settings.
Changing the Project Details:The Customer Section is a form that includes the customer name and contactinformation. Click on the "+" sign to expand the form and show each of the fields.Click on the individual field to input your data. Click on the "-" sign to collapse theform.
Project Name – The default name for all projects is "My Quilt Project". To changethis, highlight the default name and then type in the new project name. Choose afriendly name that describes the quilt or the patterns being used. If you forget thchange the project name, CS will remind you when you first click 'Save'. to save the
60
Getting Started with CreativeStudio™44
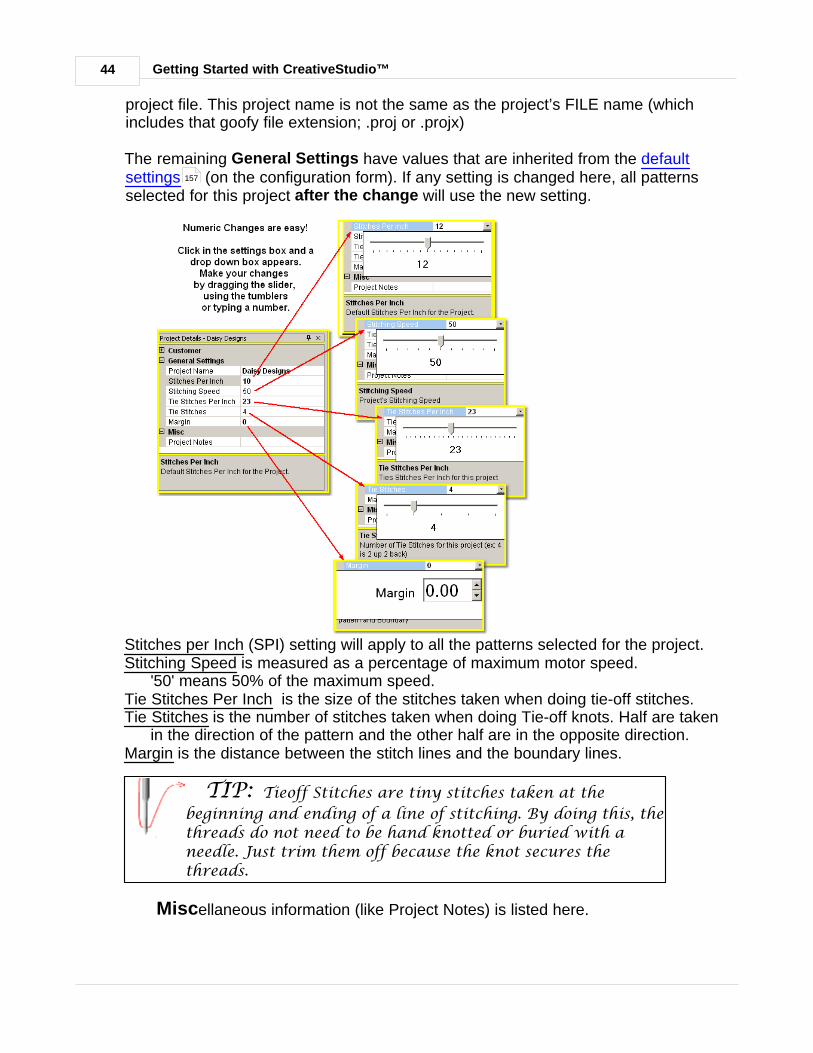
project file. This project name is not the same as the project’s FILE name (whichincludes that goofy file extension; .proj or .projx)
The remaining General Settings have values that are inherited from the defaultsettings (on the configuration form). If any setting is changed here, all patternsselected for this project after the change will use the new setting.
Stitches per Inch (SPI) setting will apply to all the patterns selected for the project. Stitching Speed is measured as a percentage of maximum motor speed.
'50' means 50% of the maximum speed. Tie Stitches Per Inch is the size of the stitches taken when doing tie-off stitches.Tie Stitches is the number of stitches taken when doing Tie-off knots. Half are taken
in the direction of the pattern and the other half are in the opposite direction. Margin is the distance between the stitch lines and the boundary lines.
TIP: Tieoff Stitches are tiny stitches taken at the
beginning and ending of a line of stitching. By doing this, the
threads do not need to be hand knotted or buried with a
needle. Just trim them off because the knot secures the
threads.
Miscellaneous information (like Project Notes) is listed here.
157

Work Area
45
Copyright © 2009 Gammill, Inc. | All Rights Reserved
Main Screen Layout
Property Window
Getting Started with CreativeStudio™46
2.4.3.2 Pattern Details - Blue Frame
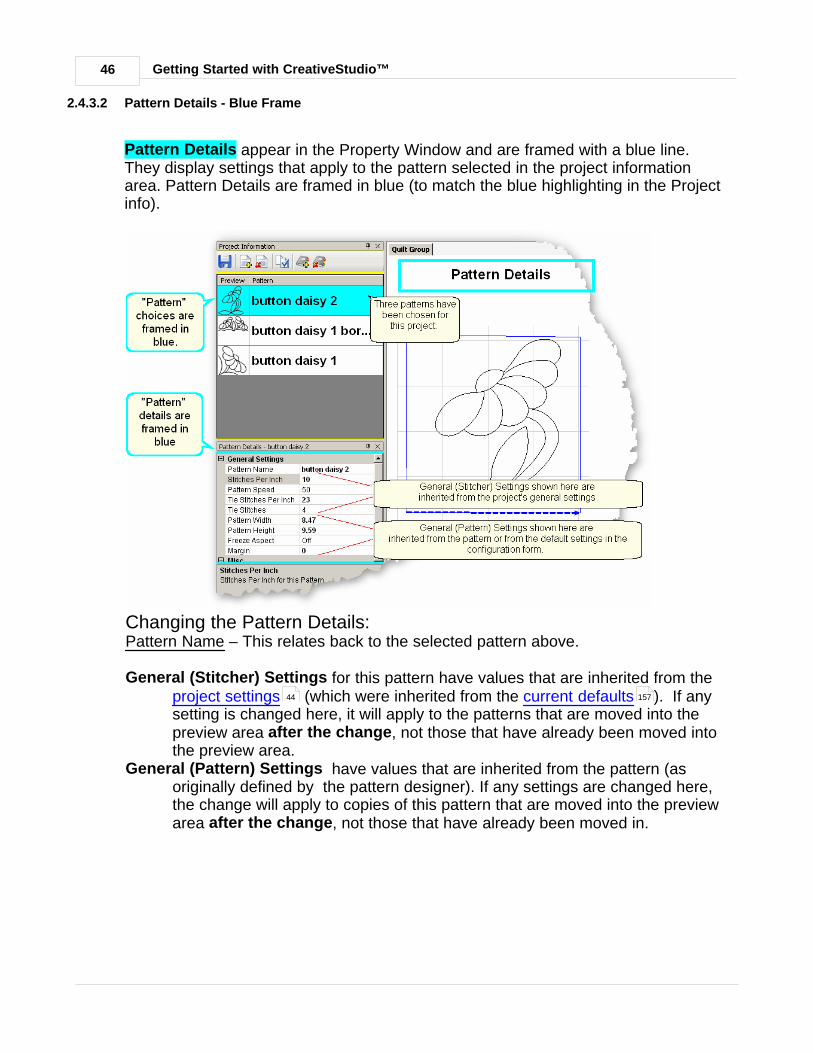
Pattern Details appear in the Property Window and are framed with a blue line.They display settings that apply to the pattern selected in the project informationarea. Pattern Details are framed in blue (to match the blue highlighting in the Projectinfo).
Changing the Pattern Details:Pattern Name – This relates back to the selected pattern above.
General (Stitcher) Settings for this pattern have values that are inherited from theproject settings (which were inherited from the current defaults ). If anysetting is changed here, it will apply to the patterns that are moved into thepreview area after the change, not those that have already been moved intothe preview area.
General (Pattern) Settings have values that are inherited from the pattern (asoriginally defined by the pattern designer). If any settings are changed here,the change will apply to copies of this pattern that are moved into the previewarea after the change, not those that have already been moved in.
44 157

Work Area
47
Copyright © 2009 Gammill, Inc. | All Rights Reserved
Main Screen Layout
Property Window
Stitches per Inch applies to this pattern. Pattern Speed is measured as a percentage of maximum motor speed. '50' means
50% of the maximum speed. Tie Stitches Per Inch is the size of the stitches taken when doing tie-off stitches.Tie Stitches is the number of stitches taken when doing Tie-off knots. Half are taken
in the direction of the pattern and the other half are in the opposite direction. Pattern Width is the width of one pattern, measured at the widest point.Pattern Height is the height of one pattern, measured at the tallest point. Freeze Aspect - 'ON' means the ratio of Height:Width remains the same when the
size changes. So, if one of the dimensions is changed, CS will change the otherautomatically to keep the ratio the same. 'OFF' means CS will allow the ratio tobe distorted.
Margin is the closest distance between the stitch lines and the boundary lines.
MiscProject Notes are saved with the project for future reference.

Getting Started with CreativeStudio™48
2.4.3.3 Selected Pattern Details - Magenta Frame
Selected Pattern Details appear in the Property Window and are framed with amagenta (hot pink) line. These details apply to the pattern selected in the previewarea (not the one highlighted in the project information area). The magenta color waschosen to match the highlighting in the Preview area.
Changing the Selected Pattern Details
General (Stitcher) settings have values that apply to the highlighted pattern andwere inherited from the pattern settings (which were inherited from theProject Settings which were inherited from the default settings) .
General (Pattern) settings apply to the characteristics of the pattern highlighted inthe preview area.
46
44 157

Work Area
49
Copyright © 2009 Gammill, Inc. | All Rights Reserved
Main Screen Layout
Property Window
Stitches per Inch applies to this pattern. Pattern Speed is a percentage of maximum motor speed. '50' means 50% of the
maximum speed.Tie Stitches Per Inch is the size of the stitches taken when doing tie-off stitches.Tie Stitches is the number of stitches taken when doing Tie-off knots. Selected Pattern Width is the width of one pattern.Selected Pattern Height is the height of one pattern. Freeze Aspect - 'OFF' means the Height & Width are independent of each other. Selected Pattern Rotation is the number of degrees that the pattern is angled.

Getting Started with CreativeStudio™50
2.4.3.4 Process Details - Gray Frame
Process Details appear in the Property Window and are framed in gray. Thereare three processes that need additional details for the setup mode; Repeat PatternSetup, Border Corner Settings and Edge-to-Edge. The Title Bar for the windowspecifically states which process is being used.
The Title Bar will always specify Which Details are being displayed, followed by twoicons. The Push Pin icon will ‘dock’ the details so they are out of the way, but stillaccessible. The “X” will exit, or close the details.
Separate quilt groups are created for Border-Corner and Edge-To-Edge.
1.) The Repeat Pattern Setup controls the positioning and placement of repeatedpatterns. The process is used when multiple copies of a particular pattern areneeded. It contains the settings which determine which pattern will be used, wherethe pattern will be stitched and how many times it is repeated. The settings areintroduced here and will be explained in detail when used in context.
Reference Point Locations are used to position the repeated patterns on the quilttop.
Reference Point is a specific point on the quilt that is used for placing patterns. Offsets are used if the repeated patterns need to be positioned some distancefrom the initial reference point. As an example, the reference point may be theupper left corner of the quilt, but the repeated patterns are intended for an innerborder, which starts some distance away. This distance is measured in two
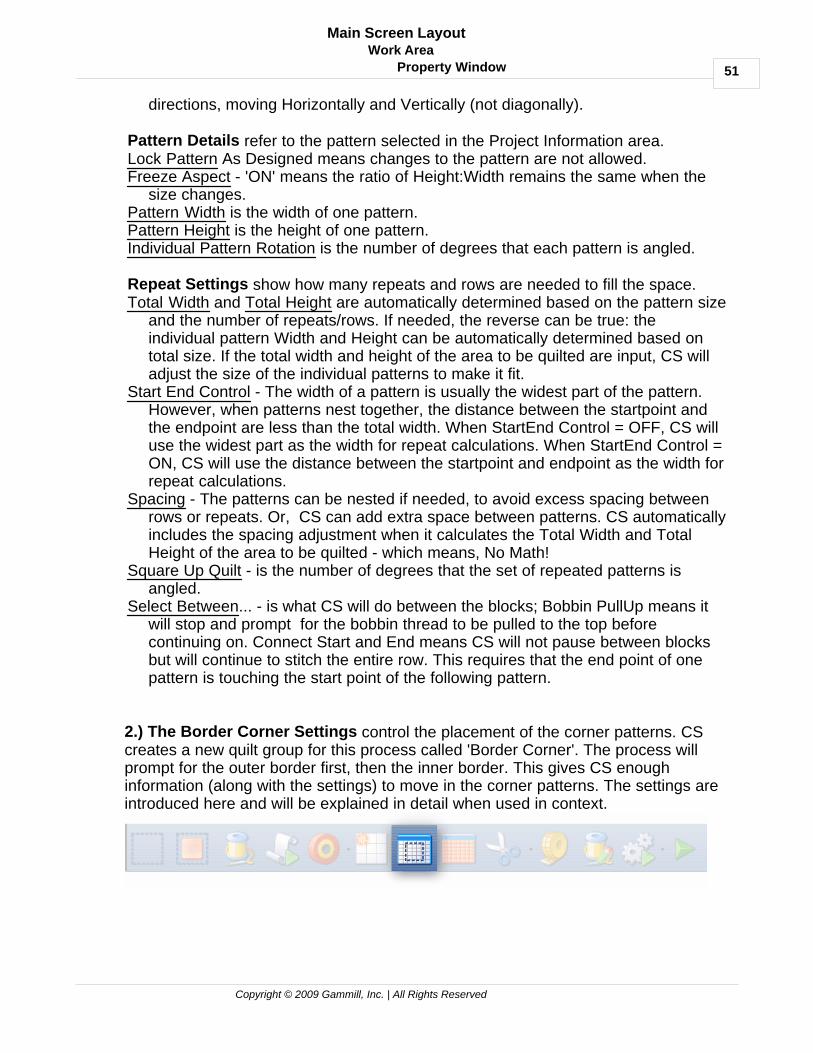
Work Area
51
Copyright © 2009 Gammill, Inc. | All Rights Reserved
Main Screen Layout
Property Window
directions, moving Horizontally and Vertically (not diagonally).
Pattern Details refer to the pattern selected in the Project Information area.Lock Pattern As Designed means changes to the pattern are not allowed.Freeze Aspect - 'ON' means the ratio of Height:Width remains the same when the
size changes. Pattern Width is the width of one pattern.Pattern Height is the height of one pattern. Individual Pattern Rotation is the number of degrees that each pattern is angled.
Repeat Settings show how many repeats and rows are needed to fill the space. Total Width and Total Height are automatically determined based on the pattern size
and the number of repeats/rows. If needed, the reverse can be true: theindividual pattern Width and Height can be automatically determined based ontotal size. If the total width and height of the area to be quilted are input, CS willadjust the size of the individual patterns to make it fit.
Start End Control - The width of a pattern is usually the widest part of the pattern.However, when patterns nest together, the distance between the startpoint andthe endpoint are less than the total width. When StartEnd Control = OFF, CS willuse the widest part as the width for repeat calculations. When StartEnd Control =ON, CS will use the distance between the startpoint and endpoint as the width forrepeat calculations.
Spacing - The patterns can be nested if needed, to avoid excess spacing betweenrows or repeats. Or, CS can add extra space between patterns. CS automaticallyincludes the spacing adjustment when it calculates the Total Width and TotalHeight of the area to be quilted - which means, No Math!
Square Up Quilt - is the number of degrees that the set of repeated patterns isangled.
Select Between... - is what CS will do between the blocks; Bobbin PullUp means itwill stop and prompt for the bobbin thread to be pulled to the top beforecontinuing on. Connect Start and End means CS will not pause between blocksbut will continue to stitch the entire row. This requires that the end point of onepattern is touching the start point of the following pattern.
2.) The Border Corner Settings control the placement of the corner patterns. CScreates a new quilt group for this process called 'Border Corner'. The process willprompt for the outer border first, then the inner border. This gives CS enoughinformation (along with the settings) to move in the corner patterns. The settings areintroduced here and will be explained in detail when used in context.
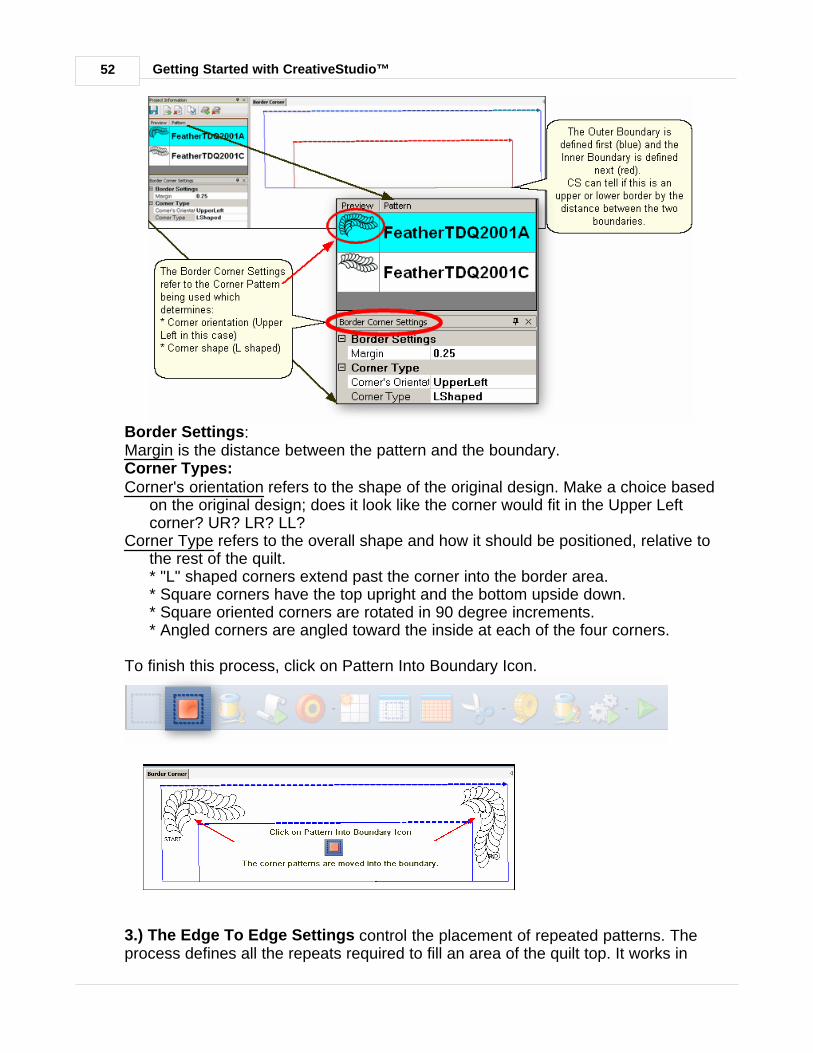
Getting Started with CreativeStudio™52
Border Settings:Margin is the distance between the pattern and the boundary.Corner Types:Corner's orientation refers to the shape of the original design. Make a choice based
on the original design; does it look like the corner would fit in the Upper Leftcorner? UR? LR? LL?
Corner Type refers to the overall shape and how it should be positioned, relative tothe rest of the quilt.* "L" shaped corners extend past the corner into the border area. * Square corners have the top upright and the bottom upside down.* Square oriented corners are rotated in 90 degree increments.* Angled corners are angled toward the inside at each of the four corners.
To finish this process, click on Pattern Into Boundary Icon.
3.) The Edge To Edge Settings control the placement of repeated patterns. Theprocess defines all the repeats required to fill an area of the quilt top. It works in

Work Area
53
Copyright © 2009 Gammill, Inc. | All Rights Reserved
Main Screen Layout
Property Window
conjunction with the Edge To Edge Continue process, which helps to position therows of quilting after the quilt top has been rolled. The settings are introduced hereand will be explained in detail when used in context.
Primary Settings refer to the quilting space.Quilt Length is to the total length of the space to be quilted. Measure the space and
then subtract the margin amount twice (top & bottom).
Size Settings refer to the quilt pattern chosen (highlighted in the Project Informationbox).
Pattern Width is the width of one pattern.Pattern Height is the height of one pattern. Repeats and Rows will be calculated by CS based on the pattern size and the quilt
space (Length and width). Changes to the number of repeats and rows will adjustthe pattern size to fit the quilt space.
Spacing allows the rows and columns to be nested if needed. The spacingmeasurements are positive if extra space is needed between rows or repeats.Spacing measurements are negative if space is removed between the rows orrepeats.
Variable Settings refer to the quilting process and the stitching preferences. Select Between Blocks tells CS what to do between patterns. The patterns can be
connected (no stop between them) or individual (CS stops, does tie-offs andbobbin pullups).
Stop at End of Row tells CS to stop and tie-off at the end of each row.Select Alternating Type describes the pattern positioning. 'No' alternating means the
patterns are placed like a spreadsheet, creating rows and columns. The otherchoices allow every other row to be staggered, making the repeats less

Getting Started with CreativeStudio™54
noticeable. Select Registration describes what CS should use as the registration points so the
rows don't get out of alignment when the quilt top is rolled. Maintain Aspect - is similar to Freeze Aspect for a pattern. 'ON' means CS will avoid
distorting the pattern proportions if at all possible. Some minor distortion may benecessary to completely fill the quilt space.
Tip: If you close the details box, you will not get it back again, so
be sure you are done with editing the Process details.
2.4.3.5 Inheriting Settings
A word about settings and the level of inheritance of settings.
Level 0: Tech support at Statler Stitcher controls all settings. Period. They do allowsome of the settings to be modified by the users, as follows:
L1: Default settings (that the users can modify) are shown in theconfiguration form. A change to the configuration form is permanent goingforward (until you change it again). These changes are not retroactive.
L2: Settings can be changed for the current session (üTools oncommand bar).
A change at this level applies to all new activity for the rest of the session.Changes are not retroactive. Nor are they permanent.
L3 Settings can be changed for a single project. A change at thislevel applies to all new activity for that project during the current session.Changes are not retroactive or permanent but they are saved with theproject so the next time the project is opened, the settings will apply.
L4 Settings can be changed for a single pattern within a project.A change at this level applies to all new activity for that pattern in thatproject during the current session. Changes are not retroactive and don’t affect other projects but they can be saved with the project.
L5 Settings can be changed for a pattern that has beenselected and is visible in the preview area of the screen. Thesechanges are not retroactive and have no effect on any otherpatterns in the project. These changes will not affect the samepattern if it is used again in this project in the future . This is thebottom of the hierarchy.
Settings always cascade forward and down, never backward or up.
2.5 Keypad Window
The Keypad Window shows an image of the six buttons on the sewing head keypad.Using the keypad reduces the number of times you must walk to the computer anduse the mouse to select an option. To view the keypad image, click on View, thenclick on Keypad Window and the image will appear in the CAD screen. This image isgrayed out which means it won't respond to any clicking with the mouse. It is only a
157
31
44
46
48

Keypad Window
55
Copyright © 2009 Gammill, Inc. | All Rights Reserved
Main Screen Layout
reminder of what the keypad buttons will do. To hide the window, click the "X" on thetitle bar. It is possible to display the keypad window all the time - see the defaultsettings in the configuration form.
Tip: The keypad buttons are very similar to P.S. so feel free to
hide the keypad window and maximize the space in the
Preview Area.
Keypad Controls can be used instead of the mouse in certain situations.Bobbin - will initiate the bobbin pull-up sequence.Select pattern - will scroll through the selected patterns in the Project Properties.Mode - will rotate through each of the icons on the Tool Bar, highlighting eachsequentially. To rotate backwards, press and hold the Stop button while pressingthe Mode button.
Select - initiates the feature represented by the icon that is currently highlighted.Stop - terminates the feature currently running.Single Stitch - will complete one stitch when pressed. Holding down the button willresult in a series of single stitches which is useful when basting or doing yourown tie-offs.
Tip: The buttons in the handles of the machine head are
hard-wired to two of the controls on the keypad. The left handle is
connected to the lower left keypad button and the right handle is
connected to the lower middle keypad button.
The keypad controls change, depending on the CS tasks being performed.

Getting Started with CreativeStudio™56
Stitcher Control Window shows the choices when the machine is sewing.Inc Speed - will increase the motor speed by 5% every time it is pressed.Dec Speed - will decrease the motor speed by 5% every time it is pressed.Quick Pause - will stop the sewing head immediately, and remember where it is so it
can restart. This button is replaced by Quick Start which restarts thestitching exactly where it stopped.
Stop - will stop the sewing head immediately, and terminate the current process. Use the Restart feature to continue the line of stitching.
2.6 Status Bar
The Status Bar displays the current status of the operation being performed.
The left section gives a status of the machine’s operation. Other info listed may beerror messages, Motor speed, Stitches per inch and more.
2.7 Task Bar
The last line of the screen display shows the Task Bar which contains buttons thatrelate back to the computer programs currently open. It is possible to have severalprograms open simultaneously. The computer will layer (or stack) the screen imagesfrom each program. Clicking one of the buttons will bring the screen for that programto the top of the stack.

Part III

Getting Started with CreativeStudio™58
3 Planning the Quilting
A key strength of the Statler Stitcher CreativeStudio™ software is the ability to:
* See it Pick, Position and Preview the quilting patterns before stitching them.
* Stitch it What You See Is What You Quilt! (WYSIWYQ)
* Save it Save all the patterns, positioning, & settings for future use.
Planning the quilting is easy now because the quilter can select, combine andpreview quilting patterns, and see (or show the customer) what they look liketogether. The preview can be saved until the quilt is ready to finish. The entireproject can be saved for future reference or repeats.
3.1 Quilt Projects
Quilt Projects are used by CreativeStudio™ as a way to collect and organize thedetails for a quilt. A project is like a notebook that contains all the information usedfor a quilt. The notebook has general project information and it has tabbedsections that contain the details relating to specific areas of the quilt. Projects filescan be saved and re-used at a future date, with minimal adjustments.
40

Quilt Projects
59
Copyright © 2009 Gammill, Inc. | All Rights Reserved
Planning the Quilting
Save your project often!
3.1.1 Origin Point
CS requires an “Origin” point which is a reference point used for the placement ofpatterns. This origin is set (using the sewing head) every time the CS software isstarted. It is important to use the same point every time if possible. Otherwise, theproject may not be easy to re-use.
"Move head to UR of stand & Press OK" is the very first step to do. Although thisdialog box asks for the Upper Right corner, it could be Upper Left or any other pointthat is reliable and repeatable.
In CS, everything is relative - to the origin that is. CS views the sewing area to beone big grid and it identifies points on the grid with (X,Y) coordinates, relative to theorigin. Why is this important? Because it enables CS to be restarted withoutre-adjusting the patterns after CS has been shut down (everyone needs to sleep
occasionally). This is worth repeating - choosing a reliable andrepeatable origin every time means the quilting sessions can beinterrupted, and restarted without having to redefine boundariesand readjust the patterns. This will save you time.
When a quilt is planned, previewed, stitched and saved, the Origin is saved with it.Repeating this quilt without having to duplicate the calculations and planning is onlypossible if the same Origin point can be identified. Think of how the patterndesigners could increase the number of predefined panels and whole cloth quilts!

Getting Started with CreativeStudio™60
3.1.2 Project Names
CS creates a project every time the software is used. By default, the project isnamed “My Quilt Project” but you can (and should) save this under a different name.Project names are different than the Project File Names.
Renaming a project is easy. Just click on Project Properties icon, and look at thegeneral settings in the Project Details. Highlight the current project name (My QuiltProject) and type over it.
Saving a project file is easy too. Just click File, click Save Project As, and the SaveAs dialog box appears. CS will try and help by using the Project Name as the FileName but it can be changed to something else if desired. Change the path ifneeded and click SAVE.
CS saves projects with a file extension of .proj or .projx. The difference is basedon the type of patterns used. If your project includes only patterns that came withyour Statler Stitcher, the file extension will be “proj”. If your project includes patternsyou purchased from a designer who encrypted them to run on your machine only,the file extension will be “projx”.
Save your project file often!
CS will remind you to save your project file before it opens a new project or closesthe software.
17
18

Quilt Projects
61
Copyright © 2009 Gammill, Inc. | All Rights Reserved
Planning the Quilting
Project Names
By clicking on the "Yes" button, the Save As dialog box appears. CS will try and helpby using the Project Name as the File Name but change it and the path if desired.Click SAVE to complete the process.
Tip: Since a project is created for each quilt, the project name (and
project file name) could include the customer name, quilt name or
date, for future reference. Remember: Project Names are differentthan the Project File Names.

Getting Started with CreativeStudio™62
3.2 Quilt Groups
A quilt group contains the information (boundaries, reference points, sizing,positioning) needed to do a particular area of a quilt. CS will create a new quilt groupautomatically for certain techniques, like Edge-To-Edge and Borders/Corners.Individual quilt groups can be created for different sections of the quilt, like theCenter Medallion, or Side Triangles, or Sashings, etc.
Each quilt group has a tab which appears in the preview area of the screen. Somequilts require only one quilt group (like E2E), and others have many (like customquilting). The following diagram shows how a quilt group can be used to preview howthe patterns will look together. By just placing the patterns on the preview area, theirrelative scale can be determined too.
3.2.1 Creating a Quilt Group
New quilt groups can be added easily. Just click on the AddQuiltGroup icon locatedin the Project Information window. Type a unique name in the pop-up box..
A tab is created with the new quilt group name. Each tab has its own preview area.
3.2.2 Removing a Quilt Group
Removing the quilt group does not delete any of the patterns selected for the project.Just click on the quilt group tab, so that tab (or quilt group) becomes the active one,
41

Quilt Groups
63
Copyright © 2009 Gammill, Inc. | All Rights Reserved
Planning the Quilting
Removing a Quilt Group
and click on the (RemoveQuiltGroup) icon located at the top of the ProjectInformation window. CS will always ask if you are sure you want to remove a group.
Tip: It is always better to remove a group and start over rather
than just deleting the patterns and boundaries inside the group.
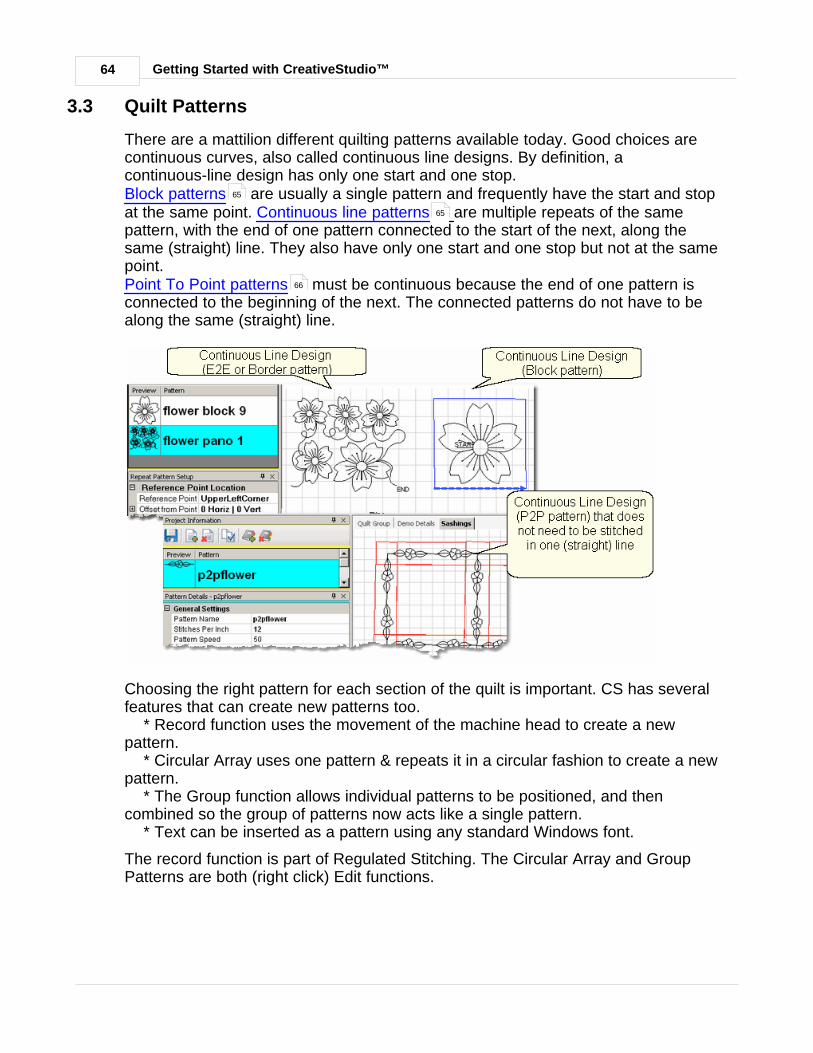
Getting Started with CreativeStudio™64
3.3 Quilt Patterns
There are a mattilion different quilting patterns available today. Good choices arecontinuous curves, also called continuous line designs. By definition, acontinuous-line design has only one start and one stop. Block patterns are usually a single pattern and frequently have the start and stopat the same point. Continuous line patterns are multiple repeats of the samepattern, with the end of one pattern connected to the start of the next, along thesame (straight) line. They also have only one start and one stop but not at the samepoint. Point To Point patterns must be continuous because the end of one pattern isconnected to the beginning of the next. The connected patterns do not have to bealong the same (straight) line.
Choosing the right pattern for each section of the quilt is important. CS has severalfeatures that can create new patterns too.
* Record function uses the movement of the machine head to create a newpattern.
* Circular Array uses one pattern & repeats it in a circular fashion to create a newpattern.
* The Group function allows individual patterns to be positioned, and thencombined so the group of patterns now acts like a single pattern.
* Text can be inserted as a pattern using any standard Windows font.
The record function is part of Regulated Stitching. The Circular Array and GroupPatterns are both (right click) Edit functions.
65
65
66
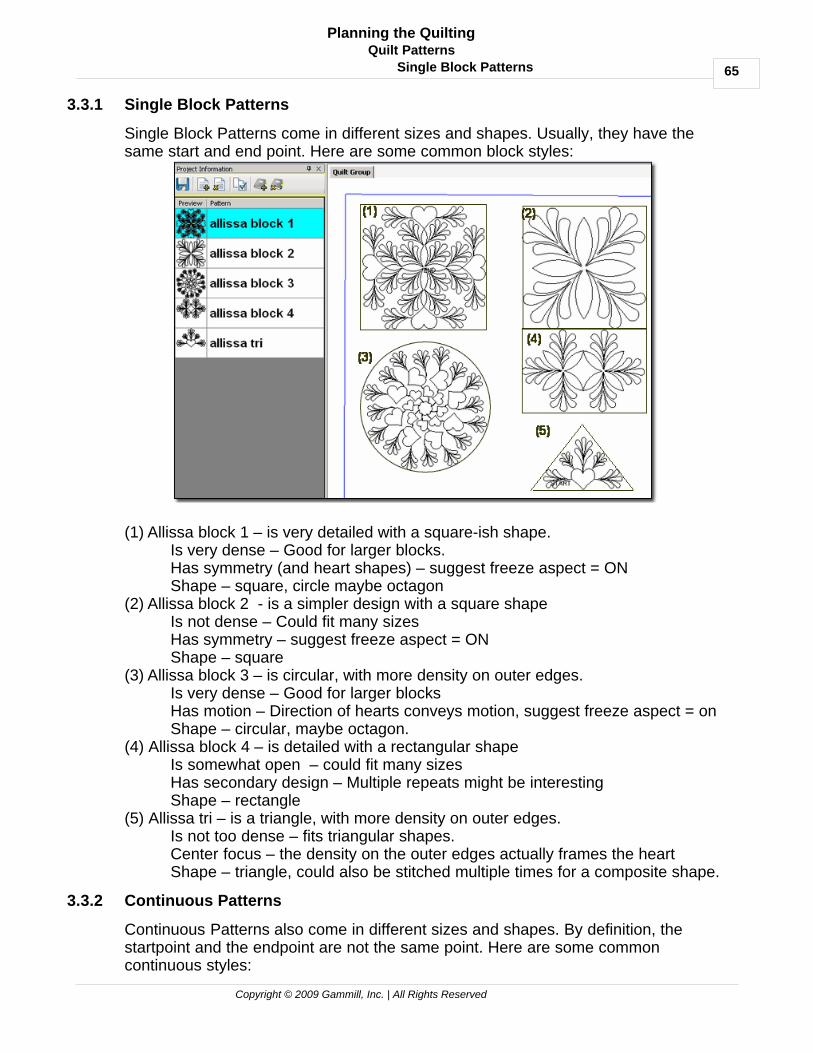
Quilt Patterns
65
Copyright © 2009 Gammill, Inc. | All Rights Reserved
Planning the Quilting
Single Block Patterns
3.3.1 Single Block Patterns
Single Block Patterns come in different sizes and shapes. Usually, they have thesame start and end point. Here are some common block styles:
(1) Allissa block 1 – is very detailed with a square-ish shape. Is very dense – Good for larger blocks.Has symmetry (and heart shapes) – suggest freeze aspect = ONShape – square, circle maybe octagon
(2) Allissa block 2 - is a simpler design with a square shapeIs not dense – Could fit many sizesHas symmetry – suggest freeze aspect = ONShape – square
(3) Allissa block 3 – is circular, with more density on outer edges.Is very dense – Good for larger blocksHas motion – Direction of hearts conveys motion, suggest freeze aspect = onShape – circular, maybe octagon.
(4) Allissa block 4 – is detailed with a rectangular shapeIs somewhat open – could fit many sizes Has secondary design – Multiple repeats might be interestingShape – rectangle
(5) Allissa tri – is a triangle, with more density on outer edges.Is not too dense – fits triangular shapes.Center focus – the density on the outer edges actually frames the heart Shape – triangle, could also be stitched multiple times for a composite shape.
3.3.2 Continuous Patterns
Continuous Patterns also come in different sizes and shapes. By definition, thestartpoint and the endpoint are not the same point. Here are some commoncontinuous styles:

Getting Started with CreativeStudio™66
(1) A Notion To Sew – is a pantograph pattern that can be repeated across anddown the entire quilt, Edge To Edge (E2E). Pantographs can also be used onthe inside of the quilt, from border to border - sometimes called B2B. Theouter edges of this pattern are relatively linear, making it a good candidate forB2B (or even a very wide border).
(2) Spool of Thread (with two spools) is a border pattern. It is continuous and isdesigned to be repeated as many times as needed, to span the border.
(3) Spool of thread (with one spool) is a corner pattern. It is continuous, and isdesigned to connect the stitch lines of the border patterns.
(4) Spool of Thread (with three spools) is a specialty pattern. This one has beendesigned to work with the border, making the transition into the corner appearmore symmetrical.
3.3.3 Point To Point Patterns
Point To Point is a unique process that allows quilting patterns to be placedprecisely. The process will prompt for a series of points and then stitch one repeatbetween each consecutive pair of points. This process delivers a very 'custom'result. The patterns must be continuous because the end of one pattern isconnected to the beginning of the next. They can be stitched with the Freeze Aspectsetting ON or OFF, for very different results.

Quilt Patterns
67
Copyright © 2009 Gammill, Inc. | All Rights Reserved
Planning the Quilting
Point To Point Patterns
In the example above, Clicks were made at varying intervals, 6", 3", 6", 3", 6". Thetop row shows the resulting pattern when the Freeze Aspect is OFF. The bottom rowshows the results when the Freeze Aspect is ON. These hearts were stitched alongone straight line but they didn't have to be.
3.4 Quilt Pattern Setup and Edit
What You See Is What You Quilt ! There is an acronym for this: WYSIWYQ (Pronounced “Whissey Wick”). Beingable to see what is about to be quilted is extremely valuable because it eliminatesmany surprises.
There are two modes involved when choosing, positioning and previewing patterns.In Setup mode, the descriptive details are set and this must be done first. In Editmode, the visual details are set and this is done last. Edit mode changes are lost ifSetup mode details are modified last.
The following section will explain the general steps of Setup Mode and Edit Mode.
Color coding is used to distinguish the mode. Blue is for Setup Mode and
magenta is Edit Mode. Other parts of the manual will use the highlighting also.
The choice of highlight colors is not accidental. The colors blue and magenta werechosen because they relate back to color coding the ‘details’ in the PropertyWindow.
Blue is used for Pattern Details settings which is done in Setup Mode.
Magenta is used for Selected Pattern details which is done in Edit Mode.
The Setup and Edit steps are described in detail here, in the same sequence thatwould be typical for starting a new project. To demonstrate how these modes worktogether we will show the steps for doing a single block. The purpose of this is to

Getting Started with CreativeStudio™68
familiarize you with some of the basic functions and explain the process and how tonavigate through it. This is just a simple example.
All of the quilting features will be described in full detail and in context in the nextsections – The Quilting Process. Each feature will include the feature name, anyassumptions and the steps to follow. If the step numbers are highlighted with blue,the step is part of the Setup mode. Steps highlighted in magenta are part of the Editmode. The following is an example of the format.
Feature: Quilting a Single BlockAssumptions:
* CS has been turned on and the Origin has been set.* The quilt is loaded, bobbins wound, machine threaded.* You (or your customer) know which patterns will be used. * A new project has been started (click File, click New Project).
Note: The Open Pattern File dialog box appears every time a project is created.This is a nice shortcut that you will enjoy having but close it now (click Cancel) soyou can learn how to open patterns on your own.
Steps to follow:Step 1. Choose a patternStep 2. Change the pattern detailsStep 3. MeasureStep 4. Define a boundary in the preview areaStep 5. Move the pattern into the boundaryStep 6.Save (and name) your project.Step 7. Adjust the pattern in the boundary.
3.4.1 Setup Mode
Setup Mode enables the quilter to change the settings that define how thepatterns should stitch.
Step 1: Choose a pattern. Choosing and editing patterns can be done as neededduring the quilting process, or can be done at the beginning of the quilting process.
* Click on Add Pattern icon (if needed).
* The ‘ Open Pattern File’ dialog box appears:

Quilt Pattern Setup and Edit
69
Copyright © 2009 Gammill, Inc. | All Rights Reserved
Planning the Quilting
Setup Mode
* Navigate the folders and files, previewing and selecting patterns. The current foldername is shown in the “Look In:” selection. In this example, it is called "PatternsPrecision stitch".* To change folders, click on the arrow to the right of the current folder name andnavigate to other folders and files. *Double click on a folder name to open it. The list of files in that folder will appear. * Click on any filename and a preview of that pattern file is displayed.
* Once the first file is selected, the keyboard navigation buttons are activated: The down arrow will move down one file at a time.The Up arrow moves up one at a time. The Right arrow moves sideways, showing details associated with each pattern
file.
* Using the mouse to scroll is sometimes faster if you don't need to look at eachpattern file:
Click on the scroll bar 'up' arrow to scroll up one file at a time.Click on the scroll bar 'down' arrow to scroll down one file at a time.
16
14

Getting Started with CreativeStudio™70
Grab & drag the scroll bar 'slider' to scroll to a different part of the folder.Click on the scroll bar ABOVE the 'slider' and move back 1 screen (about 15 files).Click on the scroll bar BELOW the 'slider' and move forward 1 screen (about 15
files).
* Use the mouse and special icons to navigate folders:
* To find a specific file, begin to type in the name of that file in the FileName box. Alist of filenames appear in a drop-down box, showing the filenames that matchthat criterion. If many files match, there will be scroll bars in the drop-down boxthat allow you to scroll through the list looking for the correct file.
* The more letters that are typed in, the more specific the search criterion and fewerfiles are returned.
* Click on the filename to select it and an image of the pattern will appear in thepreview area.

Quilt Pattern Setup and Edit
71
Copyright © 2009 Gammill, Inc. | All Rights Reserved
Planning the Quilting
Setup Mode
* Click Open to choose this pattern. CS is ready to choose more patterns so repeatthe file selection process as needed. When done, click Cancel to exit.
If you change your mind, and decide not to use a pattern that has been selected, justremove it by clicking on the Delete Pattern icon.
* Save the project.
Step 2: MeasureCS provides a Measure function which can be used throughout the entire quiltingprocess. Stitching a single pattern in a boundary does not require the Measurefunction but most other features do use it. Click the icon to begin the measureprocess.
CS prompts with the "Perform measurements" dialog box. Move the stitcher to thebeginning of the line and press OK. Move the stitcher to the end of the line and pressOK again.

Getting Started with CreativeStudio™72
* Remember to measure in the same direction that the pattern will be sewn. Themeasure function calculates the angle automatically, so use that angle as thesquaring angle.
* Measuring the block diagonally will give the height, width, length and the angle ofthe diagonal.
* It is important to understand how the angle rotations are defined. CS measures theangles by rotating counterclockwise.

Quilt Pattern Setup and Edit
73
Copyright © 2009 Gammill, Inc. | All Rights Reserved
Planning the Quilting
Setup Mode
Tip: The stitcher will measure dynamically too. Press OK the first
time, and move the sewing head. The Measure dialog box shows the
measurements as it moves. Press OK again at the end of the line,
and the exact measurement is displayed.
CS is ready to make as many measurements as needed - just keep clicking start &end points. Press Cancel when done measuring.
* It is possible to automatically transfer your most recent set of measured values.
First, make the measurement. Click on Cancel to stop measuring. Next, Right click on the field you want to transfer the measured value into. TheTransfer box appears. Finally, Click on one of the measurements and it will be transferred.
Save the project.
Step 3: Change the Pattern Details* Click on the first pattern. The pattern image and filename are highlighted in blueand the details below are framed in blue. The Title bar also includes the filename.
46

Getting Started with CreativeStudio™74
General Stitcher Settings - The first several settings refer to how the pattern willbe stitched. These settings are based on the current CS default settings. Pattern Name - the name of the pattern highlighted in blue.Stitches per Inch applies to this pattern. Pattern Speed is measured as a percentage of maximum motor speed. '50' means
50% of the maximum speed. Tie Stitches Per Inch is the size of the stitches taken when doing tie-off stitches.Tie Stitches is the number of stitches taken when doing Tie-off knots. Half are taken
in the direction of the pattern and the other half are in the opposite direction.
General Pattern Settings - The remaining settings refer to the pattern size andplacement. If the pattern needs to be a specific size, now is the time to change it.The same holds true for the Freeze Aspect setting and the Selected patternRotation. Pattern Width is the width of one pattern, measured at the widest point.Pattern Height is the height of one pattern, measured at the tallest point. Freeze Aspect - 'ON' means the ratio of Height:Width remains the same when the
size changes. So, if one of the dimensions is changed, CS will change the otherautomatically to keep the ratio the same. 'OFF' means CS will allow the ratio tobe distorted.
Margin is the closest distance between the stitch lines and the boundary lines.
Note: Below the General Settings area there is a context sensitive ‘help’ area.Clicking on any of the General Settings will provide a brief definition of thatsetting.
Save the project .
Step 4: Defining a Boundary Boundaries are used in many of the CS techniques. They might be required by atechnique (such as defining the quilting surface of an E2E design) or used as aconvenient reference for guiding the placement of patterns. Either way, theysynchronize the quilt top with the screen image.
46
46
60

Quilt Pattern Setup and Edit
75
Copyright © 2009 Gammill, Inc. | All Rights Reserved
Planning the Quilting
Setup Mode
* Click on the Boundary icon to begin defining the boundary. CS will prompt forpoints that define the area.
About boundaries:* A bounded area must have at least 3 points (a triangle) and can have hundreds. * The first point is considered the anchor. The lower left corner of the pattern will
always be aligned to the first point clicked. * The first two points define the baseline which determines the pattern rotation. * Pressing Stop completes the boundary. CS will connect the first and last points,
enclosing the area. * Choose the baseline and always click the points in a counter clockwise direction.
Patterns are aligned to the baseline as shown:
* Once a boundary is defined, it can not be changed. It can however be deleted anda new boundary defined.
* To delete a boundary, first select it, then press the Delete key on the keyboard.This works for patterns and trim boundaries also.
Step 5: Move Patterns into Boundary

Getting Started with CreativeStudio™76
* Click on a boundary to select it. (It turns red). * Click on a pattern (in the Project Information box) to select it. (it turns blue) * Click on the Pattern_To_Boundary icon to move the pattern in. The pattern ismoved into the bounded area and resized to fit.
Note: At this point, you are still in Setup mode and you can (and should) change thegeneral settings as needed.
Click on the image in the Preview area to enter the Edit Mode.
When a pattern is moved into a boundary, it will be aligned to the baseline so if itslopes up (or down) the pattern will be rotated accordingly. The slope is displayed inthe Selected Pattern Rotation field of the details.
Exit Setup mode by 1) closing the Settings dialog box, 2) changing to a different quiltgroup (tab) 3) opening another project. The individual patterns can now be edited inthe Preview area as needed.
* The Preview area is focused on the pattern most recently used. To see all patterns
and boundaries, click View All icon.
Save the project.
3.4.2 Edit Mode
Edit Mode means changing the pattern images, not the settings.
Step 6: Adjusting Patterns. * Click on the pattern within the preview area and resizing handles appearsurrounding the pattern. The size and rotation of this pattern is now displayed in the

Quilt Pattern Setup and Edit
77
Copyright © 2009 Gammill, Inc. | All Rights Reserved
Planning the Quilting
Edit Mode
Selected Pattern Details area (framed in magenta) and the title bar says specifically “Selected Pattern Details”. Do Not make any more changes to the original patterndetails (framed in blue).
Tip: The pattern details (blue) and the Selected Pattern details
(magenta) can be confusing. Be sure to notice the colors and
read the title bar to see which details are being displayed.
When a pattern is highlighted in the Preview area, the shape can be changed byusing the blue re-sizing handles. The handles have different shapes, depending ontheir function.
Resize Patterns with square or wedge shaped handles.
* The wedge shaped handles change one dimension (height or width). When onehandle is being dragged, the opposite is the anchor. So, moving the top wedgehandle will stretch (or shrink) the shape's height without moving the position of thebottom. Moving the right wedge handle will stretch (or shrink) the shape's widthwithout moving the left side, etc.
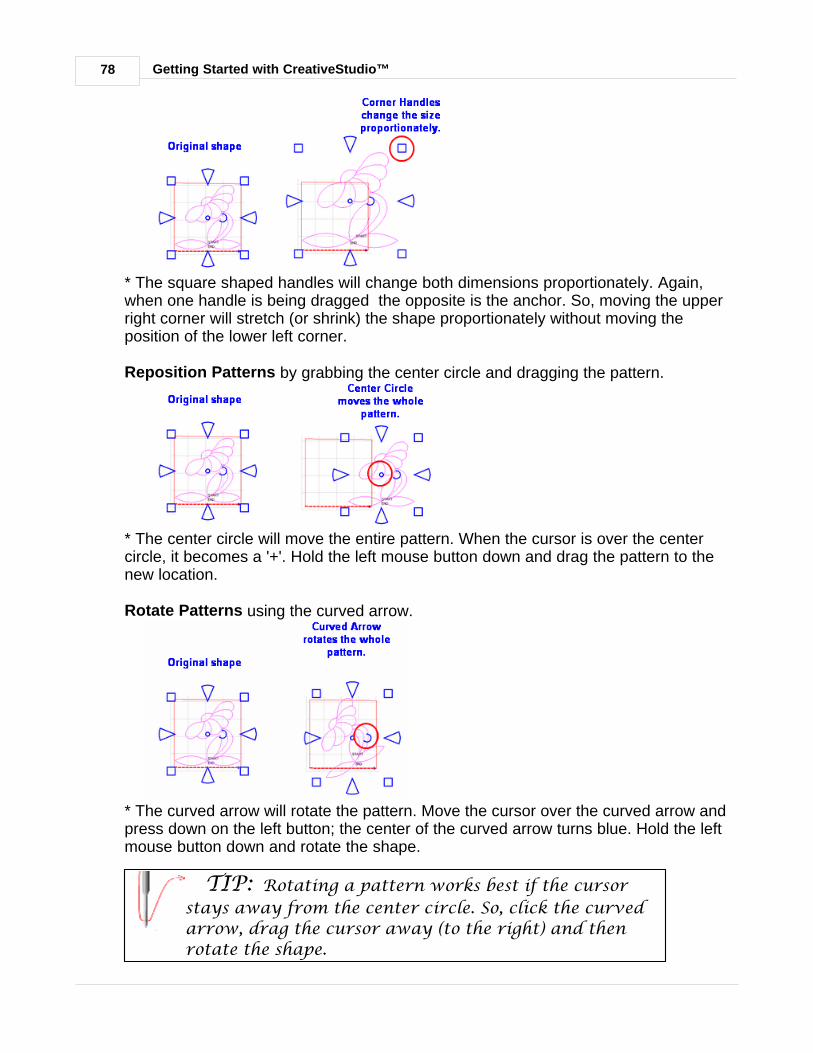
Getting Started with CreativeStudio™78
* The square shaped handles will change both dimensions proportionately. Again,when one handle is being dragged the opposite is the anchor. So, moving the upperright corner will stretch (or shrink) the shape proportionately without moving theposition of the lower left corner.
Reposition Patterns by grabbing the center circle and dragging the pattern.
* The center circle will move the entire pattern. When the cursor is over the centercircle, it becomes a '+'. Hold the left mouse button down and drag the pattern to thenew location.
Rotate Patterns using the curved arrow.
* The curved arrow will rotate the pattern. Move the cursor over the curved arrow andpress down on the left button; the center of the curved arrow turns blue. Hold the leftmouse button down and rotate the shape.
TIP: Rotating a pattern works best if the cursor
stays away from the center circle. So, click the curved
arrow, drag the cursor away (to the right) and then
rotate the shape.

Quilt Pattern Setup and Edit
79
Copyright © 2009 Gammill, Inc. | All Rights Reserved
Planning the Quilting
Edit Mode
Editing mode is easy as well as powerful. Always remember that "What You See IsWhat You Quilt", so edit until the pattern looks the way you like.
Save the project.
3.5 Quilt Pattern Creating
Quilt Patterns can be stitched, restitched, resized, repositioned, rotated, twisted,twirled, tweeked, combined and copied, all of which essentially create new patterns.These powerful options require right clicking the selected pattern(s). It is alsopossible to use any Windows font to create patterns enabling words or phrases to bestitched.
Review of Selecting Patterns.* To select a single pattern, (left) click on it once and it turns pink. * To select multiple patterns, press and hold the Control Key down then (left) click
on the individual patterns. If the re-sizing handles don't appear immediately, (left)click once on any of the patterns just selected, and the handles will appear.
* To deselect pattern(s), click on a different pattern or on any open space in thepreview area. Deselecting can also be done by pressing the Escape (Esc) key on thekeyboard.
TIP: It is a good idea to select the patterns in order. Begin with the
pattern closest to the 'Start' point and click in sequence toward the 'End'point. Some of the more advanced features of CS stitch the patterns inthe order they were selected, so selecting patterns in sequence is a goodhabit.
3.5.1 Right Click Options
Once the pattern(s) have been selected, right click anywhere inside the re-sizinghandles. A dialog box appears that provides more choices for Rotations, SewingStatus and Creating New Patterns. The choices in the dialog box will vary dependingon the number of patterns selected. If the right-click options don't appear as shown,left click the selected patterns first, then right click them.

Getting Started with CreativeStudio™80
Reposition Options.* Rotate 90 degrees - rotates the pattern counterclockwise 90 degrees. * Flip Horizontally - turns the pattern sideways. * Flip Vertically - turns the pattern upside down.* Delete removes the pattern from the preview area.
Sewing Status.* Toggle Pattern Sewn (or Toggle Group Sewn) means it won't stitch out again.
When a selected pattern is changed using "Toggle Pattern Sewn", it

Quilt Pattern Creating
81
Copyright © 2009 Gammill, Inc. | All Rights Reserved
Planning the Quilting
Right Click Options
does not look like anything happened until you deselect the pattern by
clicking anywhere else in the preview area. Then, the pattern color is
red indicating it has been sewn (versus black which is unsewn).
Moving or resizing an individual pattern will change the Sewn Status
automatically, from Sewn to Unsewn. This does not happen with
groups of patterns however.
TIP: Sometimes the last pattern sewn will appear
red, but CS wants to stitch it again. This happens when
the 'Stop' button is pressed instead of the 'OK' button
after the pattern was stitched the first time. To fix this,
just click on the last pattern, then right click it, then
choose 'Toggle Pattern Sewn'.
Creating New Patterns.* Combine Group - will group together all the selected patterns, and treat them like asingle pattern for the duration of your project, with no Bobbin Pull-up promptbetween them. This is very handy for sashings and border areas. Be sure to selectthe patterns in their proper stitching order. Once the patterns are grouped, they cannot be un-grouped without using the Undo command (which will undo everything youhave changed, not just grouping the patterns).
* Rubber Stamp - is a way to make an exact copy an existing pattern or group ofpatterns. When there are several patterns selected, CS will create a group patternfirst, and then make a copy of the group, and tag it as being unsewn. Once severalpatterns are grouped together, there is no Bobbin Pull-up prompt between them andthey stay grouped for the entire project.

Getting Started with CreativeStudio™82
TIP: If CS tries to stitch a rubber stamped pattern
twice, there are probably extra copies on top of the
original. Just move the extras and delete them.
* Circular Array - is a way to make a new circular pattern by repeating and rotating asingle pattern. CS only needs to know which pattern to use, how many repeats areneeded, how many degrees between each repeat and where the center should beplaced.
First get a single pattern image onto the preview area using Boundary/Pattern toBoundary or Repeat Patterns.Choose a design that is simple, and will fill a circularspace evenly. Dense quilting at the center can make the quilt pucker. Rememberthat each of the patterns will stitch individually, without stopping between eachpattern.
TIP: Use block patterns for circular arrays. Edge to
Edge patterns will work but there will be numerous
unconnected starts and/or stops. Once you create a design
you like, it is a good idea to group the patterns together.

Part IV

Getting Started with CreativeStudio™84
4 Quilting the Quilt - Which CS Feature To use
The quilting process generally includes four phases and uses a variety oftechniques.
1. Baste the quilt layers to stabilize them. 2. Stitch the blocks (or whatever is chosen for the center). 3. Stitch the borders, corners and sashings. 4. Finish by doing any background filler stitching.
The sequence is suggested because it minimizes the risk of distorting the fabric andgetting pleats or tucks. Not all quilts need all phases and the phases aren’t alwaysdone in this sequence – each quilt is unique.
Each CS feature is described in detail in one of these four phases.
4.1 Phase 1 - Basting
Basting is a fundamental process that is used during the initial loading of a quilt andthroughout the quilting process as the quilt is stitched and rolled. There are severalmethods for basting. Each method is useful under different circumstances.
Simple quilts may only need to have the three layers secured together and basting isadequate. Complex quilts may need to have many areas of the quilt stitchedtogether to prevent the fabrics (especially the backing) from shifting and pulling.Taking the time to stabilize the quilt will result in a flatter, straighter quilt. Stitch in theditch (SID) is commonly used in complex quilts because it secures the fabrics, andcan disappear into the seams.
4.1.1 Securing the Quilt using Baste
Securing the quilt is generally hand-guided, done in regulated mode after the beltshave been disengaged (regulated mode is explained in the next section). For quiltsthat only need to be secured on the outer edges, basting is adequate.
Feature: Baste StitchThe basting stitch is a long stitch and is often temporary. It is commonly used aroundthe outer edges of a quilt. It might be viewed as being a series of single stitchesrather than continuous stitches. The difference is the amount of pressure thehopping foot exerts on the fabric. The benefit is that less fabric gets 'pushed' forwardin the direction of the sewing. This is very valuable when trying to prevent stretchingand/or ease in extra fullness.
Assumptions: The quilt is loaded, bobbin is full, machine is threaded and thebelts are (probably) detached. Free motion quilting is usually done without the belts

Phase 1 - Basting
85
Copyright © 2009 Gammill, Inc. | All Rights Reserved
Quilting the Quilt - Which CS Feature To use
Securing the Quilt using Baste
that control the sewing head which allows the sewing head to move freely in alldirections.
Steps to follow:
1. Click on the Baste Sewing icon. A Dialog box shows settings and buttons.
Settings:Angle:This is the current angle that will be used when Channel Lock is turned on. Stitches Per Inch - Are really "Inches Per Stitch" in Baste Mode. Basting stitch size
ranges from 1/2" long (B.5) to 4 inches long (B4). Change with up/down arrows oruse mouse & keyboard.
Flip Angle: If Radiating Lines is not checked, this angle will replace the current angle.This is intended to be used with the channel lock feature. To flip the angle, pressand hold the shift button on the keypad, and press the Chan Lock button. To flipit back again, repeat the 2-button sequence.
Radiating Lines - When checked, CS uses a 2-button sequence to increase thecurrent angle by the number of degrees shown in Flip Angle. To increase thecurrent angle, press and hold the Shift Button on the keypad, and press the ChanLock Button. Repeat this to increase it again.
Needle Position - If checked, the sewing head works like the 'Gammill Plus'machines, allowing a half stitch to be taken instead of a full single stitch. Pressthe button once and the needle goes down & stays there. Press it again to bringthe needle back up. If it is down when stitching starts, it will go back down when itstops.
Buttons:Record Off means the motions are not being recorded, The Record function is
explained in depth, in a later section. Chan Lock (on/ off) locks the sewing head so it stitches a straight line at one angle.
This requires that the belts be engaged. Shift - Press this once and additional keypad functions appear & stay for a couple
seconds. This is for reference only - each blue button requires a 2-buttonsequence.
Single Stitch - press this to take a full single stitch. If the Needle Position box ischecked, this button is labeled 'Needle Position', and pressing it takes a halfstitch.
Start - starts the stitching process, and STOP ends it.
151

Getting Started with CreativeStudio™86
Tip: Wondering when/why you will ever use these buttons and
settings in Baste Mode? You probably won't use them here but you
will need them in Regulated Sewing Mode. To maintain consistency,
the settings and buttons for Baste and Regulated modes are the
same.
Additional Functions: These functions (light blue buttons) are initiated by using a2-button sequence; press and hold the Shift button and then press the secondbutton.
Flip Chan Lock - Changes the current angle.* If Radiating Lines is not checked, this will change the current angle to whatever the
Flip Angle is set at. To flip the angle, press and hold the shift button on thekeypad, and press the Chan Lock button. To flip it back again, repeat the2-button sequence.
* If Radiating Lines is checked, CS increases the current angle by the number ofdegrees shown in Flip Angle. To increase the angle, press and hold the shiftbutton on the keypad, and press the Chan Lock button. Repeat to increase itagain. It will go up to 90 degrees and return back to 0 degrees.
Shift - used to display additional functions (light blue buttons) and to execute them. Change to Need Pos - is used to 'check' (or choose) the Needle Position option,
making the Lower Left button change to 'Needle Position'. Press and hold theShift button and press Change To Need Pos button. Repeat the 2-buttonsequence to return to Single Stitch.
Start - starts the stitching process, and STOP ends it. Exit - To exit regulated mode, press and hold the Shift button and press the Exit
button. Using the mouse & screen works too.
3. Press Start on keypad when ready to sew and the button label changes to Stop.The dark blue button means the stitcher is running.

Phase 1 - Basting
87
Copyright © 2009 Gammill, Inc. | All Rights Reserved
Quilting the Quilt - Which CS Feature To use
Securing the Quilt using Baste
Notice that the two buttons on the left have changed in meaning. Inc SPI means Increase the stitch size. Dec SPI means decrease the stitch size.
4. Press Shift and Exit on keypad when ready to exit Baste mode.
Tip: Try using the single stitch basting method when easing in
excess fullness on borders. If you can’t ease and baste the fabric
without tucks, you probably can’t quilt it without tucks either.
4.1.2 Securing the Quilt using Regulated_Sewing
Securing the quilt is generally hand-guided, done in regulated mode after the beltshave been disengaged. CS uses a stitch regulator to provide even, consistentstitches.
Feature: Regulated SewingThere are three choices for the regulated stitching process: Original, Plus andSmooth. These are very similar, but each has a little different ‘feel’ giving the quiltergreater flexibility to match their personal free-motion style.
Assumptions: The quilt is loaded, bobbin is full, machine is threaded and thebelts are (probably) detached. Free motion quilting is usually done without the beltsthat control the sewing head which allows the sewing head to move freely in alldirections.
Steps to follow:
1. Choose a style of Regulated_Sewing Click on the small black arrow to the right of the Regulated Sewing icon to see thechoices. Original, Plus and Smooth vary only in the speed of the needle moving up &down. Try them all and choose the one that you like best.

Getting Started with CreativeStudio™88
2. Click on the Regulated Sewing icon. A Dialog box shows settings and buttons.
Settings:Angle:This is the current angle that will be used when Channel Lock is turned on. Stitches Per Inch - Change with up/down arrows or use mouse & keyboard. Flip Angle: If Radiating Lines is not checked, this angle will replace the current angle.
This is intended to be used with the channel lock feature. To flip the angle, pressand hold the shift button on the keypad, and press the Chan Lock button. To flipit back again, repeat the 2-button sequence.
Radiating Lines - When checked, CS uses a 2-button sequence to increase thecurrent angle by the number of degrees shown in Flip Angle. The belts must beengaged for this to work! To increase the current angle, press and hold the ShiftButton on the keypad, and press the Chan Lock Button. Repeat this to increase itagain.
Needle Position - If checked, the sewing head works like the 'Plus' machines,allowing a half stitch to be taken instead of a full single stitch. Press the buttononce and the needle goes down & stays there. Press it again to bring the needleback up. If it is down when stitching starts, it will go back down when it stops.
Buttons:Record Off means the motions are not being recorded, The Record function is
explained in depth, in a later section. Chan Lock (on/ off) locks the sewing head so it stitches a straight line at one angle. Shift - Press this once and additional keypad functions appear & stay for a couple
seconds. This is for reference only - each blue button requires a 2-buttonsequence.
Single Stitch - press this to take a full single stitch. If the Needle Position box ischecked, this button is labeled 'Needle Position', and pressing it takes a halfstitch.
Start - starts the stitching process, and STOP ends it.
Tip: Generally Regulated Sewing refers to hand guiding the
machine after the belts have been disengaged. However, if the path
to be sewn is horizontal or vertical, the belts don’t have to be
disengaged. The sewing head is a bit harder to move with the belts
engaged, but it tracks very well horizontally or vertically.
Additional Functions: These functions (light blue buttons) are initiated by using a
151

Phase 1 - Basting
89
Copyright © 2009 Gammill, Inc. | All Rights Reserved
Quilting the Quilt - Which CS Feature To use
Securing the Quilt using Regulated_Sewing
2-button sequence; press and hold the Shift button and then press the secondbutton.
Flip Chan Lock - Changes the current angle.* If Radiating Lines is not checked, this will replace the current angle to whatever the
Flip Angle is set at. To flip the angle, press and hold the shift button on thekeypad, and press the Chan Lock button. To flip it back again, repeat the2-button sequence.
* If Radiating Lines is checked, CS increases the current angle by the number ofdegrees shown in Flip Angle. To increase the angle, press and hold the shiftbutton on the keypad, and press the Chan Lock button. Repeat to increase itagain. It will go up to 90 degrees and return back to 0 degrees.
Tip: The belts MUST be engaged when using the channel lock.
Shift - used to display additional functions (light blue buttons) and to execute them. Change to Need Pos - is used to 'check' (or choose) the Needle Position option,
making the Lower Left button change to 'Needle Position'. Press and hold theShift button and press Change To Need Pos button. Repeat the 2-buttonsequence to return to Single Stitch.
Start - starts the stitching process, and STOP ends it. Exit - To exit regulated mode, press and hold the Shift button and press the Exit
button. Using the mouse & screen works too.
Tip: The LEFT handle button does the same thing as the lower left
button on the keypad. The RIGHT handle button does the same thing
as the lower center button on the keypad. This means Regulated
Mode works with the handle buttons the same way as the Gammill
Plus machines.

Getting Started with CreativeStudio™90
3. Press Start on keypad when ready to sew and the button label changes to Stop.The dark blue button means the stitcher is running.
Notice that the two buttons on the left have changed in meaning. Inc SPI means Increase the stitch size. Dec SPI means decrease the stitch size.
4. Press Shift and Exit on keypad when ready to exit regulated mode.
Quick Reference Regulated Sewing 165

Phase 1 - Basting
91
Copyright © 2009 Gammill, Inc. | All Rights Reserved
Quilting the Quilt - Which CS Feature To use
Stitch in the Ditch using Point_to_Point-Line
4.1.3 Stitch in the Ditch using Point_to_Point-Line
Stitch_in_ditch (SID) is a technique where the stitch line follows the seam lineresulting in a virtually invisible stitching line. With practice, SID can be done exactlyon the seam line. Stitch_near_ditch (SND) is a technique where the stitch line isvery near, but not on the seam line. Both SID and SND use normal length stitchesand are not removed. They become part of the overall quilting design. Some quiltersprefer to do SID free-motion but CS offers another option.
Feature: Point To Point - LinePoint to point describes a CS process where a series of connected line segmentsare positioned and stitched. Remember Dot-To-Dot coloring books? The sameconcept applies. The quilter supplies the dots and CS stitches a perfect line betweeneach contiguous pair. Each ‘dot’ is identified by moving the sewing head to eachpoint (in order) and pressing the OK button. The spot where the needle would enterthe fabric is the ‘Dot’ or ‘point’.
Assumptions: The quilt is loaded, bobbin is full, machine is threaded, bobbinswound, the speakers are on and the belts are engaged.
Tip: When the seam allowance is pressed toward one side it
becomes higher (thicker) than the other side. Doing SND on the
lower side of the seam allows the stitching to sink down and
disappear too.
Steps to follow: 1. Choose P2P-Line -
This is one of the choices presented when clicking on the black arrow to the right ofthe P2P icon.
2. Click on the P2P icon - A dialog box appears with options.

Getting Started with CreativeStudio™92
Settings:Angle: This is the current angle that will be used when the Channel Lock is turned
on. Flip Angle: If array mode is not checked, this angle replaces the current angle. To flip
the angle, press and hold the shift button on the keypad, and press the ChanLock button. To flip it back again, repeat the 2-button sequence.
Array Mode - When checked, CS uses a 2-button sequence to increase the currentangle by the number of degrees shown in the Flip Angle. To increase the currentangle, press and hold the shift button on the keypad, and press the Chan Lockbutton. Repeat this to increase it again.
Buttons:Chan Lock - locks the head so it stitches along one fixed angle. Shift: Press this and hold it down, and then press Chan Lock to Flip (or increase in
array mode) the current lock angle.OK (either button) selects the point, based on the position of the needle.Stop indicates the end of the P2P-pattern sequence.
3. Press OK to define the path. Move the machine head from one point to the next,clicking OK on each one. The machine makes a 'doink' noise every time the OKbutton is pressed. This sound confirms that the point has been registered. This alsoappears in the preview area of the screen.
4. Press 'Stop' to complete the line segments. The images appear in the previewarea. Check it before stitching.

Phase 1 - Basting
93
Copyright © 2009 Gammill, Inc. | All Rights Reserved
Quilting the Quilt - Which CS Feature To use
Stitch in the Ditch using Point_to_Point-Line
Tip: P2P-Line is an accurate way to follow a seam. When the seam
has a curve in it, the P2P click points can be very close together,
following the curve of the seam. If it is straight, the click points can
be further apart.
5. Click on Start_Quilting and the sewing head will move to the Start of thepattern. CS will prompt for pulling up the bobbin thread.
Tip: P2P-Line has its own motor speed control (found in the
configuration form). It is a good idea to stitch P2P-Line very slowly.
the default value is 10% motor speed but this can be increased or
decreated while stitching, using the keypad. SPI and Tie-off setting
are inherited from the project.
6. Press OK when ready to quilt,
7. At the end of the quilting sequence, you will be prompted to pull up the bobbinthread and click OK. It doesn't matter how the bobbin thread is pulled up, secured ortrimmed. Just be sure to click OK because it completes this process.

Getting Started with CreativeStudio™94
Tip: At the end of the stitching, pull up the cut the bobbin
thread and be sure to press the OK button, not the STOP button.
'OK' means the stitching is done completely. 'Stop' means the
process was stopped before it was finished.
Quick Reference P2P Line 167

Phase 2 - Blocks
95
Copyright © 2009 Gammill, Inc. | All Rights Reserved
Quilting the Quilt - Which CS Feature To use
4.2 Phase 2 - Blocks
After stabilizing the quilt, the blocks are stitched. In custom quilting the blocks areusually the dominant design being used. The outline of each block is identified(called a boundary) and CS uses the boundary as a template for the sizing andpositioning of the quilt patterns. Both the boundary and the pattern image arepreviewed before being stitched.
4.2.1 Define the Block using Boundary
This is a process where the quilt block shape is traced with a series of clicks, usingthe sewing head. During this process, CS displays an image of the boundary in thepreview area of the screen.
Feature: Boundary
Assumptions: Quilt is loaded and stabilized, machine is threaded, bobbins arewound, belts are engaged and patterns have been chosen.
Steps to follow:
1. Click on the Boundary icon.
2. CS will prompt for the points that define the boundary. Use as many 'click points'as needed to define the block boundary precisely. When done defining the boundedarea, click ‘Stop’.
3. An image of the bounded area appears in the preview area. The first two pointsdefine the baseline and the pattern will be squared up to this. The square blockboundary shown required 4 clicks to define it. Pressing the Stop button completedand enclosed the area. Create multiple boundaries at the same time if desired.
75

Getting Started with CreativeStudio™96
Tip: The fewest number of clicks for a boundary is 3 which defines
a triangle. There is no upper limit to the number of clicks required
to define a boundary. There is no limit to the number of boundaries
either.
4. Click View All icon to adjust the screen so that all boundaries can be seen.Check it before continuing. Add a background grid if desired.
Reference boundaries are boundaries that mark points, edges, seamlines, designsor any other reference used for pattern placement. They might be used to contain apattern, or they might just be used to help when trying to place a pattern so it fitsprecisely.
Tip: Reference boundaries are extremely useful! They can be used to
essentially trace the quilt top on the screen, to guarantee accurate patternplacement.
4.2.2 Stitch a Single Pattern using Pattern_To_Boundary
Once a boundary is defined, this feature will move a pattern into the boundary,resizing and repositioning it to fit the boundary.
Feature: Pattern_to_Boundary
Assumptions: Quilt is loaded and stabilized, machine is threaded, bobbins arewound, belts are engaged, patterns have been chosen, boundaries have beendefined.
Steps to follow: 1. Be sure the correct pattern is highlighted and the correct boundary is selected. Ifthe boundary was just created, it is already highlighted (red). If it wasn't the mostrecently defined boundary, just click it once.
31

Phase 2 - Blocks
97
Copyright © 2009 Gammill, Inc. | All Rights Reserved
Quilting the Quilt - Which CS Feature To use
Stitch a Single Pattern using Pattern_To_Boundary
2. Click on Pattern Into Boundary icon and the pattern will appear inside thebounded area in the preview area.
3. Click on the pattern in the preview area to select it.
In this example, CS resized the pattern to fit the bounded space:Before: After:
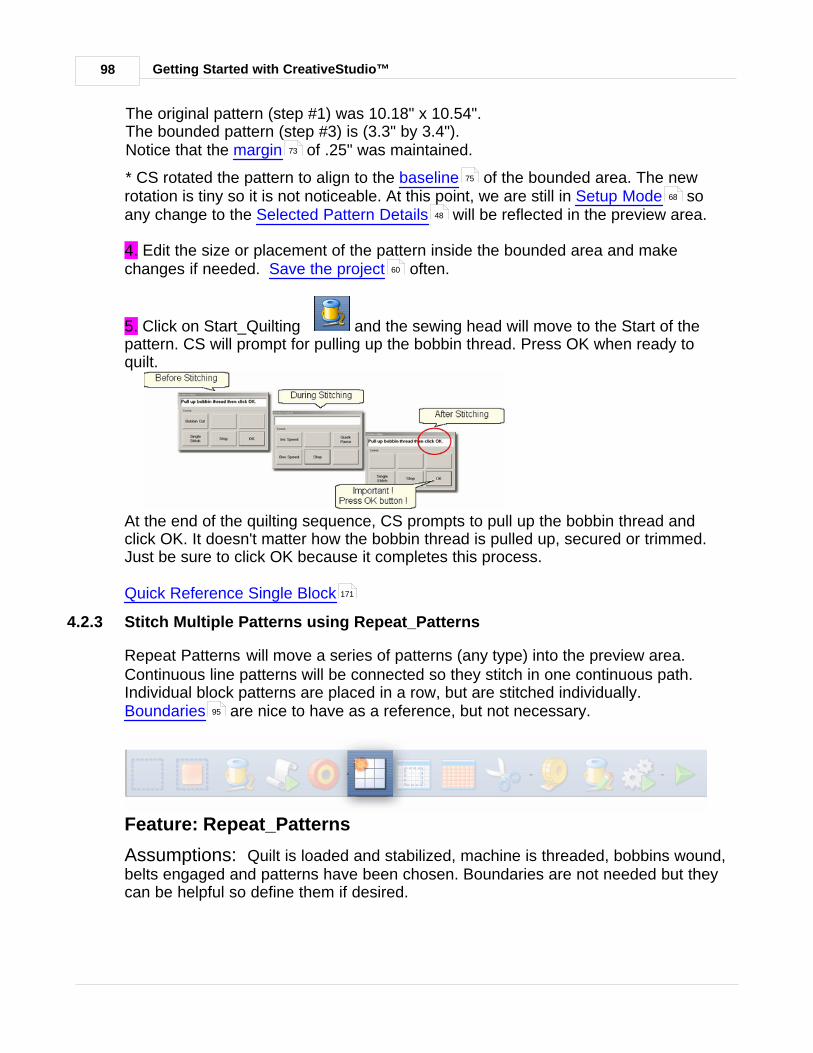
Getting Started with CreativeStudio™98
The original pattern (step #1) was 10.18" x 10.54". The bounded pattern (step #3) is (3.3" by 3.4"). Notice that the margin of .25" was maintained.
* CS rotated the pattern to align to the baseline of the bounded area. The newrotation is tiny so it is not noticeable. At this point, we are still in Setup Mode soany change to the Selected Pattern Details will be reflected in the preview area.
4. Edit the size or placement of the pattern inside the bounded area and makechanges if needed. Save the project often.
5. Click on Start_Quilting and the sewing head will move to the Start of thepattern. CS will prompt for pulling up the bobbin thread. Press OK when ready toquilt.
At the end of the quilting sequence, CS prompts to pull up the bobbin thread andclick OK. It doesn't matter how the bobbin thread is pulled up, secured or trimmed.Just be sure to click OK because it completes this process.
Quick Reference Single Block
4.2.3 Stitch Multiple Patterns using Repeat_Patterns
Repeat Patterns will move a series of patterns (any type) into the preview area.Continuous line patterns will be connected so they stitch in one continuous path.Individual block patterns are placed in a row, but are stitched individually. Boundaries are nice to have as a reference, but not necessary.
Feature: Repeat_Patterns
Assumptions: Quilt is loaded and stabilized, machine is threaded, bobbins wound,belts engaged and patterns have been chosen. Boundaries are not needed but theycan be helpful so define them if desired.
73
75
68
48
60
171
95
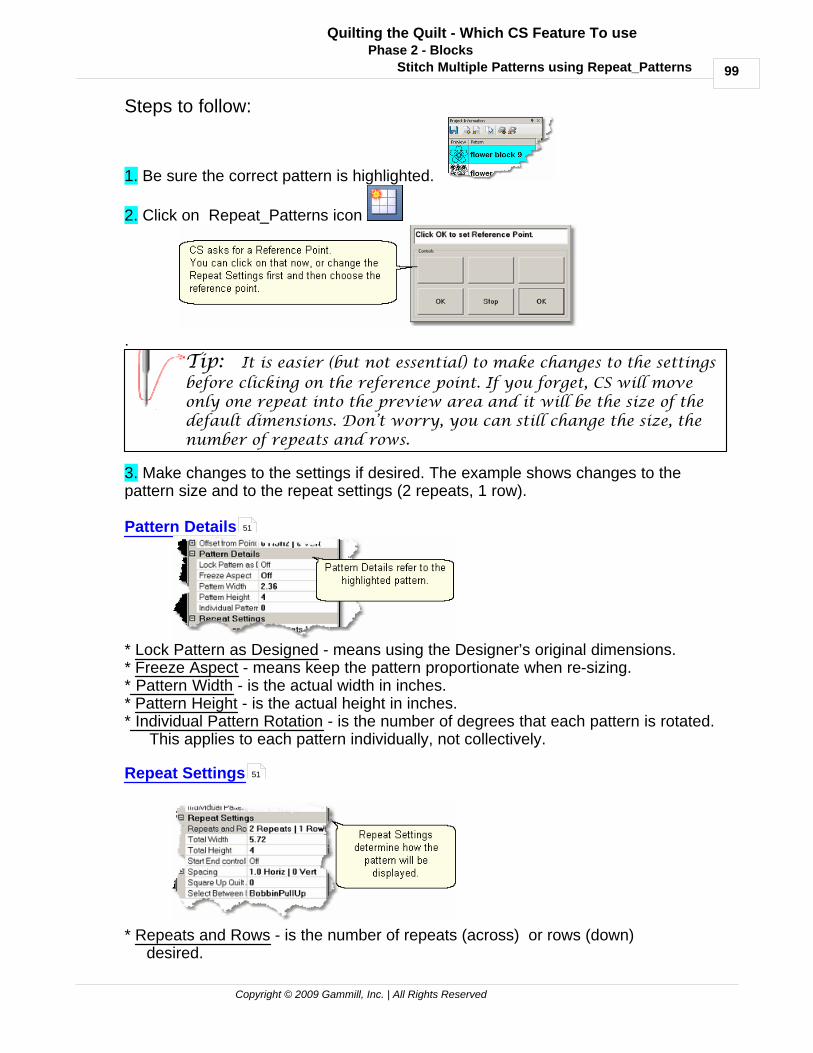
Phase 2 - Blocks
99
Copyright © 2009 Gammill, Inc. | All Rights Reserved
Quilting the Quilt - Which CS Feature To use
Stitch Multiple Patterns using Repeat_Patterns
Steps to follow:
1. Be sure the correct pattern is highlighted.
2. Click on Repeat_Patterns icon
.
Tip: It is easier (but not essential) to make changes to the settings
before clicking on the reference point. If you forget, CS will move
only one repeat into the preview area and it will be the size of the
default dimensions. Don’t worry, you can still change the size, the
number of repeats and rows.
3. Make changes to the settings if desired. The example shows changes to thepattern size and to the repeat settings (2 repeats, 1 row).
Pattern Details
* Lock Pattern as Designed - means using the Designer’s original dimensions.* Freeze Aspect - means keep the pattern proportionate when re-sizing.* Pattern Width - is the actual width in inches. * Pattern Height - is the actual height in inches.* Individual Pattern Rotation - is the number of degrees that each pattern is rotated.
This applies to each pattern individually, not collectively.
Repeat Settings
* Repeats and Rows - is the number of repeats (across) or rows (down)desired.
51
51

Getting Started with CreativeStudio™100
* Total Width - is the width of all the repeats (measured from either thestart/end points or measured from the outer edges of the patterns - seebelow).
* Total Height - is the height of all the rows (measured from either thestart/end points or measured from the outer edges of the patterns - seebelow).
* Start End Controlled (ON / OFF) means the total width/height ismeasured between the start / end points rather than the outer edges of thepatterns.
* Spacing (Horiz / Vert) is the distance between patterns. Positive numbersspread the patterns further apart and negative numbers bring them closertogether.
* Square Up Quilt Angle - is the number of degrees of rotation applied to thepattern group. This applies to patterns grouped together.
* Select Between blocks - what to do between each pattern. - BobbinPullUp treats each pattern individually and will pause to allow thebobbin thread to be pulled up and trimmed.- Connect Start/End treats the patterns as a group, stitching them in acontinuous path, joining the end of one pattern to the start of the next.
Reference Point LocationReference Point Selection is specific to the pattern, BEFORE the Square Up anglerotates the pattern.
* Reference Point Position is how CS knows where to put the pattern image. It willappear in the preview area as a small blue circle with an arrow.
* Offset from Point - is the distance (H and V) between the clicked reference pointand what the pattern will use as a reference point.
125
50

Phase 2 - Blocks
101
Copyright © 2009 Gammill, Inc. | All Rights Reserved
Quilting the Quilt - Which CS Feature To use
Stitch Multiple Patterns using Repeat_Patterns
4. Click on the point on the quilt top that you will use as your reference point and theimages are moved into the preview area.
Reminder: Any of the process (Repeat Pattern Setup) details can be changed untilyou exit Setup Mode. Then, none of them is accessible, and all changes have to bedone in Edit Mode which means the changes are made to the image in the previewarea. Save Project Settings often.
Exit Setup mode by 1) closing the Repeat Pattern Setup dialog box, 2) changing to adifferent quilt group (tab) 3) opening another project. The individual patterns can nowbe edited as needed.
60

Getting Started with CreativeStudio™102
5. Click on Start_Quilting and the sewing head will move to the Start of thepattern. CS will prompt for pulling up the bobbin thread and choosing OK whenready to quilt.
At the end of the quilting sequence, you will be prompted to pull up the bobbin threadand click OK. It doesn't matter how the bobbin thread is pulled up, secured ortrimmed. Just be sure to click OK because it completes this process.
Tip: It is possible to re-stitch a pattern that is in the preview area.
After a pattern is stitched, it turns red and is tagged as ‘sewn’. To
re-use this pattern, it needs to be tagged as ‘unsewn’. To do this,
right-click on the pattern, and choose the “toggle as unsewn”.
Reposition the pattern if needed and click on Quilt icon to stitch it
again.
4.2.4 Stitch Partial Patterns using Trim-Outside
Block patterns can be customized to fit areas by trimming away part of the block. Forexample, square blocks can be trimmed to fit side setting triangles or any other oddshaped block.
Feature: Trim Pattern - Outside
Assumptions: This assumes that the following preparation steps have beencompleted. Prep Step #1. Click on Boundary icon. Define the boundary and finish by pressingStop.Prep Step #2. Highlight the pattern to be used.Prep Step #3. Click on Pattern into Boundary icon. When the boundary is oddshaped, CS may have trouble automatically resizing the pattern to fit the space.
95

Phase 2 - Blocks
103
Copyright © 2009 Gammill, Inc. | All Rights Reserved
Quilting the Quilt - Which CS Feature To use
Stitch Partial Patterns using Trim-Outside
It will generate a warning message, but will still try to resize the pattern. Click OK toclear the Sizing Error box.
Prep Step #4. Click on the pattern and resize using the handles until satisfied.
Steps to follow: 1. Choose Trim Outside.
This is one of the choices presented when clicking on the black arrow to the right ofthe Trim icon.
2. Click on the Trim icon. CS will prompt for a Trim boundary.
77

Getting Started with CreativeStudio™104
3. Click Stop when done and CS will erase everything outside the boundary.
Tip: CS hasn't really deleted any of the pattern. It just won't sew
outside of your boundary. Therefore, you can click inside your
boundary to select the pattern and reposition it or resize it until it
fits perfectly.
4. Reposition the pattern image. Click on the pattern(s) to select if needed. Usethe handles (blue) to re-size , rotate and reposition the pattern so it aligns tothe Trim boundary. Save the project .
5. Click on Start_Quilting
77 78 78
60

Phase 2 - Blocks
105
Copyright © 2009 Gammill, Inc. | All Rights Reserved
Quilting the Quilt - Which CS Feature To use
Stitch Partial Patterns using Trim-Outside
Tip: Be Patient! CS takes a little time before it moves to the
beginning of the pattern and starts to quilt. CS needs to examine
every TRIM boundary and identify where each additional tie-off
goes.
Be Patient when doing a restart too - it takes time.
6. The sewing head will move to the Start of the pattern. CS will prompt for pulling upthe bobbin thread and will begin stitching.
The Trim function eliminated some of the pattern so tie-offs will be done at thebeginning and end of each of the remaining pattern segments. To avoid threadbreaks at these extra tie-offs, CS will finish a segment with a tie-off, and instead ofmoving directly to the beginning of the next segment it goes past about 1/4" andcomes back to the correct spot. This pulls just enough extra thread to reduce thestress and prevent thread breaks when doing the next tie-off.
At the end of the quilting sequence, you will be prompted to pull up the bobbinthread. It doesn't matter how the bobbin thread is pulled up, secured or trimmed.Just be sure to click OK because it completes this process.
Tip: Multiple "Trim-Inside" boundaries are possible in one quilt
group but only one "Trim-Outside".
Quick Reference Trim Outside
4.2.5 Stitch a Composite Pattern
Composite patterns can be created using any patterns but block patterns andP2P patterns work best. Composite patterns are recommended when a block islarge and needs more than one pattern to fill the space. Sometimes compositepatterns are created to fit unusual shapes.
Example 1: Simple patterns are often the best choice for quilts because they addcurves and motion without detracting from the piecing. Large areas may needmultiple copies to provide consistent density.
179
65
66

Getting Started with CreativeStudio™106
In the example above, the pattern was rotated 45° to fit the space. To move thepatterns into the preview area, Repeat Patterns was used (notice the referencepoint mark in the upper left corner of the block). The patterns are easy toindividually reposition inside the block. If this composite pattern is going to beused repeatedly, it may be a good idea to group the four patterns, making it onepattern.
Example 2: Sometimes the patterns need to overlap to provide consistent density.The individual patterns are harder to identify when they overlap too.
Multiple copies of the pattern were placed by defining the boundary first, then using Pattern to Boundary four times. Each pattern was moved into the boundary, thenselected, repositioned , resized and rotated to fit one of the four quadrants.After all four patterns were placed and then they were carefully resized so theoverlaps appear seamless. Again, if this composite pattern is going to be usedrepeatedly, it may be a good idea to group the four patterns, making it one pattern.
Example 3: Round patterns placed in square quilt blocks can be problematic. Fillingthe corners with a small pattern will improve quilt density. Keeping the corner patternsimple prevents detracting from the center motif.
In this example, Pattern to Boundary was used for the center motif. RepeatPatterns was used for the corners. Matching the scale of the two patterns meant
98
100
78
96
78 77 78
96
98

Phase 2 - Blocks
107
Copyright © 2009 Gammill, Inc. | All Rights Reserved
Quilting the Quilt - Which CS Feature To use
Stitch a Composite Pattern
that the center one was reduced a bit to make more space available for the corners.Each corner was rotated, resized and repositioned individually. If thesepatterns will be used repeatedly and the piecing is very accurate, this would be agood set of patterns to rubber stamp. The 5 patterns would be groupedautomatically, so the rubber stamped copy would be a single pattern.
Example 4: Odd shaped spaces are challenging too. In this example, a smalltriangular pattern was chosen because it had curvature that was very similar to thecenter block. When the triangular pattern touches the center pattern, it gives a verycustom look.
The center pattern was rotated and placed first. The four triangles were sized nextand then rotated to the correct orientation. (The top triangular pattern is detached todemonstrate how the patterns fit.) This might be a good set of patterns to rubberstamp too.
Example 5: Even Point To Point patterns can be used to fill a block. In this example,one of the four P2P patterns has been stitched so it is red.
The pattern's shape was triangular, and the P2P clicks were done at the corners ofthe square block. It took five clicks to complete this design; the last click and the firstclick were on the same point which connected the patterns. Originally, because thepatterns were triangular they touched at the center point, and looked too dense.Since each P2P pattern is editable, they were individually selected and the heightreduced so they do not touch in the center. The result demonstrates better balance.Because the composite pattern needs to stitch into the corners of the block (andblocks are rarely square) it might be better not to group these patterns.
78 77 78
128

Getting Started with CreativeStudio™108
4.2.6 Creating Text Blocks
Another composite pattern is created using the Text Property, which is a Right ClickOption. This will allow text to be typed, placed, and stitched. This feature is done inthe preview area in an open space, not on an existing pattern. Text patterns let youpersonalize your quilts with logos, dates, names or greetings.
Feature: Creating Text Blocks
Assumptions: Quilt is loaded and stabilized, machine is threaded, bobbins wound,belts engaged and patterns have been chosen. Reference boundaries arerecommended.
Steps to follow:
1. Right Click in an open area of the preview area. It is a good idea to have createda reference boundary so you can size the text to fit the space on the quilt. In ourexample, we are using the top border.
2. Click on 'Text Property' in the dialog box that appears.
3. Click in the text box and type your message. The text box looks small, but willhandle long phrases. Remember that CS will treat each phrase as a pattern, so ifyour phrase needs two (or more) lines, you need to create 2 (or more) text patterns.
4. Click on 'Place Text' when done, and the Font dialog box appears.

Phase 2 - Blocks
109
Copyright © 2009 Gammill, Inc. | All Rights Reserved
Quilting the Quilt - Which CS Feature To use
Creating Text Blocks
5. Choose the font style you like. By scrolling through the choices, you can see whatthe style looks like in the 'Sample' box. Add italics if desired, but don't bother with abold style - its not like the thread can get thicker for you. Choose any font sizebecause you will need to modify it to fit your boundary anyway.
6. Click 'OK' when ready and the pattern is moved into the preview area of thescreen. Resize as needed.
TIP: CS will stitch the first letter and move to the
next without stopping and prompting for a bobbin pull-
up, so be sure to set the tie-off stitches (and stitch length)
appropriately.
7. Save the Project.
8. Click on Start_Quilting and the sewing head will move to the Start of thefirst pattern. CS will prompt for pulling up the bobbin thread and choosing OK whenready to quilt.
60

Getting Started with CreativeStudio™110
At the end of the quilting sequence, you will be prompted to pull up the bobbinthread. It doesn't matter how the bobbin thread is pulled up, secured or trimmed.Just be sure to click OK because it completes this process.
TIP: CS can use any standard Windows font for
text. Some fonts look great but sew poorly because they
were created with polylines, so test all fonts before using
them in a favorite quilt.

Phase 3 - Borders
111
Copyright © 2009 Gammill, Inc. | All Rights Reserved
Quilting the Quilt - Which CS Feature To use
4.3 Phase 3 - Borders
Borders are (usually) continuous line patterns designed to be stitched repeatedlyacross an area. When patterns are used for the corners, they are usually stitchedfirst. Then, the border pattern is then stitched multiple times, in one continuous line,connecting the corners.
The top and bottom borders can be done in one pass, but the side borders can’talways be done in one pass. When the side borders are longer than the quiltablesurface area, they can sometimes be done in sections. With certain designs, it mightbe better to remove the quilt from the frame, rotate it and re-load so the side borders(which are now at the top and bottom) can be done in one pass.
Border designs need to be planned with the corner in mind. Sometimes the piecingand seam lines will suggest a method but the final decision probably depends on theavailable patterns.
Four examples will be shown in the following section.1. Butted borders have no corner. They stop at the edge of the quilt or at the edge
of the border. 2. Mitered Corners use the angled ends of the border pattern to create a mirror
image. 3. Square Corners are like cornerstones where a separate pattern is used to fill
the space. 4. Custom corners are designed to let the pattern flow continuously around the
corner. This is possible when a pair of patterns (border and corner) are designedtogether.
Butted Borders and Mitered corners do not use the Border/Corner feature of CS.Borders with square corners or custom corners do use the Border/Corner feature.
Tip: Draw a diagram of the entire quilt top for reference. Include
the shape of the corner treatments. Accurately measure each border
area noting the maximum size of the border. Subtract the space
115
118
121
124

Getting Started with CreativeStudio™112
required for the margins and bindings and the remainder is the
area to be stitched. Use the remainder as the target border
dimensions for planning the initial pattern size, the number of
rows and repeats.
The pattern placement sequence and stitching direction is also important. Patternswill stitch out in the same sequence as they were placed, and they always stitch fromStartpoint to Endpoint.
In this example, the patterns were placed in the top border by doing:* Corners first (Border/Corner feature with 'Pine tree block-3') Pattern #1-2.* Border pattern next (Repeat Pattern feature with 4 repeats of 'Pine Tree Border-3')
Patterns #3-6.* Additional border pattern last (Repeat Pattern feature with 1 repeat of 'Bear moose
and pine'). Pattern #7.The patterns will stitch out in the sequence noted (in the diagram above) which willresult in lots of tie-offs or dragged threads. A better method is to change thesequence by turning off (toggle as sewn) some of the patterns.
To do this:1. Turn off #5, #6 and #2 (toggle as 'Sewn'). 2. Quilt #1, #3, #4 and #7.3. Turn on #2 (toggle as 'unsewn')4. Quilt #2.5. Turn on #5 and #6 (toggle as 'unsewn')6. Re-measure the distance between the end of pattern #7 and the start of #2.7. Change the width of the last 2 patterns to fit that space.8. Quilt #5 and #6.
4.3.1 Corners using Border_Corner
When a separate pattern is used for the corner, they are generally placed first. Thisfeature will resize and position that pattern into the corners.
Feature: Border_CornerAssumptions: Quilt is loaded and stabilized, machine is threaded, bobbinswound, belts engaged, and patterns have been added to the project. The Cornerpattern should be highlighted so the Pattern Details are displayed in the Properties
112

Phase 3 - Borders
113
Copyright © 2009 Gammill, Inc. | All Rights Reserved
Quilting the Quilt - Which CS Feature To use
Corners using Border_Corner
box. Most corner patterns need to retain their original shape so Freeze aspect ONmight be a good idea.
Steps to follow:
1. Click on the Border_Corner icon 2. CS prompts for the border boundaries:
Click Outer border first (UL, UR, LR, LL corners).
Click Inner border next (UL, UR, LR, LL corners).
The image of the Outer Boundary is blue and the Inner Boundary is red. CS can tellif this is an upper or lower border by the distance between the two boundaries. If thebottom edges are very close, it is an upper border. Conversely, if the top edges arevery close, it is a bottom border.
3. Edit the Border Corner settings, choosing the type and orientation that best fitsthe corner pattern. Here are some examples of corner types.

Getting Started with CreativeStudio™114
Corner Types:* "L" shaped corners extend past the corner into the border area. * Square corners have the top upright and the bottom upside down.* Square oriented corners are rotated in 90 degree increments.* Angled corners are angled toward the inside at each of the four corners.4. CS moves the corner pattern into the preview area.
If adjustments are needed, click on the pattern to select it (pink) and then resizeand/or repositioned as needed. Don't forget to save the project .
Tip: It is fine to stitch the two corner patterns first IF you are
sure that the repeat pattern for the border area will fit without
further corner adjustments. A safer method is to add the images of
the repeated border patterns into the preview area to see how they
fit. Then you can stitch the corners.
Tip: If you decide you don't like the corner pattern and want to try
something else, just highlight the new corner pattern, click Pattern toBoundary icon, and CS will switch the patterns.
60

Phase 3 - Borders
115
Copyright © 2009 Gammill, Inc. | All Rights Reserved
Quilting the Quilt - Which CS Feature To use
Corners using Border_Corner
5. Click on Start_Quilting and the sewing head will move to the Start of thefirst pattern. CS will prompt for pulling up the bobbin thread and choosing OK whenready to quilt.
CS will stitch the first pattern and move to the next, repeating the prompts for bobbinpull-ups. At the end of the quilting sequence, you will be prompted to pull up thebobbin thread. It doesn't matter how the bobbin thread is pulled up, secured ortrimmed. Just be sure to click OK because it completes this process.
Tip: CS will stitch the patterns in the order they were moved into
the preview area, so it will stitch the left corner, then the right
corner, and then any connecting repeats that have been moved into
the border area. If you toggle the right corner as being sewn, CS will
start stitching the left corner and continue to stitch the connecting
repeats. If shrinkage is not an issue, when CS is stitching the last
repeat, toggle the right corner as being unsewn, and CS will
continue, stitching the right corner too.
The Border Corner process is repeated at the bottom edge. CS will determine that itis at the bottom edge and will position the corners properly.
Quick Reference Border-Corner
4.3.2 Borders - Butted
There is no corner pattern required for Butted borders. The top and bottom bordersstop at the outer edge of the quilt. The side borders stop at the edge of the border(where the sides meet the top and bottom). Sometimes the quilting patterns overlapbut usually they are butted too, as our example will show.
Feature: Repeat Pattern Assumptions: Quilt was measured, a diagram is drawn and the target borderdimensions have been determined. The quilt top is loaded and stabilized, machine isthreaded, bobbins wound, belts engaged, and patterns have been added to theproject.
176

Getting Started with CreativeStudio™116
1. Click on the pattern to be used. This highlights it (blue) in the Project Info area.* CS defaults to Freeze Aspect ON initially so a height change (to fit the border) will
change the width proportionately. CS then turns off Freeze Aspect so you canmake minor changes to fit the space.
2. Measure the top border height first and determine the height of the pattern.(Maximum border size less margins). Transfer the height measurements into thepattern height field of the pattern details .
3. Measure the top border width next, using the border seamline as the baseline.Be sure to measure in the direction you will be stitching because the measureprocess will also determine the square-up angle of the border. Write down thesenumbers on the diagram for use later.
Tip: It is always a good idea to see if all four borders are the same
size. Minor differences (< 5-10%) can be handled easily. Significant
differences require that each border be planned separately.
4. Boundaries are optional but very helpful because they will show (in the previewarea) any curvature in the seamlines. Reference boundaries can also trace the edgeof a pattern so the butted border pattern can be positioned precisely.
5. Click on Repeat Patterns icon. CS asks for a Reference point.
Tip: Before providing the reference point, be sure the Repeat
Pattern Setup dialog box is expecting the Reference point you plan
to provide. Also change all the Pattern Details and Repeat Settings
as needed - It is easier to do this now, before the patterns are moved
71
99
71
96
98

Phase 3 - Borders
117
Copyright © 2009 Gammill, Inc. | All Rights Reserved
Quilting the Quilt - Which CS Feature To use
Borders - Butted
to the preview area.
6. Change the repeat settings.* Transfer the border width measurement into the Total Width field, and CS will
calculate the number of repeats needed.
7. Choose a Reference point .
Move the machine head to that reference point and press OK to set it.CS moves the pattern(s) to the area anchored by the reference point. The position ofthe pattern repeats can be changed easily.
8. Edit the size and repeats using the Pattern Details or Repeat Setting Detailsfirst.
When done, Save the project .
9. Make final adjustments in the preview area last.
10. Click on Start_Quilting and CS moves the sewing head & prompts forbobbin pull-up.
11. At the end of the quilting sequence, you will be prompted to pull up the bobbinthread and click OK. It doesn't matter how the bobbin thread is pulled up, secured ortrimmed. Just be sure to click OK because it completes this process.
Tip: If the continuous line of the stitching was interrupted by the
re-positioning of the individual pattern placement, CS may do tieoff
stitches between the patterns. However, if the space is less than one
stitch length, there will be no extra tie-off.
100
99 99
60
76

Getting Started with CreativeStudio™118
Quick Reference Border-Corner
4.3.3 Borders - Mitered
Border patterns that have angled ends can eliminate the need for a corner patternwhen they are positioned to fit the miter, creating a mirror image. This techniquerequires flipping the patterns horizontally and/or vertically to create the mirrorimages. These border patterns are usually directional so planning is very important.
Feature: Repeat Pattern Assumptions: Quilt was measured, a diagram is drawn and the target borderdimensions have been determined. The quilt top is loaded and stabilized, machine isthreaded, bobbins wound, belts engaged, and patterns have been added to theproject.
1. Click on the pattern to be used. This highlights it (blue) in the Project Info area.* CS defaults to Freeze Aspect ON initially so a height change (to fit the border) will
change the width proportionately. CS then turns off Freeze Aspect so you canmake minor changes to fit the space.
2. Measure the top border height first and determine the height of the pattern.(Maximum border size less margins). Transfer the height measurements into thepattern height field of the pattern details .
3. Measure the top border width next. This measurement is just approximatebecause the true width depends on how the pattern fits into the angled sides.Measure the width across the center of the border piece. Write down these numbersfor use later.
176
71
99
71

Phase 3 - Borders
119
Copyright © 2009 Gammill, Inc. | All Rights Reserved
Quilting the Quilt - Which CS Feature To use
Borders - Mitered
4. Reference Boundaries are optional but very helpful because they will show (inthe preview area) any curvature in the seamlines. When using directional borderpatterns, the centerpoint becomes very important so add a boundary there too.
5. Click on Repeat Patterns icon. CS asks for a Reference point.
Tip: Before providing the reference point, be sure the Repeat
Pattern Setup dialog box is expecting the Reference point you plan
to provide. Also change all the Pattern Details and Repeat Settings
as needed - It is easier to do this now, before the patterns are moved
to the preview area.
6. Change the repeat settings. * Change the Total Width to your measurement and CS will calculate the number of
repeats needed. * Measure the border seamline and transfer the Angle to the Square Up Quilt Angle
in the Settings. 7. Choose a Reference point .
Move the machine head to that reference point and press OK to set it.CS moves the pattern(s) to the area anchored by the reference point. If thereference point clicked (on the quilt) is not the point being requested by the screen,just change the screen choice and the patterns will change.
8. Change the size and repeats using the Pattern Details or Repeat SettingDetails first. When using a directional pattern like the one shown, it is a good ideato have an even number of repeats because half of them will be flipped to go in theopposite direction.
96
98
100
99
99

Getting Started with CreativeStudio™120
Tip: To reposition all the patterns together, they must be selected
as a group. To do this press and hold the Control key while clicking
on the individual patterns. Once they are all selected, click on the
group and the blue resizing handles appear.
9. Make final adjustments in the preview area last. Directional patterns like theone shown need to have a different pattern n the center of the border, to make thedirection change appear planned and orderly. That additional pattern is not shownhere, but should be included in the final adjustments, before quilting.
Tip: When working with mitered corners, it is a good idea to
position the side border patterns, and check the fit at the miters. The
sides don't have to be quilted yet, but seeing how the patterns align
will make the final results better.
When done, Save the project .
10. Click on Start_Quilting and CS moves the sewing head & prompts forbobbin pull-up.
76
60

Phase 3 - Borders
121
Copyright © 2009 Gammill, Inc. | All Rights Reserved
Quilting the Quilt - Which CS Feature To use
Borders - Mitered
11. At the end of the quilting sequence, you will be prompted to pull up the bobbinthread and click OK. It doesn't matter how the bobbin thread is pulled up, secured ortrimmed. Just be sure to click OK because it completes this process.
Quick Reference Border-Corner
4.3.4 Borders with Corner Squares
Border patterns don't always fit corner spaces so choosing a separate corner patternis common. The corner should complement, but not necessarily match the patternchosen for the border.
Feature: Repeat Pattern Assumptions: Quilt was measured, a diagram is drawn and the target borderdimensions have been determined. The quilt top is loaded and stabilized, machine isthreaded, bobbins wound, belts engaged, and patterns have been added to theproject. Corner patterns have been placed and stitched as follows: Prep Step #1. Click on Boundary Icon and define a boundary in the left corner.Prep Step #2. Click on the Corner pattern to highlight it.Prep Step #3. Click on Pattern To Boundary icon & CS moves the pattern in. Prep Step #4. Adjust if needed.Prep Step #5. Repeat for the right corner.
1. Click on the border pattern to be used. This highlights it (blue) in the Project Infoarea.* CS defaults to Freeze Aspect ON initially so a height change (to fit the border) will
change the width proportionately. CS then turns off Freeze Aspect so you canmake minor changes to fit the space.
2. Measure the top border height first and determine the height of the pattern.(Maximum border size less margins). Transfer the height measurements into thepattern height field of the pattern details .
3. Measure the top border width next, using the border seamline as thebaseline.Allow for a margin at the corners if desired. Be sure to measure in the
176
71
99
71

Getting Started with CreativeStudio™122
direction you will be stitching because the measure process will also determine thesquare-up angle of the border. Write down these numbers on the diagram for uselater.
4. Reference boundaries are optional but very helpful because they will show (inthe preview area) any curvature in the seamlines. The Corner Square patterns areusually done before the borders are stitched. The corner blocks are often definedwith outlining or SID so do this if desired.
5. Click on Repeat Patterns icon. CS asks for a Reference point.
6. Change the repeat settings: * Change the Total Width to your measurement and CS will calculate the number of
repeats needed. * Change the Square Up Quilt Angle, using the angle rotation number from the width
measurement.
Tip: Sometimes it is a good idea to repeat the Measure step to get
the Square Up Angle, especially if the quilt has been tightened or
adjusted in any way..
7. Choose a Reference point . * Move the machine head to that reference point and press OK to set it. CS moves
the pattern(s) to the area anchored by the reference point. The position of thepattern repeats can be changed easily, using the reference boundaries as theguide.
96
91
98
100

Phase 3 - Borders
123
Copyright © 2009 Gammill, Inc. | All Rights Reserved
Quilting the Quilt - Which CS Feature To use
Borders with Corner Squares
8. Change the pattern size (in Pattern Details ) and/or repeats (in Repeat SettingDetails ) first.
When done, Save the project .
9. Make final adjustments in the preview area last.
10. Click on Start_Quilting and CS moves the sewing head & prompts forbobbin pull-up.
11. At the end of the quilting sequence, you will be prompted to pull up the bobbinthread and click OK. It doesn't matter how the bobbin thread is pulled up, secured ortrimmed. Just be sure to click OK because it completes this process.
Quick Reference Border-Corner
99
99
60
76
176

Getting Started with CreativeStudio™124
4.3.5 Borders with Custom Corners
To get a visually seamless continuous flow around corners, customized corners areneeded. The corner and border patterns are designed to fit together. The bestresults happen when the patterns can maintain their original proportions, so FreezeAspect is important.
Tip: It is a good idea to preview how the corners and border
patterns will fit together before stitching anything.
* Start with the Border/Corner feature, using the actual quilt
measurements. Place the corner patterns but don't stitch them yet.
* Continue with the Repeat Pattern feature also using the actual
quilt measurements. Place the border patterns and check the size
and alignment, but don't stitch them yet.
* Draw a sketch and make notes of the measurements.
* Extend the sketch to include the side border placement. Be sure the
border pattern fits the side borders as well as the top/bottom
borders.
* SAVE the project !
Feature: Repeat Pattern Assumptions: Quilt was measured, a diagram is drawn and the target borderdimensions have been determined. The quilt top is loaded and stabilized, machine isthreaded, bobbins wound, belts engaged, and patterns have been added to theproject. You know the pattern repeats and corners will fit this quilt so CustomCorners have been stitched using Border/Corner as follows:Prep Step #1. Click on Border Corner Icon:Prep Step #2. Click the Outer Border boundary as prompted. Prep Step #3. Click the Inner Border boundary as prompted.Prep Step #4. Choose the Corner type ("L", Square, Square Oriented, Angle).Prep Step #5. Choose the Orientation (the pattern image looks like which corner?)Prep Step #6. Click Pattern To Boundary if CS hasn't automatically done it.Prep Step #7. Adjust size and placement if needed.Prep Step #8. Stitch the two corners.
1. Click on the border pattern to be used. This highlights it (blue) in the Project Infoarea.* CS defaults to Freeze Aspect ON initially so a height change (to fit the border) will
change the width proportionately. CS then turns off Freeze Aspect so you canmake minor changes to fit the space.
2. Measure the top border height first and determine the height of the pattern.(Maximum border size less margins). Transfer the height measurements into thepattern height field of the pattern details .
112
71
99

Phase 3 - Borders
125
Copyright © 2009 Gammill, Inc. | All Rights Reserved
Quilting the Quilt - Which CS Feature To use
Borders with Custom Corners
3. Measure the top border width next, starting at the endpoint of the left corner,ending at the startpoint of the right corner (knot to knot). Be sure to measure in thedirection you will be stitching because the measure process will also determine thesquare-up angle of the border. Write down these numbers on the diagram for uselater.
5. Click on Repeat Patterns icon. CS asks for a Reference point.
6. Change the repeat settings. * Change Start End Controlled to = ON. CS will measure the width between the
Startpoint and Endpoint instead of using the outside edges of the pattern.
* Change the Total Width to your measurement and CS will calculate the number ofrepeats needed.
* Change the Square Up Quilt Angle, using the angle rotation number from the widthmeasurement. Both of these changes can be done by transferring measurementiff the last thing measured was the width, from the endpoint of the left corner tothe startpoint of the right corner.
7. Choose a Reference point. * Move the machine head to that reference point and press OK to set it. CS moves
the pattern(s) to the area anchored by the reference point. The position of thepattern repeats can be changed easily, using the reference boundaries as theguide.
8. Change the pattern size (in Pattern Details ) and/or repeats (in Repeat SettingDetails ) if needed.
71
98
100
99
99
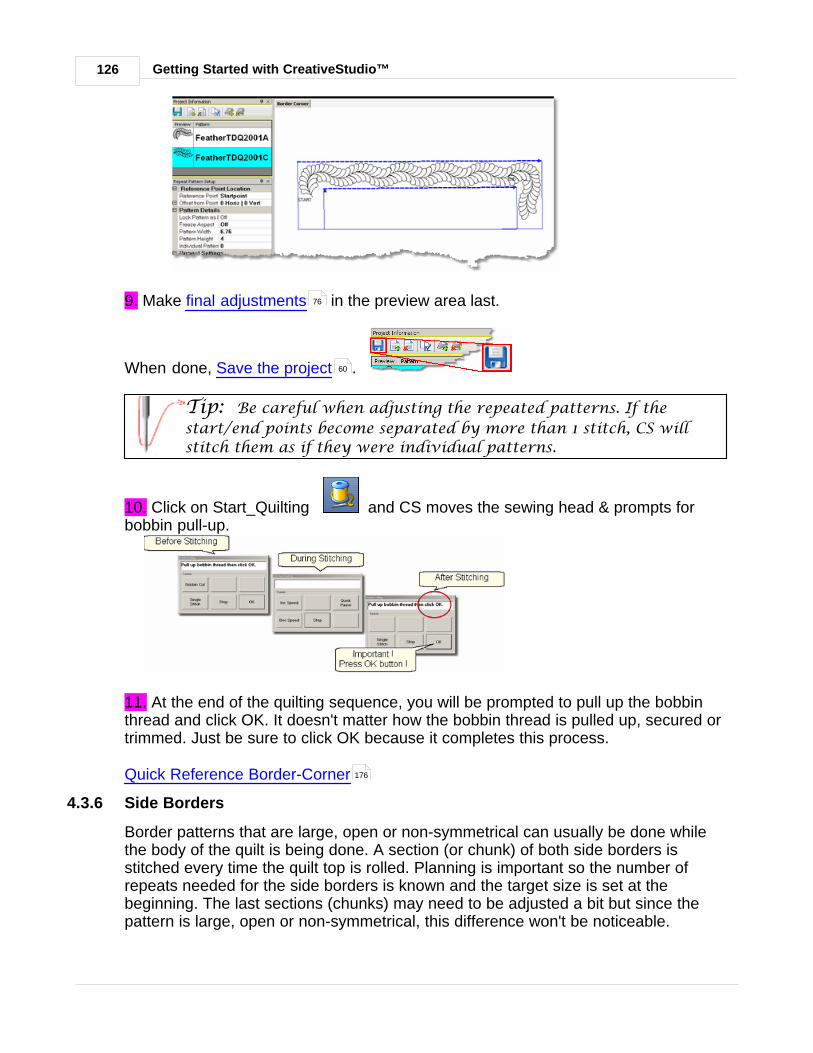
Getting Started with CreativeStudio™126
9. Make final adjustments in the preview area last.
When done, Save the project .
Tip: Be careful when adjusting the repeated patterns. If the
start/end points become separated by more than 1 stitch, CS will
stitch them as if they were individual patterns.
10. Click on Start_Quilting and CS moves the sewing head & prompts forbobbin pull-up.
11. At the end of the quilting sequence, you will be prompted to pull up the bobbinthread and click OK. It doesn't matter how the bobbin thread is pulled up, secured ortrimmed. Just be sure to click OK because it completes this process.
Quick Reference Border-Corner
4.3.6 Side Borders
Border patterns that are large, open or non-symmetrical can usually be done whilethe body of the quilt is being done. A section (or chunk) of both side borders isstitched every time the quilt top is rolled. Planning is important so the number ofrepeats needed for the side borders is known and the target size is set at thebeginning. The last sections (chunks) may need to be adjusted a bit but since thepattern is large, open or non-symmetrical, this difference won't be noticeable.
76
60
176

Phase 3 - Borders
127
Copyright © 2009 Gammill, Inc. | All Rights Reserved
Quilting the Quilt - Which CS Feature To use
Side Borders
Border patterns that are very detailed or contain stitch lines that are double stitchedmight look better if the quilt is reloaded sideways. This is a personal preference.Patterns that are very complicated or detailed (heirloom cables or feathers are goodexamples) don't hide size variations well, so do the main part of the quilt first(including the four corners, top and bottom borders) and turn the quilt.
Here are some relevant Tips given in the previous sections about borders that arevery important when doing side borders:
(Borders in general)
Tip: Draw a diagram of the entire quilt top for reference. Include
the shape of the corner treatments. Accurately measure each border
area noting the maximum size of the border. Subtract the space
required for the margins and bindings and the remainder is the
area to be stitched. Use the remainder as the target border
dimensions for planning the initial pattern size, the number of
rows and repeats.
(Stitch Sequence)
Tip: When doing side borders, be aware of the stitching sequence.
Although it is tempting to 'flip' patterns so they fit the opposite side
border, this can often reverse the stitch sequence. Grouping side
patterns together and rotating them as a unit eliminates this
problem.
(Corners)
Tip: It is possible to stitch the two corner patterns first IF you are
sure that the repeat pattern for the border area will fit without
further adjustments. A safer method is to add the images of the
repeated border patterns into the preview area to see how they fit.
(Butted Borders)
Tip: It is always a good idea to see if all four borders are the same
size. Minor differences (< 5-10%) can be handled easily. Significant
differences require that each border be planned separately.
(Custom Borders)

Getting Started with CreativeStudio™128
Tip: It is a good idea to preview how the corners and border
patterns will fit together before stitching anything.
* Start with the Border/Corner feature, using the actual quilt
measurements. Place the corner patterns but don't stitch them yet.
* Continue with the Repeat Pattern feature also using the actual
quilt measurements. Place the border patterns and check the size
and alignment, but don't stitch them yet.
* Draw a sketch and make notes of the measurements.
* Extend the sketch to include the side border placement. Be sure the
border pattern fits the side borders as well as the top/bottom
borders.
* SAVE the project !
Turning the Quilt
When it is really important to get the perfect heirloom fit, turning the quilt to do theside borders makes sense. The four corners and top borders are done when thebody of the quilt top is being quilted. Be sure to baste the side edges of the bordersas you roll the quilt. Securing the border seams with SID is often a good idea toobecause it helps prevent the layers from shifting.
When ready to remove the quilt, find the halfway point of the side borders, and markit on both sides with a safety pin. This point will be aligned to the center point of thetable leaders when it is reloaded. Carefully remove the quilt from the table leaders.Rotate the quilt and re-load, attaching just the backing to the leaders. The sideborders have been moved to the top and bottom edges and can now be measuredand stitched as a unit.
Tip: Dense background fillers should be stitched last, after the
borders have been completed. Any dense quilting in the background
around custom quilt designs can make the fabric shrink. When this
happens next to a border it can cause the border fabric to pucker
and tucks are likely. A better method is to wait until all the blocks
and borders have been completed and do the background fillers last.
Quick Reference Border-Corner
4.3.7 Sashings using Point_To_Point - Pattern
Sashings are mini-borders with an additional design requirement; they need tointersect each other and still look attractive. Placing border patterns (using RepeatPattern feature) in sashing areas is possible but each sashing strip needs to bemeasured and squared up individually. The Point To Point technique using the right
176
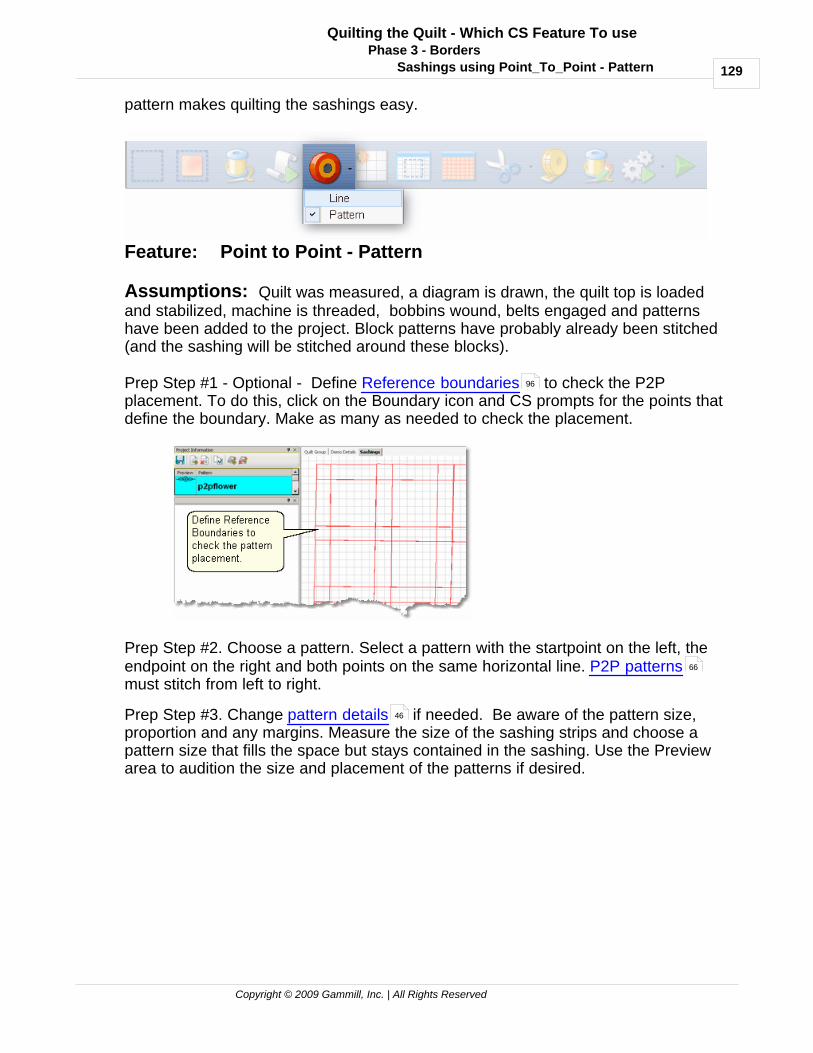
Phase 3 - Borders
129
Copyright © 2009 Gammill, Inc. | All Rights Reserved
Quilting the Quilt - Which CS Feature To use
Sashings using Point_To_Point - Pattern
pattern makes quilting the sashings easy.
Feature: Point to Point - Pattern
Assumptions: Quilt was measured, a diagram is drawn, the quilt top is loadedand stabilized, machine is threaded, bobbins wound, belts engaged and patternshave been added to the project. Block patterns have probably already been stitched(and the sashing will be stitched around these blocks).
Prep Step #1 - Optional - Define Reference boundaries to check the P2Pplacement. To do this, click on the Boundary icon and CS prompts for the points thatdefine the boundary. Make as many as needed to check the placement.
Prep Step #2. Choose a pattern. Select a pattern with the startpoint on the left, theendpoint on the right and both points on the same horizontal line. P2P patternsmust stitch from left to right.
Prep Step #3. Change pattern details if needed. Be aware of the pattern size,proportion and any margins. Measure the size of the sashing strips and choose apattern size that fills the space but stays contained in the sashing. Use the Previewarea to audition the size and placement of the patterns if desired.
96
66
46

Getting Started with CreativeStudio™130
Prep Step #4. Plan the 'Point Layout' before beginning. Most patterns look the bestwhen they maintain their original proportion (Freeze aspect= On), but this means youneed to have P2P intervals that also allow the pattern to fill the space. Other patternsneed to have one consistent dimension even if the other varies (Freeze Aspect=Off).For example, a pattern being stitched inside a sashing area should have one of thedimensions fixed so it doesn't stitch outside of the sashing.
Steps to follow:
1. Click on the P2P icon
A dialog box appears with Settings and Buttons:Settings:

Phase 3 - Borders
131
Copyright © 2009 Gammill, Inc. | All Rights Reserved
Quilting the Quilt - Which CS Feature To use
Sashings using Point_To_Point - Pattern
Angle:This is the current angle that will be used when the Channel Lock is turnedon.
Flip Angle: If array mode is not checked, this angle can replace the current anglewhen the channel lock is on. To flip the angle, press and hold the shift button onthe keypad, and press the Chan Lock button. To flip it back again, repeat the2-button sequence.
Array Mode - when checked, CS uses a 2-button sequence to increase the currentangle by the number of degrees shown in the Flip Angle. To increase the currentangle, press and hold the shift button on the keypad, and press the Chan Lockbutton. Repeat this to increase it again.
ButtonsChan Lock - locks the head so it stitches along one fixed angle. Shift: Press this AND Chan Lock to Flip the lock angle.OK (either button) selects the point, based on the position of the needle.Stop indicates the end of the P2P-pattern sequence.
2. Press OK to define the path. Move the machine head from one point to the next,pressing OK on each one. The machine makes a 'doink' noise every time the OKbutton is pressed. This sound confirms that the point has been registered.
Tip: Using the laser light to help identify the P2P points is very
helpful but if the light is not positioned properly, it can be deceiving.
Each click is registering the position of the needle, not where the
light is shining.
3. Press 'Stop' to complete the process.
* P2P isn’t stitched immediately - it shows up on the screen first.
Tip: Each P2P pattern is considered an individual pattern and
can be modified if needed. Just click on the pattern to select it (pink)
and use the blue handles to change it.
When done, Save the project .
4. Click on Start_Quilting and the sewing head will move to the Start of thepattern. CS will prompt for pulling up the bobbin thread. Press OK when ready toquilt.
60

Getting Started with CreativeStudio™132
At the end of the quilting sequence, you will be prompted to pull up the bobbin threadand click OK. It doesn't matter how the bobbin thread is pulled up, secured ortrimmed. Just be sure to click OK because it completes this process.
When the patterns are all stitched, the screen will display them with red lines insteadof black. This is a visual reminder that they are tagged as having been sewnalready.
Quick Reference P2P Pattern 169

Phase 4 - Backgrounds
133
Copyright © 2009 Gammill, Inc. | All Rights Reserved
Quilting the Quilt - Which CS Feature To use
4.4 Phase 4 - Backgrounds
An Edge-to-Edge (E2E) quilting design is a very simple form of background quilting.The pattern is stitched both across (multiple repeats) and down (multiple rows) thearea. For custom quilting, background fillers are frequently used. This is densequilting around an applique or quilted motif. The filler compresses the backgroundallowing the applique or motif to be framed and highlighted.
4.4.1 Background Fillers using Trim - Inside
Applique blocks are good examples of the need to stitch the background down,allowing the applique to 'pop'. The background pattern is usually a dense fillerpattern. The Trim-inside feature allows the background pattern to be positioned overthe entire block boundary. On top of that, the boundary of the applique shape isdefined and the boundary is trimmed away from the inside of the applique area so itwon't be stitched over.
Feature: Trim Pattern - Inside
Assumptions: The quilt top is loaded and stabilized, machine is threaded, bobbinswound, belts engaged and patterns have been added to the project.
In this example, a large area will be quilted using a background filler pattern(bubbles). The quilt has some nautical creatures that are appliqued and will not bequilted with bubbles.
Steps to follow:
1. Click on the Boundary icon and follow the prompts to define theboundary of the background area. If the project were to fill the background of anappliqued block, this would be the outer boundary.

Getting Started with CreativeStudio™134
2. Move the background filler pattern in.
Use Pattern_to_Boundary or Repeat Patterns depending on howmany repeats are needed to fill the area.
This example shows 3 repeats and 2 rows that were nested vertically by -.5". Thereis a gap on one side border and an overlap on the other which need to be adjusted.
3. . Select all the patterns together before adjusting the size and position. Thisprevents the individual patterns from becoming separated from the whole row. If thepattern doesn't fit exactly, let it extend past the outer boundary. The excess can betrimmed off before stitching.
4. Choose Trim Inside.
5. Click on the Trim icon. CS will prompt for a boundary. Use as manypoints as needed to define the boundary of the applique.
96 98

Phase 4 - Backgrounds
135
Copyright © 2009 Gammill, Inc. | All Rights Reserved
Quilting the Quilt - Which CS Feature To use
Background Fillers using Trim - Inside
6. Click Stop when done and CS will erase everything inside the applique boundary,leaving the filler pattern in the background. Save the project often. Continue withadditional Trims as needed.
Tip: Multiple "Trim-Inside" boundaries are possible in one quilt
group (but only one "Trim-Outside") so trim until the pattern is
customized to fit the space, even if it takes multiple trims.
When done trimming the applique, trim the outer edges if needed. In this example,the bottom edge fit well so only the top and sides were trimmed. This is done usingthe same Trim-Inside feature, and creating a boundary around the outer edges asshown. Be sure the boundary around the outer edge covers all of the backgroundfiller. If any of the bubbles peek out, they will be stitched.
7.Save the Project.
8. Click on Start_Quilting and CS moves the sewing head to the start of the
60

Getting Started with CreativeStudio™136
pattern and prompts for pulling up the bobbin thread.
9. Click OK when ready to quilt. If multiple patterns were moved into the boundary,they will stitch in the order they were moved. At the end of the quilting sequence, youwill be prompted to pull up the bobbin thread and click OK. It doesn't matter how thebobbin thread is pulled up, secured or trimmed. Just be sure to click OK because itcompletes this process.
Tip: Be Patient! CS will take a little time before it moves to the
beginning of the pattern and starts to quilt. CS needs to examine
every TRIM boundary and identify where each additional tie-off
goes. Be Patient when doing a restart too - it takes time.
Quick Reference Trim Inside
4.4.2 Pantographs using Edge_To_Edge
Edge To Edge pantographs are continuous line designs stitched repeatedly acrossthe quilt. Many pantographs span the entire quilt but they can also be confined to aninside area or even a border. Aligning the rows of a pantograph can be tricky,especially after rolling the quilt so CS has a special feature (E2E Continue) to helpdo that successfully.
Feature: Edge to Edge (E2E)Assumptions: The machine is threaded, bobbins wound, belts engaged andpatterns have been added to the project. Prep Step #1.) Measure the quilt length and width accurately before loading the quilt.If you are leaving a margin at the top and bottom, be sure to reduce your total quiltlength by this amount. Also it is a good idea to reduce the length a little toaccommodate shrinkage caused by the quilting. This could be from 1% to 5%,depending on the fabrics, batting and quilting density. Prep Step #2) Load the quilt and baste the outer edges. Prep Step #3) Choose a pattern and think about the scale. Large scale, open quiltingresults in a more supple quilt and small scale, dense quilting is a bit stiffer. Prep Step #4) Change the pattern details (height and width) to reflect the scale youprefer.
Pantograph patterns with irregular outer edges are designed to nest together. This
178

Phase 4 - Backgrounds
137
Copyright © 2009 Gammill, Inc. | All Rights Reserved
Quilting the Quilt - Which CS Feature To use
Pantographs using Edge_To_Edge
often puts gaps at the edges. If needed, plan on oversizing the first E2E boundary sothe quilting extends past the edges of the quilt to eliminate gaps. Use the Trimfunction as needed to remove the excess on the top and sides.
Tip: To determine how much a pattern needs to extend beyond the
quilt edges, move to a different quilt group, set the E2E pattern size
to what you need, and use Repeat Patterns to move one single
repeat into the preview area. Add a grid to the preview area so you
can see (and measure) how much overlap you need.
Steps to follow:
1. Click the E2E icon. CS prompts you to click the four corners of the first boundary. Make this as large
as possible to minimize the number of times the quilt must be rolled. CS also willcreate a new Quilt Group named Edge to Edge. If this quilt group name is alreadytaken, it will prompt you to type in a new, unique name.
2. Enter the quilt length in the Primary Settings area. Increase the actualmeasurement if the pattern will be stitching off the top & bottom edges of the quilt. Decrease the actual measurement to adjust for top and bottom margins andshrinkage (if needed).
53

Getting Started with CreativeStudio™138
CS measured the width in step 1, and gets the length from the Primary Settings. Itnow has enough information to automatically calculate the number of repeats androws required. This is just a suggestion! All settings can be changed in Setup mode(but not in Edit mode).
3. Check the E2E Setup Details:Size Settings:* Pattern Width and Pattern Height may be different from what you started with
because CS may need to adjust each individual pattern measurements toaccommodate the total measurements.
* Repeats and Rows have been set but can be changed if you do it in the setupmode (which means don’t close the E2E Setup box until you are sureadjustments are done).
* Spacing refers to the amount of space between patterns, both horizontally andvertically. Negative numbers reduce the space between patterns (rows orrepeats) and positive numbers increase it.
Variable Settings : * Select Between Blocks describes what you want CS to do between blocks.
Connect Start And End is preferred for pantographs. This connects the start ofone pattern to the end of the previous pattern. Bobbin Pullup is used if each repeat is a separate block pattern. CS automaticallyswitches to Bobbin Pullup if the repeated patterns have become disconnected.
* Select Alternating type – allows staggered rows. Complete instructions are includedin the next section.None means don’t stagger the rows.Plus Row On Top means one extra repeat will be added to the first row and everyother row.Minus Row On Top means one repeat is taken away from the first row and everyother row.
* Select Registration refers to the method of spacing the rows properly every timethe quilt is rolled. Place Two Pins means CS will pick the registration points andyou need to mark them (with pins or a marker). Use Start Point and End Pointmeans CS will use the start and end point of the previous row as the registrationpoints. Due to variations in patterns, Place Two Pins is the safest (and the
53
53

Phase 4 - Backgrounds
139
Copyright © 2009 Gammill, Inc. | All Rights Reserved
Quilting the Quilt - Which CS Feature To use
Pantographs using Edge_To_Edge
default). * Maintain Aspect means CS will try to keep the adjusted pattern ratio (length:height)
the same as the original pattern. This can’t always be done however because thepattern dimensions may not share common factors with the quilt dimensions. Forquilters who ‘don’t do math’, this just means it won’t fit without a little stretching.
4. Look at the image in the preview area. WYSIWYQ - What you see is whatyou quilt, so if you don’t like it, change it now.
The top edge is the baseline shown as a thicker, dashed line on the screen. Thepattern in the example has irregular edges which make it nest nicely. However, thepattern will stitch off of the edge when positioned to eliminate the gaps. Make sure toadd the extra space to the "Quilt Length" dimension . The Trim-Inside function canbe used to trim off the excess.
Pattern colors indicate the sewing status. Black means the patterns can be stitchedbefore advancing the quilt. Teal green means the patterns won't fit in the currentquilting space so CS can't quilt them yet. Red means the pattern has already beensewn.
Adjusting patterns that nest can be done before any quilting begins. Just select allthe patterns at once (Group All icon) and reposition as needed. If adjustments areneeded after the first rows have been completed, the non-quilted patterns need to beselected together. This is done by holding down the Ctrl key and clicking on eachpattern that needs to be adjusted.
When it looks good, Save the project .
5. Click Quilt The machine moves to the start of the first pattern, takes asingle stitch and prompts you to pull up the bobbin, so do that. Press OK on thekeypad when ready. The first row now begins.
75
76
38
60

Getting Started with CreativeStudio™140
6. At the end of the row, CS stops and prompts you to cut the bobbin thread. Itdoesn't matter how the bobbin thread is pulled up, secured or trimmed. Just be sureto click OK because it completes this process.
6A. IF you have room for another row the machine will move to thebeginning of the next row, take a stitch, prompt for Bobbin pull-up and clickOK to quilt the next row. Repeat these steps until all the rows for the currentsection are complete.
7. When CS finishes the last row that fits, you will be prompted to cut the bobbinthread and mark the two registration points. Here is what will happen:
* CS finishes the last row that will fit. CS prompts you to cut the bobbin thread, sodo that. Click OK to complete the end-of-row process. * CS prompts you to click OK when ready to mark the Right registration point. ClickOK and the stitcher moves to the first registration point. Place a pin in RegistrationPoint #1 (where the needle would enter the fabric). * CS prompts you to click OK when ready to mark the Left registration point. ClickOK and the stitcher moves to the second registration point. Place a pin inRegistration Point #2 (where the needle would enter the fabric). Click OK tocomplete the process.
Save the project .
8. Roll the quilt (baste the sides, check the bobbin, etc.) Now finish the quilt by using the Feature: Edge To Edge Continue
60

Phase 4 - Backgrounds
141
Copyright © 2009 Gammill, Inc. | All Rights Reserved
Quilting the Quilt - Which CS Feature To use
Pantographs using Edge_To_Edge
Tip: When rolling the quilt top, leave extra space above the
registration points if your patterns are nested. The space between
the pickup roller and the registration points is used when patterns
are nested, so be sure there is enough room.
Feature: Edge To Edge - Continue
Edge-To-Edge Continue is a special feature that aligns pantograph rows together
properly after the quilt has been rolled.
Assumptions:This assumes the first section (or more) is done, the registration points have beenmarked and the quilt has been rolled.
Steps to follow: (all these steps are considered ‘edit’ mode because you can’treturn to the E2E Setup details).
9. Click EdgeToEdge_Continue
10. Mark the boundary as prompted:
* CS prompts for left registration mark. Move the machine head to the UpperLeft registration point & Press OK.
* CS prompts for right registration mark. Move the machine head to the UpperRight registration point & Press OK.
11. Look at the screen and make adjustments if needed. WYSIWYQ - What yousee is what you quilt, so be sure you like it.
Tip: If you need to stop for any reason, be sure to use the Restart
Quilting function to resume. If you forget and press E2E-Continue
again, press Undo to correct this. E2E-Continue tells CS that the
current E2E section was completed successfully and you are ready to
move on.

Getting Started with CreativeStudio™142
Save the project .
12. Click Quilt The machine moves to the start of the pattern, takes asingle stitch and prompts you to pull up the bobbin, so do that. Press OK on thekeypad when ready. The first row of the new section now begins.
13. At the end of the row, CS stops and prompts you to cut the bobbin thread andclick OK.
IF you have room for another row, The machine moves to the beginning of thenext row and begins again. Continue quilting until the entire current section is done.
14. When done with the last row that will fit the current area, CS will again prompt formarking registration points. Repeat steps #7 - #14 until the last section - whenbottom edge of the quilt makes its way up to the current quiltable space.
15. Last Section adjustments are often necessary so the last time you roll the quilt,the prompts are a little different.
Save the project .
16. Click Quilt The machine moves to the start of the pattern, takes asingle stitch and prompts you to pull up the bobbin, so do that. Press OK on thekeypad when ready. The first row of the new section now begins.
17. At the end of the last row, CS stops and prompts you to cut the bobbin threadand click OK.
60
60

Phase 4 - Backgrounds
143
Copyright © 2009 Gammill, Inc. | All Rights Reserved
Quilting the Quilt - Which CS Feature To use
Pantographs using Edge_To_Edge
Quick Reference E2E
4.4.3 E2E Alternating Patterns
Edge To Edge pantographs look less structured when alternating pattern is used.Not all patterns look good using the Alternating Pattern option, but CS makes it easyto audition them. The Alternating option will always have sides that are irregular butCS will automatically Trim the sides to fit the quilt.
Feature: Edge to Edge - Alternating
Assumptions: The machine is threaded, bobbins wound, belts engaged andpatterns have been added to the project. The Prep Steps here are the same as astandard E2E. Prep Step #1.) Measure the quilt length and width accurately before loading the quilt.If you are leaving a margin at the top and bottom, be sure to reduce your total quiltlength by this amount. Also it is a good idea to reduce the length a little toaccommodate shrinkage caused by the quilting. This could be from 1% to 5%,depending on the fabrics, batting and quilting density. Prep Step #2) Load the quilt and baste the outer edges. Prep Step #3) Choose a pattern and think about the scale. Large scale, open quiltingresults in a more supple quilt and small scale, dense quilting is a bit stiffer. Prep Step #4) Change the pattern details (height and width) to reflect the scale youprefer.
Steps to follow:
1. Click the E2E icon. CS prompts you to click the four corners of the first boundary. Make this as large
as possible to minimize the number of times the quilt must be rolled. Press Stopwhen done.
2. Change settings.
180

Getting Started with CreativeStudio™144
Choose a pattern, change the size for the scale needed, input the total quilt lengthand choose the Alternating Type. CS measured the width in step 1, and gets thelength from the Primary Settings . It now has enough information to automaticallycalculate the number of repeats and rows required. 3. Check the E2E Setup Details : These were described before, but it is worthrepeating.Size Settings :* Pattern Width and Pattern Height may be different from what you started with.* Repeats and Rows have been set but can be changed if you do it in the setup
mode (which means don’t close the E2E Setup box until you are sureadjustments are done).
* Spacing refers to the amount of space between patterns, both horizontally andvertically. Adjust these numbers if needed to add or remove space betweenpatterns, especially between the rows.
Variable Settings : * Select Between Blocks describes what you want CS to do between blocks.
Connect Start And End is preferred for pantographs.Bobbin Pullup is used if each repeat is a separate block pattern. CS automaticallyswitches to Bobbin Pullup if the repeated patterns have become disconnected.
* Select Alternating type – allows staggered rows. None means don’t stagger the rows.Plus Row On Top means one extra repeat will be added to the first row and everyother row.Minus Row On Top means one repeat is taken away from the first row and everyother row.
* Select Registration refers to the method of spacing the rows properly every timethe quilt is rolled. Place Two Pins means CS will pick the registration points andyou need to mark them (with pins or a marker). Use Start Point and End Pointmeans CS will use the start and end point of the previous row as the registrationpoints. Due to variations in patterns, Place Two Pins is the safest (and thedefault).
* Maintain Aspect means CS will try to keep the adjusted pattern ratio (length:height)the same as the original pattern. This can’t always be done however because thepattern dimensions may not share common factors with the quilt dimensions. Forquilters who ‘don’t do math’, this just means it won’t fit without a little stretching.
4. Look at the image in the preview area. WYSIWYQ - What you see is whatyou quilt, so if you don’t like it, change it now.
53
52
53
53

Phase 4 - Backgrounds
145
Copyright © 2009 Gammill, Inc. | All Rights Reserved
Quilting the Quilt - Which CS Feature To use
E2E Alternating Patterns
The pattern rows have been alternated and the excess on the sides has beentrimmed automatically. The Registration points have been calculated and marked.
Save the project .
4 A. Let's say you don't like it and want to change the pattern. It is easy to tryanother one! Just highlight a different pattern and click Pattern To Boundary icon.
CS automatically adjusted the Registration points and the side edges. The patternstill needs to be adjusted however. Change settings as needed.
60
76

Getting Started with CreativeStudio™146
Notice that the upper edge will leave big gaps - the lower edge will too. To fix this,the total quilt length needs to be adjusted, then the patterns moved up to eliminatethe gap. In this example, the vertical spacing is -2,so the patterns will be moved up 2inches.
Increase the Quilt Length enough to allow the pattern to run off the edges at the topand bottom. Don't worry about the overlap because you can trim that off before
quilting. Group all the patterns together using the Group All icon . Thenmove the group up to close the gap. CS may change the settings, so watch them.
38

Phase 4 - Backgrounds
147
Copyright © 2009 Gammill, Inc. | All Rights Reserved
Quilting the Quilt - Which CS Feature To use
E2E Alternating Patterns
Tip: Shifting the patterns up a little is not a problem but when the
pattern needs to be moved up a lot, it might change the number of
rows that can be quilted in the first section. To avoid this, start a
new E2E quilt group and define the Upper Left and Upper Right
corners as being above the upper edge of the quilt. Increase the quilt
length to accommodate this space.
Before quilting, be sure to define another Trim-Inside boundary at the top of thequilt.
When it looks good, Save the project .
5. Click Quilt The machine moves to the start of the first pattern, takes asingle stitch and prompts you to pull up the bobbin, so do that. Press OK on thekeypad when ready. The first row now begins.
Repeat the steps listed in the previous section to complete the quilt. Be sure to trimthe bottom edge to fit.
Quick Reference E2E
4.4.4 E2E Concatonating Patterns
Edge To Edge patterns can be concatonated giving a very custom look. Thesepatterns must have been designed with identical structures - the same start point,end point, size, proportion and nesting shape - for them to work together.
Feature: Edge to Edge - Concatonating
Assumptions: The machine is threaded, bobbins wound, the belts engaged, andyou have patterns that are designed to work together. The Prep Steps here are alittle different than a standard E2E, but the stitching steps will be the same.
Prep Step #1.) Measure the quilt length and width accurately before loading the quilt.If you are leaving a margin at the top and bottom, be sure to reduce your total quiltlength by this amount. Also it is a good idea to reduce the length a little toaccommodate shrinkage caused by the quilting. This could be from 1% to 5%,depending on the fabrics, batting and quilting density. Prep Step #2) Load the quilt and baste the outer edges.
Steps to follow:
1. Add the patterns. Using the Add Pattern icon, find and select the patterns, adding them to the project. If any pattern needs toappear more than once in the quilting sequence, it needs to be selected more than
133
60
180

Getting Started with CreativeStudio™148
once.
2. Select the patterns in order by holding the control key down, and then clickingon each pattern, in the sequence they are to appear. You will be able to scroll upand down the list of patterns without breaking the sequence. This sequence is veryimportant as you will see.
3. Click the E2E icon. and follow the prompts to define the boundary.
4. Enter the quilt length in the Primary Settings area and CS will display thepatterns.
Here are examples of different combinations of the Ride Into The Sunset patterns.
53

Phase 4 - Backgrounds
149
Copyright © 2009 Gammill, Inc. | All Rights Reserved
Quilting the Quilt - Which CS Feature To use
E2E Concatonating Patterns
Tip: If you don't like the way your patterns look on the screen, you
can change them easily, without having to re-create the E2E quilt
group and boundaries. Just reselect the patterns in a different
sequence, and click on Pattern to Boundary icon. Voila! The new
sequence appears.
Save the project .
Follow the same steps as defined in the previous sections to stitch them. Begin at
60

Getting Started with CreativeStudio™150
Step 5 of Pantographs using Edge-To-Edge. This will guide you through the steps ofquilting each row (and advancing the quilt) until done.
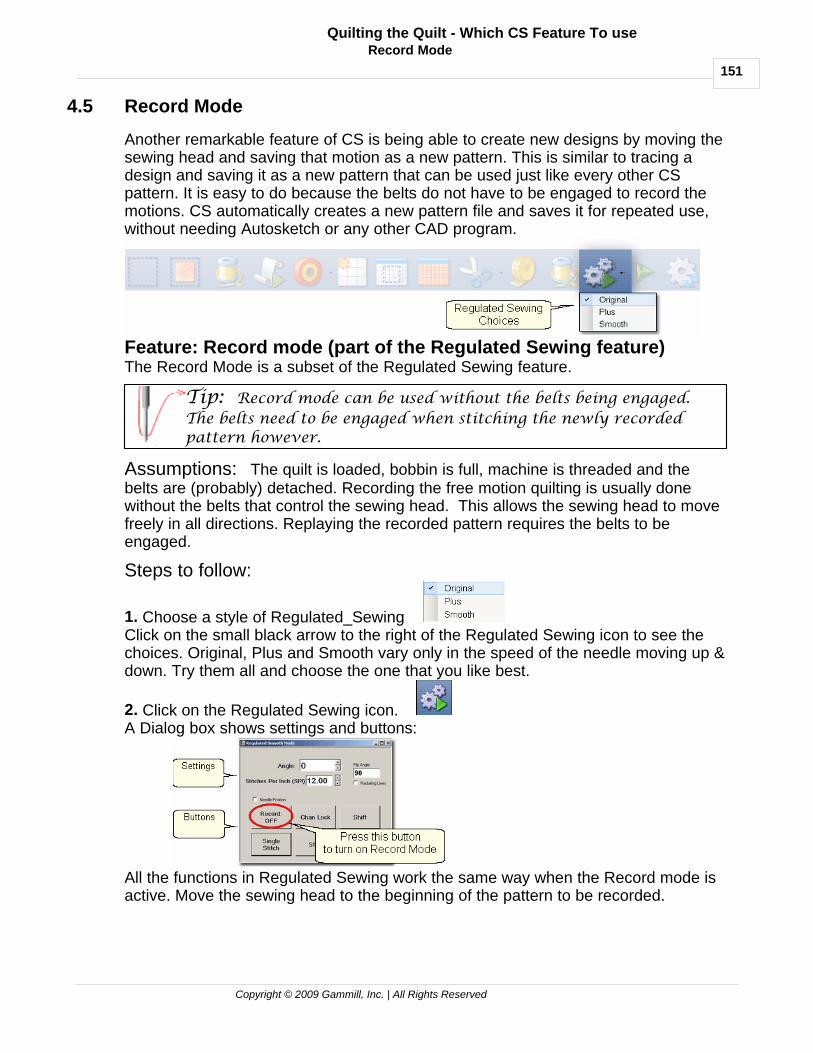
Record Mode
151
Copyright © 2009 Gammill, Inc. | All Rights Reserved
Quilting the Quilt - Which CS Feature To use
4.5 Record Mode
Another remarkable feature of CS is being able to create new designs by moving thesewing head and saving that motion as a new pattern. This is similar to tracing adesign and saving it as a new pattern that can be used just like every other CSpattern. It is easy to do because the belts do not have to be engaged to record themotions. CS automatically creates a new pattern file and saves it for repeated use,without needing Autosketch or any other CAD program.
Feature: Record mode (part of the Regulated Sewing feature)The Record Mode is a subset of the Regulated Sewing feature.
Tip: Record mode can be used without the belts being engaged.
The belts need to be engaged when stitching the newly recorded
pattern however.
Assumptions: The quilt is loaded, bobbin is full, machine is threaded and thebelts are (probably) detached. Recording the free motion quilting is usually donewithout the belts that control the sewing head. This allows the sewing head to movefreely in all directions. Replaying the recorded pattern requires the belts to beengaged.
Steps to follow:
1. Choose a style of Regulated_Sewing Click on the small black arrow to the right of the Regulated Sewing icon to see thechoices. Original, Plus and Smooth vary only in the speed of the needle moving up &down. Try them all and choose the one that you like best.
2. Click on the Regulated Sewing icon. A Dialog box shows settings and buttons:
All the functions in Regulated Sewing work the same way when the Record mode isactive. Move the sewing head to the beginning of the pattern to be recorded.

Getting Started with CreativeStudio™152
Tip: The machine does not need to be stitching to record a pattern.
It is the movement of the stitcher that is being captured, not the
movement of the needle. If stitching while recording is desired, just
press the Start button
3. Press Record to begin.
Move the stitcher to create a new pattern.
Tip: There is a limit of recording for 8 minutes only, so plan
accordingly.
4. Press Record again to end.
CS automatically creates a pattern, gives it a name, and saves it to a special foldercalled C:\Patterns Recorded. The format for the pattern name is:C:\Patterns Recorded\RecordedQLI_yyyyMonddhhss.qliwhere yyyy = the year
Mon = alpha abbreviation of the monthdd = the dayhh = the hourss = the second.qli is the file type needed by CS.
It is a good idea to rename the pattern file if it should be kept for future use.
Quick Reference Record 183

Restart
153
Copyright © 2009 Gammill, Inc. | All Rights Reserved
Quilting the Quilt - Which CS Feature To use
4.6 Restart
Restarts are needed for a variety of reasons: * The thread break sensor stops the machine.* The quilter presses the Stop button.* The machine stops because it hit an obstacle.* Only part of the pattern needs to be quilted. This is 'selective sewing' and is very
useful when only one pattern element is needed. Just define a boundary, move thepattern to the boundary and resize / reposition the pattern so the selected portion ispositioned as desired. Don't press Quilt, press Restart and choose your own restartposition. Press Stop when the selective sewing is done.
Whatever the reason, this feature makes restarting easy.
4.6.1 Thread Break Restarts
Feature: Restart (when a thread break has been detected)
Assumptions: The machine stopped and the thread break was fixed.
Steps to follow :1. To continue quilting, choose the "Auto Restart" option.
Pressing this button moves the machine back to where the break was detected.
2. CS asks if you want to confirm or move the Restart Point.
If the "Auto Restart" point is close, use Back and/or Forward to move the sewinghead 7 stitches at a time until the sewing head is positioned properly. Press Quiltwhen ready, and continue to sew.
3. Because there is a delay between the thread breaking and the sensor stoppingthe machine, the Restart Point probably needs to be moved. Press “PickNewPoint”to release the sewing head so you can move it to a different spot. The new point canbe identified using the stitcher or the computer screen.

Getting Started with CreativeStudio™154
3A. Find the restart point using the sewing head - Move the machine until theneedle is just above the point where you want to continue stitching. Press “Use ThisPt” on the keypad. CS moves to the closest stitch and waits for another response. Ifit looks good, Press Quilt and continue to sew. If not, try again by pressing “UseThis Pt” until the right spot is found.
3B. Find the restart point using the computer screen - Look at the image on thescreen and find the crosshair mark - it is a long, skinny blue plus “+” sign. Zoom inand out using the roller on the mouse. Find the spot on the screen that correspondsto the correct restart point on the quilt, and click that spot with the mouse. The bluecrosshair will move to this location on the screen and the stitcher will move to thatlocation on the quilt.
If it looks good, Press Quilt and continue to sew. If not, try clicking a different pointon the screen until the right spot is found.
Tip: The color of the pattern image on the screen can help you
locate the crosshair. Red means CS thinks that part of the pattern
has been stitched. Black means CS thinks that part of the pattern
needs to be stitched.
4. When ready, press Quilt , and continue to sew.
At the end of the quilting sequence, you will be prompted to pull up the bobbin threadand click OK. It doesn't matter how the bobbin thread is pulled up, secured or

Restart
155
Copyright © 2009 Gammill, Inc. | All Rights Reserved
Quilting the Quilt - Which CS Feature To use
Thread Break Restarts
trimmed. Just be sure to click OK because it completes this process.
Quick Reference Restart
4.6.2 Manual Stops and Restarts
Feature: Restart (when a manual stop occurred). Manual Stops and Restarts are easier to do.
Tip: For people who can hear when the bobbin needs to be
changed, this is very useful. When it sounds like it is time to change
the bobbin, watch the stitching until it gets to a place where knots
will be hidden, and press Stop. The machine stops instantly, and the
sewing head can be moved to the side of the quilt and the bobbin can
be changed. Restart remembers where it stopped and returns to that
spot accurately.
Assumptions: The machine stopped and the reason is resolved.
Steps to follow :1. Press Stop and the Stitcher Control dialog box appears.
Press Stop again to end the stitching completely if needed and use the stitcher tosecure the threads.
2. Click Restart_Quilting when ready to resume quilting. The sewing headgoes back to the spot where it detected the ‘Stop’ command and the "Pick a RestartPoint" box appears.
3. Since this is usually the correct spot, chances are good that you can press Quiltand continue on. * If this is not true, but it is close, use Back and/or Forward to move the sewing
head 7 stitches at a time until the sewing head is positioned properly. Press Quiltwhen ready, and continue to sew.
* If it isn’t close, Press “PickNewPoint” to release the sewing head so you can moveit to a different spot. The "Point Selection" dialog box appears.
184

Getting Started with CreativeStudio™156
3A. Find the restart point using the sewing head - move the machine until theneedle is just above the point where you want to continue stitching. Press “Use ThisPt” on the keypad. CS moves to the closest stitch and waits for another response. Ifit looks good, Press Quilt and continue to sew. If not, try again by pressing “UseThis Pt” until the right spot is found.
3B. Find the restart point using the computer screen - look at the image on thescreen and find the crosshair mark - it is a long, skinny blue plus “+” sign. Zoom inand out using the roller on the mouse. Find the spot on the screen that correspondsto the restart point on the quilt, and click that spot with the mouse. The bluecrosshair will move to this location on the screen and the stitcher will move to thatlocation on the quilt.
4. When ready, press Quilt, and continue to sew.
At the end of the quilting sequence, you will be prompted to pull up the bobbin threadand click OK. It doesn't matter how the bobbin thread is pulled up, secured ortrimmed. Just be sure to click OK because it completes this process.
Quick Reference Restart 184

Utility Functions
157
Copyright © 2009 Gammill, Inc. | All Rights Reserved
Quilting the Quilt - Which CS Feature To use
4.7 Utility Functions
Utility Functions are used in many different techniques. They are very important, butnot used on a regular basis.
4.7.1 Set Defaults
There are many mechanical, electrical, and numeric default settings that arerequired to run CS. The defaults are the initial values that are set every time CSstarts up. Many of these values can be changed as needed during the quiltingsession. Others are considered Restricted Areas and should not be modified withoutthe help and guidance of the Statler Stitcher Technical Support staff. The usercontrolled values are described in the following text.
To find the defaults you can change:
* Click Tools, * Click Technical Support, * Click Controller Definition * User Settable Tab contains your default values.

Getting Started with CreativeStudio™158
The Configuration Form has three tabs; User Settable (sp?), Stitcher Settings (whichcontrols the stitcher) and Galil Settings (which control the motors). DO NOT makechanges to either the Stitcher Settings or the Galil Settings without the guidance ofthe Statler Tech Support Team.
The Stitcher Settings:Left Column contains the following default values–
Speed – This is the default motor speed, in percentage. A value of 50 means 50%of the motor capacity.
P2P Line Speed - This is the default motor speed when using the P2P Linefeature.
SPI – is the initial setting for stitches per inch (SPI) Min SPI – is the minimum stitches per inch allowed by CS. Tieoffs – Check means CS will do tieoff stitches at the beginning and end of each
stitching line. Tieoff Stitches – This is the number of stitches taken by the tieoff feature.Tieoff SPI – This is the size of the stitches taken by the tieoff feature. Margins – This is the default margin size in inches.
Tip: Tie-off stitches will be more secure if the TieSPI is not evenly
divisible by the SPI. This means TieSPI divided by SPI should not be
a whole number. Example:
If SPI = 10, TieSPI should not be 10, 20 or 30. It can be 21, 22, 23 ... 29,
31, 32, etc.
If SPI = 12, Tie SPI should not be 12, 24 or 36. It can be 25, 26, 27... 35,
37, 38, etc.

Utility Functions
159
Copyright © 2009 Gammill, Inc. | All Rights Reserved
Quilting the Quilt - Which CS Feature To use
Set Defaults
Center Column contains defaults using check boxes (check = ON, blank = OFF) Trace – Do Not Change Laser Control – Check means CS controls the laser and will turn it on whenneeded. Auto Laser – Do Not ChangeBobbin Stitch – Check means CS will help bring all the threads to the top of thequilt by stopping at each Start and End, taking a single stitch, and prompting thequilter to pull up the bobbin thread. Unchecking this will make the sewing happennon-stop - dragging the thread as needed. Needle – Check means the needle is ‘on’ and will stitch as expected. Turning theneedle ‘off’ is a great feature if the stitch placement needs to be verified before itis stitched. Thread Break – Check means the thread break sensor is on, and the machine willstop if a thread break is detected. The thread break sensor is a cylinder in the topthread path. The thread wraps around it so when the machine is stitching, thethread is being drawn off the spool/cone, through the tension disks and aroundthe sensor, making the sensor turn. If it stops turning for a few seconds, themachine assumes the thread has broken and it will stop moving. Stitch Points – Check means CS will take an extra stitch in every point of apattern. This produces very sharp, distinct points.View Keypad – Check means an shaded image of the stitcher keypad will bedisplayed on the screen every time CS is started. This box is for convenienceonly, and can be closed at any time.
Tip: Sometimes an empty bobbin will trigger a thread break
message. This is because when the bobbin is empty, the machine can’
t complete a stitch so the top thread stops being drawn off the spool /
cone, the sensor stops turning and the machine will stop.
Right Column contains some defaults that use drop-down boxes to list the choicesfor each default.
Reg Type refers to the stitch regulator when in regulated mode. Reg Smoothing Do Not Change P2P Type – is the default (line or pattern) for the Point To Point feature. Reference Point – is the default position of the reference point used in Repeat
Patterns.
Changes are highlighted on the screen, but they will not change the defaults untilthey are saved.

Getting Started with CreativeStudio™160
To Save Changes, Click on the File tab, and click Save and Close.
If you forget, CS will remind you.
4.7.2 Set Origin
Every time the software is started, CS will ask for an origin point. The origin is ananchor for the system, and all movement is defined relative to that anchor.
Most graphics software uses one of three origin points: Machine origin (somerepeatable, reliable place like an upper corner), absolute origin (a fixed point, like thecenter) and relative origin (which changes by the block or project). PS uses a relativeorigin. CS uses the machine origin. If the origin could not be reset, the CS projectscould not be shared, re-used or restarted.
CS has the ability to set a specific origin point (in this case, the upper right corner)which enables the projects to be repeatable, across machines. This means thatprojects can be created for a whole quilt and the project can be sold / shared toothers, just like a single pattern is sold / shared in PS.
Tip: When setting the origin, not only should you choose a reliable,
repeatable location but you should handle the stitcher the same way
also. This means if you are exerting pressure on the machine to get
it into the corner, you should always exert that same pressure.

Utility Functions
161
Copyright © 2009 Gammill, Inc. | All Rights Reserved
Quilting the Quilt - Which CS Feature To use
Oil Stitcher Routine
4.7.3 Oil Stitcher Routine
This is a special routine that can be part of the weekly cleaning and maintenance. Itruns the sewing head motor at varying speeds backwards so the oil has a chance topenetrate some places that are otherwise hard to reach. New machines and certainclimates may require this to be done more frequently.
The process will take about 7 minutes to complete.
4.7.4 Calibrate Stitcher Motor
Calibrating the stitcher motors guarantees stitching accuracy. This doesn’t need tobe done often but can be performed as needed. It should always be done afterloading new software versions or performing any significant maintenance.
1. Click on Tools
2. Click on Calibrate Stitcher Motor
3. Move the machine head off of the quilt, remove thread and bobbin case asprompted. Click OK when done. The needle will move as if it were stitching. Whendone, a dialog box appears with New Z-Counts. The value given will depend on thecontroller model being used.
4. Click OK to end this procedure and continue stitching.

Part V

163
Copyright © 2009 Gammill, Inc. | All Rights Reserved
Quick Reference Sheets
5 Quick Reference Sheets
5.1 QuickRef Icons
CreativeStudioÔ Quick Start SheetToolbar Icons:
Icon Icon Name & location Icon Description
Tip Created for the documentation only
Precision Stitchpost script
Tips for Precision Stitch Users - denotingthe actions that are different in CS.
BoundaryMain Screen, Icon Bar
Begins the process to define a boundedarea.
Pattern_To_BoundaryMain Screen, Icon Bar
Moves the selected pattern into theselected boundary
Start_QuiltingMain Screen, Icon Bar
Begins the quilting process
Edge_To_Edge_ContinueMain Screen, Icon Bar
Continues the Edge_To_Edge quiltingsequence after the quilt is rolled
Point_To_Point - LinePoint_To_Point – PatternMain Screen, Icon Bar
Begins the P2P quilting process for linesor patterns
Repeat_PatternsMain Screen, Icon Bar
Begins the process for moving multiplecopies of a selected pattern to the previewarea
Border_Corner Main Screen, Icon Bar
Begins the process of moving the cornerpatterns into the border boundary.
Edge_To_Edge Main Screen, Icon Bar
Begins the setup process for doing E2Equilting.
Trim - InsideTrim - Outside Main Screen, Icon Bar
Begins the Trim process for Inside orOutside trims.
Measure Main Screen, Icon Bar
Starts the prompt sequence for using thesewing head to take measurements.
Restart_Quilting Main Screen, Icon Bar
Starts the process of finding the correctrestart point, and restarting the quilting atthat point.

Getting Started with CreativeStudio™164
Regulated_Sewing Main Screen, Icon Bar
Sewing with the stitch regulator (Original,Plus, or Smooth) Channel Lock andRecord Mode are here.
BasteMain Screen, Icon Bar
Basting with the stitch regulator. Channel Lock and Record Mode arehere.
Constant_Sewing Main Screen, Icon Bar
Sewing without the stitch regulator. Channel Lock and Record Mode arehere.
View All Main Screen, Icon Bar
Adjusts the Zoom distance so all patternsare viewable in the preview area.
Group All Patterns Main Screen, Icon Bar
Selects all patterns in the preview area
Quick Reference Icons for Projects:The project content can be changed using the following icons:
Icon Icon Name & location Icon Description
Save (Project)Main Screen, Project InformationBox
Saves the current project
Add Pattern Main Screen, Project InformationBox
Starts the process for addingpatterns
Delete PatternMain Screen, Project InformationBox
Deletes the selected pattern
Check Project Details Main Screen, Project InformationBox
Displays the Project Details dialogbox
Add Quilt GroupMain Screen, Project InformationBox
Creates a new Quilt Group Tab
Remove Quilt GroupMain Screen, Project InformationBox
Removes the current Quilt GroupTab
Copyright © 2009 Gammill, Inc. | All Rights ReservedStatler Stitcher® is a registered trademark of Gammill, Inc. CreativeStudio™ is a trademark of Gammill, Inc

Quick Ref Regulated
165
Copyright © 2009 Gammill, Inc. | All Rights Reserved
Quick Reference Sheets
5.2 Quick Ref Regulated
Feature: Regulated Baste Constant Speed sewingThere are three choices for the regulated stitching process: Original, Plus and Smooth.Constant Speed and Baste have their own icons but the screens and the process of stitchingare the same as Regulated Sewing. Constant Speed runs the stitcher without a stitchregulator.
Baste is essentially a repeated single stitch. The basting stitch is a long stitch and is usuallytemporary. It is the most common technique used around the outer edges. The hopping footactually applies less pressure than normal which prevents the fabric from being pushed andstretched. Stitch Length for basting begins with a 'B' and instead of the stitch size beingmeasured in SPI (Stitches Per Inch), it is measured in IPS (Inches Per Stitch). With minorexceptions, the screens for Baste and Constant Speed are the same as Regulated, whichare explained here.
Steps to follow:1. Choose a style of sewing. Click on the small black arrow to the right of the Regulated Sewing icon to see the choices.Original, Plus and Smooth vary only in the speed of the needle moving up & down. 2. Click on the Regulated Sewing icon. A Dialog box shows settings and buttons.
Regulated and Constant Speed Settings:Angle:This is the current angle that will be used when Channel Lock is turned on. Stitches Per Inch - Change with up/down arrows or use mouse & keyboard. Flip Angle: If Radiating Lines is not checked, this angle can replace the current angle.To flip
the angle, press and hold the shift button on the keypad, and press the Chan Lockbutton. To flip it back again, repeat the 2-button sequence.
Radiating Lines - When checked, CS increases the current angle by the number of degreesshown in Flip Angle. To increase the current angle, press and hold the Shift Button onthe keypad, and press the Chan Lock Button. Repeat this to increase it again.
Needle Position - If checked, the sewing head works like the 'Plus' machines, allowing a halfstitch to be taken instead of a full single stitch. Press the button once and the needlegoes down & stays there. Press it again to bring the needle back up. If it is down whenstitching starts, it will go back down when it stops.
Buttons:Record Off means the motions are not being recorded,Chan Lock (on/ off) locks the sewing head so it stitches a straight line at one angle. Shift - Press this once and additional keypad functions appear & stay for a couple seconds.
This is for reference only - each blue button requires a 2-button sequence.Single Stitch - press this to take a full single stitch. If the Needle Position box is checked,
this button is labeled 'Needle Position', and pressing it takes a half stitch.

Getting Started with CreativeStudio™166
Start - starts the stitching process, and STOP ends it.
Additional Functions: These functions (light blue buttons) are initiated by using a 2-buttonsequence; press and hold the Shift button and then press the second button.
Flip Chan Lock - Changes the current angle.* If Radiating Lines is not checked, this will change the current angle to whatever the Flip
Angle is set at. To flip the angle, press and hold the shift button on the keypad, andpress the Chan Lock button. To flip it back again, repeat the 2-button sequence.
* If Radiating Lines is checked, CS increases the current angle by the number of degreesshown in Flip Angle. To increase the angle, press and hold the shift button on thekeypad, and press the Chan Lock button. Repeat to increase it again. It will go up to 90degrees and return back to 0 degrees.
Shift - used to display additional functions (light blue buttons) and to execute them. Change to Need Pos - is used to 'check' (or choose) the Needle Position option, making the
Lower Left button change to 'Needle Position'. Press and hold the Shift button andpress Change To Need Pos button. Repeat the 2-button sequence to return to SingleStitch.
Start - starts the stitching process, and STOP ends it. Exit - To exit regulated mode, press and hold the Shift button and press the Exit button.
Using the mouse & screen works too.
3. Press Start on keypad when ready to sew and Stop on keypad to stop. Dark blue buttonsmean the stitcher is running. Notice that the two buttons on the left have changed inmeaning.
Inc SPI means Increase the Stitches per Inch. Dec SPI is decrease stitches per inch.
4. Press Shift and Exit on keypad when ready to exit regulated mode.
Copyright © 2009 Gammill, Inc. | All Rights ReservedStatler Stitcher® is a registered trademark of Gammill, Inc. CreativeStudio™ is a trademark of Gammill, Inc

Quick Ref P2P Line
167
Copyright © 2009 Gammill, Inc. | All Rights Reserved
Quick Reference Sheets
5.3 Quick Ref P2P Line
Feature: Point To Point - LinePoint to point describes a CS process where a series of connected line segments arepositioned and stitched. The quilter clicks the points and CS stitches a perfect line betweeneach contiguous pair. Each ‘point’ is identified by moving the sewing head to each point (inorder) and pressing the OK button.
Steps to follow: 1. Choose P2P-Line - (Click on the black arrow to the right of the icon). 2. Click on the P2P icon - A dialog box appears with options:
Settings:Angle:This is the current angle that will be used when the Channel Lock is turned on. Flip Angle: If array mode is not checked, this angle will replace the current angle. To flip the
angle, press and hold the shift button on the keypad, and press the Chan Lock button.To flip it back again, repeat the 2-button sequence.
Array Mode - when checked, CS can increase the current angle by the number of degreesshown in the Flip Angle. To increase the current angle, press and hold the shift button onthe keypad, and press the Chan Lock button. Repeat this to increase it again.
Buttons:Chan Lock - locks the head so it stitches along one fixed angle. Shift: Press this AND Chan Lock to Flip (or increase in array mode) the current lock angle.OK (either button) selects the point, based on the position of the needle.Stop indicates the end of the P2P-pattern sequence.
3. Press OK to define the path. Move the machine head from one point to the next, clickingOK on each one. The machine makes a 'boink' noise every time the OK button ispressed. This sound confirms that the point has been registered. The image appears inthe preview area of the screen.
4. Press 'Stop' to complete the line segments. The images appear in the preview area.Check it before stitching.
5. Click on Start_Quilting and the sewing head will move to the Start of the pattern. CS

Getting Started with CreativeStudio™168
will prompt for pulling up the bobbin thread. Press OK when ready to quilt. At the end ofthe quilting sequence you will be prompted to pull up the bobbin thread and click OK. Besure to click OK because it completes this process.
Copyright © 2009 Gammill, Inc. | All Rights ReservedStatler Stitcher® is a registered trademark of Gammill, Inc. CreativeStudio™ is a trademark of Gammill, Inc

Quick Ref P2P Pattern
169
Copyright © 2009 Gammill, Inc. | All Rights Reserved
Quick Reference Sheets
5.4 Quick Ref P2P Pattern
Feature: Point To Point - PatternPoint to point describes a CS process where a series of patterns are positioned andstitched. The quilter clicks the points and CS stitches a pattern between each contiguouspair. Each ‘point’ is identified by moving the sewing head to a spot on the quilt top (in order)and pressing the OK button.
Prep Step #1 - Optional - Define boundaries to check the P2P placement.
Prep Step #2. Choose a pattern. P2P patterns must stitch from left to right.
Prep Step #3. Change pattern details if needed. Be aware of the pattern size, proportionand any margins. Use the Preview area to audition pattern size and placement if desired.
Prep Step #4. Plan the 'Point Layout' before beginning. Most patterns look the best whenthey maintain their original proportion (Freeze aspect= On), but this means you need to haveP2P intervals that also allow the pattern to fill the space.
Steps to follow: 1. Choose P2P-Pattern - This is one of the style choices.
2. Click on the P2P icon - A dialog box appears with options:
Settings:Angle, Flip Angle and Array Mode - are available but not required.
Buttons:Chan Lock - locks the head so it stitches along one fixed angle. Shift: Press this AND Chan Lock to Flip (or increase in array mode) the current lock angle.OK (either button) selects the point, based on the position of the needle.Stop indicates the end of the P2P-pattern sequence.
3. Define the path. Move the machine head from one point to the next, clicking OK on eachone. The machine makes a 'boink' noise every time the OK button is pressed. Thissound confirms that the point has been registered. The image appears in the previewarea of the screen.
4. Press 'Stop' to complete the path. The images appear in the preview area. Check itbefore stitching.

Getting Started with CreativeStudio™170
5. Click on Start_Quilting and the sewing head moves to the Start of the pattern and CSprompts for the bobbin pull-up. Press OK when ready to quilt. At the end of the quiltingsequence you will be prompted to pull up the bobbin thread and click OK. Be sure toclick OK because it completes this process.
Copyright © 2009 Gammill, Inc. | All Rights ReservedStatler Stitcher® is a registered trademark of Gammill, Inc. CreativeStudio™ is a trademark of Gammill, Inc

Quick Ref Single Block
171
Copyright © 2009 Gammill, Inc. | All Rights Reserved
Quick Reference Sheets
5.5 Quick Ref Single Block
Feature: Single Block (using Boundary and Pattern_to_Boundary features)
Step 1: Define the Boundary Boundaries are used in many of the CS techniques. They might be required by a technique(such as defining the quilting surface of an E2E design) or used as a convenient referencefor guiding the placement of patterns. Either way, they synchronize the quilt top with thescreen image. * Click on the Boundary icon to begin defining the boundary. CS will prompt for points thatdefine the area.
About boundaries:* A bounded area must have at least 3 points (a triangle) and can have hundreds. * The first point is considered the anchor. The lower left corner of the pattern will always be
aligned to the first point clicked. * The first two points define the baseline which determines the pattern rotation. * Pressing Stop completes the boundary. CS will connect the first and last points, enclosing
the area. * Choose the baseline and always click the points in a counter clockwise direction. Patterns
are aligned to the baseline as shown: * Once a boundary is defined, it can not be changed. It can however be deleted and a new
boundary defined. * To delete a boundary, first select it, then press the Delete key on the keyboard.
Step 2: Move Patterns into Boundary * Click on a boundary to select it. (It turns red). * Click on a pattern to select it. (it turns blue) * Click on the Pattern_To_Boundary icon to move the pattern in. The pattern is moved intothe bounded area and resized to fit.
When a pattern is moved into a boundary, it will be aligned to the baseline so if it slopes up(or down) the pattern will be rotated accordingly. The slope is displayed in the SelectedPattern Rotation field of the details.* The Preview area is focused on the pattern most recently used. To see all patterns andboundaries, click View All icon.

Getting Started with CreativeStudio™172
Step 3. Click on Start_Quilting and the sewing head will move to the Start of the pattern.CS will prompt for pulling up the bobbin thread. Press OK when ready to quilt. At theend of the quilting sequence you will be prompted to pull up the bobbin thread and clickOK. Be sure to click OK because it completes this process.
Copyright © 2009 Gammill, Inc. | All Rights ReservedStatler Stitcher® is a registered trademark of Gammill, Inc. CreativeStudio™ is a trademark of Gammill, Inc

Quick Ref Composite Blocks
173
Copyright © 2009 Gammill, Inc. | All Rights Reserved
Quick Reference Sheets
5.6 Quick Ref Composite Blocks
Composite patterns can be created for a custom look, a large block or to fit anunusual space. The Right Click Editing options enable us to modify individualpatterns to create that special look. Select multiple patterns or a single pattern, andright click it to see:
Reposition Options - * Rotate 90 degrees - rotates the pattern counterclockwise 90 degrees. * Flip Horizontally - turns the pattern sideways. * Flip Vertically - turns the pattern upside down.* Delete removes the pattern from the preview area.
Sewing Status - * Toggle Pattern Sewn (or Toggle Group Sewn) means it won't stitch out again. * Toggle Pattern Unsers (or toggle group unsewn) means it will stitch again.
Combine Group - will group together all the selected patterns, and treat them like asingle pattern for the duration of your project, with no Bobbin Pull-up promptbetween them.Be sure to select the patterns in their proper stitching order. Once thepatterns are grouped, they can not be un-grouped without using the Undo command(which will undo everything you have changed, not just grouping the patterns).
Rubber Stamp - is a way to make an exact copy an existing pattern or group ofpatterns. When there are several patterns selected, CS will create a group patternfirst, and then make a copy of the group, and tag it as being unsewn. Once severalpatterns are grouped together, there is no Bobbin Pull-up prompt between them andthey stay grouped for the entire project.

Getting Started with CreativeStudio™174
Circular Array - is a way to make a new circular pattern by repeating and rotating asingle pattern. CS only needs to know which pattern to use, how many repeats areneeded, how many degrees between each repeat and where the center should beplaced.
Here are some examples:
Copyright © 2009 Gammill, Inc. | All Rights ReservedStatler Stitcher® is a registered trademark of Gammill, Inc. CreativeStudio™ is a trademark of Gammill, Inc

Quick Ref Text Blocks
175
Copyright © 2009 Gammill, Inc. | All Rights Reserved
Quick Reference Sheets
5.7 Quick Ref Text Blocks
Feature: Creating Text Blocks
Steps to follow:
1. Right Click in an open area of the preview area. It is a good idea to have createda reference boundary so you can size the text to fit the space on the quilt. In ourexample, we are using the top border.
2. Click on 'Text Property' in the dialog box that appears.
3. Click in the text box and type your message. The text box looks small, but willhandle long phrases. Remember that CS will treat each phrase as a pattern, so ifyour phrase needs two (or more) lines, you need to create 2 (or more) text patterns.
4. Click on 'Place Text' when done, and the Font dialog box appears.
5. Choose the font style you like. Preview styles in the 'Sample' box. Choose anyfont size because you will need to modify it to fit your boundary anyway.
6. Click 'OK', the text pattern is positioned. Resize as needed.
7. Save the Project.
8. Click on Start_Quilting and the sewing head will move to the Start of thefirst letter. CS stitches all letters continuously, dragging the thread between them,and only stops for the bobbin pull-up at the end of the phrase pattern. Remember toclick OK because it completes this process.
Copyright © 2009 Gammill, Inc. | All Rights ReservedStatler Stitcher® is a registered trademark of Gammill, Inc. CreativeStudio™ is a trademark of Gammill, Inc
60
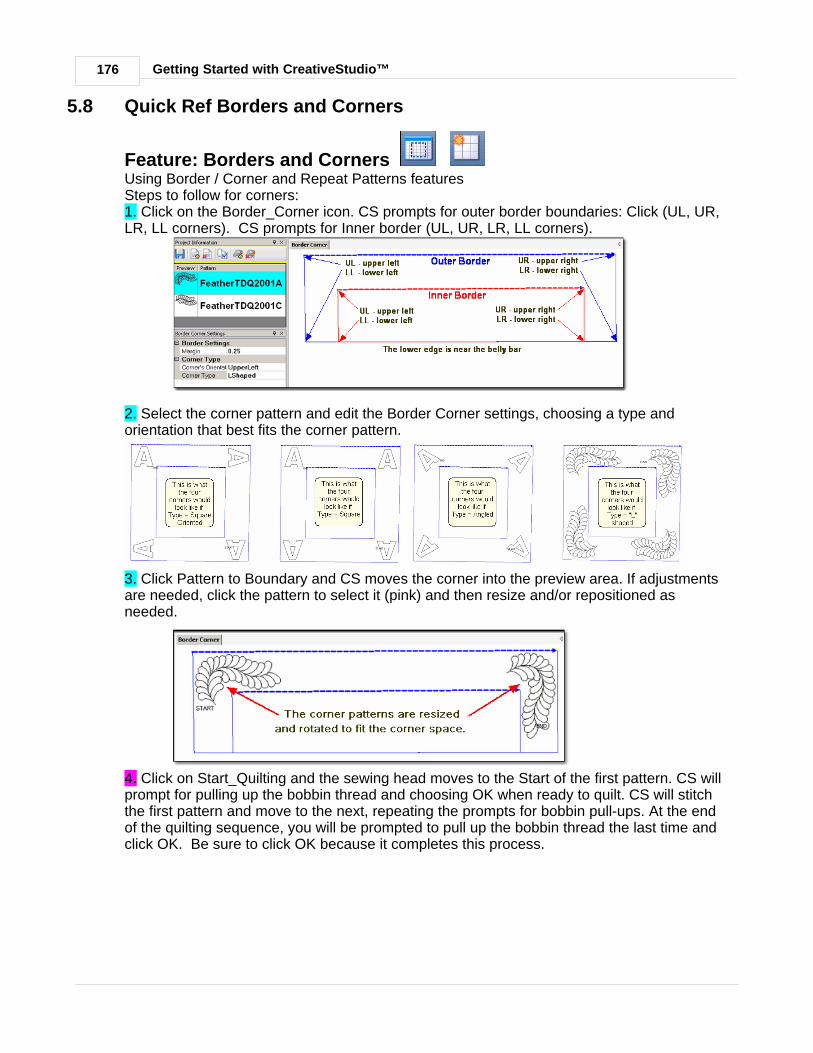
Getting Started with CreativeStudio™176
5.8 Quick Ref Borders and Corners
Feature: Borders and Corners
Using Border / Corner and Repeat Patterns featuresSteps to follow for corners:1. Click on the Border_Corner icon. CS prompts for outer border boundaries: Click (UL, UR,LR, LL corners). CS prompts for Inner border (UL, UR, LR, LL corners).
2. Select the corner pattern and edit the Border Corner settings, choosing a type andorientation that best fits the corner pattern.
3. Click Pattern to Boundary and CS moves the corner into the preview area. If adjustmentsare needed, click the pattern to select it (pink) and then resize and/or repositioned asneeded.
4. Click on Start_Quilting and the sewing head moves to the Start of the first pattern. CS willprompt for pulling up the bobbin thread and choosing OK when ready to quilt. CS will stitchthe first pattern and move to the next, repeating the prompts for bobbin pull-ups. At the endof the quilting sequence, you will be prompted to pull up the bobbin thread the last time andclick OK. Be sure to click OK because it completes this process.

Quick Ref Borders and Corners
177
Copyright © 2009 Gammill, Inc. | All Rights Reserved
Quick Reference Sheets
Feature: Borders (Repeat Pattern) Steps to follow for borders:1. Measure the top border height first and determine the height of the pattern. (Maximumborder size less margins).
2. Measure the top border width next, using the border seamline as the baseline. Be sure tomeasure in the direction you will be stitching because the measure process will alsodetermine the square-up angle of the border. Write down these numbers on the diagram foruse later.
3. Boundaries are optional but very helpful because they will show (in the preview area) anycurvature in the seamlines. Reference boundaries can also trace the edge of a pattern sothe border pattern can be positioned precisely around the corners.
4. Click on the pattern to be used. This highlights it (blue) in the Project Info area.
5. Click on Repeat Patterns icon, edit the pattern details, and choose a Reference point.Move the machine head to that reference point and press OK to set it. CS moves thepattern(s) to the area anchored by the reference point.
6. Edit the size and repeats using the Pattern Details or Repeat Setting Details first. Whendone, Save the project.
7. Make final adjustments in the preview area last. When done, Save the project.
8. Click on Start_Quilting, CS moves the sewing head & prompts for bobbin pull-up. PressOK when ready to quilt and OK again at the end of the quilting as prompted because thiscompletes the process.
Copyright © 2009 Gammill, Inc. | All Rights ReservedStatler Stitcher® is a registered trademark of Gammill, Inc. CreativeStudio™ is a trademark of Gammill, Inc

Getting Started with CreativeStudio™178
5.9 Quick Ref Trim Inside
Feature: Trim Pattern - Inside Steps to follow:
1. Click on the Boundary icon and follow the prompts to define the boundary of thebackground area. If the project were to fill the background of an appliqued block, this wouldbe the outer edges of the block.
2. Move the background filler pattern in.
Use Pattern_to_Boundary or Repeat Patterns depending on how manyrepeats are needed to fill the area. This example shows repeat patterns, nested vertically by-.5". There is a gap on one side border and an overlap on the other which need to beadjusted.
3. . Group the patterns together before adjusting the size and position. If the pattern doesn'tfit exactly, let it extend past the outer boundary, and trim the excess.
4. Choose Trim Inside and Click on the Trim icon. CS will prompt for a boundary. Useas many points as needed to define the boundary of the applique.
5. Click Stop when done and CS will erase everything inside the boundary, leaving the fillerpattern in the background. Save the project often. Continue with additional Trims asneeded.
6. Click on Start_Quilting and CS moves the sewing head to the start of the pattern andprompts for pulling up the bobbin thread. Click OK when ready to quilt. If multiple patternswere moved into the boundary, they will stitch in the order they were moved. Click OK at theend of the quilting as prompted.
Copyright © 2009 Gammill, Inc. | All Rights ReservedStatler Stitcher® is a registered trademark of Gammill, Inc. CreativeStudio™ is a trademark of Gammill, Inc
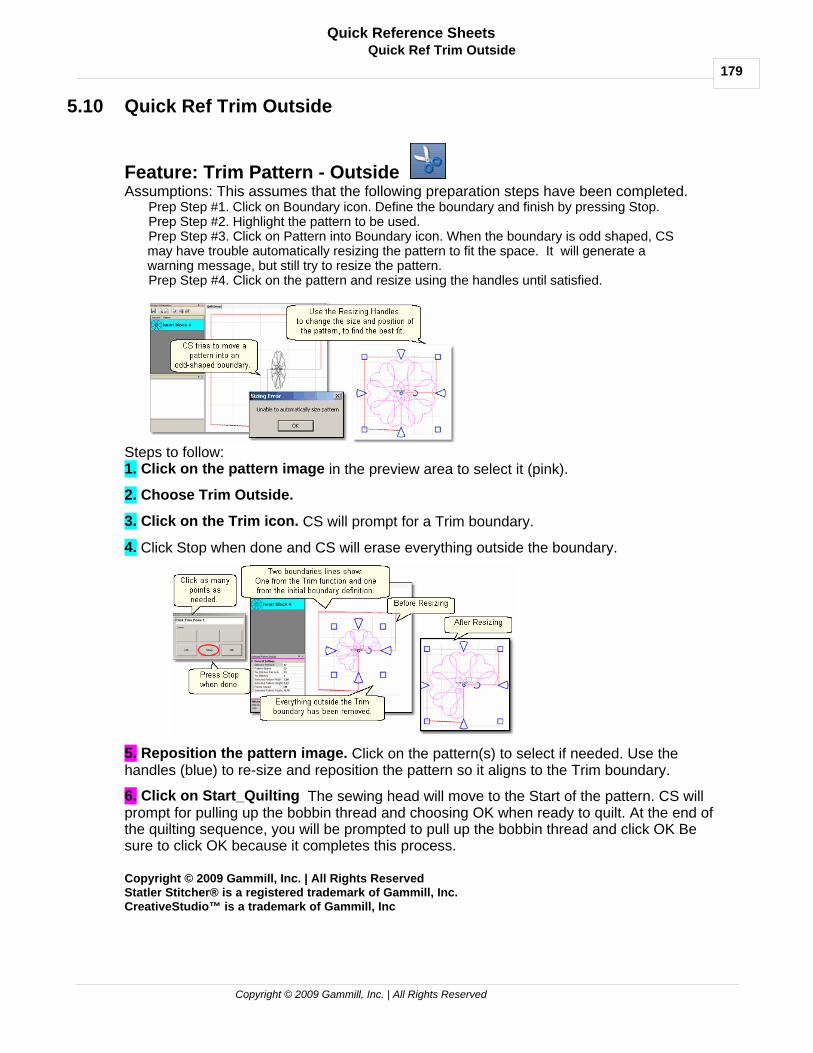
Quick Ref Trim Outside
179
Copyright © 2009 Gammill, Inc. | All Rights Reserved
Quick Reference Sheets
5.10 Quick Ref Trim Outside
Feature: Trim Pattern - Outside Assumptions: This assumes that the following preparation steps have been completed.
Prep Step #1. Click on Boundary icon. Define the boundary and finish by pressing Stop.Prep Step #2. Highlight the pattern to be used.Prep Step #3. Click on Pattern into Boundary icon. When the boundary is odd shaped, CSmay have trouble automatically resizing the pattern to fit the space. It will generate awarning message, but still try to resize the pattern. Prep Step #4. Click on the pattern and resize using the handles until satisfied.
Steps to follow: 1. Click on the pattern image in the preview area to select it (pink).
2. Choose Trim Outside.
3. Click on the Trim icon. CS will prompt for a Trim boundary.
4. Click Stop when done and CS will erase everything outside the boundary.
5. Reposition the pattern image. Click on the pattern(s) to select if needed. Use thehandles (blue) to re-size and reposition the pattern so it aligns to the Trim boundary.
6. Click on Start_Quilting The sewing head will move to the Start of the pattern. CS willprompt for pulling up the bobbin thread and choosing OK when ready to quilt. At the end ofthe quilting sequence, you will be prompted to pull up the bobbin thread and click OK Besure to click OK because it completes this process.
Copyright © 2009 Gammill, Inc. | All Rights ReservedStatler Stitcher® is a registered trademark of Gammill, Inc. CreativeStudio™ is a trademark of Gammill, Inc

Getting Started with CreativeStudio™180
5.11 Quick Ref Edge To Edge
Feature: Edge to Edge (E2E) Assumptions:
Prep Step #1.) Measure the quilt length and width accurately before loading the quilt. If youneed to stitch off the edge of the quilt, increase your total quilt length. If you are leaving amargin at the top and bottom, be sure to reduce your total quilt length by this amount. Also itis a good idea to reduce the length a little to accommodate shrinkage caused by the quilting.This could be from 1% to 5%, depending on the fabrics, batting and quilting density. Prep Step #2) Load the quilt and baste the outer edges. Prep Step #3) Choose a pattern and think about the scale. Large scale, open quilting resultsin a more supple quilt and small scale, dense quilting is a bit stiffer. Prep Step #4) Change the pattern details (height and width) to reflect the scale you prefer.
Steps to follow:1. Click the E2E icon. CS prompts you to click the four corners of the first boundary.
2. Enter the quilt length (adjusted if needed) in the Primary Settings area.
CS measured the width in step 1, and gets the length from the Primary Settings. It now hasenough information to automatically calculate the number of repeats and rows required. Thisis just a suggestion! All settings can be changed in Setup mode (but not in Edit mode).
3. Check the E2E Setup Details:Size Settings:* Pattern Width and Pattern Height may be different from what you started with.* Repeats and Rows have been set but can be changed if you do it in the setup mode.* Spacing refers to the amount of space between patterns, both horizontally and vertically.
Adjust these numbers if needed to add or remove space between patterns, especiallybetween the rows.
Variable Settings: * Select Between Blocks use Connect Start And End for pantographs * Select Alternating type – allows staggered rows.* Select Registration Place Two Pins is the default (& method shown nere) * Maintain Aspect is similar to freeze aspect.
4. Look at the image in the preview area. WYSIWYQ - What you see is what you quilt, so

Quick Ref Edge To Edge
181
Copyright © 2009 Gammill, Inc. | All Rights Reserved
Quick Reference Sheets
if you don’t like it, change it now.
The top edge is the baseline which is used to square up the patterns. The pattern in theexample has irregular edges which make it nest nicely. However, the pattern will stitch off ofthe edge when positioned to eliminate the side gaps. The Trim-Inside function can be usedto trim off the excess - just make sure to include the extra space in the "Quilt Length"dimension . When it looks good, Save the project.
5. Click Quilt The machine moves to the start of the first pattern, takes a single stitchand prompts you to pull up the bobbin, so do that. Press OK on the keypad when ready. Thefirst row now begins.
6. At the end of the row, CS stops and prompts you to cut the bobbin thread. Itdoesn't matter how the bobbin thread is pulled up, secured or trimmed. Just be sureto click OK because it completes this process.
6A. IF you have room for another row the machine will move to thebeginning of the next row, take a stitch, prompt for Bobbin pull-up and clickOK to quilt the next row. Repeat these steps until all the rows for the currentsection are complete.
7. When CS finishes the last row that fits, you will be prompted to cut the bobbinthread and mark the two registration points. Here is what will happen:
* CS finishes the last row that will fit, prompts you to cut the bobbin thread, andClock OK to complete the end-of-row process. * CS prompts you to click OK when ready to mark the Right registration point. ClickOK and the stitcher moves to the first registration point. Place a pin in RegistrationPoint #1 (where the needle would enter the fabric). * CS prompts you to click OK when ready to mark the Left registration point. ClickOK and the stitcher moves to the second registration point. Place a pin inRegistration Point #2 (where the needle would enter the fabric). Click OK tocomplete the process.
Save the project .
8. Roll the quilt (baste the sides, check the bobbin, etc.) Now finish the quilt by using the Feature: Edge To Edge Continue.
60

Getting Started with CreativeStudio™182
Feature: Edge To Edge - Continue Assumptions: The first section (or more) is done, the registration points have been markedand the quilt has been rolled. 9. Click EdgeToEdge_Continue 10. Mark the boundary as prompted: CS prompts for left registration mark and rightregistration mark, 11. Check the screen and adjust if needed. 12. Click Quilt. The first row of the new section now begins.
At the end of the row, CS stops, prompts for bobbin pull-up, Click OK. Repeat each row until the entire current section is done.
CS will again prompt for marking registration points. Roll the quilt.Repeat steps 9 - 12 until the last section - when bottom edge of the quilt
makes its way up to the current quiltable space.
13. Last Section adjustments are often necessary so the last time you roll the quilt,the prompts are a little different.
Save the project .
14. Click Quilt The machine moves to the start of the pattern, takes asingle stitch and prompts you to pull up the bobbin, so do that. Press OK on thekeypad when ready. The first row of the new section now begins.
15. At the end of the last row, CS stops and prompts you to cut the bobbin threadand click OK.
Copyright © 2009 Gammill, Inc. | All Rights ReservedStatler Stitcher® is a registered trademark of Gammill, Inc. CreativeStudio™ is a trademark of Gammill, Inc
60

Quick Ref Record
183
Copyright © 2009 Gammill, Inc. | All Rights Reserved
Quick Reference Sheets
5.12 Quick Ref Record
Feature: Record mode (using Regulated Sewing feature)The Record Mode is a subset of the Regulated Sewing feature. All the functions inRegulated Sewing work the same way when the Record mode is active. Recording ispossible without the belts being engaged. The belts need to be engaged when stitching thenewly recorded pattern however.
Steps to follow:1. Choose a style of Regulated_Sewing
2. Click on the Regulated Sewing icon. Move the sewing head to the beginning of thepattern to be recorded.
3. Press Record to begin. Move the stitcher to create a new pattern.
4. Press Record again to end. CS automatically creates a pattern, gives it a name, andsaves it to a special folder; C:\Patterns Recorded\RecordedQLI_yyyyMondd_hhmmss.qli.
Record the design multiple times if needed. Choose the best and delete the rest. It is agood idea to rename the chosen pattern file if it will be kept for future use.
Copyright © 2009 Gammill, Inc. | All Rights ReservedStatler Stitcher® is a registered trademark of Gammill, Inc. CreativeStudio™ is a trademark of Gammill, Inc

Getting Started with CreativeStudio™184
5.13 Quick Ref Restart
Feature: Restart
Restarts are needed for a variety of reasons. Either the thread break sensor stops themachine or the machine is stopped by the quilter or an obstacle.
1A. Thread Break: If the machine stopped because it detected a thread break, the pop-upbox offers an 'Auto Restart' option, so press that button. The machine head moves towhere CS detected the thread break.
1B. Manual Stop: If the machine was stopped for any other reason, click the RestartQuilting Icon. The sewing head goes back to the spot where it detected the ‘Stop’command.
2. CS asks if you want to confirm or move the Restart Point. If the stitcher is close to theright spot, use Back and/or Forward to move the sewing head 7 stitches at a time until thesewing head is positioned properly. Press Quilt when ready, and continue to sew.
3. Because there is a delay between the thread breaking and the sensor stopping themachine, the Restart Point probably needs to be moved. Press “PickNewPoint” to releasethe sewing head so you can move it to a different spot. The new point can be identifiedusing the stitcher or the computer screen.
3A. To find the restart point using the sewing head - move the machine until the needle isjust above the point where you want to continue stitching. Press “Use This Pt” on thekeypad. CS moves to the closest stitch and waits for another response. If it looks good,Press Quilt and continue to sew. If not, try again by pressing “Use This Pt” until the rightspot is found.
3B. To find the restart point using the computer screen - look at the image on the screenand find the crosshair mark - it is a long, skinny blue plus “+” sign. Zoom in and out using theroller on the mouse. Find the spot on the screen that corresponds to the restart point on thequilt, and click that spot with the mouse. The blue crosshair will move to this location on thescreen and the stitcher will move to that location on the quilt.
4. When ready, press Quilt, and continue to sew.
Copyright © 2009 Gammill, Inc. | All Rights ReservedStatler Stitcher® is a registered trademark of Gammill, Inc. CreativeStudio™ is a trademark of Gammill, Inc

Index 185
Copyright © 2009 Gammill, Inc. | All Rights Reserved
Index- A -Active Screen 56
Add Pattern Icon 40, 68
Add Quilt Group 62
Add Quilt Group Icon 40
Adjust Pattern 67, 68
Adjusting patterns 76
Adjustments 136, 143
Angle rotation 68
Applique background 133
Auto Restart 153
- B -Back 7 stitches 153, 155
Background fill pattern 133
Background fillers 133
Backgrounds 133
Baseline 68, 136, 143
Basting 84
Belts
Disengaged belts 151
Engaged Belts 151
Belts disengaged 87
Black pattern image 153, 155
Bobbin (pull up on keypad) 54
Bobbin Pullup 136, 143
Bobbin refill 155
Border Corner Icon 35, 112, 121, 124
Border Corner settings 50, 112
Border Settings
Margin 50
Borders
Butted corners 111
Custom Corners 111
Mitered corners 111
Square corners 111
Boundary Icon 35, 68, 95, 133
Boundary points
Left registration mark 136, 143
Lower Left Corner of E2E 136, 143
Lower Right Corner of E2E 136, 143
Right registration mark 136, 143
Butted borders 115
Buttons
Channel lock 91
OK 91
Shift 91
Stop 91
- C -Cables 10
CAD screen 41
Preview Area 12
Calibrate Stitcher Motor 30
Change Pattern details 67, 68
Channel lock 87
Check measurements 126
Check Project Properties icon 40
Choose a Pattern 67, 68
Chunking 126
Click counterclockwise 68
Click sound 91
Closing the Info Box 40
Command Bar 28, 157, 160, 161
Commands 28
Dropdown box 28
Composite patterns 105
Computer CPU 10
Computer Equipment 10
Computer files
Disk Drive 17
File Folder 17
Path 17
Computer Skills 17
Connect Start and End 136, 143
Constant Speed Icon 35
Continuous Curves 64
Continuous line designs 64, 111
Continuous Line Patterns 64
Continuous Patterns
Border 65
Border to Border 65
Corners 65
Edge to Edge 65
Pantograph 65
Sashing 65
Specialty 65
Controller 161
Mod 10
Power Switches - red and green 10

186 Getting Started with CreativeStudio™
Controller Definition 157
Controller Serial numbers 32
Copy files 23
Corner orientation 50, 112
Corner patterns 121
Corner type
Angled corner 112
Corner Orientation 50
Corner Type 50
L shaped 112
Square corner 112
Square oriented corner 112
Corners 111
Corners first 126
Creating custom patterns 105
Current operation 56
Current Session settings 54
Custom borders 126
Custom Corners 124
Customer Section 43
- D -Dec Speed button 54
Default settings 43, 54
Define a Boundary 67, 68
Define boundary 68
Defining the boundary points 95
Delete All Patterns Icon 35
Delete boundary 68
Delete Pattern Icon 40
Dense quilting 133, 136, 143
Details 30
Diagonal lines 68
Diagram the borders 112, 115, 118, 121, 124, 126
Dialog Box
Dropdown box 12
Popup box 12
Dink 76
Directional patterns 118, 126
Docking the Info Box 40
Doink 76
Dongle 10
dongle serial number 32
Download files 23
Drill Down 17
- E -E2E 133, 136, 143
E2E Alternating Minus 136, 143
E2E Alternating Plus 136, 143
E2E Continue Icon 136, 143
E2E Setup 50
Edge To Edge 133
Edge To Edge Continue Icon 35
Edge To Edge Icon 35, 136, 143
Edit Command
Redo 29
Undo 29
Edit framed in magenta 67, 68
Edit mode 76
Encrypted patterns 60
Encrypted projects 60
encrypting patterns 32
Endpoint 136, 143
Equipment 10
Error messages 56
Exit measure function 68
Exit Pattern Selection 68
Exit Regulated Sewing 87
Exit Setup Mode 98
Explore 17
Explore function 17
- F -File 17
File Command
New Project 29
Open Project 29
Save Project 29
File Extension
.doc 17
.dxf 17
.pat 17
.proj 60
.projx 60
.qli 17
.rtf 17
.skf 17
.txt 17
File Cabinet 17
File Drawer 17

Index 187
Copyright © 2009 Gammill, Inc. | All Rights Reserved
File Extension
File Extension 17
File name 17
File naming convention 29
File path 60
File Structure 17
Fill in corners 105
First 2 points baseline 68
First point anchor 68
Flip patterns Horizontally 118
Flip patterns Vertically 118
Folder 17
Forward 7 stitches 153, 155
Freeze Aspect 46, 50, 66, 98, 115, 118, 121, 124,128
- G -Galil Settings 157
General Pattern Settings
Freeze Aspect 46, 48, 68
Margin 46, 68
Pattern Height 46, 68
Pattern Width 46, 68
Selected Pattern Height 48, 68
Selected Pattern Rotation 48, 68
Selected Pattern Width 48, 68
General Stitcher Settings
Pattern Name 46, 68
Pattern Speed 46, 48, 68
Stitches Per Inch 46, 48, 68
Tie Stitches 46, 48, 68
Tie Stitches Per Inch 46, 48, 68
Group All Patterns Icon 35
Group border patterns 118
Group Pattern Icon 133
- H -Hand-guided 87
Handle buttons 54
Help command
About Help 32
Contents Help 32
Index Help 32
Search help 32
Help Icon 35
Hopping foot 87
Hovering 35
- I -Icons 17, 35
Inc Speed button 54
Individual Pattern Rotation 50, 98
Individual patterns 128
Inherited Settings
Level 0 control 54
Level 1 Defaults 54
Level 2 Current Session 54
Level 3 Current Project 54
Level 4 Current Pattern 54
Level 5 Selected Pattern 54
Inner Border boundary 112
Irregular boundaries 102
- K -Key Combinations 16
Keyboard 10, 14
Control Key 16
Ctl 16
Ctrl 16
Del 16
Delete key 16
Ent 16
Enter key 16
Esc 16
Escape Key 16
Keyboard navigation buttons 68
Keyboard Shortcuts 16
Keypad 10, 14, 30, 35
Keypad Controls - Idle
Bobbin 54
Mode 54
Select 54
Select Pattern 54
Single Stitch 54
Stop 54
Keypad Controls - Running
Dec Speed 54
Inc Speed 54
Quick Pause 54
Quick Start 54
Stop 54
Keypad Window 54

188 Getting Started with CreativeStudio™
- L -Laser light 30, 128
Left Handle Button 87
Lock Pattern as Designed 50, 98
- M -Main Screen
Details 28
Preview Area 28
Project Information 28
Properties Window 28
Working Area 28
Maintain Aspect 50
Manual Stop 155
Manual stops 153
Margin 43, 46
Measure 30, 67, 68
Measure dynamically 68
Measure function 115, 118, 121, 124, 128
Measured Angle 68
Measured Height 68
Measured Length 68
Measured Width 68
Measure Icon 35
Measuring
Binding space 111
Margins 111
Minimize to a button 56
Mirror image 118
Mitered borders 118
Mode button 35, 54
Monitor
Computer monitor 10
Display screen 10
Motor speed 56
Mouse 10
Mouse Buttons 14
Mouse Roller 14
Move files 23
Move Pattern into Boundary 67, 68
Multiple pattern repeats 62
Multiple Trim Inside boundaries 133
My Quilt Project 29
My Quilt Project default name 60
- N -Navigate 17
Navigate folders 68
Navigate Icons
Back to last folder visited 68
Change View Options 68
Create new folder 68
Up one level 68
Navigating
Click 14
Cursor 14
Double Click 14
Drag 14
Hovering 14
Panning 14
Right Click 14
Scroll 14
Scroll bars 14
Scrolling 14
Zoom 14
Zooming 14
Needle Off 151
Needle On/Off 30
Needle positioner 87
Nesting patterns 133, 136
- O -Object 12
Offset from (reference) point 50
Offset from Point 98
Oil Stitcher 30
Oil Stitcher Routine 161
Open Pattern files 68
Operating system 10
Origin Point 59, 160
Outer Border boundary 112
Overlapping patterns 105
- P -P2P buttons
Channel lock 128
OK 128
Shift 128
Stop 128

Index 189
Copyright © 2009 Gammill, Inc. | All Rights Reserved
P2P Icon 128
P2P patterns 128
P2P Settings
Angle 128
Array Mode 128
Flip Angle 128
Pantographs 136, 143
Path 17
Pattern Details 67, 68, 115, 118, 121, 124
Framed in Blue 46, 68
Freeze Aspect 50, 98
Individual Pattern Rotation 50, 98
Lock Pattern as Designed 50, 98
Pattern Height 50, 98
Pattern Width 50, 98
Pattern file details 68
Pattern Height 46
Pattern image color 153, 155
Pattern Name 46
Pattern Placement 111
Pattern Repeats 111
Pattern Rotation 68
Pattern Rows 111
Pattern scale 136, 143
Pattern Settings 54
Pattern Speed 46
Pattern To Boundary Icon 35, 68, 96, 112, 133
Pattern Width 46
Phase 1 84
Phase 2 - Blocks 95
Pick New Point 153, 155
Plan the Point layout 128
Planning the Quilt
Preview Patterns 58
WYSIWYQ 58
Point To Point 128
Point To Point - Line 91
Point to Point Icon
Point to Point Line Icon 35
Point to Point Pattern Icon 35
Point to Point Pattern 105
Point To Point Pattern Icon 128
Point to Point Patterns 64, 66
Power Down 12
Power Up 12
Preview area 41, 76
CAD screen 39
Preview Area Grid 30
Preview border with corner 126
Preview P2P line 91
Preview Patterns 58
Preview patterns together 41
Primary Settings
Quilt length 50, 136, 143
Process Details
Framed in Gray 50
Project 12
Project Details
Framed in Yellow 43
Project Explorer 30
Project File Names 60
Project General Settings
Margin 43
Project Name 43
Project Notes 43
Stitches Per Inch 43
Stitching Speed 43
Tie Stitches 43
Tie Stitches Per Inch 43
Project Information 30, 43, 62
Pattern file name 40
Pattern thumbnail image 40
Project Explorer 39
Selected Patterns 40
Project Information Icons
Add Pattern Icon 40
Add Quilt Group Icon 40
Check Project Properties Icon 40
Delete Pattern Icon 40
Remove Quilt Group Icon 40
Save Project Icon 40
Project Name 43
Project Names 43, 60
Project Properties 60
Project Settings 54
Properties Box
Details 12
Properties 12
Properties Settings
Pattern Details 42
Process Details 42
Project Details 42
Selected Pattern Details 42
Properties Widow 39
Property Window 30, 42

190 Getting Started with CreativeStudio™
- Q -Quick Pause button 54
Quick Start button 54
Quilt Group 12, 41
Preview Area 62
Tab name 62
Quilt Group unique name 62
Quilt Icon
Start Quilting Icon 35
Quilt Length
Adjusted quilt length 136, 143
Oversized 136, 143
Quilt Pattern Edit Mode 67
Quilt Pattern Setup Mode 67, 68
Quilt Patterns 64
Quilt Project 12
Quilt Projects
Project information 58
Projects 58
Save projects 58
Quilting density 126
Quilting Feature Icons 35
Quilting sequence 84
- R -Record Mode 151
Recorded Patterns 151
Recording OFF 151
Recording ON 151
Red pattern image 153, 155
Redo 29
Reference boundaries 68, 115, 118, 121, 124
Reference Boundary 102, 128, 133, 136, 143
Reference Point 50, 62
Reference Point Location
Offset from Point 50, 98
Reference Point 50, 98
Reference points 115, 118, 121, 124
Registration Points
First Registration Point 136, 143
Pattern Endpoint 136, 143
Pattern Startpoint 136, 143
Second Registration point 136, 143
Regulated Buttons
Channel Lock button 87
Needle Position button 87
Record mode button 87
Shift button 87
Single Stitch button 87
Start button 87
Stop button 87
Regulated mode 87
Regulated Settings
Angle 87
Flip Angle 87
Needle Position 87
Radiating Lines 87
Stitches per inch 87
Regulated Sewing 151
Baste 87
Original 87
Plus 87
Smooth 87
Regulated Sewing Icon 35, 151
Remove Quilt Group Icon 40
Removing a Quilt Group 62
Renaming a project file 60
Repeat Pattern Icon 35, 98, 115, 118, 121, 124
Repeat Pattern Setup 50
Repeat Setting Details 115, 118, 121, 124
Repeat Settings
Repeats and Rows 50, 98
Select Between 50
Select between Blocks 98
Spacing 50, 98
Spacing Horizontal 98
Spacing Vertical 98
Square Up Quilt 50
Square Up Quilt Angle 98
Start End Control 50
Start End Controlled 98
Total Height 50, 98
Total Width 50, 98
Repeats and Rows 50, 98
Resize pattern 96
Resizing handles 102, 128
Center Circle handle 76
Curved Arrow Rotation handle 76
Square shape handles 76
Wedge shape handles 76
Restart 153, 155
Restart crosshair 153, 155
Restart point 153, 155
Restart Quilting icon 35

Index 191
Copyright © 2009 Gammill, Inc. | All Rights Reserved
Restart with mouse 153, 155
Re-stitch a pattern 98
Restricted Area 157
Right Handle Button 87
Roll the quilt 136, 143
rotating pattern 96
Running buttons
Dec SPI 87
Inc SPI 87
Stop 87
- S -Sashings 128
Save As 60
Save Defaults 30
Save project 60, 67, 68
Save Project As
Exit CreativeStudio 29
Save Project Icon 40
Save Reminder 60
Scroll bar
Scroll bar arrows 68
Scroll bar slider 68
Seamless corners 111
Search 17
Search by name 68
Search by pattern file name 68
Search function 17
Securing the Quilt 87
Security key serial number 32
Select Alternating Type 50
Select between Blocks 50, 98
Select boundary 68
Select button 54
Select multiple patterns 102
Select pattern 68
Select Pattern button 54
Select Registration 50
Selected Pattern Details 67, 68
Framed in Magenta 48, 68
Selected Pattern Settings 54
Selecting Multiple patterns 133
Selective Sewing 153
Set Defaults 30, 157, 160, 161
Set Origin 30
Settings
Angle 91
Array Mode 91
Flip Angle 91
Setup framed in blue 67, 68
Shift buttons
Change to needle Pos 87
Exit 87
Flip Channel Lock 87
Record 87
Shift 87
SID 84, 91
SID corners 121
Side border sections 126
Side borders 111, 126
Single Block Patterns
Circular 65
Rectangular 65
Square 65
Triangular 65
Single Stitch 87
Single Stitch button 54
Size Settings
Pattern Height 50, 136, 143
Pattern Width 50, 136, 143
Repeats and Rows 50, 136, 143
Spacing 50, 136, 143
Slope 68
SND 84, 91
spacing 50
Spacing Horizontal 98
Spacing Vertical 98
Square Up Angle 118, 121, 124
Square Up Quilt 50
Square Up Quilt Angle 98
Stabilize the quilt 84, 91
Start Button 17
Start End Control 50
Start End Controlled 98, 124
Startpoint 136, 143
Status Bar 28
Stitch in Points 30
Stitch In the Ditch (SID) 84, 91
Stitch Near the Ditch (SND) 84, 91
Stitch partial patterns 102
Stitch regulator 87
Stitcher Per Inch 43
Stitcher Settings
Auto Laser 157
Aux Pulses Per Inch 157
Bobbin Stitch 157
Code Version 157

192 Getting Started with CreativeStudio™
Stitcher Settings
Corner Option 157
laser Control 157
Margins 157
Max Arc Accel 157
Max Arc Speed 157
Max Corner Angle 157
Min Arc Speed 157
Min Corner Angle 157
Min Corner Speed 157
Min SPI 157
Needle 157
P2P Type 157
Pulses Per Inch 157
Reg Smoothing 157
Reg Type 157
Speed 157
SPI 157
Stitch Points 157
Thead Break 157
Tieoff SPI 157
Tieoff Stitches 157
Tieoffs 157
Trace 157
XYSpeed 157
Stitches per Inch 46
Stitching sequence 126
Toggle Sewn 111
Toggle Unsewn 111
Stitching Speed 43
Stop at End of Row 50
Stop button 54
Surge Protector 10
Synchronize quilt with the screen image 68
- T -Task Bar 17, 56
Task Bar buttons 56
Tech Support Help 157
Technical Support 157
Controller Definition Form 30
Defaults 30
Diagnostics 30
Restricted Area 30
Terminology
Click 12
Double Click 12
Highlight 12
Select 12
Thread Break 153
Thread Break Detection 30
Thread break sensor 153
Thumb Drive
Jump Stich 10
Removable Disk Drive 10
Travel Drive 10
Tie Off Settings 30
Tie Stitches 43, 46
Tie Stitches per Inch 43, 46
Tie-offs 102
Title Bar 28
Exit button 28
File name 28
Full screen 28
Minimize button 28
Partial Screen 28
Resize button 28
Software 28
Toggle Unsewn 98
Tool Bar 28
Tool Strip 35
Tool tip 35
Tool Tips 12
Tools 157, 160, 161
Tools Command
Calibrate Stitcher Motor 30
Display Grid 30
Grid Size 30
Laser 30
Measure 30
Needle Off 30
Needle On 30
Oil Stitcher 30
Set Origin 30
Stitch in Points 30
Technical Support 30
Thread Break 30
Thread Break Detect 30
Tie Offs 30
Trim boundary 102
Trim Icon 133
Trim - Inside Icon 35
Trim - Outside Icon 35
Trim Inside Icon 133
Trim Outside Icon 102
Turning the quilt 111
Baste the edges 126

Index 193
Copyright © 2009 Gammill, Inc. | All Rights Reserved
Turning the quilt 111
Mark center points 126
Two button sequence 87
- U -Undo 29
Unusual block shapes 105
Use This Point 153, 155
Utility functions 157
- V -Variable Settings
Maintain Aspect 50, 136, 143
Select Alternating Type 50, 136, 143
Select Between Blocks 50, 136, 143
Select Registration 50, 136, 143
Stop at End of Row 50
Verify before deleting 62
View All Icon 35, 95
View All Patterns icon 68
View Command
Keypad Window 30
Project Explorer 30
Property Window 30
- W -What you see is what you quilt 67
Window pane 17
Work Area 39
WYSIWYQ 58, 67, 68, 76, 136, 143
- Z -Z-counts 161
Zoom in 153, 155

For questions, please contact:Statler Stitcher®, a division of Gammill, Inc.
Toll Free: 866-830-3738 | Ph: 573-474-0320 E-Mail: [email protected]
Office Hours are 8 AM - 5 PM CST, Monday-Fridaywww.STATLERSTITCHER.com
194 Getting Started with CreativeStudio™
Gammill, Inc. Corporate Headquarters1452 Gibson St. | West Plains, MO 65775
Toll-free: 800-659-8224www.GAMMILL.com
Copyright © 2008 Gammill, Inc. | All Rights Reserved

Back Cover