getting started manual for codibot -...
TRANSCRIPT

a

Getting Started Manual for CODIBOT
Step 1: Open the Box.
Step 2: Inside the box you will find the Pre-Assembled body of CODIBOT along with the Add-On packs, Connecting Wires,
Nuts & Bolts. Take out the Main body along with the Connecting Wires.
Step 3: Our first task will be to make CODI run, we will be testing its FEET. We have to connect the ARDUINO with the H-
Bridge.

Start making connections according to the diagrams given below. You don’t have to worry about connecting the H-
Bridge and motors, they are already connected just focus on Arduino and H-Bridge.
Make the following connections between H-Bridge & Arduino (Refer to the Diagram above):
• ENA to Pin 5
• IN1 to Pin 6
• IN2 to Pin 7
• IN3 to Pin 8
• IN4 to Pin 9
• ENB to Pin 10

Once Connected it should look something like this:
Step 4: Our next step is to tinker with CODI’s BRAIN so that we can teach him to run, to do that we will have to download
the program called ARDUINO from the link provided as well as the graphical plug-in called ARDUBLOCK that will help
us in coding CODI’s Brain.
ARDUINO LINK: https://www.arduino.cc/download_handler.php?f=/arduino-1.6.9-windows.exe
ARDUBLOCK LINK: http://blog.ardublock.com/engetting-started-ardublockzhardublock/
Step 5: Once the installation is complete, start ARDUINO, go to the “Tools” panel and select “ArduBlock” from the dropdown
menu. Also connect ARDUINO with your computer using the blue USB cable provided in the box. Like this:
This is ARDUINO:
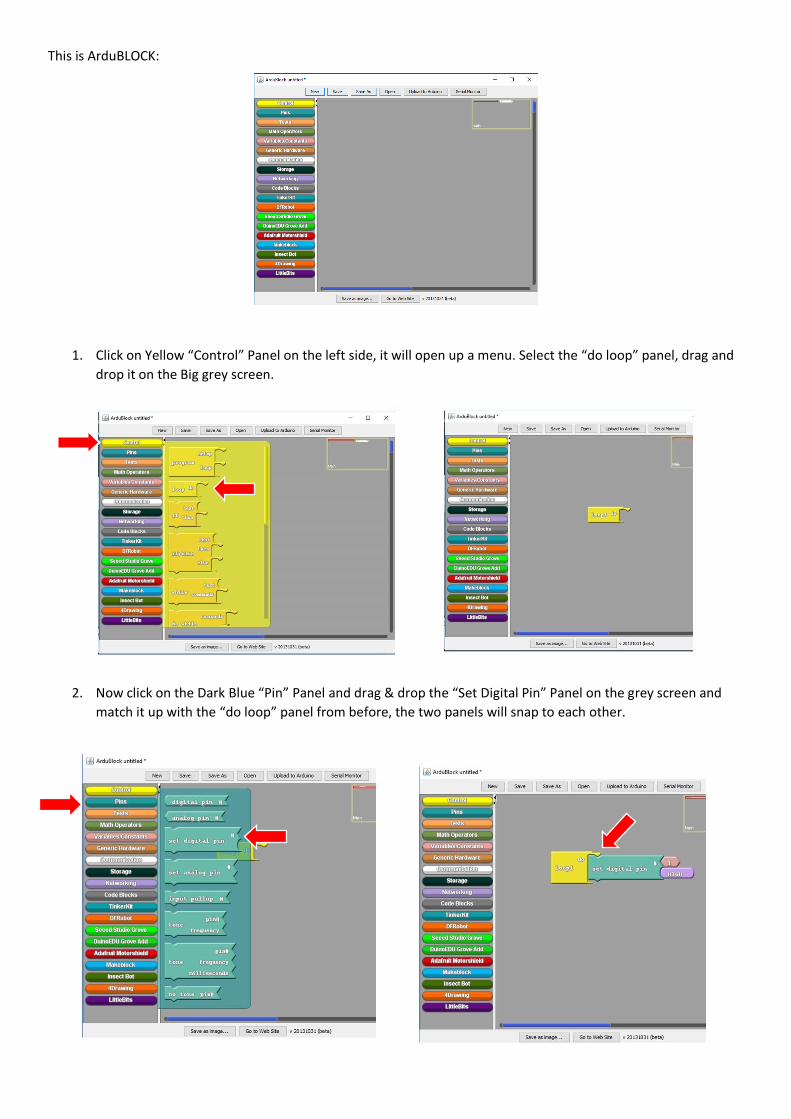
This is ArduBLOCK:
1. Click on Yellow “Control” Panel on the left side, it will open up a menu. Select the “do loop” panel, drag and
drop it on the Big grey screen.
2. Now click on the Dark Blue “Pin” Panel and drag & drop the “Set Digital Pin” Panel on the grey screen and
match it up with the “do loop” panel from before, the two panels will snap to each other.
v
v v

3. Repeat Step B, again & again such that four “Set Digital Pin” panels are stacked on top of each other.
4. Go to the first (top most) “Set Digital Pin” Panel, click on the light pink box beside the “#” sign (Pin Number)
and set the pin number to 6.
5. Go the second “Set Digital Pin” Panel and set the pin number to 7.
6. Go to the third “Set Digital Pin” Panel and set the pin number to 8.
7. Go to the fourth “Set Digital Pin” Panel and set the pin number to 9.
8. You know what we just did? We connected the CODI’s Brain with its FEET, HOW COOL IS THAT? Now, on to
the next step my young pupils.
9. Now we have to tell CODI how fast to run, to do that go to the “Pins” panel, drag & drop the “Set Analog Pin”
panel under the other panels.
v
v
v
v
v
v
v

10. Repeat the above step and put another “Set Analog Pin” panel the same way as before.
11. Set the pin number “#” of the “Set Analog Pin” to 5 and of the other one to 10.
12. Almost there, In the above steps we defined the pin numbers, now we are going to set the values of the pins.
13. Go to the First panel, click on the small triangle on purple button, it will give you two options HIGH or LOW,
select HIGH.
14. For second panel select LOW, for third select HIGH, for fourth select LOW.
15. The last two pins i.e. the “Set Analog Pins” have values 255, no need to change that.
16. Now click on the “Upload to Arduino” button, make sure your CODIBOT is connected to your computer and
the CODI’s Power Button is set to OFF. The Arduino will light up none the less.
v
v
v
v
v
v
v

17. The Arduino Screen will show the upload status of the code to the CODI’s BRAIN (notice the green bar). Once
the upload is complete, turn ON the power button and watch magic happen. The CODI’s tires will start to
move forward. At this point you can disconnect CODI from computer and let it run free.
18. Here is a table that has multiple configurations and their outcomes. Go on try them out!
Pin Value
Set Digital Pin # 6 HIGH LOW HIGH LOW HIGH LOW
Set Digital Pin # 7 LOW HIGH LOW HIGH HIGH LOW
Set Digital Pin # 8 HIGH LOW LOW HIGH HIGH LOW
Set Digital Pin # 9 LOW HIGH HIGH LOW HIGH LOW
Outcome CODI will
move FORWARDS
CODI will move
BACKWARDS
CODI will move LEFT
CODI will move RIGHT
CODI won’t move
CODI won’t move
19. The robot will move like this.
20. CONGRATULATIONS! You have completed the first step to becoming a TECH WIZARD, give yourself a pat on
the back, grab a glass of Rooh-Afzah and once finally rested, take over the world with Robots.
21. Stay tuned! For next activity. This is just the beginning of all the fun. :)

Battery Instructions: • On a full charge, the battery lasts for one hour.
• It will take 2 to 3 hours to fully charge the battery.
• Do not over charge the battery, it will result in damage to the battery and might decrease its life and
capacity.
• Handle with care.
Charging
Socket