getting started guide - imagecap.com prediscovery-getting started.pdfgetting started guide law...
TRANSCRIPT

Getting Started GuideLAW PreDiscovery™ Imaging and Electronic Discovery Processing Software
Gain Control Over the Discovery Process
Litigation Services

TABLE OF CONTENTSGETTING STARTED
FEATURES . . . . . . . . . . . . . . . . . . . . . . . . . . . . . . . . . . . . . . . . . . . . . . . . . . . . . . . . . . . . . . . . . . . . . . . . . . . . 4
CHAPTER 1: GETTING STARTED—INSTALLATION . . . . . . . . . . . . . . . . . . . . . . . . . . . . . . . . . . . . . . . . . 5
n Demo Restrictions . . . . . . . . . . . . . . . . . . . . . . . . . . . . . . . . . . . . . . . . . . . . . . . . . . . . . . . . . . . . . . . . . . . 5
n System Requirements for LAW PreDiscovery™ Software . . . . . . . . . . . . . . . . . . . . . . . . . . . . . . . . . . . . . . 6
n Installing LAW PreDiscovery . . . . . . . . . . . . . . . . . . . . . . . . . . . . . . . . . . . . . . . . . . . . . . . . . . . . . . . . . . . 8
n LAW Profile Manager . . . . . . . . . . . . . . . . . . . . . . . . . . . . . . . . . . . . . . . . . . . . . . . . . . . . . . . . . . . . . . . . 13
n Checking License Availability . . . . . . . . . . . . . . . . . . . . . . . . . . . . . . . . . . . . . . . . . . . . . . . . . . . . . . . . . . 16
n Creating Custom Profiles . . . . . . . . . . . . . . . . . . . . . . . . . . . . . . . . . . . . . . . . . . . . . . . . . . . . . . . . . . . . . 17
CHAPTER 2: GETTING STARTED—LAW PREDISCOVERY OVERVIEW . . . . . . . . . . . . . . . . . . . . . 18
n Sample Project Scenario . . . . . . . . . . . . . . . . . . . . . . . . . . . . . . . . . . . . . . . . . . . . . . . . . . . . . . . . . . . . . 19
CHAPTER 3: WALK-THROUGH—LAW PREDISCOVERY INTERFACE . . . . . . . . . . . . . . . . . . . . . 20
n Main User Interface . . . . . . . . . . . . . . . . . . . . . . . . . . . . . . . . . . . . . . . . . . . . . . . . . . . . . . . . . . . . . . . . . 20
CHAPTER 4: WALK-THROUGH—CREATING A LAW PREDISCOVERY CASE . . . . . . . . . . . . . . 22
CHAPTER 5: WALK-THROUGH—BUILDING THE CASE . . . . . . . . . . . . . . . . . . . . . . . . . . . . . . . . 25
n Importing Electronic Discovery . . . . . . . . . . . . . . . . . . . . . . . . . . . . . . . . . . . . . . . . . . . . . . . . . . . . . . . . 25
n Unicode Support . . . . . . . . . . . . . . . . . . . . . . . . . . . . . . . . . . . . . . . . . . . . . . . . . . . . . . . . . . . . . . . . . . . 31
n Scanning Documents . . . . . . . . . . . . . . . . . . . . . . . . . . . . . . . . . . . . . . . . . . . . . . . . . . . . . . . . . . . . . . . 31
n Adding Documents . . . . . . . . . . . . . . . . . . . . . . . . . . . . . . . . . . . . . . . . . . . . . . . . . . . . . . . . . . . . . . . . . 32
n Adding Attachments . . . . . . . . . . . . . . . . . . . . . . . . . . . . . . . . . . . . . . . . . . . . . . . . . . . . . . . . . . . . . . . . 32
n Inserting Documents . . . . . . . . . . . . . . . . . . . . . . . . . . . . . . . . . . . . . . . . . . . . . . . . . . . . . . . . . . . . . . . . 32
n Appending Pages . . . . . . . . . . . . . . . . . . . . . . . . . . . . . . . . . . . . . . . . . . . . . . . . . . . . . . . . . . . . . . . . . . 32
n Inserting Pages . . . . . . . . . . . . . . . . . . . . . . . . . . . . . . . . . . . . . . . . . . . . . . . . . . . . . . . . . . . . . . . . . . . . 32
n Replacing Pages/Documents . . . . . . . . . . . . . . . . . . . . . . . . . . . . . . . . . . . . . . . . . . . . . . . . . . . . . . . . . . 32

TABLE OF CONTENTSGETTING STARTED
CHAPTER 6: WALK-THROUGH—QUALITY CONTROL . . . . . . . . . . . . . . . . . . . . . . . . . . . . . . . . 33
n Creating and Editing Index Fields . . . . . . . . . . . . . . . . . . . . . . . . . . . . . . . . . . . . . . . . . . . . . . . . . . . . . . . 33
n Culling Record Sets . . . . . . . . . . . . . . . . . . . . . . . . . . . . . . . . . . . . . . . . . . . . . . . . . . . . . . . . . . . . . . . . . 36
n Filtering in the Grids . . . . . . . . . . . . . . . . . . . . . . . . . . . . . . . . . . . . . . . . . . . . . . . . . . . . . . . . . . . . . . . . 36
n Deduplication . . . . . . . . . . . . . . . . . . . . . . . . . . . . . . . . . . . . . . . . . . . . . . . . . . . . . . . . . . . . . . . . . . . . . . 37
n Searching Using Query Tools . . . . . . . . . . . . . . . . . . . . . . . . . . . . . . . . . . . . . . . . . . . . . . . . . . . . . . . . . . 41
n Tagging Documents . . . . . . . . . . . . . . . . . . . . . . . . . . . . . . . . . . . . . . . . . . . . . . . . . . . . . . . . . . . . . . . . . 44
CHAPTER 7: WALK-THROUGH—BATCH PROCESSING . . . . . . . . . . . . . . . . . . . . . . . . . . . . . . . . 48
n TIFF Conversion . . . . . . . . . . . . . . . . . . . . . . . . . . . . . . . . . . . . . . . . . . . . . . . . . . . . . . . . . . . . . . . . . . . . 50
n Distributed Batch Processing . . . . . . . . . . . . . . . . . . . . . . . . . . . . . . . . . . . . . . . . . . . . . . . . . . . . . . . . . . 52
n Document Numbering . . . . . . . . . . . . . . . . . . . . . . . . . . . . . . . . . . . . . . . . . . . . . . . . . . . . . . . . . . . . . . . 54
n Endorsing . . . . . . . . . . . . . . . . . . . . . . . . . . . . . . . . . . . . . . . . . . . . . . . . . . . . . . . . . . . . . . . . . . . . . . . . 55
CHAPTER 8: WALK-THROUGH—EXPORTING . . . . . . . . . . . . . . . . . . . . . . . . . . . . . . . . . . . . . . . . 57
n Export Profiles . . . . . . . . . . . . . . . . . . . . . . . . . . . . . . . . . . . . . . . . . . . . . . . . . . . . . . . . . . . . . . . . . . . . . 57
n Export Utility . . . . . . . . . . . . . . . . . . . . . . . . . . . . . . . . . . . . . . . . . . . . . . . . . . . . . . . . . . . . . . . . . . . . . . 59
CONCLUSION . . . . . . . . . . . . . . . . . . . . . . . . . . . . . . . . . . . . . . . . . . . . . . . . . . . . . . . . . . . . . . . . . . . . 68
4 FEATURES
GETTING STARTED GUIDE I LAW PREDISCOVERY™
FEATURES
Success in litigation goes hand in hand with clear and concise discovery. LAW PreDiscovery™ software concentrates on the first phase of discovery, enabling your litigation team to eliminate extraneous documents before production to save time, effort and money and provide better client service.
The unique application features a highly intuitive interface that can be customized to suit your processing needs. It allows you to capture and process both paper and electronic files and underlying metadata, cull duplicate, immaterial and non-responsive documents, begin searching for relevant information faster, review natively, convert to TIFF or print to paper, and export directly to Concordance® discovery management software or other popular applications for review. The tools in LAW PreDiscovery help you cut extensive document sets down to size, identify important case facts sooner and quickly respond to urgent data requests.
Use LAW PreDiscovery to:
n Process paper documents and electronic files efficiently—Law PreDiscovery is a production-level imaging and electronic discovery solution that manages scanning and ESI—Electronically Stored Data—and enables you to process, pre-review and cull hundreds of native document types and e-mails prior to scanning and reviewing
n Extract text and metadata from e-documents, emails and attachments
n Cull duplicate and immaterial files prior to production and review to reduce processing costs and review time by 50 percent, on average
n Filter by file type
n Search full text
n Index and code your data
n Convert files to TIFF or print to paper
n Perform batch processes such as document numbering, endorsing, optical character recognition (OCR), printing and TIFF conversion to streamline processing and optimize your resources
n Export native files, images, coded data and OCR text to the desired litigation support application
n Export directly to Concordance discovery management software or generate load files for import into CaseMap® fact and issue management software
n Review and produce discovery documents in various languages, including many European languages as well as Chinese, Russian, Japanese, Arabic, Korean and Greek—and even conduct mixed-language searches within documents—all using Unicode support
n Increase control and efficiency to gain a return on your investment typically in as little as two months

5 CHAPTER 1
GETTING STARTED GUIDE I LAW PREDISCOVERY™
CHAPTER 1: GETTING STARTED—INSTALLATION
Thank you for choosing LAW PreDiscovery software, designed to provide law professionals with first-class litigation support.
LAW PreDiscovery delivers the most cost-effective, time-efficient way to process paper documents and electronic files. Now you can build your case by scanning paper documents and importing electronic files quickly and easily. Prepare your document set for review by coding, culling duplicates and applying endorsements. Then export your responsive document data set for further review in Concordance software.
This Getting Started Guide will help you get up to speed on the basics quickly. It’s not often that you find so much power and flexibility in such an easy-to-use program.
Demo RestrictionsIf you are using the evaluation version of LAW PreDiscovery (if you have not yet ordered the full software), you may open the evaluation version 30 times. Your use is limited to 100 documents per case. Cases containing more than 100 documents cannot be opened in a demo version of LAW PreDiscovery. A subset of the most commonly used ISIS scanner drivers is included with the evaluation version of LAW PreDiscovery. If your scanner is not found in the driver list, please send an email to [email protected] to request a driver for your brand of scanner.
Note: To avoid inadvertently adding more than 100 documents to a demo case, thereby preventing yourself from re-opening LAW PreDiscovery later, be wary of scanning with document break sheets or to single pages. Scanning in these ways can bring unexpected results once the document limit has been reached. Any remaining pages scanned in a batch after the limit has been reached will be added to the current document.

6 CHAPTER 1
GETTING STARTED GUIDE I LAW PREDISCOVERY™
System Requirements for LAW PreDiscovery™ Software
Hardware and Software
Processor Speed (CPU)(Not specifically written to support Dual-CPU systems so performance increase may not be significant)
Software Required for Native File Printing (Microsoft® Outlook® and Lotus Notes® required for ED Loader mail store processing)
Case Storage
Network
Case Databases
Scanner Hardware
Registration
Backups
Supported Operating Systems(both 32- and 64-bit)
Hard Drive (Installation)
Memory (RAM)
1.7 GHz
Office Professional (with current service packs): 2003 or 2007Internet Explorer 6.1 Service Pack 1 or higherAdobe® Standard or Professional 7.0 or higher (Adobe Reader supported but not recommended)AutoVue ViewereDrawings ViewerLotus Notes Version 6.5 or higherMicrosoft Visio® 2003 or higherUp-to-date anti-virus software
Single computer with LAW PreDiscovery cases stored on the local hard drive
10/100 network required for production into shared cases
LAW PreDiscovery supports the following back-end databases: SQL Server® 2005 and 2008, SQL Express 2005 and 2008, and Access® 2000 (library included with LAW PreDiscovery, does not have to be installed separately). SQL is the recommended database solution.
A scanner supporting ISIS drivers; for a list of supported scanners, seehttp://www.scannerdrivers.com. LAWtsi supports TWAIN devices.
Network-based USB hardware key. At least one available USB port located on a computer accessible by all LAW PreDiscovery client stations via the network is required.
Depending on workload and number of cases, it is strongly recommended that LAW PreDiscovery cases are backed up. The backups become extremely valuable in case of hardware failure or other unforeseen circumstances.
Windows® XP SP 2+Windows Vista® (see notes below)Windows 7 (see note below)Windows 2000 Server**Windows Server 2003**Windows Server 2008**** Host for server only (storage of images
and database files)—not recommended for client stations
100 MB
1.0 GB
3.0 GHz
LAW PreDiscovery cases stored on a network server for access by LAW PreDiscovery client stations
Gigabit network recommended if working across network
Windows XP SP 2+Windows 7
2.0 GBExtra hard drive space is needed for case databases, documents, etc. High speed hard drives (7200+ RPM) for workstations.
3.0 GB
Minimum Recommended

7 CHAPTER 1
GETTING STARTED GUIDE I LAW PREDISCOVERY™
Note: LAW PreDiscovery requires the installation of source applications for all native document types that will be printed or converted to TIFF. For example, Microsoft Word must be installed to print Word documents. Microsoft Excel® must be installed to print Excel, Lotus 1-2-3, and Quattro Pro worksheets. Microsoft PowerPoint® must be installed to print PowerPoint slideshows/presentations, and so on.
Note: Although anti-virus software is not required, we highly recommend having up-to-date anti-virus software installed and running on the LAW PreDiscovery machines during processing. LexisNexis is not liable for any damage caused by viruses embedded within processed documents.
Note: If using Windows Vista or Windows 7, please note the following: n When using LAW PreDiscovery with UAC (User Account Control) enabled, it is recommended users do not create cases under the Program Files folder. This is a “protected” location in Windows 7 and Windows Vista and therefore the case folder will be redirected to the virtual store, a location in the current user’s profile (i.e., C:\Users\<User>\AppData\Local\VirtualStore\Program Files\Law50\Cases). Certain functions in LAW PreDiscovery will not work properly when this data redirection occurs. To avoid this issue, disable UAC (at your own risk) or create cases in a network location or other location not treated as a protected location by Windows 7 and Windows Vista.
Note: If using Windows Vista, please note the following: n Users may experience a decrease in processing speeds when using LAW PreDiscovery with Windows Vista. This can be caused by any number of issues including fundamental differences in the Windows Vista TCP stack, new Windows Vista network settings (there is a wealth of knowledge on the Web for tweaks in this area), incompatible NIC drivers and the particular virus scanner in use. If general navigation in LAW PreDiscovery or processing speeds (TIFF, OCR, Endorse) seem unusually slow, you are likely affected by one or more of these issues and there may or may not be a solution depending on the actual cause.

8 CHAPTER 1
GETTING STARTED GUIDE I LAW PREDISCOVERY™
Installing LAW PreDiscoveryWhen installing LAW PreDiscovery software for the first time on a computer, you will need to download and execute the latest full installation file for the software or use an installation CD if available. Be sure that all LAW PreDiscovery 4.x and 5.x dongles (hardware keys) have been removed from the computer prior to the installation.
To install using a link provided by LexisNexis, download the full installation file for LAW PreDiscovery software and double-click the installation file.
To install using a CD provided by LexisNexis, insert the installation CD. The installation wizard should automatically start up. If the install program does not start up, go to the main directory of the CD and run law_full_5.2.13.exe.
Note: The portion of the filename indicating the LAW PreDiscovery version (5.2.13 in the above example) may vary depending on the version included on the demo CD. Locate the law_full_<version #>.exe file in the root of your CD and double-click to begin the installation.
(See Pages 9-12 for Installation Setup).
9 CHAPTER 1
GETTING STARTED GUIDE I LAW PREDISCOVERY™
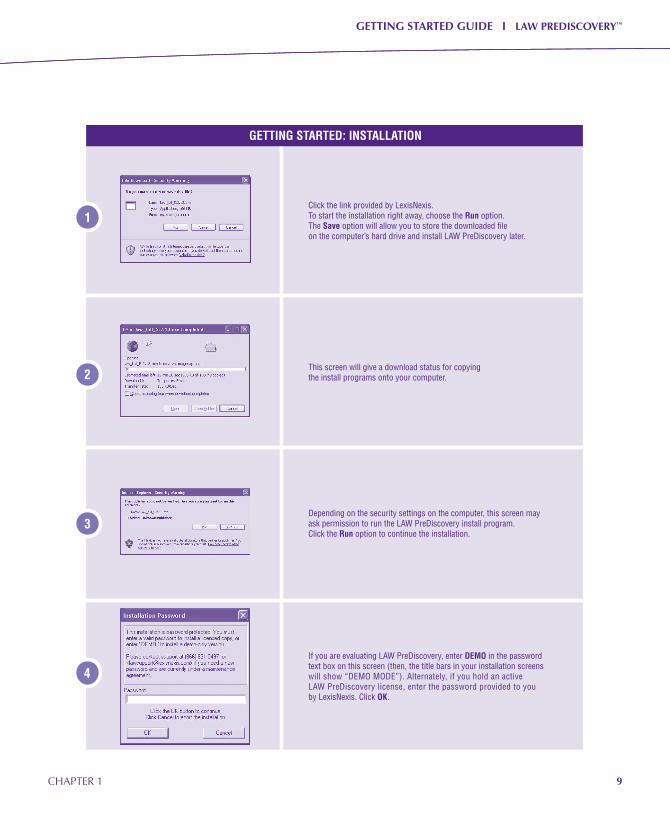
Click the link provided by LexisNexis . To start the installation right away, choose the Run option . The Save option will allow you to store the downloaded file on the computer’s hard drive and install LAW PreDiscovery later .
This screen will give a download status for copying the install programs onto your computer .
Depending on the security settings on the computer, this screen may ask permission to run the LAW PreDiscovery install program . Click the Run option to continue the installation .
If you are evaluating LAW PreDiscovery, enter DEMO in the password text box on this screen (then, the title bars in your installation screens will show “DEMO MODE”) . Alternately, if you hold an active LAW PreDiscovery license, enter the password provided to you by LexisNexis . Click OK .
GETTING STARTED: INSTALLATION
1
2
3
4
10 CHAPTER 1
GETTING STARTED GUIDE I LAW PREDISCOVERY™
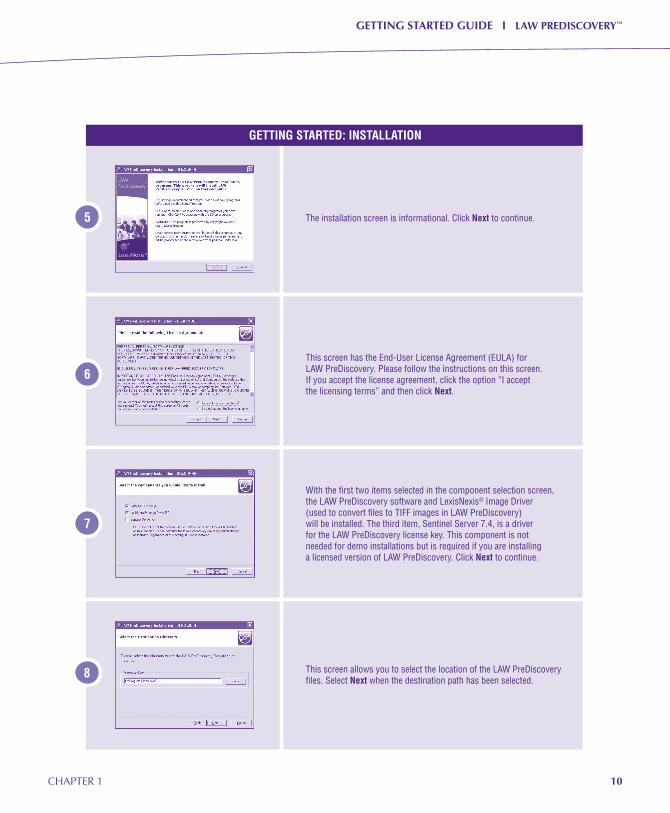
GETTING STARTED: INSTALLATION
5
6
7
8
The installation screen is informational . Click Next to continue .
This screen has the End-User License Agreement (EULA) for LAW PreDiscovery . Please follow the instructions on this screen . If you accept the license agreement, click the option “I accept the licensing terms” and then click Next .
With the first two items selected in the component selection screen, the LAW PreDiscovery software and LexisNexis® Image Driver (used to convert files to TIFF images in LAW PreDiscovery) will be installed . The third item, Sentinel Server 7 .4, is a driver for the LAW PreDiscovery license key . This component is not needed for demo installations but is required if you are installing a licensed version of LAW PreDiscovery . Click Next to continue .
This screen allows you to select the location of the LAW PreDiscovery files . Select Next when the destination path has been selected .
11 CHAPTER 1
GETTING STARTED GUIDE I LAW PREDISCOVERY™
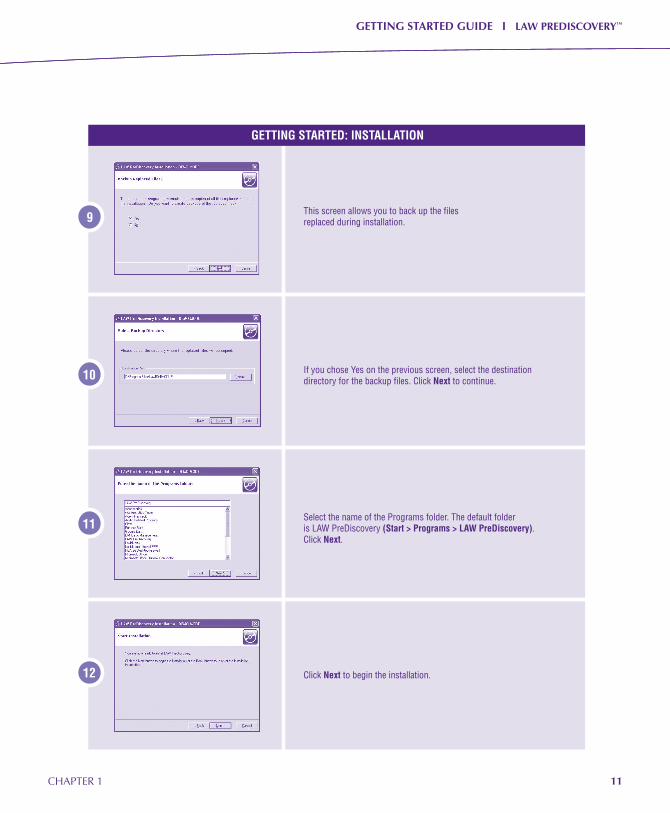
GETTING STARTED: INSTALLATION
9
10
11
12
This screen allows you to back up the files replaced during installation .
If you chose Yes on the previous screen, select the destination directory for the backup files . Click Next to continue .
Select the name of the Programs folder . The default folder is LAW PreDiscovery (Start > Programs > LAW PreDiscovery) . Click Next .
Click Next to begin the installation .

12 CHAPTER 1
GETTING STARTED GUIDE I LAW PREDISCOVERY™
GETTING STARTED: INSTALLATION
13
14
15
This screen will indicate the status as files are copied onto the user’s computer .
Select Finish to complete the installation .
Selecting OK will restart the computer . After the computer starts, the installation is complete .

13 CHAPTER 1
GETTING STARTED GUIDE I LAW PREDISCOVERY™
LAW Profile ManagerLAW PreDiscovery uses a server-based licensing scheme, making it easier to track and assign licenses. All licenses are maintained on one or more hardware dongles installed on a host computer, referred to as the “License Server.” Each workstation is then able to access the License Server through the network to “check out” available licenses for use on that individual workstation.
The LAW Profile Manager enables you to quickly select licenses, create profiles, identify the licenses in use, and identify the licenses currently available.
The LAW Profile Manager is used to establish or change the hostname of the computer that is hosting the license hardware key, or the License Server. Ensure at least one hardware dongle is attached to a computer before launching LAW PreDiscovery software.
To initially launch LAW PreDiscovery software:
1. Start the LAW PreDiscovery software from your program folder or from the shortcut icon on your desktop.
2. Enter the hostname of the server with the LAW PreDiscovery dongle attached, and click OK.
Note: If LAW PreDiscovery is installed on a network and the program file, Law50.exe, is shared, the hostname needs to be entered only once. If LAW PreDiscovery is executed locally, the hostname needs to be entered for each workstation when the product is launched.
14 CHAPTER 1
GETTING STARTED GUIDE I LAW PREDISCOVERY™
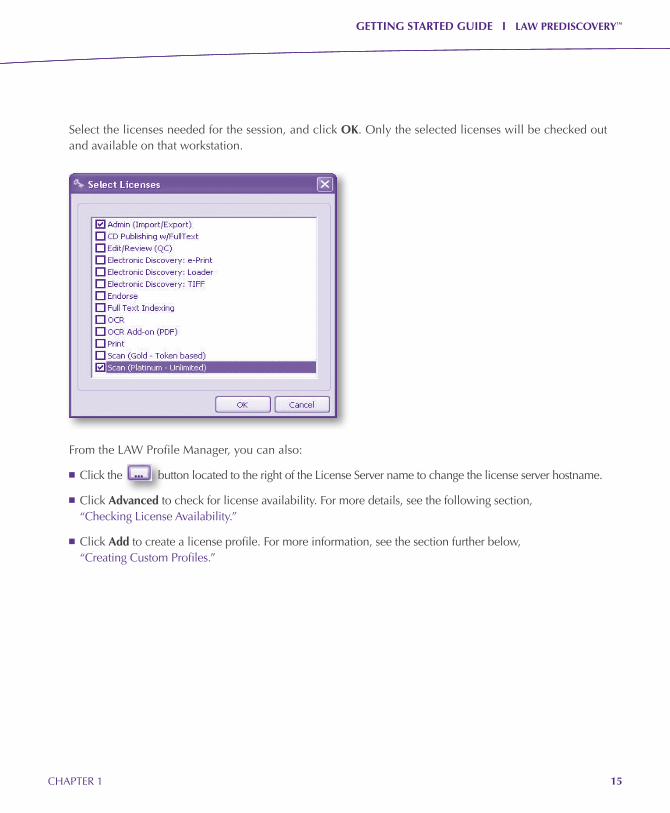
3. Select the license profile and click OK.
The default license profiles include:
n <Any Available Licenses> “Checks out” one of each available license. These licenses will not be available to other workstations using the same license key. Clicking OK starts LAW PreDiscovery software.
n <Custom> Users can check out specific licenses based on their tasks. For example, if a user needs to scan documents, that individual can choose only the Scan license. Clicking OK opens the list of licenses.
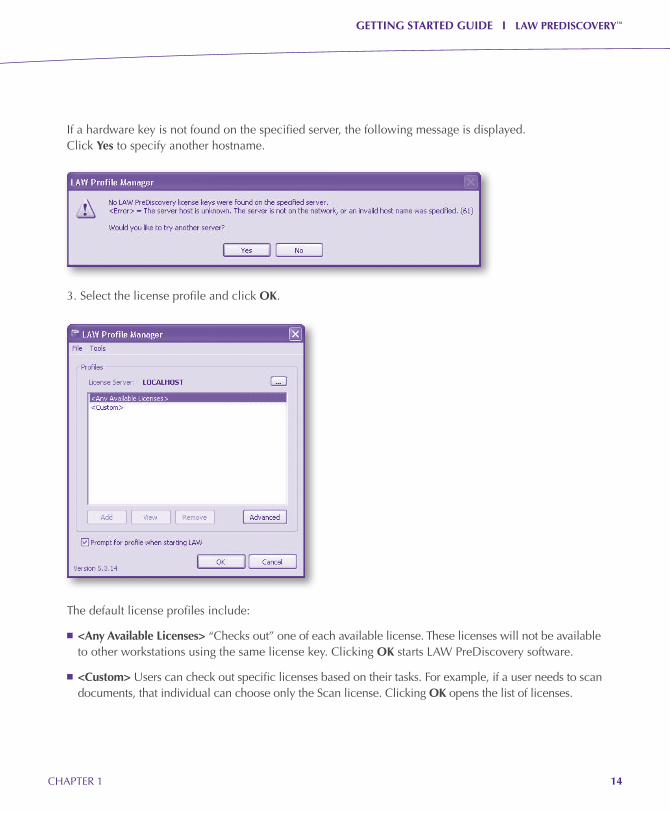
If a hardware key is not found on the specified server, the following message is displayed. Click Yes to specify another hostname.
15 CHAPTER 1
GETTING STARTED GUIDE I LAW PREDISCOVERY™
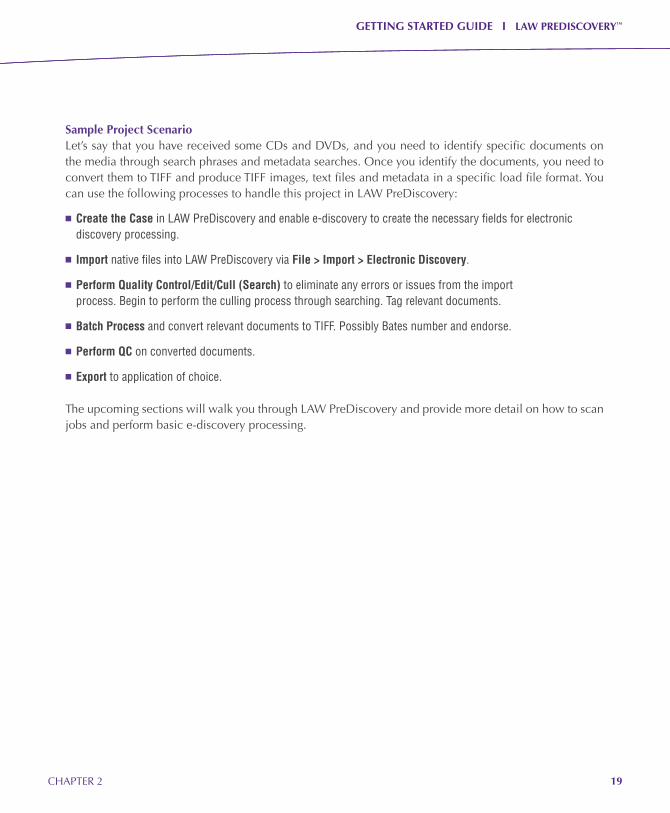
Select the licenses needed for the session, and click OK. Only the selected licenses will be checked out and available on that workstation.
From the LAW Profile Manager, you can also:
n Click the button located to the right of the License Server name to change the license server hostname.
n Click Advanced to check for license availability. For more details, see the following section, “Checking License Availability.”
n Click Add to create a license profile. For more information, see the section further below, “Creating Custom Profiles.”

16 CHAPTER 1
GETTING STARTED GUIDE I LAW PREDISCOVERY™
Checking License AvailabilityThe LAW Profile Manager (Administrative Mode) dialog box displays the license profiles and the availabil-ity of licenses, including the total number of licenses, licenses in use, and available licenses. Users can add new profiles, change the administrative password, and refresh the key to ensure the proper number of licenses is shown.
To open the Administrative Mode dialog box:
1. From the LAW Profile Manager dialog box, click Advanced.
2. Enter and confirm the administrative password. It must have a minimum of six characters. This password is used to perform administrative functions in the LAW Profile Manager. Click OK.

17 CHAPTER 1
GETTING STARTED GUIDE I LAW PREDISCOVERY™
Creating Custom ProfilesNew license profiles can be created and added to the LAW Profile Manager dialog box.
To create a new custom profile:
1. From the LAW Profile Manager dialog box, click Add.
2. Enter the administrative password created when the Profile Manager was first launched.
3. Enter the name of the new profile. Optionally, a description can be entered.
4. Select the licenses to include in the profile.
5. To set this as the default profile for the current user, select Default Profile.
6. Click OK.
The new license profile is displayed in the LAW Profile Manager dialog box. If selected as the default profile, it is automatically highlighted.
Tip: To automatically “check out” licenses and bypass the LAW Profile Manager, select the profile as the default profile. Then clear the checkbox “Prompt for profile when starting LAW PreDiscovery” in the LAW Profile Manager dialog box.

18 CHAPTER 2
GETTING STARTED GUIDE I LAW PREDISCOVERY™
CHAPTER 2: GETTING STARTED—LAW PREDISCOVERY OVERVIEW
LAW PreDiscovery allows you to scan paper documents, import load files and raw images, and import electronic discovery (ED). Once you have your discovery documents loaded, you can then cull duplicate and non-responsive files, review native documents, and search text and metadata for relevance. This prediscovery process gives you the control you need to produce and review only the documents that are most relevant to your case. This guide discusses the five key processes performed in LAW PreDiscovery.
1. Creating a New Case
2. Building the Case
n Importing Electronic Discovery
n Importing Load Files or Raw Images
n Scanning Paper Documents
3. Quality Control and Editing
n Quality Control and Editing
n Coding
n Culling
4. Batch Processing
n Bates Numbering
n Image Cleanup
n Endorsing
n OCR
n Printing
n TIFF Conversion
5. Exporting
n Load Files
n Native Files
n Images
n Text Files
19 CHAPTER 2
GETTING STARTED GUIDE I LAW PREDISCOVERY™
Sample Project ScenarioLet’s say that you have received some CDs and DVDs, and you need to identify specific documents on the media through search phrases and metadata searches. Once you identify the documents, you need to convert them to TIFF and produce TIFF images, text files and metadata in a specific load file format. You can use the following processes to handle this project in LAW PreDiscovery:
n Create the Case in LAW PreDiscovery and enable e-discovery to create the necessary fields for electronic discovery processing .
n Import native files into LAW PreDiscovery via File > Import > Electronic Discovery .
n Perform Quality Control/Edit/Cull (Search) to eliminate any errors or issues from the import process . Begin to perform the culling process through searching . Tag relevant documents .
n Batch Process and convert relevant documents to TIFF . Possibly Bates number and endorse .
n Perform QC on converted documents .
n Export to application of choice .
The upcoming sections will walk you through LAW PreDiscovery and provide more detail on how to scan jobs and perform basic e-discovery processing.

20 CHAPTER 3
GETTING STARTED GUIDE I LAW PREDISCOVERY™
CHAPTER 3: WALK-THROUGH—LAW PREDISCOVERY INTERFACE
Main User InterfaceThe main form in LAW PreDiscovery is divided into seven sections that provide easy access to index field information, images, text, native files and more.
1. Image: This area displays images (supported types) that were imported as raw images, imported as part of a load file and/or imported with a LAW PreDiscovery case, as well as scanned images, and/or images that were created using the TIFF conversion batch process. Supported image types loaded via the ED Loader also will be displayed. When no image file exists for a record, the default “NO IMAGE AVAILABLE” image will display. The View menu contains options to display the image only, thumb-nails only, or both image and thumbnails (default).

21 CHAPTER 3
GETTING STARTED GUIDE I LAW PREDISCOVERY™
2. Text: This section displays the associated text file for the record. The text may have been extracted during the ED Loader import, created during the OCR process in LAW PreDiscovery, captured as printed text during a TIFF conversion by the LexisNexis Image Driver, or imported during a raw image, load file, or LAW PreDiscovery case import.
3. Open File: This button launches the native file that exists in the case folder, if applicable. Files loaded through the ED Loader have native files tied to the records unless a filter was applied in the settings, such as deduplicating or file type filtering. EDRM XML imports may also have associated native files. The pull-down list attached to the Open File button allows users to choose a different source application with which to open the native file.
4. Index: System and/or user-defined index fields are displayed here. You can add/remove fields from this display using the Modify Fields dialog box, accessible via the Index menu. You can create profiles in the Modify Fields dialog box as well.
5. Grid View: This embedded grid is one of two grid displays provided in LAW PreDiscovery. The grid is an important tool when you perform certain tasks, such as filtering records, tagging documents, running the OCR process and reviewing metadata. For a more detailed discussion of grid displays, including how to launch them, see the section of this guide titled Walk-through: Quality Control. (Please note: the two grid displays in LAW PreDiscovery do not support Unicode foreign language capabilities. However, if Unicode characters exist in a field, they will display in a pop-up text box when you rest the pointer over the cell.)
6. Folder View: This pane displays the folder structure that was built for the specified case. You can manually create folders, or they can be automatically created when you import load files, raw images, LAW PreDiscovery cases or e-discovery. The Folder button on the main menu bar contains functions that apply to this area of the interface, such as creating and renaming folders, summarizing a folder of images, and sending a folder of records to one of the grid views.
7. Document List: This pane lists records for each folder in a LAW PreDiscovery case. In this grid, you can view up to six different fields, including DocID, Page Range (BegDoc#-EndDoc#), and Pages (total page count of the associated images). The Edit button on the main menu bar applies to this pane on the main interface. You can perform tasks such as inserting and replacing, auto-numbering, splitting and merging, and deleting records.
Now that you are familiar with the main interface of LAW PreDiscovery, let’s create a case.

22 CHAPTER 4
GETTING STARTED GUIDE I LAW PREDISCOVERY™
CHAPTER 4: WALK-THROUGH—CREATING A LAW PREDISCOVERY CASE
To begin any scanning or electronic discovery project, you must first create a case. You will store the database, native files, text and image information in the case.
To create a case:
1. Select File > New Case. The Select Database Engine dialog box will appear.
2. Choose your available database engine. If SQL is installed and configured, choose SQL Server/SQL Express 2005 option; otherwise choose Microsoft Access 2000. SQL is the recommended database solution.
3. Click OK. The New Case - Properties dialog box will appear.

23 CHAPTER 4
GETTING STARTED GUIDE I LAW PREDISCOVERY™
4. Now you need to name your case. For this example, we used EDD_001. (Note: Unicode is not supported in LAW PreDiscovery case names. While the rest of the case path can contain Unicode, it is recommended that you not include Unicode characters in the case paths to avoid potential issues with third-party applications.)
5. Now enter a case description. For this example, we used Disks 1-200. The description will help you identify the contents of the case later.
6. Click the checkbox to Enable Electronic Discovery for this case. This will automatically create the index fields for processing electronic discovery.
7. Now assign a Client or Project Name to the case. Click Edit List to add a new entry to the pull-down list. The Project Administration dialog box will appear. Click New Project. The New Project dialog box will appear. For this example we entered Project001 for the name and Test ED Project for the description. Click OK to continue.

24 CHAPTER 4
GETTING STARTED GUIDE I LAW PREDISCOVERY™
8. The Project Administration dialog box will appear once again. Click OK to return to the New Case - Properties dialog box. Select Project001 from the pull-down list.
9. The case paths will default to C:\Program Files\LAW50\Cases. Click OK to create the case.
10. That is all there is to it! You created your first case. Now let’s build your case by importing electronic discovery and scanning paper documents.

25 CHAPTER 5
GETTING STARTED GUIDE I LAW PREDISCOVERY™
CHAPTER 5: WALK-THROUGH—BUILDING THE CASE
Importing Electronic DiscoveryThe Import Electronic Discovery feature provides an easy way to import electronic discovery files into your case. LAW PreDiscovery makes it simple to include both emails and documents in a single import for greater efficiency. Once the import process is complete, you may launch and review native files, execute database and full-text searches, tag documents, and convert files to TIFF.
To import electronic documents:
1. Launch LAW PreDiscovery and open a case, such as the sample case EDD_001.
2. Click File, then Import > Electronic Discovery. The LAW PreDiscovery Electronic Discovery Loader (“ED Loader”) will appear. If you are using the DEMO version, then [Demonstration Mode] will appear in the ED Loader title bar.
3. The first step is to select a target folder. This will default to the folder that was selected in LAW PreDiscovery prior to launching the ED Loader.

26 CHAPTER 5
GETTING STARTED GUIDE I LAW PREDISCOVERY™
4. Next, assign a custodian to the batch by typing a name into the Default Custodian text box. This custodian will be assigned to all sources added to the queue.
5. Now, let’s enter a beginning DocID number in the DocID Seed text box. This feature will increment a document-level value for each record based on the specified DocID Seed.
6. Now it’s time to add sources to the Source Queue. To add a mail store (PST or NSF) to the queue, click the Mail Store button, select the files and click OK. To add a file list, click the File List button and browse to the file list.
7. Now, let’s select some folders. To add one or more folders of documents, click the Folder(s) button; the Select Folder(s) dialog box will appear. Click the checkbox next to the folder(s) to include them for processing. Check Recurse Subfolders to include all subfolders below the selected folder(s). Click Accept to add the folder(s) to the Source Queue.
27 CHAPTER 5
GETTING STARTED GUIDE I LAW PREDISCOVERY™
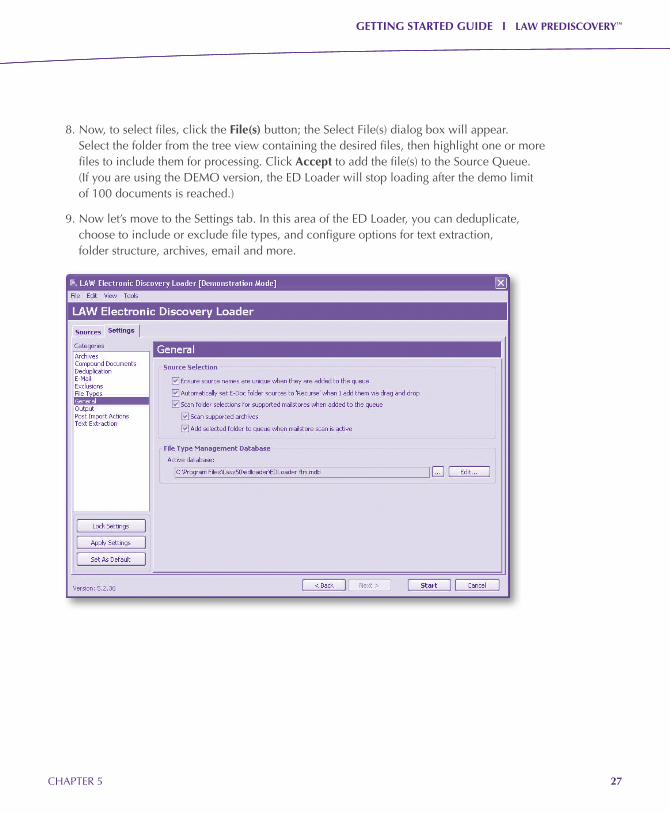
8. Now, to select files, click the File(s) button; the Select File(s) dialog box will appear. Select the folder from the tree view containing the desired files, then highlight one or more files to include them for processing. Click Accept to add the file(s) to the Source Queue. (If you are using the DEMO version, the ED Loader will stop loading after the demo limit of 100 documents is reached.)
9. Now let’s move to the Settings tab. In this area of the ED Loader, you can deduplicate, choose to include or exclude file types, and configure options for text extraction, folder structure, archives, email and more.

28 CHAPTER 5
GETTING STARTED GUIDE I LAW PREDISCOVERY™
10. To find duplicate files, click Deduplication on the Settings tab, and then click the checkbox next to Enable Duplicate Detection. There are two options for the working digest, or hash method used to check for duplicates: MD5 or SHA-1. SHA-1 is often considered to be the stronger of the two options. Choose the scope (case- or custodian-level) and the action for the duplicates, if any are detected.

29 CHAPTER 5
GETTING STARTED GUIDE I LAW PREDISCOVERY™
11. Now, let’s perform text extraction. Click Text Extraction on the Settings tab, and click the checkbox to Enable Text Extraction. Options will apply to text that is pulled during the extraction process.

30 CHAPTER 5
GETTING STARTED GUIDE I LAW PREDISCOVERY™
13. Now that sources have been added and options have been set, click Start.
14. After you click the Start button, the Confirm Settings dialog box appears. You may use it to verify that the desired settings are configured prior to extraction. After confirming the settings, click OK to begin the import.
LAW PreDiscovery will first inventory the sources to gain a file count. Once this process is complete, extraction will commence on all selected sources and records will be written to the LAW PreDiscovery case database. When the import process is complete, the Complete dialog box will appear, providing a quick summary of each source as well as a summary of all sources, including total number of records written to LAW PreDiscovery, number of warnings, etc.
12. Next, let’s try file type filtering. If Enable File Filtering is not checked, then all selected files in the Source Queue will be imported into LAW PreDiscovery, regardless of their type (record is created for each and native file is copied). If filtering is needed, enable this option, then click the File type manager: Edit button in the File Types settings. This will launch the File Type Manager, which allows users to set files as Included or Excluded prior to loading into LAW PreDiscovery. This feature will be useful when unwanted files, such as system files, exist in the selected sources and need to be excluded.

31 CHAPTER 5
GETTING STARTED GUIDE I LAW PREDISCOVERY™
Unicode SupportIn cases where you need to review and produce discovery documents in foreign languages or even conduct mixed-language searches within documents, you can benefit from the Unicode support in LAW PreDiscovery.
LAW PreDiscovery versions 5.2 and higher support the Unicode standard for universal character encoding. Proper language packs must be installed on the computer in order for the associated Unicode characters to display within the LAW PreDiscovery user interface.
You can use the ED Loader to import files that have Unicode file names or are residing in a Unicode path. You can retain and display these Unicode paths in the main folder view and in any other applicable LAW PreDiscovery folder view. Unicode existing in the metadata will be retained and can be displayed in the Index display.
Scanning DocumentsLAW PreDiscovery is made up of several different licenses that are sold individually or in bundles. If you need to process paper documents, you will need the Scan or LAWtsi (touch screen interface) scan license (available for order separately). Let’s go over some scanning basics.
Before scanning any documents, you must first select a scanner. All scan functions will be disabled until a scanner has been recognized. First, choose Select Scanner from the Scan menu to display a list of all available scanner drivers.
The next step is to set options such as black border removal and barcode detection (Scan >Scan Options), as well as scanner settings such as mode (black & white, color, grayscale), resolution (DPI), page size, brightness and contrast (Scan >Scanner Settings). Once you have selected your scanner and set up your options, you are ready to scan. All newly scanned documents will be saved in the current folder, so we recommend that you make periodic checks to ensure documents are in the intended folder. When scanning documents, you should remove any staples, clips, rubber bands or other bindery materials, and then place the page(s) to be scanned in the auto-document feeder or on the flatbed.

32 CHAPTER 5
GETTING STARTED GUIDE I LAW PREDISCOVERY™
Adding DocumentsTo add new documents to the current folder, open the desired folder and select New Document (<F3>) from the Scan menu. All new documents will be added to the end of the folder. If you are scanning from the document feeder, LAW PreDiscovery will scan until the feeder is empty.
Adding AttachmentsYou can also add documents as attachments to other documents. This allows logical grouping of related documents. To manually add an attachment, select New Attachment (<Ctrl+F3>) from the Scan menu. The new document will be added as an attachment to the last document in the current folder. Attachments cannot be added at scan time to intermediate documents in a folder. If documents have been scanned out of order, you will need to scan the attachment as a normal document to the end of the folder, move it immediately behind the appropriate parent document, and then manually attach it.
Inserting DocumentsLAW PreDiscovery allows you to insert documents in a particular location within the current folder by selecting Edit > Insert > Scanned Document. In this way, you can insert a document that was missed at scan time. This feature is very important because, unless documents are specified by a query, all processing functions (batch processing, exports) are executed in scan order. The inserted document will be placed above the currently selected document in the current folder.
Appending PagesThis function allows you to append new pages to an existing document. Select the document to which the pages should be appended, and select Append (<F5>) from the Scan menu. The new page(s) will be added to the end of the selected document.
Inserting PagesLAW PreDiscovery also allows you to insert pages into existing documents in the event that pages were missed or acquired from another source. If you need to insert new pages from the scanner, select Edit > Insert > New Page(s). The new pages will be inserted before the currently selected page. To insert pages from existing documents, select the Existing Page(s) menu item from the Insert menu. If you are inserting existing pages, you will be prompted to select one or more existing images to insert.
Replacing Pages/DocumentsThe Replace function allows you to replace pages within a document or replace the entire document. Select Edit > Replace > Page(s) to replace individual pages within a document, or select Document to replace the entire document. If you are replacing pages, the new pages will replace the current page, moving forward for as many new pages that are scanned.
33 CHAPTER 6
GETTING STARTED GUIDE I LAW PREDISCOVERY™
CHAPTER 6: WALK-THROUGH—QUALITY CONTROL
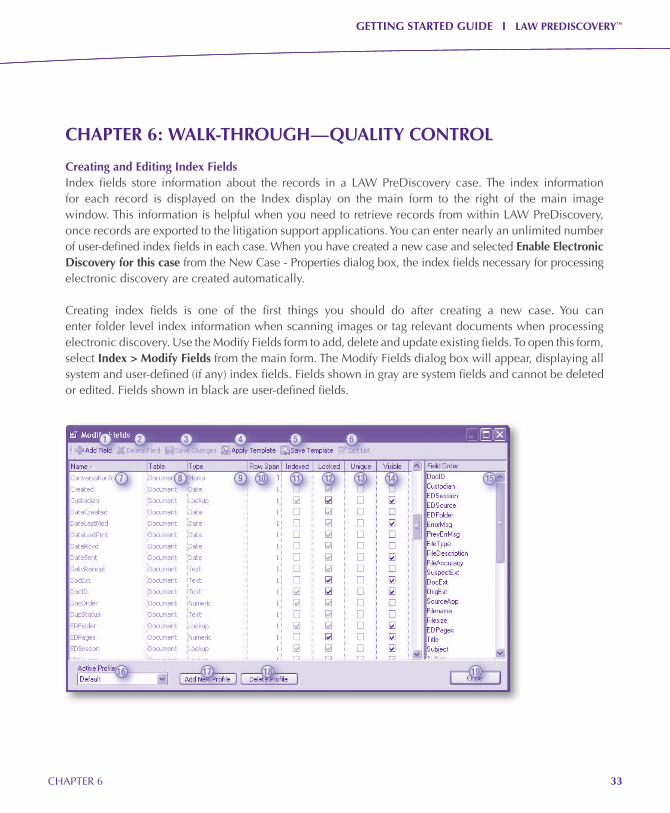
Creating and Editing Index FieldsIndex fields store information about the records in a LAW PreDiscovery case. The index information for each record is displayed on the Index display on the main form to the right of the main image window. This information is helpful when you need to retrieve records from within LAW PreDiscovery, once records are exported to the litigation support applications. You can enter nearly an unlimited number of user-defined index fields in each case. When you have created a new case and selected Enable Electronic Discovery for this case from the New Case - Properties dialog box, the index fields necessary for processing electronic discovery are created automatically.
Creating index fields is one of the first things you should do after creating a new case. You can enter folder level index information when scanning images or tag relevant documents when processing electronic discovery. Use the Modify Fields form to add, delete and update existing fields. To open this form, select Index > Modify Fields from the main form. The Modify Fields dialog box will appear, displaying all system and user-defined (if any) index fields. Fields shown in gray are system fields and cannot be deleted or edited. Fields shown in black are user-defined fields.
1
7
16 17 18 19
8 9 10 11 12 13 14 15
2 3 4 5 6
34 CHAPTER 6
GETTING STARTED GUIDE I LAW PREDISCOVERY™
1. Add Field: Launches Add Field dialog box.
2. Delete Field: Deletes a user-defined index field.
3. Save Changes: Saves changes after you edit field properties.
4. Apply Template: Applies an existing case template.
5. Save Template: Saves a case template based on the current LAW PreDiscovery case.
6. Edit List: Launches the List Editor to allow editing of list field values.
7. Name: Displays names of system- and user-defined fields.
8. Table: Indicates if a field is contained in the document- or page-level table of the database.
9. Type: Lists the type of field.
10. Row Span: Indicates how many rows of data will be visible in the Index display.
11. Indexed: Indicates if a field is indexed.
12. Locked: Indicates if a field is locked. All system fields will be locked, meaning they cannot be edited.
13. Unique: Indicates if a field is set to unique; if so, then values in this field must be unique for each record.
14. Visible: Indicates if the field is visible on the Index display.
15. Field Order: Displays the order of fields in the Index display.
16. Active Profile: Displays the name of the profile currently applied in the Index display.
17. Add New Profile: Allows users to create profiles to be used for storing field order and visibility.
18. Delete Profile: Deletes a user-defined Index profile.
19. Close: Closes the Modify Fields dialog box.

35 CHAPTER 6
GETTING STARTED GUIDE I LAW PREDISCOVERY™
Adding a Field To create a new field, click the Add Field button. The Add Field dialog box will appear. Enter a name for the field. (Index field names cannot contain Unicode characters.) The Table option allows you to select either Document-Level or Page-Level. Document-level field values will be the same for all pages of a document. Page-level field values will apply to only the selected page.
Field Types Seven field types are available when you create new fields:
n Text: This standard text field can contain up to 255 text characters .
n Auto-Increment: This is the same as the text field, except it will automatically increment from one document to the next if no value is specified .
n Date: This field requires entry of a valid date format with a 4-digit year (i .e ., mm/dd/yyyy) .
n List: This is the same as the text field, but allows entry of pre-specified values, which appear in a pull-down list for the field on the index tab . You can modify the list values by selecting the Edit List button once a list field has been selected from the fields list .
n Memo: This field type is for large text field values that exceed 255 characters—the Span Height setting adjusts the number of rows displayed on the main form (memo fields cannot be indexed) .
n Numeric: This field accepts numeric values between the values of -2147483647 and 2147483648 .
n Tag (Boolean): This field has one of two states (Yes/No) . Yes is represented by a green checkmark in the grid displays . The field, when viewed in the Index display, contains Yes and No in a pull-down list .

36 CHAPTER 6
GETTING STARTED GUIDE I LAW PREDISCOVERY™
Culling Record SetsIn many cases, not all the files on the media you receive are useful or needed by the client. As a result of the extraction process, you will be able to locate records that need to be produced. This will potentially reduce the number of files that need to be handled. In LAW PreDiscovery, once a grid is launched, documents may be searched, culled and flagged for further processing. You may use queries, filtering options and tagging options to locate the files. After flagging the necessary documents, you may query those flags and send the returned documents for batch processing or exporting.
Filtering in the GridsDocuments may be filtered in the grids based on values present in the index fields. This feature allows you to choose any field value in the current case, quickly locate any records with that same value, and remove the records without that value from the grid.
To filter records based on a field value:
1. Launch a grid display by clicking the globe icon located on the main toolbar.

37 CHAPTER 6
GETTING STARTED GUIDE I LAW PREDISCOVERY™
2. Ensure that the DocExt field is currently displayed in the grid. If not, launch the Field List (View > Field List) and click the checkbox next to this field. The DocExt field contains the file extensions of files loaded through the ED Loader.
3. Right-click in any populated cell in the DocExt column—for example, a cell containing the xls value. Filtering options will appear.
4. Choose Filter by Selection. Only records containing the selected value will remain in the grid.
5. If you wish to return documents that do not contain the selected value, choose Filter Excluding Selection. Only records that do not contain the specified value will be returned to the grid.
Note: To process the filtered documents, simply launch the Batch Process or Export Utility from the grid; only the current record set will be selected for processing.
LAW PreDiscovery allows you to easily remove the filter and return the previous set of records when needed.
To remove a filter:
1. Right-click in any cell in the grid. The filtering options will appear.
2. Choose Remove All Filters. The original record set that was loaded prior to filtering will return to the grid.
DeduplicationA duplicate file is an exact replica of another file. This is often apparent in electronic discovery containing multiple mail stores from individuals receiving the same email or when electronic files have been created and saved in multiple locations. Duplicate files are determined by hashing either the entire file (e-docs) or key metadata fields (emails). The scope of the project determines whether or not deduplication will be performed and which methods will be used.
To perform deduplication after the ED Loader import process:
1. Click Tools-Deduplication Utility to load the current duplicate information.
2. On the Info tab, click the Load button to retrieve the current deduplication statistics for the LAW PreDiscovery case, such as number of duplicates (global or custodian level) and number of root duplicate records. If deduplication has not yet been performed on the records, the values for each displayed item will be zero.

38 CHAPTER 6
GETTING STARTED GUIDE I LAW PREDISCOVERY™
3. Click each item in the Info tab to view its description (as shown in the above image).
4. On the Tools tab, consider whether to click the Deduplication Status Reset button or the Verify Deduplication Log. The Deduplication Status Reset option flushes all items from the current deduplication log and resets the deduplication-related fields for all records in the case. In other words, the entire case will be in a state as if deduplication has never been performed. The Verify Deduplication Log verifies that all entries in the log exist in the LAW PreDiscovery case. This tool is included for troubleshooting purposes.
5. Go to the Settings tab and select options.
6. Click Start.
39 CHAPTER 6
GETTING STARTED GUIDE I LAW PREDISCOVERY™
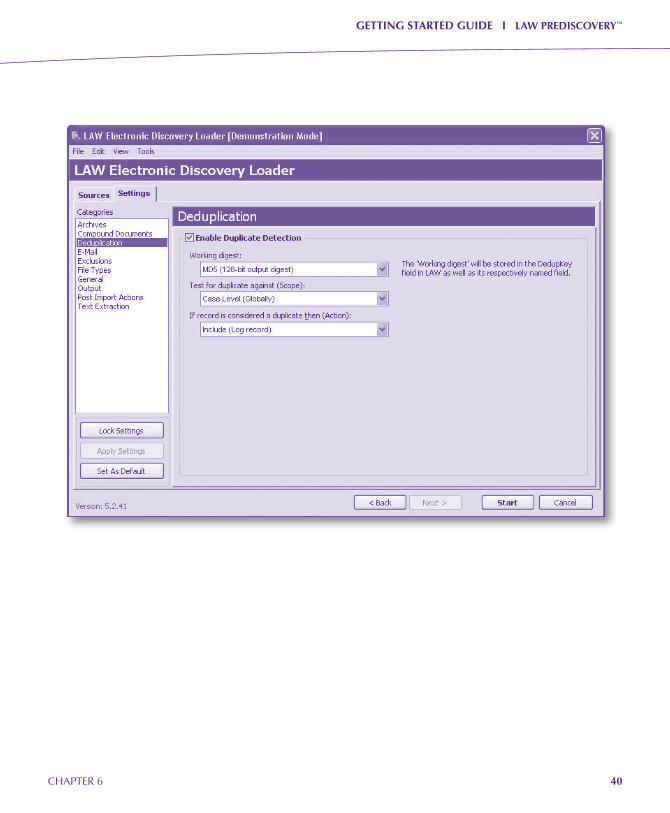
Alternately, you can perform deduplication earlier—during the ED Loader import process described previously in the section “Walk-through—Building the Case”:
1. Select File > Import > Electronic Discovery from the main menu to open the ED Loader.
2. Click the Settings tab and select Deduplication from the side menu to reach the list of available options.
3. Click the checkbox to enable duplicate detection.
4. Select the working digest you want to use. This is the method of hashing that will be used to determine duplicates. The hash values are obtained through metadata fields (email) or by hashing the entire file (e-docs). LAW PreDiscovery uses two types of hashing methods:
a. MD5: 128-bit output
b. SHA-1: 160-bit output
5. Now, select the Test to deduplicate against (Scope). During the import process, deduplication can be performed at one or two levels. Select Case Level (Globally) if you want to deduplicate documents against the entire incoming collection and against existing records in the LAW PreDiscovery case. Select Custodian Level if you want to deduplicate documents against records with identical custodian values.
6. Next, you will need to select an action from the pull-down list under “If record is considered a duplicate then (Action).” Select Include if you would like to create a record for the duplicate in the database and copy the native file into the case folder. Select Partially Exclude if you would like to create a record in the database, but not copy the native file. Select Exclude if you do not want to create a record and do not want to copy the native file to the case folder.
40 CHAPTER 6
GETTING STARTED GUIDE I LAW PREDISCOVERY™

41 CHAPTER 6
GETTING STARTED GUIDE I LAW PREDISCOVERY™
Searching Using Query ToolsClients commonly request that documents be produced based on certain criteria. LAW PreDiscovery has searching tools that allow you to perform advanced database and full-text searches to locate the requested records. You may easily return the flagged records when needed for processing by using the filtering methods in the previous section or the tool discussed in the next section.
Query BuilderThe Query Builder is ideal for running advanced database and full-text searches to locate desired records in a case. Now you can build more advanced searches by adding multiple conditions to searches and clauses within searches, save common queries and re-execute them as needed, and search a greater number of system fields in the case.
The Query Builder contains three tabs: Advanced, Saved Filters and Search History. New queries are built in the Advanced tab.
To build a query (Advanced tab):
1. To launch the Query Builder tool, click Tools > Search Records or click the binoculars icon on the main toolbar. The Database Query Builder dialog box will appear.
42 CHAPTER 6
GETTING STARTED GUIDE I LAW PREDISCOVERY™
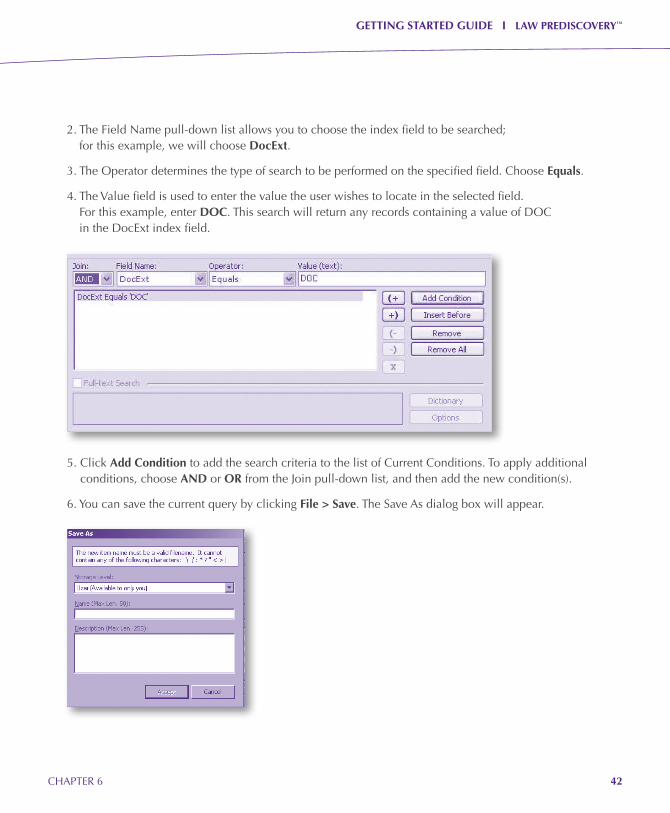
2. The Field Name pull-down list allows you to choose the index field to be searched; for this example, we will choose DocExt.
3. The Operator determines the type of search to be performed on the specified field. Choose Equals.
4. The Value field is used to enter the value the user wishes to locate in the selected field. For this example, enter DOC. This search will return any records containing a value of DOC in the DocExt index field.
5. Click Add Condition to add the search criteria to the list of Current Conditions. To apply additional conditions, choose AND or OR from the Join pull-down list, and then add the new condition(s).
6. You can save the current query by clicking File > Save. The Save As dialog box will appear.

43 CHAPTER 6
GETTING STARTED GUIDE I LAW PREDISCOVERY™
7. Choose User or Shared for the storage level to determine whether the query will be available later to only the currently logged-in user or to all users who enter the case. Enter a name for the query and a description. Click Accept. The query will be available in the Saved Filters tab each time the Query Builder is accessed in the current case.
8. Click Execute on the Advanced tab to execute the query. The query results will be returned to your default grid.
To execute a saved query (Saved Filters tab)The purpose of saving the query is to allow you to easily re-execute a common or complex query that has been previously executed in the same LAW PreDiscovery case.
1. Click the binoculars icon on the main toolbar. The Query Builder dialog box will appear.
2. Click the Saved Filters tab.
3. Choose User, Shared or All Available Views from the Storage Level/Scope pull-down list. This will determine which queries will display in the form.
4. Click the Title to view a description and preview of the selected filter. Double-click the Title to apply the query to the Advanced tab.
5. Click Execute. The results will be returned to the grid view.

44 CHAPTER 6
GETTING STARTED GUIDE I LAW PREDISCOVERY™
Search History TabThe Search History tab will save the last 50 filters that were executed from the Query Builder.
1. Click the Search History tab in the Query Builder.
2. Double-click a filter in the list to send the query to the clause list in the Advanced tab.
3. Click Execute. The results will be returned to the designated grid.
Once the desired records have been returned in the grid, the records may be flagged and sent for further processing. When the Batch Process or Export Utility is executed while a culled set of records is displayed in the grid, only that record set will be selected for processing. You can change the documents to be processed by using the folder selection options within each of these utilities.
Tagging DocumentsWhen you filter and search to locate documents, you will likely also need to tag the returned records so you can locate them for processing later. LAW PreDiscovery allows you to create a number of tag fields—for example, to be used for flagging records marked privileged or confidential.
LAW PreDiscovery enables you to create a number of tag fields for flagging these records. You may also want to tag documents that need reprocessing during the QC process. Tagging Individual DocumentsThe grid displays in LAW PreDiscovery are well suited for locating and tagging documents. Multiple tagging-related options are available to make the task easier to perform. Documents may be tagged individually or in batches.
In order to perform the next steps, a tag field will need to exist in the case. To create a tag field, click Index > Modify Fields, click Add Field, enter a name such as Print in the Name field, choose Document-Level for the Table, and choose Tag for the Type.

45 CHAPTER 6
GETTING STARTED GUIDE I LAW PREDISCOVERY™
To tag a document:
1. Launch the grid and load records.
2. If a tag field, such as the Print field created above, is not displayed in the grid currently, launch the Field List and click the checkbox next to the tag field to display it. Close the Field List.
3. Choose a document and tag it by clicking in the desired tag field. A green checkmark will appear in the cell when a record is tagged as Yes. Tag one or two other documents using the same method. You also can tag documents by using hot keys. Now that a document is tagged, it may be easily returned in a filter or query for further processing, if needed.
Tagging Multiple DocumentsYou can find additional tagging options by right-clicking a tag field in the grid displays. Select from three options that apply to selected rows in the grid; select rows by using the Shift and/or Ctrl keys to highlight multiple rows. The three options are:
1. Tag Selected Rows as Yes assigns a Yes flag (green checkmark) in the selected tag field for all highlighted rows.
2. Tag Selected Rows as No assigns a No flag to all highlighted rows.
3. Toggle Tag for Selected Rows toggles the tag for all highlighted rows; any Yes flags will be changed to No and any No flags will be changed to Yes.
You also can select from three batch tagging options that apply to all records currently loaded in the grid.
1. Tag All Rows as Yes assigns a Yes flag in the selected tag field to all records currently loaded in the grid.
2. Tag All Rows as No assigns a No flag to all records in the grid.
3. Toggle Tag for All Rows toggles the tag in the selected field for all records in the grid (changes Yes to No or vice versa).

46 CHAPTER 6
GETTING STARTED GUIDE I LAW PREDISCOVERY™
Importing a Tag ListThe Import Tag List feature is used to flag multiple records using a *.txt or *.csv file containing a list of document identifiers (i.e., DocIDs). This method of flagging is useful when the client is using a different type of database to flag records and later exports a list of documents to be produced. You may easily import this list into the existing LAW PreDiscovery case and query it later to locate the records for further processing.
To import a tag list:
1. Click File > Import > Tag List. The Import Tag List dialog box will appear.
2. Click Browse… and then locate the file containing a list of DocIDs (or some other value that is unique for each record). Click Open. If the field name is listed in the first line of the import file, be sure to check the First row contains field names option. The range delimiter may be used if row(s) in the import file contain ranges, such as ID0001-ID0075 (the hyphen would be the range delimiter in this example).

47 CHAPTER 6
GETTING STARTED GUIDE I LAW PREDISCOVERY™
3. Next, select the field that contains the values listed in the file from the Document ID Field pull-down list (i.e., DocID).
4. In the Target Field area, choose the field to update upon importing, such as a tag field (i.e., Print tag field created in a previous section). System fields that are not editable will not be listed in this pull-down list.
5. Choose the desired action for the target field. If using a tag field, choose Update or Reverse. Update will change the affected field to a true or false value, depending on the selected option. Reverse will simply toggle the value for the affected fields; if the existing value is true, it will change to false and vice versa. An Append option will be available, instead of Reverse, for other field types, allowing you to add data to a field vs. overwriting the current values. For this example, choose Update.
48 CHAPTER 7
GETTING STARTED GUIDE I LAW PREDISCOVERY™
6. The two available options for a tag field update are True and False. Choose True for this example.
7. Click Add. The condition will be added to the list of selected fields. Additional fields may be updated during the same import using steps 4 through 7.
8. Click OK to begin importing.
The chosen field(s) will be updated with the specified value. These records may then be returned by a search using the filter functions or query tools.
CHAPTER 7: WALK-THROUGH—BATCH PROCESSING
This guide has discussed methods of searching and tagging documents to prepare for other processes, such as TIFF conversion, Bates numbering and endorsing. The Batch Process utility in LAW PreDiscovery performs these processes on one or all documents in a case. The following section will provide a brief description of each available batch process; please note, all but two of these processes apply only to images; TIFF conversion and e-Print are the only batch processes that apply to native-file-only records.
Document NumberingDocument numbering allows users to assign numbering schemes at a document- and/or page-level, including the assignment of Page IDs to uniquely identify each page of a document with an associated image. Document-level fields may also be numbered using this process. Users will choose Page or Document to determine which fields will show in the Target Field pull-down. Then, the field to be numbered is selected as the Target Field and a starting # is entered. The value will increment by one for each document in the batch based on the starting #.
Image CleanupThis process offers three options for cleaning an image: Deskew, Black Border Removal, and Noise Removal (despeckle). These functions may be performed as each page is scanned or all at once in a batch process.
EndorseThis process will stamp the specified header and/or footer, such as the Page ID, onto the image. Headers and footers may be customized in Options > Header/Footer (in the Batch Processing dialog box) and removed if necessary.
49 CHAPTER 7
GETTING STARTED GUIDE I LAW PREDISCOVERY™
OCR The optical character recognition (OCR) process will create a text file for each of the selected image records, providing enhanced searching and retrieval capabilities when fed into the target application following LAW PreDiscovery. The OCR process can be quite time consuming. This time is dependent on the quality of the originals, the type of data on the page and the amount of data.
Regarding Unicode and OCR: the Expervision and TextBridge OCR engines do not currently support Unicode. To find supported languages, go to the Tools menu and select Options. Click the OCR tab and click the down arrow to open the Language pull-down menu. Printed and extracted text will contain Unicode data if it exists in the original file and can be displayed, provided the proper language pack(s) are installed on the system.
Print (Standard-Image Only)This process prints the selected images (no native files, see E-Print) to the printer specified in Options > Print Options. If a header and/or footer is specified, you can apply it to the image at this time by selecting Yes to the prompt that appears before printing begins.
Regarding Unicode and Print: the Text/RTF Printer does not support Unicode text files. It supports rich text files with Unicode. This is a limitation of the underlying component. To print Unicode text files, use either Microsoft Word or the Shell Printer as the source application. If you use the Shell Printer, you must ensure that the application registered on the system for text files supports shell prints. For example, Notepad supports shell prints.
E-Print (ED-Native Files)This process is used to print native files stored in LAW PreDiscovery to paper. Use the print batch process to print documents along with images associated with them. Use the E-Print Options to configure settings for this process.
Scan for Suspect FootersThis feature scans all pages for suspect footers (those appearing to be 1 inch or larger) and flags an index field of your choosing with Y if any pages in a document contain suspect footers, N if not. This feature is useful if images that have been imported already contained an endorsement and the documents were endorsed again, creating a double endorsement.
50 CHAPTER 7
GETTING STARTED GUIDE I LAW PREDISCOVERY™
TIFF ConversionThis process uses the LexisNexis Image Driver, Informatik Image Driver, or Peernet 7 driver to convert the selected files to TIFF images. The TIFF conversion batch process may be used to convert native files to TIFF images or to reprocess TIFF files.
Update Page DataThis process can be used to populate the PageColor, PageSize, PageWidth, and PageHeight fields for any images in the selected recordset missing this information. PageSource is not affected during this process as the source can be captured only at the time the image is acquired.
The TIFF Conversion ProcessUse the TIFF conversion process to batch-convert native files to TIFF images or to reprocess TIFF files. The documents to be included for processing are determined by the user; you can send anywhere from one document to the entire case for TIFF conversion at one time. The following steps will demonstrate one method of selecting documents and initiating the TIFF conversion process. In this example, we will filter documents in the grid using the DocExt field.
To convert images to TIFF based on a filtered set:
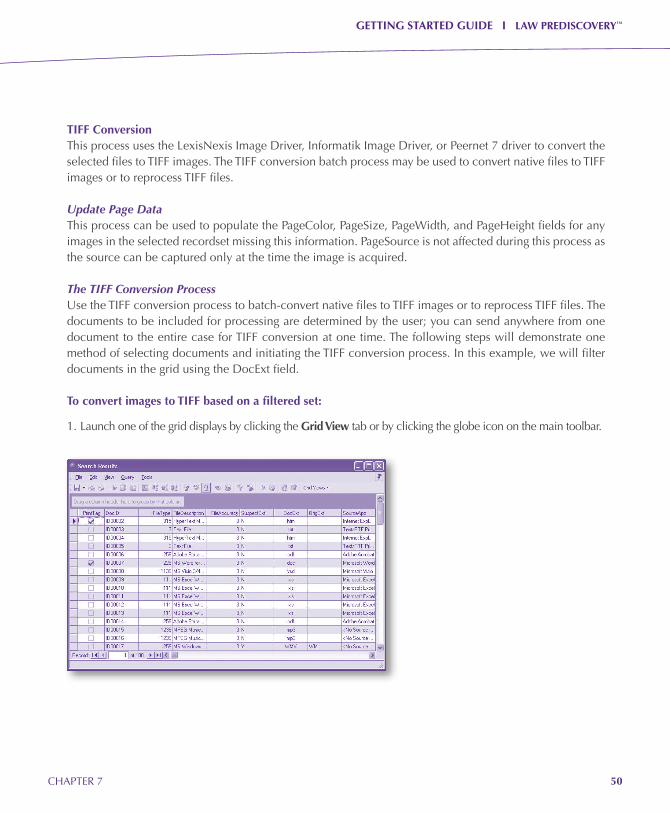
1. Launch one of the grid displays by clicking the Grid View tab or by clicking the globe icon on the main toolbar.
51 CHAPTER 7
GETTING STARTED GUIDE I LAW PREDISCOVERY™
2. Ensure that the DocExt field is displayed in the grid; if it is not, use the Field List (right-click any column header) to include the field.
3. Create a grouping by dragging the DocExt field into the grouping area located above the column headers. Expand a group of similar file extensions by clicking the plus sign next to one of the groups—XLS, for example. Right-click the XLS extension in the DocExt column, then choose Filter by Selection. Only documents containing the XLS value in the DocExt field will appear in the grid.
4. Next, click the Batch Process button on the toolbar in the grid, or click Tools > Batch Process from the grid’s menu bar. The Batch Processing dialog box will appear.
5. In the Selected Documents section, the Current Record Set option should be selected and the total number of documents/pages listed (number of pages will be listed only if images already exist for any of the selected records). The selected documents will consist of only those that were returned after applying the filter.
6. Click Options > TIFF Options. The TIFF Conversion Options dialog box will appear. This contains options related to the TIFF Conversion batch process, such as color and compression settings, placeholder options and TIFF format selection. The Options dialog box also includes tabs with native application-specific settings (e.g., Word, Excel, etc.) to control certain features during the conversion. These include automatic field replacements, Excel page orientation and several other options related to handling Excel worksheets, such as printing gridlines and hidden columns/rows. The TIFF Output settings allow users to choose the image printer and color settings. Make any desired changes to these options, and then click OK to close the window and return to the Batch Processing dialog box.
7. Click the checkbox next to the TIFF Conversion option. 8. Click Begin. The TIFF conversion will begin on the selected documents.
If errors occurred during the TIFF conversion, review the error messages in the Log Viewer to determine if the items should be reprocessed, perhaps after making changes in the Options dialog box.
52 CHAPTER 7
GETTING STARTED GUIDE I LAW PREDISCOVERY™
Distributed Batch ProcessingDistributed batch processing allows multiple LAW PreDiscovery stations to process the same batch simultaneously, while using the same settings that were specified on the machine that initiated the shared job. Only the documents selected on this initial machine will be processed.
This shared processing is available for the following batch processes:
n Image Cleanup
n Endorse
n OCR
n TIFF Conversion
n Update Page Data
When a batch has been generated, an INI file will be placed in the case folder (\$UserData\BatchProcessing\ All Users) that uniquely identifies the batch. This directory is scanned for INI files when the Batch Process utility is launched. If any INI files are present, the user will be given the option to “join” processing.
The next steps will demonstrate how to create, join and delete a shared batch.
To initialize a shared batch:
1. In the Batch Processing dialog box (Tools menu), choose the documents to include for processing.

53 CHAPTER 7
GETTING STARTED GUIDE I LAW PREDISCOVERY™
2. Now choose a process that is supported for distributed processing (see above list). Let’s use TIFF Conversion in this example. Click the checkbox next to TIFF Conversion, and then click Options > TIFF Options if any settings need to be changed, such as the image printer, color settings or application-specific settings (e.g., Excel).
3. Click the checkbox to Enable Distributed Batch Processing. Enter a title for the batch in the Name field, such as Tiff001. This is just a reference for the batch and is useful when other machines join the batch. Since multiple batches may exist for the same case, it is important to use a descriptive name to ensure the proper batch is joined when prompted on another station.
4. Click Begin to initialize the TIFF conversion on the first machine.
5. Next, open the same LAW PreDiscovery case on another station. Launch the Batch Processing dialog box. In front of this dialog box, the Running Batches dialog box will appear. All batches that were created in this case, whether currently running or not, will be listed.
54 CHAPTER 7
GETTING STARTED GUIDE I LAW PREDISCOVERY™
6. Locate the desired batch, highlight the name in the grid, and then click Join. LAW PreDiscovery will locate the next unprocessed document in the batch and begin processing it using the exact settings that applied when initializing the batch on the other station.
Deleting Shared BatchesIf a shared batch is no longer needed, you can delete the batch from the Running Batches dialog box.
1. Click Tools > Batch Process from the main menu bar. If shared jobs exist in this case, the Running Batches dialog box will appear.
2. Click the batch to be deleted. Click Edit > Delete. Click Yes to the warning message. The shared batch will be deleted from the list.
When the TIFF conversion has completed, newly created TIFF images will be viewable in the image display (Image tab on main interface), and an orange image indicator will appear next to each document in the document list (lower right pane on the main LAW PreDiscovery form) that now has an image associated with it.
Document NumberingOnce images exist in the LAW PreDiscovery case, you may want to number the documents prior to exporting. Use the Batch Processing dialog box to initialize these processes, just as you would to begin a TIFF conversion.
To number documents:
1. Click Tools > Batch Process from the main interface or from the grid. The Batch Processing dialog box will appear.
2. Click the checkbox beside Document Numbering.
3. Select “Page” or “Document” to determine which fields are available for numbering: page-level or document-level. If images exist for the selected records, a page-level field such as PageID may be chosen. Choose the Target Field from the pull-down list.

55 CHAPTER 7
GETTING STARTED GUIDE I LAW PREDISCOVERY™
4. Enter a beginning number in the Starting # field. This value will increase by one for each page of each document in the case if a page-level field is selected. If a document-level field was chosen, the starting value will increase by one for each document.
5. If you launched the Batch Processing dialog box from one of the grid displays, the Current Record Set option will be selected in the Selected Documents section and only the records currently in the grid will be processed. If you launched from the main interface, choose All Documents to process everything in the case or Selected Documents to choose certain folders and/or ranges of documents in folders. Distributed processing cannot be used with the Document Numbering process.
6. Click Begin. The selected documents will be updated with the specified numbering scheme.
EndorsingThe Endorse process will apply the specified header and/or footer to the selected images, whether the images were imported, scanned or created by converting to TIFF within LAW PreDiscovery. You may specify the header/footer value, size, location and font in the options available through the Batch Processing dialog box. To endorse documents:
1. Ensure only image records exist in the grid display.
2. Click Tools > Batch Process from the grid display. The Batch Processing dialog box will appear.

56 CHAPTER 7
GETTING STARTED GUIDE I LAW PREDISCOVERY™
3. Click the checkbox beside Endorse Image.
4. Click Options > Header/Footer… . The Header/Footer dialog box will appear.
5. Choose one or more of the six available sections for the endorsement. Click in the desired header or footer section. In this example, the Page ID will be endorsed in the right footer section and the word PRIVILEGED will be endorsed in the left footer section. To do this, click in the right footer section, then click the Page ID button ( ) (If no Page IDs exist in the case, ignore this step.) Next, click in the left footer section, then type the word PRIVILEGED. The font may be selected by clicking the button with the letter A on it ( ).
57 CHAPTER 8
GETTING STARTED GUIDE I LAW PREDISCOVERY™
6. Once the desired selections have been made, click OK to return to the Batch Processing dialog box.
7. If needed, click the checkbox to Enable Distributed Batch Processing. This will allow users to process the same batch, using the same settings, from multiple workstations. See the Distributed Batch Processing section in this guide for more information.
8. Click Begin. The selected images will be endorsed with the specified footer values.
Depending on the project, the final step may be to export the images, native files and text to a litigation support database for review.
CHAPTER 8: WALK-THROUGH—EXPORTING Export ProfilesThe Export Utility allows you to export one or a combination of the following items to the desired litigation support software: native files, images, field data and full text. Because the supported export formats are quite different from each other, LAW PreDiscovery provides you with target application-specific settings to help with each set of options. We will go over a description of each export option to help get you started.
Export profiles allow you to save settings that are used in a particular export, such as index field selection and format-specific settings. This enables you to re-open the profile and apply or review those settings later. Profiles will be created, saved, modified and opened from the Advanced Export Utility; they are saved in a *.pfl file and stored in the location of your choosing.
To create a profile:
1. Choose Tools > Export Utility. The Export Utility will appear.
58 CHAPTER 8
GETTING STARTED GUIDE I LAW PREDISCOVERY™
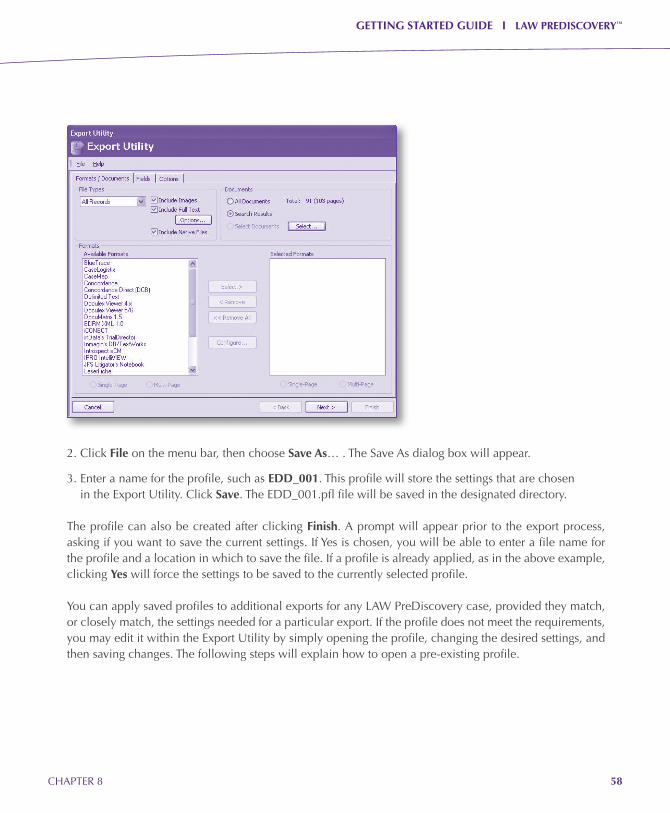
2. Click File on the menu bar, then choose Save As… . The Save As dialog box will appear.
3. Enter a name for the profile, such as EDD_001. This profile will store the settings that are chosen in the Export Utility. Click Save. The EDD_001.pfl file will be saved in the designated directory.
The profile can also be created after clicking Finish. A prompt will appear prior to the export process, asking if you want to save the current settings. If Yes is chosen, you will be able to enter a file name for the profile and a location in which to save the file. If a profile is already applied, as in the above example, clicking Yes will force the settings to be saved to the currently selected profile.
You can apply saved profiles to additional exports for any LAW PreDiscovery case, provided they match, or closely match, the settings needed for a particular export. If the profile does not meet the requirements, you may edit it within the Export Utility by simply opening the profile, changing the desired settings, and then saving changes. The following steps will explain how to open a pre-existing profile.

59 CHAPTER 8
GETTING STARTED GUIDE I LAW PREDISCOVERY™
To open a saved profile:
1. In the Export Utility, click File > Open. The Open dialog box will appear.
2. Browse to the *.pfl file you wish to apply, and then click Open. All settings saved to this profile will be applied to the Export Utility.
Export UtilityIt is extremely important to understand how the Export Utility works and how each option will affect the resulting output. If exporting is performed incorrectly, the files may not load properly, or at all, into the chosen litigation support application. This section of the guide provides a brief overview of each feature.
Formats/Documents tabThe Formats/Documents tab is used to specify the export type, the files to be included for exporting and the type of files (i.e., native files), the target application and its configuration settings (if any), and image format.
File TypesBecause LAW PreDiscovery is both a scanning and an electronic discovery application, the Export Utility allows you to choose which type of data should be included in the export. The Export Types section contains three options:
n All Records: Use this option when you have a LAW PreDiscovery case that contains both scanned (or imported) images and native files and you want to include both types in the export . You may also use this option if the case is all e-discovery or all scanned data .
n Scanned Data: Use this option when you want to export only scanned images—or images imported using a feature other than the ED Loader (such as Import Raw Images) .
n Electronic Discovery: Use this option when you want to export files that were imported as e-discovery only . This may include native files and/or the TIFF images for each electronic discovery (ED) record .
Note: Keep in mind, not all target applications support native file review. Currently, native file exports apply only to Blue Trace, CaseLogistix, Concordance, Concordance Direct (DCB), Delimited Text, EDRM XML 1.0, iCONECT®, Introspect eCM, Ringtail CaseBook and Summation.

60 CHAPTER 8
GETTING STARTED GUIDE I LAW PREDISCOVERY™
Regarding Unicode: Unicode data is supported in the Export Utility in the following export formats:
n CaseLogistix
n Delimited text
n EDRM XML 1 .0
Unicode data is automatically included in the CaseLogistix and EDRM load files. For delimited text exports, Unicode data is included only if the “Allow Unicode data (UCS-2 format)” option is enabled in this format’s configuration settings.
You can also retain Unicode data when exporting field data from the two grid displays. In order to retain Unicode data when saving results from the grids, select Unicode Text (Tab delimited)(*.csv) as the file type.
In the Export Utility, when exporting to a format that does not support Unicode, do not use the Mirror Original folder naming scheme if Unicode folders exist in the case. Also ensure that the export path does not contain Unicode. Unicode paths and file names may prevent target applications from opening the associated image, text and/or native files.
You can also choose which document states to include in the export. These are the available options:
n Include Images includes scanned images, images imported via Import Raw Images or Import Load File, and images created during the TIFF conversion batch process or using the single document TIFF conversion feature .
n Include Full Text includes full text files for any records with an associated text file . This full text may have been extracted during the ED Loader import, created during the OCR process, created during the TIFF conversion batch process or created during a single document TIFF conversion .
Options include text-specific selections such as setting the priority of text types to include in the export (Printed, OCR or Extracted) .
n Include Native includes the native files imported during the e-discovery import process . Again, not all export formats support native file review . If the only option selected is Include Native, then only certain formats (listed in the above note) will appear .

61 CHAPTER 8
GETTING STARTED GUIDE I LAW PREDISCOVERY™
DocumentsThe Documents section allows you to choose which documents to include in the export.
n All Documents includes all documents in the case, depending on the selected Export Type . For example, if this option is selected, and Electronic Discovery is chosen in the File Types section, LAW PreDiscovery exports only records imported as e-discovery; scanned data will not be included in the export .
n Search Results includes all records currently displayed in the grid . This option will be enabled only if the Export Utility is launched while a grid display is active or if the utility is launched directly from a grid .
n Selected Documents allows you to choose certain folders and/or ranges of documents within folders for processing . Click Select to launch the Select Folders dialog box, then click the checkboxes next to any folders that need to be included for export . To select a range of documents, click the folder containing the desired records, and then click the Set Range button . Click the checkboxes next to the starting and ending documents .
FormatsThis section is used to specify the target application(s), as well as the load file/image format. It is important to realize that there are many applications to choose from and not all support the same options or image formats. Also, certain applications have special configuration settings available in the Export Utility. To select a format:
1. Single-click the desired application title, such as Concordance, in the Available Formats list.
2. Directly below this list, Single-page and Multi-page image format options appear. Choose the desired format by clicking the appropriate radio button.
3. To move the format to the Selected Formats list, simply double-click the application title or ensure the
title is highlighted and click the Select button.
Note: You must select Single- or Multi-page while the format is under the Available Formats list; once it is moved to Selected Formats, the Single- or Multi-page selection cannot be changed without moving the format back to the previous side.

62 CHAPTER 8
GETTING STARTED GUIDE I LAW PREDISCOVERY™
As mentioned, certain formats will have additional configuration settings specific to that application. Use the following steps to determine if an application has additional settings.
1. Single-click the application title in the Selected Formats list.
2. If the application has additional settings available, the Configure button (located in between the Available Formats list and Selected Formats list) will be enabled. If applicable, click the Configure button.
3. View and edit (if needed) the necessary settings, then click OK to return to the Formats tab of the Export Utility.
Fields TabUse the Fields tab in the Export Utility to select the index fields to be included in the load files and to select the Image Tag, or document identifier that will be used to link the index field data to the correct image or native document. The sections below provide a brief description of each area in the Fields tab.
Selected FormatThis pull-down list contains up to five items, depending on the formats selected in the Formats/Documents tab: Default, Summation, Concordance, Concordance Direct (DCB) and Ringtail CaseBook. In the example, only Concordance is selected and therefore, Default and Concordance will show in the pull-down list.
When Default is chosen, any fields that are selected will be included in all of the selected formats’ load files. In some situations, you may need to include certain fields in a Summation load file and different fields in a Concordance load file, for example, but want to perform both exports at one time. LAW PreDiscovery provides the ability to customize the field selection and field names for each of the four aforementioned formats, while still maintaining a default field assignment for other selected formats. This will prevent the need to perform multiple exports when simply changing index field information for one or more of the formats.
To use this feature, ensure that one of the previously mentioned formats, such as Concordance, is selected on the Formats/Documents tab, and then choose Concordance from the Selected Format pull-down list on the Fields tab. Then, select the option explained in the next section.
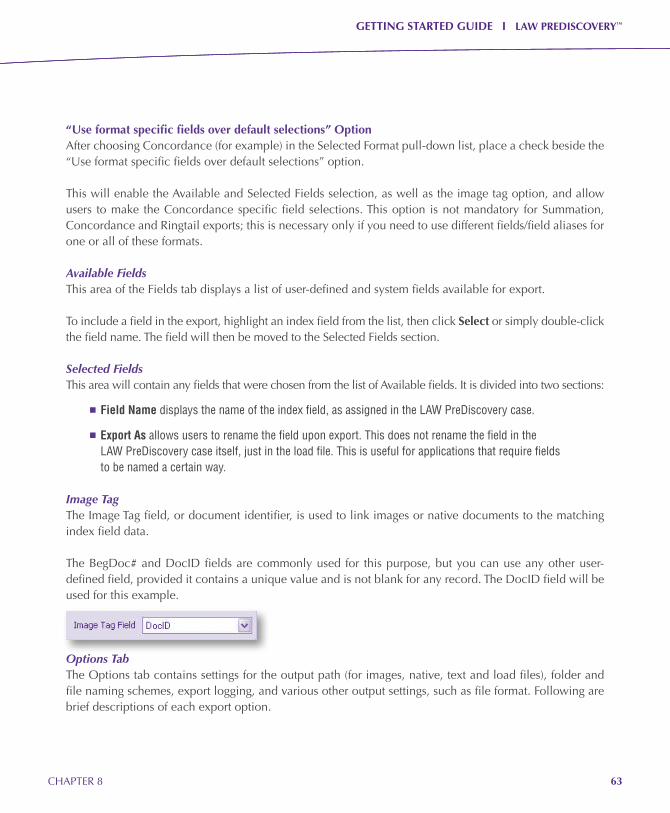
63 CHAPTER 8
GETTING STARTED GUIDE I LAW PREDISCOVERY™
“Use format specific fields over default selections” OptionAfter choosing Concordance (for example) in the Selected Format pull-down list, place a check beside the “Use format specific fields over default selections” option.
This will enable the Available and Selected Fields selection, as well as the image tag option, and allow users to make the Concordance specific field selections. This option is not mandatory for Summation, Concordance and Ringtail exports; this is necessary only if you need to use different fields/field aliases for one or all of these formats.
Available FieldsThis area of the Fields tab displays a list of user-defined and system fields available for export.
To include a field in the export, highlight an index field from the list, then click Select or simply double-click the field name. The field will then be moved to the Selected Fields section.
Selected FieldsThis area will contain any fields that were chosen from the list of Available fields. It is divided into two sections:
n Field Name displays the name of the index field, as assigned in the LAW PreDiscovery case .
n Export As allows users to rename the field upon export . This does not rename the field in the LAW PreDiscovery case itself, just in the load file . This is useful for applications that require fields to be named a certain way .
Image TagThe Image Tag field, or document identifier, is used to link images or native documents to the matching index field data.
The BegDoc# and DocID fields are commonly used for this purpose, but you can use any other user-defined field, provided it contains a unique value and is not blank for any record. The DocID field will be used for this example.
Options TabThe Options tab contains settings for the output path (for images, native, text and load files), folder and file naming schemes, export logging, and various other output settings, such as file format. Following are brief descriptions of each export option.

64 CHAPTER 8
GETTING STARTED GUIDE I LAW PREDISCOVERY™
Output PathThis section contains settings related to the location in which the files will be exported.
n The Export Path value is the location in which the exported files will be saved . These files may include images, native files, full text and load files, depending on the selected options .
n The Partition Size is used to determine how much data is written to each volume . The last folder listed in the output path is considered to be the volume name . For example, if the export path listed is C:\Exports\EDD_001\Vol001, then the first volume will be Vol001 . When the partition size has been reached, a Vol002 folder will be created, and so on . You should use the default of 650 MB if you plan to burn the exported data to CDs, but you may increase or decrease the size as needed (0=unlimited, all records will be written to one volume) .
n When the Prompt to continue export when volume is full option is enabled, a prompt will appear on the screen each time a volume is full and a new volume must be created . The user must click Yes each time in order for LAW PreDiscovery to create the new volume and continue with the export .
File Naming SchemeThe file naming grid is used to specify the type of file name to be used for images, native files and full text. The following items briefly describe each column in the grid and its purpose:
n File Type lists each type of file included in the export as well as a Default option, which applies to all types unless the Override option is used . Only file types that are selected on the Formats/Documents tab will be displayed; the Default option will always be displayed . Having each listed separately allows you to apply different options to each file type (native, images, full text), if desired.
n Override enables you to override the Default settings for the desired file type . For example, if BegDoc# is needed as the filename for images and the original filename field is needed for native files, simply check the Override option in the Native row and choose Original Filename in the File Naming column .

65 CHAPTER 8
GETTING STARTED GUIDE I LAW PREDISCOVERY™
n File Naming enables you to specify a file naming scheme for the exported files . Options include BegDoc#, DocID, Original Filename, Auto Number and many other fields .
n Exts ensures that the file extension is included in the exported filename . This is useful for single-page imports when you use a document-level file naming scheme (usually resulting in extensions such as .001, .002, etc .) .
n Starting Num is available only when you use the Auto Number file naming scheme . Enter a starting number for the exported files; the value will increase by one for each file .
n Reset Num is available only when you use the Auto Number file naming scheme . Enabling this option will force the auto-numbering to restart to the specified starting number for each new folder .
The Create control list file for extracted full text option, when enabled, provides a control list (*.lst file) that consists of a unique document identifier for each record with full text, as well as a path to the text file. This is commonly used to import text into a Summation case with existing records, but may be used for other purposes if needed. The .lst file is created in the currently specified Export Path, also found in the Options tab.
Folder Naming SchemeThe folder naming grid is used to specify the folder structure for images, native files and full text. Each option in this grid is explained below.
n File Type: This lists each type of file included in the export as well as a Default option, which applies to all types unless the Override option is used .
n Override: Use this to override the Default settings for the desired file type .
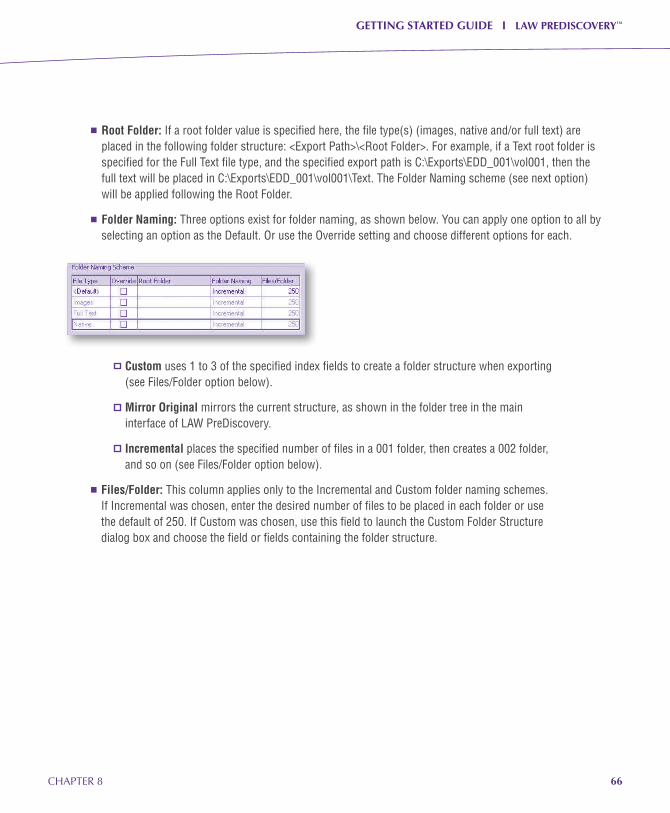
66 CHAPTER 8
GETTING STARTED GUIDE I LAW PREDISCOVERY™
n Root Folder: If a root folder value is specified here, the file type(s) (images, native and/or full text) are placed in the following folder structure: <Export Path>\<Root Folder> . For example, if a Text root folder is specified for the Full Text file type, and the specified export path is C:\Exports\EDD_001\vol001, then the full text will be placed in C:\Exports\EDD_001\vol001\Text . The Folder Naming scheme (see next option) will be applied following the Root Folder .
n Folder Naming: Three options exist for folder naming, as shown below . You can apply one option to all by selecting an option as the Default . Or use the Override setting and choose different options for each .
Custom uses 1 to 3 of the specified index fields to create a folder structure when exporting (see Files/Folder option below) .
Mirror Original mirrors the current structure, as shown in the folder tree in the main interface of LAW PreDiscovery .
Incremental places the specified number of files in a 001 folder, then creates a 002 folder, and so on (see Files/Folder option below) .
n Files/Folder: This column applies only to the Incremental and Custom folder naming schemes . If Incremental was chosen, enter the desired number of files to be placed in each folder or use the default of 250 . If Custom was chosen, use this field to launch the Custom Folder Structure dialog box and choose the field or fields containing the folder structure .
67 CHAPTER 8
GETTING STARTED GUIDE I LAW PREDISCOVERY™
Output SettingsThe Output Settings section contains options related to output image files, annotations and other miscellaneous settings.
Export StatusThis feature allows users to track whether or not a file has been exported.
A user-defined field must be selected to store the export status from the pull-down list. Exported files receive a value of Y; records that did not export receive a value of N. If an index field was created for this purpose, enable this setting and choose the field from the list.
Initializing the ExportOnce the settings are in place, click Finish to begin exporting. You will be prompted to save the settings. Click Yes to save the changes to the profile selected earlier in the guide. Next, LAW PreDiscovery will inform the user of the available space in the export path. Click Yes to proceed.
If the export completes without errors, you will be prompted to open the output folder. Click Yes to open the folder and view the output. If errors occurred, click Yes to view the errors in the Log Viewer.

68 CONCLUSION
GETTING STARTED GUIDE I LAW PREDISCOVERY™
ConclusionLAW PreDiscovery gives legal professionals the tools they need to prepare discovery with confidence and control. We hope this guide helps you make the most of LAW PreDiscovery.

GETTING STARTED GUIDE I LAW PREDISCOVERY™
| 69
LexisNexis and the Knowledge Burst logo are registered trademarks and DocPreviewer is a trademark of Reed Elsevier Properties Inc., used under license. Concordance and CaseMap are registered trademarks and FYI and PreDiscovery are trademarks of LexisNexis, a division of Reed Elsevier Inc. Other products or services may be trademarks or registered trademarks of their respective companies. © 2010 LexisNexis, a division of Reed Elsevier Inc. All rights reserved. LLG00831-3 0710
Achieve greater control, efficiency and insight with integrated Discovery Solutions from LexisNexis
The suite of Discovery Services from LexisNexis brings together all the elements you need to succeed in litigation—from litigation readiness to leading software applications. Our aim is to enable you to feel confident about every stage of the discovery process. And with so much riding on the outcome of a case, it is vital to have a company that understands your discovery needs today and tomorrow. LexisNexis is that company. We have both the legal and technological savvy to help you solve the many unplanned twists and turns of litigation.
In addition to LAW PreDiscovery imaging and electronic discovery processing software, LexisNexis offers the broadest discovery portfolio—including CaseMap with DocPreviewer™ e-mail discovery review tools, Concordance litigation management software, and Hosted FYI™—empowering law firms, corporations, and government agencies to litigate successfully in the face of overwhelming data volumes and rapidly changing technology.
To find out more, go to www.lexisnexis.com/lawprediscovery or contact a discovery services specialist today at 866.831.0497 or [email protected].
Litigation Services