getting started battery installation photocell transmitter...
TRANSCRIPT
GETTING STARTED battery installation
COUNTDOWN TIMER
PROGRAM
ON/OFF CD
SET
RANDOM
RESET
1
4
2
1
1 21
2
remove the battery cover from
the back of the timer
place two button cell batteries
between terminals observing
proper polarity then replace cover
PROGRAM
ON/OFF CD
SET
RANDOM
RESET
3 5 7 92 4 6 810
15
67
8
Press SET
Day select with
Press SET
Hour select with
Press SET
Minute select with
3 5 7 9
2 4 6 810
9
10
3
Press SET
Second select with
Press SET
1
4
2
5
67
8
Press SET
Start ON or OFF select with
Press SET
Hour select with
Press SET
Minute select with
9
10
3
Press SET
Second select with
Press SET
Press SET
Minute select with
CLOCK
The to-the-second countdown feature of this timer starts from the ON or OFF
position and counts down to zero when activated.
Press once from
LEARN
PROGRAM
ON/OFF CD
SET
RANDOM
RESET
Go to usingCLOCK
To activate/deactivate Daylight Saving Time (DST) function, press
and hold both and together for 3 seconds in mode;
solid for DST.
To toggle between 12/24 hour format, press RANDOM during
clock setting.
Stop countdown timer function with CD or ON/OFF
1
2
remove the battery cover from
the transmitter
place two AA size batteries into
compartment observing proper
polarity then replace cover
3
1
2
button descriptions
COUNTDOWN
SET
ON/OFF
RANDOM
RESET
PROGRAM
TIMER OPERATION
Programmable Timer Photocell Transmitter
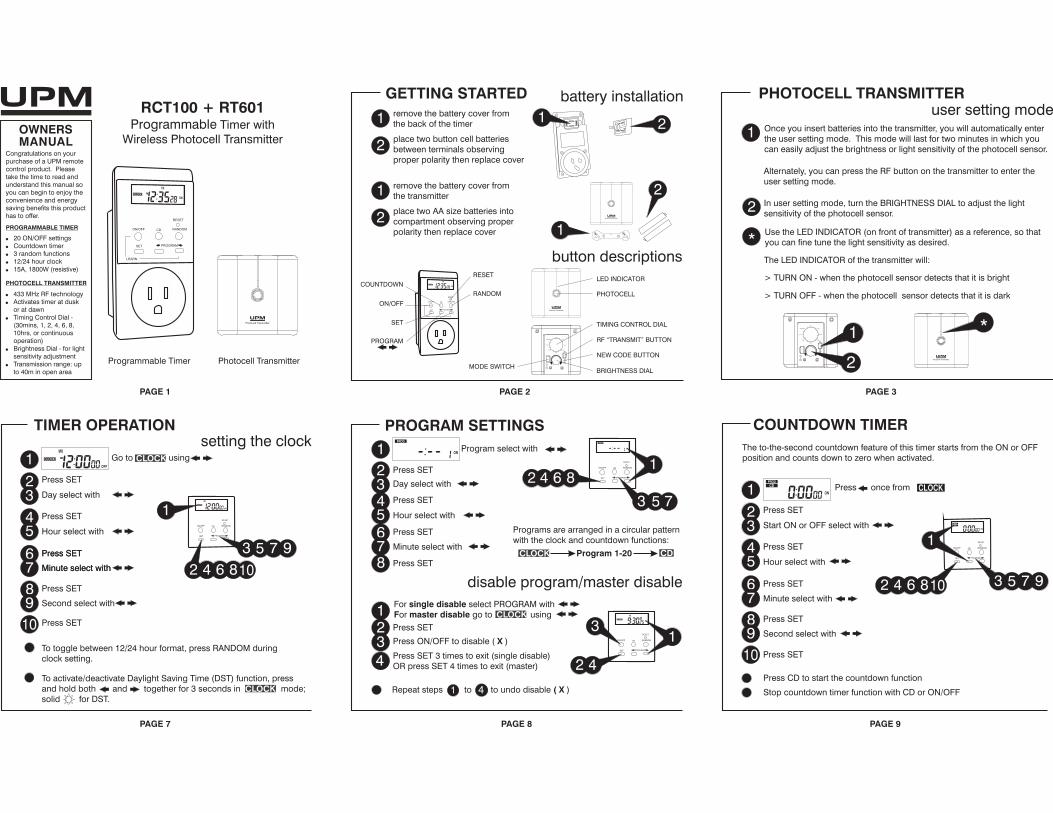
RCT100 + RT601Programmable Timer with
Wireless Photocell TransmitterOWNERSMANUAL
Congratulations on your
purchase of a UPM remote
control product. Please
take the time to read and
understand this manual so
you can begin to enjoy the
convenience and energy
saving benefits this product
has to offer.
�
�
433 M z RF technologyH
Activates timer at dusk
or at dawn
Timing Control Dial -
(30mins, 1, 2, 4, 6, 8,
10hrs, or continuous
operation)
Brightness Dial - for light
sensitivity adjustment
Transmission range: up
to 40m in open area
�
�
�
PROGRAM SETTINGS
disable program/master disable
PROGRAM
ON/OFF CD
SET
RANDOM
RESET 1
3 5 7
2 4 6 8
PROGRAM
ON/OFF CD
SET
RANDOM
RESET 1
4
3
1
4
2
5678
Press SET
Day select with
Press SET
Hour select with
Press SET
Minute select with
3
Press SET
Program select with
12 Press SET
Press ON/OFF to disable ( )X3
For select PROGRAM with
or go to using
single disable
F master disable
2Press SET 3 times to exit (single disable)
OR press SET 4 times to exit (master)
CLOCK
Programs are arranged in a circular pattern
with the clock and countdown functions:
CLOCK Program 1-20 CD
4
Repeat steps to to undo disable )( X
LEARN
PROGRAM
ON/OFF CD
SET
RANDOM
RESET
1 4Press CD to start the countdown function
TIMING CONTROL DIAL
MODE SWITCHBRIGHTNESS DIAL
NEW CODE BUTTON
RF “TRANSMIT” BUTTON
�
�
�
�
�
20 ON/OFF settings
Countdown timer
3 random functions
12/24 hour clock
15A, 1800W (resistive)
PROGRAMMABLE TIMER
PHOTOCELL TRANSMITTERLED INDICATOR
PHOTOCELL
PHOTOCELL TRANSMITTER
*
The LED INDICATOR of the transmitter will:
1 Once you insert batteries into the transmitter, you will automatically enter
the user setting mode. This mode will last for two minutes in which you
can easily adjust the brightness or light sensitivity of the photocell sensor.
Alternately, you can press the RF button on the transmitter to enter the
user setting mode.
2 In user setting mode, turn the BRIGHTNESS DIAL to adjust the light
sensitivity of the photocell sensor.
setting the clock
user setting mode
> TURN ON - when the photocell sensor detects that it is bright
Use the LED INDICATOR (on front of transmitter) as a reference, so that
you can fine tune the light sensitivity as desired.
> TURN OFF - when the photocell sensor detects that it is dark
*1
2
PAGE 1 PAGE 2 PAGE 3
PAGE 9PAGE 8PAGE 7
RANDOM FUNCTION TROUBLESHOOTING
PROGRAM
ON/OFF CD
SET
RANDOM
RESET
3
21
short/ randomlong
programmable random
PROGRAM
ON/OFF CD
SET
RANDOM
RESET
21
4 3
LCD display seems “frozen”. Buttons
won’t respond.
Timer loses programs when unplugged
Programmed ON/OFF times don’t
execute
Programmed ON/OFF times don’t
execute at specified times.
Transmitter stops turning receiver on
and off.
Press reset button to reset timer.
Replace batteries.
Ensure that the program disable feature is
not enabled.
Ensure that the random function is not
enabled.
Use the LEARN function to reprogram the
receiver or check the batteries.
problem solution
TECHNICAL SPECIFICATIONSProgrammable Timer RCT100
Ratings: 120V AC, 15A
Max Load: 1800W resistive; 600W tungsten
Photocell Transmitter RT601
Transmission Range: up to 40m in open area
Transmission Frequency: 433.92 M zH
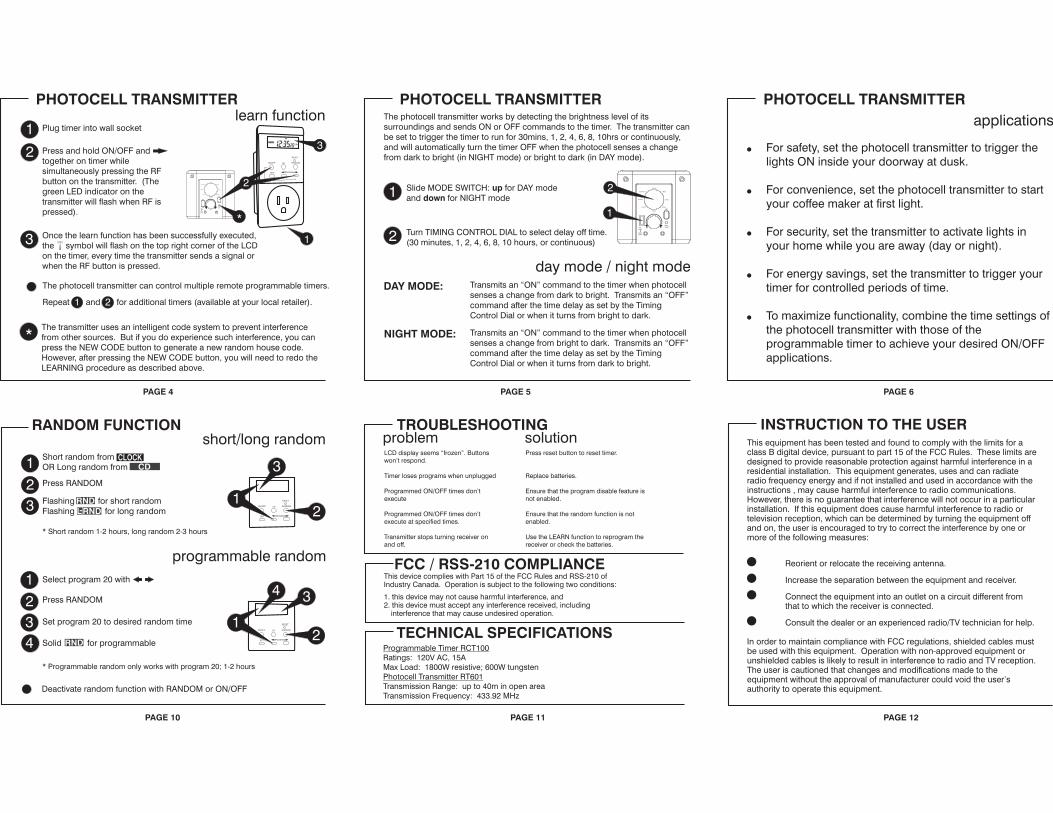
PHOTOCELL TRANSMITTER
2Repeat and for additional timers (available at your local retailer).
Press and hold ON/OFF and
together on timer while
simultaneously pressing the RF
button on the transmitter. (The
green LED indicator on the
transmitter will flash when RF is
pressed).
1
1 Plug timer into wall socket
2
LEARN
PROGRAM
ON/OFF CD
SET
RANDOM
RESET
1
*1
The transmitter uses an intelligent code system to prevent interference
from other sources. But if you do experience such interference, you can
press the NEW CODE button to generate a new random house code.
However, after pressing the NEW CODE button, you will need to redo the
LEARNING procedure as described above.
The photocell transmitter can control multiple remote programmable timers.
2
*
1
learn functionPHOTOCELL TRANSMITTER
Transmits an “ON” command to the timer when photocell
senses a change from dark to bright. Transmits an “OFF”
command after the time delay as set by the Timing
Control Dial or when it turns from bright to dark.
3 Once the learn function has been successfully executed,
the symbol will flash on the top right corner of the LCD
on the timer, every time the transmitter sends a signal or
when the RF button is pressed.
3
day mode / night mode
The photocell transmitter works by detecting the brightness level of its
surroundings and sends ON or OFF commands to the timer. The transmitter can
be set to trigger the timer to run for 30mins, 1, 2, 4, 6, 8, 10hrs or continuously,
and will automatically turn the timer OFF when the photocell senses a change
from dark to bright (in NIGHT mode) or bright to dark (in DAY mode).
Transmits an “ON” command to the timer when photocell
senses a change from bright to dark. Transmits an “OFF”
command after the time delay as set by the Timing
Control Dial or when it turns from dark to bright.
DAY MODE:
NIGHT MODE:
Turn TIMING CONTROL DIAL to select delay off time.
(30 minutes, 1, 2, 4, 6, 8, 10 hours, or continuous)
Slide MODE SWITCH: for DAY mode
and for NIGHT mode
up
down
2
2
INSTRUCTION TO THE USERThis equipment has been tested and found to comply with the limits for aclass B digital device, pursuant to part 15 of the FCC Rules. These limits aredesigned to provide reasonable protection against harmful interference in aresidential installation. This equipment generates, uses and can radiateradio frequency energy and if not installed and used in accordance with theinstructions , may cause harmful interference to radio communications.However, there is no guarantee that interference will not occur in a particularinstallation. If this equipment does cause harmful interference to radio ortelevision reception, which can be determined by turning the equipment offand on, the user is encouraged to try to correct the interference by one ormore of the following measures:
Reorient or relocate the receiving antenna.
Increase the separation between the equipment and receiver.
Connect the equipment into an outlet on a circuit different fromthat to which the receiver is connected.
Consult the dealer or an experienced radio/TV technician for help.
In order to maintain compliance with FCC regulations, shielded cables mustbe used with this equipment. Operation with non-approved equipment orunshielded cables is likely to result in interference to radio and TV reception.The user is cautioned that changes and modifications made to theequipment without the approval of manufacturer could void the user’sauthority to operate this equipment.
�
�
�
�
This device complies with Part 15 of the FCC Rules and RSS-210 ofIndustry Canada. Operation is subject to the following two conditions:
FCC / RSS-210 COMPLIANCE
PHOTOCELL TRANSMITTER
�
�
�
�
�
For safety, set the photocell transmitter to trigger the
lights ON inside your doorway at dusk.
For convenience, set the photocell transmitter to start
your coffee maker at first light.
For security, set the transmitter to activate lights in
your home while you are away (day or night).
For energy savings, set the transmitter to trigger your
timer for controlled periods of time.
To maximize functionality, combine the time settings of
the photocell transmitter with those of the
programmable timer to achieve your desired ON/OFF
applications.
applications
1. this device may not cause harmful interference, and2. this device must accept any interference received, including
interference that may cause undesired operation.
Flashing for short random
Flashing for long random
1
2 Press RANDOM
3
Short random from
OR Long random from CD
RND
LRND-
* Short random 1-2 hours, long random 2-3 hours
1
2 Press RANDOM
Set program 20 to desired random time3
3
Select program 20 with
Solid for programmableRND
* Programmable random only works with program 20; 1-2 hours
4
Deactivate random function with RANDOM or ON/OFF
PAGE 4 PAGE 5 PAGE 6
PAGE 12PAGE 11PAGE 10

4
2
5
678
Appuyer sur RÉGLER
Sélectionner jour avec
Appuyer sur RÉGLER
Sélectionner heure avec
910
3
Appuyer sur RÉGLER
Sélectionner seconde avec
Appuyer sur RÉGLER
Appuyer sur RÉGLER
Sélectionner minute avec
COMMENT DÉMARRER Emplacementsdes touches
MINUTERIE DE COMPTE À REBOURS
PROGRAM
ON/OFF CD
SET
RANDOM
RESET
1
1
1 21
2
enlever le couvercle du compartimentdes piles au dos de la minuterie
placer 2 piles boutons entre lesterminaux selon la polaritéindiquée puis replacer le couvercle
3 5 7 92 4 6 810
1
La fonction de compte à rebours est lancée à partir de MARCHE ou ARRÊT etcompte à rebours jusqu’à zéro lorsqu’elle est activée.
LEARN
PROGRAM
ON/OFF CD
SET
RANDOM
RESET
PROGRAM
ON/OFF CD
SET
RANDOM
RESET
3 5 7 92 4 6 810
1
1
2
enlever le couvercle du compartimentdes piles au dos de l'émetteur
placer 2 piles AA dans lecompartiment selon la polaritéindiquée puis replacer le couvercle
31
2
Description des touches
CR
RÉGLER
MARCHE/ARRÊT
ALÉATOIRE
REMISE À ZÉRO
PROGRAMME
FONCTIONNEMENT DE LA MINUTERIE
Minuterie Programmable Émetteur Photocelluleà
RCT100 + RT601Minuterie programmable avecémetteur à photocellule sans fil
Félicitations. Vous avezchoisi un produittélécommandé UPM.Veuillez prendre le tempsde lire et comprendre cemanuel pour pouvoirprofiter de la commodité etde l'économie d'énergie dece produit.
�
�
Technologie deradiofréquence de 433MHz
Étendue d'émission : jusqu'à40 mètres en surface ouverte
Active la minuterie aucrépuscule ou à l'aubeCadran de commande (30min, 1, 2, 4, 6, 8, 10 h oufonctionnement continuel)Cadran de luminosité pourajuster la sensibilité à lalumière
�
�
�
RÉGLAGE DE PROGRAMME
PROGRAM
ON/OFF CD
SET
RANDOM
RESET 1
3 5 7
2 4 6 8
PROGRAM
ON/OFF CD
SET
RANDOM
RESET 1
4
3
1
4
2
5678
Appuyer sur RÉGLER
Sélectionner jour avec
Appuyer sur RÉGLER
Sélectionner heure avec
Appuyer sur RÉGLER
Sélectionner minute avec
3
Appuyer sur RÉGLER
Sélectionner programmeavec
2
Les programmes sont en ordre circulaire avecl’horloge et les fonctions compte à rebours:
Programme 1-20 CR
LEARN
PROGRAM
ON/OFF CD
SET
RANDOM
RESET
CADRAN DE COMMANDEDE L'HEURE
TOUCHE MODECADRAN DE LUMINOSITÉ
BOUTON NOUVEAU CODE
BOUTON TRANSMISSION RF
�
�
�
�
�
20 réglages MARCHE\ARRÊTMinuterie de compte àrebours3 fonctions aléatoiresHorloge 12 ou 24 heures15A, 1800W (résistant)
MINUTERIE PROGRAMMABLE
ÉMETTEUR PHOTOCELLULEÀ
VOYANT DEL
PHOTOCELLULE
ÉMETTEUR PHOTOCELLULEÀ
*Le voyant DEL sur l'émetteur :
1 Une fois les piles insérées, on est automatiquement en mode réglage del'utilisateur. Ce mode dure deux minutes pendant lesquelles on peutfacilement régler la sensibilité à la lumière du capteur à photocellule.
On peut aussi appuyer sur le bouton RF sur l'émetteur pour utiliser cemode.
2 En mode réglage de l'utilisateur, tourner le CADRAN DE LUMINOSITÉ pourrégler la sensibilité à la lumière du capteur à photocellule.
réglage de l’horloge
Mode de réglage de l'utilisateur
> S'ALLUMERA lorsque le capteur à photocellule décèle qu'il fait jour
Se servir du voyant DEL (sur l'émetteur) comme référence pour régler plusprécisément la sensibilité à la lumière tel que désiré.
> S'ÉTEINDRA lorsque le capteur à photocellule décèle qu'il fait noir
*1
2
Aller àavec
HORLOGE
Pour changer le format de 12/24 heure appuyer pendant leréglage de l’heure.
ALÉATOIRE
Pour activer/désactiver la fonction d’épargne de jour, appuyer et tenir lesdeux ensemble pour 3 secondes dans la fonction horloge.Solide pour DST.
HORLOGE
HORLOGE
Désactivation de programme ou du programme maître
12 Appuyer sur RÉGLER
Appuyer sur marche-arr ésactiverêt pour d3Appuyer sur R 3 fois pour sortir (simple)ou appuyer 4 fois pour sortir (maître)
ÉGLER4Répéter les étapes à pour annulerla désactivation (X)
1 4
Désactivation d’un programme simple sélectionner avecDésactivation du programme maître aller à avecHORLOGE
4
2
5
678
Appuyer sur RÉGLER
Commencer ARRÊT/MARCHE avec
Appuyer sur RÉGLER
Sélectionner heure avec
Appuyer sur RÉGLER
Sélectionner minute avec
910
3
Appuyer sur RÉGLER
Sélectionner seconde avec
Appuyer sur RÉGLER
Appuyer sur CR pour lancer le compte à rebours
Appuyer sur CR ou MARCHE-ARRÊT pour arrêter le compte à rebours
MANUEL DUPROPRIÉTAIRE
Appuyez à une reprise sur à partir de
PAGE 1 PAGE 2 PAGE 3
PAGE 9PAGE 8PAGE 7

FONCTION ALÉATOIRE DÉPANNAGE
PROGRAM
ON/OFF CD
SET
RANDOM
RESET
3
21
Court/long aléatoire
Aléatoire programmable
PROGRAM
ON/OFF CD
SET
RANDOM
RESET
21
4 3
L’affichage à cristaux liquides semble bloqué, lestouches ne marchent pas.
La minuterie perd des programmes lorsqu'il estdéconnecté.
Les heures programmées avec marche-arrêt nemarchent pas.
Les heures programmées avec marche-arrêt nemarchent pas aux heures établies.
L'émetteur n'allume et n'éteint plus le récepteur.
Appuyer sur remise à zéro pour remettre laminuterie à zéro.
Remplacez les piles.
S’assurer que la fonction de désactivation n’est pasen marche.
Se servir de la fonction APPRENTISSAGE pourreprogrammer le récepteur ou vérifier les piles.
Vérifier que la fonction aléatoire n’est pas enmarche.
problème solution
SPÉCIFICATIONS TECHNIQUESMinuterie Programmable RCT100
1800W résistant; 600W tungst nemetteur Photocellule RT601
Commande: 120V AC, 15ACharge maximum:
Portée d'émission : jusqu'à 40 mètres en aire ouverteFréquence d'émission : 433,92 MHz
àè
É
ÉMETTEUR PHOTOCELLULEÀ
2Répéter et pour d'autres minuteries (disponibles chez votredétaillant).
Appuyer sur MARCHE/ARRÊT etensemble tout en appuyant
sur RF sur l'émetteur. (Le voyantDEL vert sur l'émetteur clignoteralorsqu'on appuie sur RF.)
1
1 Brancher la minuterie dans la prise murale.
2LEARN
PROGRAM
ON/OFF CD
SET
RANDOM
RESET
1
*1
L'émetteur se sert d'un système de code intelligent pour prévenirl'interférence d'autres sources. En cas d'interférence, appuyer sur lebouton NOUVEAU CODE pour créer un nouveau code maison au hasard.On doit alors refaire l'APPRENTISSAGE tel que décrit plus haut.
L'émetteur à photocellule peut commander plusieurs minuteriestélécommandées.
2
*
1
Fonction d'apprentissageÉMETTEUR PHOTOCELLULEÀ
Transmet une commande de MARCHE à la minuterie lorsquela photocellule capte un changement de l'obscurité au jour etune commande d'ARRÊT à la fin de la période réglée sur lecadran de commande de l'heure ou lorsque le jour fait placeà l'obscurité.
3 Si l'apprentissage est réussi, le symbole clignoteradans le coin supérieur droit de l'écran ACL sur laminuterie chaque fois que l'émetteur envoie un signal oulorsqu'on appuie sur RF.
3
Mode jour / nuit
L'émetteur à photocellule décèle le niveau de lumière et envoie une commandede MARCHE ou d'ARRÊT à la minuterie. On peut le régler pour que la minuteriefonctionne pendant 30 min, 1, 2, 4, 6, 8 ou 10 h ou continuellement et s'arrêteautomatiquement lorsque la photocellule détecte un changement de l'obscuritéau jour (en mode NUIT) ou du jour à l'obscurité (en mode JOUR).
Transmet une commande de MARCHE à la minuterie lorsquela photocellule capte un changement du jour à l'obscurité etune commande d'ARRÊT à la fin de la période réglée sur lecadran de commande de l'heure ou lorsque l'obscurité faitplace au jour.
MODE JOUR :
MODE NUIT :
Tourner le CADRAN DE COMMANDE DEL'HEURE pour régler le temps defonctionnement. (30 minutes, 1, 2, 4, 6,8, 10 h ou continuel)
Touche MODE pour modeJOUR et pour mode NUIT
vers le hautle bas
2
2
Ce dispositif respecte la Partie 15 du règlement de la FCC et le RSS-210 d'IndustrieCanada. Le fonctionnement est assujetti aux deux conditions suivantes :
FCC / RSS-210 CONFORMITÉ
ÉMETTEUR PHOTOCELLULEÀ
�
�
�
�
�
Sûreté : régler l'émetteur à photocellule de façon àALLUMER les lumières de votre entrée de porte aucrépuscule.
Commodité : régler l'émetteur à photocellule de façon àfaire démarrer votre cafetière dès qu'il fait jour.
Sécurité : régler l'émetteur de façon à to activer les lumièresde votre domicile quand vous êtes absent (jour ou nuit).
Économie d'énergie : régler l'émetteur de façon à fairemarcher votre minuterie pendant des périodes de tempsprécises.
Maximiser la fonctionnalité, combinez le réglage de l'heurede l'émetteur à photocellule avec celui de la minuterieprogrammable afin de réaliser les applications MARCHE-ARRÊT désirées.
Applications
1.2.
ce dispositif ne doit pas causer d'interférence néfaste; etce dispositif doit accepter toute l'interférence reçue, y compris cellequi peut entraîner un fonctionnement non désiré.
RNDLRND-
12 Appuyer sur ALÉATOIRE
3* Aléatoire court est de 1 à 2 heures,
Aléatoire long est de 2 à 3 heures
Aléatoire court deou Aléatoire long de
L’HORLOGECR
CLIGNOTE POUR ALÉATOIRE COURTCLIGNOTE POUR ALÉATOIRE LONG
* La fonction aléatoire programmable ne fonctionne qu'avec leProgramme 20; 1 à 2 heures
RND
12 Appuyer sur ALÉATOIRE
Régler programme 20 à l’heure aléatoire34
Sélectionner programme 20 avec
Désactiver la fonction aléatoire avec ALÉATOIRE ou MARCHE-ARRÊT
Aléatoire solide est programmable
DIRECTIVES À L'INTENTION DE L'UTILISATEUR
Ce matériel a été testé et respecte les limites des dispositifs numériques declasse B, conformément à Partie 15 du règlement de la FCC. Ces limitesvisent à offrir une protection raisonnable contre le brouillage préjudiciable desinstallations résidentielles. Ce matériel génère, utilise et peut émettre uneénergie radiofréquence et peut causer un brouillage préjudiciable auxradiocommunications s'il n'est pas installé et utilisé selon le mode d'emploi. Iln'existe toutefois aucune garantie qu'aucun interférence ne se produira dansune certaine installation. Si ce matériel cause une interférence néfaste à laréception de programmes de télévision ou de radio, ce qu'on peut détermineren mettant en marche et en arrêtent le matériel, on encourage l'utilisateur àessayer de corriger la situation en prenant l'une ou plusieurs des mesuressuivantes :
réorienter ou déplacer l'antenne de réception;accroître l'écart entre le matériel et le récepteur;relier le matériel dans une prise sur un circuit autre que celui du récepteur;consulter le concessionnaire ou un technicien radio/télé expérimenté pour
obtenir de l'aide.
Afin de maintenir le respect du règlement de la FCC, on doit utiliser descâbles armés avec ce matériel, sans quoi il y aura probablement unbrouillage de la réception de programmes de télévision ou de radio.L'utilisateur est averti que tout changement apporté au matériel sansl'approbation du fabricant peut entraîner l'annulation de sa capacité de fairefonctionner ce matériel.
�
�
�
�
PAGE 4 PAGE 5 PAGE 6
PAGE 12PAGE 11PAGE 10