georgia highlands college · magnified, therefore larger, but that you cannot see as much of the...
TRANSCRIPT

GEORGIA HIGHLANDS COLLEGE
LABORATORY MANUAL
Anatomy and Physiology I BIOL 2121K
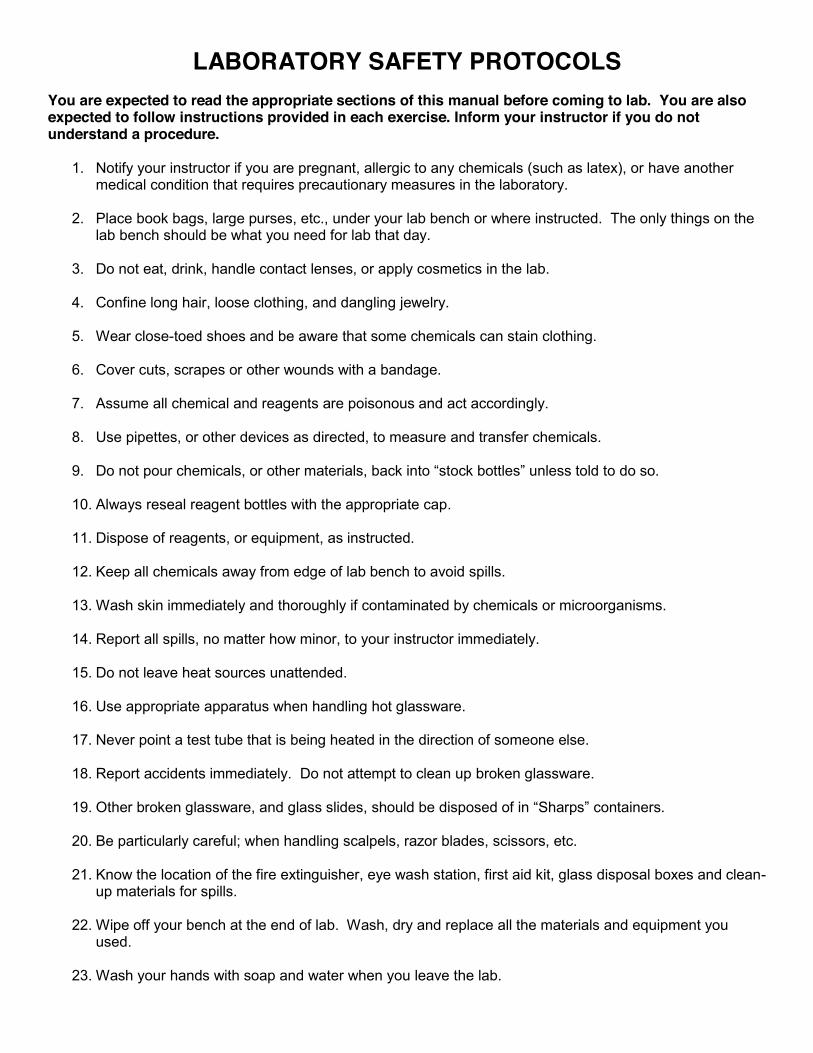
LABORATORY SAFETY PROTOCOLS You are expected to read the appropriate sections of this manual before coming to lab. You are also expected to follow instructions provided in each exercise. Inform your instructor if you do not understand a procedure.
1. Notify your instructor if you are pregnant, allergic to any chemicals (such as latex), or have another medical condition that requires precautionary measures in the laboratory.
2. Place book bags, large purses, etc., under your lab bench or where instructed. The only things on the lab bench should be what you need for lab that day.
3. Do not eat, drink, handle contact lenses, or apply cosmetics in the lab.
4. Confine long hair, loose clothing, and dangling jewelry.
5. Wear close-toed shoes and be aware that some chemicals can stain clothing.
6. Cover cuts, scrapes or other wounds with a bandage.
7. Assume all chemical and reagents are poisonous and act accordingly.
8. Use pipettes, or other devices as directed, to measure and transfer chemicals.
9. Do not pour chemicals, or other materials, back into “stock bottles” unless told to do so.
10. Always reseal reagent bottles with the appropriate cap.
11. Dispose of reagents, or equipment, as instructed.
12. Keep all chemicals away from edge of lab bench to avoid spills.
13. Wash skin immediately and thoroughly if contaminated by chemicals or microorganisms.
14. Report all spills, no matter how minor, to your instructor immediately.
15. Do not leave heat sources unattended.
16. Use appropriate apparatus when handling hot glassware.
17. Never point a test tube that is being heated in the direction of someone else.
18. Report accidents immediately. Do not attempt to clean up broken glassware.
19. Other broken glassware, and glass slides, should be disposed of in “Sharps” containers.
20. Be particularly careful; when handling scalpels, razor blades, scissors, etc.
21. Know the location of the fire extinguisher, eye wash station, first aid kit, glass disposal boxes and clean-
up materials for spills.
22. Wipe off your bench at the end of lab. Wash, dry and replace all the materials and equipment you used.
23. Wash your hands with soap and water when you leave the lab.

TABLE OF CONTENTS
EXERCISE TITLE PAGE NUMBERS 1 Microscopy and Cytology 4-10
2 Histology 11-20
3 Osseous Tissue and the Skeletal System 21-37
4 Muscle Tissue and the Muscular System 38-53
5 Nervous tissue and the Nervous System 54-61
6 Special Senses 62-68

MICROSCOPY AND CYTOLOGY Introduction: A true study of anatomy not only considers the large, visible structures of an organism, but also the small structures that provide the organism its form and function. To view these small structures, we require a tool to magnify the near invisible details. Our microscopes are compound, bright-field microscopes. These microscopes utilize a combination of lenses to magnify and clarify small objects of interest. The specimen is illuminated with light and will appear as a darker or stained image on a light background. Our microscopes are designed to be parfocal - meaning that when an object is in focus with one power, it should be in focus on another power (or very close to being focused). I. Parts of the Microscope: Be able to identify the parts of the microscope using the labeled
picture.
Parts of the Microscope:
1. Oculars (10X) 2. Body Tube 3. Arm 4. Coarse Adjustment Knob 5. Fine Adjustment Knob 6. Power Cord 7. Base 8. Power Switch 9. Mechanical Stage Knobs 10. Light Source 11. Condenser with Iris Diaphragm 12. Mechanical Stage with Clips 13. Objectives Lenses:
a. Scanning Power (red 4X) b. Low Power (yellow 10X) c. High Power (blue 40X) d. Oil Immersion (white
100X…not always present) 14. Nosepiece
II. Calculating Total Magnification: The microscopes used in the labs are compound microscopes, meaning that both ocular and objective lenses are used during observation. The use of both lenses provides a higher degree of magnification than using a single lens. Total magnification can be calculated for the microscope by using the following formula:
Total Magnification= Power of Objective lens X Power of the Oculars Example: High Power = 40X X Oculars= 10X Therefore, 40X X 10X = 400X
1
4
5
13
12
3
2
7
14
10
11
8 9
6

Complete the table below to demonstrate your understanding of Total Magnification:
POWER OF OBJECTIVE POWER OF OCULARS TOTAL MAGNIFICATION
SCANNING POWER
LOW POWER
HIGH POWER
OIL IMMERSION
III. Proper use of the microscope:
1. Carefully place the microscope on the tabletop in a position comfortable for viewing. Make sure to grasp the arm of the microscope when moving the microscope. Do not attempt to move the microscope by grasping the body tube.
2. Check to be sure that the power switch is in the off position and that the light intensity on the base is at the lowest setting. Plug the microscope into the nearest outlet.
3. Using lens paper and cleaning solution, clean the oculars and the objectives of the microscope to remove dust and oil. Be sure to use only the lens paper provided. Normal paper towel is too abrasive.
4. Turn the nosepiece until the scanning power objective (red ring) is in place. 5. Move stage down using the course adjustment to put slides in place. This position is called the start
position and ensures a maximum working distance. Slides should be placed between the stage clips, not underneath them.
6. Use the course adjustment knob to move the stage up and down while on scanning power to achieve focus of the specimen. It is usually helpful to bring the stage to its highest position while on scanning power and focus the specimen away from the objective. This cuts out a lot of needless adjustment and makes finding the specimen quicker and easier.
7. When focus is achieved on scanning power, center the specimen in the field and then rotate the nosepiece to bring the low power objective (yellow ring) into place.
8. Using the fine adjustment knob, SLOWLY adjust the position of the stage until the image is in focus. Since the microscopes are parfocal, this should be a small adjustment.
9. Repeat the previous step to view the specimen at high power. You may have to adjust the position of the slide on the stage using the stage control knobs.
10. When you have completed viewing the slide, move the nosepiece to scanning power and lower the stage using the course adjustment. Be careful not to attempt this with the microscope at the high power setting as you could drive the lens through the slide, damaging both.
11. When you complete the viewing of all slides, return the slides to the proper trays, clean the microscope lenses again, and return the microscope to the proper cabinet with the dust cover in place.
IV. Inversion:
1. Obtain a prepared slide of the letter “e.” Mount the slide on the stage of the microscope. Center the “e” under the objective.
2. While on scanning power, move the stage to the highest position. Careful! You must be on scanning power only. Any other objective could damage the slide.
3. Once at the highest position, use the course adjustment to bring the “e” into focus. Slow careful movements will ensure that you do not over focus.

4. Notice that the image on the slide is different when view through the microscope than when viewed with the unaided eye. The image is upside down and appears backwards. This is referred to as inversion and is caused as the light passing through the specimen is passed through lenses. Students need to remember to account for inversion when moving the slide using the mechanical stage controls. Since the image is inverted, movements of the stage will likewise be reversed.
V. Field of View:
1. After noting the effects of inversion, move the nosepiece so that the low power objective is in place. Since the microscopes are parfocal, only a small amount of focusing with the fine adjustment knob is necessary to refocus the image.
2. Using the stage controls, center the “e” in the center of the field of view. Notice that not only is the “e” magnified, therefore larger, but that you cannot see as much of the “e” or the surrounding background.
As magnification of a specimen increases, the amount of the specimen, or the field of view, decreases. This means that more of the specimen is visible at the lower powers. Good microscope use begins with the lower powers. Students often have a difficult time locating structures with a microscope because they try to start with the highest magnification. This is poor technique because so little of the slide is visible at the higher powers.
VI. Depth of Focus (Depth of Field):
1. Properly mount the slide named “Colored Threads” on the stage. 2. Find the area of the slide where the three threads cross with scanning power. 3. Move to low power and adjust the focus with the fine adjustment knob. 4. Try to focus the microscope so that all three threads are in perfect focus.
Is it possible to focus all three threads? The answer is no. While the threads are small and thin, they still have a dimensional height. Since the threads are stacked atop each other, they are in different planes. This means trying to focus all the strings at the same time is not possible. This demonstrates the concept of depth of focus (field).
Notes: VII. Cytology: The Study of Cells The microscopes we use today are far more complex than those used in the 1600s. The first microscopes only allowed scientists to view the box-like structures that Robert Hooke coined as a “cell”. Later advances in lenses, microscope construction, and staining techniques have enabled other scientists to see more components inside of cells. Human cells are eukaryotic, that is, they possess 1) a membrane-bound nucleus, 2) numerous membrane-bound organelles, and 3) several rod-shaped chromosomes. Use the cell models available in the laboratory to identify the various organelles of a typical eukaryotic animal cell.

1. Plasma membrane 2. Mitochondria 3. Cytoplasm 4. Smooth ER 5. Rough ER 6. Centrioles 7. Golgi apparatus 8. Nucleus 9. Nucleoli 10. Ribosomes 11. DNA (red threads)
VIII. Cytology: Cell Cycle (Interphase and M phase)
Multicellular organisms develop from a zygote, which is formed by the fusion of a sperm and an egg (gametes). Each gamete has half a half complement of chromosomes (haploid number) and when combined gives rise to a zygote with a complete set (diploid number) of chromosomes. In order for the zygote to develop into a multicellular organism, it must repeatedly undergo cellular divisions. The series of events a cell (or zygote) undergoes that ultimately produces a new cell is called the cell cycle.
The cell cycle is divided into two major stages: Interphase and Mitosis. The cell spends 90% of its time in interphase.
1
3
2
9
8
7
6
5
4
10
11
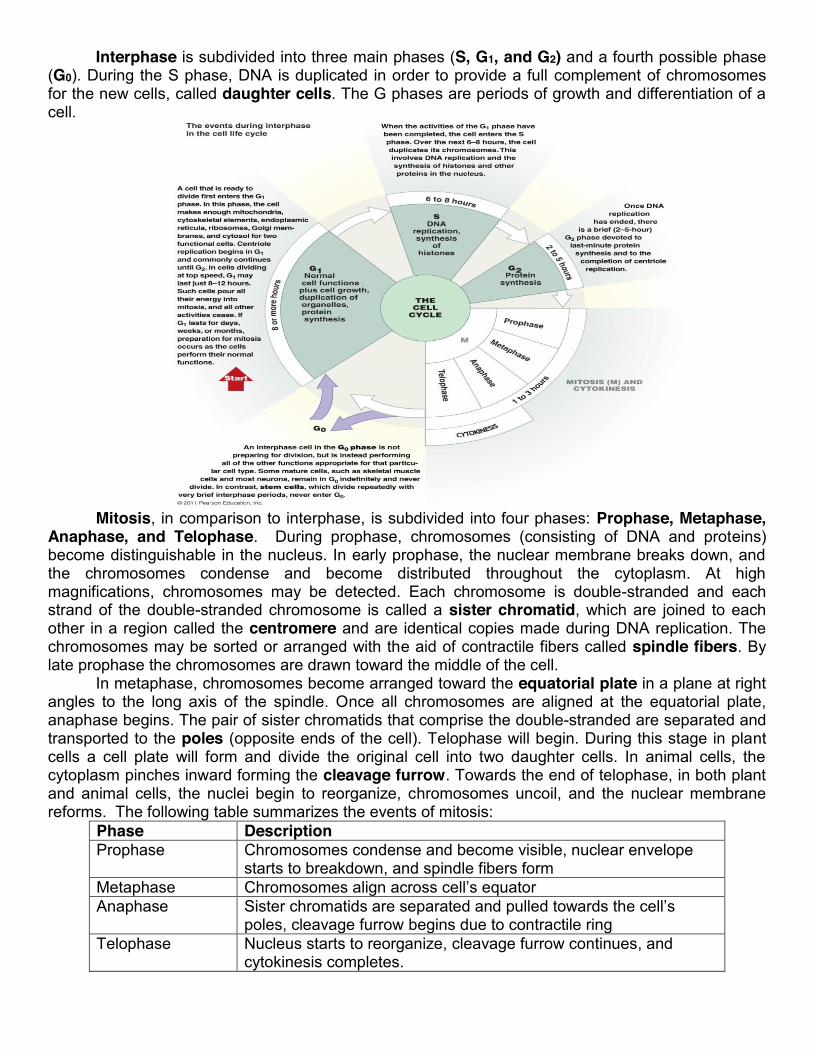
Interphase is subdivided into three main phases (S, G1, and G2) and a fourth possible phase (G0). During the S phase, DNA is duplicated in order to provide a full complement of chromosomes for the new cells, called daughter cells. The G phases are periods of growth and differentiation of a cell.
Mitosis, in comparison to interphase, is subdivided into four phases: Prophase, Metaphase,
Anaphase, and Telophase. During prophase, chromosomes (consisting of DNA and proteins) become distinguishable in the nucleus. In early prophase, the nuclear membrane breaks down, and the chromosomes condense and become distributed throughout the cytoplasm. At high magnifications, chromosomes may be detected. Each chromosome is double-stranded and each strand of the double-stranded chromosome is called a sister chromatid, which are joined to each other in a region called the centromere and are identical copies made during DNA replication. The chromosomes may be sorted or arranged with the aid of contractile fibers called spindle fibers. By late prophase the chromosomes are drawn toward the middle of the cell.
In metaphase, chromosomes become arranged toward the equatorial plate in a plane at right angles to the long axis of the spindle. Once all chromosomes are aligned at the equatorial plate, anaphase begins. The pair of sister chromatids that comprise the double-stranded are separated and transported to the poles (opposite ends of the cell). Telophase will begin. During this stage in plant cells a cell plate will form and divide the original cell into two daughter cells. In animal cells, the cytoplasm pinches inward forming the cleavage furrow. Towards the end of telophase, in both plant and animal cells, the nuclei begin to reorganize, chromosomes uncoil, and the nuclear membrane reforms. The following table summarizes the events of mitosis:
Phase Description Prophase Chromosomes condense and become visible, nuclear envelope
starts to breakdown, and spindle fibers form Metaphase Chromosomes align across cell’s equator Anaphase Sister chromatids are separated and pulled towards the cell’s
poles, cleavage furrow begins due to contractile ring Telophase Nucleus starts to reorganize, cleavage furrow continues, and
cytokinesis completes.
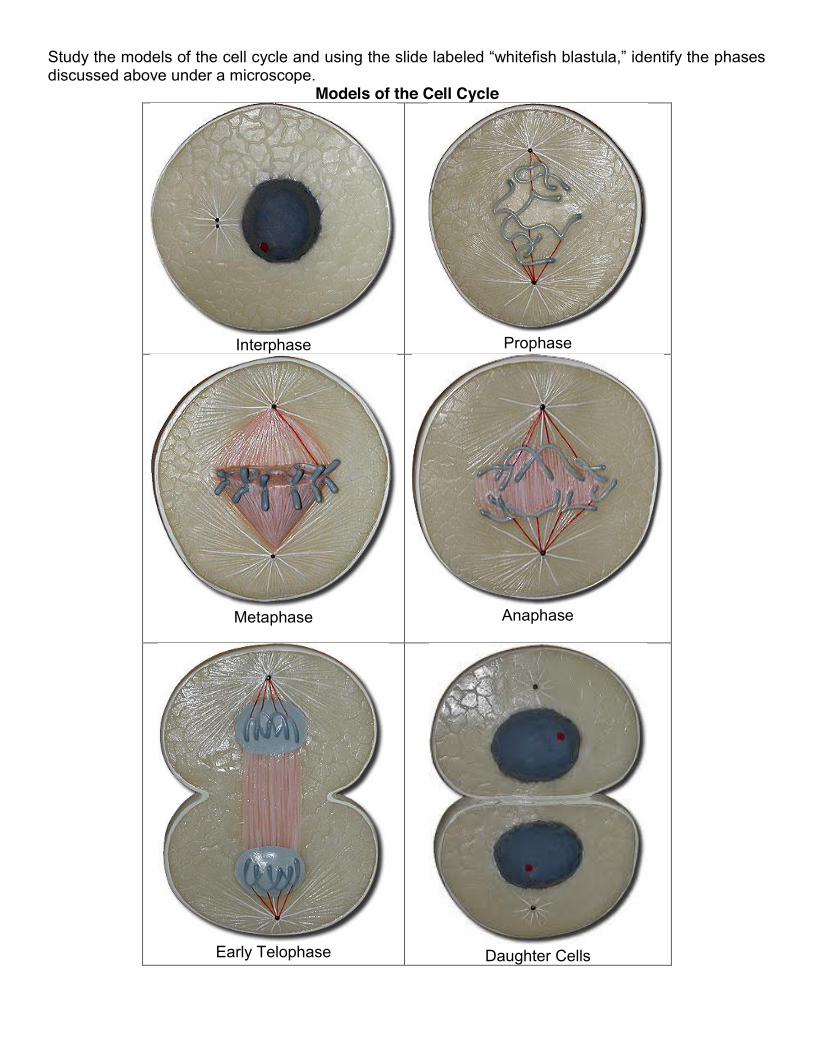
Study the models of the cell cycle and using the slide labeled “whitefish blastula,” identify the phases discussed above under a microscope.
Models of the Cell Cycle
Interphase
Prophase
Metaphase
Anaphase
Early Telophase
Daughter Cells
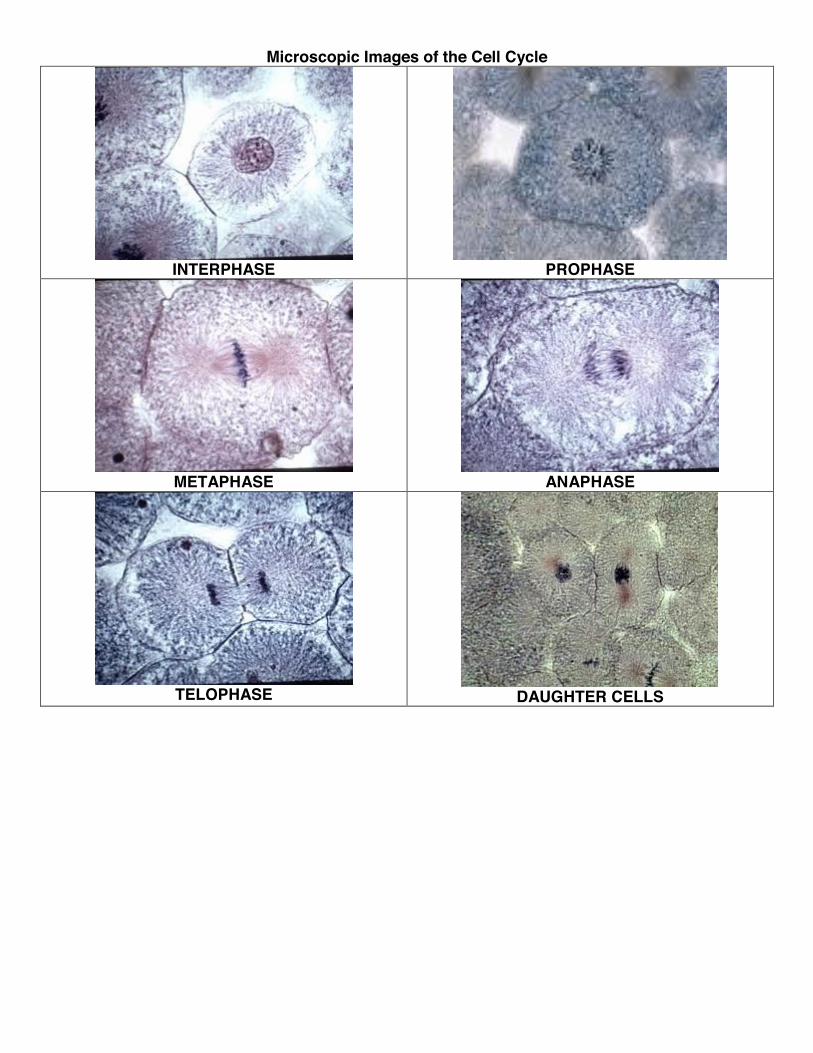
Microscopic Images of the Cell Cycle
INTERPHASE
PROPHASE
METAPHASE
ANAPHASE
TELOPHASE
DAUGHTER CELLS

HISTOLOGY
Introduction: As mentioned earlier, cells are the smallest units of life. In complex organisms, cells group together with one another based on similar structure and function to form tissues. Tissues provide the numerous functions of organs necessary to maintain biological life. This lab exercise seeks to introduce the various tissues found in the human body and to familiarize you with their composition and function. The study of tissues is called histology, and is important to the understanding of how the human body is able to function as a unit. I. Classification of tissues The human body is composed of four basic types of tissues; epithelium, connective, muscular, and nervous tissues. These tissues vary in their composition and their function. A basic understanding of the role of each tissue makes understanding the specific functions easier.
1. Epithelium- lines and covers surfaces 2. Connective tissue- protects, support, and bind together 3. Muscular tissue- produces movement 4. Nervous tissue- receives stimuli and conduct impulses
Now that we have an understanding of the basic roles of the tissues, we turn our focus to a more thorough investigation of the form and function of the different types of tissues in the human body. II. Epithelium
x When considering the characteristics that make a tissue epithelium, it is important to think about the following:
o Polarity- epithelium is arranged so there is one free surface (apical surface) and one attached surface (basal surface). The apical surface faces the lumen of the organ.
o Cellular nature- cells in epithelium fit closely together side by side and sometimes atop each other to form sheets of cells. These sheets are held together by specialized junctions.
o Supported by connective tissue- attachment to a layer of connective tissue at the basal surface forms a layer called the basement membrane, an adhesive layer formed by secretions from the epithelial cells and the connective tissue cells.
o Avascular- epithelium typically lacks its own blood supply. o Regeneration- epithelium cells can regenerate if proper nourished.
x Epithelia are classified according to their shape and arrangement. o Shape: squamous, cuboidal, columnar o Arrangement: simple (pseudostratified) or stratified
x Types of epithelium
o Simple squamous, simple cuboidal, simple columnar, pseudostratified columnar, stratified squamous, stratified cuboidal, stratified columnar, and transitional
o Know all types of epithelium and their description, function, and location observed in the lab:
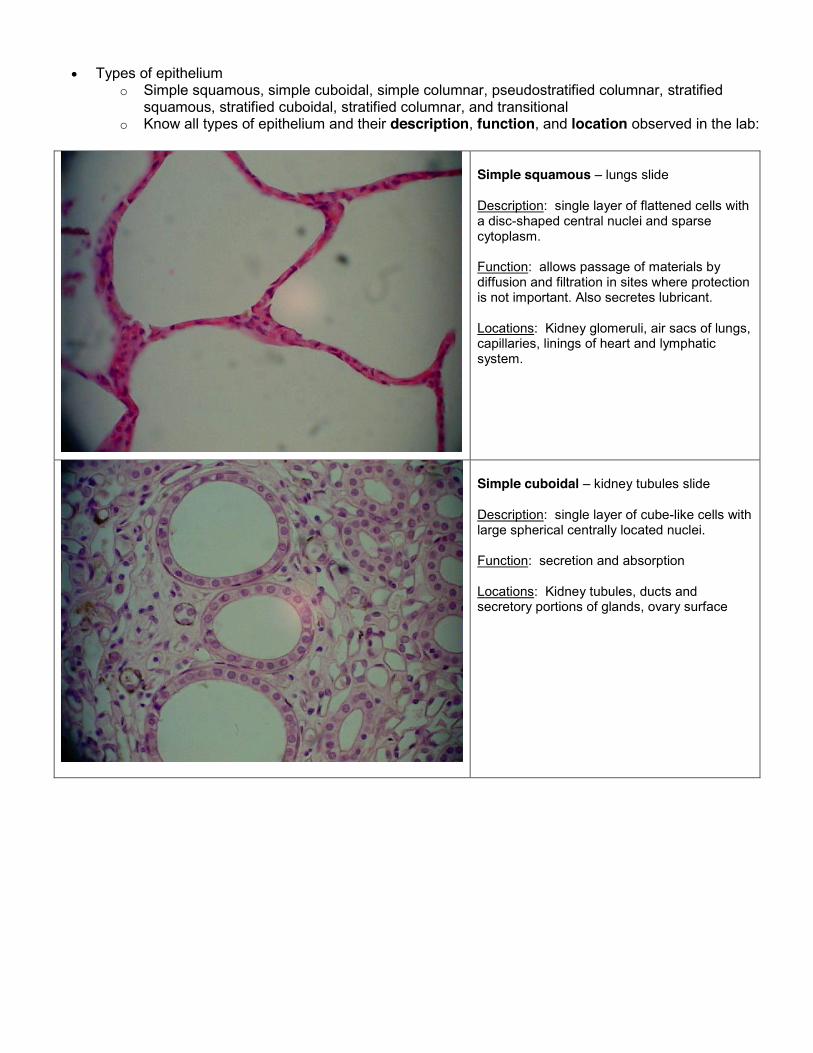
Simple squamous – lungs slide Description: single layer of flattened cells with a disc-shaped central nuclei and sparse cytoplasm. Function: allows passage of materials by diffusion and filtration in sites where protection is not important. Also secretes lubricant. Locations: Kidney glomeruli, air sacs of lungs, capillaries, linings of heart and lymphatic system.
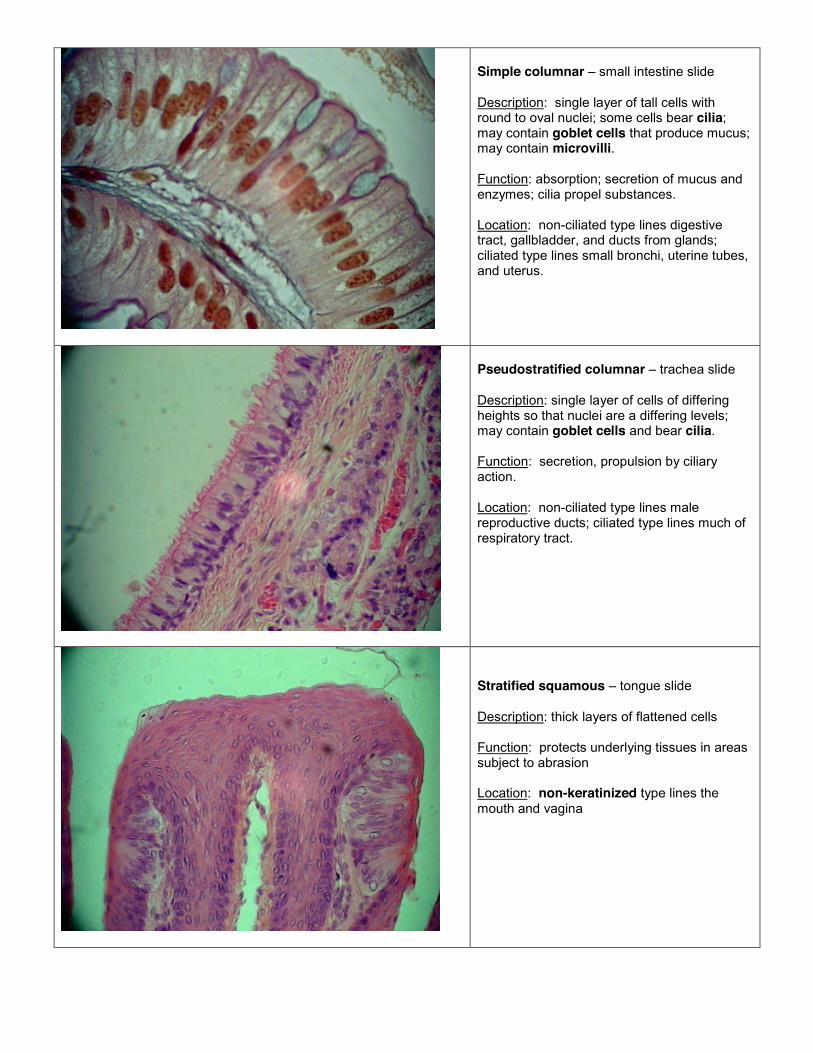
Simple cuboidal – kidney tubules slide Description: single layer of cube-like cells with large spherical centrally located nuclei. Function: secretion and absorption Locations: Kidney tubules, ducts and secretory portions of glands, ovary surface
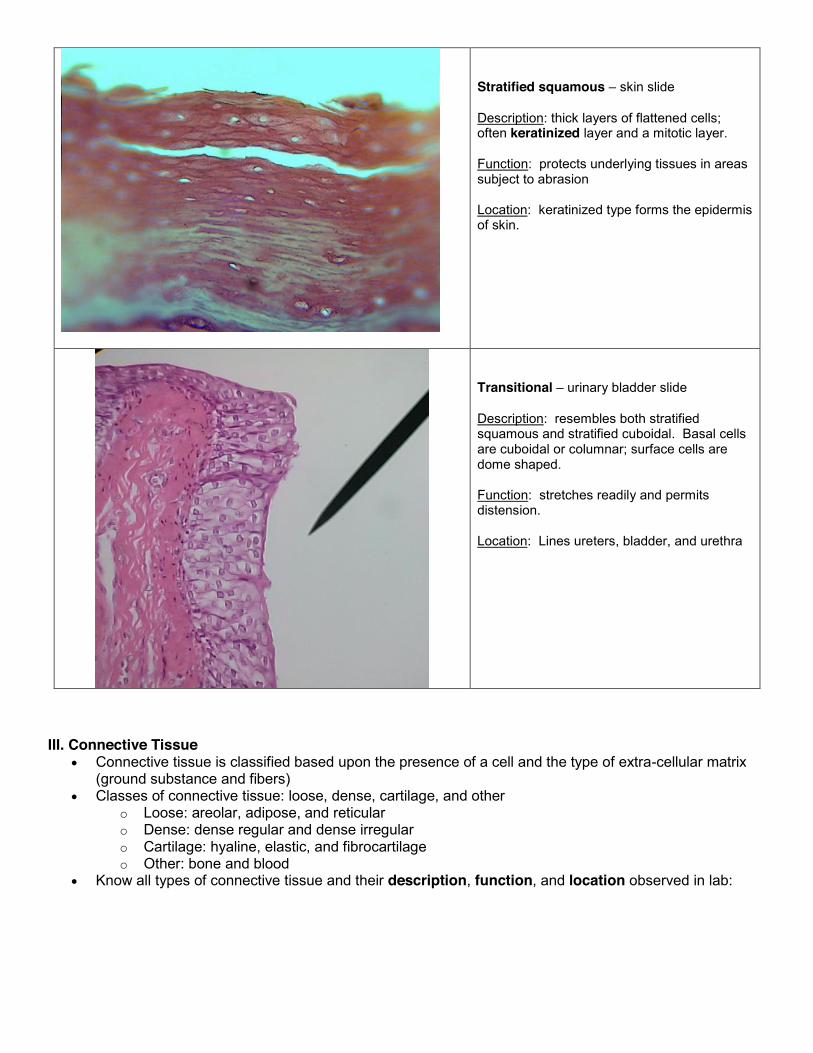
Simple columnar – small intestine slide Description: single layer of tall cells with round to oval nuclei; some cells bear cilia; may contain goblet cells that produce mucus; may contain microvilli. Function: absorption; secretion of mucus and enzymes; cilia propel substances. Location: non-ciliated type lines digestive tract, gallbladder, and ducts from glands; ciliated type lines small bronchi, uterine tubes, and uterus.
Pseudostratified columnar – trachea slide Description: single layer of cells of differing heights so that nuclei are a differing levels; may contain goblet cells and bear cilia. Function: secretion, propulsion by ciliary action. Location: non-ciliated type lines male reproductive ducts; ciliated type lines much of respiratory tract.
Stratified squamous – tongue slide Description: thick layers of flattened cells Function: protects underlying tissues in areas subject to abrasion Location: non-keratinized type lines the mouth and vagina
Stratified squamous – skin slide Description: thick layers of flattened cells; often keratinized layer and a mitotic layer. Function: protects underlying tissues in areas subject to abrasion Location: keratinized type forms the epidermis of skin.
Transitional – urinary bladder slide Description: resembles both stratified squamous and stratified cuboidal. Basal cells are cuboidal or columnar; surface cells are dome shaped. Function: stretches readily and permits distension. Location: Lines ureters, bladder, and urethra
III. Connective Tissue
x Connective tissue is classified based upon the presence of a cell and the type of extra-cellular matrix (ground substance and fibers)
x Classes of connective tissue: loose, dense, cartilage, and other o Loose: areolar, adipose, and reticular o Dense: dense regular and dense irregular o Cartilage: hyaline, elastic, and fibrocartilage o Other: bone and blood
x Know all types of connective tissue and their description, function, and location observed in lab:
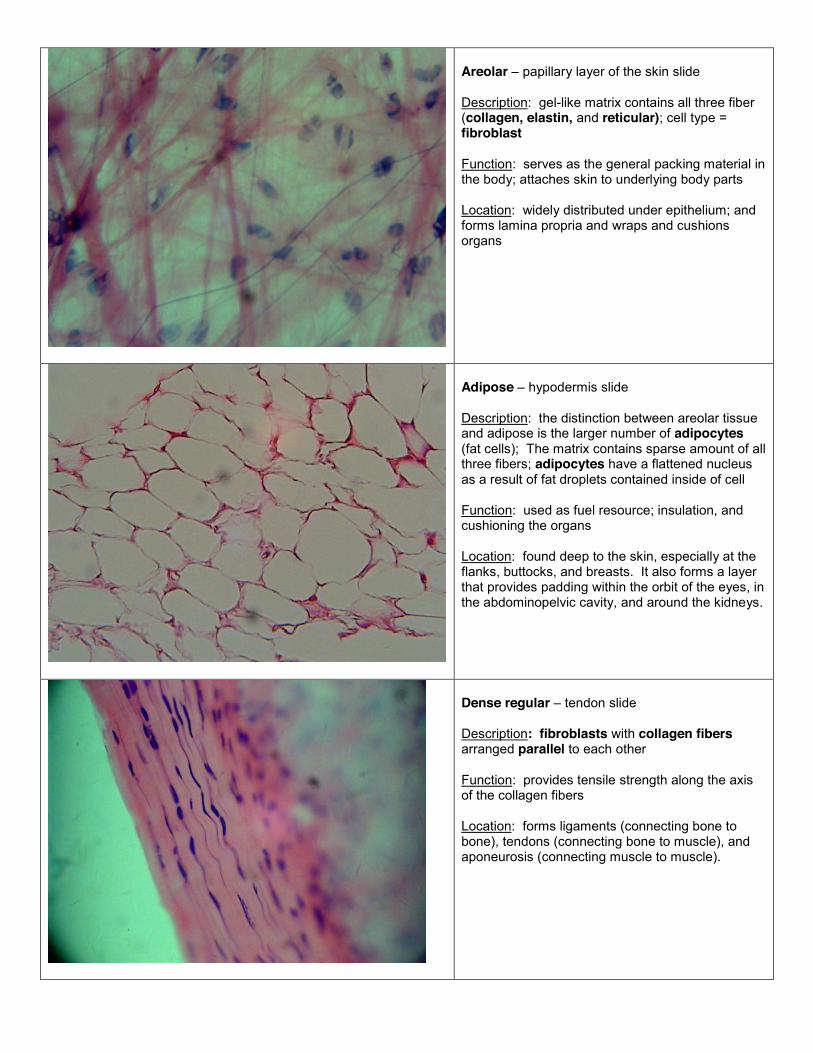
Areolar – papillary layer of the skin slide Description: gel-like matrix contains all three fiber (collagen, elastin, and reticular); cell type = fibroblast Function: serves as the general packing material in the body; attaches skin to underlying body parts Location: widely distributed under epithelium; and forms lamina propria and wraps and cushions organs
Adipose – hypodermis slide Description: the distinction between areolar tissue and adipose is the larger number of adipocytes (fat cells); The matrix contains sparse amount of all three fibers; adipocytes have a flattened nucleus as a result of fat droplets contained inside of cell Function: used as fuel resource; insulation, and cushioning the organs Location: found deep to the skin, especially at the flanks, buttocks, and breasts. It also forms a layer that provides padding within the orbit of the eyes, in the abdominopelvic cavity, and around the kidneys.
Dense regular – tendon slide Description: fibroblasts with collagen fibers arranged parallel to each other Function: provides tensile strength along the axis of the collagen fibers Location: forms ligaments (connecting bone to bone), tendons (connecting bone to muscle), and aponeurosis (connecting muscle to muscle).

Dense irregular – dermis of the skin slide Description: non-parallel arranged collagen fibers with fibroblast Function: withstands tension and provides strength in all directions Location: found in the dermis of the skin and fibrous joint capsules
Hyaline – trachea slide Description: chondroblasts produce matrix with few collagen fibers, chondrocytes located within lacunae (spaces) Function: supports and reinforces Location: found attaching ribs to the sternum, tip of the nose, tracheal rings, and the larynx
Elastic – epiglottis slide Description: chondroblasts produce matrix with elastic fibers Function: maintains shape and structure; provides flexible support Location: supports external ear and epiglottis
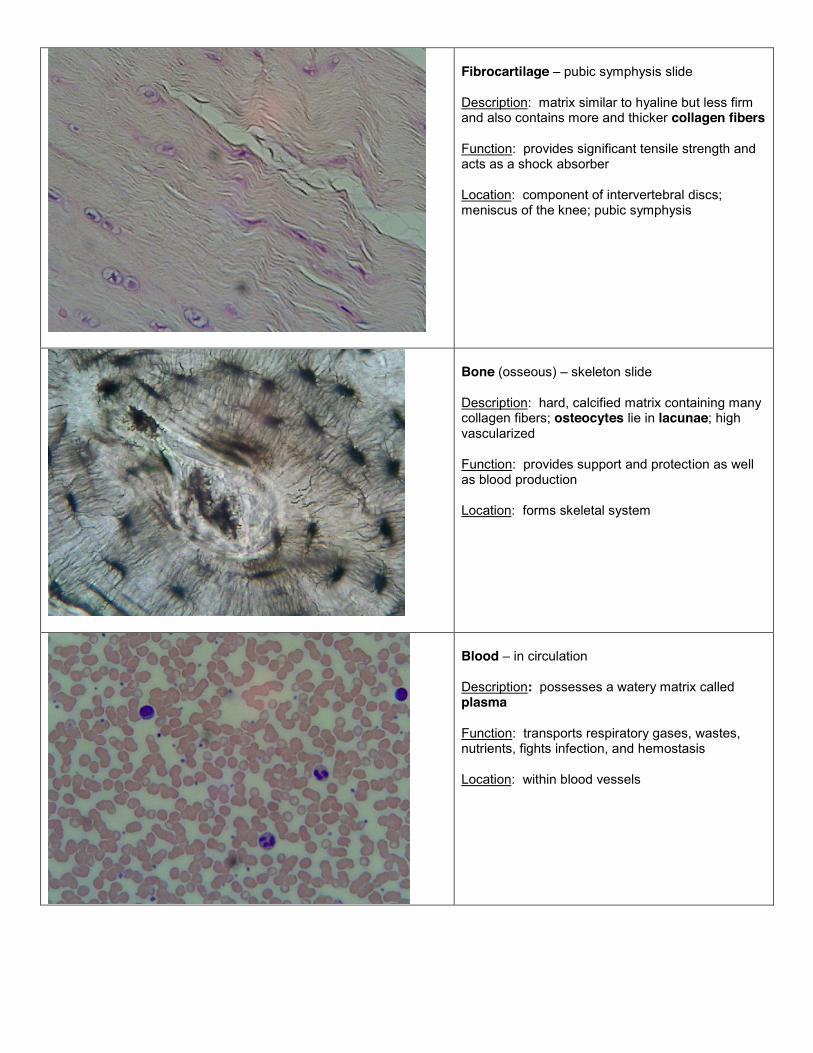
Fibrocartilage – pubic symphysis slide Description: matrix similar to hyaline but less firm and also contains more and thicker collagen fibers Function: provides significant tensile strength and acts as a shock absorber Location: component of intervertebral discs; meniscus of the knee; pubic symphysis
Bone (osseous) – skeleton slide Description: hard, calcified matrix containing many collagen fibers; osteocytes lie in lacunae; high vascularized Function: provides support and protection as well as blood production Location: forms skeletal system
Blood – in circulation Description: possesses a watery matrix called plasma Function: transports respiratory gases, wastes, nutrients, fights infection, and hemostasis Location: within blood vessels

VI. The Integument
x The body is protected externally by one of its largest organs, the skin or integument. While protection is the main function of the skin, it performs many other functions, such as providing insulation, helping with temperature regulation, and provides tactility (sense of touch). It evens functions in the production of vitamin D needed for proper body function.
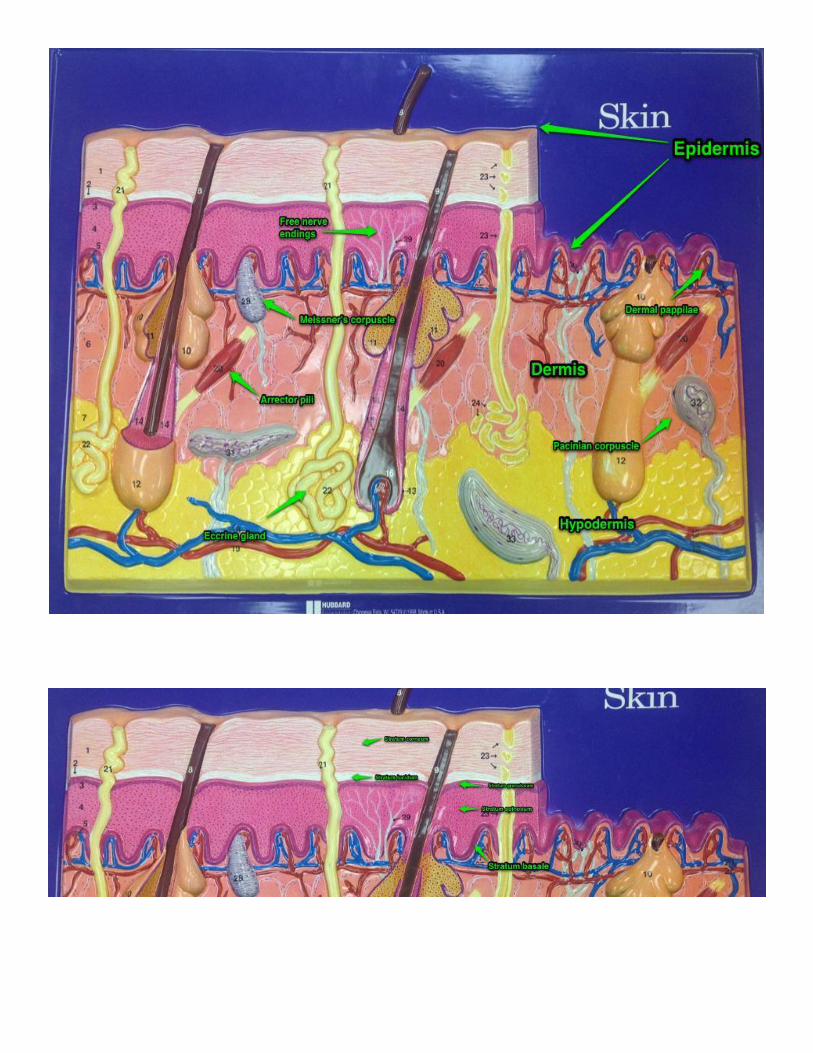
x Skin Composition: The skin is formed by two distinctive layers; the epidermis (outer layer) and the
dermis (bottom layer). The hypodermis {also known as the subcutaneous layer} supports the skin, helps to attach the skin to the underlying muscle, and provides adipose for temperature regulation and cushioning.
[Bracketed numbers next to structures correspond to the numbers on the purple plaque]
x Epidermis- composed of keratinized stratified squamous epithelium; arranged into five layers called strata (singular = stratum)
o Stratum corneum- outermost layer of flattened, dead cells [1] o Stratum lucidum- thin, translucent layer found only in thick areas of the skin. [2] o Stratum granulosum- names for the abundance of granules present. Upper boundary of this
layer is where cells begin to die [3] o Stratum spinosum- layer where cells divide rapidly. Usually one of the thicker layers of the
epidermis. [4] o Stratum basale- the lowest layer of the skin. Attached to the dermis where it forms a basement
membrane. Cells are constantly dividing to produce new cells. [5] x Dermis- composed of dense irregular connective tissue [6]
o Dermal papillae- projections or ridges that arise from the dermis that serve as attachment points for the epidermis
o Hypodermis- composed of adipose tissue [7]
x Skin also has unique structures that perform various functions: o Glandular Structures
� Eccrine gland (sudoriferous gland) - produces sweat (mixture of water, salts, and urea) that acts to cool the body. [22]
� Sebaceous gland- produces sebum (oil) to help keep the skin soft and pliable. [10] o Nervous Structures
� Free nerve endings- associated with pain sensation; located in near dermal papillae [29] � Meissner’s corpuscle- touch receptors- associated with tactility; located in near dermal
papillae [28] � Pacinian corpuscle- pressure receptors; located deep within dermis at the boundary of the
dermis and hypodermis.[31, 32, 33] o Muscle Structures
� Arrector pili- muscle that pulls up hair follicle leading to goose flesh or “goose bumps” [20] o Appendages
� Hair shaft [8]- part of the hair that projects beyond the skin surface. � Hair follicle [12]- sheath of epidermal tissue that produces and supports the hair shaft.


THE SKELETAL SYSTEM Introduction: The skeleton is the body’s structural framework and is composed of two of the supportive tissues studied earlier; bone and cartilage. The main functions of the skeleton are to provide support and protection for the body. It also acts as a point of attachment for muscles providing the leverage needed to produce movement. The skeleton also acts as a site for mineral storage and as the site of hematopoiesis (production of blood cells). Histology of Bone
I. Using a prepared slide of compact bone, be able to identify the following parts: Compact bone slide:
x Osteon x Central (or Haversian) canal x Lamellae (concentric) x Canaliculi, x Lacunae with osteocytes
II. Using the bone model, be able to identify the following parts labeled in the image below: Bone Model:
x Periosteum x Endosteum x Compact bone x Spongy bone x Osteon x Central (or Haversian) canal x Perforating canal x Concentric lamellae x Circumferential lamellae x Interstitial lamellae x Marrow x Trabeculae

Bone Markings Overview: The bumps, holes, and ridges that cover the bones of the body are called bone markings. Bone markings represent the points of attachment for muscles, the structures responsible for forming joints, and the openings through which vessels and nerves pass. Projections:
o Serve as muscle and ligament attachment: � Tuberosity- Large rounded projection or a collection of roughened lumps � Crest- narrow ridge of bone that is usually prominent � Trochanter- large, blunt, irregular shaped processes � Line- thin, narrow ridge of bone, usually less prominent than a crest � Tubercle- Small rounded projection or process � Epicondyle- raised area on or above a condyle (see below) � Spine- sharp, slender, process or projection that is typically pointed � Process- any bony projection
o Form joints: � Head- Enlarged portion of a bone typically carried on a narrow neck � Facet- smooth and often flat articulating surface � Condyle- rounded surface that serves as a point of articulation � Ramus- arm-like bar or projection of bone
Depressions and openings that allow passage of blood vessels and nerves: o Groove- a furrow or ditch-like structure o Fissure- a narrow slit-like crack or opening o Foramen- a round or oval opening through a bone o Notch- indentation at the edge of a structure or bone.
Others: o Meatus- canal or channel-like passageway o Sinus- bone cavity or space within a bone. o Fossa- shallow basin-like depression in the surface of a bone
Divisions of the skeleton: The skeleton can be divided into two basic parts; the axial skeleton and the appendicular skeleton. The axial skeleton is the bones associated with the central portion of the body and include the bones of the skull, thoracic (chest) cage, and the vertebral column. The appendicular skeleton is made up of the bones associated with the limbs and includes the pectoral girdle, the upper limbs, the pelvic girdle, and the lower limbs. You are responsible for learning all the bones of the skeleton and all the markings listed on the next several pages. The photos are for reference only! Remember: Lab is considered a self-directed learning experience! Use your textbook, lab book, and atlas to identify all the bones and bone markings. If you have questions, then please feel free to ask the instructor. I. Axial Skeleton (Skull, Thoracic Cage, and Vertebral Column)
1. Skull a. Cranial bones: Frontal, Parietal, Temporal, Occipital, Ethmoid, and Sphenoid b. Facial bones: nasal, zygomatic, maxilla, palatine, lacrimal, inferior concha, vomer and mandible c. Hyoid d. Cranial bone markings:
i. Frontal bone markings:
1. Frontal sinus 2. Supraorbital margin (ridge) 3. Supraorbital foramen (may look like a notch) 4. Glabella
ii. Parietal bone markings: 1. Sagittal suture (between the two parietals) 2. Coronal suture (between frontal and anterior border of parietals)
iii. Occipital bone markings: 1. Lambdoid suture (between posterior parietals and occipital bone) 2. Occipital condyles 3. Foramen magnum 4. External occipital protuberance
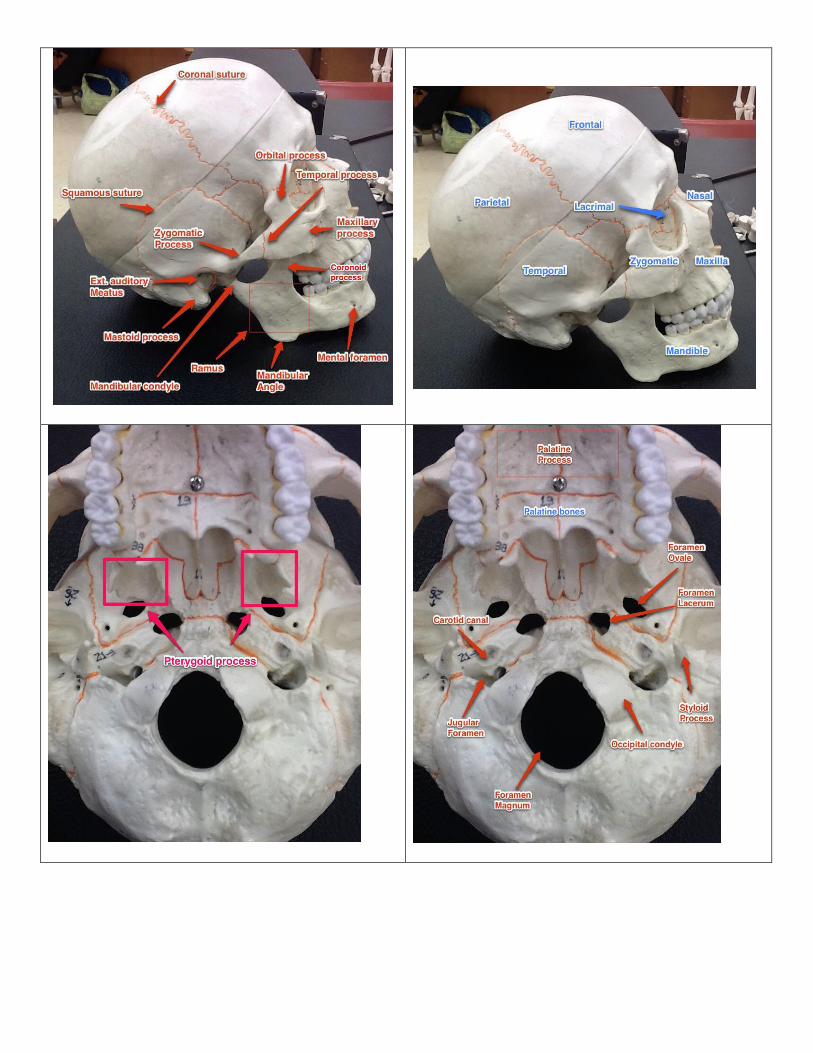
iv. Temporal bone markings: 1. Squamous suture (between parietals and squamous of temporal) 2. External acoustic (auditory) meatus 3. Mastoid process 4. Styloid process 5. Petrous portion 6. Zygomatic process 7. Jugular foramen 8. Carotid canal 9. Internal acoustic (auditory) meatus 10. Foramen lacerum
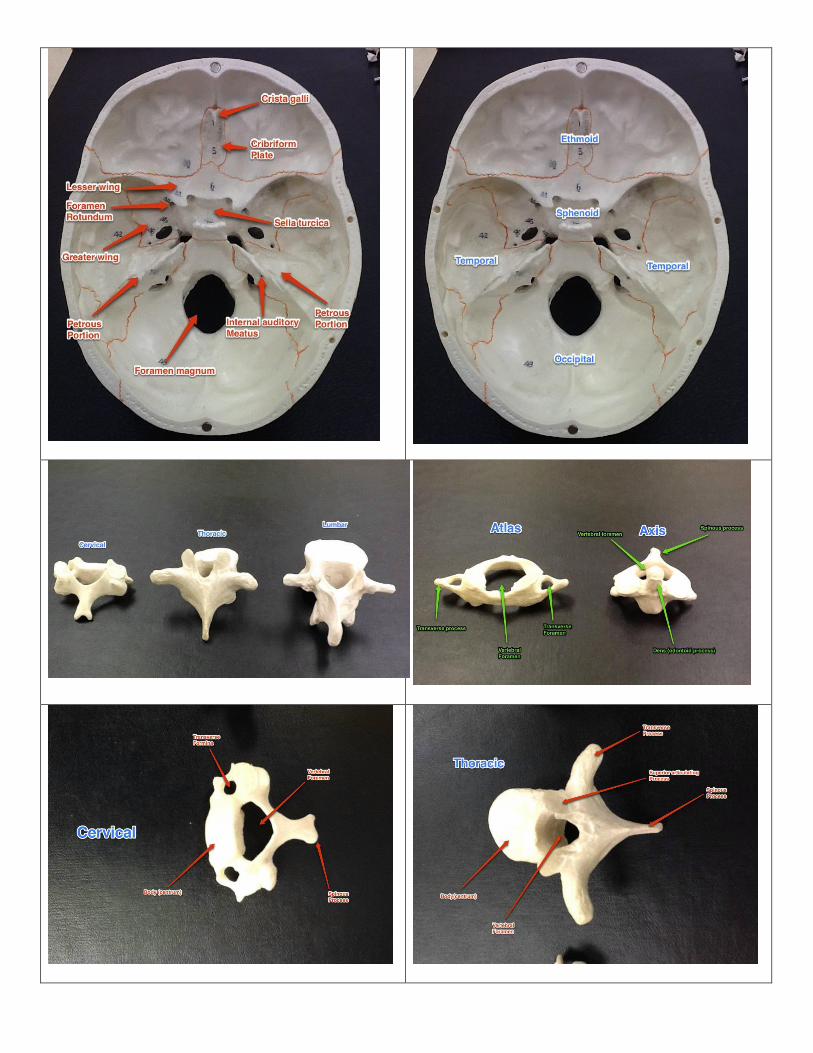
v. Sphenoid bone makings: 1. Greater wings 2. Lesser wing 3. Sphenoid sinus 4. Pterygoid processes 5. Sella turcica (which houses the pituitary gland) 6. Optic canal 7. Foramen ovale 8. Foramen rotundum 9. Superior orbital fissure
vi. Ethmoid bone markings: 1. Perpendicular plate 2. Crista galli 3. Cribriform (horizontal) plate 4. Ethmoid sinus 5. Middle nasal concha
e. Facial bone markings: i. Nasal bones ii. Lacrimal bones iii. Zygomatic bones
1. Orbital process 2. Temporal process 3. Maxillary process
iv. Maxilla 1. Alveolar margin 2. Infraorbital foramen 3. Palatine processes 4. Inferior orbital fissure 5. Maxillary sinus
v. Palatine bones vi. Mandible
1. Mandibular condyle
2. Coronoid process 3. Alveolar margin 4. Mental foramen 5. Mandibular foramen
vii. Vomer viii. Inferior nasal concha
f. Hyoid bone 2. Thoracic Cage
a. Ribs (True ribs 1-7, false ribs 8-12, and floating ribs 11-12) b. Sternum
i. Manubrium ii. Body iii. Xiphoid process iv. Clavicular notch v. Jugular notch vi. Costal cartilages
3. Vertebral Column a. Vertebrae: for each vertebra be able to identify the following structures: centrum (body),
spinous process, transverse process, and vertebral foramen. i. Cervical vertebrae (7) have two transverse foramina and first two cervical vertebra are
particularly unique: C1 = atlas C2 = axis with odontoid process (also known as the dens)
ii. Thoracic vertebrae (12) iii. Lumbar vertebrae (5) do not have transverse foramina nor costal facets
b. Sacrum: (5) fused bones to form the sacrum i. Sacral foramen ii. Median sacral crest iii. Sacral promontory iv. Ala
c. Coccyx: (1-4) fused bones II. APPENDICULAR SKELETON (Pectoral Girdle, Arms, Pelvic Girdle, and Legs)
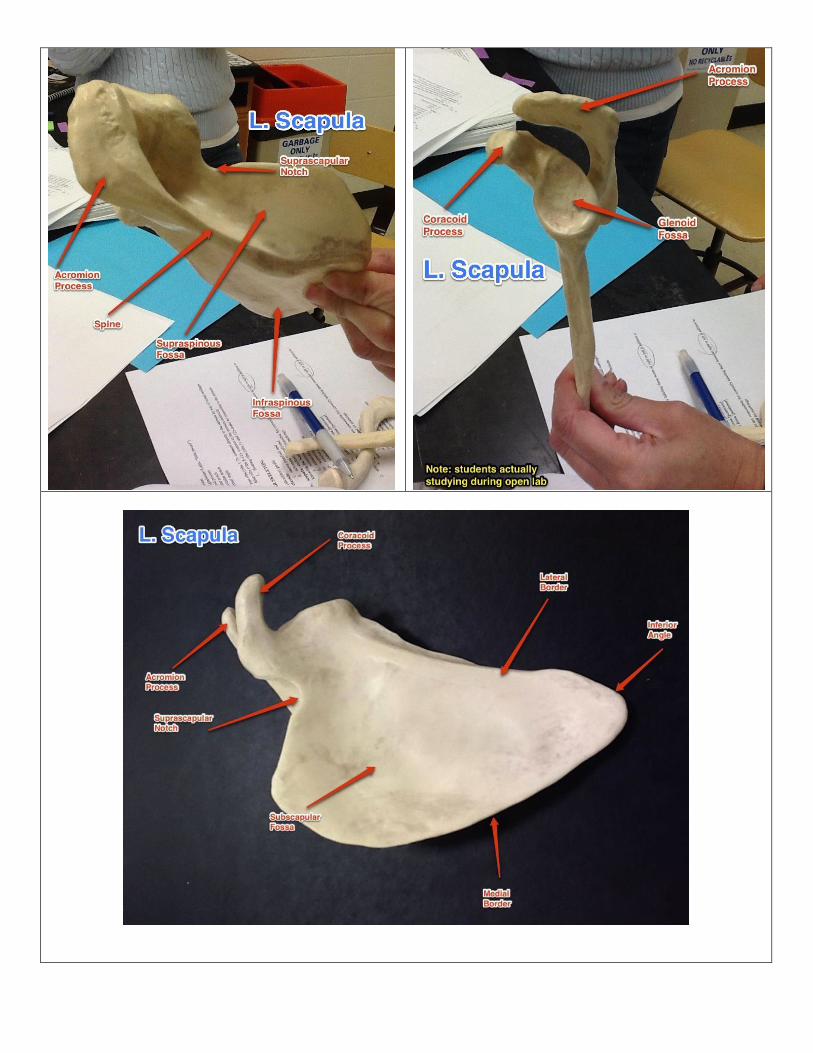
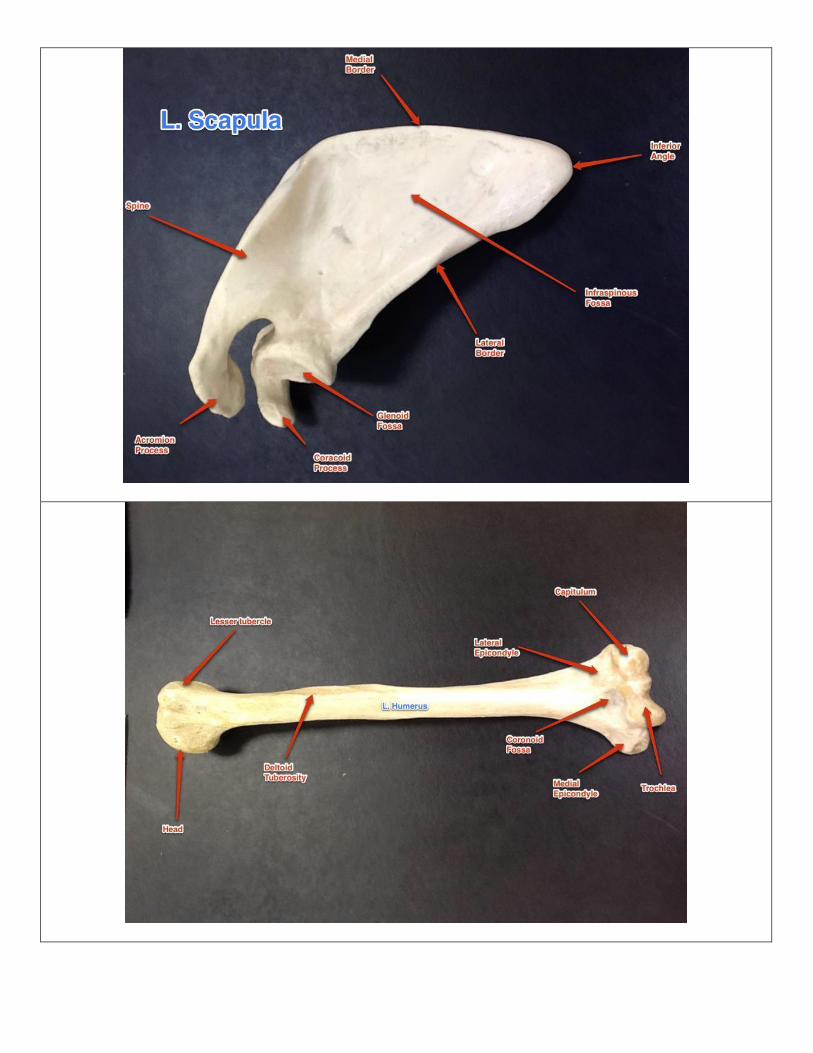
1. Pectoral Girdle a. Scapula (students must be able to identify right versus left)
i. Coracoid process ii. Acromion process iii. Spine iv. Supraspinous fossa v. Infraspinous fossa vi. Glenoid cavity (fossa) vii. Subscapular fossa viii. Suprascapular notch ix. Vertebral (medial) border x. Axillary (lateral) border
b. Clavicle i. Acromial end ii. Sternal end
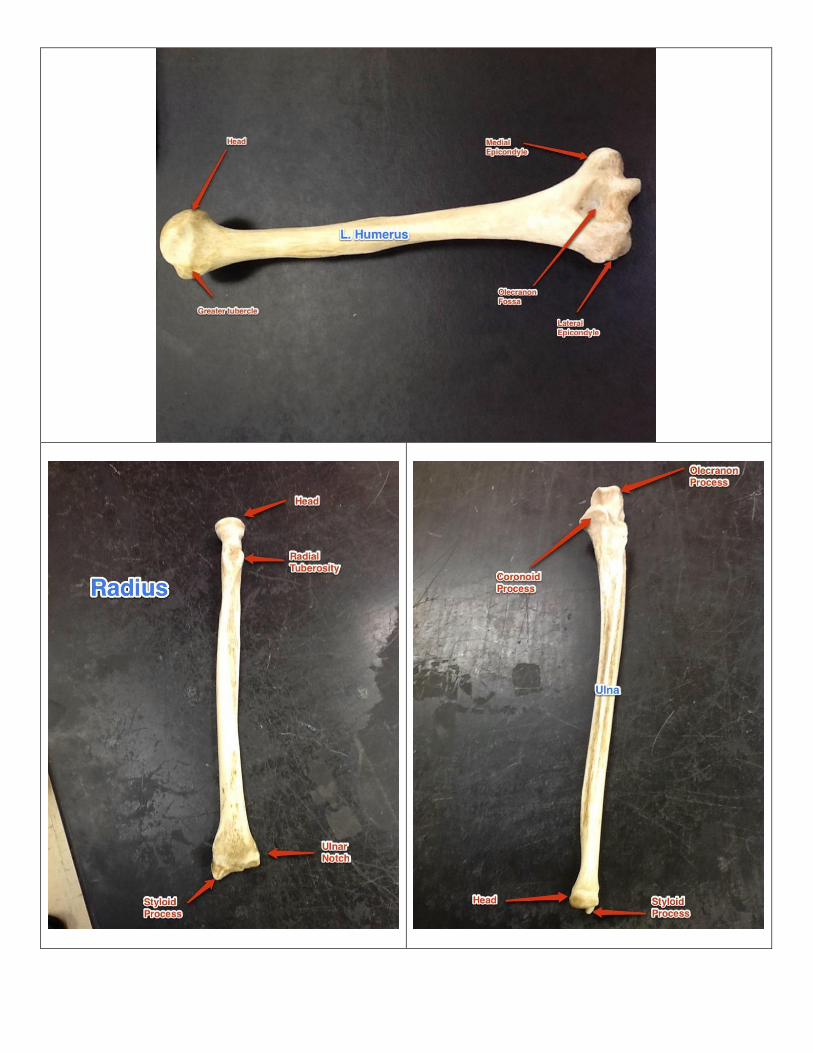
2. Bones of upper extremity: arm and forearm (humerus, radius, ulna, carpals, metacarpals, and phalanges)
a. Humerus (students must be able to identify right versus left) i. Head of humerus ii. Greater tubercle iii. Lesser tubercle iv. Intertubercular sulcus (groove)
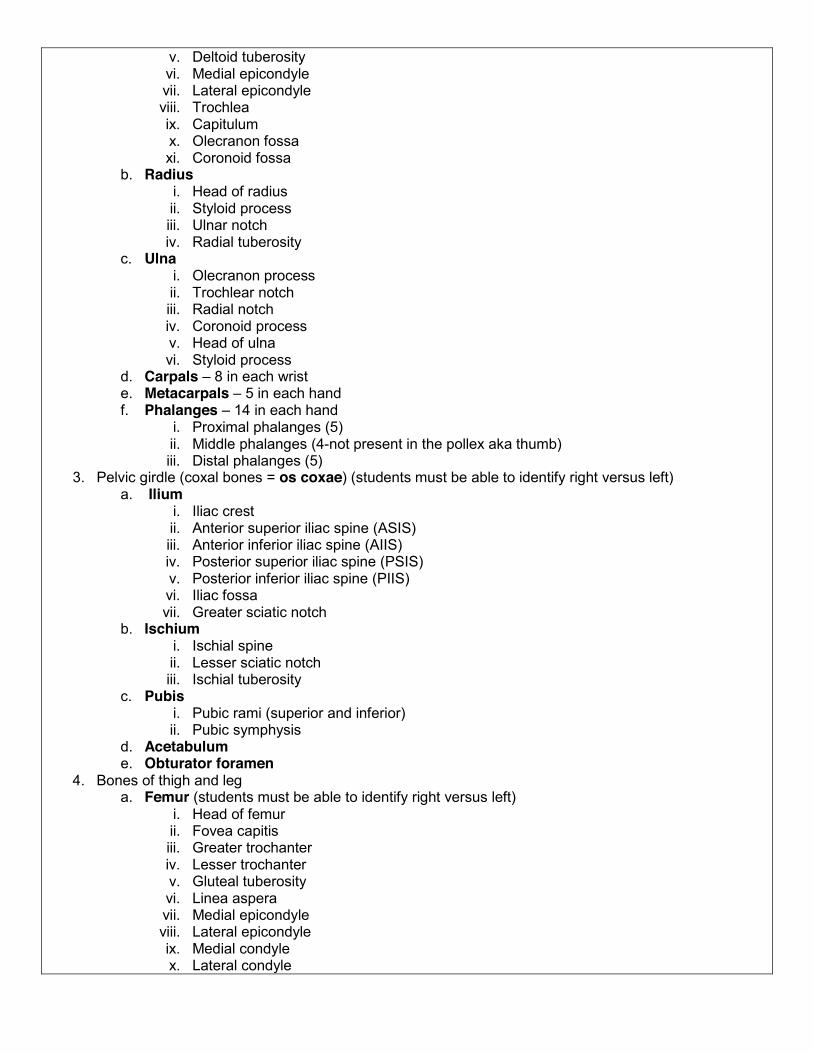
v. Deltoid tuberosity vi. Medial epicondyle vii. Lateral epicondyle viii. Trochlea ix. Capitulum x. Olecranon fossa xi. Coronoid fossa
b. Radius i. Head of radius ii. Styloid process iii. Ulnar notch iv. Radial tuberosity
c. Ulna i. Olecranon process ii. Trochlear notch iii. Radial notch iv. Coronoid process v. Head of ulna vi. Styloid process
d. Carpals – 8 in each wrist e. Metacarpals – 5 in each hand f. Phalanges – 14 in each hand
i. Proximal phalanges (5) ii. Middle phalanges (4-not present in the pollex aka thumb) iii. Distal phalanges (5)
3. Pelvic girdle (coxal bones = os coxae) (students must be able to identify right versus left) a. Ilium
i. Iliac crest ii. Anterior superior iliac spine (ASIS) iii. Anterior inferior iliac spine (AIIS) iv. Posterior superior iliac spine (PSIS) v. Posterior inferior iliac spine (PIIS) vi. Iliac fossa vii. Greater sciatic notch
b. Ischium i. Ischial spine ii. Lesser sciatic notch iii. Ischial tuberosity
c. Pubis i. Pubic rami (superior and inferior) ii. Pubic symphysis
d. Acetabulum e. Obturator foramen
4. Bones of thigh and leg a. Femur (students must be able to identify right versus left)
i. Head of femur ii. Fovea capitis iii. Greater trochanter iv. Lesser trochanter v. Gluteal tuberosity vi. Linea aspera vii. Medial epicondyle viii. Lateral epicondyle ix. Medial condyle x. Lateral condyle
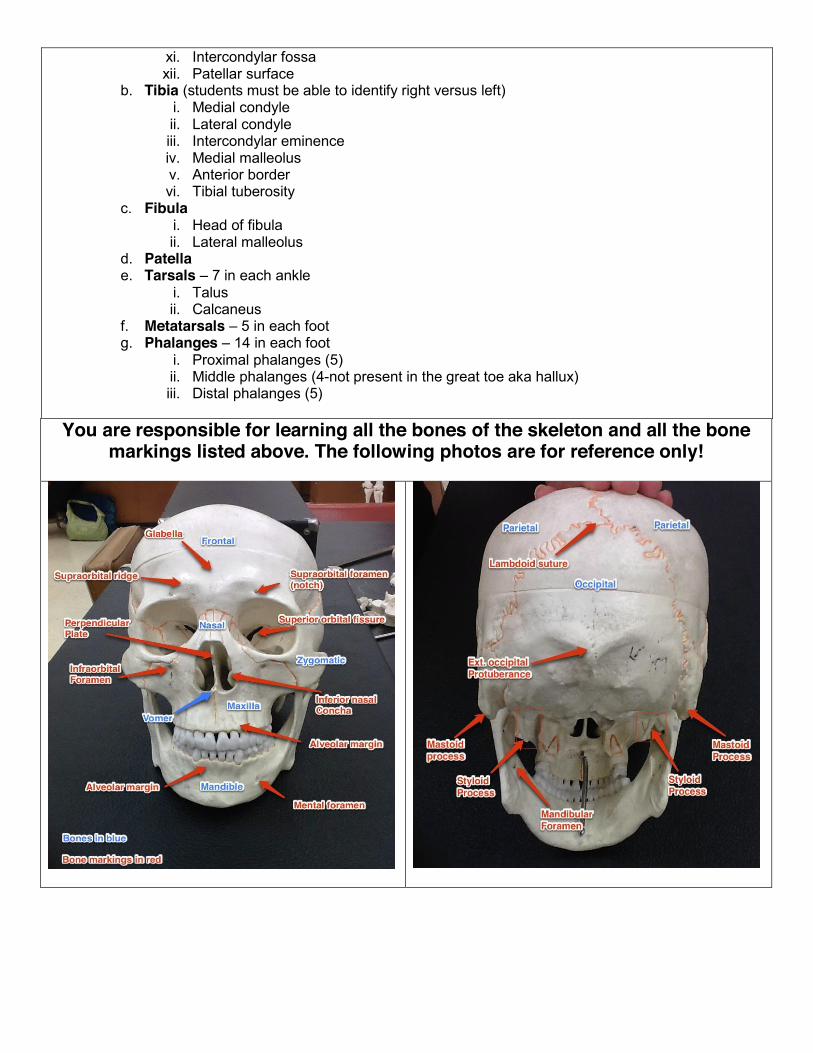
xi. Intercondylar fossa xii. Patellar surface
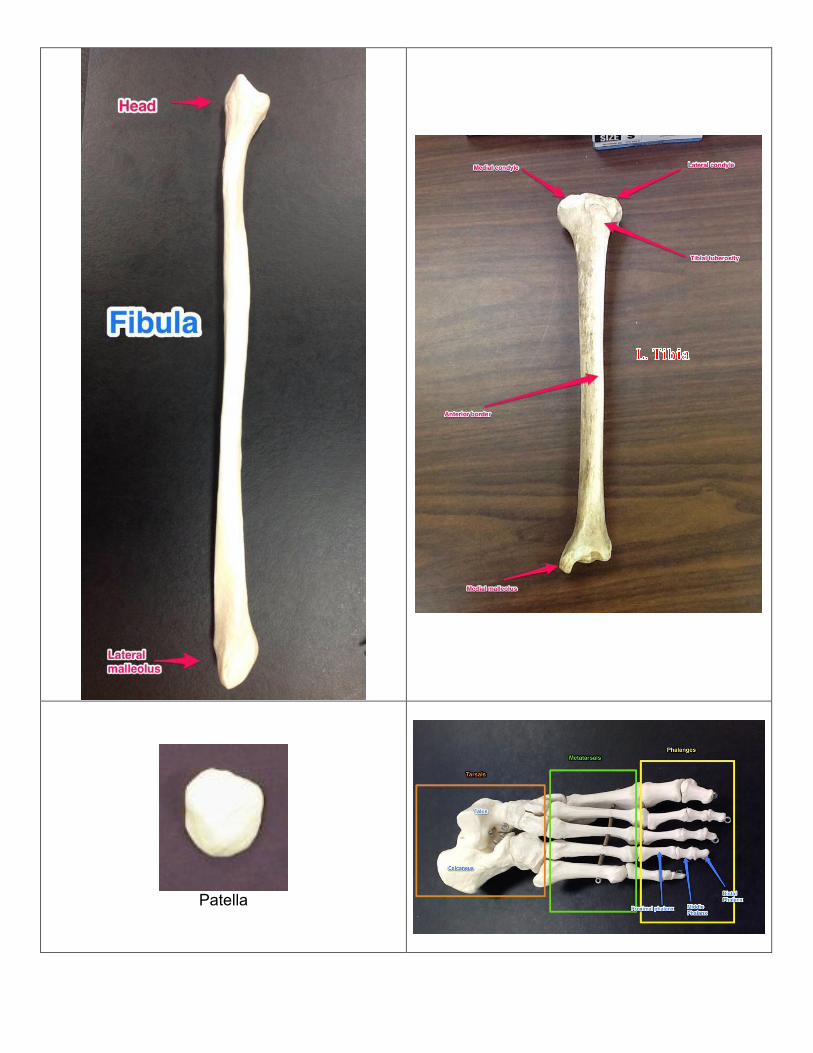
b. Tibia (students must be able to identify right versus left) i. Medial condyle ii. Lateral condyle iii. Intercondylar eminence iv. Medial malleolus v. Anterior border vi. Tibial tuberosity
c. Fibula i. Head of fibula ii. Lateral malleolus
d. Patella e. Tarsals – 7 in each ankle
i. Talus ii. Calcaneus
f. Metatarsals – 5 in each foot g. Phalanges – 14 in each foot
i. Proximal phalanges (5) ii. Middle phalanges (4-not present in the great toe aka hallux) iii. Distal phalanges (5)
You are responsible for learning all the bones of the skeleton and all the bone
markings listed above. The following photos are for reference only!

Hyoid

Rib


Patella

Sinuses model (anterior view)
Sinuses model (supra-lateral view)

MUSCULAR SYSTEM Introduction: The human body can produce a wide range of movements. From blinking, to running, to the pumping of blood through our bodies, we depend on the action of contractile fibers found within muscle tissue to drive movements in the body. Muscles are complex biological machines that we often take for granted. The focus of this lab will be to explore the histology of muscle tissue and to examine the skeletal muscles of the human body. I. Histology: Examine the following slides and learn to recognize the structures listed in bold print. Consult
your text for images of each organ. Muscle tissue is classified as being one of three types based on its location, composition, and function. Those three types of muscle are skeletal, cardiac, and smooth muscle tissues.
Skeletal muscle tissue Description: composed of long, fiber-like cells with multiple nuclei. Skeletal muscle is often referred to as striated muscle due to the obvious stripes seen on the cells formed by the A and I bands found on the myofibrils. Skeletal muscle is a voluntary muscle type. Function: movement of muscle tissues by conscious control Location: attached to the skeleton Connective tissues supporting skeletal muscle: Epimysium surrounds the whole muscle, perimysium surrounds each fascicle, and endomysium surrounds each muscle fiber.
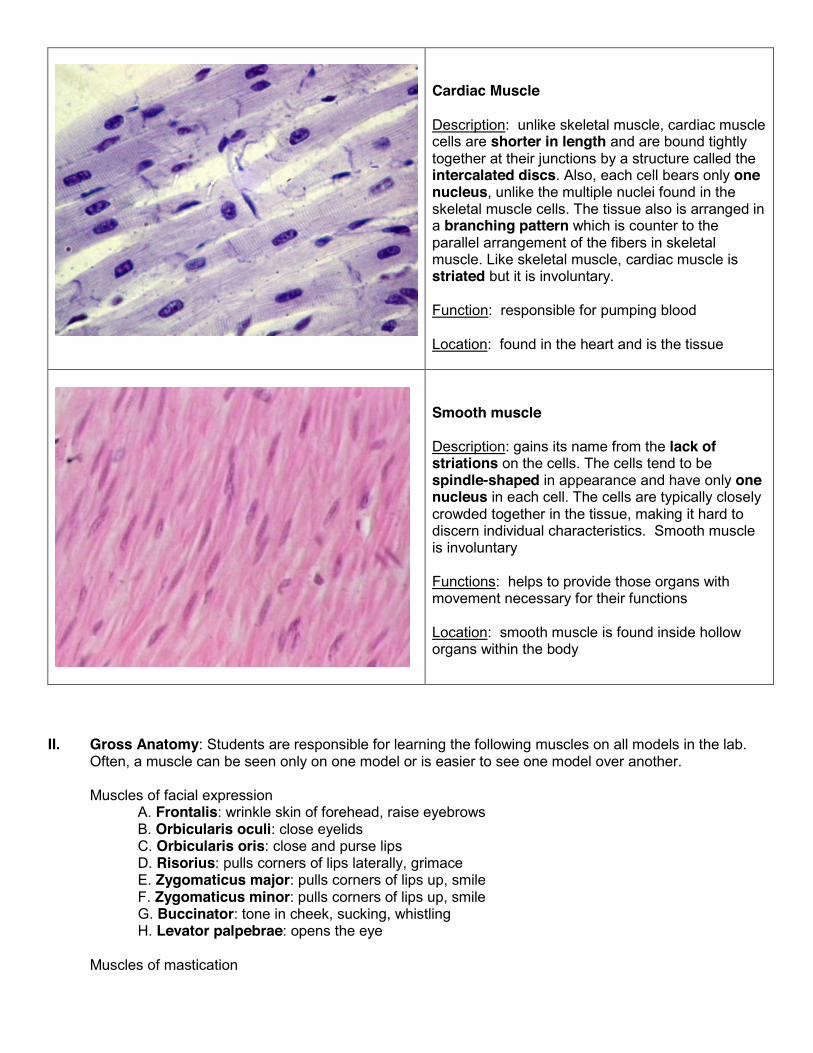
Cardiac Muscle Description: unlike skeletal muscle, cardiac muscle cells are shorter in length and are bound tightly together at their junctions by a structure called the intercalated discs. Also, each cell bears only one nucleus, unlike the multiple nuclei found in the skeletal muscle cells. The tissue also is arranged in a branching pattern which is counter to the parallel arrangement of the fibers in skeletal muscle. Like skeletal muscle, cardiac muscle is striated but it is involuntary. Function: responsible for pumping blood Location: found in the heart and is the tissue
Smooth muscle Description: gains its name from the lack of striations on the cells. The cells tend to be spindle-shaped in appearance and have only one nucleus in each cell. The cells are typically closely crowded together in the tissue, making it hard to discern individual characteristics. Smooth muscle is involuntary Functions: helps to provide those organs with movement necessary for their functions Location: smooth muscle is found inside hollow organs within the body
II. Gross Anatomy: Students are responsible for learning the following muscles on all models in the lab. Often, a muscle can be seen only on one model or is easier to see one model over another.
Muscles of facial expression A. Frontalis: wrinkle skin of forehead, raise eyebrows B. Orbicularis oculi: close eyelids C. Orbicularis oris: close and purse lips D. Risorius: pulls corners of lips laterally, grimace E. Zygomaticus major: pulls corners of lips up, smile F. Zygomaticus minor: pulls corners of lips up, smile G. Buccinator: tone in cheek, sucking, whistling H. Levator palpebrae: opens the eye
Muscles of mastication

A. Masseter: strongly elevate mandible, close jaws B. Temporalis: strongly elevate mandible, close jaws
Muscles moving the head and spine A. Sternocleidomastoid: together, flex forward; singly, tilt and rotate B. Sternohyoid: depresses larynx and hyoid bone C. Occipitalis: moves the scalp posteriorly D. Splenius capitis: turn the head side to side to say “no” E. Erector spinae: extends the vertebral column
Extrinsic muscles of the eye: move the eyeball
A. Superior rectus: eyeball up B. Medial rectus: eyeball medial C. Inferior rectus: eyeball down D. Lateral rectus: eyeball lateral E. Superior oblique: eyeball downward and outward rotation F. Inferior oblique: eyeball upward and outward rotation
Muscles of the abdominal wall
A. External abdominal oblique B. Internal abdominal oblique C. Transversus abdominis D. Rectus abdominis E. Linea Alba
Muscles for breathing A. Diaphragm: pushes abdominal contents down (inspiration) B. External intercostal muscles: raise and spread ribs (inspiration) C. Internal intercostal muscles: forced expiration only
Muscles of the pelvic floor
A. Coccygeus group: tone supports pelvic organs B. Levator ani: controls bowel elimination C. External anal sphincter: controls bowel elimination
Muscles acting on the scapula A. Trapezius: upper portion elevates; lower, depresses B. Serratus anterior: rotates C. Pectoralis minor: pulls anteriorly D. Levator scapulae: elevates E. Rhomboideus major: elevate and adduct F. Rhomboideus minor: elevate and adduct
Muscles acting on the humerus (at shoulder joint)
A. Pectoralis major: flexes, adducts, and medially rotates B. Latissimus dorsi: extends, adducts, and medially rotates C. Deltoid: abducts D. Supraspinatus: abducts E. Infraspinatus: laterally rotates F. Subscapularis: medially rotates G. Teres major: extends, adducts, and medially rotates H. Teres minor: laterally rotates I. Coracobrachialis: flexes and adducts
Muscles acting on the forearm (at elbow joint)
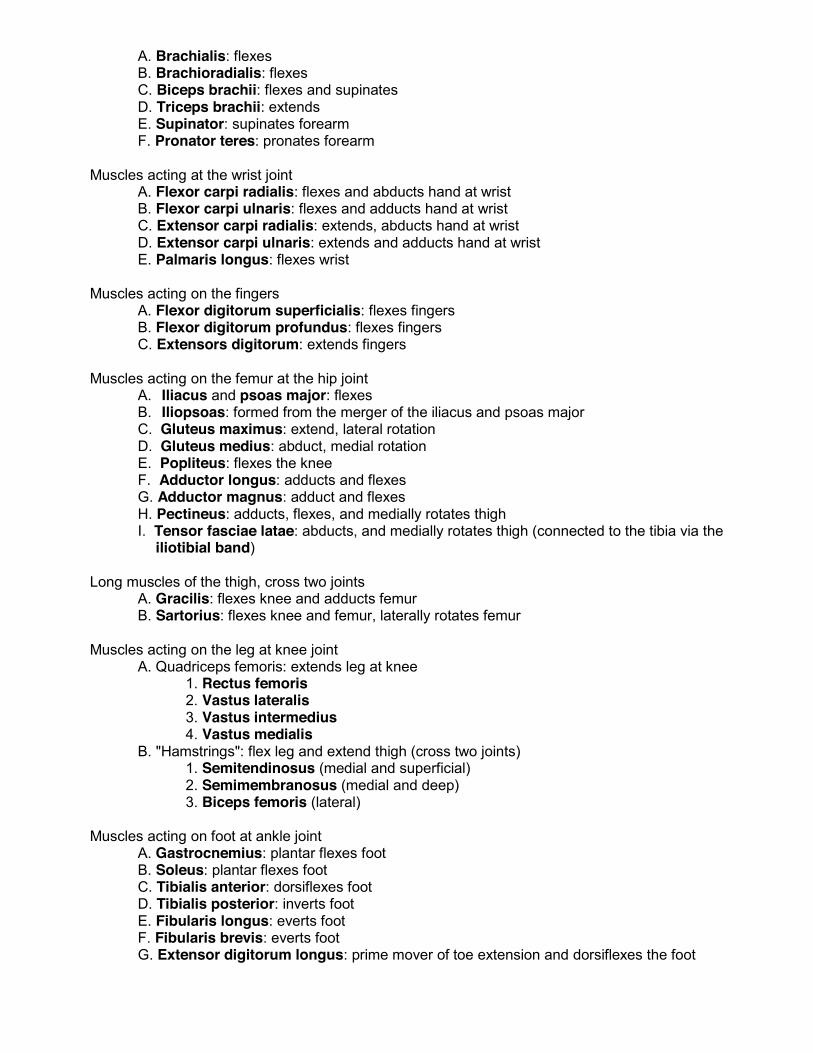
A. Brachialis: flexes B. Brachioradialis: flexes C. Biceps brachii: flexes and supinates D. Triceps brachii: extends E. Supinator: supinates forearm F. Pronator teres: pronates forearm
Muscles acting at the wrist joint
A. Flexor carpi radialis: flexes and abducts hand at wrist B. Flexor carpi ulnaris: flexes and adducts hand at wrist C. Extensor carpi radialis: extends, abducts hand at wrist D. Extensor carpi ulnaris: extends and adducts hand at wrist E. Palmaris longus: flexes wrist
Muscles acting on the fingers A. Flexor digitorum superficialis: flexes fingers B. Flexor digitorum profundus: flexes fingers C. Extensors digitorum: extends fingers
Muscles acting on the femur at the hip joint A. Iliacus and psoas major: flexes B. Iliopsoas: formed from the merger of the iliacus and psoas major C. Gluteus maximus: extend, lateral rotation D. Gluteus medius: abduct, medial rotation E. Popliteus: flexes the knee F. Adductor longus: adducts and flexes G. Adductor magnus: adduct and flexes H. Pectineus: adducts, flexes, and medially rotates thigh I. Tensor fasciae latae: abducts, and medially rotates thigh (connected to the tibia via the
iliotibial band)
Long muscles of the thigh, cross two joints A. Gracilis: flexes knee and adducts femur B. Sartorius: flexes knee and femur, laterally rotates femur
Muscles acting on the leg at knee joint A. Quadriceps femoris: extends leg at knee
1. Rectus femoris 2. Vastus lateralis 3. Vastus intermedius 4. Vastus medialis
B. "Hamstrings": flex leg and extend thigh (cross two joints) 1. Semitendinosus (medial and superficial) 2. Semimembranosus (medial and deep) 3. Biceps femoris (lateral)
Muscles acting on foot at ankle joint A. Gastrocnemius: plantar flexes foot B. Soleus: plantar flexes foot C. Tibialis anterior: dorsiflexes foot D. Tibialis posterior: inverts foot E. Fibularis longus: everts foot F. Fibularis brevis: everts foot G. Extensor digitorum longus: prime mover of toe extension and dorsiflexes the foot

H. Flexor digitorum longus: plantar flexes and inverts foot, flexes the toes and helps foot grip the group
USE THE LABELED PHOTOS ON THE FOLLOWING PAGES FOR REFERENCE ONLY!
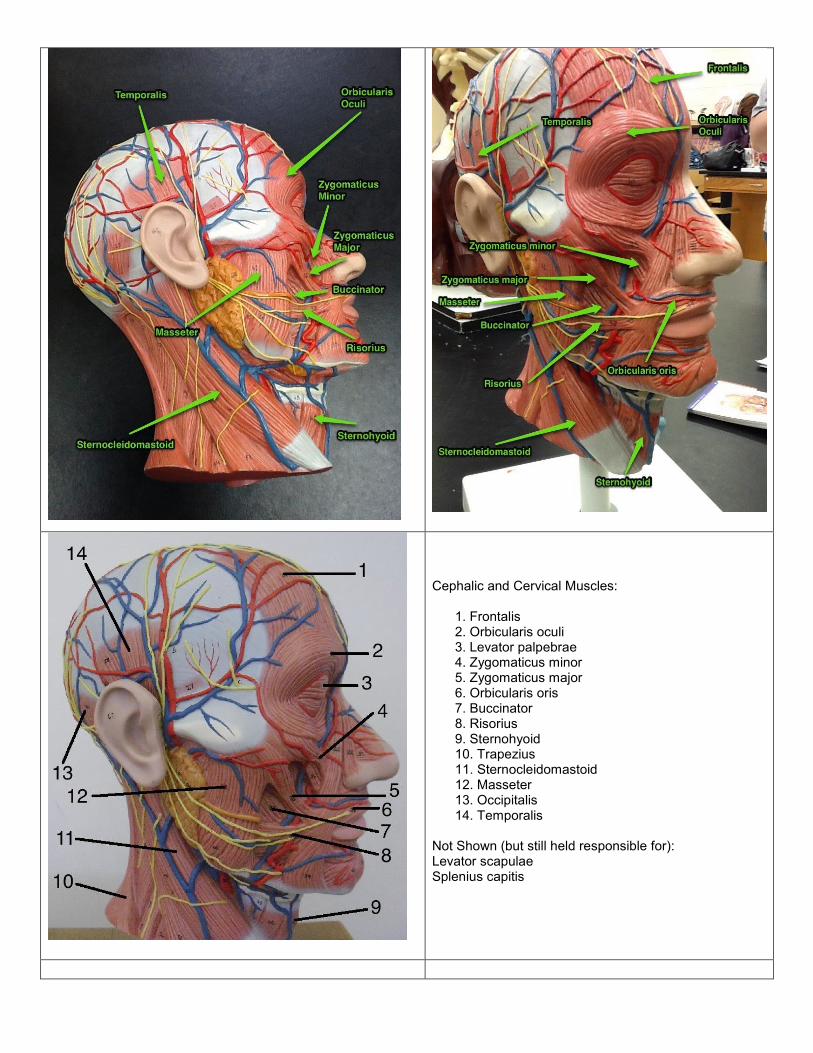
Cephalic and Cervical Muscles:
1. Frontalis 2. Orbicularis oculi 3. Levator palpebrae 4. Zygomaticus minor 5. Zygomaticus major 6. Orbicularis oris 7. Buccinator 8. Risorius 9. Sternohyoid 10. Trapezius 11. Sternocleidomastoid 12. Masseter 13. Occipitalis 14. Temporalis
Not Shown (but still held responsible for): Levator scapulae Splenius capitis
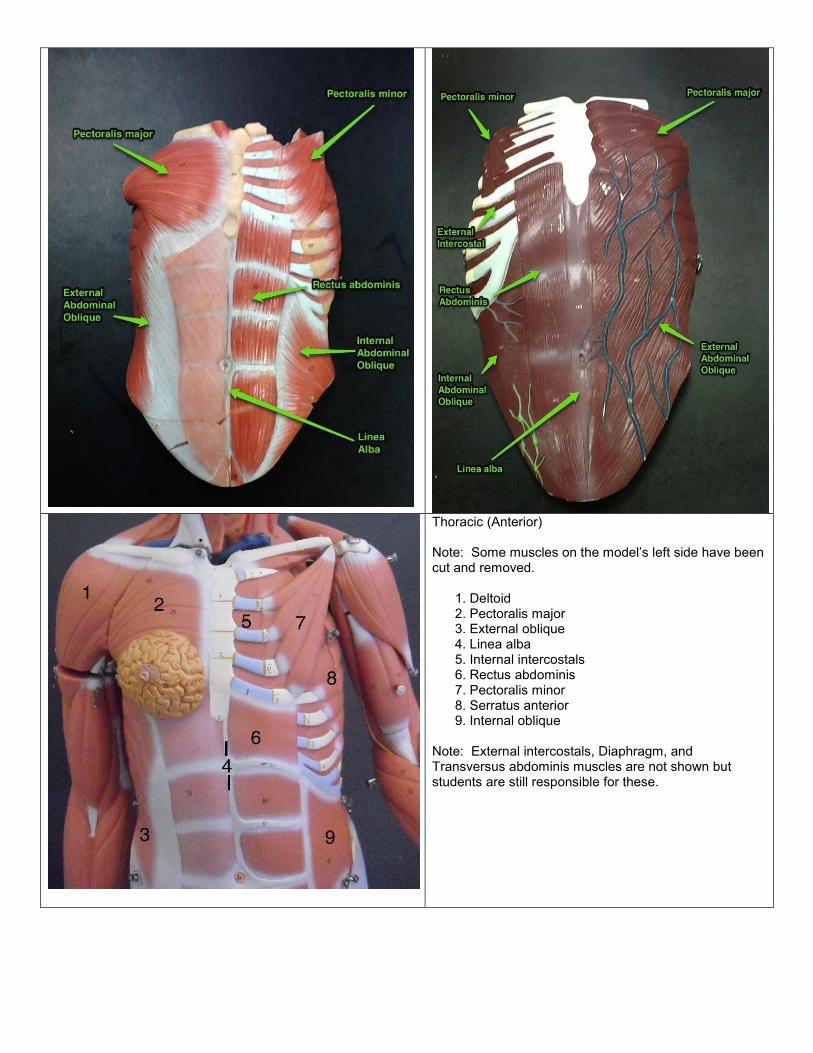
Thoracic (Anterior) Note: Some muscles on the model’s left side have been cut and removed.
1. Deltoid 2. Pectoralis major 3. External oblique 4. Linea alba 5. Internal intercostals 6. Rectus abdominis 7. Pectoralis minor 8. Serratus anterior 9. Internal oblique
Note: External intercostals, Diaphragm, and Transversus abdominis muscles are not shown but students are still responsible for these.
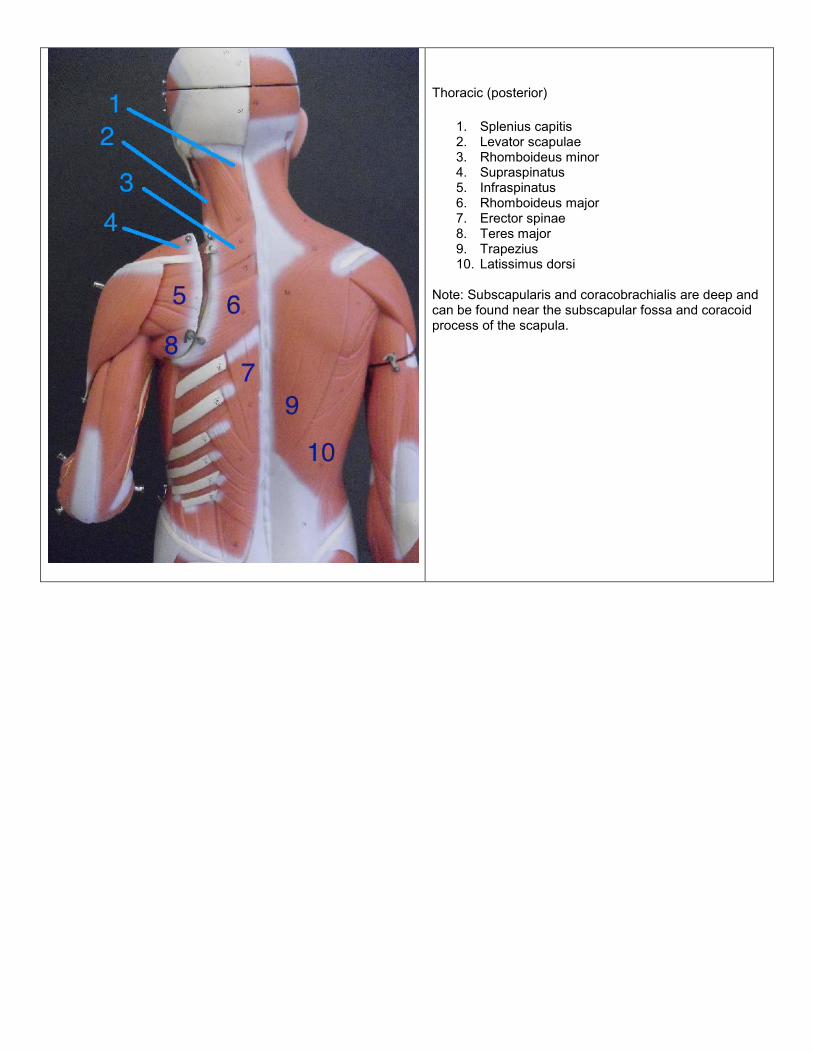
Thoracic (posterior)
1. Splenius capitis 2. Levator scapulae 3. Rhomboideus minor 4. Supraspinatus 5. Infraspinatus 6. Rhomboideus major 7. Erector spinae 8. Teres major 9. Trapezius 10. Latissimus dorsi
Note: Subscapularis and coracobrachialis are deep and can be found near the subscapular fossa and coracoid process of the scapula.


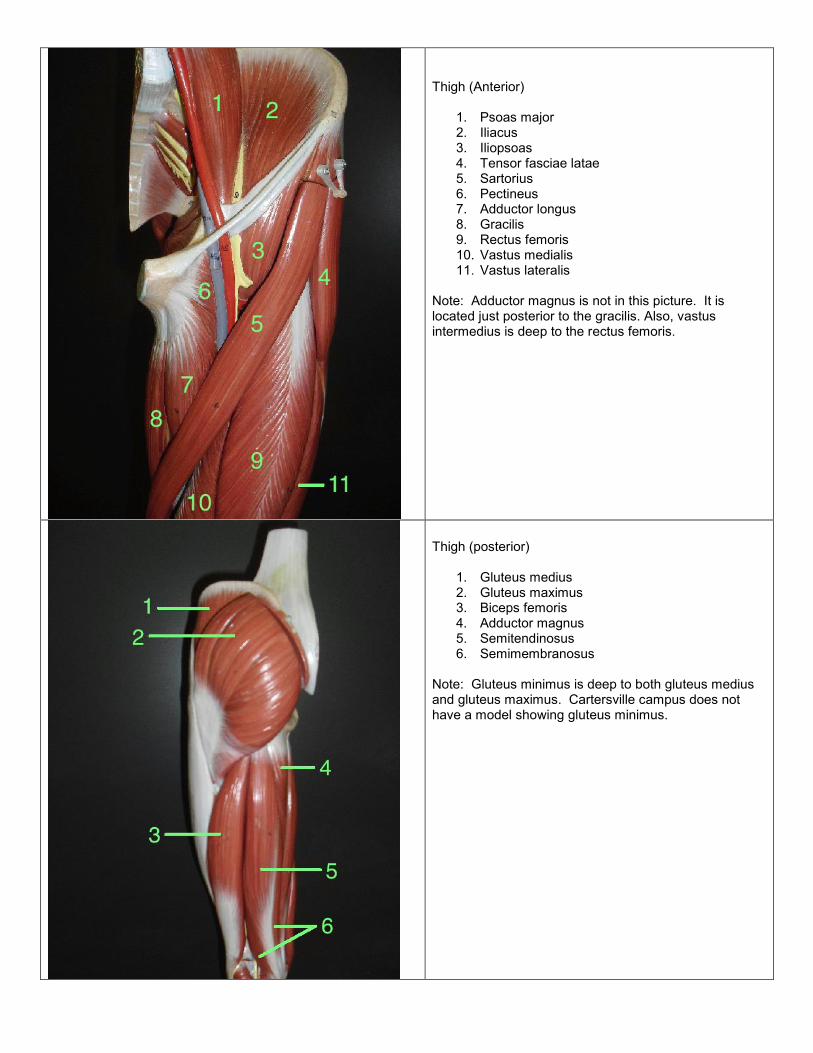
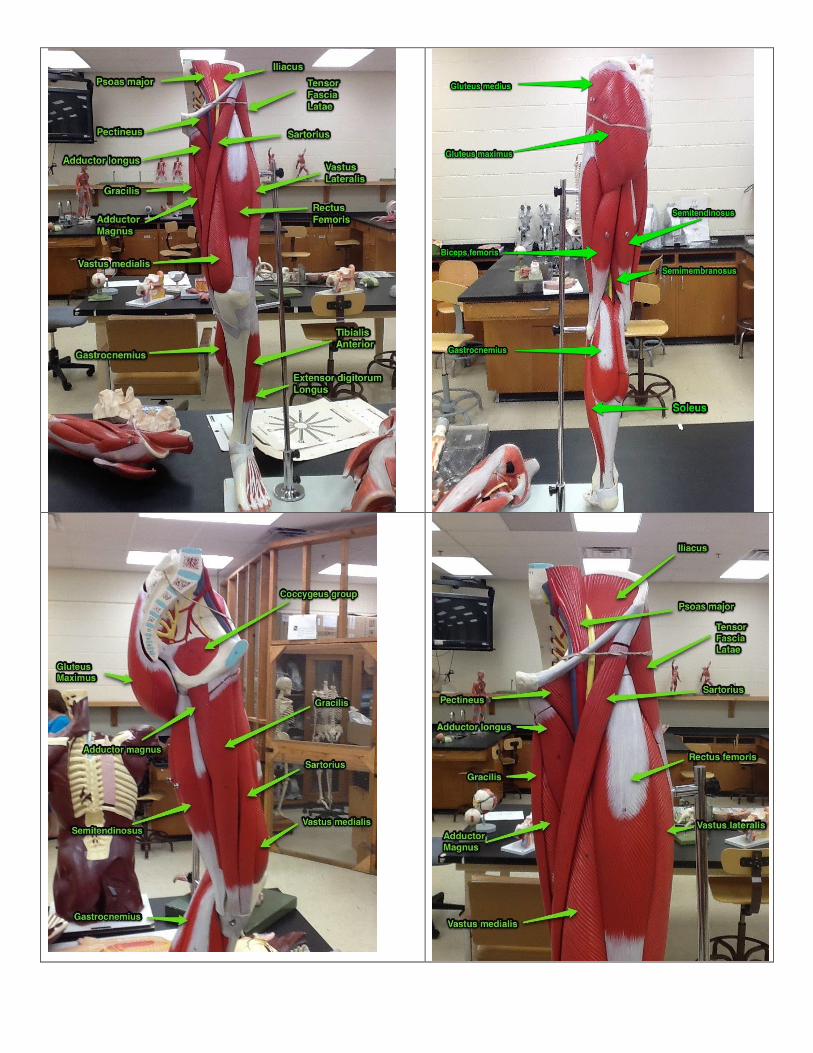
Thigh (Anterior)
1. Psoas major 2. Iliacus 3. Iliopsoas 4. Tensor fasciae latae 5. Sartorius 6. Pectineus 7. Adductor longus 8. Gracilis 9. Rectus femoris 10. Vastus medialis 11. Vastus lateralis
Note: Adductor magnus is not in this picture. It is located just posterior to the gracilis. Also, vastus intermedius is deep to the rectus femoris.
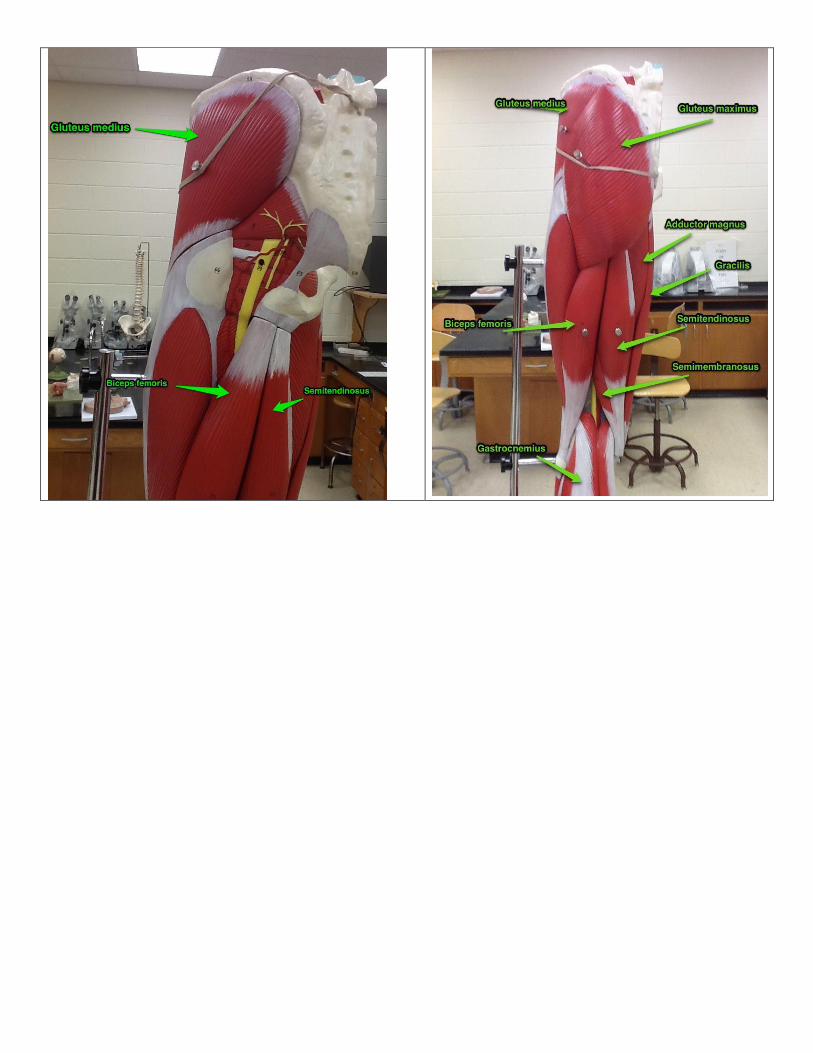
Thigh (posterior)
1. Gluteus medius 2. Gluteus maximus 3. Biceps femoris 4. Adductor magnus 5. Semitendinosus 6. Semimembranosus
Note: Gluteus minimus is deep to both gluteus medius and gluteus maximus. Cartersville campus does not have a model showing gluteus minimus.
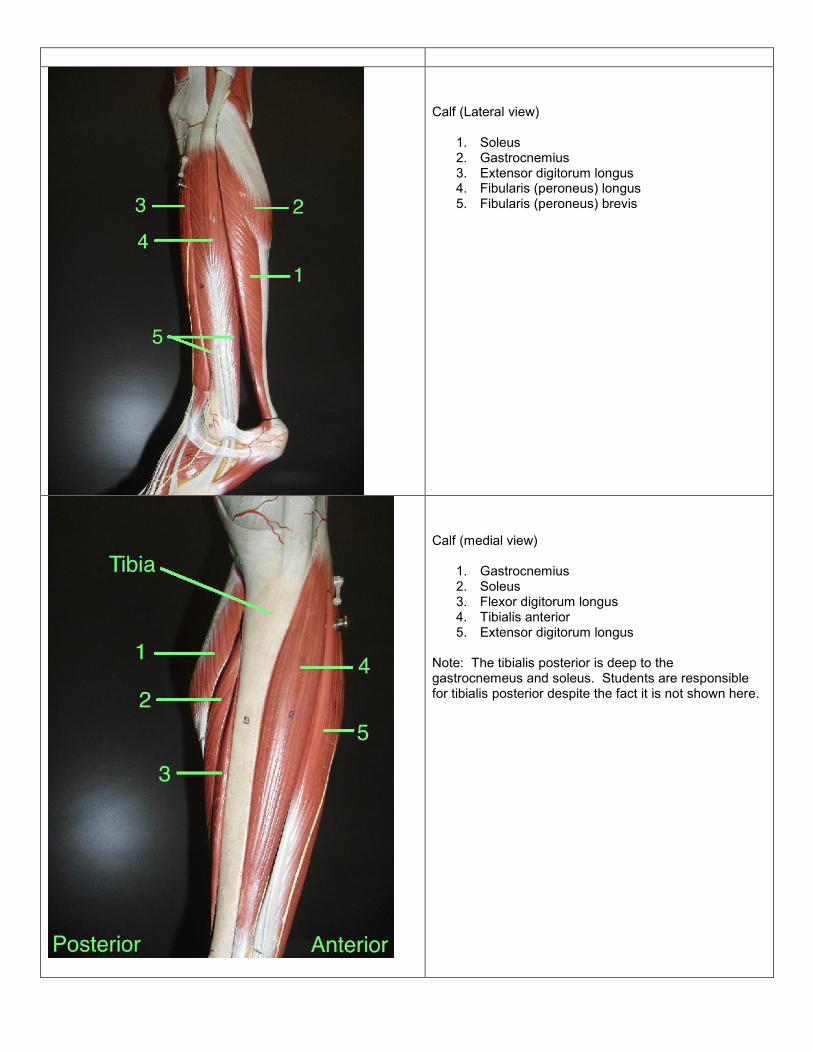
Calf (Lateral view)
1. Soleus 2. Gastrocnemius 3. Extensor digitorum longus 4. Fibularis (peroneus) longus 5. Fibularis (peroneus) brevis
Calf (medial view)
1. Gastrocnemius 2. Soleus 3. Flexor digitorum longus 4. Tibialis anterior 5. Extensor digitorum longus
Note: The tibialis posterior is deep to the gastrocnemeus and soleus. Students are responsible for tibialis posterior despite the fact it is not shown here.
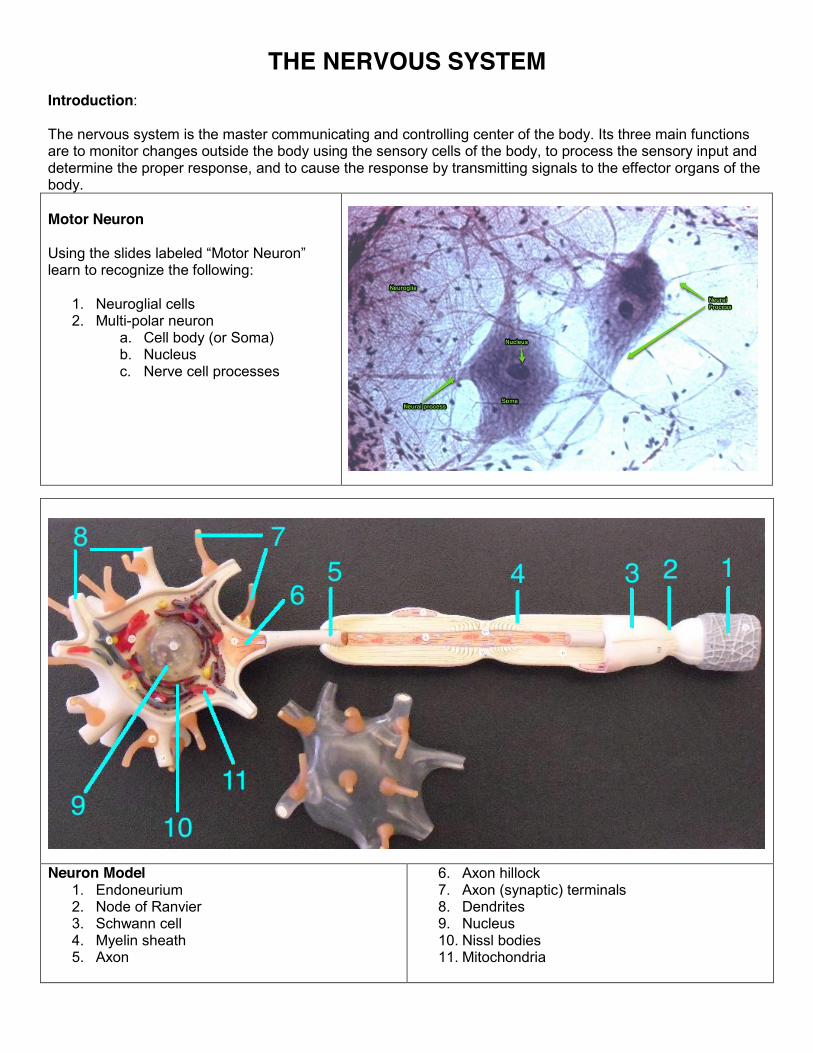
THE NERVOUS SYSTEM Introduction: The nervous system is the master communicating and controlling center of the body. Its three main functions are to monitor changes outside the body using the sensory cells of the body, to process the sensory input and determine the proper response, and to cause the response by transmitting signals to the effector organs of the body. Motor Neuron Using the slides labeled “Motor Neuron” learn to recognize the following:
1. Neuroglial cells 2. Multi-polar neuron
a. Cell body (or Soma) b. Nucleus c. Nerve cell processes
Neuron Model
1. Endoneurium 2. Node of Ranvier 3. Schwann cell 4. Myelin sheath 5. Axon
6. Axon hillock 7. Axon (synaptic) terminals 8. Dendrites 9. Nucleus 10. Nissl bodies 11. Mitochondria
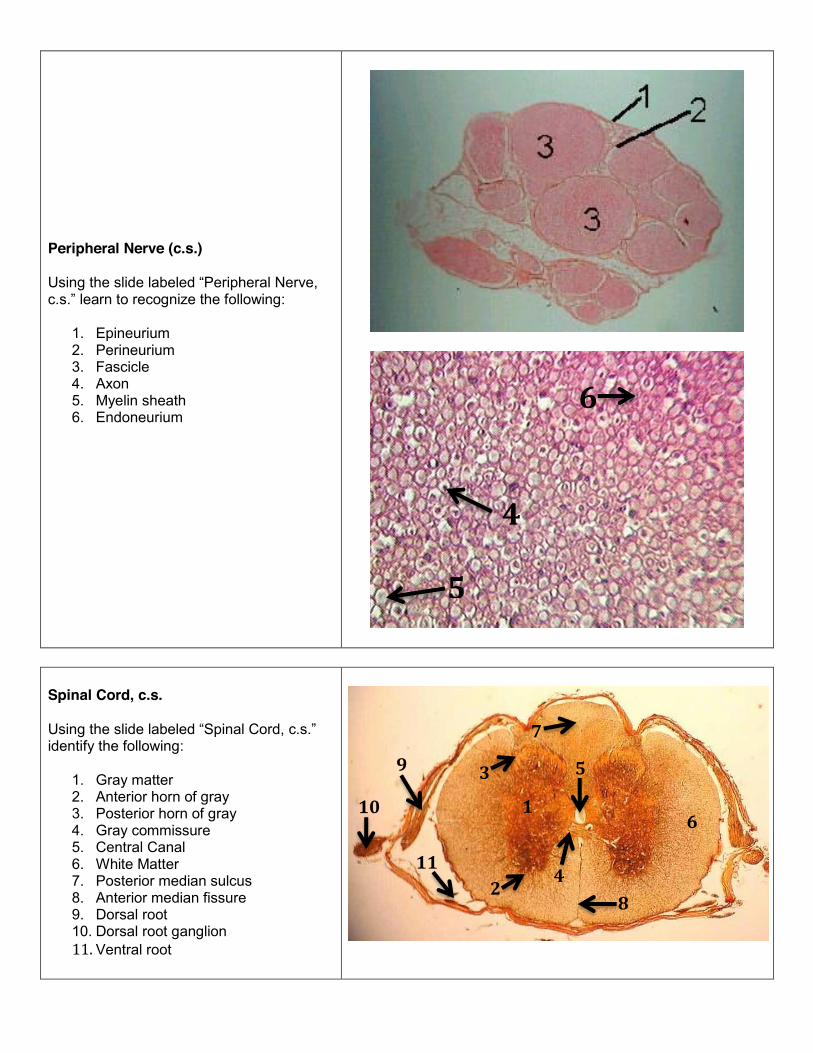
Spinal Cord, c.s. Using the slide labeled “Spinal Cord, c.s.” identify the following:
1. Gray matter 2. Anterior horn of gray 3. Posterior horn of gray 4. Gray commissure 5. Central Canal 6. White Matter 7. Posterior median sulcus 8. Anterior median fissure 9. Dorsal root 10. Dorsal root ganglion 11. Ventral root
Peripheral Nerve (c.s.) Using the slide labeled “Peripheral Nerve, c.s.” learn to recognize the following:
1. Epineurium 2. Perineurium 3. Fascicle 4. Axon 5. Myelin sheath 6. Endoneurium
2
3
4
5
7
1 6
8
4
9
5
6
11
10
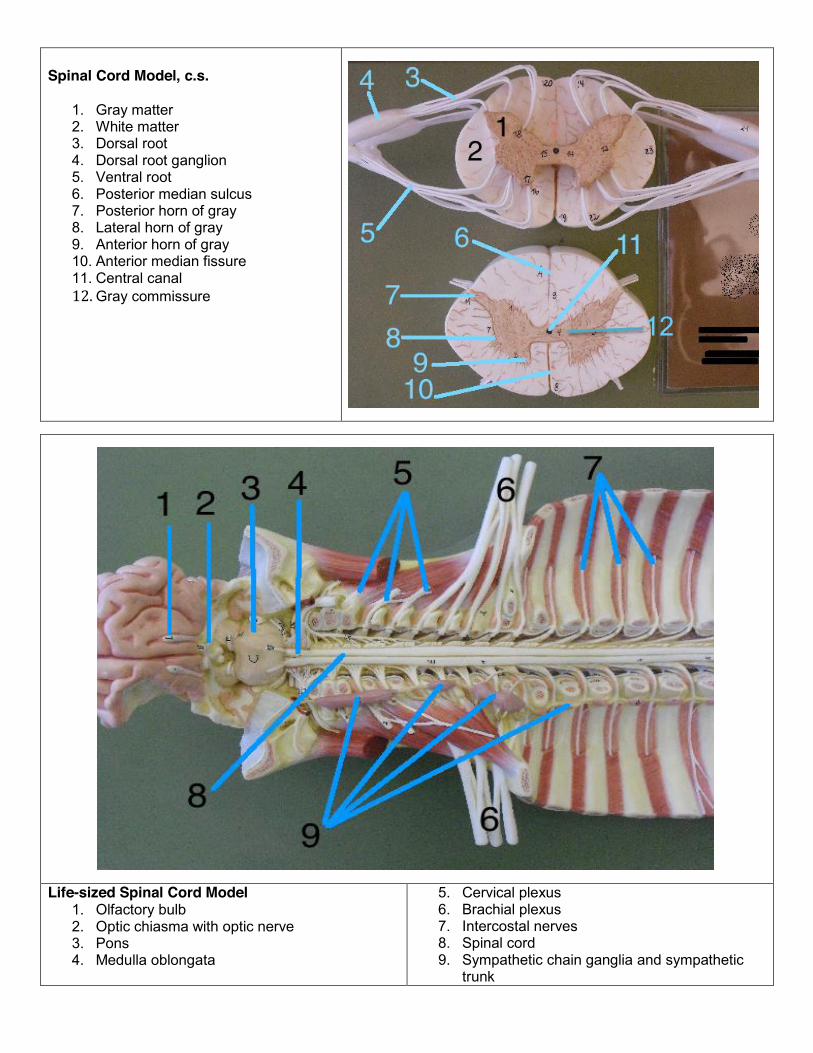
Spinal Cord Model, c.s.
1. Gray matter 2. White matter 3. Dorsal root 4. Dorsal root ganglion 5. Ventral root 6. Posterior median sulcus 7. Posterior horn of gray 8. Lateral horn of gray 9. Anterior horn of gray 10. Anterior median fissure 11. Central canal 12. Gray commissure
Life-sized Spinal Cord Model 1. Olfactory bulb 2. Optic chiasma with optic nerve 3. Pons 4. Medulla oblongata
5. Cervical plexus 6. Brachial plexus 7. Intercostal nerves 8. Spinal cord 9. Sympathetic chain ganglia and sympathetic
trunk
12
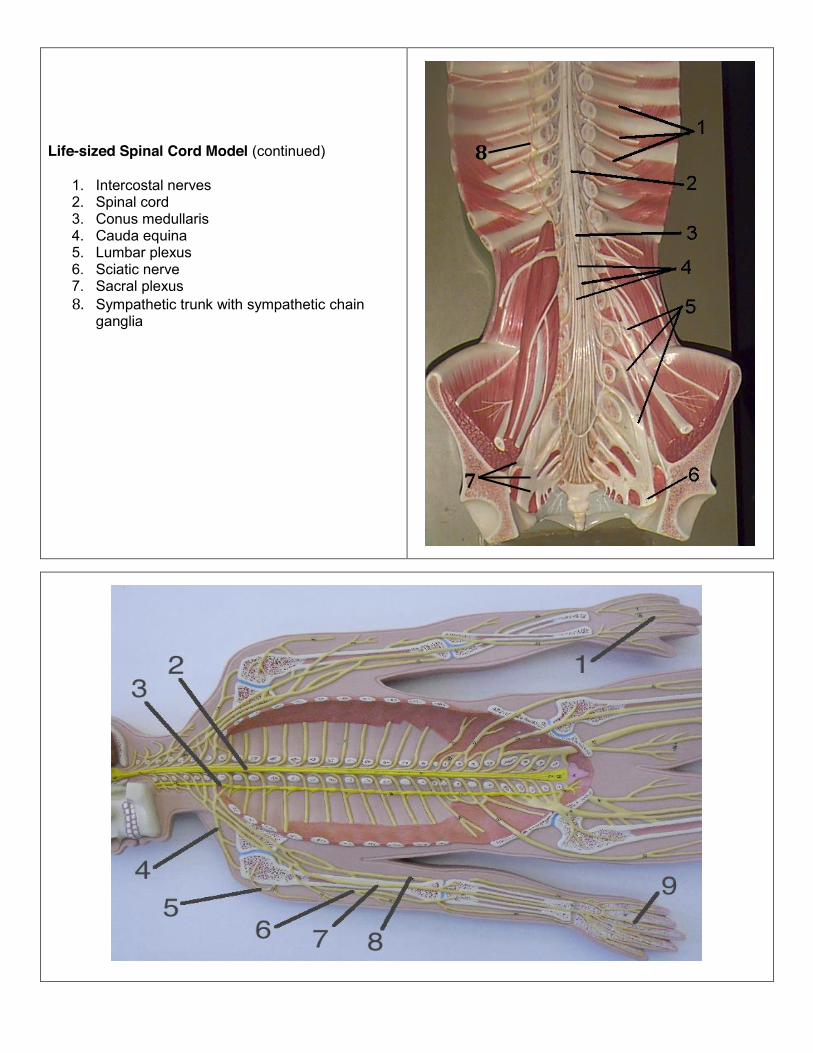
Life-sized Spinal Cord Model (continued)
1. Intercostal nerves 2. Spinal cord 3. Conus medullaris 4. Cauda equina 5. Lumbar plexus 6. Sciatic nerve 7. Sacral plexus 8. Sympathetic trunk with sympathetic chain
ganglia
7
8
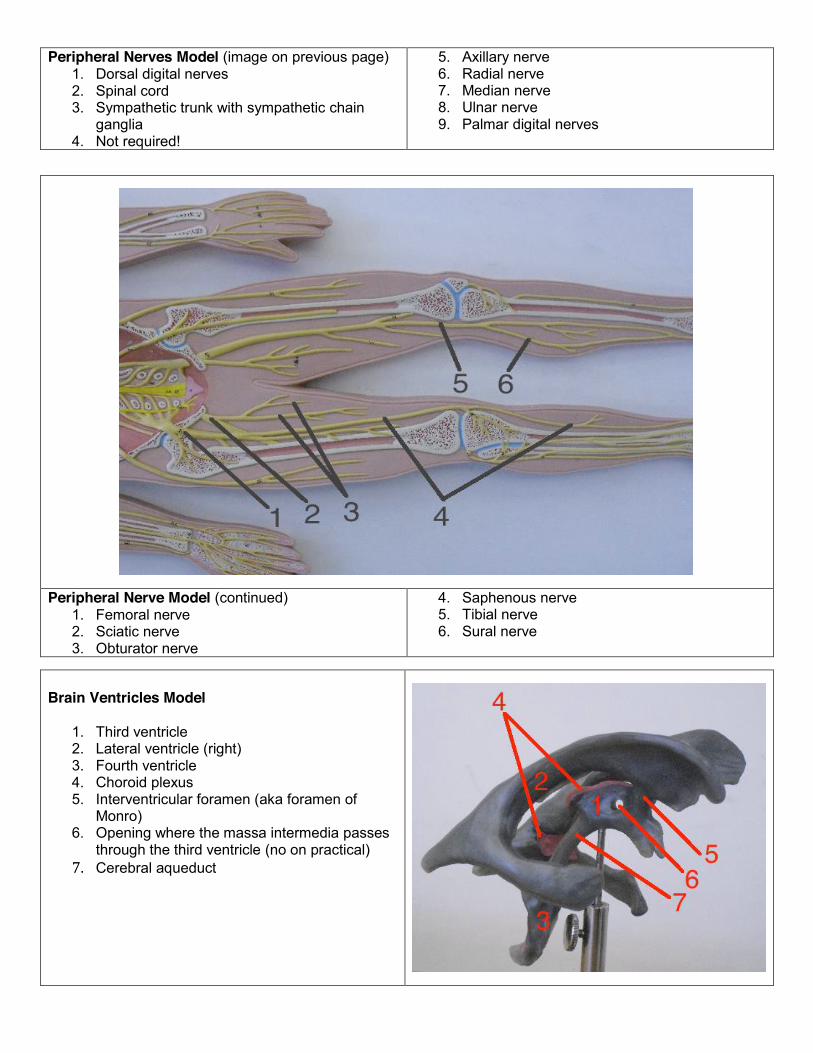
Peripheral Nerves Model (image on previous page) 1. Dorsal digital nerves 2. Spinal cord 3. Sympathetic trunk with sympathetic chain
ganglia 4. Not required!
5. Axillary nerve 6. Radial nerve 7. Median nerve 8. Ulnar nerve 9. Palmar digital nerves
Peripheral Nerve Model (continued)
1. Femoral nerve 2. Sciatic nerve 3. Obturator nerve
4. Saphenous nerve 5. Tibial nerve 6. Sural nerve
Brain Ventricles Model
1. Third ventricle 2. Lateral ventricle (right) 3. Fourth ventricle 4. Choroid plexus 5. Interventricular foramen (aka foramen of
Monro) 6. Opening where the massa intermedia passes
through the third ventricle (no on practical) 7. Cerebral aqueduct

Brain Model (external view)
1. Precentral gyrus 2. Central sulcus 3. Postcentral gyrus 4. Parietal lobe 5. Occipital lobe 6. Cerebellum 7. Transverse fissure 8. Lateral sulcus 9. Temporal lobe 10. Frontal lobe
12 Cranial Nerves CN I – Olfactory Nerve CN II – Optic Nerve CN III – Oculomotor Nerve CN IV – Trochlear Nerve CN V – Trigeminal Nerve CN VI – Abducens Nerve CN VII – Facial Nerve CN VIII – Vestibulocochlear Nerve CN IX – Glossopharyngeal Nerve CN X – Vagus Nerve CN XI – Accessory Nerve CN XII – Hypoglossal Nerve
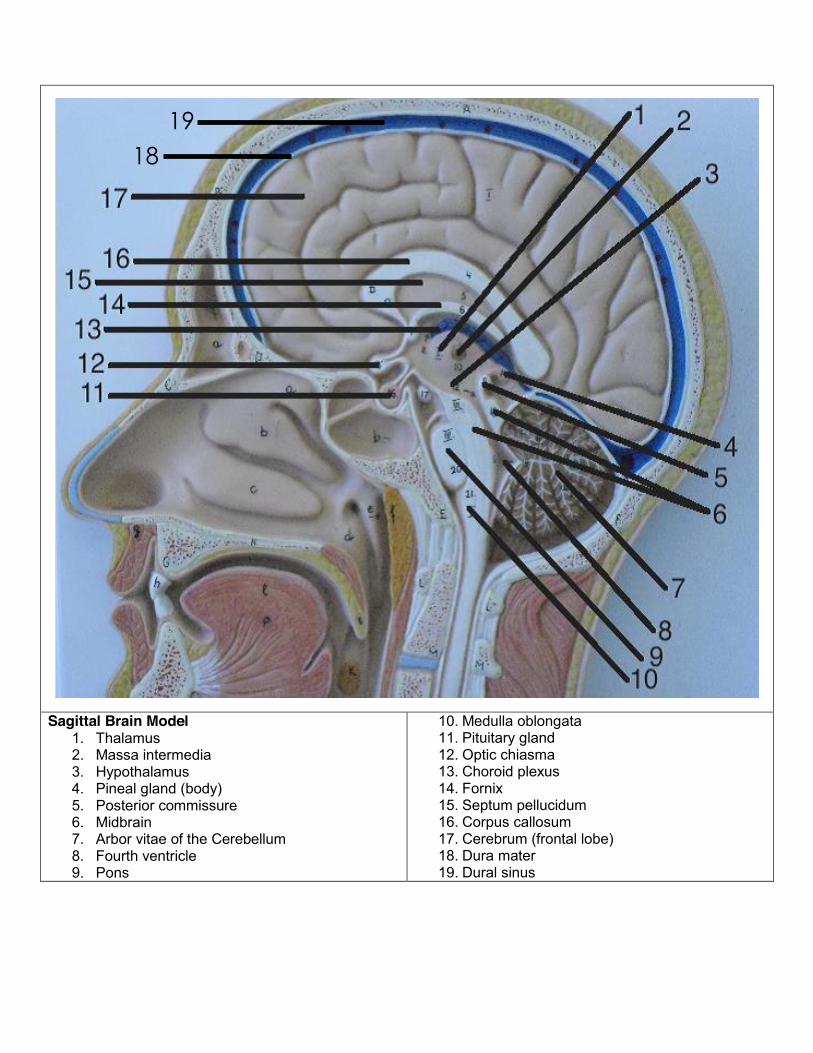
Sagittal Brain Model 1. Thalamus 2. Massa intermedia 3. Hypothalamus 4. Pineal gland (body) 5. Posterior commissure 6. Midbrain 7. Arbor vitae of the Cerebellum 8. Fourth ventricle 9. Pons
10. Medulla oblongata 11. Pituitary gland 12. Optic chiasma 13. Choroid plexus 14. Fornix 15. Septum pellucidum 16. Corpus callosum 17. Cerebrum (frontal lobe) 18. Dura mater 19. Dural sinus
18 19
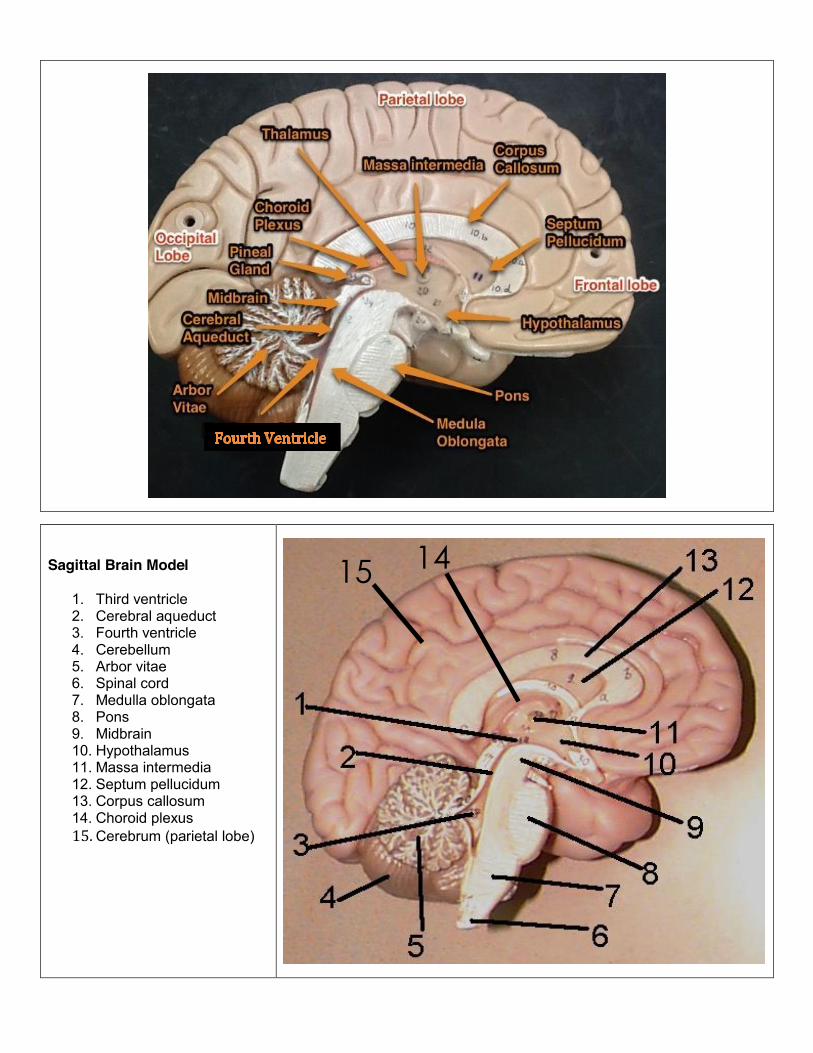
Sagittal Brain Model
1. Third ventricle 2. Cerebral aqueduct 3. Fourth ventricle 4. Cerebellum 5. Arbor vitae 6. Spinal cord 7. Medulla oblongata 8. Pons 9. Midbrain 10. Hypothalamus 11. Massa intermedia 12. Septum pellucidum 13. Corpus callosum 14. Choroid plexus 15. Cerebrum (parietal lobe)
14 15
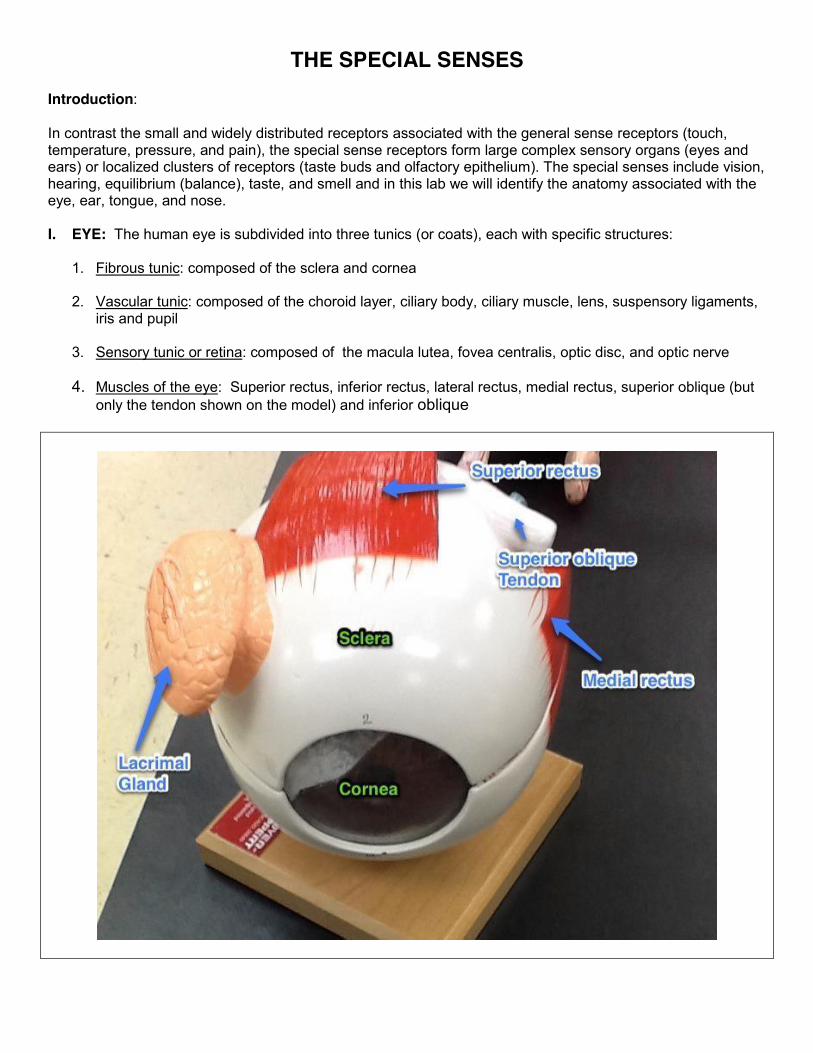
THE SPECIAL SENSES Introduction: In contrast the small and widely distributed receptors associated with the general sense receptors (touch, temperature, pressure, and pain), the special sense receptors form large complex sensory organs (eyes and ears) or localized clusters of receptors (taste buds and olfactory epithelium). The special senses include vision, hearing, equilibrium (balance), taste, and smell and in this lab we will identify the anatomy associated with the eye, ear, tongue, and nose. I. EYE: The human eye is subdivided into three tunics (or coats), each with specific structures:
1. Fibrous tunic: composed of the sclera and cornea
2. Vascular tunic: composed of the choroid layer, ciliary body, ciliary muscle, lens, suspensory ligaments,
iris and pupil
3. Sensory tunic or retina: composed of the macula lutea, fovea centralis, optic disc, and optic nerve
4. Muscles of the eye: Superior rectus, inferior rectus, lateral rectus, medial rectus, superior oblique (but only the tendon shown on the model) and inferior oblique

Superficial (External) Eye Structures
1. Iris 2. Cornea 3. Pupil 4. Sclera
5. Choroid layer 6. Optic Nerve (CN II) 7. Medial rectus 8. Inferior rectus

Deep Eye Structures
1. Ciliary muscle 2. Suspensory ligaments 3. Pupil 4. Lens
5. Macula lutea (w/ fovea centralis) 6. Retina 7. Optic disc (leading to optic nerve) 8. Vitreous humor (body)
1. Anterior segment (or cavity) filled with
aqueous humor 2. Posterior sement (or cavity) filled with
vitreous humor (body)
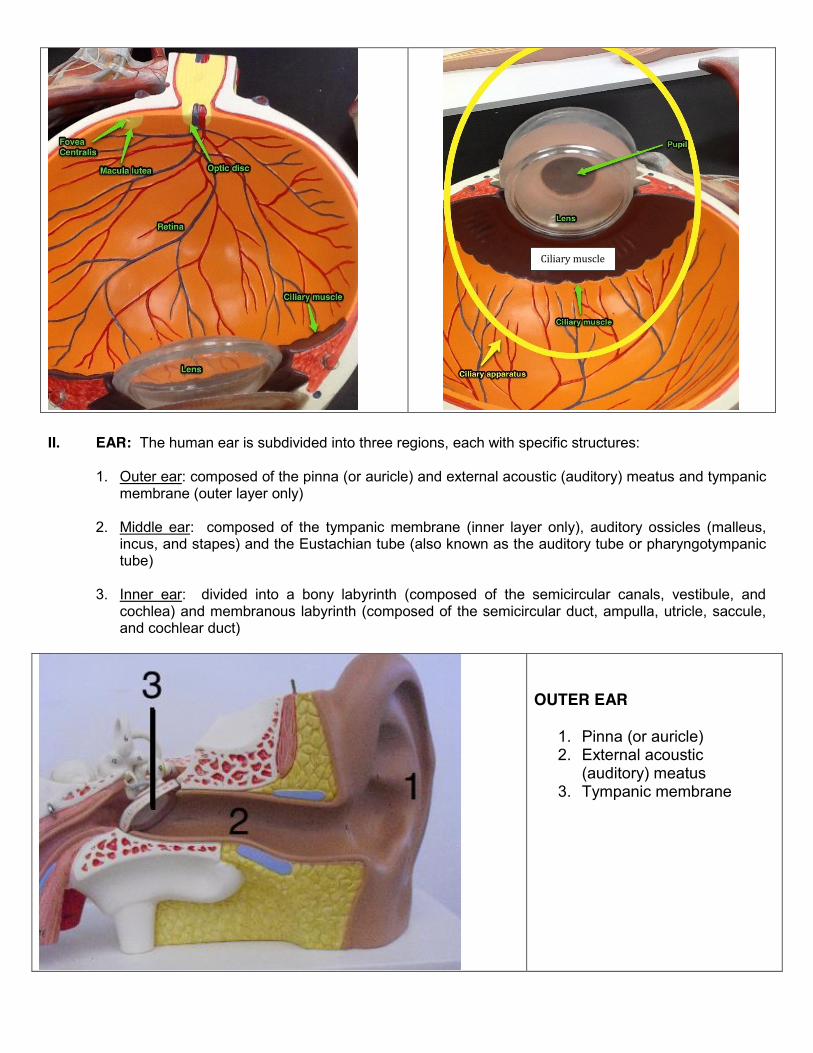
II. EAR: The human ear is subdivided into three regions, each with specific structures:
1. Outer ear: composed of the pinna (or auricle) and external acoustic (auditory) meatus and tympanic
membrane (outer layer only)
2. Middle ear: composed of the tympanic membrane (inner layer only), auditory ossicles (malleus, incus, and stapes) and the Eustachian tube (also known as the auditory tube or pharyngotympanic tube)
3. Inner ear: divided into a bony labyrinth (composed of the semicircular canals, vestibule, and
cochlea) and membranous labyrinth (composed of the semicircular duct, ampulla, utricle, saccule, and cochlear duct)
OUTER EAR
1. Pinna (or auricle) 2. External acoustic
(auditory) meatus 3. Tympanic membrane
Ciliary muscle
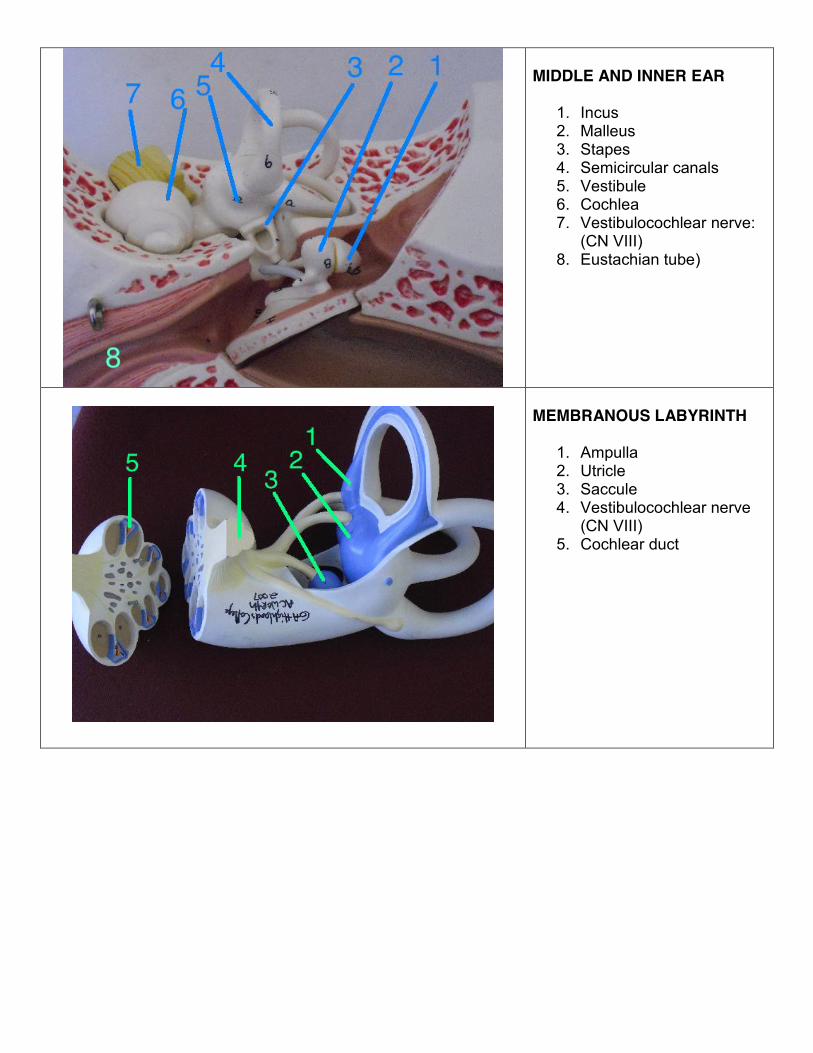
MIDDLE AND INNER EAR
1. Incus 2. Malleus 3. Stapes 4. Semicircular canals 5. Vestibule 6. Cochlea 7. Vestibulocochlear nerve:
(CN VIII) 8. Eustachian tube)
MEMBRANOUS LABYRINTH
1. Ampulla 2. Utricle 3. Saccule 4. Vestibulocochlear nerve
(CN VIII) 5. Cochlear duct

Membranous labryinth
x Cochlea x Cochlear duct x Vesticule x Saccule x Utricle x Ampullae x Semicircular duct x Semicircular canal x Vestibulocochlear
nerve
III. TONGUE: the human tongue is covered with numerous ridge-like projections called papillae.
Papilla:
1. Circumvallate papillae 2. Fungiform papillae 3. Filiform papillae 4. Foliate papillae
Cochlear duct
Semicircular duct
Utricle
Ampulla
Vestibulocochlear nerve
Saccule
Vestibule
Semicircular canals
Cochlea
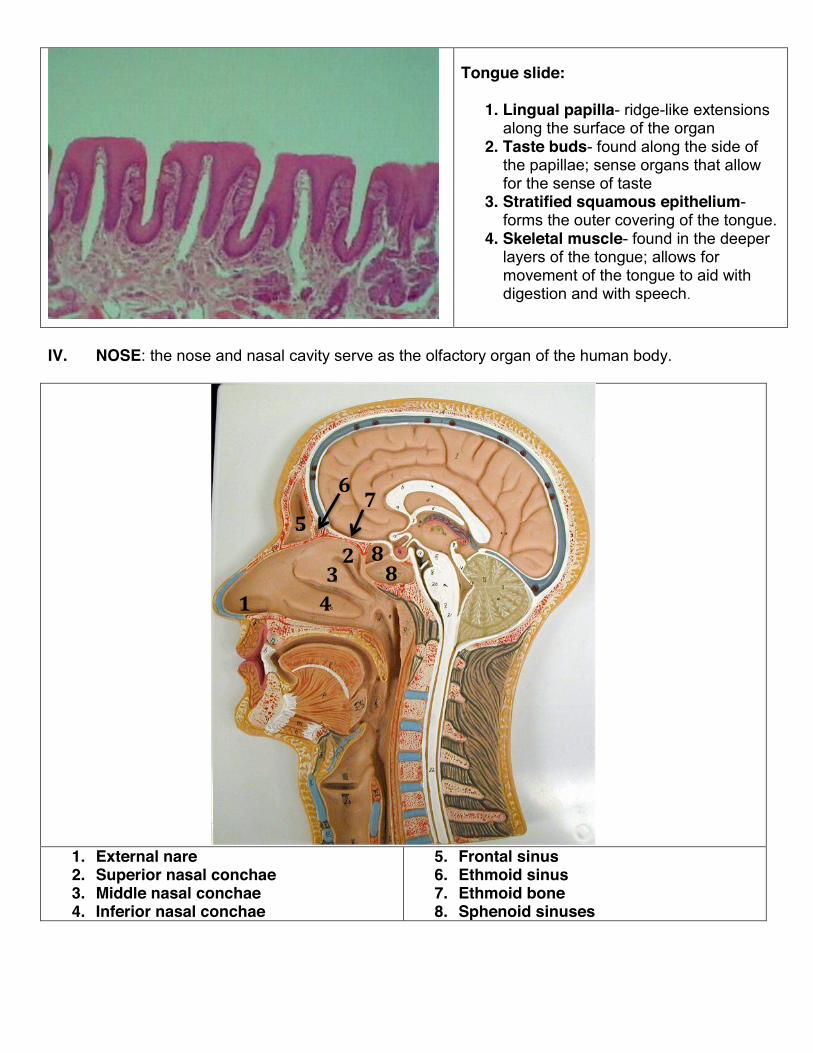
Tongue slide:
1. Lingual papilla- ridge-like extensions along the surface of the organ
2. Taste buds- found along the side of the papillae; sense organs that allow for the sense of taste
3. Stratified squamous epithelium- forms the outer covering of the tongue.
4. Skeletal muscle- found in the deeper layers of the tongue; allows for movement of the tongue to aid with digestion and with speech.
IV. NOSE: the nose and nasal cavity serve as the olfactory organ of the human body.
1. External nare 2. Superior nasal conchae 3. Middle nasal conchae 4. Inferior nasal conchae
5. Frontal sinus 6. Ethmoid sinus 7. Ethmoid bone 8. Sphenoid sinuses
2 3
4 1
6 7
5
8 8