genie mobile app · download the genie mobile app the genie mobile app runs on android and ios...
TRANSCRIPT
350 East Plumeria DriveSan Jose, CA 95134 USA
March 2017202-11742-01
genie Mobile App User Manual
2
NETGEAR genie App
SupportThank you for purchasing this NETGEAR product. You can visit www.netgear.com/support to register your product, get help, access the latest downloads and user manuals, and join our community. We recommend that you use only official NETGEAR support resources.
ConformityFor the current EU Declaration of Conformity, visit http://kb.netgear.com/app/answers/detail/a_id/11621.
ComplianceFor regulatory compliance information, visit http://www.netgear.com/about/regulatory.
See the regulatory compliance document before connecting the power supply.
Trademarks© NETGEAR, Inc., NETGEAR and the NETGEAR Logo are trademarks of NETGEAR, Inc. Any non-NETGEAR trademarks are used for reference purposes only.
Contents
Chapter 1 Getting Started
Router Requirements . . . . . . . . . . . . . . . . . . . . . . . . . . . . . . . . . . . . . . . . . . . . . . . . . 6Download the genie Mobile App. . . . . . . . . . . . . . . . . . . . . . . . . . . . . . . . . . . . . . . . 6
Update the genie App. . . . . . . . . . . . . . . . . . . . . . . . . . . . . . . . . . . . . . . . . . . . . . . 6Install the Android genie Mobile App . . . . . . . . . . . . . . . . . . . . . . . . . . . . . . . . . . 7Install the iOS genie Mobile App. . . . . . . . . . . . . . . . . . . . . . . . . . . . . . . . . . . . . . 7
Create a NETGEAR Account . . . . . . . . . . . . . . . . . . . . . . . . . . . . . . . . . . . . . . . . . . . . 7Log In to Your Router Using the genie Mobile App. . . . . . . . . . . . . . . . . . . . . . . . . 8Log Out of Your NETGEAR Single Sign-On Account. . . . . . . . . . . . . . . . . . . . . . . . 9
Chapter 2 Manage Your WiFi Network
View Information About Your WiFi Network . . . . . . . . . . . . . . . . . . . . . . . . . . . . . 11View Your Router WiFi Network Settings . . . . . . . . . . . . . . . . . . . . . . . . . . . . . . . 13
View Your Router WiFi Network Settings from the WiFi Page . . . . . . . . . . . . 13View Your Router WiFi Network Settings from the Network Information Panel13
Change Your Router’s WiFi Network Name . . . . . . . . . . . . . . . . . . . . . . . . . . . . . . 14Change Your Router’s WiFi Password or Security Level . . . . . . . . . . . . . . . . . . . 15Change the WiFi Channel . . . . . . . . . . . . . . . . . . . . . . . . . . . . . . . . . . . . . . . . . . . . . 16View the Network Map. . . . . . . . . . . . . . . . . . . . . . . . . . . . . . . . . . . . . . . . . . . . . . . 17View Devices Connected to Your Network . . . . . . . . . . . . . . . . . . . . . . . . . . . . . . 17
View Devices Connected to the Network Using the Network Map . . . . . . . 17View Devices Connected to the Network Using Network Information Panel18
Enable Access Control and Pause Internet Access . . . . . . . . . . . . . . . . . . . . . . . . 19Enable Access Control . . . . . . . . . . . . . . . . . . . . . . . . . . . . . . . . . . . . . . . . . . . . . 19Pause Internet Access . . . . . . . . . . . . . . . . . . . . . . . . . . . . . . . . . . . . . . . . . . . . . 20
Modify the Device Type in the Network Map. . . . . . . . . . . . . . . . . . . . . . . . . . . . 20Set Up a Guest WiFi Network . . . . . . . . . . . . . . . . . . . . . . . . . . . . . . . . . . . . . . . . . 21
Enable Guest Access . . . . . . . . . . . . . . . . . . . . . . . . . . . . . . . . . . . . . . . . . . . . . . . 21View or Change the Guest WiFi Settings. . . . . . . . . . . . . . . . . . . . . . . . . . . . . . 22
Connect to a WiFi Network Using a QR Code . . . . . . . . . . . . . . . . . . . . . . . . . . . . 23Display the WiFi Network QR Code . . . . . . . . . . . . . . . . . . . . . . . . . . . . . . . . . . 23Scan a WiFi Network QR Code Using the Mobile genie App. . . . . . . . . . . . . . 24
Enable the Traffic Meter. . . . . . . . . . . . . . . . . . . . . . . . . . . . . . . . . . . . . . . . . . . . . . 25Change the Traffic Meter Settings . . . . . . . . . . . . . . . . . . . . . . . . . . . . . . . . . . . . . 25
Chapter 3 Parental Controls
Set Up Parental Controls . . . . . . . . . . . . . . . . . . . . . . . . . . . . . . . . . . . . . . . . . . . . . 29Enable or Disable Parental Controls . . . . . . . . . . . . . . . . . . . . . . . . . . . . . . . . . . . . 29
3
NETGEAR genie App
Create a Bypass Account Using the genie App . . . . . . . . . . . . . . . . . . . . . . . . . . . 30Set the Parental Controls Filtering Level . . . . . . . . . . . . . . . . . . . . . . . . . . . . . . . . 30
Set the Parental Controls Filtering Level for Your Router Network. . . . . . . . 31Set Parental Controls Filtering Levels for Each Device . . . . . . . . . . . . . . . . . . 32
Chapter 4 Remotely Access Your Router
Enable Remote Access . . . . . . . . . . . . . . . . . . . . . . . . . . . . . . . . . . . . . . . . . . . . . . . 35Remotely Manage Your Router Using the genie App . . . . . . . . . . . . . . . . . . . . . . 35Enable Your Router to Work with Amazon Alexa . . . . . . . . . . . . . . . . . . . . . . . . . 36
Link the NETGEAR Skill to Your Alexa App. . . . . . . . . . . . . . . . . . . . . . . . . . . . . 36Alexa Commands Supported by NETGEAR Routers . . . . . . . . . . . . . . . . . . . . . 36
Chapter 5 Share Files
Access Files on a USB Storage Device Connected to the Router . . . . . . . . . . . . 38Upload Files From Your Mobile Device to Your USB Storage Device . . . . . . . . . 38Download Files From USB Storage Device Connected to the Router . . . . . . . . 39View Files Downloaded From Your USB Storage Device . . . . . . . . . . . . . . . . . . . 40Send Files With Turbo Transfer . . . . . . . . . . . . . . . . . . . . . . . . . . . . . . . . . . . . . . . . 41Enable or Disable the Turbo Transfer Power Saving Mode . . . . . . . . . . . . . . . . . 41View or Delete the Turbo Transfer History . . . . . . . . . . . . . . . . . . . . . . . . . . . . . . 42
Chapter 6 Use MyMedia to Play and Share Media Files
Play Media Files From Your Home Network . . . . . . . . . . . . . . . . . . . . . . . . . . . . . 45Share Media With Chromecast Using the Mobile genie App. . . . . . . . . . . . . . . . 46Change the MyMedia Player . . . . . . . . . . . . . . . . . . . . . . . . . . . . . . . . . . . . . . . . . . 46Restart the MyMedia Service . . . . . . . . . . . . . . . . . . . . . . . . . . . . . . . . . . . . . . . . . 47Refresh the MyMedia Source Folders . . . . . . . . . . . . . . . . . . . . . . . . . . . . . . . . . . 48Prevent Devices on the Network From Accessing Your Files . . . . . . . . . . . . . . . 49Prevent Media Files From Playing on Your Device . . . . . . . . . . . . . . . . . . . . . . . . 49
Chapter 7 Administration
Register Your NETGEAR Router . . . . . . . . . . . . . . . . . . . . . . . . . . . . . . . . . . . . . . . . 52Reboot Your Router. . . . . . . . . . . . . . . . . . . . . . . . . . . . . . . . . . . . . . . . . . . . . . . . . . 52View the genie Mobile App Version . . . . . . . . . . . . . . . . . . . . . . . . . . . . . . . . . . . . 53View the Router Model Number or Firmware Version . . . . . . . . . . . . . . . . . . . . . 54View the Local and Remote Access List . . . . . . . . . . . . . . . . . . . . . . . . . . . . . . . . . 54View the Router Serial Number. . . . . . . . . . . . . . . . . . . . . . . . . . . . . . . . . . . . . . . . 56
4
1
1. Getting StartedNETGEAR provides free Android and iOS mobile genie® apps that let you manage your router. If you already downloaded the genie app, update the app on your mobile device.
This chapter covers the following topics:
• Router Requirements • Download the genie Mobile App • Create a NETGEAR Account • Log In to Your Router Using the genie Mobile App • Log Out of Your NETGEAR Single Sign-On Account
To find out which mobile platforms are supported and toget the downloads, visit the NETGEAR genie website at netgear.com/genie.
5
NETGEAR genie App
Router Requirements
To view a list of routers that can be managed using the genie app, visit netgear.com/landing/en-us/netgear-genie-routers.aspx.
Download the genie Mobile App
The genie mobile app runs on Android and iOS mobile devices, such as Android smartphones, iPhones, iPads, and tablets. For information about which mobile devices are currently supported, visit the NETGEAR genie web page.
To use the mobile app, you must connect your Android or iOS mobile device to your NETGEAR home WiFi network. For information about how to connect your mobile device to your WiFi network, see the documentation that came with your mobile device.
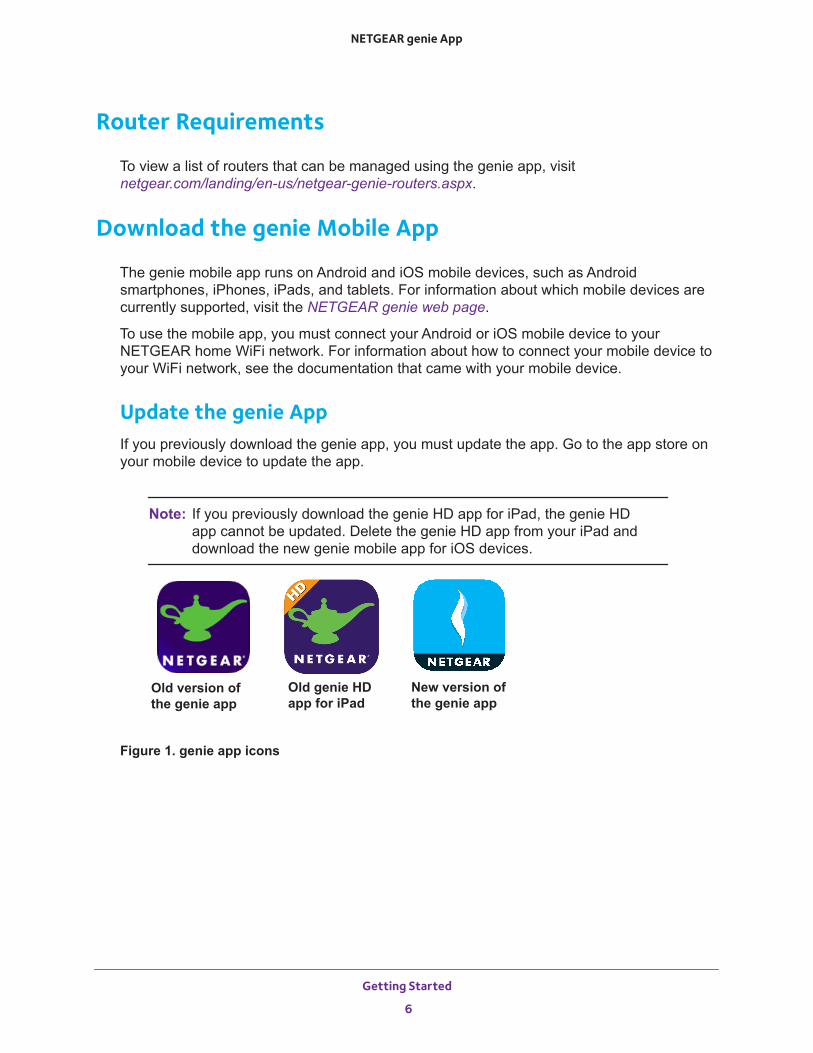
Update the genie AppIf you previously download the genie app, you must update the app. Go to the app store on your mobile device to update the app.
Note: If you previously download the genie HD app for iPad, the genie HD app cannot be updated. Delete the genie HD app from your iPad and download the new genie mobile app for iOS devices.
Old version of the genie app
New version of the genie app
Old genie HD app for iPad
Figure 1. genie app icons
Getting Started
6
NETGEAR genie App
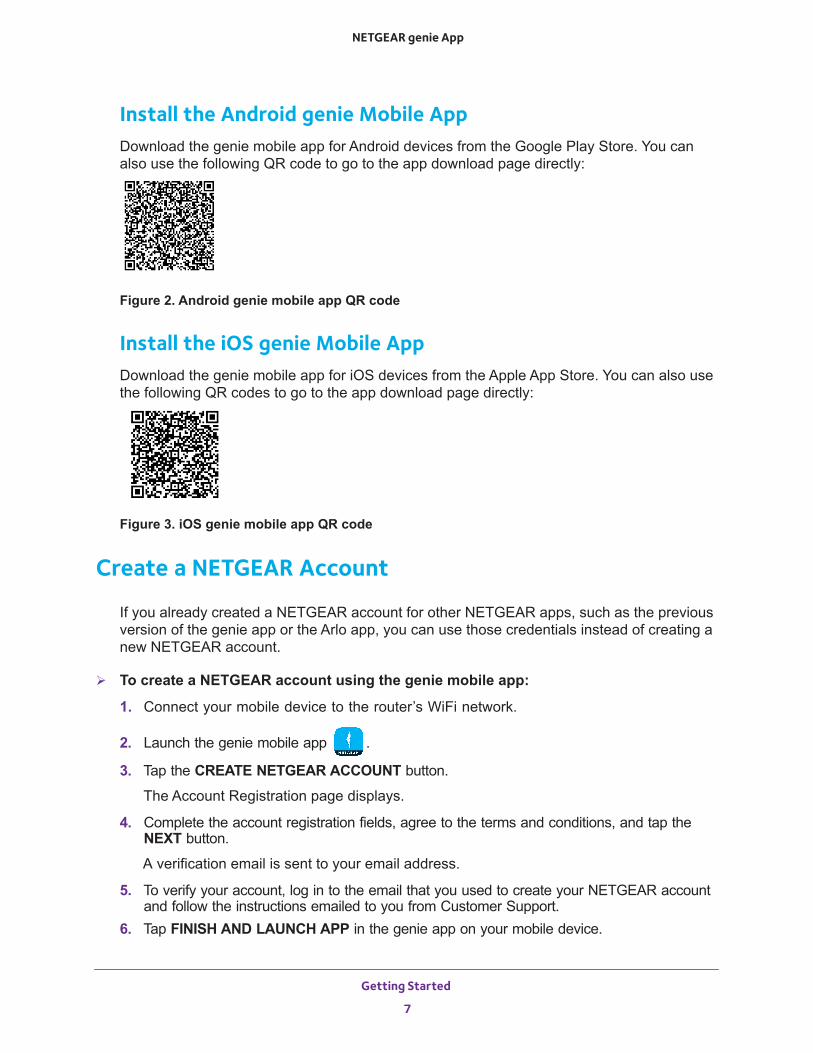
Install the Android genie Mobile AppDownload the genie mobile app for Android devices from the Google Play Store. You can also use the following QR code to go to the app download page directly:
Figure 2. Android genie mobile app QR code
Install the iOS genie Mobile AppDownload the genie mobile app for iOS devices from the Apple App Store. You can also use the following QR codes to go to the app download page directly:
Figure 3. iOS genie mobile app QR code
Create a NETGEAR Account
If you already created a NETGEAR account for other NETGEAR apps, such as the previous version of the genie app or the Arlo app, you can use those credentials instead of creating a new NETGEAR account.
To create a NETGEAR account using the genie mobile app:
1. Connect your mobile device to the router’s WiFi network.
2. Launch the genie mobile app .
3. Tap the CREATE NETGEAR ACCOUNT button.
The Account Registration page displays.
4. Complete the account registration fields, agree to the terms and conditions, and tap the NEXT button.
A verification email is sent to your email address.
5. To verify your account, log in to the email that you used to create your NETGEAR account and follow the instructions emailed to you from Customer Support.
6. Tap FINISH AND LAUNCH APP in the genie app on your mobile device.
Getting Started
7
NETGEAR genie App
The dashboard displays.
Your new NETGEAR account is active.
Log In to Your Router Using the genie Mobile App
If you have a NETGEAR account, use those credentials to sign in to the genie mobile app. If you don't have a NETGEAR account, create an account or tap SKIP.
To log in to your router using the genie mobile app:
1. Connect your mobile device to the router’s WiFi network.
Note: If you’re accessing your router remotely, skip this step.
2. Launch the genie mobile app .
3. Tap the SIGN IN button.
Note: If you don't have a NETGEAR account, create an account or tap SKIP.
The Account Login page displays.
4. Enter your NETGEAR account credentials and tap the SIGN IN button.
If you’re accessing your router locally, the Local Access page displays. If you’re accessing your router remotely, the Remote Access page displays.
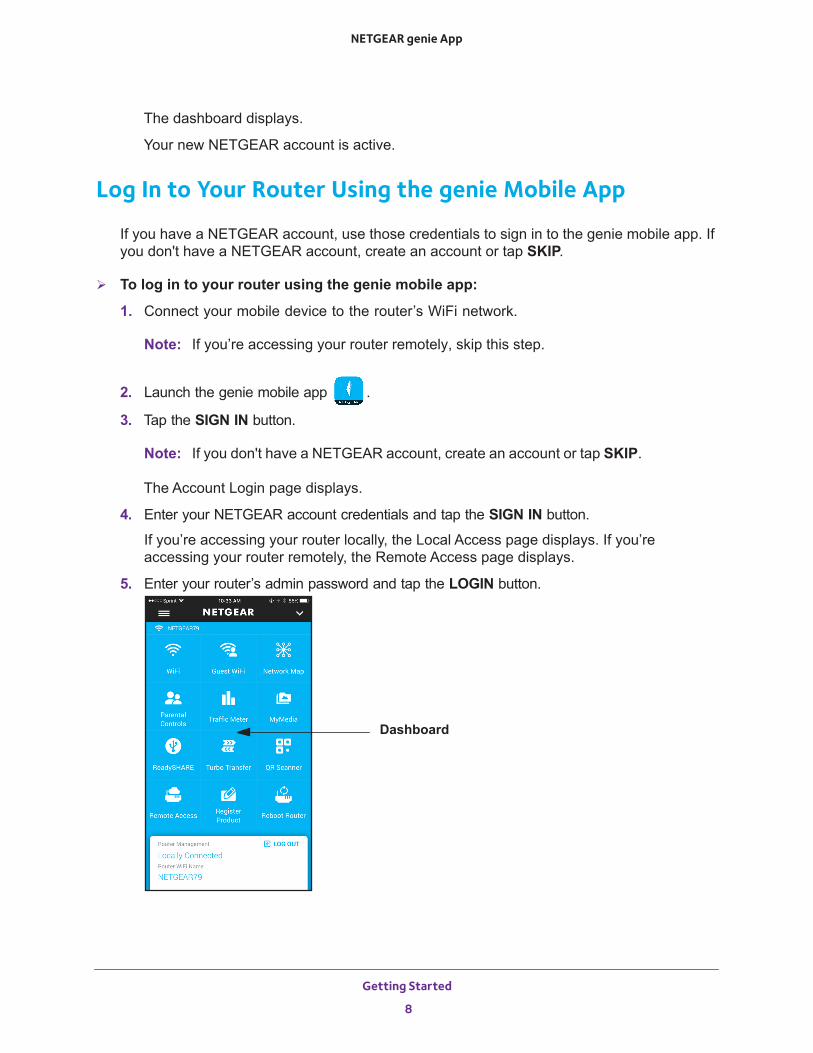
5. Enter your router’s admin password and tap the LOGIN button.
Dashboard
Getting Started
8
NETGEAR genie App
Log Out of Your NETGEAR Single Sign-On Account
The following instructions assume you are already logged in the genie mobile app.
To log out of your NETGEAR SSO account:
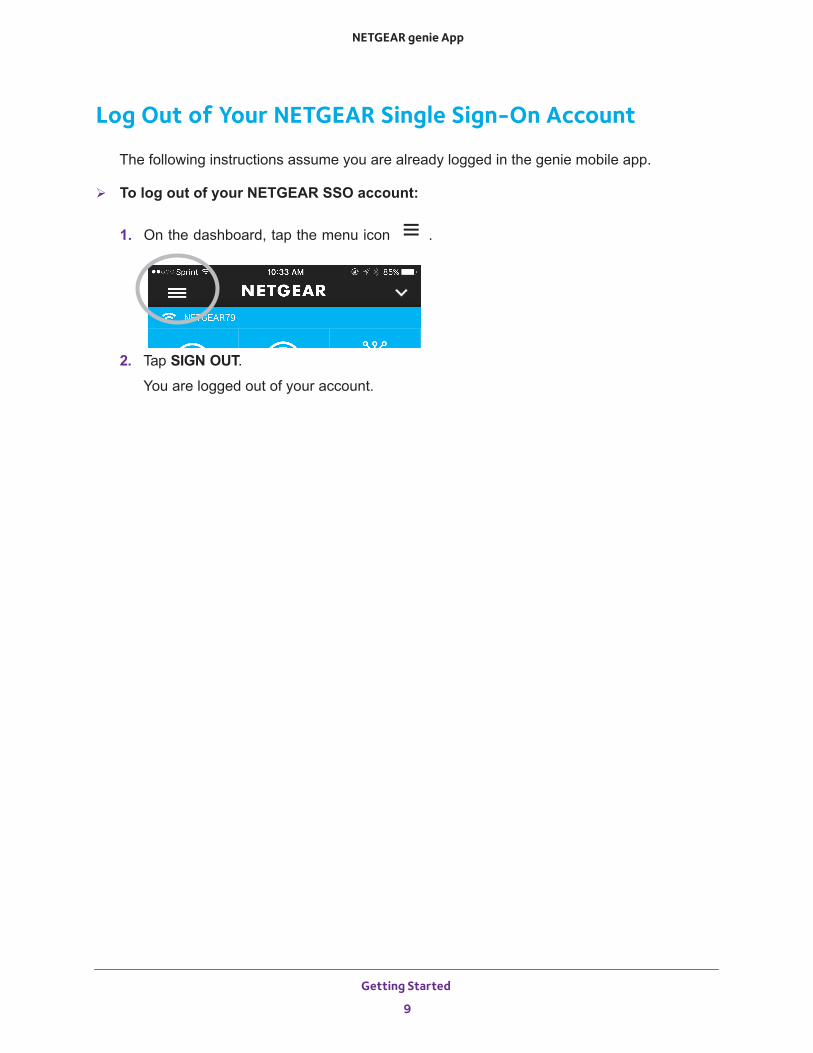
1. On the dashboard, tap the menu icon .
2. Tap SIGN OUT.
You are logged out of your account.
Getting Started
9
2
2. Manage Your WiFi NetworkThis chapter contains the following sections:
• View Information About Your WiFi Network • View Your Router WiFi Network Settings • Change Your Router’s WiFi Network Name • Change Your Router’s WiFi Password or Security Level • Change the WiFi Channel • View the Network Map • View Devices Connected to Your Network • Enable Access Control and Pause Internet Access • Modify the Device Type in the Network Map • Set Up a Guest WiFi Network • Connect to a WiFi Network Using a QR Code • Enable the Traffic Meter • Change the Traffic Meter Settings
10
NETGEAR genie App
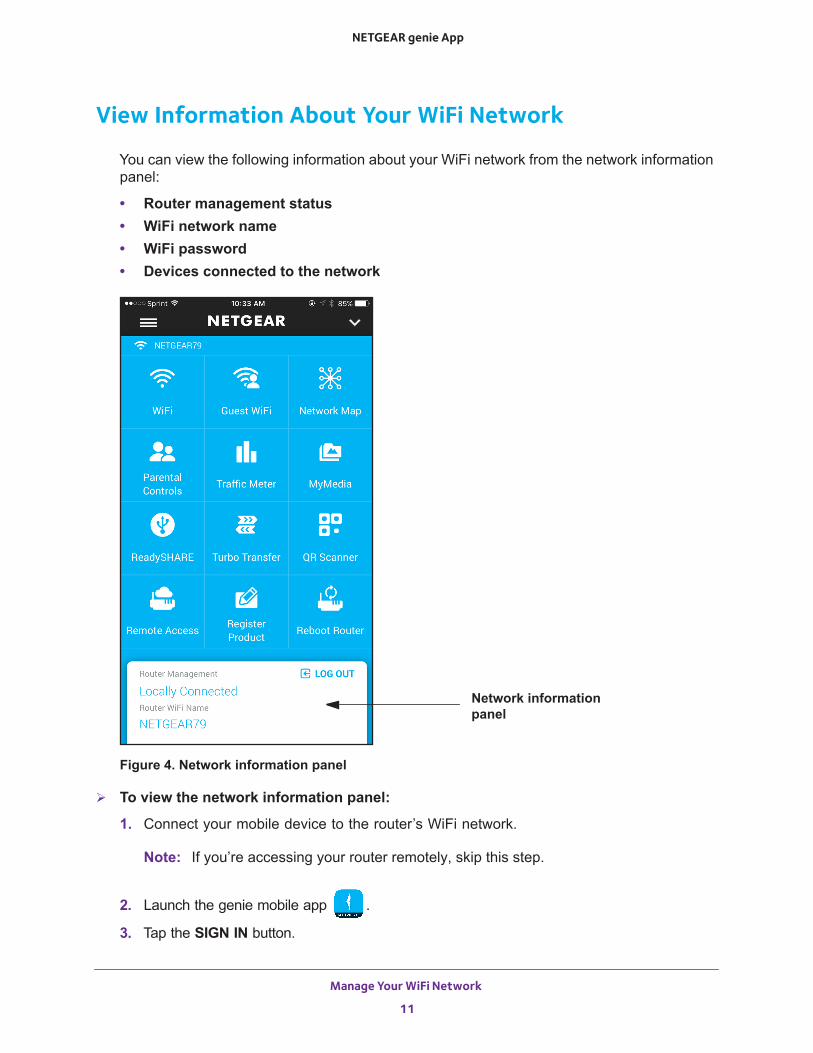
View Information About Your WiFi Network
You can view the following information about your WiFi network from the network information panel:
• Router management status• WiFi network name• WiFi password• Devices connected to the network
Network information panel
Figure 4. Network information panel
To view the network information panel:
1. Connect your mobile device to the router’s WiFi network.
Note: If you’re accessing your router remotely, skip this step.
2. Launch the genie mobile app .
3. Tap the SIGN IN button.
Manage Your WiFi Network
11
NETGEAR genie App
Note: If you don't have a NETGEAR account, create an account or tap SKIP.
The Account Login page displays.
4. Enter your NETGEAR account credentials and tap the SIGN IN button.
If you’re accessing your router locally, the Local Access page displays. If you’re accessing your router remotely, the Remote Access page displays.
5. Enter your router’s admin password and tap the LOGIN button.
The dashboard displays.
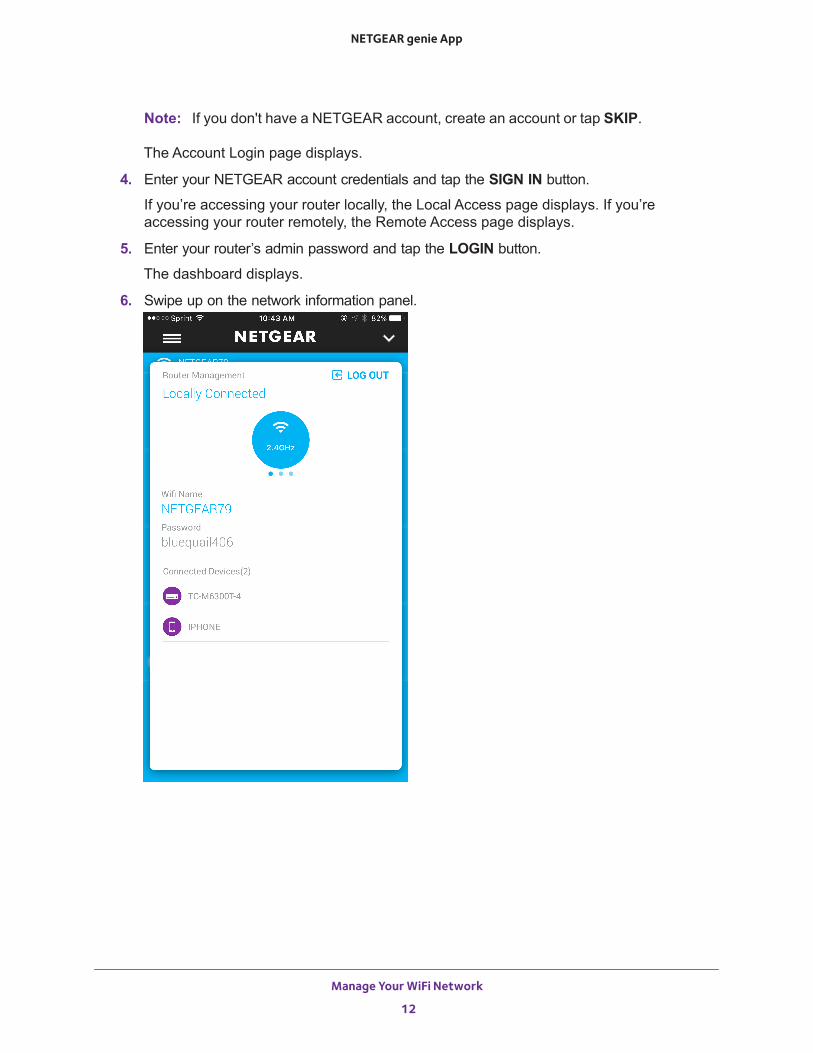
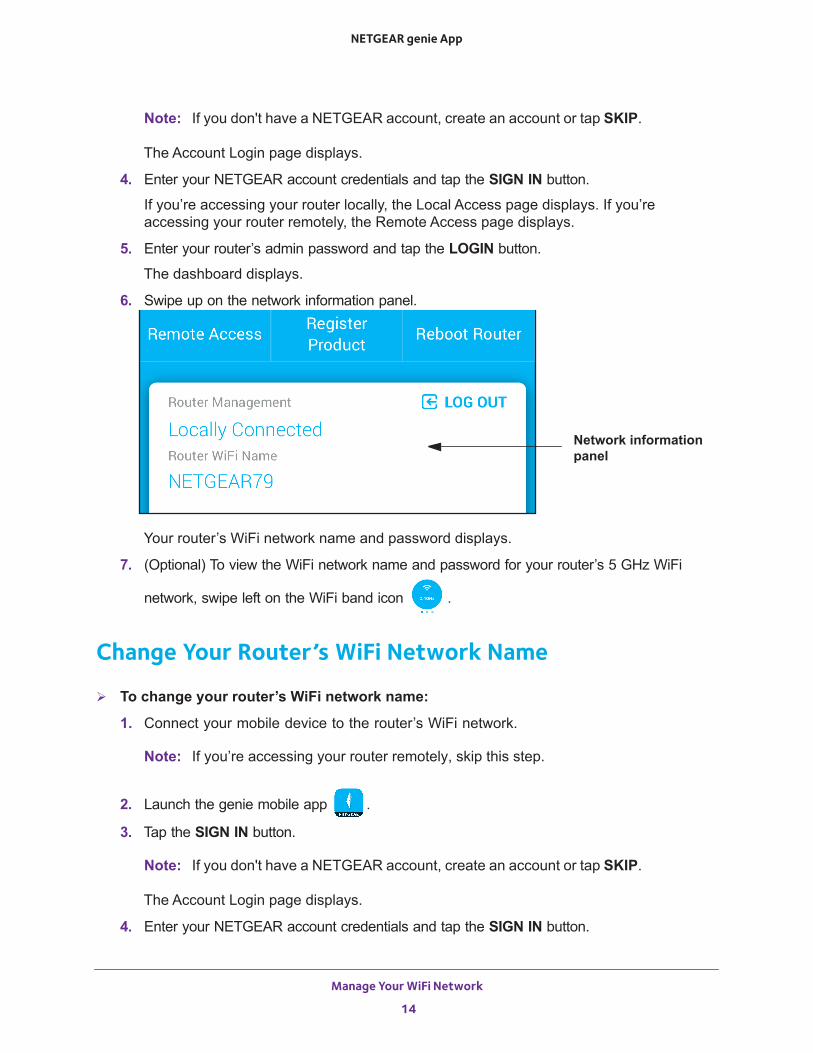
6. Swipe up on the network information panel.
Manage Your WiFi Network
12
NETGEAR genie App
View Your Router WiFi Network Settings
You can view your router’s network settings, such as the WiFi network name and password, from the WiFi page of from the network information panel.
View Your Router WiFi Network Settings from the WiFi Page
To view your router’s WiFi network settings from the WiFi page:
1. Connect your mobile device to the router’s WiFi network.
Note: If you’re accessing your router remotely, skip this step.
2. Launch the genie mobile app .
3. Tap the SIGN IN button.
Note: If you don't have a NETGEAR account, create an account or tap SKIP.
The Account Login page displays.
4. Enter your NETGEAR account credentials and tap the SIGN IN button.
If you’re accessing your router locally, the Local Access page displays. If you’re accessing your router remotely, the Remote Access page displays.
5. Enter your router’s admin password and tap the LOGIN button.
The dashboard displays.
6. Tap WiFi.The WiFi page displays. The WiFi name, password, security level and channel displays on the page.
View Your Router WiFi Network Settings from the Network Information Panel
To view your router’s WiFi network settings from the network information panel:
1. Connect your mobile device to the router’s WiFi network.
Note: If you’re accessing your router remotely, skip this step.
2. Launch the genie mobile app .
3. Tap the SIGN IN button.
Manage Your WiFi Network
13
NETGEAR genie App
Note: If you don't have a NETGEAR account, create an account or tap SKIP.
The Account Login page displays.
4. Enter your NETGEAR account credentials and tap the SIGN IN button.
If you’re accessing your router locally, the Local Access page displays. If you’re accessing your router remotely, the Remote Access page displays.
5. Enter your router’s admin password and tap the LOGIN button.
The dashboard displays.
6. Swipe up on the network information panel.
Network information panel
Your router’s WiFi network name and password displays.
7. (Optional) To view the WiFi network name and password for your router’s 5 GHz WiFi
network, swipe left on the WiFi band icon .
Change Your Router’s WiFi Network Name
To change your router’s WiFi network name:
1. Connect your mobile device to the router’s WiFi network.
Note: If you’re accessing your router remotely, skip this step.
2. Launch the genie mobile app .
3. Tap the SIGN IN button.
Note: If you don't have a NETGEAR account, create an account or tap SKIP.
The Account Login page displays.
4. Enter your NETGEAR account credentials and tap the SIGN IN button.
Manage Your WiFi Network
14
NETGEAR genie App
If you’re accessing your router locally, the Local Access page displays. If you’re accessing your router remotely, the Remote Access page displays.
5. Enter your router’s admin password and tap the LOGIN button.
The dashboard displays.
6. Tap WiFi.The WiFi page displays.
7. (Optional) To change the WiFi network name for your router’s 5 GHz WiFi network, swipe left on the WiFi band icon.
The page adjusts.
Note: If you are using an Orbi router, you cannot change the Orbi’s 5 GHz WiFi network name because the Orbi’s 2.4 GHz and 5 GHz WiFi networks share the same WiFi network name.
8. Tap the WiFi Name field and enter a new WiFi network name in the field.
9. Tap the save icon .
Your settings are saved.
Change Your Router’s WiFi Password or Security Level
To change your router’s WiFi password or security level:
1. Connect your mobile device to the router’s WiFi network.
Note: If you’re accessing your router remotely, skip this step.
2. Launch the genie mobile app .
Note: If you don't have a NETGEAR account, create an account or tap SKIP.
The Account Login page displays.
3. Enter your NETGEAR account credentials and tap the SIGN IN button.
If you’re accessing your router locally, the Local Access page displays. If you’re accessing your router remotely, the Remote Access page displays.
4. Enter your router’s admin password and tap the LOGIN button.
The dashboard displays.
5. Tap WiFi.The WiFi page displays.
Manage Your WiFi Network
15
NETGEAR genie App
6. (Optional) To change the WiFi password for your router’s 5 GHz WiFi network, swipe left on
the WiFi band icon .
Note: If you are using an Orbi router, you cannot change the Orbi’s 5 GHz WiFi password because the Orbi’s 2.4 GHz and 5 GHz WiFi networks share the same WiFi password.
7. Tap the Password field and enter a new password in the field.8. Tap the Security field and select a new security level.
9. Tap the save icon .
Your settings are saved.
Change the WiFi Channel
To change the WiFi channel:
1. Connect your mobile device to the router’s WiFi network.
Note: If you’re accessing your router remotely, skip this step.
2. Launch the genie mobile app .
3. Tap the SIGN IN button.
Note: If you don't have a NETGEAR account, create an account or tap SKIP.
The Account Login page displays.
4. Enter your NETGEAR account credentials and tap the SIGN IN button.
If you’re accessing your router locally, the Local Access page displays. If you’re accessing your router remotely, the Remote Access page displays.
5. Enter your router’s admin password and tap the LOGIN button.
The dashboard displays.
6. Tap WiFi.The WiFi page displays.
7. Tap the Channel field.
The Channel page displays.
8. If your channel was set to Auto, move the Auto slider to the left to turn off auto-selection.9. Move the channel selector to the left or right to select a channel.
Manage Your WiFi Network
16
NETGEAR genie App
computers and WiFi devices from the WiFi network.
Your settings are saved.
View the Network Map
The network map displays the computers and mobile devices that are connected to your router.
To view the network map:
1. Connect your mobile device to the router’s WiFi network.
Note: If you’re accessing your router remotely, skip this step.
2. Launch the genie mobile app .
3. Tap the SIGN IN button.
Note: If you don't have a NETGEAR account, create an account or tap SKIP.
The Account Login page displays.
4. Enter your NETGEAR account credentials and tap the SIGN IN button.
If you’re accessing your router locally, the Local Access page displays. If you’re accessing your router remotely, the Remote Access page displays.
5. Enter your router’s admin password and tap the LOGIN button.
The dashboard displays.
6. Tap Network Map.
The Network Map page displays.
View Devices Connected to Your Network
You can view devices connected to your router’s network using the network map or the network information panel.
View Devices Connected to the Network Using the Network Map
To view devices connected to the router network using the network map:
1. Connect your mobile device to the router’s WiFi network.
Note: If you’re accessing your router remotely, skip this step.
Manage Your WiFi Network
17
NETGEAR genie App
2. Launch the genie mobile app .
3. Tap the SIGN IN button.
Note: If you don't have a NETGEAR account, create an account or tap SKIP.
The Account Login page displays.
4. Enter your NETGEAR account credentials and tap the SIGN IN button.
If you’re accessing your router locally, the Local Access page displays. If you’re accessing your router remotely, the Remote Access page displays.
5. Enter your router’s admin password and tap the LOGIN button.
The dashboard displays.
6. Tap Network Map.
The Network Map page displays.
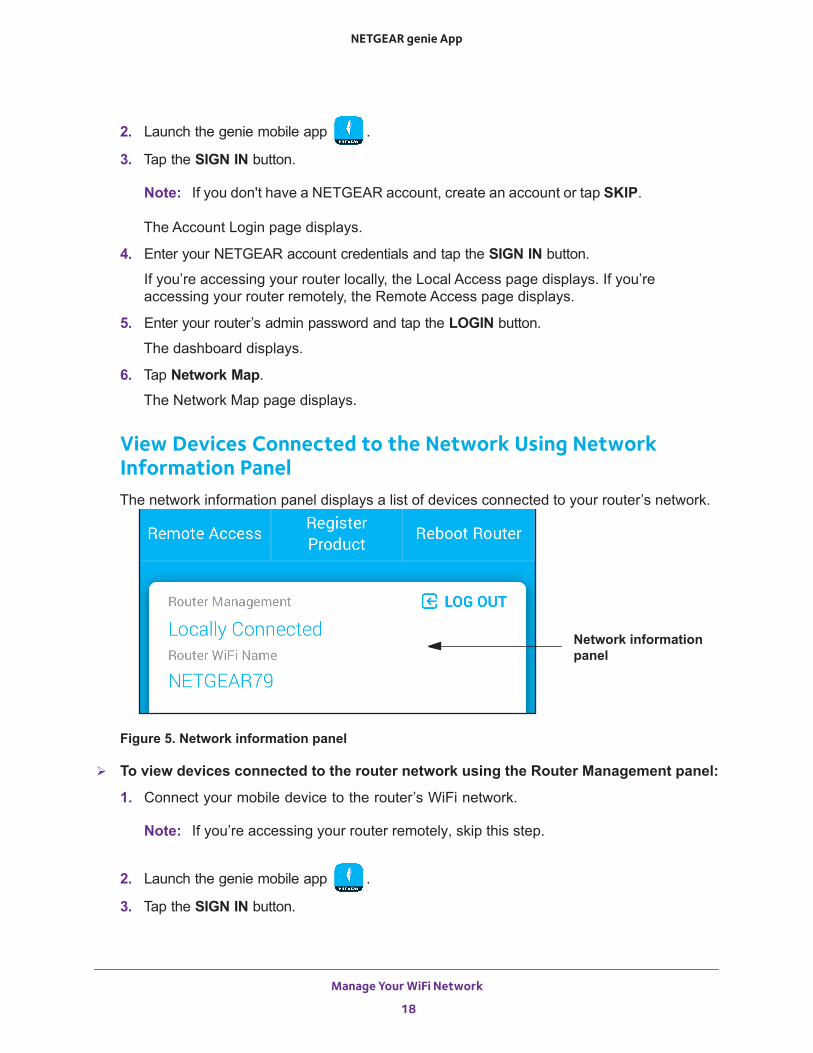
View Devices Connected to the Network Using Network Information PanelThe network information panel displays a list of devices connected to your router’s network.
Network information panel
Figure 5. Network information panel
To view devices connected to the router network using the Router Management panel:
1. Connect your mobile device to the router’s WiFi network.
Note: If you’re accessing your router remotely, skip this step.
2. Launch the genie mobile app .
3. Tap the SIGN IN button.
Manage Your WiFi Network
18
NETGEAR genie App
Note: If you don't have a NETGEAR account, create an account or tap SKIP.
The Account Login page displays.
4. Enter your NETGEAR account credentials and tap the SIGN IN button.
If you’re accessing your router locally, the Local Access page displays. If you’re accessing your router remotely, the Remote Access page displays.
5. Enter your router’s admin password and tap the LOGIN button.
The dashboard displays.
6. Swipe up on the network information panel.
The devices that are connected to your router display.
Note: When you swipe the 2.4 GHz or 5 GHz WiFi band icon , the Connected Devices list doesn’t change due to firmware limitations.
Enable Access Control and Pause Internet Access
If you enable access control, you can pause Internet access for devices connected to your network.
Enable Access Control
To enable access control:
1. Connect your mobile device to the router’s WiFi network.
Note: If you’re accessing your router remotely, skip this step.
2. Launch the genie mobile app .
3. Tap the SIGN IN button.
Note: If you don't have a NETGEAR account, create an account or tap SKIP.
The Account Login page displays.
4. Enter your NETGEAR account credentials and tap the SIGN IN button.
If you’re accessing your router locally, the Local Access page displays. If you’re accessing your router remotely, the Remote Access page displays.
5. Enter your router’s admin password and tap the LOGIN button.
The dashboard displays.
6. Tap Network Map.
The Network Map displays.
Manage Your WiFi Network
19
NETGEAR genie App
7. To enable access control, move the Access Control slider to the right.8. Tap a device.
The Device page displays.
9. To block the device from the network, move the Pause Internet slider to the right.10. To allow a blocked device to access the network, move the Pause Internet slider to the left.
Pause Internet AccessYou must enable access control before you can pause Internet access for devices connected to your network.
To pause Internet access for devices on the network:
1. Connect your mobile device to the router’s WiFi network.
Note: If you’re accessing your router remotely, skip this step.
2. Launch the genie mobile app .
3. Tap the SIGN IN button.
Note: If you don't have a NETGEAR account, create an account or tap SKIP.
The Account Login page displays.
4. Enter your NETGEAR account credentials and tap the SIGN IN button.
If you’re accessing your router locally, the Local Access page displays. If you’re accessing your router remotely, the Remote Access page displays.
5. Enter your router’s admin password and tap the LOGIN button.
The dashboard displays.
6. Tap Network Map.
The Network Map displays.
7. To enable access control, move the Access Control slider to the right.8. Tap a device.
The Device page displays.
9. To block the device from the network, move the Pause Internet slider to the right.10. To allow a blocked device to access the network, move the Pause Internet slider to the left.
Modify the Device Type in the Network Map
You can modify the device type that displays in the network map.
Manage Your WiFi Network
20
NETGEAR genie App
To modify the device type that displays in the network map:
1. Connect your mobile device to the router’s WiFi network.
Note: If you’re accessing your router remotely, skip this step.
2. Launch the genie mobile app .
3. Tap the SIGN IN button.
Note: If you don't have a NETGEAR account, create an account or tap SKIP.
The Account Login page displays.
4. Enter your NETGEAR account credentials and tap the SIGN IN button.
If you’re accessing your router locally, the Local Access page displays. If you’re accessing your router remotely, the Remote Access page displays.
5. Enter your router’s admin password and tap the LOGIN button.
The dashboard displays.
6. Tap Network Map.
The Network Map displays.
7. Tap a device that is connected to the router.
The device details page displays.
8. Tap the Type field.
The Device page displays.
9. Tap the device type.
Your settings are saved.
Set Up a Guest WiFi Network
If your router supports a guest WiFi network, you can enable guest access and view and change the guest WiFi settings. You can even allow guest access for a specific length of time. A guest network allows others to use your WiFi router to access the Internet, but not content on other computers or devices on the same network.
Enable Guest AccessTo set up your guest WiFi network, you must enable the guest assess feature.
To enable guest access:
1. Connect your mobile device to the router’s WiFi network.
Manage Your WiFi Network
21
NETGEAR genie App
Note: If you’re accessing your router remotely, skip this step.
2. Launch the genie mobile app .
3. Tap the SIGN IN button.
Note: If you don't have a NETGEAR account, create an account or tap SKIP.
The Account Login page displays.
4. Enter your NETGEAR account credentials and tap the SIGN IN button.
If you’re accessing your router locally, the Local Access page displays. If you’re accessing your router remotely, the Remote Access page displays.
5. Enter your router’s admin password and tap the LOGIN button.
The dashboard displays.
6. Tap Guest WiFi.The Guest WiFi page displays.
7. To set up a 5 GHz guest WiFi network, swipe left on the WiFi band icon.8. To enable guest access, move the Guest Access slider to the right.
Guest access is enabled.
View or Change the Guest WiFi SettingsIf guest access is enabled on your router, you can change the guest WiFi network name (SSID), WiFi password, and security level.
To view or change the guest WiFi settings:
1. Connect your mobile device to the router’s WiFi network.
Note: If you’re accessing your router remotely, skip this step.
2. Launch the genie mobile app .
3. Tap the SIGN IN button.
Note: If you don't have a NETGEAR account, create an account or tap SKIP.
The Account Login page displays.
4. Enter your NETGEAR account credentials and tap the SIGN IN button.
If you’re accessing your router locally, the Local Access page displays. If you’re accessing your router remotely, the Remote Access page displays.
5. Enter your router’s admin password and tap the LOGIN button.
Manage Your WiFi Network
22
NETGEAR genie App
The dashboard displays.
6. Tap Guest WiFi.The Guest WiFi page displays.
7. To change the 5 GHz guest WiFi settings, swipe left on the WiFi band icon .
8. To change the guest WiFi network name (SSID), tap the Name/SSID field and enter a new name.
9. To change the guest WiFi password, tap the Key/Password field and enter a new password in the field.
10. To change the security level, tap the Security field and select a new security level.
11. Tap the save icon .
Your settings are saved.
Connect to a WiFi Network Using a QR Code
The genie app can generate a QR code of your router’s WiFi network and guest access. Other mobile devices can then use their genie mobile app’s QR code scanner to scan the QR code and connect to the WiFi network. For you to use the genie app’s QR code scanner, your mobile device must include a camera.
Display the WiFi Network QR Code You must display the WiFi network QR code on another mobile device before you can scan the QR code.
To display the WiFi network QR code in the genie mobile app:
1. Connect your mobile device to the router’s WiFi network.
Note: If you’re accessing your router remotely, skip this step.
2. Launch the genie mobile app .
3. Tap the SIGN IN button.
Note: If you don't have a NETGEAR account, create an account or tap SKIP.
The Account Login page displays.
4. Enter your NETGEAR account credentials and tap the SIGN IN button.
If you’re accessing your router locally, the Local Access page displays. If you’re accessing your router remotely, the Remote Access page displays.
Manage Your WiFi Network
23
NETGEAR genie App
5. Enter your router’s admin password and tap the LOGIN button.
The dashboard displays.
6. Tap WiFi.The QR code displays.
Scan a WiFi Network QR Code Using the Mobile genie AppThe Android and iOS mobile genie app includes a QR scanner so that you can scan a WiFi network QR code that displays on another device so that your device can join the WiFi network.
To connect to a WiFi network using the QR code scanner on the genie mobile app:
1. Connect your mobile device to the router’s WiFi network.
Note: If you’re accessing your router remotely, skip this step.
2. Launch the genie mobile app .
3. Tap SKIP.
If you’re accessing your router locally, the Local Access page displays. If you’re accessing your router remotely, the Remote Access page displays.
4. Tap CONTINUE WITHOUT LOGIN.
The dashboard displays.
5. Tap QR Scanner.6. If you did not allow the genie mobile app to access your camera, tap the OK button to allow
access.7. When prompted, align the QR code within the frame.
Your phone or tablet scans the QR code for the network.
If you are using an iOS device, the password is copied to the clipboard.
If you are using an Android device, a pop-up message displays asking if you want to connect to the network.
8. If you are using an iOS device, do the following:a. Exit the app.b. Tap Settings > Wi-Fi.c. Tap the network name.d. Paste the password from the clipboard in the Password field.e. Tap Join.
Manage Your WiFi Network
24
NETGEAR genie App
9. If you are using an Android device, tap OK to connect to the network.
Enable the Traffic Meter
The traffic meter measures Internet download and upload traffic on your network. You can view traffic for today, yesterday, this week, this month, or last month.
To enable the traffic meter:
1. Connect your mobile device to the router’s WiFi network.
Note: If you’re accessing your router remotely, skip this step.
2. Launch the genie mobile app .
3. Tap the SIGN IN button.
Note: If you don't have a NETGEAR account, create an account or tap SKIP.
The Account Login page displays.
4. Enter your NETGEAR account credentials and tap the SIGN IN button.
If you’re accessing your router locally, the Local Access page displays. If you’re accessing your router remotely, the Remote Access page displays.
5. Enter your router’s admin password and tap the LOGIN button.
The dashboard displays.
6. Tap Traffic Meter.The Traffic Meter page displays.
7. Move the Enable slider to the right.
A window opens asking if you want to enable the traffic meter.
8. Tap OKAY.
The traffic meter is enabled and the page adjusts.
Change the Traffic Meter Settings
To change the traffic meter settings:
1. Connect your mobile device to the router’s WiFi network.
Note: If you’re accessing your router remotely, skip this step.
2. Launch the genie mobile app .
Manage Your WiFi Network
25
NETGEAR genie App
3. Tap the SIGN IN button.
Note: If you don't have a NETGEAR account, create an account or tap SKIP.
The Account Login page displays.
4. Enter your NETGEAR account credentials and tap the SIGN IN button.
If you’re accessing your router locally, the Local Access page displays. If you’re accessing your router remotely, the Remote Access page displays.
5. Enter your router’s admin password and tap the LOGIN button.
The dashboard displays.
6. Tap Traffic Meter.The Traffic Meter page displays,
7. Tap the settings icon.
The Settings page displays.
8. To set the traffic meter start time, tap the day and time menus.9. To set the traffic meter value limit, tap the menu.10. Tap the SAVE button.
Your settings are saved.
Manage Your WiFi Network
26
NETGEAR genie App
Manage Your WiFi Network
27
3
3. Parental ControlsThis chapter contains the following sections:
• Set Up Parental Controls • Enable or Disable Parental Controls • Create a Bypass Account Using the genie App • Set the Parental Controls Filtering Level
28
NETGEAR genie App
Set Up Parental Controls
Parental controls allow you to control the Internet content on your home network. After installation, Parental Controls automatically starts.
If your router supports Parental Controls, you can set it up using the genie app.
You must have an OpenDNS account to set up Parental Controls. If you do not have an account, you can sign up for a free account using the genie app.
To set up parental controls using the genie mobile app:
1. Connect your mobile device to the router’s WiFi network.
Note: If you’re accessing your router remotely, skip this step.
2. Launch the genie mobile app .
3. Tap the SIGN IN button.
Note: If you don't have a NETGEAR account, create an account or tap SKIP.
The Account Login page displays.
4. Enter your NETGEAR account credentials and tap the SIGN IN button.
If you’re accessing your router locally, the Local Access page displays. If you’re accessing your router remotely, the Remote Access page displays.
5. Enter your router’s admin password and tap the LOGIN button.
The dashboard displays.
6. Tap Parental Controls.
The Parental Controls page displays.
7. To log in to your OpenDNS account, tap the LOGIN button, enter your OpenDNS user name, and tap the LOGIN button.
Parental Controls is automatically enabled.
8. To create an OpenDNS account, tap CREATE ACCOUNT, fill in the fields, tap the SIGN UP button.
Your account is created and Parental Controls is automatically enabled
Enable or Disable Parental Controls
After you set up an OpenDNS Account, you can enable or disable Parental Controls from your computer or WiFi device.
Parental Controls
29
NETGEAR genie App
To enable or disable Parental Controls using the genie mobile app:
1. Connect your mobile device to the router’s WiFi network.
Note: If you’re accessing your router remotely, skip this step.
2. Launch the genie mobile app .
3. Tap the SIGN IN button.
Note: If you don't have a NETGEAR account, create an account or tap SKIP.
The Account Login page displays.
4. Enter your NETGEAR account credentials and tap the SIGN IN button.
If you’re accessing your router locally, the Local Access page displays. If you’re accessing your router remotely, the Remote Access page displays.
5. Enter your router’s admin password and tap the LOGIN button.
The dashboard displays.
6. Tap Parental Controls.
The Parental Controls page displays.
7. If you are not logged in to your OpenDNS account, tap the LOGIN button, enter your OpenDNS user name and tap the LOGIN button.
8. To enable Parental Controls, move the Enable button to the right.9. To disable Parental Controls. move the Enable button to the left.
Create a Bypass Account Using the genie App
After you set up Parental Controls, you can create a bypass account that lets you set custom filtering levels that you can save. After you create a bypass account, you can visit https://netgear.opendns.com/ to change your account settings.
To create a bypass account using the mobile genie app for Android devices:
1. Visit https://netgear.opendns.com/.2. Enter your OpenDNS user name and password in the fields and tap the Sign in button.3. Follow the onscreen instructions to create a bypass account.
Set the Parental Controls Filtering Level
You can set one Parental Controls filtering level for the whole router network, or you can set different filtering level for each device connected to the router network.
Parental Controls
30
NETGEAR genie App
Set the Parental Controls Filtering Level for Your Router NetworkYou can set the Parental Controls filtering level for your router network.
To set the Parental Controls filtering level for your router network:
1. Connect your mobile device to the router’s WiFi network.
Note: If you’re accessing your router remotely, skip this step.
2. Launch the genie mobile app .
3. Tap the SIGN IN button.
Note: If you don't have a NETGEAR account, create an account or tap SKIP.
The Account Login page displays.
4. Enter your NETGEAR account credentials and tap the SIGN IN button.
If you’re accessing your router locally, the Local Access page displays. If you’re accessing your router remotely, the Remote Access page displays.
5. Enter your router’s admin password and tap the LOGIN button.
The dashboard displays.
6. Tap Parental Controls.
The Parental Controls page displays.
7. If you are not logged in to your OpenDNS account, tap the LOGIN button, enter your OpenDNS user name, and tap the LOGIN button.
8. To enable Parental Controls, move the Enable slider to the right.
Parental Controls
31
NETGEAR genie App
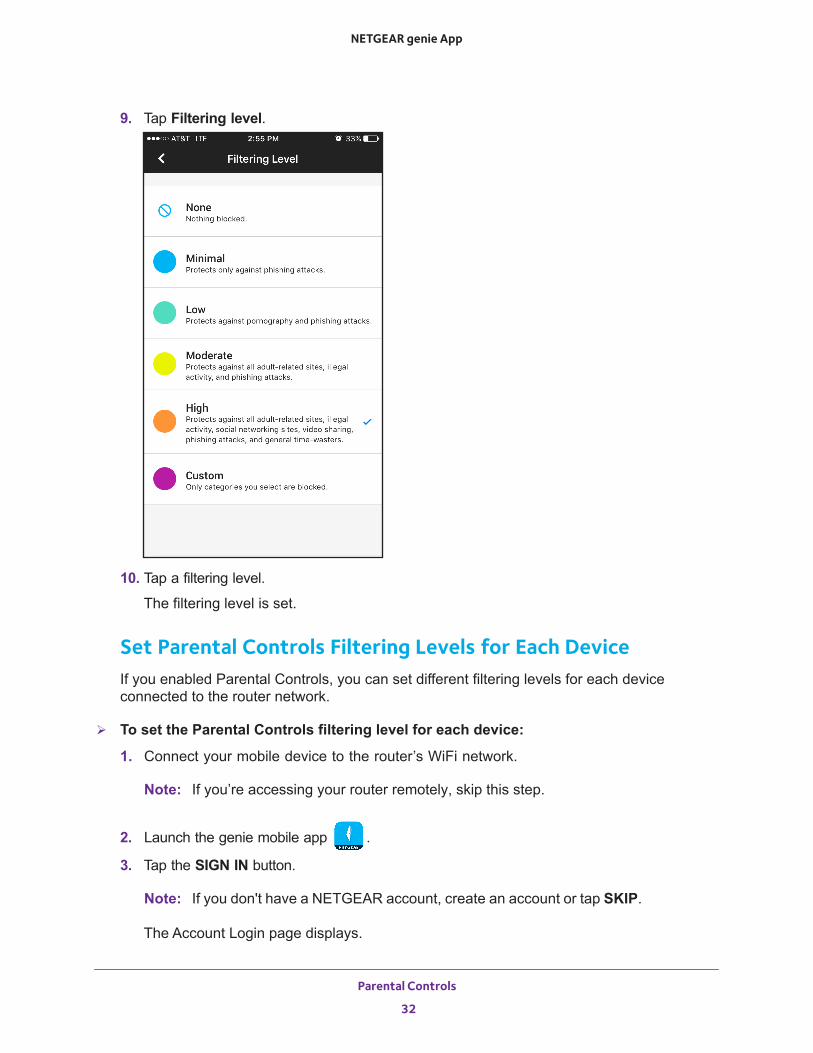
9. Tap Filtering level.
10. Tap a filtering level.
The filtering level is set.
Set Parental Controls Filtering Levels for Each DeviceIf you enabled Parental Controls, you can set different filtering levels for each device connected to the router network.
To set the Parental Controls filtering level for each device:
1. Connect your mobile device to the router’s WiFi network.
Note: If you’re accessing your router remotely, skip this step.
2. Launch the genie mobile app .
3. Tap the SIGN IN button.
Note: If you don't have a NETGEAR account, create an account or tap SKIP.
The Account Login page displays.
Parental Controls
32
NETGEAR genie App
4. Enter your NETGEAR account credentials and tap the SIGN IN button.
If you’re accessing your router locally, the Local Access page displays. If you’re accessing your router remotely, the Remote Access page displays.
5. Enter your router’s admin password and tap the LOGIN button.
The dashboard displays.
6. Tap Parental Controls.
The Parental Controls page displays.
7. If you are not logged in to your OpenDNS account, tap the LOGIN button, enter your OpenDNS user name and tap the LOGIN button.
8. In Parental Controls is not enabled, move the Enable slider to the right.9. Return to the dashboard and tap Network Map.
The Network Map page displays.
10. Tap the device that you want to set a filter level for.
The device information page displays.
11. Tap Filter Level.12. Tap a filtering level.
The filtering level is set.
Parental Controls
33
4
4. Remotely Access Your RouterThis chapter contains the following sections:
• Enable Remote Access • Remotely Manage Your Router Using the genie App • Enable Your Router to Work with Amazon Alexa
34
NETGEAR genie App
Enable Remote Access
The genie app allows you to remotely access your router and manage its settings. To enable remote access, your mobile device must be connected to your router’s WiFi network locally.
To enable remote access using the genie mobile app:
1. Connect your mobile device to the router’s WiFi network.
2. Launch the genie mobile app .
3. Tap the SIGN IN button.
Note: If you don't have a NETGEAR account, create an account.
The Account Login page displays.
4. Enter your NETGEAR account credentials and tap the SIGN IN button.
The Local Access page displays.
5. Enter your router’s admin password and tap the LOGIN button.
The dashboard displays.
6. Tap Remote Access.
The Remote Access page displays.
7. To enable remote access, move the Remote Access slider to the right.
Remote access is enabled.
Remotely Manage Your Router Using the genie App
With remote access enabled, the following router functions can be managed remotely:
• WiFi settings• Guest WiFi• Network map• Parental Controls• Traffic meter• Reboot router
To remote manage your router using the genie mobile app:
1. Launch the genie mobile app .
2. Tap the SIGN IN button.
The Account Login page displays.
Remotely Access Your Router
35
NETGEAR genie App
3. Enter your NETGEAR account credentials and tap the SIGN IN button.
The Remote Access page displays.
4. Enter your router’s admin password and tap the LOGIN button.
The dashboard displays.
5. Tap a setting you want to remotely manage.
Enable Your Router to Work with Amazon Alexa
For your router to work with Amazon Alexa, you must enable remote access, download the Alexa app on your mobile device, and link the NETGEAR skill to your Alexa app. For more information about how to enable remote access, see Enable Your Router to Work with Amazon Alexa .
Link the NETGEAR Skill to Your Alexa AppDownload the Alexa app on your mobile device from the app store.
To link the NETGEAR skill to your Alexa app:
1. Launch the Alexa app from a mobile device that is connected to your R7000 WiFi network.
2. Tap Home > Skills.3. In the Search all skills field, type NETGEAR skill.4. Tap the NETGEAR skill5. Tap Link Account.
A NETGEAR account sign in page displays.
6. Enter your NETGEAR account credentials and tap Sign in.7. Tap Accept.
Your NETGEAR skill is linked to your Alexa app.
Alexa Commands Supported by NETGEAR RoutersThe way that you phrase your commands can vary. For example, both “Alexa, ask NETGEAR to enable the guest network” and “Alexa, ask NETGEAR to turn on my guest network” turn on your guest WiFi network.
The following Alexa commands are supported by your NETGEAR router:
• Alexa, ask NETGEAR to enable the guest network.• Alexa, ask NETGEAR to disable the guest network.• Alexa, ask NETGEAR to reboot my router.• Alexa, ask NETGEAR to send me my WiFi settings.
Remotely Access Your Router
36
5
5. Share FilesThis chapter contains the following sections:
• Access Files on a USB Storage Device Connected to the Router • Upload Files From Your Mobile Device to Your USB Storage Device • Download Files From USB Storage Device Connected to the Router • View Files Downloaded From Your USB Storage Device • Send Files With Turbo Transfer • Enable or Disable the Turbo Transfer Power Saving Mode • View or Delete the Turbo Transfer History
Note: If you are using the genie app remotely, the ReadySHARE® feature is not available.
37
NETGEAR genie App
Access Files on a USB Storage Device Connected to the Router
You can access files stored on a USB storage device that is connected to your router’s USB port or eSATA port. Not all router models include these ports.
To access files on a USB storage device connected to the router:
1. Connect your mobile device to the router’s WiFi network.
2. Launch the genie mobile app .
3. Tap the SIGN IN button.
Note: If you don't have a NETGEAR account, create an account or tap SKIP.
The Account Login page displays.
4. Enter your NETGEAR account credentials and tap the SIGN IN button.
The Local Access page displays.
5. Enter your router’s admin password and tap the LOGIN button.
The dashboard displays.
6. Tap ReadySHARE.
The LOCAL page displays.
7. Tap ReadySHARE.8. Tap your USB storage device to access it.
Upload Files From Your Mobile Device to Your USB Storage Device
You can upload files stored on your mobile device to a USB storage device connected to your router using the genie app.
For the genie app to display the photos on your device, you must allow the genie app to access the files on your mobile device. For information about how to allow the genie app to access your files, see the documentation that came with your mobile device.
To upload files from your mobile device to your USB storage device:
1. Connect your mobile device to the router’s WiFi network.
2. Launch the genie mobile app .
3. Tap the SIGN IN button.
Share Files
38
NETGEAR genie App
Note: If you don't have a NETGEAR account, create an account or tap SKIP.
The Account Login page displays.
4. Enter your NETGEAR account credentials and tap the SIGN IN button.
The Local Access page displays.
5. Enter your router’s admin password and tap the LOGIN button.
The dashboard displays.
6. Tap ReadySHARE.
The LOCAL page displays.
7. Tap a folder.
The files in that folder display.
8. Tap the menu icon and then tap upload.9. Tap a check box next to the file that you want to upload and then tap the OK button.
The Remote page displays.
10. Tap the USB storage device that you want to upload the file to.11. Tap UPLOAD > YES.
The file uploads.
12. Tap the OK button.
Download Files From USB Storage Device Connected to the Router
You can download files stored on your USB storage device to the genie app.
To download files on a USB storage device connected to the router:
1. Connect your mobile device to the router’s WiFi network.
2. Launch the genie mobile app .
3. Tap the SIGN IN button.
Note: If you don't have a NETGEAR account, create an account or tap SKIP.
The Account Login page displays.
4. Enter your NETGEAR account credentials and tap the SIGN IN button.
The Local Access page displays.
5. Enter your router’s admin password and tap the LOGIN button.
Share Files
39
NETGEAR genie App
The dashboard displays.
6. Tap ReadySHARE.
The LOCAL page displays.
7. Tap ReadySHARE.
The READYSHARE page displays.
8. Tap a USB storage device.
A list of files and folders on the USB storage device display.
9. Tap the menu icon .
10. Tap download.11. Tap the check box next to the file that you want to download and tap the OK button.
The file downloads to the Downloads folder in the LOCAL section.
View Files Downloaded From Your USB Storage Device
If you used the genie app to download files from a USB storage device connected to your router, the files are downloaded to a Downloads folder in the LOCAL section of the app.
To view the files you downloaded from your USB storage device:
1. Connect your mobile device to the router’s WiFi network.
2. Launch the genie mobile app .
3. Tap the SIGN IN button.
Note: If you don't have a NETGEAR account, create an account or tap SKIP.
The Account Login page displays.
4. Enter your NETGEAR account credentials and tap the SIGN IN button.
The Local Access page displays.
5. Enter your router’s admin password and tap the LOGIN button.
The dashboard displays.
6. Tap ReadySHARE.
The LOCAL page displays.
7. Tap the Downloads folder.
The files that you downloaded display.
Share Files
40
NETGEAR genie App
Send Files With Turbo Transfer
If at least two mobile devices are connected to your router’s network, you can send files from one mobile device to another using the genie mobile app. The genie app must be installed on both devices for you to send files with Turbo Transfer.
To send files with Turbo Transfer:
1. Connect your mobile device to the router’s WiFi network.
2. Launch the genie mobile app .
3. Tap the SIGN IN button.
Note: If you don't have a NETGEAR account, create an account or tap SKIP.
The Account Login page displays.
4. Enter your NETGEAR account credentials and tap the SIGN IN button.
The Local Access page displays.
5. Enter your router’s admin password and tap the LOGIN button.
The dashboard displays.
6. Tap Turbo Transfer.The Turbo Transfer page displays.
7. Tap the destination mobile device that you want to send files to.
If you do not see any mobile devices on the page, power saving mode might be enabled, which disables Turbo Transfer on your mobile device. For more information about how to disable power saving mode, see Enable or Disable the Turbo Transfer Power Saving Mode on page 41.
8. Tap Photo, Music, Video, or History.
A list of files displays.
9. Tap the file and tap the SEND button.
The file is sent to the destination mobile device.
Note: If the destination mobile device does not receive the file or folder, restart the genie app on both devices and try again.
Enable or Disable the Turbo Transfer Power Saving Mode
You can enable power saving mode on the genie app to conserve battery power on your mobile device. With the power saving feature enabled, other mobile devices on your network
Share Files
41

NETGEAR genie App
can transfer files to this device or access media files on this device only when the Turbo Transfer or My Media page is open on your device.
To enable or disable power saving mode:
1. Connect your mobile device to the router’s WiFi network.
2. Launch the genie mobile app .
3. Tap the SIGN IN button.
Note: If you don't have a NETGEAR account, create an account or tap SKIP.
The Account Login page displays.
4. Enter your NETGEAR account credentials and tap the SIGN IN button.
The Local Access page displays.
5. Enter your router’s admin password and tap the LOGIN button.
The dashboard displays.
6. Tap Turbo Transfer.The Turbo Transfer page displays.
7. Tap the settings icon.
The Turbo Transfer Settings page displays.
8. To enable power saving mode, move the Enable Power Saving Mode slider to right.9. To disable power saving mode, move the Enable Power Saving Mode slider to left.
View or Delete the Turbo Transfer History
You can view and delete the history of files sent and received using Turbo Transfer.
To view or delete the Turbo Transfer history:
1. Connect your mobile device to the router’s WiFi network.
2. Launch the genie mobile app .
3. Tap the SIGN IN button.
Note: If you don't have a NETGEAR account, create an account or tap SKIP.
The Account Login page displays.
4. Enter your NETGEAR account credentials and tap the SIGN IN button.
The Local Access page displays.
Share Files
42
NETGEAR genie App
5. Enter your router’s admin password and tap the LOGIN button.
The dashboard displays.
6. Tap Turbo Transfer.The Turbo Transfer page displays.
7. Tap the History button.
The History page displays.
8. Tap RECEIVED to view the files received by your mobile device.9. Tap SENT to view the files sent from your mobile device.10. To delete a file, tap the delete icon next to the file that you want to delete.11. To delete all the files, tap the trash icon at the top-right corner of the page and then tap YES.
Share Files
43
6
6. Use MyMedia to Play and Share Media FilesYou can use the MyMedia® feature on the genie app to play media stored on computerr and WiFi devices that are connected to your NETGEAR router’s network.
This chapter contains the following sections:
• Play Media Files From Your Home Network • Share Media With Chromecast Using the Mobile genie App • Change the MyMedia Player • Restart the MyMedia Service • Refresh the MyMedia Source Folders • Prevent Devices on the Network From Accessing Your Files • Prevent Media Files From Playing on Your Device
Note: All your mobile devices must be on the same network to use the MyMedia feature.
44
NETGEAR genie App
Play Media Files From Your Home Network
Use the genie app to play media files stored on devices that are connected to your router’s home network.
For you to play media from your home network on a device, the device must support the DLNA. Game consoles (like Xbox 360 or PS3) and DVRs do not support the DLNA. For this reason, they do not display as players in MyMedia.
MyMedia finds only the media types supported by the player. For example, an iPad does not play Adobe Flash files because this format is not supported.
If you want to access media files stored on a USB storage device connected to the router, you must set up the router as a DLNA media server. For more information, see your router’s user manual. Your router’s user manual is available online at downloadcenter.netgear.com.
To play media files from your network on the genie mobile app:
1. Connect your mobile device to the router’s WiFi network.
2. Launch the genie mobile app .
3. Tap the SIGN IN button.
Note: If you don't have a NETGEAR account, create an account or tap SKIP.
The Account Login page displays.
4. Enter your NETGEAR account credentials and tap the SIGN IN button.
The Local Access page displays.
5. Enter your router’s admin password and tap the LOGIN button.
The dashboard displays.
6. Tap the MyMedia button.
The MyMedia page displays.
7. Tap PLAYER.
A list of devices displays.
8. Select the device that you want to play media files on.9. Tap SOURCE.
A list of devices displays.
10. Tap the device.
A list of folders on the device displays.
11. Tap the folder and tap the media file within the folder.
The media file plays on the selected player.
Use MyMedia to Play and Share Media Files
45
NETGEAR genie App
Share Media With Chromecast Using the Mobile genie App
Chromecast is a media streaming device that plugs into the HDMI port on your TV. If you use Chromecast, the genie mobile app lets you use Chromecast to play media from devices on your network on your TV.
To share media on the network with Chromecast using the mobile genie app for iOS devices:
1. Connect your mobile device to the router’s WiFi network.
2. Launch the genie mobile app .
3. Tap the SIGN IN button.
Note: If you don't have a NETGEAR account, create an account or tap SKIP.
The Account Login page displays.
4. Enter your NETGEAR account credentials and tap the SIGN IN button.
The Local Access page displays.
5. Enter your router’s admin password and tap the LOGIN button.
The dashboard displays.
6. Tap the MyMedia button.
The MyMedia page displays.
7. Tap PLAYER.
A list of devices displays.
8. Tap your Chromecast device.9. Tap SOURCE.
A list of devices displays.
10. Tap the device.
A list of folders on the device displays.
11. Tap the folder and tap the media file within the folder.
The media file plays on your TV through Chromecast.
Change the MyMedia Player
You can change the device that your media plays on.
Use MyMedia to Play and Share Media Files
46
NETGEAR genie App
To change the player device:
1. Connect your mobile device to the router’s WiFi network.
2. Launch the genie mobile app .
3. Tap the SIGN IN button.
Note: If you don't have a NETGEAR account, create an account or tap SKIP.
The Account Login page displays.
4. Enter your NETGEAR account credentials and tap the SIGN IN button.
The Local Access page displays.
5. Enter your router’s admin password and tap the LOGIN button.
The dashboard displays.
6. Enter your router’s admin password and tap the LOGIN button.
The dashboard displays.
7. Tap the MyMedia button.
The MyMedia page displays
8. Tap PLAYER.
A list of devices displays.
9. Tap a device.
Restart the MyMedia Service
If your WiFi network settings change and you want to use MyMedia, we recommend thatyou restart the MyMedia service.
To restart the MyMedia service:
1. Connect your mobile device to the router’s WiFi network.
2. Launch the genie mobile app .
3. Tap the SIGN IN button.
Note: If you don't have a NETGEAR account, create an account or tap SKIP.
The Account Login page displays.
4. Enter your NETGEAR account credentials and tap the SIGN IN button.
The Local Access page displays.
5. Enter your router’s admin password and tap the LOGIN button.
Use MyMedia to Play and Share Media Files
47
NETGEAR genie App
The dashboard displays.
6. Tap the MyMedia button.
The MyMedia page displays.
7. Tap the settings icon.
The MyMedia Options page displays.
8. In the Refresh Media Service section, tap the restart icon.
The media service restarts.
Refresh the MyMedia Source Folders
You can refresh the MyMedia source folders if any changes are made to the media folders on the source device.
To refresh the MyMedia source folder:
1. Connect your mobile device to the router’s WiFi network.
2. Launch the genie mobile app .
3. Tap the SIGN IN button.
Note: If you don't have a NETGEAR account, create an account or tap SKIP.
The Account Login page displays.
4. Enter your NETGEAR account credentials and tap the SIGN IN button.
The Local Access page displays.
5. Enter your router’s admin password and tap the LOGIN button.
The dashboard displays.
6. Tap MyMedia.
The MyMedia page displays.
7. Tap the settings icon.
The MyMedia Options page displays.
8. In the Refresh Source Folder section, tap the refresh icon.
The source folder refreshes.
Use MyMedia to Play and Share Media Files
48
NETGEAR genie App
Prevent Devices on the Network From Accessing Your Files
By default, the genie app allows devices on your network to access files on your mobile device. If you do not want devices on the network to access your files, you can disable this feature.
To prevent devices on the network from accessing your files:
1. Connect your mobile device to the router’s WiFi network.
2. Launch the genie mobile app .
3. Tap the SIGN IN button.
Note: If you don't have a NETGEAR account, create an account or tap SKIP.
The Account Login page displays.
4. Enter your NETGEAR account credentials and tap the SIGN IN button.
The Local Access page displays.
5. Enter your router’s admin password and tap the LOGIN button.
The dashboard displays.
6. Tap MyMedia.
The MyMedia page displays.
7. Tap the settings icon.
The MyMedia Options page displays.
8. Move the Share Files In the Network slider to the left
Devices on the network cannot access files on your device.
Prevent Media Files From Playing on Your Device
By default, devices on your network are allowed to play or view media files on your device.
To prevent devices on the network from playing media files on your device:
1. Connect your mobile device to the router’s WiFi network.
2. Launch the genie mobile app .
3. Tap the SIGN IN button.
Note: If you don't have a NETGEAR account, create an account or tap SKIP.
Use MyMedia to Play and Share Media Files
49
NETGEAR genie App
The Account Login page displays.
4. Enter your NETGEAR account credentials and tap the SIGN IN button.
The Local Access page displays.
5. Enter your router’s admin password and tap the LOGIN button.
The dashboard displays.
6. Tap MyMedia.7. The MyMedia page displays.8. Tap the settings icon.
The MyMedia Options page displays.
9. Move the Allow play in the network slider to the left.
Devices on the network cannot play media files on your device.
Use MyMedia to Play and Share Media Files
50
7
7. AdministrationThis chapter contains the following sections:
• Register Your NETGEAR Router • Reboot Your Router • View the genie Mobile App Version • View the Router Model Number or Firmware Version • View the Local and Remote Access List • View the Router Serial Number
51
NETGEAR genie App
Register Your NETGEAR Router
We recommend that you register your product. You must register your product before you can contact Customer Support. When you register your product, it is registered to your NETGEAR account.
Note: You can register your router only if your mobile device is connected to your router’s WiFi network locally.
To register your router using the genie mobile app:
1. Connect your mobile device to the router’s WiFi network.
2. Launch the genie mobile app .
3. Tap the SIGN IN button.
Note: If you don't have a NETGEAR account, create an account or tap SKIP.
The Account Login page displays.
4. Enter your NETGEAR account credentials and tap the SIGN IN button.
The Local Access page displays.
5. Enter your router’s admin password and tap the LOGIN button.
The dashboard displays.
6. Tap Register Product.A message about registering your product displays.
7. Tap the REGISTER button.
Your product is registered to your account.
Reboot Your Router
You can reboot your router using the genie mobile app.
To reboot the router using the genie mobile app:
1. Connect your mobile device to the router’s WiFi network.
Note: If you’re accessing your router remotely, skip this step.
2. Launch the genie mobile app .
Administration
52
NETGEAR genie App
3. Tap the SIGN IN button.
Note: If you don't have a NETGEAR account, create an account or tap SKIP.
The Account Login page displays.
4. Enter your NETGEAR account credentials and tap the SIGN IN button.
If you’re accessing your router locally, the Local Access page displays. If you’re accessing your router remotely, the Remote Access page displays.
5. Enter your router’s admin password and tap the LOGIN button.
The dashboard displays.
6. Tap Reboot Router.A message displays asking you to confirm that you want to reboot the router.
7. Click the OK button.
The router reboots.
View the genie Mobile App Version
To view the genie mobile app version:
1. Connect your mobile device to the router’s WiFi network.
Note: If you’re accessing your router remotely, skip this step.
2. Launch the genie mobile app .
3. Tap the SIGN IN button.
Note: If you don't have a NETGEAR account, create an account or tap SKIP.
The Account Login page displays.
4. Enter your NETGEAR account credentials and tap the SIGN IN button.
If you’re accessing your router locally, the Local Access page displays. If you’re accessing your router remotely, the Remote Access page displays.
5. Enter your router’s admin password and tap the LOGIN button.
The dashboard displays.
6. Tap the menu icon .7. Tap ABOUT.
The About page displays.
Your genie app version displays.
Administration
53
NETGEAR genie App
View the Router Model Number or Firmware Version
You can view the router model or the firmware version from the genie mobile app.
To view information about the router on the genie mobile app:
1. Connect your mobile device to the router’s WiFi network.
Note: If you’re accessing your router remotely, skip this step.
2. Launch the genie mobile app .
3. Tap the SIGN IN button.
Note: If you don't have a NETGEAR account, create an account or tap SKIP.
The Account Login page displays.
4. Enter your NETGEAR account credentials and tap the SIGN IN button.
If you’re accessing your router locally, the Local Access page displays. If you’re accessing your router remotely, the Remote Access page displays.
5. Enter your router’s admin password and tap the LOGIN button.
The dashboard displays.
6. Tap the menu icon .7. Tap ABOUT.
The About page displays.
The router model and the firmware version displays.
View the Local and Remote Access List
You can view which router you are locally connected to, and which routers you enabled remote access for using the genie mobile app.
To view the local and remote access list:
1. Connect your mobile device to the router’s WiFi network.
Note: If you’re accessing your router remotely, skip this step.
2. Launch the genie mobile app .
3. Tap the SIGN IN button.
Administration
54
NETGEAR genie App
Note: If you don't have a NETGEAR account, create an account or tap SKIP.
The Account Login page displays.
4. Enter your NETGEAR account credentials and tap the SIGN IN button.
If you’re accessing your router locally, the Local Access page displays. If you’re accessing your router remotely, the Remote Access page displays.
5. Enter your router’s admin password and tap the LOGIN button.
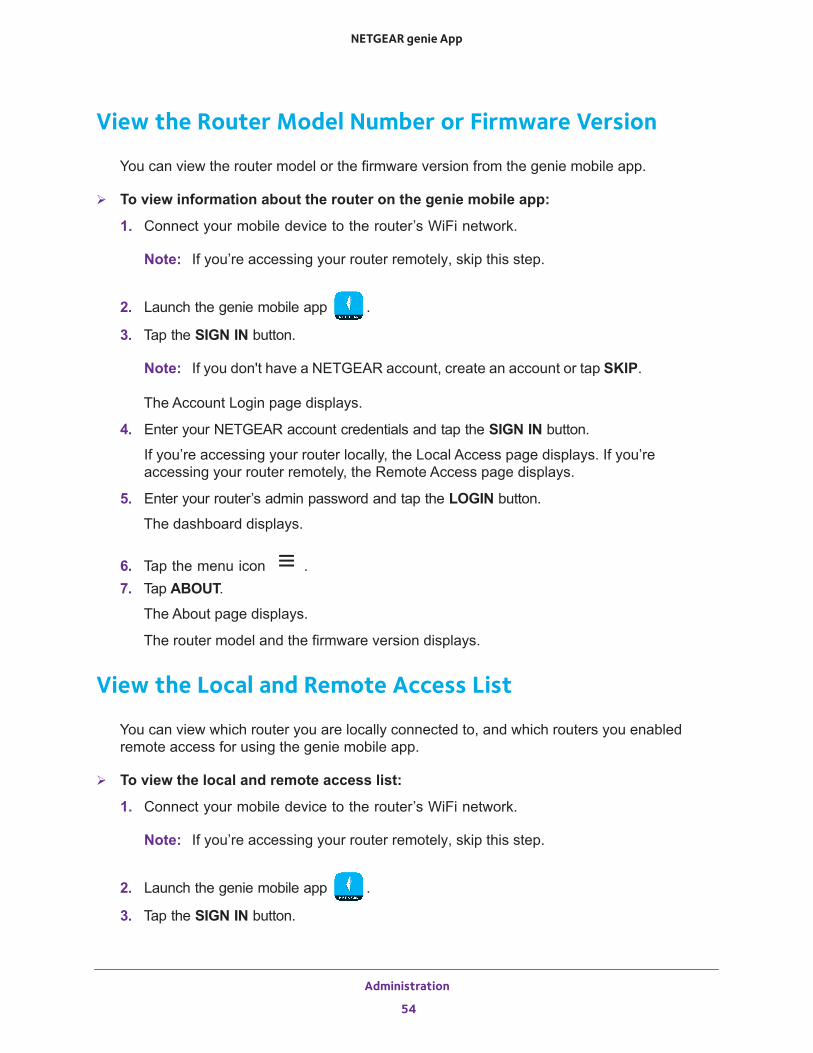
The dashboard displays.
6. Tap the drop-down arrow on the top-right corner of the page.
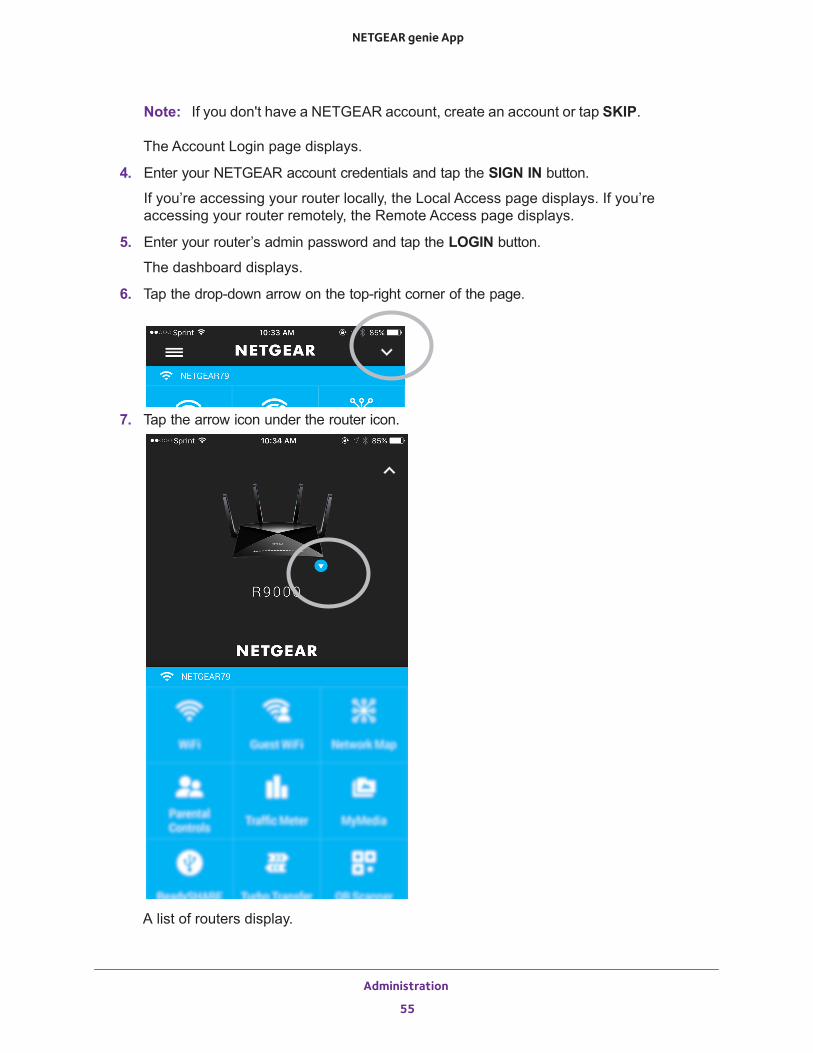
7. Tap the arrow icon under the router icon.
A list of routers display.
Administration
55
NETGEAR genie App
Note: The arrow icon only displays if you are locally connected to your router, or if the genie mobile app detects that you enabled remote access for more than one router. If you are managing one router only, and you are remotely connected to that router, the arrow icon does not display.
View the Router Serial Number
You can view your router’s serial number from the genie mobile app.
To view your router’s serial number:
1. Connect your mobile device to the router’s WiFi network.
2. Launch the genie mobile app .
3. Tap the SIGN IN button.
Note: If you don't have a NETGEAR account, create an account or tap SKIP.
The Account Login page displays.
4. Enter your NETGEAR account credentials and tap the SIGN IN button.
The Local Access page displays.
5. Enter your router’s admin password and tap the LOGIN button.
The dashboard displays.
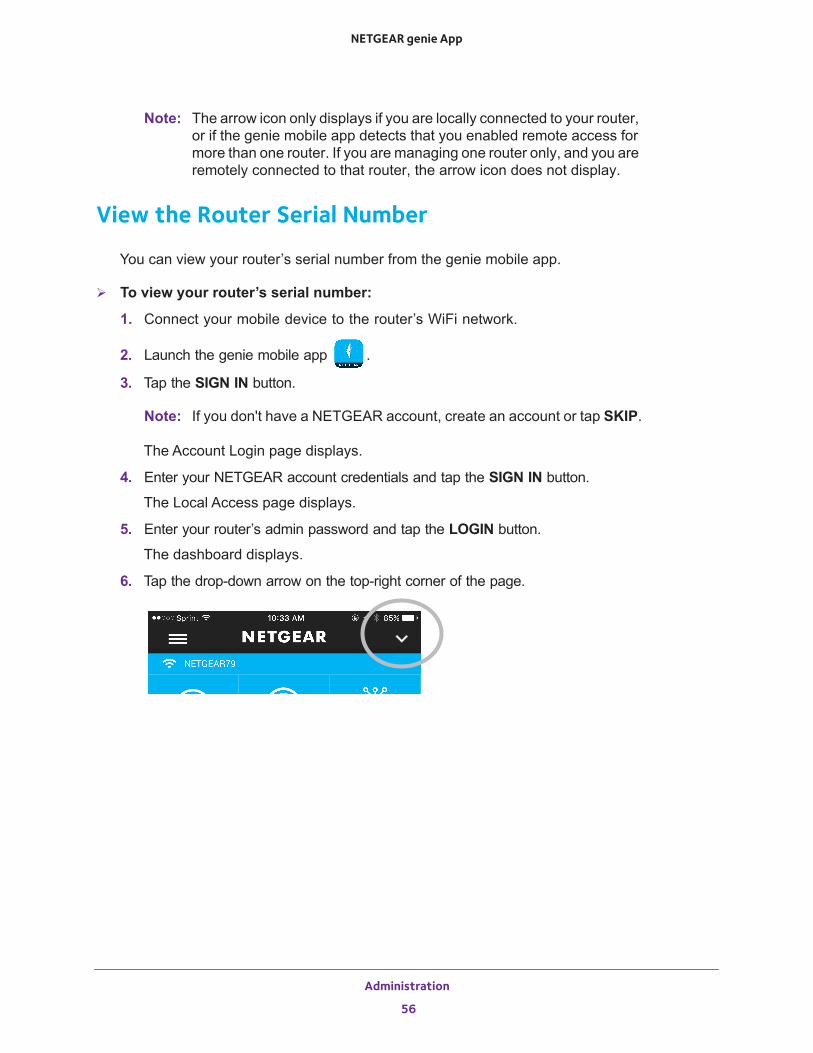
6. Tap the drop-down arrow on the top-right corner of the page.
Administration
56

NETGEAR genie App
7. Tap the arrow icon under the router icon.
Your router’s serial number displays next to the router.
Administration
57