genesys active - switch side preparation - nim - 4.1
DESCRIPTION
Genesys Active - Switch Side Preparation - NIM - 4.1TRANSCRIPT
Switch-Side Preparation - Genesys SIP Server Using Active Recording
385A1047-20 Rev. A0January 2012
NICE Interaction Management 4.1


Information in this document is subject to change without notice and does not represent a commitment on the part of NICE Systems Ltd. The systems described in this document are furnished under a license agreement or nondisclosure agreement.
All information included in this document, such as text, graphics, photos, logos and images, is the exclusive property of NICE Systems Ltd. and protected by United States and international copyright laws.
Permission is granted to view and photocopy (or print) materials from this document for personal, non-commercial use only. Any other copying, distribution, retransmission or modification of the information in this document, whether in electronic or hard copy form, without the express prior written permission of NICE Systems Ltd., is strictly prohibited. In the event of any permitted copying, redistribution or publication of copyrighted material, no changes in, or deletion of, author attribution, trademark legend or copyright notice shall be made.
All contents of this document are: Copyright © 2012 NICE Systems Ltd. All rights reserved.
This product is covered by one or more of the following US patents:
ACTIMIZE, Actimize logo, Alpha, Customer Feedback, eGlue Interact, FAST, FAST alpha Silver, Fortent, Fortent Logo, IEX, Insight from Interactions, Intent. Insight. Impact., Interaction Capture Unit, Know More, Risk Less, Last Message Replay, Mass Detection, Center, Mirra, My Universe, NICE, NICE Analyzer, NICE Inform, NICE Logo, NICE Perform, NICE Situator, NICE SmartCenter, NICE Storage Center, NICE Systems, NiceCall, NiceCall Focus, NiceLog, NiceTrack, NiceTrack IP Probe, NiceTrack Location Tracking, NiceTrack Mass Detection Center, NiceTrack Monitoring Center, NiceTrack Pattern Analyzer, NiceTrack Traffic Analysis, NiceVision, NiceVision Alto, NiceVision Analytics, NiceVision ControlCenter, NiceVision Digital, NiceVision Net, NiceVision NVSAT, NiceVision Pro, Open Situation Management, Playback Organizer, Scenario Replay, Searchspace, Syfact, Syfact Investigator, TotalView are trademarks and/or registered trademarks of NICE Systems Ltd. All other trademarks are the property of their respective owners.
Applications to register certain of these marks have been filed in certain countries, including Australia, Brazil, the European Union, Israel, Japan, Mexico, Argentina and the United States. Some of such registrations have matured to registrations.
385A1047-20 Rev. A0
RE41,292
5,903,269
6,192,346
6,330,025
6,785,370
6,965,886
7,203,655
7,392,160
7,577,246
7,665,114
7,728,870
7,822,605
8,078,463
5,274,738
5,911,134
6,222,542
6,542,602
6,856,343
6,970,829
7,240,328
7,436,887
7,581,001
7,683,929
7,738,459
7,848,947
5,325,292
5,937,029
6,246,752
6,615,193
6,865,604
7,010,106
7,305,082
7,474,633
7,587,454
7,705,880
7,751,590
7,933,407
5,339,203
6,040,832
6,249,570
6,694,374
6,871,229
7,010,109
7,333,445
7,532,744
7,599,475
7,714,878
7,761,544
7,953,219
5,396,371
6,044,355
6,252,946
6,728,345
6,880,004
7,058,589
7,346,186
7,545,803
7,631,046
7,716,048
7,770,221
8,005,675
5,446,603
6,115,746
6,252,947
6,775,372
6,937,706
7,085,728
7,383,199
7,546,173
7,660,297
7,720,706
7,788,095
8,050,955
5,457,782
6,122,665
6,311,194
6,785,369
6,959,079
7,152,018
7,386,105
7,573,421
7,664,794
7,725,318
7,801,288
8,060,364
For assistance, contact your local supplier or nearest NICE Systems Customer Service Center:
EMEA Region: (Europe, Middle East, Africa)Tel: +972-9-775-3800Fax: +972-9-775-3000email: [email protected]
APAC Region: (Asia/Pacific)Tel: +852-8338-9818Fax: +852-2802-1800email: [email protected]
The Americas Region: (North, Central, South America)Tel: 1-800-6423-611Fax: +720-264-4012email: [email protected]
Israel:Tel: 09-775-3333Fax: 09-775-3000email: [email protected]
All queries, comments, and suggestions are welcome! Please email: [email protected]
For more information about NICE, visit www.nice.com
International Headquarters-IsraelTel: +972-9-775-3100Fax: +972-9-775-3070email: [email protected]
North AmericaTel: 1-800-663-5601Fax: +201-356-2197email: [email protected]
United KingdomTel: +44-8707-22-4000Fax: +44-8707-22-4500
GermanyTel: +49-(0)-69-97177-0Fax: +49-(0)-69-97177-200
FranceTel: +33-(0)1-41-38-5000Fax: +33-(0)1-41-38-5001
Hong-KongTel: +852-2598-3838Fax: +852-2802-1800
NICE invites you to join the NICE User Group (NUG).
Visit the NUG Website at www.niceusergroup.org, and follow the online instructions.

Revision History
Revision Modification Date Description
A0 January 2012 • Set up a new book
• Added content for NICE system integration with Genesys SIP server using active recording

NICE Interaction Management Release 4.16Switch-Side Preparation - Genesys SIP Server Using Active Recording (Rev A0)
Contents
1Genesys Switch Configuration 7
Active Voice Recording Overview . . . . . . . . . . . . . . . . . . . . . . . . . . . . . . . . . . . . 8Verifying the SIP Environment Options . . . . . . . . . . . . . . . . . . . . . . . . . . . . . . . . 9Creating an Application Template . . . . . . . . . . . . . . . . . . . . . . . . . . . . . . . . . . . .12Creating and Configuring a Recording Application . . . . . . . . . . . . . . . . . . . . . .17Configuring a Resource Using the Resource Group Wizard . . . . . . . . . . . . . . .25Verifying the Genesys T-Server Configuration . . . . . . . . . . . . . . . . . . . . . . . . . .32
Checking Genesys T-Server Licenses . . . . . . . . . . . . . . . . . . . . . . . . . . . . . . .32Checking the Licenses using Genesys Configuration Manager . . . . . . . . . .32Checking the Licenses using FlexLM License Manager . . . . . . . . . . . . . . . .35
AGenesys Switch Configuration 36
Genesys Configuration Management Information. . . . . . . . . . . . . . . . . . . . . . . .37

NICE Interaction Management Release 4.17Switch-Side Preparation - Genesys SIP Server Using Active Recording (Rev A0)
1
Genesys Switch Configuration
Contents
Active Voice Recording Overview...................................................................................8
Verifying the SIP Environment Options..........................................................................9
Creating an Application Template.................................................................................12
Creating and Configuring a Recording Application ....................................................17
Configuring a Resource Using the Resource Group Wizard......................................25
Verifying the Genesys T-Server Configuration ............................................................32
IMPORTANT This chapter provides information for NICE Interaction Management site engineers. The actual switch configuration is performed by the Genesys site engineer only.

NICE Interaction Management Release 4.18
Chapter 1: Genesys Switch ConfigurationActive Voice Recording Overview
Switch-Side Preparation - Genesys SIP Server Using Active Recording (Rev A0)
Active Voice Recording OverviewTo implement the active voice recording solution, you need to execute the following Genesys SIP server-related procedures in the system:
• Verifying the SIP Environment Options on page 9
• Creating an Application Template on page 12
• Creating and Configuring a Recording Application on page 17
• Configuring a Resource Using the Resource Group Wizard on page 25
• Verifying the Genesys T-Server Configuration on page 32
NOTE: The site engineer is expected to be familiar with the Genesys Administrator interface, including accessing the Genesys Administrator screen.

NICE Interaction Management Release 4.19
Chapter 1: Genesys Switch ConfigurationVerifying the SIP Environment Options
Switch-Side Preparation - Genesys SIP Server Using Active Recording (Rev A0)
Verifying the SIP Environment OptionsThis procedure describes how to verify the values of specific server setting options in the SIP environment. This procedure must be executed in advance, before running other procedures.
To verify the SIP environment options:
1. In the Genesys Administrator window, select PROVISIONING > Environment > Application.
A list of configured folders appears.Figure 1-1 Genesys Administrator Window
2. Select the SIP Server.
A list of SIP servers/T-Servers appears.Figure 1-2 List of SIP Servers/T-Servers
3. Double-click an appropriate SIP Server.
NOTE: You must verify that the specific server parameter options, as defined in the procedure, are set to True. If any one of them is set to False, you will not be able to record voice.
NICE Interaction Management Release 4.110
Chapter 1: Genesys Switch ConfigurationVerifying the SIP Environment Options
Switch-Side Preparation - Genesys SIP Server Using Active Recording (Rev A0)
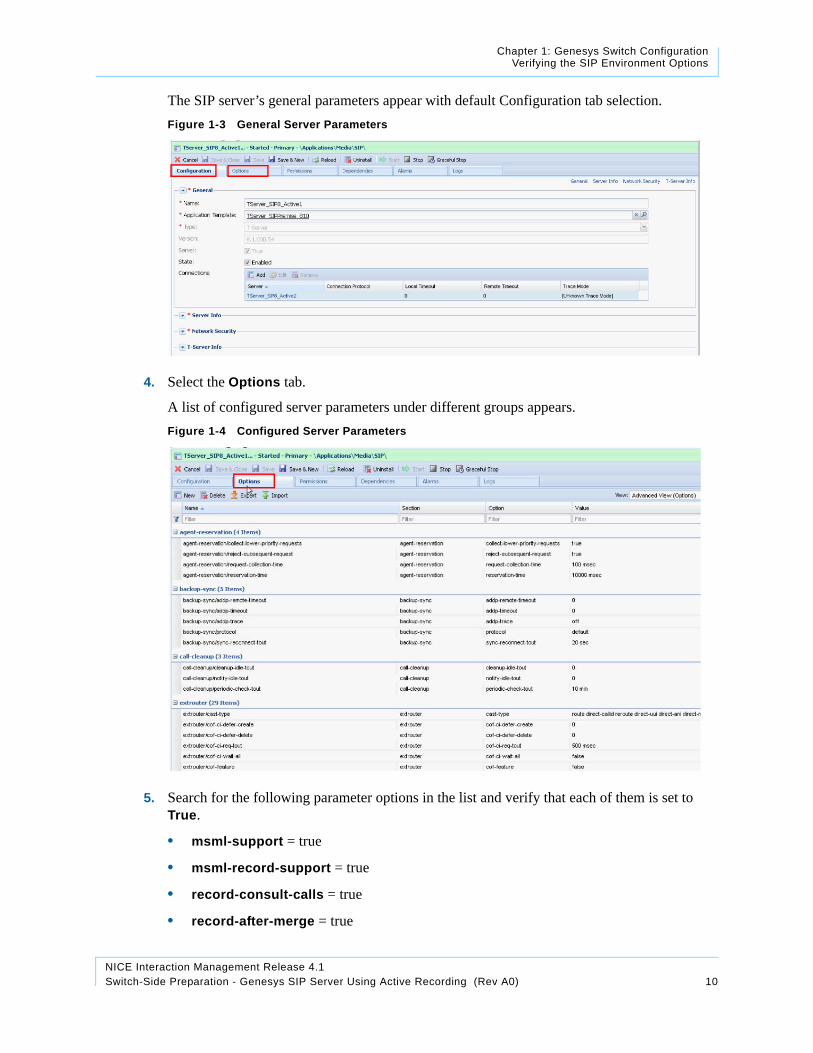
The SIP server’s general parameters appear with default Configuration tab selection.Figure 1-3 General Server Parameters
4. Select the Options tab.
A list of configured server parameters under different groups appears.Figure 1-4 Configured Server Parameters
5. Search for the following parameter options in the list and verify that each of them is set to True.
• msml-support = true
• msml-record-support = true
• record-consult-calls = true
• record-after-merge = true
NICE Interaction Management Release 4.111
Chapter 1: Genesys Switch ConfigurationVerifying the SIP Environment Options
Switch-Side Preparation - Genesys SIP Server Using Active Recording (Rev A0)
• resource-management-by-rm = true
NOTE: If the parameter option value is False, change the setting to True.
NICE Interaction Management Release 4.112
Chapter 1: Genesys Switch ConfigurationCreating an Application Template
Switch-Side Preparation - Genesys SIP Server Using Active Recording (Rev A0)
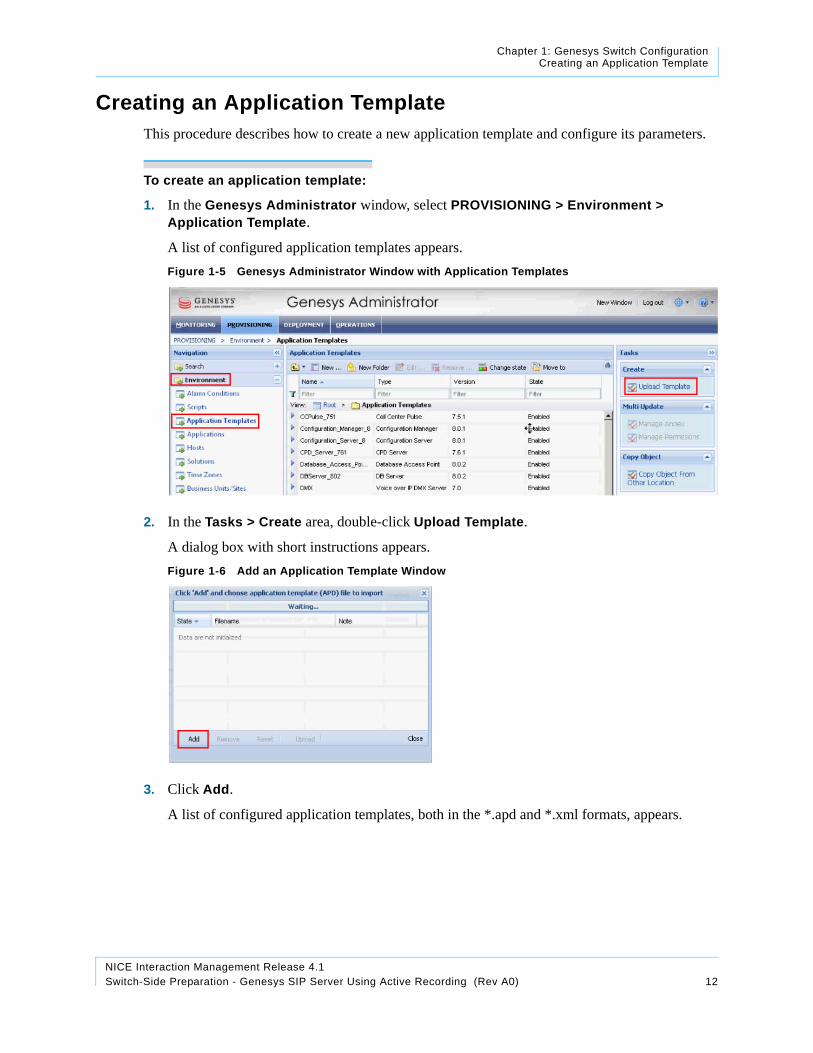
Creating an Application TemplateThis procedure describes how to create a new application template and configure its parameters.
To create an application template:
1. In the Genesys Administrator window, select PROVISIONING > Environment > Application Template.
A list of configured application templates appears.Figure 1-5 Genesys Administrator Window with Application Templates
2. In the Tasks > Create area, double-click Upload Template.
A dialog box with short instructions appears.Figure 1-6 Add an Application Template Window
3. Click Add.
A list of configured application templates, both in the *.apd and *.xml formats, appears.

NICE Interaction Management Release 4.113
Chapter 1: Genesys Switch ConfigurationCreating an Application Template
Switch-Side Preparation - Genesys SIP Server Using Active Recording (Rev A0)
Figure 1-7 List of Application Templates
4. Select the application template file with VP_CallRecordingServer_*.apd format.
NOTE: * is the version number of the template.
The application template configuration details (without metadata) appear.Figure 1-8 Application Template Parameters
5. Click Import Metadata.
A dialog box with short instructions appears.

NICE Interaction Management Release 4.114
Chapter 1: Genesys Switch ConfigurationCreating an Application Template
Switch-Side Preparation - Genesys SIP Server Using Active Recording (Rev A0)
Figure 1-9 Adding Metadata
6. Click Add.
A list of configured application templates, both in *.apd and *.xml formats, appears.Figure 1-10 List of Application Templates
7. Select the application template file with VP_CallRecordingServer_*.xml format.
NOTE: * is the version number of the template.
The application template metadata appears.
NICE Interaction Management Release 4.115
Chapter 1: Genesys Switch ConfigurationCreating an Application Template
Switch-Side Preparation - Genesys SIP Server Using Active Recording (Rev A0)
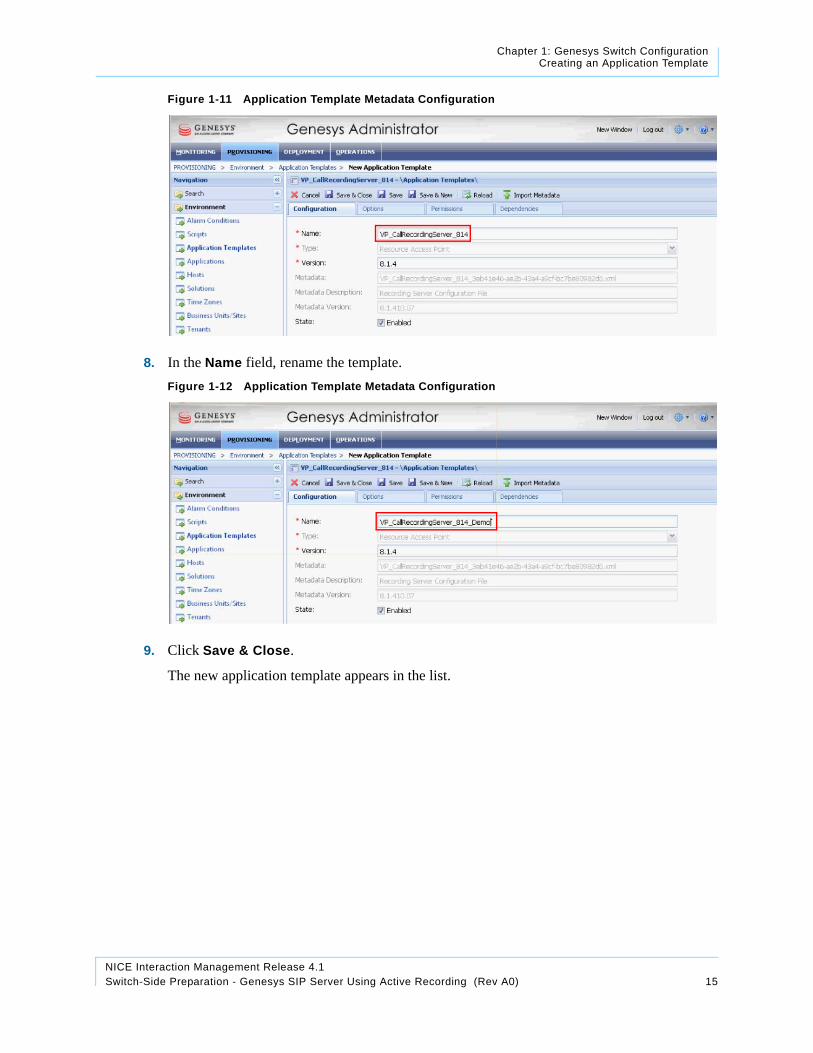
Figure 1-11 Application Template Metadata Configuration
8. In the Name field, rename the template.Figure 1-12 Application Template Metadata Configuration
9. Click Save & Close.
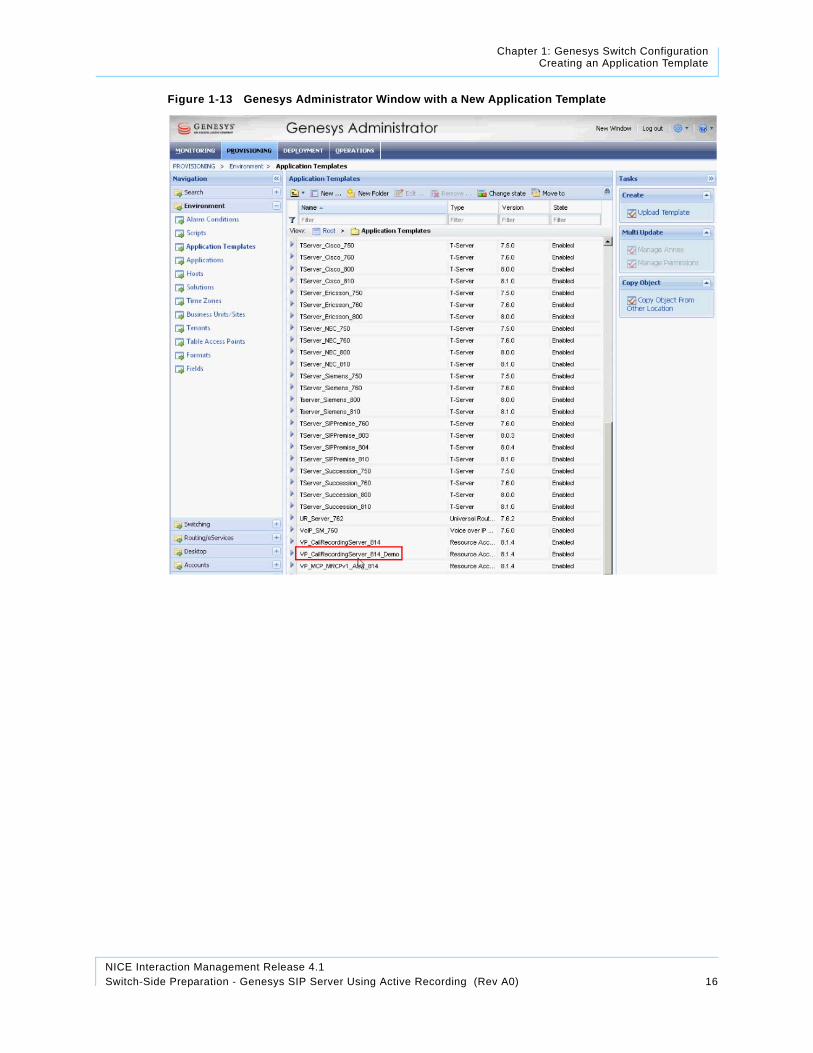
The new application template appears in the list.
NICE Interaction Management Release 4.116
Chapter 1: Genesys Switch ConfigurationCreating an Application Template
Switch-Side Preparation - Genesys SIP Server Using Active Recording (Rev A0)
Figure 1-13 Genesys Administrator Window with a New Application Template
NICE Interaction Management Release 4.117
Chapter 1: Genesys Switch ConfigurationCreating and Configuring a Recording Application
Switch-Side Preparation - Genesys SIP Server Using Active Recording (Rev A0)
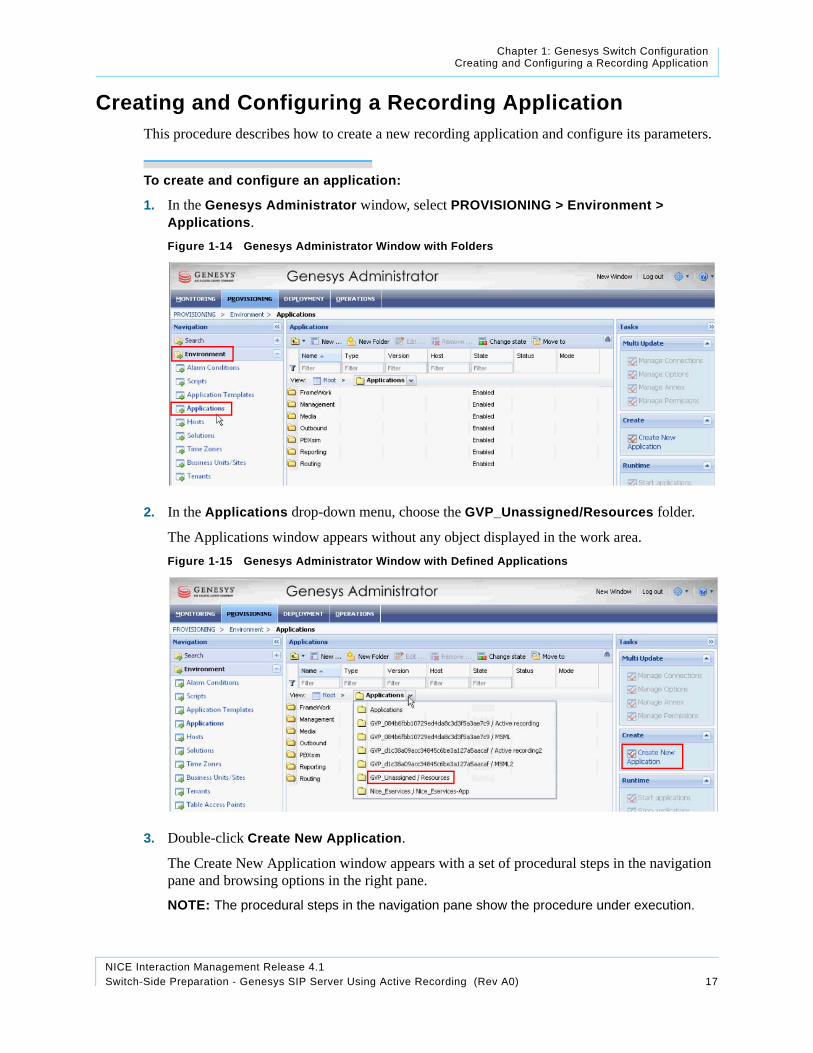
Creating and Configuring a Recording ApplicationThis procedure describes how to create a new recording application and configure its parameters.
To create and configure an application:
1. In the Genesys Administrator window, select PROVISIONING > Environment > Applications.Figure 1-14 Genesys Administrator Window with Folders
2. In the Applications drop-down menu, choose the GVP_Unassigned/Resources folder.
The Applications window appears without any object displayed in the work area.Figure 1-15 Genesys Administrator Window with Defined Applications
3. Double-click Create New Application.
The Create New Application window appears with a set of procedural steps in the navigation pane and browsing options in the right pane.
NOTE: The procedural steps in the navigation pane show the procedure under execution.

NICE Interaction Management Release 4.118
Chapter 1: Genesys Switch ConfigurationCreating and Configuring a Recording Application
Switch-Side Preparation - Genesys SIP Server Using Active Recording (Rev A0)
Figure 1-16 Create New Application Window
4. Click Browse for Template.
A list of configured application templates appears.Figure 1-17 Predefined Application Templates
5. Select the template and click OK.
The application template parameters appear.

NICE Interaction Management Release 4.119
Chapter 1: Genesys Switch ConfigurationCreating and Configuring a Recording Application
Switch-Side Preparation - Genesys SIP Server Using Active Recording (Rev A0)
Figure 1-18 Application Template Parameters
6. Click Next.
The template metadata details appear in the right pane.
NOTE: If required, click the Browse button to replace the template’s metadata file.
Figure 1-19 Application Template Metadata
7. Click Next.
The application parameter window appears both with default parameters and blank fields.
NOTE: Make sure that the mandatory fields have proper entries.

NICE Interaction Management Release 4.120
Chapter 1: Genesys Switch ConfigurationCreating and Configuring a Recording Application
Switch-Side Preparation - Genesys SIP Server Using Active Recording (Rev A0)
Figure 1-20 Default Application Parameters
8. Enter the application parameters, as follows:
• Name field: Enter the application name
• Host field: Select the host name from the search listFigure 1-21 Application Parameters
9. Click Create.
Summarized results of the application template parameter configuration appear.

NICE Interaction Management Release 4.121
Chapter 1: Genesys Switch ConfigurationCreating and Configuring a Recording Application
Switch-Side Preparation - Genesys SIP Server Using Active Recording (Rev A0)
Figure 1-22 Summarized Results of Application Template Configuration
10. Click Finish.
The application parameters window appears.Figure 1-23 Resource AOR IP Configuration
11. Do the following:
a. Click the Options tab (if not default selected).
b. Enter the VRSP IP address in the sip:1.10.32.144:5060 format.
c. Click the Configuration tab.
General application parameters appear.
NICE Interaction Management Release 4.122
Chapter 1: Genesys Switch ConfigurationCreating and Configuring a Recording Application
Switch-Side Preparation - Genesys SIP Server Using Active Recording (Rev A0)
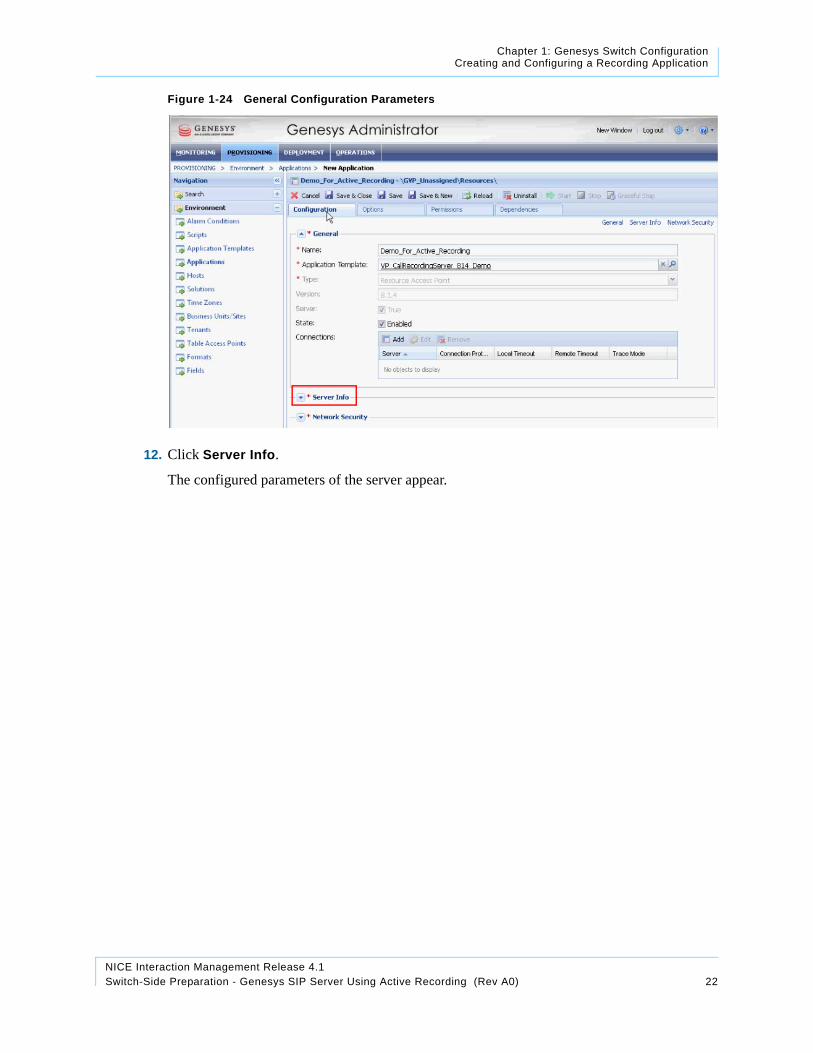
Figure 1-24 General Configuration Parameters
12. Click Server Info.
The configured parameters of the server appear.

NICE Interaction Management Release 4.123
Chapter 1: Genesys Switch ConfigurationCreating and Configuring a Recording Application
Switch-Side Preparation - Genesys SIP Server Using Active Recording (Rev A0)
Figure 1-25 Server Parameter Configuration
13. Click Add.
The Port Info dialog box appears.Figure 1-26 Server Port Info Window
14. In the Port field, enter the server port number and click OK.
The port number appears in the Server Info window.

NICE Interaction Management Release 4.124
Chapter 1: Genesys Switch ConfigurationCreating and Configuring a Recording Application
Switch-Side Preparation - Genesys SIP Server Using Active Recording (Rev A0)
Figure 1-27 Application Parameter Window
15. Click Save & Close to save the configuration.

NICE Interaction Management Release 4.125
Chapter 1: Genesys Switch ConfigurationConfiguring a Resource Using the Resource Group Wizard
Switch-Side Preparation - Genesys SIP Server Using Active Recording (Rev A0)
Configuring a Resource Using the Resource Group WizardThis procedures describes how to configure a resource using the Resource Group Wizard.
The Resource Group Wizard supports the following functionality:
• Configuring a resource group name
• Selecting a resource group type such as media control platform, call control platform, gateway, CTI connector, or recording servers
• Assigning resources to groups
To configure a resource using the Resource Group Wizard:
1. Access the Genesys Administrator window.
2. Select PROVISIONING > Voice Platform > Resource Groups.
A list of configured resource groups appears.Figure 1-28 Resource Group Configuration Window
3. Click New.
The wizard introduction page appears.

NICE Interaction Management Release 4.126
Chapter 1: Genesys Switch ConfigurationConfiguring a Resource Using the Resource Group Wizard
Switch-Side Preparation - Genesys SIP Server Using Active Recording (Rev A0)
Figure 1-29 Resource Group Wizard
4. Click Next.
The Resource Manager Selection page appears.Figure 1-30 Configuring Resource Manager
5. Click Add.
The Select Components window with a list of predefined resources appears.

NICE Interaction Management Release 4.127
Chapter 1: Genesys Switch ConfigurationConfiguring a Resource Using the Resource Group Wizard
Switch-Side Preparation - Genesys SIP Server Using Active Recording (Rev A0)
Figure 1-31 Select Components Window
6. Select a resource (for example, RM) and click OK.
The Resource Manager Selection page displaying the selected resource appears.Figure 1-32 Resource Group Wizard with Remote Manager Selection
7. Click Next.
The Group Name and Type page appears.
NICE Interaction Management Release 4.128
Chapter 1: Genesys Switch ConfigurationConfiguring a Resource Using the Resource Group Wizard
Switch-Side Preparation - Genesys SIP Server Using Active Recording (Rev A0)
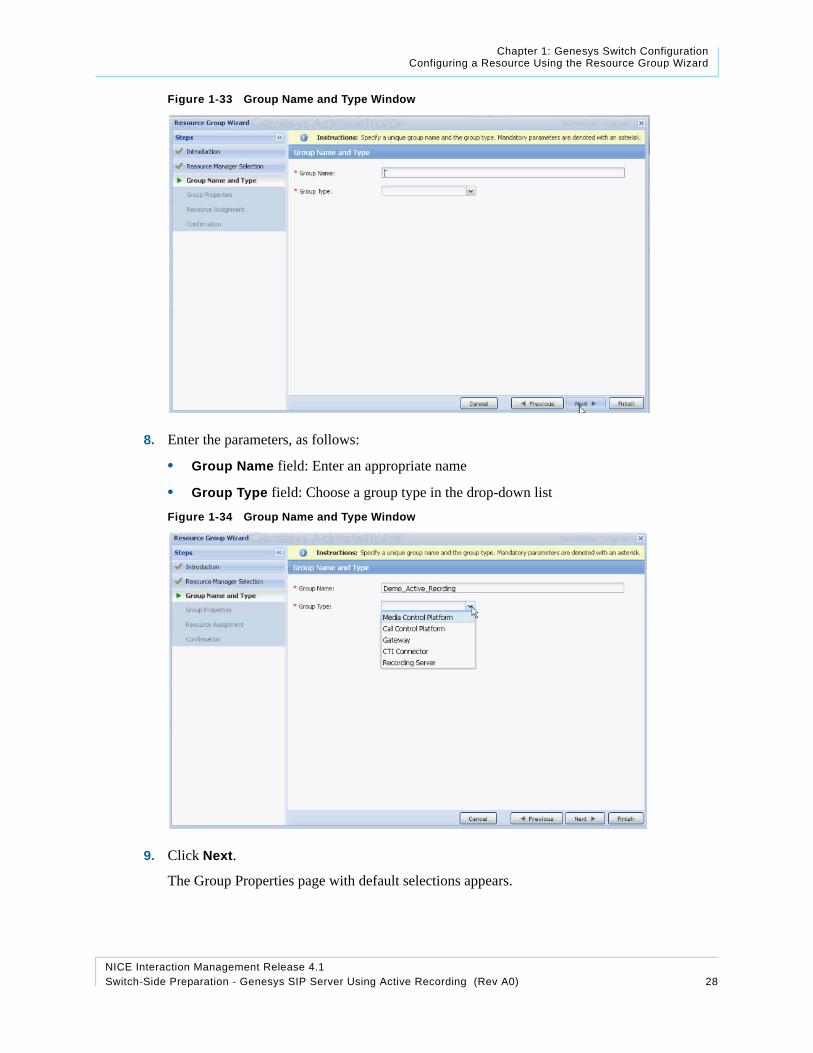
Figure 1-33 Group Name and Type Window
8. Enter the parameters, as follows:
• Group Name field: Enter an appropriate name
• Group Type field: Choose a group type in the drop-down listFigure 1-34 Group Name and Type Window
9. Click Next.
The Group Properties page with default selections appears.

NICE Interaction Management Release 4.129
Chapter 1: Genesys Switch ConfigurationConfiguring a Resource Using the Resource Group Wizard
Switch-Side Preparation - Genesys SIP Server Using Active Recording (Rev A0)
Figure 1-35 Group Properties Window
10. Select values in the Monitoring Method and Load Balancing Scheme fields from the drop-down lists, as follows:
• Monitoring Method: None
• Load Balancing Scheme: Parallel Forking
11. Click Next.
The Resource Assignment window with predefined resources and their IPs appears.Figure 1-36 Resource Assignment Window

NICE Interaction Management Release 4.130
Chapter 1: Genesys Switch ConfigurationConfiguring a Resource Using the Resource Group Wizard
Switch-Side Preparation - Genesys SIP Server Using Active Recording (Rev A0)
12. Select a resource (for example, Demo_for_Active_Recording) and define the parameter values, as follows:
• IP Address: Modify the default IP, if required
• SIP Port: Define a port number
• SPS Port: Define a port number
• Max Ports: Define a maximum number of ports
• Redundancy: Select a redundancy option in the drop-down listFigure 1-37 Resource Assignment with Configured Parameters
13. Click Next.
A confirmation page appears with defined parameters in the wizard.
NICE Interaction Management Release 4.131
Chapter 1: Genesys Switch ConfigurationConfiguring a Resource Using the Resource Group Wizard
Switch-Side Preparation - Genesys SIP Server Using Active Recording (Rev A0)
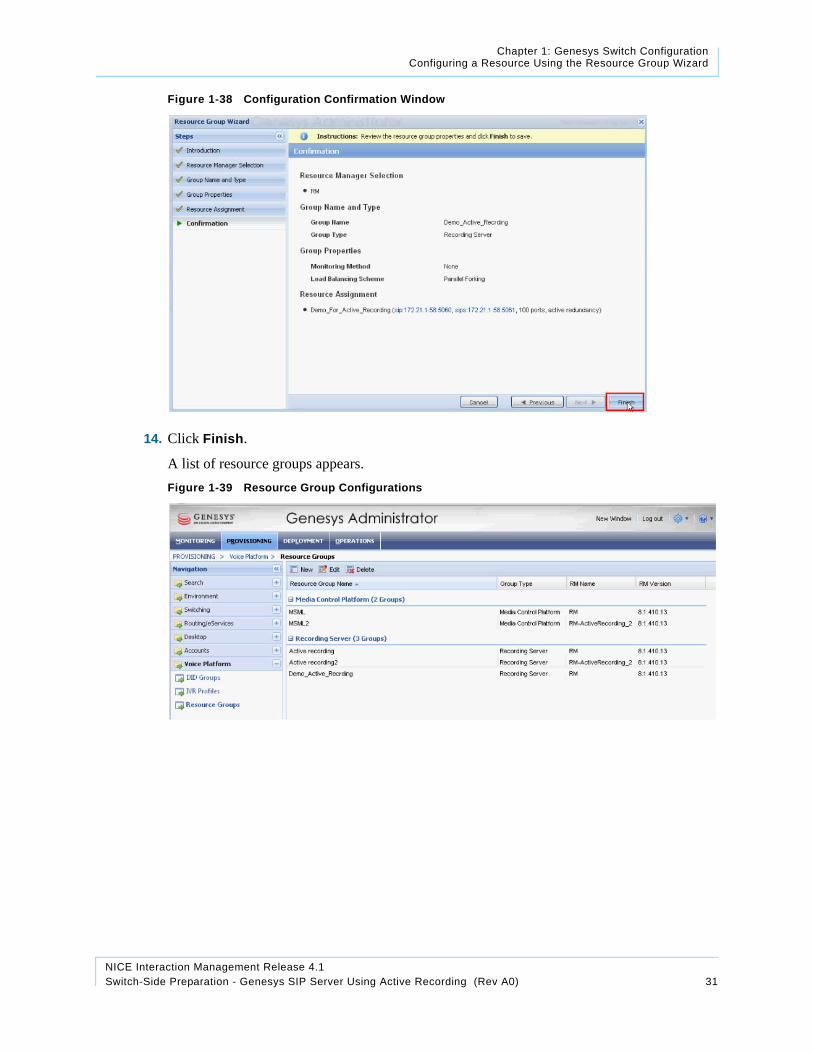
Figure 1-38 Configuration Confirmation Window
14. Click Finish.
A list of resource groups appears.Figure 1-39 Resource Group Configurations
NICE Interaction Management Release 4.132
Chapter 1: Genesys Switch ConfigurationVerifying the Genesys T-Server Configuration
Switch-Side Preparation - Genesys SIP Server Using Active Recording (Rev A0)
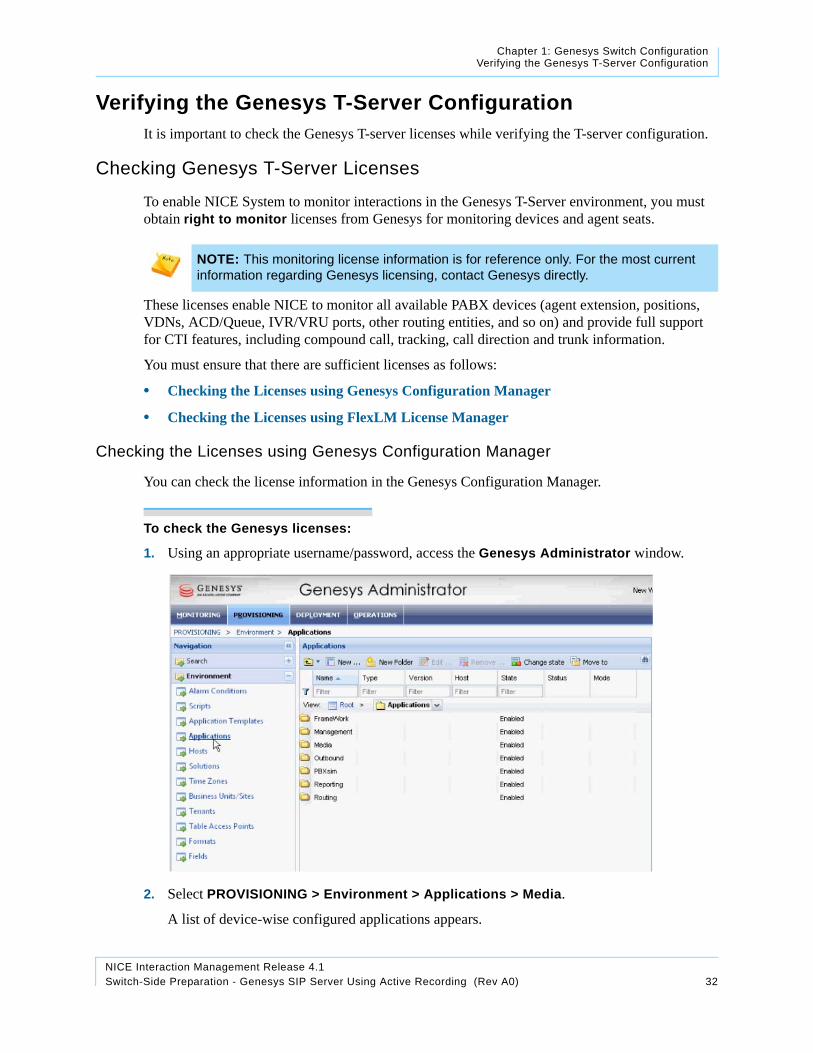
Verifying the Genesys T-Server ConfigurationIt is important to check the Genesys T-server licenses while verifying the T-server configuration.
Checking Genesys T-Server Licenses
To enable NICE System to monitor interactions in the Genesys T-Server environment, you must obtain right to monitor licenses from Genesys for monitoring devices and agent seats.
These licenses enable NICE to monitor all available PABX devices (agent extension, positions, VDNs, ACD/Queue, IVR/VRU ports, other routing entities, and so on) and provide full support for CTI features, including compound call, tracking, call direction and trunk information.
You must ensure that there are sufficient licenses as follows:
• Checking the Licenses using Genesys Configuration Manager
• Checking the Licenses using FlexLM License Manager
Checking the Licenses using Genesys Configuration Manager
You can check the license information in the Genesys Configuration Manager.
To check the Genesys licenses:
1. Using an appropriate username/password, access the Genesys Administrator window.
2. Select PROVISIONING > Environment > Applications > Media.
A list of device-wise configured applications appears.
NOTE: This monitoring license information is for reference only. For the most current information regarding Genesys licensing, contact Genesys directly.
NICE Interaction Management Release 4.133
Chapter 1: Genesys Switch ConfigurationVerifying the Genesys T-Server Configuration
Switch-Side Preparation - Genesys SIP Server Using Active Recording (Rev A0)
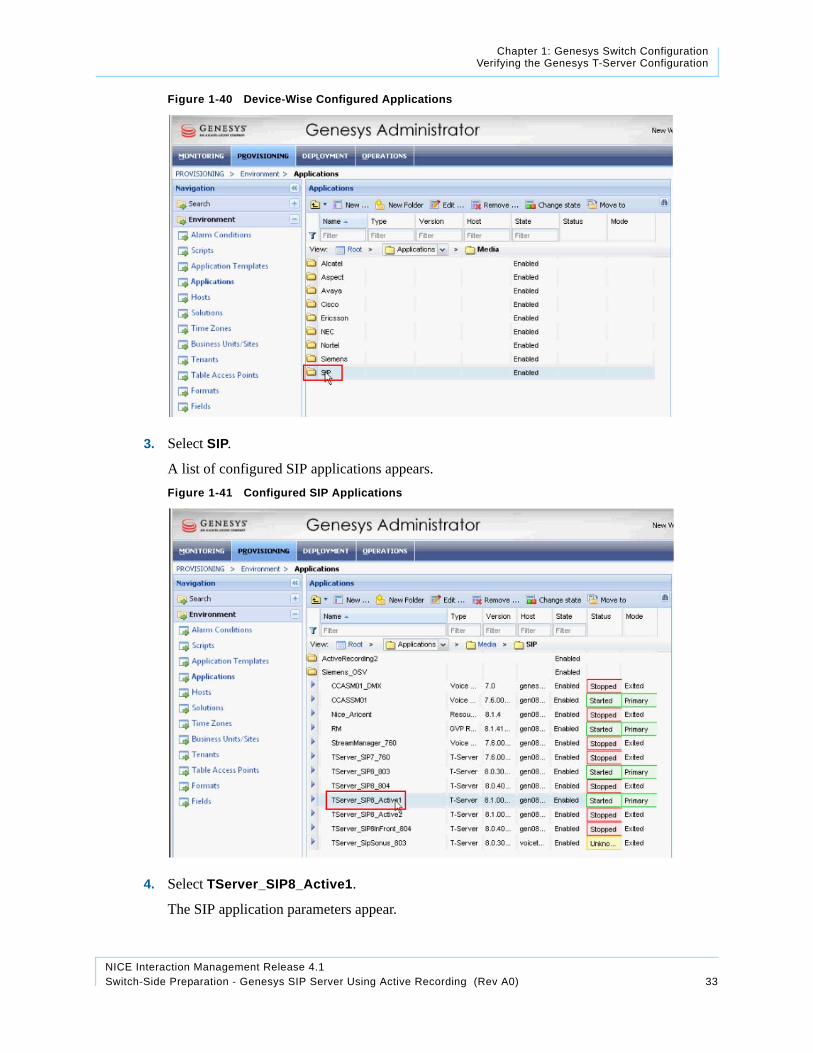
Figure 1-40 Device-Wise Configured Applications
3. Select SIP.
A list of configured SIP applications appears.Figure 1-41 Configured SIP Applications
4. Select TServer_SIP8_Active1.
The SIP application parameters appear.

NICE Interaction Management Release 4.134
Chapter 1: Genesys Switch ConfigurationVerifying the Genesys T-Server Configuration
Switch-Side Preparation - Genesys SIP Server Using Active Recording (Rev A0)
Figure 1-42 SIP Application Parameters
5. Select the Options tab.
A list of group-wise SIP application parameters appears.Figure 1-43 Group-Wise SIP Application Parameters
6. In the Options field, type num.
A filtered list, including the type of licenses appears.
NICE Interaction Management Release 4.135
Chapter 1: Genesys Switch ConfigurationVerifying the Genesys T-Server Configuration
Switch-Side Preparation - Genesys SIP Server Using Active Recording (Rev A0)
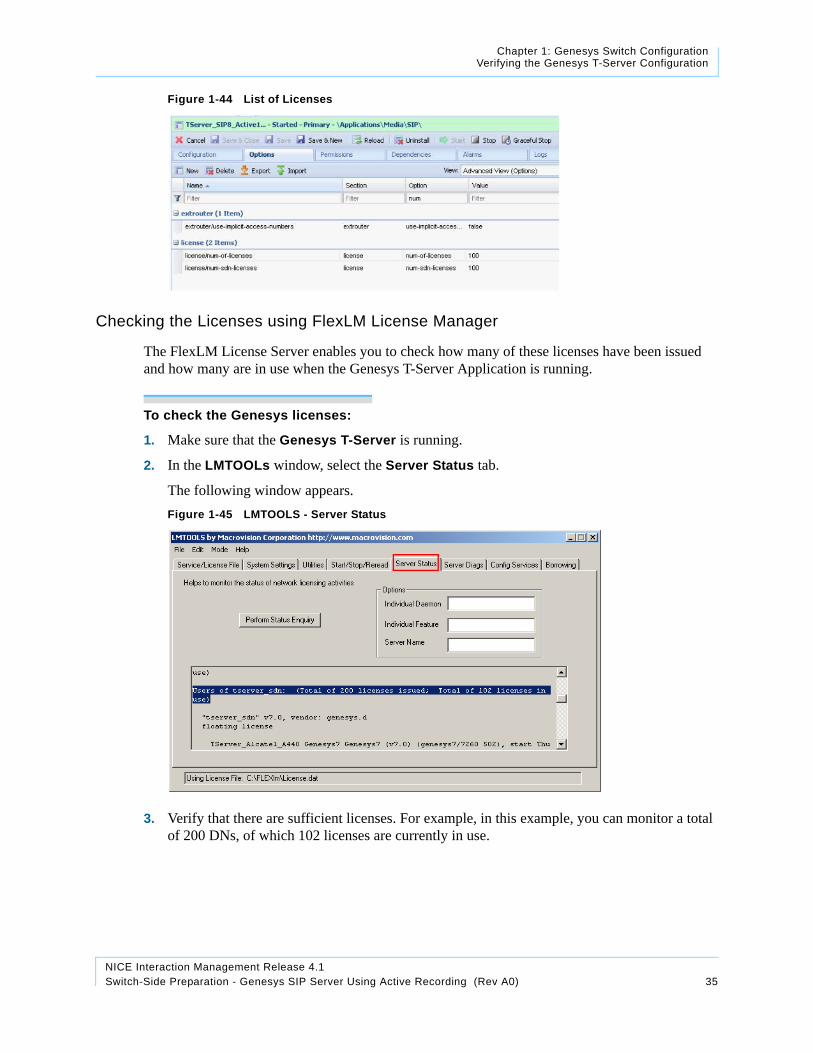
Figure 1-44 List of Licenses
Checking the Licenses using FlexLM License Manager
The FlexLM License Server enables you to check how many of these licenses have been issued and how many are in use when the Genesys T-Server Application is running.
To check the Genesys licenses:
1. Make sure that the Genesys T-Server is running.
2. In the LMTOOLs window, select the Server Status tab.
The following window appears.Figure 1-45 LMTOOLS - Server Status
3. Verify that there are sufficient licenses. For example, in this example, you can monitor a total of 200 DNs, of which 102 licenses are currently in use.

NICE Interaction Management Release 4.136Switch-Side Preparation - Genesys SIP Server Using Active Recording (Rev A0)
A
Genesys Switch Configuration
Contents
Genesys Configuration Management Information ......................................................37
IMPORTANT This chapter provides information for NICE Interaction Management site engineers. The actual switch configuration is performed by the Genesys site engineer only.
NICE Interaction Management Release 4.137
Appendix A: Genesys Switch ConfigurationGenesys Configuration Management Information
Switch-Side Preparation - Genesys SIP Server Using Active Recording (Rev A0)
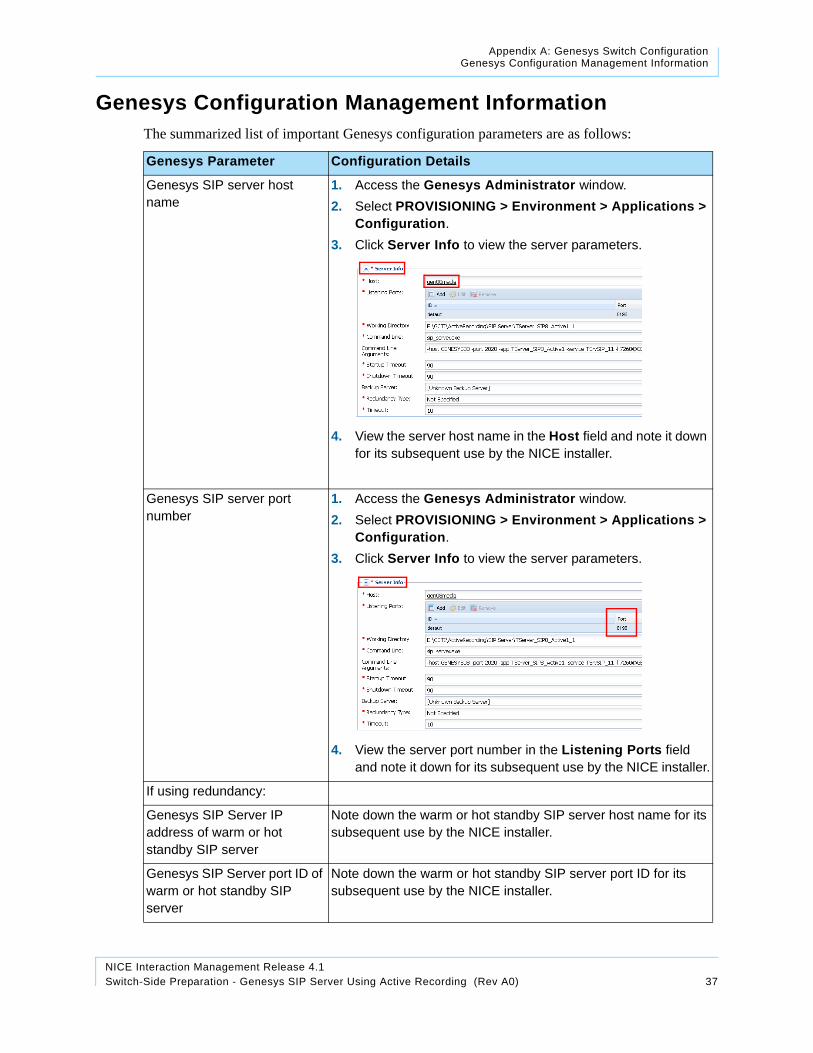
Genesys Configuration Management InformationThe summarized list of important Genesys configuration parameters are as follows:
Genesys Parameter Configuration Details
Genesys SIP server host name
1. Access the Genesys Administrator window.2. Select PROVISIONING > Environment > Applications >
Configuration.3. Click Server Info to view the server parameters.
4. View the server host name in the Host field and note it down for its subsequent use by the NICE installer.
Genesys SIP server port number
1. Access the Genesys Administrator window.2. Select PROVISIONING > Environment > Applications >
Configuration.3. Click Server Info to view the server parameters.
4. View the server port number in the Listening Ports field and note it down for its subsequent use by the NICE installer.
If using redundancy:
Genesys SIP Server IP address of warm or hot standby SIP server
Note down the warm or hot standby SIP server host name for its subsequent use by the NICE installer.
Genesys SIP Server port ID of warm or hot standby SIP server
Note down the warm or hot standby SIP server port ID for its subsequent use by the NICE installer.
NICE Interaction Management Release 4.138
Appendix A: Genesys Switch ConfigurationGenesys Configuration Management Information
Switch-Side Preparation - Genesys SIP Server Using Active Recording (Rev A0)
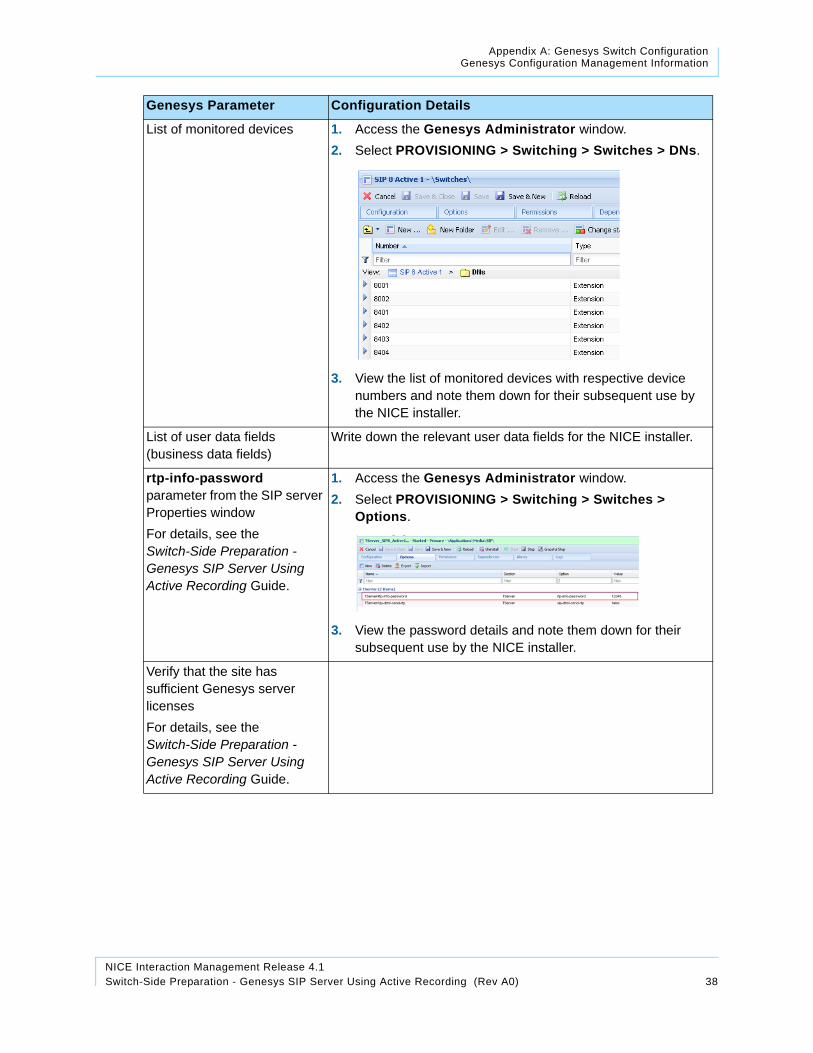
List of monitored devices 1. Access the Genesys Administrator window.2. Select PROVISIONING > Switching > Switches > DNs.
3. View the list of monitored devices with respective device numbers and note them down for their subsequent use by the NICE installer.
List of user data fields (business data fields)
Write down the relevant user data fields for the NICE installer.
rtp-info-password parameter from the SIP server Properties window For details, see the Switch-Side Preparation - Genesys SIP Server Using Active Recording Guide.
1. Access the Genesys Administrator window.2. Select PROVISIONING > Switching > Switches >
Options.
3. View the password details and note them down for their subsequent use by the NICE installer.
Verify that the site has sufficient Genesys server licensesFor details, see the Switch-Side Preparation - Genesys SIP Server Using Active Recording Guide.
Genesys Parameter Configuration Details