genechiptm mirna 2.0 assay software module v1 · genechiptm 5mirna 2.0 assay software module v1.1...
TRANSCRIPT

For Research Use Only. Not for use in diagnostic procedures.
GeneChipTM
miRNA 2.0 Assay Software Module v1.1 User’s Guide
Information in this document is subject to change without notice.
DISCLAIMER
TO THE EXTENT ALLOWED BY LAW, THERMO FISHER SCIENTIFIC AND/OR ITS AFFILIATE(S) WILL NOT BE LIABLE FOR SPECIAL, INCIDENTAL, INDIRECT, PUNITIVE, MULTIPLE OR CONSEQUENTIAL DAMAGES IN CONNECTION WITH OR ARISING FROM THIS DOCUMENT, INCLUDING YOUR USE OF IT.
Important Licensing Information
These products may be covered by one or more Limited Use Label Licenses. By use of these products, you accept the terms and conditions of all applicable Limited Use Label Licenses.
Corporate entity
Life Technologies | Carlsbad, CA 92008 USA | Toll free in USA 1.800.955.6288
Trademarks
All trademarks are the property of Thermo Fisher Scientific and its subsidiaries unless otherwise specified.All other trademarks are the property of their respective owners.
© 2017Thermo Fisher Scientific Inc. All rights reserved.
P/N 703073
2 GeneChipTM
miRNA 2.0 Assay Software Module v1.1
Contents
GeneChip™ miRNA 2.0 Assay Software Module v1.1 ....................................................... 3
Introduction ............................................................................................................................ 3
Nomenclature ......................................................................................................................... 3
Major Features of miRNA 2.0 ASM v1.1 .................................................................................. 4
Reagents.................................................................................................................................. 4
Installing the ASM (Assay Software Module) .................................................................... 5
Installing a Certificate ............................................................................................................. 5
Installing the miRNA 2.0 ASM v1.1 ......................................................................................... 7
Creating a Test Request .................................................................................................... 12
Adding Specimen Information ......................................................................................... 13
The Assay Information/Home Window ........................................................................... 15
Adding Reagent Information ................................................................................................ 15
Reagent Kit Information ........................................................................................................ 16
Reagent Entry Information .................................................................................................... 16
Reagent Kit Lot Numbers and Expiration Dates .................................................................... 17
Specimen Report Tab ............................................................................................................ 17
Test Request Log Tab ............................................................................................................ 18
Batching Additional Test Request Information ................................................................ 19
Gridding Manually .......................................................................................................... 20
Transferring Data ............................................................................................................. 20
Reviewing the Test Report ............................................................................................... 21
Ordering Information ....................................................................................................... 23

GeneChipTM
miRNA 2.0 Assay Software Module v1.1 3
GeneChip™ miRNA 2.0 Assay Software Module v1.1
Introduction
This User's Guide demonstrates how to create a GeneChip™ miRNA 2.0 Assay Software Module v1.1
RUO Assay Test Request.
This software is for use with the GCS3000Dx v.2 system and is also compatible with the following Reagent
Kits:
GeneChip™ 3' IVT Express Kit
FlashTag™ Labeling Kit
Biotin HSR RNA Labeling Kit
GeneChip™ Hybridization Control Kit
GeneChip™ Hybridization, Wash & Stain Kit
Nomenclature
The Assay name is GeneChip™ miRNA 2.0 Assay.
The Assay display name is miRNA 2.0 ASM v1.1.
The term ASM refers to Assay Software Module.

4 GeneChipTM
miRNA 2.0 Assay Software Module v1.1
Major Features of miRNA 2.0 ASM v1.1
The major features of miRNA 2.0 ASM v1.1 are 4 windows that augment assay record keeping. This user
guide will also discuss the use of these windows in setting up the assay. These windows include:
Additional Information window
Assay Home window (or Assay Landing window)
Batch Edit window
Report window
miRNA 2.0 ASM v1.1 (under the control of the AMDS application), transfers all specimen information to
the server.
IMPORTANT: It is NOT the purpose of this abbreviated User's Guide to instruct you on how to run the Assay. This guide instructs only how to create a RUO Test Request and track associated information.
To complete an Assay run, you must follow the standard AMDS Assay protocols, then process it through
the workflow to register, hybridize, wash/stain, and scan the array (as part of the array cartridge). These
specifics are discussed in the Molecular Diagnostic Software User’s Guide (P/N 08-0261).
IMPORTANT: Before using the information contained in this guide to run the assay, you must thoroughly be familiar with the following documents:
Molecular Diagnostic Software User’s Guide (P/N 08-0261)
Molecular Diagnostic Software Quick Reference Card (P/N 08-0262)
FlashTag™ Biotin HSR RNA Labeling Kit User Manual (P/N 703095)
GeneChip™ Expression Analysis Technical Manual (P/N 702232)
Expression Wash, Stain and Scan User Manual for Cartridge Arrays (P/N 702731)
Reagents
Reagents for the GeneChip™ miRNA 2.0 Array - single array (P/N 520902) comprise the following Reagent
Sub-Kits:
FlashTag™ Biotin HSR RNA Labeling Kit (10 rxn) - (P/N 901910)
FlashTag™ Biotin HSR RNA Labeling Kit (30 rxn) - (P/N 901911)
GeneChip™ Hybridization, Wash & Stain Kit (30 rxn) - (P/N 900720)
GeneChip™ Expression 3'-Amplification Reagent Hybridization Controls (30 rxn) (P/N 900454)
Wash Buffer A - (P/N 900721)
Wash Buffer B - (P/N 900722)

GeneChipTM
miRNA 2.0 Assay Software Module v1.1 5
Installing the ASM (Assay Software Module)
To process a miRNA 2.0 ASM v1.1 Test Request on the system, you must first:
1. Install a Certificate (only for secure transfers to a Data Transfer Server and not required for CIFS
transfers)
2. Install the miRNA 2.0 ASM v1.1
Installing a Certificate
NOTE: In most cases, the Field Service Technician installs the certificate and ASM.
NOTE: The steps in this section apply only if you are using a Data Transfer Server. If you are transferring your data via CIFS, SKIP to Installing the miRNA 2.0 ASM v1.1 on page 8.
As a security measure, AMDS requires that you or the field service technician install a SSL server certificate
on your local workstation in order for your workstation to communicate with the server. This is required
for the transfer of miRNA 2.0 ASM v1.1 test request data to the Data Transfer Server.
The service technician should have installed a certificate at the time of the system's installation. If for some
reason the service technician did not install a certificate or if the server has changed after the system's initial
installation, you must install or reinstall a certificate.
You MUST install the certificate before installing the Assay.
If a proper certificate has not been installed, you can still install the assay and process test requests;
however, you will not have permission to access the server, and you cannot transfer test request data to the
server.
If you cannot access the server and have already installed a certificate, contact Technical Support.
NOTE: You must be logged in with either Laboratory Supervisor or System Maintainer privileges to install a certificate.
The Active Worklist Administrator panel contains the Assay Management button and provides the starting
point for installing a certificate (Figure 1).
Figure 1 The Active Worklist Administrator Pane (lower left)
1. Insert the CD into the drive.
2. Click Assay Management.
The Assay Management window appears.
3. Click Install Certificate.

6 GeneChipTM
miRNA 2.0 Assay Software Module v1.1
The Server Certificate Browse window appears. (Figure 2)
Figure 2 The Server Certificate Browse window.
4. Make sure the Install from CD radio button is selected, then navigate to and click the
appropriate .cerfile.
5. Click OK.
The message You have successfully added the server certificate xxxxx.cer to the AMDS trusted certificate
storeappears.
NOTE: If the certificate installation fails, an error message appears. You cannot access the server or transfer data without a certificate. Contact your Service Representative for information on obtaining a new certificate.
6. Click OK to return to the Assay Management window.
GeneChipTM
miRNA 2.0 Assay Software Module v1.1 7
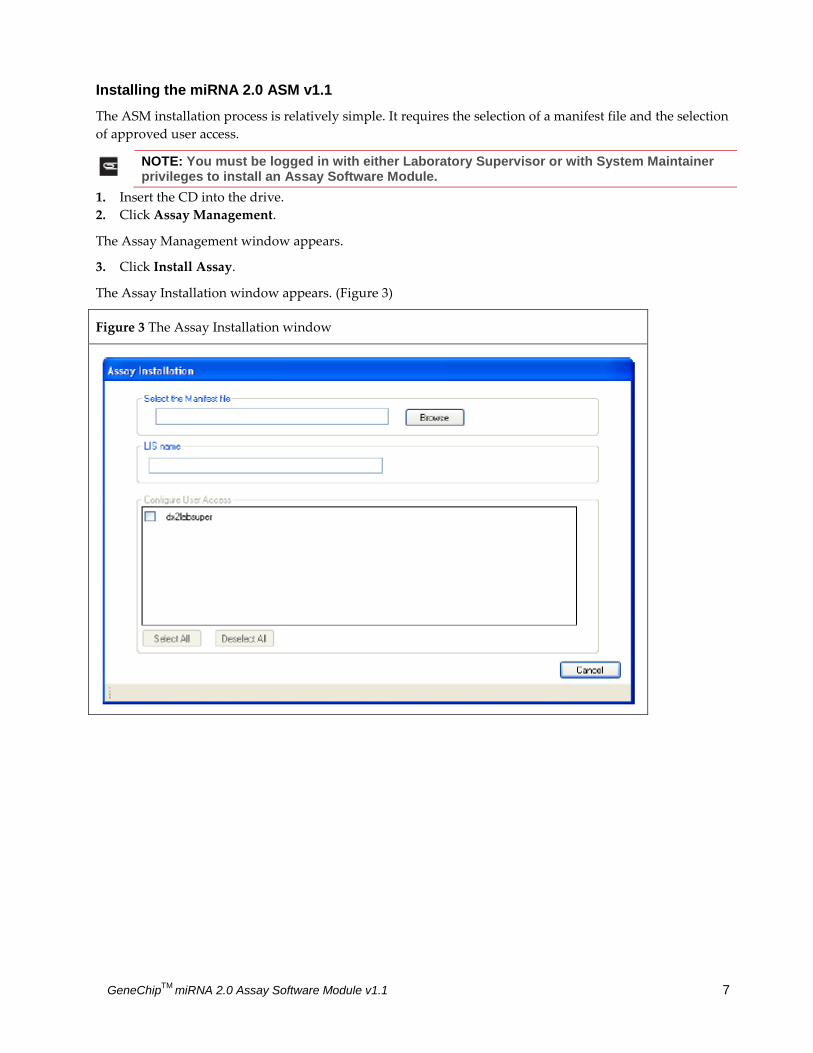
Installing the miRNA 2.0 ASM v1.1
The ASM installation process is relatively simple. It requires the selection of a manifest file and the selection
of approved user access.
NOTE: You must be logged in with either Laboratory Supervisor or with System Maintainer privileges to install an Assay Software Module.
1. Insert the CD into the drive.
2. Click Assay Management.
The Assay Management window appears.
3. Click Install Assay.
The Assay Installation window appears. (Figure 3)
Figure 3 The Assay Installation window

8 GeneChipTM
miRNA 2.0 Assay Software Module v1.1
4. Click Browse.
The Assay Installation Browse window appears. (Figure 4)
Figure 4 The Assay Installation Browse window
5. Make sure the Install from CD radio button is selected, then navigate to and click on
D:\miRNA_2.0_ASM_v1.1\mirna_2.0_asm_v1.1.manifest
6. Click OK.
The Assay Installation window appears. (Figure 5)
Figure 5 The Assay Installation browse window for miRNA 2.0 ASM v1.1
7. Click to choose each authorized Assay User or click Select All.
GeneChipTM
miRNA 2.0 Assay Software Module v1.1 9
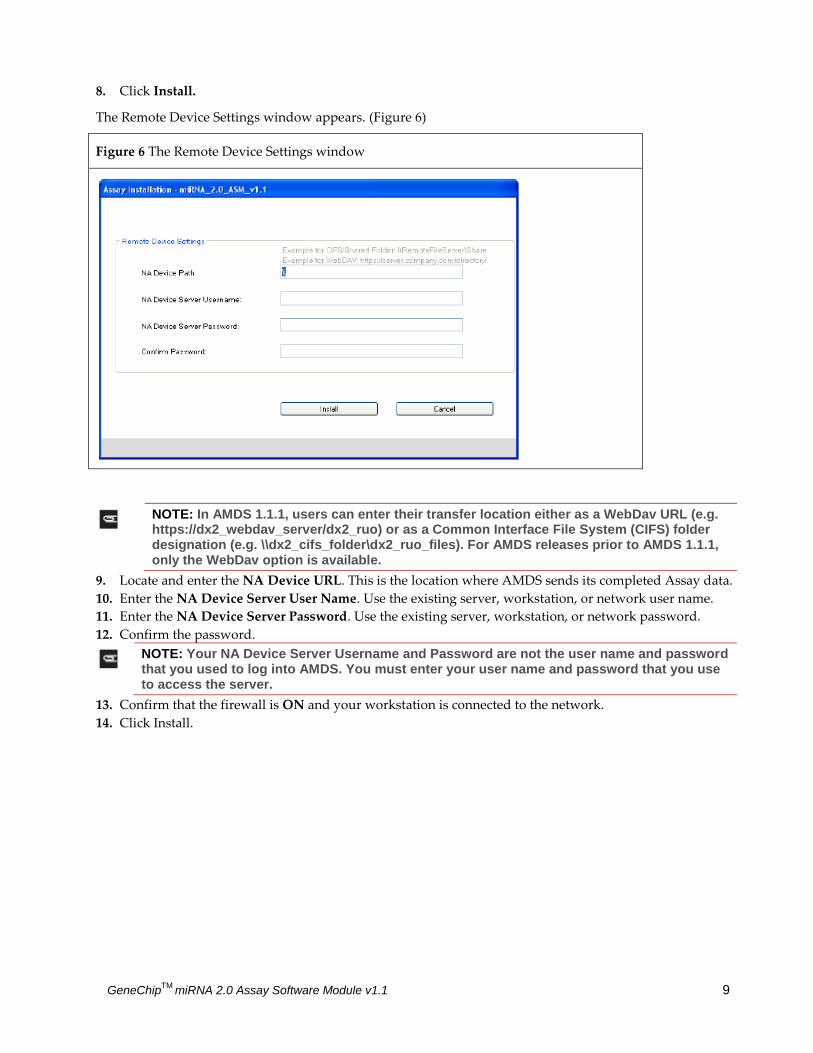
8. Click Install.
The Remote Device Settings window appears. (Figure 6)
Figure 6 The Remote Device Settings window
NOTE: In AMDS 1.1.1, users can enter their transfer location either as a WebDav URL (e.g. https://dx2_webdav_server/dx2_ruo) or as a Common Interface File System (CIFS) folder designation (e.g. \\dx2_cifs_folder\dx2_ruo_files). For AMDS releases prior to AMDS 1.1.1, only the WebDav option is available.
9. Locate and enter the NA Device URL. This is the location where AMDS sends its completed Assay data.
10. Enter the NA Device Server User Name. Use the existing server, workstation, or network user name.
11. Enter the NA Device Server Password. Use the existing server, workstation, or network password.
12. Confirm the password.
NOTE: Your NA Device Server Username and Password are not the user name and password that you used to log into AMDS. You must enter your user name and password that you use to access the server.
13. Confirm that the firewall is ON and your workstation is connected to the network.
14. Click Install.

10 GeneChipTM
miRNA 2.0 Assay Software Module v1.1
Firewall Issues
If the software cannot connect through your system's firewall, the following error message appears: (Figure
7)
Figure 7 Error Message
There are 3 buttons to acknowledge the Remote Device Settings Error message (Figure 7)
Abort - Exits the Assay installation.
Retry - Attempts another try.
Ignore - Continues the installation.
NOTE: If you select Ignore, AMDS installs the Assay, however you will not be granted permission to communicate with any remote server.
Repairing Currently Installed ASM
If this ASM already exists on the system and it is reinstalled, the following message appears: (Figure 8)
Figure 8 The Repair Assay window
Any AMDS user with valid AMDS credentials and appropriate permissions can Repair the previously
installed ASM.
1. Enter your User Name and Password, then click Continue.
The ASM Installation status window and progress bar appears. (Figure 9)

GeneChipTM
miRNA 2.0 Assay Software Module v1.1 11
Figure 9 The Assay Installation window
2. Click Finish to conclude the ASM installation and return to the Assay Management window.
Installation of the ASM is complete.

12 GeneChipTM
miRNA 2.0 Assay Software Module v1.1
Creating a Test Request
NOTE: You must be a Laboratory Supervisor, Technician, or Technologist to create a Test Request.
1. If you are not already in the Active Worklist window, click the Active Worklist button. (Figure 10) The
Active Worklist panel appears.
Figure 10 The Active Worklist window
2. From the Active Worklist toolbar, click Create.
The Enter Test Request window appears. (Figure 11)
Figure 11 The Enter Test Request window
3. Use the handheld barcode scanner to enter one or more Specimen IDs. You may also enter the
Specimen IDs manually.
4. Select the Assay Name from the drop-down menu - for EACH Specimen ID.
NOTE: The current Assay Name for the GeneChip™ miRNA 2.0 ASM v1.1 is miRNA 2.0 ASM v1.1.
5. Once you have made your entries, click Submit.
The Enter Test Request window closes. The software displays the Active Worklist window with the newly
created test request(s) on the window.
NOTE: After you have submitted the test request, the procedures for Registration, Hybridization, Fluidics Station processing and Scanning are the same as those steps outlined in the Molecular Diagnostic Software User's Guide (P/N 08-0261). Refer to that document for further instructions.

GeneChipTM
miRNA 2.0 Assay Software Module v1.1 13
Adding Specimen Information
After you create a Test Request and return to the Active Worklist, you can add certain types of pertinent
information about the specimen. You can also add this information later here, or in other worklists. This
information is not necessary in order to run the assay.
IMPORTANT: You cannot associate any additional information with test requests after scanning has started. You will not be able to save your edits. If you attempt to save, the software displays an error message.
Editing specimen information requires an e-signature upon saving, however an e-signature is NOT
required for initial data entry.
1. Click the desired Specimen ID field. The Additional Information window appears. (Figure 12)
Figure 12 The Specimen ID Additional Information window
2. Add the following information:
Species - Enter manually.
Individual Record Number - Enter manually.

14 GeneChipTM
miRNA 2.0 Assay Software Module v1.1
Individual Family Name - Enter manually.
Individual Given Name - Enter manually.
Sex - Select: Male - Female - Unknown - Blank Field
Date of Birth - Enter manually using a defined format. The format must be entered in an ISO 8601
format: 4-digit year first, then month, then day. (Example: 2012-11-09 for November 9, 2012) No
other date format is allowed.
Specimen Type - Select: Blood - Solid Tissue - Soft Tissue - Saliva - Buccal Swab - Plasma - Blank
Field
Specimen Size Unit - Select: mL - µL - oz - mg - g - inch - cm - mm - Blank Field
Specimen Size Value - Enter manually using a floating-point numeric value.
Method of Collection - Enter manually.
Collection Date - Enter manually using an ISO 8601 approved date format.
Collection Time - Enter manually using either a 12 or 24-hour time format. Twenty-four hour
entries are automatically converted to 12-hour. (Example: 13:15 -> 1:15 pm)
Requestor Family Name - Enter manually.
Requestor Given Name - Enter manually.
Requesting Institution - Enter manually.
Request Date - Enter manually using an ISO 8601 approved date format.
Additional Info 1-5 - Manually enter up to 5 fields.
3. Click Save and Close or Close (to exit without saving).
After clicking Close, the following may occur:
If no edits were made, the window closes.
If you made edits, a Would you like to save changes? message appears.
Do one of the following:
Click Yes to collect an e-signature, save edits, and close window.
Click No to discard edits and close window.
Click Cancel to display the Specimen ID additional information window (with edits displayed).

GeneChipTM
miRNA 2.0 Assay Software Module v1.1 15
The Assay Information/Home Window
Adding Reagent Information
The Assay Information (or Assay Home) window provides a summary of all specimen information, test
request logs, and pertinent reagent information for each assay type.
The Assay Information/Home window has the following tabs/sub-windows:
Reagent Information
Specimen Report
Test Request Log
1. From any worklist window, go to the Assay Name field and click Assay Name.
The Assay Information/Home window appears.
2. Click the Reagent Information tab (Figure 13) to view current Reagent information
3. Click to select each appropriate Specimen ID from the list (left pane).
Figure 13 The Reagent Information tab
4. Use the handheld barcode scanner to scan each Reagent Kit barcode.
NOTE: You can also enter the reagent kit information manually by selecting test requests in the left side of the window, then placing the cursor in to the lot number and expiration date fields for the appropriate kits and typing in the correct information. This method should be used for all reagents manufactured by companies other than Thermo Fisher Scientific.
The scanner parses the Reagent information, then enters its lot number and expiration date into the correct
fields (for all selected test requests). Using the barcode scanner eliminates manual entry errors.
5. Click Save.

16 GeneChipTM
miRNA 2.0 Assay Software Module v1.1
Reagent Kit Information
The miRNA 2.0 ASM v1.1 Assay Information/Home window contains the following Reagent Kit
information:
Reagent Kit Name
FlashTag™ Biotin HSR RNA Labeling Kit (10 rxn) - (P/N 901910)
FlashTag™ Biotin HSR RNA Labeling Kit (30 rxn) - (P/N 901911)
GeneChip™ Hybridization, Wash & Stain Kit (30 rxn) - (P/N 900720)
GeneChip™ Expression 3'-Amplification Reagent Hybridization Controls (30 rxn) - (P/N
900454)
Wash Buffer A - (P/N 900721)
Wash Buffer B - (P/N 900722)
Reagent Kit Manufacturer information
Reagent Lot Number
Reagent Expiration Date
NOTE: The Reagent Kit Lot Number, and Expiration Date are NOT required to run the Assay.
Reagent Entry Information
AMDS provides the ability to transfer the Reagent Kit Name, Manufacturer, Part Number, Lot No. and
Expiration Date to the server, along with other test request information.
Reagents marked with Thermo Fisher Scientific as the manufacturer can be entered using a barcode
scanner. The corresponding lot number and expiration date (for ALL selected Test Requests) are
automatically entered into their appropriate field.
Reagent information manufactured by other companies must be entered manually.
NOTE: You cannot make any edits to a test request after the array associated with that particular test request has started scanning on the GCS3000Dx v.2 scanner.
If you click Close only, the following occurs:
If no edits were performed, the window closes.
If edits were made, the message Would you like to save changes? (with 3 buttons) appears. Do one
of the following:
Click Yes to save edits and close the window.
Click No to discard ALL edits and return to the Reagent Information window.
Click Cancel to return to the Reagent Information window (with edits saved).

GeneChipTM
miRNA 2.0 Assay Software Module v1.1 17
Reagent Kit Lot Numbers and Expiration Dates
The miRNA 2.0 ASM v1.1 retains the association between a Reagent Kit Lot Number and its Expiration
Date.
Expiration Date Scenarios
If you enter a Lot Number already associated with another Test Request, AMDS auto-populates the
Expiration Date field. Click Save to save all associated Test Requests.
To modify an AMDS auto-populated Expiration Date field, enter the date change, then click Save. The
message Do you want to save this expiration date for all other test requests with this lot number? appears.
Do the following:
Click OK to save this Expiration Date for ALL Test Requests.
Click Cancel to return to the window without modifying the original Expiration Date.
Clicking OK, generates the following message:
You have changed the expiration date for <reagent kit name> Lot <lot number> from <old date> to <new date>.
This affects <count> Test Requests.
After saving, the new Expiration Date(s) are retained. ALL pre-scanned Test Request(s) and Lot Number(s)
now include their new Expiration Date(s).
Specimen Report Tab
Click the Specimen Report tab (Figure 14) to view all the Specimen IDs associated with that Assay type (in
this case the miRNA 2.0 ASM v1.1).
Figure 14 The Specimen Report tab

18 GeneChipTM
miRNA 2.0 Assay Software Module v1.1
Click the Specimen Report tab to view ALL Specimen IDs associated with an Assay type. This window
includes the following fields:
Specimen ID
Individual Record Number
Individual Family Name
Individual Given Name
Requestor Family Name
Requestor Given Name
Requesting Institution
Request Date
Test Request Log Tab
Click the Test Request Log tab (Figure 15) to view all the Test Requests associated with an Assay type.
Each Test Request includes the following Log Entry information:
Date
Time
User
Type
Subsystem
Short Message
Long Message
Figure 15 The Test Request Log tab

GeneChipTM
miRNA 2.0 Assay Software Module v1.1 19
Batching Additional Test Request Information
Use the Batch Edit feature to enter or edit the identical information over multiple Test Requests
IMPORTANT: To ensure data accuracy, changes must saved before scanning. You cannot add or edit information after scanning is complete.
1. In the Active Worklist or any of the worklist windows, select your test requests.
2. Click the Batch Edit button. The Assay Batch Information window appears (Figure 16) listing Specimen
IDs (left column).
3. Use the right column to enter or change the following:
Species
Sex
Specimen Type
Requestor Family Name
Requestor Given Name
Requesting Institution
Request Date
Additional Info 1-5 (five user-defined fields)
4. Click Save and Close to save changes. To exit the Batch Edit window click Close, then click the
appropriate button.
Yes - Saves changes.
No - Discards changes.
Cancel - Returns to Batch Edit window with previous changes saved..
Figure 16 The Assay Batch Information window
20 GeneChipTM
miRNA 2.0 Assay Software Module v1.1
Gridding Manually
If an alert (error) occurs during the automatic gridding process you can perform a manual grid alignment.
IMPORTANT: Before gridding manually, you must be familiar with the gridding function referenced in the GeneChip™ System 3000Dx v.2 User Guide (P/N 08-0261), the GeneChip™ Command Console™ 1.0 User's Guide (P/N 702569), the GeneChip™ System 3000Dx (for EU) User's Guide (P/N 08-0136), or other applicable documentation. The AMDS manual’s gridding procedure is based on the gridding procedure outlined in these manuals.
A gridding failure on a Test Request triggers a manual grid alignment alert. Do the following to remedy
this alert:
1. Click the Alert (Alerts window - right side).
2. View the Alert, then click Resolve.
3. Enter your User ID and Password.
4. Click OK.
The DatImageViewer window appears.
5. Manually adjust the grid.
6. Click Save.
7. Close DatImageViewer.
Transferring Data
AMDS automatically transfers the completed Assay data to the URL that you set up when you originally
installed your Assay. The descriptor labels and data that AMDS transfers to the non-AMDS system include
the following File types: .ARR - .AUDIT - .CEL - .DAT - .LOG- .MD5
The .MD5 file is a CHECKSUM file. Use the utility FastSum (Windows™ ) or md5sum (Linux) to confirm
the AMDS has correctly transferred all the files.
NOTE: Specimen and tracked Reagent information labels (and their corresponding data fields) can either be completed or left blank.
The AMDS confirms the data has completed its transfer successfully, by the following criteria:
The Assay module detects no exceptions upon transferring.
The Assay module confirms that every file listed - has successfully transferred to the server.
After AMDS transfers files to the server, it places all associated files in a folder named,miRNA 2.0 ASM
v1.1.
The AMDS renames the transferred files using the following convention:
Test Request Date and Time + "_" + 3 digits + "_" + specimenID + original file extension. Example:
20120821_153910_001_H919800.DAT
NOTE: After a successful data transfer, AMDS auto-deletes the .DAT and .CEL files from its local hard drive.

GeneChipTM
miRNA 2.0 Assay Software Module v1.1 21
Reviewing the Test Report
After completing all Assay steps (Registration, Hybridization, Wash/Stain, Scanning, etc.), the Test Request
moves to a Non-Active Worklist. ASM generates a Date/Time stamp hyperlink.
IMPORTANT: To view the Test Result report, you must be in the Non-Active Worklist window.
1. From the Review Results column (far right), Locate the Test Request Record you want to review, then
click its Date/Time hyperlink. The Test Results/Test Report window appears. (Figure 17)
Figure 17 The Test Result View window for the Test Report
The Test Report (Figure 17 on page 23) displays the following information:
Upload details
Upload URL (Save location of files)
Upload Time
Source Machine Name
22 GeneChipTM
miRNA 2.0 Assay Software Module v1.1
Assay Details
Specimen ID
Array barcode
Uploaded Files (Transferred files)
.ARR
.AUDIT
.CEL
.DAT
.LOG
.MD5
Close - Closes the Results window.
Print - Prints the results to a pre-configured default printer.
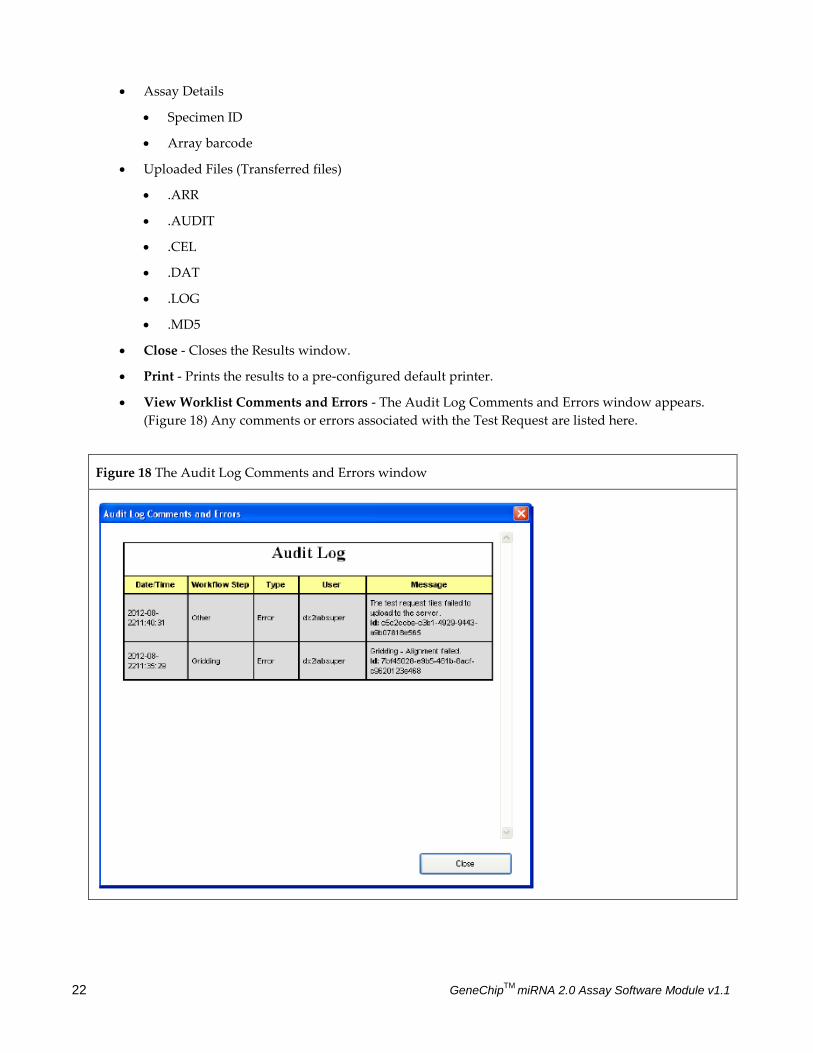
View Worklist Comments and Errors - The Audit Log Comments and Errors window appears.
(Figure 18) Any comments or errors associated with the Test Request are listed here.
Figure 18 The Audit Log Comments and Errors window

GeneChipTM
miRNA 2.0 Assay Software Module v1.1 23
Ordering Information
The table below lists the miRNA 2.0 ASM v1.1 Reagents, Arrays and associated part numbers.
Name P/N Supplier
FlashTag™ Biotin HSR RNA Labeling Kit (10 rxn) 901910 Thermo Fisher Scientific
FlashTag™ Biotin HSR RNA Labeling Kit (30 rxn) 901911 Thermo Fisher Scientific
GeneChip™ Expression 3'-Amplification Reagent
Hybridization Controls (30 rxn)
900454 Thermo Fisher Scientific
GeneChip™ Hybridization, Wash & Stain Kit (30 rxn) 900720 Thermo Fisher Scientific
Wash Buffer A 900721 Thermo Fisher Scientific
Wash Buffer B 900722 Thermo Fisher Scientific
GeneChip miRNA 2.0 Array (2 arrays) 901753 Thermo Fisher Scientific
GeneChip miRNA 2.0 Array (6 arrays) 901754 Thermo Fisher Scientific
GeneChip miRNA 2.0 Array (30 arrays) 901755 Thermo Fisher Scientific

24 GeneChipTM
miRNA 2.0 Assay Software Module v1.1
Documentation and support
Obtaining support
Technical support For the latest services and support information for all locations,
visitwww.thermofisher.com.
At the website, you can:
Access worldwide telephone and fax numbers to contact Technical Support
and Sales facilities
Search through frequently asked questions (FAQs)
Submit a question directly to Technical Support (thermofisher.com/support)
Search for user documents, SDSs, vector maps and sequences, application
notes, formulations, handbooks, certificates of analysis, citations, and other
product support documents
Obtain information about customer training
Download software updates and patches
Safety Data Sheets (SDS)
Safety Data Sheets (SDSs) are available at thermofisher.com/support.
Limited product warranty
Life Technologies Corporation and/or its affiliate(s) warrant their products as set
forth in the Life Technologies’ General Terms and Conditions of Sale found on
Life Technologies’ website at www.thermofisher.com/us/en/home/global/terms-
and-conditions.html. If you have any questions, please contact Life Technologies
at www.thermofisher.com/support.

