geappliances votre réfrigérateur est doté d’une machine à glaçons automatique évitez le...
TRANSCRIPT
GEAppliances.com
Ref
rige
rato
rsTo
p-Fr
eeze
r
197D8622P001 49-60655-2 11-11 GE
Safety Instructions . . . . . . . . . .2–4
Operating InstructionsAutomatic Icemaker . . . . . . . . . . . . . . .7Care and Cleaning . . . . . . . . . . . . . . . . .8Shelves . . . . . . . . . . . . . . . . . . . . . . . . .5, 6Storage Drawers . . . . . . . . . . . . . . . . . . .6Temperature Controls . . . . . . . . . . . . . .5
Installation InstructionsPreparing to Install the Refrigerator . . . . . . . . . . . . . . . . . . . .9Reversing the Door Swing . . . . .13–16Water Line Installation . . . . . . . .10–12
Troubleshooting TipsBefore You Call For Service . . . . . .17, 18Normal Operating Sounds . . . . . . . .17
Consumer SupportConsumer Support . . . . . . Back CoverRefrigerator Warranty . . . . . . . . . . 19
Write the model and serial numbers here:
Model #______________________
Serial # ______________________
You can find them on a label on the upper left side of the fresh foodcompartment.
Models 16, 17, 18
Owner’s Manual andInstallation Instructions

2
COMMENT VOUS DÉBARRASSER CONVENABLEMENT DE VOTRE ANCIEN RÉFRIGÉRATEUR
Les enfants pris au piège ou morts d’asphyxie sont toujours d’actualité. Les réfrigérateursabandonnés sont toujours aussi dangereux, même si on n’attend que «quelques jours» pour s’en débarrasser. Si vous ne gardez pas votre ancien réfrigérateur, veuillez suivre les directivesci-dessous afin de prévenir les accidents.
Avant de vous débarrasser de votre ancienréfrigérateur ou congélateur :
Démontez les portes.
Laissez les clayettes en place afin d’empêcher les enfants de grimper à l’intérieur.
RéfrigérantsTous les appareils de réfrigération contiennent desréfrigérants qui, conformément aux lois fédérales,doivent être enlevés avant toute élimination del’appareil. Si vous vous débarrassez de vieuxappareils de réfrigération, vérifiez, auprès de lasociété qui s’occupe de leur élimination, ce que vous devez faire.
DANGER! RISQUES POUR LES ENFANTS
PROPER DISPOSAL OF THE REFRIGERATORChild entrapment and suffocation are not problems of the past. Junked or abandonedrefrigerators are still dangerous…even if they will sit for “just a few days.” If you are getting rid of your old refrigerator, please follow theinstructions below to help prevent accidents.
Before You Throw Away Your Old Refrigerator or Freezer:
Take off the doors.
Leave the shelves in place so that children may not easily climb inside.
If the refrigerator has a lock make it unusable
RefrigerantsAll refrigeration products contain refrigerants,which under federal law must be removed prior toproduct disposal. If you are getting rid of an oldrefrigeration product, check with the companyhandling the disposal about what to do.
DANGER! RISK OF CHILD ENTRAPMENT
CORDONS PROLONGATEURSNous vous recommandons fortement de ne pas utiliser de cordons prolongateurs à cause des risquespotentiels qu’ils présentent dans certaines conditions.
Toutefois si vous décidez d’utiliser tout de même un cordon prolongateur, il est absolument nécessaire qu’il s’agisse d’un cordon à 3 fils avec mise à la terre pour appareils électro ménagers homologué UL (aux États-Unis) ou certifié CSA (au Canada), pourvu d’une fiche et d’une prise mises à la terre de 15 ampères (minimum) etde 120 volts.
USE OF EXTENSION CORDSBecause of potential safety hazards under certain conditions, we strongly recommend against the use of an extension cord.
However, if you must use an extension cord, it is absolutely necessary that it be a UL-listed (in the United States)or a CSA certified (in Canada), 3-wire grounding type appliance extension cord having a grounding type plugand outlet and that the electrical rating of the cord be 15 amperes (minimum) and 120 volts.
IMPORTANT SAFETY INFORMATION.READ ALL INSTRUCTIONS BEFORE USING.

IMPORTANT SAFETY INFORMATION.READ ALL INSTRUCTIONS BEFORE USING. GEAppliances.com
WARNING!Use this appliance only for its intended purpose as described in this Owner’s Manual.
SAFETY PRECAUTIONSWhen using electrical appliances, basic safety precautions should be followed, including the following:
This refrigerator must be properly installed and located in accordance with the InstallationInstructions before it is used.
Do not attempt to or allow children to climb, stand orhang on the shelves in the refrigerator. They coulddamage the refrigerator and seriously injure themselves.
Do not touch the cold surfaces in the freezercompartment when hands are damp or wet. Skin may stick to these extremely cold surfaces.
Do not store or use gasoline or other flammable vaporsand liquids in the vicinity of this or any other appliance.
Keep fingers out of the “pinch point” areas; clearancesbetween the doors and between the doors and cabinet are necessarily small. Be careful closing doors when children are in the area.
Unplug the refrigerator before cleaning and makingrepairs.
In refrigerators with automatic icemakers, avoid contact with the moving parts of the ejector mechanism, or with the heating element thatreleases the cubes. Do not place fingers or hands on theautomatic icemaking mechanism while the refrigerator isplugged in.
NOTE: We strongly recommend that any servicing beperformed by a qualified individual.
Turning the temperature control to the OFF position doesnot remove power to the light circuit.
Do not refreeze frozen foods which have thawed completely.
Do not allow children to play with refrigerator or tamper with controls.
Before replacing a burned-out light bulb, therefrigerator should be unplugged in order to avoidcontact with a live wire filament. (A burned-out light maybreak when being replaced.)
MESURES DE SÉCURITÉ IMPORTANTES.LISEZ D’ABORD TOUTES LES DIRECTIVES.
AVERTISSEMENT!N’utilisez cet électroménager que pour l’usage auquel il est destiné, comme expliqué dans leprésent manuel.
MESURES DE SÉCURITÉLorsque vous utilisez un appareil électrique, observez toujours les mesures de sécurité de base, y compris les suivantes.
Installez le réfrigérateur conformément aux directivesd’installation avant de l’utiliser.
Ne laissez pas les enfants grimper, s’asseoir, se tenir debout ni se pendre aux clayettes duréfrigérateur. Ils pourraient endommager leréfrigérateur et se blesser gravement.
N’entreposez et n’utilisez pas d’essence ou autres vapeurs et liquides inflammables à proximité decet appareil ou de tout autre appareil électroménager.
Éloignez les doigts des parties du réfrigérateur où l’on peut facilement se pincer : les espaces entre lesportes et entre les portes et les placards sont toujoursétroits. Soyez prudent lorsque vous fermez les portes de l’appareil en présence desenfants.
Débranchez votre réfrigérateur avant de le nettoyer oude le réparer.
Si votre réfrigérateur est doté d’une machine à glaçons
automatique évitez le contact avec les pièces mobilesdu mécanisme éjecteur, ou avec l’élément chauffant quilibère les glaçons. Ne posez pas les doigts ou les mains sur le mécanismede la machine à glaçons pendant que le réfrigérateur est branché.
Ne touchez pas les surfaces froides du congélateur sivous avez les mains humides ou mouillées : la peaurisque d’adhérer à ces surfaces très froides.
REMARQUE : Nous vous recommandons vivement deconfier toute réparation à un technicien qualifié.
Lorsque vous réglez la commande sur 0 (éteint),l’alimentation électrique de l’ampoule n’est pas coupée.
Ne recongelez pas les aliments surgelés qui ontcomplètement dégelé.
Le réfrigérateur doit être débranché avant de remplacerl'ampoule afin d'éviter tout contact avec un fil de câblesous tension.
3

IMPORTANT SAFETY INFORMATION.READ ALL INSTRUCTIONS BEFORE USING.
WARNING!HOW TO CONNECT ELECTRICITYDo not, under any circumstances, cut or remove the third (ground) prong from the power cord. For personal safety, this appliance must be properly grounded.
The power cord of this appliance is equipped with a 3-prong (grounding) plug which mates with a standard 3-prong (grounding) wall outlet to minimize the possibility ofelectric shock hazard from this appliance.
Have the wall outlet and circuit checked by a qualifiedelectrician to make sure the outlet is properly grounded.
Where a standard 2-prong wall outlet is encountered, it isyour personal responsibility and obligation to have itreplaced with a properly grounded 3-prong wall outlet.
The refrigerator should always be plugged into its ownindividual electrical outlet which has a voltage, wattageand frequency that match the rating plate.
This provides the best performance and also preventsoverloading house wiring circuits which could cause a firehazard from overheated wires.
Never unplug your refrigerator by pulling on the powercord. Always grip plug firmly and pull straight out from theoutlet.
Repair or replace immediately all power cords that havebecome frayed or otherwise damaged. Do not use a cordthat shows cracks or abrasion damage along its length orat either end.
When moving the refrigerator away from the wall, be careful not to roll over or damage the power cord.
MESURES DE SÉCURITÉ IMPORTANTES.LISEZ D’ABORD TOUTES LES DIRECTIVES.
AVERTISSEMENT!RACCORDEMENT ÉLECTRIQUENe coupez ni retirez en aucun cas la troisième broche (mise à la terre) de la fiche du cordond’alimentation. Pour votre sécurité, cet appareil doit être correctement mis à la terre.
Le cordon d’alimentation de cet appareil est muni d’unefiche à 3 broches (mise à la terre) qui se branche dansune prise murale ordinaire à 3 alvéoles (mise à la terre)pour réduire au minimum les risques de chocsélectriques.
Faites examiner la prise de courant et le circuit par unélectricien qualifié pour vous assurer que la prise estcorrectement mise à la terre.
Si la prise murale est du type standard à 2 alvéoles, il vousincombe de la faire remplacer par une prise à 3 alvéolescorrectement mise à la terre.
Le réfrigérateur doit toujours être branché dans sa propreprise de courant, dont la tension nominale est identique àcelle indiquée sur la plaque signalétique.
Cette précaution est recommandée pour garantir unrendement optimum et éviter une surcharge des circuitsélectriques de la résidence, ce qui pourrait créer un risqued’incendie par surchauffe des fils.
Ne débranchez jamais le réfrigérateur en tirant sur lecordon d’alimentation. Saisissez fermement la fiche ducordon et tirez droit pour la retirer de la prise.
Réparez ou remplacez immédiatement tout cordoneffiloché ou endommagé. N’utilisez pas un cordon fendilléou présentant des signes d’usure.
Lorsque vous déplacez votre réfrigérateur du mur, faitesattention de ne pas le faire rouler sur le cordond’alimentation afin de ne pas l’endommager.
4
VEUILLEZ LIRE ET SUIVRE ATTENTIVEMENT CES MESURES DE SÉCURITÉ.CONSERVEZ CES DIRECTIVES
READ AND FOLLOW THIS SAFETY INFORMATION CAREFULLY.
SAVE THESE INSTRUCTIONS
About the fresh food compartment shelves.
About the temperature control dial. GEAppliances.com
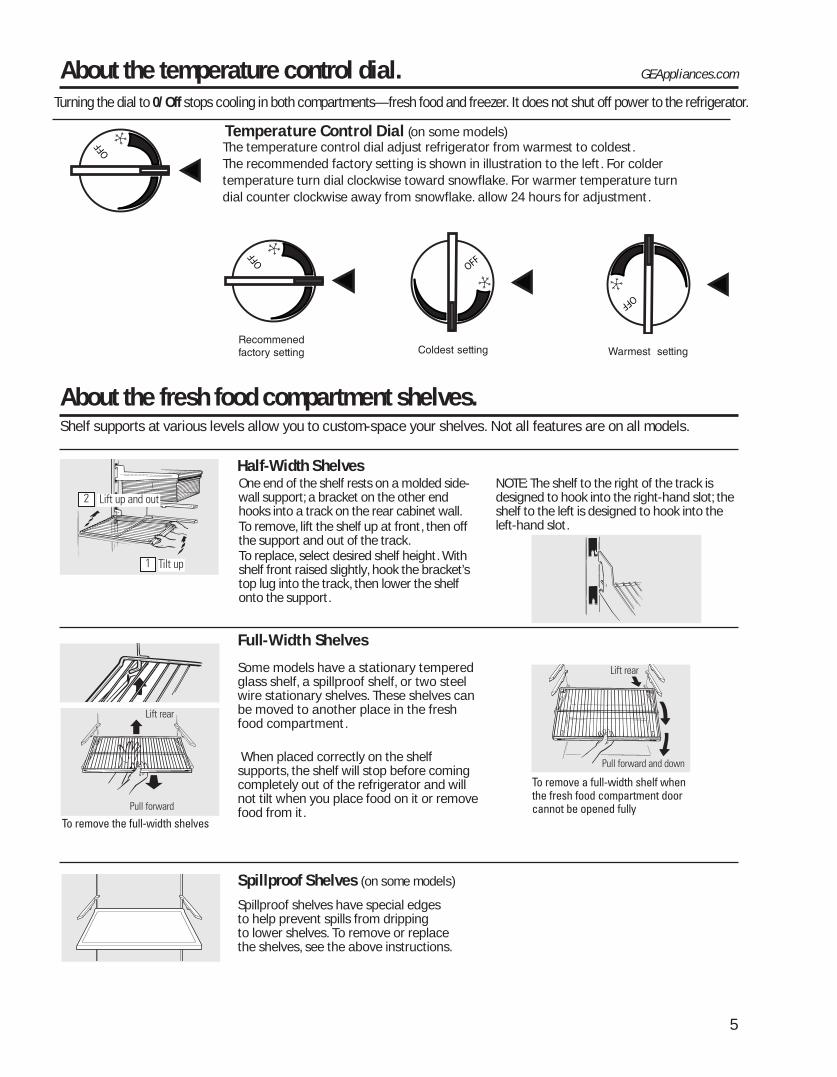
Shelf supports at various levels allow you to custom-space your shelves. Not all features are on all models.
Full-Width Shelves
Some models have a stationary temperedglass shelf, a spillproof shelf, or two steelwire stationary shelves. These shelves canbe moved to another place in the freshfood compartment.
When placed correctly on the shelfsupports, the shelf will stop before comingcompletely out of the refrigerator and willnot tilt when you place food on it or removefood from it.
Half-Width ShelvesOne end of the shelf rests on a molded side-wall support; a bracket on the other endhooks into a track on the rear cabinet wall.To remove, lift the shelf up at front, then offthe support and out of the track.To replace, select desired shelf height. Withshelf front raised slightly, hook the bracket’stop lug into the track, then lower the shelfonto the support.
NOTE: The shelf to the right of the track isdesigned to hook into the right-hand slot; theshelf to the left is designed to hook into theleft-hand slot.
2 Lift up and out
1 Tilt up
To remove a full-width shelf whenthe fresh food compartment doorcannot be opened fully
Lift rear
Pull forward and down
Lift rear
Pull forward
To remove the full-width shelves
5
Spillproof Shelves (on some models)
Spillproof shelves have special edges to help prevent spills from dripping to lower shelves. To remove or replace the shelves, see the above instructions.
Turning the dial to 0/ Off stops cooling in both compartments—fresh food and freezer. It does not shut off power to the refrigerator.
Temperature Control Dial (on some models)The temperature control dial adjust refrigerator from warmest to coldest.The recommended factory setting is shown in illustration to the left. For coldertemperature turn dial clockwise toward snowflake. For warmer temperature turndial counter clockwise away from snowflake. allow 24 hours for adjustment.
OFF
OFF
OFF
Recommenedfactory setting Coldest setting Warmest setting
OFF

The snacks drawer can be moved to themost useful location for your family’sneeds.
Snacks Drawer
Not all features are on all models.
About the storage drawers.
6
Fruit and Vegetable DrawersExcess water that may accumulate in thebottom of the drawers should be emptiedand the drawers wiped dry.
About the freezer compartment shelves.Step Shelf (on some models)To remove the step shelf:
Lift left side of shelf slightly.
Move shelf to the left to free its right endsfrom holes in the cabinet wall.
Lower right side of shelf, move shelf tothe right and take it out.3
21
To replace the step shelf:
With shelf tilted as shown, fit left ends ofshelf into holes in cabinet wall.
Lift left side of shelf slightly, swing shelfup, fit right ends of shelf into holes incabinet wall, and lower shelf into place.
21
1 2 3

About storage drawer and cover removal. GEAppliances.com
Not all features are on all models.
Twin Drawer ShelfTo remove:
Remove the drawers.
Reach in, push the front of glass cover up,and at the same time, pull it forward asfar as it will come.
Tilt it and take it out. Avoid cleaning the coldglass cover with hot water because the extremetemperature difference may cause it to break.
Remove the drawer frame. (Alwaysremove the glass cover before you takeout the drawer frame.)
Lift the frame off the supports at each side andback, pull it forward, tilt it and take it out.
To replace:Lower the frame until it rests on thesupports at each side and back.Replace the glass cover, pushing its rearedge firmly into the rear frame channeland gently lowering the front into place.Replace the drawers.3
21
3
21
Drawer and Cover RemovalDrawers can be removed easily by grasping the sides and lifting up slightly while pulling drawerspast the stop location.
Full-Width Drawer with Plastic CoverTo remove the cover, lift it off its supports,pull it forward, tilt it and take it out.
Adjustable Humidity Drawer (on some models)Slide the control all the way to the HIGH setting to provide high humidityrecommended for most vegetables.
Slide the control all the way to the LOWsetting to provide lower humidity levelsrecommended for most fruits.
About the automatic icemaker.A newly-installed refrigerator may take 12 to 24 hours to begin making ice.
Automatic Icemaker (on some models)The icemaker will produce approximately 70-100cubes in a 24-hour period, depending on thefreezer compartment temperature, roomtemperature, number of door openings andother use conditions.If the refrigerator is operated before the waterconnection is made to the icemaker, set theswitch to OFF or move the feeler arm to theSTOP (up) position.When the refrigerator has been connected tothe water supply, set the switch to the ONposition or move the feeler arm to the ON(down) position.The icemaker will fill with water when it cools to15°F. A newly-installed refrigerator may take 12 to24 hours to begin making ice cubes.Once the icemaker starts to make ice, it may take up to 48 hours to fill the bin, dependingon the temperature settings and number ofdoor openings.You will hear a buzzing sound each time theicemaker fills with water.Throw away the first few batches of ice to allow the water line to clear.Be sure nothing interferes with the sweep ofthe feeler arm.
When the bin fills to the level of the feeler arm,the icemaker will stop producing ice.It is normal for several cubes to be joinedtogether.If ice is not used frequently, old ice cubes willbecome cloudy, taste stale, shrink or fusetogether.Icemaker Accessory KitIf your refrigerator did not already comeequipped with an automatic icemaker, anicemaker accessory kit is available at extra cost.Check the back of the refrigerator for the specific icemaker kit needed for your model.
Feeler Arm inthe STOP(up) positionFeeler Arm in
the ON (down)position
7
There are 2 types of icemakers:
Power switch model
Feeler arm model
ON OFF
Icemaker
Feeler Arm
Power Switch

Care and cleaning of the refrigerator.
8
Cleaning the OutsideThe door handles and trim (on some models). Clean with a cloth dampened with soapy water. Dry with a soft cloth.
Keep the outside clean. Wipe with a clean cloth lightlydampened with kitchen appliance wax or mild liquid dishdetergent. Dry and polish with a clean, soft cloth.
The stainless steel panels and door handles (on somemodels) can be cleaned with a commercially availablestainless steel cleaner. Do not use appliance wax or polishon the stainless steel.
Do not wipe the refrigerator with a soiled dish cloth orwet towel. These may leave a residue that can erode thepaint. Do not use scouring pads, powdered cleaners,bleach or cleaners containing bleach because theseproducts can scratch and weaken the paint finish.
Cleaning the InsideTo help prevent odors, leave an open box of baking sodain the fresh food and freezer compartments.
Unplug the refrigerator before cleaning. If this is not practical, wring excess moisture out ofsponge or cloth when cleaning around switches, lights orcontrols.
Use warm water and baking soda solution—about atablespoon (15 ml) of baking soda to a quart (1 liter) of water. This both cleans and neutralizes odors. Rinse andwipe dry.
After cleaning the door gaskets, apply a thin layer ofpetroleum jelly to the door gaskets at the hinge side. Thishelps keep the gaskets from sticking and bending out ofshape.
Avoid cleaning cold glass shelves (on some models) withhot water because the extreme temperature differencemay cause them to break. Handle glass shelves carefully. Bumping temperedglass can cause it to shatter.
Do not wash any plastic refrigerator parts in thedishwasher.
CondenserThere is no need for routinecondenser cleaning in normalhome operatingenvironments. However, inenvironments that may beparticularly dusty or greasy,the condenser should be
cleaned periodically for efficient refrigerator operation.
To clean the condenser, turn the temperature control dialto OFF. Sweep away or vacuum up dust.
For best results, use a brush specially designed for thispurpose. It is available at most appliance parts stores.
Moving the RefrigeratorBe careful when moving the refrigerator away from the wall. All types of floor coverings can be damaged,particularly cushioned coverings and those withembossed surfaces.
Turn the leveling legs at each front corner of the refrigeratorcounterclockwise until the rollers support the refrigerator. Pull the refrigerator straight out and return itto position by pushing it straight in. Moving the refrigerator in a side direction may result in damage to the floor covering or refrigerator.
When pushing the refrigerator back, make sure you don’troll over the power cord or icemaker supply line (on somemodels).
After rolling the refrigerator back into place, turn the legsclockwise until the legs again bear the weight of therefrigerator.
Light Bulb ReplacementTo replace a burned-out bulb, unplug the refrigeratorfrom its electrical outlet, unscrew the bulb when cool andreplace it with an appliance bulb of the same or lowerwattage.
Turning the control to the OFF position does not removepower to the light circuit.
Preparing for VacationFor long vacations or absences, remove food and unplugthe refrigerator. Move the temperature control dial to theOFF position, and clean the interior with a baking sodasolution of one tablespoon (15 ml) of baking soda to onequart (1 liter) of water. Leave the doors open.
Move the feeler arm to the STOP (up) position, or movethe switch to the OFF position on the slide switch modeland shut off the water supply to the refrigerator.
If the temperature can drop below freezing, have aqualified servicer drain the water supply system (on somemodels) to prevent serious property damage due to flooding.
Preparing to MoveSecure all loose items such as grille, shelves and drawersby taping them securely in place to prevent damage. Be sure the refrigerator stays in an upright position duringmoving.
Cleaning the condenser coils.

CLEARANCESBEFORE YOU BEGINRead these instructions completely and carefully.
• IMPORTANT – Save these instructions forlocal inspector’s use.
• IMPORTANT – Observe all governingcodes and ordinances.
• Note to Installer – Be sure to leave theseinstructions with the Consumer.
• Note to Consumer – Keep these instructionsfor future reference.
• Skill level – Installation of this appliance requiresbasic mechanical skills.
• Completion time – Refrigerator Installation15 minutesReversing the Door Swing1 hour
• Proper installation is the responsibility of the installer. • Product failure due to improper installation is not
covered under the Warranty.
• Do not install the refrigerator where the temperature will gobelow 60°F (16°C) because it will not run often enough tomaintain proper temperatures.
• Install it on a floor strong enough to support it fully loaded.
REFRIGERATOR LOCATION
Allow the following clearances for ease of installation,proper air circulation and plumbing and electricalconnections.
• Sides 3/4” (19 mm)• Top 1” (25 mm)• Back 2” (50 mm)
Leveling legs near each front corner of the refrigerator areadjustable. They firmly position the refrigerator and preventit from moving when the doors are opened. Leveling legsshould be set so the front of the refrigerator is raised justenough that the doors close easily when opened abouthalfway.
Turn the leveling legs clockwise to raise the refrigerator,counterclockwise to lower it.
Rollers next to the leveling legs allow you to move therefrigerator away from the wall for cleaning.
Turn the legs counterclockwise until the weight of therefrigerator is transferred from them to the rollers. Afterrolling the refrigerator back into place, turn the legsclockwise until the legs again bear the weight of therefrigerator.
ROLLERS AND LEVELING LEGS
If the refrigerator has an icemaker, it will have to beconnected to a cold water line. A water supply kit(containing copper tubing, shutoff valve, fittings andinstructions) is available at extra cost from your dealer,by visiting our Website at GEAppliances.com (in Canadaat www.geappliances.ca) or from Parts and Accessories,1.800.661.1616.
WATER SUPPLY TO THE ICEMAKER (onsome models)
9
Installation Instructions Models 16, 17, 18If you have questions, call 1.800.GE.CARES or visit our Website at: GEAppliances.com
In Canada, call 1.800.561.3344 or Visit our Website at: www.geappliances.ca

10
WHAT YOU WILL NEED
• Copper or GE SmartConnect™ Refrigerator Tubing kit,1/4” outer diameter to connect the refrigerator to thewater supply. If using copper, be sure both ends of thetubing are cut square.
To determine how much tubing you need: measure thedistance from the water valve on the back of therefrigerator to the water supply pipe. Then add 8’ (2.4 m). Be sure there is sufficient extra tubing (about 8’ [2.4 m] coiled into 3 turns of about 10” [25 cm] diameter) to allow the refrigerator to move outfrom the wall after installation.
INSTALLING THE WATER LINE (ON SOME MODELS)
Installation Instructions
BEFORE YOU BEGINRecommended copper water supply kits are WX8X2,WX8X3 or WX8X4, depending on the amount of tubingyou need. Approved plastic water supply lines are GESmartConnect™ Refrigerator Tubing (WX08X10006,WX08X10015 and WX08X10025).
When connecting your refrigerator to a GE ReverseOsmosis Water System, the only approved installation iswith a GE RVKit. For other reverse osmosis watersystems, follow the manufacturer’s recommendations.
This water line installation is not warranted by therefrigerator or icemaker manufacturer. Follow theseinstructions carefully to minimize the risk of expensivewater damage.
Water hammer (water banging in the pipes) in houseplumbing can cause damage to refrigerator parts andlead to water leakage or flooding. Call a qualifiedplumber to correct water hammer before installing the water supply line to the refrigerator.
To prevent burns and product damage, do not hook upthe water line to the hot water line.
If you use your refrigerator before connecting the waterline, make sure the switch is set to OFF or the feeler armin the STOP (up) position.
Do not install the icemaker tubing in areas whe retemperatures fall below freezing.
When using any electrical device (such as a power drill)during installation, be sure the device is double insulatedor grounded in a manner to prevent the hazard ofelectric shock, or is battery powered.
All installations must be in accordance with localplumbing code requirements.
1
WHAT YOU WILL NEED (CONT.)GE SmartConnect™ Refrigerator Tubing Kits are availablein the following lengths:
6’ (1.8 m) – WX08X1000615’ (4.6 m) – WX08X1001525’ (7.6 m) – WX08X10025
Be sure that the kit you select allows at least 8’ (2.4 m) asdescribed above.
NOTE: The only GE approved plastic tubing is thatsupplied in GE SmartConnect™ Refrigerator Tubingkits. Do not use any other plastic water supply linebecause the line is under pressure at all times. Certaintypes of plastic will crack or rupture with age and cause water damage to your home.
• A GE water supply kit (containing tubing, shutoff valveand fittings listed below) is available at extra cost fromyour dealer or from Parts and Accessories, 1.800.661.1616.
• A cold water supply. The water pressure must bebetween 20 and 120 p.s.i. (1.4–8.1 bar).
• Power drill.• 1/2” or adjustable wrench.• Straight and Phillips
blade screwdriver.• Two 1/4 ” outer diameter compression nuts and
2 ferrules (sleeves)—to connect the copper tubing to the shutoff valve and the refrigerator water valve.
OR• If you are using a GE SmartConnect™ Refrigerator
Tubing kit, the necessary fittings are preassembled to the tubing.
• If your existing copper water line has a flared fitting atthe end, you will need an adapter (available atplumbing supply stores) to connect the water line tothe refrigerator OR you can cut off the flared fitting with a tube cutter and then use a compression fitting.Do not cut formed end from GE SmartConnect™
Refrigerator tubing.
• Shutoff valve to connect to the cold water line. The shutoff valve should have a water inlet with aminimum inside diameter of 5/32” at the point ofconnection to the COLD WATER LINE. Saddle-typeshutoff valves are included in many water supply kits.Before purchasing, make sure a saddle-type valvecomplies with your local plumbing codes.

Installation InstructionsInstall the shutoff valve on the nearest frequently used drinking water line.
SHUT OFF THE MAIN WATER SUPPLYAND UNPLUG REFRIGERATORTurn on the nearest faucet (counterclockwise) longenough to clear the line of water.
1
11
Choose a location for the valve that is easilyaccessible. It is best to connect into the side of avertical water pipe. When it is necessary to connectinto a horizontal water pipe, make the connection tothe top or side, rather than at the bottom, to avoiddrawing off any sediment from the water pipe.
Drill a 1/4” hole in the water pipe (even if using a self-piercing valve), using a sharp bit. Remove any burrsresulting from drilling the hole in the pipe. Take carenot to allow water to drain into the drill. Failure todrill a 1/4” hole may result in reduced ice productionor smaller cubes.
DRILL THE HOLE FOR THE VALVE2
Fasten the shutoff valve to the cold water pipe withthe pipe clamp.
Tighten the clamp screws until the sealing washerbegins to swell.
NOTE: Do not overtighten or you may crush thetubing.
NOTE: Commonwealth of Massachusetts PlumbingCodes 248CMR shall be adhered to. Saddle valves areillegal and use is not permitted in Massachusetts.Consult with your licensed plumber.
FASTEN THE SHUTOFF VALVE3
Washer
Inlet End
Clamp Screw
Vertical ColdWater Pipe
Saddle-TypeShutoff Valve
Pipe Clamp FLUSH OUT THE TUBINGTurn the main water supply on (counterclockwise) andflush out the tubing until the water is clear.
Shut the water off at the water valve after about one quart (1 liter) of water has been flushed throughthe tubing.
6
CONNECT THE TUBING TO THE VALVEPlace the compression nut and ferrule (sleeve) for copper tubing onto the end of the tubing andconnect it to the shutoff valve. Make sure the tubing is fully inserted into the valve. Tighten the compression nut securely.For plastic tubing from a GE SmartConnect™
Refrigerator Tubing kit, insert the molded end of the tubing into the shutoff valve and tightencompression nut until it is hand tight, then tighten oneadditional turn with a wrench. Overtightening maycause leaks.
NOTE: Commonwealth of Massachusetts PlumbingCodes 248CMR shall be adhered to. Saddle valves areillegal and use is not permitted in Massachusetts.Consult with your licensed plumber.
5
Saddle-TypeShutoff Valve
CompressionNut
SmartConnect™
Tubing
Packing Nut
Outlet Valve Ferrule (sleeve)
ROUTE THE TUBINGRoute the tubing between the cold water line and therefrigerator.Route the tubing through a hole drilled in the wall orfloor (behind the refrigerator or adjacent base cabinet)as close to the wall as possible. NOTE: Be sure there is sufficient extra tubing (about 8feet [244 cm] coiled into 3 turns of about 10” [25 cm]diameter) to allow the refrigerator to move out fromthe wall after installation.
4

ON OFF
Installation Instructions
12
CONNECT THE TUBING TO THE REFRIGERATORNOTES:• Before making the connection to the refrigerator, be
sure the refrigerator power cord is not plugged intothe wall outlet.
• We recommend installing a water filter if your water supply has sand or particles that could clog the screenof the refrigerator’s water valve. Install it in the waterline near the refrigerator. If using GE SmartConnect™
Refrigerator Tubing kit, you will need an additionaltube (WX08X10002) to connect the filter. Do not cutplastic tube to install filter.
Remove the access cover.
Remove the plastic flexible cap from the water valve (refrigerator connection).
Place the compression nut and ferrule (sleeve) onto the end of the tubing as shown. On GESmartConnect™ Refrigerator Tubing kit, the nuts are already assembled to the tubing.Insert the end of the tubing into the water valveconnection as far as possible. While holding thetubing, tighten the fitting.For plastic tubing from a GE SmartConnect™
Refrigerator Tubing kit, insert the molded end of the tubing into the shutoff valve and tightencompression nut until it is hand tight, then tighten one additional turn with a wrench.Overtightening may cause leaks.Fasten the tubing into the clamp provided to hold it in a vertical position. You may need to pry open the clamp.
7 TURN THE WATER ON AT THE SHUTOFF VALVETighten any connections that leak.
8
Tubing Clamp
1/4” Compression Nut
Ferrule (sleeve)
SmartConnect™
TubingRefrigerator Connection
1/4” CopperTubing
PLUG IN THE REFRIGERATORArrange the coil of tubing so that it does not vibrate against the back of the refrigerator or against the wall.Push the refrigerator back to the wall.
9
Reattach the access cover.
INSTALLING THE WATER LINE (CONT.)1
On power switch models, set the icemaker powerswitch to the 0N position. On feeler arm models,move the feeler arm to the ON (down) position. Theicemaker will not begin to operate until it reaches itsoperating temperature of 15°F (–9°C) or below. It will then begin operation automatically.
NOTE: In lower water pressure conditions, the watervalve may turn on up to 3 times to deliver enoughwater to the icemaker.
START THE ICEMAKER
Powerswitch
Power switch model
Feeler Arm in theSTOP (up) position
Feeler Arm inthe ON (down) position
Feeler arm model
10

13
Installation Instructions
REVERSING THE DOOR SWING2
When reversing the door swing:
• Read the instructions all the way through before starting.
• Handle parts carefully to avoid scratching paint.
• Set screws down by their related parts to avoid using themin the wrong places.
• Provide a non-scratching work surface for the doors.
IMPORTANT: Once you begin, do not move the cabinetuntil door-swing reversal is completed.
These instructions are for changing the hinges from the right side to the left side—if you ever want to change thehinges back to the right side, follow these same instructionsand reverse all references to left and right.
IMPORTANT NOTES
Phillips screwdriver
TOOLS REQUIRED
Masking tape
T20 or T25 Torxdriver(needed for some models)
5/16” hex-head socket driver
5/16” open-endwrenchPutty knife or thin-blade
screwdriver
2.1Tape the door shut with masking tape.
2.2With a 5/16” hex-head socket driver, remove thescrews that hold the top hinge to the cabinet.
REMOVE THE FREEZER DOOR2
2.3Lift the hinge straight up to free the hinge pin fromthe socket in the top of the door and set it aside,along with its screws.
Top Hinge
2.6Transfer the 2 screws from the opposite side of thecabinet to the screw holes vacated by the top hingeremoval.
2.5Set the door on a non-scratching surface with theoutside up.
2.4Remove the tape and tilt the door away from thecabinet. Lift it off the center hinge pin.
1.1Unplug the refrigerator from its electricaloutlet.
1.2Empty all door shelves, including the dairycompartment.
CAUTION: Do not let either door drop to the floor. Todo so could damage the door stop.
BEFORE YOU START1

Installation Instructions
3.1Tape the door shut with masking tape.
REMOVE THE FRESH FOOD DOOR3
3.4Set the door outside-up on a non-scratching surface.
3.3Remove the tape and tilt the door away from thecabinet. Lift the door from the pin in the bottom hingebracket. (If the plastic washer sticks to the door bottom,put it back on the hinge.)
3.2Using a 5/16” hex-head socket screwdriver and a5/16” open-end wrench, remove the two screwsholding the center hinge to the cabinet. Lift thecenter hinge to free its pin from the socket in the topof the door, and set hinge and screws aside. Becareful not to lose the center hinge spacer andwasher.
3.7Take one of the screws removed in step 2 and start it in the outermost screw hole on the opposite side. Do notdrive it all the way down—leave enough space under thescrew head for thickness of the bracket.
14
REVERSING THE HARDWARE4
REVERSING THE DOOR SWING (CONT.)2
3.5Transfer the two screws from the opposite side of thecabinet to the screw holes vacated by the center hingeremoval.
3.6Transfer the washer (if your model has one) to theopposite side.
3 REMOVE THE FRESH FOOD DOOR (CONT.)
4.1 Move the bottom hinge bracket and plastic washer from theright side to the left side.
PlasticWasher
HingeBracket
Switch the hinge pin to theopposite side of the bracket.
Installation Instructions
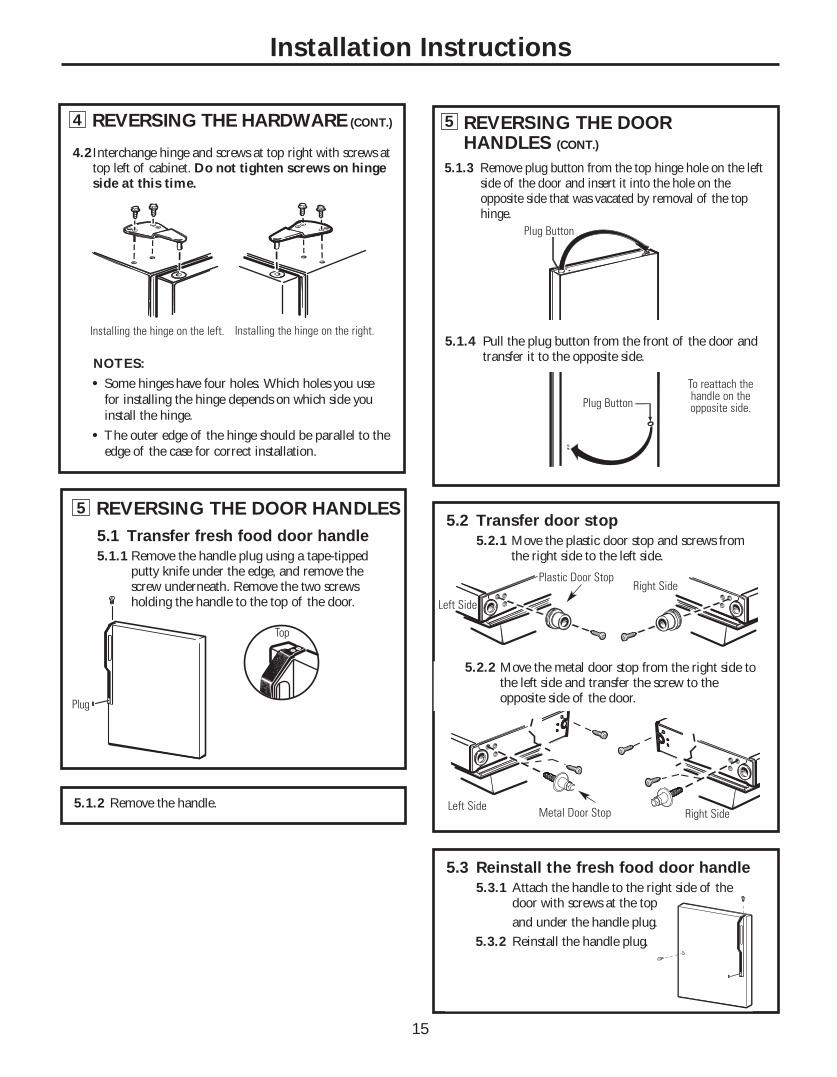
4.2Interchange hinge and screws at top right with screws attop left of cabinet. Do not tighten screws on hingeside at this time.
NOTES:• Some hinges have four holes. Which holes you use
for installing the hinge depends on which side youinstall the hinge.
• The outer edge of the hinge should be parallel to theedge of the case for correct installation.
Installing the hinge on the left. Installing the hinge on the right.
REVERSING THE DOOR HANDLES5
5.1.2 Remove the handle.
Top
Plug
15
5.3 Reinstall the fresh food door handle5.3.1 Attach the handle to the right side of the
door with screws at the top
and under the handle plug.
5.3.2 Reinstall the handle plug.
REVERSING THE HARDWARE (CONT.)4
5.1 Transfer fresh food door handle5.1.1 Remove the handle plug using a tape-tipped
putty knife under the edge, and remove thescrew underneath. Remove the two screwsholding the handle to the top of the door.
5.1.3 Remove plug button from the top hinge hole on the leftside of the door and insert it into the hole on theopposite side that was vacated by removal of the tophinge.
Plug Button
5.1.4 Pull the plug button from the front of the door andtransfer it to the opposite side.
5.2 Transfer door stop5.2.1 Move the plastic door stop and screws from
the right side to the left side.
To reattach thehandle on theopposite side.Plug Button
REVERSING THE DOOR HANDLES (CONT.)
5
Plastic Door Stop
Left Side
Right Side
Metal Door StopLeft SideRight Side
5.2.2 Move the metal door stop from the right side tothe left side and transfer the screw to theopposite side of the door.

Installation Instructions
5.4.3 Remove the screw from theright top edge of the doorand insert it into the handlescrew hole on the left side.
5.4.4 Transfer the door stop as shown in precedingsection 5.2.
5.4.5 Attach the handle to the rightedge of the door with screws at top and bottom,using bottom holes vacated byremoval of the door stopscrews.
TOP
BOTTOM
Top
Bottom
5.4 Transfer Freezer Door Handle5.4.1 Remove the screw
holding the handle to the top of the door and the two screws holding the handle to the bottom of the door.
5.4.2 Remove the handle.
16
6.1.2 Insert the pin on the center hinge into the socket in thetop of the door. Place the spacer, then the washer, on thehinge pin. NOTE: The center hinge must be turned over as shown when mounted on the left side.
Plastic Washerand Spacer
Hinge Pin
6.2 Re-hang the freezer door6.2.1 Lower the freezer door
onto the center hinge pin. Be sure the washer and spacer are in place on the pin.
RE-HANGING THE DOORS (CONT.)6
Center Hinge Pin
Plastic Washerand Spacer
REVERSING THE DOOR SWING (CONT.)2
6.1.3 Tilt the door toward the cabinet. As the door is broughtinto position, slide the hinge under the head of the screwwhich earlier had been partly driven into the outermosthole. Insert the remaining screw, then tighten both screwssecurely.
6.1 Re-hang the fresh food door6.1.1 Lower the fresh food door onto the
bottom hinge pin. Be sure the washer is in place on the pin.
RE-HANGING THE DOORS6
PlasticWasher
HingeBracket
6.2.2 Tilt the door toward the cabinet, lifting the top hinge sothe pin fits into the socket on the top of the door.
6.2.3. Make sure the door is slightly above the top of thecabinet and the gap between the doors is even across thefront. Tighten the top hinge screws. Do not overtightenthese screws–tighten them until they are just snug, thenturn them another one-half turn.
REVERSING THE DOOR HANDLES (CONT.)5

17
The new high efficiencycompressor may runfaster and longer thanyour old refrigerator andyou may hear a high-pitched hum or pulsating soundwhile it is operating.
You may hear a whooshing sound when the doors close.This is due to pressure equalizing within the refrigerator.
Normal operating sounds. GEAppliances.com
Newer refrigerators sound different from older refrigerators. Modern refrigerators have more featuresand use newer technology.
You may hear the fans spinning athigh speeds. This happens when the refrigerator isfirst plugged in, when the doors areopened frequently or when
a large amount of food is added to the refrigerator orfreezer compartments. The fans are helping to maintainthe correct temperatures.
CLICKS, POPS,CRACKS and CHIRPS
You may hear cracking or popping sounds when therefrigerator is first plugged in. This happens as therefrigerator cools to the correct temperature.
The compressor may cause a clicking or chirping soundwhen attempting to restart (this could take up to 5 minutes).
Expansion and contraction of cooling coils during and afterdefrost can cause a cracking or popping sound.
On models with an icemaker, after an icemaking cycle, youmay hear the ice cubes dropping into the ice bucket.
WATER SOUNDS
The flow of refrigerant through the freezer cooling coils maymake a gurgling noise like boiling water.
Water dropping on the defrost heater can cause a sizzling,popping or buzzing sound during the defrost cycle.
A water dripping noise may occur during the defrost cycle as icemelts from the evaporator and flows into the drain pan.
Closing the door may cause a gurgling sound due topressure equalization.
Do you hear what I hear? These sounds are normal.
For additional information on normalicemaker operating sounds, see the About the automatic icemaker section.
Before you call for service…Troubleshooting Tips Save time and money! Review the charts on the followingpages first and you may not need to call for service.
Problem Possible Causes What To DoRefrigerator does not Refrigerator in defrost cycle. • Wait about 30 minutes for defrost cycle to end.operate Temperature control dial • Move the temperature control dial to a temperature
in OFF position. setting.
Refrigerator is unplugged. • Push the plug completely into the outlet.
The fuse is blown/circuit • Replace fuse or reset the breaker. breaker is tripped.
Vibration or rattling (slight Roller screws or leveling legs • See Rollers and Leveling Legs.vibration is normal) need adjusting.Fresh food or freezer Temperature control dial • See About the temperature control dial.compartment too warm not set cold enough.
Warm weather or frequent • Set the temperature control dial one step colder. door openings. See About the temperature control dial.Door left open. • Check to see if package is holding door open.
Package blocking air duct in • Check to see if package is blocking air duct in freezer freezer compartment. compartment.
HUMMM...WHOOSH...

Problem Possible Causes What To DoNormal when refrigerator • Wait 24 hours for the refrigerator to completely is first plugged in. cool down.Often occurs when large • This is normal.amounts of food areplaced in refrigerator.Door left open. • Check to see if package is holding door open.Hot weather or frequent • This is normal.door openings.Temperature control dial • See About the temperature control dial.set at the coldest setting.Grille and condenser • See Care and cleaning.need cleaning.
Frost or ice crystals Door left open. • Check to see if package is holding door open.on frozen food Too frequent or too long (frost within package door openings.is normal)Automatic icemaker Icemaker is not on. • Move the feeler arm to the ON (down) position,does not work or move the power switch to the ON position(on some models) Water supply turned off or • See Installing the water line.
not connected.Freezer compartment • Wait 24 hours for the refrigerator to completely too warm. cool down.Piled up cubes in the storage • Level cubes by hand.bin cause the icemaker to shut off.
Frequent “buzzing” sound Icemaker is on but the water • Move the feeler arm to the STOP (up) position, or movesupply to the refrigerator has the power switch to the OFF position,not been connected Keeping it on will damage the water valve..
Cubes too small Water shutoff valve connecting • Call the plumber to clear the valve.refrigerator to water line may be clogged.
Slow ice cube freezing Door left open. • Check to see if package is holding door open.Temperature control dial • See About the temperature control dial.not set cold enough.
Ice cubes have Ice storage bin needs cleaning. • Empty and wash bin. Discard old cubes.odor/taste Food transmitting odor/taste • Wrap foods well.
to ice cubes.Interior of refrigerator • See Care and cleaning.needs cleaning.
Moisture forms on Not unusual during • Wipe surface dry and reset temperature control dial cabinet surface periods of high humidity. one setting colder.between the doorsMoisture collects inside Too frequent or too(in humid weather, air long door openings.carries moisture intorefrigerator when doors re opened)Refrigerator has odor Foods transmitting • Foods with strong odors should be tightly wrapped.
odor to refrigerator. • Keep an open box of baking soda in the refrigerator; replace every three months.
Interior needs cleaning. • See Care and cleaning.
Motor operates for longperiods or cycles on andoff frequently. (Modernrefrigerators with morestorage space and a largerspace and a larger freezerrequire more operatingtime. They start and stopoften to maintain eventemperatures.)
Before you call for service…Troubleshooting Tips
18

Refrigerator Warranty. (For customers in the United States)All warranty service provided by our Factory Service Centers, or an authorized Customer Care® technician. To schedule service, on-line, 24 hours a day, visit us at GEAppliances.com, or call800.GE.CARES (800.432.2737). Please have serial number and modelnumber available when calling for service.
For The Period Of: GE Will Replace:
GE and GE PROFILE MODELS:
One Year Any part of the refrigerator which fails due to a defect in materials or workmanship.From the date of the During this limited one-year warranty, GE will also provide, free of charge, all labor and original purchase related service to replace the defective part.
Thirty Days Any part of the water filter cartridge which fails due to a defect in materials or workmanship.(Water filter, if included) During this limited thirty-day warranty, GE will also provide, free of charge, a replacement waterFrom the original filter cartridge.purchase date of the refrigerator
GE PROFILE MODELS ONLY:
Five Years Any part of the sealed refrigerating system (the compressor, condenser, evaporator (GE Profile models only) and all connecting tubing) which fails due to a defect in materials or workmanship.From the date of the During this limited five-year sealed refrigerating system warranty, GE will also provide, original purchase free of charge, all labor and related service to replace the defective part in the sealed
refrigerating system.
Service trips to your home to teach you how to use the product.
Improper installation, delivery or maintenance.
Failure of the product if it is abused, misused, or used forother than the intended purpose or used commercially.
Loss of food due to spoilage.
Replacement of house fuses or resetting of circuit breakers.
Damage caused after delivery.
Products which are not defective, broken or which areworking as described in the Owner’s manual.
Replacement of the water filter cartridge, if included, due to water pressure that is outside the specified operating range or due to excessive sediment in the water supply.
Replacement of the light bulbs, if included, or water filtercartridge, if included, other than as noted above.
Damage to the product caused by accident, fire, floods or acts of God.
Incidental or consequential damage caused by possible defects with this appliance.Product not accessible to provide required service.
What GE Will Not Cover:
This warranty is extended to the original purchaser and any succeeding owner for products purchased for home usewithin the USA. If the product is located in an area where service by a GE Authorized Servicer is not available, youmay be responsible for a trip charge or you may be required to bring the product to an Authorized GE Servicelocation for service. In Alaska, the warranty excludes the cost of shipping or service calls to your home.
Some states do not allow the exclusion or limitation of incidental or consequential damages. This warranty gives youspecific legal rights, and you may also have other rights which vary from state to state. To know what your legalrights are, consult your local or state consumer affairs office or your state’s Attorney General.
Warrantor: General Electric Company. Louisville, KY 40225
Staple your receipt here. Proof of the original purchase
date is needed to obtain serviceunder the warranty.
EXCLUSION OF IMPLIED WARRANTIES—Your sole and exclusive remedy is product repair as provided in thisLimited Warranty. Any implied warranties, including the implied warranties of merchantability or fitness for aparticular purpose, are limited to one year or the shortest period allowed by law.
19

Consumer Support.
Have a question or need assistance with your appliance? Try the GE Appliances Website 24 hours a day, any day of the year! For greater convenience and faster service, you can now download Owner’s Manuals, order parts, or even schedule service on-line. In Canada: www.geappliances.ca
GE supports the Universal Design concept—products, services and environments that can be used by people of allages, sizes and capabilities. We recognize the need to design for a wide range of physical and mental abilities andimpairments. For details of GE’s Universal Design applications, including kitchen design ideas for people with disabilities,check out our Website today. For the hearing impaired, please call 800.TDD.GEAC (800.833.4322).In Canada, contact: Manager, Consumer Relations, Mabe Canada Inc.
Suite 310, 1 Factory LaneMoncton, N.B. E1C 9M3
Extended Warranties In the U.S.: GEAppliances.com
Individuals qualified to service their own appliances can have parts or accessories sent directly to their homes (VISA,MasterCard and Discover cards are accepted). Order on-line today, 24 hours every day or by phone at 1.800.661.1616 during normal business hours.Instructions contained in this manual cover procedures to be performed by any user. Other servicing generally should bereferred to qualified service personnel. Caution must be exercised, since improper servicing may cause unsafe operation. Customers in Canada should consult the yellow pages for the nearest Mabe service center, or call 1.800.661.1616.
If you are not satisfied with the service you receive from GE, contact us on our Website with all the details includingyour phone number, or write to: General Manager, Customer Relations
GE Appliances, Appliance ParkLouisville, KY 40225
In Canada: www.geappliances.ca, or write to: Director, Consumer Relations, Mabe Canada Inc.Suite 310, 1 Factory LaneMoncton, N.B. E1C 9M3
Register your new appliance on-line—at your convenience! Timely product registration will allow for enhanced communication and prompt service under the terms of your warranty, should the need arise. You may also mail in the pre-printed registration card included in the packing material. In Canada: www.geappliances.ca
GEAppliances.com
GEAppliances.com
GE Appliances Website In the U.S.: www.Hotpoint.com
Schedule Service In the U.S.: www.Hotpoint.comExpert GE repair service is only one step away from your door. Get on-line and schedule your service at yourconvenience 24 hours any day of the year! Or call 800.GE.CARES (800.432.2737) during normal business hours.In Canada, call 1.800.561.3344
Real Life Design Studio In the U.S.: GEAppliances.com
Purchase a GE extended warranty and learn about special discounts that are available while your warranty is still in effect. You can purchase it on-line anytime, or call 1.888.261.2133 during normal business hours. GE ConsumerHome Services will still be there after your warranty expires.
GEAppliances.com
GEAppliances.com
GEAppliances.com
Parts and Accessories In the U.S.: www.Hotpoint.com
Contact Us In the U.S.: www.Hotpoint.com
Register Your Appliance In the U.S.: www.Hotpoint.com
Printed in the United StatesPrinted on Recycled Paper