gardening 101 guide - friendship...
TRANSCRIPT

P a g e | 1
Friendship Gardens’ Gardening 101 Guide
Table of Contents:
pg. 3: I. Garden Bed Preparation
fghfgh
pg. 5: II. Soil Life
pg. 7: III. Planting
pg. 10: IV. Watering
pg. 12: V. Spring Gardening
pg. 15: VI. Summer Gardening
pg. 17: VII. Fall Gardening
pg. 18: VIII. Winter Gardening
pg. 21: IX. Organic Pests and Disease Controls
pg. 24: X. Composting

P a g e | 2
Welcome to our Introduction to Gardening guide!
Many of the people who come to us are first time gardeners, those who have never picked up a
spade before, so we have this special guide just for those who need some help getting started.
While we have a large amount of information in this document, experience has shown us
that the number one way to learn to garden, is to actually get out there and do it. We have a
few ways that you can take what you read here to the next level. First off, check out our
workshops, we have many classes geared to newer gardeners. Second is to volunteer, with
a large network of gardens, we have a large number of volunteer days at locations
throughout the city, all our Garden Leaders and staff are very accustom to showing people
how to garden on these days. Finally if you are with a group of individuals who wish to
learn more, we are sometimes able to hold special classes for your group, please contacts
us for more details.
The information we have compiled should be used to get you started, but should not be
considered comprehensive. There are many approaches and techniques that can lead to
successful gardening. The techniques you will learn from Friendship Gardens are based on our
success in past years, but we are always expanding our education and encourage you to do the
same.
Backyard vs. Production Gardens
The planting techniques for a production garden, like the ones in our network growing food for
Friendship Trays, are different than the planting techniques for a backyard garden. Production
gardens are designed for whole crops to be harvested at once. If your whole backyard garden
matured at the same time it would leave you with way too much produce one week and none
the rest of the time. Instead, plant your backyard garden the way you eat; a little at a time. Put
a couple of plants or seeds in the ground each week and you will not only spread out your
garden work but you will spread out your ability to eat well and often.

P a g e | 3
I. Garden Bed Preparation
Is it time to get your garden ready again? This information will help you prepare an existing garden for planting. If this is your first season and you are just starting your garden, you will want to do a soil test and amend the soil based on the results. For more information on that see the Soil Life section.
Soil Amendments
The most important thing to add to your garden each season is compost. Ideally, this is compost you made in your own bin. Home grown compost is better than compost that you purchase because it has a wider variety of decomposed material (food scraps) compared to store-bought compost (usually just cow manure.). Adding good compost to your soil adds nutrients (fertilizer), gives your soil better texture for drainage and nutrient retention, and boosts the number of micro-organisms in your soil. For more info see the Soil Life section.
You will want to add 1-3 inches of compost before each planting season depending on the quality of your existing soil. We also recommend adding these organic (made from plants, animals, and rock) soil amendments as needed: plantone, lime, blood meal, and bone meal. Each adds different nutrients to the soil. This is where soil testing comes into play for new and existing gardens. It will allows you to determine how much and of what you will need to add. Plantone is an organic fertilizer, add a little of this one if nothing else. All of these should be sprinkled on top of the already spread compost to be dug in later. The amount depends on the size of your garden. Check the chart on the bag.
Turning the Soil
After you have added your compost and other amendments on top, it’s time to turn the soil. This not only mixes all your nutrients in, it also loosens up the compacted soil making it easier for roots to grow around the soil particles. One way to achieve this is to use a tiller. There are many small tillers on the market that can even fit into small raised beds, you can also consider borrowing one from a neighbor or renting one. The advantage of using a tiller is that is it much less work and breaks up dirt clogs easily. The disadvantages are that they are expensive, you don’t get exercise, it will kill some of the worm life in your bed, and they only reach down 10 or so inches leaving the deeper soil compacted and unfriendly to deep roots.
Another way to turn your soil is a technique called double digging. You will need a shovel and a digging fork (not a pitch fork). Digging forks usually have only four very strong and thick tines that are meant for digging.
1. Use the shovel to dig a one-foot-deep and one shovel width trench along the edge of your plot. Put the soil that you remove in a wheel barrow or on a tarp. You will add this dirt to the last trench row at the end.

P a g e | 4
2. Drive the tines of your digging fork as deep as you can into the exposed subsoil. Rock the handle back and forth to break up the soil. Do this every foot of the length of your trench.
3. Dig another trench next to the first, putting the removed soil from the second trench into the first trench.
4. Repeat the fork rocking and trench digging until you finish your garden area. Add the removed soil from the first trench to the last trench you dig.
Advantages: great exercise - skip the gym for the day!, breaks up subsoil for deep root penetration, low cost, and fewer worm deaths.
Disadvantages: Dirt clods do not get finely pureed, difficult for older gardeners.
Get the kids involved!
Kids make great soil turners! Make sure their shovels are appropriate for their size and let them get to work in the sunshine!

P a g e | 5
II. Soil Life
Good soil quality is the foundation of all gardening. Experienced gardeners like to say that you “feed the soil, not the plant.” Healthy soil requires preparation and maintenance, but takes out a lot of the guess work of “what went wrong?” later on! When you prepare an in-ground garden (not raised bed) for planting, the first thing you need to do is assess the quality of your soil. During the early stages of garden planning, you should conduct a soil test. Soil test kits can be picked up from the NC State County Extension Office. Follow the instructions and mail it off for testing. The test is free, but be patient on getting the results. A soil test will give you information about your soil composition and toxicity levels, which is particularly important in urban settings where your location may have been used for other purposes in the past. All soils are made up of a combination of three basic components: clay, sand, and loam. Your soil also has a specific ratio of nitrogen, phosphorus and potassium (N-P-K). Good quality soils have high quality organic materials, good aeration, and the ability to hold just enough moisture. While the soil test is essential, you can tell a lot about your soil simply by looking at the color and holding it in your hand. A high quality soil will be a dark rich brown to black, light, somewhat crumbly in your hand, and a velvety (or loamy) feel when you rub it between your fingers. When we think about a garden, we tend to focus on the tasty vegetables they produce, but our soils are teeming with life! In one gram of healthy soil (about the weight of a standard paper clip) expect to find these critters:
All of these forms of life are useful in breaking down organic matter and providing nutrients, which is why we choose organic and non-synthetic soil amendments. Amending the soil with chemical fertilizers will kill your soil life and affect the health of your plants.
Credits: Materials drawn from N.C. State's Cooperative Extension and Community Food Gardening Manual
for North Carolina by Don Boekelheide, Dr. Lucy Bradley and Dr. Keith Baldwin, draft version March 2010.

P a g e | 6
Prepping the soil
If you are planning an in-ground garden here in the South, it’s a pretty fair bet that you have clay soil that will take a little effort to prepare before you are ready to plant. The biggest problems with clay soils are excess water retention and compaction. To improve the texture of the soil and promote better drainage, the best thing that you can add is compost and other organic material. While adding some sand is okay, too much can backfire by making your soil drain too quickly. If the site has good drainage and the soil is workable, prepping the soil involves adding about 1-3 inches of compost (or composted manure) to the soil when the soil is first turned.If the soil tests indicate low pH (highly acidic), add lime at the same time you add compost. Do not add fertilizer and garden lime at the same time. We also recommend adding these organic (made from plants, animals, and rock) soil amendments as needed: plantone, blood meal, and bone meal. Each adds different nutrients to the soil. Bone meal adds Phosphorus, blood meal adds Nitrogen, and plantone is an organic fertilizer mix that adds N, P and K.
Soil maintenance
Annually, gardeners can add up to 1 inch of compost to plots using simple hand tools. Remember that with harvest, nutrients are taken out of the soil. With each new planting and depending on which plants are going in, add fertilizer. Every three years gardeners should test the soil, adding lime and other nutrients as needed. Mulch is a great addition to the garden for keeping weeds under control, protecting the soil and retaining moisture. Organic matter is best (leaves, straw, wood chips), but newspaper and cardboard also work well. The mulch layer doesn’t have to be large; 2-3 inches is very effective. Be sure not to exceed 4 inches.
Raised bed gardening
If your soil is beyond hope or you are gardening with a population who would benefit from easier accessibility, another option is to create raised beds that sit on top of your existing soil. The easiest way to prepare the soil in raised beds is to purchase topsoil and compost or planter mix. Avoid falling into a false sense of security about your soil: Raised beds, like conventional beds, need to have regular soil maintenance. Add a ½ inch layer of compost annually and fertilize with each new planting to maintain soil nutrients. Be especially careful not to over-fertilize in containers and raised beds. Also, be on the watch for signs of soil compaction, nutrient depletion, or disease, such as stunted plants.
Get the kids involved!
For a quick and fun soil check, have kids dig out of the garden a cube of soil about one foot on a side and count how many worms and bugs are in it. Compare with another area of the garden or an area of the yard. Record and test at the beginning of each season.

P a g e | 7
III. Planting the Garden
The soil is ready, the season is right, it’s time to plant. Now what? There are two ways of getting your plants in the ground: direct seeding in the garden and starting plants indoors that will be transplanted in the garden later. Below you will learn how and when to use both techniques.
Direct Seeding in the Garden
All plants can be direct seeded in the garden and many plants do better when sown directly in the ground. However, to get a head start on the growing season or to maximize space efficiently, you may want to start some slow-growing crops indoors. For example, we always start tomatoes and peppers indoors when it is still cold outside so that they can be moved out as already established plants when the weather warms up. By doing this, we get about a month’s head start and we can grow more spring crops in the ground that would have been used for getting the tomatoes and peppers started. Conversely, there are many fast-germinating and growing crops that we almost always direct seed like lettuce, radishes, and green beans.
How to direct seed
Because germination rates vary, you will always want to over-seed (planting more seed, closer together than the mature plants will be) when direct seeding. The spacing of the seeds will depend on the final spacing of the mature plants. For example, lettuce seed which can grow closely together should be sprinkled in a very shallow trench. The seeds of broccoli, which need about a square foot each when mature, should be planted one seed every 3 or 4 inches.
Depth
A good rule of thumb is to plant the seeds at a depth of three times the length of the seed. Therefore, tiny lettuce seeds will be just below the surface and larger okra seeds will be a bit deeper.
Thinning
No matter what you are direct seeding, the crop and harvest will benefit if you thin at least once (sometimes more often) early. Failure to thin will cause plants to compete with each other and never reach their potential. This is especially damaging for root crops like radishes and beets that need to bulb out underground.

P a g e | 8
When the plants are an inch or so high, use scissors or your hands to gently (you don’t want to disturb the roots of the surrounding plants) remove the weaker-looking plants. Leave one healthy plant every 3 or 4 inches. For larger plant varieties, you will need to thin again in a couple weeks until the spacing is appropriate for that variety of mature plants. Go ahead and eat the thinnings! All baby plants are edible and many are sold in stores at high prices as “micro-greens”.
Starting Seeds indoors
Containers: Almost anything can be used as a container for starting seeds. Many people choose reusable plastic pots/seed trays or ones made from fiber or peat that can be planted with the plant and will break down as the plant grows. Whatever you choose it should be 3 or 3.5 inches deep and have drainage holes in the bottom. Growing mediums: You have many choices of what to fill your containers with. The choices comes with varying advantages and varying prices. Here are some of the options: peat moss, vermiculite (super heated until popped - mica), potting mixes, compost, and even soil from the garden. We recommend using a potting mix or seed starting mix. Most of them are a mixture of vermiculite or perlite, peat moss, compost, and soil. Location: Germinating seeds need light, so find a sunny window, preferably with southern exposure or set up some white fluorescent bulbs wherever you choose to grow.
Planting
Once you've picked your growing medium, containers and growing spot, it’s time to fill the containers and get planting. Start by filling a bucket with potting soil and soaking it with water. Mix the water in so that it is nice and damp but don't add so much that you make soup. This will give your seeds a good head start with moisture and keep the soil from drying out as quickly. Also, you won’t have to water the seeds after planting them, which can potentially wash them out. Next, fill your containers with moist soil and start planting.Plant two seeds in each container at a depth of about three times the width of the seed. Do not let your seeds dry out. Once they start germinating they must stay moist or they will die. Check on them each day and water gently if the soil is starting to dry out. Transplant in the garden after a couple weeks when the plant looks healthy, strong, and established. Be sure that it is warm enough for your seedlings at night before sending your babies out to the garden.

P a g e | 9
Planting transplants
Whether you bought them at your favorite local hardware store (Renfrow Hardware in Matthews is a great resource) or you started them on your window sill inside, you now need to get them in the garden so they can grow big and strong and make you lots of food. Lay out all your plants in containers on top of the soil to get your spacing right in your garden. Check the seed package or plant tag for correct spacing. Once your spacing is set you can start planting. Dig a hole larger than the root ball of the plant you are planting. Gently put the stem of the plant between your middle and ring finger palm facing the soil so that when you flip the container over the plant is facing down and resting in the palm of your hand. Squeeze the container gently until the plant drops in your hand. If the plant is root locked (the roots have grown in a tight mess on the bottom of the container) gently break up the very bottom of the root area. This will promote new root growth once in the garden. Place the transplant in the hole, gently fill the soil in around it and press down. This will ensure the roots contact the soil around it. The last step is to water. Always water well after you transplant.
Get the kids involved
Kids love seeing things germinate. If you are doing a lesson on germination with young kids, be sure to pick a fast-germinating seed (lettuce, radish, peas, beans). If you pick something slow like tomatoes they will lose interest and forget about the seeds. Seeds will germinate only with moisture. A fun activity for kids: Put some lettuce seeds inside a folded moist paper towel. Put the paper towel in a zip lock bag and hang in the window. Spray once a day with a mist spray bottle to keep moist until seeds germinate. This activity allows kids to see the germination without soil blocking the view. And the sprouted seeds are edible!
P a g e | 10
IV. Watering the Garden
The perfect amount of rain from Mother Nature is the best. Too bad that rarely happens. Water is as important to the growth of fruits and vegetables as it is for humans. To provide water for your plants, even in times of drought, you have some options.
Rain water collection systems
To ensure that you have rain water for your garden, you will need to catch some. The size of the garden will determine whether you use 55-gallon rain barrels or much larger rain collection systems. Catching rain water for your garden conserves drinking water, saves money, and is better for plants than tap water. City water contains chlorine and other chemicals that make it safe to drink but not great for plants. Generally, rain water also has naturally balanced PH levels. The main drawback to using collected rain water is that unless you install some sort of pump you will be using good old gravity to retrieve the collected water. Raising your rain barrel on bricks or a platform will increase your pressure, but with a rain collection system, filling watering cans and watering by hand is your primary strategy.
City Water
Even if you have a rain water collection system, it is a good idea to also have easy access to a water spigot. You can easily hook up a hose, sprayer, wand or sprinkler to water your garden.
Irrigation systems for large gardens
For larger gardens that are difficult to water by hand, you may want to install an irrigation system. Many can be connected to water spigots like drip irrigation or soaker hoses. Check out DripWorksUSA. Other low flow systems use only gravity and can be attached to a rain collection system. Check out Dripirrigation.
Different plants need different amounts of water. There are both water-loving veggies (like lettuce and melons) and drought resistant veggies (like mustard greens). Even within a crop, some varieties are more drought resistant than others. Research what you’re planting.
Plants need different amounts of water at different stages of their lives. Germinating seeds need to stay moist once the germination process has started or they will not sprout. Seeds should be watered daily until the seeds have sprouted. Be careful not to water seeds too much or too aggressively (splashing around large amounts of water). This can wash out seeds before they sprout. Established plants should be watered every other day or as needed.

P a g e | 11
How much water?
Most established plants (not germinating seeds) should be watered every other day or every third day, depending on daily temperatures. You will learn to allow the plants to tell you when they need water. Plants that need to be watered usually have limp-looking leaves. You can also feel the soil under the mulch. If it is very dry, it needs to be watered.
Mulching
Mulch early and mulch deep. Soil was not meant to be bare. Bare soil hardens and dries out. Adding mulch not only keeps weeds at bay but also holds in moisture, which conserves water. Any carbon source can be used as mulch (leaves, straw, hay, even shredded paper). You can also buy bagged mulch, but there are better and cheaper (as in free) options. Keep in mind that you want to use mulch that will break down easily and quickly, which will add organic matter to your soil when you turn it over in between plantings. So, using hardwood mulch or large nugget mulch is not recommended because it will not break down very quickly.
Watering in the morning is best
Avoid watering in the heat of the day because much of the water will be lost to evaporation. Also avoid watering at night as wet leaves overnight encourages fungus disease.
While you are watering is a great time to look for pests. See our material on Organic Controls. Remember, a well-watered garden is a happy garden and a happy garden makes for happy bellies!
Getting the kids involved
Watering is a fun and easy activity for kids. Get special, brightly colored watering cans or have the children decorate your rain barrel.

P a g e | 12
V. Spring Gardening
Ah, springtime in North Carolina. Time to get out in the garden and… wait! If you are planting a spring garden – meaning a garden you’d like to eat from in the spring and early summer – you need to start before the Super Bowl and try to get your first plants in by Valentine’s Day. Yes, the ground is hard and you’ll need to bundle up, but when you’re harvesting fresh, healthy food while everyone else is just starting a summer tomato patch, you’ll be glad you did.
What should you plant and when?
You will likely plant most of the vegetables in a spring garden between February and April. Some vegetables thrive better when planted earlier (peas, onions, berries.) Others do best planted late in the season (cucumbers, eggplant.) Some vegetables can be planted almost any time through the season. Check the planting guide below for more information on individual plants. And remember, planting both seeds and plants means you can harvest more food more often. A garden is for eating all year round, after all.
Get the kids involved!
Take your children to the gardening store (Psst… Renfrow Hardware in Matthews is a great one! Ask David for some help exploring.) Go through the seed bins and check out the cool names of some of the varieties. Talk about what your kids might like to grow and eat… and try some vegetables they don’t know. Kohlrabi, anyone? Every garden needs flowers (and so do the bees that pollinate them!), so start flower seeds inside in small cups to transplant to the garden when it warms up outside.The more the children take part, the more likely they’ll taste the broccoli you grew together.
When to plant various vegetables
Planting dates Inches Planting Min. soil
for seed or between depth temp. Days to
Vegetables transplants (1) Suggested Cultivars plants (inches) °F (2)
maturity
Asparagus (crowns) Nov. 15-Mar. 15 Mary Washington, Jersey Giant, Jersey
Gem 15 6.0 ‹ 2 years
Beans, snap Apr. 15-July 15 Tenderette, Harvester, Roma II (flat), 3 1.0 60 50-55
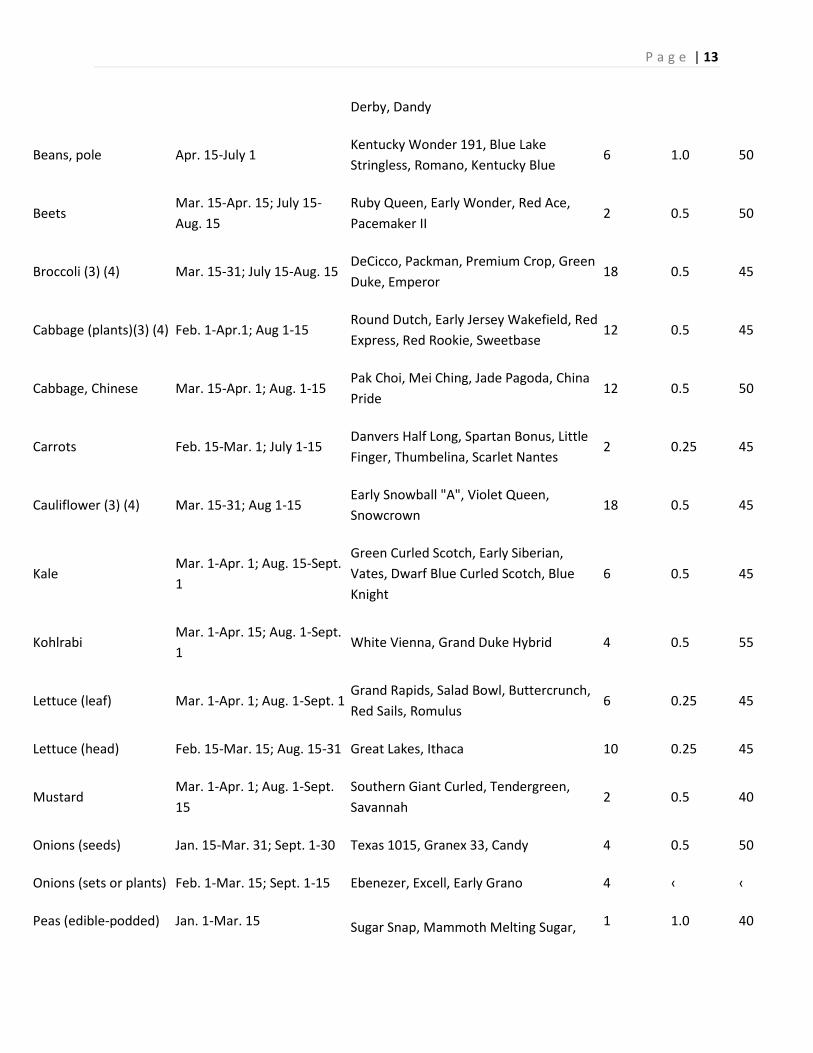
P a g e | 13
Derby, Dandy
Beans, pole Apr. 15-July 1 Kentucky Wonder 191, Blue Lake
Stringless, Romano, Kentucky Blue 6 1.0 50 65-70
Beets Mar. 15-Apr. 15; July 15-
Aug. 15
Ruby Queen, Early Wonder, Red Ace,
Pacemaker II 2 0.5 50 55-60
Broccoli (3) (4) Mar. 15-31; July 15-Aug. 15 DeCicco, Packman, Premium Crop, Green
Duke, Emperor 18 0.5 45 70-80
Cabbage (plants)(3) (4) Feb. 1-Apr.1; Aug 1-15 Round Dutch, Early Jersey Wakefield, Red
Express, Red Rookie, Sweetbase 12 0.5 45 70-80
Cabbage, Chinese Mar. 15-Apr. 1; Aug. 1-15 Pak Choi, Mei Ching, Jade Pagoda, China
Pride 12 0.5 50 75-85
Carrots Feb. 15-Mar. 1; July 1-15 Danvers Half Long, Spartan Bonus, Little
Finger, Thumbelina, Scarlet Nantes 2 0.25 45 85-95
Cauliflower (3) (4) Mar. 15-31; Aug 1-15 Early Snowball "A", Violet Queen,
Snowcrown 18 0.5 45 55-65
Kale Mar. 1-Apr. 1; Aug. 15-Sept.
1
Green Curled Scotch, Early Siberian,
Vates, Dwarf Blue Curled Scotch, Blue
Knight
6 0.5 45 40-50
Kohlrabi Mar. 1-Apr. 15; Aug. 1-Sept.
1 White Vienna, Grand Duke Hybrid 4 0.5 55 50-60
Lettuce (leaf) Mar. 1-Apr. 1; Aug. 1-Sept. 1 Grand Rapids, Salad Bowl, Buttercrunch,
Red Sails, Romulus 6 0.25 45 40-50
Lettuce (head) Feb. 15-Mar. 15; Aug. 15-31 Great Lakes, Ithaca 10 0.25 45 70-85
Mustard Mar. 1-Apr. 1; Aug. 1-Sept.
15
Southern Giant Curled, Tendergreen,
Savannah 2 0.5 40 30-40
Onions (seeds) Jan. 15-Mar. 31; Sept. 1-30 Texas 1015, Granex 33, Candy 4 0.5 50 130-150
Onions (sets or plants) Feb. 1-Mar. 15; Sept. 1-15 Ebenezer, Excell, Early Grano 4 ‹ ‹ 60-80
Peas (edible-podded) Jan. 1-Mar. 15 Sugar Snap, Mammoth Melting Sugar, 1 1.0 40 60-70

P a g e | 14
Snowbird, Sugar Bon
Peas, garden Jan. 1-Mar. 15 Wando, Green Arrow, Freezonian, Tall
Telephone 1 1.0 40 65-70
Potatoes (Irish) Feb. 15-Apr. 1 Kennebec, Red Pontiac, Yukon Gold,
Superior 10 5.0 40 95-120
Pumpkins Apr. 15-June 15
Autumn Gold, Howden's Field, Spookie
(small), Baby Bear, Connecticut Field, Big
Moon (big), Jack Be Little (dwarf)
48 1.5 70 115-120
Radishes Feb. 1-Apr. 1; Aug. 15-Sept.
15
Early Scarlet Globe, Cherry Belle,
Snowbells, White Icicle 1 0.5 45 25-30
Radish, Diakon Feb. 1-Apr. 1; Aug. 15-Sept.
15 April Cross, H. N. Cross 4 0.5 50 60-75
Rutabagas Feb. 1-Apr. 1; July 1-Aug. 1 American Purple Top, Laurentian 4 0.5 60 70-80
Spinach Feb. 15-Mar. 15; Aug. 1-15 Hybrid 7, Dark Green Bloomsdale, Tyee
Hybrid 6 0.5 45 50-60
Squash, winter Apr. 15-May 15; Aug. 1-15
Sweet Mama, Early Butternut, Spaghetti,
Cream of the Crop, Table Ace, Lakota,
Butterbush
36 1.0 60 70-95
Swiss chard Mar. 15-May 1 Lucullus, Rhubarb Chard 6 0.5 50 60-70
Turnips Feb. 1-Apr. 15; Aug. 1-31 Purple Top White Globe, Just Right,
Tokyo Cross Hybrid, White Egg, All Top 2 0.5 60 55-60
Watermelons Apr. 15-June 1 Congo, Sweet Princess, Golden Crown, 60 1.5 70 90-10

P a g e | 15
VI. Summer Gardening
Nothing’s more synonymous with a Carolina summer than getting out in the garden in a big straw hat and growing some ‘maters, cukes, squash and peppers. No matter how small your plot is, you can grow much more than that. And don’t just think about planting once this summer. There are plenty of things you can plant throughout the season to extend your garden (and your family’s health) well into the fall.
What to plant and when
The list of fruits and veggies you can grow this season are boundless. Start in mid-April and save some room for a second or even third planting over the next few months. Refer to the planting guide below for individual crops. When the dog days are upon us and your neighbor’s garden is fading fast, you will still reap the benefits of late-season planting well into the fall. Tomatoes and eggplant in October? You betcha.
The last frost rule
According to the N.C. Cooperative Extension Service, April 2 is the average day for the final frost of the season in the Charlotte area. If you aim to plant the majority of your crop around tax day, that should work fine. Beans, beets, broccoli, cabbage, carrots, cauliflower, lettuce, onions, potatoes, radishes and turnips are some good choices. Favorites like cantaloupe, corn, cucumbers, peppers, squash, tomatoes and watermelons grow best when planted late in the season.
Water, water everywhere
Along with good, weed-free soil and lots of sunlight, the single most important thing to your summer garden’s health is water. When it’s hot out and when many of us are out of town for vacation, you need a plan in place. Whether you have an irrigation system, a rain barrel, or some small helpful hands to carry water cans, your established garden needs to be watered at least every other day. If it hasn’t rained in awhile and it is extremely hot, it would benefit from daily waterings. See our Watering the garden “section for more info.
Don’t let the bugs bug ya
Insects, bugs and other pests are more active during the late summer than any other time of the year. Before reaching for seven dust that harms your veggies and your family, read our guide on Organic pest control.

P a g e | 16
In the weeds
Perfect conditions for growing tomatoes are also perfect conditions for growing weeds. Annoyingly, weeds (any unwanted plant) often grow faster than the plants we are trying to grow. Weeds are a problem because they compete with and often crowd out your veggies. However annoying, you do not need to spray for weeds. Weed killers also harm veggie plants and our bodies when we eat them. Instead keep weeds from growing in the first place by mulching your garden heavily. (See our Watering the garden and Organic pest controls sections.) When weeds do pop up, simply weed by hand into a bucket and then dump into your compost pile. For larger gardens, you will need a hoe to cut the weeds off at the surface.
Get the kids involved!
There’s more to gardening than just digging in the dirt, though most children enjoy finding worms and other creatures in the soil. Make sure the kids are involved with choosing seeds and plants and planning what you will grow. If you have pests in your garden, and you will, collect and identify them in a bug book. Pulling weeds can get a little boring for all of us. Try making a game out of it. See who can fill their pail the fastest for a small prize. Just make sure they know the difference between a weed and a plant you want to keep! Have your kids paint small stake signs identifying each crop. Popsicle sticks or wood scraps work fine. A parent can nail the stakes together. Keep a photo diary documenting your growing garden. When it’s time to start harvesting, kids love to help judge and pick what’s ripe. Let small hands help with the cooking as well and, at summer’s end, share the tradition of canning and pickling. Pasta sauce or vegetable soup will taste much better in January when they know they helped make it themselves.

P a g e | 17
VII. Fall Gardening
Summer in the South is the traditional time to get out in the garden, but fall is the perfect season to grow. With just a little effort, you can eat delicious produce throughout the autumn and winter. Remember, gardening is about eating, not weeding, so think of your garden as a 365 day per year source of fresh, healthy food!
What should you plant and when?
Planting for fall starts in July and August and you can continue to plant through September and sometimes later in the mild Carolina weather. Many veggies, like lettuce and spinach, can be planted in spring or fall and actually thrive and taste better when grown in cooler temperatures. Consider planting some crops from seed and some from plants. Also, stagger your planting times for a continual harvest. Refer to the fall crop planting guide below for more information.
Seeds versus plants
Direct seeding for crops like broccoli, cabbage, and collards can produce great results. However, your success depends on having enough moisture available to keep the young seedlings actively growing after germination. If you don’t have an irrigation source, you might be better off using plant starts or starting your seeds inside. Seeds should be planted deeper in the fall because the moisture level is lower in the soil and the surface temperature is higher. Note: Herbs aren’t just for spring. Start cilantro, parsley, etc. from seed and enjoy all winter! For more info see our “Planting" guide.
First frost
Some plants are more frost-tolerant than others. In the counties surrounding Mecklenburg, our average date for the first killing frost is Oct. 24. Cover growing beds or rows with burlap or a floating row cover supported by stakes or wire to keep the material from directly touching the plants. Individual plants can be protected by using milk jugs. Most semi-hardy and hardy vegetables will require little or no frost protection.Semi-hardy vegetables should be harvested before a heavy freeze. Root crops like carrots and radishes should be harvested or mulched heavily before a hard freeze. During mild winters, harvest may continue through spring.
Get the kids involved!
Collect seeds and compost summer plants. Start seeds in paper cups indoors, watch them sprout and then transplant them to the garden. Pull up the root crops, like carrots, when they’re ready to cook and then prepare a simple, fresh meal. Collect leaves for compost when they start to fall. Plant garlic cloves around Halloween to ward off “vampires" and carve those pumpkins from your summer garden.
P a g e | 18
VIII. Winter Gardening
Many gardeners enjoy gardening in cooler weather because there is less weed pressure, the temperatures are more enjoyable, they enjoy the types of crops you can grow in cool weather and like everything you grow in your garden, the food will be tastier and higher in vitamins than their supermarket alternatives. Winter gardening is about eating food fresh from your garden during the winter, not about growing the food in the winter. Due to the shorter days and much cooler air and soil temps, crops don’t grow much in the winter, they grow in the fall. To have a successful winter garden, you should aim to grow enough cold hardy plants in the fall that you can leave in the ground and harvest all winter. Think of your garden as a large refrigerator that you don't have to pay for! In cooler weather you can generally grow leafy crops (you eat the leaves) and root crops (you eat the roots). Some, like beets and turnips, are great because you can eat the root AND the leaves.
Plant cold hardy or frost hardy varieties. Of the cool weather crops some are more cold hardy (their cold tolerance level) than others. If your goal is winter harvesting be sure to select cold hardy plants and cold hardy varieties of plants. Here is a quick list of cold hardy plants that I have seen live through frost, freezes, and even snow on the ground:
Collard Greens Brussel Sprouts Kale Spinach Garlic Onions
Mulch Heavily
Mulching with a carbon source helps protect your soil and keeps it from freezing for a while. Think of it as a blanket for your plants (but don’t cover them!). Mulching also helps retain moisture, suppress weed growth, and when its time to turn your soil, you are folding in nutrients and organic matter. Here are some good sources of mulch: Leaves (free and plentiful in the fall, become a leaf thief and take bags from neighbors as well), straw (preferred over hay because it has less weed seeds in it), hay (the top cutting of grass, therefore it has seeds in it that may sprout in the spring), partially decomposed compost, and Shredded paper.

P a g e | 19
Season Extenders
These tools will help you adjust the temperatures of your crops which will keep you crops alive longer in cold weather and may keep some crops growing past when they would normally go dormant.
Cold frames:
These are simply wooden planter boxes with glass lids that you can open to vent. During the day keep them vented. At night close the lid. Cold frames can be used as mini greenhouses as you start plants or they can house plants for the life of the plant. Many gardeners have success growing lettuce in cold frames throughout the winter.
Row covers:
Thin fabric or plastic that is gently wrapped over the plants like a blanket. Some plants do fine with the row cover resting right on the plant, other more delicate plants prefer that the row cover is held up by thin metal tubing or PVC pipe. Row covers don’t prevent the temperatures from getting just as cold as outside the row cover. What they do is simply slow down the rate of the temperature decrease. Often, it is not cold temps that damage plants, rather it is the rapid drop in temperatures that often happens in the winter when the sun goes down.
Greenhouses:
A greenhouse is a small room with glass or plastic sides and roof that let light in. They let the sunlight in and hold heat well which will help keep your winter plants alive and possibly growing in the winter. Some greenhouses have heaters which allow gardeners to grow almost any crops they want as long as they are careful about regulating the temperature. Greenhouses are also commonly used to start plants in the early Spring before transplanting them in the ground.
Getting a Head Start on Spring
Some plants like spinach will grow enough to get established in the fall, then go dormant in the winter (you can still harvest if you want), and then in the Spring they start growing again. Because these plants that got established in the Fall already had a healthy root system, they really take off when it starts to warm up. In this way, you can have VERY early spinach.
P a g e | 20
Growing Cover Crops to Build the Soil
Consider setting aside part of your winter gardening for growing a cover crop (also called green manure) that will protect your soil and build fertility for next spring and summer. Cover crop seeds are spread over a bed in the fall, grow all winter, and then are dug under in early spring. Here are a couple good winter cover crops: Crimson Clover, Winter Rye, Hairy Vetch
Sheet Composting
Another way to build your fertility for the next year is to sheet compost over the late fall and winter. Sheet composting also called lasagna composting is essentially building a very low spread out compost pile in your garden that will break down and feed your soil. To get started, spread food scraps or other nitrogen (coffee grounds, farm animal poop, etc) in your garden area. Then, add a thick layer of leaves (plentiful in the fall) and give it a good soaking with water. If you want, add another layer of food scraps, leaves, and water on top. Then, leave the spot alone until the spring when your can till or dig all those good composted nutrients into your soil.
Winter “Gardening”
Use the down time to take care of your tools and plan your spring and summer gardens. Another way to keep the gardening hobby going in the winter is to use the natural rhythm to do some gardening related work that doesn’t involve digging in the dirt. All tools need cleaning, sharpening, and other maintenance. Why not get this done while it is cold out so that you will be ready for spring? You could also use the winter months to read seed catalogs, plan your garden, and dream about spring. That way, when spring does come, you will be ready and itching to get out and work the soil.
P a g e | 21
IX. Organic Pest & Disease Controls
One of the principles of organic gardening is to avoid using synthetic chemicals to control undesirable pests. Since pests come in all shapes and sizes, here’s a few strategies for you to try. This guide is only a starting point.
Strategies to prevent and control pests and disease
Integrated Pest Management is an overall strategy aimed at reducing or eliminating the amount of pesticides used in horticulture. The three-pronged approach involves: prevention, observation, and intervention. Prevention starts in the planning phase of your garden. Be sure to check for fire ants and other pests (including small mammals) during the site evaluation and take precautions while you are preparing the garden. Use good quality soil, compost, and mulch. Companion planting (below) to attract birds and “good” bugs is another preventative strategy. You can also release good bugs, such as lady bugs and praying mantis into areas of your garden infested with insect pests. These beneficial insects are available for sale at garden centers and through mail order. Observation will be an ongoing need in the garden. One of the first steps is knowing the difference between pests and allies (bad bugs and good bugs). Keep an insect guide around the garden to help you identify insects and larvae that you find in the garden. Someone needs to check plants weekly, if not daily. Is the problem concentrated to a particular plant type. Intervention should always start with the least invasive strategy first. Removing insects by hand and dropping them into a bucket of soapy water is effective, but labor intensive. There are a number of certified organic approved substances that can be used as pesticides in organic gardens (below). Companion planting is another garden strategy that needs to be implemented in the planting phase. Attract birds with seed and berry-bearing plants: black-eyed susans, coneflowers, cosmos, sunflowers, roses, blueberry, and dogwood, for example. (These will also attract beneficial pollinators!)
P a g e | 22
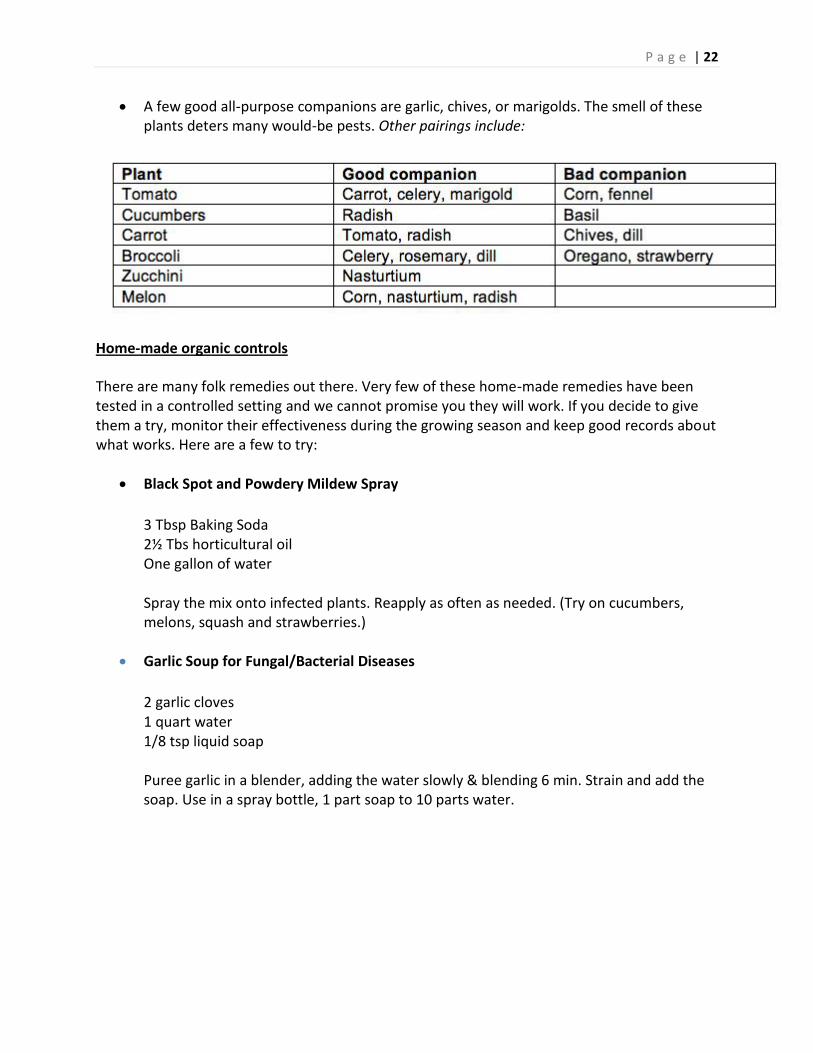
A few good all-purpose companions are garlic, chives, or marigolds. The smell of these plants deters many would-be pests. Other pairings include:
Home-made organic controls
There are many folk remedies out there. Very few of these home-made remedies have been tested in a controlled setting and we cannot promise you they will work. If you decide to give them a try, monitor their effectiveness during the growing season and keep good records about what works. Here are a few to try:
Black Spot and Powdery Mildew Spray
3 Tbsp Baking Soda 2½ Tbs horticultural oil One gallon of water Spray the mix onto infected plants. Reapply as often as needed. (Try on cucumbers, melons, squash and strawberries.)
Garlic Soup for Fungal/Bacterial Diseases
2 garlic cloves 1 quart water 1/8 tsp liquid soap Puree garlic in a blender, adding the water slowly & blending 6 min. Strain and add the soap. Use in a spray bottle, 1 part soap to 10 parts water.

P a g e | 23
Soapy Pepper Spray Recipe
2 Tbsp red pepper 6 drops liquid soap 1 gallon water Let sit overnight and stir thoroughly. Spray weekly to protect all members of the cabbage family from critters.
Deer deterrent
Mix one egg per gallon of water and spray on plants. Reapply once a week or after rain. Sprinkle human hair around outside of garden. Barber shops will give you bags of it for free but you will get funny looks when you ask. Human urine is another smell-based deterrent. Just don’t let the neighbors catch you! If you want to try out more homemade sprays and creative home-made solutions to pests, check out Sharon Lovejoy’s Trowel and Error (Workman Publishing, 2003).
Approved organic controls
Bacillius thuringienses, or BT, is a bacterium that kills leaf-eating caterpillars by invading their digestive system. It is sold under a variety of brand names in the form of a soluble powder that is sprayed on the plant surface and is then ingested by the pest. Be sure to use the right type of BT for the pest you want to control. Diatomaceous earth is fossilized remains of prehistoric diatoms. The ground-up rock is somewhat abrasive and its content is mostly silica. It creates an abrasive barrier when sprinkled around the base of plants and the moisture absorbency of the substance will desiccate (suck the moisture out of) insects that come into contact with it.
Just for Kids
Make a snake out of worn sections of black or green garden hose. Paint the hose to resemble a snake and hang it over tree branches to keep rodents and birds away from your fruit trees. Build and decorate bird houses to encourage these insect-eating friends to visit the garden. Sources: http://www.cdcg.org/pests.html; Lovejoy, Trowel and Error

P a g e | 24
X. Composting
Compost is a dark, mineral-rich material that is the result of decomposed garden and kitchen waste. You can reduce waste in your garden and create free materials for improving soil quality by setting up a bin in your garden. The most important thing to remember is that compost is a natural process. It is going to happen anyway. We are just trying to speed it up a little and control the end product. Don’t worry! See the bottom of this page for info on how to sign up for a hands-on composting workshop in your area. There are a variety ways to compost and the style of composting you choose depends largely on what type of organic material you are putting in your compost. For community gardens, we recommend the following types: Hot & fast, trench, and slow & cool. The trench and slow & cool methods require more space and time than hot & fast, so use these techniques as a back-up. To use up kitchen scraps at home and make some humus-rich compost for your backyard garden, you might also try Vermicomposting (worms) or Bokashi (an anaerobic method using live organisms you can buy online).
Hot compost:
What do you need to get started?
A space: Place your bin anywhere that is convenient (a sunny location will help speed up the “cooking” and will require more water than a shady location.)
A bin: While not absolutely necessary, compost piles in bins have a neater appearance and heat up faster, speeding up the composting process. You can buy a bin, or build one inexpensively from simple materials. Here’s one example that we love and use often: Take 10-12 feet of 2”x4” welded wire fencing 36 inches high. Leave one-inch lengths of horizontal wire sticking out on one side. Form a cylinder and use the one-inch lengths of wire to hook around the other end to hold the fencing together. To turn the pile, simply unhook the wire and lift the fencing away from the pile. Set up again right next to the pile and use a pitch fork to fork the pile into the new bin.
Tools: A shovel, garden hose, wheelbarrow (for transporting), rake (for keeping the area tidy), pitchfork or similar tool (optional, but useful for aerating and turning your compost), and a 3-4 length of 5/8” rebar (not absolutely necessary, but can be used to aerate pile and can serve as a cheap thermometer to see if your pile is heating up like it should be.) See note below.

P a g e | 25
Making a batch of compost
The best way to make compost is in batches, filling your bin to the top with the proper materials. This aerobic (with air!) composting is powered by microbes that require oxygen. You make compost by combining the right amounts of water, air, carbon, and nitrogen.
Water and air: Make sure your batch is thoroughly moistened. The pile should be moist but no water should come out if you squeeze a handful. Air is provided by turning the compost or by including chunky materials such as twigs and Sweet Gum tree gum balls.
Carbon: This is the “brown” material you add to your batch. One of the easiest (and cheapest!) sources is fallen leaves, which can be collected in the fall and stored for multiple batches throughout the year. Other brown material includes: spoiled hay and straw, shredded paper and cardboard, and stable litter.
Nitrogen: This is the “green” material and is what heats up your pile. Sources include fresh manure from farm animals (not from your house pets!), grass clippings, and raw vegetable kitchen scraps (no meat or dairy!). Coffee grounds, though brown, are actually “green material.” You can also use purchased materials such as alfalfa meal, cottonseed meal, blood meal or commercial fertilizer.
***A note on grass clippings: Grass is a very rich nitrogen source, but clippings can easily clump together to form a stinky mess in your compost. They make a great natural mulch for your lawn, so one solution is to just leave them there. If you want to add them to your compost, mix them with sawdust or dry leaves before adding to your batch. ***
Putting it all together
Layer the raw materials, following this sequence 3 or 4 times until your bin is full:
1. Add about one foot of leaves (about 3-4 bags in the simple bin described above). Pack it down with a rake and wet the leaves. 2. Add nitrogen (food scraps, cow manure, grass clippings, etc), spreading it evenly over the surface of the leaves, sprinkle on 6 cups of organic fertilizer or 12 cups of alfalfa meal (the fertilizer or alfalfa is optional but will speed up decomposition.) 3. Add one shovelful of rich soil or finished compost (to introduce some beneficial microorganisms that do all the heavy lifting.) 4. Mix well with a garden fork while watering until the layer is soaked. 5. Repeat until the bin is full. Be sure to end with a layer of carbon to reduce odors. Some composters also add one inch of soil to the top of the bin to reduce odors.

P a g e | 26
Turning
If you don’t turn, you have a cool pile and that’s okay; it will simply take longer to get rich compost. Remember, don’t worry, compost happens! Turn a layered pile after the first two weeks, then three times over the next two months. If you start your pile in the spring, it should be ready in 4-6 months. If you start in the fall, it should be ready in 8-10 months. An alternative to turning is to take the dowel or rebar (see tools) and push holes into the compost from time to time, allowing air into the center of the pile.
Worms!
Worms can be added to cold compost piles to help speed up the rate of decomposition. You will want to keep the pile moist, but not wet and you will want to monitor the temperature of the pile in the summer months so that you do not cook your worms. If your pile is sitting on the ground, worms will find it and will come and go as they please as your compost heats up.
Just for kids!
Bring leaves and food scraps from home to add to the compost pile! Talk your parents into vermicomposting (composting with worms) because it is just plain awesome. To sign up for a composting workshop put on by our fabulous partner the Solid Waste Division of Mecklenburg County, visit http://www.wipeoutwaste.com.
Articles by Henry Owen with assistance from Kathy Metzo and Carol Adams. Document
compiled and edited by Brian Cline for Friendship Gardens, Inc.