gamemaker workflow
TRANSCRIPT

GameMaker Workflow
To begin I had to create a sprite for the player. I decided to have a bit of fun with the player
character to make him look a bit funnier than other sprites I plan to make. I used a 64x64 bit canvas.
After drawing the character sprite I thought I should animated him, so I copied the image and made
the flame coming from the character’s ship slightly smaller. I did this over again for four more
frames, and then I copied some of the frames to make it look like the flame was growing again. All
these images will be frames in an animation that is automatically made in GameMaker.
When I finished making the sprite; I centred the origin (found in the bottom right corner of the sprite
menu) and modified the mask to be an ellipse shape instead of a cube. This mask will act as a hit box
in a collision.

Next I created an object for the player and added code to it. This piece of code will allow the player
to move up, down, left and right on the screen using the W, A, S, D keys.
I also added limits to the movement to prevent the player object from going off the screen.
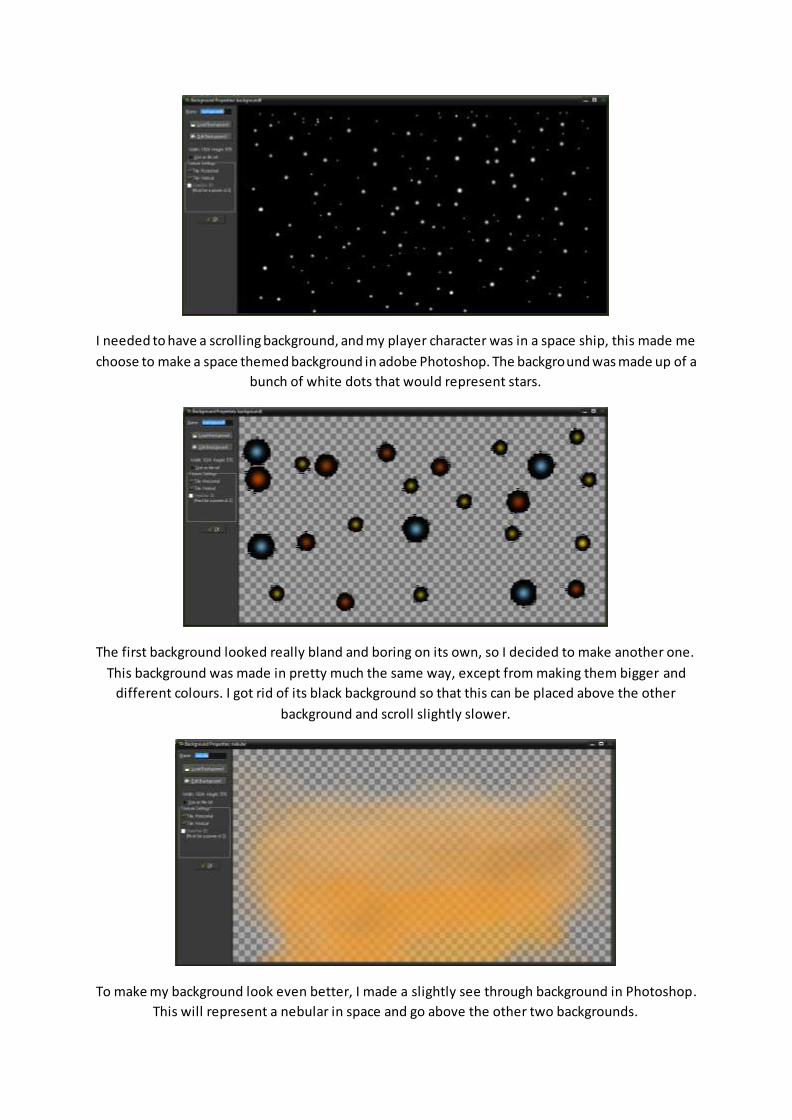
I needed to have a scrolling background, and my player character was in a space ship, this made me
choose to make a space themed background in adobe Photoshop. The background was made up of a
bunch of white dots that would represent stars.
The first background looked really bland and boring on its own, so I decided to make another one.
This background was made in pretty much the same way, except from making them bigger and
different colours. I got rid of its black background so that this can be placed above the other
background and scroll slightly slower.
To make my background look even better, I made a slightly see through background in Photoshop.
This will represent a nebular in space and go above the other two backgrounds.
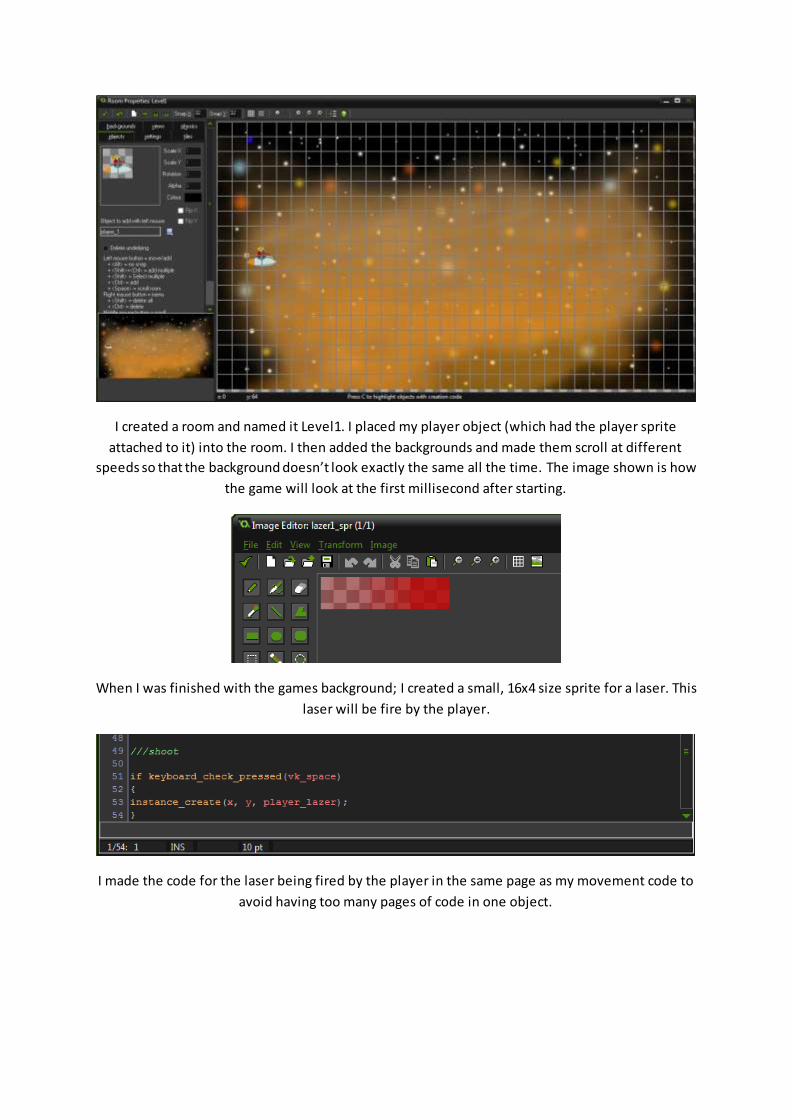
I created a room and named it Level1. I placed my player object (which had the player sprite
attached to it) into the room. I then added the backgrounds and made them scroll at different
speeds so that the background doesn’t look exactly the same all the time. The image shown is how
the game will look at the first millisecond after starting.
When I was finished with the games background; I created a small, 16x4 size sprite for a laser. This
laser will be fire by the player.
I made the code for the laser being fired by the player in the same page as my movement code to
avoid having too many pages of code in one object.

After making the laser sprite I created an object for the laser and coded it, making is move right
across the screen after being fired at pixel a second. I also used a sound that will make a zap sound
play when the laser is fired.
I also coded the laser so that it would be destroyed when it leaves the room (goes off screen) so that
it doesn’t slow down the game and create lag when enough are fired.
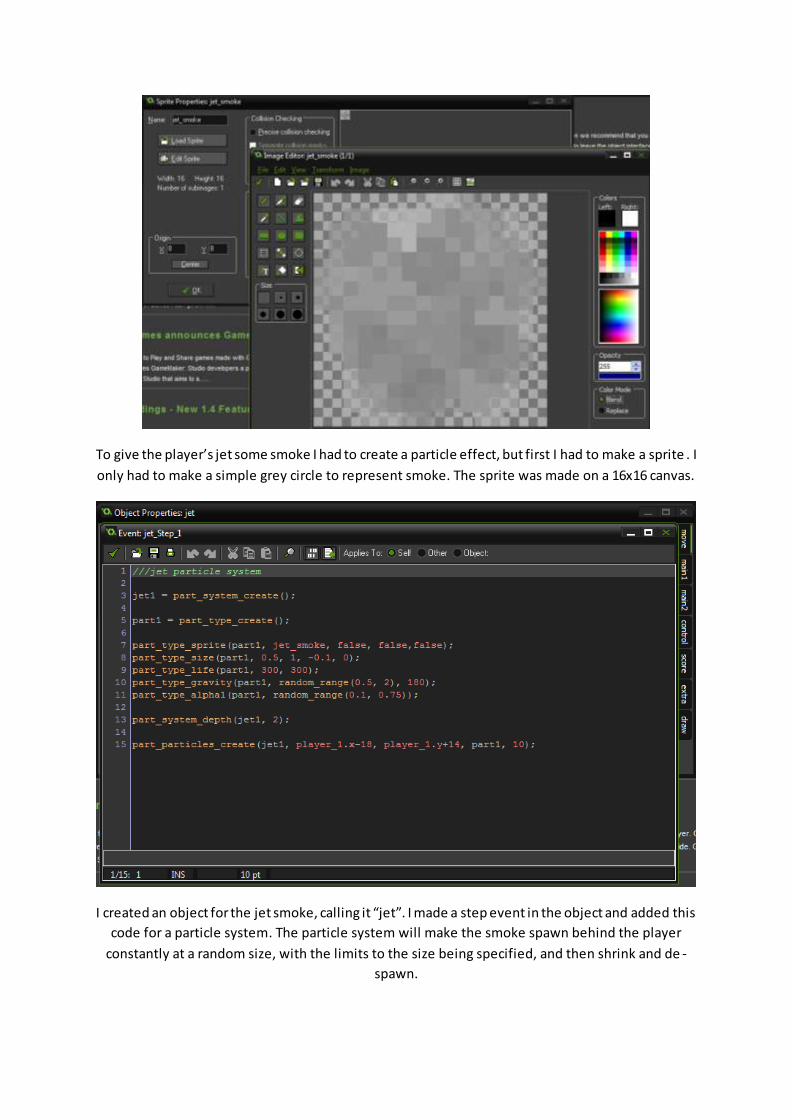
To give the player’s jet some smoke I had to create a particle effect, but first I had to make a sprite . I
only had to make a simple grey circle to represent smoke. The sprite was made on a 16x16 canvas.
I created an object for the jet smoke, calling it “jet”. I made a step event in the object and added this
code for a particle system. The particle system will make the smoke spawn behind the player
constantly at a random size, with the limits to the size being specified, and then shrink and de -
spawn.

Once that I was done making my player laser I needed to make an enemy for the player to shoot. I
named it enemy1 because I planned to make at least two enemies. I animated its jet flame the same
way I did the player sprite’s animation. I also centred the origin as I will for all my sprites. I used a
64x64 bit canvas.
I gave the enemy sprite an ellipse mask as it works well with the sprite shape and having a precise
mask can slow down the game.

I created an object for the enemy1 sprite and gave it code which allows it to move left across the
screen, going against the player. I also gave it a shoot alarm and code that allows the enemy to shoot
another laser that I made before adding the code.
The enemy laser uses a 16x6 bit purple flame sprite to make it more visible among the player’s laser.
The code for this laser is essentially the same as the player laser, except this laser is fired at the
player instead of it just going horizontal.
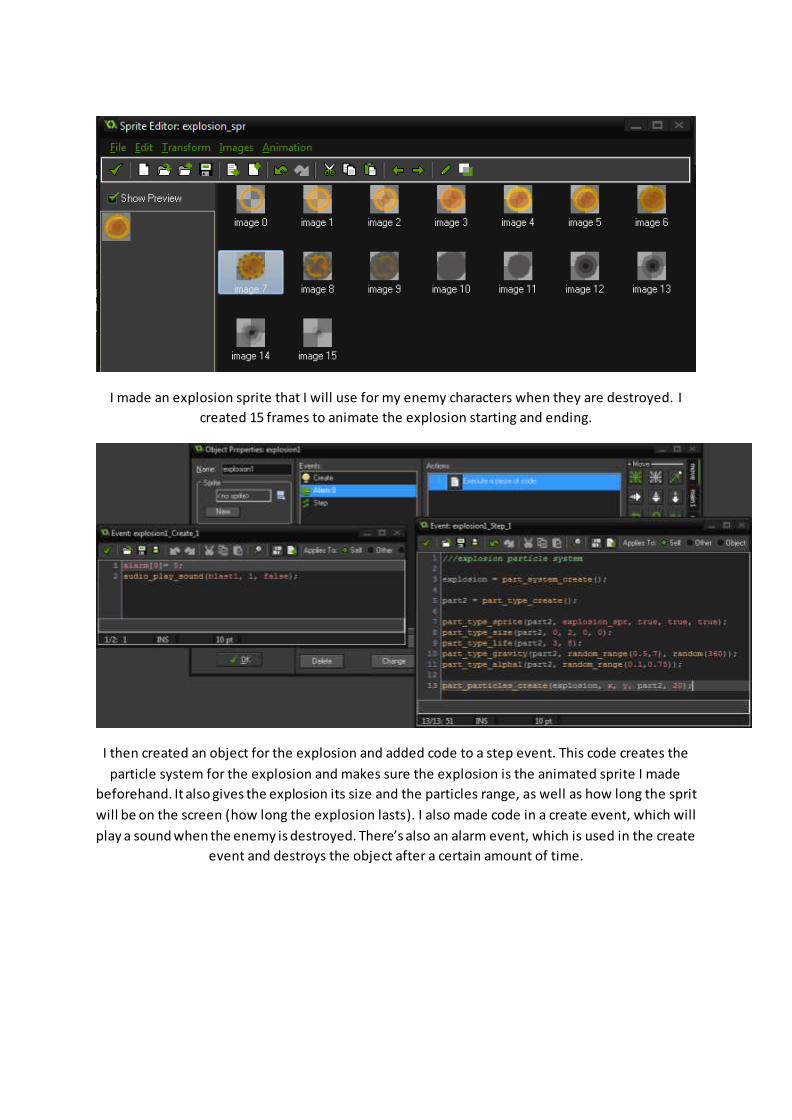
I made an explosion sprite that I will use for my enemy characters when they are destroyed. I
created 15 frames to animate the explosion starting and ending.
I then created an object for the explosion and added code to a step event. This code creates the
particle system for the explosion and makes sure the explosion is the animated sprite I made
beforehand. It also gives the explosion its size and the particles range, as well as how long the sprit
will be on the screen (how long the explosion lasts). I also made code in a create event, which will
play a sound when the enemy is destroyed. There’s also an alarm event, which is used in the create
event and destroys the object after a certain amount of time.

I went onto the enemy1 object and added collisions with the player and the player laser, and added
code to them that spawns the explosion when they are destroyed by either the player laser or a
collision with the player.
I created an object called system, this is used for placing code so that I don’t have too many objects
on my objects list and it also makes code easier to find. I added an alarm event to spawn the enemy1
object into the game until the player dies or the level ends. I used a create event to make the alarm
spawn the enemy. I would also use this system object to code in things such as a health bar and
score system.

I also made an explosion for when the player is killed.
I created an object for this explosion and gave it code for a particle system; it’s pretty much the
same as the code for the other explosion with just a few minor changes.
I added an alarm to the object and coded it to play another explosion sound. It will also restart the
game when the player dies (when the explosion is finished).

I used the system object to create some code that will give the player a shield (health bar). The
second piece of code is used to make the health bar visible in the top left of the screen, it al so gives
it a colour and size and length.
I added more code to the player object so that when it dies (the shield is brought down to zero) the
explosion will swap places with the player sprite and the particle system I have on the player jet is
destroyed.
I added collisions to the player, with the enemy1 and the enemy laser. The laser will take 15 points
from the 100 point health bar, and a collision with the enemy itself will take 30 points.

I created a second enemy sprite and called it enemy2 using a 64x64 bit canvas, the bars in its mouth
move to the right as if they are rotating as does the orange dot in its eye. Unfortunately the eye is
difficult to see so I may change that at a later date.
I also created rocket for the new enemy, I named it enemy2 laser just to be more consistent. This
rocket is slightly larger than the enemy laser and will do more damage to the player. The red dot will
help the player notice it easier.

I then created an enemy2 object and gave it movement and shooting code. The enemy will move left
across the screen at 8 frames per second and shoot every 20 frames. This enemy also has the ability
to move vertically (vspeed), following the player.
I gave the enemy code that will destroy it when it leaves the room and makes sure that it can’t move
off the top or bottom of the screen.

I created the enemy2 laser object and added code that will destroy it when it leaves the room, as
well as code to make it move horizontally and play a sound when it’s fired.
I created collision events for the enemy2 and its laser in the player object. A hit from the laser will
take 20 health points and crashing into the enemy will take 40 health points.
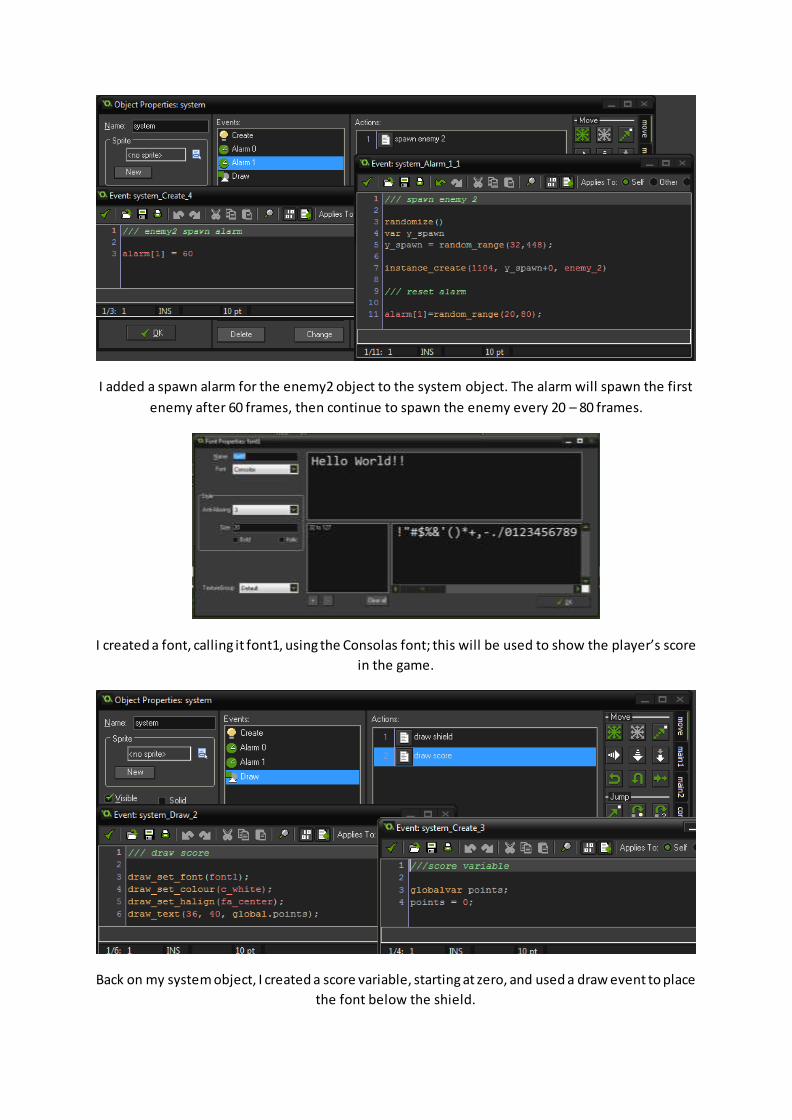
I added a spawn alarm for the enemy2 object to the system object. The alarm will spawn the first
enemy after 60 frames, then continue to spawn the enemy every 20 – 80 frames.
I created a font, calling it font1, using the Consolas font; this will be used to show the player’s score
in the game.
Back on my system object, I created a score variable, starting at zero, and used a draw event to place
the font below the shield.

I went onto the enemy1 object and added collisions with the player and the player laser, and added
code to them that spawns the explosion when they are destroyed by either the player laser or a
collision with the player. In the “shot by player” code I added code to make the score points go up by
one point when the enemy is shot by the player but not when it crashes into them.
I also gave the enemy2 object the same collision code as enemy1 so the same thing will happen
when the player shoots enemy2.
I created a start button; I made the image on Photoshop then loaded it in as a sprite. The second,
smaller, image will be used to appear when the mouse is moved over the button.
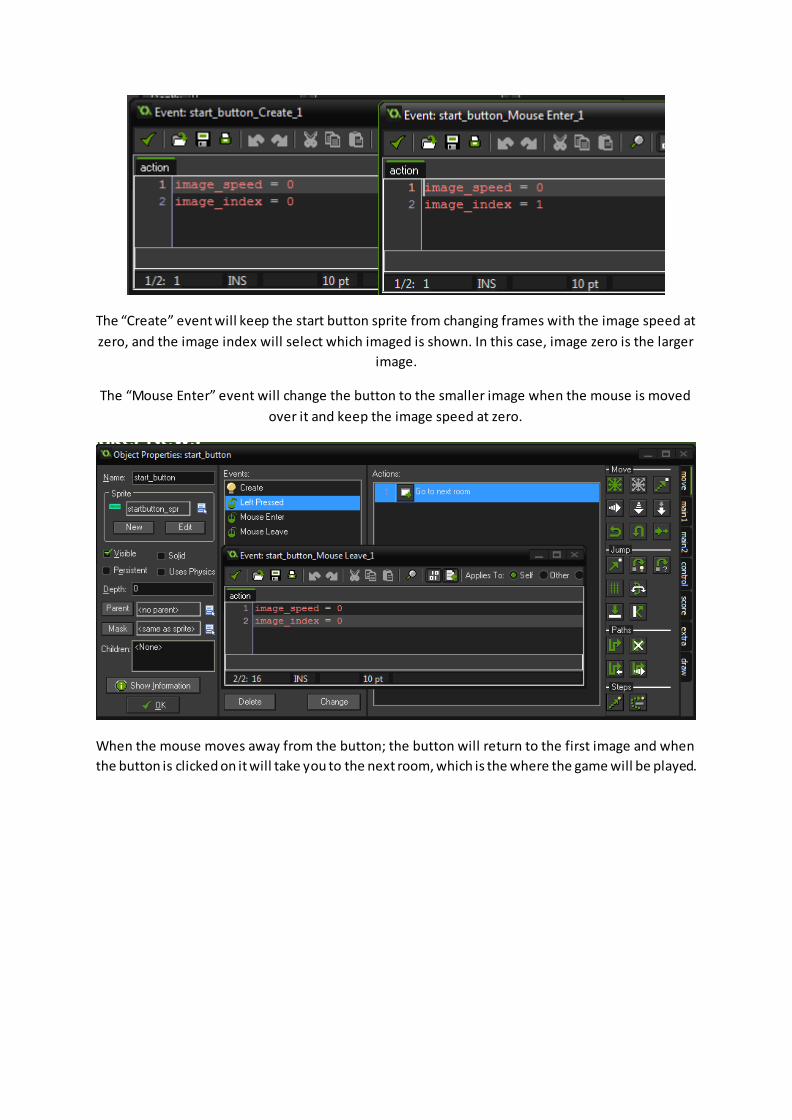
The “Create” event will keep the start button sprite from changing frames with the image speed at
zero, and the image index will select which imaged is shown. In this case, image zero is the larger
image.
The “Mouse Enter” event will change the button to the smaller image when the mouse is moved
over it and keep the image speed at zero.
When the mouse moves away from the button; the button will return to the first image and when
the button is clicked on it will take you to the next room, which is the where the game will be played.