gaia installation and upgrade guide r75 - boway. · pdf fileinstallation and upgrade guide...
TRANSCRIPT
27 October 2011
Installation and Upgrade Guide
Gaia
Early Availability
R75

© 2011 Check Point Software Technologies Ltd.
All rights reserved. This product and related documentation are protected by copyright and distributed under licensing restricting their use, copying, distribution, and decompilation. No part of this product or related documentation may be reproduced in any form or by any means without prior written authorization of Check Point. While every precaution has been taken in the preparation of this book, Check Point assumes no responsibility for errors or omissions. This publication and features described herein are subject to change without notice.
RESTRICTED RIGHTS LEGEND:
Use, duplication, or disclosure by the government is subject to restrictions as set forth in subparagraph (c)(1)(ii) of the Rights in Technical Data and Computer Software clause at DFARS 252.227-7013 and FAR 52.227-19.
TRADEMARKS:
Refer to the Copyright page (http://www.checkpoint.com/copyright.html) for a list of our trademarks.
Refer to the Third Party copyright notices (http://www.checkpoint.com/3rd_party_copyright.html) for a list of relevant copyrights and third-party licenses.

Contents
Clean Gaia Installation on an Open Server ........................................................... 4 Installing Gaia on an IP Appliance ......................................................................... 5 Upgrading from SecurePlatform to Gaia ............................................................... 7
Upgrading an Open Server .................................................................................. 7 Upgrading an Appliance ...................................................................................... 7 Upgrading a ClusterXL gateway Cluster .............................................................. 8 Advanced Upgrade of a Standalone Deployment ................................................ 9
Upgrade Workflow .......................................................................................... 9 Before Upgrading ............................................................................................ 9 Getting the Migration Tools ............................................................................. 9 Procedures on the Source Computer .............................................................10 Procedures on the Target Computer ..............................................................10 Testing the Target and Connecting to the Network ........................................10
Upgrading from IPSO to Gaia............................................................................... 12 Supported IPSO to Gaia Upgrade Path ..............................................................12 Preparing for the Upgrade ..................................................................................13 IPSO to Gaia Upgrade Procedure Overview .......................................................13 Step 1: Getting the Upgrade Package and the Gaia Image ................................14 Step 2: Mounting Gaia ISO on an FTP Server ....................................................15 Step 3: Installing the Upgrade Package on the IP Appliance ..............................15 Step 4: Running the Upgrade Script ...................................................................15 Step 5 (Optional, Recommended): Supplying Backup Server Information ..........16 Step 6: (Optional): Supplying Special Upgrade Package Server Information ......16 Step 7: Confirming Your Selections ....................................................................17 Step 8: Upgrade Runs Automatically ..................................................................17 Step 9: Making Sure the Upgrade Succeeded ....................................................18 Rollback from Gaia to IPSO ................................................................................19
Initial Configuration .............................................................................................. 21 Running Gaia on a 64 Bit Computer .................................................................... 22

Page 4
Chapter 1
Clean Gaia Installation on an Open Server
This section shows how to do a clean installation of Gaia as a Security Gateway and/or Security Management server.
To do a fresh installation of Gaia using the DVD:
1. Put the Gaia DVD into the drive.
2. Boot the computer from the DVD.
3. When the boot screen shows, press Enter to continue.
You must press Enter in 90 seconds, or the computer will try to boot from the hard drive.
4. Follow the instructions to install Gaia.

Page 5
Chapter 2
Installing Gaia on an IP Appliance Mount the Gaia ISO image on a Linux-based FTP Server
1. Upload the Gaia ISO file to an FTP server
2. On a Linux-based FTP server, run:
mount -o loop -t iso9660 <ISO_filename> <mounting_destination_dir>
Do a clean installation of Gaia on an IP Appliance with IPSO.
1. Use ftp to download the Gaia boot manager file install_gaiabootmgr to the IP Appliance.
Be sure to download from the ftp server as a binary file.
2. Run chmod +x install_gaiabootmgr
3. Verify that the boot manager is located in the logical drive ad0 by running the command ipsctl –a | grep CF
The output will be similar to
hw:disk:ad:0:location = InternalCF
hw:disk:ad:0:type = CF-INTERNAL-IDE
4. Install the boot manager by running
./install_gaiabootmgr /dev/ad0
The boot manager is installed.
Installing bootmgr Version IP-Series-BM-GAIA81_B730174012-2011.08.22-115338
on /dev/ad0
Warning: Installer will partition and install the bootmanager image on
/dev/ad0
Do you want to continue? [yes/no]
5. Type y
Installing image...
Installation of image IP-Series-BM-GAIA81_B730174012-2011.08.22-115338 done.
Please reboot the system to proceed with gaia installation.
6. Reboot the IP Appliance.
The appliance boots into the Gaia boot manager. You will see the prompt:
BOOTMGR[1]>
7. Run the command
install
8. Supply the IP settings of the IP Appliance
In this example output the FTP server is in the same subnet as the IP Appliance, so there is no default gateway:
Enter IP address of this client (): 192.0.2.10
Enter Netmask length of this client (24):
Do you want to enter default gateway ? [y/n] () n
9. Choose the interface that is connected to the FTP server
Choose an interface:
1) eth1
2) eth2
3) eth3
4) eth4
Enter a number [1-4]: 1
10. Supply the FTP server details

Installing Gaia on an IP Appliance Page 6
Enter IP address of FTP server (): 192.0.2.2
Enter user name (admin): root
Enter password for "root":
Enter Directory on the FTP server (): <mounting_destination_dir>
11. Specify the type of IP appliance: Disk-based or diskless:
Diskless Install (No):
For a diskless appliance, choose Yes
For a disk-based appliance, choose No
12. Confirm your selections:
Network Interface = eth1
Client IP address = 192.0.2.10
Client Netmask length = 24
FTP Server IP address = 192.0.2.2
FTP user = root
FTP Directory = <mounting_destination_dir>
Diskless Install = No
Are these values correct ? [y/n] (y)
##################### Network Installation ########################
Ensure you have backed-up all required data onto a remote machine.
This process will DESTROY any existing files and data on your disk(s).
#####################################################################
Continue? (y/n) [n]y
13. When the installation has finished, you will see the Gaia prompt.
14. Connect to the WebUI. Browse to
https://<IP Appliance IP Address>
15. Run the First Time Configuration Wizard.
Congratulations. Gaia is installed on the IP Appliance.

Page 7
Chapter 3
Upgrading from SecurePlatform to Gaia
This section explains how to upgrade an open server, an appliance, or a ClusterXL gateway cluster from SecurePlatform to Gaia. The Security Gateway and/or the Security Management server on the appliance is upgraded to R75.
In This Chapter
Upgrading an Open Server 7
Upgrading an Appliance 7
Upgrading a ClusterXL gateway Cluster 8
Advanced Upgrade of a Standalone Deployment 9
Upgrading an Open Server To upgrade an open server using the DVD:
1. Do these steps to upgrade your product licenses to R75 or higher:
a) Upgrade the licenses.
b) Attach the licenses to the Security Gateway or standalone Gateway.
2. Connect a DVD drive to the USB port on the computer.
3. On non-Windows platforms, run: patch add cd
4. Select the applicable upgrade option.
5. After the upgrade, remove the DVD from the drive.
6. Reboot.
7. Install a policy:
a) Using SmartDashboard of the correct version, connect to the Security Management server.
b) Open the General Properties page of the Gaia Gateway object.
c) Click Get to update the Platform details.
d) Install the policy on the Gaia Gateway.
Upgrading an Appliance To upgrade a SecurePlatform appliance:
1. Do these steps to upgrade your product licenses to R75 or higher:
a) Upgrade the licenses.
b) Attach the licenses to the Security Gateway or standalone Gateway.
2. Obtain the appliance upgrade package. The package name is (or is similar to) splatform_upg_gaia_ea2.tgz

Upgrading from SecurePlatform to Gaia Page 8
3. Connect to the SecurePlatform appliance from a Web browser to
https://<appliance_ip_address>.
4. In the login page, enter an administrator username and password.
5. Go to the Upgrade page.
6. Upload the appliance upgrade package to the appliance.
7. Ignore any warning messages.
8. Continue according to the on-screen instructions.
After the upgrade is complete, the appliance boots to Gaia.
9. Install a policy:
a) Using SmartDashboard of the correct version, connect to the Security Management server.
b) Open the General Properties page of the Gaia Gateway object.
c) Click Get to update the Platform details.
d) Install the policy on the Gaia Gateway.
Upgrading a ClusterXL gateway Cluster In this procedure, the gateway cluster has an active member (A), and two backup members (B and C). First upgrade B and C, and then upgrade A.
To do a zero down-time upgrade of a ClusterXL gateway cluster:
1. Upgrade the backup members (B and C). See Upgrading an Open Server from SecurePlatform to Gaia ("Upgrading an Open Server" on page 7) or Upgrading an Appliance from SecurePlatform to Gaia ("Upgrading an Appliance" on page 7).
2. Verify the active member (A) is Active, and the and BC are Ready: On each member, run the command
cphaprob stat.
3. Transfer traffic to members B and C by stopping traffic on A. On A, run cphastop
4. Upgrade member A, as above.
5. Install the policy on A.
Upgrading from SecurePlatform to Gaia Page 9
Advanced Upgrade of a Standalone Deployment
This section shows the procedure for an advanced upgrade of a standalone deployment from SecurePlatform to Gaia.
Using advanced upgrade, you install R75 on Gaia on a different computer than the one you want to upgrade. This is typically a clean installation, but you can also use another existing server. You then migrate the management databases from the existing (source) computer to the new (target) computer using the
migrate command or the installation DVD.
You can do an advanced upgrade on primary and secondary Security Management servers. Advanced upgrade has these advantages:
Prevents unnecessary down time during the upgrade.
Lets you test the new version before you use it.
Lets you move your Security Management server to a different platform.
Important - The source and target computers must have exactly the same products and features installed.
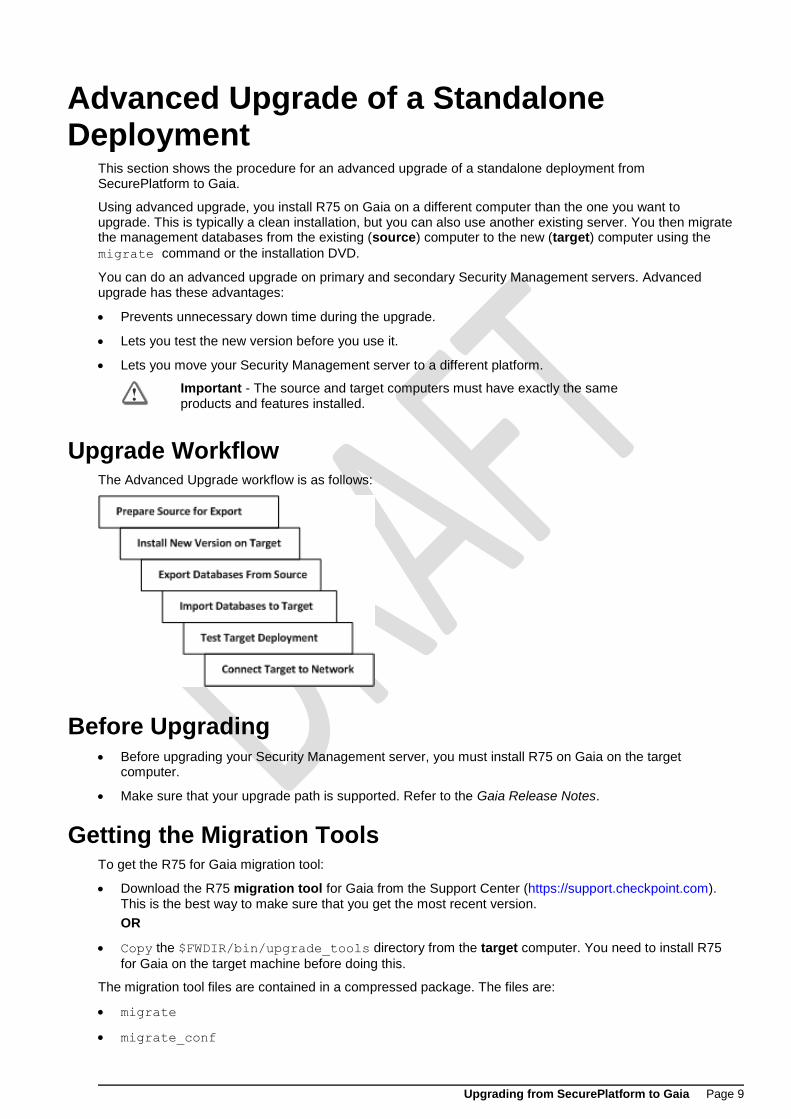
Upgrade Workflow The Advanced Upgrade workflow is as follows:
Before Upgrading Before upgrading your Security Management server, you must install R75 on Gaia on the target
computer.
Make sure that your upgrade path is supported. Refer to the Gaia Release Notes.
Getting the Migration Tools To get the R75 for Gaia migration tool:
Download the R75 migration tool for Gaia from the Support Center (https://support.checkpoint.com). This is the best way to make sure that you get the most recent version.
OR
Copy the $FWDIR/bin/upgrade_tools directory from the target computer. You need to install R75
for Gaia on the target machine before doing this.
The migration tool files are contained in a compressed package. The files are:
migrate
migrate_conf

Upgrading from SecurePlatform to Gaia Page 10
upgrade_export
upgrade_import
Procedures on the Source Computer Preparing the Source For Export
1. Copy the migration tools files to the source computer. Use FTP, SCP or similar.
Note:
Copy the migration tools to a temporary directory, such as /var/tmp.
Do not overwrite existing tools.
2. Make sure the files have executable permissions. For example, In the temporary directory, run chmod 777 *
3. Run fw logswitch to close the SmartView Tracker log files (optional).
4. Close all SmartConsole applications on GUI clients. Alternatively, you can run the cpstop command on
the source computer (Do not do this for standalone deployments).
Important - If you don't close the GUI clients or run cpstop, the
exported database can become corrupted.
Now, create the database export file.
To create a database export file on the source computer:
1. Run: ./migrate export <new database name>.tgz.
2. Do the instructions shown on the screen. This creates the <new database name>.tgz file.
3. Move the database export tgz file to a safe, temporary location on another computer. Use FTP, SCP or
similar. If you can move it directly to the target computer, place the database file in a temporary directory on the target.
Procedures on the Target Computer 1. Install R75 Gaia Security Management Server or a standalone deployment on the target computer
("Clean Gaia Installation on an Open Server" on page 4). Configure as required.
2. Get the R75 migration tool for Gaia. Use the migration tool you downloaded from the Support Center, or
use the tools in the $FWDIR/bin/upgrade_tools directory of the target computer.
3. Import the <database file name>.tgz file from the source computer to the target:
a) Connect to the target using a secure console connection, such as ssh.
b) Authenticate with the administrator username and password.
c) Log in to the shell: Run shell.
d) Move the database tgz file from the source computer to a temporary directory on the target
computer. You can use ftp to move the file.
e) Run: cd <path to temporary directory>.
f) Run: ./migrate import <new database name>.tgz.
g) Do the instructions on the screen to import the databases.
Testing the Target and Connecting to the Network 1. Test the target <t_gaia> installation:
a) Connect to the Security Management server using the R75 SmartDashboard.
b) In SmartDashboard, edit the target object.
c) In the General Properties page, click Get.

Upgrading from SecurePlatform to Gaia Page 11
Note - The OS is shown as SecurePlatform. This is correct for Early Availability.
d) Install a policy.
2. Disconnect the source computer from the network.
3. Connect the target computer to the network.

Page 12
Chapter 4
Upgrading from IPSO to Gaia This chapter explains how to upgrade an IP Appliance from IPSO to Gaia. The Security Gateway and/or the Security Management server on the IP Appliance is upgraded to R75.
This chapter also explains how to do a rollback from Gaia to IPSO.
In This Chapter
Supported IPSO to Gaia Upgrade Path 12
Preparing for the Upgrade 13
IPSO to Gaia Upgrade Procedure Overview 13
Step 1: Getting the Upgrade Package and the Gaia Image 14
Step 2: Mounting Gaia ISO on an FTP Server 15
Step 3: Installing the Upgrade Package on the IP Appliance 15
Step 4: Running the Upgrade Script 15
Step 5 (Optional, Recommended): Supplying Backup Server Information 16
Step 6: (Optional): Supplying Special Upgrade Package Server Information 16
Step 7: Confirming Your Selections 17
Step 8: Upgrade Runs Automatically 17
Step 9: Making Sure the Upgrade Succeeded 18
Rollback from Gaia to IPSO 19
Supported IPSO to Gaia Upgrade Path Upgrade to Gaia with R75 is supported from IPSO 6.2 with version R70 and higher.
Upgrading from IPSO to Gaia Page 13
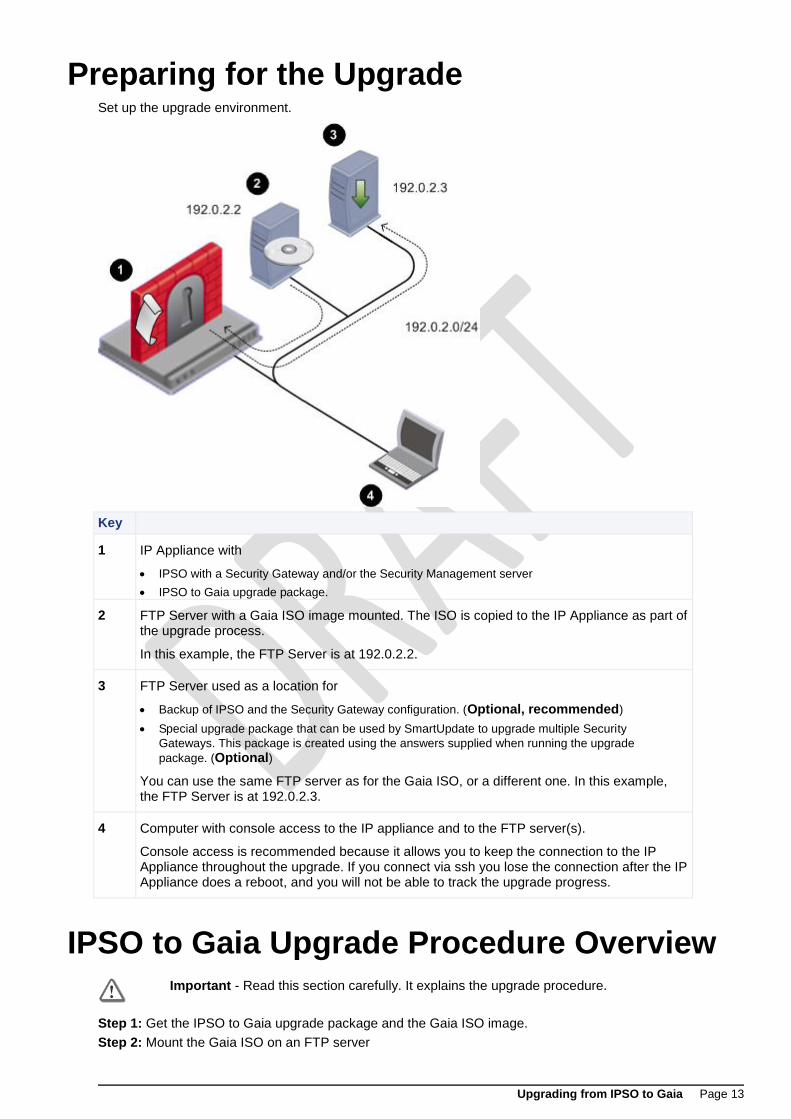
Preparing for the Upgrade Set up the upgrade environment.
Key
1 IP Appliance with
IPSO with a Security Gateway and/or the Security Management server
IPSO to Gaia upgrade package.
2 FTP Server with a Gaia ISO image mounted. The ISO is copied to the IP Appliance as part of the upgrade process.
In this example, the FTP Server is at 192.0.2.2.
3 FTP Server used as a location for
Backup of IPSO and the Security Gateway configuration. (Optional, recommended)
Special upgrade package that can be used by SmartUpdate to upgrade multiple Security
Gateways. This package is created using the answers supplied when running the upgrade
package. (Optional)
You can use the same FTP server as for the Gaia ISO, or a different one. In this example, the FTP Server is at 192.0.2.3.
4 Computer with console access to the IP appliance and to the FTP server(s).
Console access is recommended because it allows you to keep the connection to the IP Appliance throughout the upgrade. If you connect via ssh you lose the connection after the IP Appliance does a reboot, and you will not be able to track the upgrade progress.
IPSO to Gaia Upgrade Procedure Overview
Important - Read this section carefully. It explains the upgrade procedure.
Step 1: Get the IPSO to Gaia upgrade package and the Gaia ISO image.
Step 2: Mount the Gaia ISO on an FTP server

Upgrading from IPSO to Gaia Page 14
Step 3: Install the upgrade package on the IP Appliance using Network Voyager or clish.
Step 4: Run the upgrade package script, and supply information about the location of the Gaia ISO image.
Step 5: Optional, but recommended: Supply information about an FTP server to be used as a backup location for the IPSO system and configuration. You can use the backup to revert to the pre-upgrade configuration. The backup results in two tgz files, for:
IPSO. A Security Management server backup includes the:
Configuration database.
Configuration files.
User directories.
Log files.
Check Point Security Gateway and/or Security Management server.
Step 6: Optional: Supply information about creating a customized IPSO to Gaia upgrade package which can be used to upgrade multiple Security Gateways or Security Management servers without having to answer any questions. You can also use the special upgrade package as a SmartUpdate upgrade package for gateways. The procedure is:
Upgrade one Security Gateway using the standard IPSO to Gaia upgrade package. Supply the required information to create the special upgrade package.
Upgrade all your other Security Gateways simultaneously using the special upgrade package, without supplying any information. All IP Appliances must be able to access the same ftp servers as the first Security Gateway.
Step 7: Confirm your selections
Step 8: The upgrade package script now operates automatically:
a) If you chose to make a backup package: Copies the backup tarballs from the IP Appliance to the FTP server.
b) If you chose to make a customized upgrade package: Copies the package from the IP Appliance to the FTP server.
c) Copies the Gaia image from the FTP server to the IP Appliance.
d) Installs the Gaia image.
e) Installs the Gaia boot manager.
f) Reboots the IP Appliance.
At this point you will see the Gaia prompt on the IP Appliance
Step 9: Make sure that the upgrade succeeded.
Step 1: Getting the Upgrade Package and the Gaia Image
1. Download the Gaia installation package for IP Appliance from the Check Point Support Center (http://supportcenter.checkpoint.com).
You will see two packages:
Gaia ISO image
IPSO to Gaia upgrade package. The file name is <upgrade_package_name>.tgz.
For example CP-IPSO2GaiaUpgrade-1.4-1.tgz
2. Prepare the upgrade package:
EITHER: Copy the upgrade package to an FTP server, in a directory of your choice.
OR: Transfer the upgrade package by FTP to the home directory on the IP Appliance, or to some other location.
Upgrading from IPSO to Gaia Page 15
Step 2: Mounting Gaia ISO on an FTP Server
Mount Gaia ISO Image on a Linux-based FTP server:
1. Upload the Gaia ISO file to the FTP server
2. On a Linux-based FTP server, run: mount -o loop -t iso9660 <ISO_filename> <mounting_destination_dir>
Step 3: Installing the Upgrade Package on the IP Appliance
1. Log in to the IP Appliance using a console
2. Enter clish. Run clish
3. Install the I2G package on the IPSO appliance. Do this using Network Voyager
(http://supportcontent.checkpoint.com/documentation_download?ID=10293) , or using clish:
If the I2G package is on an FTP server, run:
add package media ftp addr <FTP_IP> user <uname> password <pass> name
<full_path>/<upgrade_package_name>.tgz
If the file is locally on the IP Appliance, go to the directory where the package is located, and run:
add package media local name ./<upgrade_package_name>.tgz
The upgrade package is installed.
Trying to install package: ./<upgrade_package_name>.tgz
Package Information --
Name : IPSO to Gaia Upgrade
Version : <version>
Release : <Release>
Description: IPSO to Gaia Upgrade Package (<upgrade_package_version>)
Package will be installed under: /opt
Package installed and activated successfully.
End of package installation.
The installation success message is Package installed and activated successfully.
The package is reported to be activated, however, there are no background processes running.
4. Show the active packages. Run show package active
Name Ver Rel Dir Desc
{Check Point CPinfo } 10 00 /opt/CPinfo-10 {Check Point CPinfo}
{Check Point R70} R70 00 /opt/CPsuite-R70 {Check Point R70}
{IPSO to Gaia Upgrade} <ver> <rel> /opt/<upgrade_package_name> {IPSO to
Gaia Upgrade Package (<upgrade_package_version>)}
5. Exit clish. Run exit
Step 4: Running the Upgrade Script 1. Run cpstop
2. Enable IP forwarding on IPSO.
ipsofwd on <administrator username>
3. Go to the location of the package
cd /opt/<upgrade_package_name>/
4. Run the upgrade to Gaia script.
Upgrading from IPSO to Gaia Page 16
./run-upgrade-to-Gaia
If you are running a special upgrade package, the upgrade runs automatically. Continue with Step 8: Upgrade Runs Automatically (on page 17).
The script runs.
Welcome to the IPSO to Gaia Upgrade procedure.
Checking platform...OK
Checking IPSO OS version ...OK
The following types of information are needed to prepare
your IPSO appliance for the upgrade:
- info about downloading the Gaia image.
- info about transferring an IPSO backup (optional).
- info about transferring a special copy of this package (optional).
Answer the prompts for this info and then the upgrade is performed.
Hit 'Enter' to continue or Ctrl-C to exit
Details for download of the Gaia image:
IP address of FTP server []: 192.0.2.2
User name []: fred
Password []: *****
Directory []: /image
Checking FTP access to 192.0.2.2 (it may take a minute) ... done
5. Supply the information for downloading the Gaia image
Note - If you have run the upgrade script before, the previously entered values are shown in square brackets [ ]. Press Enter to accept the values, or type in the new values and press Enter.
Step 5 (Optional, Recommended): Supplying Backup Server Information
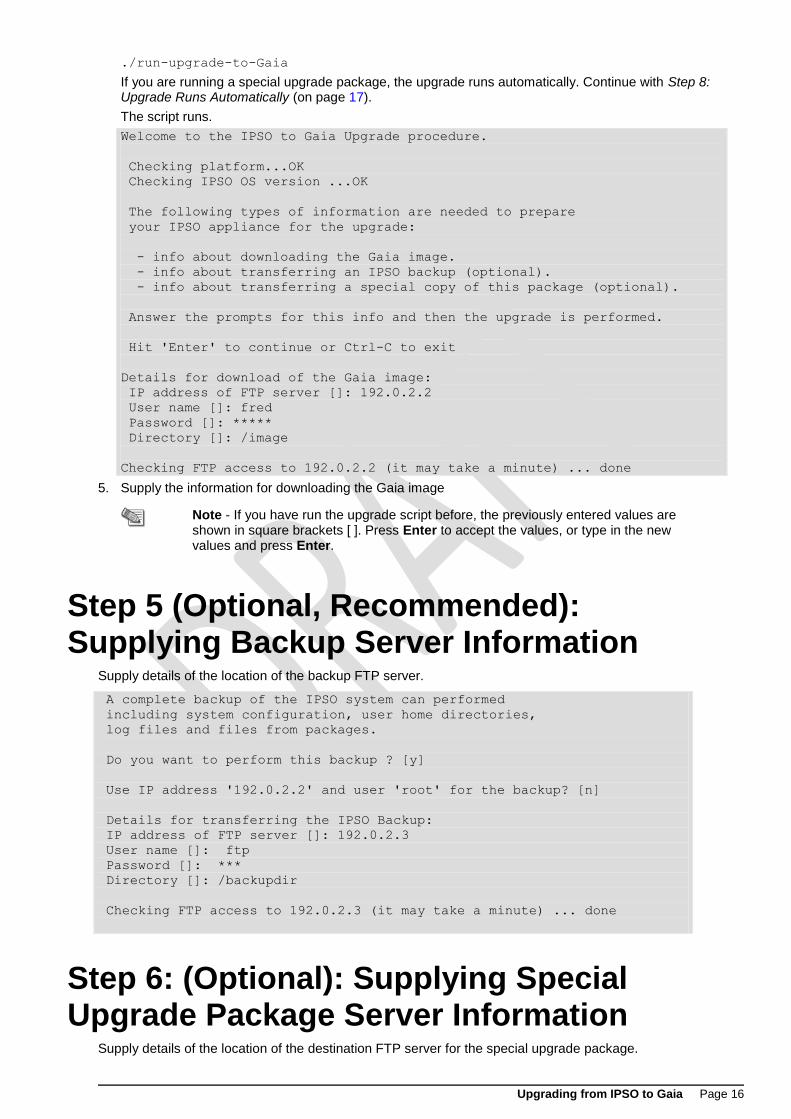
Supply details of the location of the backup FTP server.
A complete backup of the IPSO system can performed
including system configuration, user home directories,
log files and files from packages.
Do you want to perform this backup ? [y]
Use IP address '192.0.2.2' and user 'root' for the backup? [n]
Details for transferring the IPSO Backup:
IP address of FTP server []: 192.0.2.3
User name []: ftp
Password []: ***
Directory []: /backupdir
Checking FTP access to 192.0.2.3 (it may take a minute) ... done
Step 6: (Optional): Supplying Special Upgrade Package Server Information
Supply details of the location of the destination FTP server for the special upgrade package.

Upgrading from IPSO to Gaia Page 17
A package with your answers to the previous prompts can be created.
This package can be used on other IPSO gateways for
unattended conversion to Gaia.
Do you want to create such a package? [y]
Details for transferring the package with your answers:
IP address of FTP server [192.0.2.3]:
User name [ftp]:
Password [***]:
Directory [packagedir]:
Checking FTP access to 192.0.2.3 (it may take a minute) ... done
Step 7: Confirming Your Selections You see a summary of all your answers.
Information for download of the Gaia image:
FTP Server IP Address = 192.0.2.2
FTP Server user name = root
Directory on FTP Server = /imagedir
Information for transferring the IPSO Backup:
FTP Server IP Address = 192.0.2.3
FTP Server user name = ftp
Directory on FTP Server = /backupdir
Information for transferring the package with your answers:
FTP Server IP Address = 192.0.2.3
FTP Server user name = ftp
Directory on FTP Server = /packagedir
Are these values correct? [y]
1. Click n to change the selections you made before, or type y to start the upgrade.
The backup file and the special upgrade package file, if you chose to create them, are created.
Writing values to file
Performing IPSO backup (file <ipso_backup_file_name>.tgz) ... done
Performing Check Point Security Gateway backup (file <Security
Gateway_backup_file_name>.tgz) ... done
Transferring IPSO and Check Point Security Gateway backup files ... done
Creating a package with your answers (<upgrade_package_name>_AUTO.tgz)
... done
Transferring package with your answers ... done
Installing Gaia Boot Manager ... done
2. You have 30 seconds to abort. To stop the upgrade, press Enter.
IP appliance reboots in 30 seconds to complete the upgrade.
Hit 'Enter' to abort.
Important - If you want to make changes, press Enter now. This stops the upgrade to Gaia. To complete the upgrade to Gaia, reboot the IP Appliance.
Step 8: Upgrade Runs Automatically The Upgrade occurs unattended. This takes at least 15 minutes.
The IP Appliance reboots.

Upgrading from IPSO to Gaia Page 18
If you are connected to the IP Appliance using SSH the connection to the appliance will close. You can only reconnect after the upgrade has completed.
Boot manager runs.
Gaia image is installed. +ÄÄÄÄÄÄÄÄÄÄÄÄ+ Package Installation +ÄÄÄÄÄÄÄÄÄÄÄÄÄ+
| |
| 0% |
| |
| Core Operating System |
| |
+ÄÄÄÄÄÄÄÄÄÄÄÄÄÄÄÄÄÄÄÄÄÄÄÄÄÄÄÄÄÄÄÄÄÄÄÄÄÄÄÄÄÄÄÄÄÄÄÄÄ+
During the installation:
The IPSO configuration is imported into Gaia
SIC trust settings are imported.
R75 is installed and the configuration is imported.
For a Security Management server, the management database is imported.
You now see the Gaia prompt .
Congratulations. Gaia and R75 are installed on the IP Appliance.
Step 9: Making Sure the Upgrade Succeeded
If the IP Appliance is a standalone deployment (a locally managed gateway), do the procedures for a Security Gateway and for a Security Management server.
If the IP Appliance is a Security Gateway:
1. At the Gaia prompt, log in with your IPSO credentials.
2. Run fw ver to see the Security Gateway version information
3. Run fw stat to confirm that the default policy is enforced.
4. Launch R75 SmartDashboard
5. In the Security Gateway object:
a) Click Test SIC status. SIC status should be Trust Established.
b) Change the version to R75
6. Install a policy on the Security Gateway.
If the IP Appliance is a Security Management server:
1. At the Gaia prompt, log in with your IPSO credentials.
2. Run fwm ver to see the Security Management server version information
3. Install an R75 SmartDashboard on your GUI client computer or on the Security Management server.
4. Connect from SmartDashboard to the Security Management server using your unchanged, pre-upgrade credentials.
5. In SmartDashboard, in one or more Security Gateway objects, click Test SIC status. SIC status should be Trust Established.
6. Install a policy on the Security Gateways.

Upgrading from IPSO to Gaia Page 19
Rollback from Gaia to IPSO You can do a rollback from Gaia to IPSO 6.2. You can also restore the Check Point Security Gateway and/or Security Management server configuration.
Before doing a rollback from Gaia to IPSO
Make sure that:
1. The IPSO boot manager installer (install_ipsobootmgr) is available. You can find it on an IPSO
computer.
2. An IPSO image is available. Put the IPSO image on an FTP server, and make sure that the FTP server is accessible from the Gaia computer.
3. A backup of the Check Point Security Gateway and/or Security Management server on the Gaia computer is available. Put the backup tarfile on an FTP server, and make sure the FTP server is accessible from the Gaia computer.
4. On a standalone Check Point gateway: Export the Security Management server database using the
migrate_export migration tool ("Advanced Upgrade of a Standalone Deployment" on page 9).
To do a rollback from Gaia to IPSO.
1. At the Gaia command line prompt, login as the administrator.
2. Enter the Gaia shell. Type shell.
3. Copy the IPSO boot manager installer (install_ipsobootmgr) from an IPSO computer to a location
of your choice on the Gaia system. For example, to /var/tmp.
4. Change file attributes to give executable permissions. Run
chmod 777 install_ipsobootmgr
5. Install the IPSO boot manager. At the command prompt run
./install_ipsobootmgr /dev/hda
The script asks if you want to roll back to
1. IPSO 4.2 2. IPSO 6.2
6. Choose 2
7. Type reboot
After the reboot, the system is running the IPSO boot manager.
8. At the shell prompt, install the IPSO image. Run
install
9. Provide the following information:
IP address of the computer.
Default gateway of the computer.
IP address of the FTP server with the IPSO image.
User credentials.
Directory path.
The system automatically reboots into IPSO.
10. Configure the computer using the First Time Configuration Wizard. Provide the following information:
Hostname
New password for admin
Enable the management port physical interface
IP address for the management interface
Default gateway
To restore the Check Point Security Gateway and/or Security Management server configuration
1. Log in to the newly installed and configured IPSO computer as admin

Upgrading from IPSO to Gaia Page 20
2. Use FTP to transfer the the backup archive file containing the Check Point Security Gateway and/or Security Management server to the computer, and then uncompress the archive. In the following example,
The name of the backup archive is CP_archive_nms71_20101124.tgz
The IP address of the FTP server containing the backup archive is 192.0.2.3.
cd /tmp
ftp ftp://192.0.2.3>/pub/CP_archive_nms71_20101124.tgz
tar xzf /tmp/CP_archive_nms71_20101124.tgz
3. On a standalone Check Point gateway only:
Import the Security Management server database that was exported from the Gaia gateway using the
migrate_import migration tool ("Advanced Upgrade of a Standalone Deployment" on page 9).
4. Restore the IPSO backup file using the set restore CLI commands. In the following example,
The IP address of the FTP server containing the IPSO backup file is 192.0.2.2
The IPSO backup file is in the pub directory.
clish
set restore remote ftp-site ftp://192.0.2.2
set restore remote ftp-user <username e.g. anonymous>
set restore remote ftp-pass <password>
set restore remote ftp-dir pub
set restore remote filename i2g_backup_<hostname and timestamp>.tgz
IPSO automatically reboots.
5. Log out.
6. Log in as admin.
7. Verify the configuration has been restored.

Page 21
Chapter 5
Initial Configuration This chapter shows how to do the initial system configuration using the First Time Wizard.
Content TBD

Page 22
Chapter 6
Running Gaia on a 64 Bit Computer By default, Gaia automatically boots to the 32 bit edition, even when installed on a 64 bit computer. You can configure Gaia to automatically boot to the 64 bit edition.
To configure Gaia to boot in the 64 bit edition.
1. Log out from the WebUI.
2. Connect to the Gaia computer using an SSL terminal emulation utility.
3. Go to the expert mode.
4. Open the /etc/grub.conf file in a plain text editor, such as vi.
5. Change the default=x line to default=5.
6. Reboot the computer.
When the computer reboots, make sure that the edition is 64 bit. To see which edition is running:
Go to the WebUI System Overview pane. The edition shows in the System Overview widget.
or
Run the show version os edition command.