ft designer tutorial advanced englisch -...
TRANSCRIPT

Fischertechnik-Designer Tutorial
________________________________________________________________________________
Advanced by Andreas „Laserman“ Guerten Page 1 of 16
Content:
Cable connection between connectors 2 ( easy )
Hose Manager ( not so easy!)
Create movements / Movies
Create chains
Cable Connection between 2 connectors :
Here , for example, Pull plug 1 onto the canvas .
Rightly turn / push / zoom .
White arrow from right menu ( if not already done ) .
Select plug ( left mouse button on the green connector ) .
[Shift] button ( up arrow on keyboard - United Mach button ) and hold with the left mouse button
click silver plug .
Then you have selected both parts of the connector .
Now select "Window" menu >> " Coordinates Manager " .
Move plug to the red axis ( 2x click the left double arrow ) .
Coordinates Manager by clicking on close red cross again .

Fischertechnik-Designer Tutorial
________________________________________________________________________________
Advanced by Andreas „Laserman“ Guerten Page 2 of 16
Second pull plug on canvas.
White arrow from right menu ( if not already done ) .
Then select the first green plug ( left mouse button ) .
Then again hold down [Shift] key and select the second green connector .

Fischertechnik-Designer Tutorial
________________________________________________________________________________
Advanced by Andreas „Laserman“ Guerten Page 3 of 16
Menu "Edit " >> " create cable " OK >>
Hose Manager :
Here on a example I prefer first time a compressor - cylinder 45 in the workspace

Fischertechnik-Designer Tutorial
________________________________________________________________________________
Advanced by Andreas „Laserman“ Guerten Page 4 of 16
Here you can see how it looks when I fade the component edges ( "View" menu >> " component
edges draw " ) .
However, " normal " components dissolve into each other when the component edges are hidden.
So you should be always visible , the component edges really .
Now I start the hose Manager :
"Window" menu >> " Tube Manager "
Here are 4 Views :
page
Front
Top view
and 3D
I can view each individual cope push (press and hold left mouse button and slide your mouse ) and
back (right-click and hold your mouse and slide up or down) .

Fischertechnik-Designer Tutorial
________________________________________________________________________________
Advanced by Andreas „Laserman“ Guerten Page 5 of 16
Then I select on the green plus " pneumatic hose " from
Now I have to choose the needle in the right hand menu and can now set points in one of the 3
windows . In the 3D view it is not.
I have set a breakpoint on the hose connection in plan view with the left mouse button :

Fischertechnik-Designer Tutorial
________________________________________________________________________________
Advanced by Andreas „Laserman“ Guerten Page 6 of 16
This is a bit too low , as has been seen in the front view .
So the cross - arrow selected from the right menu and move the base in the front view ( with the left
mouse button , the white ball is pushed up ) :
Now put more points ( Select again in the right menu , the pin ) .
Here you need some sense of where how many are needed .
I'm making a total of 4 points here .

Fischertechnik-Designer Tutorial
________________________________________________________________________________
Advanced by Andreas „Laserman“ Guerten Page 7 of 16
Correct as long until everything fits .
Finished!
Movements / create Movies :
You can take the FT designers also make films .
These are independent of the kinematics engine of the program , which is dealt with in a separate
tutorial ( kinematics ) .
In the following example I move only a small part . Will you move more , which goes accordingly.
One can only move 1 piece at a time . So first select first part with the left mouse button . Then red
save button press down .

Fischertechnik-Designer Tutorial
________________________________________________________________________________
Advanced by Andreas „Laserman“ Guerten Page 8 of 16
call coordinates Manager ( " window " >> " Coordinates Manager " ) .
Select rod ( with the left mouse button ) .
[Shift] and additionally select with the left mouse button right-hand door .
Then 3x the green double arrow to the left click .
So it looks like :
Slide frame counter with the left mouse button on 20th
Select only the door ( with the left mouse button ) . The bar served only as an aid .
Again press the red save button .

Fischertechnik-Designer Tutorial
________________________________________________________________________________
Advanced by Andreas „Laserman“ Guerten Page 9 of 16
Close Coordinates Manager again .
Now you can see the movement by reciprocating the frame counter .
For more parts you go so on :
Frame counter push to the left again to 1.
Select next part ( left mouse button ) .
Press the red save button .
Rotate or move with the Coordinates Manager component .
Frame counter 20 slide .
Select only the new part ( left mouse button ) .
Press the red button memory .
etc.
Create chains :
You can take the FT - Dseigner also create chains , however, you can not animate it .
So again 2 gears

Fischertechnik-Designer Tutorial
________________________________________________________________________________
Advanced by Andreas „Laserman“ Guerten Page 10 of 16
The chain links can be found under " Wheels " ( such as gears )
First pulling the first piece to a gear :
Now marking the gear with the left mouse button
Gets the Coordinate Manager ( "Window" menu >> " coordinate Manager " )
And rotates the gear on the axis passing through the center ( in the case of blue) with 1x the double
arrow to the right.

Fischertechnik-Designer Tutorial
________________________________________________________________________________
Advanced by Andreas „Laserman“ Guerten Page 11 of 16
Then pull the next chain link on the gear and so on, until the gear is occupied.
The last link in this gear has to turn to , to point to the other gear ( note the red line ) .
Now you can easily grow the chain links to the other .

Fischertechnik-Designer Tutorial
________________________________________________________________________________
Advanced by Andreas „Laserman“ Guerten Page 12 of 16
With the second gear as it comes with the first ( links back to the draw gear - this time the little one
) .
Here one must now highlight gear and chain link , because it is not true .
So Left Mouse Button on gear , [Shift] and additionally left mouse button on the chain link .
Then call Coordinates Manager , and turn until it fits .

Fischertechnik-Designer Tutorial
________________________________________________________________________________
Advanced by Andreas „Laserman“ Guerten Page 13 of 16
Now again the small gear a bit further turn ( with left mouse button and select 1x double arrow ,
click here Blue ) .
Now just pull the chain links on small gear such as the large gear .
And last gear align again (this time in the large gear )

Fischertechnik-Designer Tutorial
________________________________________________________________________________
Advanced by Andreas „Laserman“ Guerten Page 14 of 16
Now again build the chain links to one another .
And the rest of the chain links draw on the large gear again . Only one times - a trial basis . Then
you can see how you have to correct . I've shot here the gear already 90 degrees on the blue axis .

Fischertechnik-Designer Tutorial
________________________________________________________________________________
Advanced by Andreas „Laserman“ Guerten Page 15 of 16
You see it does not quite fit .
So correct .
Only select the link on which you want to turn the chain . Then select the rest of the chain links (
hold down [ Shift] -Tase ) and rotate ( Coordinates Manager )
Fischertechnik-Designer Tutorial
________________________________________________________________________________
Advanced by Andreas „Laserman“ Guerten Page 16 of 16
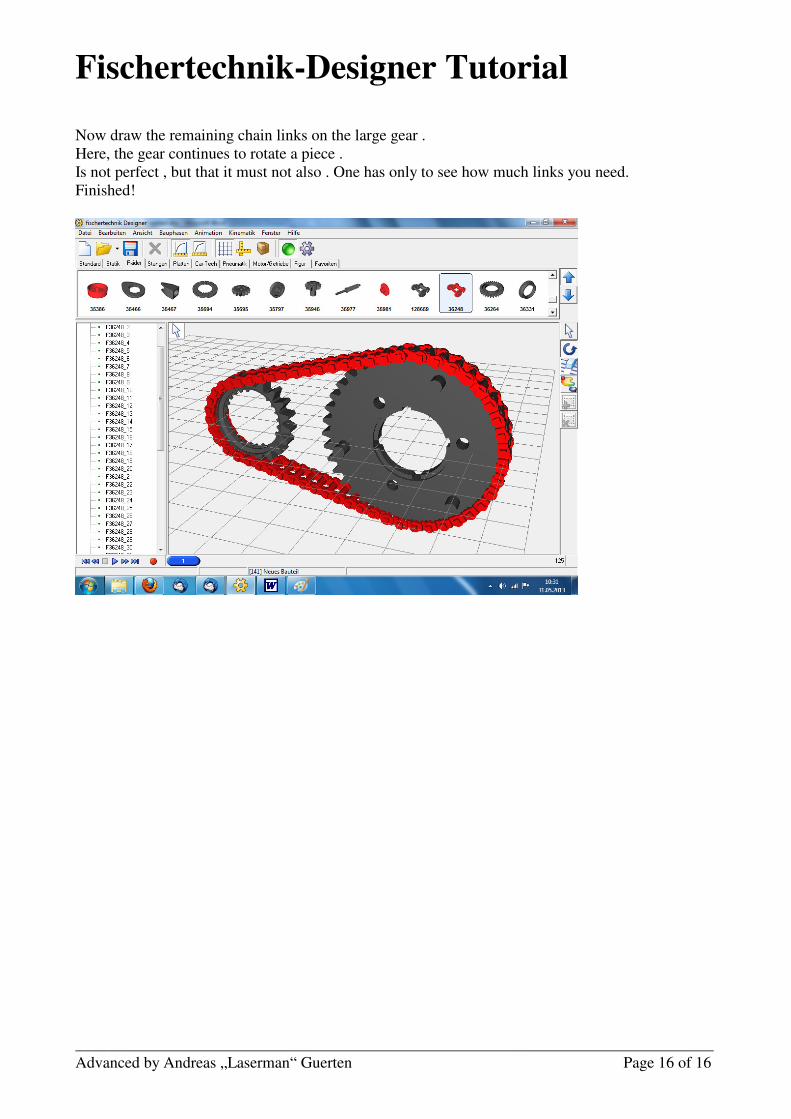
Now draw the remaining chain links on the large gear .
Here, the gear continues to rotate a piece .
Is not perfect , but that it must not also . One has only to see how much links you need.
Finished!