frontier barn doors
TRANSCRIPT
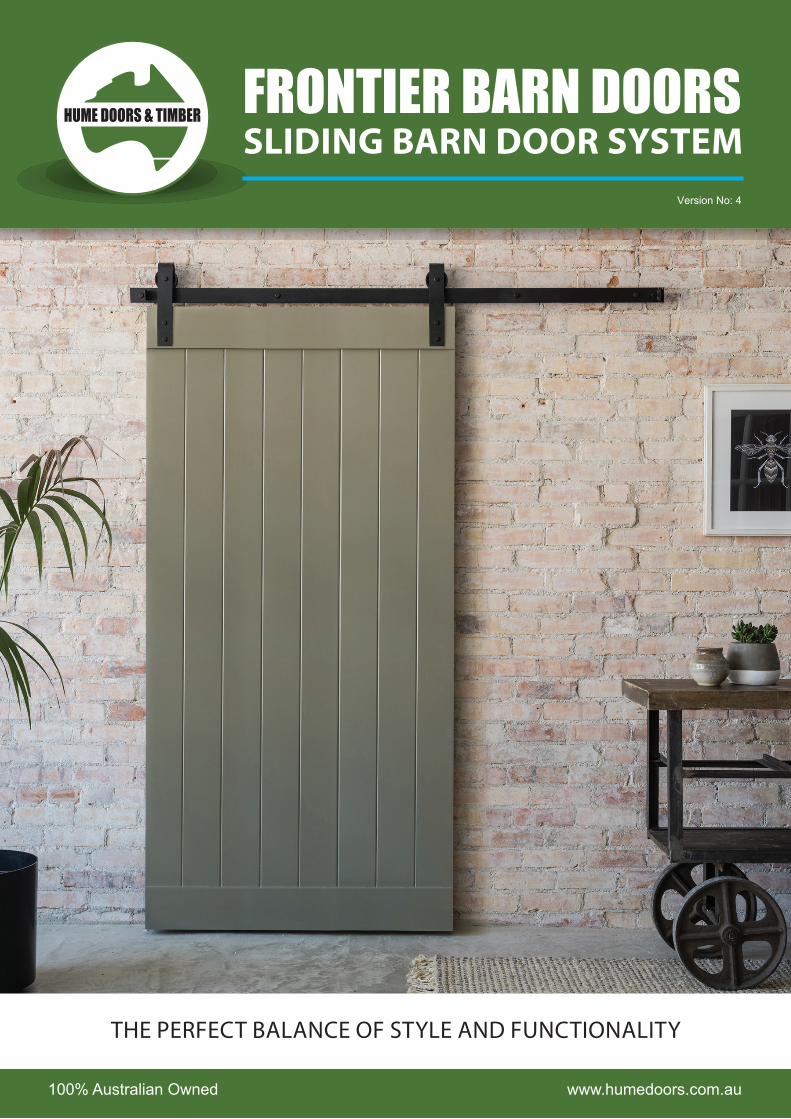
THE PERFECT BALANCE OF STYLE AND FUNCTIONALITY
100% Australian Owned www.humedoors.com.au
FRONTIER BARN DOORSSLIDING BARN DOOR SYSTEM
Version No: 4

100% Australian Owned www.humedoors.com.au2
PERFECT FOR BIG OPEN SPACES
Barn doors are not just for barns, from the countryside these wide sliding doors have entered modern houses to become popular interior decor pieces. From cosy hide away bedrooms to rustic home o�ce doors and unique wardrobe solutions, the Frontier sliding system is the perfect room divider.
FRONTIERBARN DOOR SLIDING SYSTEM

100% Australian Owned www.humedoors.com.au3
PRODUCT DETAILSMaterial SteelTrack Length 2000mmDoor Thickness 35-40mmMaximum Door Width 1000mmMaximum Opening Width 900mm (square set)Maximum Door Weight 80kgFinish Black Powder CoatApplication For doors up to 1000mm wide only.
2 Kits required for double door installation.Fixing Frontier Sliding System includes: Fixing screws to suit masonry and
plasterboard walls. Tracks are pre-drilled.To calculate door size Height = Opening Height + 50mm
Width = Opening width + 100mm
FRONTIER TRACK SYSTEM
The Frontier Barn Door Sliding System incorporates an architecturally designed track system of the highest quality. The Frontier range o�ers a classic barn door look with exposed steel straps. Nylon wheels allow for smooth running along a �at bar track.
FEATURES:• Easy to install• Perfect for DIY• High quality powder coat �nish• Quiet operation on nylon wheels
FRONTIERBARN DOOR SLIDING SYSTEM
FRONTIER TRACK AND FITTINGS(GST Additional)
2.0M TRACK & FITTINGS2.4M TRACK & FITTINGS
Suits doors up to 1500mm wide - 1 Door (Single)Suits doors up to 1200mm wide - 1 Door (Single)Suits doors up to 1000mm wide - 1 Door (Single)
3.0M TRACK & FITTINGS
T*Frontier rack Sliding System sold separately
100% Australian Owned www.humedoors.com.au4
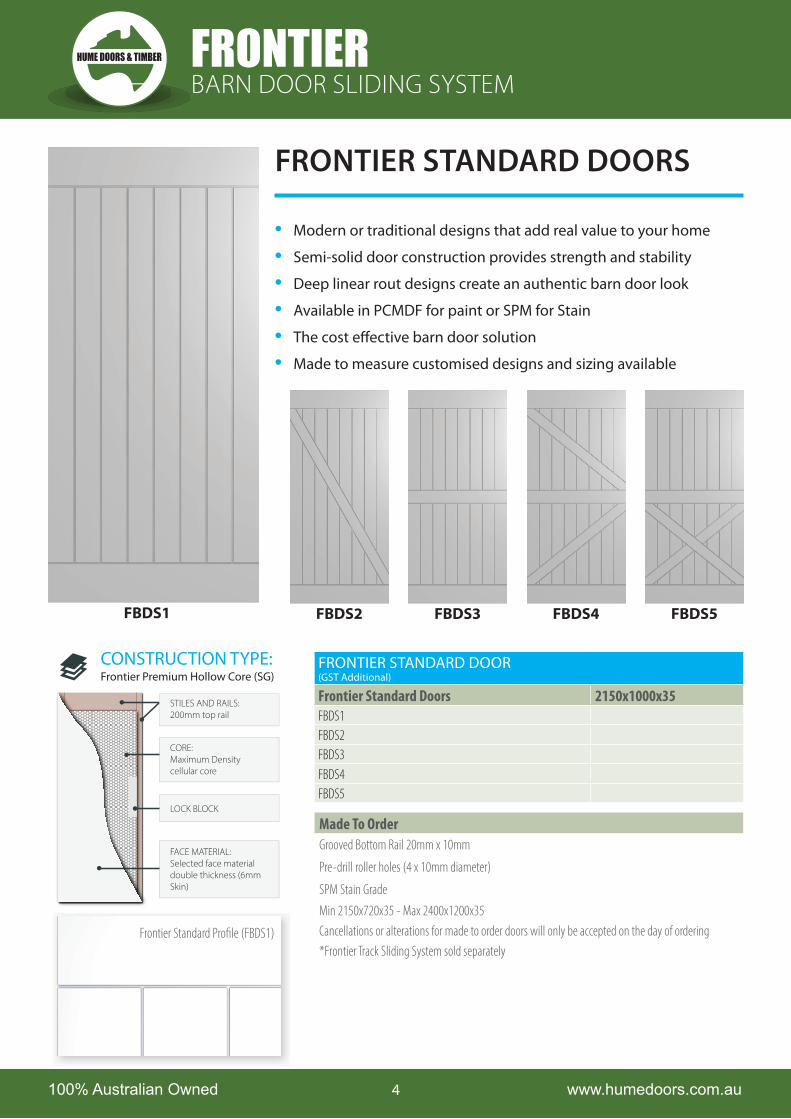
FRONTIER STANDARD DOORS
• Modern or traditional designs that add real value to your home
• Semi-solid door construction provides strength and stability
• Deep linear rout designs create an authentic barn door look
• Available in PCMDF for paint or SPM for Stain
• The cost e�ective barn door solution
• Made to measure customised designs and sizing available
FBDS1 FBDS2 FBDS3 FBDS4 FBDS5
FACE MATERIAL:Selected face material double thickness (6mm Skin)
CORE:Maximum Density cellular core
LOCK BLOCK
STILES AND RAILS:200mm top rail
CONSTRUCTION TYPE: Frontier Premium Hollow Core (SG)
FRONTIER STANDARD DOOR (GST Additional)
Frontier Standard Doors 2150x1000x35FBDS1FBDS2FBDS3FBDS4FBDS5
Made To OrderGrooved Bottom Rail 20mm x 10mm
Pre-drill roller holes (4 x 10mm diameter)
SPM Stain GradeMin 2150x720x35 - Max 2400x1200x35Cancellations or alterations for made to order doors will only be accepted on the day of ordering
T*Frontier rack Sliding System sold separatelyFrontier Standard Profile (FBDS1)
FRONTIERBARN DOOR SLIDING SYSTEM

100% Australian Owned www.humedoors.com.au5
• Crisp and clean designs to create an authentic barn door look
• 5 Classically modern designs
• Frame and In�ll constructed shaker style door
• Available in PCMDF for paint
• The Ultimate barn door solution
FBDU1 FBDU2 FBDU3 FBDU4 FBDU5
INFILL PANELSolid Infill
STILES AND RAILS:200mm top rail
FACE MATERIAL:PCMDF for paint
CONSTRUCTION TYPE: Frontier Ultimate Solid In�ll Core
FRONTIER ULTIMATE DOOR(GST Additional)
Frontier Standard Doors 2150x1000x35FBDU1FBDU2FBDU3FBDU4FBDU5
Made To OrderGrooved Bottom Rail 20mm x 10mm
Pre-drill roller holes (4 x 10mm diameter)
Special sizes not available
Cancellations or alterations for made to order doors will only be accepted on the day of ordering
*Frontier Track Sliding System sold separatelyFrontier Ultimate Profile (FBDU1)
ULTIMATE
FRONTIERBARN DOOR SLIDING SYSTEM
100% Australian Owned www.humedoors.com.au
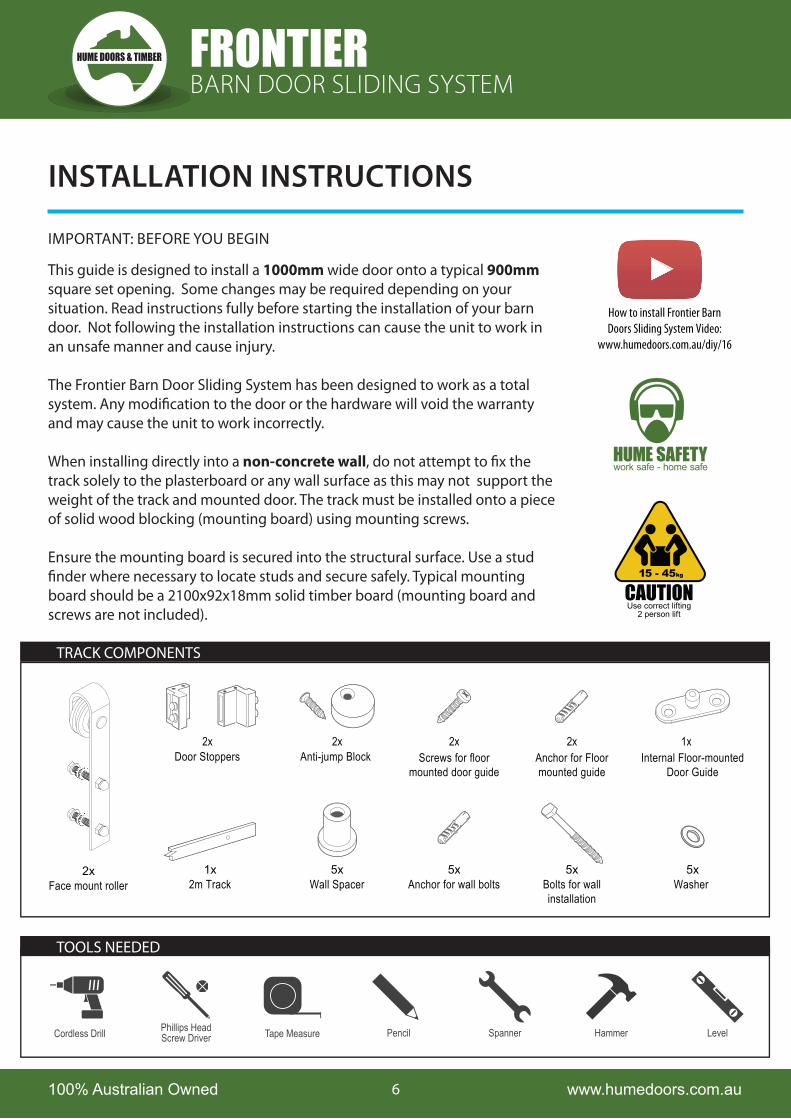
INSTALLATION INSTRUCTIONS
IMPORTANT: BEFORE YOU BEGIN
This guide is designed to install a 1000mm wide door onto a typical 900mm square set opening. Some changes may be required depending on your situation. Read instructions fully before starting the installation of your barn door. Not following the installation instructions can cause the unit to work in an unsafe manner and cause injury.
The Frontier Barn Door Sliding System has been designed to work as a total system. Any modi�cation to the door or the hardware will void the warranty and may cause the unit to work incorrectly.
When installing directly into a non-concrete wall, do not attempt to �x the track solely to the plasterboard or any wall surface as this may not support the weight of the track and mounted door. The track must be installed onto a piece of solid wood blocking (mounting board) using mounting screws.
Ensure the mounting board is secured into the structural surface. Use a stud �nder where necessary to locate studs and secure safely. Typical mounting board should be a 2100x92x18mm solid timber board (mounting board and screws are not included).
How to install Frontier Barn Doors Sliding System Video:
www.humedoors.com.au/diy/16
Face mount roller2x
2x2xDoor Stoppers Anti-jump Block Screws for floor
mounted door guideInternal Floor-mounted
Door GuideAnchor for Floor mounted guide
2x 2x 1x
1x2m Track
5x 5x Wall Spacer Bolts for wall
installation
5xWasher
5x Anchor for wall bolts
TRACK COMPONENTS
TOOLS NEEDED
Phillips HeadScrew Driver Tape MeasureCordless Drill Spanner LevelPencil Hammer
15 - 45kg
CAUTIONUse correct lifting
2 person lift
HUME SAFETYwork safe - home safe
FRONTIERBARN DOOR SLIDING SYSTEM
6

100% Australian Owned www.humedoors.com.au7
1. ATTACH THE ROLLERS TO DOOR
1.1. Mark the �rst hole 90mm from the side edge and 40mm down from the top edge of the door with a pencil (Figure 1).
1.2. Mark the second hole 90mm further down from the �rst hole (Figure 1).
1.3. Pre-drill both holes using a 10mm drill bit (Figure 1).
1.4. Using a spanner, �x the roller in place. Ensure the roller is secure and straight on the door (Figure 2).
1.5. Repeat this process for the other roller.
1.6. Go to STEP 2
Face mount roller (x2)
40
90
90
DOOR
DOOR
40
9090
(Figure 2)(Figure 1)
2. ANTI-JUMP BLOCK INSTALLATION
2.1. Measure and mark 35mm from the edge of rollers and 7mm from the face of the door.
2.2. Pre drill using a 3mm drill bit and �x anti-jump blocks using screws provided.
NOTE: The hole for the anti-jump blocks should be o�set from the centre of the door so the block can be rotated out of the way when hanging the door on the track.
2.3. Go to STEP 3
35mm
7mm
35
35
Anti-jump block and screws (x2)
FRONTIERBARN DOOR SLIDING SYSTEM

100% Australian Owned www.humedoors.com.au8
3.1. Using a ladder, tape measure and level, �nd the centre line position for the track by adding 43mm to the door height. Measure from the �oor up and mark with a pencil.
3.2. For a 900mm opening, the “Start Location” of the track is 75mm from the edge of the opening. Measure 75mm from the edge of the opening and mark “Start Location” of track on the centre line.
NOTE: If your opening is less than 900mm use the following formula to �nd the “Start Location” of track:
Measure (x) from the edge of the opening and mark “Start Location” of track on the centre line.
3.4. For �xing track to a CONCRETE WALL wall Go to STEP 4
3.5. For �xing track to a NON-CONCRETE WALL wall Go to STEP 6
3. MEASURE AND MARK FOR TRACK LOCATION
Doo
r Hei
ght +
43m
m
Floor
Centre line of track
75mmor (x)
Sta
rt L
ocat
ion
4. CONCRETE WALL: WALL PREPARATION
4.1. Position the track centred on the “Start Location” and ensure track is level.
4.2. Use the track as a template and mark mounting hole locations with a pencil.
4.4. Pre-drill the concrete at marked locations using a 10mm masonry drill bit. (TIP: Temporarily install track with one end bolt. This will create a pivot point to easily level the track. Mark the rest of your holes)
4.5. Go to STEP 5
Centre line of track
Doo
r Hei
ght +
43m
m
Ensure the track is level
Sta
rt L
ocat
ion
2m Track
2m Track (x1)
(1000 - Opening Width) / 2 + 75 = (x)
FRONTIERBARN DOOR SLIDING SYSTEM
100% Australian Owned www.humedoors.com.au9
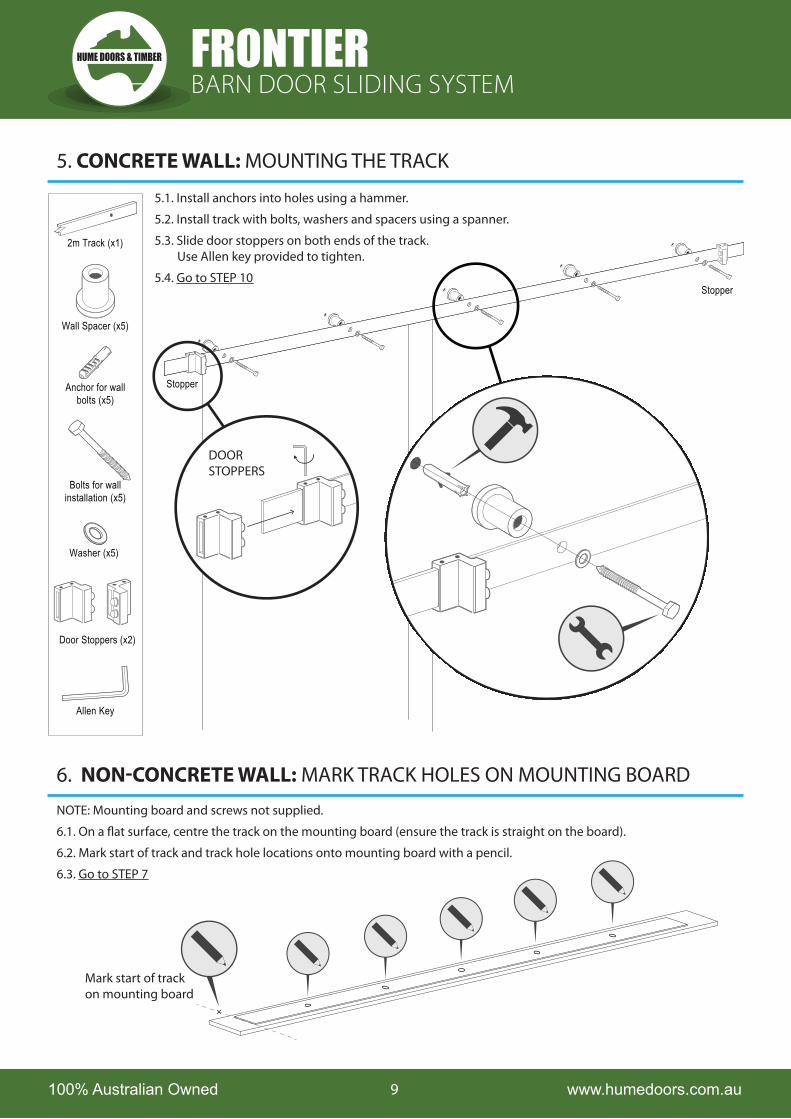
5. CONCRETE WALL: MOUNTING THE TRACK
2m Track (x1)
6. NONCONCRETE WALL: MARK TRACK HOLES ON MOUNTING BOARD
NOTE: Mounting board and screws not supplied.
6.1. On a �at surface, centre the track on the mounting board (ensure the track is straight on the board).
6.2. Mark start of track and track hole locations onto mounting board with a pencil.
6.3. Go to STEP 7
Mark start of track on mounting board
5.1. Install anchors into holes using a hammer.
5.2. Install track with bolts, washers and spacers using a spanner.
5.3. Slide door stoppers on both ends of the track. Use Allen key provided to tighten.
5.4. Go to STEP 10
Wall Spacer (x5)
Anchor for wall bolts (x5)
Bolts for wall installation (x5)
Door Stoppers (x2)
Washer (x5)
Allen Key
Stopper
Stopper
DOOR STOPPERS
FRONTIERBARN DOOR SLIDING SYSTEM
100% Australian Owned www.humedoors.com.au10
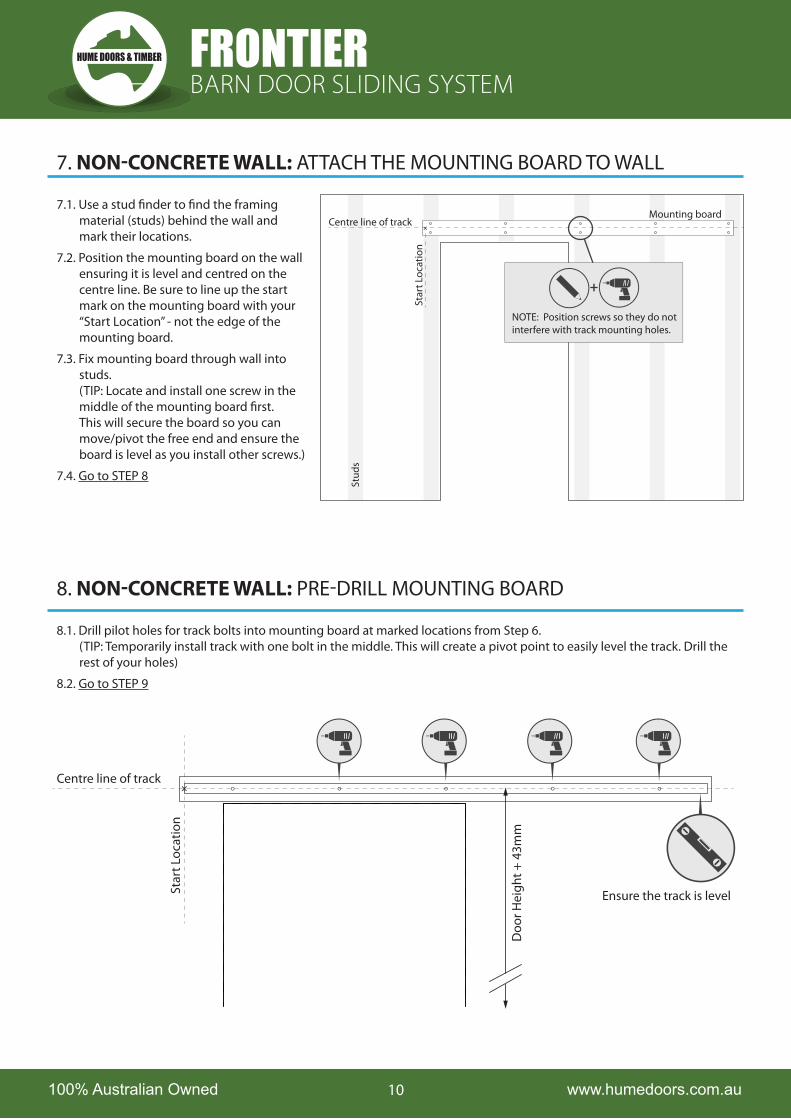
7. NONCONCRETE WALL: ATTACH THE MOUNTING BOARD TO WALL
7.1. Use a stud �nder to �nd the framing material (studs) behind the wall and mark their locations.
7.2. Position the mounting board on the wall ensuring it is level and centred on the centre line. Be sure to line up the start mark on the mounting board with your “Start Location” - not the edge of the mounting board.
7.3. Fix mounting board through wall into studs.(TIP: Locate and install one screw in the middle of the mounting board �rst. This will secure the board so you can move/pivot the free end and ensure the board is level as you install other screws.)
7.4. Go to STEP 8
Stud
s
Centre line of track
NOTE: Position screws so they do not interfere with track mounting holes.
8. NONCONCRETE WALL: PRE-DRILL MOUNTING BOARD
8.1. Drill pilot holes for track bolts into mounting board at marked locations from Step 6.(TIP: Temporarily install track with one bolt in the middle. This will create a pivot point to easily level the track. Drill the rest of your holes)
8.2. Go to STEP 9
Centre line of track
Star
t Loc
atio
n
Doo
r Hei
ght +
43m
m
Ensure the track is level
Sta
rt L
ocat
ion
Mounting board
FRONTIERBARN DOOR SLIDING SYSTEM

100% Australian Owned www.humedoors.com.au11
9.1. Install track with bolts, washers and spacers using a spanner.
9.2. Slide door stoppers on both ends of the track. Use allen key provided to tighten.
9.3. Go to STEP 10
Stopper
Stopper
FIX TRACK
DOOR STOPPERS
10. HANGING DOOR AND ADJUSTING STOPPERS
10.1. Ensure anti-jump blocks are in the unlocked position (A).
10.2. Place assembled door with rollers onto track.
10.3. Rotate the anti-jump blocks to locked position (B).
10.4. Slide door back and forth to test how well the door covers the opening. Reposition stoppers as needed.
10.5. If less travel of the door is required, the stoppers can be moved inside end mounting bolts.(TIP: If needed - remove the end mounting bolts and spacers, slide the stopper to the new location and reinstall bolt and spacer)
10.6. Go to STEP 11
9. NONCONCRETE WALL: ATTACHING TRACK TO MOUNTING BOARD
Stopper
UNLOCKEDPosition for hanging and removing door
LOCKEDStops track falling o�Position for door operation
A
B
Ensure door stoppers are �xed �rmly in place before hanging door.!
Stopper
2m Track (x1)
Wall Spacer (x5)
Door Stoppers (x2)
Washer (x5)
Allen Key
Bolts for wall installation (x5)
Mounting board
FRONTIERBARN DOOR SLIDING SYSTEM
100% Australian Owned www.humedoors.com.au12
Screws for floor mounted door
guide (x2)
Internal Floor-mounted
Door Guide (x1)
Anchor for Floor mounted guide (x2)
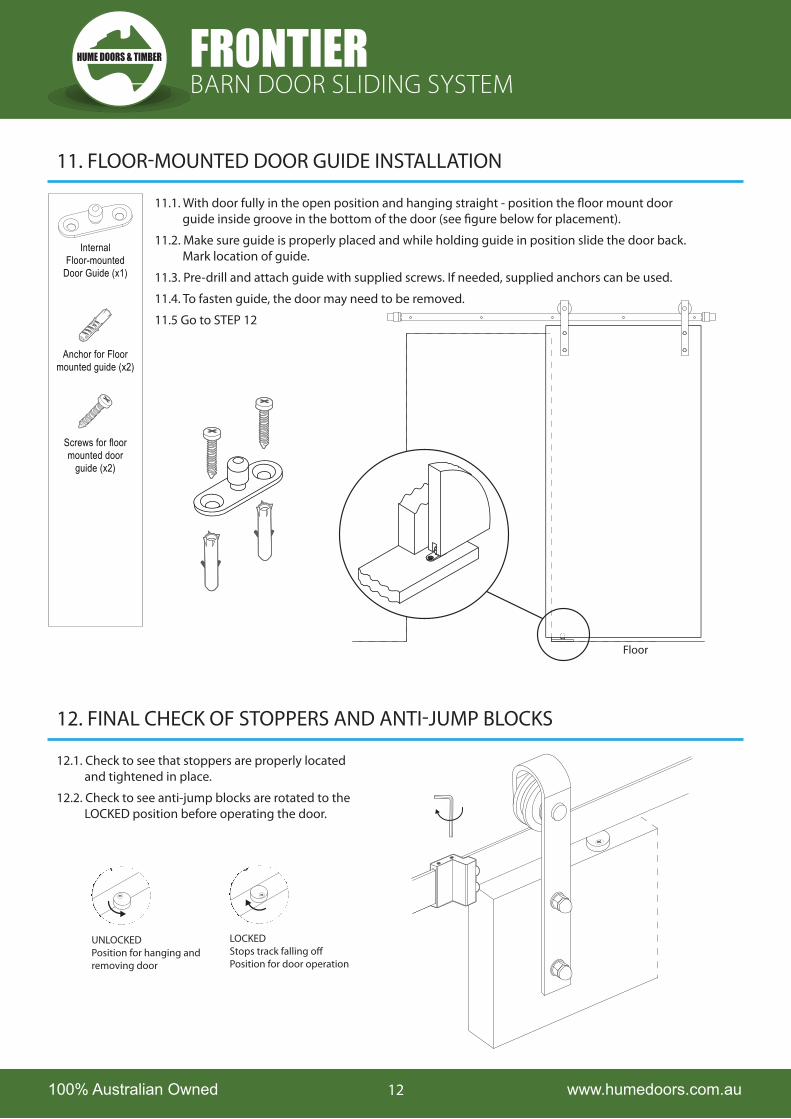
UNLOCKEDPosition for hanging and removing door
LOCKEDStops track falling o�Position for door operation
A B
12. FINAL CHECK OF STOPPERS AND ANTI-JUMP BLOCKS
12.1. Check to see that stoppers are properly located and tightened in place.
12.2. Check to see anti-jump blocks are rotated to the LOCKED position before operating the door.
11. FLOOR-MOUNTED DOOR GUIDE INSTALLATION
11.1. With door fully in the open position and hanging straight - position the �oor mount door guide inside groove in the bottom of the door (see �gure below for placement).
11.2. Make sure guide is properly placed and while holding guide in position slide the door back. Mark location of guide.
11.3. Pre-drill and attach guide with supplied screws. If needed, supplied anchors can be used.
11.4. To fasten guide, the door may need to be removed.
11.5 Go to STEP 12
Floor
FRONTIERBARN DOOR SLIDING SYSTEM

100% Australian Owned www.humedoors.com.au13
FRESH & MODERN
HAMPTON BARN DOORS
• This door is perfect for this loftspace, fresh and modern.
• Featured: Joinery Ext (JST1)
• This door is crisp & clean in style& adds just a little bit more to thisvery inviting bedroom.
• Featured: Hampton (HAM5)
FRONTIERBARN DOOR SLIDING SYSTEM

100% Australian Owned www.humedoors.com.au14
THE GRAND LOOK
COLOURFUL DOUBLE
• The Grand look. This is a greataddition/idea for a wine cellar orwine tasting room in this case.
• Featured: Linear (HLR260)
• Sometimes you don’t have roomfor huge doors–double smallersize doors work well.
• Featured: Hampton Double(HAM5)
FRONTIERBARN DOOR SLIDING SYSTEM

Disclaimer: This is a business to business pricelist and is not recommended for general use. Hume Doors & Timber reserves the right to alter or amend without prior notice, any data, dimensions and
NEW SOUTH WALESHUME DOORS & TIMBER – (AUST) PTY LTD ABN 39 001 472 493
120 Hume Highway, Lansvale NSW 2166 PO Box 333, Cabramatta NSW 2166 P | 02 9794 1111 F | 02 9794 1199 E | [email protected]
No. 2 Belah Road, Port Macquarie NSW 2444 P | 02 6581 0011 F | 02 6581 0091 E | [email protected]
7 Waterloo Avenue, Thornton NSW 2322 P | 02 4966 8880 F | 02 4966 8881 E | [email protected]
QUEENSLANDHUME DOORS & TIMBER (QLD) PTY LTD ABN 25 009 994 996
86 – 92 Mudgee Street, Kingston QLD 4114 PO Box 2243, Logan City D.C. Qld 4114 P | 07 3489 6200 F | 07 3489 6299 E | [email protected]
14 Junction Drive, Coolum Beach, Qld 4573 P | 07 5446 2640 F | 07 5446 3530 E | [email protected]
64 Fearnley Street, Portsmith, QLD 40870 P | 07 4041 2099 F | 07 4041 2047 E | [email protected]
3 Adams Road (Cnr Beresford), Yarrawonga NT 0830 P | 08 8932 3733 F | 08 8932 3799 E | [email protected]
VICTORIAHUME DOORS & TIMBER (VIC) PTY LTD ABN 87 006 329 906
33 Remington Drive, South Dandenong VIC 3175 PO Box 4236, South Dandenong VIC 3164 P | 03 9799 6888 F | 03 9799 9688 E | [email protected]
5 Trotters Lane, Prospect TAS 7250 P | 0432 042 917 E | [email protected]
SOUTH AUSTRALIAHUME DOORS & TIMBER (SA) PTY LTD ABN 34 007 512 209
89 Heaslip Road, Burton SA 5110 PO Box 2037, Salisbury Downs SA 5108 P | 08 8280 2000 F | 08 8280 8099 E | [email protected]
WESTERN AUSTRALIAHUME DOORS & TIMBER (WA) PTY LTD ABN 62 009 421 569
75 Briggs Street, Carlisle WA 6101 PO Box 118, Welshpool WA 6986 P | 08 9470 1800 F | 08 9472 3802 E | [email protected]
www.humedoors.com.auCONTACT DETAILS