front fascia removal (2014) - - 2011-2016 ... · pdf file1 2014 - wk - jeep grand cherokee -...
TRANSCRIPT
1
2014 - WK - JEEP GRAND CHEROKEE - FASCIA, Front/Removal
REMOVAL
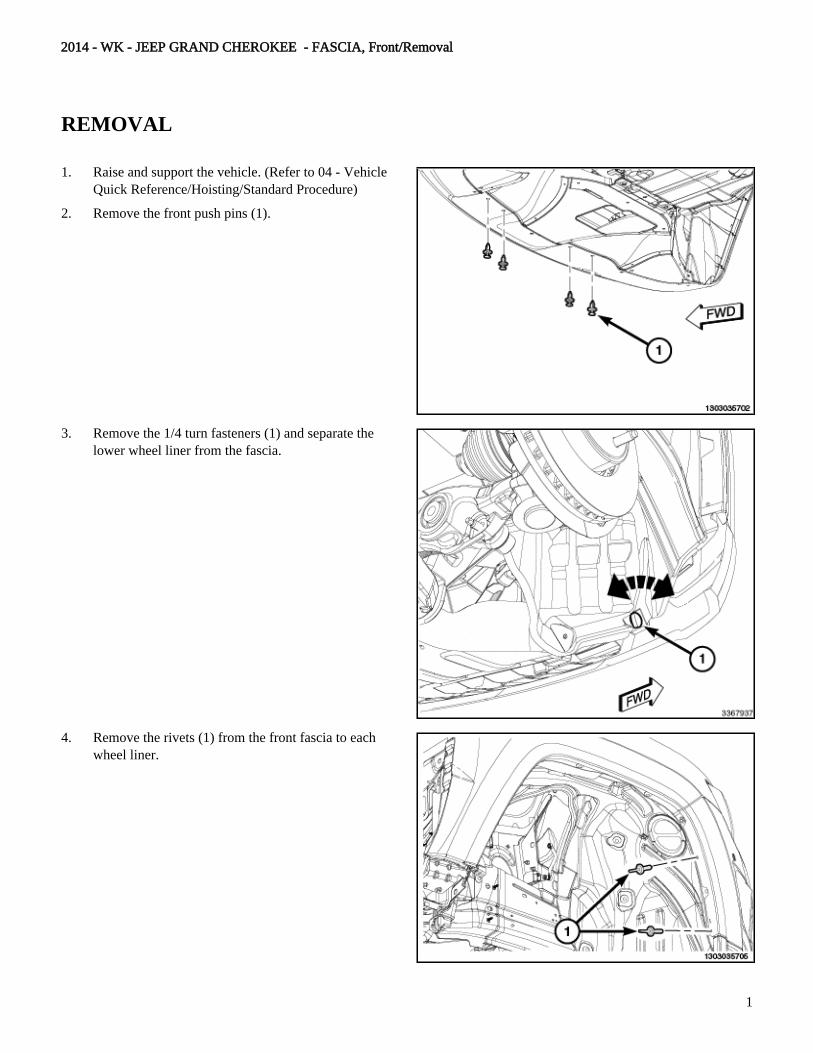
1. Raise and support the vehicle. (Refer to 04 - VehicleQuick Reference/Hoisting/Standard Procedure)
2. Remove the front push pins (1).
3. Remove the 1/4 turn fasteners (1) and separate thelower wheel liner from the fascia.
4. Remove the rivets (1) from the front fascia to eachwheel liner.

2
5. Remove the fasteners (2) securing the fascia (1) to thesupport brackets.
6. Disconnect the fog lamp electrical connectors (1), ifequipped.

3
7. Remove the upper push pin fasteners (3).
8. Release the integral latches at the wheel wellopenings (2) and the radiator grille assembly (1).
9. Remove the fascia.
REMOVAL – SRT8
1. Raise and support the vehicle.
2. Remove the fasteners (2) from the front belly pan (1)to each wheel liner.
3. Remove the push pin (4) and the rear fasteners (3)from the belly pan.
4. Remove the front push pins (5) from the belly pan tothe fascia and remove the belly pan (1).

4
5. Remove the rivets (1) from the front fascia to eachwheel liner.
6. Remove the fasteners (2) securing the fascia (1) to thesupport brackets.

5
7. Release the integral latches at the wheel wellopenings and the radiator grille assembly.
8. Disconnect the fog lamp electrical connectors, ifequipped.
9. Remove the upper push pin fasteners and remove thefascia.
1
2014 - WK - JEEP GRAND CHEROKEE - FASCIA, Front/Installation
INSTALLATION
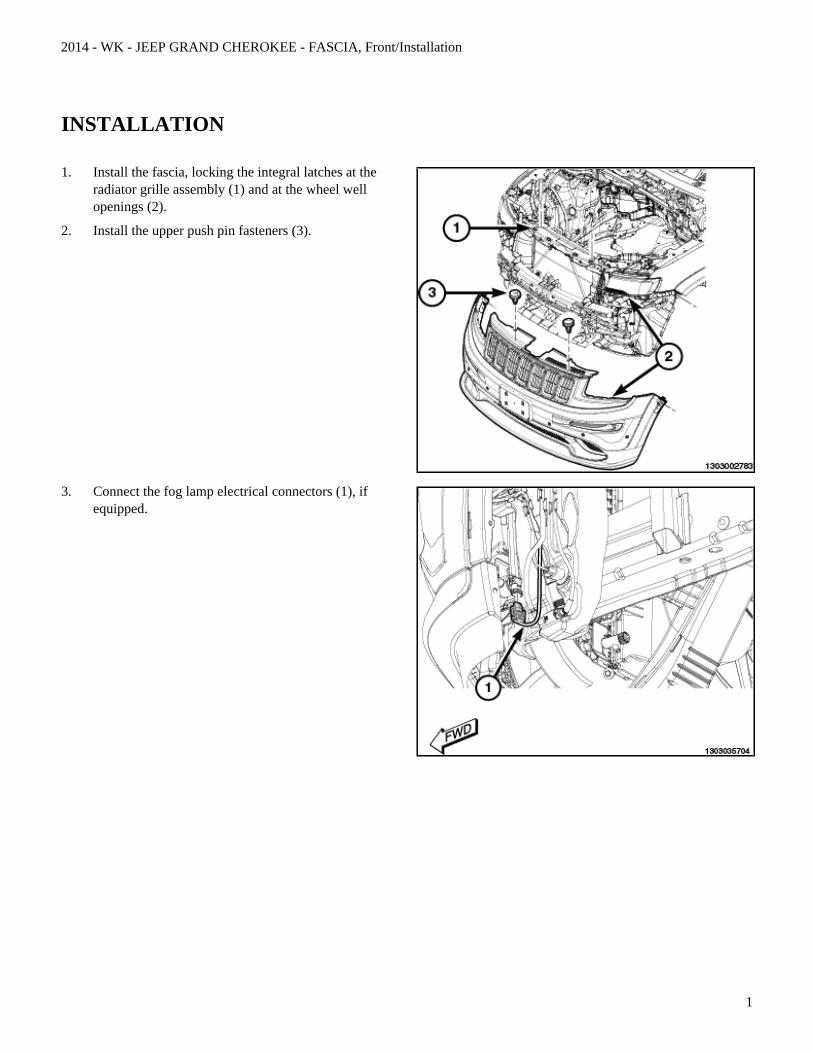
1. Install the fascia, locking the integral latches at theradiator grille assembly (1) and at the wheel wellopenings (2).
2. Install the upper push pin fasteners (3).
3. Connect the fog lamp electrical connectors (1), ifequipped.

2
4. Install the fasteners (2) securing the fascia (1) to thesupport brackets.
5. Install the 1/4 turn fasteners (1) and secure the lowerwheel liner to the fascia.

3
6. Install the rivets (1) securing the front fascia to eachwheel liner.
7. Install the front underbody push pins (1).
INSTALLATION – SRT8
1. Position the front fascia and connect the fog lampelectrical connectors, if equipped.
2. Install the fascia, locking the integral latches atthe radiator grille assembly and at the wheel wellopenings.

4
3. Install the fasteners (2) securing the fascia (1) to thesupport brackets.
4. Install the rivets (1) securing the front fascia to eachwheel liner.

5
5. Install the belly pan (1) and install the front push pins(5) securing the belly pan (1) to the fascia.
6. Install the push pin (4) and the rear fasteners (3)securing the rear of the belly pan.
7. Install the fasteners (2) securing the front belly pan(1) to each wheel liner.

1
2014 - WK - JEEP GRAND CHEROKEE - GRILLE/Removal
REMOVAL
1. Remove the front fascia assembly, (Refer to 13 -Frame and Bumpers/Bumpers/FASCIA, Front -Removal).
2. Remove the two outer rivets (1).
3. Remove the 14 screws (2).
4. Separate the upper grille assembly (1) from the upperfront fascia assembly (2).

2
5. Release the clips (2) and separate the inner grillebezel assembly (1), if necessary.
6. Release the clips and separate the inner grille inserts(1) from the bezel (2) as necessary.

1
2014 - WK - JEEP GRAND CHEROKEE - GRILLE/Installation
INSTALLATION
1. As necessary, position the inserts (1) back onto thebezel (2) and seat fully.
2. As necessary, position the inner grille bezel assembly(1) back onto the upper grille bezel (2) and seat fully.

2
3. Position the upper grille assembly (1) back onto thefront fascia assembly (2).
4. Install the 14 screws (2).
5. Install two new outer rivets (1).
6. Install the front fascia assembly, (Refer to 13 - Frameand Bumpers/Bumpers/FASCIA, Front - Installation).

1
2014 - WK - JEEP GRAND CHEROKEE - Front Lamp/Removal
LAMP
WARNING: To avoid serious or fatal injury when working on the High Intensity Discharge (HID) headlampsystem, be certain to take the proper precautions. The headlamp switch must be in the OFF position.Disconnect and isolate the battery negative cable. There is a risk of fatal injury caused by contactwith high voltage used in the HID headlamps. There is a risk of explosion or fire caused by highlyflammable materials in the vicinity of damaged HID lighting elements. There is a risk of injurycaused by exposure to Ultra Violet (UV) light, a risk of burns caused by high component operatingtemperatures, a risk of mercury poisoning through glass splinters produced by bursting HID lightingelements. There is also a risk of poisoning caused by inhalation of mercury vapors and by toxicsalts and mercury compounds being ingested or coming into contact with the skin. Do not come intocontact with parts that are under high voltage. Persons with active electronic implants (e.g. heartpacemakers) must never work on HID headlamps. Wear insulated safety shoes, safety glasses andprotective gloves. Remove flammable materials and ensure sufficient ventilation in the working area.
1. Disconnect and isolate the battery negative cable.
2. Remove the front fascia.
3. Remove upper the screws (1).

2
4. Remove the lower screws (1).
5. Pull the lamp away from the front of the vehicle far enough to access and disconnect the FEM wire harnessconnections on the back of the lamp housing.
6. Remove the front lamp unit from the vehicle.
1
2014 - WK - JEEP GRAND CHEROKEE - Front Lamp/Installation
LAMP
WARNING: To avoid serious or fatal injury when working on the High Intensity Discharge (HID) headlampsystem, be certain to take the proper precautions. The headlamp switch must be in the OFF position.Disconnect and isolate the battery negative cable. There is a risk of fatal injury caused by contactwith high voltage used in the HID headlamps. There is a risk of explosion or fire caused by highlyflammable materials in the vicinity of damaged HID lighting elements. There is a risk of injurycaused by exposure to Ultra Violet (UV) light, a risk of burns caused by high component operatingtemperatures, a risk of mercury poisoning through glass splinters produced by bursting HID lightingelements. There is also a risk of poisoning caused by inhalation of mercury vapors and by toxicsalts and mercury compounds being ingested or coming into contact with the skin. Do not come intocontact with parts that are under high voltage. Persons with active electronic implants (e.g. heartpacemakers) must never work on HID headlamps. Wear insulated safety shoes, safety glasses andprotective gloves. Remove flammable materials and ensure sufficient ventilation in the working area.
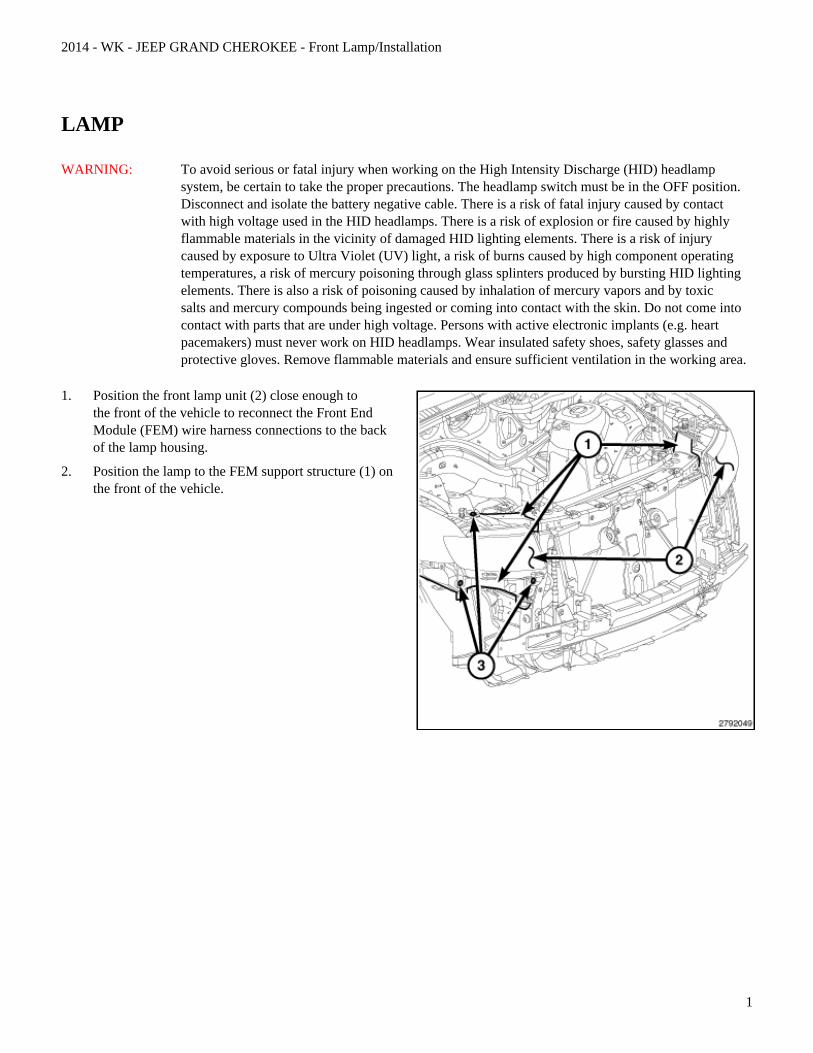
1. Position the front lamp unit (2) close enough tothe front of the vehicle to reconnect the Front EndModule (FEM) wire harness connections to the backof the lamp housing.
2. Position the lamp to the FEM support structure (1) onthe front of the vehicle.

2
3. Install and tighten the lower screws (3). Tighten thescrews to 7 N·m (62 in. lbs.).
4. Install the upper screws (1). Tighten the screws to 7N·m (62 in. lbs.).
5. Install the front fascia.
6. Reconnect the battery negative cable.
7. Confirm proper headlamp alignment. (Refer to 08 - Electrical/8L - Lamps and Lighting/Lamps/Lighting - Exterior -Standard Procedure).