french bistro recipes - sur la table bistro recipes spring classes to inspire and delight. from...
TRANSCRIPT
F R E N C H B i S T R O R E C i p E S
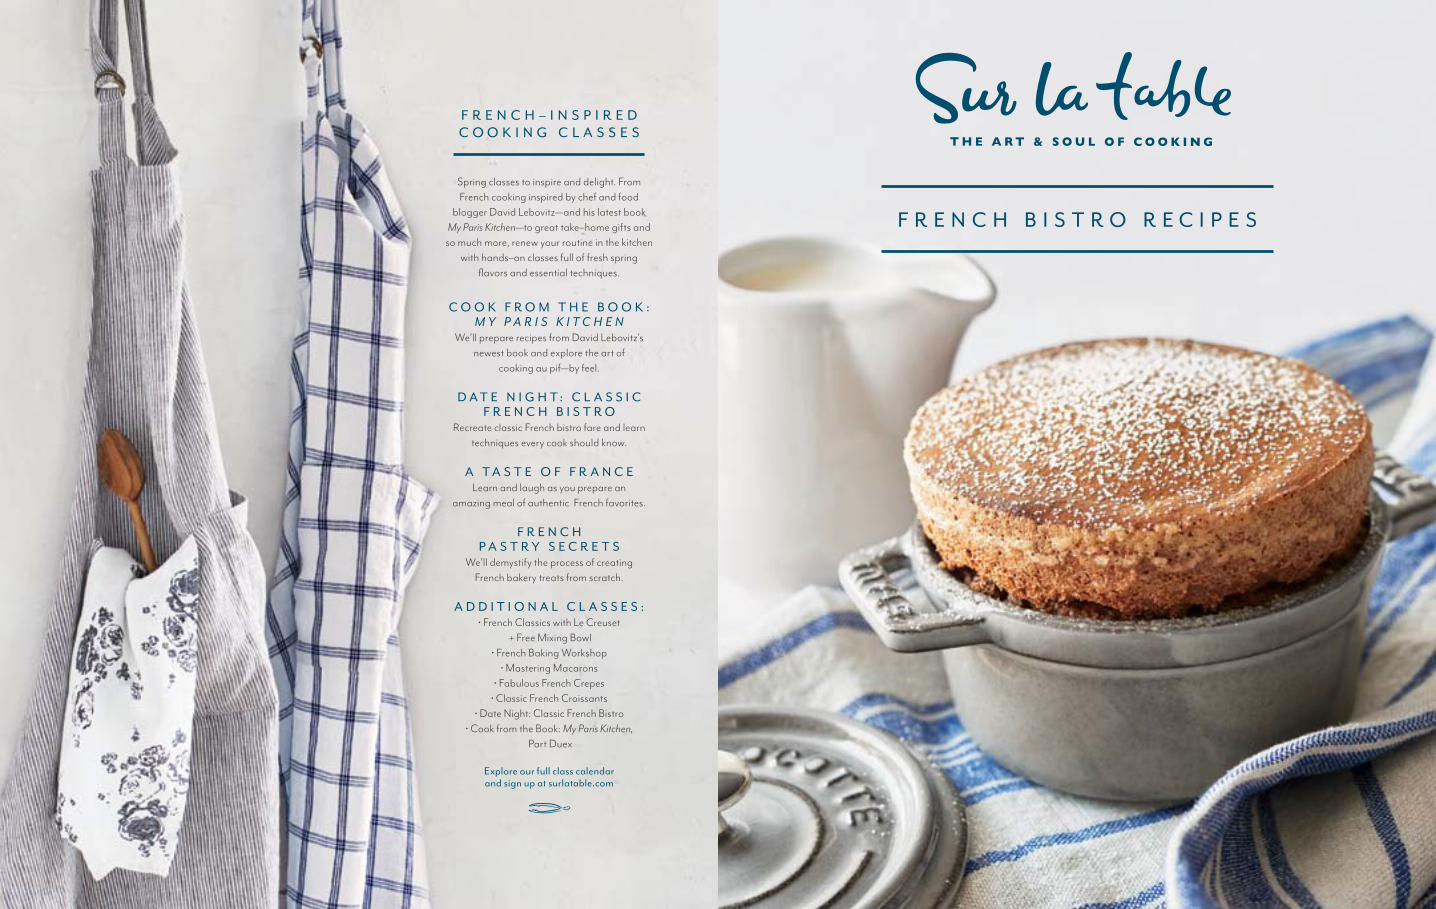
Spring classes to inspire and delight. From French cooking inspired by chef and food
blogger David Lebovitz—and his latest book My Paris Kitchen—to great take–home gifts and
so much more, renew your routine in the kitchen with hands–on classes full of fresh spring
flavors and essential techniques.
C O O K F R O M T H E B O O K : M y P a r i s K i t c h e n
We’ll prepare recipes from David Lebovitz’s newest book and explore the art of
cooking au pif—by feel.
D A T E N i G H T : C L A S S i C F R E N C H B i S T R O
Recreate classic French bistro fare and learn techniques every cook should know.
A T A S T E O F F R A N C E Learn and laugh as you prepare an
amazing meal of authentic French favorites.
F R E N C H p A S T R Y S E C R E T S
We’ll demystify the process of creating French bakery treats from scratch.
A D D i T i O N A L C L A S S E S : • French Classics with Le Creuset
+ Free Mixing Bowl• French Baking Workshop
• Mastering Macarons• Fabulous French Crepes
• Classic French Croissants• Date Night: Classic French Bistro
• Cook from the Book: My Paris Kitchen, Part Duex
Explore our full class calendar and sign up at surlatable.com
F R E N C H – i N S p i R E DC O O K i N G C L A S S E S
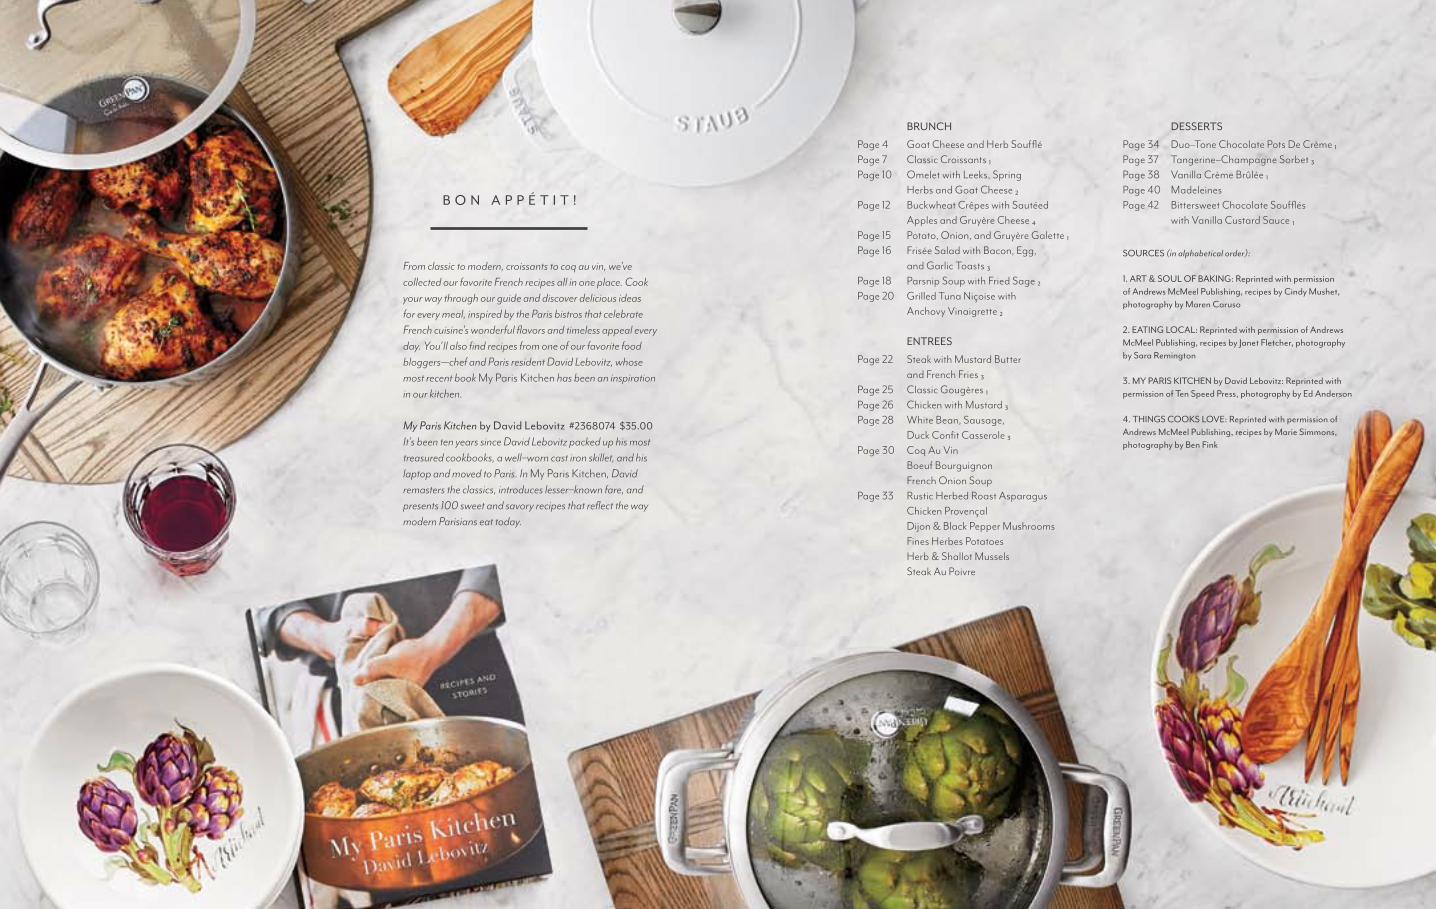
T A B L E O F C O N T E N T S
BRUNCH
Goat Cheese and Herb SouffléClassic Croissants ₁Omelet with Leeks, Spring Herbs and Goat Cheese ₂Buckwheat Crêpes with Sautéed Apples and Gruyère Cheese ₄Potato, Onion, and Gruyère Galette ₁Frisée Salad with Bacon, Egg, and Garlic Toasts ₃Parsnip Soup with Fried Sage ₂Grilled Tuna Niçoise with Anchovy Vinaigrette ₂
ENTREES
Steak with Mustard Butter and French Fries ₃Classic Gougères ₁Chicken with Mustard ₃White Bean, Sausage, Duck Confit Casserole ₃Coq Au VinBoeuf BourguignonFrench Onion SoupRustic Herbed Roast AsparagusChicken ProvençalDijon & Black Pepper MushroomsFines Herbes PotatoesHerb & Shallot MusselsSteak Au Poivre
SOURCES (in alphabetical order):
1. ART & SOUL OF BAKING: Reprinted with permission of Andrews McMeel Publishing, recipes by Cindy Mushet, photography by Maren Caruso
2. EATING LOCAL: Reprinted with permission of Andrews McMeel Publishing, recipes by Janet Fletcher, photography by Sara Remington
3. MY PARIS KITCHEN by David Lebovitz: Reprinted with permission of Ten Speed Press, photography by Ed Anderson
4. THINGS COOKS LOVE: Reprinted with permission of Andrews McMeel Publishing, recipes by Marie Simmons, photography by Ben Fink
Page 4Page 7Page 10
Page 12
Page 15Page 16
Page 18Page 20
Page 22
Page 25Page 26Page 28
Page 30
Page 33
Page 34Page 37Page 38Page 40Page 42
DESSERTS
Duo–Tone Chocolate Pots De Crème ₁Tangerine–Champagne Sorbet ₃Vanilla Crème Brûlée ₁MadeleinesBittersweet Chocolate Soufflés with Vanilla Custard Sauce ₁
B O N A p p é T i T !
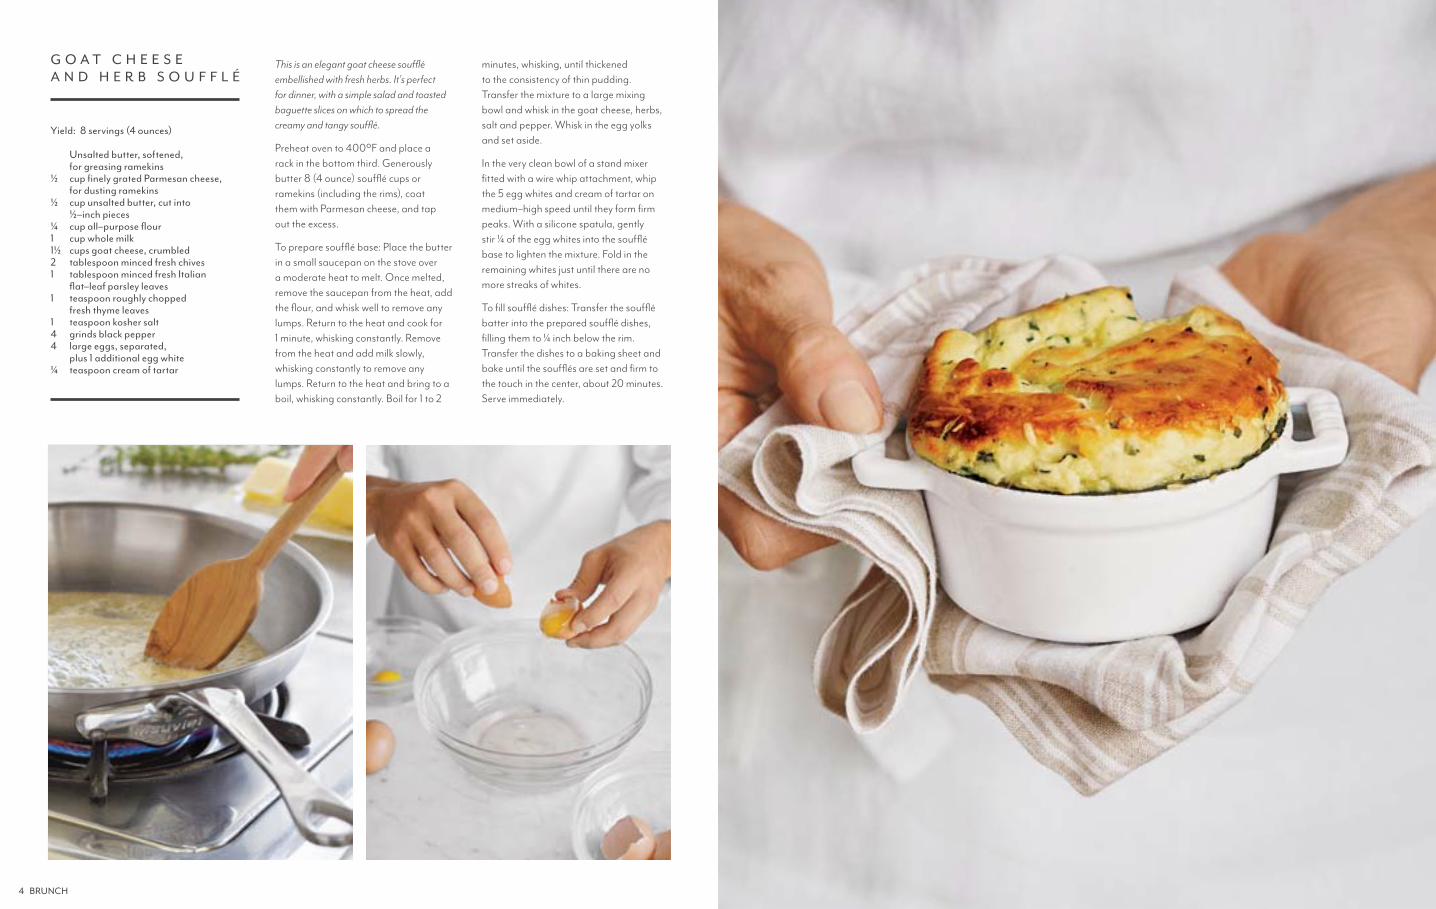
From classic to modern, croissants to coq au vin, we’ve collected our favorite French recipes all in one place. Cook your way through our guide and discover delicious ideas for every meal, inspired by the Paris bistros that celebrate French cuisine’s wonderful flavors and timeless appeal every day. You’ll also find recipes from one of our favorite food bloggers—chef and Paris resident David Lebovitz, whose most recent book My Paris Kitchen has been an inspiration in our kitchen.
My Paris Kitchen by David Lebovitz #2368074 $35.00 It’s been ten years since David Lebovitz packed up his most treasured cookbooks, a well–worn cast iron skillet, and his laptop and moved to Paris. In My Paris Kitchen, David remasters the classics, introduces lesser–known fare, and presents 100 sweet and savory recipes that reflect the way modern Parisians eat today.
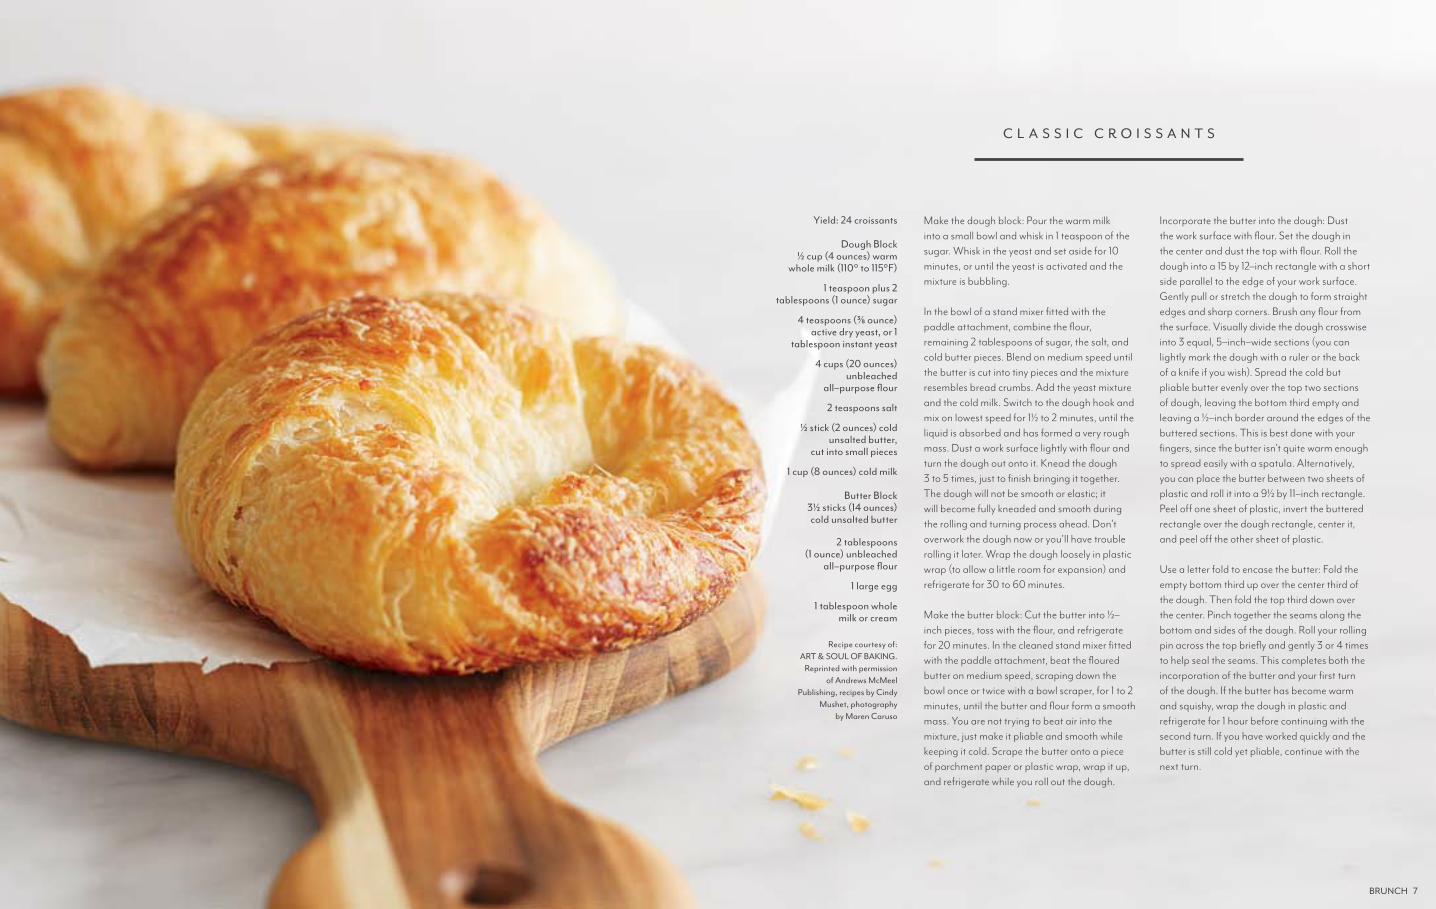
This is an elegant goat cheese soufflé embellished with fresh herbs. It’s perfect for dinner, with a simple salad and toasted baguette slices on which to spread the creamy and tangy soufflé.
Preheat oven to 400ºF and place a rack in the bottom third. Generously butter 8 (4 ounce) soufflé cups or ramekins (including the rims), coat them with Parmesan cheese, and tap out the excess.
To prepare soufflé base: Place the butter in a small saucepan on the stove over a moderate heat to melt. Once melted, remove the saucepan from the heat, add the flour, and whisk well to remove any lumps. Return to the heat and cook for 1 minute, whisking constantly. Remove from the heat and add milk slowly, whisking constantly to remove any lumps. Return to the heat and bring to a boil, whisking constantly. Boil for 1 to 2
minutes, whisking, until thickened to the consistency of thin pudding. Transfer the mixture to a large mixing bowl and whisk in the goat cheese, herbs, salt and pepper. Whisk in the egg yolks and set aside.
In the very clean bowl of a stand mixer fitted with a wire whip attachment, whip the 5 egg whites and cream of tartar on medium–high speed until they form firm peaks. With a silicone spatula, gently stir ¼ of the egg whites into the soufflé base to lighten the mixture. Fold in the remaining whites just until there are no more streaks of whites.
To fill soufflé dishes: Transfer the soufflé batter into the prepared soufflé dishes, filling them to ¼ inch below the rim. Transfer the dishes to a baking sheet and bake until the soufflés are set and firm to the touch in the center, about 20 minutes. Serve immediately.
Unsalted butter, softened, for greasing ramekinscup finely grated Parmesan cheese, for dusting ramekinscup unsalted butter, cut into ½–inch piecescup all–purpose flourcup whole milkcups goat cheese, crumbledtablespoon minced fresh chivestablespoon minced fresh Italian flat–leaf parsley leavesteaspoon roughly chopped fresh thyme leavesteaspoon kosher saltgrinds black pepperlarge eggs, separated, plus 1 additional egg whiteteaspoon cream of tartar
½
½
¼11½21
1
144
¼
Yield: 8 servings (4 ounces)
G O A T C H E E S E A N D H E R B S O U F F L é
4 BRUNCH
C L A S S i C C R O i S S A N T S
Yield: 24 croissants
Dough Block ½ cup (4 ounces) warm
whole milk (110° to 115°F)
1 teaspoon plus 2 tablespoons (1 ounce) sugar
4 teaspoons (⅜ ounce) active dry yeast, or 1
tablespoon instant yeast
4 cups (20 ounces) unbleached
all–purpose flour
2 teaspoons salt
½ stick (2 ounces) cold unsalted butter,
cut into small pieces
1 cup (8 ounces) cold milk
Butter Block 3½ sticks (14 ounces) cold unsalted butter
2 tablespoons (1 ounce) unbleached
all–purpose flour
1 large egg
1 tablespoon whole milk or cream
Make the dough block: Pour the warm milk into a small bowl and whisk in 1 teaspoon of the sugar. Whisk in the yeast and set aside for 10 minutes, or until the yeast is activated and the mixture is bubbling.
In the bowl of a stand mixer fitted with the paddle attachment, combine the flour, remaining 2 tablespoons of sugar, the salt, and cold butter pieces. Blend on medium speed until the butter is cut into tiny pieces and the mixture resembles bread crumbs. Add the yeast mixture and the cold milk. Switch to the dough hook and mix on lowest speed for 1½ to 2 minutes, until the liquid is absorbed and has formed a very rough mass. Dust a work surface lightly with flour and turn the dough out onto it. Knead the dough 3 to 5 times, just to finish bringing it together. The dough will not be smooth or elastic; it will become fully kneaded and smooth during the rolling and turning process ahead. Don’t overwork the dough now or you’ll have trouble rolling it later. Wrap the dough loosely in plastic wrap (to allow a little room for expansion) and refrigerate for 30 to 60 minutes.
Make the butter block: Cut the butter into ½–inch pieces, toss with the flour, and refrigerate for 20 minutes. In the cleaned stand mixer fitted with the paddle attachment, beat the floured butter on medium speed, scraping down the bowl once or twice with a bowl scraper, for 1 to 2 minutes, until the butter and flour form a smooth mass. You are not trying to beat air into the mixture, just make it pliable and smooth while keeping it cold. Scrape the butter onto a piece of parchment paper or plastic wrap, wrap it up, and refrigerate while you roll out the dough.
Incorporate the butter into the dough: Dust the work surface with flour. Set the dough in the center and dust the top with flour. Roll the dough into a 15 by 12–inch rectangle with a short side parallel to the edge of your work surface. Gently pull or stretch the dough to form straight edges and sharp corners. Brush any flour from the surface. Visually divide the dough crosswise into 3 equal, 5–inch–wide sections (you can lightly mark the dough with a ruler or the back of a knife if you wish). Spread the cold but pliable butter evenly over the top two sections of dough, leaving the bottom third empty and leaving a ½–inch border around the edges of the buttered sections. This is best done with your fingers, since the butter isn’t quite warm enough to spread easily with a spatula. Alternatively, you can place the butter between two sheets of plastic and roll it into a 9½ by 11–inch rectangle. Peel off one sheet of plastic, invert the buttered rectangle over the dough rectangle, center it, and peel off the other sheet of plastic.
Use a letter fold to encase the butter: Fold the empty bottom third up over the center third of the dough. Then fold the top third down over the center. Pinch together the seams along the bottom and sides of the dough. Roll your rolling pin across the top briefly and gently 3 or 4 times to help seal the seams. This completes both the incorporation of the butter and your first turn of the dough. If the butter has become warm and squishy, wrap the dough in plastic and refrigerate for 1 hour before continuing with the second turn. If you have worked quickly and the butter is still cold yet pliable, continue with the next turn.
Recipe courtesy of: ART & SOUL OF BAKING.
Reprinted with permission of Andrews McMeel
Publishing, recipes by Cindy Mushet, photography
by Maren Caruso
BRUNCH 7
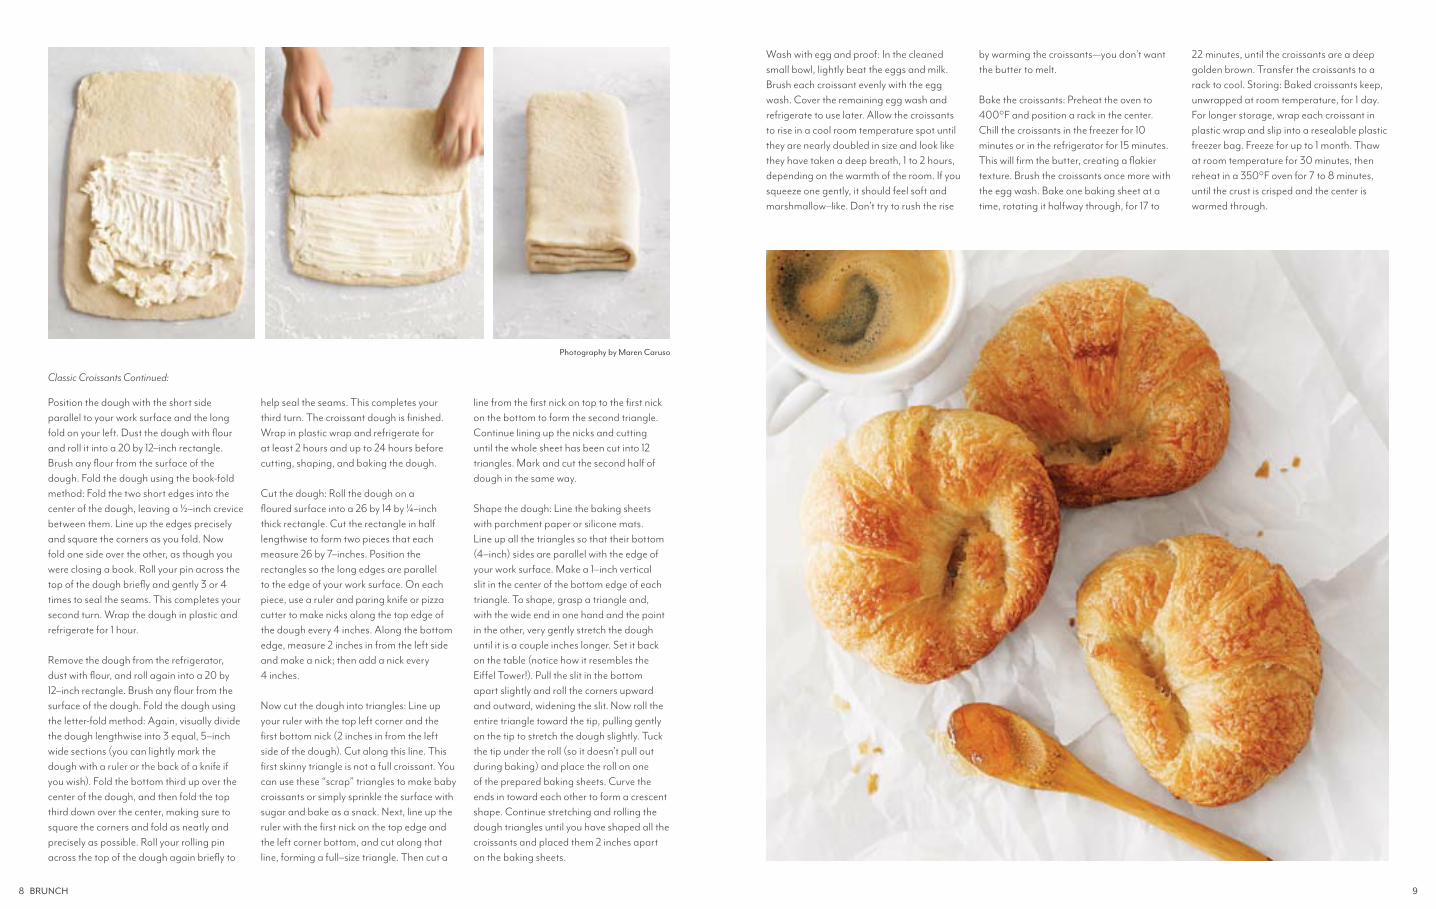
Position the dough with the short side parallel to your work surface and the long fold on your left. Dust the dough with flour and roll it into a 20 by 12–inch rectangle. Brush any flour from the surface of the dough. Fold the dough using the book-fold method: Fold the two short edges into the center of the dough, leaving a ½–inch crevice between them. Line up the edges precisely and square the corners as you fold. Now fold one side over the other, as though you were closing a book. Roll your pin across the top of the dough briefly and gently 3 or 4 times to seal the seams. This completes your second turn. Wrap the dough in plastic and refrigerate for 1 hour.
Remove the dough from the refrigerator, dust with flour, and roll again into a 20 by 12–inch rectangle. Brush any flour from the surface of the dough. Fold the dough using the letter-fold method: Again, visually divide the dough lengthwise into 3 equal, 5–inch wide sections (you can lightly mark the dough with a ruler or the back of a knife if you wish). Fold the bottom third up over the center of the dough, and then fold the top third down over the center, making sure to square the corners and fold as neatly and precisely as possible. Roll your rolling pin across the top of the dough again briefly to
help seal the seams. This completes your third turn. The croissant dough is finished. Wrap in plastic wrap and refrigerate for at least 2 hours and up to 24 hours before cutting, shaping, and baking the dough.
Cut the dough: Roll the dough on a floured surface into a 26 by 14 by ¼–inch thick rectangle. Cut the rectangle in half lengthwise to form two pieces that each measure 26 by 7–inches. Position the rectangles so the long edges are parallel to the edge of your work surface. On each piece, use a ruler and paring knife or pizza cutter to make nicks along the top edge of the dough every 4 inches. Along the bottom edge, measure 2 inches in from the left side and make a nick; then add a nick every 4 inches.
Now cut the dough into triangles: Line up your ruler with the top left corner and the first bottom nick (2 inches in from the left side of the dough). Cut along this line. This first skinny triangle is not a full croissant. You can use these “scrap” triangles to make baby croissants or simply sprinkle the surface with sugar and bake as a snack. Next, line up the ruler with the first nick on the top edge and the left corner bottom, and cut along that line, forming a full–size triangle. Then cut a
line from the first nick on top to the first nick on the bottom to form the second triangle. Continue lining up the nicks and cutting until the whole sheet has been cut into 12 triangles. Mark and cut the second half of dough in the same way.
Shape the dough: Line the baking sheets with parchment paper or silicone mats. Line up all the triangles so that their bottom (4–inch) sides are parallel with the edge of your work surface. Make a 1–inch vertical slit in the center of the bottom edge of each triangle. To shape, grasp a triangle and, with the wide end in one hand and the point in the other, very gently stretch the dough until it is a couple inches longer. Set it back on the table (notice how it resembles the Eiffel Tower!). Pull the slit in the bottom apart slightly and roll the corners upward and outward, widening the slit. Now roll the entire triangle toward the tip, pulling gently on the tip to stretch the dough slightly. Tuck the tip under the roll (so it doesn’t pull out during baking) and place the roll on one of the prepared baking sheets. Curve the ends in toward each other to form a crescent shape. Continue stretching and rolling the dough triangles until you have shaped all the croissants and placed them 2 inches apart on the baking sheets.
Classic Croissants Continued:
Wash with egg and proof: In the cleaned small bowl, lightly beat the eggs and milk. Brush each croissant evenly with the egg wash. Cover the remaining egg wash and refrigerate to use later. Allow the croissants to rise in a cool room temperature spot until they are nearly doubled in size and look like they have taken a deep breath, 1 to 2 hours, depending on the warmth of the room. If you squeeze one gently, it should feel soft and marshmallow–like. Don’t try to rush the rise
by warming the croissants—you don’t want the butter to melt.
Bake the croissants: Preheat the oven to 400°F and position a rack in the center. Chill the croissants in the freezer for 10 minutes or in the refrigerator for 15 minutes. This will firm the butter, creating a flakier texture. Brush the croissants once more with the egg wash. Bake one baking sheet at a time, rotating it halfway through, for 17 to
22 minutes, until the croissants are a deep golden brown. Transfer the croissants to a rack to cool. Storing: Baked croissants keep, unwrapped at room temperature, for 1 day. For longer storage, wrap each croissant in plastic wrap and slip into a resealable plastic freezer bag. Freeze for up to 1 month. Thaw at room temperature for 30 minutes, then reheat in a 350°F oven for 7 to 8 minutes, until the crust is crisped and the center is warmed through.
Photography by Maren Caruso
8 BRUNCH 9

Melt 1 tablespoon of the butter in a small skillet over moderately low heat. Add the leeks, season with salt and pepper, and stir to coat with the butter. Cover and cook, stirring occasionally, until the leeks are tender but not meltingly soft, about 10 minutes.
In a small bowl, mash the goat cheese with the chervil until blended.
Crack the eggs into a bowl and add the chives, parsley, and water. Beat vigorously with a whisk until the eggs are light and very foamy.
Melt the remaining 2 tablespoons butter in a 10–inch nonstick skillet over moderately high heat. When the butter begins to sizzle and foam, add the eggs and spread them in an even layer with
a heatproof rubber spatula. Let the eggs set for a few seconds, then use the spatula to push the firmer cooked egg at the edges toward the center of the skillet so that the uncooked portion flows onto the bare pan bottom. With the spatula, gently pat the eggs into an even layer.
When the eggs have almost completely set but are still a little moist on the surface, dollop the goat cheese on one–half. Spoon the leeks over the goat cheese. Fold the other half of the omelet over the filling and slide the omelet onto a warm plate. Top with a little parsley and serve immediately.
Recipe courtesy of: EATING LOCAL. Reprinted with permission of Andrews McMeel Publishing, recipes by Janet Fletcher
tablespoons unsalted buttercup thinly sliced leeks, white and pale green parts onlyKosher or sea salt and freshly ground black pepperounces fresh goat cheese, at room temperaturetablespoons minced fresh chervillarge eggstablespoon minced fresh chivestablespoon minced fresh Italian parsley, plus more for garnishtablespoon water
31
2
2311
1
Yield: 1 serving
O M E L E T W i T H L E E K S , S p R i N G H E R B S A N D G O A T C H E E S E
10 BRUNCH

Crêpe Battercup buckwheat flourcup all–purpose flourteaspoon coarse saltlarge eggscups watertablespoons salted or unsalted butter, melted
Fillingtablespoons salted or unsalted butteryellow onions, cut into ⅛–inch wedgesslightly green Golden Delicious apples,quartered, cored, and cut into ⅛–inch wedgesounces smoked ham, thinly slivered (optional)tablespoons freshly squeezed lemon juiceteaspoon freshly grated nutmegPinch of coarse salttablespoon salted or unsalted butter,melted, plus 2 tablespoons, softenedcups (12 ounces) coarsely grated Gruyère or Comté cheese
1½121½2
436
23⅛
1
3
Throughout France, you will find small restaurants, often tucked away on side streets, specializing in crêpes. In Brittany, the crêpes are made with buckwheat flour and the typical filling is a smear of salted butter, cheese, ham or bacon, thinly sliced fruit, and/or eggs. In most of France, crêpes are rolled up or folded into half or quarter circles, but in Brittany, where they are sometimes called galettes, they are folded differently. The filling is spread in the center of the pancake, the four rounded sides are folded in over the filling, forming a square, and then the crêpe is inverted onto a serving plate.
Make the crêpe batter: In a large bowl, stir together the buckwheat flour, all–purpose flour, and salt. In a small bowl, whisk the eggs until well blended; stir in the water and butter. Gradually whisk the egg mixture into the flour mixture until the batter is smooth. Cover and refrigerate for 1 hour. The batter should be the consistency of heavy cream. If it is too thick, whisk in additional water, 1 tablespoon at a time.
B U C K W H E A T C R Ê p E S W i T H S A U T é E D A p p L E S A N D G R U Y È R E C H E E S E
Yield: 12 Crêpes
While the batter is resting, prepare the filling: In a large skillet, melt the butter over medium–low heat. Add the onions, increase the heat to medium, and cook, stirring, for 5 minutes. Add the apples and cook, stirring, for 10 to 15 minutes, until the apples begin to brown and have softened. Add the ham and sprinkle with the lemon juice, nutmeg, and salt. Cover and set aside until ready to fill the crêpes.
Heat a 9 to 11–inch crêpe pan over medium–low heat until hot enough for a drop of water to sizzle on contact. Brush the surface of the crêpe pan with a thin film of the melted butter. Blot any excess with the tip of a paper towel. Stir the crêpe batter well with the whisk. Ladle about ⅓ cup of the batter into the heated pan, and simultaneously tilt and roll the pan from side to side to coat the surface with a thin layer of batter. Cook for 1 minute, or until the edges begin to set.
Run the tip of a small, narrow rubber spatula under the edges of the crêpe to loosen it from the pan. Use your fingertips to lift the crêpe and quickly flip it over. Cook the other side for 30 seconds, or until the batter is set into a thin pancake. Do not brown the crêpe or cook it until crisp. Transfer the crêpe to a large, round plate. Repeat with the remaining batter, brushing the pan with more butter if necessary. Stack the crêpes as they are made. You should have 12 crêpes. If making ahead, wrap the crêpes in plastic wrap or aluminum foil to prevent drying out. The crêpes can be refrigerated for up to 2 days.
If the crêpes have been made ahead, fill them one at a time by first warming each crêpe in the pan over low heat. While they are still in the pan, sprinkle about ¼ cup of the cheese in the center of the crêpe. Top the cheese with a large spoonful of the warm apple filling, spreading it into a single layer. Fold in two opposite sides of the circle to cover the filling. Then fold in the remaining two rounded sides, overlapping slightly, to form a square envelope. With a wide spatula, lift the crêpe from the pan and invert it, so it is seam side down, onto a serving plate. Cover with aluminum foil to keep warm if not serving at once. Fill the remaining crêpes in the same way. Reserve the remaining filling.
Just before serving, brush the smooth top of each crêpe with a thin film of the softened butter. Reheat the remaining apple filling and spoon a portion on top of each crêpe. Serve at once.
Recipe courtesy of: THINGS COOKS LOVE. Reprinted with permission of Andrews McMeel Publishing, recipes by Marie Simmons
12 BRUNCH
Yield: 8 to 10 servings, 1 (10–inch) galette
1 recipe Flaky Pie or Tart Dough
(use your own recipe or find ours at surlatable.com)
1½ tablespoons olive oil, plus 1 tablespoon for drizzling
1 large onion (12 ounces), thinly sliced
½ teaspoon finely choppedfresh thyme or rosemary
¼ teaspoon plus 1 pinch kosher salt
Black pepper
4 ounces Gruyère cheese, coarsely grated
1 pound red potatoes, washed (left unpeeled)
and cut into ¼–inch–thick slices
1 egg, lightly beaten
Crème fraîche, for serving (optional)
Golden caviar, for serving (optional)
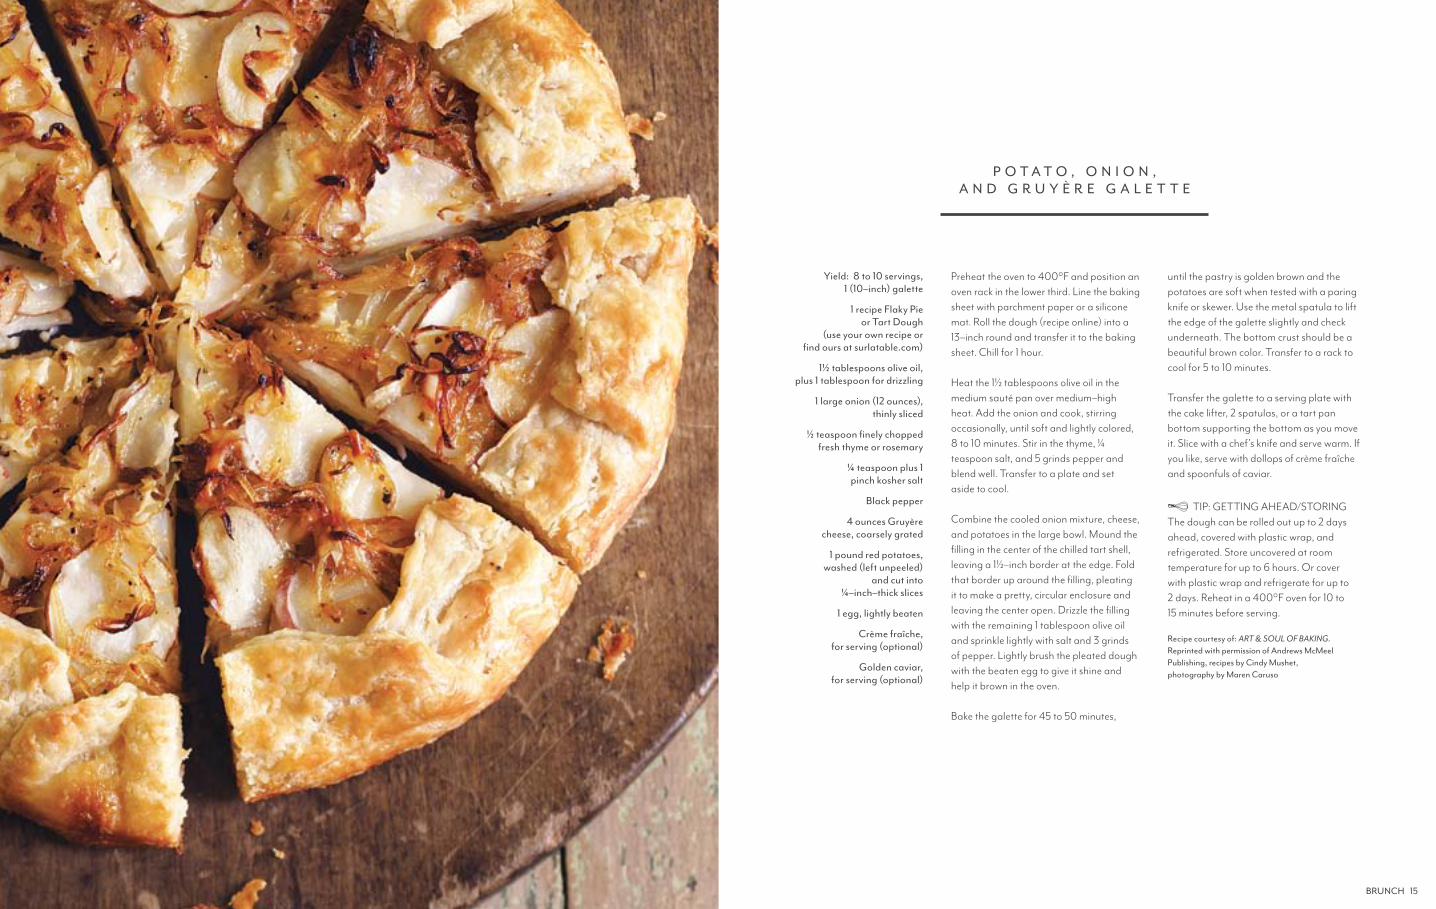
p O T A T O , O N i O N , A N D G R U Y È R E G A L E T T E
Preheat the oven to 400°F and position an oven rack in the lower third. Line the baking sheet with parchment paper or a silicone mat. Roll the dough (recipe online) into a 13–inch round and transfer it to the baking sheet. Chill for 1 hour.
Heat the 1½ tablespoons olive oil in the medium sauté pan over medium–high heat. Add the onion and cook, stirring occasionally, until soft and lightly colored, 8 to 10 minutes. Stir in the thyme, ¼ teaspoon salt, and 5 grinds pepper and blend well. Transfer to a plate and set aside to cool.
Combine the cooled onion mixture, cheese, and potatoes in the large bowl. Mound the filling in the center of the chilled tart shell, leaving a 1½–inch border at the edge. Fold that border up around the filling, pleating it to make a pretty, circular enclosure and leaving the center open. Drizzle the filling with the remaining 1 tablespoon olive oil and sprinkle lightly with salt and 3 grinds of pepper. Lightly brush the pleated dough with the beaten egg to give it shine and help it brown in the oven.
Bake the galette for 45 to 50 minutes,
until the pastry is golden brown and the potatoes are soft when tested with a paring knife or skewer. Use the metal spatula to lift the edge of the galette slightly and check underneath. The bottom crust should be a beautiful brown color. Transfer to a rack to cool for 5 to 10 minutes.
Transfer the galette to a serving plate with the cake lifter, 2 spatulas, or a tart pan bottom supporting the bottom as you move it. Slice with a chef’s knife and serve warm. If you like, serve with dollops of crème fraîche and spoonfuls of caviar.
Recipe courtesy of: ART & SOUL OF BAKING. Reprinted with permission of Andrews McMeel Publishing, recipes by Cindy Mushet, photography by Maren Caruso
BRUNCH 15
The dough can be rolled out up to 2 days ahead, covered with plastic wrap, and refrigerated. Store uncovered at room temperature for up to 6 hours. Or cover with plastic wrap and refrigerate for up to 2 days. Reheat in a 400°F oven for 10 to 15 minutes before serving.
TIP: GETTING AHEAD/STORING

From My Paris Kitchen by David Lebovitz: Salade lyonnaise was the first dish that made me fall in love with French cuisine. Even though the French can be rather territorial about their food (“You want bouillabaisse? Go to Marseille!” “Aïoli? Too much garlic. That’s for les Provençaux . . . ”), salade lyonnaise is universally beloved across France, and beyond. But I have to say, if you want the best version, you should go to Lyon. As much as people love to travel to Paris, few make the trip to Lyon, which can be reached in two hours on the high–speed TGV train. Dotted around the city are gut–busting restaurants called bouchons, where the food is brought to the table in big earthenware bowls and rustic terrines, and diners are encouraged to help themselves—repeatedly, if you wish. (Which is the first reminder that you’re not in Paris anymore.) At the end of a meal, most places will not let you leave unless you have at least one glass of eau-de-vie, a spirited shot of high–test distilled brandy that will help you digest whatever came before. (And can make you forget it, the day after.) If that isn’t enough to put you on a train, Lyon is also home to Bernachon. This is the only location of the world–famous chocolate shop that imports its own cocoa beans, which they blend, grind, and melt to make their chocolates and confections. But what makes me crazy are their Kalouga bars, which are the gold standard of salted caramel–filled chocolate bars, and I’ve been known to buy out their entire inventory, and stockpile them in my apartment back in Paris.
Like good chocolates, salade lyonnaise is a confluence of good, yet humble, ingredients coming together to become something more
Yield: 4 to 6 servings
Garlic Croutons
2½ tablespoons olive oil, plus more if needed
1 clove garlic, peeled and slightly crushed
1½ cups (65g) cubes or torn pieces of bread, about ¾ inch (2cm) in size
Sea salt or kosher salt
Salad
8 to 12 new potatoes (12 ounces/ 360g)
Sea salt or kosher salt
2 cups (300g) diced, thick–cut bacon, smoked or un–smoked
4 teaspoons red wine vinegar
1½ tablespoons Dijon mustard
F R i S é E S A L A D W i T H B A C O N , E G G , A N D G A R L i C T O A S T S
Recipe courtesy of MY PARIS KITCHEN by David Lebovitz: Reprinted with permission of Ten Speed Press
5 tablespoons olive oil or neutral–tasting vegetable oil
1 tablespoon water
2 teaspoons peeled and minced garlic
8 cups (150g) loosely packed frisée or escarole leaves
2 tablespoons finely chopped fresh flat-leaf parsley or fresh chives
Freshly ground black pepper
4 poached eggs or 4 hard–cooked eggs peeled and quartered
important than each one could be on its own. The frisée should be crisp and fresh, to stand up to the warm ingredients that would turn other salad greens into a mushy pile. The pieces of bacon should be lightly browned, not too crunchy, so they have a bit of juicy chewiness still left in them. And the fingerling potatoes should be warm when the salad is tossed, which helps them soak up the mustardy flavor of the dressing. Poached eggs are added, and the runny yolks get stirred into the salad to enrich the vinaigrette. There are other versions that use hard–cooked eggs, if you’d rather keep things simple.
Although this salad is hearty enough to feed a normal person as a meal, it’s considered a first course where it originated. Drink this with a fruity red wine, such as a Brouilly or Beaujolais, slightly chilled, as they do in Lyon. And if you ever have this salad in the city where it originated, get yourself to Bernachon for a salted butter caramel–filled chocolate bar afterwards. You can thank me later, preferably with a chocolate bar filled with salted butter caramel.
To make the croutons, heat the oil in a skillet over medium heat. Add the garlic and cook until it’s deeply golden brown; be careful not to burn it. Remove and reserve the garlic, then add the bread, stirring the cubes in the oil, turning them frequently. Add a sprinkle of salt and a dribble more oil if necessary, until the bread is brown on all sides, about 5 minutes. Set aside until ready to serve.
To make the salad, put the potatoes in a saucepan with enough cold water to cover. Add some salt and bring to a boil over high heat. Decrease the heat to a low boil and cook for 15 minutes, until the potatoes are tender when pierced with a sharp knife. (If done in advance, cook them slightly less, and let them rest in the warm water for up to 45 minutes.)
While the potatoes are cooking, fry the bacon in a skillet over medium heat until just starting to crisp. Drain the pieces on a plate lined with paper towels.
In a large salad bowl, whisk together the vinegar, mustard, ¼ teaspoon of salt, the oil, water, and garlic. (If you like garlic a lot, you can chop up the fried garlic clove from making the croutons and add that as well.)
To assemble the salad, slice the potatoes and add them to the bowl along with the bacon and toss gently. Add the frisée, parsley, and some black pepper. Add the croutons and hard–cooked eggs (if using) and toss very well. Divide among four salad bowls. If using poached eggs, slide one on top of each salad and serve.
Variation: Although it’s not traditional, I sometimes add 2 cups (260g) of crumbled blue cheese to the salad at the last minute, omitting the eggs.
16 BRUNCH
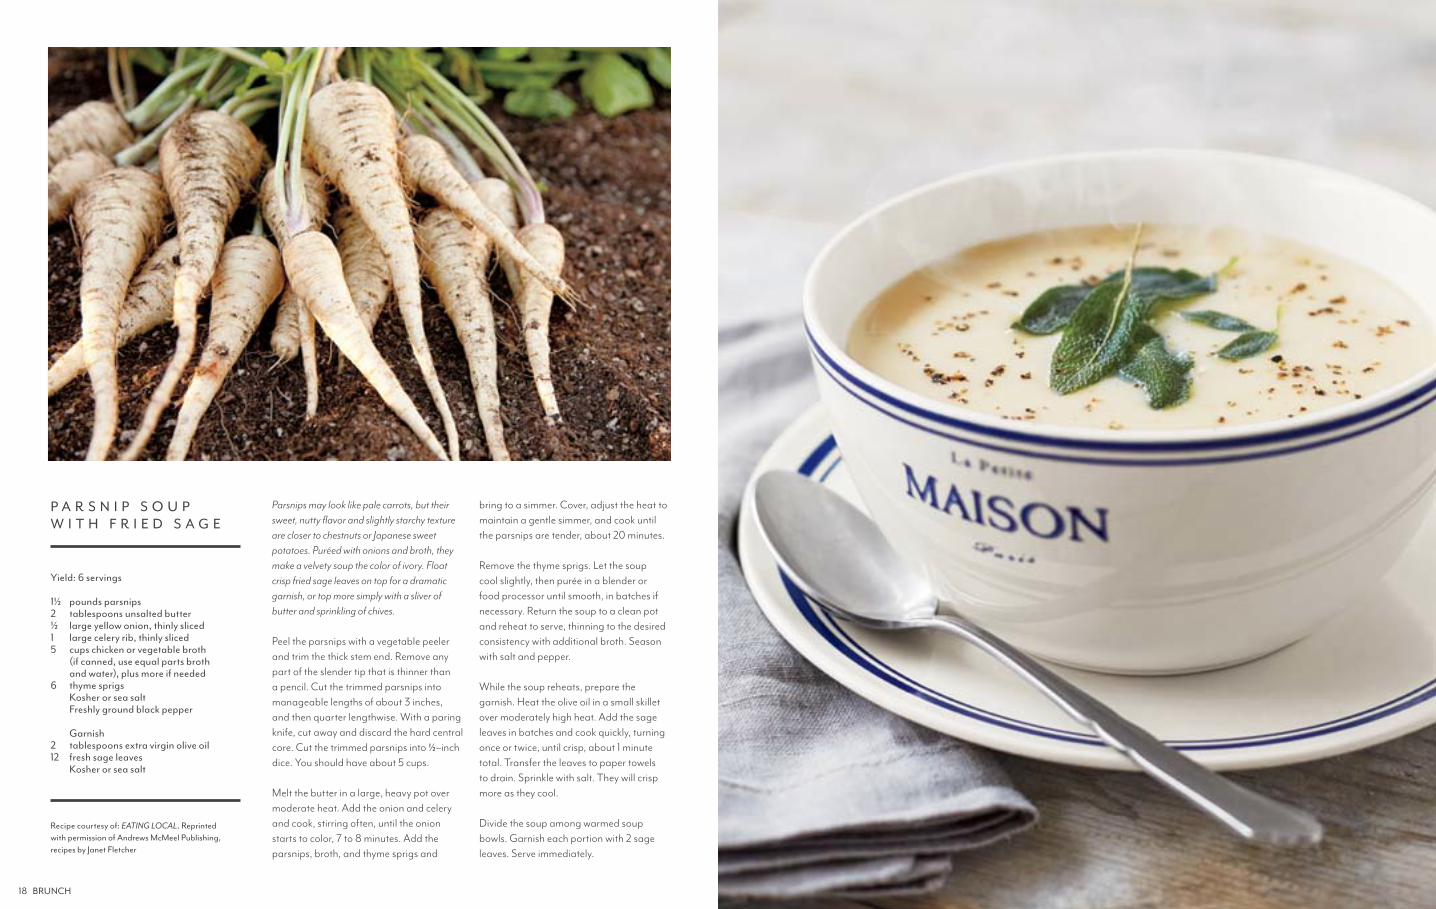
Parsnips may look like pale carrots, but their sweet, nutty flavor and slightly starchy texture are closer to chestnuts or Japanese sweet potatoes. Puréed with onions and broth, they make a velvety soup the color of ivory. Float crisp fried sage leaves on top for a dramatic garnish, or top more simply with a sliver of butter and sprinkling of chives.
Peel the parsnips with a vegetable peeler and trim the thick stem end. Remove any part of the slender tip that is thinner than a pencil. Cut the trimmed parsnips into manageable lengths of about 3 inches, and then quarter lengthwise. With a paring knife, cut away and discard the hard central core. Cut the trimmed parsnips into ½–inch dice. You should have about 5 cups.
Melt the butter in a large, heavy pot over moderate heat. Add the onion and celery and cook, stirring often, until the onion starts to color, 7 to 8 minutes. Add the parsnips, broth, and thyme sprigs and
bring to a simmer. Cover, adjust the heat to maintain a gentle simmer, and cook until the parsnips are tender, about 20 minutes.
Remove the thyme sprigs. Let the soup cool slightly, then purée in a blender or food processor until smooth, in batches if necessary. Return the soup to a clean pot and reheat to serve, thinning to the desired consistency with additional broth. Season with salt and pepper.
While the soup reheats, prepare the garnish. Heat the olive oil in a small skillet over moderately high heat. Add the sage leaves in batches and cook quickly, turning once or twice, until crisp, about 1 minute total. Transfer the leaves to paper towels to drain. Sprinkle with salt. They will crisp more as they cool.
Divide the soup among warmed soup bowls. Garnish each portion with 2 sage leaves. Serve immediately.
pounds parsnipstablespoons unsalted butterlarge yellow onion, thinly slicedlarge celery rib, thinly slicedcups chicken or vegetable broth (if canned, use equal parts broth and water), plus more if neededthyme sprigsKosher or sea salt Freshly ground black pepper
Garnishtablespoons extra virgin olive oilfresh sage leavesKosher or sea salt
1½2½15
6
212
Yield: 6 servings
p A R S N i p S O U p W i T H F R i E D S A G E
Recipe courtesy of: EATING LOCAL. Reprinted with permission of Andrews McMeel Publishing, recipes by Janet Fletcher
18 BRUNCH
To make the anchovy vinaigrette, in a small bowl, whisk together the olive oil, vinegar, anchovies, garlic, capers, tarragon, and fish sauce. Season to taste with salt.
Preheat the oven to 375ºF. If the beet greens are attached, remove all but ½ inch of the stem. Put the beets in a large baking dish, and add water to a depth of ¼ inch. Cover and bake until a knife pierces them easily, 45 minutes or longer, depending on their size. When cool enough to handle, peel the beets and cut into wedges.
Put the potatoes in a large pot and add salted water to cover by 1 inch. Bring to a boil over high heat, then reduce the heat to maintain a simmer and cook until tender when pierced, 15 to 20 minutes. Drain. When cool enough to handle, peel the potatoes and slice thickly.
Bring a large pot of salted water to a boil over high heat. Add the green beans and boil until they have lost their crispness but are still firm, about 5 minutes. Drain in a sieve or colander and immediately run under cold running water until cool. Drain again and pat thoroughly dry.
Put the eggs in a small saucepan with water to cover by 1 inch. Bring to a boil over high heat, then immediately cover and remove from the heat. Let stand for 6 minutes exactly. Drain and quickly run under cold running water until cool, then peel.
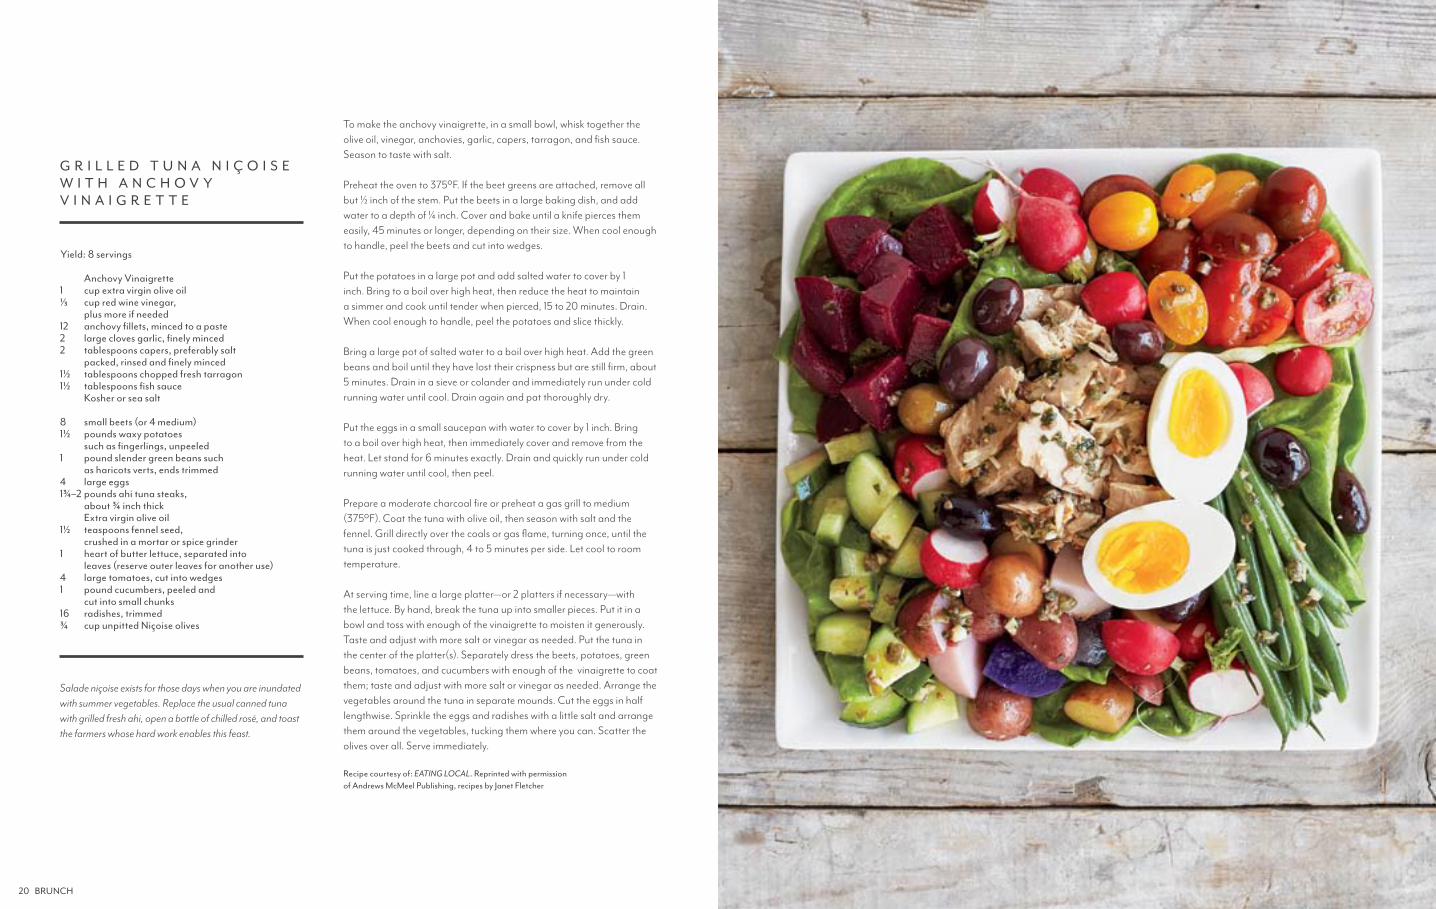
Prepare a moderate charcoal fire or preheat a gas grill to medium (375ºF). Coat the tuna with olive oil, then season with salt and the fennel. Grill directly over the coals or gas flame, turning once, until the tuna is just cooked through, 4 to 5 minutes per side. Let cool to room temperature.
At serving time, line a large platter—or 2 platters if necessary—with the lettuce. By hand, break the tuna up into smaller pieces. Put it in a bowl and toss with enough of the vinaigrette to moisten it generously. Taste and adjust with more salt or vinegar as needed. Put the tuna in the center of the platter(s). Separately dress the beets, potatoes, green beans, tomatoes, and cucumbers with enough of the vinaigrette to coat them; taste and adjust with more salt or vinegar as needed. Arrange the vegetables around the tuna in separate mounds. Cut the eggs in half lengthwise. Sprinkle the eggs and radishes with a little salt and arrange them around the vegetables, tucking them where you can. Scatter the olives over all. Serve immediately.
Recipe courtesy of: EATING LOCAL. Reprinted with permission of Andrews McMeel Publishing, recipes by Janet Fletcher
Anchovy Vinaigrettecup extra virgin olive oilcup red wine vinegar, plus more if neededanchovy fillets, minced to a pastelarge cloves garlic, finely mincedtablespoons capers, preferably salt packed, rinsed and finely mincedtablespoons chopped fresh tarragontablespoons fish sauceKosher or sea salt
small beets (or 4 medium)pounds waxy potatoes such as fingerlings, unpeeledpound slender green beans such as haricots verts, ends trimmedlarge eggspounds ahi tuna steaks, about ¾ inch thickExtra virgin olive oilteaspoons fennel seed, crushed in a mortar or spice grinderheart of butter lettuce, separated into leaves (reserve outer leaves for another use)large tomatoes, cut into wedgespound cucumbers, peeled and cut into small chunksradishes, trimmedcup unpitted Niçoise olives
1⅓
1222
1½1½
81½
1
41¾–2
1½
1
41
16¾
Yield: 8 servings
G R i L L E D T U N A N i Ç O i S E W i T H A N C H O V Y V i N A i G R E T T E
Salade niçoise exists for those days when you are inundated with summer vegetables. Replace the usual canned tuna with grilled fresh ahi, open a bottle of chilled rosé, and toast the farmers whose hard work enables this feast.
20 BRUNCH
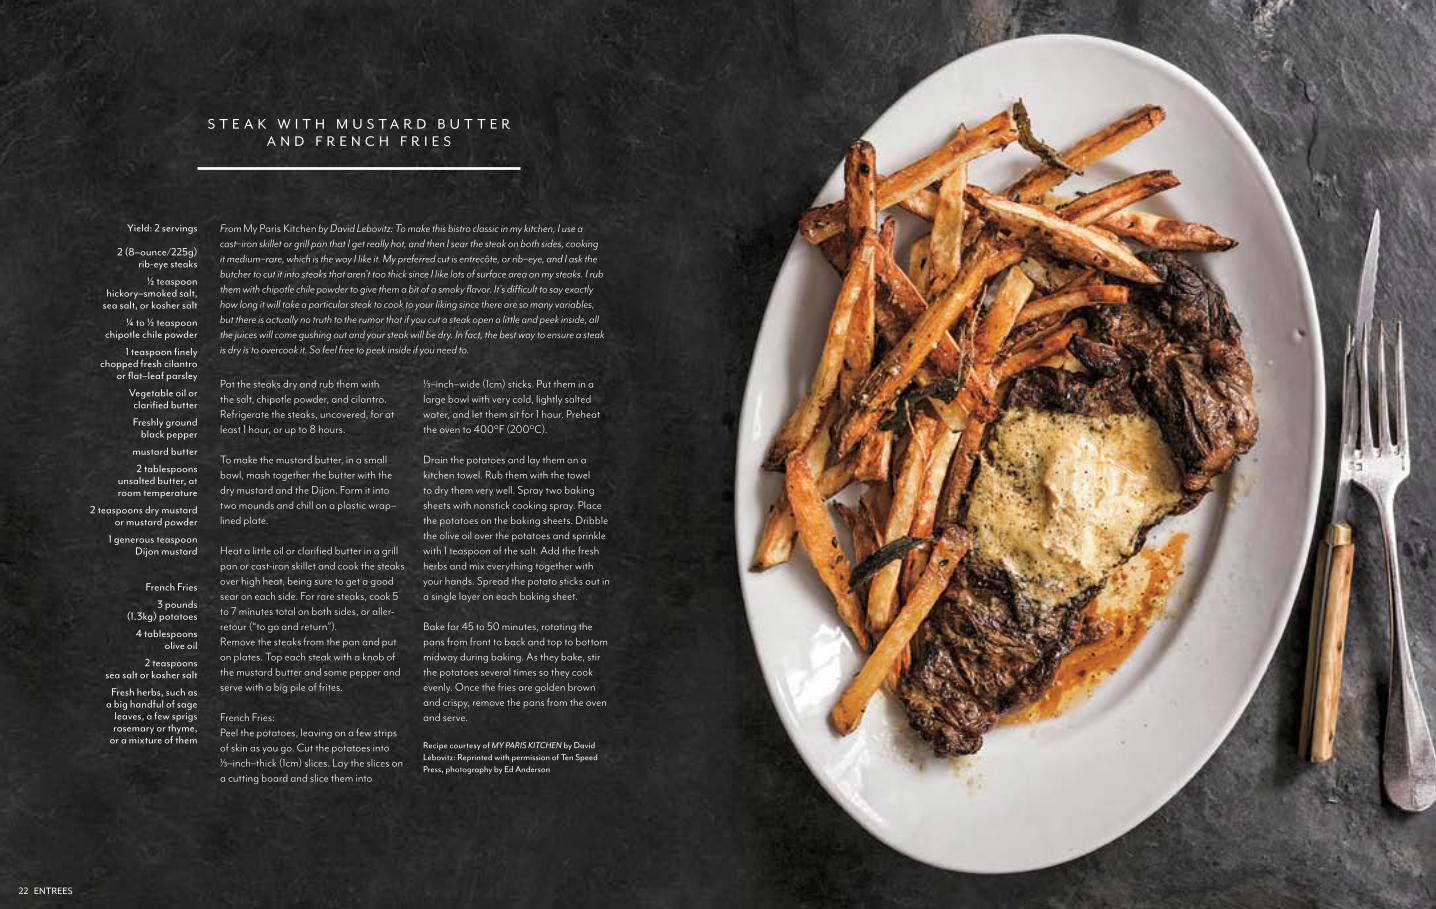
Pat the steaks dry and rub them with the salt, chipotle powder, and cilantro. Refrigerate the steaks, uncovered, for at least 1 hour, or up to 8 hours.
To make the mustard butter, in a small bowl, mash together the butter with the dry mustard and the Dijon. Form it into two mounds and chill on a plastic wrap–lined plate.
Heat a little oil or clarified butter in a grill pan or cast-iron skillet and cook the steaks over high heat, being sure to get a good sear on each side. For rare steaks, cook 5 to 7 minutes total on both sides, or aller-retour (“to go and return”).Remove the steaks from the pan and put on plates. Top each steak with a knob of the mustard butter and some pepper and serve with a big pile of frites.
French Fries:Peel the potatoes, leaving on a few strips of skin as you go. Cut the potatoes into ⅓–inch–thick (1cm) slices. Lay the slices on a cutting board and slice them into
⅓–inch–wide (1cm) sticks. Put them in a large bowl with very cold, lightly salted water, and let them sit for 1 hour. Preheat the oven to 400°F (200°C).
Drain the potatoes and lay them on a kitchen towel. Rub them with the towel to dry them very well. Spray two baking sheets with nonstick cooking spray. Place the potatoes on the baking sheets. Dribble the olive oil over the potatoes and sprinkle with 1 teaspoon of the salt. Add the fresh herbs and mix everything together with your hands. Spread the potato sticks out in a single layer on each baking sheet.
Bake for 45 to 50 minutes, rotating the pans from front to back and top to bottom midway during baking. As they bake, stir the potatoes several times so they cook evenly. Once the fries are golden brown and crispy, remove the pans from the oven and serve.
Recipe courtesy of MY PARIS KITCHEN by David Lebovitz: Reprinted with permission of Ten Speed Press, photography by Ed Anderson
Yield: 2 servings
2 (8–ounce/225g) rib-eye steaks
½ teaspoon hickory–smoked salt,
sea salt, or kosher salt
¼ to ½ teaspoon chipotle chile powder
1 teaspoon finely chopped fresh cilantro
or flat–leaf parsley
Vegetable oil or clarified butter
Freshly ground black pepper
mustard butter
2 tablespoons unsalted butter, at room temperature
2 teaspoons dry mustard or mustard powder
1 generous teaspoon Dijon mustard
French Fries
3 pounds (1.3kg) potatoes
4 tablespoons olive oil
2 teaspoons sea salt or kosher salt
Fresh herbs, such as a big handful of sage
leaves, a few sprigs rosemary or thyme,
or a mixture of them
S T E A K W i T H M U S T A R D B U T T E R A N D F R E N C H F R i E S
From My Paris Kitchen by David Lebovitz: To make this bistro classic in my kitchen, I use a cast–iron skillet or grill pan that I get really hot, and then I sear the steak on both sides, cooking it medium–rare, which is the way I like it. My preferred cut is entrecôte, or rib–eye, and I ask the butcher to cut it into steaks that aren’t too thick since I like lots of surface area on my steaks. I rub them with chipotle chile powder to give them a bit of a smoky flavor. It’s difficult to say exactly how long it will take a particular steak to cook to your liking since there are so many variables, but there is actually no truth to the rumor that if you cut a steak open a little and peek inside, all the juices will come gushing out and your steak will be dry. In fact, the best way to ensure a steak is dry is to overcook it. So feel free to peek inside if you need to.
22 ENTREES

C L A S S i C G O U G È R E S
Gougères are traditional cheese–laced pâte à choux appetizers from the Burgundy region of France, flavored with mustard, Gruyère cheese, and cracked black pepper—heavenly with a glass of red wine. Try different cheeses and flavorings and you will have a whole new hors d’oeuvre. Or, split the baked puffs in half and fill them with crab or lobster salad, or any filling you like. They aren’t as flashy as some art–directed appetizers, but they always disappear first at a party.
Gougères are one of those versatile pastries that caterers love to have on hand. The pâte à choux is made plain, then divided into several bowls, and each portion gets its own flavorings—one becomes a classic version like the recipe here, another might be blended with goat cheese and herbs, or blue cheese and walnuts. Instant variety. Do try this at home.
Preheat the oven to 400ºF and position two racks in the top and lower thirds of the oven. Line the baking sheets with parchment paper.
In the bowl of the stand mixer, combine the dough, ¾ cup of the cheese, the mustard, and black pepper. Mix on low just until evenly blended. Spoon 1–inch rounds of the dough onto the prepared baking sheets, about 1 inch apart. In a small bowl, lightly beat the egg to blend thoroughly. Brush a light coating of egg over the tops of the rounds, being careful that it does not drip down the sides (it will glue the dough to the parchment). You will not use all the egg. Sprinkle each round with a little of the remaining ¼ cup cheese.
Bake the gougères for 20 minutes, then reduce the oven temperature to 350ºF, switch the sheets between the racks, rotate each pan from front to back, and bake for 10 to 15 minutes longer, until the gougères are a deep golden brown and no bubbling moisture is visible around the sides of each shape. Transfer to a rack to cool briefly. Serve the gougères
warm, piled on a platter for guests to help themselves.
Pâte à Choux:Cook the butter, water, and salt in the medium saucepan over low heat, stirring from time to time with the wooden spoon so the butter melts evenly. When the butter has melted, increase the heat and bring to a boil. Immediately remove the pan from the heat and add the flour all at once. Beat vigorously with the wooden spoon until the dough comes together in a mass around the spoon. Place the pan back over the medium heat and continue to cook, beating, for another minute or so to dry out the dough—the pan will have a thin film of dough on the bottom.
Transfer the dough to the bowl of the stand mixer. Beat on medium speed for 1 minute to slightly cool the dough and develop the gluten. In the medium bowl, beat the eggs together until you can’t distinguish the yellow from the white. With the mixer on medium, add the eggs a couple tablespoons at a time, allowing each addition to blend completely into the dough before continuing. When all the eggs are incorporated, the mixture should be shiny and elastic and stick to the side of the bowl. It should also pass the “string test”: Place a bit of dough between your thumb and forefinger and pull them apart. The doughshould form a stretchy string about 1½ to 2–inches long. If the dough has not reached this stage, beat another egg and continue adding it, a little at a time, until the dough is finished.
Gougères
1 recipe Pâte à Choux
(See below)
1 cup (4 ounces) grated Gruyere
cheese
2 teaspoons Dijon mustard
½ teaspoon ground or cracked
black pepper
1 large egg
Pâte à Choux
1 stick unsalted butter,cut into ½–inch pieces
1 cup water
¼ teaspoon salt
1 cup unbleached all–purpose flour
4 large eggs, plus another tablespoon
or two, if needed
Yield: 32 gougeres
Recipe courtesy of: ART & SOUL OF
BAKING. Reprinted with permission of Andrews McMeel
Publishing, recipes by Cindy Mushet
Baked gougères may be stored airtight at room temperature for up to 3 days. Before serving, warm and crisp them for 7 to 9 minutes in a 375ºF oven, until the outside crust is crisp and the interior is heated through.
TIP: STORING
ENTREES 25
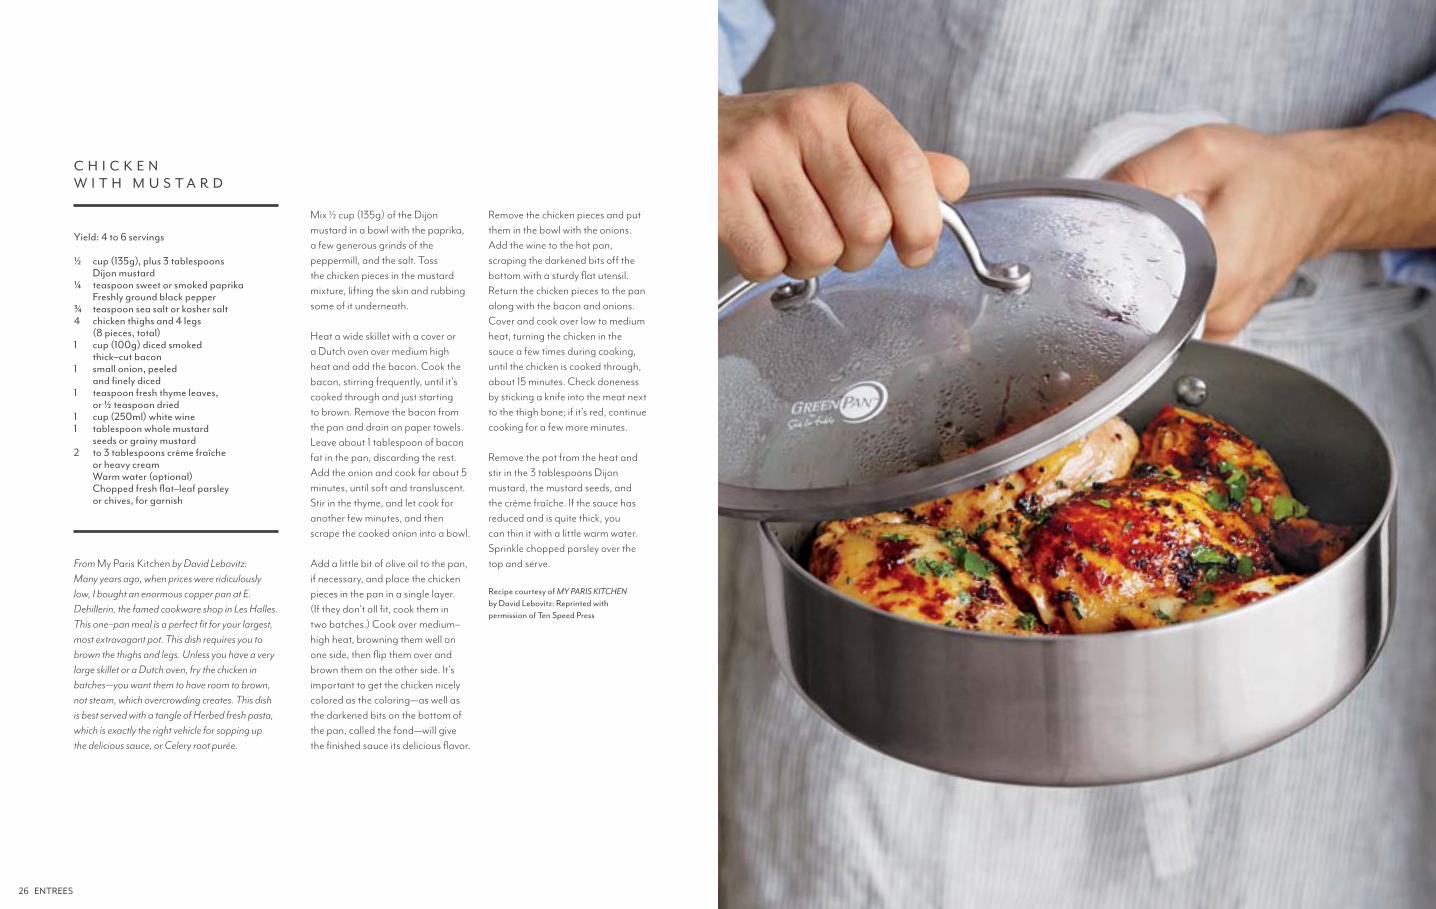
From My Paris Kitchen by David Lebovitz: Many years ago, when prices were ridiculously low, I bought an enormous copper pan at E. Dehillerin, the famed cookware shop in Les Halles. This one–pan meal is a perfect fit for your largest, most extravagant pot. This dish requires you to brown the thighs and legs. Unless you have a very large skillet or a Dutch oven, fry the chicken in batches—you want them to have room to brown, not steam, which overcrowding creates. This dish is best served with a tangle of Herbed fresh pasta, which is exactly the right vehicle for sopping up the delicious sauce, or Celery root purée.
cup (135g), plus 3 tablespoons Dijon mustardteaspoon sweet or smoked paprikaFreshly ground black pepperteaspoon sea salt or kosher saltchicken thighs and 4 legs (8 pieces, total)cup (100g) diced smoked thick–cut baconsmall onion, peeled and finely diced teaspoon fresh thyme leaves, or ½ teaspoon driedcup (250ml) white winetablespoon whole mustard seeds or grainy mustardto 3 tablespoons crème fraîche or heavy creamWarm water (optional)Chopped fresh flat–leaf parsley or chives, for garnish
½
¼
¾4
1
1
1
11
2
Yield: 4 to 6 servings
C H i C K E N W i T H M U S T A R D
Mix ½ cup (135g) of the Dijon mustard in a bowl with the paprika, a few generous grinds of the peppermill, and the salt. Toss the chicken pieces in the mustard mixture, lifting the skin and rubbing some of it underneath.
Heat a wide skillet with a cover or a Dutch oven over medium high heat and add the bacon. Cook the bacon, stirring frequently, until it’s cooked through and just starting to brown. Remove the bacon from the pan and drain on paper towels. Leave about 1 tablespoon of bacon fat in the pan, discarding the rest. Add the onion and cook for about 5 minutes, until soft and transluscent. Stir in the thyme, and let cook for another few minutes, and then scrape the cooked onion into a bowl.
Add a little bit of olive oil to the pan, if necessary, and place the chicken pieces in the pan in a single layer. (If they don’t all fit, cook them in two batches.) Cook over medium–high heat, browning them well on one side, then flip them over and brown them on the other side. It’s important to get the chicken nicely colored as the coloring—as well as the darkened bits on the bottom of the pan, called the fond—will give the finished sauce its delicious flavor.
Remove the chicken pieces and put them in the bowl with the onions. Add the wine to the hot pan, scraping the darkened bits off the bottom with a sturdy flat utensil. Return the chicken pieces to the pan along with the bacon and onions. Cover and cook over low to medium heat, turning the chicken in the sauce a few times during cooking, until the chicken is cooked through, about 15 minutes. Check doneness by sticking a knife into the meat next to the thigh bone; if it’s red, continue cooking for a few more minutes.
Remove the pot from the heat and stir in the 3 tablespoons Dijon mustard, the mustard seeds, and the crème fraîche. If the sauce has reduced and is quite thick, you can thin it with a little warm water. Sprinkle chopped parsley over the top and serve.
Recipe courtesy of MY PARIS KITCHEN by David Lebovitz: Reprinted with permission of Ten Speed Press
26 ENTREES
1
13
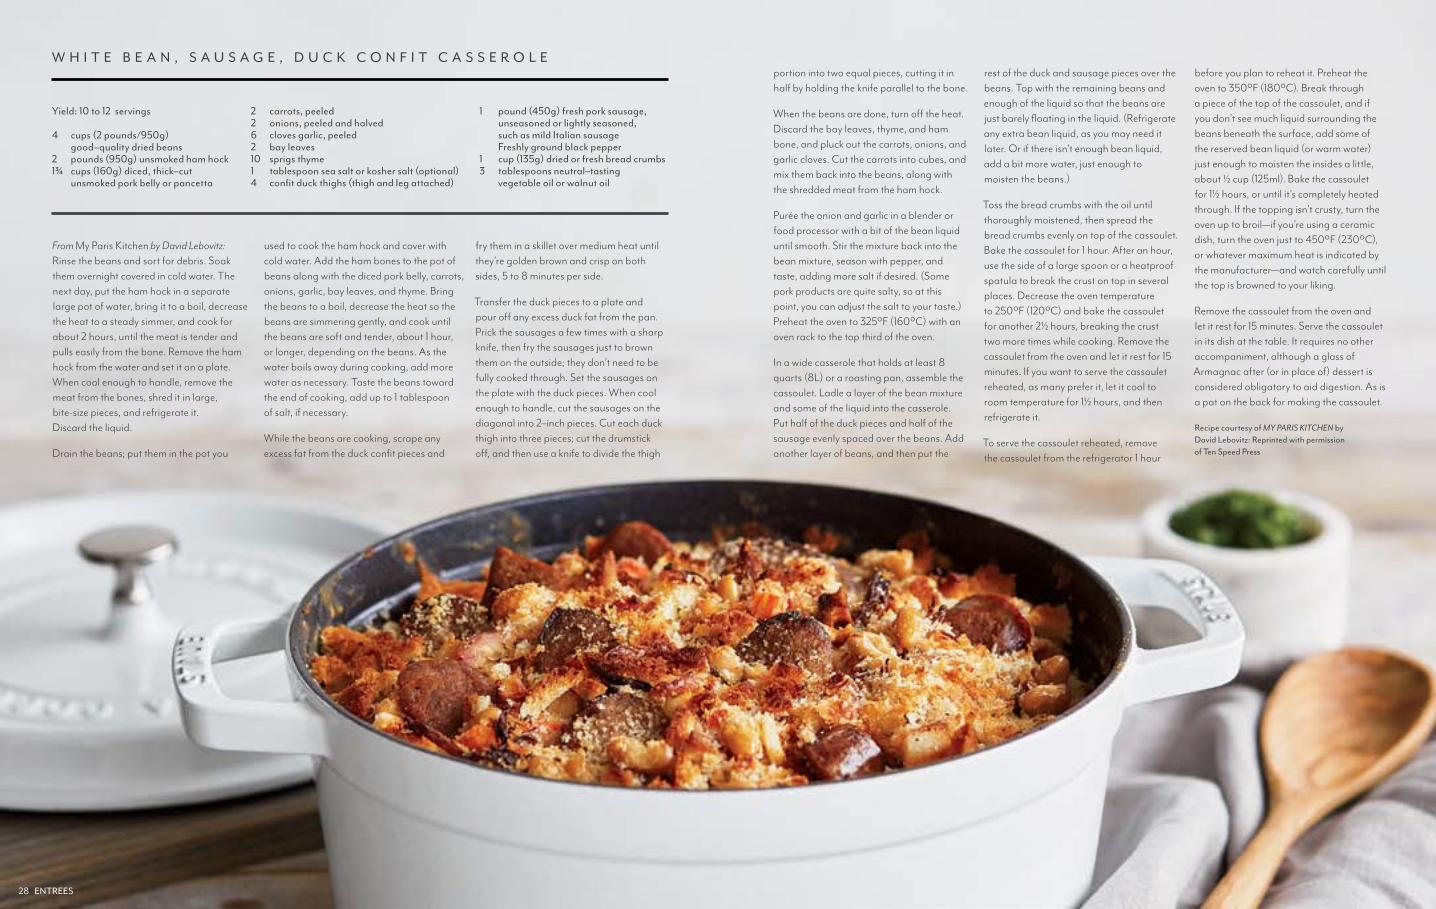
From My Paris Kitchen by David Lebovitz: Rinse the beans and sort for debris. Soak them overnight covered in cold water. The next day, put the ham hock in a separate large pot of water, bring it to a boil, decrease the heat to a steady simmer, and cook for about 2 hours, until the meat is tender and pulls easily from the bone. Remove the ham hock from the water and set it on a plate. When cool enough to handle, remove the meat from the bones, shred it in large, bite-size pieces, and refrigerate it. Discard the liquid.
Drain the beans; put them in the pot you
used to cook the ham hock and cover with cold water. Add the ham bones to the pot of beans along with the diced pork belly, carrots, onions, garlic, bay leaves, and thyme. Bring the beans to a boil, decrease the heat so the beans are simmering gently, and cook until the beans are soft and tender, about 1 hour, or longer, depending on the beans. As the water boils away during cooking, add more water as necessary. Taste the beans toward the end of cooking, add up to 1 tablespoon of salt, if necessary.
While the beans are cooking, scrape any excess fat from the duck confit pieces and
fry them in a skillet over medium heat until they’re golden brown and crisp on both sides, 5 to 8 minutes per side.
Transfer the duck pieces to a plate and pour off any excess duck fat from the pan. Prick the sausages a few times with a sharp knife, then fry the sausages just to brown them on the outside; they don’t need to be fully cooked through. Set the sausages on the plate with the duck pieces. When cool enough to handle, cut the sausages on the diagonal into 2–inch pieces. Cut each duck thigh into three pieces; cut the drumstick off, and then use a knife to divide the thigh
cups (2 pounds/950g) good–quality dried beanspounds (950g) unsmoked ham hockcups (160g) diced, thick–cutunsmoked pork belly or pancetta
4
21¾
22621014
Yield: 10 to 12 servings
W H i T E B E A N , S A U S A G E , D U C K C O N F i T C A S S E R O L E
carrots, peeledonions, peeled and halvedcloves garlic, peeledbay leavessprigs thymetablespoon sea salt or kosher salt (optional)confit duck thighs (thigh and leg attached)
pound (450g) fresh pork sausage,unseasoned or lightly seasoned, such as mild Italian sausageFreshly ground black peppercup (135g) dried or fresh bread crumbstablespoons neutral–tastingvegetable oil or walnut oil
portion into two equal pieces, cutting it in half by holding the knife parallel to the bone.
When the beans are done, turn off the heat. Discard the bay leaves, thyme, and ham bone, and pluck out the carrots, onions, and garlic cloves. Cut the carrots into cubes, and mix them back into the beans, along with the shredded meat from the ham hock.
Purée the onion and garlic in a blender or food processor with a bit of the bean liquid until smooth. Stir the mixture back into the bean mixture, season with pepper, and taste, adding more salt if desired. (Some pork products are quite salty, so at this point, you can adjust the salt to your taste.) Preheat the oven to 325ºF (160ºC) with an oven rack to the top third of the oven.
In a wide casserole that holds at least 8 quarts (8L) or a roasting pan, assemble the cassoulet. Ladle a layer of the bean mixture and some of the liquid into the casserole. Put half of the duck pieces and half of the sausage evenly spaced over the beans. Add another layer of beans, and then put the
rest of the duck and sausage pieces over the beans. Top with the remaining beans and enough of the liquid so that the beans are just barely floating in the liquid. (Refrigerate any extra bean liquid, as you may need it later. Or if there isn’t enough bean liquid, add a bit more water, just enough to moisten the beans.)
Toss the bread crumbs with the oil until thoroughly moistened, then spread the bread crumbs evenly on top of the cassoulet. Bake the cassoulet for 1 hour. After an hour, use the side of a large spoon or a heatproof spatula to break the crust on top in several places. Decrease the oven temperature to 250ºF (120ºC) and bake the cassoulet for another 2½ hours, breaking the crust two more times while cooking. Remove the cassoulet from the oven and let it rest for 15 minutes. If you want to serve the cassoulet reheated, as many prefer it, let it cool to room temperature for 1½ hours, and then refrigerate it.
To serve the cassoulet reheated, remove the cassoulet from the refrigerator 1 hour
before you plan to reheat it. Preheat the oven to 350ºF (180ºC). Break through a piece of the top of the cassoulet, and if you don’t see much liquid surrounding the beans beneath the surface, add some of the reserved bean liquid (or warm water) just enough to moisten the insides a little, about ½ cup (125ml). Bake the cassoulet for 1½ hours, or until it’s completely heated through. If the topping isn’t crusty, turn the oven up to broil—if you’re using a ceramic dish, turn the oven just to 450ºF (230ºC), or whatever maximum heat is indicated by the manufacturer—and watch carefully until the top is browned to your liking.
Remove the cassoulet from the oven and let it rest for 15 minutes. Serve the cassoulet in its dish at the table. It requires no other accompaniment, although a glass of Armagnac after (or in place of) dessert is considered obligatory to aid digestion. As is a pat on the back for making the cassoulet.
Recipe courtesy of MY PARIS KITCHEN by David Lebovitz: Reprinted with permission of Ten Speed Press
28 ENTREES
COQ AU VIN
Yield: 4 to 6 servings
1 chicken, about 4 pounds, cut into 8 pieces
Salt and freshly ground pepper, to taste
1 Tablespoon olive oil
½ pound bacon, cut into ¼” dice
Various legends trace Coq Au Vin to ancient Julius Caesar but the recipe was not documented until the early 20th Century. It is generally accepted that it existed as a rustic dish long before that. Authentic flavors of French Burgundy wine, mushrooms, garlic and herbs will make this a favorite. Serve over wide noodle pasta. Delicious with crusty artisan breads or oven roasted baby red potatoes.
Oven Method: Season chicken with salt and pepper. Preheat an oven to 325°F. In a large Dutch oven over medium-high heat, warm the olive oil until just smoking. Add the bacon and cook until crisp, 5 to 8 minutes. Remove from pan. Reserve 1 tablespoon bacon fat, working in small batches, brown the chicken on both sides, 8 to 10 minutes per batch. Remove all fat from pan. Return all the chicken to the pot and add the Coq Au Vin Base, bacon, onions and carrots, Bring to a slow boil, cover the pot, transfer to the oven and bake until the chicken is fork–tender, 2 to 2 ½ hours. Serve the chicken and sauce immediately Sprinkle with parsley.
Slow–Cooker Method: Following directions above, excluding the use of oven, place ingredients into slow cooker and cover. Cook on high until chicken is fork tender, about 3 hours. Add the carrots and onions in the last 2 hours of cooking.
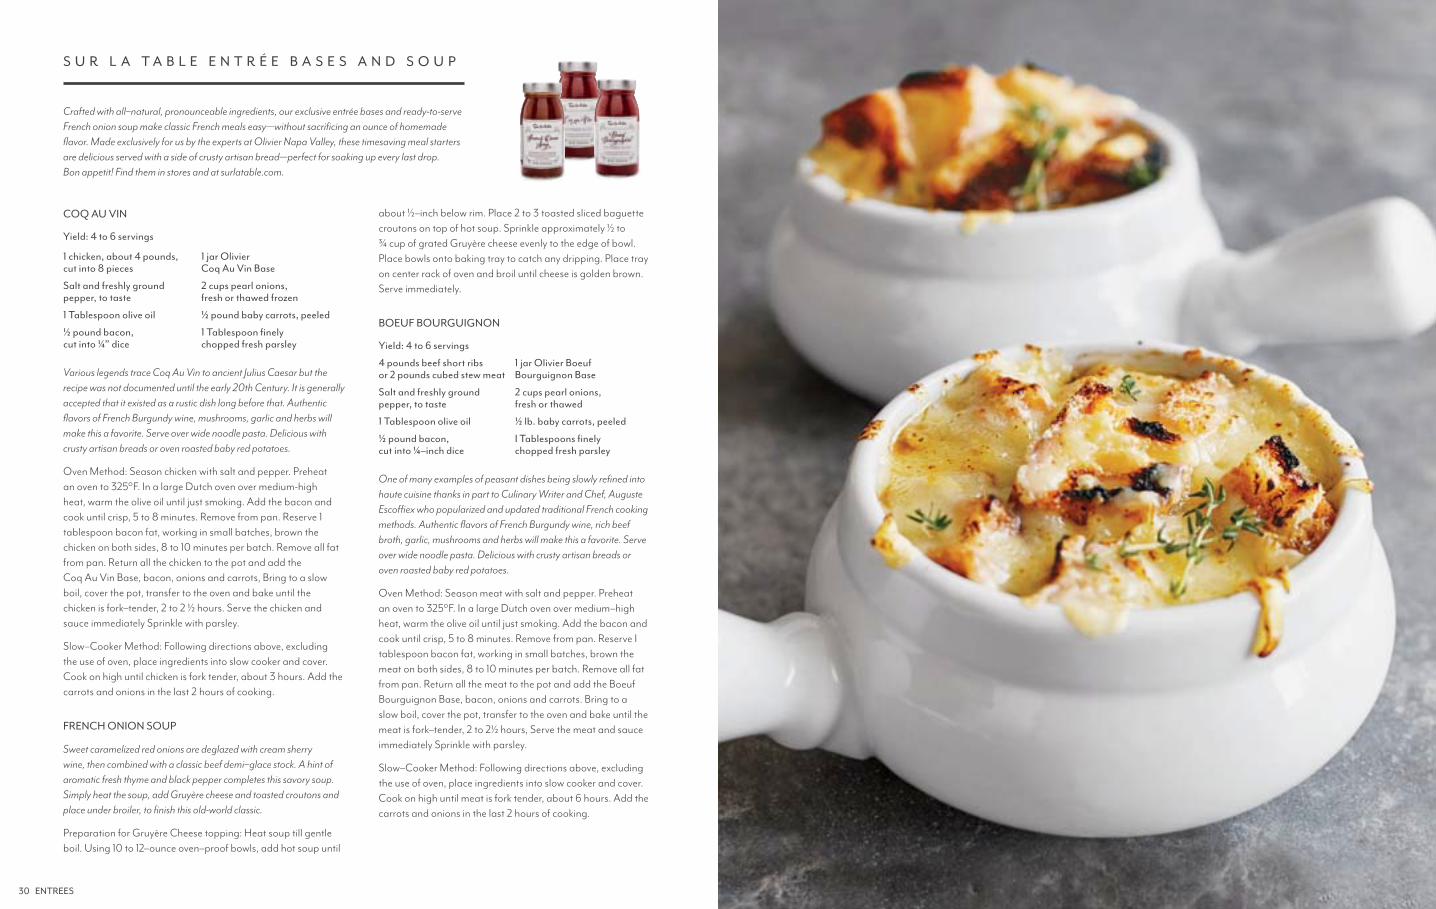
FRENCH ONION SOUP
Sweet caramelized red onions are deglazed with cream sherry wine, then combined with a classic beef demi–glace stock. A hint of aromatic fresh thyme and black pepper completes this savory soup. Simply heat the soup, add Gruyère cheese and toasted croutons and place under broiler, to finish this old-world classic.
Preparation for Gruyère Cheese topping: Heat soup till gentle boil. Using 10 to 12–ounce oven–proof bowls, add hot soup until
S U R L A T A B L E E N T R é E B A S E S A N D S O U p
Crafted with all–natural, pronounceable ingredients, our exclusive entrée bases and ready-to-serve French onion soup make classic French meals easy—without sacrificing an ounce of homemade flavor. Made exclusively for us by the experts at Olivier Napa Valley, these timesaving meal starters are delicious served with a side of crusty artisan bread—perfect for soaking up every last drop. Bon appetit! Find them in stores and at surlatable.com.
about ½–inch below rim. Place 2 to 3 toasted sliced baguette croutons on top of hot soup. Sprinkle approximately ½ to ¾ cup of grated Gruyère cheese evenly to the edge of bowl. Place bowls onto baking tray to catch any dripping. Place tray on center rack of oven and broil until cheese is golden brown. Serve immediately.
BOEUF BOURGUIGNON
Yield: 4 to 6 servings
4 pounds beef short ribs or 2 pounds cubed stew meat
Salt and freshly ground pepper, to taste
1 Tablespoon olive oil
½ pound bacon, cut into ¼–inch dice
One of many examples of peasant dishes being slowly refined into haute cuisine thanks in part to Culinary Writer and Chef, Auguste Escoffiex who popularized and updated traditional French cooking methods. Authentic flavors of French Burgundy wine, rich beef broth, garlic, mushrooms and herbs will make this a favorite. Serve over wide noodle pasta. Delicious with crusty artisan breads or oven roasted baby red potatoes.
Oven Method: Season meat with salt and pepper. Preheat an oven to 325°F. In a large Dutch oven over medium–high heat, warm the olive oil until just smoking. Add the bacon and cook until crisp, 5 to 8 minutes. Remove from pan. Reserve I tablespoon bacon fat, working in small batches, brown the meat on both sides, 8 to 10 minutes per batch. Remove all fat from pan. Return all the meat to the pot and add the Boeuf Bourguignon Base, bacon, onions and carrots. Bring to a slow boil, cover the pot, transfer to the oven and bake until the meat is fork–tender, 2 to 2½ hours, Serve the meat and sauce immediately Sprinkle with parsley.
Slow–Cooker Method: Following directions above, excluding the use of oven, place ingredients into slow cooker and cover. Cook on high until meat is fork tender, about 6 hours. Add the carrots and onions in the last 2 hours of cooking.
30 ENTREES
1 jar Olivier Coq Au Vin Base
2 cups pearl onions, fresh or thawed frozen
½ pound baby carrots, peeled
1 Tablespoon finely chopped fresh parsley
1 jar Olivier Boeuf Bourguignon Base
2 cups pearl onions, fresh or thawed
½ lb. baby carrots, peeled
I Tablespoons finely chopped fresh parsley

RUSTIC HERBED ROAST ASPARAGUS
1 lb asparagus, trimmed
1 Tablespoon seasoning
Preheat oven to 400°F and place asparagus on a baking sheet. Mix seasoning, olive oil and butter in a small bowl. Drizzle over asparagus and toss to coat. Roast for 8–10 minutes.
Alternate Recipe: Combine seasoning, olive oil and butter and drizzle over chopped potatoes or other root vegetables. Roast in preheated 350°F oven for 25–30 minutes.
CHICKEN PROVENÇAL2 pounds tomatoes, cut into wedges
2 large onions, cut into wedges
1 fennel bulb, cut into wedges
5 large garlic cloves, sliced
1 cup Niçoise olives, pitted
Preheat oven to 400°F. Place tomatoes, onions, fennel, sliced garlic and olives in a large roasting pan. In a small bowl, combine seasoning packet, minced garlic, salt, pepper and olive oil. Pour half of mixture over vegetables and toss to coat. Push vegetables to sides of pan.
Pat the chicken dry, rub with mixture and place in roasting pan. Roast 75–90 minutes, until thigh temperature is 170°F. Let the chicken rest for 10 minutes before carving. Gently toss roasted vegetables with pan juices and serve with crusty bread.
DIJON & BLACK PEPPER MUSHROOMS3 Tablespoon butter
1 lb sliced mushrooms such as baby portobellos
1½ Tablespoon seasoning
Add butter to skillet over medium heat. When the butter has melted, add mushrooms and seasoning. Sautée mushrooms for 5–7 minutes, or until fully cooked. Also makes a great seasoning for potatoes and other hearty vegetables.
FINES HERBES POTATOES1 pound fingerling potatoes, whole or halved
1 Tablespoon seasoning
Preheat oven to 350° F and place potatoes on a baking sheet. Mix seasoning, olive oil and butter in a small bowl. Drizzle over potatoes and toss to coat. Roast for 25–30 minutes. Alternate Recipe: Follow recipe above using other types of potatoes or root vegetables.
HERB & SHALLOT MUSSELS6 Tablespoon butter
1 packet seasoning
1 cup white wine
2 pounds mussels, scrubbed, debearded and unopened
Melt butter in a large sauce pan on medium–low heat. Add seasoning packet, stir for 3 minutes. Add wine; boil until reduced by half. Add mussels, cover, cook, shaking pan occasionally, 5–7 minutes. Transfer mussels to a bowl, discarding any unopened ones. Tent bowl with foil. Add lemon juice and salt to liquid in pan. Cook 1 more minute. Add salt and pepper to taste. Pour liquid over mussels and serve with toasted sourdough.
STEAK AU POIVRETwo 8 oz steak filets
Salt to taste
Bring steaks to room temperature for 30–60 minutes prior to cooking. Sprinkle all sides with salt. Roughly crush the seasoning blend and press it into both sides of the steaks. Melt butter in a nonstick pan over medium–high heat. As the butter turns golden, gently place the steaks in the pan. For medium–rare, cook for 5 minutes (internal temp 130–135ºF)on each side, only turning once to keep peppercorn crust intact. Remove from pan, tent with foil and let rest for 10 minutes before serving.
O U R N E W F R E N C H S E A S O N i N G B L E N D S
Make quick work of fabulous everyday meals—from extra–flavorful chicken provençal to perfect potatoes, asparagus and more. Simply add our seasoning bases to your fresh ingredients for scrumptious French dishes everyone will love. Made in the USA just for us. Find them in stores and at surlatable.com.
ENTREES 33
3 Tablespoon olive oil
1 Tablespoon butter, melted
1 packet seasoning
1 teaspoon minced garlic
3 teaspoon salt
1 teaspoon pepper
6 Tablespoon extra–virgin olive oil
1 whole chicken (about 4 pounds), cut into pieces
3 Tablespoon olive oil
1 Tablespoon butter, melted
½ lemon, juiced
½ teaspoon salt
More salt and pepper, to taste
2 Tablespoon butter
1 packet seasoning
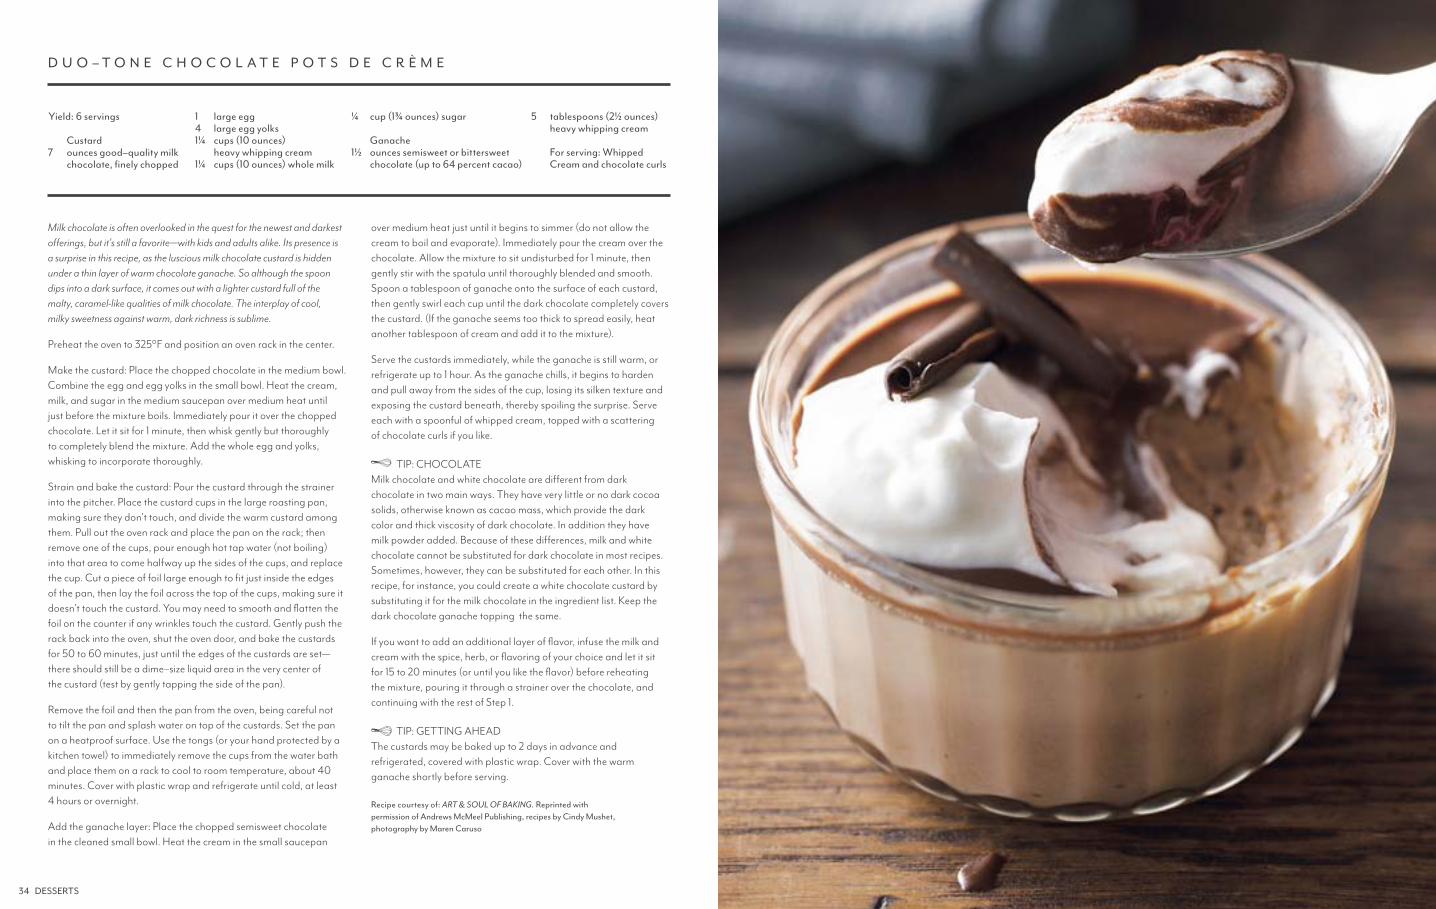
Milk chocolate is often overlooked in the quest for the newest and darkest offerings, but it’s still a favorite—with kids and adults alike. Its presence is a surprise in this recipe, as the luscious milk chocolate custard is hidden under a thin layer of warm chocolate ganache. So although the spoon dips into a dark surface, it comes out with a lighter custard full of the malty, caramel-like qualities of milk chocolate. The interplay of cool, milky sweetness against warm, dark richness is sublime.
Preheat the oven to 325°F and position an oven rack in the center.
Make the custard: Place the chopped chocolate in the medium bowl. Combine the egg and egg yolks in the small bowl. Heat the cream, milk, and sugar in the medium saucepan over medium heat until just before the mixture boils. Immediately pour it over the chopped chocolate. Let it sit for 1 minute, then whisk gently but thoroughly to completely blend the mixture. Add the whole egg and yolks, whisking to incorporate thoroughly.
Strain and bake the custard: Pour the custard through the strainer into the pitcher. Place the custard cups in the large roasting pan, making sure they don’t touch, and divide the warm custard among them. Pull out the oven rack and place the pan on the rack; then remove one of the cups, pour enough hot tap water (not boiling) into that area to come halfway up the sides of the cups, and replace the cup. Cut a piece of foil large enough to fit just inside the edges of the pan, then lay the foil across the top of the cups, making sure it doesn’t touch the custard. You may need to smooth and flatten the foil on the counter if any wrinkles touch the custard. Gently push the rack back into the oven, shut the oven door, and bake the custards for 50 to 60 minutes, just until the edges of the custards are set—there should still be a dime–size liquid area in the very center of the custard (test by gently tapping the side of the pan).
Remove the foil and then the pan from the oven, being careful not to tilt the pan and splash water on top of the custards. Set the pan on a heatproof surface. Use the tongs (or your hand protected by a kitchen towel) to immediately remove the cups from the water bath and place them on a rack to cool to room temperature, about 40 minutes. Cover with plastic wrap and refrigerate until cold, at least 4 hours or overnight.
Add the ganache layer: Place the chopped semisweet chocolate in the cleaned small bowl. Heat the cream in the small saucepan
over medium heat just until it begins to simmer (do not allow the cream to boil and evaporate). Immediately pour the cream over the chocolate. Allow the mixture to sit undisturbed for 1 minute, then gently stir with the spatula until thoroughly blended and smooth. Spoon a tablespoon of ganache onto the surface of each custard, then gently swirl each cup until the dark chocolate completely covers the custard. (If the ganache seems too thick to spread easily, heat another tablespoon of cream and add it to the mixture).
Serve the custards immediately, while the ganache is still warm, or refrigerate up to 1 hour. As the ganache chills, it begins to harden and pull away from the sides of the cup, losing its silken texture and exposing the custard beneath, thereby spoiling the surprise. Serve each with a spoonful of whipped cream, topped with a scattering of chocolate curls if you like.
Recipe courtesy of: ART & SOUL OF BAKING. Reprinted with permission of Andrews McMeel Publishing, recipes by Cindy Mushet, photography by Maren Caruso
Custardounces good–quality milkchocolate, finely chopped
7
141¼
1¼
¼
1½
5
Yield: 6 servings
D U O – T O N E C H O C O L A T E p O T S D E C R È M E
large egglarge egg yolkscups (10 ounces) heavy whipping creamcups (10 ounces) whole milk
cup (1¾ ounces) sugar
Ganacheounces semisweet or bittersweetchocolate (up to 64 percent cacao)
tablespoons (2½ ounces)heavy whipping cream For serving: Whipped Cream and chocolate curls
The custards may be baked up to 2 days in advance and refrigerated, covered with plastic wrap. Cover with the warm ganache shortly before serving.
TIP: GETTING AHEAD
Milk chocolate and white chocolate are different from dark chocolate in two main ways. They have very little or no dark cocoa solids, otherwise known as cacao mass, which provide the dark color and thick viscosity of dark chocolate. In addition they have milk powder added. Because of these differences, milk and white chocolate cannot be substituted for dark chocolate in most recipes. Sometimes, however, they can be substituted for each other. In this recipe, for instance, you could create a white chocolate custard by substituting it for the milk chocolate in the ingredient list. Keep the dark chocolate ganache topping the same.
If you want to add an additional layer of flavor, infuse the milk and cream with the spice, herb, or flavoring of your choice and let it sit for 15 to 20 minutes (or until you like the flavor) before reheating the mixture, pouring it through a strainer over the chocolate, and continuing with the rest of Step 1.
TIP: CHOCOLATE
34 DESSERTS

From My Paris Kitchen by David Lebovitz: Most people associate Christmas in Paris with luxe items, specifically oysters, foie gras, Champagne, and chocolate. But no feast is complete until the clementines come out: shiny bowls of little orange citrus, often festooned with their leaves. From the start of clementine season, which begins in late fall, Parisians make the rounds of the outdoor markets, going from stand to stand, tasting the samples that vendors peel and put on plates to find the sweetest specimens out there. Most vendors use their fingers to peel the tangerines, but a few use their teeth to rip away the skin. (I avoid tasting those particular ones.) Of all the things people associate with winter in Paris—the lavish department store windows, people buying Champagne by the case, lugs of fresh oysters sold on the sidewalks, butchers offering creamy slabs of pate de foie gras—I look forward to those clementines the most. And it’s impossible not to get caught up in the fruit frenzy at the market, with shoppers and vendors loading up big bags to carry home, and no one leaves with less than a few pounds. Of course, my responsibility every year for Christmas is the final course, and one year I made a dessert that had everyone stunned: a Champagne jelly with supremes (carefully cut sections, with no membranes) of pink grapefruit, tangerines, navel oranges, and thin strips of candied orange peel, festively served in Champagne glasses with a scoop of icy–cold tangerine–Champagne sorbet perched on top. It’s a wonderful do-ahead dessert that goes especially well after winter dishes like cassoulet or Counterfeit duck confit.
In a large saucepan over low heat, warm ½ cup (125ml) of the tangerine juice with the sugar, stirring until the sugar is dissolved. Remove from the heat and stir in the remaining 2½ cups (625ml) of tangerine juice. Add the Champagne. Transfer to a container and chill thoroughly.
Freeze in an ice cream maker according to the manufacturer’s instructions. Note that this will not freeze as hard as other sorbets because of the alcohol in the Champagne. However, it will make it more scoopable once fully frozen.
Variations: If you wish to serve this with Champagne gelée, soften 2 envelopes (14g) of unflavored gelatin by sprinkling over ½ cup (125ml) of cold water in a very large bowl and letting sit for 5 minutes. In a small saucepan, heat ½ cup (125ml) of water with 1 cup (200g) of sugar until the sugar is dissolved, then pour it over the gelatin and stir well. Add 1 bottle of Champagne or sparkling wine (it will foam up, so pour it slowly) and a squeeze of lemon or lime juice. Pour the mixture into a smaller container and chill until firm, at least 6 hours.
To serve, spoon some of the chilled gelée in wine goblets, breaking it up into bite–size mounds. Garnish with fresh orange, tangerine, or grapefruit segments, or a combination of them. Top with a scoop of tangerine–Champagne sorbet. Duck fat cookies make a snappy accompaniment. Tangerine–Champagne sorbet is also good with a spoonful of warm sabayon, made with either Champagne or a sweet dessert wine, such as Sauternes. Make the sabayon by whisking together ⅔ cup (165ml) of Sauternes with ⅓ cup (60g) of sugar and 6 large egg yolks in a large bowl set over a saucepan of simmering water. Continue whisking until the mixture becomes foamy. Keep whisking until it thickens; when you lift the whisk, the mixture should hold its shape when it falls back onto the surface.
Yield: 1 quart
3 cups (750ml) freshly squeezed
tangerine juice from 4 pounds (1.9kg)
tangerines
⅔ cup (140g) granulated sugar
1 cup (250 ml) Champagne or sparkling wine
T A N G E R i N E – C H A M p A G N E S O R B E T
Recipe courtesy of MY PARIS KITCHEN
by David Lebovitz: Reprinted with
permission of Ten Speed Press
DESSERTS 37
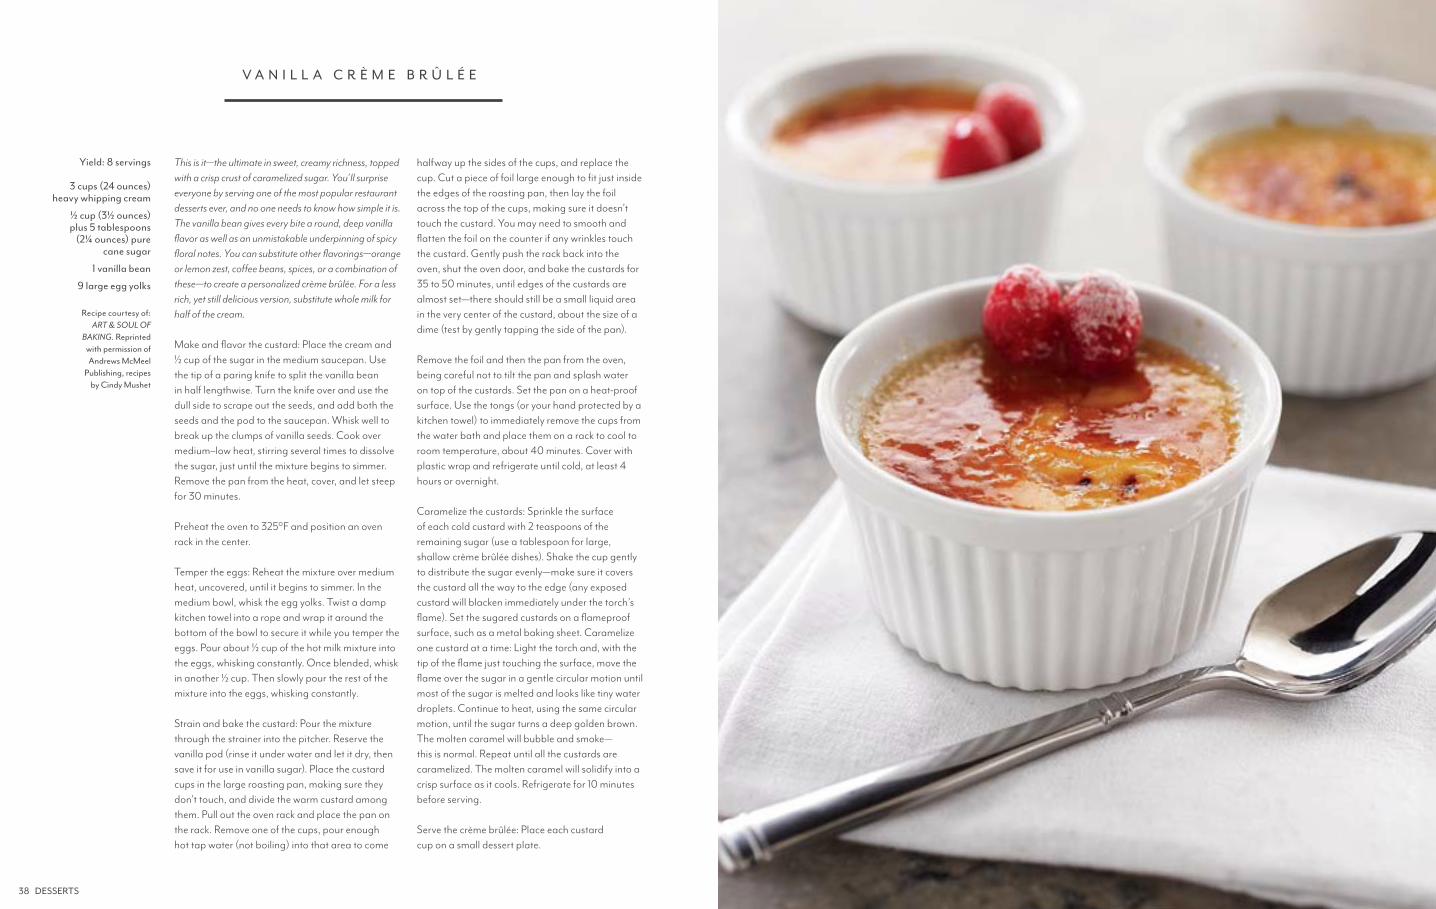
This is it—the ultimate in sweet, creamy richness, topped with a crisp crust of caramelized sugar. You’ll surprise everyone by serving one of the most popular restaurant desserts ever, and no one needs to know how simple it is. The vanilla bean gives every bite a round, deep vanilla flavor as well as an unmistakable underpinning of spicy floral notes. You can substitute other flavorings—orange or lemon zest, coffee beans, spices, or a combination of these—to create a personalized crème brûlée. For a less rich, yet still delicious version, substitute whole milk for half of the cream.
Make and flavor the custard: Place the cream and ½ cup of the sugar in the medium saucepan. Use the tip of a paring knife to split the vanilla bean in half lengthwise. Turn the knife over and use the dull side to scrape out the seeds, and add both the seeds and the pod to the saucepan. Whisk well to break up the clumps of vanilla seeds. Cook over medium–low heat, stirring several times to dissolve the sugar, just until the mixture begins to simmer. Remove the pan from the heat, cover, and let steep for 30 minutes.
Preheat the oven to 325°F and position an oven rack in the center.
Temper the eggs: Reheat the mixture over medium heat, uncovered, until it begins to simmer. In the medium bowl, whisk the egg yolks. Twist a damp kitchen towel into a rope and wrap it around the bottom of the bowl to secure it while you temper the eggs. Pour about ½ cup of the hot milk mixture into the eggs, whisking constantly. Once blended, whisk in another ½ cup. Then slowly pour the rest of the mixture into the eggs, whisking constantly.
Strain and bake the custard: Pour the mixture through the strainer into the pitcher. Reserve the vanilla pod (rinse it under water and let it dry, then save it for use in vanilla sugar). Place the custard cups in the large roasting pan, making sure they don’t touch, and divide the warm custard among them. Pull out the oven rack and place the pan on the rack. Remove one of the cups, pour enough hot tap water (not boiling) into that area to come
halfway up the sides of the cups, and replace the cup. Cut a piece of foil large enough to fit just inside the edges of the roasting pan, then lay the foil across the top of the cups, making sure it doesn’t touch the custard. You may need to smooth and flatten the foil on the counter if any wrinkles touch the custard. Gently push the rack back into the oven, shut the oven door, and bake the custards for 35 to 50 minutes, until edges of the custards are almost set—there should still be a small liquid area in the very center of the custard, about the size of a dime (test by gently tapping the side of the pan).
Remove the foil and then the pan from the oven, being careful not to tilt the pan and splash water on top of the custards. Set the pan on a heat-proof surface. Use the tongs (or your hand protected by a kitchen towel) to immediately remove the cups from the water bath and place them on a rack to cool to room temperature, about 40 minutes. Cover with plastic wrap and refrigerate until cold, at least 4 hours or overnight.
Caramelize the custards: Sprinkle the surface of each cold custard with 2 teaspoons of the remaining sugar (use a tablespoon for large, shallow crème brûlée dishes). Shake the cup gently to distribute the sugar evenly—make sure it covers the custard all the way to the edge (any exposed custard will blacken immediately under the torch’s flame). Set the sugared custards on a flameproof surface, such as a metal baking sheet. Caramelize one custard at a time: Light the torch and, with the tip of the flame just touching the surface, move the flame over the sugar in a gentle circular motion until most of the sugar is melted and looks like tiny water droplets. Continue to heat, using the same circular motion, until the sugar turns a deep golden brown. The molten caramel will bubble and smoke—this is normal. Repeat until all the custards are caramelized. The molten caramel will solidify into a crisp surface as it cools. Refrigerate for 10 minutes before serving. Serve the crème brûlée: Place each custard cup on a small dessert plate.
Yield: 8 servings
3 cups (24 ounces) heavy whipping cream
½ cup (3½ ounces) plus 5 tablespoons
(2¼ ounces) pure cane sugar
1 vanilla bean
9 large egg yolks
V A N i L L A C R È M E B R Û L é E
Recipe courtesy of: ART & SOUL OF
BAKING. Reprinted with permission of Andrews McMeel
Publishing, recipes by Cindy Mushet
38 DESSERTS
sticks unsalted butter (6 ounces)tablespoons softened unsalted butter (for greasing pan)A bit of extra flour for dusting baking panlarge eggsA pinch fine–grain sea saltcups sugarZest of one large lemonteaspoon vanilla extractcups unbleached all–purpose flourPowdered sugar
Special equipment: A madeleine baking pan, regular or small
1 ½2
4
⅔
1¾
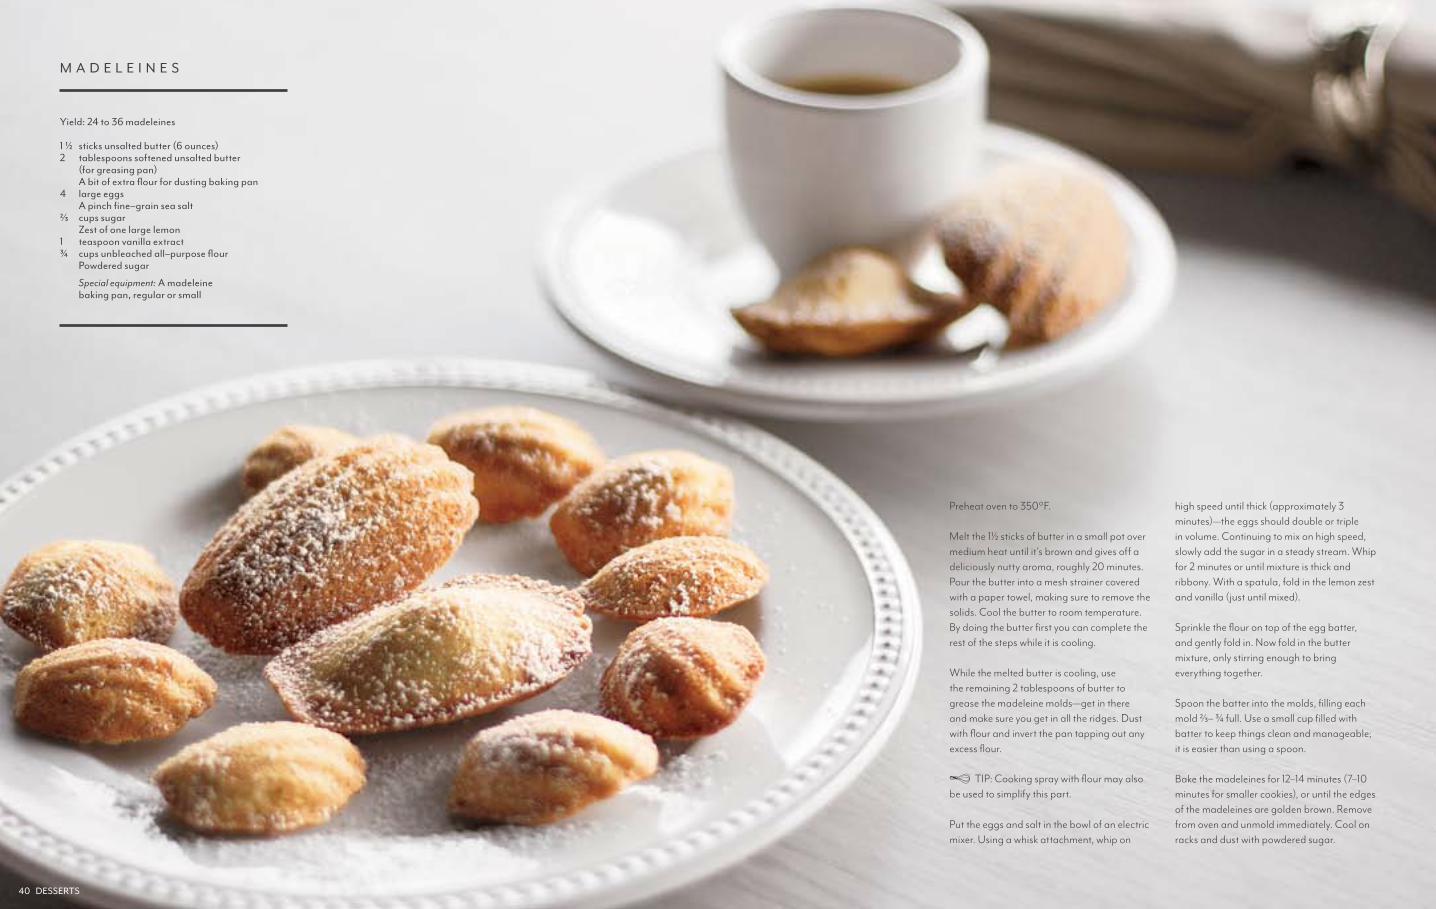
Yield: 24 to 36 madeleines
M A D E L E i N E S
Preheat oven to 350°F.
Melt the 1½ sticks of butter in a small pot over medium heat until it’s brown and gives off a deliciously nutty aroma, roughly 20 minutes. Pour the butter into a mesh strainer covered with a paper towel, making sure to remove the solids. Cool the butter to room temperature. By doing the butter first you can complete the rest of the steps while it is cooling.
While the melted butter is cooling, use the remaining 2 tablespoons of butter to grease the madeleine molds—get in there and make sure you get in all the ridges. Dust with flour and invert the pan tapping out any excess flour.
Put the eggs and salt in the bowl of an electric mixer. Using a whisk attachment, whip on
high speed until thick (approximately 3 minutes)—the eggs should double or triple in volume. Continuing to mix on high speed, slowly add the sugar in a steady stream. Whip for 2 minutes or until mixture is thick and ribbony. With a spatula, fold in the lemon zest and vanilla (just until mixed).
Sprinkle the flour on top of the egg batter, and gently fold in. Now fold in the butter mixture, only stirring enough to bring everything together.
Spoon the batter into the molds, filling each mold ⅔– ¾ full. Use a small cup filled with batter to keep things clean and manageable; it is easier than using a spoon.
Bake the madeleines for 12–14 minutes (7–10 minutes for smaller cookies), or until the edges of the madeleines are golden brown. Remove from oven and unmold immediately. Cool on racks and dust with powdered sugar.
be used to simplify this part. TIP: Cooking spray with flour may also
40 DESSERTS

This is the ultimate dessert soufflé. It delivers dark chocolate in an elegant party dress, and is also the only soufflé that can be prepared up to 24 hours in advance and held in the refrigerator before baking. Since the sauce can be made in advance as well, the combination is perfect for entertaining.
Preheat the oven to 375°F and position an oven rack in the bottom third. Generously butter the soufflé dishes (including the rims), dust them with sugar, and tap out the excess.
Melt the chocolate: Pour 2 inches of water in the bottom of the double boiler and bring to a rolling boil. Off the heat, place the chocolate in the top of the double boiler. Turn the heat off and set the chocolate over the steaming water. Stir occasionally with the spatula until the chocolate is melted and smooth. Leave over the warm water until needed.
Make the béchamel: Melt the butter in the small saucepan over medium heat. Remove from the heat, add the flour, and whisk well to remove any lumps. Return to the heat and cook for 1 minute, whisking constantly. Remove the pan from the heat and add the milk slowly, whisking constantly to remove any lumps. Return the pan to the heat and bring to a boil, whisking constantly. Cook for 1 to 2 minutes, until thickened to the consistency of thin pudding. Remove from the heat and whisk in the vanilla. Whisk in the espresso powder and pinch of salt. With a clean spatula, scrape the melted chocolate into the large bowl. Add the béchamel sauce and whisk to blend. Whisk in the egg yolks. Cover and keep warm while you whip the egg whites.
Whip the egg whites: Whip the 4 egg whites on medium speed until they form soft peaks. With the mixer running, rain in the granulated sugar and beat until firm peaks form. You can also use a hand
mixer and a medium bowl. With a spatula, gently stir one–fourth of the egg whites into the chocolate béchamel sauce to lighten the mixture. Fold in the remaining whites just until there are no more streaks of whites.
Fill the dishes and bake: Transfer the soufflé batter to the pastry bag. Pipe the batter into each soufflé dish, filling it to ¼ inch below the rim. Transfer the dishes to the baking sheet. Bake for 14 to 18 minutes (higher percentage chocolates will bake more quickly), until the soufflés are set and firm to the touch in the center. Serve immediately, dusted with confectioners’ sugar and accompanied by individual pitchers of the vanilla custard sauce (recipe online) to pour over the soufflés. You can also bake this in a 6–cup buttered and sugared soufflé dish. Bake for 32 to 38 minutes, until set and firm to the touch in the center. Serve immediately.
Yield: 8 servings
8 ounces bittersweet chocolate (up to 70
percent cacao), finely chopped
1 tablespoon (½ ounce) unsalted butter,
cut into ½–inch pieces
1 tablespoon (½ ounce) unbleached
all–purpose flour
½ cup (4 ounces) whole milk
1 teaspoon pure vanilla extract
½ teaspoon instant espresso powder
dissolved in ½ teaspoon water
Pinch of salt
3 large eggs, separated, plus
1 additional egg white
¼ cup (1¾ ounces) granulated sugar
Confectioners’ sugar, for dusting
Vanilla Custard Sauce(Find the recipe at
surlatable.com
B i T T E R S W E E T C H O C O L A T E S O U F F L é S W i T H V A N i L L A C U S T A R D S A U C E
The chocolate really shines through in this recipe. There is nothing here to hide the off–notes and sugary sweetness of poor–quality chocolate. Similarly, the nuances of your favorite chocolate will emerge. If you use a sweet, mild dark chocolate, the finished soufflé will delight you and melt in your mouth like a puff of chocolate cotton candy. If you use extra–dark bittersweet chocolate with lots of complex, wine–like flavors, your soufflé will reflect those qualities as well.
Recipe courtesy of: ART & SOUL OF BAKING. Reprinted with permission of Andrews McMeel Publishing, recipes by Cindy Mushet
TIP: CHOCOLATE
42 DESSERTS