freelancer guideline - amazon s3 · pdf filefreelancer guideline: 1. ... add your first name...
TRANSCRIPT

Freelancer Guideline:
1. Setting up a profile
2. How to create an ideabook
3. Useful tips
4. Publishing Plan
5. Invoices
6. Communication

Setting up a profileEverything you need to know when setting up a profile on homify
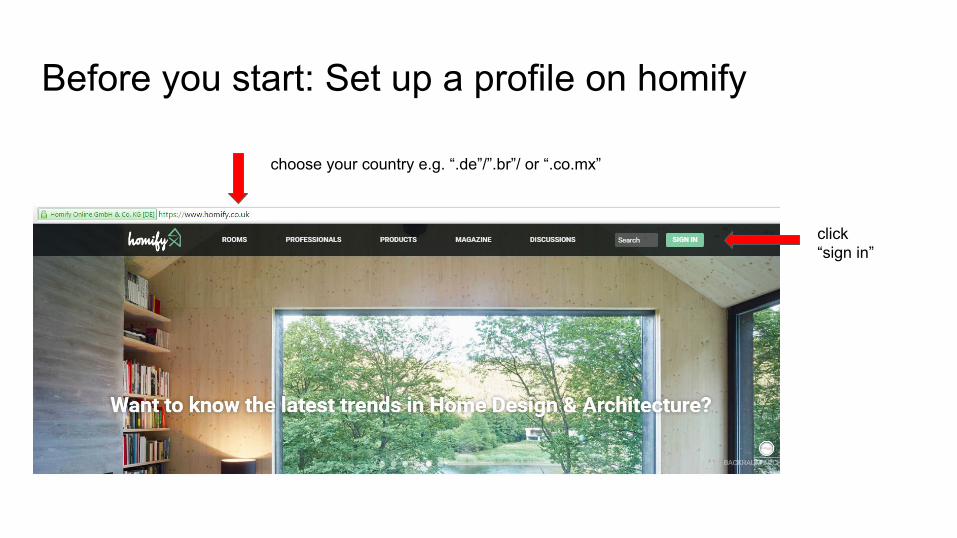
Before you start: Set up a profile on homify
choose your country e.g. “.de”/”.br”/ or “.co.mx”
click“sign in”
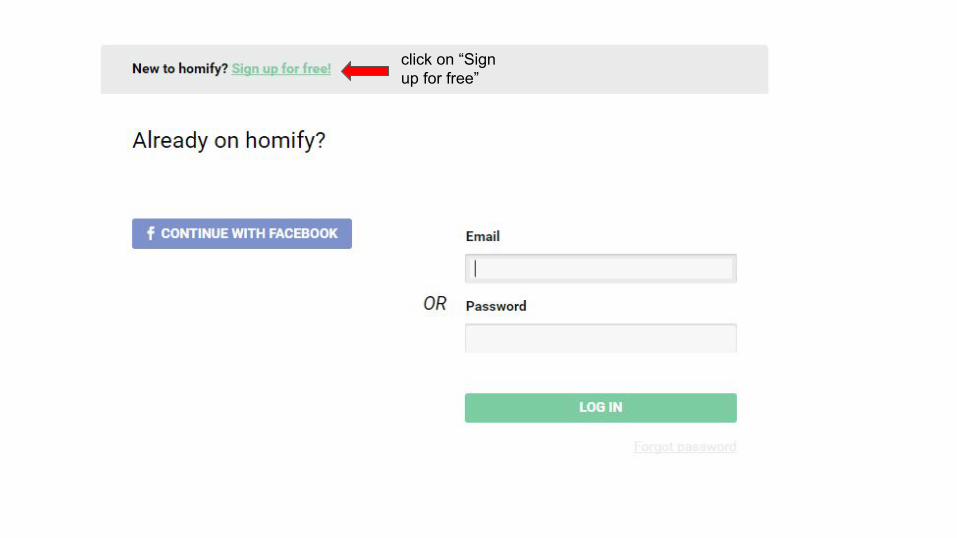
click on “Sign up for free”

● Enter your email address and password into
the appropriate boxes
● Confirm your password
● Tick the box “I am a Professional”
● Tick the box for terms and conditions
● If you wish to receive our newsletter, please
tick that one too
● Now click “SIGN UP FOR FREE”
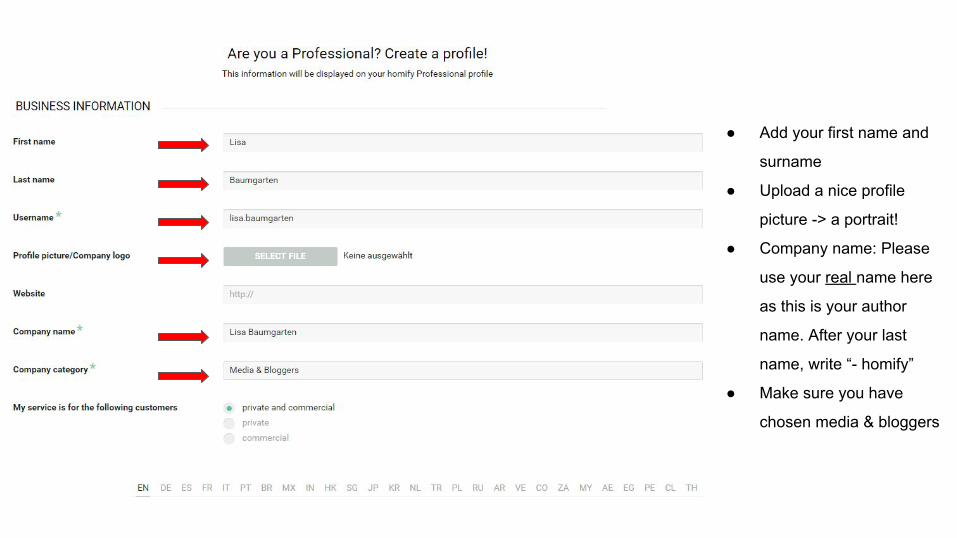
● Add your first name and
surname
● Upload a nice profile
picture -> a portrait!
● Company name: Please
use your real name here
as this is your author
name. After your last
name, write “- homify”
● Make sure you have
chosen media & bloggers
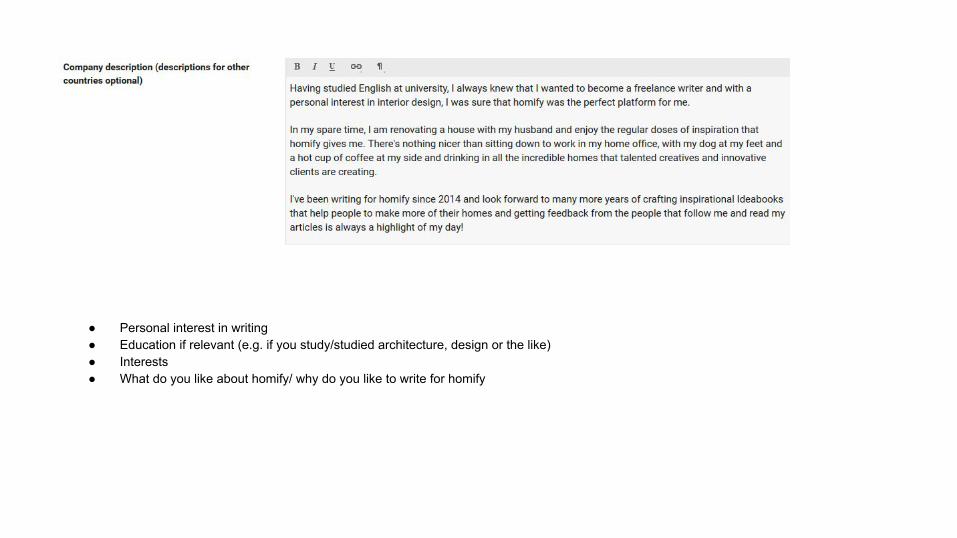
● Personal interest in writing ● Education if relevant (e.g. if you study/studied architecture, design or the like)● Interests● What do you like about homify/ why do you like to write for homify
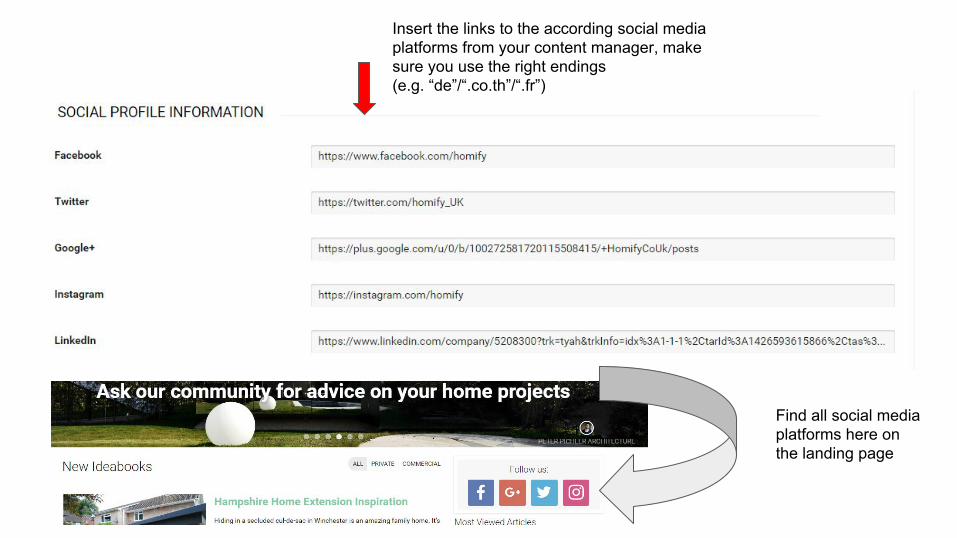
Insert the links to the according social media platforms from your content manager, make sure you use the right endings (e.g. “de”/“.co.th”/“.fr”)
Find all social media platforms here on the landing page
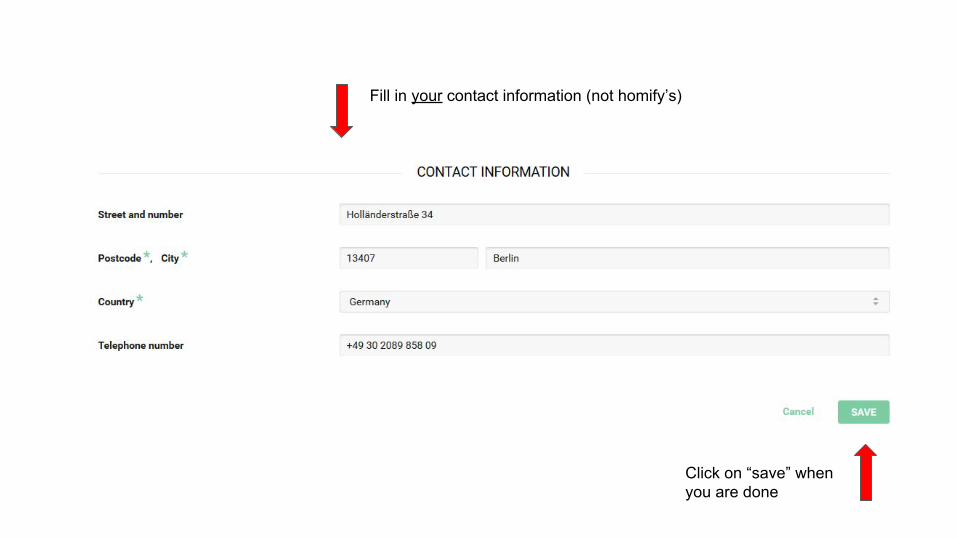
Fill in your contact information (not homify’s)
Click on “save” when you are done
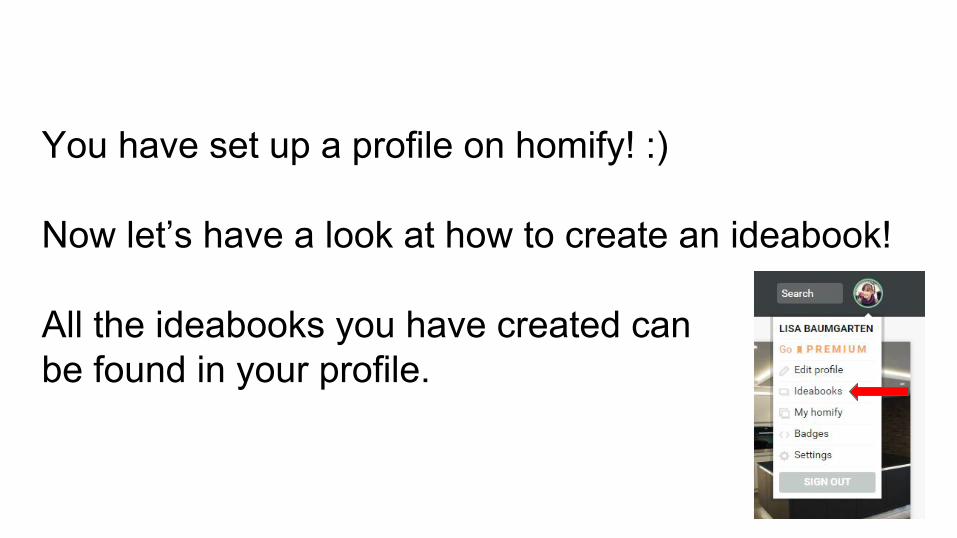
You have set up a profile on homify! :)
Now let’s have a look at how to create an ideabook!
All the ideabooks you have created can be found in your profile.
How to create an ideabookWhat to take care of when editing an ideabook

General rules:● Every ideabook needs to have at least 5 pictures!
● Every ideabook needs to have at least 600 words!
● Every ideabook must contain 3 links!
● Make sure your ideabook is being published on the right domain by choosing the correct language!
● Never use pictures from other websites than homify!
● NEVER copy & paste from other websites or existing homify ideabooks - write original content!
● For translations: You can either translate the whole text or write about it in your own words - just make sure to use
the same images!
● No double content: If you write about the same project in the same language (english, spanish, portuguese…) make
sure your content is unique!
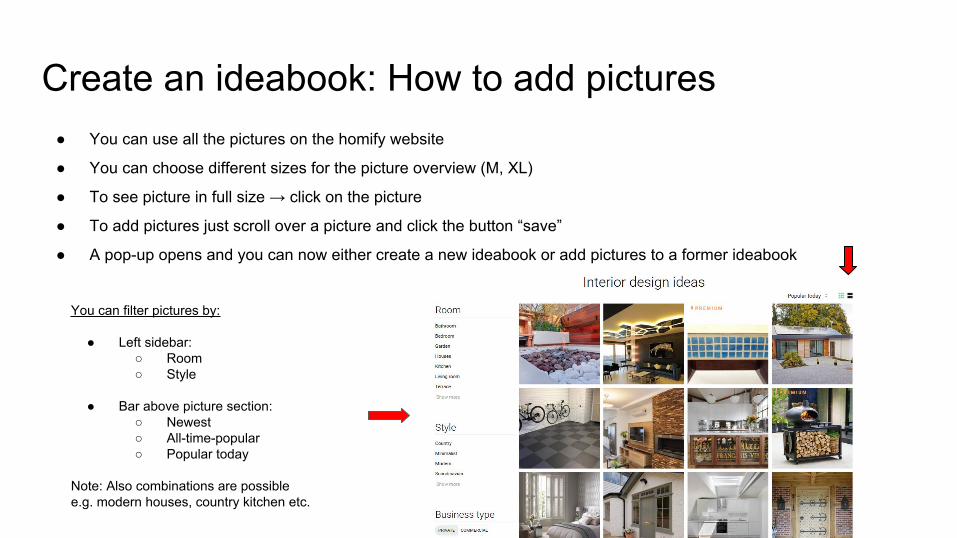
Create an ideabook: How to add pictures ● You can use all the pictures on the homify website
● You can choose different sizes for the picture overview (M, XL)
● To see picture in full size → click on the picture
● To add pictures just scroll over a picture and click the button “save”
● A pop-up opens and you can now either create a new ideabook or add pictures to a former ideabook
You can filter pictures by:
● Left sidebar:○ Room ○ Style
● Bar above picture section:○ Newest○ All-time-popular○ Popular today
Note: Also combinations are possible e.g. modern houses, country kitchen etc.
Different types of ideabooks● 360°/Blockbuster: Describes a house project. Always starts with a facade followed by interior images. In some
cases we have only interior pictures, this also counts as a Blockbuster (BB)
● before/after (B/A): Conversion, renovation - either of one house project or of a kitchen/garden/bathroom
● guide: Gives useful advices e.g. cleaning, how to design a kitchen
● listicle: Inspirational article with specific topics e.g. amazing houses, modern bedrooms, fancy bathtubs
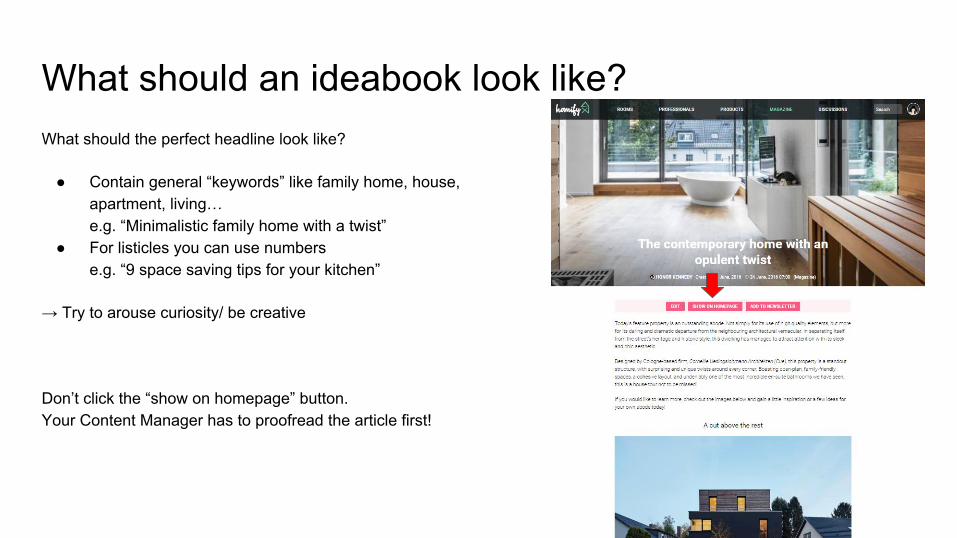
What should an ideabook look like?What should the perfect headline look like?
● Contain general “keywords” like family home, house, apartment, living… e.g. “Minimalistic family home with a twist”
● For listicles you can use numberse.g. “9 space saving tips for your kitchen”
→ Try to arouse curiosity/ be creative
Don’t click the “show on homepage” button. Your Content Manager has to proofread the article first!
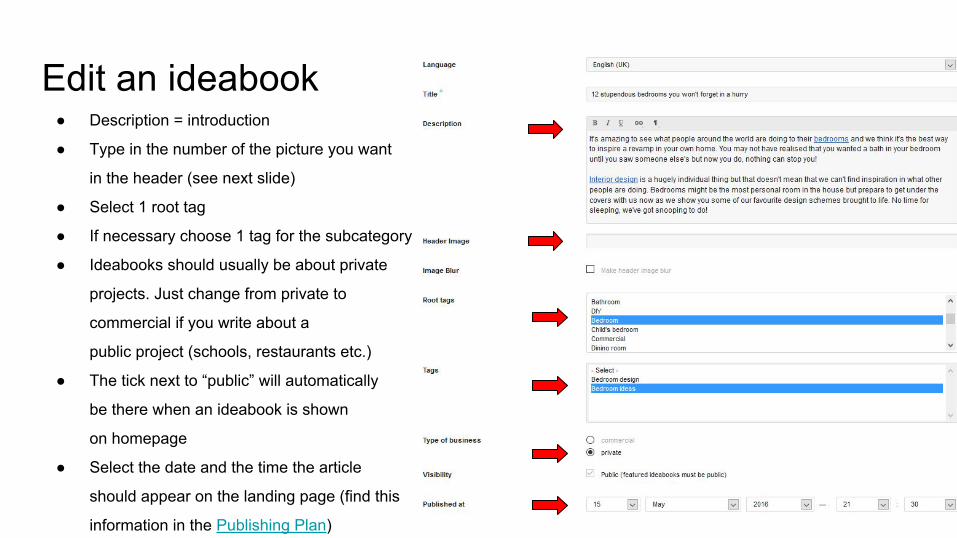
Edit an ideabook● Description = introduction
● Type in the number of the picture you want
in the header (see next slide)
● Select 1 root tag
● If necessary choose 1 tag for the subcategory
● Ideabooks should usually be about private
projects. Just change from private to
commercial if you write about a
public project (schools, restaurants etc.)
● The tick next to “public” will automatically
be there when an ideabook is shown
on homepage
● Select the date and the time the article
should appear on the landing page (find this
information in the Publishing Plan)
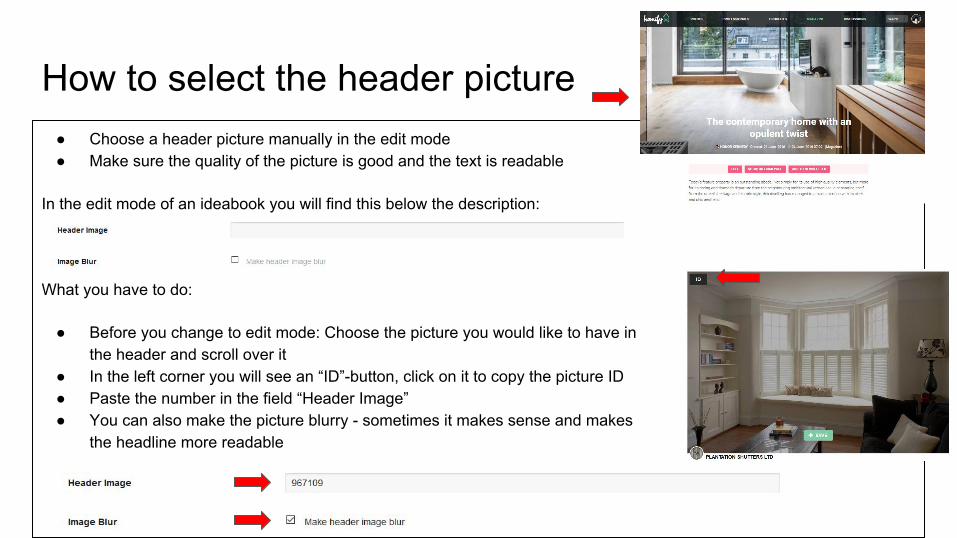
How to select the header picture● Choose a header picture manually in the edit mode● Make sure the quality of the picture is good and the text is readable
In the edit mode of an ideabook you will find this below the description:
What you have to do:
● Before you change to edit mode: Choose the picture you would like to have in the header and scroll over it
● In the left corner you will see an “ID”-button, click on it to copy the picture ID● Paste the number in the field “Header Image”● You can also make the picture blurry - sometimes it makes sense and makes
the headline more readable
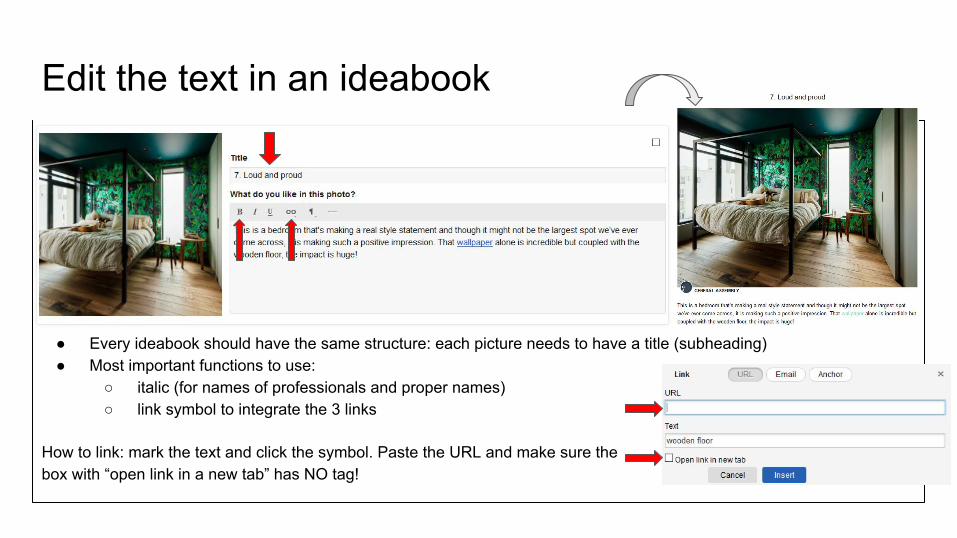
Edit the text in an ideabook
● Every ideabook should have the same structure: each picture needs to have a title (subheading)● Most important functions to use:
○ italic (for names of professionals and proper names)○ link symbol to integrate the 3 links
How to link: mark the text and click the symbol. Paste the URL and make sure the box with “open link in a new tab” has NO tag!
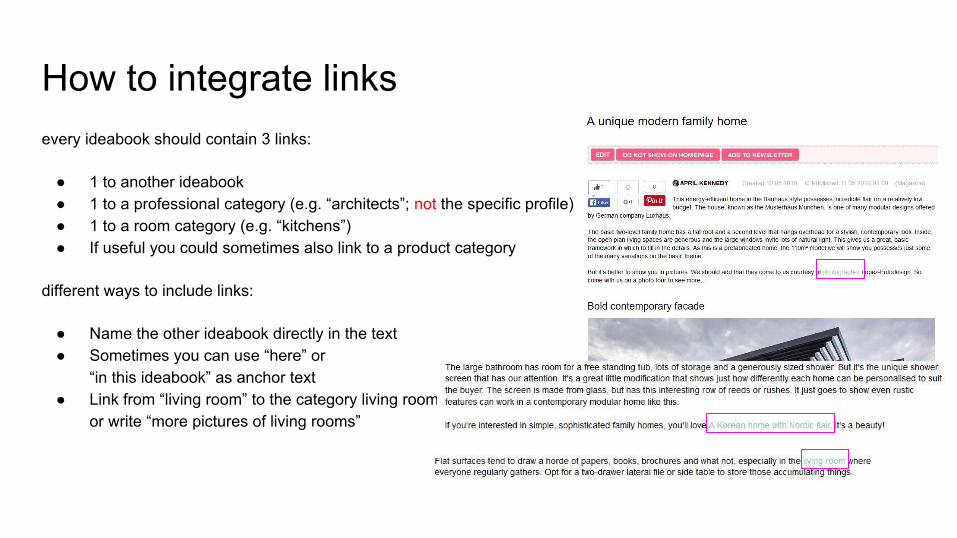
How to integrate linksevery ideabook should contain 3 links:
● 1 to another ideabook● 1 to a professional category (e.g. “architects”; not the specific profile) ● 1 to a room category (e.g. “kitchens”)● If useful you could sometimes also link to a product category
different ways to include links:
● Name the other ideabook directly in the text ● Sometimes you can use “here” or
“in this ideabook” as anchor text● Link from “living room” to the category living room
or write “more pictures of living rooms”

remove, shift & copy pictures● Change picture order via drag & drop
● Delete pictures: tick the pictures you want
to remove and choose “remove photos”
● Move or copy pictures by ticking them and
choose the procedure at the bottom of your
ideabook

SEO-BOX● Copy the headline and paste it into the meta title● Add 5-7 relevant keywords
-> good combinations: room + “ideas”, room + “design”
● Meta-Description: should contain relevant keywordsand tell the reader what they can expect-> it’s the text that will be shown in the googleresults and the magazine preview on facebook
● SEO-Text: a question to encourage the communityto write comments below the article(please always use italic)
Useful TipsFurther tips to find the right pictures

Tips for finding pictures
● Browse the homify website (categories, experts, products, magazine)
● As local professionals are shown automatically you have to choose
another country manually with the flag menu at the bottom to see more pictures
● You can also select different styles/rooms such as the combination of
style and room
● You can also use the search function to look for more specific pictures
e.g. freestanding bathtubs, kitchen islands etc.
Select other countries via flags:
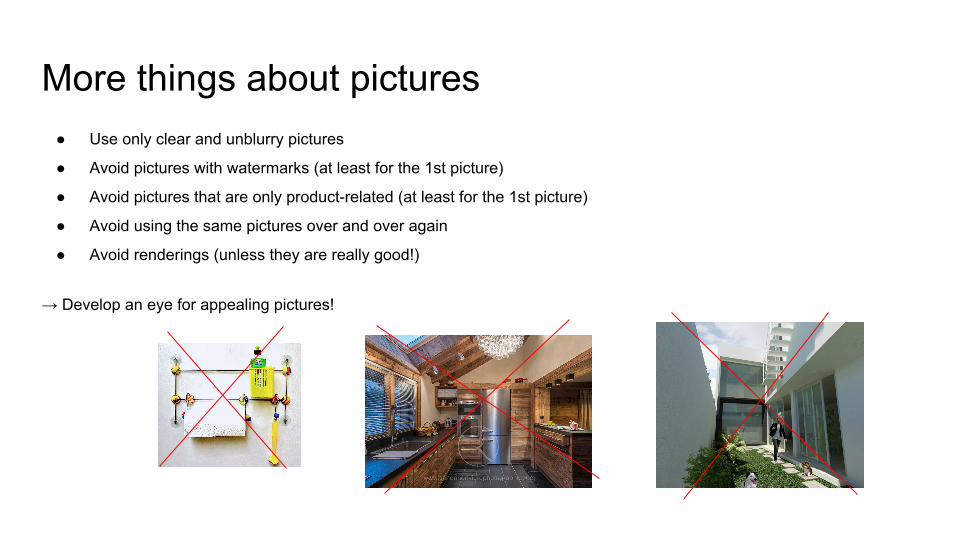
More things about pictures● Use only clear and unblurry pictures
● Avoid pictures with watermarks (at least for the 1st picture)
● Avoid pictures that are only product-related (at least for the 1st picture)
● Avoid using the same pictures over and over again
● Avoid renderings (unless they are really good!)
→ Develop an eye for appealing pictures!
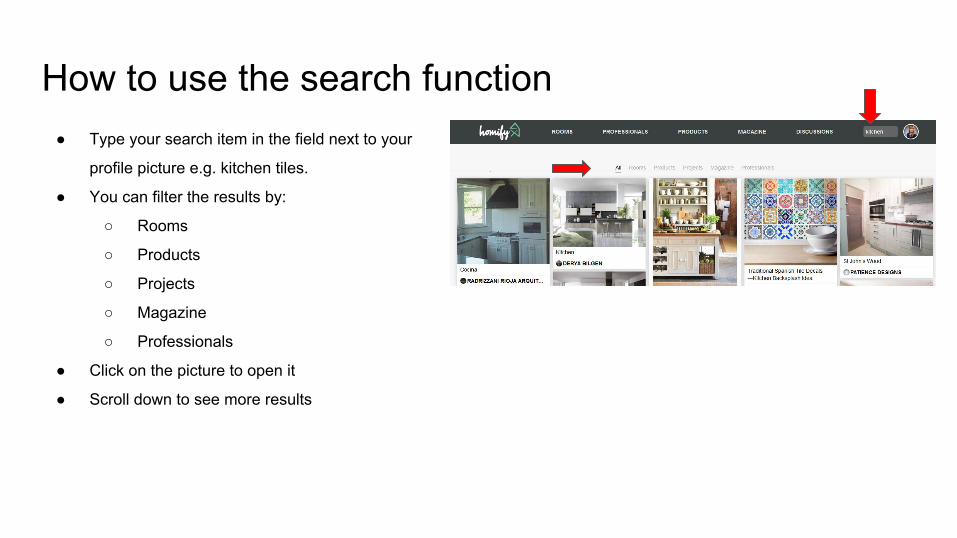
How to use the search function● Type your search item in the field next to your
profile picture e.g. kitchen tiles.
● You can filter the results by:
○ Rooms
○ Products
○ Projects
○ Magazine
○ Professionals
● Click on the picture to open it
● Scroll down to see more results
Publishing PlanOrganisation tool for your articles
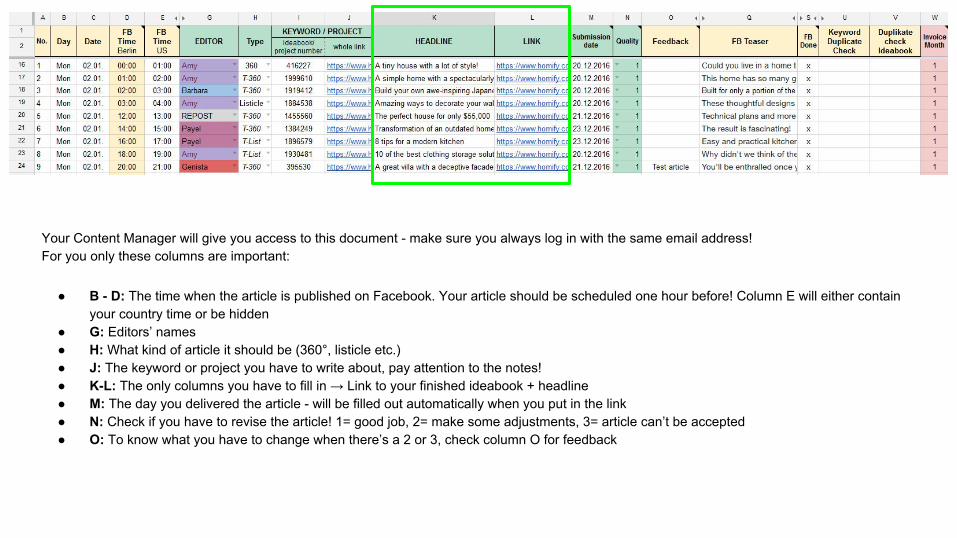
Your Content Manager will give you access to this document - make sure you always log in with the same email address!For you only these columns are important:
● B - D: The time when the article is published on Facebook. Your article should be scheduled one hour before! Column E will either contain your country time or be hidden
● G: Editors’ names● H: What kind of article it should be (360°, listicle etc.)● J: The keyword or project you have to write about, pay attention to the notes!● K-L: The only columns you have to fill in → Link to your finished ideabook + headline● M: The day you delivered the article - will be filled out automatically when you put in the link● N: Check if you have to revise the article! 1= good job, 2= make some adjustments, 3= article can’t be accepted ● O: To know what you have to change when there’s a 2 or 3, check column O for feedback
InvoicesPlease read this carefully and stick to the rules
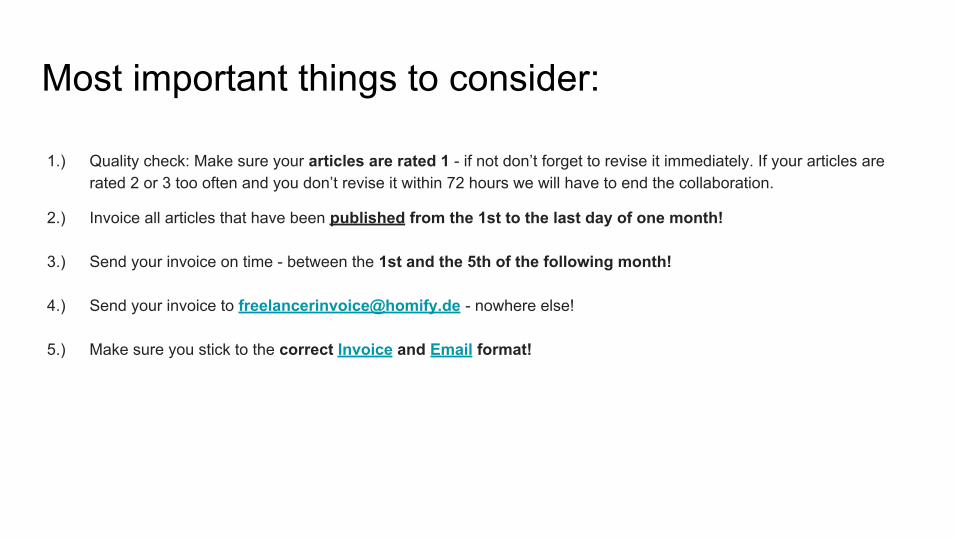
Most important things to consider:
1.) Quality check: Make sure your articles are rated 1 - if not don’t forget to revise it immediately. If your articles are rated 2 or 3 too often and you don’t revise it within 72 hours we will have to end the collaboration.
2.) Invoice all articles that have been published from the 1st to the last day of one month!
3.) Send your invoice on time - between the 1st and the 5th of the following month!
4.) Send your invoice to [email protected] - nowhere else!
5.) Make sure you stick to the correct Invoice and Email format!

Correct Invoice Format:
We only accept invoices that are in a correct format. Here is a checklist:
● Your full name and address● Invoice number
→ It’s important to use ongoing invoice numbers. That means each of your invoices must have a new number, that you have never used for any homify invoice before.
● Billing period (First to last day of the month: 01.03. - 31.03.2016)● Date● homify address● Links to written ideabooks (instead of only headlines)● European bank account (members of European Union only) or Paypal Details
Important: The invoice need to be send as a PDF document and named like this: Countrycode_your namee. g. AR_Costa Sanchez
Find your invoice template here!
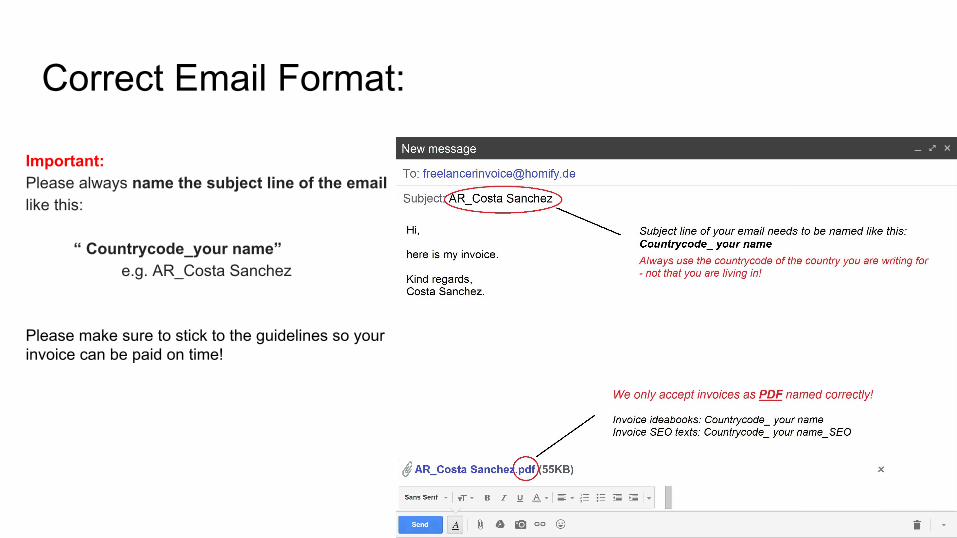
Correct Email Format:
Important: Please always name the subject line of the email like this:
“ Countrycode_your name” e.g. AR_Costa Sanchez
Please make sure to stick to the guidelines so your invoice can be paid on time!
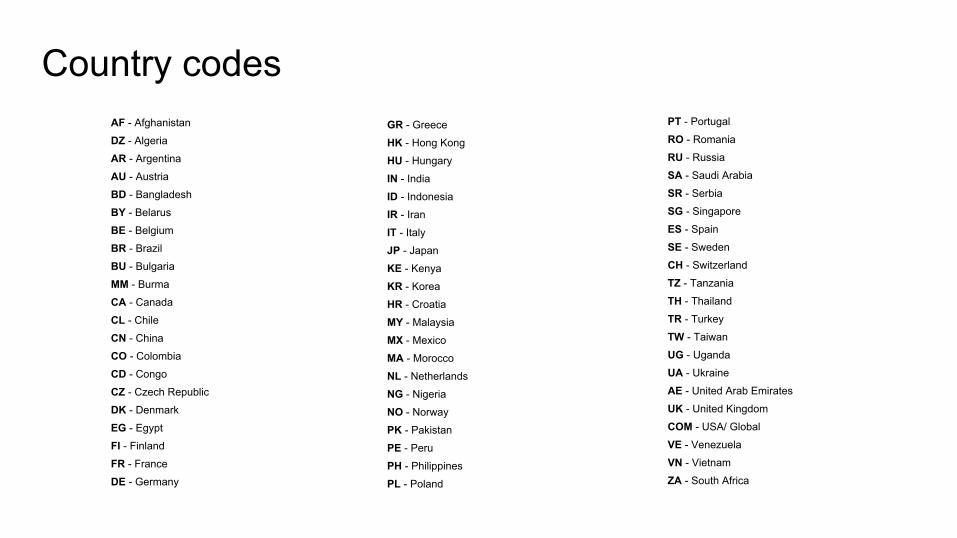
Country codesPT - Portugal
RO - Romania
RU - Russia
SA - Saudi Arabia
SR - Serbia
SG - Singapore
ES - Spain
SE - Sweden
CH - Switzerland
TZ - Tanzania
TH - Thailand
TR - Turkey
TW - Taiwan
UG - Uganda
UA - Ukraine
AE - United Arab Emirates
UK - United Kingdom
COM - USA/ Global
VE - Venezuela
VN - Vietnam
ZA - South Africa
GR - Greece
HK - Hong Kong
HU - Hungary
IN - India
ID - Indonesia
IR - Iran
IT - Italy
JP - Japan
KE - Kenya
KR - Korea
HR - Croatia
MY - Malaysia
MX - Mexico
MA - Morocco
NL - Netherlands
NG - Nigeria
NO - Norway
PK - Pakistan
PE - Peru
PH - Philippines
PL - Poland
AF - Afghanistan
DZ - Algeria
AR - Argentina
AU - Austria
BD - Bangladesh
BY - Belarus
BE - Belgium
BR - Brazil
BU - Bulgaria
MM - Burma
CA - Canada
CL - Chile
CN - China
CO - Colombia
CD - Congo
CZ - Czech Republic
DK - Denmark
EG - Egypt
FI - Finland
FR - France
DE - Germany

CommunicationHow to communicate with your Content Manager
If you have any questions or doubts always contact your Content Manager!
● Communication is mainly done through the Publishing Plan or by Email
● Inform your supervisor as soon as possible: ○ when you cannot observe your deadline○ when you are sick○ about your holiday plans so s/he can find replacement or you have to work in advance○ If you notice that an article has been ordered a second time from you
Communication is everything!