free end table plans
TRANSCRIPT

End Table Copyright © 2007-2011 The Douglas Group. All Rights Reserved.
www.ePlanSets.com Sheet of 9
AKING FURNITURE
-------------------------------------------------------------------------- ---------- ---------------from Plastic Pipe and Pipe Fit- ------------------------------------------------------------------------------------------------------------- tings is quite a bit different
than doing a Plastic plumbing project. You don’t have to worry about the slope of your drain line, and you don’t need to bother to check for leaks, once the project is fully assembled.
However, you do need to be very accurate when you cut your pipe to the various lengths required. You do need to make your cuts square. When you assemble the pieces, you must make sure each pipe is fully seated into it’s fitting. If you don’t fully seat each joint, your effective, or assembled length will not be right. On a project like this, if your assembled lengths vary, you will not be satisfied with your finished project.
Building this End Table is a perfect first Plastic Pipe project, and a great way to begin to develop your skills in this direction. This is a beginner’s level project.
On all of the projects we offer as Project ePlanSets, working slowly, and carefully will help
End Table – Project ePlanSet
M
This is a complete and easy to follow Project ePlanSet, including instructions on how to build this project – and some basic information on where to obtain finishing ideas, such as about the simulated marble finish we used on our prototype.
You will notice on sheet 3 a complete parts list with color-coding so you can easily identify each part on any drawing sheet. All of the Pipe and Fittings used in this Project are made out of 3/4 inch diameter white PVC Schedule 40 Plastic Pipe and Fittings. (We did not use the 3/4 inch beige CPVC Plastic Pipe or Fittings.)
We suggest you read through everything in this Project ePlanSet before starting to work. It may save time and energy later.
help you to build a project that will demon-strate your fine craftsmanship. If you can do that, then you will learn and understand many of the basic skills required to successfully build a variety of the Plastic Pipe Projects we offer as Project ePlanSets.
1
End Table Copyright © 2007-2011 The Douglas Group. All Rights Reserved.
www.ePlanSets.com Sheet of 9
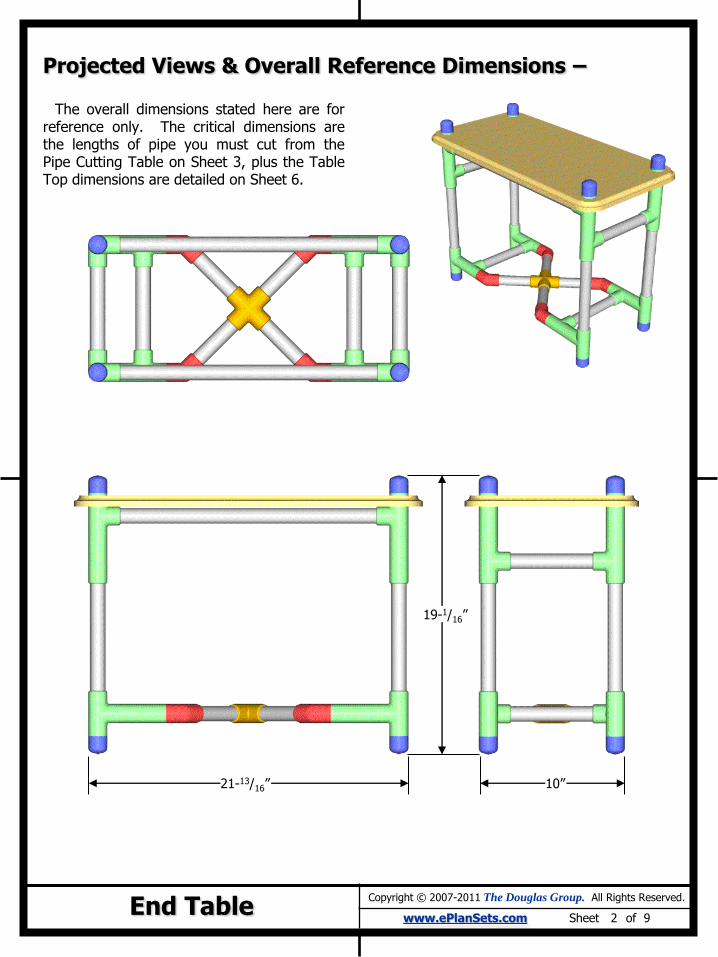
19-1/16”
21-13/16”
Projected Views & Overall Reference Dimensions –
The overall dimensions stated here are for reference only. The critical dimensions are the lengths of pipe you must cut from the Pipe Cutting Table on Sheet 3, plus the Table Top dimensions are detailed on Sheet 6.
10”
2

End Table Copyright © 2007-2011 The Douglas Group. All Rights Reserved.
www.ePlanSets.com Sheet of 9
Complete Pipe Fittings List & Pipe Cutting Table –
Pipe Cutting Table Schedule 40 – ¾” Dia.
Code Qty Length
A 8 1-13/16”
B 12 2”
C 4 9-3/8”
D 4 7-9/16”
E 4 3-3/4”
F 2 19-7/16”
Total Length Needed = 15 ft.
A
A
A
A
B
B
B
B
B
B
C
C
D
D
E
E
F
Pipe Fittings List Schedule 40 – ¾” Dia.
Color ID Qty Description
16 Tee – Straight 900
8 Cap
4 Elbow – 450
1 Cross – Straight 900
Table Top
Exploded Assembly View
3
B
D
Table Top
MDF
(Medium Density
Furniture Grade
Particle Board)
12” x 24” x ¾”
End Table Copyright © 2007-2011 The Douglas Group. All Rights Reserved.
www.ePlanSets.com Sheet of 9
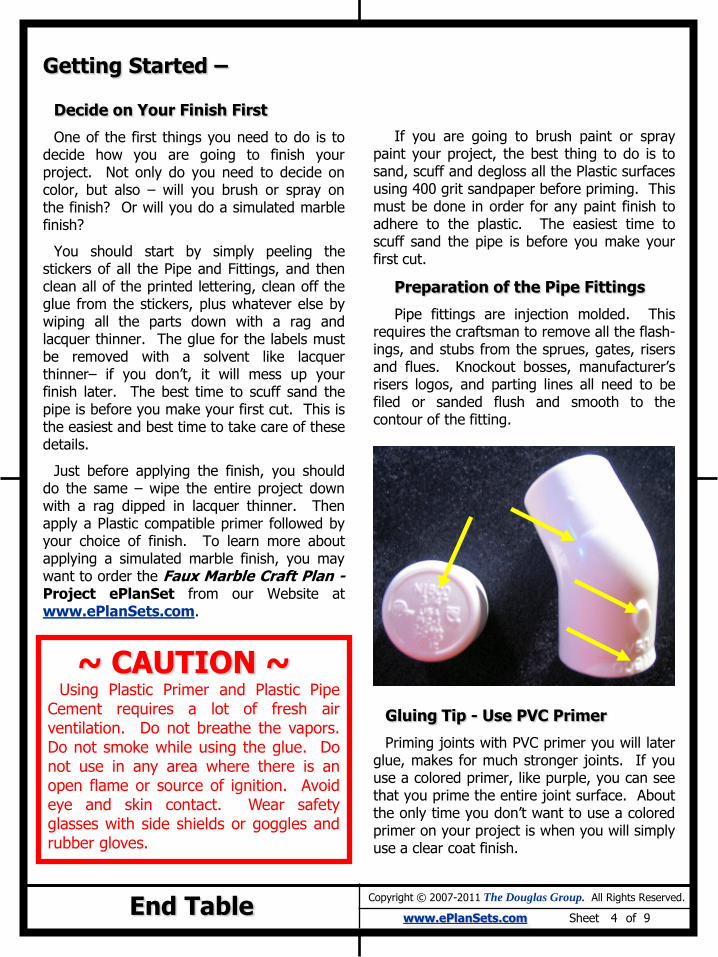
If you are going to brush paint or spray paint your project, the best thing to do is to sand, scuff and degloss all the Plastic surfaces using 400 grit sandpaper before priming. This must be done in order for any paint finish to adhere to the plastic. The easiest time to scuff sand the pipe is before you make your first cut.
Preparation of the Pipe Fittings
Pipe fittings are injection molded. This requires the craftsman to remove all the flash- ings, and stubs from the sprues, gates, risers and flues. Knockout bosses, manufacturer’s risers logos, and parting lines all need to be filed or sanded flush and smooth to the contour of the fitting.
Gluing Tip - Use PVC Primer
Priming joints with PVC primer you will later glue, makes for much stronger joints. If you use a colored primer, like purple, you can see that you prime the entire joint surface. About the only time you don’t want to use a colored primer on your project is when you will simply use a clear coat finish.
Decide on Your Finish First
One of the first things you need to do is to decide how you are going to finish your project. Not only do you need to decide on color, but also – will you brush or spray on the finish? Or will you do a simulated marble finish?
You should start by simply peeling the stickers of all the Pipe and Fittings, and then clean all of the printed lettering, clean off the glue from the stickers, plus whatever else by wiping all the parts down with a rag and lacquer thinner. The glue for the labels must be removed with a solvent like lacquer thinner– if you don’t, it will mess up your finish later. The best time to scuff sand the pipe is before you make your first cut. This is the easiest and best time to take care of these details.
Just before applying the finish, you should do the same – wipe the entire project down with a rag dipped in lacquer thinner. Then apply a Plastic compatible primer followed by your choice of finish. To learn more about applying a simulated marble finish, you may want to order the Faux Marble Craft Plan - Project ePlanSet from our Website at www.ePlanSets.com.
Getting Started –
~ CAUTION ~ Using Plastic Primer and Plastic Pipe
Cement requires a lot of fresh air ventilation. Do not breathe the vapors. Do not smoke while using the glue. Do not use in any area where there is an open flame or source of ignition. Avoid eye and skin contact. Wear safety glasses with side shields or goggles and rubber gloves.
4

End Table Copyright © 2007-2011 The Douglas Group. All Rights Reserved.
www.ePlanSets.com Sheet of 9
~ CAUTION ~ Sanding Plastic generates a fine dust. We
suggest wearing a filter mask over your nose and mouth so the dust doesn’t get into your lungs. Plus, we suggest wearing eye protection to protect your sight.
Tools you will need –
Large Miter Box with Hand Saw. (See the text on Sheet 7 for more information.)
Finishing Sander
Files & Assorted Garnet Sandpaper
Try Square
Some General Notes –
Our End Table project involves many steps, each of which is relatively easy – on an individual basis. The sequence of performing these steps is important, and, in some assembly procedures, you must do a number of things all at the same time.
If you have had experience in gluing up Plastic Pipe plumbing projects prior to this Project, some of our procedures here are very different from traditional means. Be careful to read and follow specific directions on making each assembly.
--
Craftsmanship How To –
Before you apply any primer or glue to any joint you should completely dry fit the entire project. By doing so, you can readily see if things don’t line up. You then have the chance to make corrections without any embarrassment.
~ Please Note ~ The PVC Pipe and Pipe Fittings used to build
this Prototype End Table are schedule 40 and ¾ inch diameter. Fittings are likely to have minor size variations from one manufacturer to another. Even though they may all still be in compliance with ASTM D 2466, there will likely be dimensional differences, which you must allow for, These differences are not detailed in this Project ePlanSet. This may mean your finished project may not look exactly like what is depicted here.
5

End Table Copyright © 2007-2011 The Douglas Group. All Rights Reserved.
www.ePlanSets.com Sheet of 9
The Top –
The End Table Top is symmetrical about both it’s vertical and horizontal Center Lines. The top is cut out of 3/4” thick MDF furniture grade particle board.
An elegant alternative would be to cut the top out of Plexiglas, or even real glass. If you can find it, you may even want to try some “smoked” Plexiglas, for a touch of added sophistication. Or, you may even want to go with some Plastic much thicker, or even real glass – depending on what your budget will allow.
Once the top is completely cut out, mark and center punch the hole locations. Use a compass to draw the corner radii before cutting them. Drill the holes, route the cove and sand the top with progressively finer and finer sandpaper.
When finished, the Top sim-ply sets on top of the Plastic Pipe Table frame. You may want to get some small round peel-and-stick pads for the Top to actually set on.
8-11/16”
12”
3/8” cove
4-11/32”
6”
1- 5/16” dia 4 holes
20-1/2”
10-1/4”
6
23-3/4”
11-3/8”
3/4” thick
3/8”
1- 5/8” rad 4 corners

End Table Copyright © 2007-2011 The Douglas Group. All Rights Reserved.
www.ePlanSets.com Sheet of 9
Some Notes on Craftsmanship –
This project requires you to make square cuts, to the exact length specified for each piece of pipe you cut. Tolerances on cut pipe lengths are plus or minus 1/32”. Each time you fit a pipe into the bell of a fitting, it should “bottom out”, or be pressed in until it can’t go in any further.
---
Making Square Cuts –
The best tool to make your square cuts is a miter box fitted with a fine tooth hand saw. Even then, a true, clean square cut may need to be cleaned up a bit with a keen eye, a try square, and a sander. If you know you are going to have to clean up the ends after sawing, then allow a little extra in length for each cut – maybe an extra 1/16” or so. You may have to experiment – improving your cutting skills as you go.
If you plan to do more and larger Plastic Pipe Projects after this one, then you should probably purchase a large, quality miter box with a fine tooth hand saw, unless you already have one in your shop. 4” diameter Plastic pipe actually mea-sures about 4-1/2” outside diameter. Many miter boxes will not have that capacity.
Another alternative is to use a power miter saw or chop saw. This may be more difficult to control, and it will give you a rougher cut. If you go this route, it is best to use a fine tooth blade. Also, be aware, even if you are using a 10” diameter blade, there is not enough clearance to cut through a 4” Plastic pipe.
Generally speaking, using power tools requires skills quite different from working with wood. If you use power tools, set your speeds fast and take your cuts very slow, either feeding the work into the blade, or feeding the blade into the work very gradually.
-----
Mark Each Piece as You Cut –
As you cut each piece of pipe, it’s a good idea to mark the part ID, and the finished length, right when you take it out of the miter box. You can write this information on a piece of masking tape and stick it to the cut piece of pipe. Your assembly will go much smoother if you keep things well organized from the very beginning.
~ CAUTION ~ We have made every effort to make sure every detail, every dimension and every
specification in this Project ePlanSet is accurate. We design and build our projects in order to verify all the information included. However, we are human. Errors are possible. We regret any errors that may be present, but cannot assume any responsibility for our unintentional errors. You should always dry fit assemblies and sub-assemblies to check for accuracy before applying any glue, making any adjustments as needed.
~ CAUTION ~ If you use power tools in your wood-
working shop, be very careful. Plastic does not cut nor machine anything like wood. Most woodworking saw blades, drill bits, and cutting tools are aggressive on Plastic, and will grab the Plastic – possibly pulling you into harm’s way. Saw blades with very fine teeth work best for cutting Plastic.
7

End Table Copyright © 2007-2011 The Douglas Group. All Rights Reserved.
www.ePlanSets.com Sheet of 9
Assembly –
Bottom Frame Section
Top Frame Section
8
Prime and glue each joint as shown.
End Table Copyright © 2007-2011 The Douglas Group. All Rights Reserved.
www.ePlanSets.com Sheet of 9
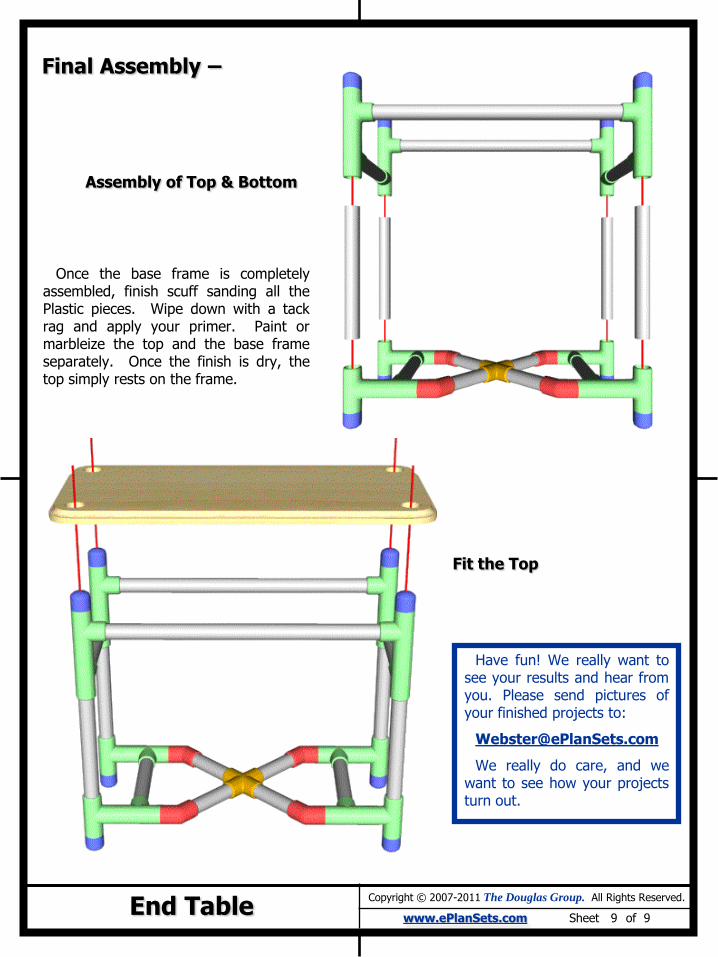
Final Assembly –
Assembly of Top & Bottom
Fit the Top
Have fun! We really want to see your results and hear from you. Please send pictures of your finished projects to:
We really do care, and we want to see how your projects turn out.
9
Once the base frame is completely assembled, finish scuff sanding all the Plastic pieces. Wipe down with a tack rag and apply your primer. Paint or marbleize the top and the base frame separately. Once the finish is dry, the top simply rests on the frame.