fpsc hints tips manual
DESCRIPTION
Here you will find some useful hints for FPS Creator.TRANSCRIPT
Hints ‘n’ Tips Guide By Nickydude - Revision 8
Picture created by Xplosys [www.fpsfree.com]
MERRY CHRISTMAS EVERYONE
FPS Creator Hint’s ‘n’ Tips Guide – Revision 8 Page 2
Welcome to the First Person Shooter Creator (FPSC) Hints ‘n’ Tips Guide! This guide includes
tutorials, scripts, game creation tips and answered questions to help you get started with
one of the greatest pieces of game making software there is today.
I’d like to thank all those who have contributed to this guide because without their help,
beginners like me would never have got to grips with the software and would still be
struggling.
If you’d like to make a contribution, whether it’s a tutorial, a useful web link, a handy script
or even a bit of advice, I’m sure other beginners would find it invaluable and your effort
would be greatly appreciated. All contributions can be sent to the following address:
Note: This guide is for the classic version of FPSC and you may find
that some things might not work correctly in FPSC X10.
By Nickydude
FPS Creator Hint’s ‘n’ Tips Guide – Revision 8 Page 3
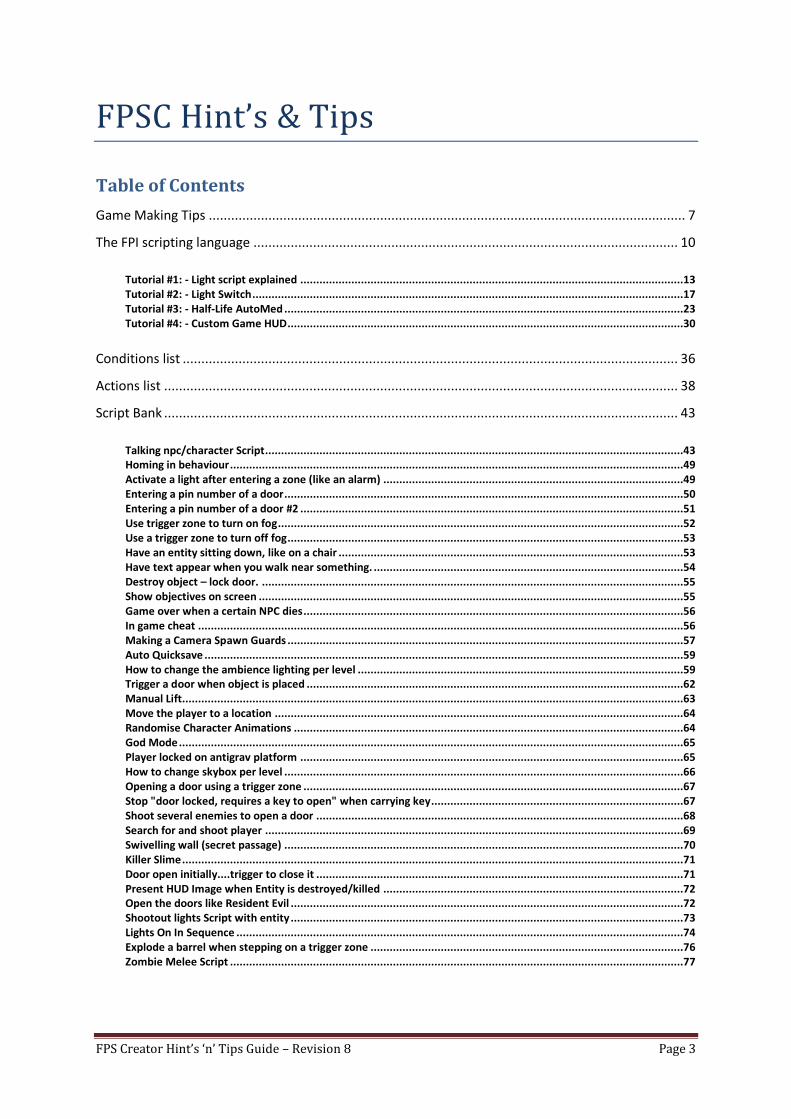
FPSC Hint’s & Tips
Table of Contents
Game Making Tips ................................................................................................................................ 7
The FPI scripting language .................................................................................................................. 10
Tutorial #1: - Light script explained ........................................................................................................................13 Tutorial #2: - Light Switch .......................................................................................................................................17 Tutorial #3: - Half-Life AutoMed .............................................................................................................................23 Tutorial #4: - Custom Game HUD ............................................................................................................................30
Conditions list ..................................................................................................................................... 36
Actions list .......................................................................................................................................... 38
Script Bank .......................................................................................................................................... 43
Talking npc/character Script ...................................................................................................................................43 Homing in behaviour ..............................................................................................................................................49 Activate a light after entering a zone (like an alarm) ..............................................................................................49 Entering a pin number of a door .............................................................................................................................50 Entering a pin number of a door #2 ........................................................................................................................51 Use trigger zone to turn on fog ...............................................................................................................................52 Use a trigger zone to turn off fog ............................................................................................................................53 Have an entity sitting down, like on a chair ............................................................................................................53 Have text appear when you walk near something. .................................................................................................54 Destroy object – lock door. ....................................................................................................................................55 Show objectives on screen .....................................................................................................................................55 Game over when a certain NPC dies .......................................................................................................................56 In game cheat ........................................................................................................................................................56 Making a Camera Spawn Guards ............................................................................................................................57 Auto Quicksave ......................................................................................................................................................59 How to change the ambience lighting per level ......................................................................................................59 Trigger a door when object is placed ......................................................................................................................62 Manual Lift.............................................................................................................................................................63 Move the player to a location ................................................................................................................................64 Randomise Character Animations ..........................................................................................................................64 God Mode ..............................................................................................................................................................65 Player locked on antigrav platform ........................................................................................................................65 How to change skybox per level .............................................................................................................................66 Opening a door using a trigger zone .......................................................................................................................67 Stop "door locked, requires a key to open" when carrying key ...............................................................................67 Shoot several enemies to open a door ...................................................................................................................68 Search for and shoot player ...................................................................................................................................69 Swivelling wall (secret passage) .............................................................................................................................70 Killer Slime .............................................................................................................................................................71 Door open initially....trigger to close it ...................................................................................................................71 Present HUD Image when Entity is destroyed/killed ..............................................................................................72 Open the doors like Resident Evil ...........................................................................................................................72 Shootout lights Script with entity ...........................................................................................................................73 Lights On In Sequence ............................................................................................................................................74 Explode a barrel when stepping on a trigger zone ..................................................................................................76 Zombie Melee Script ..............................................................................................................................................77
FPS Creator Hint’s ‘n’ Tips Guide – Revision 8 Page 4
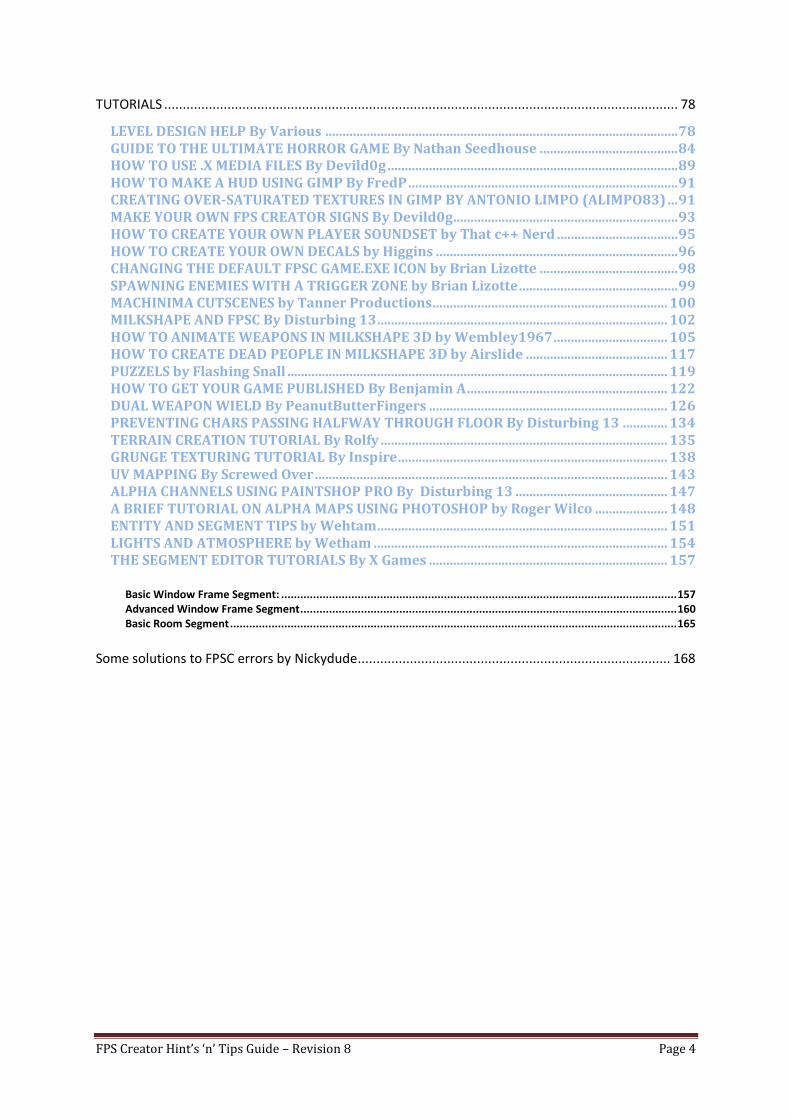
TUTORIALS .......................................................................................................................................... 78
LEVEL DESIGN HELP By Various ...................................................................................................... 78 GUIDE TO THE ULTIMATE HORROR GAME By Nathan Seedhouse ........................................ 84 HOW TO USE .X MEDIA FILES By Devild0g .................................................................................... 89 HOW TO MAKE A HUD USING GIMP By FredP .............................................................................. 91 CREATING OVER-SATURATED TEXTURES IN GIMP BY ANTONIO LIMPO (ALIMPO83) ... 91 MAKE YOUR OWN FPS CREATOR SIGNS By Devild0g ................................................................. 93 HOW TO CREATE YOUR OWN PLAYER SOUNDSET by That c++ Nerd ................................... 95 HOW TO CREATE YOUR OWN DECALS by Higgins ...................................................................... 96 CHANGING THE DEFAULT FPSC GAME.EXE ICON by Brian Lizotte ........................................ 98 SPAWNING ENEMIES WITH A TRIGGER ZONE by Brian Lizotte .............................................. 99 MACHINIMA CUTSCENES by Tanner Productions.................................................................... 100 MILKSHAPE AND FPSC By Disturbing 13 .................................................................................... 102 HOW TO ANIMATE WEAPONS IN MILKSHAPE 3D by Wembley1967 ................................. 105 HOW TO CREATE DEAD PEOPLE IN MILKSHAPE 3D by Airslide ......................................... 117 PUZZELS by Flashing Snall .............................................................................................................. 119 HOW TO GET YOUR GAME PUBLISHED By Benjamin A .......................................................... 122 DUAL WEAPON WIELD By PeanutButterFingers ..................................................................... 126 PREVENTING CHARS PASSING HALFWAY THROUGH FLOOR By Disturbing 13 ............. 134 TERRAIN CREATION TUTORIAL By Rolfy ................................................................................... 135 GRUNGE TEXTURING TUTORIAL By Inspire .............................................................................. 138 UV MAPPING By Screwed Over ...................................................................................................... 143 ALPHA CHANNELS USING PAINTSHOP PRO By Disturbing 13 ............................................ 147 A BRIEF TUTORIAL ON ALPHA MAPS USING PHOTOSHOP by Roger Wilco ..................... 148 ENTITY AND SEGMENT TIPS by Wehtam.................................................................................... 151 LIGHTS AND ATMOSPHERE by Wetham ..................................................................................... 154 THE SEGMENT EDITOR TUTORIALS By X Games ..................................................................... 157
Basic Window Frame Segment: ............................................................................................................................ 157 Advanced Window Frame Segment ...................................................................................................................... 160 Basic Room Segment ............................................................................................................................................ 165
Some solutions to FPSC errors by Nickydude .................................................................................... 168
FPS Creator Hint’s ‘n’ Tips Guide – Revision 8 Page 5
Quick Tips ......................................................................................................................................... 170
Display a hud while holding an object .................................................................................................................. 170 Alter lift weight .................................................................................................................................................... 170 Respawn Times .................................................................................................................................................... 170 Distance + Size ..................................................................................................................................................... 170 Change lighting while playing ............................................................................................................................... 170 Fix disappearing labels ......................................................................................................................................... 170 Dynamic entity & scripts ...................................................................................................................................... 171 Reversed colours .................................................................................................................................................. 171 Change character shadow .................................................................................................................................... 171 Infinite ammo ...................................................................................................................................................... 171 Movable teleport ................................................................................................................................................. 171 Light from light marker ........................................................................................................................................ 171 Level distortion fixed ........................................................................................................................................... 171 Breakable doors ................................................................................................................................................... 172 How to delete entities in one go .......................................................................................................................... 172 Rotating entities .................................................................................................................................................. 172 Winzone with video ............................................................................................................................................. 172 Disappearing Walls / Corridors ............................................................................................................................. 172 Air shaft / duct lag ............................................................................................................................................... 173 Door opened by key and stays open ..................................................................................................................... 173
FPS Creator Hint’s ‘n’ Tips Guide – Revision 8 Page 6
Questions & Answers ........................................................................................................................ 174
Q: How do I stop weapons and ammo floating up and down and glowing? .......................................................... 174 Q: How do I get my player to follow a waypoint? ................................................................................................. 174 Q: How do I change the backdrop (sky/ground)? .................................................................................................. 174 Q: How do I make dark rooms / lower the overall lighting level? .......................................................................... 174 Q: How do you get a sound zone to play music from when the player steps into the zone? .................................. 174 Q: How do I change the player’s walking speed? .................................................................................................. 174 Q: How can I put the name of the game on the main menu? ................................................................................ 174 Q: How do you make platforms move horizontally, like across chasms or acid? ................................................... 175 Q: How do I get rid of all the blood from the enemies? ........................................................................................ 175 Q: Is there is a way to let an entity spawn when another is dead?........................................................................ 176 Q: I can’t get my teleporter to work, why? ........................................................................................................... 176 Q: How do I have a flickering light? ...................................................................................................................... 176 Q: How do I make an object transparent? ............................................................................................................ 176 Q: How can my enemies have low gravity? .......................................................................................................... 176 Q: How do I align something with the ceiling, like a light? .................................................................................... 176 Q: How do I make a door start open / broken?..................................................................................................... 176 Q: How can I play a sound when the player picks up ammo? ................................................................................ 177 Q: How do you make a character start with a weapon in multiplayer? ................................................................. 177 Q: Whenever I run my game, the characters are all black, like shadows, why? ..................................................... 178 Q: How do I put non default weapons in allocation slots when building my game? .............................................. 178 Q: I need a barrel that spawns from a trigger zone and explodes straight away, how? ......................................... 178 Q: What image files can I use in FPSC? ................................................................................................................. 178 Q: How do I get a weapon to lie on its side? ......................................................................................................... 178 Q: Why are the blood splat decals flickering in my game? .................................................................................... 178 Q: How do I get objects to rest on other objects? ................................................................................................. 179 Q: When I shoot once, there are two bullet holes, why? ...................................................................................... 179 Q: How do I change the footstep sounds when walking on something?................................................................ 179 Q: Why aren’t my doors opening? ........................................................................................................................ 180 Q: How can I make curved walls that can be destroyed? ...................................................................................... 180 Q: How to do an enemy to walk until the end of the waypoint and to stop? ........................................................ 180 Q: How do you delete an enemy when it's reach the end of its way point? .......................................................... 180 Q: When I place a light on the wall and play the game, they fall off! Why?........................................................... 180 Q: How do you turn lights on and off? .................................................................................................................. 180 Q: How do I edit the loading screen without getting an error? ............................................................................. 181 Q: Why won’t my barrels explode when I shoot them? ........................................................................................ 182 Q: How do I change the radius of a grenade explosion?........................................................................................ 182 Q: Is it possible to turn a decal (like steam) on / off? ............................................................................................ 182 Q: How do I change the resolution of a build game?............................................................................................. 182 Q: Why are there gaps around my doors when place them on a wall? .................................................................. 182 Q: How do I turn a sound zone off using a switch? ............................................................................................... 183 Q: What ports do I have to forward in order for me to start a server? .................................................................. 183 Q: Can I change the size of a decal, like blood? ..................................................................................................... 183 Q: When I place a wall / floor down, the floor / wall next to it changes, why? ..................................................... 183 Q: When I export my character from my model program and import it into FPSC, it’s the wrong way round! ...... 183 Q: How can I move part of my map to another part of the play area? .................................................................. 183
OUTRO and Thanks ........................................................................................................................... 185
FPS Creator Hint’s ‘n’ Tips Guide – Revision 8 Page 7
Game Making Tips by Various
1. MAKE SURE YOU HAVE THE LATEST DIRECTX VERIOSN INSTALLED. IF YOU HAVEN’T DOWNLOADED
IT AFTER DECEMBER 1ST 2006, YOU’LL NEED TO.
2. READ THE MANUAL. All of it! This will save you being flamed on the Forum.
3. Don't make big open areas, they seem to decrease a lot the speed, FPSC cannot handle it. But if you
really want to do it, you can use invisible segments;
4. Don't have too many dynamic objects in one room, it's decrease the speed;
5. Use doors (especially automatic doors);
6. Have a good variety of objectives;
7. Use custom objects;
8. Test everything, go to all corners, try finding bugs;
9. Don't give up when you find a problem - try solving it;
10. Have a large variety of enemies;
11. Get some model packs, they are worth it;
12. Make lots of levels and make each one different from each other.
13. Use physics well: But breakable things, things that fall and/or you can push;
14. Be careful when using the fire effects, it must be a non accessible area, because if you look from the
upside, you'll see it's just a line;
15. Draw your maps on paper first define simple marks as lights, range, and entity’s.
16. Make your story before starting anything.
17. Can’t find an answer? Don’t moan for it...just ask nicely on the FPS Forum with a normal topic title.
18. Don’t try to be a smart guy, take advice from people.
19. People don’t like your game? Add some lightning. Is the story marked CLEARLY in the game?
20. Stock Media is OK, but level design must be OK to let Stock media look OK!
21. Don’t announce ANY game until you REALY think it’s worth posting it;
22. Learn FPI Scripting, it’s VERY useful to be a FPSC master
23. Post screeny's in .jpg format when you’ve made a model, game or WHATEVER.
24. Listen to the MOD's on the Forum, most of them had the EA version so they know it very well.
25. Use the search option before posting, chances are your question has been posted before.
26. All player unseen segments parts should be deleted, this will speed up everything, ex: if the player
isn't supposed to see the back of a building, you can delete it.
(use noclip on some random games to see how professionals made them: example games: hl2, ut2k4,
css, cs1.6 hitman, max payne1/2, etc.)
27. Really important thing: if you really want to move with creating games, just have this in mind, the
game isn't for you to have fun, but to others, since it's you making the game, you'll know everything,
you'll know the story, you'll know how the levels look like, you'll know where each enemy is going to
be and how they act. Knowing all this will make it. BUT when building a game, build it how YOU like it,
and not others, forget others opinions until you've built your very own game (there’s always someone
who thinks 100% the same as you think), after that you see if it's ok to accept others opinions or not.
28. Don't lose hope, if someone says that you level sucks, it doesn't matter what 1 guy says, show it to
more people, and eventually you'll see that they like it.
29. After releasing a demo or beta, learn to accept both positive and negative comments, this will help
you in many ways.
30. Need help with textures or models (new ones), feel free to ask help on the Forum.
31. The more work from you, the more unique your game will be, it's ok to use others people work (with
their proper permission) but the game looks much better if it has more work from you;
FPS Creator Hint’s ‘n’ Tips Guide – Revision 8 Page 8
32. Don't release betas after betas, the less the better, and the more work added in each beta, the more
the players will like your game;
33. FPSC isn't meant for you to make next HL or Quake or even next Halo; just a plain "simple" nowadays
game.
34. You can find a lot of information about detailed game planning by searching Google, but there are a
few basics you should have at a minimum. A basic plan should include the story line, maps of each
level and explanations of game progression, with diagrams of characters, objects, puzzles, etc. A game
plan is basically a walk through or book of the game.
35. Some people set out to build a game limited by what is available to them: the basic included themes
and whatever else is available at the forum and elsewhere. Others set out to build a game they can
imagine and then work to find or create the content they need to fill it. The second option is harder
and takes longer, but makes for a great original game.
36. Get Photoshop, PaintShop Pro or Gimp and learn how to texture. Some custom textures on the walls
can make all the difference in the world.
37. Try to learn how to script. It very easy and is required to make an FPSC game that isn’t just run n gun,
or at least a extraordinary run n gun game.
38. Try to variate the tempo of your game.
39. Make the environments feel non-linear even though they maybe are.
40. Variate the situations the player are in. Using some puzzle situations between the shooting keeps the
player from not being wearied.
41. Get Fruityloops or another music program to make some background music, ambience and sounds
for your game.
42. To avoid frame rate problems with large levels, try not to put too much on the same level building
area. Use staircases and elevators to extend upwards and downwards to build on those levels.
43. Print your manual out. It's not that many pages, especially if you print front and back. I find it's always
easier to read and comprehend something when its right in front of me in black and white;
44. Stick to one project, no one likes to see 100 different threads about all your different projects, also
you'll be able to concentrate more on the one project you have to make that the best you possibly
can, as opposed to doing a little on each at a time and losing concentration.
45. Created a 'grid' on Photoshop ( 40x40 squares ) and use markers to define what kind of walls to use
in a level, filled with x's and o's to define where certain entities and lights are, numbers where
waypoints for enemies are, and letters where winzones, story zones, start zones, etc. are.
The grid also kind of looks like a 'battleship' map ( the board game where you try and sink the others
ship by saying something like 'a1' or 'b12' or something along those lines ) so you can have some kind
of coordinate system to help you.
46. Sometimes, building an entire level from scratch can seriously improve frame rates, it is a theory that
FPSC sometimes compiles areas that are deleted (as notable by the 0 fps bug) or places the same
segment multiple times in the same location.
47. Better A.I. without new scripts:
Sniper:
Main = Snipe.fpi
Shoot = Snipe.fpi
Gunner:
Main = Snipe.fpi
Shoot = Shoot.fpi or Shootclose.fpi
48. Additionally, do not be AFRAID of physics objects. Physics may slow down your game slightly, but it is
OFF most of the time, an object only interacts with the physics system if a force is applied (or it is
spawned, or the game starts)

FPS Creator Hint’s ‘n’ Tips Guide – Revision 8 Page 9
49. Also, do not be afraid of wide open rooms, yes, I am contradict what you are saying because I have
noted that large open rooms CAN render properly without a large slowdown, what causes the
slowdown is polyleaks.
50. Double Side Tiles, A very interesting fact I noticed, double sided tiles are less likely to produce a poly
leak then single sided ones, furthermore, single sided tiles might become 'invisible' on the opposing
side.
51. Use few weapons, one thing I hate is when I play a game and pick up dozens of weapons, you really
only use 4 different weapons... Pistol, Heavy Gun (SMG, Shotgun, RL), Sniper Rifle, Grenades. No
reason to have guns that replace others.
52. Do not be afraid of Dynamic Objects.
53. Constantly remind the player of his objectives, simply throwing a guy into a shoot-em-up does little to
make a game, making the story unravel around him through head set communications, over heard
conversations or notes left on the floor does wonders to immerse the player in the game. DO NOT
have a guy nag the player to complete his objectives.
54. DO NOT force the player to stack boxes WITHOUT changing the friction level on the boxes. By
standards it is WAY too low, turn it up or else you will have a very frustrated player.
55. Change the health pack scripts to heal small amounts instead of the full 500 heal they currently do.
56. NEVER hold a random boss fight. Nothing is worse than when a game has a boss fight thrown in
without reason (IE. You’re on the way to kill the 'big guy' when he sends his apprentice to kill you...). It
may seem cool first few times, but pretty soon the player will recognise it as filler.
In a game I have been playing there has been 3 boss fights over 2 hours, and that does not include the
objective based fights (basically throw x number of people into y object).
57. Have a large amount of acrobatics in the game, simply put, walking is boring... it is much more fun to
climb walls or run across unstable platforms to get to the other side. The thing is a person can easily
beat a shooting game, and once a puzzle is discovered it isn't the same anymore... But acrobatics are
something that takes time and can be fun a few times over.
58. Do not, under any circumstances, force the player to walk a great distance over a locked door. I mean
take a look at half life, you have this guy with all these explosives, but he can't blow apart a single
door...
59. Darkness is bad. What is scarier... a zombie covered in blood eyes rolling, foam gushing from its
mouth... its skin yellow, wrinkled, and falling off, its clothes tattered and torn or a dark room?
60. Light is bad. What is scarier, a bloody knife in the middle of a well lit foyer or a knife clearly seen,
blood still dripping from its tip, but you cannot see (clearly) where the source is... or if the wielder is
still around.
61. If you just bought the software, don't jump into making an official game, you should play around and
learn how it works!
62. Don't leave open rooms empty; add some boxes and furniture or better yet people!
63. Don't Substitute quality for quantity
64. Don't be afraid to ask questions!
65. Try to not intersect 2 static lights when with full lightmap, that creates a big instability and it might
crash during the build of your level (it creates a big instability, it doesn't mean it doesn't work, it will
work, but, it has a bigger case of crashing).
FPS Creator Hint’s ‘n’ Tips Guide – Revision 8 Page 10
The FPI scripting language By xplosys
The scripting language is a simple trigger-based artificial intelligence language used to program objects in
games. It consists of simple if/then syntax and a pre-defined list of conditions and actions. This tutorial will
discuss how the game engine processes fpi script elements and its progression.
An fpi script is made up of statements and remarks. The statements start with a colon. Following that is a
condition, a test to see if something is true. If there is more than one condition, they are separated by a
comma. After all the conditions have been listed, there is another colon. The second colon separates the
conditions from the actions. If there is more than one action, they too are separated by a comma.
:condition,second condition:action,second action
Remarks, sometimes called comments, start with a semicolon. For the purpose of this tutorial, we will use the
term remarks so that we don't confuse comments with conditions. Remarks are used to label the script and
clarify or document its use for both the creator and end user. In many cases, a remark is used to define a
segment of a script, such as the header and trigger sections. The engine ignores remarks when executing the
script and they are in no way necessary for it to operate, except for the reason stated above. We will discuss
the importance of remarks again as we dissect a script.
;this is a remark
In the following sample script, you can see the use of Remarks, Conditions and Actions. The use of spacing
between script lines can also help to define and clarify the script and its different sections.
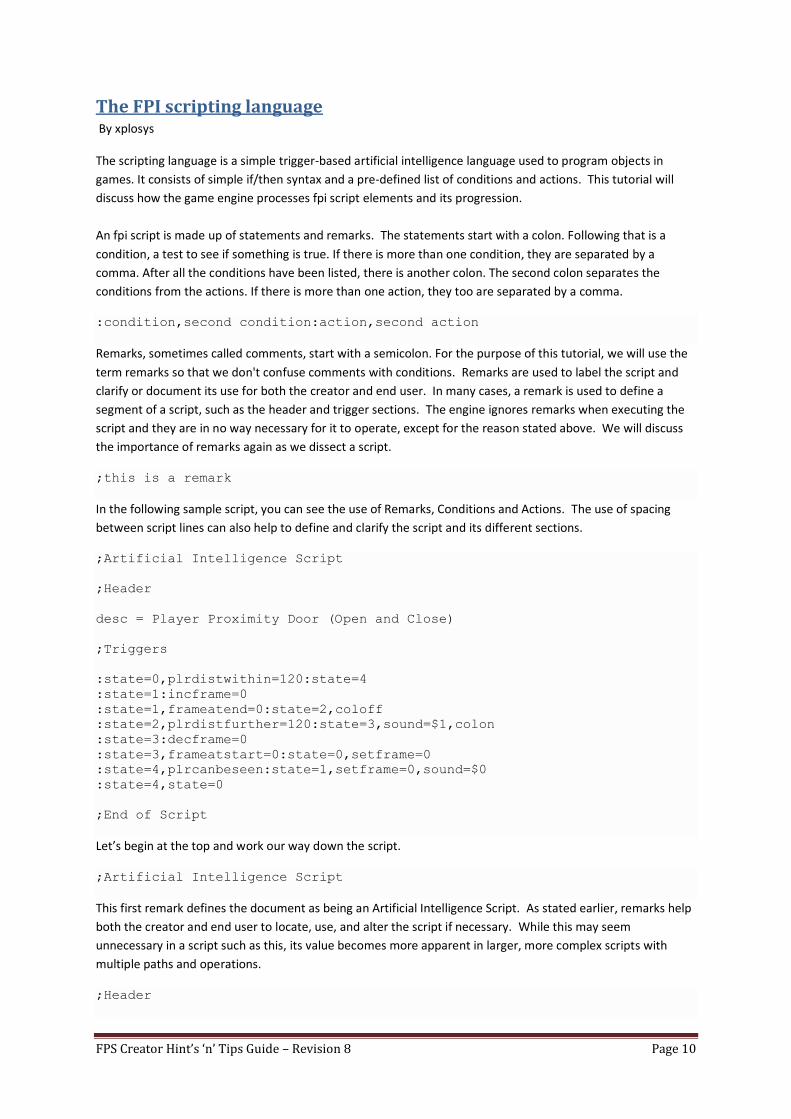
;Artificial Intelligence Script
;Header
desc = Player Proximity Door (Open and Close)
;Triggers
:state=0,plrdistwithin=120:state=4
:state=1:incframe=0
:state=1,frameatend=0:state=2,coloff
:state=2,plrdistfurther=120:state=3,sound=$1,colon
:state=3:decframe=0
:state=3,frameatstart=0:state=0,setframe=0
:state=4,plrcanbeseen:state=1,setframe=0,sound=$0
:state=4,state=0
;End of Script
Let’s begin at the top and work our way down the script.
;Artificial Intelligence Script
This first remark defines the document as being an Artificial Intelligence Script. As stated earlier, remarks help
both the creator and end user to locate, use, and alter the script if necessary. While this may seem
unnecessary in a script such as this, its value becomes more apparent in larger, more complex scripts with
multiple paths and operations.
;Header
FPS Creator Hint’s ‘n’ Tips Guide – Revision 8 Page 11
The header section is followed by the scripts description ( desc = description ) and may contain additional
remarks as required to clarify the scripts purpose, actions or even instructions to the end user. Simply stated,
anything can follow the header remark. Remember that each new line of a remark must begin with a semi-
colon.
desc = Player Proximity Door (Open and Close)
The scripts description is preceded by the abbreviation desc =. While a description is not necessary for the
script to operate, I'm sure you can realize the purpose for this one by now. Believe me, as you get into more
complicated scripts, the reason for all this documentation will become apparent.
So far we have discussed the basic contents of fpi scripts, the proper way to document them and the reasons
to do so. Now it’s time to get down to the meat of the script.
;Triggers
The triggers section contains the statements of the script and is made up of conditions and actions. As earlier
discussed, statements start with a colon, followed by a condition. In order to understand how conditions are
tested, it is important to know how values are stored. Think of a condition as being a container. Inside the
container is a value which can be set at the start of the game, changed during the play of the game, or fixed
throughout the game.
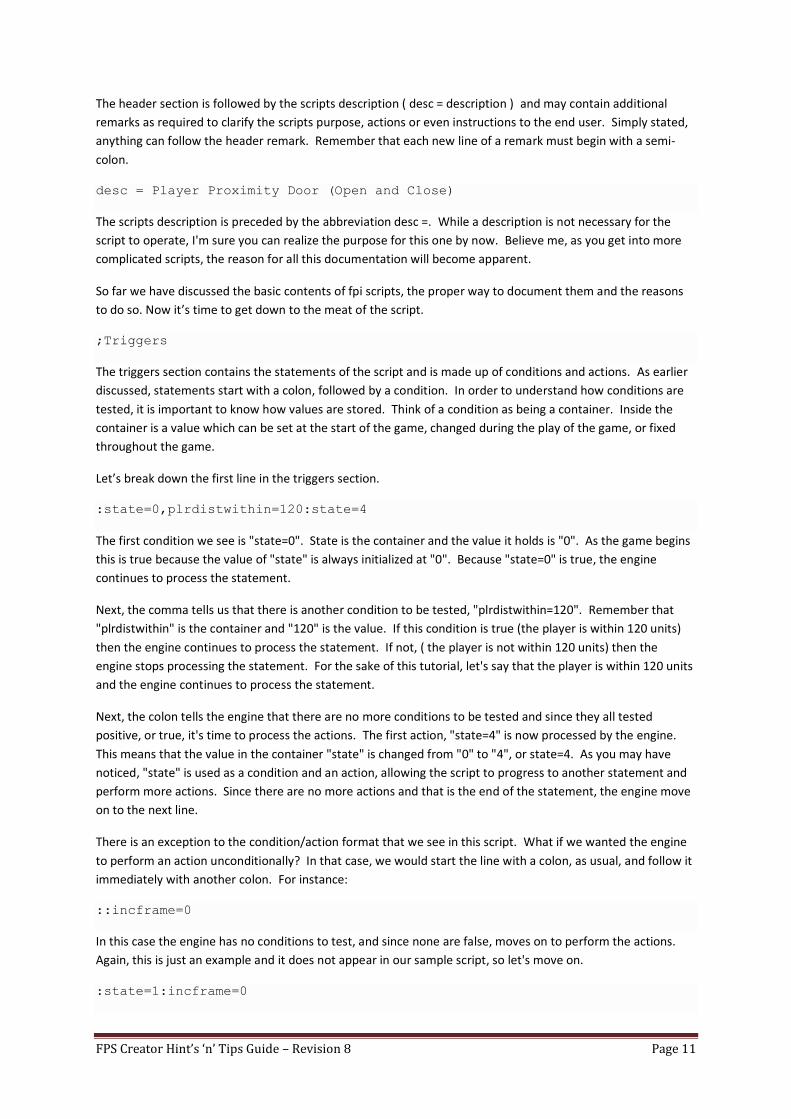
Let’s break down the first line in the triggers section.
:state=0,plrdistwithin=120:state=4
The first condition we see is "state=0". State is the container and the value it holds is "0". As the game begins
this is true because the value of "state" is always initialized at "0". Because "state=0" is true, the engine
continues to process the statement.
Next, the comma tells us that there is another condition to be tested, "plrdistwithin=120". Remember that
"plrdistwithin" is the container and "120" is the value. If this condition is true (the player is within 120 units)
then the engine continues to process the statement. If not, ( the player is not within 120 units) then the
engine stops processing the statement. For the sake of this tutorial, let's say that the player is within 120 units
and the engine continues to process the statement.
Next, the colon tells the engine that there are no more conditions to be tested and since they all tested
positive, or true, it's time to process the actions. The first action, "state=4" is now processed by the engine.
This means that the value in the container "state" is changed from "0" to "4", or state=4. As you may have
noticed, "state" is used as a condition and an action, allowing the script to progress to another statement and
perform more actions. Since there are no more actions and that is the end of the statement, the engine move
on to the next line.
There is an exception to the condition/action format that we see in this script. What if we wanted the engine
to perform an action unconditionally? In that case, we would start the line with a colon, as usual, and follow it
immediately with another colon. For instance:
::incframe=0
In this case the engine has no conditions to test, and since none are false, moves on to perform the actions.
Again, this is just an example and it does not appear in our sample script, so let's move on.
:state=1:incframe=0
FPS Creator Hint’s ‘n’ Tips Guide – Revision 8 Page 12
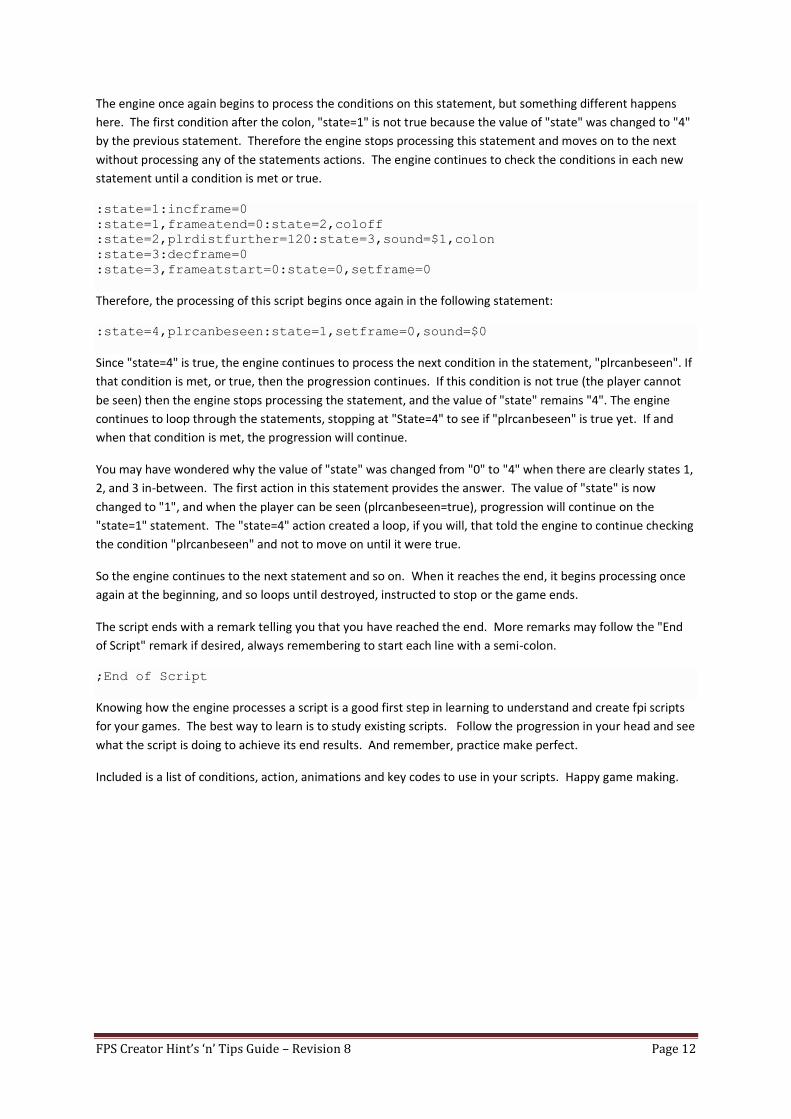
The engine once again begins to process the conditions on this statement, but something different happens
here. The first condition after the colon, "state=1" is not true because the value of "state" was changed to "4"
by the previous statement. Therefore the engine stops processing this statement and moves on to the next
without processing any of the statements actions. The engine continues to check the conditions in each new
statement until a condition is met or true.
:state=1:incframe=0
:state=1,frameatend=0:state=2,coloff
:state=2,plrdistfurther=120:state=3,sound=$1,colon
:state=3:decframe=0
:state=3,frameatstart=0:state=0,setframe=0
Therefore, the processing of this script begins once again in the following statement:
:state=4,plrcanbeseen:state=1,setframe=0,sound=$0
Since "state=4" is true, the engine continues to process the next condition in the statement, "plrcanbeseen". If
that condition is met, or true, then the progression continues. If this condition is not true (the player cannot
be seen) then the engine stops processing the statement, and the value of "state" remains "4". The engine
continues to loop through the statements, stopping at "State=4" to see if "plrcanbeseen" is true yet. If and
when that condition is met, the progression will continue.
You may have wondered why the value of "state" was changed from "0" to "4" when there are clearly states 1,
2, and 3 in-between. The first action in this statement provides the answer. The value of "state" is now
changed to "1", and when the player can be seen (plrcanbeseen=true), progression will continue on the
"state=1" statement. The "state=4" action created a loop, if you will, that told the engine to continue checking
the condition "plrcanbeseen" and not to move on until it were true.
So the engine continues to the next statement and so on. When it reaches the end, it begins processing once
again at the beginning, and so loops until destroyed, instructed to stop or the game ends.
The script ends with a remark telling you that you have reached the end. More remarks may follow the "End
of Script" remark if desired, always remembering to start each line with a semi-colon.
;End of Script
Knowing how the engine processes a script is a good first step in learning to understand and create fpi scripts
for your games. The best way to learn is to study existing scripts. Follow the progression in your head and see
what the script is doing to achieve its end results. And remember, practice make perfect.
Included is a list of conditions, action, animations and key codes to use in your scripts. Happy game making.
FPS Creator Hint’s ‘n’ Tips Guide – Revision 8 Page 13
Tutorial #1: - Light script explained
By PlystirE
For this first tutorial, we'll be opening up a default script and attempting to FULLY understand how it works.
I've decided to use the "light1.fpi" script due to its simplicity and yet, complex nature.
Open it up in Notepad, or if you so choose, an FPI Editor of your choice. It can be found in the following
directory: FPS Creator/Files/scriptbank
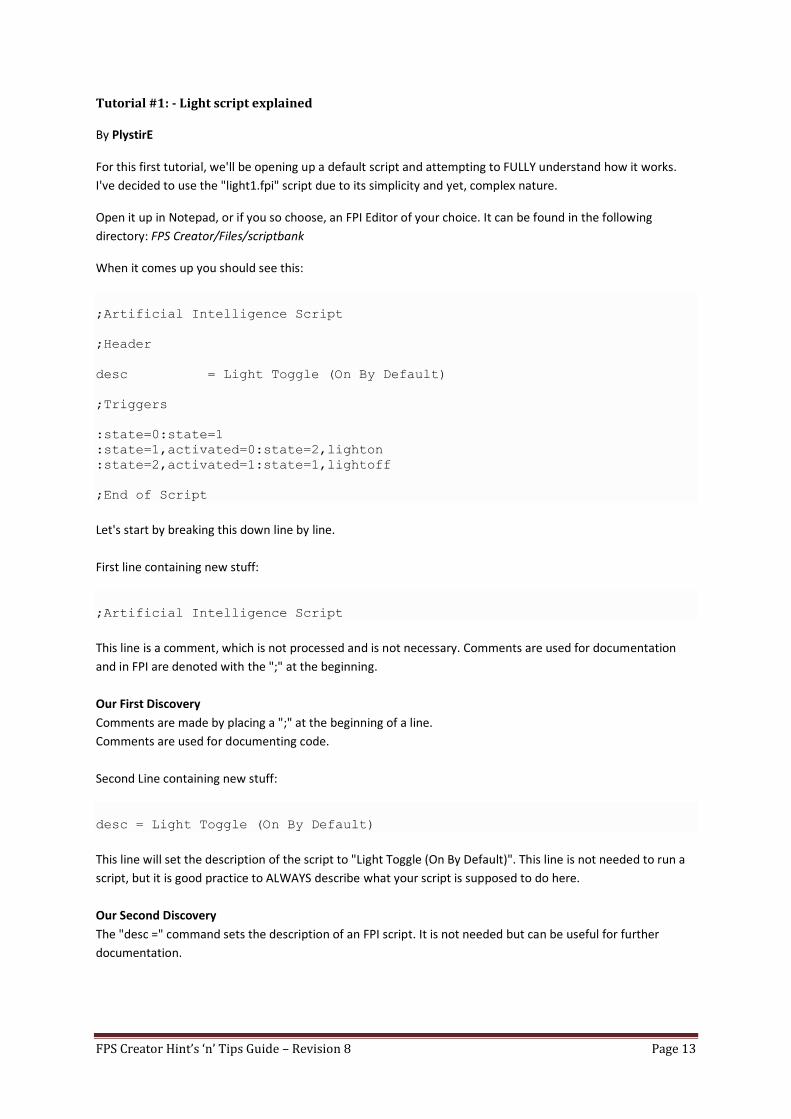
When it comes up you should see this:
;Artificial Intelligence Script
;Header
desc = Light Toggle (On By Default)
;Triggers
:state=0:state=1
:state=1,activated=0:state=2,lighton
:state=2,activated=1:state=1,lightoff
;End of Script
Let's start by breaking this down line by line.
First line containing new stuff:
;Artificial Intelligence Script
This line is a comment, which is not processed and is not necessary. Comments are used for documentation
and in FPI are denoted with the ";" at the beginning.
Our First Discovery
Comments are made by placing a ";" at the beginning of a line.
Comments are used for documenting code.
Second Line containing new stuff:
desc = Light Toggle (On By Default)
This line will set the description of the script to "Light Toggle (On By Default)". This line is not needed to run a
script, but it is good practice to ALWAYS describe what your script is supposed to do here.
Our Second Discovery
The "desc =" command sets the description of an FPI script. It is not needed but can be useful for further
documentation.
FPS Creator Hint’s ‘n’ Tips Guide – Revision 8 Page 14
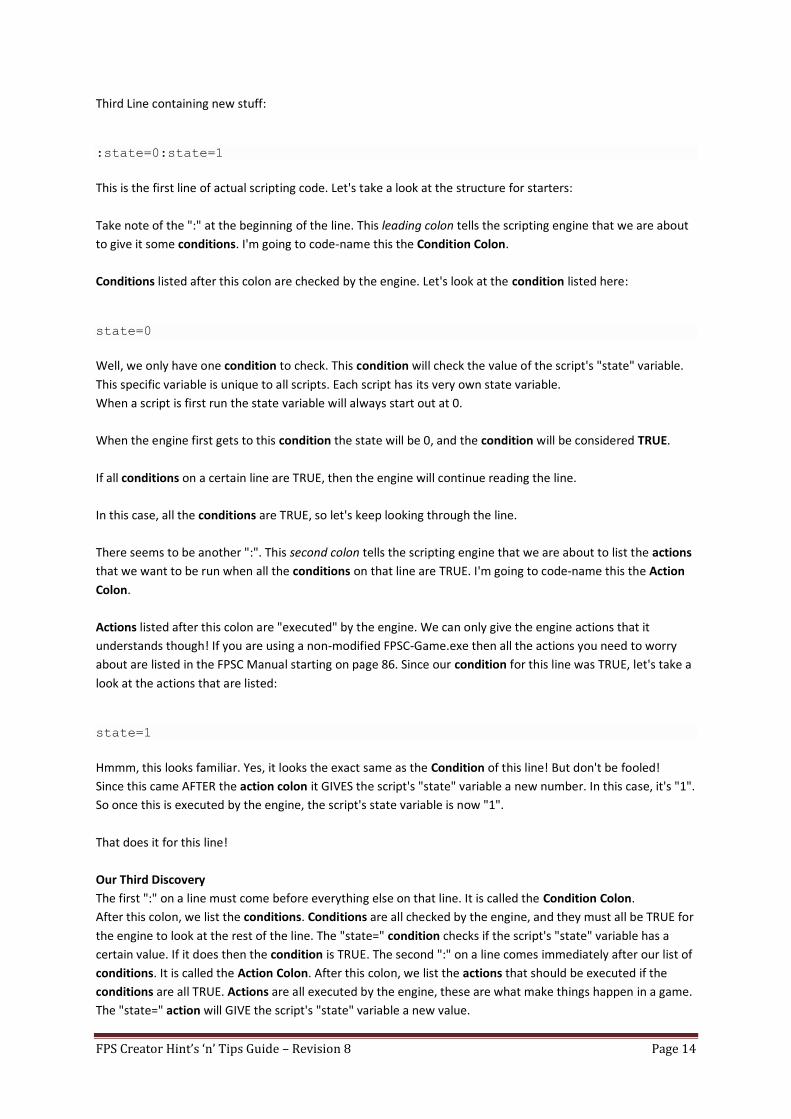
Third Line containing new stuff:
:state=0:state=1
This is the first line of actual scripting code. Let's take a look at the structure for starters:
Take note of the ":" at the beginning of the line. This leading colon tells the scripting engine that we are about
to give it some conditions. I'm going to code-name this the Condition Colon.
Conditions listed after this colon are checked by the engine. Let's look at the condition listed here:
state=0
Well, we only have one condition to check. This condition will check the value of the script's "state" variable.
This specific variable is unique to all scripts. Each script has its very own state variable.
When a script is first run the state variable will always start out at 0.
When the engine first gets to this condition the state will be 0, and the condition will be considered TRUE.
If all conditions on a certain line are TRUE, then the engine will continue reading the line.
In this case, all the conditions are TRUE, so let's keep looking through the line.
There seems to be another ":". This second colon tells the scripting engine that we are about to list the actions
that we want to be run when all the conditions on that line are TRUE. I'm going to code-name this the Action
Colon.
Actions listed after this colon are "executed" by the engine. We can only give the engine actions that it
understands though! If you are using a non-modified FPSC-Game.exe then all the actions you need to worry
about are listed in the FPSC Manual starting on page 86. Since our condition for this line was TRUE, let's take a
look at the actions that are listed:
state=1
Hmmm, this looks familiar. Yes, it looks the exact same as the Condition of this line! But don't be fooled!
Since this came AFTER the action colon it GIVES the script's "state" variable a new number. In this case, it's "1".
So once this is executed by the engine, the script's state variable is now "1".
That does it for this line!
Our Third Discovery
The first ":" on a line must come before everything else on that line. It is called the Condition Colon.
After this colon, we list the conditions. Conditions are all checked by the engine, and they must all be TRUE for
the engine to look at the rest of the line. The "state=" condition checks if the script's "state" variable has a
certain value. If it does then the condition is TRUE. The second ":" on a line comes immediately after our list of
conditions. It is called the Action Colon. After this colon, we list the actions that should be executed if the
conditions are all TRUE. Actions are all executed by the engine, these are what make things happen in a game.
The "state=" action will GIVE the script's "state" variable a new value.
FPS Creator Hint’s ‘n’ Tips Guide – Revision 8 Page 15
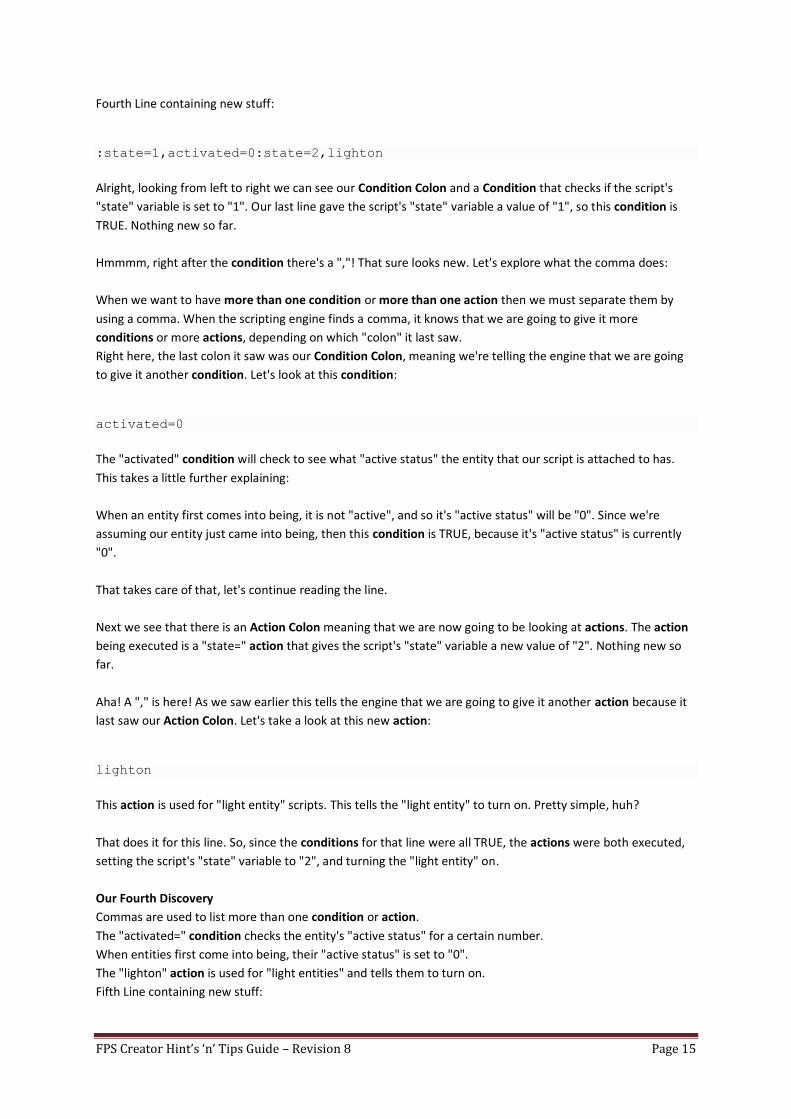
Fourth Line containing new stuff:
:state=1,activated=0:state=2,lighton
Alright, looking from left to right we can see our Condition Colon and a Condition that checks if the script's
"state" variable is set to "1". Our last line gave the script's "state" variable a value of "1", so this condition is
TRUE. Nothing new so far.
Hmmmm, right after the condition there's a ","! That sure looks new. Let's explore what the comma does:
When we want to have more than one condition or more than one action then we must separate them by
using a comma. When the scripting engine finds a comma, it knows that we are going to give it more
conditions or more actions, depending on which "colon" it last saw.
Right here, the last colon it saw was our Condition Colon, meaning we're telling the engine that we are going
to give it another condition. Let's look at this condition:
activated=0
The "activated" condition will check to see what "active status" the entity that our script is attached to has.
This takes a little further explaining:
When an entity first comes into being, it is not "active", and so it's "active status" will be "0". Since we're
assuming our entity just came into being, then this condition is TRUE, because it's "active status" is currently
"0".
That takes care of that, let's continue reading the line.
Next we see that there is an Action Colon meaning that we are now going to be looking at actions. The action
being executed is a "state=" action that gives the script's "state" variable a new value of "2". Nothing new so
far.
Aha! A "," is here! As we saw earlier this tells the engine that we are going to give it another action because it
last saw our Action Colon. Let's take a look at this new action:
lighton
This action is used for "light entity" scripts. This tells the "light entity" to turn on. Pretty simple, huh?
That does it for this line. So, since the conditions for that line were all TRUE, the actions were both executed,
setting the script's "state" variable to "2", and turning the "light entity" on.
Our Fourth Discovery
Commas are used to list more than one condition or action.
The "activated=" condition checks the entity's "active status" for a certain number.
When entities first come into being, their "active status" is set to "0".
The "lighton" action is used for "light entities" and tells them to turn on.
Fifth Line containing new stuff:
FPS Creator Hint’s ‘n’ Tips Guide – Revision 8 Page 16
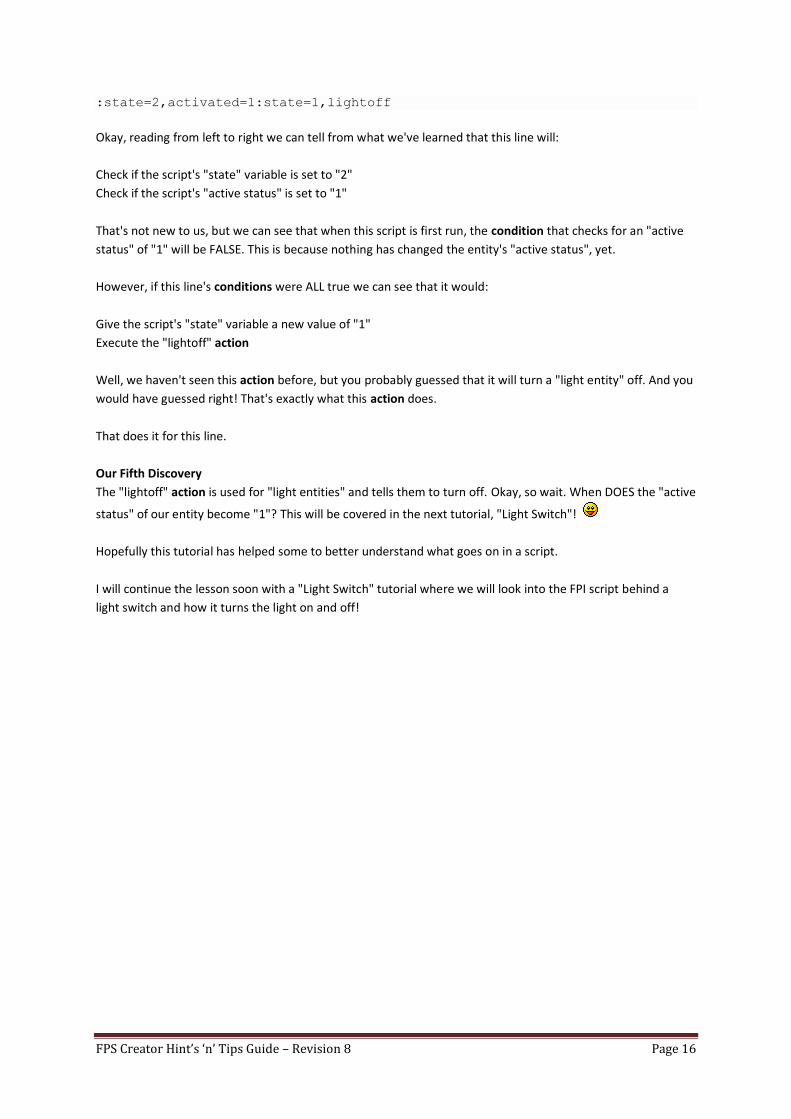
:state=2,activated=1:state=1,lightoff
Okay, reading from left to right we can tell from what we've learned that this line will:
Check if the script's "state" variable is set to "2"
Check if the script's "active status" is set to "1"
That's not new to us, but we can see that when this script is first run, the condition that checks for an "active
status" of "1" will be FALSE. This is because nothing has changed the entity's "active status", yet.
However, if this line's conditions were ALL true we can see that it would:
Give the script's "state" variable a new value of "1"
Execute the "lightoff" action
Well, we haven't seen this action before, but you probably guessed that it will turn a "light entity" off. And you
would have guessed right! That's exactly what this action does.
That does it for this line.
Our Fifth Discovery
The "lightoff" action is used for "light entities" and tells them to turn off. Okay, so wait. When DOES the "active
status" of our entity become "1"? This will be covered in the next tutorial, "Light Switch"!
Hopefully this tutorial has helped some to better understand what goes on in a script.
I will continue the lesson soon with a "Light Switch" tutorial where we will look into the FPI script behind a
light switch and how it turns the light on and off!
FPS Creator Hint’s ‘n’ Tips Guide – Revision 8 Page 17
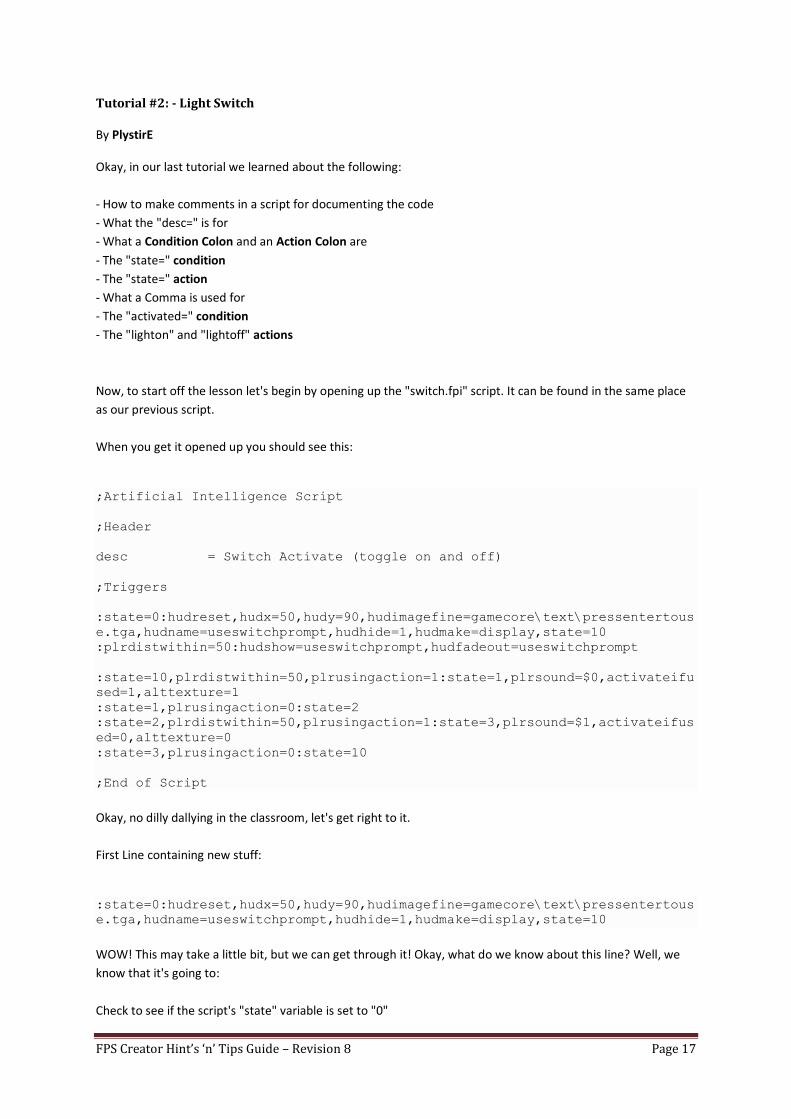
Tutorial #2: - Light Switch
By PlystirE
Okay, in our last tutorial we learned about the following:
- How to make comments in a script for documenting the code
- What the "desc=" is for
- What a Condition Colon and an Action Colon are
- The "state=" condition
- The "state=" action
- What a Comma is used for
- The "activated=" condition
- The "lighton" and "lightoff" actions
Now, to start off the lesson let's begin by opening up the "switch.fpi" script. It can be found in the same place
as our previous script.
When you get it opened up you should see this:
;Artificial Intelligence Script
;Header
desc = Switch Activate (toggle on and off)
;Triggers
:state=0:hudreset,hudx=50,hudy=90,hudimagefine=gamecore\text\pressentertous
e.tga,hudname=useswitchprompt,hudhide=1,hudmake=display,state=10
:plrdistwithin=50:hudshow=useswitchprompt,hudfadeout=useswitchprompt
:state=10,plrdistwithin=50,plrusingaction=1:state=1,plrsound=$0,activateifu
sed=1,alttexture=1
:state=1,plrusingaction=0:state=2
:state=2,plrdistwithin=50,plrusingaction=1:state=3,plrsound=$1,activateifus
ed=0,alttexture=0
:state=3,plrusingaction=0:state=10
;End of Script
Okay, no dilly dallying in the classroom, let's get right to it.
First Line containing new stuff:
:state=0:hudreset,hudx=50,hudy=90,hudimagefine=gamecore\text\pressentertous
e.tga,hudname=useswitchprompt,hudhide=1,hudmake=display,state=10
WOW! This may take a little bit, but we can get through it! Okay, what do we know about this line? Well, we
know that it's going to:
Check to see if the script's "state" variable is set to "0"
FPS Creator Hint’s ‘n’ Tips Guide – Revision 8 Page 18
Then if that condition is true, it will execute the actions listed after the Action Colon.
But... hold on a sec. What exactly do all those actions do? Let me start this little endeavour of knowledge by
first explaining about HUDs:
Images that are going to be put onto the screen and not into the 3D world are called HUDs in FPSC. This line, as
we will soon find out, creates a very small HUD. How does it do that? Let's look at the first action taking place:
Hudreset
This action tells the engine to prepare itself to load up a brand spankin' new HUD. This will allow you to further
describe how the new HUD should be loaded without messing with previously loaded HUDs.
Now that our engine is ready to load up our new HUD let's start looking at the rest of the actions.
hudx=50
Okay, this action tells the engine that the HUD about to be loaded is going to be centered at the 50% mark of
our screen's width. Some of you may be thinking "Huh?!?" so I'll elaborate.
The screen's width is the size of the screen horizontally. This is given by your game's resolution. This action
tells the engine that you want the hud to be centered halfway (50%) across the screen.
That's it for that action. Next is:
hudy=90
This is similar to the previous action except it positions our soon to be loaded HUD vertically. In this case we
want the HUD to be 90% down the screen. That'll put it ALMOST at the bottom.
Next action in line is:
hudimagefine=gamecore\text\pressentertouse.tga
This one tells the engine that we're wanting to load an "image" of "fine" quality into our HUD. That image is
going to be found at the path provided to this action.
But wait... where's the "C:\Program Files\" etc.? The script assumes that it's already looking in the "FPSC
Creator\Files" folder. So, we can leave off the folders BEFORE that and just skip to the path inside of the "Files"
folder. In this particular case our image would be located in the "FPSC Creator\Files\gamecore\text" folder,
and the image to be loaded is the "pressentertouse.tga" file.
Now that our HUD has an image in it, what else is there?
hudname=useswitchprompt
This action gives a name to our HUD. The name chosen is "useswitchprompt". It's also wise to give slightly
FPS Creator Hint’s ‘n’ Tips Guide – Revision 8 Page 19
descriptive names to your HUDs so that while you're scripting you won't get confused between loaded HUDs.
That was pretty simple, next action is:
hudhide=1
This action immediately hides the HUD from view. In our "Light Switch" example, we don't want the player to
see the HUD if they're nowhere NEAR the switch, so we hide it from the get go.
Another easy one. Let's see here, next is:
hudmake=display
This one can be troublesome to first time scripters. It is the final word in loading up a new HUD, because it is
the last action to be executed when loading one! So what does the "=display" mean? And what else could it
equal?
Well, let's say this, you execute this command to finish loading your HUD and it also tells the engine how to
treat the HUD. This time, it told the engine that it's just going to be a "display" HUD, meaning that it won't do
anything special but be displayed.
Out of shear completion of this tutorial here are the other values you can set this equal to: pointer, button,
status, internal, numeric, anim, edit, list, ipaddress, winnersname
I will not elaborate on the use of each one in this tutorial as it deviates from the scope.
After that action we can see that it will then give the script's "state" command a new value of "10".
Our First Discovery (And what a discovery it is)
The "hudreset" action readies the engine to load a new HUD.
The "hudx=" action positions the new HUD horizontally by a percentage of the screen's width.
The "hudy=" action positions the new HUD vertically by a percentage of the screen's height.
The "hudimagefine=" action loads an image using fine quality into the new HUD.
The "hudname=" action gives the new HUD a name that we can use for scripting later.
The "hudhide=" action will immediately hide the HUD from view.
The "hudmake=" action will complete the loading process by telling the engine how to treat the new HUD.
Second Line containing new stuff:
:plrdistwithin=50:hudshow=useswitchprompt,hudfadeout=useswitchprompt
Okay, so in this line's condition list we see a new condition:
plrdistwithin=50
This condition will be TRUE if the player is closer than 50 units from the light switch. A good way to
guesstimate a nice distance is to remember that segments are 100 units wide, so this is checking if we're half a
segment away from it.
FPS Creator Hint’s ‘n’ Tips Guide – Revision 8 Page 20
Now onto the action list:
hudshow=useswitchprompt
This action will make the HUD named "useswitchprompt" visible. Remember that "useswitchprompt" is what
we named the HUD that we loaded. So, now the HUD is visible!
hudfadeout=useswitchprompt
This action will cause the HUD named "useswitchprompt" to fade away and become hidden from view.
But... wait just a second. I thought we wanted to SEE the HUD! How come we're making it fade away right
after we show it?
Let's take a quick time-out to discuss something.
It is CRUCIAL to understand that the script is not run just once per game! It is, in fact, looked through by the
engine MANY times per second. So while you are writing your script, pretend that as soon as the engine
finishes reading the last line of script that it will immediately start back at the top. Even though you didn't
realise it, the engine has already gone and read through every other script in your game as well! So keep that
in mind when scripting.
So what does that mean here? It means that the engine will show us the HUD and then BEGIN to fade it away
immediately. But it comes back and shows us the HUD once again before it even had a chance to fade. This will
make it appear as though the HUD is not fading away.
So then, why tell it to fade away if it's not going to really fade? Because as soon as the condition for this line is
FALSE, meaning our player is further from the switch than 50 units, then the "fadeout" action will have a
chance to fade it out and hide it, making it look very smooth and appealing.
Our Second Discovery
The "plrdistwithin=" condition will check to see if the player is within a certain amount of units from the entity.
The "hudshow=" action will tell the engine to make a HUD with a specified name visible to the player.
The "hudfadeout=" action will tell the engine to make a HUD start to fade away.
Third Line containing new stuff:
:state=10,plrdistwithin=50,plrusingaction=1:state=1,plrsound=$0,activateifu
sed=1,alttexture=1
Okay, so this line checks to see if the script's "state" variable is set to "10", then check to see if the player is
within 50 units of the entity, and THEN:
plrusingaction=1
This condition will check to see if the player is currently pushing the "Use" or "Action" key... I prefer to call it
the "Use" key so as not to get mixed up with scripting terminology. The default Use Key is the "Enter" key.
If the player is pressing this key then the "plrusingaction" will be a "1", if not, it will be a "0".
FPS Creator Hint’s ‘n’ Tips Guide – Revision 8 Page 21
So, our line continues, and if our list of conditions are all TRUE, then it will set the script's "state" variable to a
new value of "1", and then:
plrsound=$0
This action will play a sound. What sound will it play? Well we gave it a "$0" so what does that mean? Let's
look at the properties of the switch entity we are giving this to. If you scroll to the bottom of the list of
properties for the switch, you'll see two fields labelled "Sound0" and "Sound1". By giving this action the value
of "$0" it will play the sound in the "Sound0" field of that entity. Like-wise, if you gave this action a value of
"$1" it would play the sound in the "Sound1" field.
Okay, that's simple enough, right? Now let's look at:
activateifused=1
Aha! Here we are, the action that makes it all work! Go back to the properties of your switch entity. You will
see a field in the "AI Automated" section called "If Used". This action will look for any and ALL entities in your
level that have EXACTLY that name, and set their "active status" to whatever number you give. In this case it
will set the "active status" of those entities to "1".
This, ladies and gentlemen, is how our Light from Tutorial #1 will get an "active status" of "1". Simply give the
switch entities "If Used" field the name of the light.
One more action to look at for this line:
alttexture=1
Okay, back to the properties we go! Under the "Optional Visuals" section you'll see a field named "Texture"
and a field named "Alt Texture". If we gave this action a value of "0" it would texture the entity with whatever
texture is in the "Texture" field. But, since we gave it a value of "1" then it will texture the entity with whatever
texture is given in the "Alt Texture" field.
It is important to note that the texture an entity has when it first comes into being is the texture given in the
"Texture" field.
Our Third Discovery
The "plrusingaction=" condition will check to see if the player is pressing the "Use" key on the keyboard. If they
are, then it will be a value of "1", if not then it will be "0".
The "plrsound=" action takes two values. "$0" and "$1" which correspond to the fields "Sound0" and "Sound1"
in the entity's properties. It plays the sound within the matching field.
The "activateifused=" action will set the "active status" of all entities, whose names match the name given in
the entity's "If Used" field of the properties, to a specific value.
The "alttexture=" action takes two values. "0" and "1" which correspond to the fields "Texture" and "Alt
Texture" in the entity's properties. It textures the entity with the texture specified in the matching field.
What's this?! We're done?!?! Yes! There are no more new conditions or actions in this script. But, just to clear
up any haziness here, let's give a basic description of what's going to go on here:
The script loads in a new HUD and calls it "useswitchprompt". If the player comes within 50 units of the switch
that has this script, then it will display the HUD.
FPS Creator Hint’s ‘n’ Tips Guide – Revision 8 Page 22
The HUD will fade away if the player walks out of range from the switch.
If the player is within 50 units of the switch and is pressing the Use key, it will activate the entities in its "If
Used" field with a value of "1", play a sound specified in the "Sound0" field, and texture itself with the texture
specified in the "Alt Texture" field.
To keep the switch from toggling too fast, we will wait until the player is NOT pressing the Use key, before
moving on.
If the player is within 50 units of the switch and is pressing the Use key again, it will activate the entities in its
"If Used" field with a value of "0", play a sound specified in the "Sound1" field, and texture itself with the
texture specified in the "Texture" field.
Then, it waits for the player to stop pushing the Use key, and goes back to waiting for the player to press the
Use key to activate the "If Used" field entities with a value of "1".
As you can see, it is effectively looping itself to turn on and off our Light! (Or whatever you want it to turn on
and off)
This concludes Tutorial #2.
Hope I was able to get some novice scripters on their way to scripting greatness!
If anyone would like a tutorial, please ask and I will consider if I have time to discuss it, but if the tutorial would
exceed the scope of this thread (Complete Newbs) then I may have to make a new thread for it.
Good luck out there, guys!
FPS Creator Hint’s ‘n’ Tips Guide – Revision 8 Page 23
Tutorial #3: - Half-Life AutoMed
By PlystirE
I decided that I don't like the current script for the Automed they give us in the scifi section. I want it more like
the Med Units in Half-Life. So in today's lesson, we're going to come up with a script that will do the following:
Give the player health, 1 unit at a time
Continually give health as long as the player has the Use Key held down
Loop a sound while the med unit is giving health
Won't give the player more health than they are supposed to have
Will ONLY give up to 100 health to the player before "running out" (This will keep the player from
camping the automed device and being immortal)
First things first, we want the automed to give health. So let's look in our trusty manual and find an action
that'll do that for us. After a little searching I found this action that will do just nicely:
plraddhealth=X
This action will give the player an amount of health equal to X. So if we want to give the player 10 health right
away the action would read "plraddhealth=10". Simple, right? ... Right.
Okay, we also want this thing to loop a sound while it's pumping our players full of med dopamine. Let's see,
the manual says that this action will do the trick:
loopsound=X
Sound actions can work in two different ways. Just like the "sound=" action that we covered in Tutorial 2,
where X would equal "$0" or "$1" and we would put the sound in the entity's properties. But any sound action
can also be given a specific path to a sound file! Remember, the engine assumes that the current directory is
the "Files" directory. So, in general the current directory would be the "C:/Program Files/The Game
Creators/FPS Creator/Files" directory. From there we would be able to give it a specific path to any sound in
the "audiobank" folder. Example would be: "audiobank/items/healthup.wav"
Alright, so now we know the commands to give the player some health and to loop a sound. What about when
the player decides they had enough health for now and stop pressing the Use Key? Or when the unit runs out
of that fine dine health serum? We got to stop that sound or it'll just keep on looping! Well, the manual
doesn't have this action listed so I'll fill you guys in. In order to "stop sounds" the command is:
stopsound
And it does exactly what it sounds like. No values needed. Just use that action and your looping sound will
stop. Hurray!
FPS Creator Hint’s ‘n’ Tips Guide – Revision 8 Page 24
Let's start up our script! Open a new Notepad file and type this in:
;The Half-Life Automed Unit, Tutorial #3
;Header
desc = AutoMed Station
;Triggers
Well, let's start brainstorming for a minute on how we're going to do this.
First, we need to see if the player is in range of using our AutoMed. After all, we don't want them to be
accessing free bodyjuice telepathically from the basement when our AutoMed is on the top floor! Let's say if
the player is within 100 units (1 segment width) then they can use it. So to start off let's put in a condition to
check for the "state" variable at 0 (Since it just came into being and check for the player being within 100 units.
The line should look like this so far:
:state=0,plrdistwithin=100
Don't put in the Action Colon just yet, we still have more things to check for!
If we left it like that and started pumping out sweet syringical goodness then the player would need only run
up to the automed and it'd start doing it without the player pushing a button! Well, you could do that if you
want, just leave off this next piece:
Check for the player pushing down the Use Key. You remember that condition, right? That was in Tutorial #2
for flipping the light switch! Same deal here, we'll use the "plrusingaction=X" condition! Now, we want to
know if they ARE pushing it so X would be equal to "1", right?
So after we put that in our line looks like this:
:state=0,plrdistwithin=100,plrusingaction=1
Hmmm, well, that sounds good for right now. If all those conditions are true, then we need to give the
deserving player some loving! And by that, I mean health.
Put in the Action Colon now so we can move onto executing some actions.
We said we wanted to give health to them 1 unit at a time, so we'll use the "plraddhealth=X" action where X is
gonna equal "1".
We also said that we wanted to loop a sound while the player was getting their health, se we'll use the
"loopsound=X" action.
I took a listen at all the sounds in the audiobank and I thought that the "acidhum.wav" sounded the best for
my health looping purposes. You may not think so, so if you'd like you can go find a sound more suitable to
your needs.
The file I wanted is in the "audiobank/atmos" directory.
Adding those two actions onto our first line we should have what looks like this:
FPS Creator Hint’s ‘n’ Tips Guide – Revision 8 Page 25
:state=0,plrdistwithin=100,plrusingaction=1:plraddhealth=1,loopsound=audiob
ank/atmos/acidhum.wav
Awesome, now when the player gets in range of the Automed and presses (and holds) the Use Key, they'll get
health and hear a cool looping sound to boot!
But wait, we can't run this just yet. What was that other command we just learned about? The one NOT in the
manual? That's right, we got to stop the looping sound when the player's not getting anymore health!
So when should we stop the sound? When the player isn't using the Automed anymore, right? ...Right!
Let's make a new line and check for the player NOT pressing the Use Key. Then in our Action List we'll just tell
the sound to stop. We'll get something looking like this to start with:
:state=0,plrusingaction=0:stopsound
Okay, just using those two lines our Automed will work! But, unfortunately, it won't work the way we want it
to. What's wrong with it? Well, let's take a moment to "idiot proof" our script, as it's said in the professional
realm.
Q. What if a player was to walk up to our Automed, hold down the Use Key, then walk away from it?
A. The player would stop getting health, but the sound would not stop until the player released the Use Key!
That's a problem, as it makes our Automed very amateurish. So, let's make a new line that will check for the
player being further than 100 units from our Automed and then stop the sound if they are.
Well, we haven't yet covered how to detect if the player is FURTHER than a certain distance from the entity, so
let's look in the manual. The manual gives us this condition to detect if the player is FURTHER than a certain
distance from the entity:
plrdistfurther=X
Yes, it is very self-explanatory. Use this condition to find out if the player is further than X units from the entity.
Let's use that condition and finish up our line of code to get something that looks like this:
:state=0,plrdistfurther=100:stopsound
Great! Now the sound will stop when the player runs away from our Automed! Problem solved. Using just
what we have now, we'll discover yet another setback, but nothing us scripters can't handle!
Q. What's wrong now?
A. The player can indeed use our Automed to get health and the sound is just perfect, but the Automed
doesn't STOP giving us health!
How do we get around this? Well, we'll need a way to keep track of how much health our Automed has given
the player overall. To do this, we'd need a "variable". Now I know what some of you expert scripters are
probably thinking. "But the only way to get variables is to use empty's mod or to modify the source code
ourselves in V1.0!!!"
Wrong! I do recall that I've used the term "variable" to describe TWO things thus far. Can anyone tell me what
they are? You guessed it, class! The "state" and "active status" variables! Those will allow us to stick in
whatever numbers we want and to detect what number they are! But, only one of those will fit the bill, so to
FPS Creator Hint’s ‘n’ Tips Guide – Revision 8 Page 26
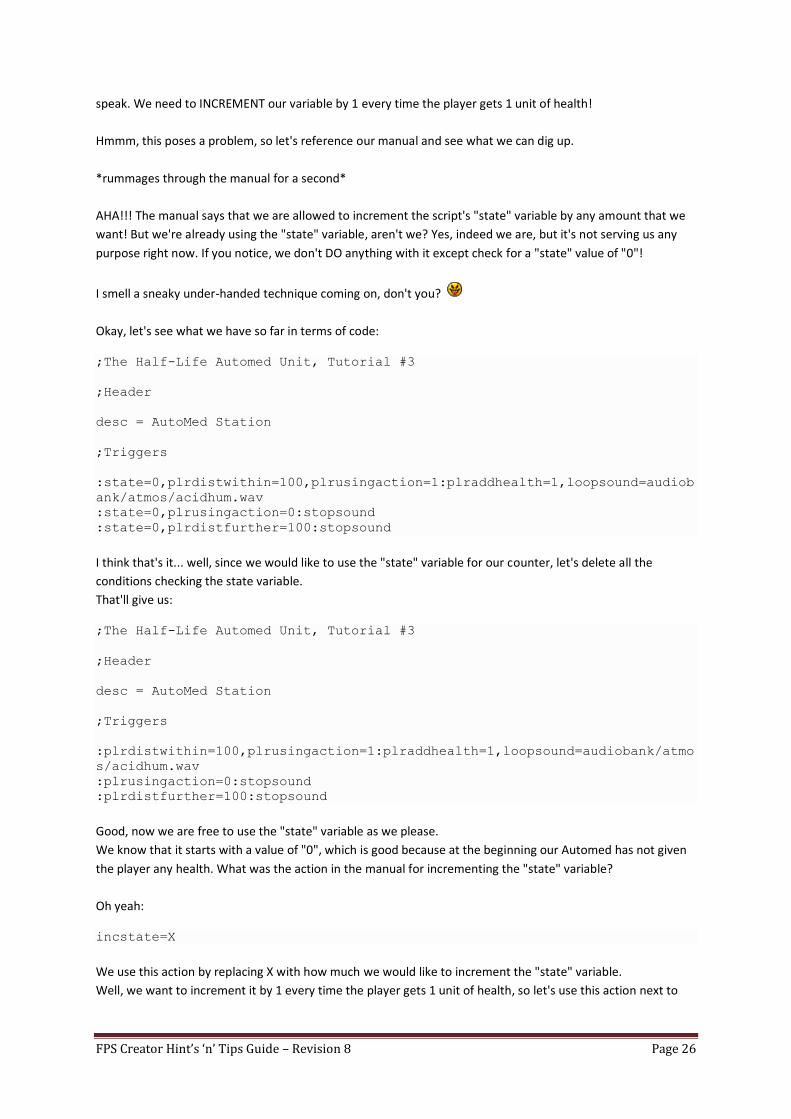
speak. We need to INCREMENT our variable by 1 every time the player gets 1 unit of health!
Hmmm, this poses a problem, so let's reference our manual and see what we can dig up.
*rummages through the manual for a second*
AHA!!! The manual says that we are allowed to increment the script's "state" variable by any amount that we
want! But we're already using the "state" variable, aren't we? Yes, indeed we are, but it's not serving us any
purpose right now. If you notice, we don't DO anything with it except check for a "state" value of "0"!
I smell a sneaky under-handed technique coming on, don't you?
Okay, let's see what we have so far in terms of code:
;The Half-Life Automed Unit, Tutorial #3
;Header
desc = AutoMed Station
;Triggers
:state=0,plrdistwithin=100,plrusingaction=1:plraddhealth=1,loopsound=audiob
ank/atmos/acidhum.wav
:state=0,plrusingaction=0:stopsound
:state=0,plrdistfurther=100:stopsound
I think that's it... well, since we would like to use the "state" variable for our counter, let's delete all the
conditions checking the state variable.
That'll give us:
;The Half-Life Automed Unit, Tutorial #3
;Header
desc = AutoMed Station
;Triggers
:plrdistwithin=100,plrusingaction=1:plraddhealth=1,loopsound=audiobank/atmo
s/acidhum.wav
:plrusingaction=0:stopsound
:plrdistfurther=100:stopsound
Good, now we are free to use the "state" variable as we please.
We know that it starts with a value of "0", which is good because at the beginning our Automed has not given
the player any health. What was the action in the manual for incrementing the "state" variable?
Oh yeah:
incstate=X
We use this action by replacing X with how much we would like to increment the "state" variable.
Well, we want to increment it by 1 every time the player gets 1 unit of health, so let's use this action next to
FPS Creator Hint’s ‘n’ Tips Guide – Revision 8 Page 27
where we give the player 1 unit of health in our first line of code. Just stick it in the list and your first line
should now look like this:
:plrdistwithin=100,plrusingaction=1:incstate=1,plraddhealth=1,loopsound=aud
iobank/atmos/acidhum.wav
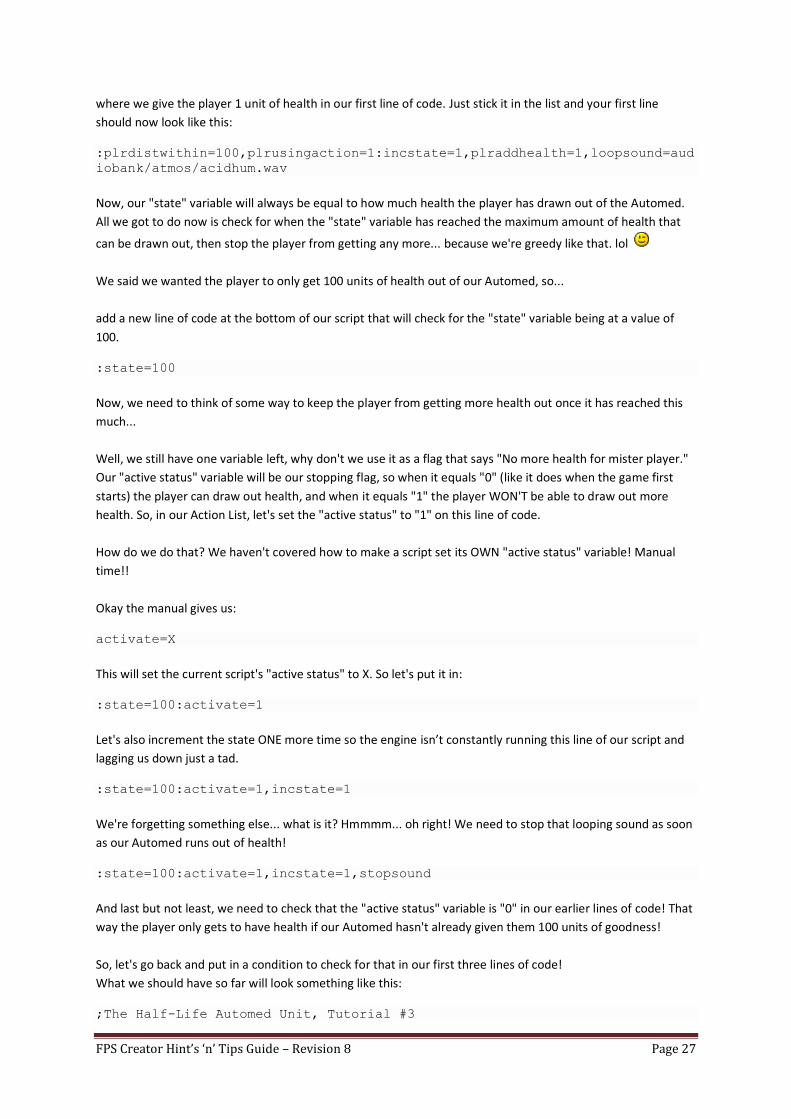
Now, our "state" variable will always be equal to how much health the player has drawn out of the Automed.
All we got to do now is check for when the "state" variable has reached the maximum amount of health that
can be drawn out, then stop the player from getting any more... because we're greedy like that. lol
We said we wanted the player to only get 100 units of health out of our Automed, so...
add a new line of code at the bottom of our script that will check for the "state" variable being at a value of
100.
:state=100
Now, we need to think of some way to keep the player from getting more health out once it has reached this
much...
Well, we still have one variable left, why don't we use it as a flag that says "No more health for mister player."
Our "active status" variable will be our stopping flag, so when it equals "0" (like it does when the game first
starts) the player can draw out health, and when it equals "1" the player WON'T be able to draw out more
health. So, in our Action List, let's set the "active status" to "1" on this line of code.
How do we do that? We haven't covered how to make a script set its OWN "active status" variable! Manual
time!!
Okay the manual gives us:
activate=X
This will set the current script's "active status" to X. So let's put it in:
:state=100:activate=1
Let's also increment the state ONE more time so the engine isn’t constantly running this line of our script and
lagging us down just a tad.
:state=100:activate=1,incstate=1
We're forgetting something else... what is it? Hmmmm... oh right! We need to stop that looping sound as soon
as our Automed runs out of health!
:state=100:activate=1,incstate=1,stopsound
And last but not least, we need to check that the "active status" variable is "0" in our earlier lines of code! That
way the player only gets to have health if our Automed hasn't already given them 100 units of goodness!
So, let's go back and put in a condition to check for that in our first three lines of code!
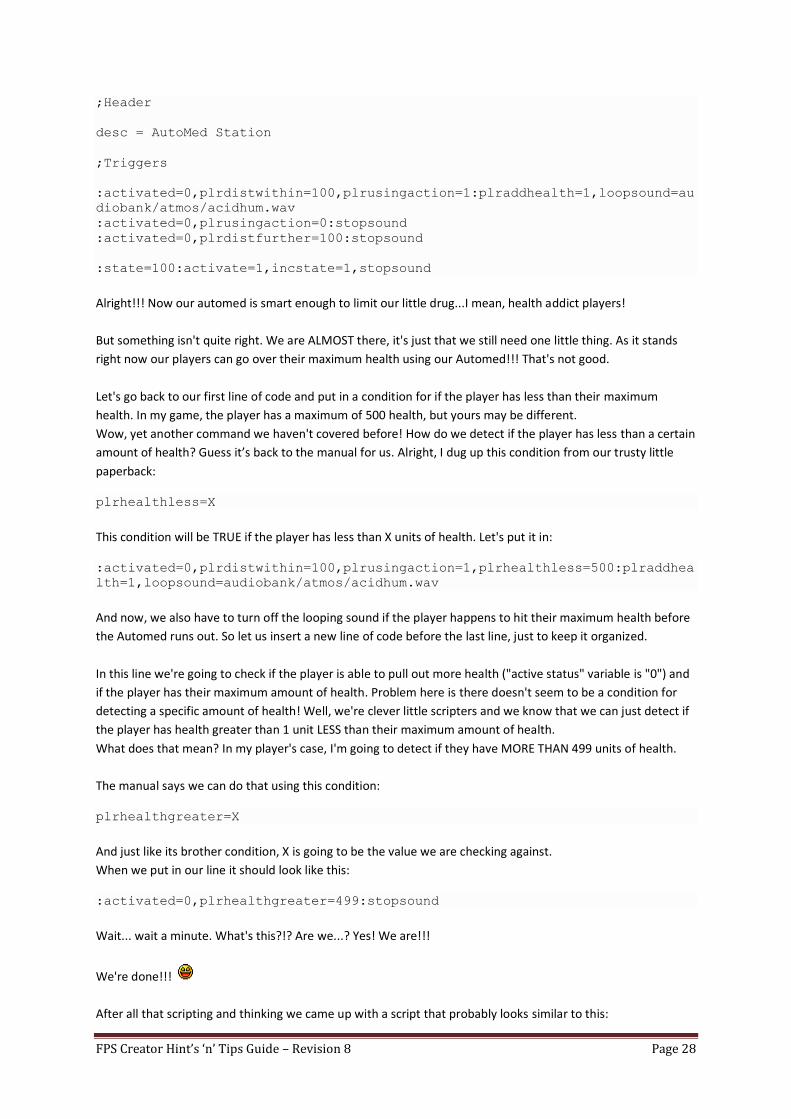
What we should have so far will look something like this:
;The Half-Life Automed Unit, Tutorial #3
FPS Creator Hint’s ‘n’ Tips Guide – Revision 8 Page 28
;Header
desc = AutoMed Station
;Triggers
:activated=0,plrdistwithin=100,plrusingaction=1:plraddhealth=1,loopsound=au
diobank/atmos/acidhum.wav
:activated=0,plrusingaction=0:stopsound
:activated=0,plrdistfurther=100:stopsound
:state=100:activate=1,incstate=1,stopsound
Alright!!! Now our automed is smart enough to limit our little drug...I mean, health addict players!
But something isn't quite right. We are ALMOST there, it's just that we still need one little thing. As it stands
right now our players can go over their maximum health using our Automed!!! That's not good.
Let's go back to our first line of code and put in a condition for if the player has less than their maximum
health. In my game, the player has a maximum of 500 health, but yours may be different.
Wow, yet another command we haven't covered before! How do we detect if the player has less than a certain
amount of health? Guess it’s back to the manual for us. Alright, I dug up this condition from our trusty little
paperback:
plrhealthless=X
This condition will be TRUE if the player has less than X units of health. Let's put it in:
:activated=0,plrdistwithin=100,plrusingaction=1,plrhealthless=500:plraddhea
lth=1,loopsound=audiobank/atmos/acidhum.wav
And now, we also have to turn off the looping sound if the player happens to hit their maximum health before
the Automed runs out. So let us insert a new line of code before the last line, just to keep it organized.
In this line we're going to check if the player is able to pull out more health ("active status" variable is "0") and
if the player has their maximum amount of health. Problem here is there doesn't seem to be a condition for
detecting a specific amount of health! Well, we're clever little scripters and we know that we can just detect if
the player has health greater than 1 unit LESS than their maximum amount of health.
What does that mean? In my player's case, I'm going to detect if they have MORE THAN 499 units of health.
The manual says we can do that using this condition:
plrhealthgreater=X
And just like its brother condition, X is going to be the value we are checking against.
When we put in our line it should look like this:
:activated=0,plrhealthgreater=499:stopsound
Wait... wait a minute. What's this?!? Are we...? Yes! We are!!!
We're done!!!
After all that scripting and thinking we came up with a script that probably looks similar to this:
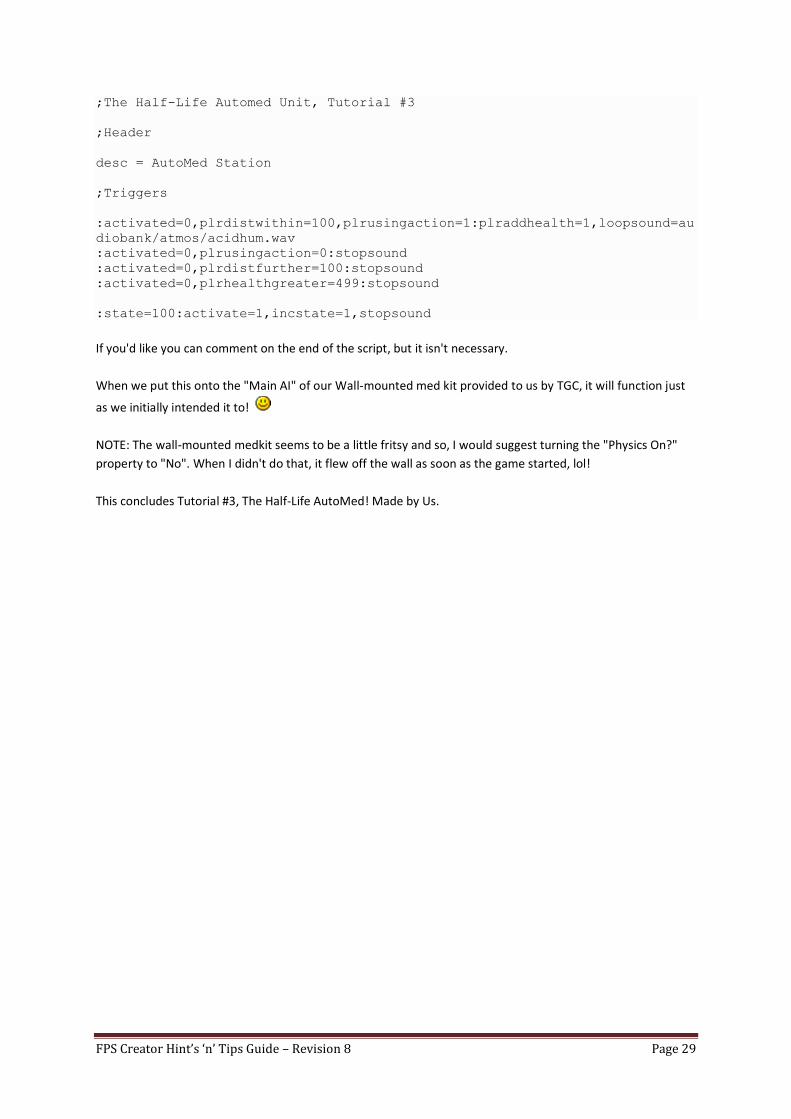
FPS Creator Hint’s ‘n’ Tips Guide – Revision 8 Page 29
;The Half-Life Automed Unit, Tutorial #3
;Header
desc = AutoMed Station
;Triggers
:activated=0,plrdistwithin=100,plrusingaction=1:plraddhealth=1,loopsound=au
diobank/atmos/acidhum.wav
:activated=0,plrusingaction=0:stopsound
:activated=0,plrdistfurther=100:stopsound
:activated=0,plrhealthgreater=499:stopsound
:state=100:activate=1,incstate=1,stopsound
If you'd like you can comment on the end of the script, but it isn't necessary.
When we put this onto the "Main AI" of our Wall-mounted med kit provided to us by TGC, it will function just
as we initially intended it to!
NOTE: The wall-mounted medkit seems to be a little fritsy and so, I would suggest turning the "Physics On?"
property to "No". When I didn't do that, it flew off the wall as soon as the game started, lol!
This concludes Tutorial #3, The Half-Life AutoMed! Made by Us.
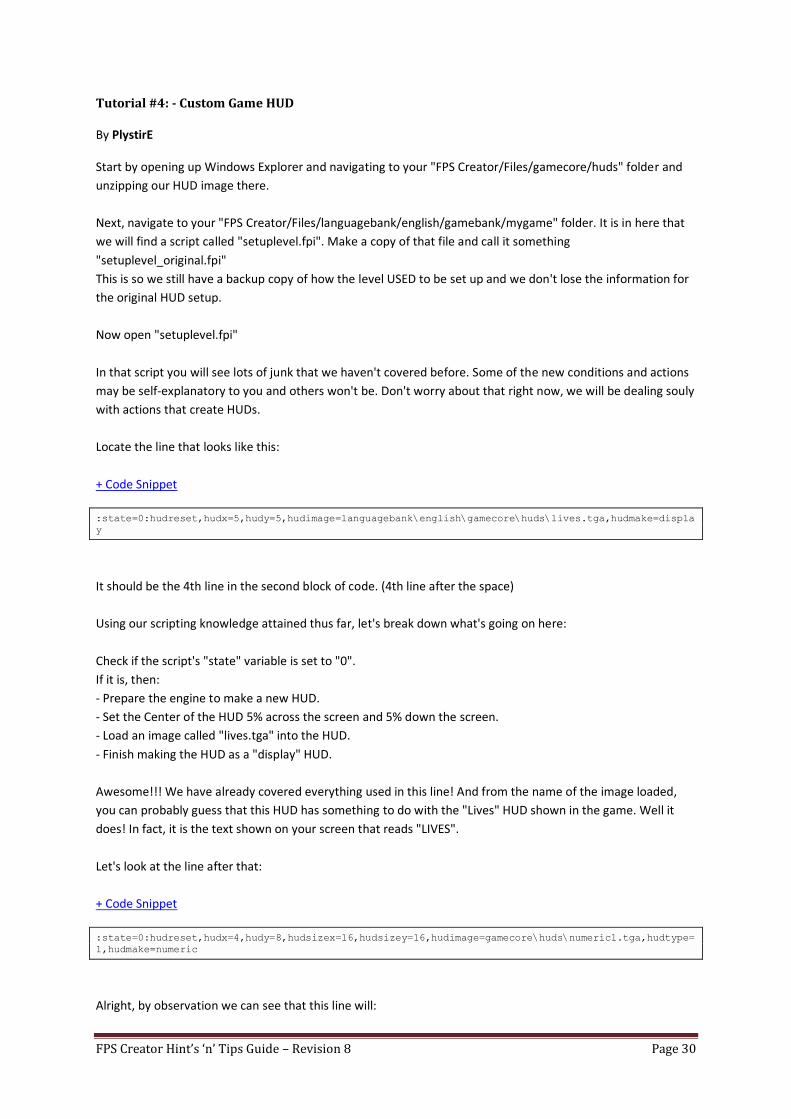
FPS Creator Hint’s ‘n’ Tips Guide – Revision 8 Page 30
Tutorial #4: - Custom Game HUD
By PlystirE
Start by opening up Windows Explorer and navigating to your "FPS Creator/Files/gamecore/huds" folder and
unzipping our HUD image there.
Next, navigate to your "FPS Creator/Files/languagebank/english/gamebank/mygame" folder. It is in here that
we will find a script called "setuplevel.fpi". Make a copy of that file and call it something
"setuplevel_original.fpi"
This is so we still have a backup copy of how the level USED to be set up and we don't lose the information for
the original HUD setup.
Now open "setuplevel.fpi"
In that script you will see lots of junk that we haven't covered before. Some of the new conditions and actions
may be self-explanatory to you and others won't be. Don't worry about that right now, we will be dealing souly
with actions that create HUDs.
Locate the line that looks like this:
+ Code Snippet
:state=0:hudreset,hudx=5,hudy=5,hudimage=languagebank\english\gamecore\huds\lives.tga,hudmake=displa
y
It should be the 4th line in the second block of code. (4th line after the space)
Using our scripting knowledge attained thus far, let's break down what's going on here:
Check if the script's "state" variable is set to "0".
If it is, then:
- Prepare the engine to make a new HUD.
- Set the Center of the HUD 5% across the screen and 5% down the screen.
- Load an image called "lives.tga" into the HUD.
- Finish making the HUD as a "display" HUD.
Awesome!!! We have already covered everything used in this line! And from the name of the image loaded,
you can probably guess that this HUD has something to do with the "Lives" HUD shown in the game. Well it
does! In fact, it is the text shown on your screen that reads "LIVES".
Let's look at the line after that:
+ Code Snippet
:state=0:hudreset,hudx=4,hudy=8,hudsizex=16,hudsizey=16,hudimage=gamecore\huds\numeric1.tga,hudtype=
1,hudmake=numeric
Alright, by observation we can see that this line will:
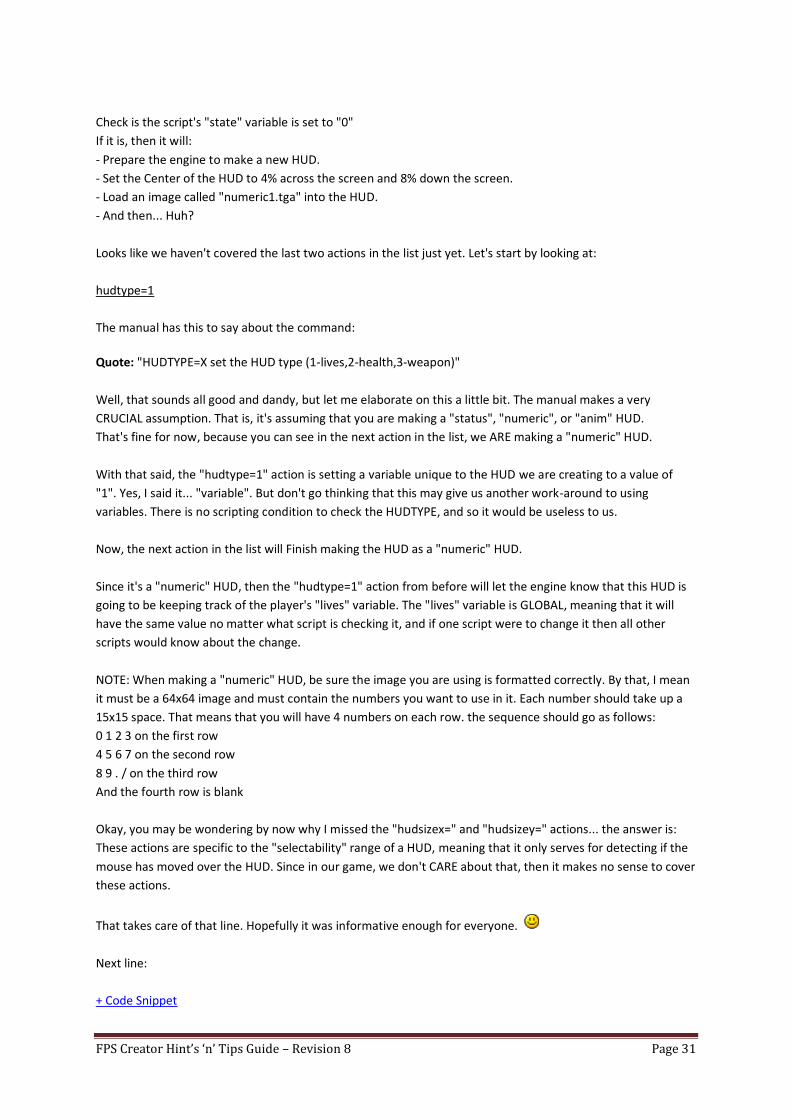
FPS Creator Hint’s ‘n’ Tips Guide – Revision 8 Page 31
Check is the script's "state" variable is set to "0"
If it is, then it will:
- Prepare the engine to make a new HUD.
- Set the Center of the HUD to 4% across the screen and 8% down the screen.
- Load an image called "numeric1.tga" into the HUD.
- And then... Huh?
Looks like we haven't covered the last two actions in the list just yet. Let's start by looking at:
hudtype=1
The manual has this to say about the command:
Quote: "HUDTYPE=X set the HUD type (1-lives,2-health,3-weapon)"
Well, that sounds all good and dandy, but let me elaborate on this a little bit. The manual makes a very
CRUCIAL assumption. That is, it's assuming that you are making a "status", "numeric", or "anim" HUD.
That's fine for now, because you can see in the next action in the list, we ARE making a "numeric" HUD.
With that said, the "hudtype=1" action is setting a variable unique to the HUD we are creating to a value of
"1". Yes, I said it... "variable". But don't go thinking that this may give us another work-around to using
variables. There is no scripting condition to check the HUDTYPE, and so it would be useless to us.
Now, the next action in the list will Finish making the HUD as a "numeric" HUD.
Since it's a "numeric" HUD, then the "hudtype=1" action from before will let the engine know that this HUD is
going to be keeping track of the player's "lives" variable. The "lives" variable is GLOBAL, meaning that it will
have the same value no matter what script is checking it, and if one script were to change it then all other
scripts would know about the change.
NOTE: When making a "numeric" HUD, be sure the image you are using is formatted correctly. By that, I mean
it must be a 64x64 image and must contain the numbers you want to use in it. Each number should take up a
15x15 space. That means that you will have 4 numbers on each row. the sequence should go as follows:
0 1 2 3 on the first row
4 5 6 7 on the second row
8 9 . / on the third row
And the fourth row is blank
Okay, you may be wondering by now why I missed the "hudsizex=" and "hudsizey=" actions... the answer is:
These actions are specific to the "selectability" range of a HUD, meaning that it only serves for detecting if the
mouse has moved over the HUD. Since in our game, we don't CARE about that, then it makes no sense to cover
these actions.
That takes care of that line. Hopefully it was informative enough for everyone.
Next line:
+ Code Snippet
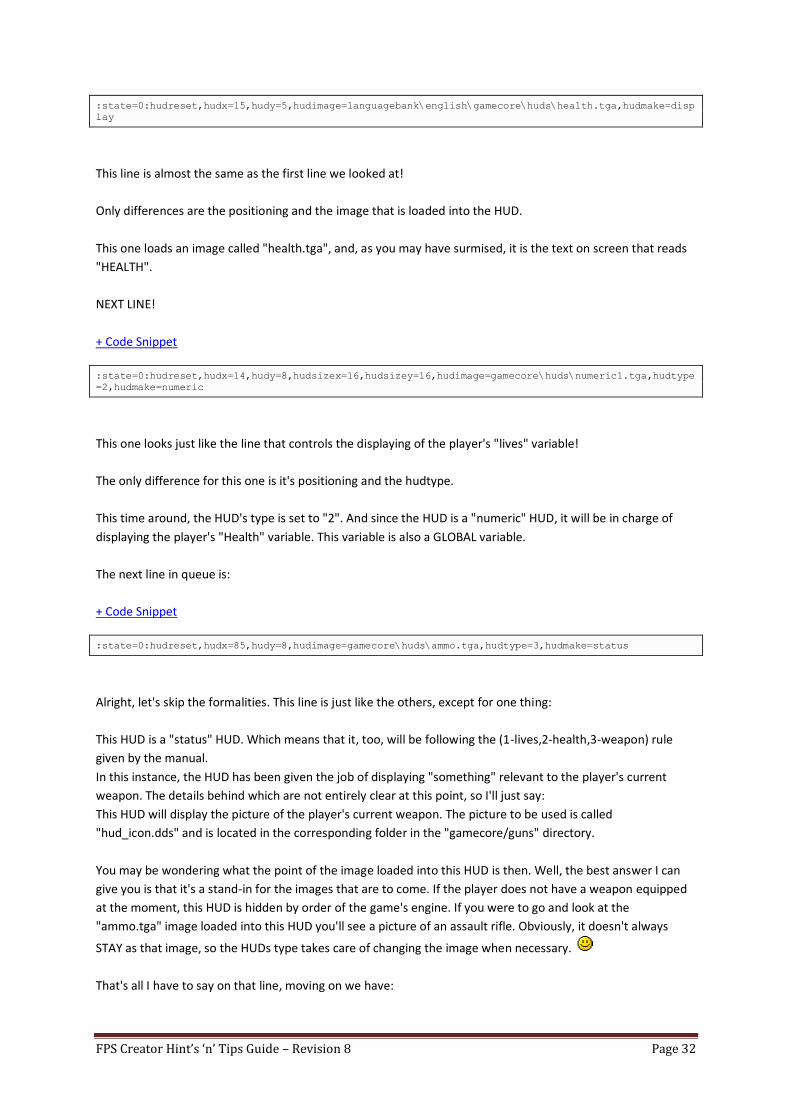
FPS Creator Hint’s ‘n’ Tips Guide – Revision 8 Page 32
:state=0:hudreset,hudx=15,hudy=5,hudimage=languagebank\english\gamecore\huds\health.tga,hudmake=disp
lay
This line is almost the same as the first line we looked at!
Only differences are the positioning and the image that is loaded into the HUD.
This one loads an image called "health.tga", and, as you may have surmised, it is the text on screen that reads
"HEALTH".
NEXT LINE!
+ Code Snippet
:state=0:hudreset,hudx=14,hudy=8,hudsizex=16,hudsizey=16,hudimage=gamecore\huds\numeric1.tga,hudtype
=2,hudmake=numeric
This one looks just like the line that controls the displaying of the player's "lives" variable!
The only difference for this one is it's positioning and the hudtype.
This time around, the HUD's type is set to "2". And since the HUD is a "numeric" HUD, it will be in charge of
displaying the player's "Health" variable. This variable is also a GLOBAL variable.
The next line in queue is:
+ Code Snippet
:state=0:hudreset,hudx=85,hudy=8,hudimage=gamecore\huds\ammo.tga,hudtype=3,hudmake=status
Alright, let's skip the formalities. This line is just like the others, except for one thing:
This HUD is a "status" HUD. Which means that it, too, will be following the (1-lives,2-health,3-weapon) rule
given by the manual.
In this instance, the HUD has been given the job of displaying "something" relevant to the player's current
weapon. The details behind which are not entirely clear at this point, so I'll just say:
This HUD will display the picture of the player's current weapon. The picture to be used is called
"hud_icon.dds" and is located in the corresponding folder in the "gamecore/guns" directory.
You may be wondering what the point of the image loaded into this HUD is then. Well, the best answer I can
give you is that it's a stand-in for the images that are to come. If the player does not have a weapon equipped
at the moment, this HUD is hidden by order of the game's engine. If you were to go and look at the
"ammo.tga" image loaded into this HUD you'll see a picture of an assault rifle. Obviously, it doesn't always
STAY as that image, so the HUDs type takes care of changing the image when necessary.
That's all I have to say on that line, moving on we have:
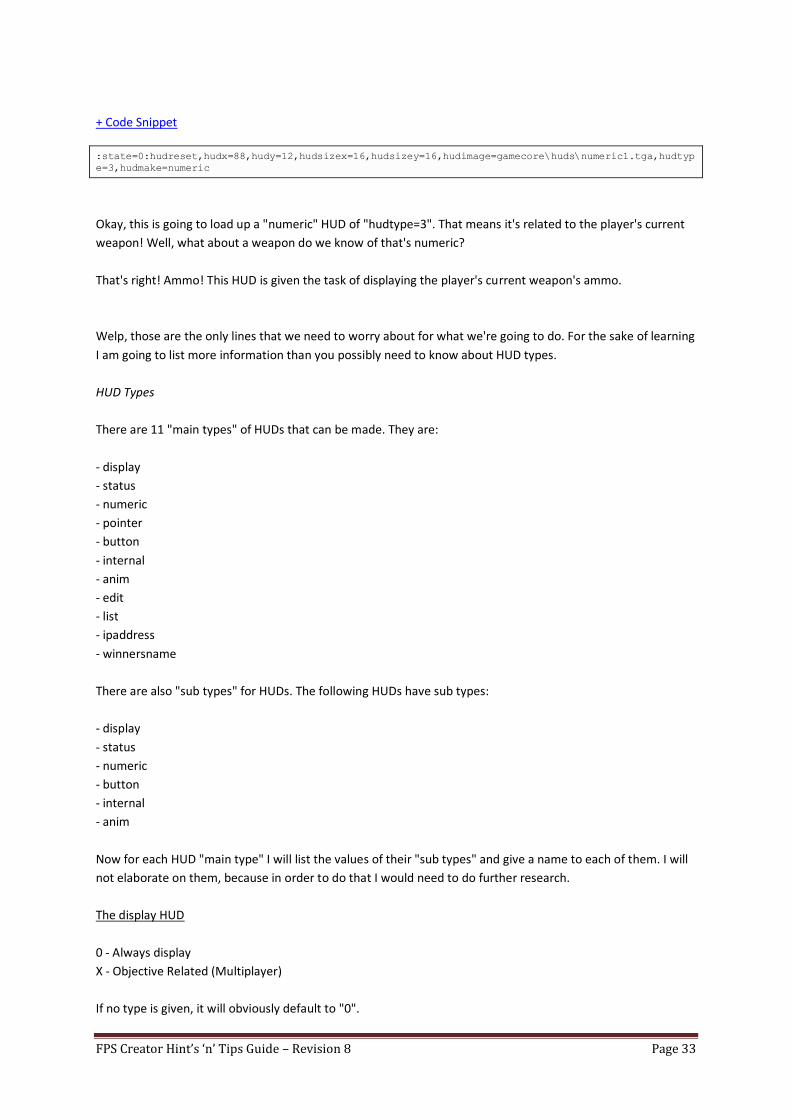
FPS Creator Hint’s ‘n’ Tips Guide – Revision 8 Page 33
+ Code Snippet
:state=0:hudreset,hudx=88,hudy=12,hudsizex=16,hudsizey=16,hudimage=gamecore\huds\numeric1.tga,hudtyp
e=3,hudmake=numeric
Okay, this is going to load up a "numeric" HUD of "hudtype=3". That means it's related to the player's current
weapon! Well, what about a weapon do we know of that's numeric?
That's right! Ammo! This HUD is given the task of displaying the player's current weapon's ammo.
Welp, those are the only lines that we need to worry about for what we're going to do. For the sake of learning
I am going to list more information than you possibly need to know about HUD types.
HUD Types
There are 11 "main types" of HUDs that can be made. They are:
- display
- status
- numeric
- pointer
- button
- internal
- anim
- edit
- list
- ipaddress
- winnersname
There are also "sub types" for HUDs. The following HUDs have sub types:
- display
- status
- numeric
- button
- internal
- anim
Now for each HUD "main type" I will list the values of their "sub types" and give a name to each of them. I will
not elaborate on them, because in order to do that I would need to do further research.
The display HUD
0 - Always display
X - Objective Related (Multiplayer)
If no type is given, it will obviously default to "0".
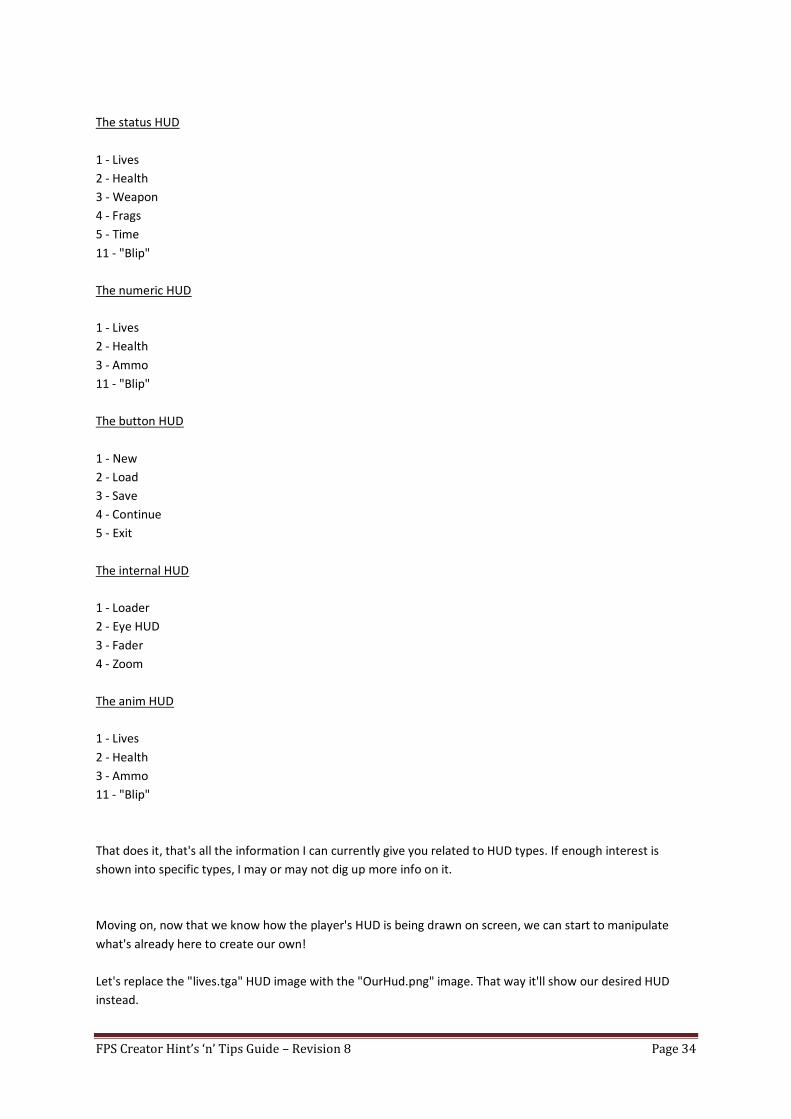
FPS Creator Hint’s ‘n’ Tips Guide – Revision 8 Page 34
The status HUD
1 - Lives
2 - Health
3 - Weapon
4 - Frags
5 - Time
11 - "Blip"
The numeric HUD
1 - Lives
2 - Health
3 - Ammo
11 - "Blip"
The button HUD
1 - New
2 - Load
3 - Save
4 - Continue
5 - Exit
The internal HUD
1 - Loader
2 - Eye HUD
3 - Fader
4 - Zoom
The anim HUD
1 - Lives
2 - Health
3 - Ammo
11 - "Blip"
That does it, that's all the information I can currently give you related to HUD types. If enough interest is
shown into specific types, I may or may not dig up more info on it.
Moving on, now that we know how the player's HUD is being drawn on screen, we can start to manipulate
what's already here to create our own!
Let's replace the "lives.tga" HUD image with the "OurHud.png" image. That way it'll show our desired HUD
instead.

FPS Creator Hint’s ‘n’ Tips Guide – Revision 8 Page 35
Since the image I have given already has the text for everything, we can go ahead and comment out the line
that loads up the "health.tga" image. Remember how to do that? We just put a ";" at the beginning of the line.
Now, for my HUD I didn't see any use for the big picture of the player's gun on screen. I mean, he's HOLDING
the thing, why be redundant and show a picture of it? So I've also commented out the line that loads up the
"ammo.tga" image.
Alright, now that our desired HUD image is being shown on the screen, let's move the "numeric" HUDs over to
it and position them so that they are sitting inside the box that they belong in.
To do this takes a little bit of "guess and check" type work, where you guess a percentage value on the screen
to put the "numeric" HUD, then test the game and see if it was good enough or not. Well, I already did the
guessing and checking for you, and I found:
The hudx for the "OurHud.png" image was about 13 and the hudy for it was about 10. I liked that position, but
you may think otherwise and you are free to change it and discover your own position for it on-screen.
The hudx for the Health "numeric" HUD was about 7, and the hudy for it was also about 7.
The hudx for the Lives "numeric" HUD was about 16, and the hudy for it was about 7.
The hudx for the Ammo "numeric" HUD was about 6, and the hudy for it was about 16.
Those values worked for me, and I liked the result. The "numeric" HUDs fit nicely into the spaces provided and
are labelled accordingly.
Now, I encourage you to go out and make a HUD of your own. When everyone starts using the same old HUD,
it gets boring. I believe if somebody makes a game, it should have its own unique HUD, and since you just
learned how to make one, GO FOR IT!!
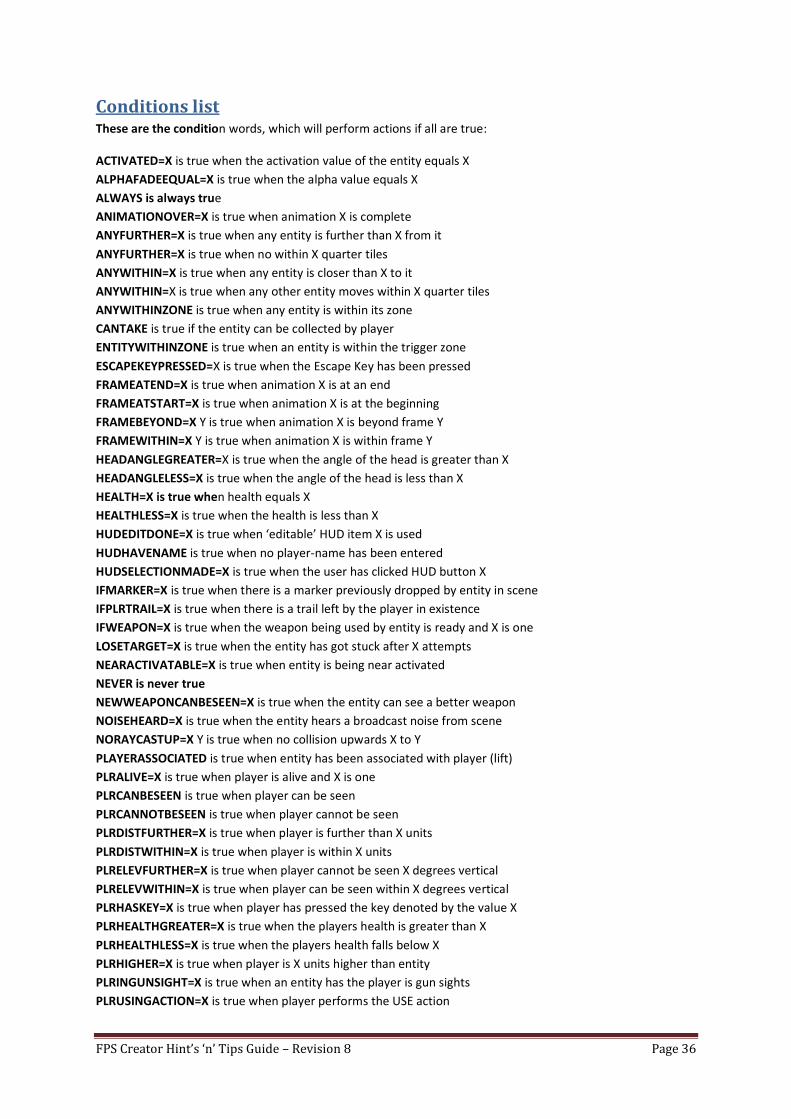
FPS Creator Hint’s ‘n’ Tips Guide – Revision 8 Page 36
Conditions list These are the condition words, which will perform actions if all are true:
ACTIVATED=X is true when the activation value of the entity equals X
ALPHAFADEEQUAL=X is true when the alpha value equals X
ALWAYS is always true
ANIMATIONOVER=X is true when animation X is complete
ANYFURTHER=X is true when any entity is further than X from it
ANYFURTHER=X is true when no within X quarter tiles
ANYWITHIN=X is true when any entity is closer than X to it
ANYWITHIN=X is true when any other entity moves within X quarter tiles
ANYWITHINZONE is true when any entity is within its zone
CANTAKE is true if the entity can be collected by player
ENTITYWITHINZONE is true when an entity is within the trigger zone
ESCAPEKEYPRESSED=X is true when the Escape Key has been pressed
FRAMEATEND=X is true when animation X is at an end
FRAMEATSTART=X is true when animation X is at the beginning
FRAMEBEYOND=X Y is true when animation X is beyond frame Y
FRAMEWITHIN=X Y is true when animation X is within frame Y
HEADANGLEGREATER=X is true when the angle of the head is greater than X
HEADANGLELESS=X is true when the angle of the head is less than X
HEALTH=X is true when health equals X
HEALTHLESS=X is true when the health is less than X
HUDEDITDONE=X is true when ‘editable’ HUD item X is used
HUDHAVENAME is true when no player-name has been entered
HUDSELECTIONMADE=X is true when the user has clicked HUD button X
IFMARKER=X is true when there is a marker previously dropped by entity in scene
IFPLRTRAIL=X is true when there is a trail left by the player in existence
IFWEAPON=X is true when the weapon being used by entity is ready and X is one
LOSETARGET=X is true when the entity has got stuck after X attempts
NEARACTIVATABLE=X is true when entity is being near activated
NEVER is never true
NEWWEAPONCANBESEEN=X is true when the entity can see a better weapon
NOISEHEARD=X is true when the entity hears a broadcast noise from scene
NORAYCASTUP=X Y is true when no collision upwards X to Y
PLAYERASSOCIATED is true when entity has been associated with player (lift)
PLRALIVE=X is true when player is alive and X is one
PLRCANBESEEN is true when player can be seen
PLRCANNOTBESEEN is true when player cannot be seen
PLRDISTFURTHER=X is true when player is further than X units
PLRDISTWITHIN=X is true when player is within X units
PLRELEVFURTHER=X is true when player cannot be seen X degrees vertical
PLRELEVWITHIN=X is true when player can be seen within X degrees vertical
PLRHASKEY=X is true when player has pressed the key denoted by the value X
PLRHEALTHGREATER=X is true when the players health is greater than X
PLRHEALTHLESS=X is true when the players health falls below X
PLRHIGHER=X is true when player is X units higher than entity
PLRINGUNSIGHT=X is true when an entity has the player is gun sights
PLRUSINGACTION=X is true when player performs the USE action
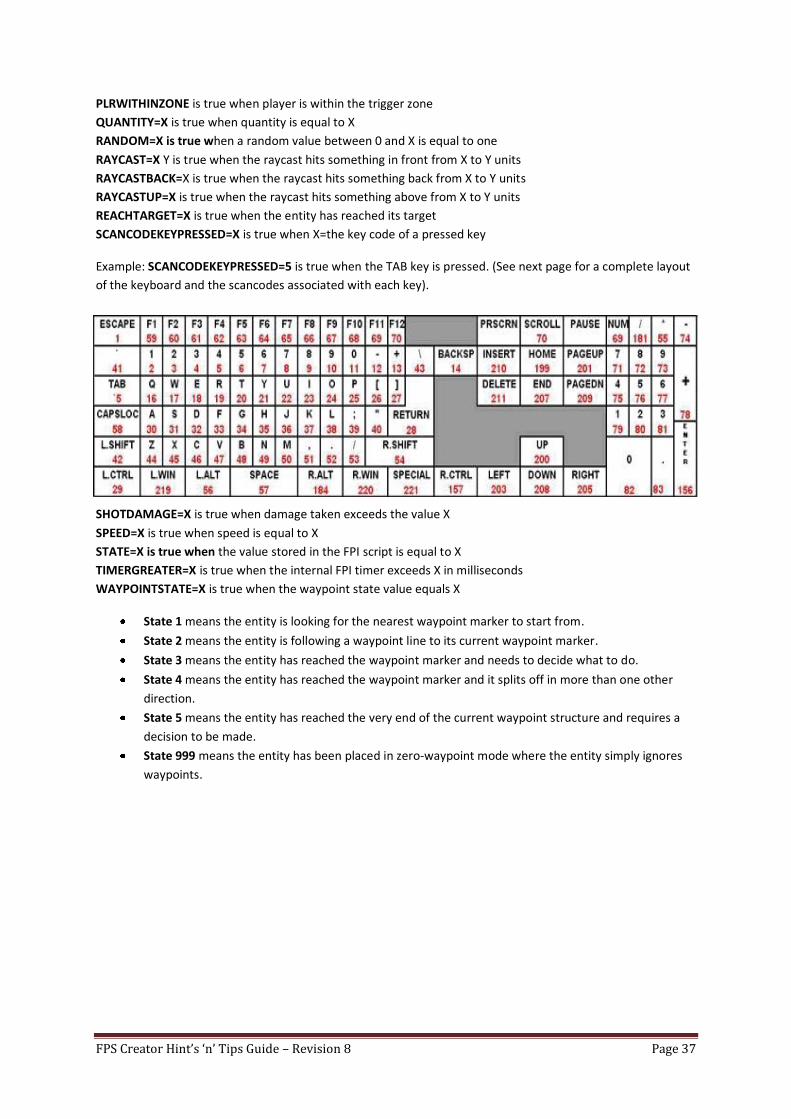
FPS Creator Hint’s ‘n’ Tips Guide – Revision 8 Page 37
PLRWITHINZONE is true when player is within the trigger zone
QUANTITY=X is true when quantity is equal to X
RANDOM=X is true when a random value between 0 and X is equal to one
RAYCAST=X Y is true when the raycast hits something in front from X to Y units
RAYCASTBACK=X is true when the raycast hits something back from X to Y units
RAYCASTUP=X is true when the raycast hits something above from X to Y units
REACHTARGET=X is true when the entity has reached its target
SCANCODEKEYPRESSED=X is true when X=the key code of a pressed key
Example: SCANCODEKEYPRESSED=5 is true when the TAB key is pressed. (See next page for a complete layout
of the keyboard and the scancodes associated with each key).
SHOTDAMAGE=X is true when damage taken exceeds the value X
SPEED=X is true when speed is equal to X
STATE=X is true when the value stored in the FPI script is equal to X
TIMERGREATER=X is true when the internal FPI timer exceeds X in milliseconds
WAYPOINTSTATE=X is true when the waypoint state value equals X
State 1 means the entity is looking for the nearest waypoint marker to start from.
State 2 means the entity is following a waypoint line to its current waypoint marker.
State 3 means the entity has reached the waypoint marker and needs to decide what to do.
State 4 means the entity has reached the waypoint marker and it splits off in more than one other
direction.
State 5 means the entity has reached the very end of the current waypoint structure and requires a
decision to be made.
State 999 means the entity has been placed in zero-waypoint mode where the entity simply ignores
waypoints.
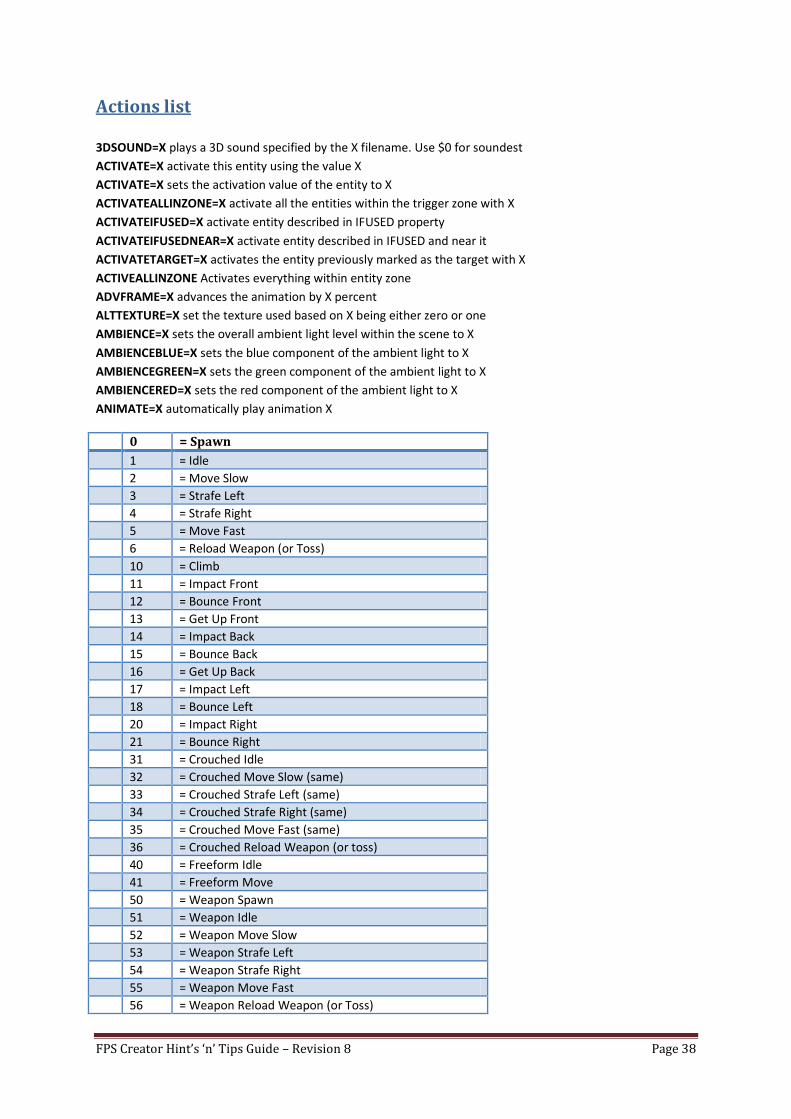
FPS Creator Hint’s ‘n’ Tips Guide – Revision 8 Page 38
Actions list
3DSOUND=X plays a 3D sound specified by the X filename. Use $0 for soundest
ACTIVATE=X activate this entity using the value X
ACTIVATE=X sets the activation value of the entity to X
ACTIVATEALLINZONE=X activate all the entities within the trigger zone with X
ACTIVATEIFUSED=X activate entity described in IFUSED property
ACTIVATEIFUSEDNEAR=X activate entity described in IFUSED and near it
ACTIVATETARGET=X activates the entity previously marked as the target with X
ACTIVEALLINZONE Activates everything within entity zone
ADVFRAME=X advances the animation by X percent
ALTTEXTURE=X set the texture used based on X being either zero or one
AMBIENCE=X sets the overall ambient light level within the scene to X
AMBIENCEBLUE=X sets the blue component of the ambient light to X
AMBIENCEGREEN=X sets the green component of the ambient light to X
AMBIENCERED=X sets the red component of the ambient light to X
ANIMATE=X automatically play animation X
0 = Spawn
1 = Idle
2 = Move Slow
3 = Strafe Left
4 = Strafe Right
5 = Move Fast
6 = Reload Weapon (or Toss)
10 = Climb
11 = Impact Front
12 = Bounce Front
13 = Get Up Front
14 = Impact Back
15 = Bounce Back
16 = Get Up Back
17 = Impact Left
18 = Bounce Left
20 = Impact Right
21 = Bounce Right
31 = Crouched Idle
32 = Crouched Move Slow (same)
33 = Crouched Strafe Left (same)
34 = Crouched Strafe Right (same)
35 = Crouched Move Fast (same)
36 = Crouched Reload Weapon (or toss)
40 = Freeform Idle
41 = Freeform Move
50 = Weapon Spawn
51 = Weapon Idle
52 = Weapon Move Slow
53 = Weapon Strafe Left
54 = Weapon Strafe Right
55 = Weapon Move Fast
56 = Weapon Reload Weapon (or Toss)

FPS Creator Hint’s ‘n’ Tips Guide – Revision 8 Page 39
57 = Weapon NEW Climb
61 = Weapon Impact Front
62 = Weapon Bounce Front
63 = Weapon Get Up Front
64 = Weapon Impact Back
65 = Weapon Bounce Back
66 = Weapon Get Up Back
67 = Weapon Impact Left
68 = Weapon Bounce Left
70 = Weapon Impact Right
71 = Weapon Bounce Right
81 = Weapon Crouched Idle
82 = Weapon Crouched Move Slow (same)
83 = Weapon Crouched Strafe Left (same)
84 = Weapon Crouched Strafe Right (same)
85 = Weapon Crouched Move Fast (same)
86 = Weapon Crouched Reload Weapon (or toss)
90 = Weapon Freeform Idle
91 = Weapon Freeform Move
ASSOCIATEPLAYER associate this entity with the player (lift)
BACKDROP=X loads and pastes the screen backdrop using X filename
CHOOSESTRAFE randomly selects a strafe direction (i.e. left/right/forward)
COLLECTTARGET if the target is a collectable, collect the target if close
COLOFF deactivate all player collision with this entity
COLON activate all player collision with this entity
CONTINUEGAME=X continue game action issued to move onto the next page
DECALPHAFADE=X decrement the alpha fade, X being the destination
DECFRAME=X decrement another frame in animation X
DESTROY destroy entity
DROPMARKER drops a marker the entity can later return to
FLOATRATE=X cause the entity to float in the air at a hover rate of X
FLOORLOGIC=X if X is one, entity never leaves its Y position
FOG=X sets the fog mode within the scene when X is one
FOGBLUE=X sets the blue component of the fog to X
FOGGREEN=X sets the green component of the fog to X
FOGRED=X sets the red component of the fog to X
FOLLOWPLR follows the players trail if one exists
FORCEBACK=X apply a force to the entity by a factor of X backwards
FORCEBOUNCE=X apply a force to the entity to cause it to bounce back by X
FORCEFORE=X apply a force to the entity by a factor of X forwards
FORCELEFT=X apply a force to the entity by a factor of X left
FORCERIGHT=X apply a force to the entity by a factor of X right
FREEZE=X stop entity from moving
HOSTGAME triggers a multiplayer game to be HOSTED
HUDANIM=X set the filename X of the animation sequence (exclude #.TGA)
HUDBLUE=X sets the blue component of your HUD item
HUDFADEOUT causes the HUD item to fade from the screen
HUDFONT=X sets the font name of your HUD item
HUDGREEN=X sets the green component of your HUD item
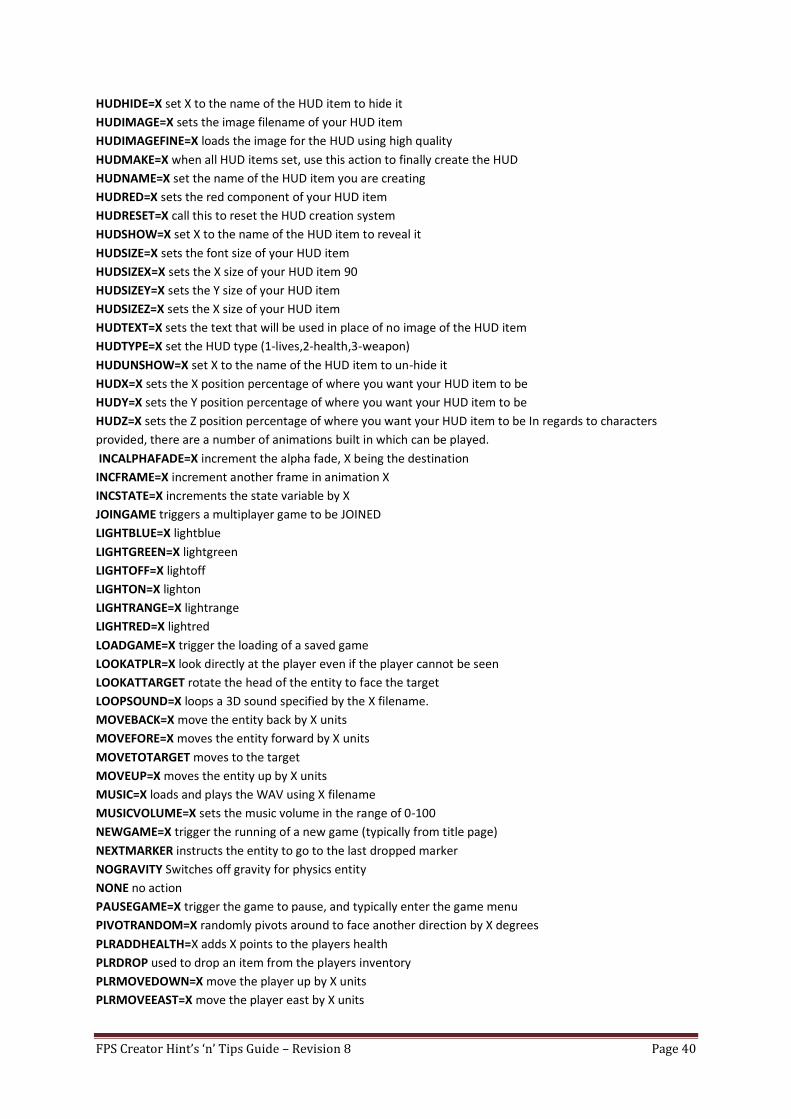
FPS Creator Hint’s ‘n’ Tips Guide – Revision 8 Page 40
HUDHIDE=X set X to the name of the HUD item to hide it
HUDIMAGE=X sets the image filename of your HUD item
HUDIMAGEFINE=X loads the image for the HUD using high quality
HUDMAKE=X when all HUD items set, use this action to finally create the HUD
HUDNAME=X set the name of the HUD item you are creating
HUDRED=X sets the red component of your HUD item
HUDRESET=X call this to reset the HUD creation system
HUDSHOW=X set X to the name of the HUD item to reveal it
HUDSIZE=X sets the font size of your HUD item
HUDSIZEX=X sets the X size of your HUD item 90
HUDSIZEY=X sets the Y size of your HUD item
HUDSIZEZ=X sets the X size of your HUD item
HUDTEXT=X sets the text that will be used in place of no image of the HUD item
HUDTYPE=X set the HUD type (1-lives,2-health,3-weapon)
HUDUNSHOW=X set X to the name of the HUD item to un-hide it
HUDX=X sets the X position percentage of where you want your HUD item to be
HUDY=X sets the Y position percentage of where you want your HUD item to be
HUDZ=X sets the Z position percentage of where you want your HUD item to be In regards to characters
provided, there are a number of animations built in which can be played.
INCALPHAFADE=X increment the alpha fade, X being the destination
INCFRAME=X increment another frame in animation X
INCSTATE=X increments the state variable by X
JOINGAME triggers a multiplayer game to be JOINED
LIGHTBLUE=X lightblue
LIGHTGREEN=X lightgreen
LIGHTOFF=X lightoff
LIGHTON=X lighton
LIGHTRANGE=X lightrange
LIGHTRED=X lightred
LOADGAME=X trigger the loading of a saved game
LOOKATPLR=X look directly at the player even if the player cannot be seen
LOOKATTARGET rotate the head of the entity to face the target
LOOPSOUND=X loops a 3D sound specified by the X filename.
MOVEBACK=X move the entity back by X units
MOVEFORE=X moves the entity forward by X units
MOVETOTARGET moves to the target
MOVEUP=X moves the entity up by X units
MUSIC=X loads and plays the WAV using X filename
MUSICVOLUME=X sets the music volume in the range of 0-100
NEWGAME=X trigger the running of a new game (typically from title page)
NEXTMARKER instructs the entity to go to the last dropped marker
NOGRAVITY Switches off gravity for physics entity
NONE no action
PAUSEGAME=X trigger the game to pause, and typically enter the game menu
PIVOTRANDOM=X randomly pivots around to face another direction by X degrees
PLRADDHEALTH=X adds X points to the players health
PLRDROP used to drop an item from the players inventory
PLRMOVEDOWN=X move the player up by X units
PLRMOVEEAST=X move the player east by X units
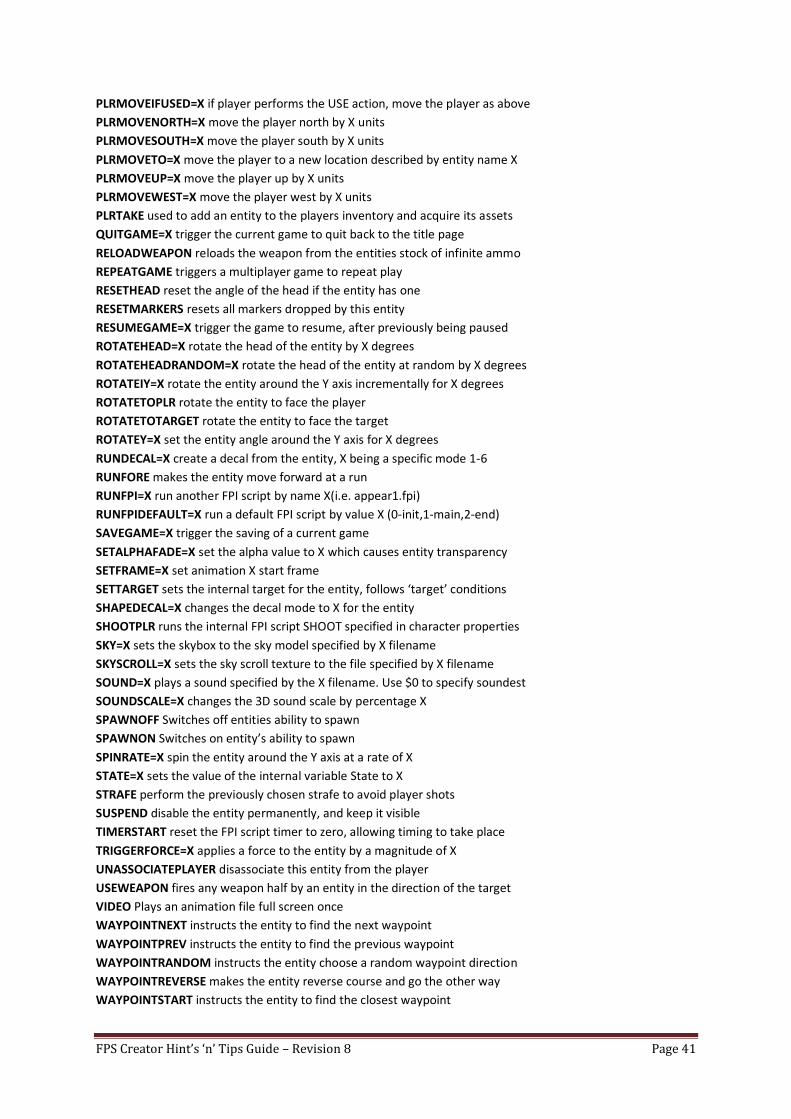
FPS Creator Hint’s ‘n’ Tips Guide – Revision 8 Page 41
PLRMOVEIFUSED=X if player performs the USE action, move the player as above
PLRMOVENORTH=X move the player north by X units
PLRMOVESOUTH=X move the player south by X units
PLRMOVETO=X move the player to a new location described by entity name X
PLRMOVEUP=X move the player up by X units
PLRMOVEWEST=X move the player west by X units
PLRTAKE used to add an entity to the players inventory and acquire its assets
QUITGAME=X trigger the current game to quit back to the title page
RELOADWEAPON reloads the weapon from the entities stock of infinite ammo
REPEATGAME triggers a multiplayer game to repeat play
RESETHEAD reset the angle of the head if the entity has one
RESETMARKERS resets all markers dropped by this entity
RESUMEGAME=X trigger the game to resume, after previously being paused
ROTATEHEAD=X rotate the head of the entity by X degrees
ROTATEHEADRANDOM=X rotate the head of the entity at random by X degrees
ROTATEIY=X rotate the entity around the Y axis incrementally for X degrees
ROTATETOPLR rotate the entity to face the player
ROTATETOTARGET rotate the entity to face the target
ROTATEY=X set the entity angle around the Y axis for X degrees
RUNDECAL=X create a decal from the entity, X being a specific mode 1-6
RUNFORE makes the entity move forward at a run
RUNFPI=X run another FPI script by name X(i.e. appear1.fpi)
RUNFPIDEFAULT=X run a default FPI script by value X (0-init,1-main,2-end)
SAVEGAME=X trigger the saving of a current game
SETALPHAFADE=X set the alpha value to X which causes entity transparency
SETFRAME=X set animation X start frame
SETTARGET sets the internal target for the entity, follows ‘target’ conditions
SHAPEDECAL=X changes the decal mode to X for the entity
SHOOTPLR runs the internal FPI script SHOOT specified in character properties
SKY=X sets the skybox to the sky model specified by X filename
SKYSCROLL=X sets the sky scroll texture to the file specified by X filename
SOUND=X plays a sound specified by the X filename. Use $0 to specify soundest
SOUNDSCALE=X changes the 3D sound scale by percentage X
SPAWNOFF Switches off entities ability to spawn
SPAWNON Switches on entity’s ability to spawn
SPINRATE=X spin the entity around the Y axis at a rate of X
STATE=X sets the value of the internal variable State to X
STRAFE perform the previously chosen strafe to avoid player shots
SUSPEND disable the entity permanently, and keep it visible
TIMERSTART reset the FPI script timer to zero, allowing timing to take place
TRIGGERFORCE=X applies a force to the entity by a magnitude of X
UNASSOCIATEPLAYER disassociate this entity from the player
USEWEAPON fires any weapon half by an entity in the direction of the target
VIDEO Plays an animation file full screen once
WAYPOINTNEXT instructs the entity to find the next waypoint
WAYPOINTPREV instructs the entity to find the previous waypoint
WAYPOINTRANDOM instructs the entity choose a random waypoint direction
WAYPOINTREVERSE makes the entity reverse course and go the other way
WAYPOINTSTART instructs the entity to find the closest waypoint

FPS Creator Hint’s ‘n’ Tips Guide – Revision 8 Page 42
WAYPOINTSTOP stops the entity following waypoints
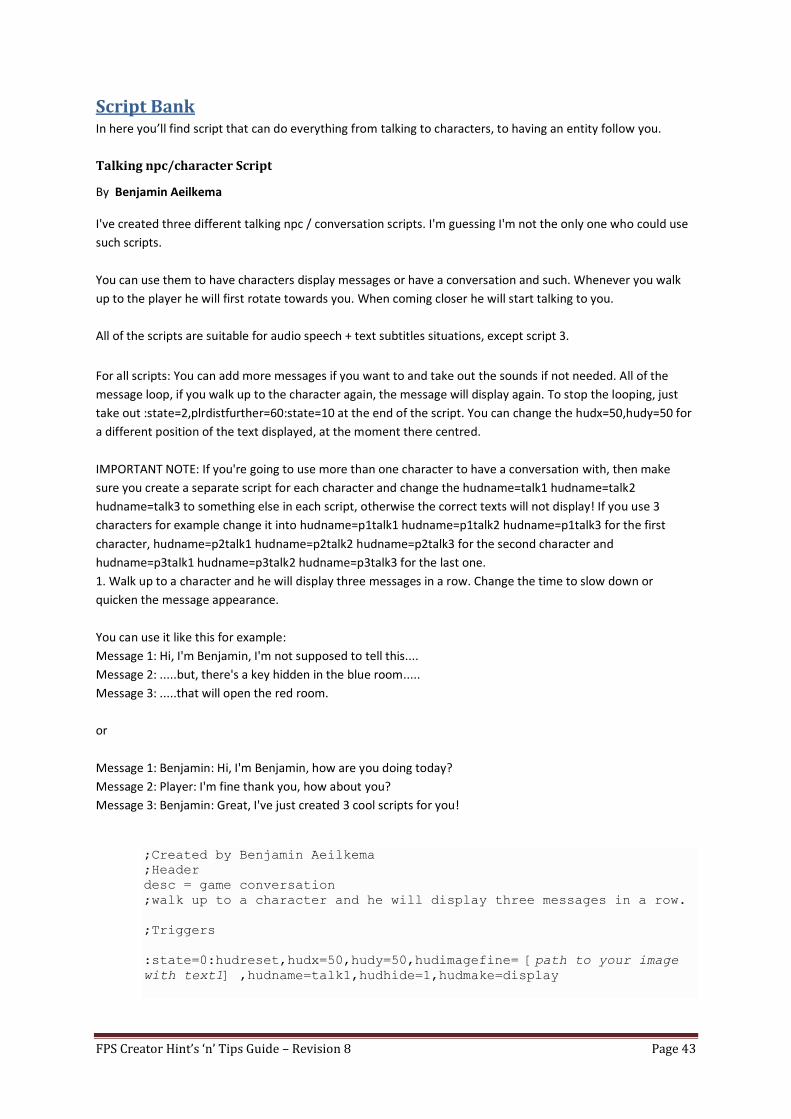
FPS Creator Hint’s ‘n’ Tips Guide – Revision 8 Page 43
Script Bank In here you’ll find script that can do everything from talking to characters, to having an entity follow you.
Talking npc/character Script
By Benjamin Aeilkema
I've created three different talking npc / conversation scripts. I'm guessing I'm not the only one who could use
such scripts.
You can use them to have characters display messages or have a conversation and such. Whenever you walk
up to the player he will first rotate towards you. When coming closer he will start talking to you.
All of the scripts are suitable for audio speech + text subtitles situations, except script 3.
For all scripts: You can add more messages if you want to and take out the sounds if not needed. All of the
message loop, if you walk up to the character again, the message will display again. To stop the looping, just
take out :state=2,plrdistfurther=60:state=10 at the end of the script. You can change the hudx=50,hudy=50 for
a different position of the text displayed, at the moment there centred.
IMPORTANT NOTE: If you're going to use more than one character to have a conversation with, then make
sure you create a separate script for each character and change the hudname=talk1 hudname=talk2
hudname=talk3 to something else in each script, otherwise the correct texts will not display! If you use 3
characters for example change it into hudname=p1talk1 hudname=p1talk2 hudname=p1talk3 for the first
character, hudname=p2talk1 hudname=p2talk2 hudname=p2talk3 for the second character and
hudname=p3talk1 hudname=p3talk2 hudname=p3talk3 for the last one.
1. Walk up to a character and he will display three messages in a row. Change the time to slow down or
quicken the message appearance.
You can use it like this for example:
Message 1: Hi, I'm Benjamin, I'm not supposed to tell this....
Message 2: .....but, there's a key hidden in the blue room.....
Message 3: .....that will open the red room.
or
Message 1: Benjamin: Hi, I'm Benjamin, how are you doing today?
Message 2: Player: I'm fine thank you, how about you?
Message 3: Benjamin: Great, I've just created 3 cool scripts for you!
;Created by Benjamin Aeilkema
;Header
desc = game conversation
;walk up to a character and he will display three messages in a row.
;Triggers
:state=0:hudreset,hudx=50,hudy=50,hudimagefine= [path to your image
with text1] ,hudname=talk1,hudhide=1,hudmake=display

FPS Creator Hint’s ‘n’ Tips Guide – Revision 8 Page 44
:state=0:hudreset,hudx=50,hudy=50,hudimagefine=[path to your image
with text2], hudname=talk2,hudhide=1,hudmake=display
:state=0:hudreset,hudx=50,hudy=50,hudimagefine=[path to your image
with text3], hudname=talk3,hudhide=1,hudmake=display,state=10
:state=10,plrdistwithin=160:rotatetoplr
:state=10,plrdistwithin=60:rotatetoplr,sound=[path to a sound]
,timerstart,state=20
:state=20,plrdistwithin=60:rotatetoplr,hudshow=talk1,hudfadeout=talk1
:state=20,timergreater=7500:state=20,rotatetoplr,sound=[path to a
sound],timerstart,state=30
:state=30,plrdistwithin=60:rotatetoplr,hudshow=talk2,hudfadeout=talk2
:state=30,timergreater=7500:state=30,rotatetoplr,sound=[path to a
sound], timerstart,state=40
:state=40,plrdistwithin=60:rotatetoplr,hudshow=talk3,hudfadeout=talk3
:state=40,timergreater=7500:timerstart,state=2
:state=2,plrdistfurther=60:state=10
;End of Script
2. Walk up to a character and he will display a message. Walk away and the message will disappear. Walk up to
the character again and a different message will appear. Walk away and the message will disappear. Walk up
to the character once more and a different message will appear. Walk away and the message will disappear.
You could use it like this for example:
Message 1: Hi, I'm Benjamin, I love FPSC
Message 2: Oh, it's you again. I've got nothing more to say to you.
Message 3: What you again? Stop bothering me!
;Created by Benjamin Aeilkema
;Header
desc = game conversation
;walk up to a character and he will display a message. Walk away and
the message will disappear.
;walk up to the character again and a different message will appear.
Walk away and the message will disappear.
;walk up to the character once more and a different message will
appear. Walk away and the message will disappear.
;Triggers
:state=0:hudreset,hudx=50,hudy=50,hudimagefine=[path to your image
with text1], hudhide=1,hudmake=display
:state=0:hudreset,hudx=50,hudy=50,hudimagefine=[path to your image
with text2], hudname=talk2,hudhide=1,hudmake=display
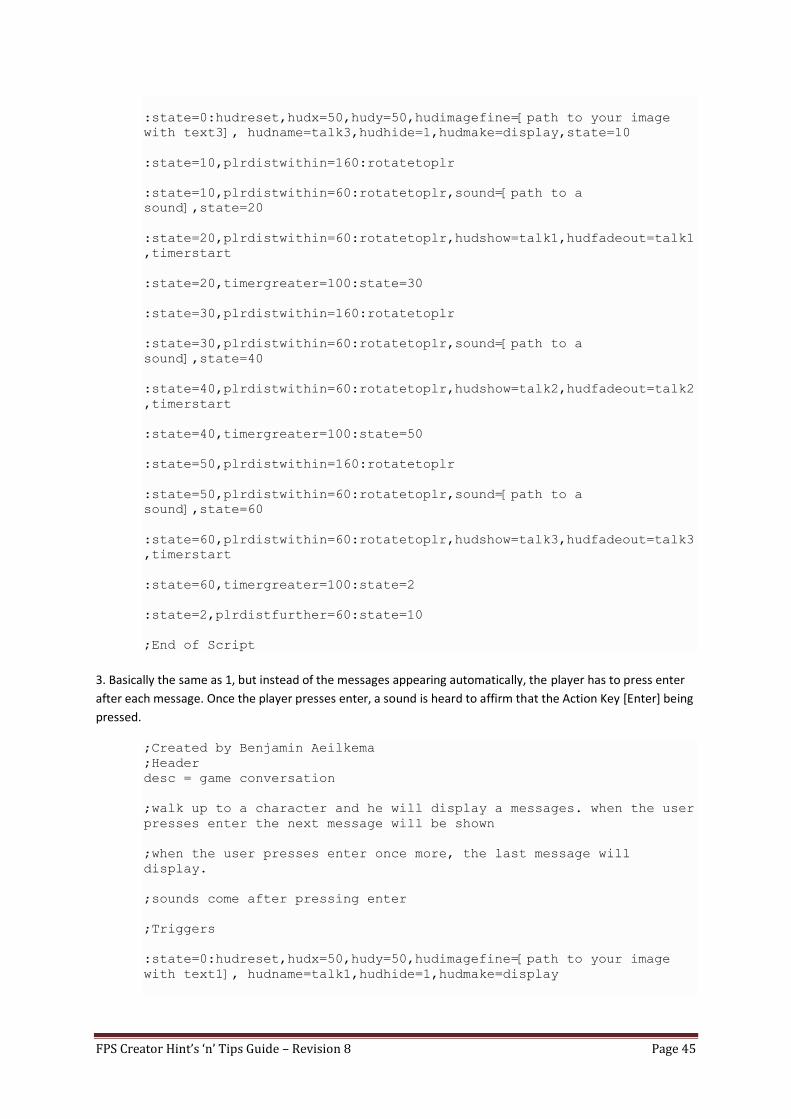
FPS Creator Hint’s ‘n’ Tips Guide – Revision 8 Page 45
:state=0:hudreset,hudx=50,hudy=50,hudimagefine=[path to your image
with text3], hudname=talk3,hudhide=1,hudmake=display,state=10
:state=10,plrdistwithin=160:rotatetoplr
:state=10,plrdistwithin=60:rotatetoplr,sound=[path to a
sound],state=20
:state=20,plrdistwithin=60:rotatetoplr,hudshow=talk1,hudfadeout=talk1
,timerstart
:state=20,timergreater=100:state=30
:state=30,plrdistwithin=160:rotatetoplr
:state=30,plrdistwithin=60:rotatetoplr,sound=[path to a
sound],state=40
:state=40,plrdistwithin=60:rotatetoplr,hudshow=talk2,hudfadeout=talk2
,timerstart
:state=40,timergreater=100:state=50
:state=50,plrdistwithin=160:rotatetoplr
:state=50,plrdistwithin=60:rotatetoplr,sound=[path to a
sound],state=60
:state=60,plrdistwithin=60:rotatetoplr,hudshow=talk3,hudfadeout=talk3
,timerstart
:state=60,timergreater=100:state=2
:state=2,plrdistfurther=60:state=10
;End of Script
3. Basically the same as 1, but instead of the messages appearing automatically, the player has to press enter
after each message. Once the player presses enter, a sound is heard to affirm that the Action Key [Enter] being
pressed.
;Created by Benjamin Aeilkema
;Header
desc = game conversation
;walk up to a character and he will display a messages. when the user
presses enter the next message will be shown
;when the user presses enter once more, the last message will
display.
;sounds come after pressing enter
;Triggers
:state=0:hudreset,hudx=50,hudy=50,hudimagefine=[path to your image
with text1], hudname=talk1,hudhide=1,hudmake=display
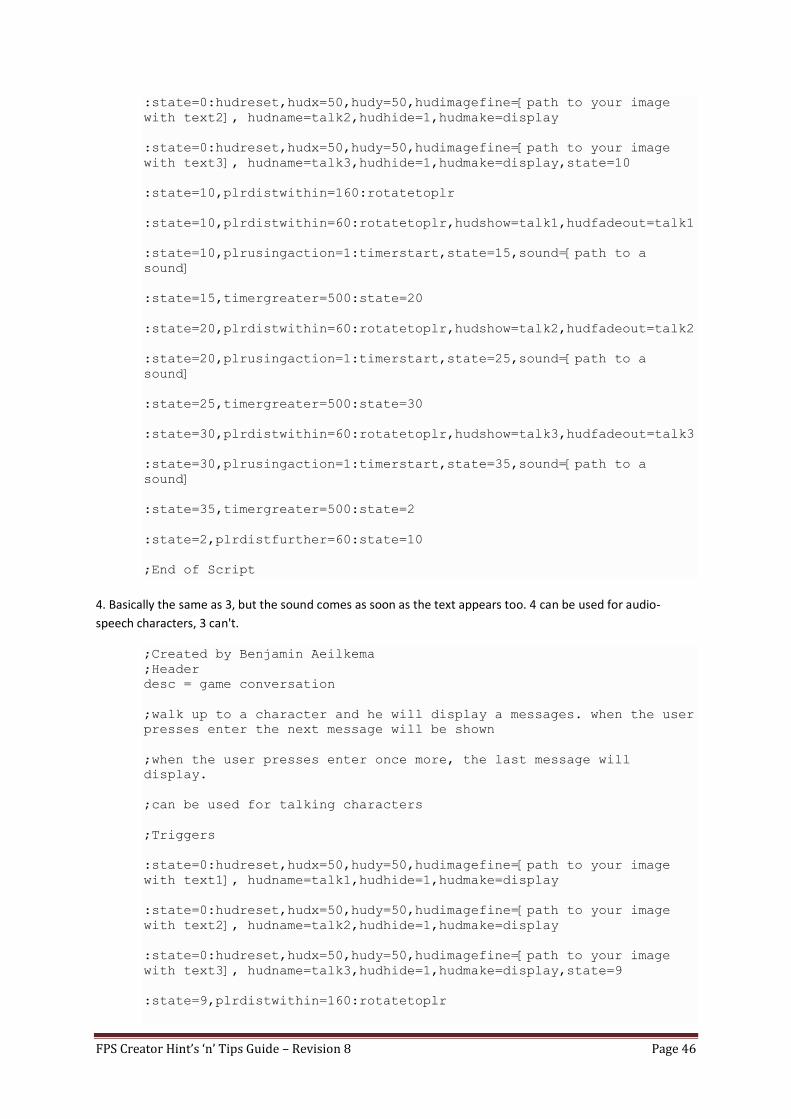
FPS Creator Hint’s ‘n’ Tips Guide – Revision 8 Page 46
:state=0:hudreset,hudx=50,hudy=50,hudimagefine=[path to your image
with text2], hudname=talk2,hudhide=1,hudmake=display
:state=0:hudreset,hudx=50,hudy=50,hudimagefine=[path to your image
with text3], hudname=talk3,hudhide=1,hudmake=display,state=10
:state=10,plrdistwithin=160:rotatetoplr
:state=10,plrdistwithin=60:rotatetoplr,hudshow=talk1,hudfadeout=talk1
:state=10,plrusingaction=1:timerstart,state=15,sound=[path to a
sound]
:state=15,timergreater=500:state=20
:state=20,plrdistwithin=60:rotatetoplr,hudshow=talk2,hudfadeout=talk2
:state=20,plrusingaction=1:timerstart,state=25,sound=[path to a
sound]
:state=25,timergreater=500:state=30
:state=30,plrdistwithin=60:rotatetoplr,hudshow=talk3,hudfadeout=talk3
:state=30,plrusingaction=1:timerstart,state=35,sound=[path to a
sound]
:state=35,timergreater=500:state=2
:state=2,plrdistfurther=60:state=10
;End of Script
4. Basically the same as 3, but the sound comes as soon as the text appears too. 4 can be used for audio-
speech characters, 3 can't.
;Created by Benjamin Aeilkema
;Header
desc = game conversation
;walk up to a character and he will display a messages. when the user
presses enter the next message will be shown
;when the user presses enter once more, the last message will
display.
;can be used for talking characters
;Triggers
:state=0:hudreset,hudx=50,hudy=50,hudimagefine=[path to your image
with text1], hudname=talk1,hudhide=1,hudmake=display
:state=0:hudreset,hudx=50,hudy=50,hudimagefine=[path to your image
with text2], hudname=talk2,hudhide=1,hudmake=display
:state=0:hudreset,hudx=50,hudy=50,hudimagefine=[path to your image
with text3], hudname=talk3,hudhide=1,hudmake=display,state=9
:state=9,plrdistwithin=160:rotatetoplr

FPS Creator Hint’s ‘n’ Tips Guide – Revision 8 Page 47
:state=9,plrdistwithin=60:state=10,sound= [path to a sound]
:state=10,plrdistwithin=60:rotatetoplr,hudshow=talk1,hudfadeout=talk1
:state=10,plrusingaction=1:timerstart,state=15
:state=15,timergreater=500:state=19
:state=19,plrdistwithin=60:state=20,sound= [path to a sound]
:state=20,plrdistwithin=60:rotatetoplr,hudshow=talk2,hudfadeout=talk2
:state=20,plrusingaction=1:timerstart,state=25
:state=25,timergreater=500:state=29
:state=29,plrdistwithin=60:state=30,sound=[path to a sound]
:state=30,plrdistwithin=60:rotatetoplr,hudshow=talk3,hudfadeout=talk3
:state=30,plrusingaction=1:timerstart,state=35
:state=35,timergreater=500:state=2
:state=2,plrdistfurther=60:state=9
;End of Script
As suggested I'll add variations to this original thread, makes it easier to find everything.
Variation 1:
When the player walks up to the character the message will show. When the player presses Enter or walks
away, the message will disappear and never come back!
;Header
desc = game conversation show one screen once only no sound
;Triggers
:state=0:hudreset,hudx=50,hudy=50,hudimagefine=[point to the image],
hudname=img1,hudhide=1,hudmake=display,state=10
:state=10,plrdistwithin=160:rotatetoplr
:state=10,plrdistwithin=60:rotatetoplr,state=20
:state=20,plrdistwithin=60:rotatetoplr,hudshow=img1,hudfadeout=img1
:state=20,plrdistwithin=60,plrusingaction=1:state=40
:state=20,plrdistfurther=60:state=40
;End of Script
Variation 2 (modified by Trotter):
Walk up to a character and...nothing happens. You have to use the "action" button to make him speak. When
the user presses enter once more, the last message will display. Sounds come after pressing enter.
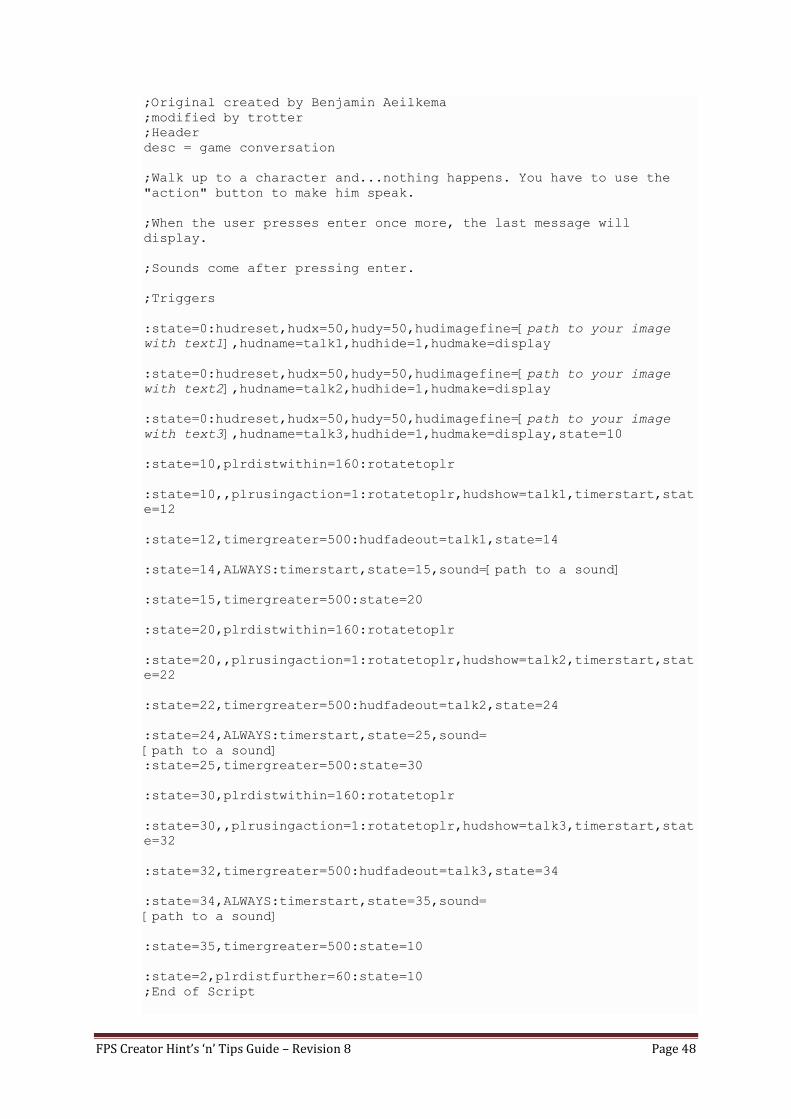
FPS Creator Hint’s ‘n’ Tips Guide – Revision 8 Page 48
;Original created by Benjamin Aeilkema
;modified by trotter
;Header
desc = game conversation
;Walk up to a character and...nothing happens. You have to use the
"action" button to make him speak.
;When the user presses enter once more, the last message will
display.
;Sounds come after pressing enter.
;Triggers
:state=0:hudreset,hudx=50,hudy=50,hudimagefine=[path to your image
with text1],hudname=talk1,hudhide=1,hudmake=display
:state=0:hudreset,hudx=50,hudy=50,hudimagefine=[path to your image
with text2],hudname=talk2,hudhide=1,hudmake=display
:state=0:hudreset,hudx=50,hudy=50,hudimagefine=[path to your image
with text3],hudname=talk3,hudhide=1,hudmake=display,state=10
:state=10,plrdistwithin=160:rotatetoplr
:state=10,,plrusingaction=1:rotatetoplr,hudshow=talk1,timerstart,stat
e=12
:state=12,timergreater=500:hudfadeout=talk1,state=14
:state=14,ALWAYS:timerstart,state=15,sound=[path to a sound]
:state=15,timergreater=500:state=20
:state=20,plrdistwithin=160:rotatetoplr
:state=20,,plrusingaction=1:rotatetoplr,hudshow=talk2,timerstart,stat
e=22
:state=22,timergreater=500:hudfadeout=talk2,state=24
:state=24,ALWAYS:timerstart,state=25,sound=
[path to a sound]
:state=25,timergreater=500:state=30
:state=30,plrdistwithin=160:rotatetoplr
:state=30,,plrusingaction=1:rotatetoplr,hudshow=talk3,timerstart,stat
e=32
:state=32,timergreater=500:hudfadeout=talk3,state=34
:state=34,ALWAYS:timerstart,state=35,sound=
[path to a sound]
:state=35,timergreater=500:state=10
:state=2,plrdistfurther=60:state=10
;End of Script
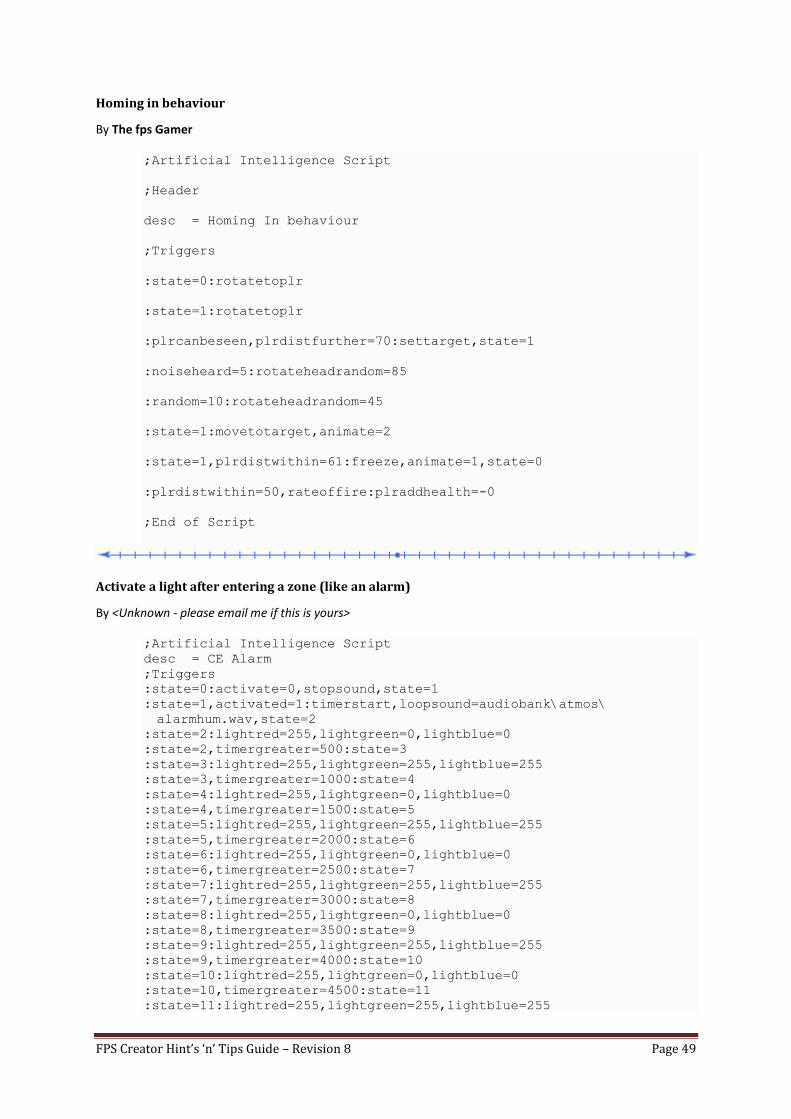
FPS Creator Hint’s ‘n’ Tips Guide – Revision 8 Page 49
Homing in behaviour
By The fps Gamer
;Artificial Intelligence Script
;Header
desc = Homing In behaviour
;Triggers
:state=0:rotatetoplr
:state=1:rotatetoplr
:plrcanbeseen,plrdistfurther=70:settarget,state=1
:noiseheard=5:rotateheadrandom=85
:random=10:rotateheadrandom=45
:state=1:movetotarget,animate=2
:state=1,plrdistwithin=61:freeze,animate=1,state=0
:plrdistwithin=50,rateoffire:plraddhealth=-0
;End of Script
Activate a light after entering a zone (like an alarm)
By <Unknown - please email me if this is yours>
;Artificial Intelligence Script
desc = CE Alarm
;Triggers
:state=0:activate=0,stopsound,state=1
:state=1,activated=1:timerstart,loopsound=audiobank\atmos\
alarmhum.wav,state=2
:state=2:lightred=255,lightgreen=0,lightblue=0
:state=2,timergreater=500:state=3
:state=3:lightred=255,lightgreen=255,lightblue=255
:state=3,timergreater=1000:state=4
:state=4:lightred=255,lightgreen=0,lightblue=0
:state=4,timergreater=1500:state=5
:state=5:lightred=255,lightgreen=255,lightblue=255
:state=5,timergreater=2000:state=6
:state=6:lightred=255,lightgreen=0,lightblue=0
:state=6,timergreater=2500:state=7
:state=7:lightred=255,lightgreen=255,lightblue=255
:state=7,timergreater=3000:state=8
:state=8:lightred=255,lightgreen=0,lightblue=0
:state=8,timergreater=3500:state=9
:state=9:lightred=255,lightgreen=255,lightblue=255
:state=9,timergreater=4000:state=10
:state=10:lightred=255,lightgreen=0,lightblue=0
:state=10,timergreater=4500:state=11
:state=11:lightred=255,lightgreen=255,lightblue=255
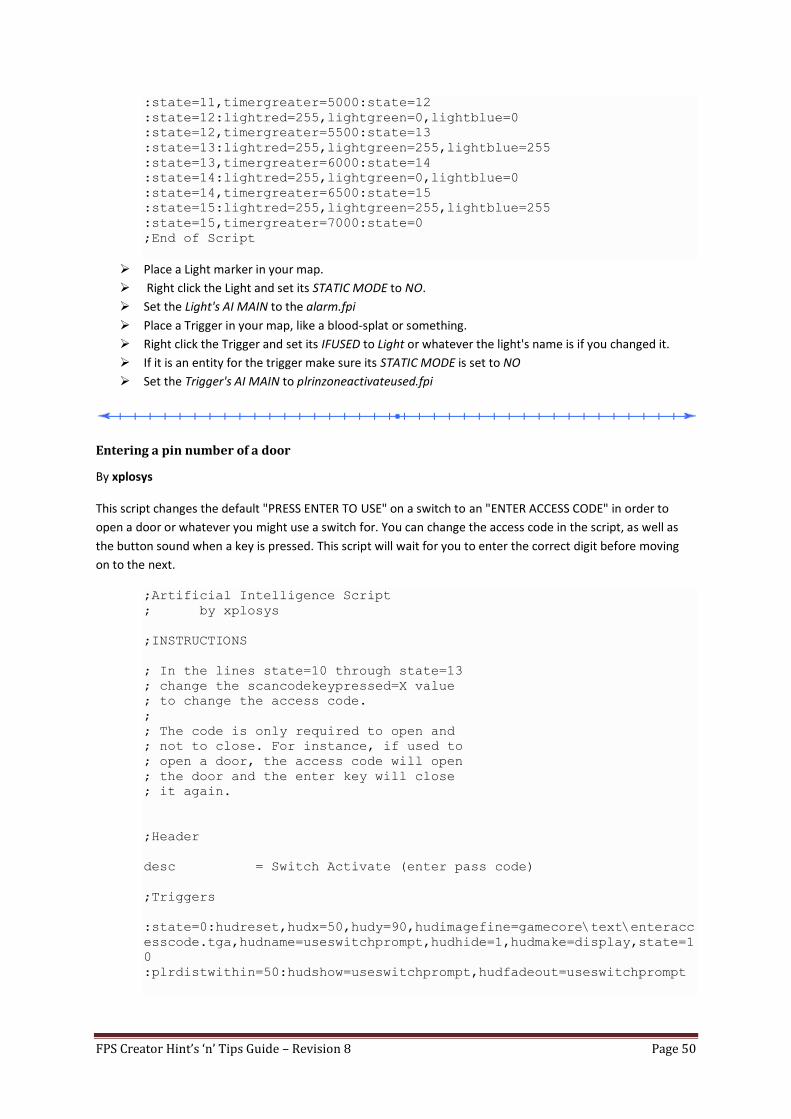
FPS Creator Hint’s ‘n’ Tips Guide – Revision 8 Page 50
:state=11,timergreater=5000:state=12
:state=12:lightred=255,lightgreen=0,lightblue=0
:state=12,timergreater=5500:state=13
:state=13:lightred=255,lightgreen=255,lightblue=255
:state=13,timergreater=6000:state=14
:state=14:lightred=255,lightgreen=0,lightblue=0
:state=14,timergreater=6500:state=15
:state=15:lightred=255,lightgreen=255,lightblue=255
:state=15,timergreater=7000:state=0
;End of Script
Place a Light marker in your map.
Right click the Light and set its STATIC MODE to NO.
Set the Light's AI MAIN to the alarm.fpi
Place a Trigger in your map, like a blood-splat or something.
Right click the Trigger and set its IFUSED to Light or whatever the light's name is if you changed it.
If it is an entity for the trigger make sure its STATIC MODE is set to NO
Set the Trigger's AI MAIN to plrinzoneactivateused.fpi
Entering a pin number of a door
By xplosys
This script changes the default "PRESS ENTER TO USE" on a switch to an "ENTER ACCESS CODE" in order to
open a door or whatever you might use a switch for. You can change the access code in the script, as well as
the button sound when a key is pressed. This script will wait for you to enter the correct digit before moving
on to the next.
;Artificial Intelligence Script
; by xplosys
;INSTRUCTIONS
; In the lines state=10 through state=13
; change the scancodekeypressed=X value
; to change the access code.
;
; The code is only required to open and
; not to close. For instance, if used to
; open a door, the access code will open
; the door and the enter key will close
; it again.
;Header
desc = Switch Activate (enter pass code)
;Triggers
:state=0:hudreset,hudx=50,hudy=90,hudimagefine=gamecore\text\enteracc
esscode.tga,hudname=useswitchprompt,hudhide=1,hudmake=display,state=1
0
:plrdistwithin=50:hudshow=useswitchprompt,hudfadeout=useswitchprompt
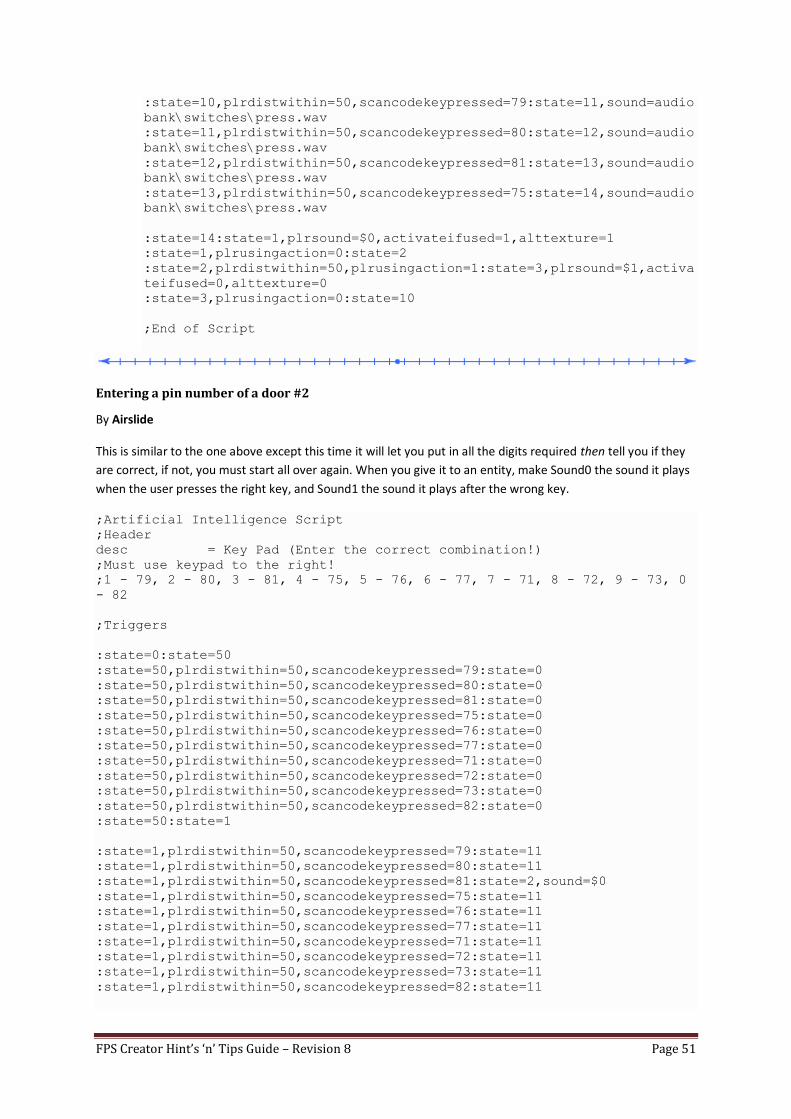
FPS Creator Hint’s ‘n’ Tips Guide – Revision 8 Page 51
:state=10,plrdistwithin=50,scancodekeypressed=79:state=11,sound=audio
bank\switches\press.wav
:state=11,plrdistwithin=50,scancodekeypressed=80:state=12,sound=audio
bank\switches\press.wav
:state=12,plrdistwithin=50,scancodekeypressed=81:state=13,sound=audio
bank\switches\press.wav
:state=13,plrdistwithin=50,scancodekeypressed=75:state=14,sound=audio
bank\switches\press.wav
:state=14:state=1,plrsound=$0,activateifused=1,alttexture=1
:state=1,plrusingaction=0:state=2
:state=2,plrdistwithin=50,plrusingaction=1:state=3,plrsound=$1,activa
teifused=0,alttexture=0
:state=3,plrusingaction=0:state=10
;End of Script
Entering a pin number of a door #2
By Airslide
This is similar to the one above except this time it will let you put in all the digits required then tell you if they
are correct, if not, you must start all over again. When you give it to an entity, make Sound0 the sound it plays
when the user presses the right key, and Sound1 the sound it plays after the wrong key.
;Artificial Intelligence Script
;Header
desc = Key Pad (Enter the correct combination!)
;Must use keypad to the right!
;1 - 79, 2 - 80, 3 - 81, 4 - 75, 5 - 76, 6 - 77, 7 - 71, 8 - 72, 9 - 73, 0
- 82
;Triggers
:state=0:state=50
:state=50,plrdistwithin=50,scancodekeypressed=79:state=0
:state=50,plrdistwithin=50,scancodekeypressed=80:state=0
:state=50,plrdistwithin=50,scancodekeypressed=81:state=0
:state=50,plrdistwithin=50,scancodekeypressed=75:state=0
:state=50,plrdistwithin=50,scancodekeypressed=76:state=0
:state=50,plrdistwithin=50,scancodekeypressed=77:state=0
:state=50,plrdistwithin=50,scancodekeypressed=71:state=0
:state=50,plrdistwithin=50,scancodekeypressed=72:state=0
:state=50,plrdistwithin=50,scancodekeypressed=73:state=0
:state=50,plrdistwithin=50,scancodekeypressed=82:state=0
:state=50:state=1
:state=1,plrdistwithin=50,scancodekeypressed=79:state=11
:state=1,plrdistwithin=50,scancodekeypressed=80:state=11
:state=1,plrdistwithin=50,scancodekeypressed=81:state=2,sound=$0
:state=1,plrdistwithin=50,scancodekeypressed=75:state=11
:state=1,plrdistwithin=50,scancodekeypressed=76:state=11
:state=1,plrdistwithin=50,scancodekeypressed=77:state=11
:state=1,plrdistwithin=50,scancodekeypressed=71:state=11
:state=1,plrdistwithin=50,scancodekeypressed=72:state=11
:state=1,plrdistwithin=50,scancodekeypressed=73:state=11
:state=1,plrdistwithin=50,scancodekeypressed=82:state=11
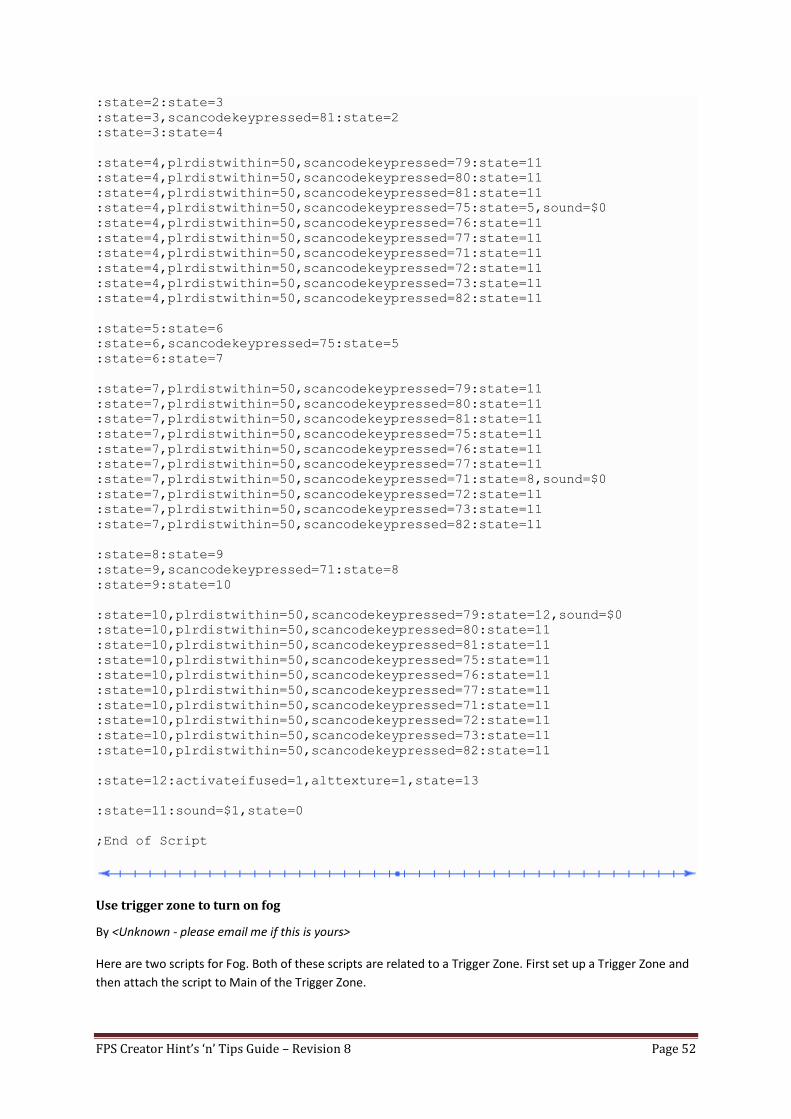
FPS Creator Hint’s ‘n’ Tips Guide – Revision 8 Page 52
:state=2:state=3
:state=3,scancodekeypressed=81:state=2
:state=3:state=4
:state=4,plrdistwithin=50,scancodekeypressed=79:state=11
:state=4,plrdistwithin=50,scancodekeypressed=80:state=11
:state=4,plrdistwithin=50,scancodekeypressed=81:state=11
:state=4,plrdistwithin=50,scancodekeypressed=75:state=5,sound=$0
:state=4,plrdistwithin=50,scancodekeypressed=76:state=11
:state=4,plrdistwithin=50,scancodekeypressed=77:state=11
:state=4,plrdistwithin=50,scancodekeypressed=71:state=11
:state=4,plrdistwithin=50,scancodekeypressed=72:state=11
:state=4,plrdistwithin=50,scancodekeypressed=73:state=11
:state=4,plrdistwithin=50,scancodekeypressed=82:state=11
:state=5:state=6
:state=6,scancodekeypressed=75:state=5
:state=6:state=7
:state=7,plrdistwithin=50,scancodekeypressed=79:state=11
:state=7,plrdistwithin=50,scancodekeypressed=80:state=11
:state=7,plrdistwithin=50,scancodekeypressed=81:state=11
:state=7,plrdistwithin=50,scancodekeypressed=75:state=11
:state=7,plrdistwithin=50,scancodekeypressed=76:state=11
:state=7,plrdistwithin=50,scancodekeypressed=77:state=11
:state=7,plrdistwithin=50,scancodekeypressed=71:state=8,sound=$0
:state=7,plrdistwithin=50,scancodekeypressed=72:state=11
:state=7,plrdistwithin=50,scancodekeypressed=73:state=11
:state=7,plrdistwithin=50,scancodekeypressed=82:state=11
:state=8:state=9
:state=9,scancodekeypressed=71:state=8
:state=9:state=10
:state=10,plrdistwithin=50,scancodekeypressed=79:state=12,sound=$0
:state=10,plrdistwithin=50,scancodekeypressed=80:state=11
:state=10,plrdistwithin=50,scancodekeypressed=81:state=11
:state=10,plrdistwithin=50,scancodekeypressed=75:state=11
:state=10,plrdistwithin=50,scancodekeypressed=76:state=11
:state=10,plrdistwithin=50,scancodekeypressed=77:state=11
:state=10,plrdistwithin=50,scancodekeypressed=71:state=11
:state=10,plrdistwithin=50,scancodekeypressed=72:state=11
:state=10,plrdistwithin=50,scancodekeypressed=73:state=11
:state=10,plrdistwithin=50,scancodekeypressed=82:state=11
:state=12:activateifused=1,alttexture=1,state=13
:state=11:sound=$1,state=0
;End of Script
Use trigger zone to turn on fog
By <Unknown - please email me if this is yours>
Here are two scripts for Fog. Both of these scripts are related to a Trigger Zone. First set up a Trigger Zone and
then attach the script to Main of the Trigger Zone.
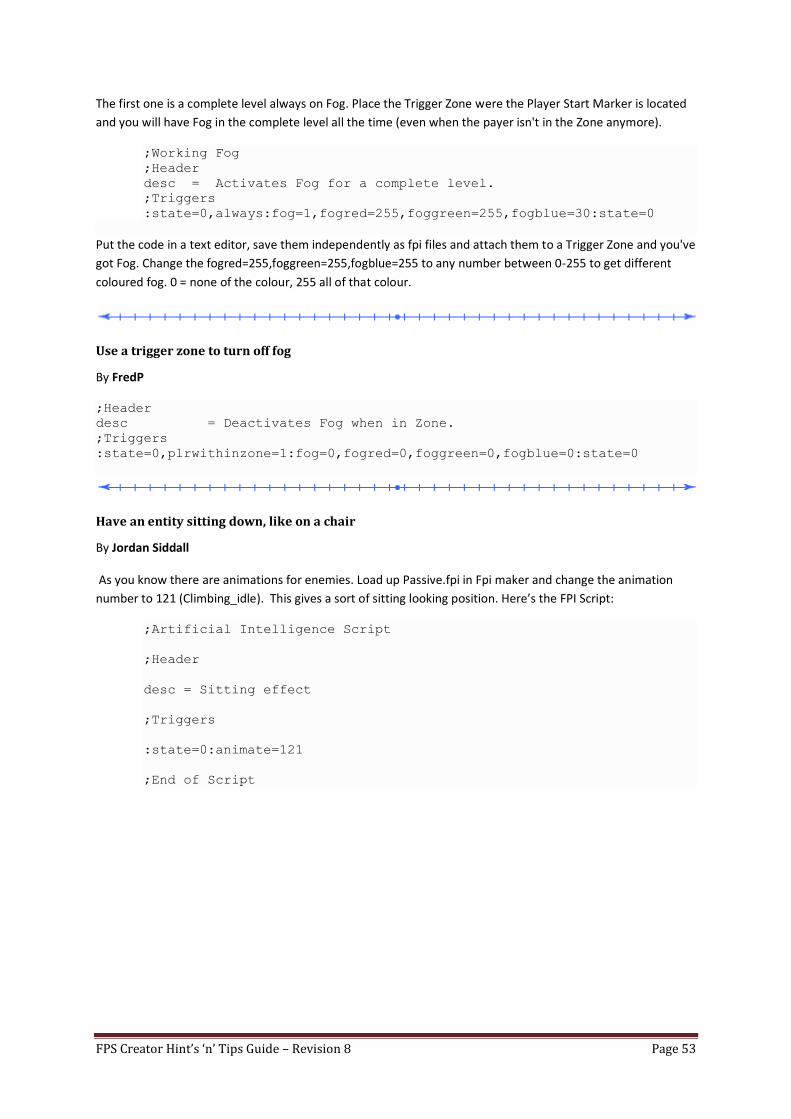
FPS Creator Hint’s ‘n’ Tips Guide – Revision 8 Page 53
The first one is a complete level always on Fog. Place the Trigger Zone were the Player Start Marker is located
and you will have Fog in the complete level all the time (even when the payer isn't in the Zone anymore).
;Working Fog
;Header
desc = Activates Fog for a complete level.
;Triggers
:state=0,always:fog=1,fogred=255,foggreen=255,fogblue=30:state=0
Put the code in a text editor, save them independently as fpi files and attach them to a Trigger Zone and you've
got Fog. Change the fogred=255,foggreen=255,fogblue=255 to any number between 0-255 to get different
coloured fog. 0 = none of the colour, 255 all of that colour.
Use a trigger zone to turn off fog
By FredP
;Header
desc = Deactivates Fog when in Zone.
;Triggers
:state=0,plrwithinzone=1:fog=0,fogred=0,foggreen=0,fogblue=0:state=0
Have an entity sitting down, like on a chair
By Jordan Siddall
As you know there are animations for enemies. Load up Passive.fpi in Fpi maker and change the animation
number to 121 (Climbing_idle). This gives a sort of sitting looking position. Here’s the FPI Script:
;Artificial Intelligence Script
;Header
desc = Sitting effect
;Triggers
:state=0:animate=121
;End of Script
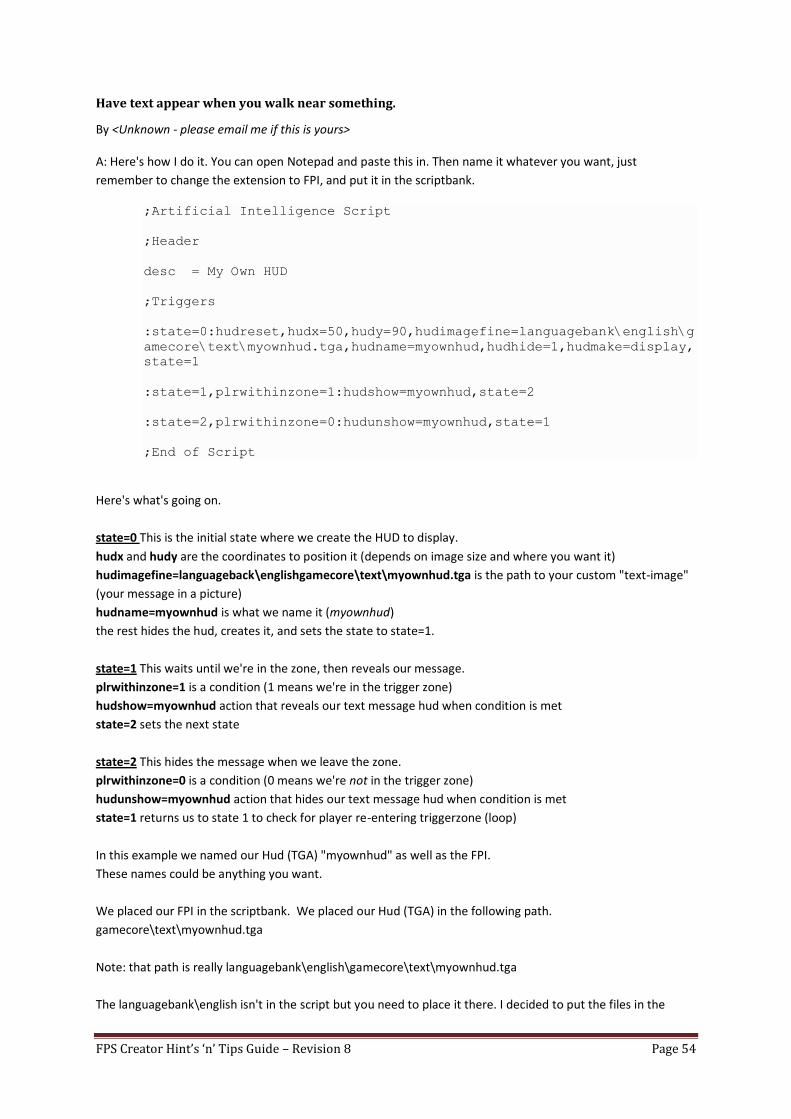
FPS Creator Hint’s ‘n’ Tips Guide – Revision 8 Page 54
Have text appear when you walk near something.
By <Unknown - please email me if this is yours>
A: Here's how I do it. You can open Notepad and paste this in. Then name it whatever you want, just
remember to change the extension to FPI, and put it in the scriptbank.
;Artificial Intelligence Script
;Header
desc = My Own HUD
;Triggers
:state=0:hudreset,hudx=50,hudy=90,hudimagefine=languagebank\english\g
amecore\text\myownhud.tga,hudname=myownhud,hudhide=1,hudmake=display,
state=1
:state=1,plrwithinzone=1:hudshow=myownhud,state=2
:state=2,plrwithinzone=0:hudunshow=myownhud,state=1
;End of Script
Here's what's going on.
state=0 This is the initial state where we create the HUD to display.
hudx and hudy are the coordinates to position it (depends on image size and where you want it)
hudimagefine=languageback\englishgamecore\text\myownhud.tga is the path to your custom "text-image"
(your message in a picture)
hudname=myownhud is what we name it (myownhud)
the rest hides the hud, creates it, and sets the state to state=1.
state=1 This waits until we're in the zone, then reveals our message.
plrwithinzone=1 is a condition (1 means we're in the trigger zone)
hudshow=myownhud action that reveals our text message hud when condition is met
state=2 sets the next state
state=2 This hides the message when we leave the zone.
plrwithinzone=0 is a condition (0 means we're not in the trigger zone)
hudunshow=myownhud action that hides our text message hud when condition is met
state=1 returns us to state 1 to check for player re-entering triggerzone (loop)
In this example we named our Hud (TGA) "myownhud" as well as the FPI.
These names could be anything you want.
We placed our FPI in the scriptbank. We placed our Hud (TGA) in the following path.
gamecore\text\myownhud.tga
Note: that path is really languagebank\english\gamecore\text\myownhud.tga
The languagebank\english isn't in the script but you need to place it there. I decided to put the files in the
FPS Creator Hint’s ‘n’ Tips Guide – Revision 8 Page 55
default folders rather than making new ones because of this.
Now just place a Trigger Zone Marker where you want it.
Then right click it and change the ai main to whatever you named your FPI.
Destroy object – lock door.
By <Unknown - please email me if this is yours>
Here is a script that when you put it into a trigger zone, it will close a door.
;Artificial Intelligence Script
;Header
desc = Door close trigger
;Triggers
:state=0,plrwithinzone=1:activateifused=0,sound=$0,state=1
Show objectives on screen
By Silent Thunder and Conjured Entertainment
This script displays the objectives (an image – “objectives.tga” which you must create) when you hold the TAB
key and disappears when you let off of it.
;Objectives on Screen Script
; Script by: Silent Thunder
; Edited by Conjured Entertainment
desc = Display Objectives via TAB key
;Triggers
:state=0:hudreset,hudx=50,hudy=90,hudimagefine=gamecore/huds/objectiv
es.tga,hudname=objectives,hudhide=1,hudmake=display,state=1
:state=1,scancodekeypressed=15:state=2
:state=1:hudunshow=objectives
:state=2:hudshow=objectives,state=1
;End of Script
FPS Creator Hint’s ‘n’ Tips Guide – Revision 8 Page 56
Game over when a certain NPC dies
By Candle
Add the following script to Destroy under the NPC’s AI Script and it will be game over for the player if this NPC
dies.
;End Game Script
; By Candle http://www.candles-weblog.us
;Header
desc = Shoot NPC
;Triggers
:state=0:state=1
:state=1,alphafadeequal=100:decalphafade=0
:state=1,alphafadeequal=0:state=2,destroy,newgame
;End of Script
In game cheat
By Gam3r
Here’s how to let the player have an in game cheat:
;Artificial Intelligence Script
; script by Gam3r
; please visit http://tbc.redlime.org or fpsc.redlime.org for more
scripts and media!
;header
desc = Health Cheat
;triggers
:state=0,plrwithinzone=1:state=1
:state=1,SCANCODEKEYPRESSED=35:state=2
:state=2,SCANCODEKEYPRESSED=18:state=3
:state=3,SCANCODEKEYPRESSED=30:state=4
:state=4,SCANCODEKEYPRESSED=38:state=5
:state=5,SCANCODEKEYPRESSED=20:state=6
:state=6,SCANCODEKEYPRESSED=35:plraddhealth=100,hudreset,hudx=50,hudy
=10,hudimage=languagebank\english\gamecore\huds\cheatactivated.png,hu
dname=cheat,hudhide=1,hudmake=display,hudshow=cheat,hudfadeout=cheat,
state=0
;End of Script
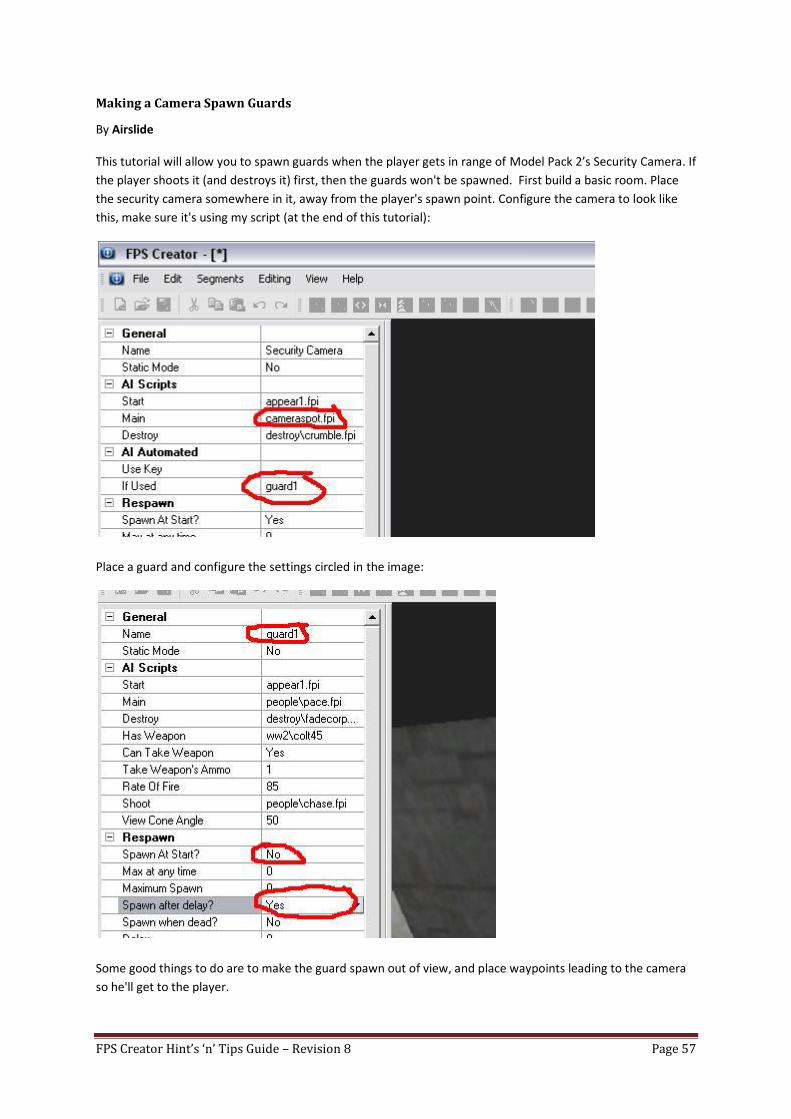
FPS Creator Hint’s ‘n’ Tips Guide – Revision 8 Page 57
Making a Camera Spawn Guards
By Airslide
This tutorial will allow you to spawn guards when the player gets in range of Model Pack 2’s Security Camera. If
the player shoots it (and destroys it) first, then the guards won't be spawned. First build a basic room. Place
the security camera somewhere in it, away from the player's spawn point. Configure the camera to look like
this, make sure it's using my script (at the end of this tutorial):
Place a guard and configure the settings circled in the image:
Some good things to do are to make the guard spawn out of view, and place waypoints leading to the camera
so he'll get to the player.
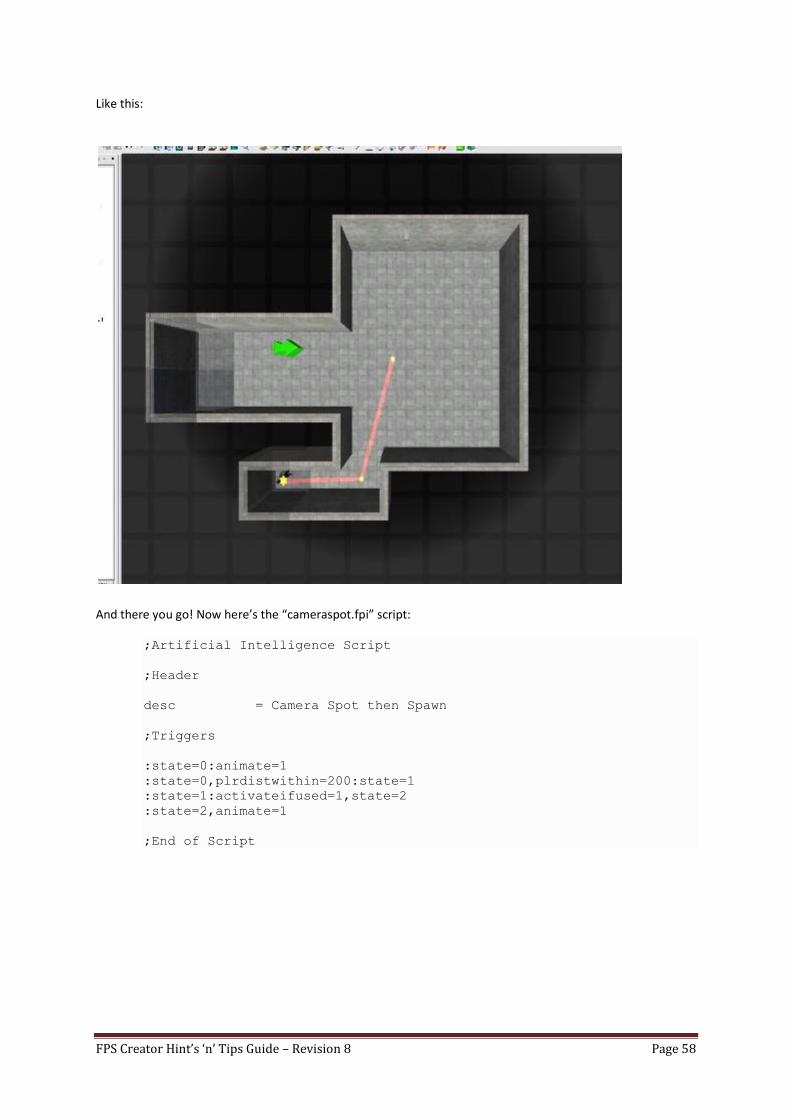
FPS Creator Hint’s ‘n’ Tips Guide – Revision 8 Page 58
Like this:
And there you go! Now here’s the “cameraspot.fpi” script:
;Artificial Intelligence Script
;Header
desc = Camera Spot then Spawn
;Triggers
:state=0:animate=1
:state=0,plrdistwithin=200:state=1
:state=1:activateifused=1,state=2
:state=2,animate=1
;End of Script
FPS Creator Hint’s ‘n’ Tips Guide – Revision 8 Page 59
Auto Quicksave
By Airslide
This script can be very useful, it autosaves to the first slot by using the 'quicksave' command.
;Artificial Intelligence Script
;Header
desc = Plr Save In Zone
;Triggers
:state=0,plrwithinzone=1:quicksavegame,state=1
;state=1,plrwithinzone=0:state=0
It also has a bottom line you can uncomment if you wish to save every time the player enters the area. It could
be modified to be like Ghost Recon: Advanced Warfighter, where you press enter and it restores your health
+saves. Of course, if you want it like that, you may want to modify it to let the player choose the slot.
How to change the ambience lighting per level
By Benjamin A
You can change the ambience level through a script. Create a trigger zone, place it near the player. Attach a
script to it that controls the ambience for that level. Do this in each level.
;Header
desc = ambience by BenjaminA
;Triggers
:state=0,always:ambience=3,ambiencered=25,ambiencegreen=25,ambienceblue=155
:state=0
;End of Script
Change this script for each level and save it as a new file. You need a file for each level.
Or.... you can also use a number of larger trigger zones and change the ambience within the level and have
different ambience effects in your level.
This will give you a bright ambience in when the player is in a trigger zone:
;Header
desc = bright ambience by BenjaminA
;Triggers
:state=0,plrwithinzone=1:ambience=95,ambiencered=255,ambiencegreen=255,ambi
enceblue=255:state=0
;End of Script
FPS Creator Hint’s ‘n’ Tips Guide – Revision 8 Page 60
This will give you a dark ambience when the player is in a trigger zone:
;Header
desc = dark ambience by BenjaminA
;Triggers
:state=0,plrwithinzone=1:ambience=3,ambiencered=96,ambiencegreen=255,ambien
ceblue=255:state=0
;End of Script
This will give you a more normal ambience again.
;Header
desc = normal ambience by BenjaminA
;Triggers
:state=0,plrwithinzone=1:ambience=28,ambiencered=95,ambiencegreen=255,ambie
nceblue=255:state=0
;End of Script
You can use a number of these scripts in one level. Attach the scripts and others you've derived from them to
trigger zones. When the player steps into the trigger zone the ambience will change. When he's steps into
another a trigger zone, the ambiance will change again and so on.
Here are some fun ones:
;Header desc = disco ambience by BenjaminA
;Triggers
:state=0,plrwithinzone=1:ambience=25,ambiencered=255,ambiencegreen=0,ambien
ceblue=0,timerstart,state=1
:state=1,timergreater=500:state=2
:state=2,plrwithinzone=1:ambience=5,ambiencered=255,ambiencegreen=0,ambienc
eblue=0,timerstart,state=3
:state=3,timergreater=500:state=4
:state=4,plrwithinzone=1:ambience=35,ambiencered=0,ambiencegreen=255,ambien
ceblue=0,timerstart,state=5
:state=5,timergreater=500:state=6
:state=6,plrwithinzone=1:ambience=5,ambiencered=0,ambiencegreen=255,ambienc
eblue=0,timerstart,state=7
:state=7,timergreater=500:state=8
:state=8,plrwithinzone=1:ambience=25,ambiencered=0,ambiencegreen=0,ambience
blue=255,timerstart,state=9
:state=9,timergreater=500:state=10
FPS Creator Hint’s ‘n’ Tips Guide – Revision 8 Page 61
:state=10,plrwithinzone=1:ambience=5,ambiencered=0,ambiencegreen=0,ambience
blue=255,timerstart,state=11
:state=11,timergreater=500:state=0
;End of Script
---ooOOoo---
;Header
desc = flickering ambience by BenjaminA
;Triggers
:state=0,plrwithinzone=1:ambience=25,ambiencered=255,ambiencegreen=255,ambi
enceblue=255,timerstart,state=1
:state=1,timergreater=900:state=2
:state=2,plrwithinzone=1:ambience=5,ambiencered=255,ambiencegreen=255,ambie
nceblue=255,timerstart,state=3
:state=3,timergreater=400:state=0
---ooOOoo---
Next is a script that will change the ambience from day to night while you’re actually playing the game!
;Artificial Intelligence Script
;Header
desc = day night routine by BenjaminA
;Triggers
:state=0,plrwithinzone=1:ambience=5,ambiencered=255,ambiencegreen=255,ambie
nceblue=255,timerstart,state=1
:state=1,timergreater=9500:state=2
:state=2,plrwithinzone=1:ambience=15,ambiencered=255,ambiencegreen=255,ambi
enceblue=255,timerstart,state=3
:state=3,timergreater=4500:state=4
:state=4,plrwithinzone=1:ambience=30,ambiencered=255,ambiencegreen=255,ambi
enceblue=255,timerstart,state=5
:state=5,timergreater=4500:state=6
:state=6,plrwithinzone=1:ambience=45,ambiencered=255,ambiencegreen=255,ambi
enceblue=255,timerstart,state=7
:state=7,timergreater=9500:state=8
:state=8,plrwithinzone=1:ambience=30,ambiencered=255,ambiencegreen=255,ambi
enceblue=255,timerstart,state=9
FPS Creator Hint’s ‘n’ Tips Guide – Revision 8 Page 62
:state=9,timergreater=4500:state=10
:state=10,plrwithinzone=1:ambience=15,ambiencered=255,ambiencegreen=255,amb
ienceblue=255,timerstart,state=11
:state=11,timergreater=4500:state=0
;End of Script
You can change the timing as you like, but note that state 1 & 7 use larger number to really give the impression
of a day and night, the others are dayrise and nightfall, they don't take as long as the day.
Trigger a door when object is placed
By Conjured Entertainment
(1) Copy and paste this code in Notepad and save it as openup.fpi in the scriptbank\user folder
(or whatever you want to name it, just make sure it has the fpi extension)
;Artificial Intelligence Script
;Header
desc = open up
;Triggers
:state=0,anywithinzone=1:activateifused=1,state=1
:state=1,anywithinzone=0:activateifused=0,state=0
;End of Script
(2) Place the 2 entities, a remote door and your pedestal (I used a blood-splat)
(3) Right click on the pedestal and put Remote Door (or door's new name if you changed it) in the IFUSED
field.
(4) Set the AIMAIN of your pedestal to point to your script (openup.fpi)
(5) Place your crate or any other object that can be picked up.
Now if you carry the crate to the pedestal then the door will open.
If you move it away the door will close again.
It was easier than I originally thought.
If you replace the anywithinzone to plrwithinzone then it will activate if the player stands there.
This is if you just want them to select a certain textured tile as their answer and skip the crate.
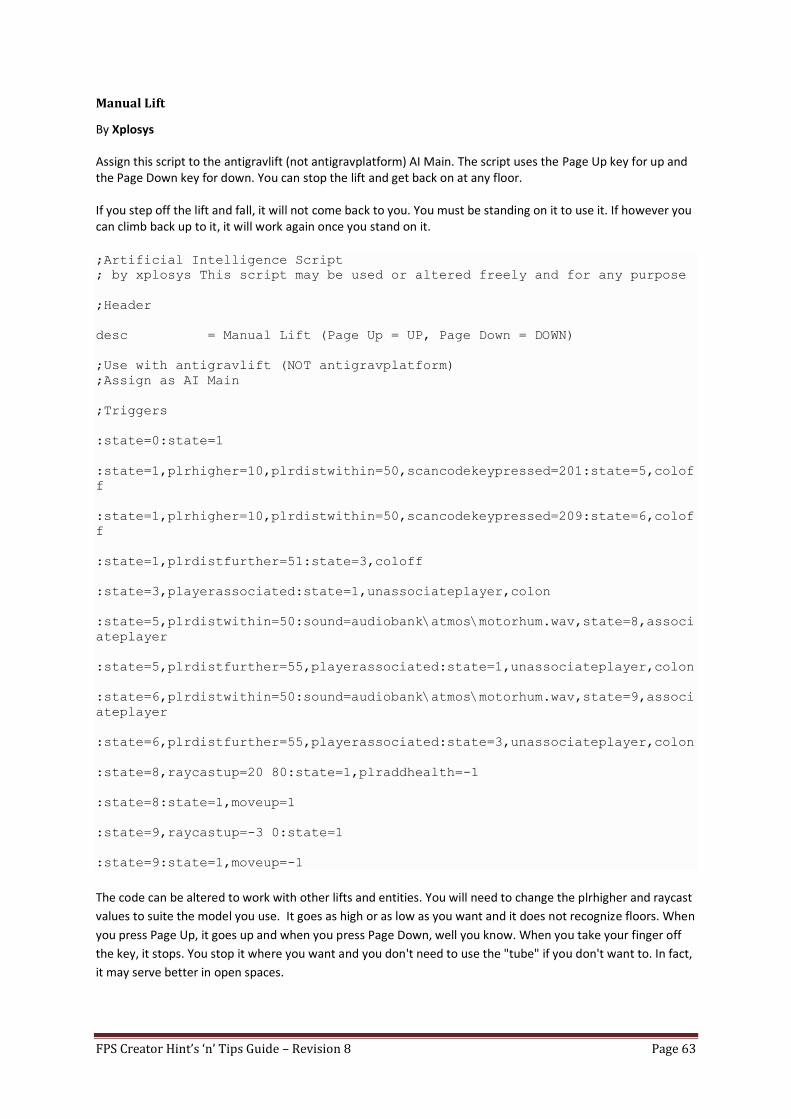
FPS Creator Hint’s ‘n’ Tips Guide – Revision 8 Page 63
Manual Lift
By Xplosys
Assign this script to the antigravlift (not antigravplatform) AI Main. The script uses the Page Up key for up and the Page Down key for down. You can stop the lift and get back on at any floor. If you step off the lift and fall, it will not come back to you. You must be standing on it to use it. If however you can climb back up to it, it will work again once you stand on it. ;Artificial Intelligence Script
; by xplosys This script may be used or altered freely and for any purpose
;Header
desc = Manual Lift (Page Up = UP, Page Down = DOWN)
;Use with antigravlift (NOT antigravplatform)
;Assign as AI Main
;Triggers
:state=0:state=1
:state=1,plrhigher=10,plrdistwithin=50,scancodekeypressed=201:state=5,colof
f
:state=1,plrhigher=10,plrdistwithin=50,scancodekeypressed=209:state=6,colof
f
:state=1,plrdistfurther=51:state=3,coloff
:state=3,playerassociated:state=1,unassociateplayer,colon
:state=5,plrdistwithin=50:sound=audiobank\atmos\motorhum.wav,state=8,associ
ateplayer
:state=5,plrdistfurther=55,playerassociated:state=1,unassociateplayer,colon
:state=6,plrdistwithin=50:sound=audiobank\atmos\motorhum.wav,state=9,associ
ateplayer
:state=6,plrdistfurther=55,playerassociated:state=3,unassociateplayer,colon
:state=8,raycastup=20 80:state=1,plraddhealth=-1
:state=8:state=1,moveup=1
:state=9,raycastup=-3 0:state=1
:state=9:state=1,moveup=-1
The code can be altered to work with other lifts and entities. You will need to change the plrhigher and raycast
values to suite the model you use. It goes as high or as low as you want and it does not recognize floors. When
you press Page Up, it goes up and when you press Page Down, well you know. When you take your finger off
the key, it stops. You stop it where you want and you don't need to use the "tube" if you don't want to. In fact,
it may serve better in open spaces.
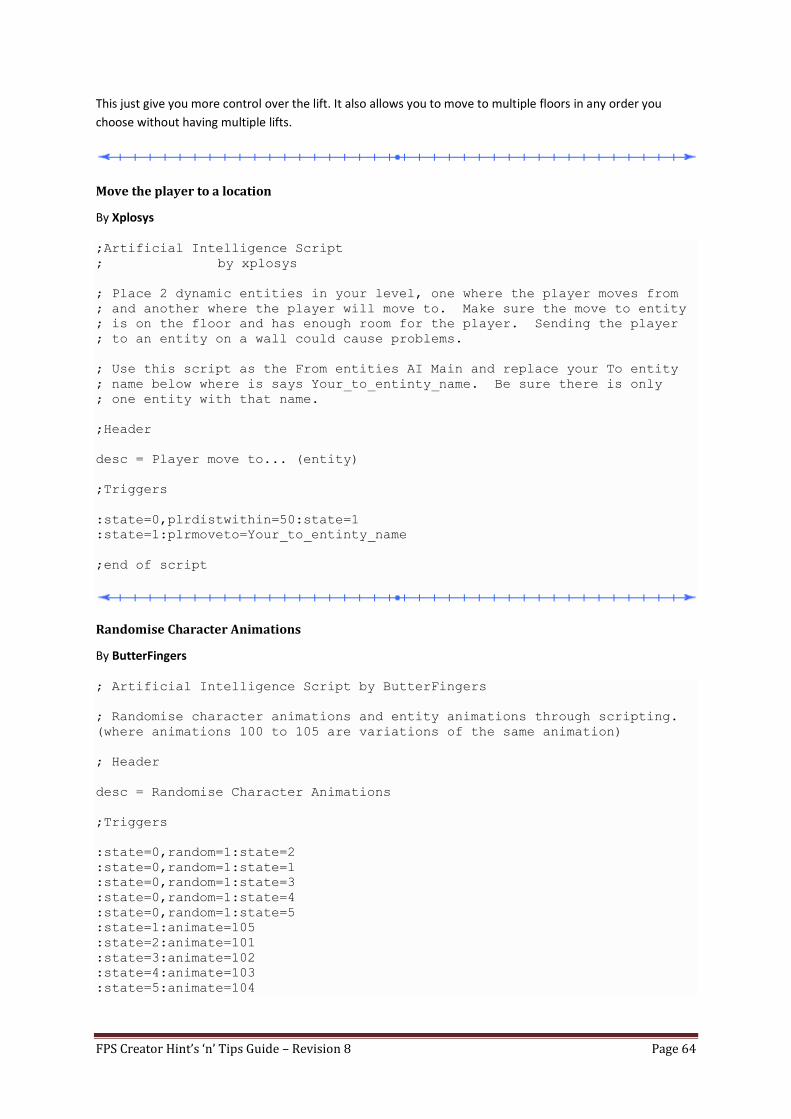
FPS Creator Hint’s ‘n’ Tips Guide – Revision 8 Page 64
This just give you more control over the lift. It also allows you to move to multiple floors in any order you
choose without having multiple lifts.
Move the player to a location
By Xplosys
;Artificial Intelligence Script
; by xplosys
; Place 2 dynamic entities in your level, one where the player moves from
; and another where the player will move to. Make sure the move to entity
; is on the floor and has enough room for the player. Sending the player
; to an entity on a wall could cause problems.
; Use this script as the From entities AI Main and replace your To entity
; name below where is says Your_to_entinty_name. Be sure there is only
; one entity with that name.
;Header
desc = Player move to... (entity)
;Triggers
:state=0,plrdistwithin=50:state=1
:state=1:plrmoveto=Your_to_entinty_name
;end of script
Randomise Character Animations
By ButterFingers
; Artificial Intelligence Script by ButterFingers
; Randomise character animations and entity animations through scripting.
(where animations 100 to 105 are variations of the same animation)
; Header
desc = Randomise Character Animations
;Triggers
:state=0,random=1:state=2
:state=0,random=1:state=1
:state=0,random=1:state=3
:state=0,random=1:state=4
:state=0,random=1:state=5
:state=1:animate=105
:state=2:animate=101
:state=3:animate=102
:state=4:animate=103
:state=5:animate=104
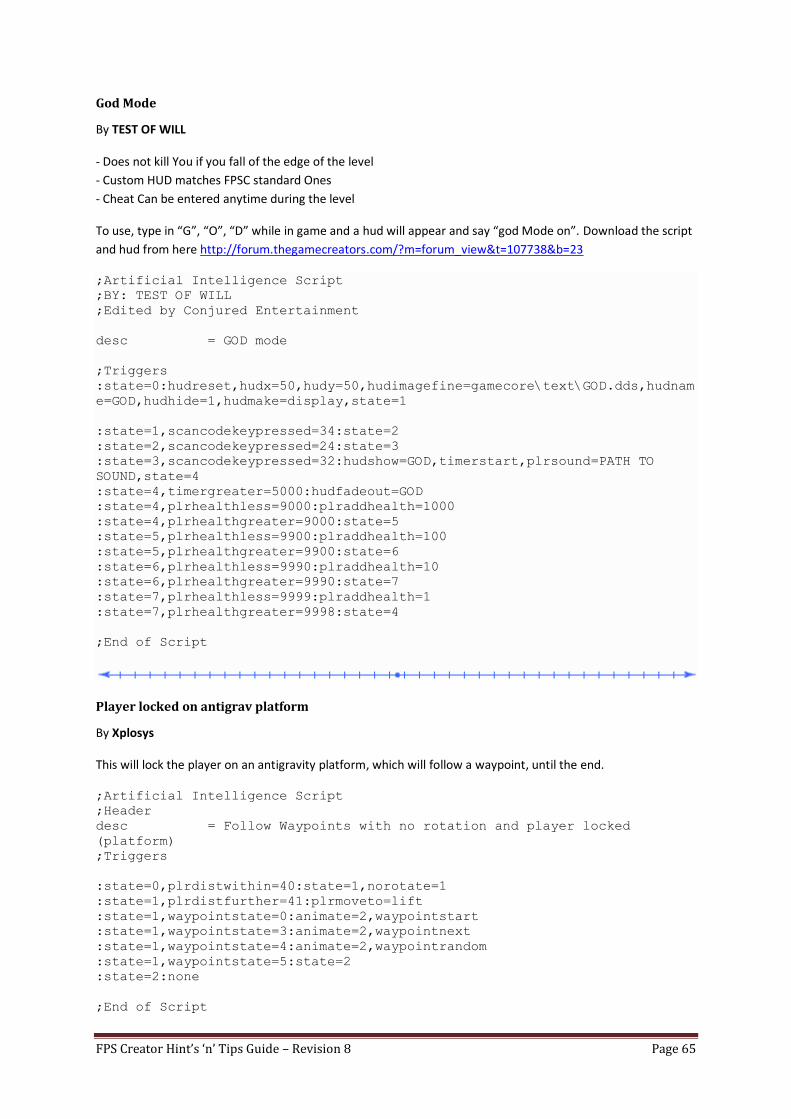
FPS Creator Hint’s ‘n’ Tips Guide – Revision 8 Page 65
God Mode
By TEST OF WILL
- Does not kill You if you fall of the edge of the level
- Custom HUD matches FPSC standard Ones
- Cheat Can be entered anytime during the level
To use, type in “G”, “O”, “D” while in game and a hud will appear and say “god Mode on”. Download the script
and hud from here http://forum.thegamecreators.com/?m=forum_view&t=107738&b=23
;Artificial Intelligence Script
;BY: TEST OF WILL
;Edited by Conjured Entertainment
desc = GOD mode
;Triggers
:state=0:hudreset,hudx=50,hudy=50,hudimagefine=gamecore\text\GOD.dds,hudnam
e=GOD,hudhide=1,hudmake=display,state=1
:state=1,scancodekeypressed=34:state=2
:state=2,scancodekeypressed=24:state=3
:state=3,scancodekeypressed=32:hudshow=GOD,timerstart,plrsound=PATH TO
SOUND,state=4
:state=4,timergreater=5000:hudfadeout=GOD
:state=4,plrhealthless=9000:plraddhealth=1000
:state=4,plrhealthgreater=9000:state=5
:state=5,plrhealthless=9900:plraddhealth=100
:state=5,plrhealthgreater=9900:state=6
:state=6,plrhealthless=9990:plraddhealth=10
:state=6,plrhealthgreater=9990:state=7
:state=7,plrhealthless=9999:plraddhealth=1
:state=7,plrhealthgreater=9998:state=4
;End of Script
Player locked on antigrav platform
By Xplosys
This will lock the player on an antigravity platform, which will follow a waypoint, until the end.
;Artificial Intelligence Script
;Header
desc = Follow Waypoints with no rotation and player locked
(platform)
;Triggers
:state=0,plrdistwithin=40:state=1,norotate=1
:state=1,plrdistfurther=41:plrmoveto=lift
:state=1,waypointstate=0:animate=2,waypointstart
:state=1,waypointstate=3:animate=2,waypointnext
:state=1,waypointstate=4:animate=2,waypointrandom
:state=1,waypointstate=5:state=2
:state=2:none
;End of Script
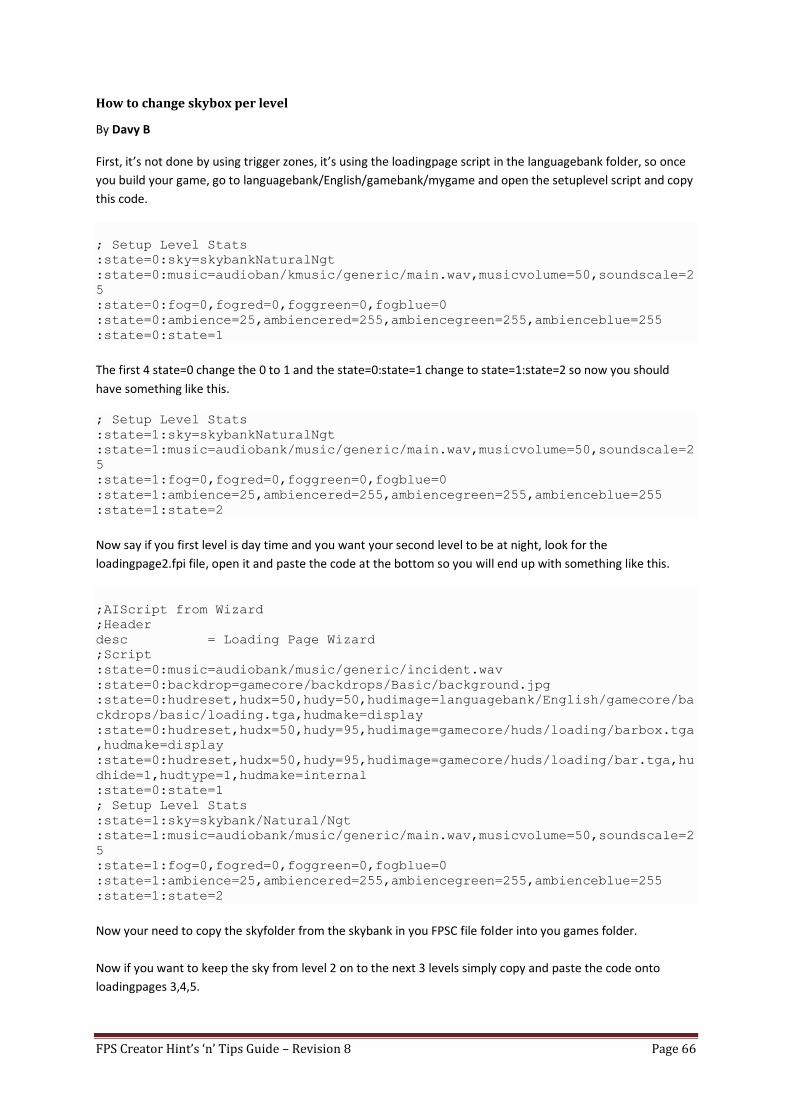
FPS Creator Hint’s ‘n’ Tips Guide – Revision 8 Page 66
How to change skybox per level
By Davy B
First, it’s not done by using trigger zones, it’s using the loadingpage script in the languagebank folder, so once
you build your game, go to languagebank/English/gamebank/mygame and open the setuplevel script and copy
this code.
; Setup Level Stats
:state=0:sky=skybankNaturalNgt
:state=0:music=audioban/kmusic/generic/main.wav,musicvolume=50,soundscale=2
5
:state=0:fog=0,fogred=0,foggreen=0,fogblue=0
:state=0:ambience=25,ambiencered=255,ambiencegreen=255,ambienceblue=255
:state=0:state=1
The first 4 state=0 change the 0 to 1 and the state=0:state=1 change to state=1:state=2 so now you should
have something like this.
; Setup Level Stats
:state=1:sky=skybankNaturalNgt
:state=1:music=audiobank/music/generic/main.wav,musicvolume=50,soundscale=2
5
:state=1:fog=0,fogred=0,foggreen=0,fogblue=0
:state=1:ambience=25,ambiencered=255,ambiencegreen=255,ambienceblue=255
:state=1:state=2
Now say if you first level is day time and you want your second level to be at night, look for the
loadingpage2.fpi file, open it and paste the code at the bottom so you will end up with something like this.
;AIScript from Wizard
;Header
desc = Loading Page Wizard
;Script
:state=0:music=audiobank/music/generic/incident.wav
:state=0:backdrop=gamecore/backdrops/Basic/background.jpg
:state=0:hudreset,hudx=50,hudy=50,hudimage=languagebank/English/gamecore/ba
ckdrops/basic/loading.tga,hudmake=display
:state=0:hudreset,hudx=50,hudy=95,hudimage=gamecore/huds/loading/barbox.tga
,hudmake=display
:state=0:hudreset,hudx=50,hudy=95,hudimage=gamecore/huds/loading/bar.tga,hu
dhide=1,hudtype=1,hudmake=internal
:state=0:state=1
; Setup Level Stats
:state=1:sky=skybank/Natural/Ngt
:state=1:music=audiobank/music/generic/main.wav,musicvolume=50,soundscale=2
5
:state=1:fog=0,fogred=0,foggreen=0,fogblue=0
:state=1:ambience=25,ambiencered=255,ambiencegreen=255,ambienceblue=255
:state=1:state=2
Now your need to copy the skyfolder from the skybank in you FPSC file folder into you games folder.
Now if you want to keep the sky from level 2 on to the next 3 levels simply copy and paste the code onto
loadingpages 3,4,5.
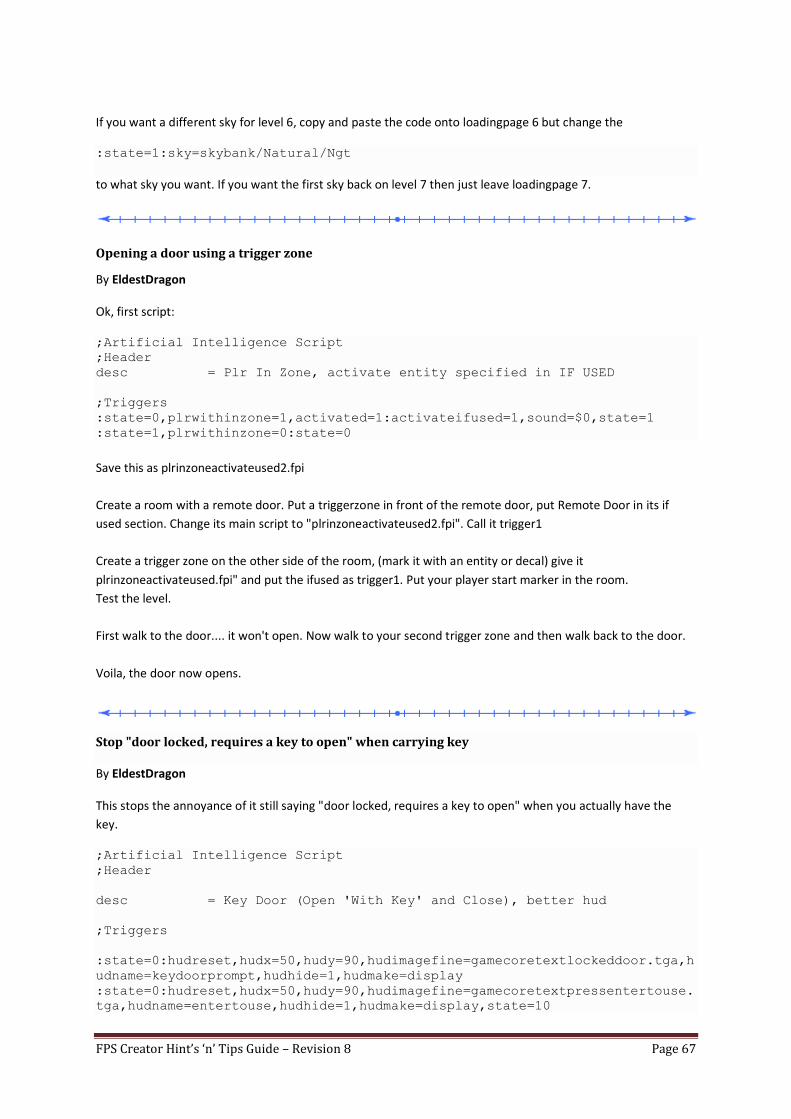
FPS Creator Hint’s ‘n’ Tips Guide – Revision 8 Page 67
If you want a different sky for level 6, copy and paste the code onto loadingpage 6 but change the
:state=1:sky=skybank/Natural/Ngt
to what sky you want. If you want the first sky back on level 7 then just leave loadingpage 7.
Opening a door using a trigger zone
By EldestDragon
Ok, first script:
;Artificial Intelligence Script
;Header
desc = Plr In Zone, activate entity specified in IF USED
;Triggers
:state=0,plrwithinzone=1,activated=1:activateifused=1,sound=$0,state=1
:state=1,plrwithinzone=0:state=0
Save this as plrinzoneactivateused2.fpi
Create a room with a remote door. Put a triggerzone in front of the remote door, put Remote Door in its if
used section. Change its main script to "plrinzoneactivateused2.fpi". Call it trigger1
Create a trigger zone on the other side of the room, (mark it with an entity or decal) give it
plrinzoneactivateused.fpi" and put the ifused as trigger1. Put your player start marker in the room.
Test the level.
First walk to the door.... it won't open. Now walk to your second trigger zone and then walk back to the door.
Voila, the door now opens.
Stop "door locked, requires a key to open" when carrying key By EldestDragon
This stops the annoyance of it still saying "door locked, requires a key to open" when you actually have the
key.
;Artificial Intelligence Script
;Header
desc = Key Door (Open 'With Key' and Close), better hud
;Triggers
:state=0:hudreset,hudx=50,hudy=90,hudimagefine=gamecoretextlockeddoor.tga,h
udname=keydoorprompt,hudhide=1,hudmake=display
:state=0:hudreset,hudx=50,hudy=90,hudimagefine=gamecoretextpressentertouse.
tga,hudname=entertouse,hudhide=1,hudmake=display,state=10
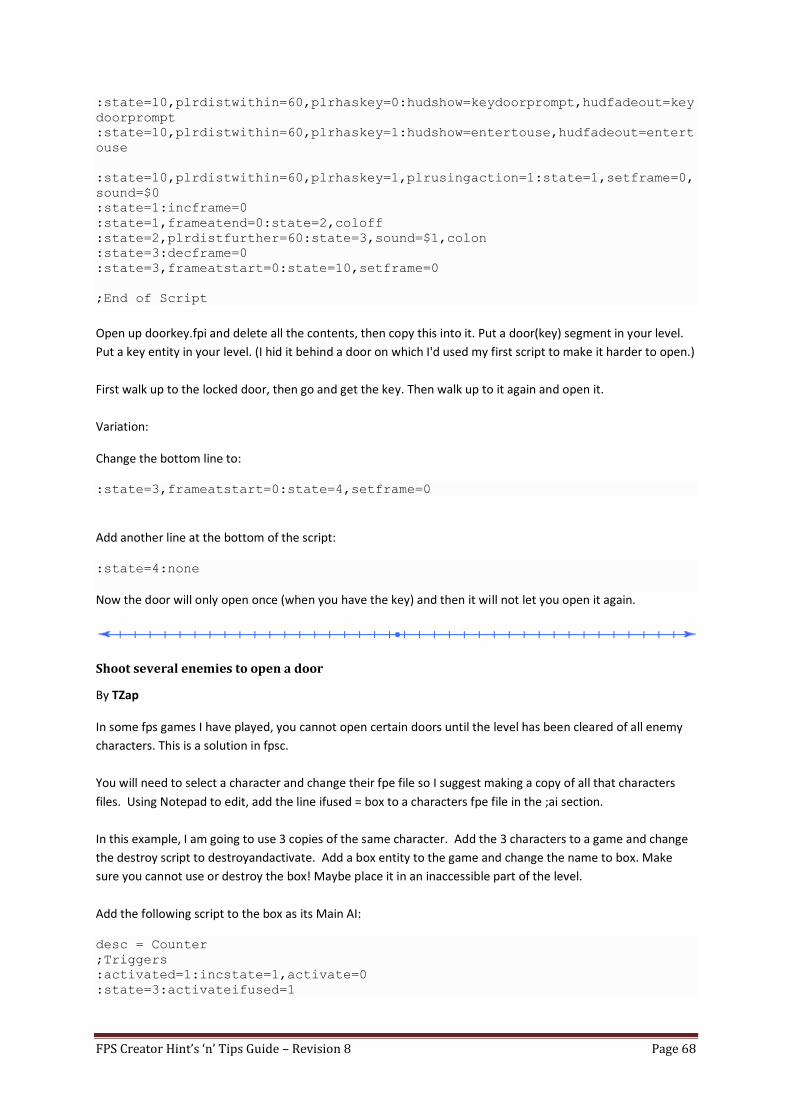
FPS Creator Hint’s ‘n’ Tips Guide – Revision 8 Page 68
:state=10,plrdistwithin=60,plrhaskey=0:hudshow=keydoorprompt,hudfadeout=key
doorprompt
:state=10,plrdistwithin=60,plrhaskey=1:hudshow=entertouse,hudfadeout=entert
ouse
:state=10,plrdistwithin=60,plrhaskey=1,plrusingaction=1:state=1,setframe=0,
sound=$0
:state=1:incframe=0
:state=1,frameatend=0:state=2,coloff
:state=2,plrdistfurther=60:state=3,sound=$1,colon
:state=3:decframe=0
:state=3,frameatstart=0:state=10,setframe=0
;End of Script
Open up doorkey.fpi and delete all the contents, then copy this into it. Put a door(key) segment in your level.
Put a key entity in your level. (I hid it behind a door on which I'd used my first script to make it harder to open.)
First walk up to the locked door, then go and get the key. Then walk up to it again and open it.
Variation:
Change the bottom line to:
:state=3,frameatstart=0:state=4,setframe=0
Add another line at the bottom of the script:
:state=4:none
Now the door will only open once (when you have the key) and then it will not let you open it again.
Shoot several enemies to open a door
By TZap
In some fps games I have played, you cannot open certain doors until the level has been cleared of all enemy
characters. This is a solution in fpsc.
You will need to select a character and change their fpe file so I suggest making a copy of all that characters
files. Using Notepad to edit, add the line ifused = box to a characters fpe file in the ;ai section.
In this example, I am going to use 3 copies of the same character. Add the 3 characters to a game and change
the destroy script to destroyandactivate. Add a box entity to the game and change the name to box. Make
sure you cannot use or destroy the box! Maybe place it in an inaccessible part of the level.
Add the following script to the box as its Main AI:
desc = Counter
;Triggers
:activated=1:incstate=1,activate=0
:state=3:activateifused=1
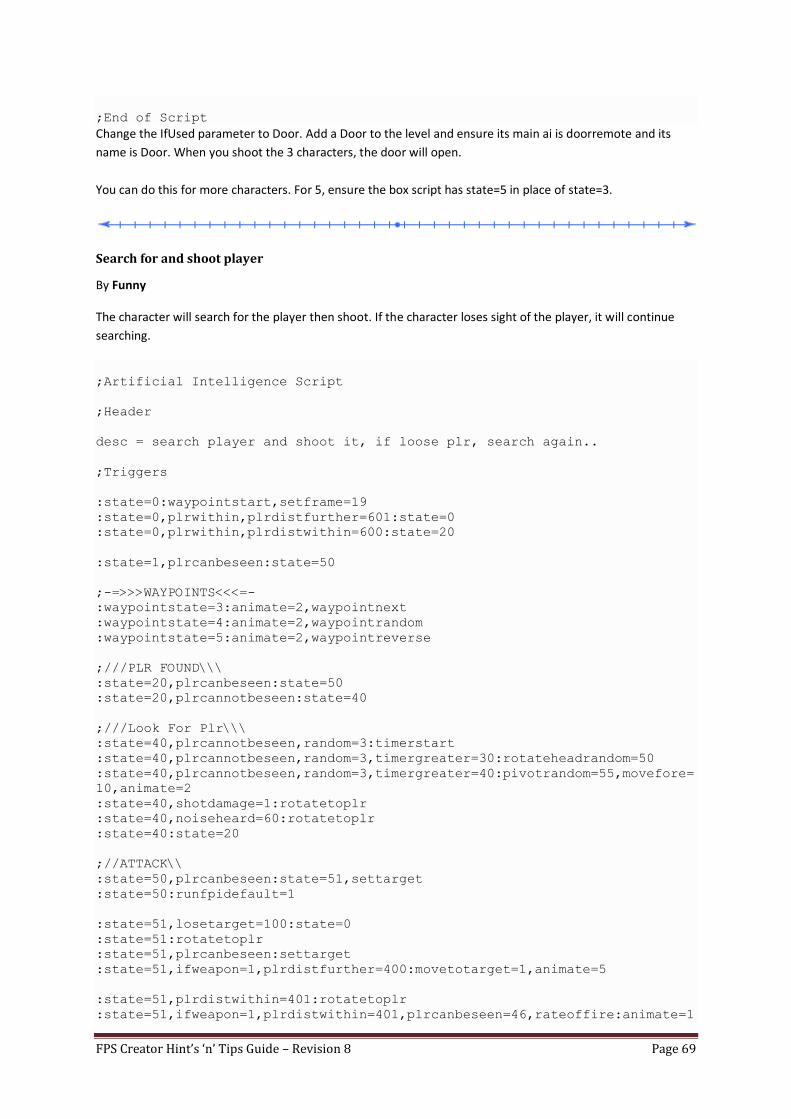
FPS Creator Hint’s ‘n’ Tips Guide – Revision 8 Page 69
;End of Script
Change the IfUsed parameter to Door. Add a Door to the level and ensure its main ai is doorremote and its
name is Door. When you shoot the 3 characters, the door will open.
You can do this for more characters. For 5, ensure the box script has state=5 in place of state=3.
Search for and shoot player
By Funny
The character will search for the player then shoot. If the character loses sight of the player, it will continue
searching.
;Artificial Intelligence Script
;Header
desc = search player and shoot it, if loose plr, search again..
;Triggers
:state=0:waypointstart,setframe=19
:state=0,plrwithin,plrdistfurther=601:state=0
:state=0,plrwithin,plrdistwithin=600:state=20
:state=1,plrcanbeseen:state=50
;-=>>>WAYPOINTS<<<=-
:waypointstate=3:animate=2,waypointnext
:waypointstate=4:animate=2,waypointrandom
:waypointstate=5:animate=2,waypointreverse
;///PLR FOUND\\\
:state=20,plrcanbeseen:state=50
:state=20,plrcannotbeseen:state=40
;///Look For Plr\\\
:state=40,plrcannotbeseen,random=3:timerstart
:state=40,plrcannotbeseen,random=3,timergreater=30:rotateheadrandom=50
:state=40,plrcannotbeseen,random=3,timergreater=40:pivotrandom=55,movefore=
10,animate=2
:state=40,shotdamage=1:rotatetoplr
:state=40,noiseheard=60:rotatetoplr
:state=40:state=20
;//ATTACK\\
:state=50,plrcanbeseen:state=51,settarget
:state=50:runfpidefault=1
:state=51,losetarget=100:state=0
:state=51:rotatetoplr
:state=51,plrcanbeseen:settarget
:state=51,ifweapon=1,plrdistfurther=400:movetotarget=1,animate=5
:state=51,plrdistwithin=401:rotatetoplr
:state=51,ifweapon=1,plrdistwithin=401,plrcanbeseen=46,rateoffire:animate=1
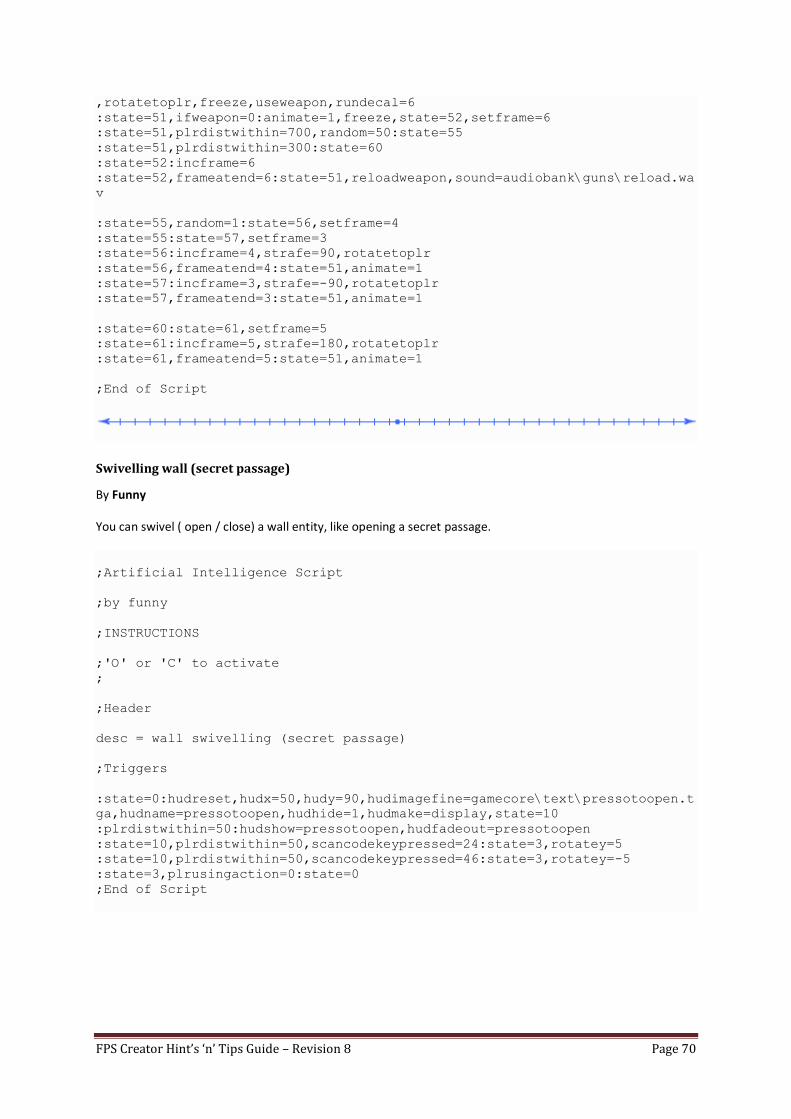
FPS Creator Hint’s ‘n’ Tips Guide – Revision 8 Page 70
,rotatetoplr,freeze,useweapon,rundecal=6
:state=51,ifweapon=0:animate=1,freeze,state=52,setframe=6
:state=51,plrdistwithin=700,random=50:state=55
:state=51,plrdistwithin=300:state=60
:state=52:incframe=6
:state=52,frameatend=6:state=51,reloadweapon,sound=audiobank\guns\reload.wa
v
:state=55,random=1:state=56,setframe=4
:state=55:state=57,setframe=3
:state=56:incframe=4,strafe=90,rotatetoplr
:state=56,frameatend=4:state=51,animate=1
:state=57:incframe=3,strafe=-90,rotatetoplr
:state=57,frameatend=3:state=51,animate=1
:state=60:state=61,setframe=5
:state=61:incframe=5,strafe=180,rotatetoplr
:state=61,frameatend=5:state=51,animate=1
;End of Script
Swivelling wall (secret passage)
By Funny
You can swivel ( open / close) a wall entity, like opening a secret passage.
;Artificial Intelligence Script
;by funny
;INSTRUCTIONS
;'O' or 'C' to activate
;
;Header
desc = wall swivelling (secret passage)
;Triggers
:state=0:hudreset,hudx=50,hudy=90,hudimagefine=gamecore\text\pressotoopen.t
ga,hudname=pressotoopen,hudhide=1,hudmake=display,state=10
:plrdistwithin=50:hudshow=pressotoopen,hudfadeout=pressotoopen
:state=10,plrdistwithin=50,scancodekeypressed=24:state=3,rotatey=5
:state=10,plrdistwithin=50,scancodekeypressed=46:state=3,rotatey=-5
:state=3,plrusingaction=0:state=0
;End of Script
FPS Creator Hint’s ‘n’ Tips Guide – Revision 8 Page 71
Killer Slime By Nickydude
Have you ever got frustrated that a decal can't kill you (in this case the slime decal) and you have to use a
trigger zone? Ever wanted to create a puzzle in where you have to use boxes to get over the slime otherwise it
reduces your health if you step on it?
You can't do that with a trigger zone (as you'll always be 'in' it even if you're on boxes).
Well, here's the answer! This script will only reduce a player’s health if he's actually standing on the slime!
Copy it to notepad and save it as "SlimeKiller.fpi" (or whatever you want) and place it in your scriptbank. In the
'Main' of the decal, place this script and you've got killer slime!
;Killer Slime Script
;By Nickydude
;Header
desc = Runs Decal Loop
;Triggers
:state=0:rundecal=5,state=1
:state=1,plrdistwithin=40:plraddhealth=-10
;End of Script
Door open initially....trigger to close it
By TZap
Made this little script to allow player through an open door but then closes behind him (use a trigger zone to
close the door). It cannot be opened again. I have seen this is a few fps games:
;Artificial Intelligence Script
;Header
desc = Remote Controlled Door (Open initially and Closed by
trigger)
;Triggers
:state=0:state=1,setframe=0,sound=$0
:state=1:incframe=0
:state=1,frameatend=0:state=2,coloff
:state=2,activated=1:state=3,sound=$1,colon
:state=3:decframe=0
:state=3,frameatstart=0:setframe=0
;End of Script
FPS Creator Hint’s ‘n’ Tips Guide – Revision 8 Page 72
Present HUD Image when Entity is destroyed/killed
By Urlforce Studios
I altered the death script to make this script to present a objective completed hud image when a entity that
was a objective was killed. Be sure to change the hud image name AND the hud name.
;Artificial Intelligence Script
;Header
desc = Leave corpse
;Triggers
:state=0:state=1
:state=1:hudreset,hudx=50,hudy=90,hudimagefine=gamecore\text\mrsjackson.dds
,hudname=mrsjackson,hudhide=1,hudmake=display,state=2
:state=2:plrsound=audiobank\misc\ping.wav,hudshow=mrsjackson,hudfadeout=mrs
jackson,state=3
:state=3:rundecal=5,suspend,coloff
;End of Script
Open the doors like Resident Evil
By Deadly Massacre
1. You must quit the main script of the door.
2. Make a trigger zone next to the door.
3. Use the following two scripts and put them in the "scriptbankuser" folder. Save the first script as “RE-
Doors.fpi” and the second as “RE_Doors2.fpi”.
4. Edit the "RE_doors.fpi" script (with the notepad).
5. Where appears "YOURVIDEOHERE" put the location of your video (the video that shows the door
opening like the Resident Evil).
6. Where appears "YOURVIDEODURATION" put the duration of your video in milliseconds.
7. Put the script "RE_doors.fpi" as the trigger zone main script.
8. That's all!
NOTE:YOU MUST PUT THE TRIGGER ZONE NEXT TO ALL THE DOORS.
;Artificial Intelligence Script
; RE_Doors.fpi by Franco's Productions
;Header
desc = RE Script
;Triggers
:state=0,plrdistwithin=120,plrwithinzone,plrcanbeseen:video=
YOURVIDEOHERE,state=1,setframe=0
:state=1:incframe=0
:state=1,frameatend=0:state=2,coloff
:state=2,timegreater=10000:state=3,colon
:state=3:decframe=0,runfpi=scriptbank\user\RE_doors2.fpi
:state=3,frameatstart=0:state=0,setframe=0
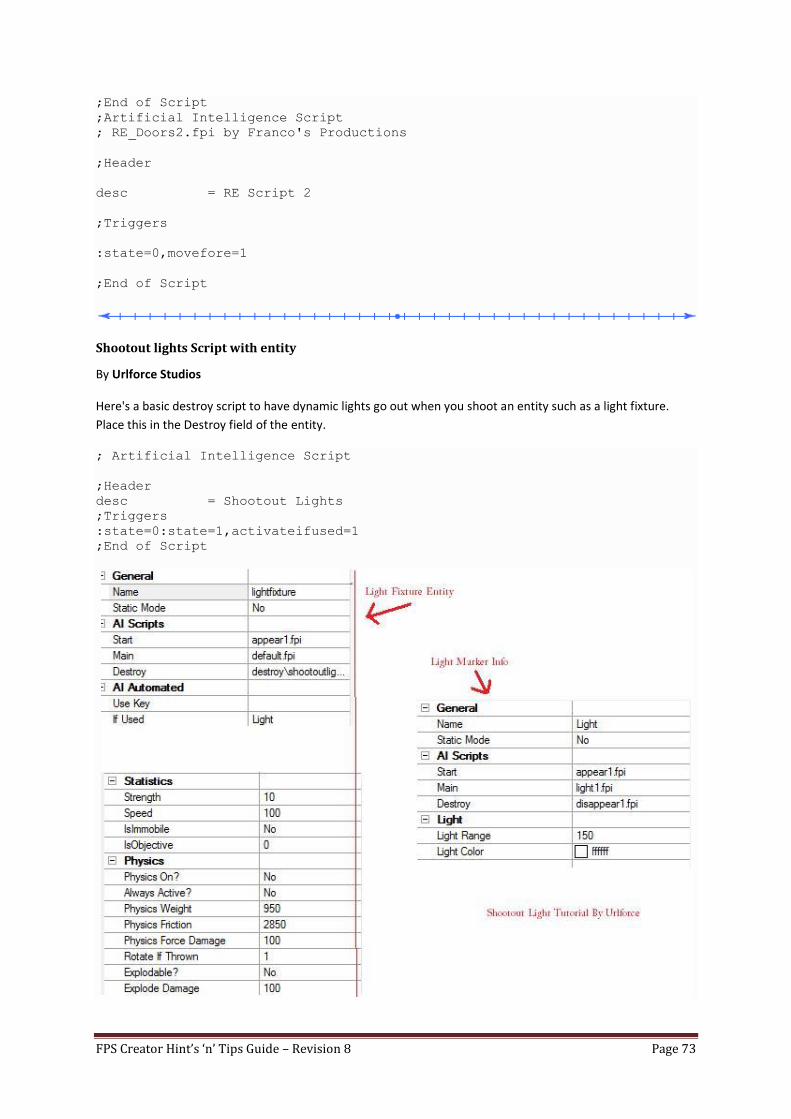
FPS Creator Hint’s ‘n’ Tips Guide – Revision 8 Page 73
;End of Script
;Artificial Intelligence Script
; RE_Doors2.fpi by Franco's Productions
;Header
desc = RE Script 2
;Triggers
:state=0,movefore=1
;End of Script
Shootout lights Script with entity
By Urlforce Studios
Here's a basic destroy script to have dynamic lights go out when you shoot an entity such as a light fixture.
Place this in the Destroy field of the entity.
; Artificial Intelligence Script
;Header
desc = Shootout Lights
;Triggers
:state=0:state=1,activateifused=1
;End of Script
FPS Creator Hint’s ‘n’ Tips Guide – Revision 8 Page 74
Lights On In Sequence
By PlystirE
“I am wondering if there is a way to turn on a series of lights in such a way to make it look like they have
activated one after another. What I mean is you enter a large cavernous space and it is initially completely
dark. After a moment, the lights begin to come on. They come on one at a time, but the lights that are on
remain on when the next light comes on. It would add to the enormity of the room.”
It's not often that people ask for something that actually needs a weird workaround for, so I was pleased to
make this. Okay, first things first, you'll want to make an "invisible entity". You need this because Lights don't
have an IfUsed field, and we need that for what we're about to do.
The invisible entity should use this script as its "Spawn" script:
;Artificial Intelligence Script
;Header
desc = Appear invisible
;Triggers
:state=0:setalphafade=0,coloff,runfpidefault=1
;End of Script
I use these entities a lot so treat them nicely. Next, save this script in the user folder of the scriptbank:
;Artificial Intelligence Script
;Header
desc = Delayed Activation (1 second)
;Triggers
:state=0,activated=1:timerstart,state=1
:state=1,timergreater=1000:activateifused=1,state=2
:state=2,activated=0:activateifused=0,state=0
;End of Script
I named this "DelayActivate.fpi" but you can use a different name if you so choose.
NOTE: This script will make sure that all the lights won't come on at once, you can adjust the delay between
lights by changing that "1000" to a different number.
Now, set up all your lights to be turned on in sequence. When I did this I named them "Light1", "Light2", etc.
all the way up to 7, which is how many lights I tested this with. Make sure they are all dynamic lights! And give
them the "light1off.fpi" script, so they start out being turned off.
Okay, now for each light EXCEPT the last light, make an accompanying invisible entity. Name it THE SAME
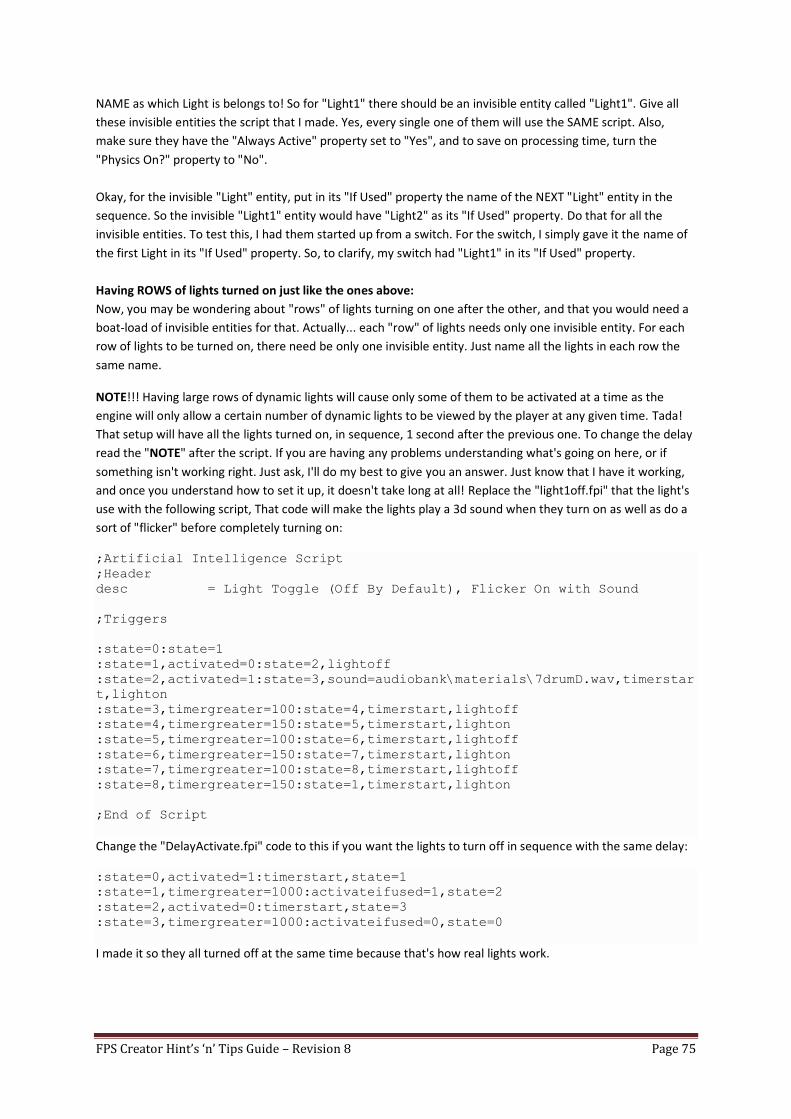
FPS Creator Hint’s ‘n’ Tips Guide – Revision 8 Page 75
NAME as which Light is belongs to! So for "Light1" there should be an invisible entity called "Light1". Give all
these invisible entities the script that I made. Yes, every single one of them will use the SAME script. Also,
make sure they have the "Always Active" property set to "Yes", and to save on processing time, turn the
"Physics On?" property to "No".
Okay, for the invisible "Light" entity, put in its "If Used" property the name of the NEXT "Light" entity in the
sequence. So the invisible "Light1" entity would have "Light2" as its "If Used" property. Do that for all the
invisible entities. To test this, I had them started up from a switch. For the switch, I simply gave it the name of
the first Light in its "If Used" property. So, to clarify, my switch had "Light1" in its "If Used" property.
Having ROWS of lights turned on just like the ones above:
Now, you may be wondering about "rows" of lights turning on one after the other, and that you would need a
boat-load of invisible entities for that. Actually... each "row" of lights needs only one invisible entity. For each
row of lights to be turned on, there need be only one invisible entity. Just name all the lights in each row the
same name.
NOTE!!! Having large rows of dynamic lights will cause only some of them to be activated at a time as the
engine will only allow a certain number of dynamic lights to be viewed by the player at any given time. Tada!
That setup will have all the lights turned on, in sequence, 1 second after the previous one. To change the delay
read the "NOTE" after the script. If you are having any problems understanding what's going on here, or if
something isn't working right. Just ask, I'll do my best to give you an answer. Just know that I have it working,
and once you understand how to set it up, it doesn't take long at all! Replace the "light1off.fpi" that the light's
use with the following script, That code will make the lights play a 3d sound when they turn on as well as do a
sort of "flicker" before completely turning on:
;Artificial Intelligence Script
;Header
desc = Light Toggle (Off By Default), Flicker On with Sound
;Triggers
:state=0:state=1
:state=1,activated=0:state=2,lightoff
:state=2,activated=1:state=3,sound=audiobank\materials\7drumD.wav,timerstar
t,lighton
:state=3,timergreater=100:state=4,timerstart,lightoff
:state=4,timergreater=150:state=5,timerstart,lighton
:state=5,timergreater=100:state=6,timerstart,lightoff
:state=6,timergreater=150:state=7,timerstart,lighton
:state=7,timergreater=100:state=8,timerstart,lightoff
:state=8,timergreater=150:state=1,timerstart,lighton
;End of Script
Change the "DelayActivate.fpi" code to this if you want the lights to turn off in sequence with the same delay:
:state=0,activated=1:timerstart,state=1
:state=1,timergreater=1000:activateifused=1,state=2
:state=2,activated=0:timerstart,state=3
:state=3,timergreater=1000:activateifused=0,state=0
I made it so they all turned off at the same time because that's how real lights work.
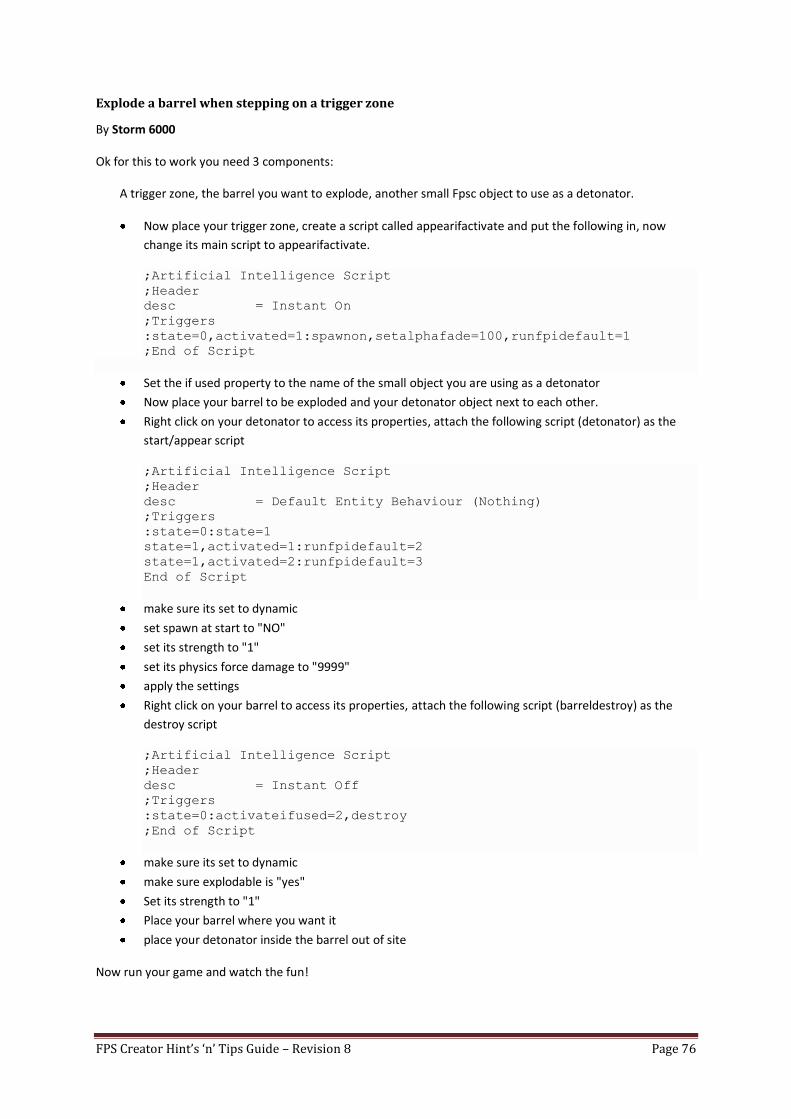
FPS Creator Hint’s ‘n’ Tips Guide – Revision 8 Page 76
Explode a barrel when stepping on a trigger zone
By Storm 6000
Ok for this to work you need 3 components:
A trigger zone, the barrel you want to explode, another small Fpsc object to use as a detonator.
Now place your trigger zone, create a script called appearifactivate and put the following in, now
change its main script to appearifactivate.
;Artificial Intelligence Script
;Header
desc = Instant On
;Triggers
:state=0,activated=1:spawnon,setalphafade=100,runfpidefault=1
;End of Script
Set the if used property to the name of the small object you are using as a detonator
Now place your barrel to be exploded and your detonator object next to each other.
Right click on your detonator to access its properties, attach the following script (detonator) as the
start/appear script
;Artificial Intelligence Script
;Header
desc = Default Entity Behaviour (Nothing)
;Triggers
:state=0:state=1
state=1,activated=1:runfpidefault=2
state=1,activated=2:runfpidefault=3
End of Script
make sure its set to dynamic
set spawn at start to "NO"
set its strength to "1"
set its physics force damage to "9999"
apply the settings
Right click on your barrel to access its properties, attach the following script (barreldestroy) as the
destroy script
;Artificial Intelligence Script
;Header
desc = Instant Off
;Triggers
:state=0:activateifused=2,destroy
;End of Script
make sure its set to dynamic
make sure explodable is "yes"
Set its strength to "1"
Place your barrel where you want it
place your detonator inside the barrel out of site
Now run your game and watch the fun!
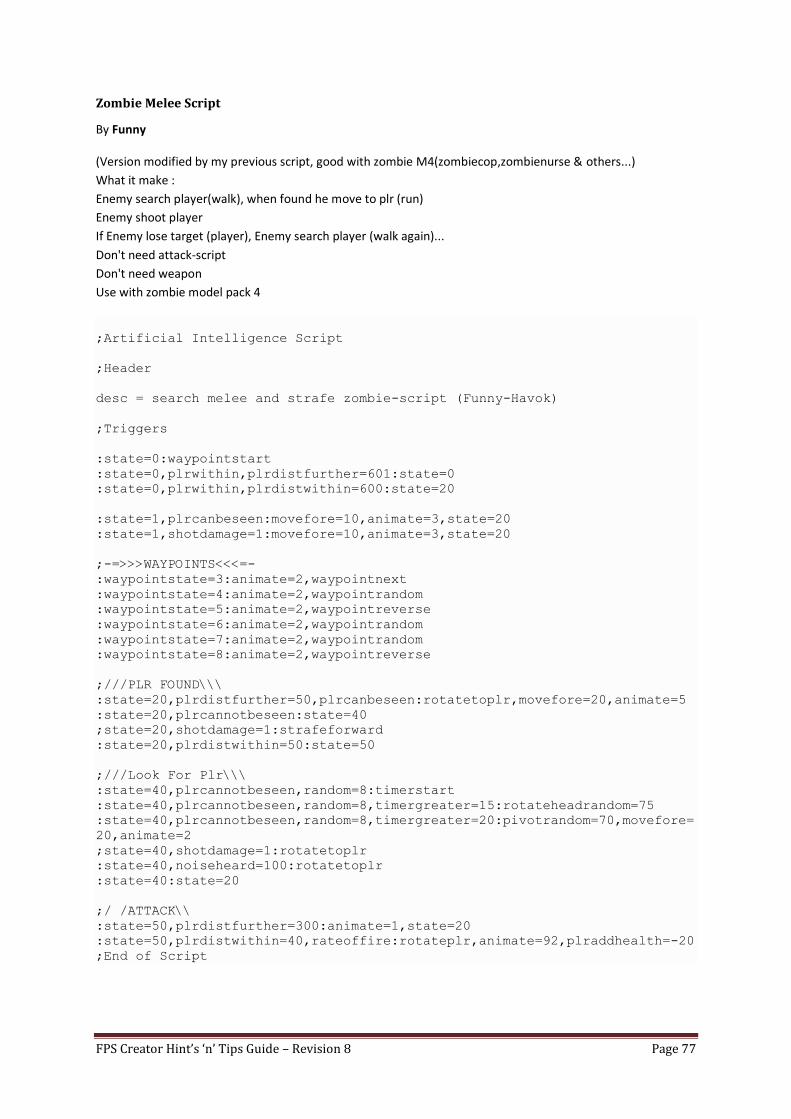
FPS Creator Hint’s ‘n’ Tips Guide – Revision 8 Page 77
Zombie Melee Script
By Funny
(Version modified by my previous script, good with zombie M4(zombiecop,zombienurse & others...)
What it make :
Enemy search player(walk), when found he move to plr (run)
Enemy shoot player
If Enemy lose target (player), Enemy search player (walk again)...
Don't need attack-script
Don't need weapon
Use with zombie model pack 4
;Artificial Intelligence Script
;Header
desc = search melee and strafe zombie-script (Funny-Havok)
;Triggers
:state=0:waypointstart
:state=0,plrwithin,plrdistfurther=601:state=0
:state=0,plrwithin,plrdistwithin=600:state=20
:state=1,plrcanbeseen:movefore=10,animate=3,state=20
:state=1,shotdamage=1:movefore=10,animate=3,state=20
;-=>>>WAYPOINTS<<<=-
:waypointstate=3:animate=2,waypointnext
:waypointstate=4:animate=2,waypointrandom
:waypointstate=5:animate=2,waypointreverse
:waypointstate=6:animate=2,waypointrandom
:waypointstate=7:animate=2,waypointrandom
:waypointstate=8:animate=2,waypointreverse
;///PLR FOUND\\\
:state=20,plrdistfurther=50,plrcanbeseen:rotatetoplr,movefore=20,animate=5
:state=20,plrcannotbeseen:state=40
;state=20,shotdamage=1:strafeforward
:state=20,plrdistwithin=50:state=50
;///Look For Plr\\\
:state=40,plrcannotbeseen,random=8:timerstart
:state=40,plrcannotbeseen,random=8,timergreater=15:rotateheadrandom=75
:state=40,plrcannotbeseen,random=8,timergreater=20:pivotrandom=70,movefore=
20,animate=2
;state=40,shotdamage=1:rotatetoplr
:state=40,noiseheard=100:rotatetoplr
:state=40:state=20
;/ /ATTACK\\
:state=50,plrdistfurther=300:animate=1,state=20
:state=50,plrdistwithin=40,rateoffire:rotateplr,animate=92,plraddhealth=-20
;End of Script
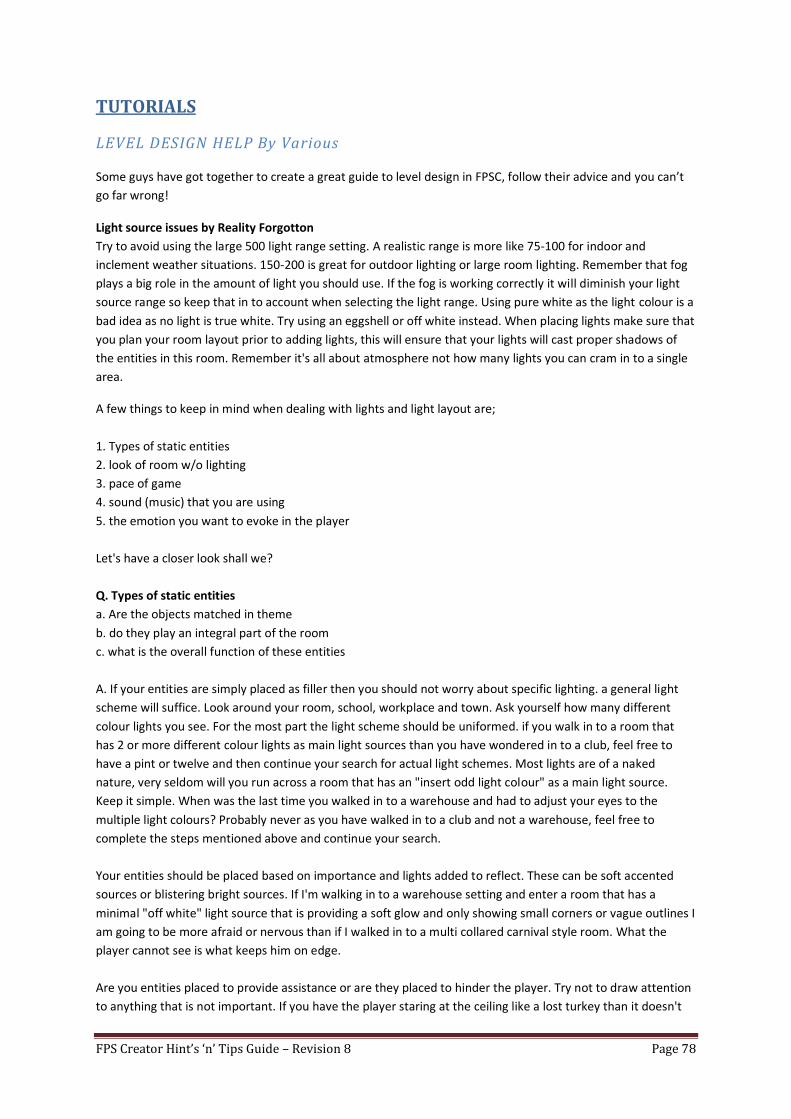
FPS Creator Hint’s ‘n’ Tips Guide – Revision 8 Page 78
TUTORIALS
LEVEL DESIGN HELP By Various
Some guys have got together to create a great guide to level design in FPSC, follow their advice and you can’t
go far wrong!
Light source issues by Reality Forgotton
Try to avoid using the large 500 light range setting. A realistic range is more like 75-100 for indoor and
inclement weather situations. 150-200 is great for outdoor lighting or large room lighting. Remember that fog
plays a big role in the amount of light you should use. If the fog is working correctly it will diminish your light
source range so keep that in to account when selecting the light range. Using pure white as the light colour is a
bad idea as no light is true white. Try using an eggshell or off white instead. When placing lights make sure that
you plan your room layout prior to adding lights, this will ensure that your lights will cast proper shadows of
the entities in this room. Remember it's all about atmosphere not how many lights you can cram in to a single
area.
A few things to keep in mind when dealing with lights and light layout are;
1. Types of static entities
2. look of room w/o lighting
3. pace of game
4. sound (music) that you are using
5. the emotion you want to evoke in the player
Let's have a closer look shall we?
Q. Types of static entities
a. Are the objects matched in theme
b. do they play an integral part of the room
c. what is the overall function of these entities
A. If your entities are simply placed as filler then you should not worry about specific lighting. a general light
scheme will suffice. Look around your room, school, workplace and town. Ask yourself how many different
colour lights you see. For the most part the light scheme should be uniformed. if you walk in to a room that
has 2 or more different colour lights as main light sources than you have wondered in to a club, feel free to
have a pint or twelve and then continue your search for actual light schemes. Most lights are of a naked
nature, very seldom will you run across a room that has an "insert odd light colour" as a main light source.
Keep it simple. When was the last time you walked in to a warehouse and had to adjust your eyes to the
multiple light colours? Probably never as you have walked in to a club and not a warehouse, feel free to
complete the steps mentioned above and continue your search.
Your entities should be placed based on importance and lights added to reflect. These can be soft accented
sources or blistering bright sources. If I'm walking in to a warehouse setting and enter a room that has a
minimal "off white" light source that is providing a soft glow and only showing small corners or vague outlines I
am going to be more afraid or nervous than if I walked in to a multi collared carnival style room. What the
player cannot see is what keeps him on edge.
Are you entities placed to provide assistance or are they placed to hinder the player. Try not to draw attention
to anything that is not important. If you have the player staring at the ceiling like a lost turkey than it doesn't
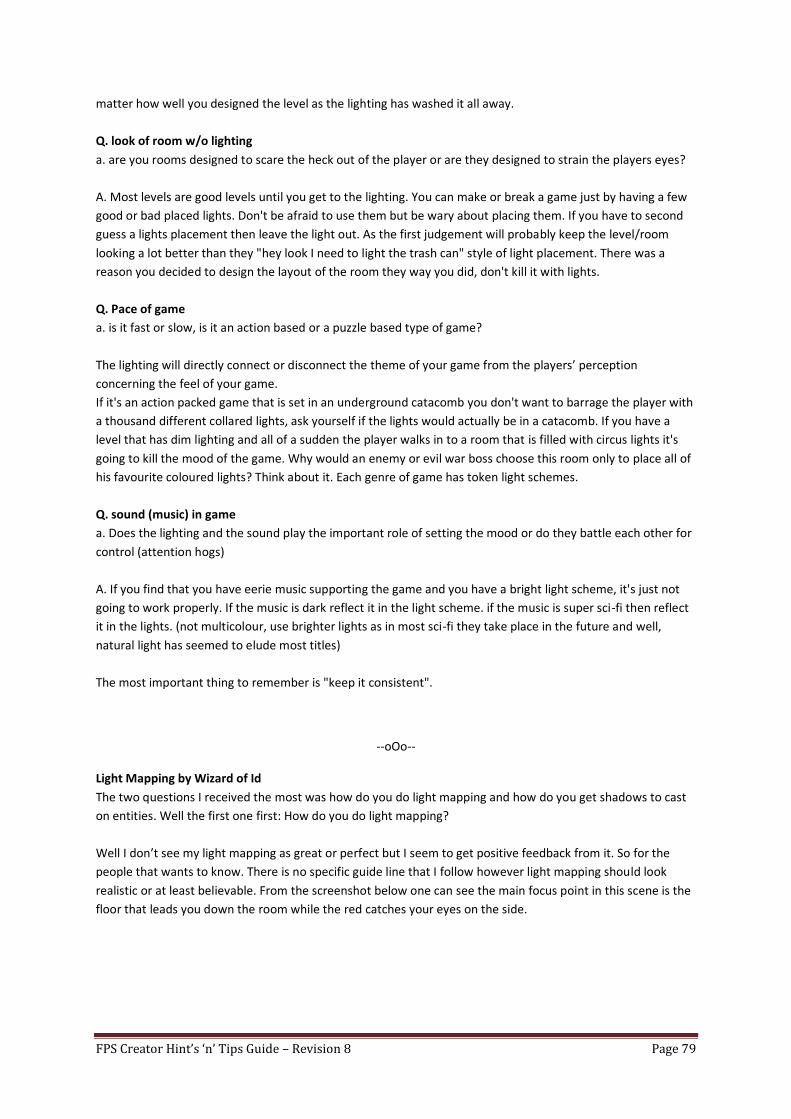
FPS Creator Hint’s ‘n’ Tips Guide – Revision 8 Page 79
matter how well you designed the level as the lighting has washed it all away.
Q. look of room w/o lighting
a. are you rooms designed to scare the heck out of the player or are they designed to strain the players eyes?
A. Most levels are good levels until you get to the lighting. You can make or break a game just by having a few
good or bad placed lights. Don't be afraid to use them but be wary about placing them. If you have to second
guess a lights placement then leave the light out. As the first judgement will probably keep the level/room
looking a lot better than they "hey look I need to light the trash can" style of light placement. There was a
reason you decided to design the layout of the room they way you did, don't kill it with lights.
Q. Pace of game
a. is it fast or slow, is it an action based or a puzzle based type of game?
The lighting will directly connect or disconnect the theme of your game from the players’ perception
concerning the feel of your game.
If it's an action packed game that is set in an underground catacomb you don't want to barrage the player with
a thousand different collared lights, ask yourself if the lights would actually be in a catacomb. If you have a
level that has dim lighting and all of a sudden the player walks in to a room that is filled with circus lights it's
going to kill the mood of the game. Why would an enemy or evil war boss choose this room only to place all of
his favourite coloured lights? Think about it. Each genre of game has token light schemes.
Q. sound (music) in game
a. Does the lighting and the sound play the important role of setting the mood or do they battle each other for
control (attention hogs)
A. If you find that you have eerie music supporting the game and you have a bright light scheme, it's just not
going to work properly. If the music is dark reflect it in the light scheme. if the music is super sci-fi then reflect
it in the lights. (not multicolour, use brighter lights as in most sci-fi they take place in the future and well,
natural light has seemed to elude most titles)
The most important thing to remember is "keep it consistent".
--oOo--
Light Mapping by Wizard of Id
The two questions I received the most was how do you do light mapping and how do you get shadows to cast
on entities. Well the first one first: How do you do light mapping?
Well I don’t see my light mapping as great or perfect but I seem to get positive feedback from it. So for the
people that wants to know. There is no specific guide line that I follow however light mapping should look
realistic or at least believable. From the screenshot below one can see the main focus point in this scene is the
floor that leads you down the room while the red catches your eyes on the side.
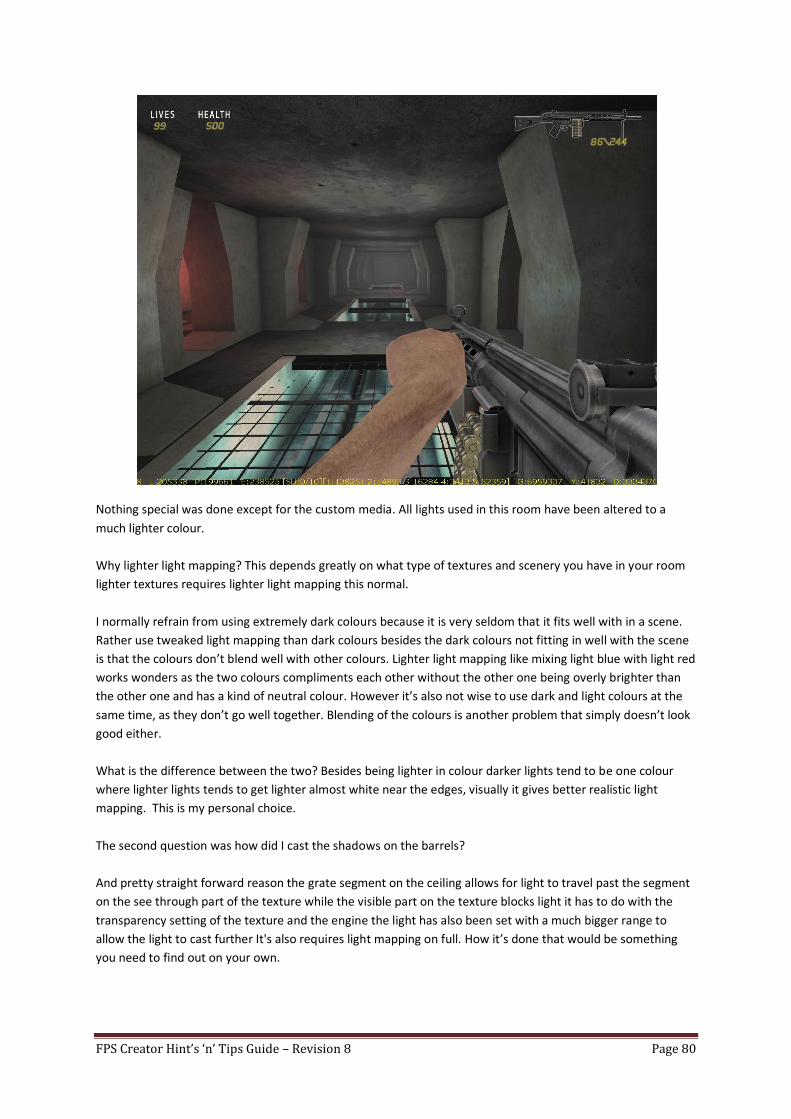
FPS Creator Hint’s ‘n’ Tips Guide – Revision 8 Page 80
Nothing special was done except for the custom media. All lights used in this room have been altered to a
much lighter colour.
Why lighter light mapping? This depends greatly on what type of textures and scenery you have in your room
lighter textures requires lighter light mapping this normal.
I normally refrain from using extremely dark colours because it is very seldom that it fits well with in a scene.
Rather use tweaked light mapping than dark colours besides the dark colours not fitting in well with the scene
is that the colours don’t blend well with other colours. Lighter light mapping like mixing light blue with light red
works wonders as the two colours compliments each other without the other one being overly brighter than
the other one and has a kind of neutral colour. However it’s also not wise to use dark and light colours at the
same time, as they don’t go well together. Blending of the colours is another problem that simply doesn’t look
good either.
What is the difference between the two? Besides being lighter in colour darker lights tend to be one colour
where lighter lights tends to get lighter almost white near the edges, visually it gives better realistic light
mapping. This is my personal choice.
The second question was how did I cast the shadows on the barrels?
And pretty straight forward reason the grate segment on the ceiling allows for light to travel past the segment
on the see through part of the texture while the visible part on the texture blocks light it has to do with the
transparency setting of the texture and the engine the light has also been set with a much bigger range to
allow the light to cast further It's also requires light mapping on full. How it’s done that would be something
you need to find out on your own.
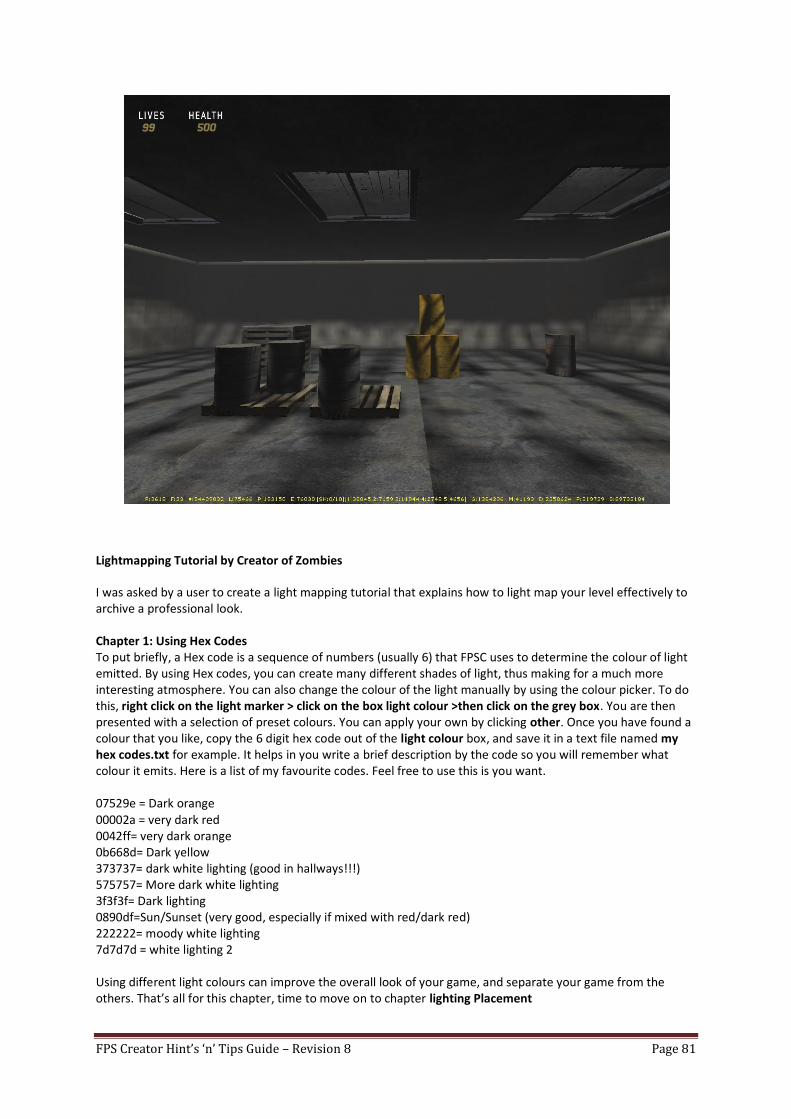
FPS Creator Hint’s ‘n’ Tips Guide – Revision 8 Page 81
Lightmapping Tutorial by Creator of Zombies
I was asked by a user to create a light mapping tutorial that explains how to light map your level effectively to archive a professional look. Chapter 1: Using Hex Codes To put briefly, a Hex code is a sequence of numbers (usually 6) that FPSC uses to determine the colour of light emitted. By using Hex codes, you can create many different shades of light, thus making for a much more interesting atmosphere. You can also change the colour of the light manually by using the colour picker. To do this, right click on the light marker > click on the box light colour >then click on the grey box. You are then presented with a selection of preset colours. You can apply your own by clicking other. Once you have found a colour that you like, copy the 6 digit hex code out of the light colour box, and save it in a text file named my hex codes.txt for example. It helps in you write a brief description by the code so you will remember what colour it emits. Here is a list of my favourite codes. Feel free to use this is you want. 07529e = Dark orange 00002a = very dark red 0042ff= very dark orange 0b668d= Dark yellow 373737= dark white lighting (good in hallways!!!) 575757= More dark white lighting 3f3f3f= Dark lighting 0890df=Sun/Sunset (very good, especially if mixed with red/dark red) 222222= moody white lighting 7d7d7d = white lighting 2 Using different light colours can improve the overall look of your game, and separate your game from the others. That’s all for this chapter, time to move on to chapter lighting Placement
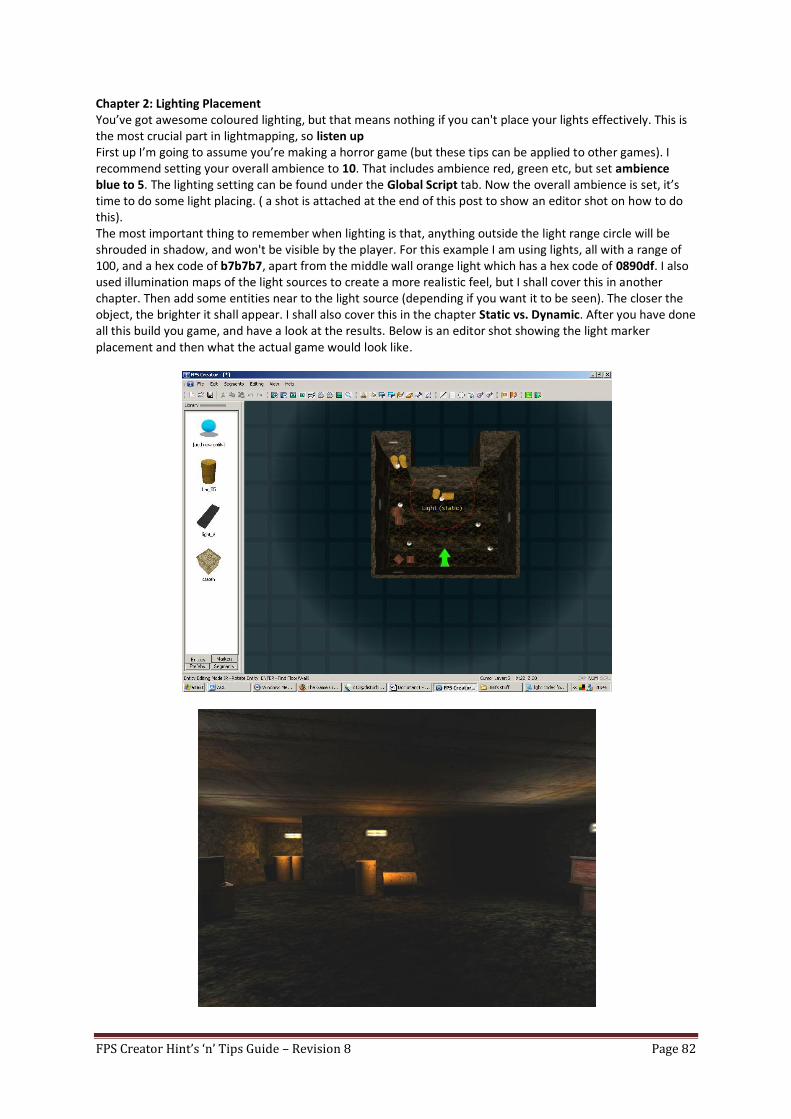
FPS Creator Hint’s ‘n’ Tips Guide – Revision 8 Page 82
Chapter 2: Lighting Placement You’ve got awesome coloured lighting, but that means nothing if you can't place your lights effectively. This is the most crucial part in lightmapping, so listen up First up I’m going to assume you’re making a horror game (but these tips can be applied to other games). I recommend setting your overall ambience to 10. That includes ambience red, green etc, but set ambience blue to 5. The lighting setting can be found under the Global Script tab. Now the overall ambience is set, it’s time to do some light placing. ( a shot is attached at the end of this post to show an editor shot on how to do this). The most important thing to remember when lighting is that, anything outside the light range circle will be shrouded in shadow, and won't be visible by the player. For this example I am using lights, all with a range of 100, and a hex code of b7b7b7, apart from the middle wall orange light which has a hex code of 0890df. I also used illumination maps of the light sources to create a more realistic feel, but I shall cover this in another chapter. Then add some entities near to the light source (depending if you want it to be seen). The closer the object, the brighter it shall appear. I shall also cover this in the chapter Static vs. Dynamic. After you have done all this build you game, and have a look at the results. Below is an editor shot showing the light marker placement and then what the actual game would look like.
FPS Creator Hint’s ‘n’ Tips Guide – Revision 8 Page 83
Placement entities by Reality Forgotten
When creating your level design (on paper) try to factor in player/enemy collision. You don't want things to be
so tight that the enemy gets hung on a box/crate. If you absolutely have to cram everything together you can
place dynamic entities in the places that make the passage unusable, forcing player interaction with the
environment. Think to yourself “Does this entity need to be here?" just because the room is empty or close to
empty doesn't mean you have to fill the void with a thousand other entities. Some of the best rooms are
decoration with very few items. Remember that atmosphere is the key.
*some other notes*
-- Remove things that the player is not going to see.
-- try to go light in the AI scripts; they will bog down your game.
-- Read the manual! Please read it.
Sound Effects by Nickydude
Sound effects can really bring a game to life, I don’t mean the usual gunshots, footsteps and creaking doors, I
mean ‘off camera’ sound effects. I’ve put this technique to good effect in my *Nickydude’s+ wip game called
The Facility – Here’s a link to a topic about it on the TGC forums:
http://forum.thegamecreators.com/?m=forum_view&t=95345&b=25
Near the start of the game, there is an ‘off camera’ scream, perhaps a fallen comrade? Perhaps a hunted
scientist? Who knows. Then there are falling body parts from an opening in the ceiling, along with a hideous
creature roar and heavy footsteps above you as it walks away... Later on, while crawling through air
conditioning ducts, there is a weird creature moan echoing through the cramped tunnels, but from where does
it come from?
All these can add to the atmosphere and can break up long walking sections and gives the illusion that there
are other things going on in your game than just having things happen where the player is. Never
underestimate the power of sound effects... Mwahahahahaha.... ;)
...to be continued...
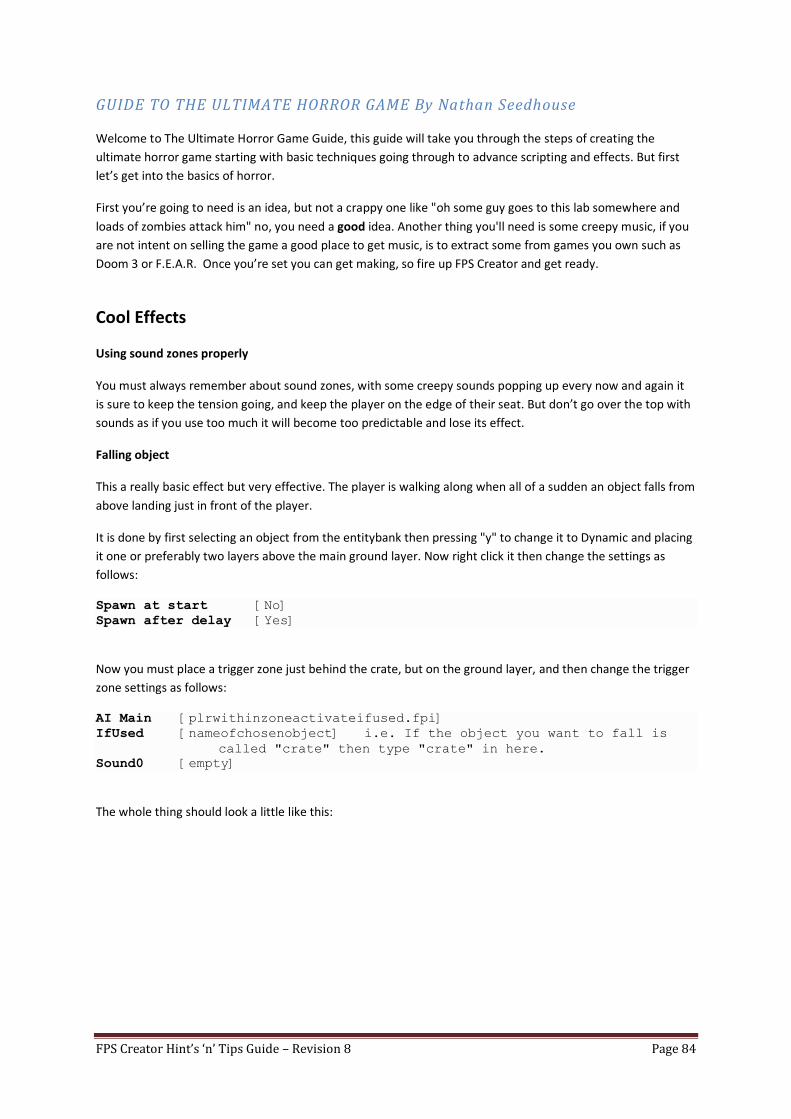
FPS Creator Hint’s ‘n’ Tips Guide – Revision 8 Page 84
GUIDE TO THE ULTIMATE HORROR GAME By Nathan Seedhouse
Welcome to The Ultimate Horror Game Guide, this guide will take you through the steps of creating the
ultimate horror game starting with basic techniques going through to advance scripting and effects. But first
let’s get into the basics of horror.
First you’re going to need is an idea, but not a crappy one like "oh some guy goes to this lab somewhere and
loads of zombies attack him" no, you need a good idea. Another thing you'll need is some creepy music, if you
are not intent on selling the game a good place to get music, is to extract some from games you own such as
Doom 3 or F.E.A.R. Once you’re set you can get making, so fire up FPS Creator and get ready.
Cool Effects
Using sound zones properly
You must always remember about sound zones, with some creepy sounds popping up every now and again it
is sure to keep the tension going, and keep the player on the edge of their seat. But don’t go over the top with
sounds as if you use too much it will become too predictable and lose its effect.
Falling object
This a really basic effect but very effective. The player is walking along when all of a sudden an object falls from
above landing just in front of the player.
It is done by first selecting an object from the entitybank then pressing "y" to change it to Dynamic and placing
it one or preferably two layers above the main ground layer. Now right click it then change the settings as
follows:
Spawn at start [No]
Spawn after delay [Yes]
Now you must place a trigger zone just behind the crate, but on the ground layer, and then change the trigger
zone settings as follows:
AI Main [plrwithinzoneactivateifused.fpi]
IfUsed [nameofchosenobject] i.e. If the object you want to fall is
called "crate" then type "crate" in here.
Sound0 [empty]
The whole thing should look a little like this:
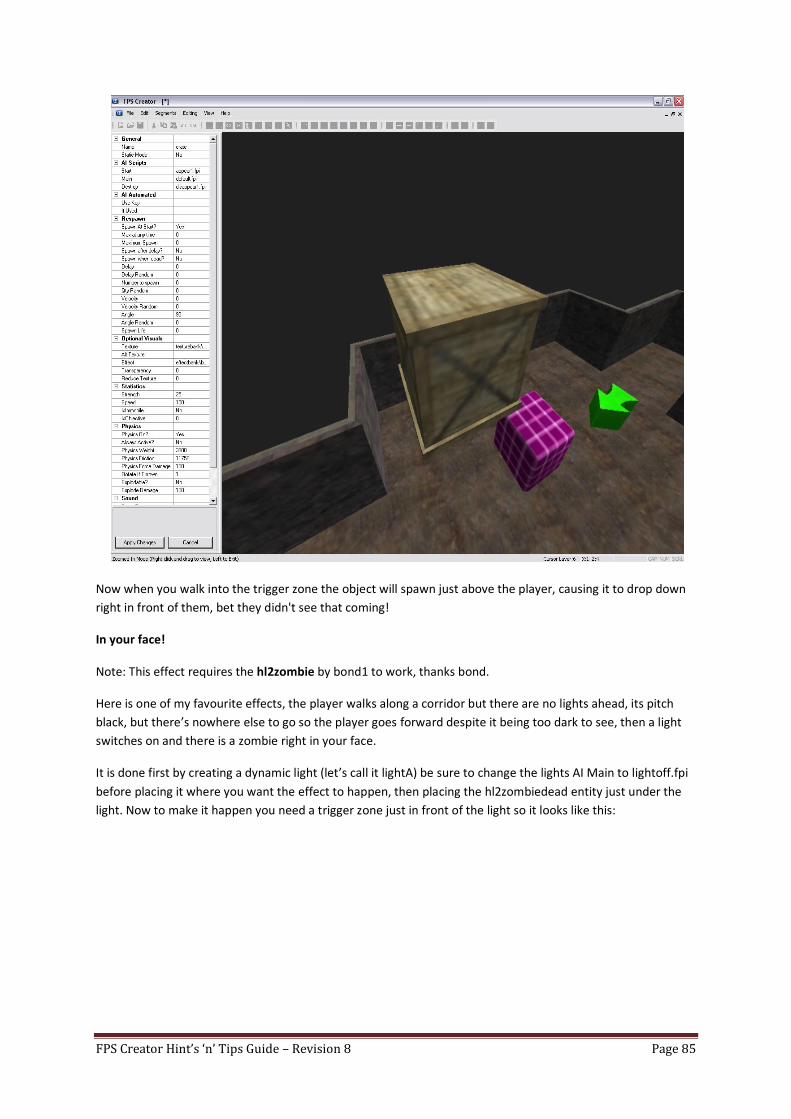
FPS Creator Hint’s ‘n’ Tips Guide – Revision 8 Page 85
Now when you walk into the trigger zone the object will spawn just above the player, causing it to drop down
right in front of them, bet they didn't see that coming!
In your face!
Note: This effect requires the hl2zombie by bond1 to work, thanks bond.
Here is one of my favourite effects, the player walks along a corridor but there are no lights ahead, its pitch
black, but there’s nowhere else to go so the player goes forward despite it being too dark to see, then a light
switches on and there is a zombie right in your face.
It is done first by creating a dynamic light (let’s call it lightA) be sure to change the lights AI Main to lightoff.fpi
before placing it where you want the effect to happen, then placing the hl2zombiedead entity just under the
light. Now to make it happen you need a trigger zone just in front of the light so it looks like this:
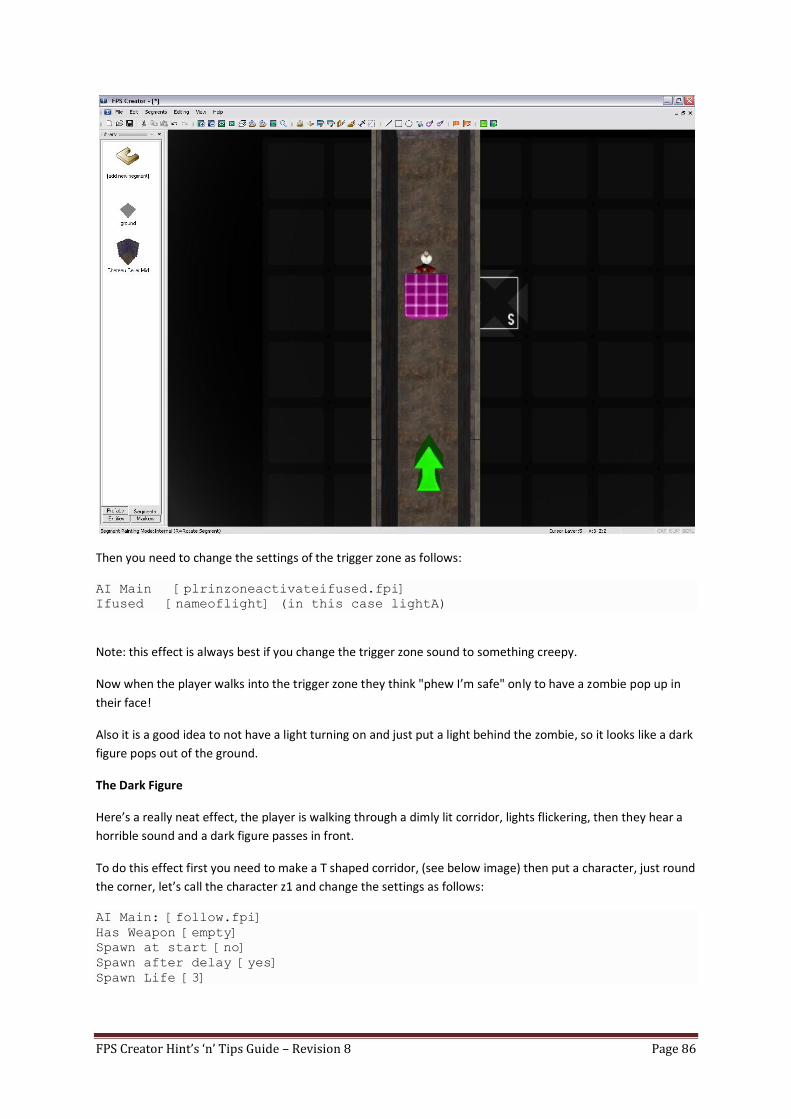
FPS Creator Hint’s ‘n’ Tips Guide – Revision 8 Page 86
Then you need to change the settings of the trigger zone as follows:
AI Main [plrinzoneactivateifused.fpi]
Ifused [nameoflight] (in this case lightA)
Note: this effect is always best if you change the trigger zone sound to something creepy.
Now when the player walks into the trigger zone they think "phew I’m safe" only to have a zombie pop up in
their face!
Also it is a good idea to not have a light turning on and just put a light behind the zombie, so it looks like a dark
figure pops out of the ground.
The Dark Figure
Here’s a really neat effect, the player is walking through a dimly lit corridor, lights flickering, then they hear a
horrible sound and a dark figure passes in front.
To do this effect first you need to make a T shaped corridor, (see below image) then put a character, just round
the corner, let’s call the character z1 and change the settings as follows:
AI Main: [follow.fpi]
Has Weapon [empty]
Spawn at start [no]
Spawn after delay [yes]
Spawn Life [3]
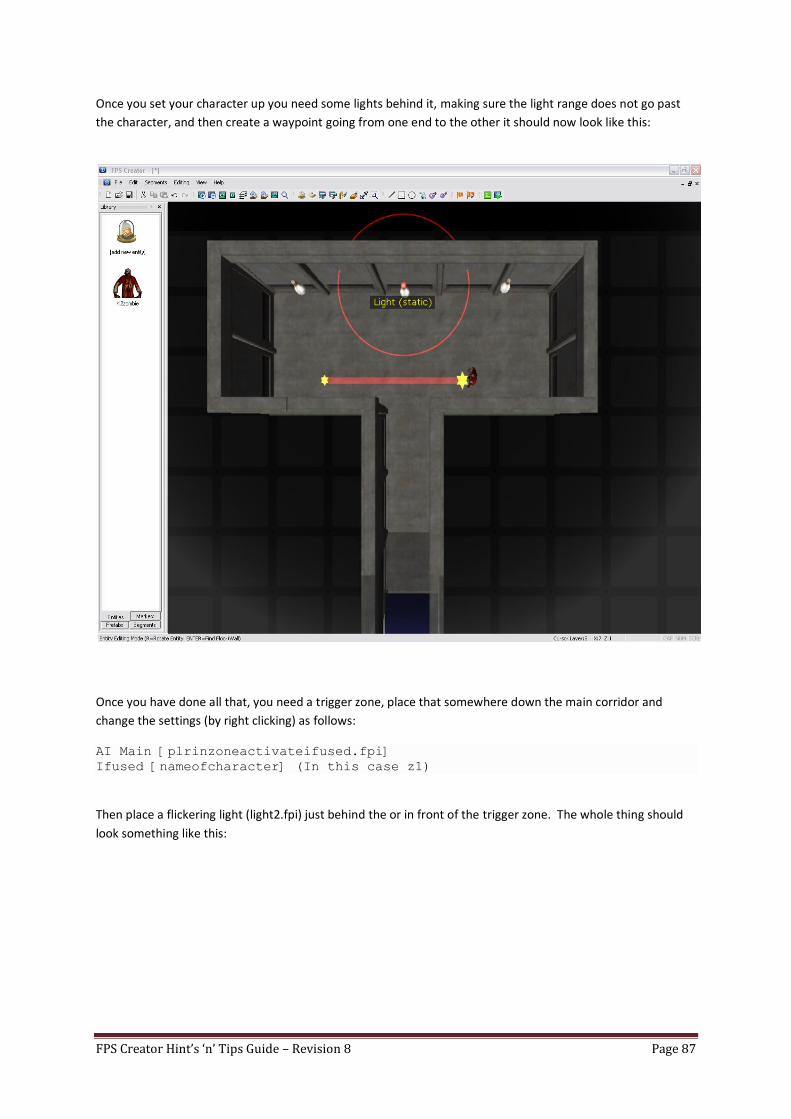
FPS Creator Hint’s ‘n’ Tips Guide – Revision 8 Page 87
Once you set your character up you need some lights behind it, making sure the light range does not go past
the character, and then create a waypoint going from one end to the other it should now look like this:
Once you have done all that, you need a trigger zone, place that somewhere down the main corridor and
change the settings (by right clicking) as follows:
AI Main [plrinzoneactivateifused.fpi]
Ifused [nameofcharacter] (In this case z1)
Then place a flickering light (light2.fpi) just behind the or in front of the trigger zone. The whole thing should
look something like this:
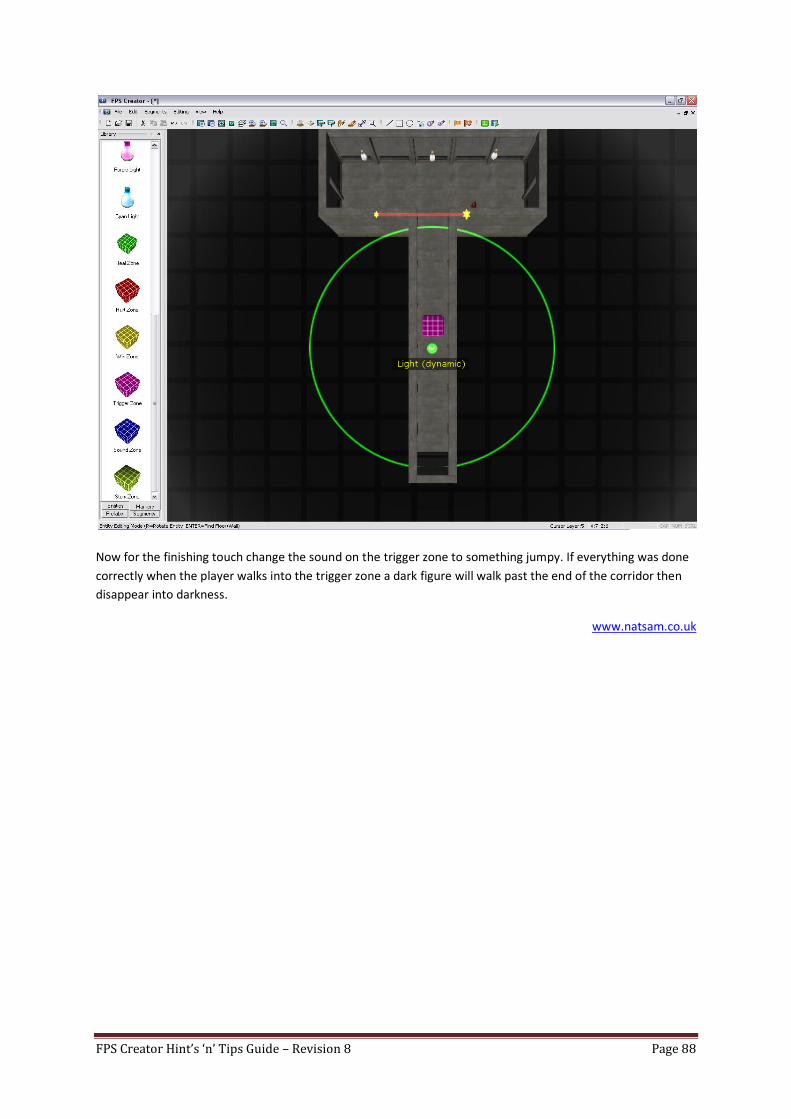
FPS Creator Hint’s ‘n’ Tips Guide – Revision 8 Page 88
Now for the finishing touch change the sound on the trigger zone to something jumpy. If everything was done
correctly when the player walks into the trigger zone a dark figure will walk past the end of the corridor then
disappear into darkness.
www.natsam.co.uk
FPS Creator Hint’s ‘n’ Tips Guide – Revision 8 Page 89
HOW TO USE .X MEDIA FILES By Devild0g
Hey all. Thank you for checking out my first tutorial. I have seen this question asked, but not a whole lot of
answers. Believe me I have been all over the forums. If this was already answered I apologise. This is going to
be a tutorial, using step by step, for the absolute beginner, so if you’re advanced this is not for you.
What you need for tutorial:
-This tutorial uses DARKmatter, FPScreator, some sort of Photoshop program, or such to save files as .tga, I
recommend Paint Shop Pro which can be downloaded free! For 60 days.
-This tutorial is guided by Windows XP edition.
STEP 1: We are going to open up FPSCreator. Go to "start", "all programs", "the game creators", "FPSCreator",
then click the "FPSCreator" icon. All we did here of course was open the program. Like I said this is for absolute
beginners.
STEP 2: Now we have the program loaded up, and you can see the area where you add prefabs, or entities,
segments, or markers.
STEP 3: This is the step where we’re going to do a little tweaking. And we’re going to visit the folders that
FPScreator is in. So get ready! (note: Remember this is step by step, if you follow all these direction's, there is
no way to mess this up! You will be using your own .x files in no time!) Bottom left click "start", then "my
computer", "local disk C:" , then "program files". Scroll until you find "The Game Creators" Folder. Click that.
Now open the folder "FPS Creator". Open the folder "Files". Now open the folder that says "EntityBank".
STEP 4: With the "Entity Bank" folder open, right click anywhere in the folder. Then select "new" and select
"folder". Once you have that folder created rename it by right clicking it, and select "rename". We’re going to
name this folder, "MyEntities".
STEP 5: Now with this step here. It may be a little tricky. But this is step by step. So just follow along. This
specific step is going to use DarkMATTER 2. Ok, now we go to "start", "my computer", "local disk C:", "program
files". Open up "The Game Creators" folder, click on the "DarkMATTER2" folder: Open up the folder
"DM2Browser", then open the folder titles "Media". In this tutorial were going to add a tank. So click the folder
titled, "Tanks". How about we add the A-7V tank? So open the folder titled "A-7V". Now you see the funky
image there? and the .x file to the right of it? We’re going to use those. Now time for step 6!
STEP 6: Make sure you have a clear view of your desktop! That where I like to put everything so it doesn’t get
lost. Please remember so we don’t take this tank away from your darkMATTER folder, we are going to have to
"COPY" NOT "CUT". So do not cut any images or .x files. Only copy. So what we’re going to do now, is with the
folder, "A-7V" open were going to right click with the mouse, the file "A7V" image and select "copy". Go
anywhere on your desktop now, right click it, and select "paste. And there it is. Do the same to the .x file, right
click "copy”, go to desktop, and "paste". Now we have the two files we need there for us to work with.
STEP 7: Now remember the folder we created earlier called, "MyEntities"? If you don’t have no fear, were step
by step'n it here. No make sure you have a clear view of your desktop, cause were about to move the files "A-
7V”, which is our .x file. And the "A7V" which is our image file. First things first though! We need to make our
image file a .tga file! This can be done with almost any pain programs. I’m going to assume you are using the
program mentioned above, "PaintShop Pro" Which can be downloaded free from www.jasc.com.
STEP 8: Go to "Start", "All Programs", "Jasc Software", and click on the "PaintShop pro" icon, so we can open it
up! Now with PaintShop Pro opened up. We need to find our image. Remember we saved it on the desktop!
FPS Creator Hint’s ‘n’ Tips Guide – Revision 8 Page 90
So, looking at paint shop pro, we go to "file”, "open”. Now there pops up a box. Make sure the "look in" is
looking at the desktop. If not, simply select the arrow, and scroll until you find the "desktop". Look for the file,
"a7v", and double click it. It will now be open in paint shop pro. All we have to do here is really simple. Turn
this image into a .tga file! So looking at PaintShop Pro, go to "file", then "save as". Now you’re going to see "file
name" keep that the same, don’t change anything there. Under that you’re going to see "save as type". We
want to scroll until we see the option "TRUEVISION TARGA(*.tga)". Now hit "save". Now this file is now saved
on the desktop. But be aware the old file we had is also there. So were going to delete that now. to avoid
confusion. Go to your desktop, and delete the file other then the .tga file we just made.
STEP 9: Were done with PaintShop Pro now. So go ahead and close it out. Now what we need to do is find an
"entity" that already exists in FPSCreator, and take that ".fpe file". Easy. I figure when I have the program,
"FPSCreator" open, and I select, "entities", then "ww2", "furnitureb”, the "damaged tank" looks like what we
need here right? Good glad you agree. Now, we need to look for the "damaged tank.fpe" file in FPScreator. So
go to "start", "my computer", "local disk C:", "program files", "The game creators folder", then "FPScreator
folder", open the "files" folder. Open the "entitybank folder"; open up "ww2" folder. Now "furnitureb",
Remember we were looking for the "damagedtank.fpe"? When you find the files that say "damaged_tank",
you’re on track here. But there are two files! Click on the file on the right of that image "damaged_tank". The
file we need should look like a notepad file. What we’re going to do here is right click, the file called
"damaged_tank", and select copy. Now move this file to the desktop with the other 2! (THE .fpe file LOOKS
LIKE A NOTEPAD FILE!)
STEP 10: Guess what! Only a few more things left! What we’re going to do now, with the new .FPE file we have
on our desktop, we need to rename it. So "right click" select "rename", rename it to "a7v". Now double click
on that .fpe file we just renamed. If your computer asks you what program you'd like to open it up with, just
select, the program "notepad". Now you’re going to see all sorts of foreign text in there right? Nah. Not too
bad. Let’s get to messing with the script a little bit.
STEP 11: With our .fpe file open, we see something that says ";HEADER", right? Under that it will say, "desc =
damaged_tank". Let's change that. Just delete the part that says "damaged_tank", and type in "A7_V". Now
we’re done there. So scroll down to where it says, ";Orientation", just under that you’re going to see the word
"model", then to its right, a crap load of stuff, ending with a .x, right? We need to change this. Before we do
mess with anything else though we need to move our 3 files to "MyEntities Folder" we made earlier. Sorry for
skipping that. Go to the "a7v" file we been messing with, and go to "file" then "save". Then close it out. Go to
your desktop where those three files are at. Put them right next to each other. Now select all those files by
click somewhere around them, hold the "left mouse button”, this will select them, now click the "right mouse
button" select "cut". Now we can "cut" these files cause there ours, and won’t ruin anything.
STEP 12: Now we need to go to "start" , "my computer", "local disk C:", "Program files", now open "the game
creators folder", select "FPS Creator folder" , Open up "files" then open up "Entity Bank". Last but not least we
open up the "MyEntities" folder we created earlier. "Right click" in that folder, and select "paste". Now the
three Files we messed with earlier are part of the FPS Creators program. Although we still need to do a few
more things to the .fpe file we messed with earlier. So open up the "a7v" .FPE file. The one that looks like
notepad. Where it says ";Orientation", under that it says "model = blah blah blah.x". What we need to put here
is exactly this, if you followed this step by step! Remember without the quotation marks! "model = C:\Program
Files\The Game Creators\FPS Creator\Files\entitybank\MyEntities\A-7V.x". This is pointing to our .x file. Were
almost all set.
STEP 13: Now looking at our a7v FPE file we scroll down and see where it says ";visualinfo". See where it says
"textured"? That what we need to change now? And do you remember the .tga file we created? That exactly
FPS Creator Hint’s ‘n’ Tips Guide – Revision 8 Page 91
what needs to go there! It will look exactly like this when you have changed it. "textured = C:\Program
Files\The Game Creators\FPS Creator\Files\entitybank\MyEntities\a7v.tga". Again don’t put the quotation
marks in there. Now with the .fpe file we have open we need to just save it now. So go to "file" and just select
"save".
STEP 14: I’m assuming you have FPSCreator open still. What we need to do now is close it. So close it out
completely. Now we’re going to open it back up, go to "start" , "all programs" , "the game creators" , "fps
creator" , then open "fps creator". Then it loads. Ok here is what we do now. With FPS Creator open, we select
the "entities" tab. Now it will have the "add new entity" option. Click that. Now scroll down until you see the
new option called "MyEntities". Look for the "a7v". Then put it on in the game! If you want, you can mess with
the x, y rotate commands in the .fpe file, to change the tanks angle and what not. Make sure you have the
"build game" options set to high to look at the DARKmatter beauty Such as texture detail, and light map
settings. Later I will give a tutorial on using the xrotate, and yrotate commands. Which my wife taught me. lol.
But are pretty darn easy!
HOW TO MAKE A HUD USING GIMP By FredP
1. First, you want to fire up the Gimp.
2. Left click on File and then on New. Pick the length and width of your HUD and click on OK.
3. Choose a colour by left clicking on Dialogs and then on Colours.
4. Then left click on tools/paint tools/bucket fill to make your HUD the colour you picked.
5. Then left click on tools/selection tools/rect select to select a rectangle.
6. Make a rectangle where you want the number of lives you have left to be.
7. Then click on layer/mask/add layer mask.
8. Click on selection/invert mask/ok.
9. Then left click layer/mask/apply layer mask then left click anywhere to select none.
10. Go back to 6 above and repeat for the lives.
11. Change the foreground colour by clicking on dialogs/colour. If not your text will be the same as your
background colour and you won't see it.
12. Now click tools/text.
13. Left click somewhere around your first box and type in "LIVES". Hit ENTER and then close the text box.
14. Left click somewhere around your second box and type "HEALTH”. Hit ENTER and close the text box.
15. Note: If you are displaying something other than lives or health then type that.
16. Then left click on file/save as. Call your HUD whatever you want. Just make sure it ends with .dds.
Then save it where you want to save your HUD.
CREATING OVER-SATURATED TEXTURES IN GIMP BY ANTONIO LIMPO (ALIMPO83)
IF YOU NEVER USED GIMP, PLEASE FOLLOW THE LINK TO THE GIMP SITE: WWW.GIMP.ORG
It’s been a while since my first GIMP tutorial, on how to create fake bump textures for hi-speed and/or for use
in low-end 3D engines. Since it had such success, with hundreds and hundreds of downloads, I’ve decided to
make a new one. As the other, this one is very simple.
Well, I’ve been doing some tests and all, and come up with a good looking over - saturated textures, like the
ones you see in excellent games like the Silent Hill series by Konami. It’s fairly easy to accomplish these great
effects in GIMP.
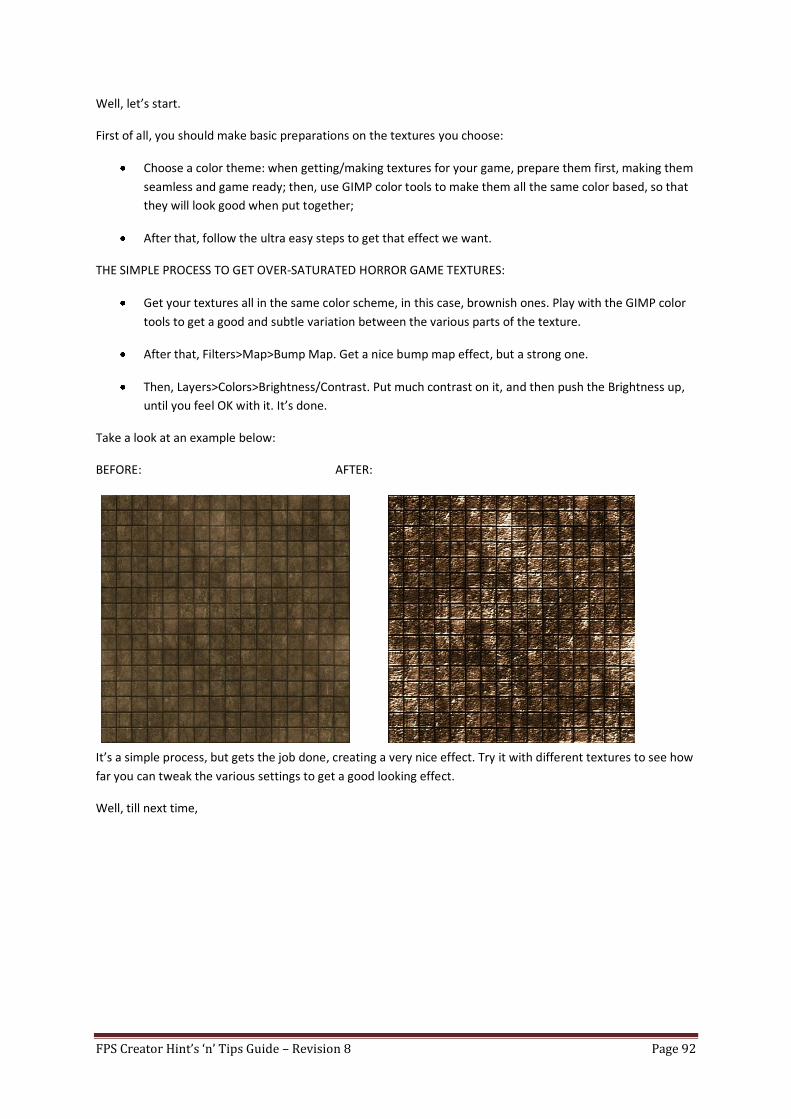
FPS Creator Hint’s ‘n’ Tips Guide – Revision 8 Page 92
Well, let’s start.
First of all, you should make basic preparations on the textures you choose:
Choose a color theme: when getting/making textures for your game, prepare them first, making them
seamless and game ready; then, use GIMP color tools to make them all the same color based, so that
they will look good when put together;
After that, follow the ultra easy steps to get that effect we want.
THE SIMPLE PROCESS TO GET OVER-SATURATED HORROR GAME TEXTURES:
Get your textures all in the same color scheme, in this case, brownish ones. Play with the GIMP color
tools to get a good and subtle variation between the various parts of the texture.
After that, Filters>Map>Bump Map. Get a nice bump map effect, but a strong one.
Then, Layers>Colors>Brightness/Contrast. Put much contrast on it, and then push the Brightness up,
until you feel OK with it. It’s done.
Take a look at an example below:
BEFORE: AFTER:
It’s a simple process, but gets the job done, creating a very nice effect. Try it with different textures to see how
far you can tweak the various settings to get a good looking effect.
Well, till next time,
FPS Creator Hint’s ‘n’ Tips Guide – Revision 8 Page 93
MAKE YOUR OWN FPS CREATOR SIGNS By Devild0g
Welcome to my second tutorial. By the time you’re done reading this, you’re going to be able to take any pic
off your PC or internet and turn it into a sign. Whether you want to be perverted or serious, this works. Now in
this tutorial unlike the last one I did, I'm not going to say "start" blah blah. Because if you don't know how to
open up fps creator, you shouldn't be trying any tutorial's.
-What you need for this tutorial
1) FPS CREATOR
2) Some kind of PaintShop Program ex: PaintShop Pro, Adobe.
3) A .DDS converter. Which can be found for free by going to this link here:
http://eliteforce2.filefront.com/file/DDS_Converter;29412.
4) Please make sure you install it.
5) Most of all keep an open mind. There may be 100 ways of doing this. Maybe there is a two step process to
doing it. But I'm going to show you the way I did it.
STEP 1: First we go to www.google.com. Type in the search "eagle globe anchor" but without the quotes. A
page pops up saying "US MARINE CORP EMBLEM". Go to that page. You see the Marine Corp Symbol? We’re
going to copy that. If you can do a screen capture. Otherwise, I will include the download of the Eagle Globe
and Anchor in this thread. Ok make sure your saving everything on desktop, which makes it easier to mess
with everything, and find things we need.
STEP 2: Now, just like making your own entities, we have to use some of the files that are already installed
with FPSC. So what we’re going to do is go to "start", "my computer" "c:" , "program files", "The Game
Creators", "FPS CREATOR", "Files" , "entity bank", "ww2", "wall furniture". See all that crazy stuff? We’re going
to steal three items from here. And I'm going to tell you which ones.
STEP 3: Ok look for the file's that say, "sign_f" there should be three of them! What we're going to do is COPY
COPY COPY!!! Not CUT!! Cutting files can result in missing files. So we will play it safe. Copy all three files that
say "sign_f", to the desktop. Which if you’re not sure is the place your computer comes to when you first turn
it on. (duh) Ok, now we have to find out where all the "sign_f" files are pointing too. But I know where, so I'll
tell you. If you would like to know exactly where, all you have to do it open the .fpe files. It says exactly.
STEP 4: So I opened up the "sign_f" .fpe, and it told me where its model was located. So I go to "start", "My
Computer", "C:", "Program Files", "The Game Creators", "FPS Creator" , "Files" , "meshbank", "WW2",
"scenery", "signs". Now in this folder create a new folder called "eg_a". Of course without the parenthesis. Do
this by right clicking in the "signs" folder, select "new" then "folder". Name it "eg_a". Now open your new
"eg_a" folder. Yeah it’s empty. What goes here is the .x file. Go to your desktop, find our "sign_f" .x file. COPY
it, and put it in our new "eg_a" folder. Right click this file, and select "rename" name it to "eg_a". Were done
with this folder.
STEP 5: Now we need to go to the "texture bank". And put some things in there. So once again we go "start" ,
"my computer" , "C:", "Program files", "The Game Creators" , "FPS Creator" , "files", "texture bank", "WW2",
"scenery" , "signs". Now in here were going to create another folder, and call it, you guessed it, "eg_a". If
you’re unsure how to do this. Please see above. What’s going to go in here? Your .dds file! So what we need to
do is open up your program I told you to get which converts .jpg's or .bmp's to .dds. Called "DDS Converter 2".
Open it up, and then browse to your eagle globe and anchor file on the desktop. This program works quickly,
and closes automatically. Your new file "eg_a" is now on the desktop. Now go back to the folder you created in
the "texture bank" portion titles eg_a, open it up, and then place your new .dds file in there. That’s it now
FPS Creator Hint’s ‘n’ Tips Guide – Revision 8 Page 94
close that folder.
STEP 6: Now what we need to do is take all three files we still have on our desktop and put them so that FPS
Creator will read them. Then a little .fpe tweaking and we're all set. Easy enough right? Now go to "start", "my
computer", "C:", "Program Files" , "The Game Creators", "FPS Creator", "files", "entity bank", "WW2", "wall
furniture". Now in here is where we seen all those crazy files at. If you remember it’s also where we stole our
files for making our new sign. We’re going to go to our desktop now, and tweak a few things here. Mmm k ? If
you did not save our original picture "the eagle globe and anchor, then re download it using this forum
"download" link". If you still have that file we need to change it to a ".bmp" So get out your favourite Paint
Program and do so. Save this to the desktop, and make sure its name is "eg_a".
STEP 7: Now remember the ".fpe" file we took from the "sign_f" that should be on your desktop. What we’re
going to do is rename it now to "eg_a". We will mess with this later. Now the ".bin" file you took from the
"sign_f" we're not going to touch. All were going to do to it is rename it to "eg_a". Now we have our three files
that need to go into the folder you should still have open. Which is mentioned in step 6. Now copy all three of
them files, that have "eg_a", this time we will CUT them because there our files, and we don’t need them all
over the place. Now paste the three files in the "wall furniture" folder you should still have open.
STEP 8: Final Step: With our "wall furniture" folder open, click on the "eg_a.fpe" file. We need to tell this file
where our images and .x file are located. IF you followed these steps all you have to do it type this where I tell
you to. And everything will be peachy. Looking at our "eg_a.fpe" we see something that says "desc =" , erase
the "sign_f", and put eg_a, so it will look like this. "desc = eg_a". Now go down to where it says
;orientation
model = meshbank\ww2\scenery\signs\eg_a\eg_a.x
This points to our .x file that we put in earlier. Remember? Good. Now scroll down to where it says
;visualinfo
textured = texturebank\ww2\scenery\signs\eg_a\eg_a.dds
This points to the actual image file for our new Marine Corp Symbol. Now make sure you SAVE the "eg_a.fpe",
before closing it. Or you'll be repeating this step over again. Now you’re safe to close all folders this tutorial
had you open. Let's start FPS CREATOR, and find our symbol! Put a prefab room, any will do in the fps creator.
Then go to "entities", "ww2" , "wall furniture", and there is our "eg_a". Eagle Globe & Anchor, United States
Marine Corp emblem. Hope you all enjoy this tutorial.
FPS Creator Hint’s ‘n’ Tips Guide – Revision 8 Page 95
HOW TO CREATE YOUR OWN PLAYER SOUNDSET by That c++ Nerd
1. Create a bunch of .wav files by yelling and experimenting with all kinds of loud noises.
2. Choose which you think are good for the following.
Jumping (Leap.wav)
Landing (Land.wav)
Being shot (3) (Hurt 1, 2, 3 .wav)
And when your health hits 0. (Finalmoan.wav)
3. Save them in .wav format to
C:\Program Files\The Game Creators\FPS Creator\Files\audiobank\voices\[type your soundset name
here]
with the file names
Finalmoan.wav
Hurt1.wav
Hurt2.wav
Hurt3.wav
Land.wav
Leap.wav
Spawn.wav
And your done! Now just type in the exact name for your soundset under properties for the player
start marker (right click) where it says soundset.
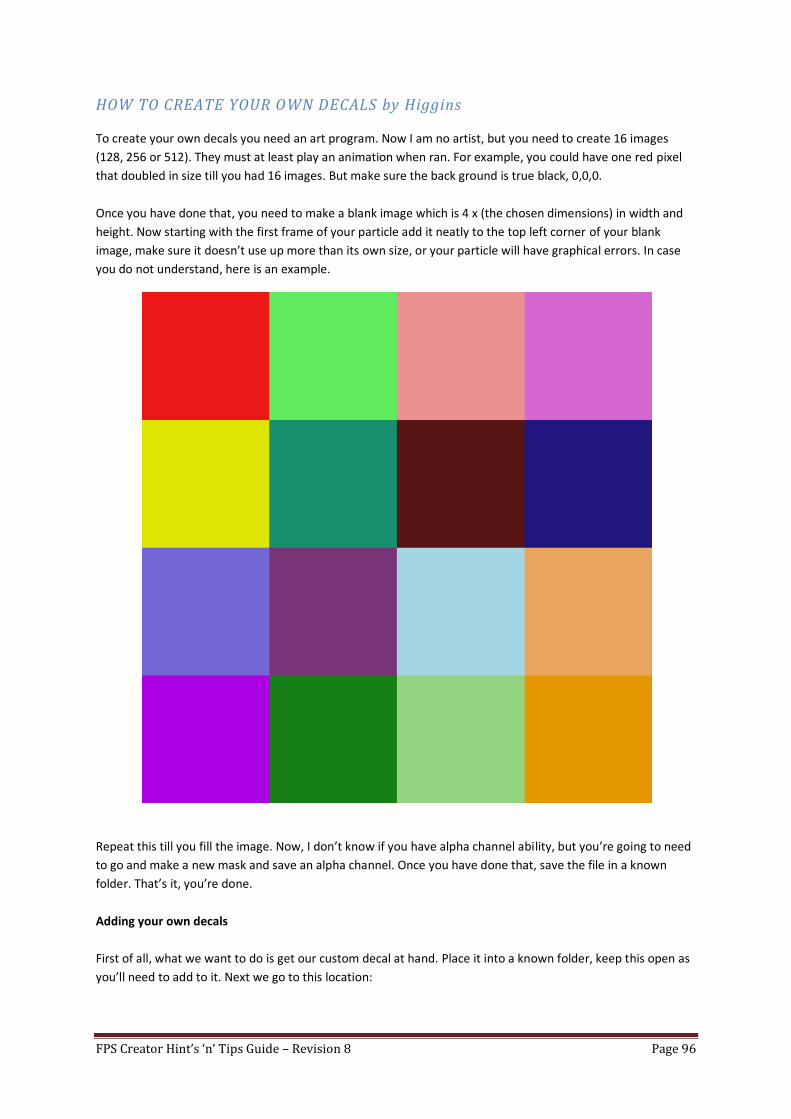
FPS Creator Hint’s ‘n’ Tips Guide – Revision 8 Page 96
HOW TO CREATE YOUR OWN DECALS by Higgins
To create your own decals you need an art program. Now I am no artist, but you need to create 16 images
(128, 256 or 512). They must at least play an animation when ran. For example, you could have one red pixel
that doubled in size till you had 16 images. But make sure the back ground is true black, 0,0,0.
Once you have done that, you need to make a blank image which is 4 x (the chosen dimensions) in width and
height. Now starting with the first frame of your particle add it neatly to the top left corner of your blank
image, make sure it doesn’t use up more than its own size, or your particle will have graphical errors. In case
you do not understand, here is an example.
Repeat this till you fill the image. Now, I don’t know if you have alpha channel ability, but you’re going to need
to go and make a new mask and save an alpha channel. Once you have done that, save the file in a known
folder. That’s it, you’re done.
Adding your own decals
First of all, what we want to do is get our custom decal at hand. Place it into a known folder, keep this open as
you’ll need to add to it. Next we go to this location:
FPS Creator Hint’s ‘n’ Tips Guide – Revision 8 Page 97
The Game Creators/FPS Creator/Files/entitybank/generic/decals
Go ahead and copy one of the FPE files and paste it into your folder. Right click the file and rename it to
something relating to the decal you have made. Open the file up and edit the following:
;header
desc =
;ai
aiinit = Add either (repeatsound.fpi) or (appear1.fpi)
aimain = decalflat.fpi
aidestroy = disappear1.fpi
;orientation
model = particles.x
textured = particles_d.tga
defaultheight = 0.5
transparency = 0
soundset = Add the sound you want to play near the decal
;identity details
strength = 0
isimmobile = 1
ismarker = 4
;decals
decalmax = 1
decal0 = Name of particle folder under The Game Creators/FPS
Creator/Files/gamecore/decals
Now we are moving to this location: The Game Creators/FPS Creator/Files/gamecore/decals
Create a new folder in this directory, name it what your particle is. Now open that folder and create a text
document. Rename it decalspec and add the following:
;decal spec
;DECAL
across = 4
down = 4
offsety = 8
scale = The scale you want the decal to be
Now copy your particle image from your known folder and paste it into your new gamecore/decals folder.
Open up FPSC, click entities, generic, decals and select your new decal. Place it into your scene and test the
map to view your handy work.
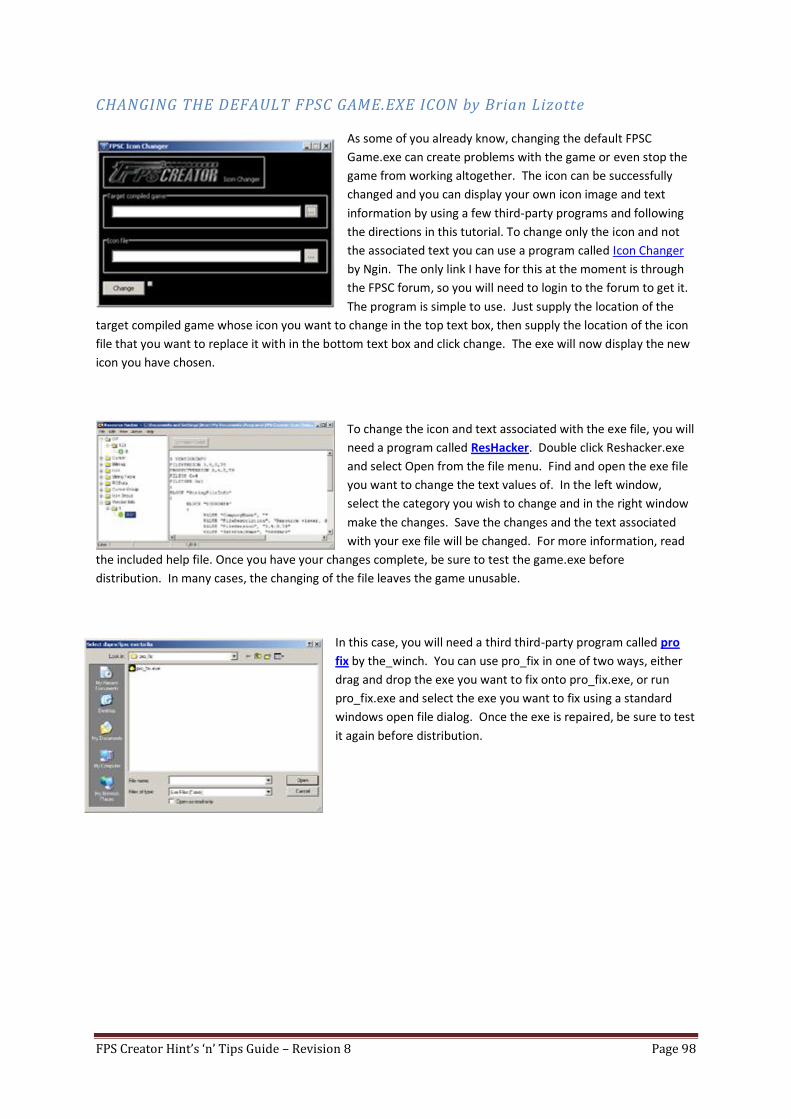
FPS Creator Hint’s ‘n’ Tips Guide – Revision 8 Page 98
CHANGING THE DEFAULT FPSC GAME.EXE ICON by Brian Lizotte
As some of you already know, changing the default FPSC
Game.exe can create problems with the game or even stop the
game from working altogether. The icon can be successfully
changed and you can display your own icon image and text
information by using a few third-party programs and following
the directions in this tutorial. To change only the icon and not
the associated text you can use a program called Icon Changer
by Ngin. The only link I have for this at the moment is through
the FPSC forum, so you will need to login to the forum to get it.
The program is simple to use. Just supply the location of the
target compiled game whose icon you want to change in the top text box, then supply the location of the icon
file that you want to replace it with in the bottom text box and click change. The exe will now display the new
icon you have chosen.
To change the icon and text associated with the exe file, you will
need a program called ResHacker. Double click Reshacker.exe
and select Open from the file menu. Find and open the exe file
you want to change the text values of. In the left window,
select the category you wish to change and in the right window
make the changes. Save the changes and the text associated
with your exe file will be changed. For more information, read
the included help file. Once you have your changes complete, be sure to test the game.exe before
distribution. In many cases, the changing of the file leaves the game unusable.
In this case, you will need a third third-party program called pro
fix by the_winch. You can use pro_fix in one of two ways, either
drag and drop the exe you want to fix onto pro_fix.exe, or run
pro_fix.exe and select the exe you want to fix using a standard
windows open file dialog. Once the exe is repaired, be sure to test
it again before distribution.
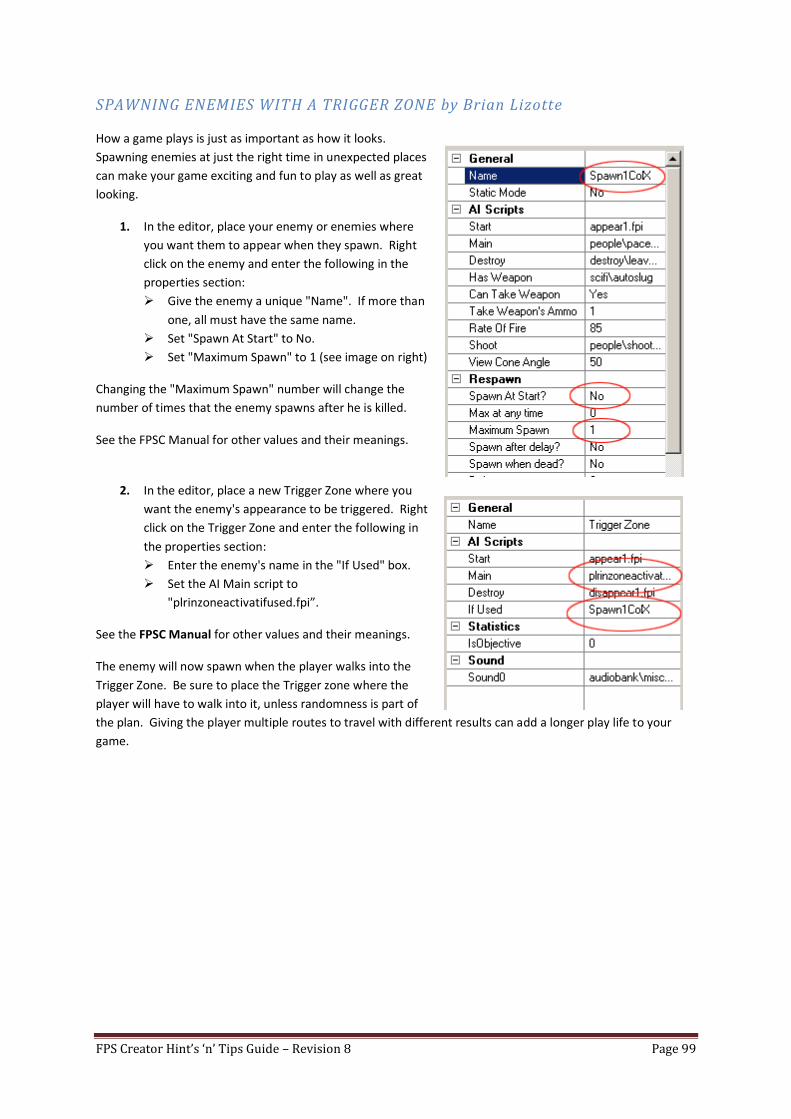
FPS Creator Hint’s ‘n’ Tips Guide – Revision 8 Page 99
SPAWNING ENEMIES WITH A TRIGGER ZONE by Brian Lizotte
How a game plays is just as important as how it looks.
Spawning enemies at just the right time in unexpected places
can make your game exciting and fun to play as well as great
looking.
1. In the editor, place your enemy or enemies where
you want them to appear when they spawn. Right
click on the enemy and enter the following in the
properties section:
Give the enemy a unique "Name". If more than
one, all must have the same name.
Set "Spawn At Start" to No.
Set "Maximum Spawn" to 1 (see image on right)
Changing the "Maximum Spawn" number will change the
number of times that the enemy spawns after he is killed.
See the FPSC Manual for other values and their meanings.
2. In the editor, place a new Trigger Zone where you
want the enemy's appearance to be triggered. Right
click on the Trigger Zone and enter the following in
the properties section:
Enter the enemy's name in the "If Used" box.
Set the AI Main script to
"plrinzoneactivatifused.fpi”.
See the FPSC Manual for other values and their meanings.
The enemy will now spawn when the player walks into the
Trigger Zone. Be sure to place the Trigger zone where the
player will have to walk into it, unless randomness is part of
the plan. Giving the player multiple routes to travel with different results can add a longer play life to your
game.
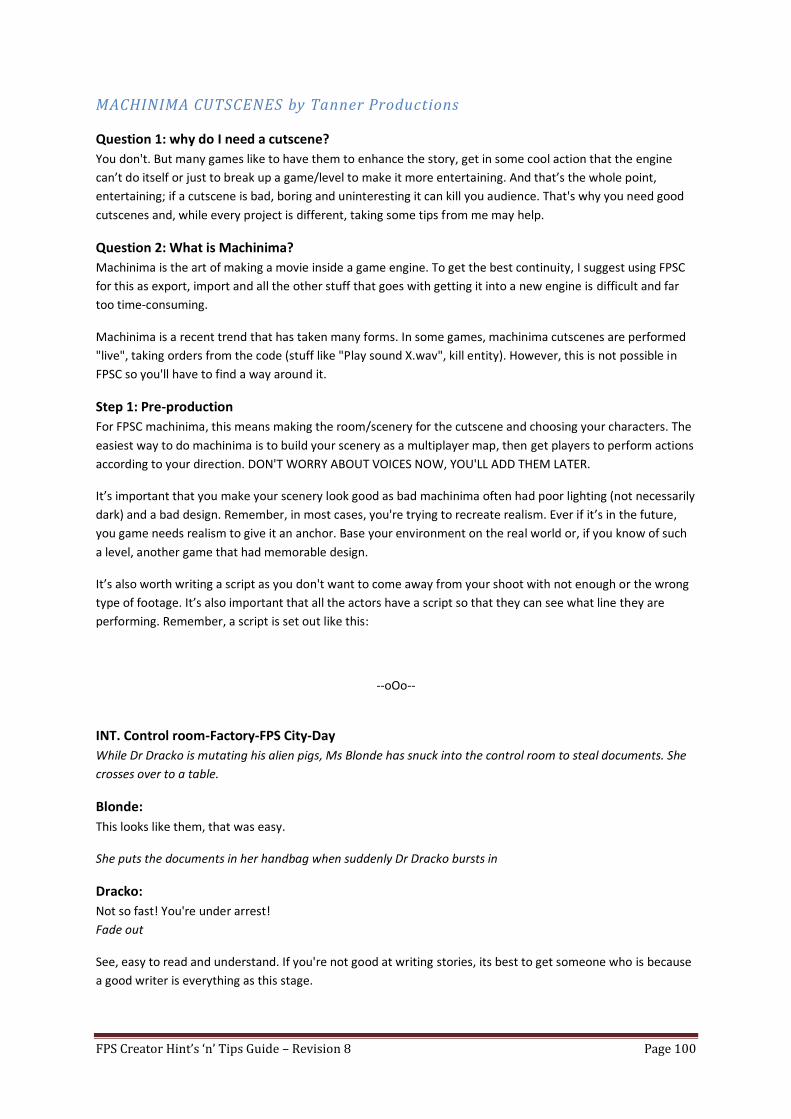
FPS Creator Hint’s ‘n’ Tips Guide – Revision 8 Page 100
MACHINIMA CUTSCENES by Tanner Productions
Question 1: why do I need a cutscene?
You don't. But many games like to have them to enhance the story, get in some cool action that the engine
can’t do itself or just to break up a game/level to make it more entertaining. And that’s the whole point,
entertaining; if a cutscene is bad, boring and uninteresting it can kill you audience. That's why you need good
cutscenes and, while every project is different, taking some tips from me may help.
Question 2: What is Machinima?
Machinima is the art of making a movie inside a game engine. To get the best continuity, I suggest using FPSC
for this as export, import and all the other stuff that goes with getting it into a new engine is difficult and far
too time-consuming.
Machinima is a recent trend that has taken many forms. In some games, machinima cutscenes are performed
"live", taking orders from the code (stuff like "Play sound X.wav", kill entity). However, this is not possible in
FPSC so you'll have to find a way around it.
Step 1: Pre-production
For FPSC machinima, this means making the room/scenery for the cutscene and choosing your characters. The
easiest way to do machinima is to build your scenery as a multiplayer map, then get players to perform actions
according to your direction. DON'T WORRY ABOUT VOICES NOW, YOU'LL ADD THEM LATER.
It’s important that you make your scenery look good as bad machinima often had poor lighting (not necessarily
dark) and a bad design. Remember, in most cases, you're trying to recreate realism. Ever if it’s in the future,
you game needs realism to give it an anchor. Base your environment on the real world or, if you know of such
a level, another game that had memorable design.
It’s also worth writing a script as you don't want to come away from your shoot with not enough or the wrong
type of footage. It’s also important that all the actors have a script so that they can see what line they are
performing. Remember, a script is set out like this:
--oOo--
INT. Control room-Factory-FPS City-Day
While Dr Dracko is mutating his alien pigs, Ms Blonde has snuck into the control room to steal documents. She
crosses over to a table.
Blonde:
This looks like them, that was easy.
She puts the documents in her handbag when suddenly Dr Dracko bursts in
Dracko:
Not so fast! You're under arrest!
Fade out
See, easy to read and understand. If you're not good at writing stories, its best to get someone who is because
a good writer is everything as this stage.
FPS Creator Hint’s ‘n’ Tips Guide – Revision 8 Page 101
Step 2: Production
Once you've made your map, and distributed it, you can begin. Organise a time to meet in the map and tell
people what model they are to pick.
You're going to need to capture the acting so you can make it into a movie. For this, don't put a camera in
front of your monitor, get a screen-recorder. There are several on the net, here are some:
Game Cam, Fraps, Screen Recorder Gold
All of these work with FPSC but on some computers, they may slow the frame-rate down. If, however, they
don't then you're all set.
Make sure your actors know who is playing who; you may want to E-mail them and say "Your playing (Dr
Dracko), turn up at (9:00 PM GMT) and select (colonel X) as your player model".
You can give your actors directions by talking to them in multiplayer, press Y (I think). You'll have to learn how
to recorder by yourself because it varies from program to program. Remember not to record too much; Video
= Disk space and lots of it, make sure everything you get is worth using or at least considering.
The one major draw-back with machinima is that its limited to what the engine can do, which in FPSC's case
isn't much. However, for a simple script it’s fairly OK but you may want some custom media to help add variety
and fit in with the story. Once you've got your footage, it’s time to edit...
Step 3a: Post-Production-Edit
To edit your footage, add titles and voice etc you'll need a video editing software. There are loads, many aren't
free but I really depends how deep you're willing to go.
Adobe Premiere, Power Director (what I use), Ulead Video studio, Sony Vegas 6, Zwei Stein (a very strange ,
little program , Video Edit Magic
May I also recommend you download RAD Video Tools, perhaps the most useful conversion tool on the net for
free. Every video editor varies slightly but once you've used one, you can learn the other quite easily. NEVER
EVER USE WINDOWS MOVIE MAKER, it is the worst video editor ever made. If Adobe Premier were a marine,
windows movie maker would still be bashing stuff and shouting "Ug!". It isn't useful for anything except a
cheap gimmick for Microsoft.
Step 3b: Post-production-Adding Voices
You will most probably need to add voices to your cutscene. First, you'll need a microphone, then a program to
capture the sound.
Wavepad, Audacity, Goldwave
MP3 files are smaller than .wav; use this to your advantage. If you have a voice actor in another country, get
them to send you their clips as MP3, they will be small but high quality.
Step 3c: Post-production-Special Effects
You want an explosion? Don't try it in FPSC, do it now, in post-pro. I still think that the best place to get
explosions/fire/havoc/weather effects is from Detonation Films.com. Their free stuff collection has served me
well in the past. You'll need something to composite the explosion into a shot. Some video editors can do this,
but for free, I suggest Wax as it is very useful and can do quite a lot of stuff.
FPS Creator Hint’s ‘n’ Tips Guide – Revision 8 Page 102
MILKSHAPE AND FPSC By Disturbing 13
Greetings all. There seems to be some of confusion and what not about getting models working in FPSC with
the use of milkshape3d. Hopefully here I can answer some questions and help those having any trouble with
getting characters and such into FPSC.
Q-Can I get a .x file into Milkshape?
A-Yes. You can directly get a .x file into milkshape by clicking Tools/DirectX Mesh Tools- this opens a box with
more Icons. Click the Folder icon and choose the .x file of choice. Click the Disk icon and it will place the object
in milkshape.
NOTE- It will have no bones and retain no animation; this is a mesh only tool. While it is in the mesh tool you
can also use the polly reduction tool slide bar. It's not the best reduction tool but still is available to you.
Q-Can I get the standard FPSC animated skeleton into milkshape, retaining animation?
A-Yes and No. Though Milkshape can import a .x it can't import the animation directly. I find that Fragmotion
serves as a great companion to Milkshape. Fragmotion can import a .x file and retain the animation as well as
bone information, then export as a Milkshape3d file (.ms3d) This allows for the mesh, bones and animation to
be imported
into Milkshape.
Q- Ok so I have this model and animated skeleton Imported into Milkshape, But I want to create my own
enemy; What do I do?
A- What you can do is 'select faces', then select all the faces and delete them. This will give you a skeleton to
work with. The skeleton is still animated, so all you have to do is create your model around the skeleton. Use
milkshapes ability to uv map; the less you depend on other programs the better.
Q- But I just found a bunch of freebies on Turbo Squid and they are already uv mapped, I just need them
attached to the FPSC skeleton. How do I go about doing that ?
A- Very carefully. The first thing you do is make sure you have a working FPSC skeleton and save skeleton only
as a milshape 3d file. Then close milkshape. Open it again and import your model FIRST! Then File/Merge...and
choose the skeleton MS3d file.
The skeleton must be chosen second or you will lose all animation. You may have to resize/reshape the model
in order to fit the skeleton. NEVER reshape the skeleton to fit the model; it will screw up all your animation.
Attatch the vertices to the bones as normal and export.
Q- When exporting my model, how do I go about doing it? What exporter should I use? What settings should
I have on?
A- First off save your model to back it up, then export using the JT exporter; do not use the directX 8.0
exporter. For some reason it totally screws up animation and models in FPSC(at least in my experience) Use
the Jt exporter and make sure the following changes are made in the JT exporter dialogue box-

FPS Creator Hint’s ‘n’ Tips Guide – Revision 8 Page 103
Q-I followed your advice but my model still sinks halfway into the ground; What am I doing wrong?
A- You are using an older skeleton. Before FPSC V1.4 it really didn’t matter about the first bone of the skeleton;
all you had to do was make sure the feet were at y coordinates '0'. Now the industry standard is having a 'root
bone'- the first bone of the model is at x,y,z, coordinates 0,0,0. In between the feet. allot of skeletons of the
past had the 'root bone' at the crotch area or even off to the side at hip height. Do not use these skeletons;
import a better one with the proper positioning.
Q-With the milkshape skeletons, do you assign the vertices to the bones or bips?
A- I have always assigned Vertices to the bones right below the listed Bip. I don't suppose it really doesn't
matter, but I tend to try to stick with operating on the more milkshape related parts within milkshape, just to
avoid unforeseeable problems.
Q-How do I set up animations in my FPE from mikshape?
A- Well quite honestly if you are using the default skeleton then you really just have to copy a similar FPE and
just change the name, name of the model and name of the texture. A current animation list and their numbers
should already be provided on page 88 of your FPSC manual. These are the standard animation numbers and
they correlate to the anim frame numbers (example)-
anim1 = 210,234 (anim1 refers to the idle animation, 210,234 are the frames of the start and end animation)
Should you have a custom skeleton the numbers need to be subtracted by 1 (from what they are listed in
milkshape)This is because FPSC reads the first frame as frame 1 where as Milkshape reads the first frame as 0.
Q-Can I alter the animations in the default skeleton?
A- Yes but honestly it's easier to add animations to the end of the animation frames. The problem is when you
import a .x that has been turned into an ms3d file, all the 'key frame animation' info is gone and it makes every
frame a key frame. So to make a custom animation just increase the amount of frames by what you will need
and create your animation at the end. Google a milkshape animation tutorial for specifics on how to animate.

FPS Creator Hint’s ‘n’ Tips Guide – Revision 8 Page 104
Q-I do everything you say for the animation thing with the directx jt, but when I export it, and put it into
make entities from x it keeps saying error 7018 could not load object at line 49, can you help?
A- I honestly don't have any experience with 'make entities from x'. I do everything manually and use a
previous example that is similar to what I am putting in and only change the necessary parts. If you already
have a failed attempt then you already have bad info that does not get covered up. You can relieve this by
erasing the previously made .bin and .dbo that is associated with the file, otherwise no changes will be made.
Sometimes you also get an error like this if you make an entity and not attach it to a bone. All models in FPSC
MUST have a bone attached, even if all the vertices are attached to a single bone set at x,y,z, coordinates 0,0,0.
Even segments.
Q-Is there a way in Milkshape that in just the last frames, that you can reset the skeleton??
A- Yes; the easiest way to do this is to go to the first frame of animation, select/bones, then select the entire
skeleton, Animate/check 'Operate on selected joints only',Animate/Copy Keyframes, move to the blank frame
or first frame you wish the 'reset' frame to be, Animate/Paste Keyframes, Animate/Set Keyframe. This will
make the start frame of the new animation the same as the very first. I never suggest manually moving the
bones as the human hand, though skilled, cannot achieve the perfection of copying the pose.
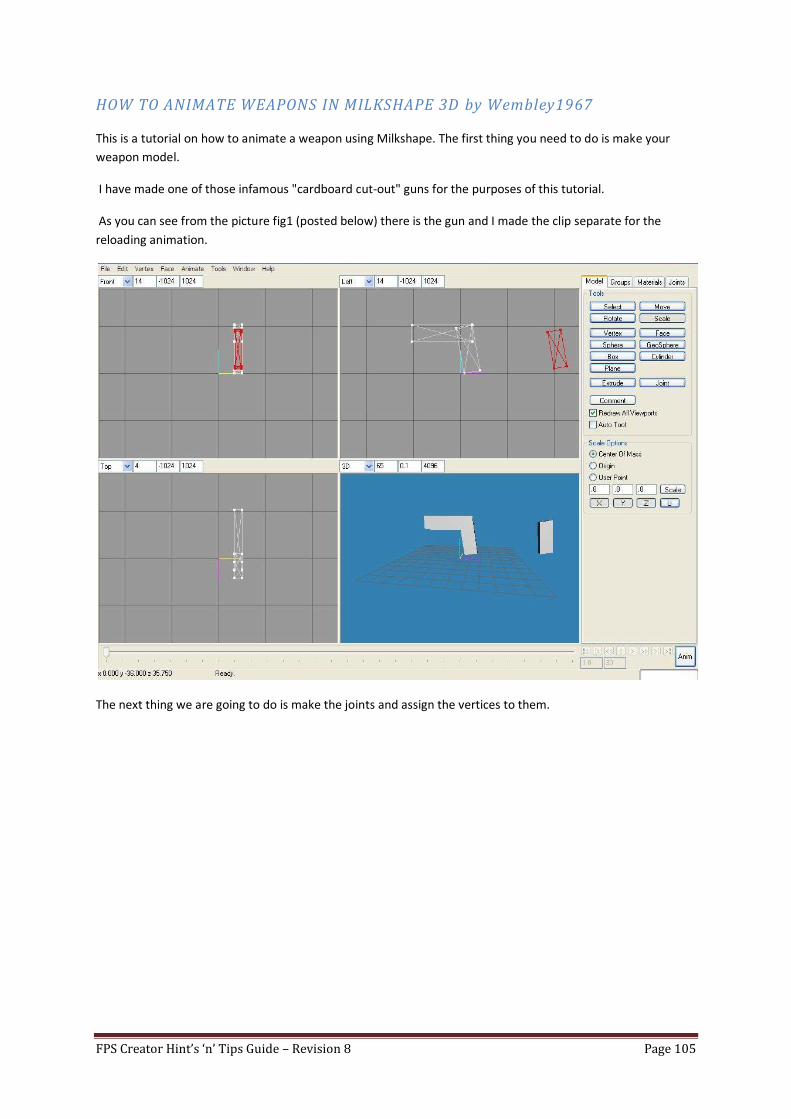
FPS Creator Hint’s ‘n’ Tips Guide – Revision 8 Page 105
HOW TO ANIMATE WEAPONS IN MILKSHAPE 3D by Wembley1967
This is a tutorial on how to animate a weapon using Milkshape. The first thing you need to do is make your
weapon model.
I have made one of those infamous "cardboard cut-out" guns for the purposes of this tutorial.
As you can see from the picture fig1 (posted below) there is the gun and I made the clip separate for the
reloading animation.
The next thing we are going to do is make the joints and assign the vertices to them.
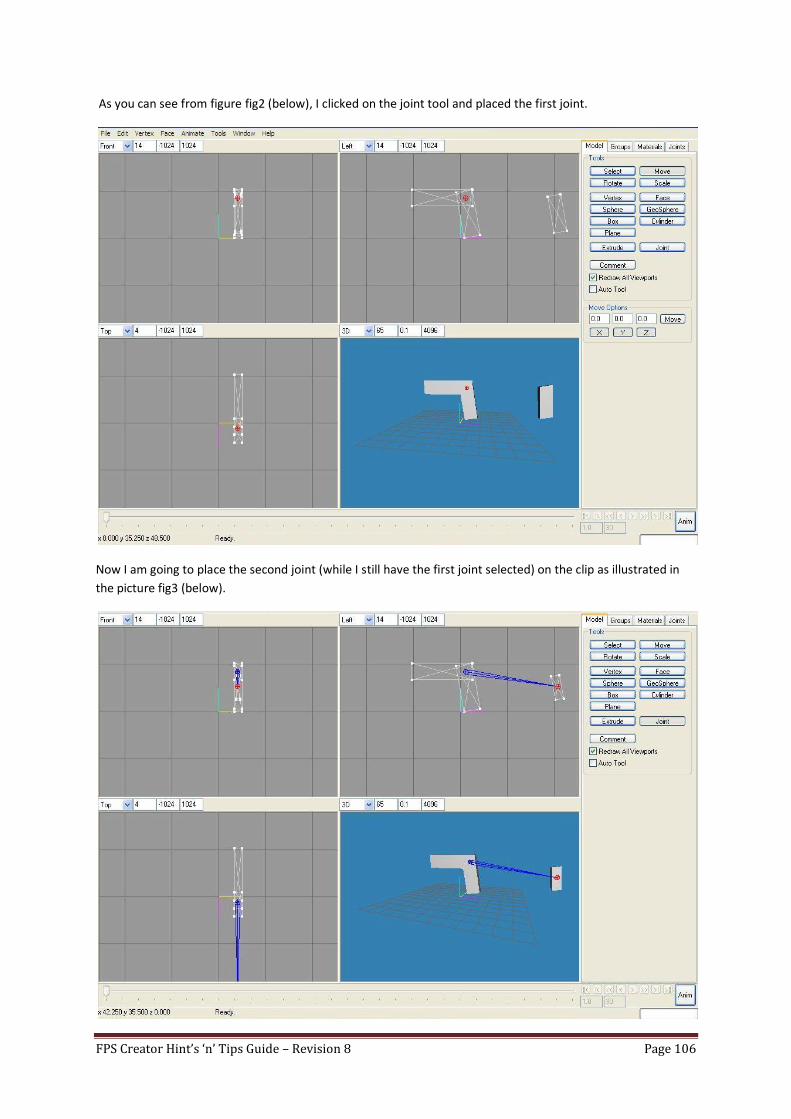
FPS Creator Hint’s ‘n’ Tips Guide – Revision 8 Page 106
As you can see from figure fig2 (below), I clicked on the joint tool and placed the first joint.
Now I am going to place the second joint (while I still have the first joint selected) on the clip as illustrated in
the picture fig3 (below).
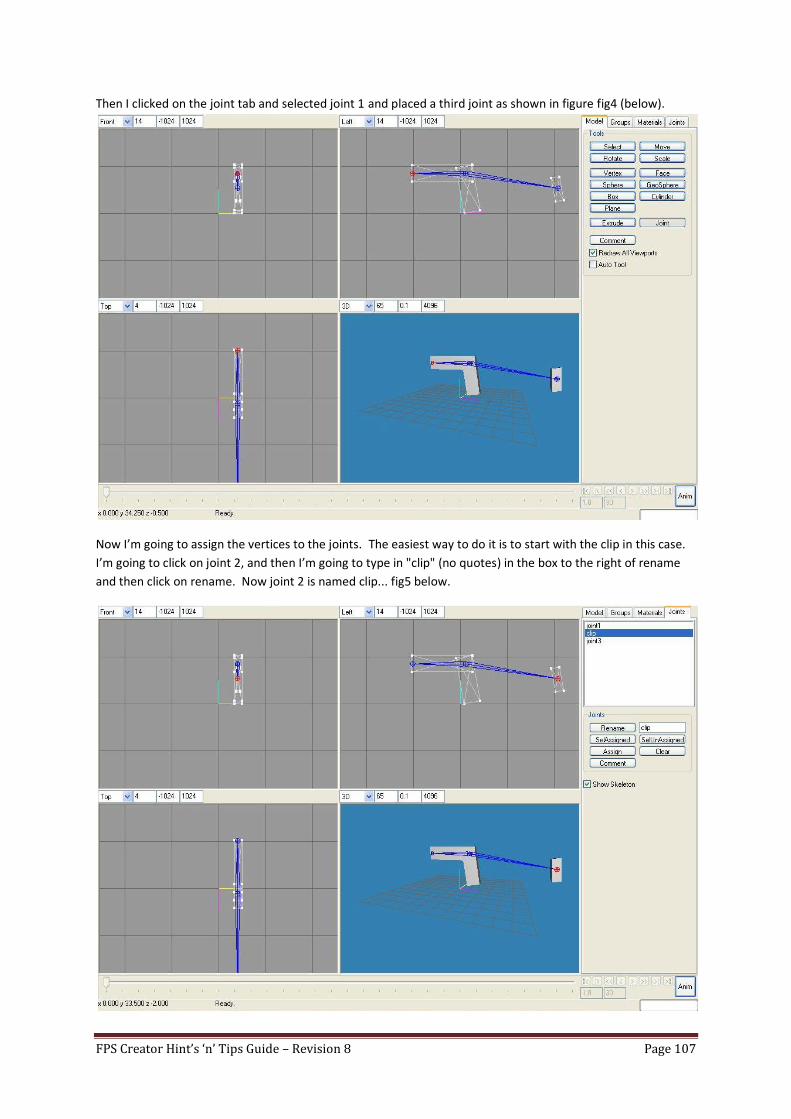
FPS Creator Hint’s ‘n’ Tips Guide – Revision 8 Page 107
Then I clicked on the joint tab and selected joint 1 and placed a third joint as shown in figure fig4 (below).
Now I’m going to assign the vertices to the joints. The easiest way to do it is to start with the clip in this case.
I’m going to click on joint 2, and then I’m going to type in "clip" (no quotes) in the box to the right of rename
and then click on rename. Now joint 2 is named clip... fig5 below.
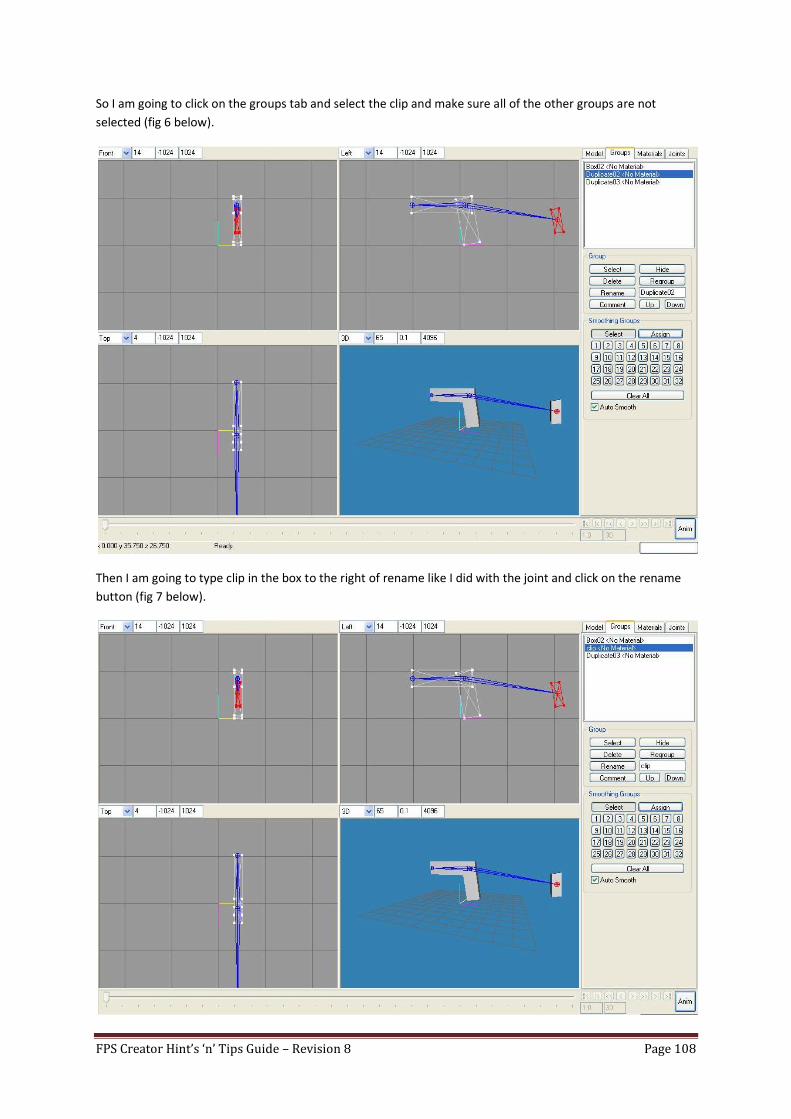
FPS Creator Hint’s ‘n’ Tips Guide – Revision 8 Page 108
So I am going to click on the groups tab and select the clip and make sure all of the other groups are not
selected (fig 6 below).
Then I am going to type clip in the box to the right of rename like I did with the joint and click on the rename
button (fig 7 below).
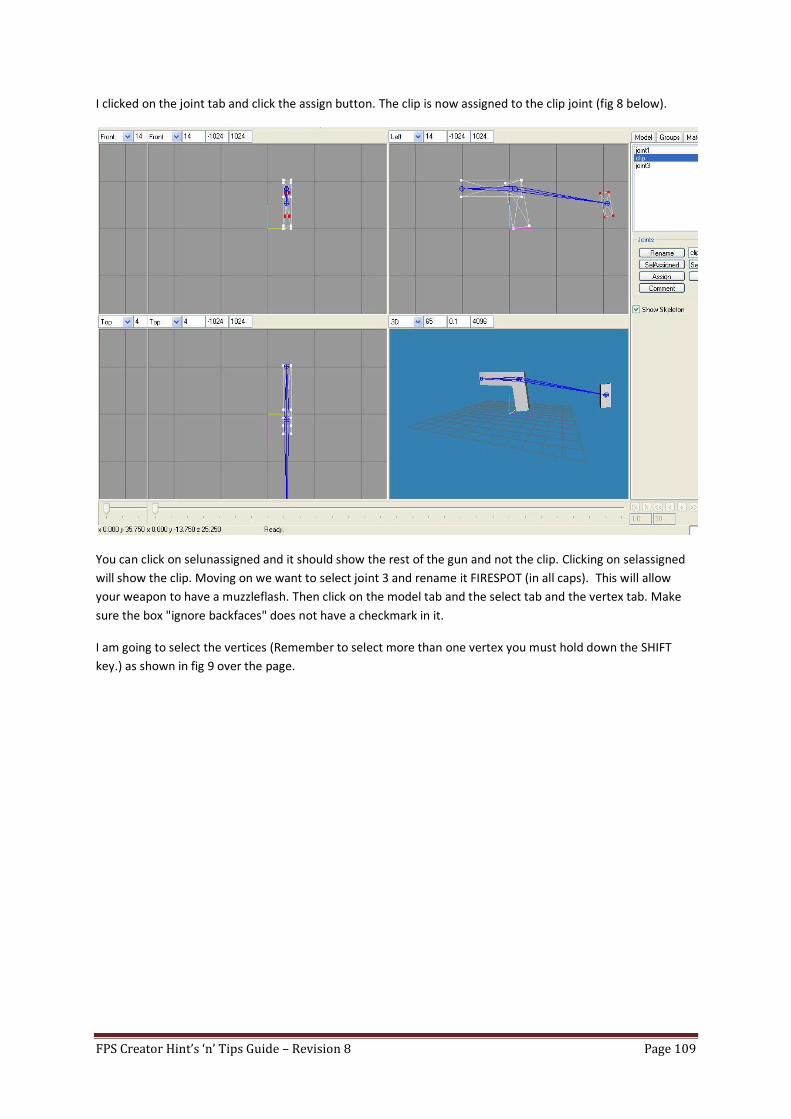
FPS Creator Hint’s ‘n’ Tips Guide – Revision 8 Page 109
I clicked on the joint tab and click the assign button. The clip is now assigned to the clip joint (fig 8 below).
You can click on selunassigned and it should show the rest of the gun and not the clip. Clicking on selassigned
will show the clip. Moving on we want to select joint 3 and rename it FIRESPOT (in all caps). This will allow
your weapon to have a muzzleflash. Then click on the model tab and the select tab and the vertex tab. Make
sure the box "ignore backfaces" does not have a checkmark in it.
I am going to select the vertices (Remember to select more than one vertex you must hold down the SHIFT
key.) as shown in fig 9 over the page.
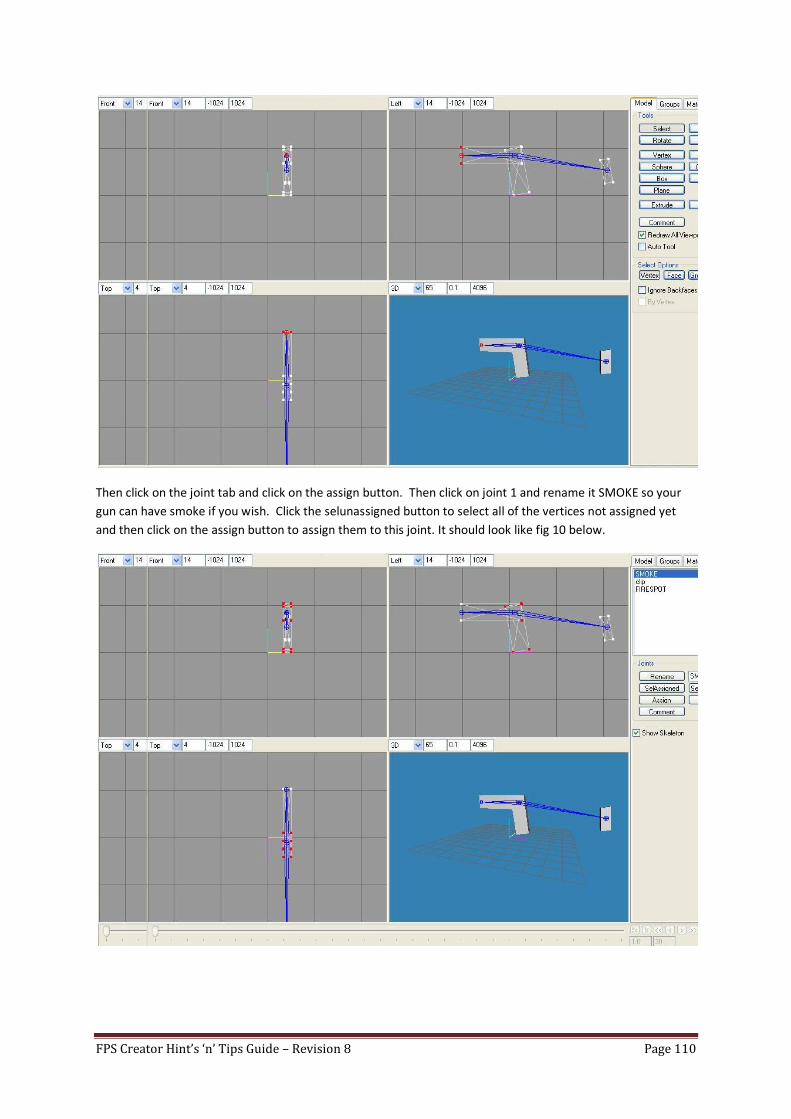
FPS Creator Hint’s ‘n’ Tips Guide – Revision 8 Page 110
Then click on the joint tab and click on the assign button. Then click on joint 1 and rename it SMOKE so your
gun can have smoke if you wish. Click the selunassigned button to select all of the vertices not assigned yet
and then click on the assign button to assign them to this joint. It should look like fig 10 below.
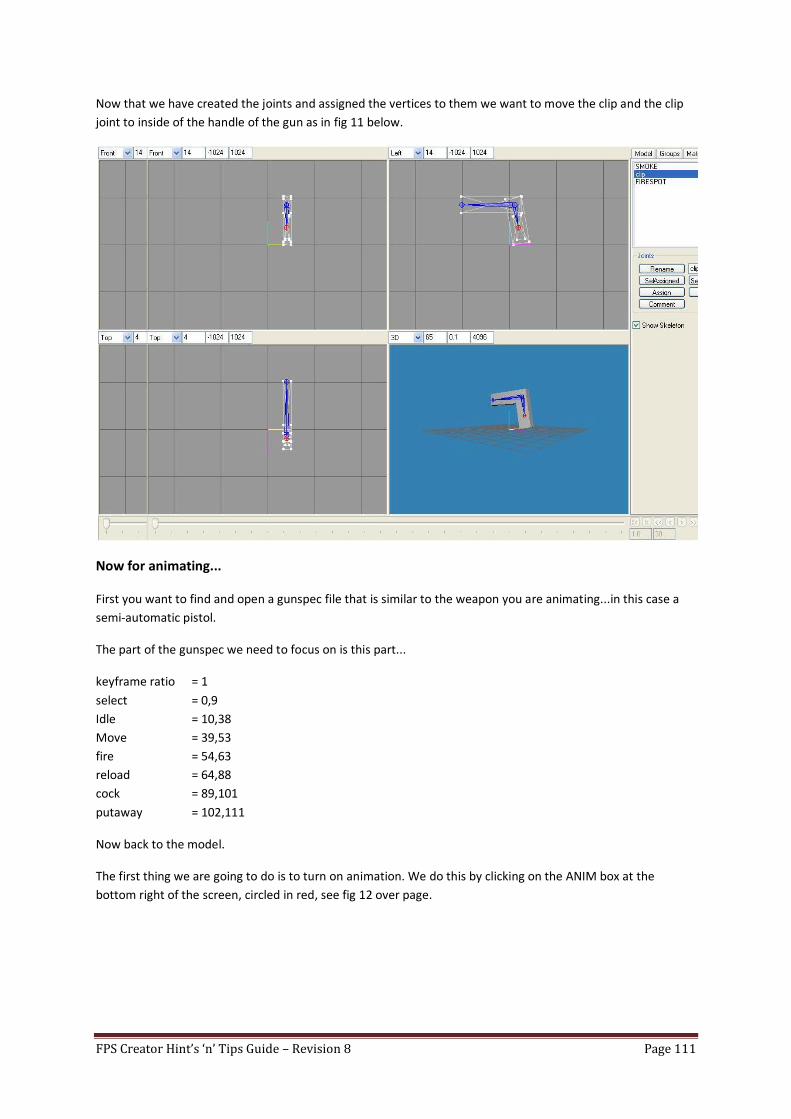
FPS Creator Hint’s ‘n’ Tips Guide – Revision 8 Page 111
Now that we have created the joints and assigned the vertices to them we want to move the clip and the clip
joint to inside of the handle of the gun as in fig 11 below.
Now for animating...
First you want to find and open a gunspec file that is similar to the weapon you are animating...in this case a
semi-automatic pistol.
The part of the gunspec we need to focus on is this part...
keyframe ratio = 1
select = 0,9
Idle = 10,38
Move = 39,53
fire = 54,63
reload = 64,88
cock = 89,101
putaway = 102,111
Now back to the model.
The first thing we are going to do is to turn on animation. We do this by clicking on the ANIM box at the
bottom right of the screen, circled in red, see fig 12 over page.
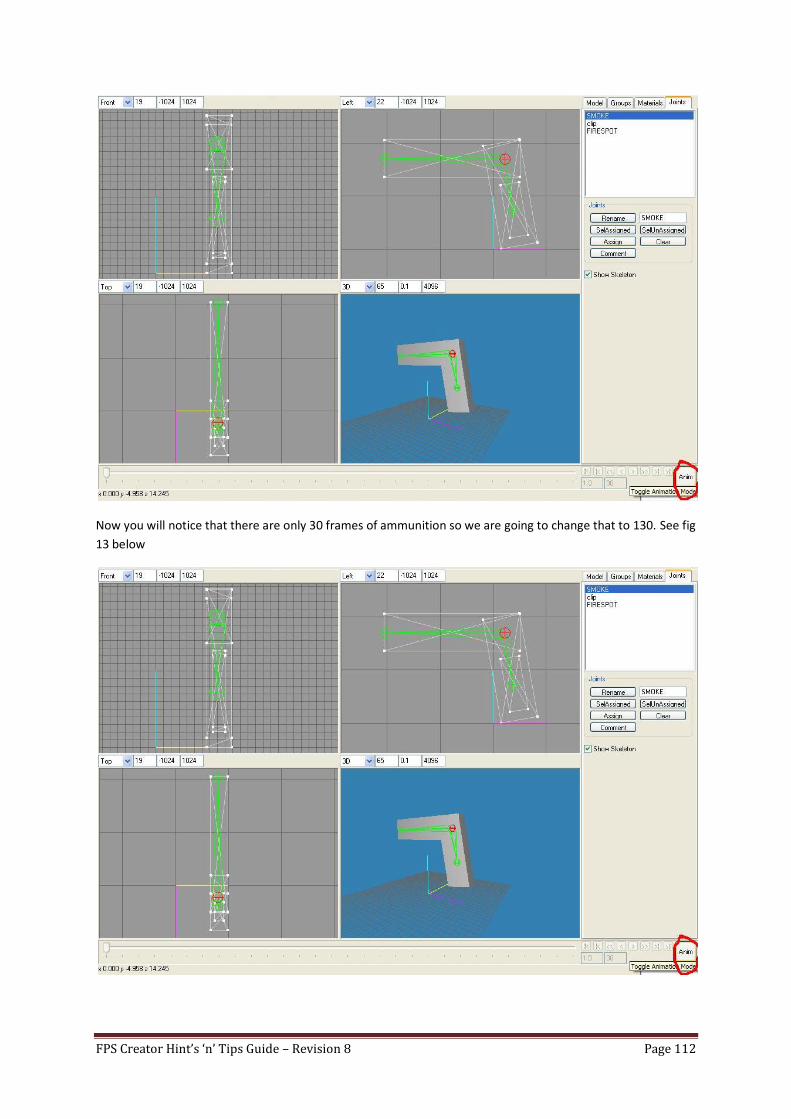
FPS Creator Hint’s ‘n’ Tips Guide – Revision 8 Page 112
Now you will notice that there are only 30 frames of ammunition so we are going to change that to 130. See fig
13 below
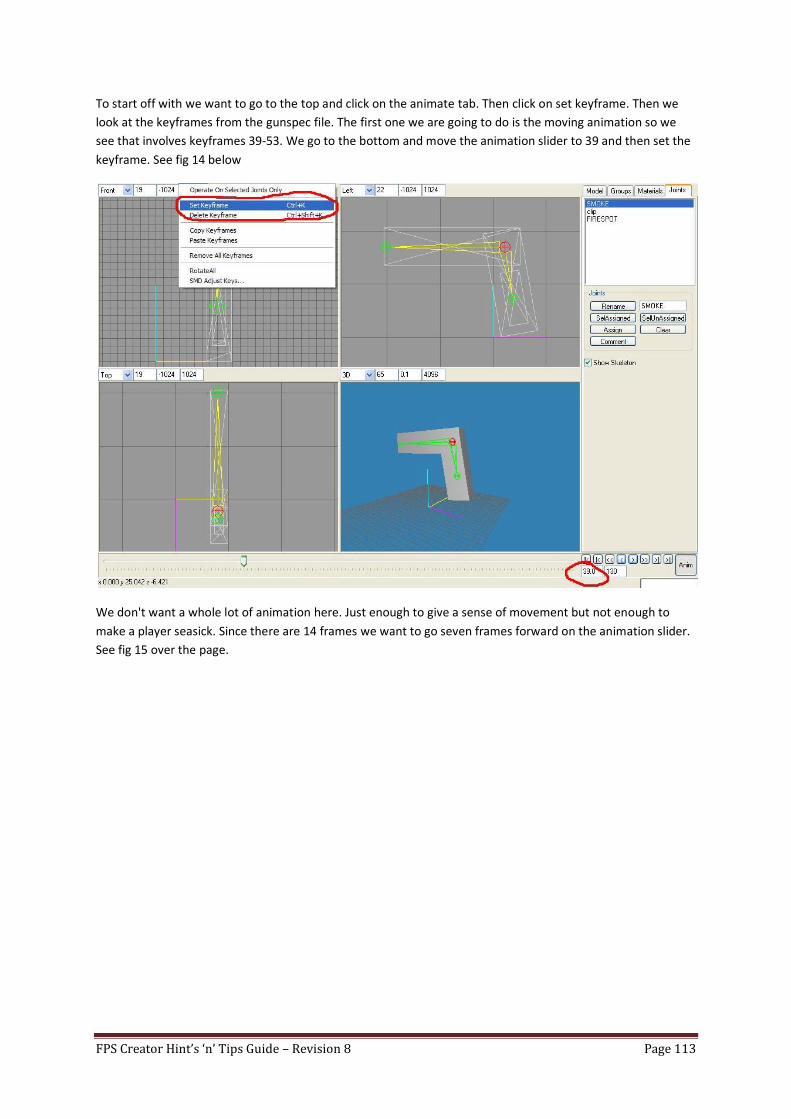
FPS Creator Hint’s ‘n’ Tips Guide – Revision 8 Page 113
To start off with we want to go to the top and click on the animate tab. Then click on set keyframe. Then we
look at the keyframes from the gunspec file. The first one we are going to do is the moving animation so we
see that involves keyframes 39-53. We go to the bottom and move the animation slider to 39 and then set the
keyframe. See fig 14 below
We don't want a whole lot of animation here. Just enough to give a sense of movement but not enough to
make a player seasick. Since there are 14 frames we want to go seven frames forward on the animation slider.
See fig 15 over the page.
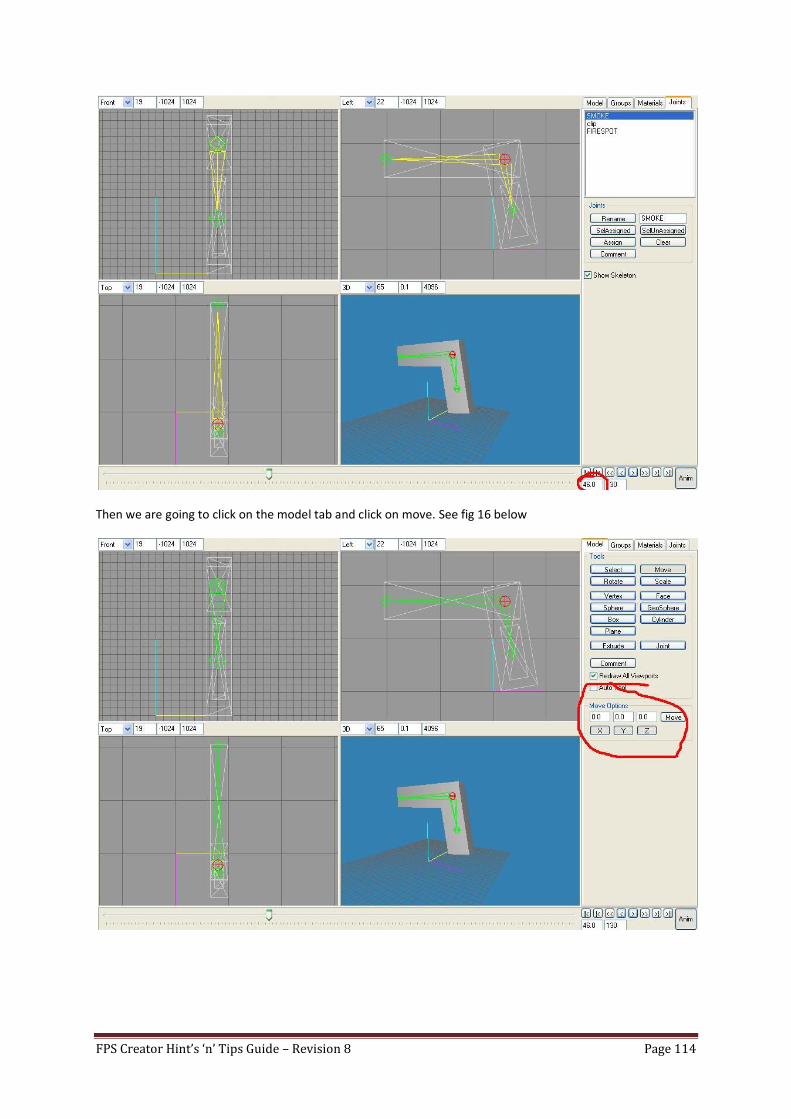
FPS Creator Hint’s ‘n’ Tips Guide – Revision 8 Page 114
Then we are going to click on the model tab and click on move. See fig 16 below
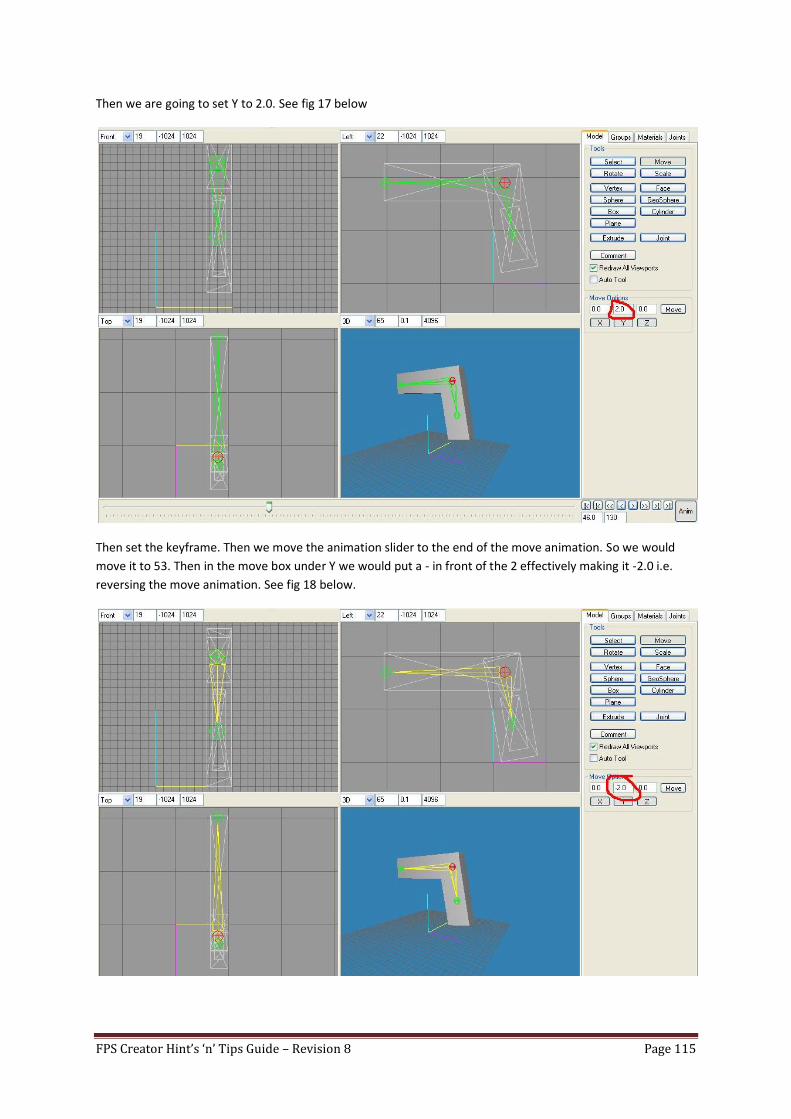
FPS Creator Hint’s ‘n’ Tips Guide – Revision 8 Page 115
Then we are going to set Y to 2.0. See fig 17 below
Then set the keyframe. Then we move the animation slider to the end of the move animation. So we would
move it to 53. Then in the move box under Y we would put a - in front of the 2 effectively making it -2.0 i.e.
reversing the move animation. See fig 18 below.

FPS Creator Hint’s ‘n’ Tips Guide – Revision 8 Page 116
Click on move and set the keyframe.
Now for the firing animation...
The firing animation is 54-63. So we would move the slider to 54 and set the keyframe. Then we move to
keyframe 59. Click on the rotate tab. Set x to 15 and leave the rest at 0. Click on rotate and set the keyframe.
See fig 29 below
Move the slider to frame 63. Put a - sign in front of the 15 in the x box on rotate, making it -15. Click on rotate
and set the keyframe. The reload animation is 64-88. What you would do here is click on the joints tab at the
top and select the clip joint.
Move the slider to 64 and set the keyframe. Move the slider to 76. Click on the model tab. Click on the move
tab. Set Y to -15.Make sure the others are at 0. Click on move and set the keyframe. Move the slider to 88. Set
Y to 15. Click on move. Set the keyframe. Move the slider to 130. Set the keyframe. Click on the ANIM button
to leave animation mode.
Save your gun.
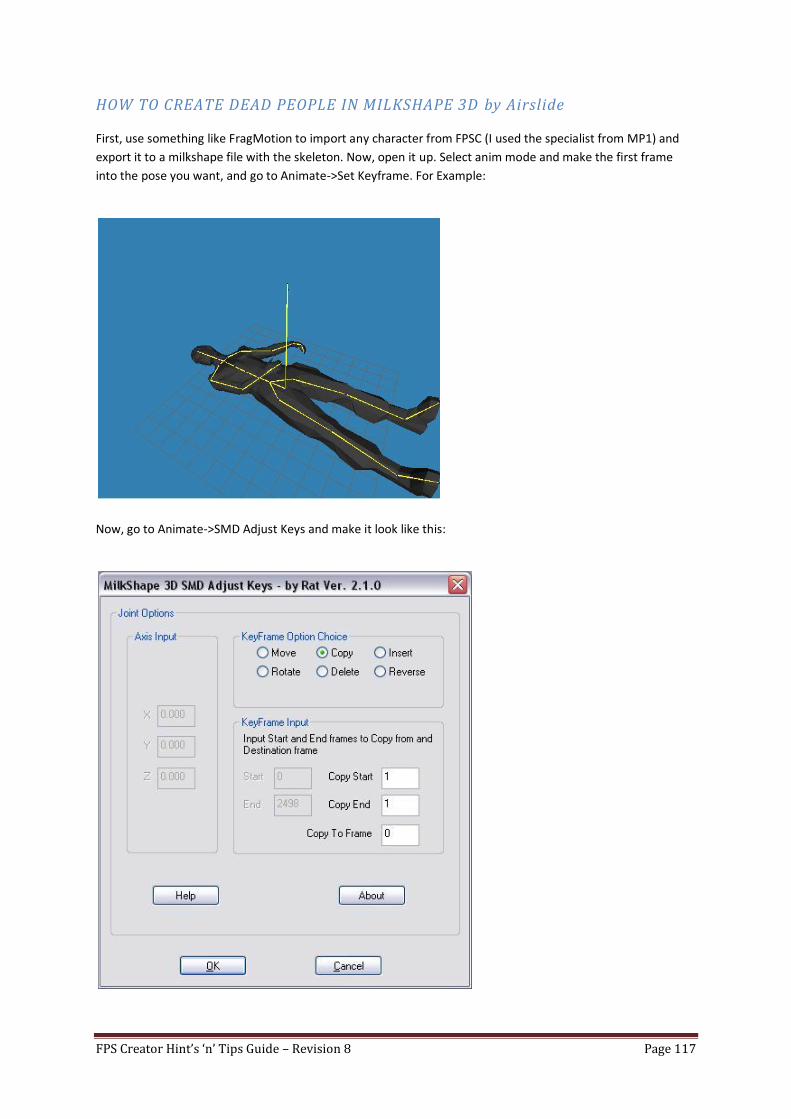
FPS Creator Hint’s ‘n’ Tips Guide – Revision 8 Page 117
HOW TO CREATE DEAD PEOPLE IN MILKSHAPE 3D by Airslide
First, use something like FragMotion to import any character from FPSC (I used the specialist from MP1) and
export it to a milkshape file with the skeleton. Now, open it up. Select anim mode and make the first frame
into the pose you want, and go to Animate->Set Keyframe. For Example:
Now, go to Animate->SMD Adjust Keys and make it look like this:

FPS Creator Hint’s ‘n’ Tips Guide – Revision 8 Page 118
Now, go out of animation mode. The body should remain the same. Highlight and delete the entire skeleton.
EDIT: Exporting Setup:
And here's my outcome (You'll have to make it FPSC ready yourself):

FPS Creator Hint’s ‘n’ Tips Guide – Revision 8 Page 119
PUZZELS by Flashing Snall
Contents
Introduction
Puzzle game traits
Puzzle ideas and methods
Tips
Closing remarks
Introduction
When gaming dawned, there was not only one kind of game. There were many different kinds of game types
including first person shooters and puzzle games. People may believe that FPSC can only be used to make FPS
games, but they are wrong. FPSC can make puzzle games, if you know how. This tutorial will show you how to
do so, and give you tips on how to make an over all, better FPS game.
Puzzle game traits
Let’s say you are playing a soul puzzle game, nothing but puzzles. All it is is puzzle after puzzle after puzzle. You
step into the first challenge. Something needs to happen. Most puzzle games have good plots to go along with
them, or even not so great plots. When you enter the challenge, a hud could flash across the screen, or a story
zone could be activated. Once the story zone or hud has past, the player will be given some instructions on
how to play the puzzle. it works best to include this in you hud or story map so the game flows along.
We now have 2 things that puzzle game should have,
1) a story
2) instructions
Moving on, when the player starts to try and beat the puzzle, it gets boring fast. For instance, if you are in the
middle of a big room with a bunch of little sections to it, and you have to go in the right one or die. if all you
have the core, the player will just take to process of elimination, or quitting. They will give up. You need
something else going on, such as graphics, music, sounds, periodic explosions, or something to keep the player
aware of whets going on.
So updating our list of stuff to have
1) a story
2) instructions
3) side activities
The last thing. You need more than on puzzle if you're going to make an entire game. You can’t have the right
zone puzzle 5 times in a row. The player will be bored out of their minds. I'm not saying you can’t use the same
puzzle twice, just not in a row, and not the same exact thing. Mix it up a little. have puzzle 1, then puzzle 2,
then a variation on puzzle 1.
So, the puzzle game traits are
1)a story
2)instructions
3)side activities
4)more than one puzzle
Puzzle ideas and methods
As stated before, you need more than one puzzle. Here are some puzzle ideas.
Correct zone
The correct zone puzzle is simple. Make a large room, rectangular works best. Then use boards, textures, or
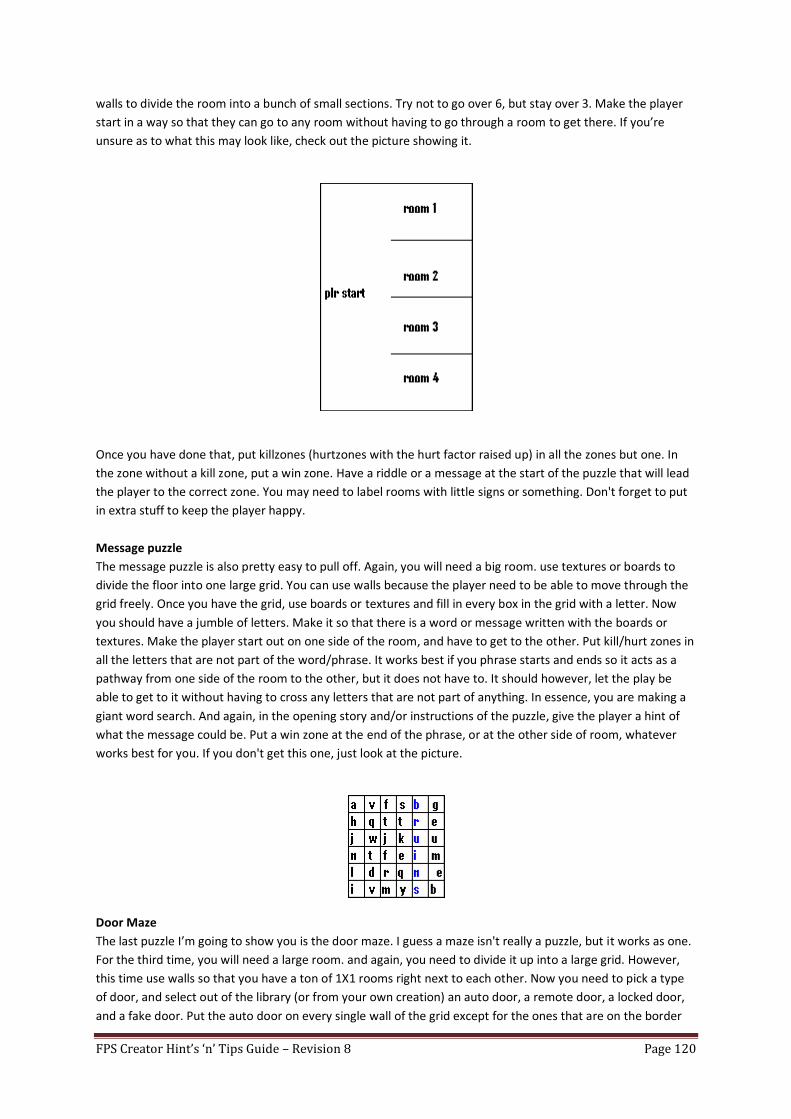
FPS Creator Hint’s ‘n’ Tips Guide – Revision 8 Page 120
walls to divide the room into a bunch of small sections. Try not to go over 6, but stay over 3. Make the player
start in a way so that they can go to any room without having to go through a room to get there. If you’re
unsure as to what this may look like, check out the picture showing it.
Once you have done that, put killzones (hurtzones with the hurt factor raised up) in all the zones but one. In
the zone without a kill zone, put a win zone. Have a riddle or a message at the start of the puzzle that will lead
the player to the correct zone. You may need to label rooms with little signs or something. Don't forget to put
in extra stuff to keep the player happy.
Message puzzle
The message puzzle is also pretty easy to pull off. Again, you will need a big room. use textures or boards to
divide the floor into one large grid. You can use walls because the player need to be able to move through the
grid freely. Once you have the grid, use boards or textures and fill in every box in the grid with a letter. Now
you should have a jumble of letters. Make it so that there is a word or message written with the boards or
textures. Make the player start out on one side of the room, and have to get to the other. Put kill/hurt zones in
all the letters that are not part of the word/phrase. It works best if you phrase starts and ends so it acts as a
pathway from one side of the room to the other, but it does not have to. It should however, let the play be
able to get to it without having to cross any letters that are not part of anything. In essence, you are making a
giant word search. And again, in the opening story and/or instructions of the puzzle, give the player a hint of
what the message could be. Put a win zone at the end of the phrase, or at the other side of room, whatever
works best for you. If you don't get this one, just look at the picture.
Door Maze
The last puzzle I’m going to show you is the door maze. I guess a maze isn't really a puzzle, but it works as one.
For the third time, you will need a large room. and again, you need to divide it up into a large grid. However,
this time use walls so that you have a ton of 1X1 rooms right next to each other. Now you need to pick a type
of door, and select out of the library (or from your own creation) an auto door, a remote door, a locked door,
and a fake door. Put the auto door on every single wall of the grid except for the ones that are on the border
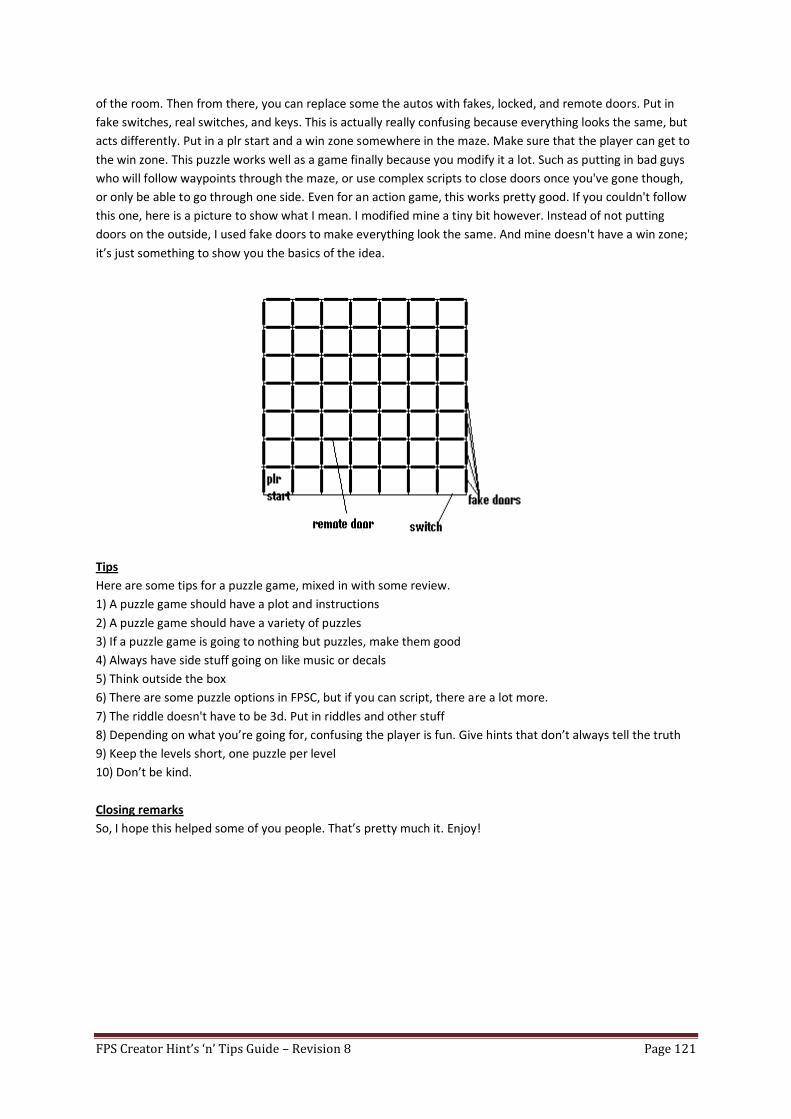
FPS Creator Hint’s ‘n’ Tips Guide – Revision 8 Page 121
of the room. Then from there, you can replace some the autos with fakes, locked, and remote doors. Put in
fake switches, real switches, and keys. This is actually really confusing because everything looks the same, but
acts differently. Put in a plr start and a win zone somewhere in the maze. Make sure that the player can get to
the win zone. This puzzle works well as a game finally because you modify it a lot. Such as putting in bad guys
who will follow waypoints through the maze, or use complex scripts to close doors once you've gone though,
or only be able to go through one side. Even for an action game, this works pretty good. If you couldn't follow
this one, here is a picture to show what I mean. I modified mine a tiny bit however. Instead of not putting
doors on the outside, I used fake doors to make everything look the same. And mine doesn't have a win zone;
it’s just something to show you the basics of the idea.
Tips
Here are some tips for a puzzle game, mixed in with some review.
1) A puzzle game should have a plot and instructions
2) A puzzle game should have a variety of puzzles
3) If a puzzle game is going to nothing but puzzles, make them good
4) Always have side stuff going on like music or decals
5) Think outside the box
6) There are some puzzle options in FPSC, but if you can script, there are a lot more.
7) The riddle doesn't have to be 3d. Put in riddles and other stuff
8) Depending on what you’re going for, confusing the player is fun. Give hints that don’t always tell the truth
9) Keep the levels short, one puzzle per level
10) Don’t be kind.
Closing remarks
So, I hope this helped some of you people. That’s pretty much it. Enjoy!
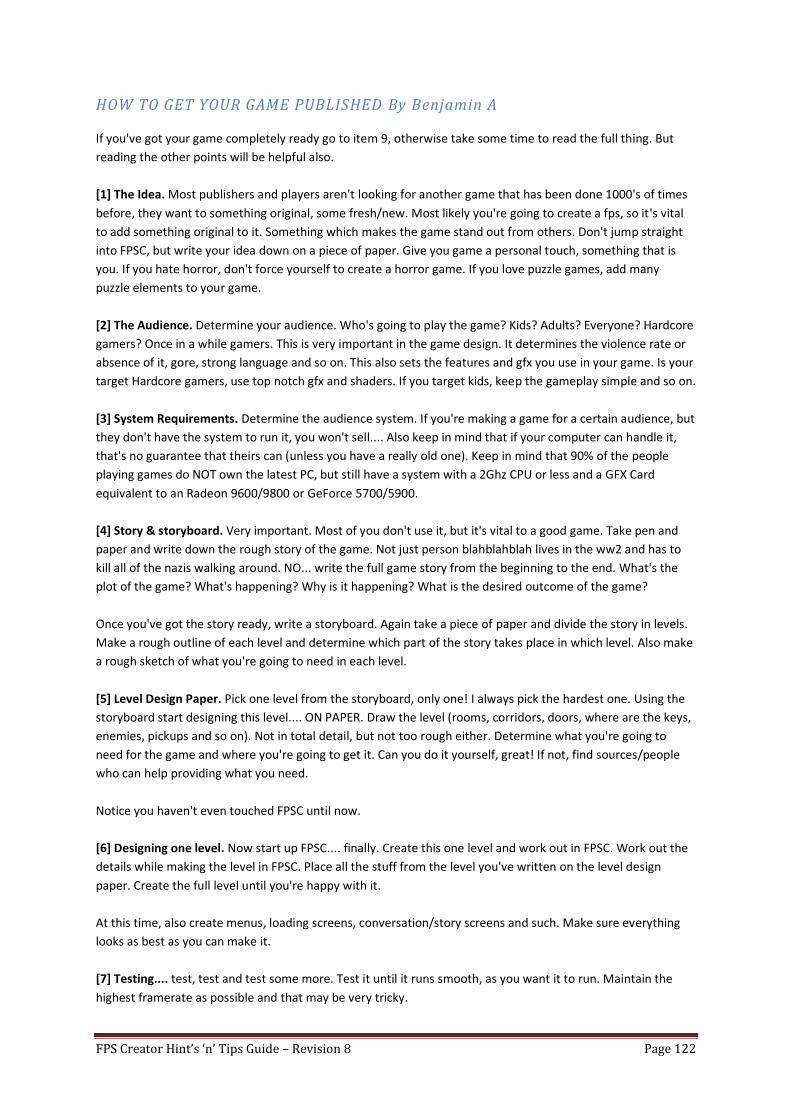
FPS Creator Hint’s ‘n’ Tips Guide – Revision 8 Page 122
HOW TO GET YOUR GAME PUBLISHED By Benjamin A
If you've got your game completely ready go to item 9, otherwise take some time to read the full thing. But
reading the other points will be helpful also.
[1] The Idea. Most publishers and players aren't looking for another game that has been done 1000's of times
before, they want to something original, some fresh/new. Most likely you're going to create a fps, so it's vital
to add something original to it. Something which makes the game stand out from others. Don't jump straight
into FPSC, but write your idea down on a piece of paper. Give you game a personal touch, something that is
you. If you hate horror, don't force yourself to create a horror game. If you love puzzle games, add many
puzzle elements to your game.
[2] The Audience. Determine your audience. Who's going to play the game? Kids? Adults? Everyone? Hardcore
gamers? Once in a while gamers. This is very important in the game design. It determines the violence rate or
absence of it, gore, strong language and so on. This also sets the features and gfx you use in your game. Is your
target Hardcore gamers, use top notch gfx and shaders. If you target kids, keep the gameplay simple and so on.
[3] System Requirements. Determine the audience system. If you're making a game for a certain audience, but
they don't have the system to run it, you won't sell.... Also keep in mind that if your computer can handle it,
that's no guarantee that theirs can (unless you have a really old one). Keep in mind that 90% of the people
playing games do NOT own the latest PC, but still have a system with a 2Ghz CPU or less and a GFX Card
equivalent to an Radeon 9600/9800 or GeForce 5700/5900.
[4] Story & storyboard. Very important. Most of you don't use it, but it's vital to a good game. Take pen and
paper and write down the rough story of the game. Not just person blahblahblah lives in the ww2 and has to
kill all of the nazis walking around. NO... write the full game story from the beginning to the end. What's the
plot of the game? What's happening? Why is it happening? What is the desired outcome of the game?
Once you've got the story ready, write a storyboard. Again take a piece of paper and divide the story in levels.
Make a rough outline of each level and determine which part of the story takes place in which level. Also make
a rough sketch of what you're going to need in each level.
[5] Level Design Paper. Pick one level from the storyboard, only one! I always pick the hardest one. Using the
storyboard start designing this level.... ON PAPER. Draw the level (rooms, corridors, doors, where are the keys,
enemies, pickups and so on). Not in total detail, but not too rough either. Determine what you're going to
need for the game and where you're going to get it. Can you do it yourself, great! If not, find sources/people
who can help providing what you need.
Notice you haven't even touched FPSC until now.
[6] Designing one level. Now start up FPSC.... finally. Create this one level and work out in FPSC. Work out the
details while making the level in FPSC. Place all the stuff from the level you've written on the level design
paper. Create the full level until you're happy with it.
At this time, also create menus, loading screens, conversation/story screens and such. Make sure everything
looks as best as you can make it.
[7] Testing.... test, test and test some more. Test it until it runs smooth, as you want it to run. Maintain the
highest framerate as possible and that may be very tricky.
FPS Creator Hint’s ‘n’ Tips Guide – Revision 8 Page 123
[8] The Preview Demo. Don't worry we're getting closer to the publishing part. You've got one level now and
it's the way you want it. Now it's time to expose it to the public. The public is a few people from your target
audience. The public isn't necessarily this forum, often it's better not to ask us in this phase. We often proof to
be bad critics around here.
I've found family members to be excellent preview testers. Brothers, sisters, dad, mum, children, as long as
they are in the target audience. So don't let your 18 year old brother test the game that's meant for your 8
year old sister and so on.
Get a few trusted people and often family works best in this phase. They're most of the times much more
critical as others and that helps you to develop your game to the max. Don't feel bad if they hate it, listen to
them and improve your game or even redraw it. If your families mouth drops open because they're stunned by
what you made and they loved playing it, you're on the right track.
[9] Go here or there.... The level has been tweaked, you listened well to your initial tester and they've
approved of it by now. Now you can go 3 ways.
A. Expand your testing audience.
B. Start developing the full game
C. Get feedback from a publisher.
A and B you can handle, C is hard part, but the route we want to go, after all we want out game to be
published, don't we?
First of all select a number of publishers; there are 100's of them. You can try the big guys (like Valve, Sierra
and so), but it's better to start with smaller ones. Now contact them by email. Make it clear you're working on
a game and you only want feedback at this moment. Is this something they would be willing to publish? Are
there hints they can give you in making the game better.
What do you sent them? At this moment you sent them you're request for feedback, by giving them the
SHORT VERSION of the game story. Tell them what features the full game will have. About how many levels
will the full game have? Enclose some screenshots and a link to the demo.
Be polite and try to keep it short. No long stuff (like my forum post here), but to the point. Us a trustable email
account, it may take a while for them to contact you.
Now wait.... this can take up to 3 weeks. In this 3 week period of time, do not contact them. If you don't hear
back from them after a period of 3 weeks, contact them once again. STAY POLITE. If you don't hear back from
them after this try, forget it. Don't feel bad when they reply at all, some never do.
When they reply and give you feedback, do something with it. They're trying to help you to make your game
better. I've had a number of publishers give me great advice.
Don't expect a contract or anything at this time; go back to the development of the full game. If you're very
lucky they may express interest in the full game and be willing to even sign an agreement for them to publish
the finished game. It happens, but not often. Of the six games I had published, that only happened to me once.
[10] Finished Game. You've got the full game finished. All levels are done, loading screens, menus,
FPS Creator Hint’s ‘n’ Tips Guide – Revision 8 Page 124
conversation/story screens, movies, in-game screens and pop-up texts, game over screen, game completed
screen, music, sounds and so on.
Now give the full game to a number of people to test. At this phase let it be some people of the target
audience, but also some peers and others who may help you in bug hunting. Get feedback from the target
audience about the gameplay and what they think of it, from the others hear about the problems and bugs.
With all this information improve your game and let them play once again, until the game as good as it needs
to be.
[11] Self-publish. You're almost ready to look for a publisher. But before doing so, publish it yourself. Create a
nice looking website, semi-pro if possible, which will reflect your game(s) and appeal to your target audience.
If you can do it, get someone else to do it. Put the game on it, get PayPal and start selling it. Keep in mind that
every publisher you get into contact with goes to this website, it's your 'business card'. If it's sloppy then they
will think your game is sloppy. If it looks bad, then they will think your game is bad. If it looks childish, then
they will think your game is childish. This is good when you create a children’s game, but not when you're
trying to sell a brutal horror shooter.
Make sure you have screenshots, a video, and demo on the website and the opportunity for others visiting
your website to buy it. Make sure the customer knows what he/she's buying. Don't create false illusions; be
honest about your game.
Host..... you NEED a reliable host. Not one of those free ones that's here today and gone tomorrow. Perhaps
you need to invest some money into getting a domain and a reliable host.
PRICING..... this is the tricky part. I've seen people ask S19.99 for games I wouldn't even spend a penny/dime
on. Determine what your game is worth, check with others what they ask or simply ask your testers how much
they would be willing to pay for it. The price must reflect the game. I've priced Commander Josh $8-$9 on
purpose: It's made with FPSC V1.0, so it doesn't have save/load, but a workaround. It has 12 missions, not
hundreds. So you got to carefully consider your price. If one can buy a similar game as yours that is much
better, has more missions and features then don't give yours the same price.
[12] Promotion. Submit the game to other websites. Not just any website, but well known ones, like
download.com and so on. This will be the test for your game and to create a presence for your game. If a
publisher later on searches for your game and finds it at some different well known websites and portals, then
it helps to impress them. So PROMOTE your game!
You want to create a presence for your game. This way you can make sales yourself and make the game
known. Just for fun.... go to Google and type commander josh there. As you can see, a name is important.
Create a well to remember not already used a million times name.
[13] Finally.... contacting the publishers. Done all of this? It's time to contact publishers now. Just email them
and tell them what you've created and direct them for more info to your website. Keep it direct, simple, to the
point and short. Don't brag that you've created the best game in the world.... you didn't, I already did that, so
you can't brag about that anymore It's OK to be a bit bold in the email, as long as you don't go over the top.
Just as a guideline, here are parts of the email I've sent to Manifesto, I've taken out references to another
game and used my forum name, make sure you use your real one.
FPS Creator Hint’s ‘n’ Tips Guide – Revision 8 Page 125
"Hello,
My name is BenjaminA from the Netherlands, and I'm a indie game developer. At the moment I'm looking for a
new publisher for my games. I've noticed you're claiming to be a different kind of publisher and it sure sounds
appealing. Could you tell me what kind of contracts you're usually dealing with?
The two games I'm interested in getting published are Commander Josh and XXXXXXX.
Commander Josh is a FPS-Shooter with a twist, all of the details can be found here:
http://www.gamefun4u.nl/page9.html
Thank you for taking the time to check out these games and I'm hoping to be a part of the revolution you've
started.
Regards,
BenjaminA
GameFun4U
The Netherlands"
As simple as that. Now wait 3 weeks. Don't contact them within these weeks at all. Just sit and wait. If they get
back to you, cool, if not contact them once again after 3 weeks.
[14] Deal Guidelines. If they contact you, follow a few simple guidelines.
NEVER give them your full game without a contract. They may buy it from your shop (some will do, let them
think of this, don't tell them they can), that's their full right and then you've made some money.
Work with non-exclusive deals if possible. That means you can give the game to other publishers also. If they
offer you a million for an exclusive deal, take it!
Listen to them. They may want a slightly customized version of your game, with their logos and links in it and
so on. Don't mumble, just create it.
Make sure the customer who buys your game at their store(s) has a way of finding you, also put a link to your
website in the game or in the readme. If they like your game, they may want more of your games.
BE POLITE! Always. You may end negotiating for a while and end up with no deal, too bad. Stay polite, they
may publish your next game.
[15] Closing thoughts..... I guess that's about it. If I do think of something more, I'll post it. If you think I've
forgotten something, let me know. If something isn't clear, ask me about it.
Good luck in getting ready to publish your own game. Don't feel bad if no publishers want it, it's not the end of
the world. Most titles never get published by publishers; just self-publish them, that's fun also!
Whatever you do, make sure creating game is FUN. If in the end, you don't make a penny/dime of the games,
you still had lots of fun creating them and that's what it's all about.
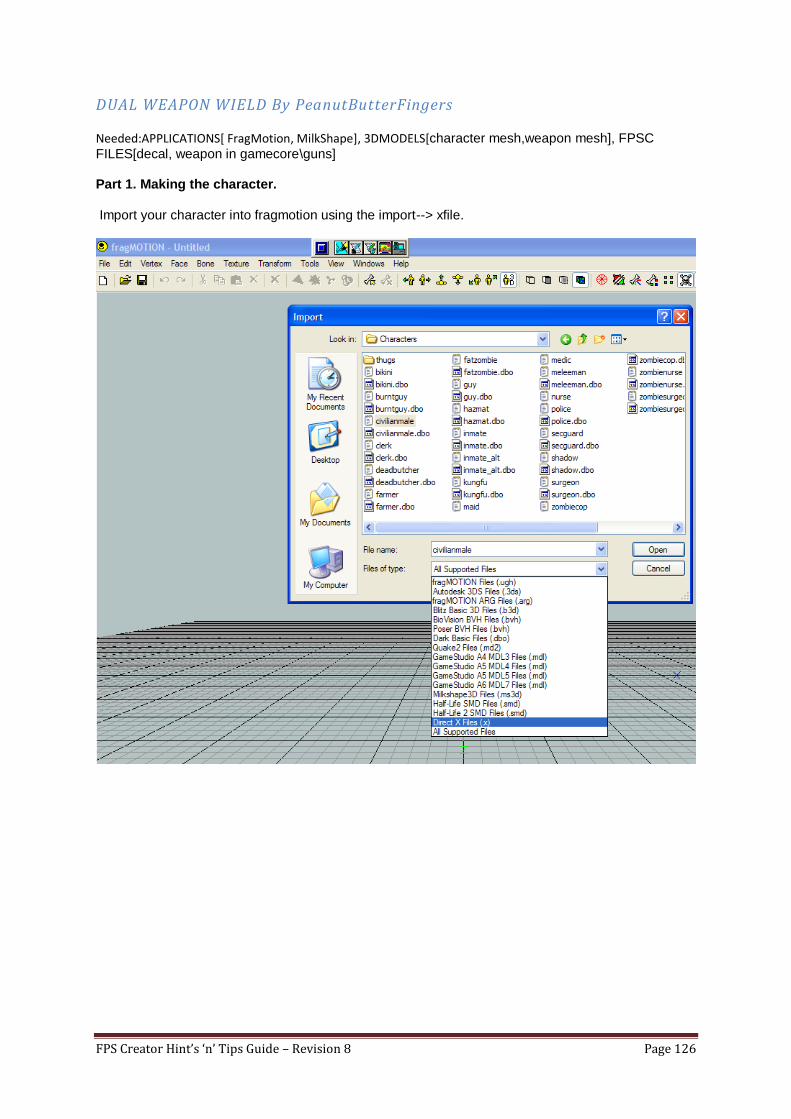
FPS Creator Hint’s ‘n’ Tips Guide – Revision 8 Page 126
DUAL WEAPON WIELD By PeanutButterFingers
Needed:APPLICATIONS[ FragMotion, MilkShape], 3DMODELS[character mesh,weapon mesh], FPSC
FILES[decal, weapon in gamecore\guns] Part 1. Making the character.
Import your character into fragmotion using the import--> xfile.
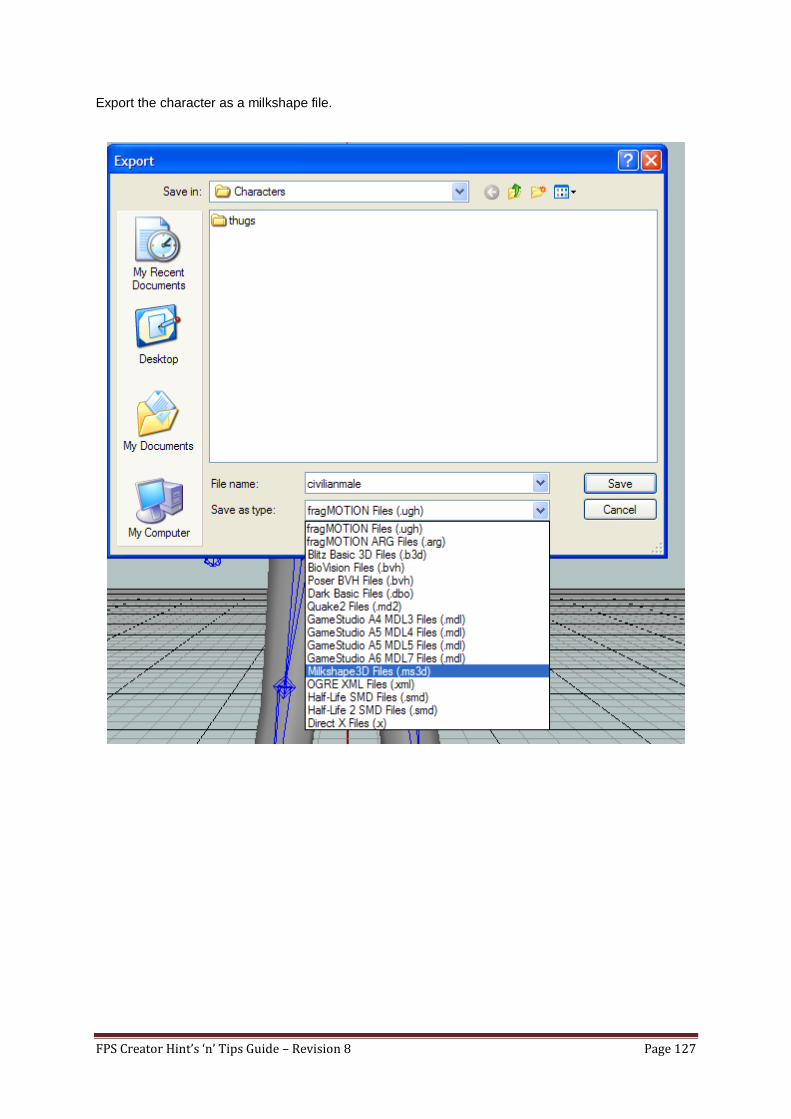
FPS Creator Hint’s ‘n’ Tips Guide – Revision 8 Page 127
Export the character as a milkshape file.
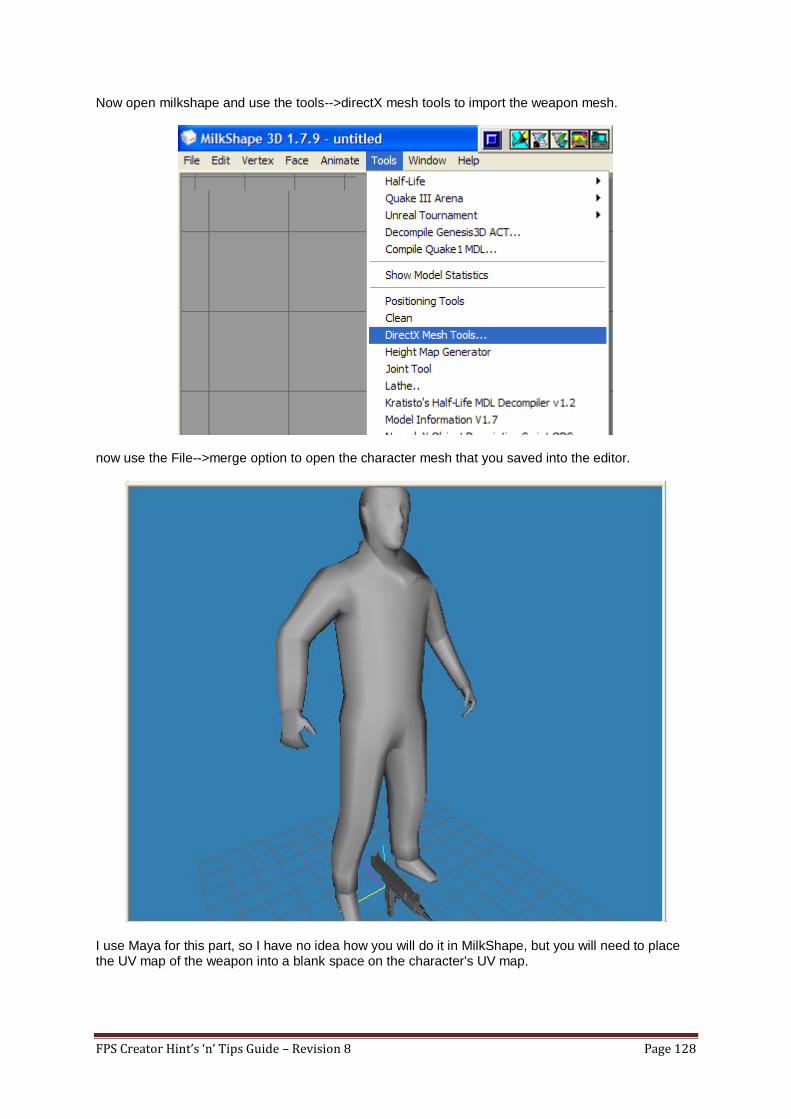
FPS Creator Hint’s ‘n’ Tips Guide – Revision 8 Page 128
Now open milkshape and use the tools-->directX mesh tools to import the weapon mesh.
now use the File-->merge option to open the character mesh that you saved into the editor.
I use Maya for this part, so I have no idea how you will do it in MilkShape, but you will need to place the UV map of the weapon into a blank space on the character's UV map.
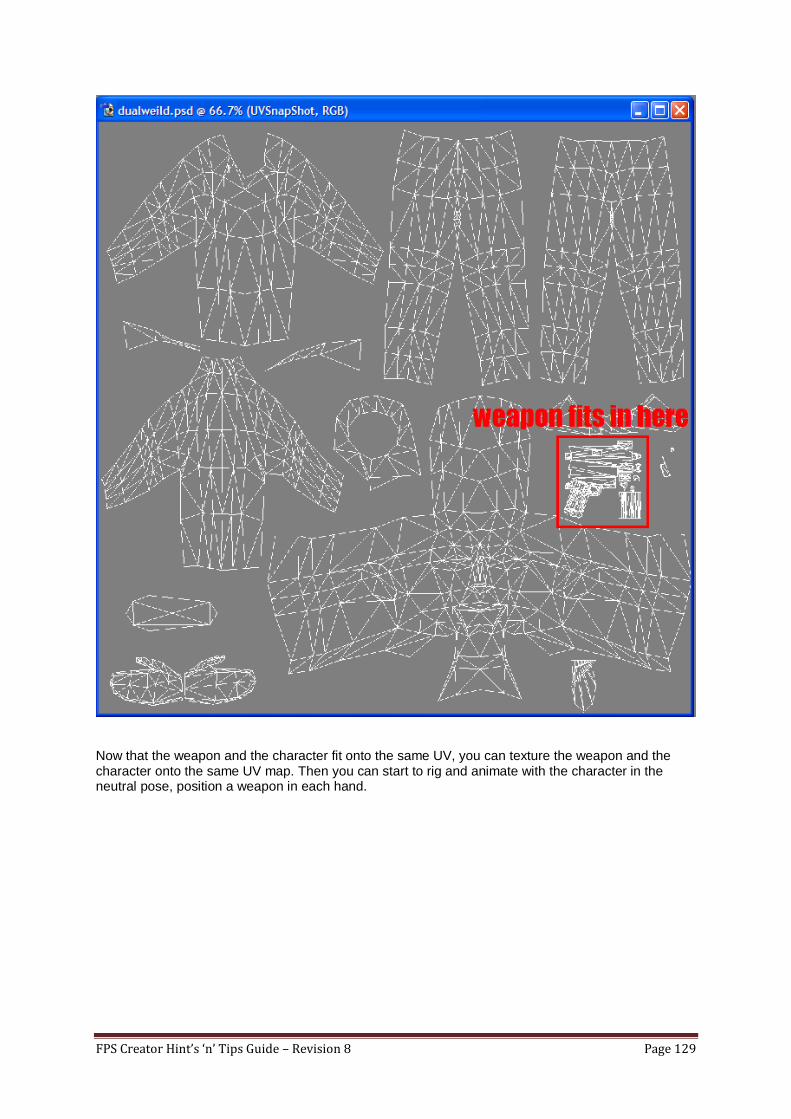
FPS Creator Hint’s ‘n’ Tips Guide – Revision 8 Page 129
Now that the weapon and the character fit onto the same UV, you can texture the weapon and the character onto the same UV map. Then you can start to rig and animate with the character in the neutral pose, position a weapon in each hand.
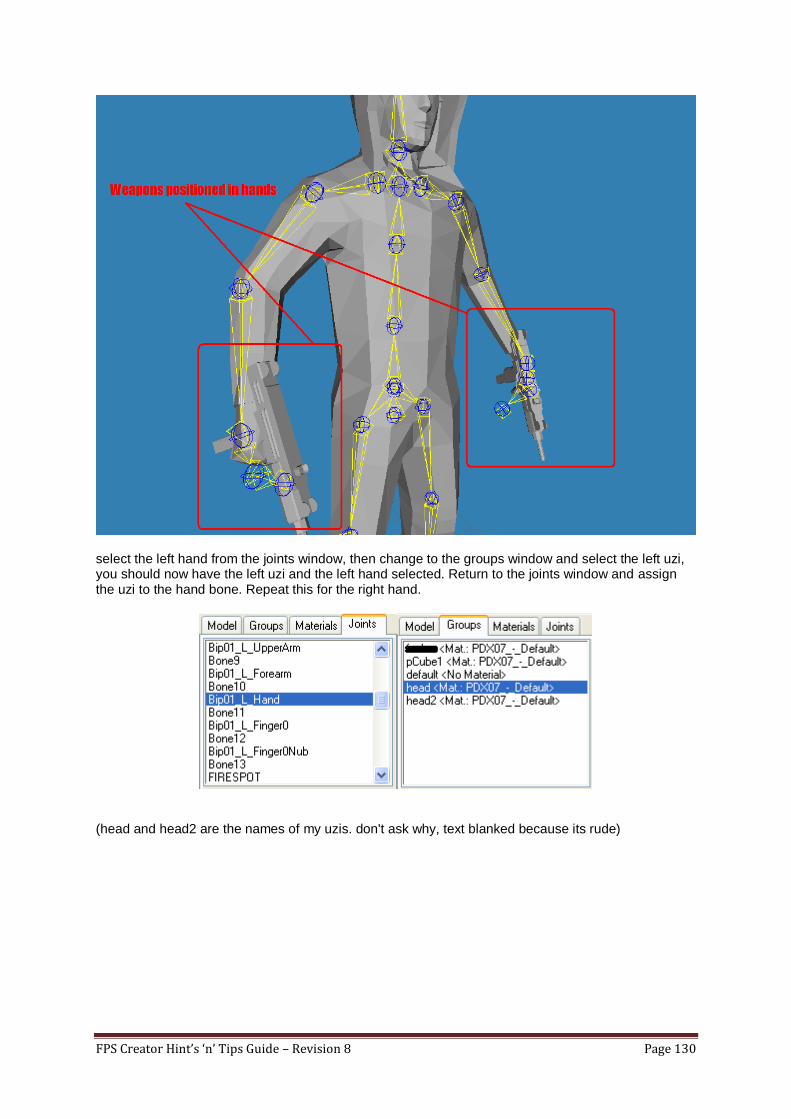
FPS Creator Hint’s ‘n’ Tips Guide – Revision 8 Page 130
select the left hand from the joints window, then change to the groups window and select the left uzi, you should now have the left uzi and the left hand selected. Return to the joints window and assign the uzi to the hand bone. Repeat this for the right hand.
(head and head2 are the names of my uzis. don't ask why, text blanked because its rude)
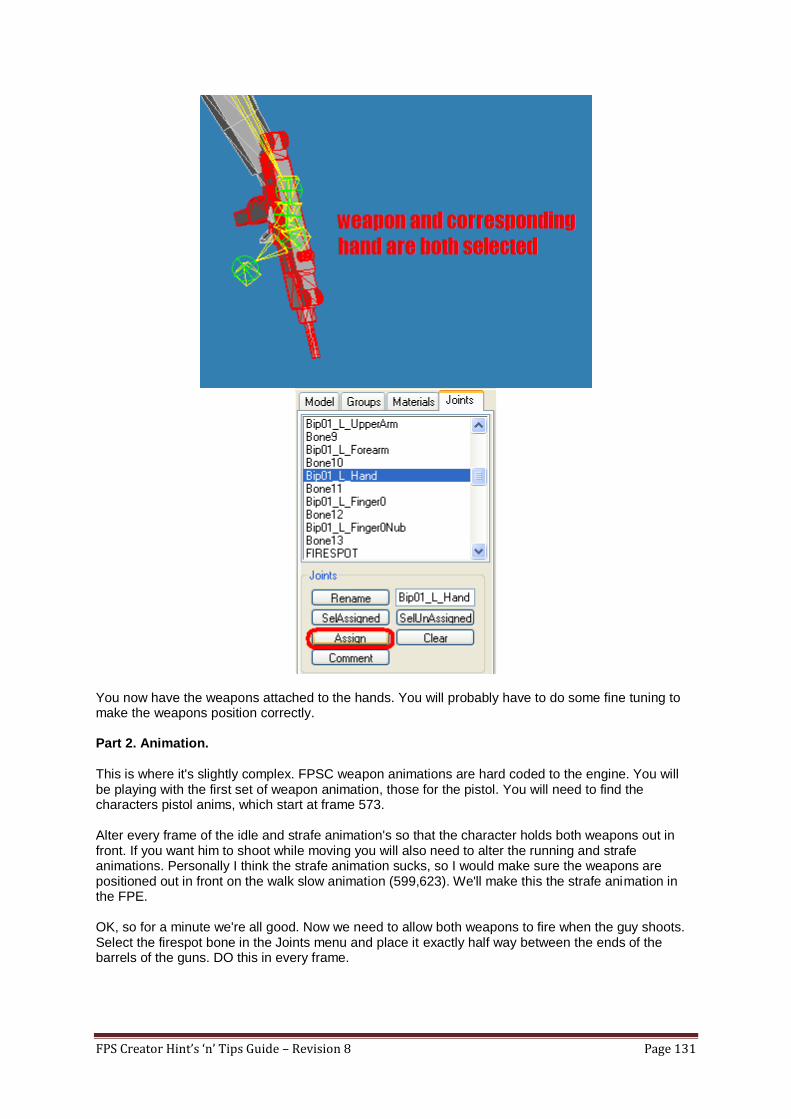
FPS Creator Hint’s ‘n’ Tips Guide – Revision 8 Page 131
You now have the weapons attached to the hands. You will probably have to do some fine tuning to make the weapons position correctly. Part 2. Animation.
This is where it's slightly complex. FPSC weapon animations are hard coded to the engine. You will be playing with the first set of weapon animation, those for the pistol. You will need to find the characters pistol anims, which start at frame 573. Alter every frame of the idle and strafe animation's so that the character holds both weapons out in front. If you want him to shoot while moving you will also need to alter the running and strafe animations. Personally I think the strafe animation sucks, so I would make sure the weapons are positioned out in front on the walk slow animation (599,623). We'll make this the strafe animation in the FPE. OK, so for a minute we're all good. Now we need to allow both weapons to fire when the guy shoots. Select the firespot bone in the Joints menu and place it exactly half way between the ends of the barrels of the guns. DO this in every frame.
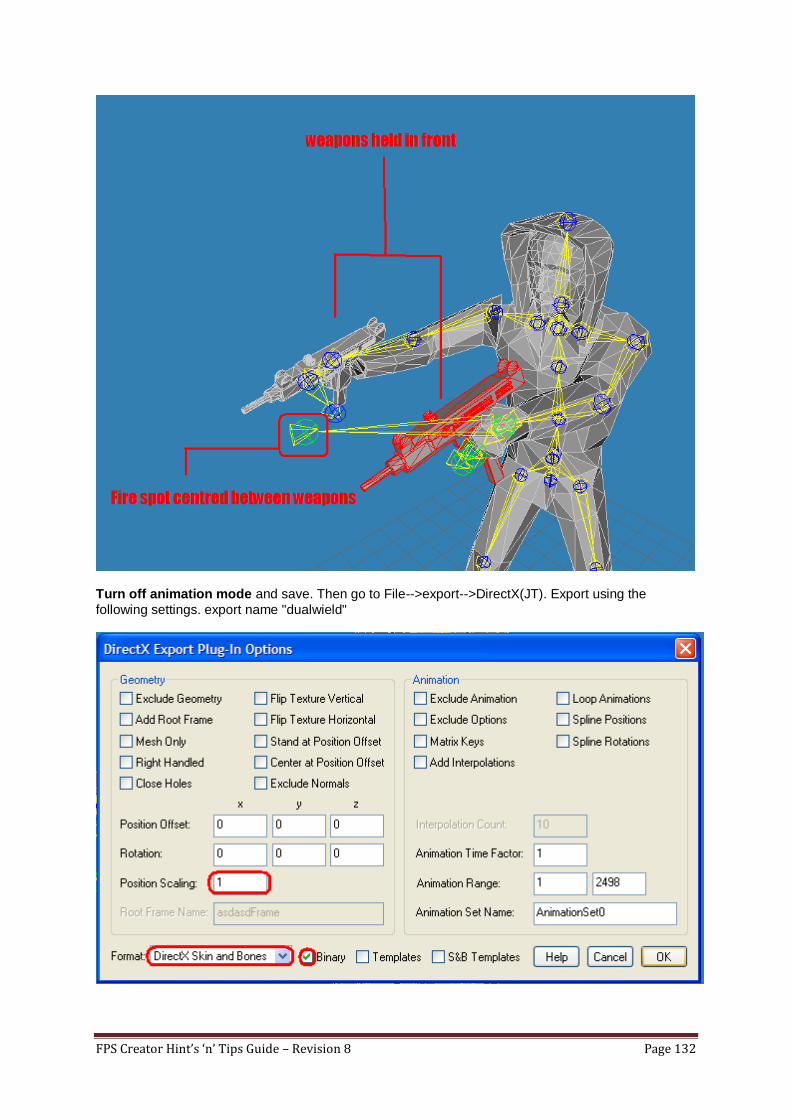
FPS Creator Hint’s ‘n’ Tips Guide – Revision 8 Page 132
Turn off animation mode and save. Then go to File-->export-->DirectX(JT). Export using the
following settings. export name "dualwield"
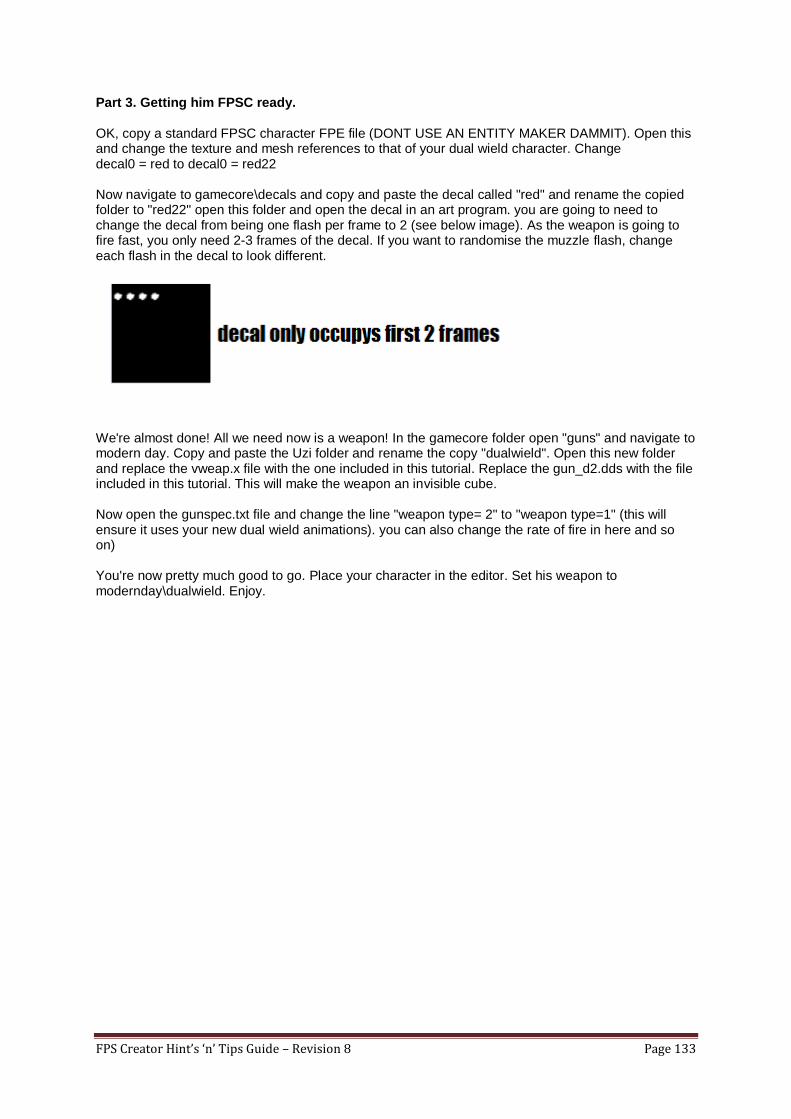
FPS Creator Hint’s ‘n’ Tips Guide – Revision 8 Page 133
Part 3. Getting him FPSC ready. OK, copy a standard FPSC character FPE file (DONT USE AN ENTITY MAKER DAMMIT). Open this and change the texture and mesh references to that of your dual wield character. Change decal0 = red to decal0 = red22 Now navigate to gamecore\decals and copy and paste the decal called "red" and rename the copied folder to "red22" open this folder and open the decal in an art program. you are going to need to change the decal from being one flash per frame to 2 (see below image). As the weapon is going to fire fast, you only need 2-3 frames of the decal. If you want to randomise the muzzle flash, change each flash in the decal to look different.
We're almost done! All we need now is a weapon! In the gamecore folder open "guns" and navigate to modern day. Copy and paste the Uzi folder and rename the copy "dualwield". Open this new folder and replace the vweap.x file with the one included in this tutorial. Replace the gun_d2.dds with the file included in this tutorial. This will make the weapon an invisible cube. Now open the gunspec.txt file and change the line "weapon type= 2" to "weapon type=1" (this will ensure it uses your new dual wield animations). you can also change the rate of fire in here and so on) You're now pretty much good to go. Place your character in the editor. Set his weapon to modernday\dualwield. Enjoy.
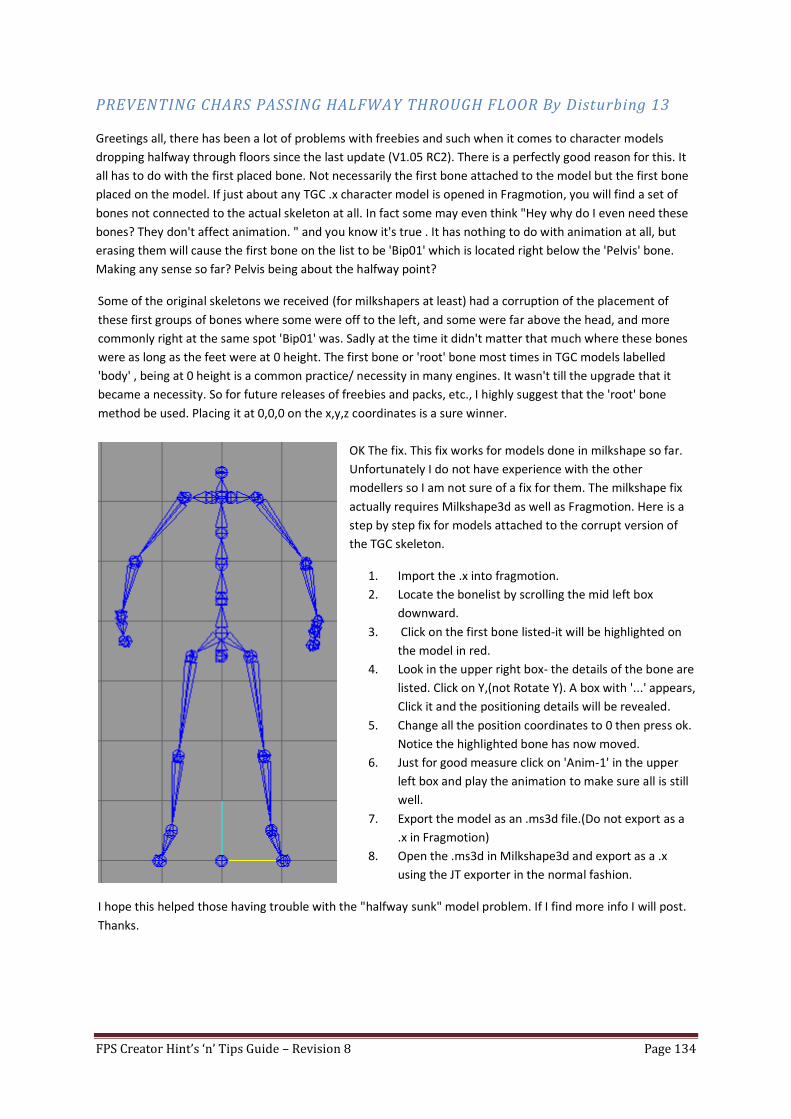
FPS Creator Hint’s ‘n’ Tips Guide – Revision 8 Page 134
PREVENTING CHARS PASSING HALFWAY THROUGH FLOOR By Disturbing 13
Greetings all, there has been a lot of problems with freebies and such when it comes to character models
dropping halfway through floors since the last update (V1.05 RC2). There is a perfectly good reason for this. It
all has to do with the first placed bone. Not necessarily the first bone attached to the model but the first bone
placed on the model. If just about any TGC .x character model is opened in Fragmotion, you will find a set of
bones not connected to the actual skeleton at all. In fact some may even think "Hey why do I even need these
bones? They don't affect animation. " and you know it's true . It has nothing to do with animation at all, but
erasing them will cause the first bone on the list to be 'Bip01' which is located right below the 'Pelvis' bone.
Making any sense so far? Pelvis being about the halfway point?
Some of the original skeletons we received (for milkshapers at least) had a corruption of the placement of
these first groups of bones where some were off to the left, and some were far above the head, and more
commonly right at the same spot 'Bip01' was. Sadly at the time it didn't matter that much where these bones
were as long as the feet were at 0 height. The first bone or 'root' bone most times in TGC models labelled
'body' , being at 0 height is a common practice/ necessity in many engines. It wasn't till the upgrade that it
became a necessity. So for future releases of freebies and packs, etc., I highly suggest that the 'root' bone
method be used. Placing it at 0,0,0 on the x,y,z coordinates is a sure winner.
OK The fix. This fix works for models done in milkshape so far.
Unfortunately I do not have experience with the other
modellers so I am not sure of a fix for them. The milkshape fix
actually requires Milkshape3d as well as Fragmotion. Here is a
step by step fix for models attached to the corrupt version of
the TGC skeleton.
1. Import the .x into fragmotion.
2. Locate the bonelist by scrolling the mid left box
downward.
3. Click on the first bone listed-it will be highlighted on
the model in red.
4. Look in the upper right box- the details of the bone are
listed. Click on Y,(not Rotate Y). A box with '...' appears,
Click it and the positioning details will be revealed.
5. Change all the position coordinates to 0 then press ok.
Notice the highlighted bone has now moved.
6. Just for good measure click on 'Anim-1' in the upper
left box and play the animation to make sure all is still
well.
7. Export the model as an .ms3d file.(Do not export as a
.x in Fragmotion)
8. Open the .ms3d in Milkshape3d and export as a .x
using the JT exporter in the normal fashion.
I hope this helped those having trouble with the "halfway sunk" model problem. If I find more info I will post.
Thanks.

FPS Creator Hint’s ‘n’ Tips Guide – Revision 8 Page 135
TERRAIN CREATION TUTORIAL By Rolfy
This tutorial will help you to get your terrains into FPSC, with full collision for player and enemies. I know
others have done much the same thing but this takes it a little further.
For this tutorial I used 3dsMax, but it should work in theory for any modelling program which will enable you
to cut and slice your meshes into smaller parts.
The main thing to remember here is that you must be precise in your slices or you will end up with alignment
and collision errors in your segments.
I am assuming a basic knowledge of Max to use this method, please do not ask questions about using Max in
this thread, if you don’t know how to turn the grid on I can only suggest you read the software manual.
First off create your terrain, I use 'Mountain' a free plug-in by Effectware, I have used this plug-in for many
years now through many versions of Max and it has served me well on many occasions. you can download it
here.
http://www.maxplugins.de
I use feet/inches for the units set up. It can also help to use snap to grid to keep your slices precise.
For this example I have set the terrain to be 100'wide by 8'high,this will fit perfectly into 12x12 segments, you
can make your terrain larger but be aware when you import into segment editor it will only accept 55 slices,
after that it will crash.
If it helps you can import a floor segment to get some idea of scale you will be slicing your mesh into 3x3
segment parts.
Convert your terrain into an editable mesh and turn on edge selection in the modify tab, turn on slice plane
and tick the 'split' box. Rotate the slice plane 90 degrees on the x axis and place on the origin, click slice.
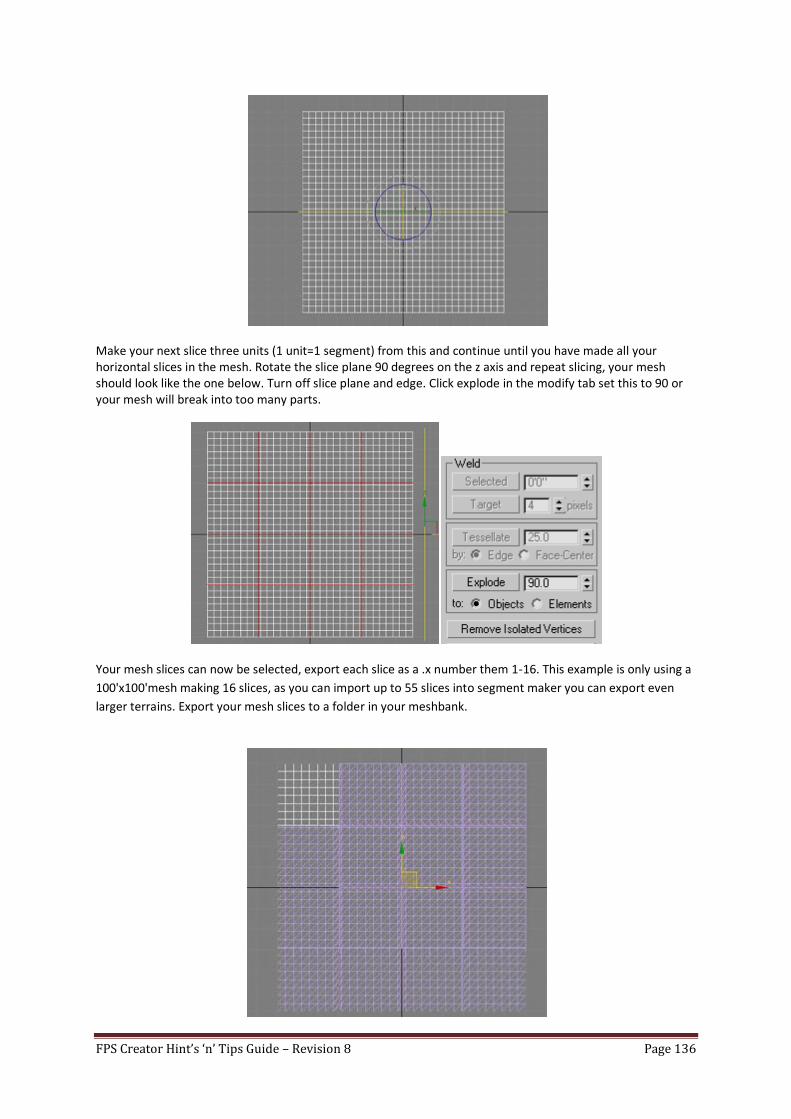
FPS Creator Hint’s ‘n’ Tips Guide – Revision 8 Page 136
Make your next slice three units (1 unit=1 segment) from this and continue until you have made all your horizontal slices in the mesh. Rotate the slice plane 90 degrees on the z axis and repeat slicing, your mesh should look like the one below. Turn off slice plane and edge. Click explode in the modify tab set this to 90 or your mesh will break into too many parts.
Your mesh slices can now be selected, export each slice as a .x number them 1-16. This example is only using a
100'x100'mesh making 16 slices, as you can import up to 55 slices into segment maker you can export even
larger terrains. Export your mesh slices to a folder in your meshbank.
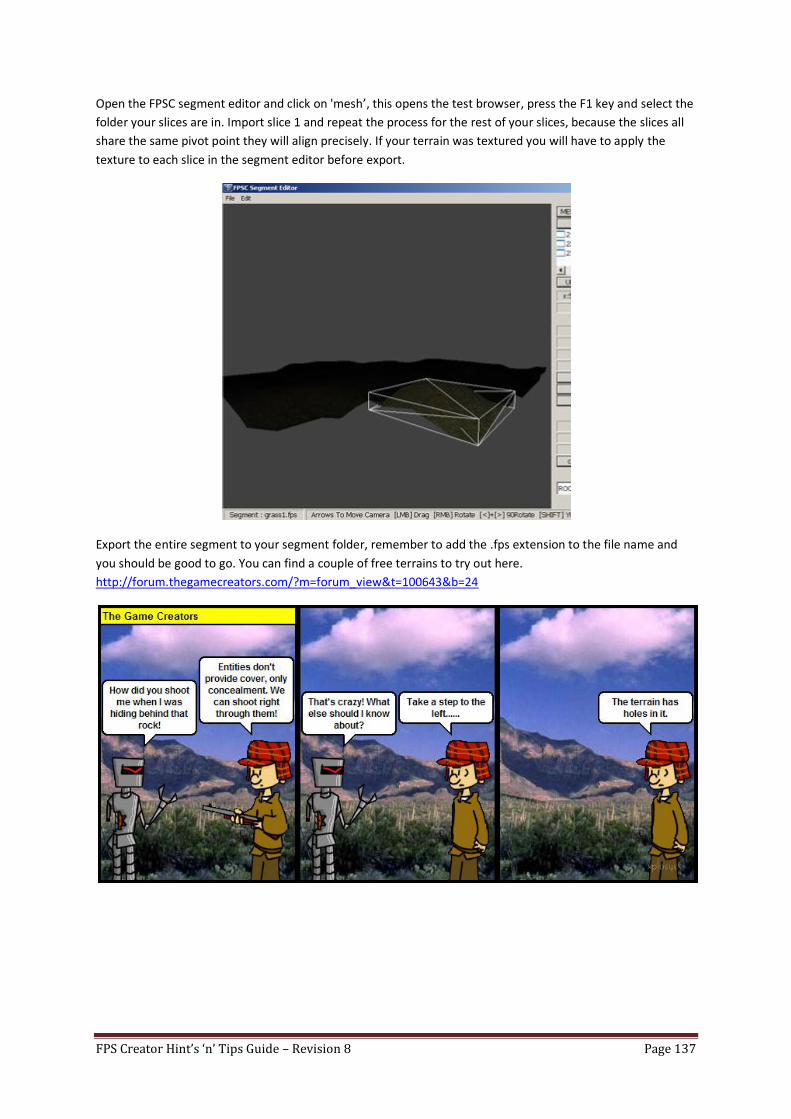
FPS Creator Hint’s ‘n’ Tips Guide – Revision 8 Page 137
Open the FPSC segment editor and click on 'mesh’, this opens the test browser, press the F1 key and select the
folder your slices are in. Import slice 1 and repeat the process for the rest of your slices, because the slices all
share the same pivot point they will align precisely. If your terrain was textured you will have to apply the
texture to each slice in the segment editor before export.
Export the entire segment to your segment folder, remember to add the .fps extension to the file name and
you should be good to go. You can find a couple of free terrains to try out here.
http://forum.thegamecreators.com/?m=forum_view&t=100643&b=24
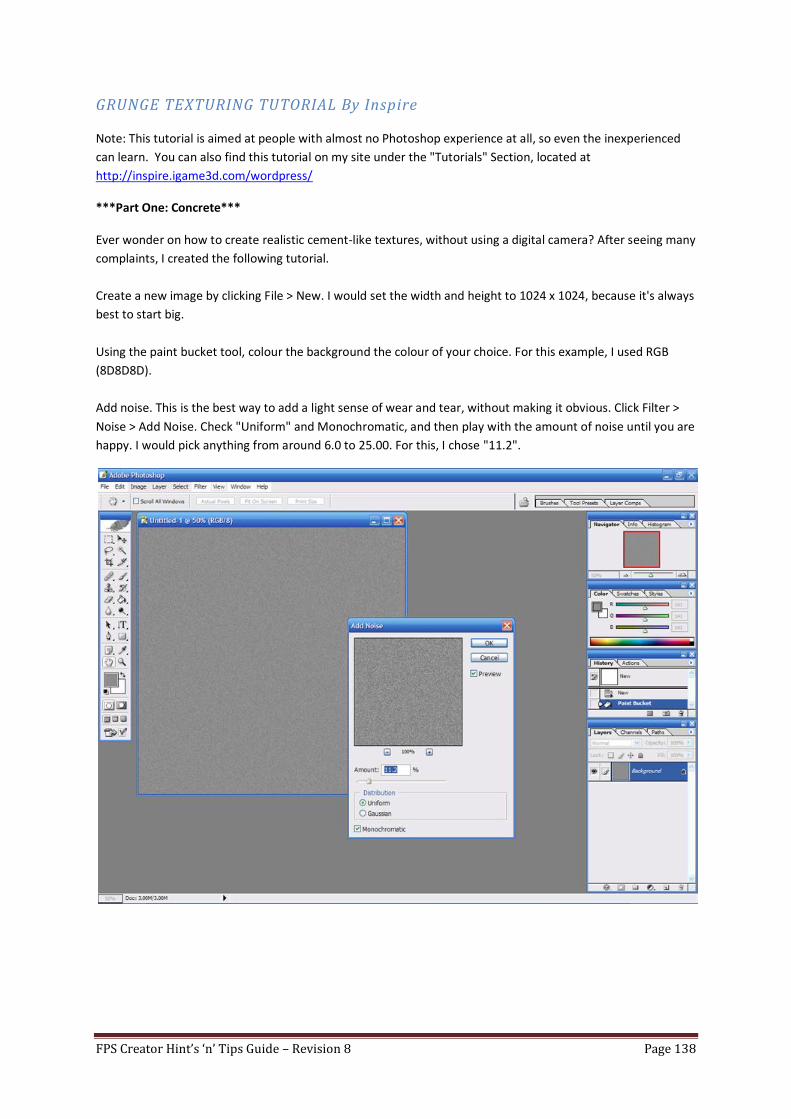
FPS Creator Hint’s ‘n’ Tips Guide – Revision 8 Page 138
GRUNGE TEXTURING TUTORIAL By Inspire
Note: This tutorial is aimed at people with almost no Photoshop experience at all, so even the inexperienced
can learn. You can also find this tutorial on my site under the "Tutorials" Section, located at
http://inspire.igame3d.com/wordpress/
***Part One: Concrete***
Ever wonder on how to create realistic cement-like textures, without using a digital camera? After seeing many
complaints, I created the following tutorial.
Create a new image by clicking File > New. I would set the width and height to 1024 x 1024, because it's always
best to start big.
Using the paint bucket tool, colour the background the colour of your choice. For this example, I used RGB
(8D8D8D).
Add noise. This is the best way to add a light sense of wear and tear, without making it obvious. Click Filter >
Noise > Add Noise. Check "Uniform" and Monochromatic, and then play with the amount of noise until you are
happy. I would pick anything from around 6.0 to 25.00. For this, I chose "11.2".
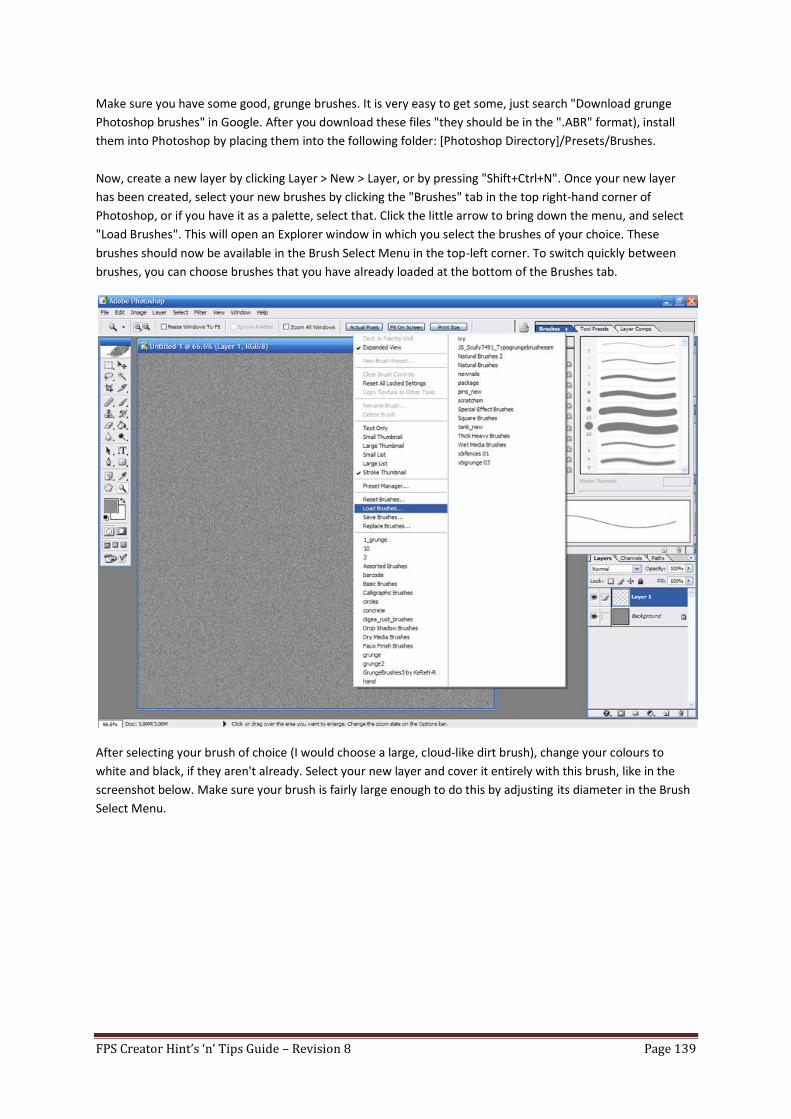
FPS Creator Hint’s ‘n’ Tips Guide – Revision 8 Page 139
Make sure you have some good, grunge brushes. It is very easy to get some, just search "Download grunge
Photoshop brushes" in Google. After you download these files "they should be in the ".ABR" format), install
them into Photoshop by placing them into the following folder: [Photoshop Directory]/Presets/Brushes.
Now, create a new layer by clicking Layer > New > Layer, or by pressing "Shift+Ctrl+N". Once your new layer
has been created, select your new brushes by clicking the "Brushes" tab in the top right-hand corner of
Photoshop, or if you have it as a palette, select that. Click the little arrow to bring down the menu, and select
"Load Brushes". This will open an Explorer window in which you select the brushes of your choice. These
brushes should now be available in the Brush Select Menu in the top-left corner. To switch quickly between
brushes, you can choose brushes that you have already loaded at the bottom of the Brushes tab.
After selecting your brush of choice (I would choose a large, cloud-like dirt brush), change your colours to
white and black, if they aren't already. Select your new layer and cover it entirely with this brush, like in the
screenshot below. Make sure your brush is fairly large enough to do this by adjusting its diameter in the Brush
Select Menu.
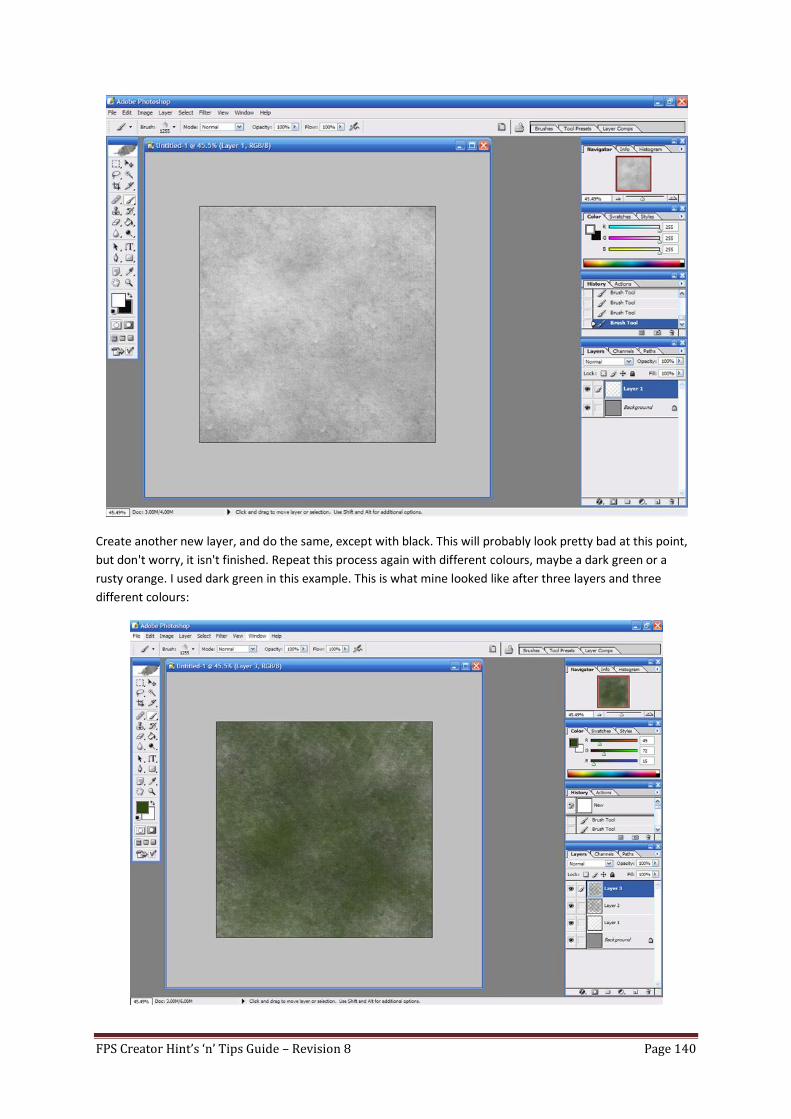
FPS Creator Hint’s ‘n’ Tips Guide – Revision 8 Page 140
Create another new layer, and do the same, except with black. This will probably look pretty bad at this point,
but don't worry, it isn't finished. Repeat this process again with different colours, maybe a dark green or a
rusty orange. I used dark green in this example. This is what mine looked like after three layers and three
different colours:

FPS Creator Hint’s ‘n’ Tips Guide – Revision 8 Page 141
Adjust the opacity of each layer until they blend together well, none of them being dominant over the other ones. Save often while making textures, because a sudden computer freeze or an accident could cause
something getting broken.
This next part is optional. If you have small, scratch-like brushes, load them up. Create a new layer, and change
your colour to white. Randomly spread a single brush over a layer. Do this again with different scratch brushes
and new layers. For a nice set of scratch brushes, check this out (download). Again, this will look stupid at first,
but adjust the opacity until it is barely noticeable, and you're good to go. Depending on the brightness of your
texture, this opacity might even get down below 5%. For my three layers, I got 8%, 10%, and 14%. It's okay if
you can barely notice these layers, because they will show up in the next step. Save your texture as a .PSD file
at this point.
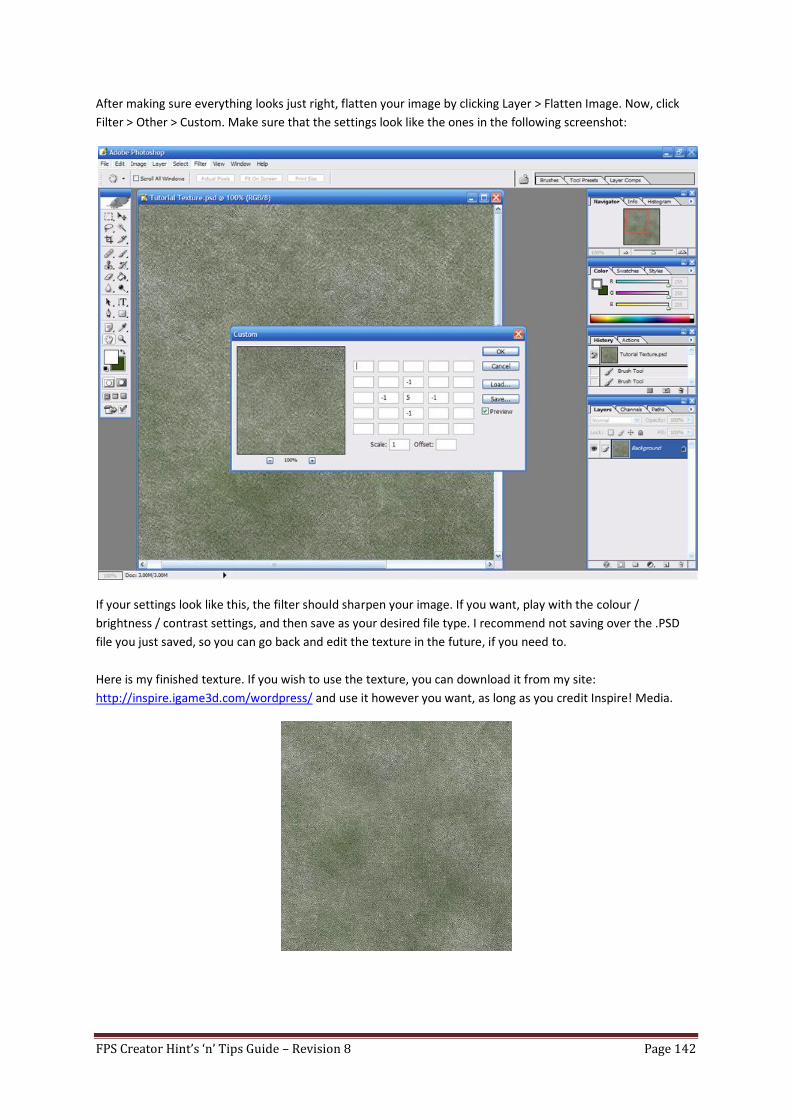
FPS Creator Hint’s ‘n’ Tips Guide – Revision 8 Page 142
After making sure everything looks just right, flatten your image by clicking Layer > Flatten Image. Now, click
Filter > Other > Custom. Make sure that the settings look like the ones in the following screenshot:
If your settings look like this, the filter should sharpen your image. If you want, play with the colour /
brightness / contrast settings, and then save as your desired file type. I recommend not saving over the .PSD
file you just saved, so you can go back and edit the texture in the future, if you need to.
Here is my finished texture. If you wish to use the texture, you can download it from my site:
http://inspire.igame3d.com/wordpress/ and use it however you want, as long as you credit Inspire! Media.

FPS Creator Hint’s ‘n’ Tips Guide – Revision 8 Page 143
UV MAPPING By Screwed Over
1. First, save your model as a wavefront object:
2. Then download and install ‘UV Mapper Classic’ (www.uvmapper.com) and load your model into it.
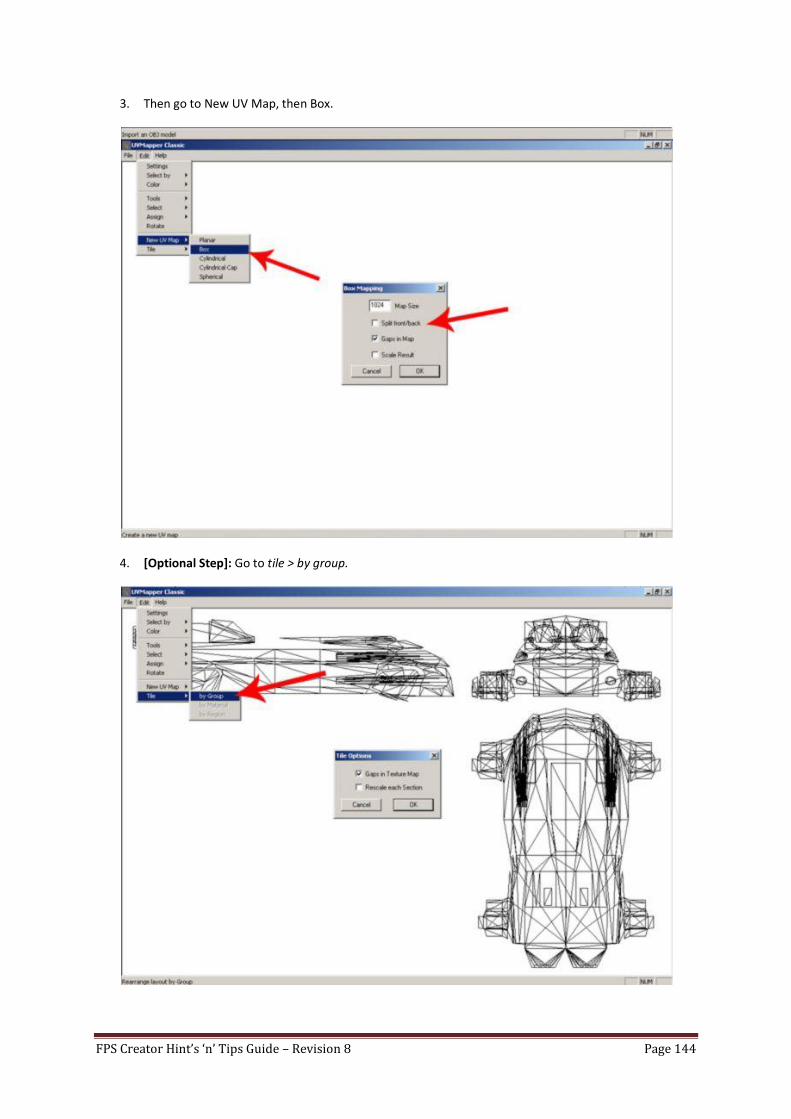
FPS Creator Hint’s ‘n’ Tips Guide – Revision 8 Page 144
3. Then go to New UV Map, then Box.
4. [Optional Step]: Go to tile > by group.
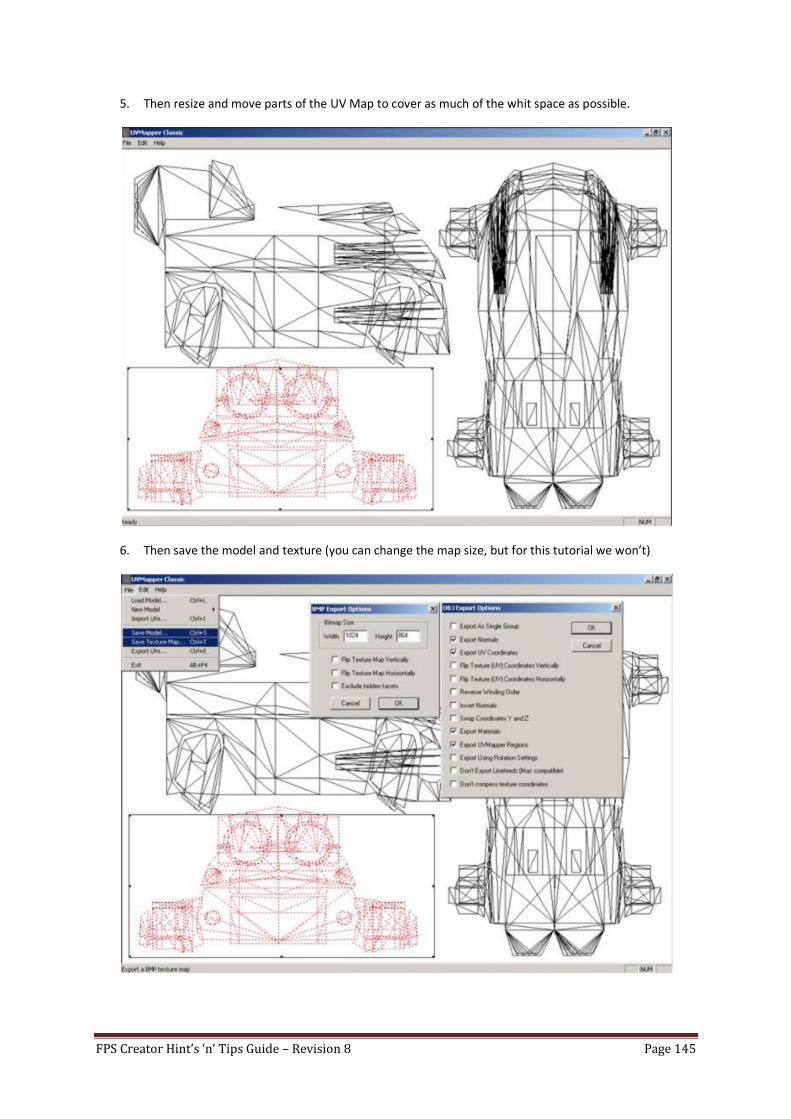
FPS Creator Hint’s ‘n’ Tips Guide – Revision 8 Page 145
5. Then resize and move parts of the UV Map to cover as much of the whit space as possible.
6. Then save the model and texture (you can change the map size, but for this tutorial we won’t)
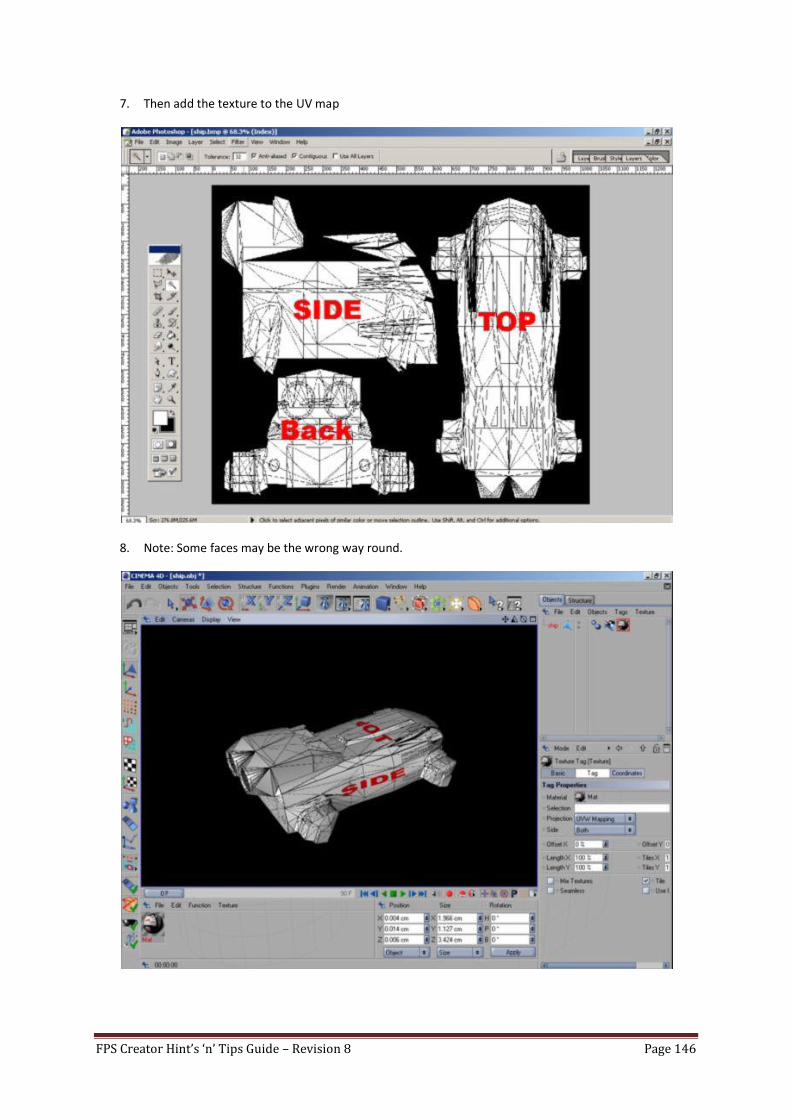
FPS Creator Hint’s ‘n’ Tips Guide – Revision 8 Page 146
7. Then add the texture to the UV map
8. Note: Some faces may be the wrong way round.
FPS Creator Hint’s ‘n’ Tips Guide – Revision 8 Page 147
ALPHA CHANNELS USING PAINTSHOP PRO By Disturbing 13
Here is a complete and clear explanation on how to create a .tga with an alpha channel in Paint Shop Pro.
Most versions do this the same way but just in case, I am using 8.0. Alpha channels are useful for all sorts
of things like making fences, making floor grates, or overlays, hud objects, and crosshairs .
1. Import or create your object in the normal way but be careful not to use true black in parts that you
want to show up. You can tell if you used true black by using the colour selector tool(that looks like an
eye dropper)select the suspecting area and look at the colour properties. Make sure it’s not R,G&B
values of 0,0,0. Anything that is NOT going to be rendered in game should be coloured True Black =
R,G,&B value 0,0,0.
2. In the Layer window, Right click your layer, and choose 'New Mask Layer/From Image'. (If your object
is not already considered a full layer you will be prompted to do so now)
3. A window will pop up asking which type of mask you will be using; choose 'Any non-zero value', then
click 'Ok'. If you did everything correctly so far, all the undesired area will be gone and in its place will
be grey and white checkerboard that represents nothing being present.
4. Next at the top bar of options (same bar that 'File' is on)click 'Selections'/'From Mask'. If done
correctly you will now see a 'mask' around your object (identifiable by the rotating string effect).
5. Again, click 'Selections' but this time go to 'Load/Save Selection'/'Save Selection To Alpha Channel'. A
window should pop up with a picture of the alpha channel-White sections will be rendered in game,
and black sections will not. If it looks correct to you then click 'Save'. It really doesn't matter if you
name the alpha channel or not ;I just use the default name.
6. You will be then back at your picture. In the layers panel, right click on the 'Mask - Raster 1' and
'Delete'. it will then ask if you would like the mask layer merged with the layer below it; Click 'Yes'
7. Then go to the top bar, click 'File'/'Save As'; Choose 'Truvision Targa (*.tga)'. Name the file and decide
where you want it exported to. It will then prompt the last window mentioning the use of only one
alpha channel and such; ignore this and click 'Yes'.
Congratulations you have just made your first .tga with a built in alpha map. So ends the tutorial. Happy
Game making!
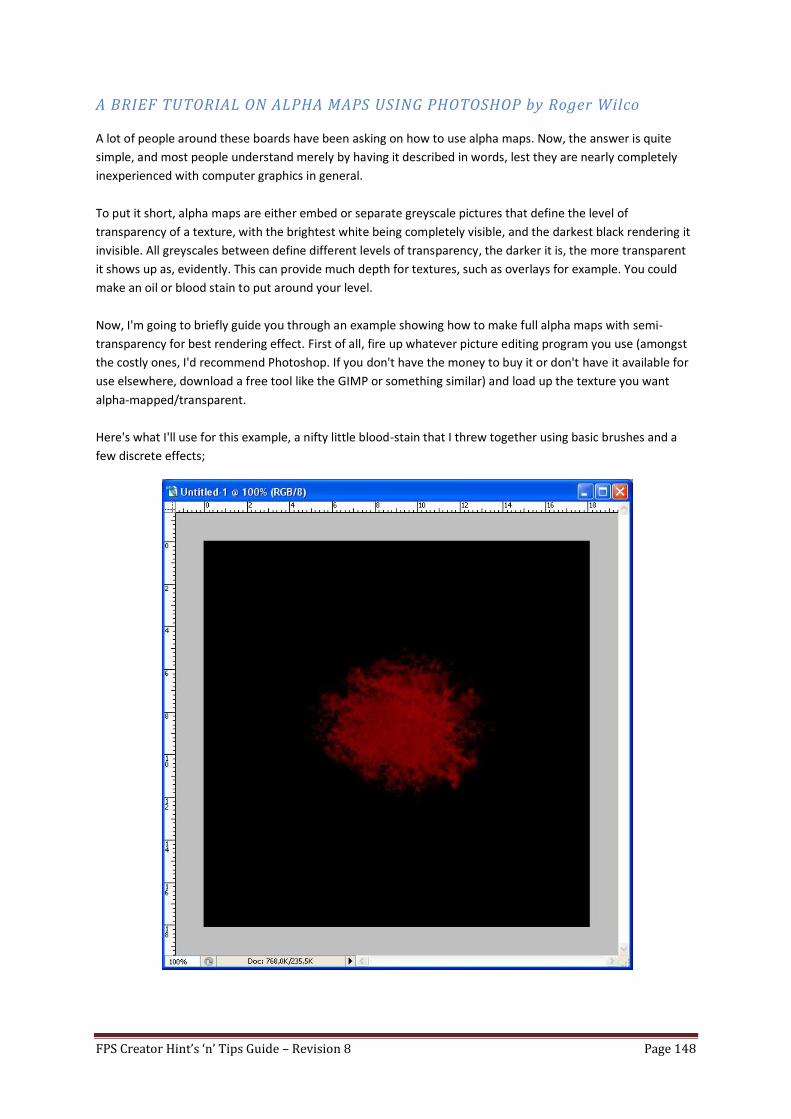
FPS Creator Hint’s ‘n’ Tips Guide – Revision 8 Page 148
A BRIEF TUTORIAL ON ALPHA MAPS USING PHOTOSHOP by Roger Wilco
A lot of people around these boards have been asking on how to use alpha maps. Now, the answer is quite
simple, and most people understand merely by having it described in words, lest they are nearly completely
inexperienced with computer graphics in general.
To put it short, alpha maps are either embed or separate greyscale pictures that define the level of
transparency of a texture, with the brightest white being completely visible, and the darkest black rendering it
invisible. All greyscales between define different levels of transparency, the darker it is, the more transparent
it shows up as, evidently. This can provide much depth for textures, such as overlays for example. You could
make an oil or blood stain to put around your level.
Now, I'm going to briefly guide you through an example showing how to make full alpha maps with semi-
transparency for best rendering effect. First of all, fire up whatever picture editing program you use (amongst
the costly ones, I'd recommend Photoshop. If you don't have the money to buy it or don't have it available for
use elsewhere, download a free tool like the GIMP or something similar) and load up the texture you want
alpha-mapped/transparent.
Here's what I'll use for this example, a nifty little blood-stain that I threw together using basic brushes and a
few discrete effects;
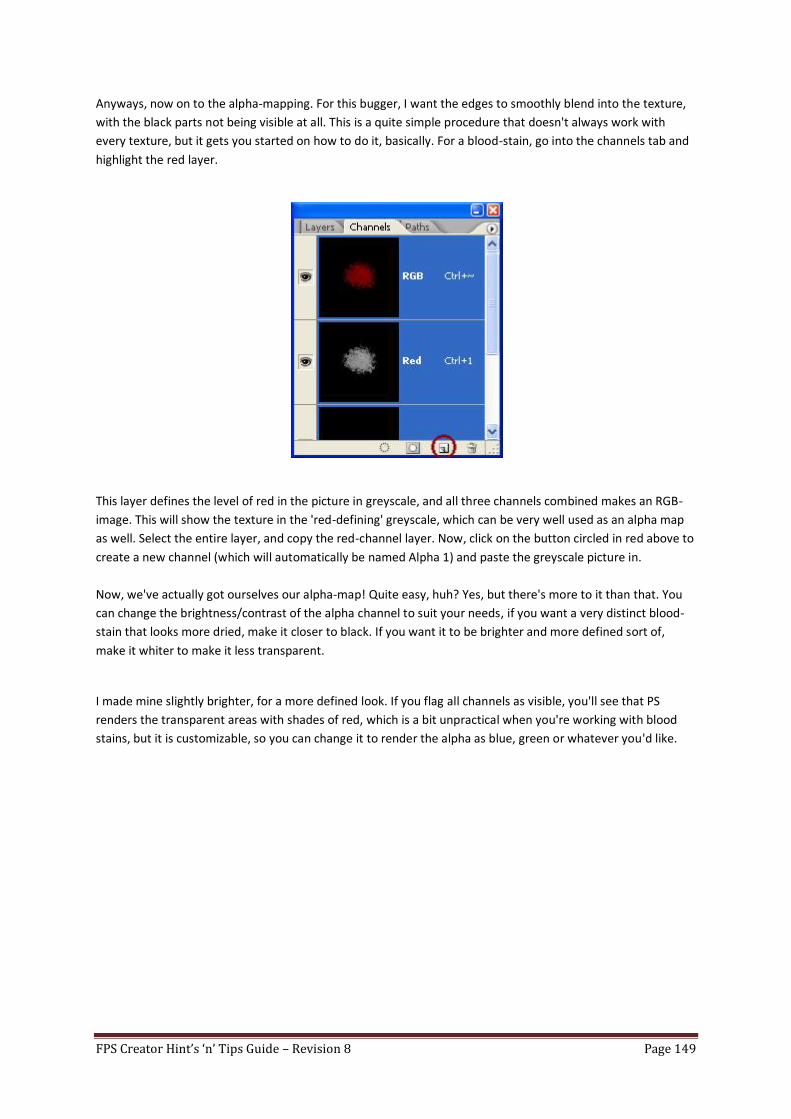
FPS Creator Hint’s ‘n’ Tips Guide – Revision 8 Page 149
Anyways, now on to the alpha-mapping. For this bugger, I want the edges to smoothly blend into the texture,
with the black parts not being visible at all. This is a quite simple procedure that doesn't always work with
every texture, but it gets you started on how to do it, basically. For a blood-stain, go into the channels tab and
highlight the red layer.
This layer defines the level of red in the picture in greyscale, and all three channels combined makes an RGB-
image. This will show the texture in the 'red-defining' greyscale, which can be very well used as an alpha map
as well. Select the entire layer, and copy the red-channel layer. Now, click on the button circled in red above to
create a new channel (which will automatically be named Alpha 1) and paste the greyscale picture in.
Now, we've actually got ourselves our alpha-map! Quite easy, huh? Yes, but there's more to it than that. You
can change the brightness/contrast of the alpha channel to suit your needs, if you want a very distinct blood-
stain that looks more dried, make it closer to black. If you want it to be brighter and more defined sort of,
make it whiter to make it less transparent.
I made mine slightly brighter, for a more defined look. If you flag all channels as visible, you'll see that PS
renders the transparent areas with shades of red, which is a bit unpractical when you're working with blood
stains, but it is customizable, so you can change it to render the alpha as blue, green or whatever you'd like.
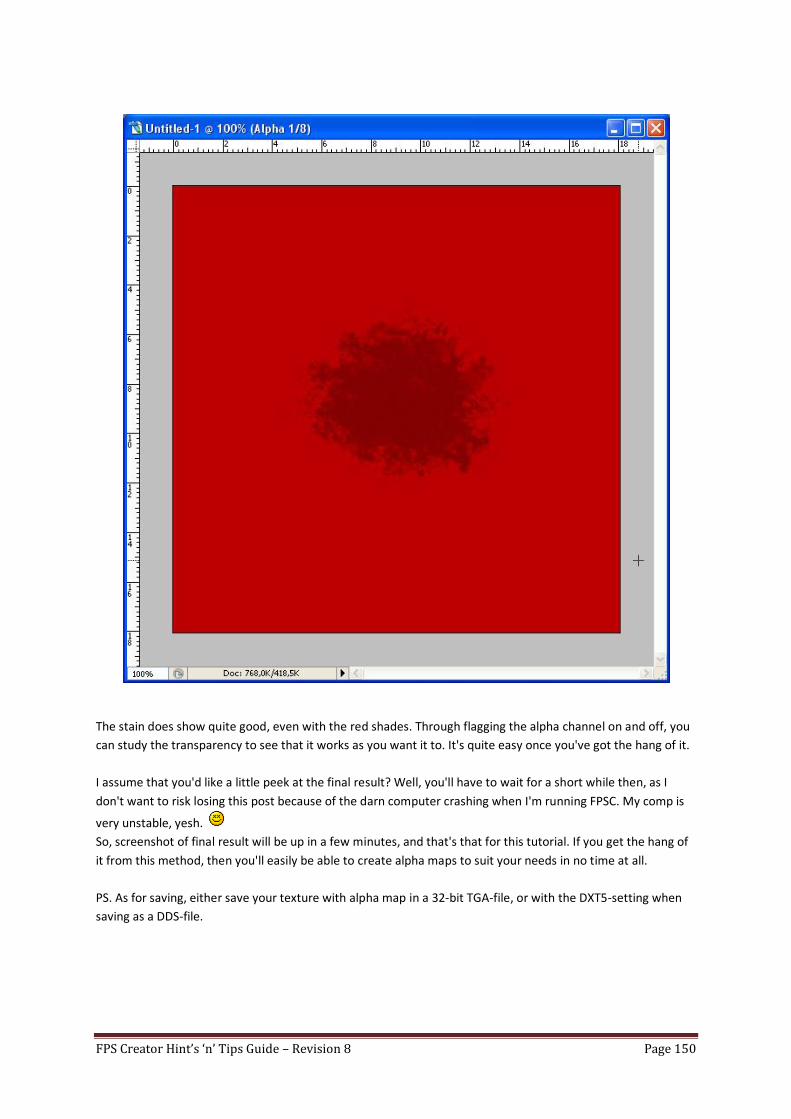
FPS Creator Hint’s ‘n’ Tips Guide – Revision 8 Page 150
The stain does show quite good, even with the red shades. Through flagging the alpha channel on and off, you
can study the transparency to see that it works as you want it to. It's quite easy once you've got the hang of it.
I assume that you'd like a little peek at the final result? Well, you'll have to wait for a short while then, as I
don't want to risk losing this post because of the darn computer crashing when I'm running FPSC. My comp is
very unstable, yesh.
So, screenshot of final result will be up in a few minutes, and that's that for this tutorial. If you get the hang of
it from this method, then you'll easily be able to create alpha maps to suit your needs in no time at all.
PS. As for saving, either save your texture with alpha map in a 32-bit TGA-file, or with the DXT5-setting when
saving as a DDS-file.
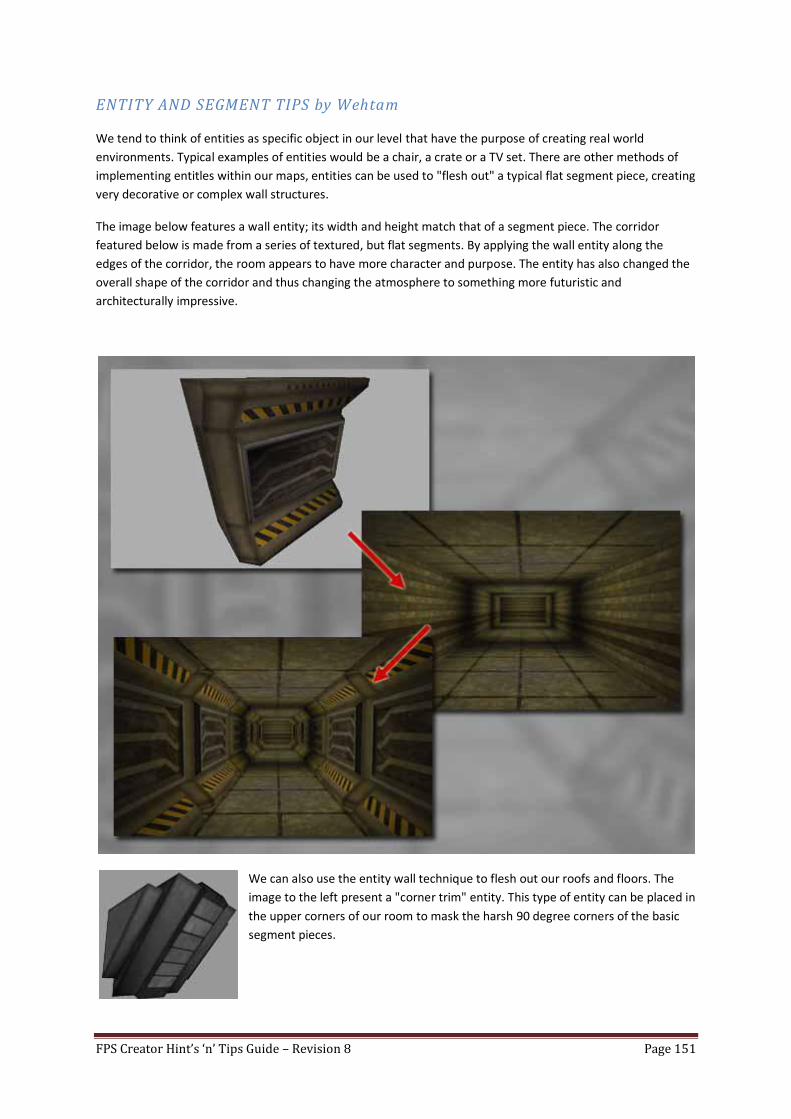
FPS Creator Hint’s ‘n’ Tips Guide – Revision 8 Page 151
ENTITY AND SEGMENT TIPS by Wehtam
We tend to think of entities as specific object in our level that have the purpose of creating real world
environments. Typical examples of entities would be a chair, a crate or a TV set. There are other methods of
implementing entitles within our maps, entities can be used to "flesh out" a typical flat segment piece, creating
very decorative or complex wall structures.
The image below features a wall entity; its width and height match that of a segment piece. The corridor
featured below is made from a series of textured, but flat segments. By applying the wall entity along the
edges of the corridor, the room appears to have more character and purpose. The entity has also changed the
overall shape of the corridor and thus changing the atmosphere to something more futuristic and
architecturally impressive.
We can also use the entity wall technique to flesh out our roofs and floors. The
image to the left present a "corner trim" entity. This type of entity can be placed in
the upper corners of our room to mask the harsh 90 degree corners of the basic
segment pieces.
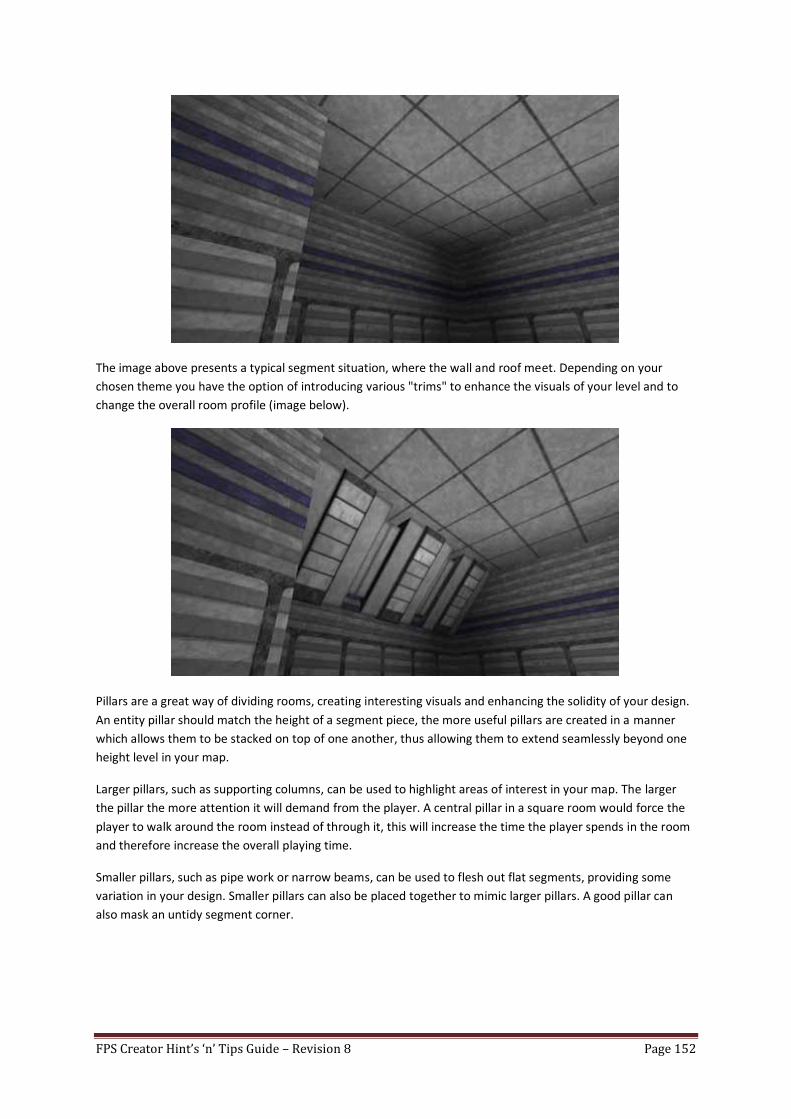
FPS Creator Hint’s ‘n’ Tips Guide – Revision 8 Page 152
The image above presents a typical segment situation, where the wall and roof meet. Depending on your
chosen theme you have the option of introducing various "trims" to enhance the visuals of your level and to
change the overall room profile (image below).
Pillars are a great way of dividing rooms, creating interesting visuals and enhancing the solidity of your design.
An entity pillar should match the height of a segment piece, the more useful pillars are created in a manner
which allows them to be stacked on top of one another, thus allowing them to extend seamlessly beyond one
height level in your map.
Larger pillars, such as supporting columns, can be used to highlight areas of interest in your map. The larger
the pillar the more attention it will demand from the player. A central pillar in a square room would force the
player to walk around the room instead of through it, this will increase the time the player spends in the room
and therefore increase the overall playing time.
Smaller pillars, such as pipe work or narrow beams, can be used to flesh out flat segments, providing some
variation in your design. Smaller pillars can also be placed together to mimic larger pillars. A good pillar can
also mask an untidy segment corner.
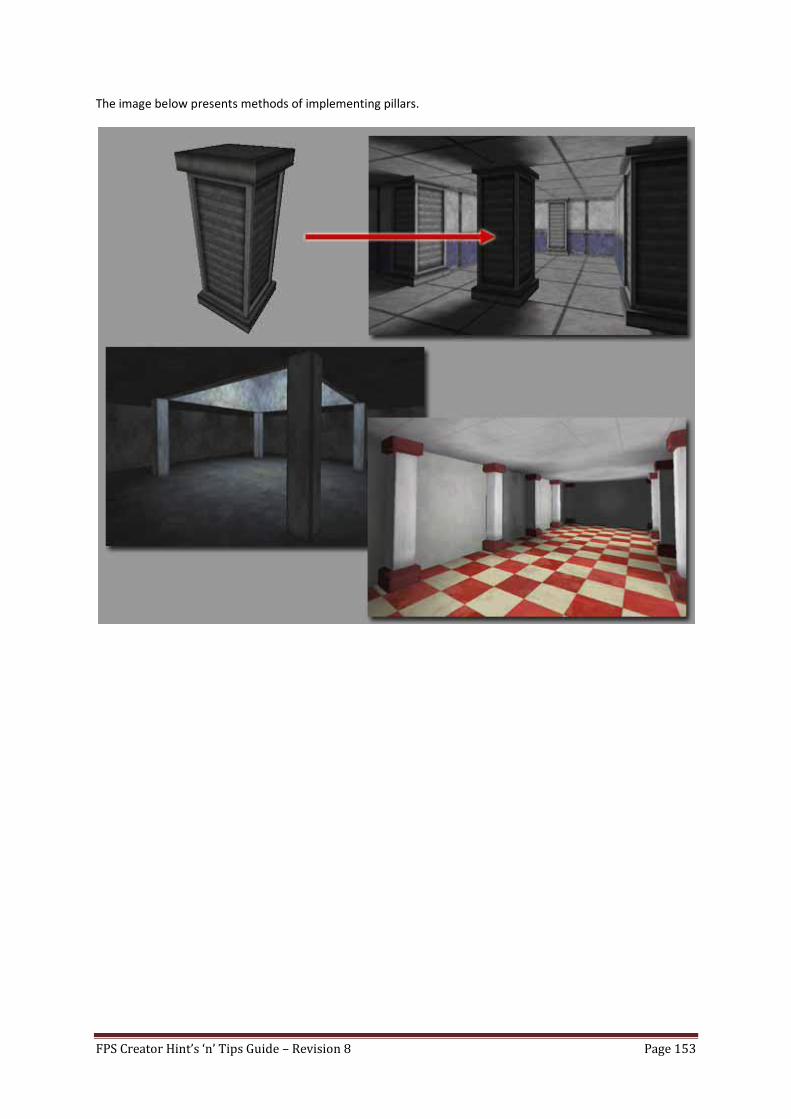
FPS Creator Hint’s ‘n’ Tips Guide – Revision 8 Page 153
The image below presents methods of implementing pillars.
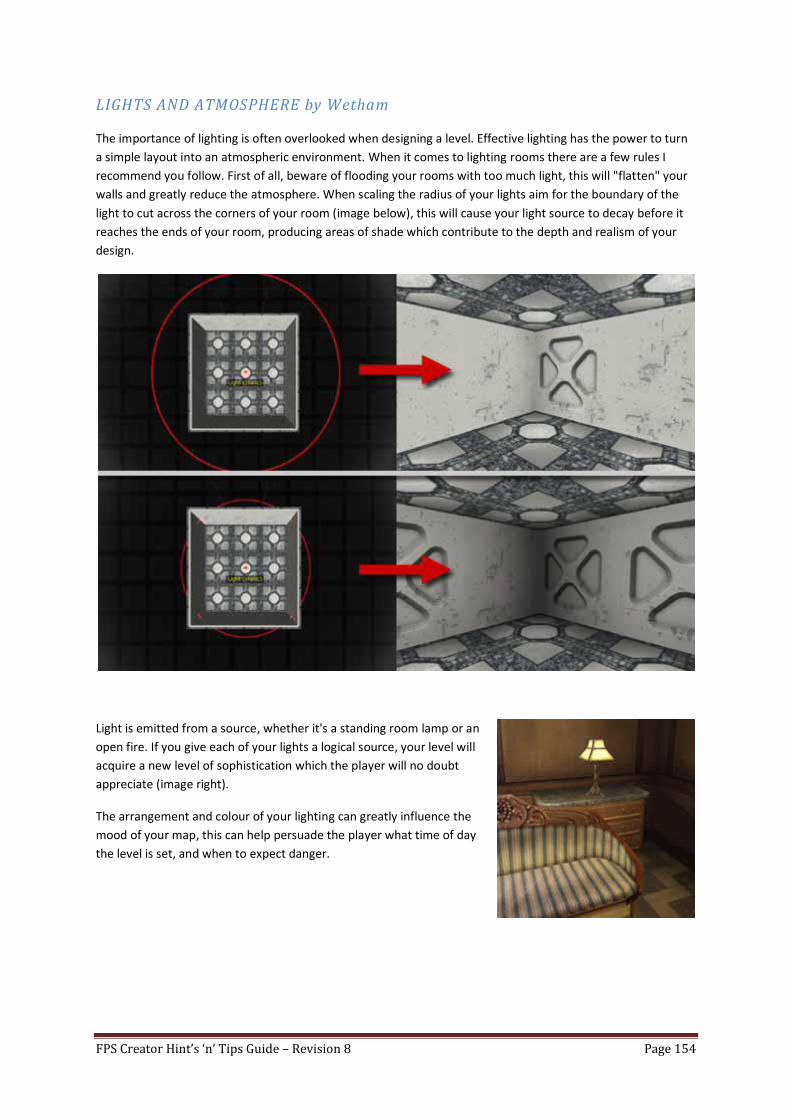
FPS Creator Hint’s ‘n’ Tips Guide – Revision 8 Page 154
LIGHTS AND ATMOSPHERE by Wetham
The importance of lighting is often overlooked when designing a level. Effective lighting has the power to turn
a simple layout into an atmospheric environment. When it comes to lighting rooms there are a few rules I
recommend you follow. First of all, beware of flooding your rooms with too much light, this will "flatten" your
walls and greatly reduce the atmosphere. When scaling the radius of your lights aim for the boundary of the
light to cut across the corners of your room (image below), this will cause your light source to decay before it
reaches the ends of your room, producing areas of shade which contribute to the depth and realism of your
design.
Light is emitted from a source, whether it's a standing room lamp or an
open fire. If you give each of your lights a logical source, your level will
acquire a new level of sophistication which the player will no doubt
appreciate (image right).
The arrangement and colour of your lighting can greatly influence the
mood of your map, this can help persuade the player what time of day
the level is set, and when to expect danger.
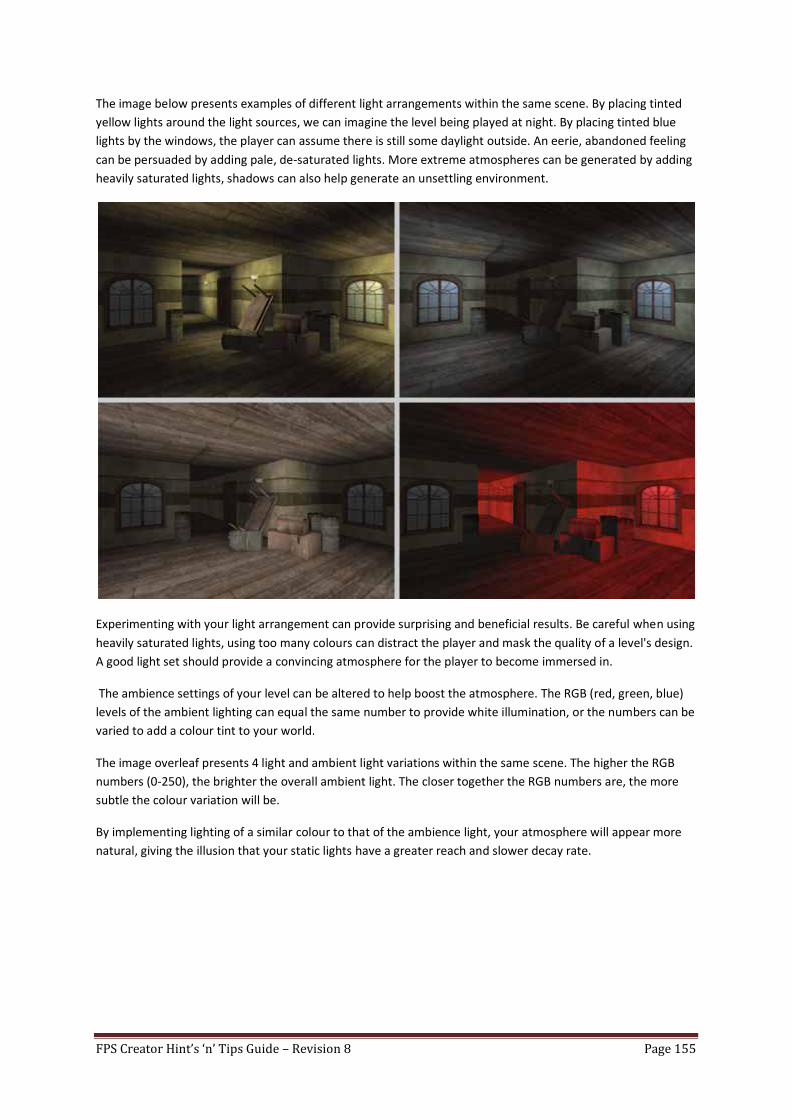
FPS Creator Hint’s ‘n’ Tips Guide – Revision 8 Page 155
The image below presents examples of different light arrangements within the same scene. By placing tinted
yellow lights around the light sources, we can imagine the level being played at night. By placing tinted blue
lights by the windows, the player can assume there is still some daylight outside. An eerie, abandoned feeling
can be persuaded by adding pale, de-saturated lights. More extreme atmospheres can be generated by adding
heavily saturated lights, shadows can also help generate an unsettling environment.
Experimenting with your light arrangement can provide surprising and beneficial results. Be careful when using
heavily saturated lights, using too many colours can distract the player and mask the quality of a level's design.
A good light set should provide a convincing atmosphere for the player to become immersed in.
The ambience settings of your level can be altered to help boost the atmosphere. The RGB (red, green, blue)
levels of the ambient lighting can equal the same number to provide white illumination, or the numbers can be
varied to add a colour tint to your world.
The image overleaf presents 4 light and ambient light variations within the same scene. The higher the RGB
numbers (0-250), the brighter the overall ambient light. The closer together the RGB numbers are, the more
subtle the colour variation will be.
By implementing lighting of a similar colour to that of the ambience light, your atmosphere will appear more
natural, giving the illusion that your static lights have a greater reach and slower decay rate.
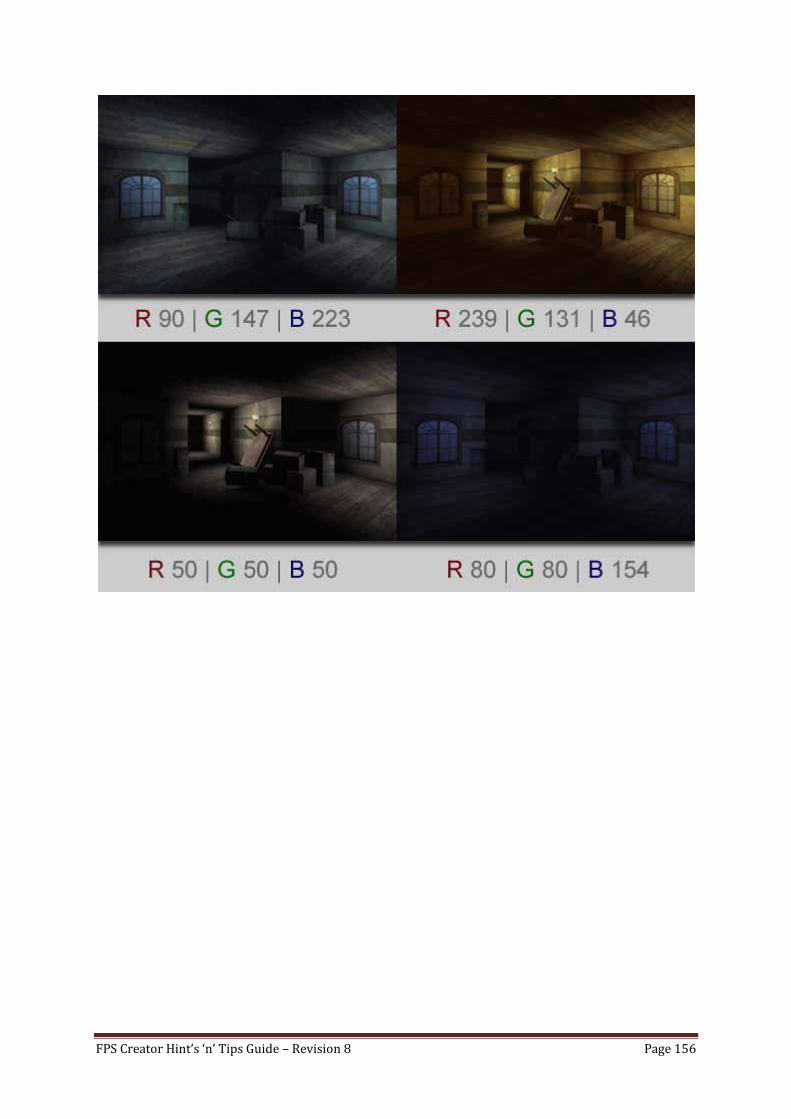
FPS Creator Hint’s ‘n’ Tips Guide – Revision 8 Page 156
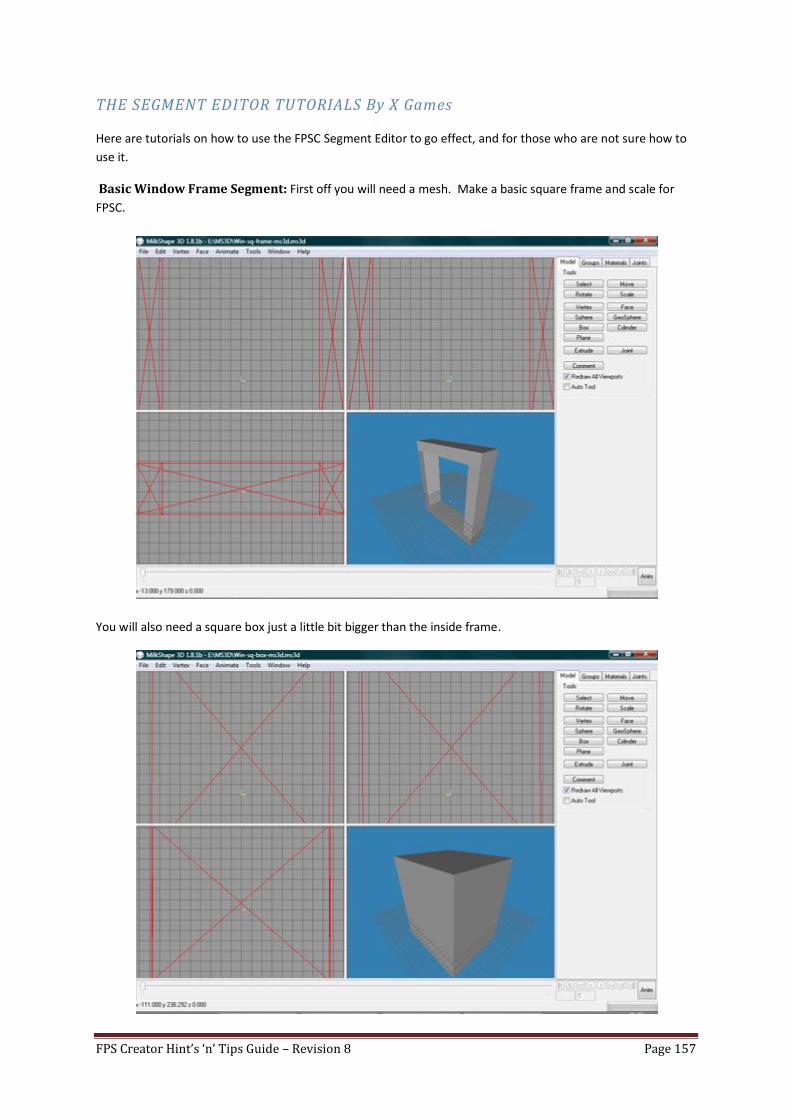
FPS Creator Hint’s ‘n’ Tips Guide – Revision 8 Page 157
THE SEGMENT EDITOR TUTORIALS By X Games
Here are tutorials on how to use the FPSC Segment Editor to go effect, and for those who are not sure how to
use it.
Basic Window Frame Segment: First off you will need a mesh. Make a basic square frame and scale for
FPSC.
You will also need a square box just a little bit bigger than the inside frame.
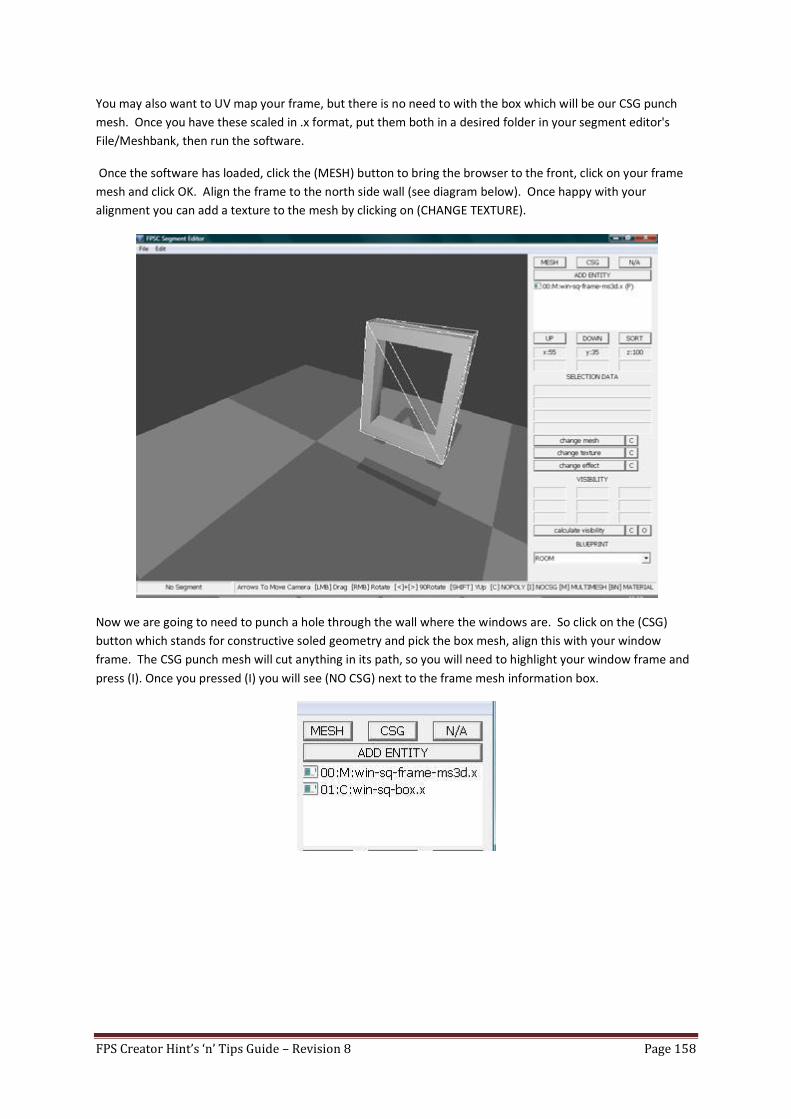
FPS Creator Hint’s ‘n’ Tips Guide – Revision 8 Page 158
You may also want to UV map your frame, but there is no need to with the box which will be our CSG punch
mesh. Once you have these scaled in .x format, put them both in a desired folder in your segment editor's
File/Meshbank, then run the software.
Once the software has loaded, click the (MESH) button to bring the browser to the front, click on your frame
mesh and click OK. Align the frame to the north side wall (see diagram below). Once happy with your
alignment you can add a texture to the mesh by clicking on (CHANGE TEXTURE).
Now we are going to need to punch a hole through the wall where the windows are. So click on the (CSG)
button which stands for constructive soled geometry and pick the box mesh, align this with your window
frame. The CSG punch mesh will cut anything in its path, so you will need to highlight your window frame and
press (I). Once you pressed (I) you will see (NO CSG) next to the frame mesh information box.
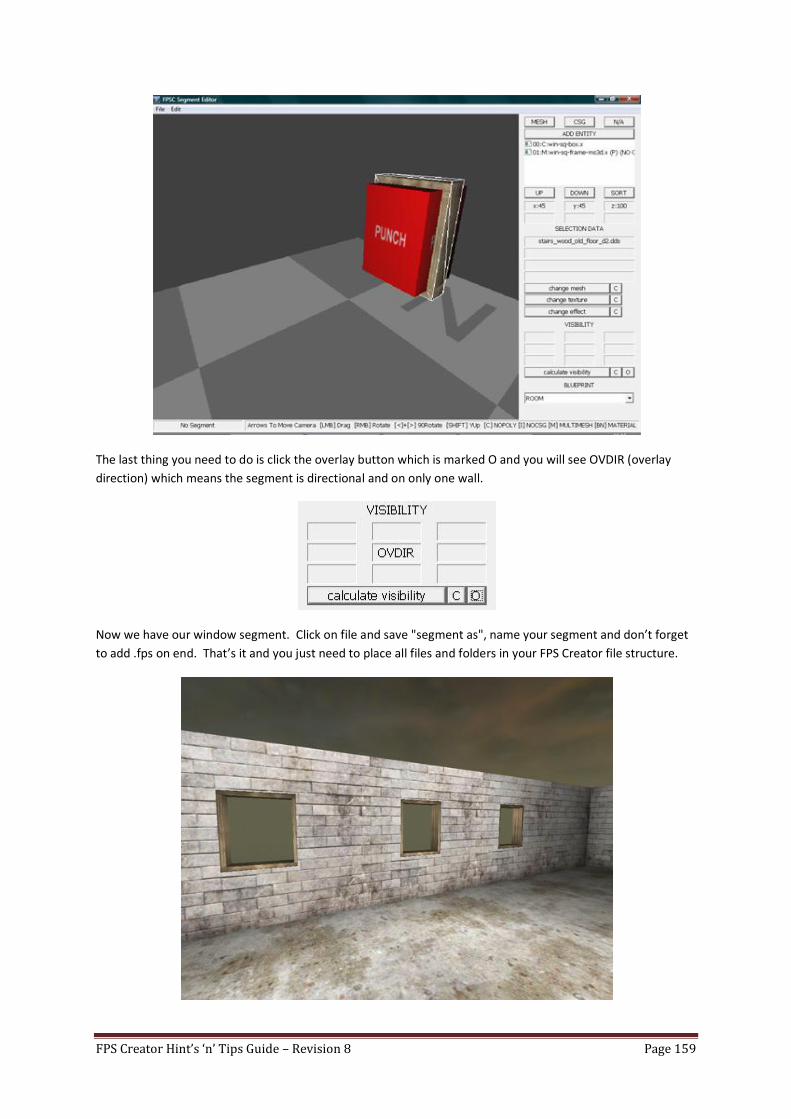
FPS Creator Hint’s ‘n’ Tips Guide – Revision 8 Page 159
The last thing you need to do is click the overlay button which is marked O and you will see OVDIR (overlay
direction) which means the segment is directional and on only one wall.
Now we have our window segment. Click on file and save "segment as", name your segment and don’t forget
to add .fps on end. That’s it and you just need to place all files and folders in your FPS Creator file structure.
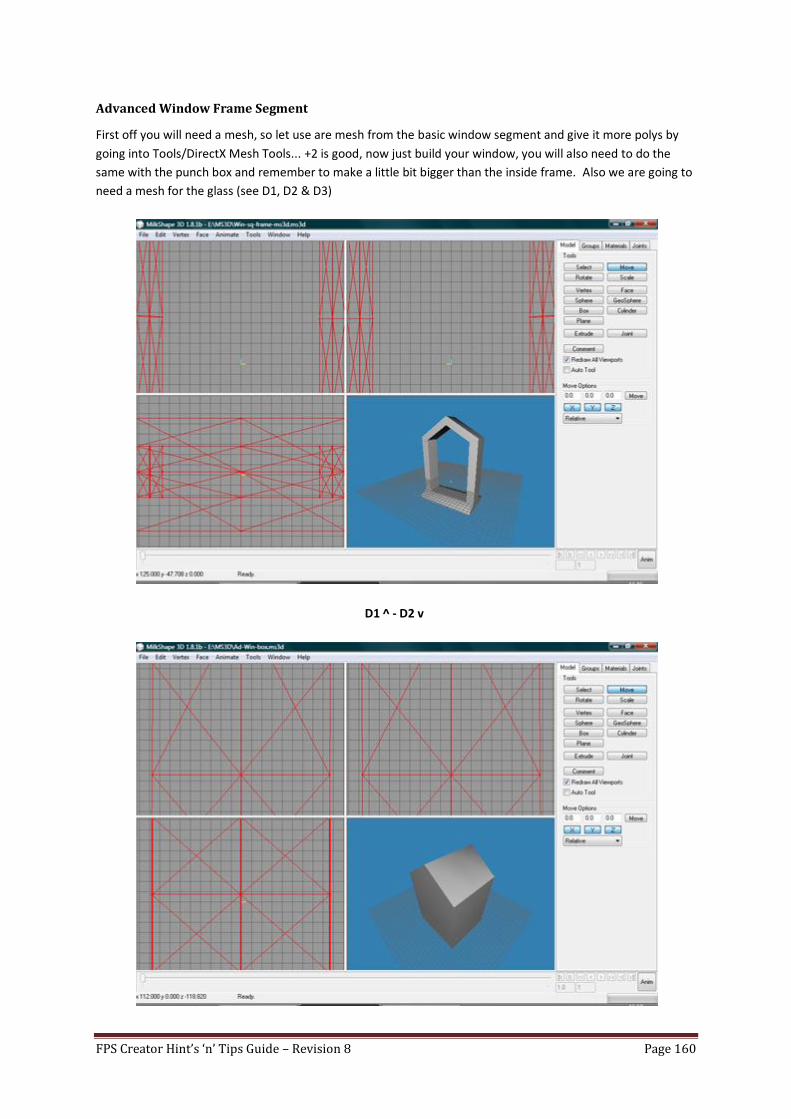
FPS Creator Hint’s ‘n’ Tips Guide – Revision 8 Page 160
Advanced Window Frame Segment
First off you will need a mesh, so let use are mesh from the basic window segment and give it more polys by
going into Tools/DirectX Mesh Tools... +2 is good, now just build your window, you will also need to do the
same with the punch box and remember to make a little bit bigger than the inside frame. Also we are going to
need a mesh for the glass (see D1, D2 & D3)
D1 ^ - D2 v
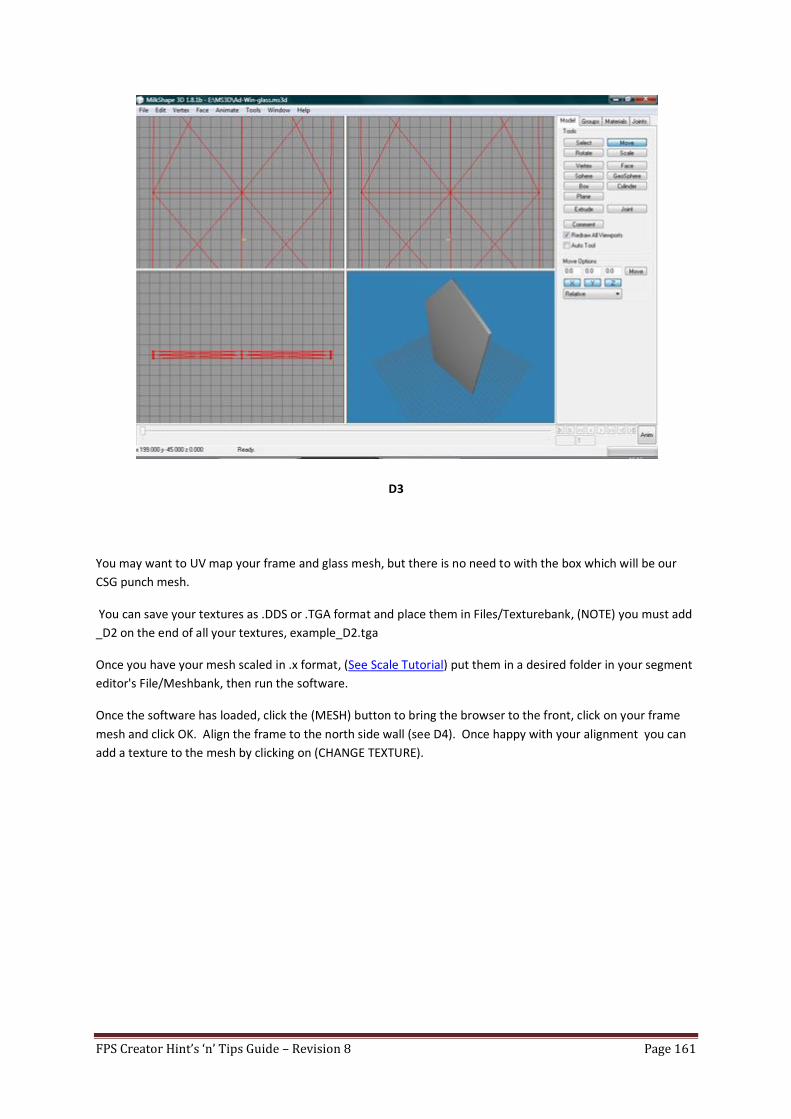
FPS Creator Hint’s ‘n’ Tips Guide – Revision 8 Page 161
D3
You may want to UV map your frame and glass mesh, but there is no need to with the box which will be our
CSG punch mesh.
You can save your textures as .DDS or .TGA format and place them in Files/Texturebank, (NOTE) you must add
_D2 on the end of all your textures, example_D2.tga
Once you have your mesh scaled in .x format, (See Scale Tutorial) put them in a desired folder in your segment
editor's File/Meshbank, then run the software.
Once the software has loaded, click the (MESH) button to bring the browser to the front, click on your frame
mesh and click OK. Align the frame to the north side wall (see D4). Once happy with your alignment you can
add a texture to the mesh by clicking on (CHANGE TEXTURE).
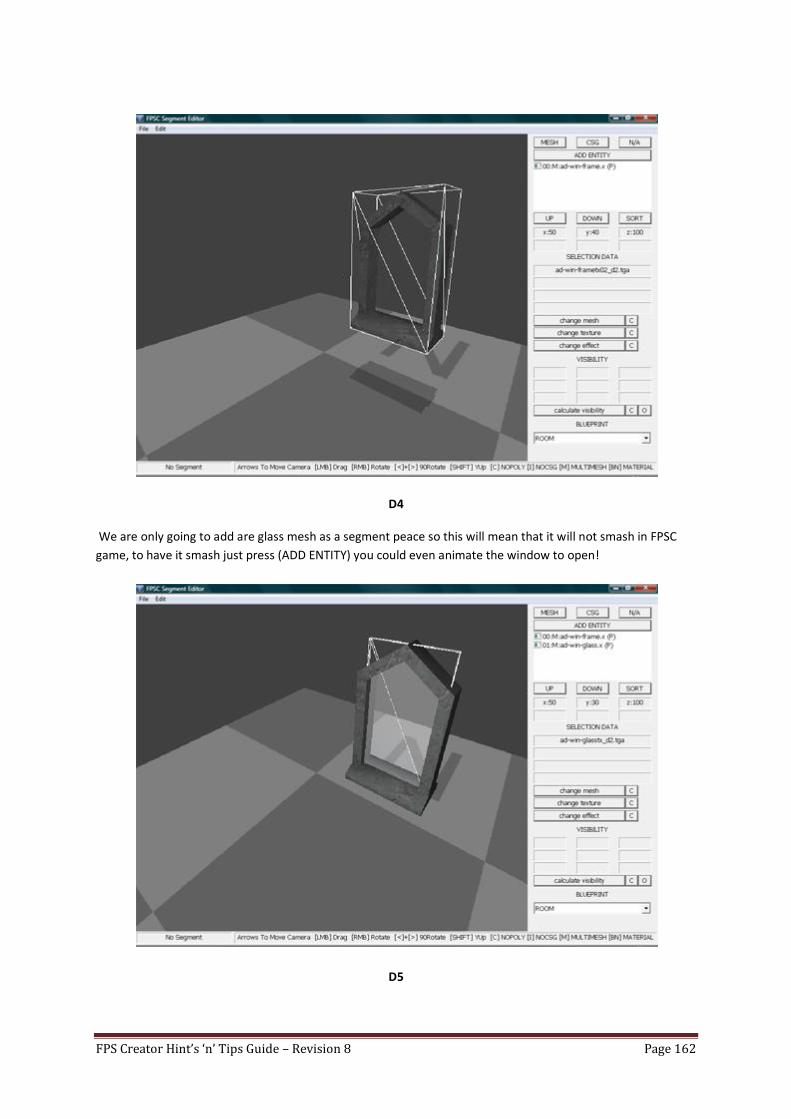
FPS Creator Hint’s ‘n’ Tips Guide – Revision 8 Page 162
D4
We are only going to add are glass mesh as a segment peace so this will mean that it will not smash in FPSC
game, to have it smash just press (ADD ENTITY) you could even animate the window to open!
D5
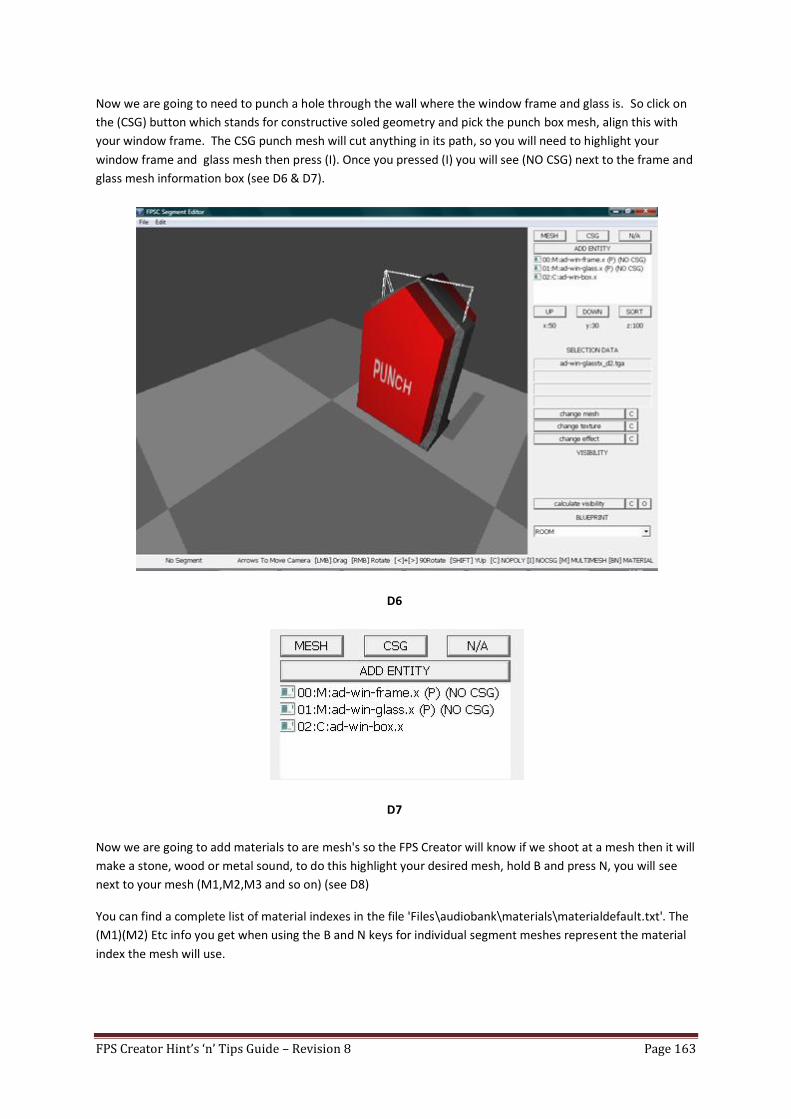
FPS Creator Hint’s ‘n’ Tips Guide – Revision 8 Page 163
Now we are going to need to punch a hole through the wall where the window frame and glass is. So click on
the (CSG) button which stands for constructive soled geometry and pick the punch box mesh, align this with
your window frame. The CSG punch mesh will cut anything in its path, so you will need to highlight your
window frame and glass mesh then press (I). Once you pressed (I) you will see (NO CSG) next to the frame and
glass mesh information box (see D6 & D7).
D6
D7
Now we are going to add materials to are mesh's so the FPS Creator will know if we shoot at a mesh then it will
make a stone, wood or metal sound, to do this highlight your desired mesh, hold B and press N, you will see
next to your mesh (M1,M2,M3 and so on) (see D8)
You can find a complete list of material indexes in the file 'Files\audiobank\materials\materialdefault.txt'. The
(M1)(M2) Etc info you get when using the B and N keys for individual segment meshes represent the material
index the mesh will use.
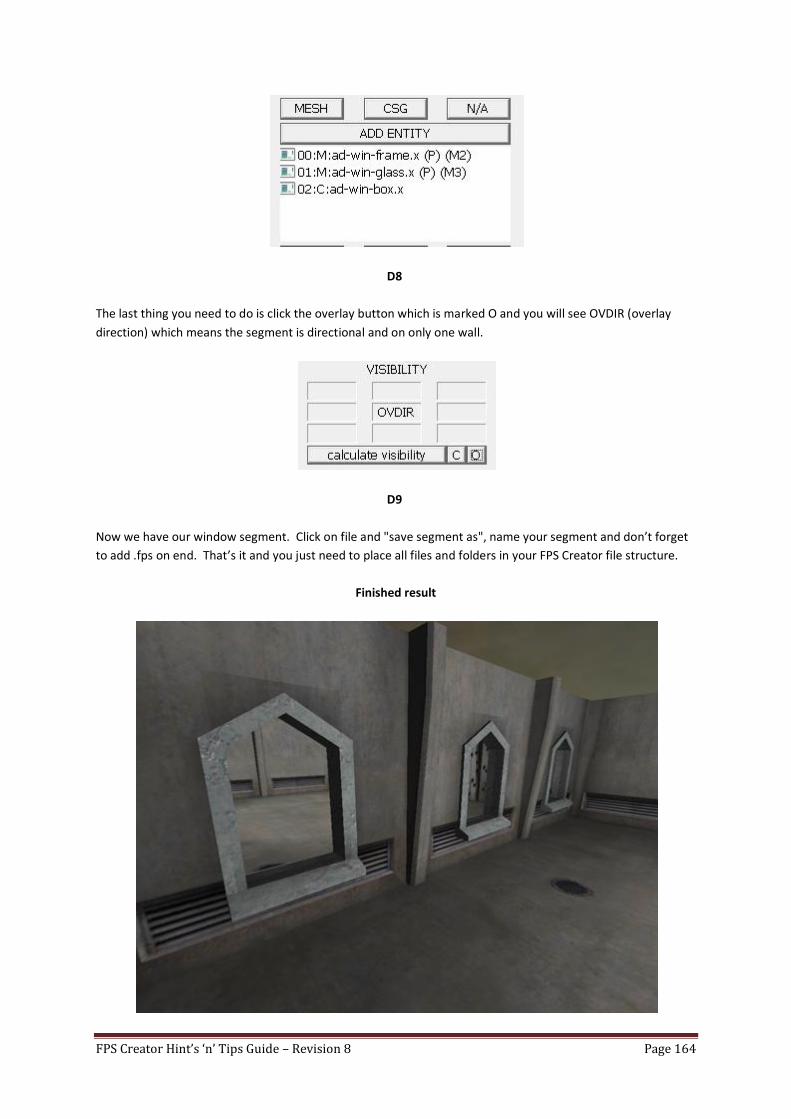
FPS Creator Hint’s ‘n’ Tips Guide – Revision 8 Page 164
D8
The last thing you need to do is click the overlay button which is marked O and you will see OVDIR (overlay
direction) which means the segment is directional and on only one wall.
D9
Now we have our window segment. Click on file and "save segment as", name your segment and don’t forget
to add .fps on end. That’s it and you just need to place all files and folders in your FPS Creator file structure.
Finished result
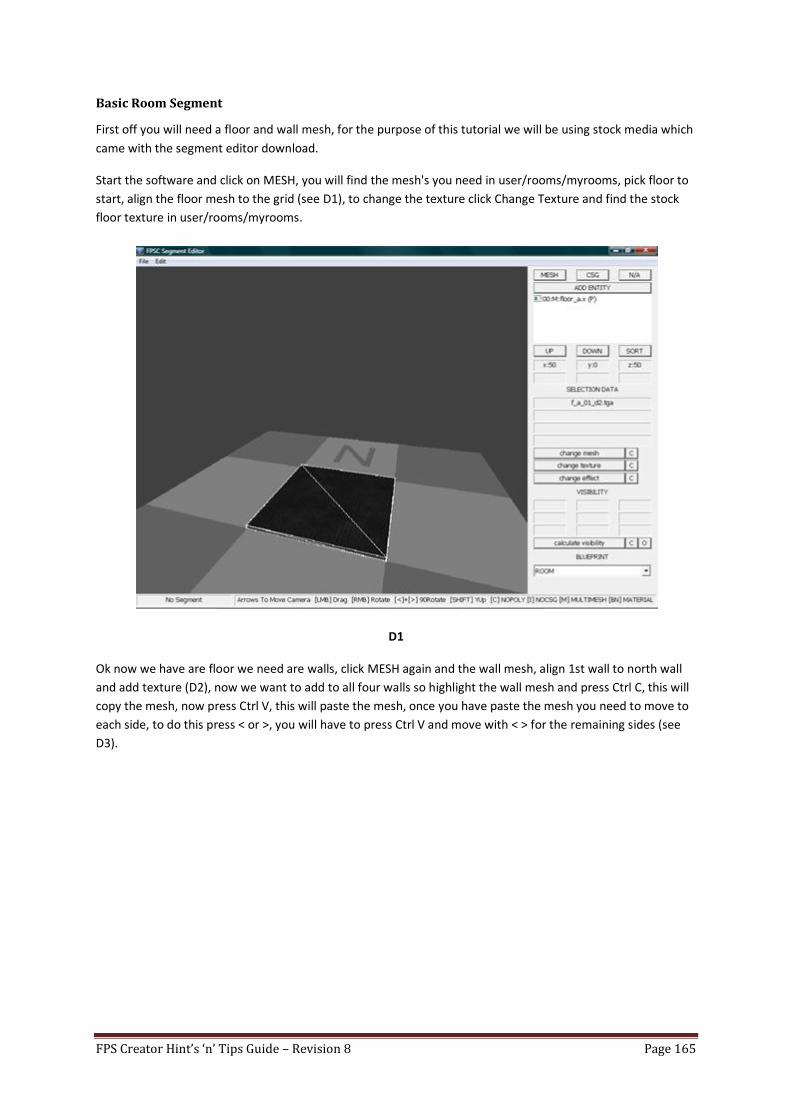
FPS Creator Hint’s ‘n’ Tips Guide – Revision 8 Page 165
Basic Room Segment
First off you will need a floor and wall mesh, for the purpose of this tutorial we will be using stock media which
came with the segment editor download.
Start the software and click on MESH, you will find the mesh's you need in user/rooms/myrooms, pick floor to
start, align the floor mesh to the grid (see D1), to change the texture click Change Texture and find the stock
floor texture in user/rooms/myrooms.
D1
Ok now we have are floor we need are walls, click MESH again and the wall mesh, align 1st wall to north wall
and add texture (D2), now we want to add to all four walls so highlight the wall mesh and press Ctrl C, this will
copy the mesh, now press Ctrl V, this will paste the mesh, once you have paste the mesh you need to move to
each side, to do this press < or >, you will have to press Ctrl V and move with < > for the remaining sides (see
D3).
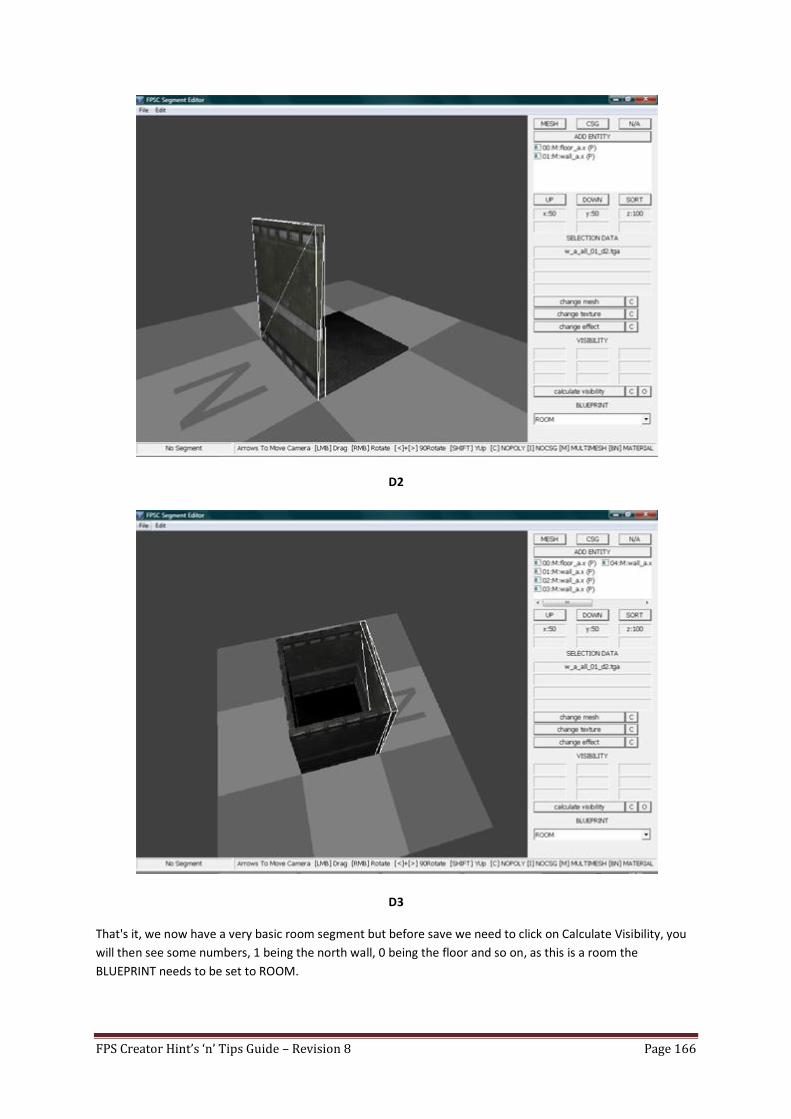
FPS Creator Hint’s ‘n’ Tips Guide – Revision 8 Page 166
D2
D3
That's it, we now have a very basic room segment but before save we need to click on Calculate Visibility, you
will then see some numbers, 1 being the north wall, 0 being the floor and so on, as this is a room the
BLUEPRINT needs to be set to ROOM.
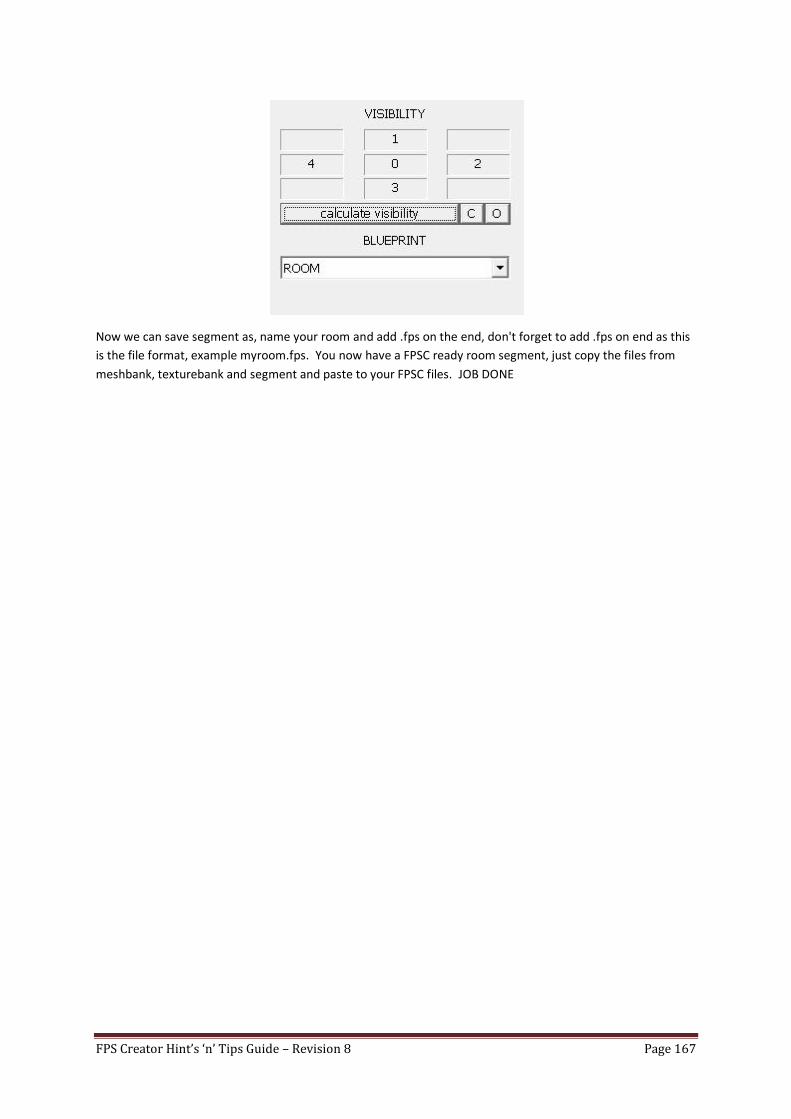
FPS Creator Hint’s ‘n’ Tips Guide – Revision 8 Page 167
Now we can save segment as, name your room and add .fps on the end, don't forget to add .fps on end as this
is the file format, example myroom.fps. You now have a FPSC ready room segment, just copy the files from
meshbank, texturebank and segment and paste to your FPSC files. JOB DONE

FPS Creator Hint’s ‘n’ Tips Guide – Revision 8 Page 168
Some solutions to FPSC errors by Nickydude It seems like FPSC throws out many errors even when it seems like you haven't changed a thing from the last
time it ran! Or perhaps it runs fine for you but your friends are getting errors? Well, here's a list of solutions
that people have come across that could possibly work:
Q: It won't work on my machine, it just crashes when I try to test / build a game. It works on my machine
but not my friends! He has the latest version of DirectX - 9.0c
A: There are many 'editions' of DirectX9.0c, just like there are many release candidates of V1.04 of FPSC. Make
sure you and your friend have downloaded at least the December 2006 edition of DirectX. If you / he hasn't
downloaded DirectX since December 2006, you / he needs to.
Q: A game I made yesterday won't work today, and I haven't changed a thing! It says an object doesn't
exists.
A: Have you ran some hard drive cleaning software in the meantime [System Mechanic, Norton Utilities,
WinOptimiser or something similar]? That could be your problem. These 'clean' certain files that FPSC needs,
you'll need to reinstall FPSC and any updates.
Q: I keep getting "This application has encountered a problem and needs to close. Extra Debug Info:0 0".
What does that mean?
A: This general 'catch all' error when FPSC doesn't know why it failed. Most of the time though it has to do
with custom media, something you've made that FPSC doesn't like. Try starting from scratch and placing your
custom media one by one and testing the game after each one, this should narrow down which media is
causing the trouble.
Q: Every time I use a certain segment, I get an error and FPSC crashes.
A: It could be that the fps file for that segment is looking for textures that aren't there, or in a different place.
Open up the fps file for that segment and look where it say "texture0 = ", "texture1 = ", "texture2 = " and so on
and make sure the textures these are pointing to are actually there.
===============================================
;Segment Parts
partmode0 = 0
meshname0 = meshbank/ww2/france/rooms/chateau_study_room/floor_a.x
offx0 = 0
offy0 = -51
offz0 = 0
rotx0 = 0
roty0 = 0
rotz0 = 0
texture0 = segments/DTIRooms4I/nsideRoomFlr.tga <this is an example>
transparency0 = 0
effect0 =
colmode0 = 1
csgmesh0 =
csgmode0 = 0
...
...
===============================================
FPS Creator Hint’s ‘n’ Tips Guide – Revision 8 Page 169
Q: When I run my game, all the segments / textures are all over the place and look really weird and
stretched!
A: This could be because you have FULL SHADER EFFECTS turned on. There's an issue for some people when
they have shader effects on, try turning them off.
Q: I've created custom segments but in game they are all white! There's no texture on them.
A: See Every time I use a certain segment, I get an error and FPSC crashes.
Q: When I build my game it stops saying “Waiting for thread to finish” but it never does!
A: This is usually caused by custom media. Try changing entities which you think might be causing the problem
from static to dynamic, which sometimes does the trick.
By Nickydude
FPS Creator Hint’s ‘n’ Tips Guide – Revision 8 Page 170
Quick Tips This section will provide you with little tips & tricks that you might not have known about.
Display a hud while holding an object
If you pick up a dynamic object with the following script attached:
:state=0:hudreset,hudx=50,hudy=50,hudimagefine=gamecore\text\text.DDS,
hudname=a1,hudhide=1,hudmake=display,state=10
:state=10,plrdistwithin=40:state=1
:state=1:hudshow=a1,hudfadeout=a1
:state=1,plrdistwithin=60,plrusingaction=1:state=40
:state=1,plrdistfurther=60:state=40
The hud will display until you throw it away. You could make a scroll / map object and have a player carry it
around to view a map, instead of going back and forth.
Alter lift weight
If you alter the weight of a lift, you’ll find it will tilt towards the side the player is on.
Respawn Times
Respawn timers are different than entity timers used in scripts, 100= 1 second in respawn time, and 1000= 1
second in entity timer scripts. If you're wanting a weapon/ammo to respond in like 5.5 seconds you should
enter 550 as your respawn time.
Distance + Size
When a script talks about distance (“plrdistwithin=200”), 100 is equal to one segment width, so
“plrdistwithin=200”) means within 2 segments. A segment in FPSC is approximately 8 foot 4 inches in real
world size (thanks to Locrian for that tip)
Change lighting while playing
While playing a game, you can use the < and > keys to change the amount of lighting.
Fix disappearing labels
Here is a fix for those disappearing labels for custom segments and entity's. The reason they don't appear on
the left side of the FPSC window is that they are missing .loc files. So the fix is to go to the
languagebank\english\textfiles\library and recreate the directory structure for you entity and segment folders
and files. Just follow what FPSC already have under prefabs, entity, and segment folders.

FPS Creator Hint’s ‘n’ Tips Guide – Revision 8 Page 171
Dynamic entity & scripts
If an entity is running a script, the entity MUST be DYNAMIC (“Static = No”), the script won’t work otherwise.
Reversed colours
When putting a hex number for a light marker colour, the number is reversed. The most common way that hex
colour numbers are displayed is ‘RRGGBB’, so for example ‘0000FF’ would be pure blue, but FPSC reverses this
as BBGGRR. So if you wanted yellow for example, instead of ‘FFFF00’ as normal, you would have ‘00FFFF’.
Change character shadow
You can change the look of a shadow for a character (the ‘blob’ beneath their feet) by looking for a texture
called ‘blob’ and changing it.
Infinite ammo
Placing “N/A” in the Ammo part of a Weapon’s property will give infinite ammo!
Movable teleport
You can make any object a destination for a teleport using the PLRMOVETO command. This is handy if the
object is dynamic; the object can be picked up and placed elsewhere then teleported too!
Light from light marker
When placing a light marker (a light bulb) be aware that the light actually comes from the screw part at the top
of the bulb, not the actual bulb itself.
Level distortion fixed
If you find your levels distorted when testing your game, try the following:
1. Test the level. When you start off, everything will be distorted.
2. Switch to wireframe mode (hit TAB, then hit the "[" key).
3. Shoot a weapon once. You will see the wireframe of the level snap into place.
4. Exit wireframe mode, and there you go!
(Thanks to Inspire for that tip).

FPS Creator Hint’s ‘n’ Tips Guide – Revision 8 Page 172
Breakable doors
If you want breakable doors, try the following:
1. Make a Door(Remote) 2. Go into entity editing mode(N Key), right-click on the door and set its main script as "Default.fpi" 3. Set the door's strength to whatever you want.
How to delete entities in one go
Do you have a room full of entities you want to delete in one go without having to delete them one by one?
Then here’s how!
Press the 'E' key to select segment selection mode
Now click and hold down the left mouse button on the top left most entity
Whilst holding down the left mouse button, drag the striped box that appears to the bottom right to
enclose all the entities you want to delete
Release the left mouse button to complete the range selection
Now press CTRL+X to cut the segment selection from the map, then press DELETE
Now press CTRL+Z to Undo the delete, and notice only the segments are restored
This trick only works if you only want to retain the basic segments. Segment overlays and entities cannot be
restored in this way. Practise this with some sample levels before applying the technique to your current level
designs. You may find your productivity increasing quite a bit!
Rotating entities
The manual tells you that pressing ‘R’ will rotate the entity but there are other combinations of keys that will
allow you to rotate the entity in any way:
When holding the SHIFT+R it will move slower, while holding the CTRL+R it will move somewhat faster and
pressing the 1, 2, 3, 4, 5, 6. It will rotate in any direction. It’s the same with shift and ctrl.
Winzone with video
In order to play a video when the player has won (winzone), put a story zone on top of a win zone, the video
plays first, and then the level ends.
Disappearing Walls / Corridors
Walls and corridors will disappear if they are single sided and facing east. To fix this, place a floor behind the
walls. It has nothing to do with the version of DirectX, it's something to do with the code.
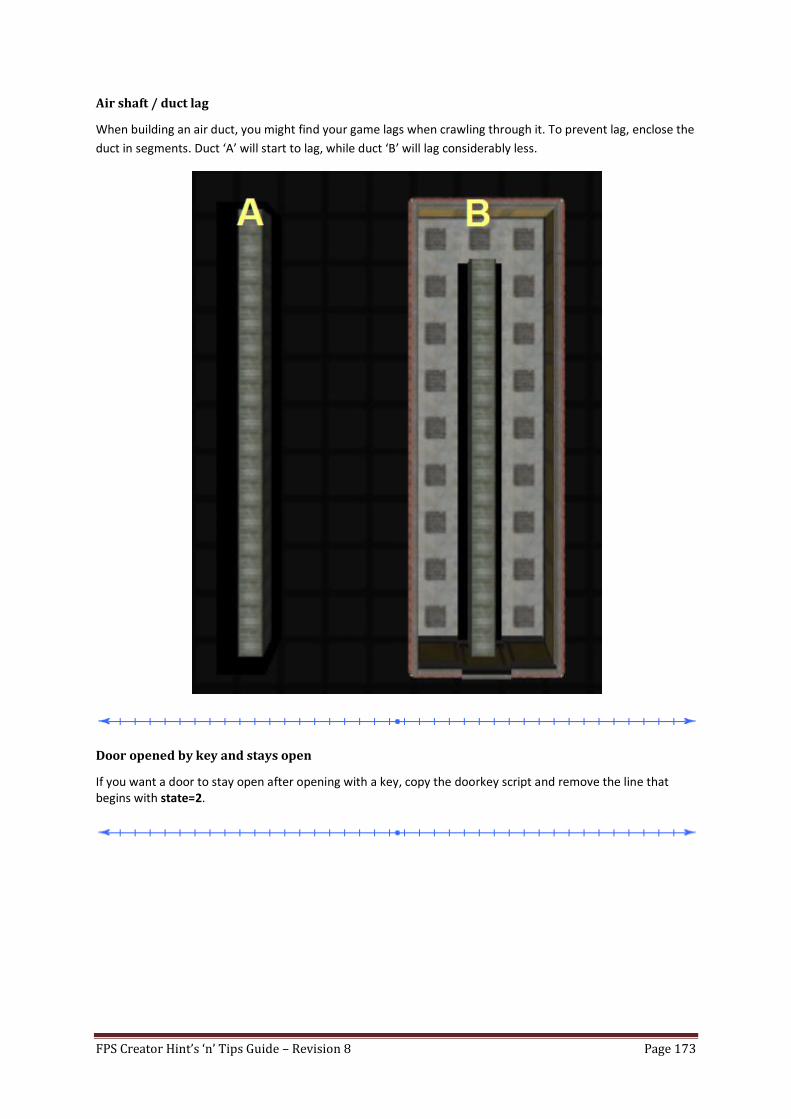
FPS Creator Hint’s ‘n’ Tips Guide – Revision 8 Page 173
Air shaft / duct lag
When building an air duct, you might find your game lags when crawling through it. To prevent lag, enclose the
duct in segments. Duct ‘A’ will start to lag, while duct ‘B’ will lag considerably less.
Door opened by key and stays open
If you want a door to stay open after opening with a key, copy the doorkey script and remove the line that begins with state=2.
FPS Creator Hint’s ‘n’ Tips Guide – Revision 8 Page 174
Questions & Answers
Q: How do I stop weapons and ammo floating up and down and glowing?
A: Right click on the weapon/or ammo and change the main ai script from “weaponglow” or “ammoglow” to
“weapon” or “ammo”.
Q: How do I get my player to follow a waypoint?
A: Right click on the entity and under “AI Scripts > Main”, select a script from the “scriptbank\people” folder.
(See the manual for a full description of what each script is).
Q: How do I change the backdrop (sky/ground)?
A: Go into “Edit > Build Game”, click the Level Settings tab and click the Edit button next to Global Script, now
just change the ‘Sky’ to whatever you want.
Q: How do I make dark rooms / lower the overall lighting level?
A: Go into “Edit > Build Game”, click Level Settings then edit the Global Script. You need to change the
Ambience Level . Ambience Green, Ambience Red and Ambience Blue to how you want them. The higher the
number, the more. If you find the numbers revert back, you can always edit the fpi file manually.
Q: How do you get a sound zone to play music from when the player steps into the zone?
A: Well, you could either make a soundloopinzone and make the sound zone really huge, or you can put a
trigger zone instead of a sound zone. Make the trigger zone activate an entity outside of the level. Make sure
that the entity has a 'no' under spawn at start then put its main script has repeatsound, then go to its sound0,
and put that as the sound you want to play. Here’s how to use a trigger zone:
1. Go to the entitybank in FPSC and pull out the blue generator thing (this could be any entity).
2. Place the generator outside of the 2 rooms.
3. Under the generator settings, set the 'spawn at start' to no, and at the very bottom, 'sound0' to
whatever you want your music to be.
4. In the trigger zone's settings, change the 'ifused' field to the name of the generator.
5. Under the trigger zones main script, select plrinzoneactivateused.fpi
6. Test the game and see what happens.
Q: How do I change the player’s walking speed?
A: After you’ve put the player’s start marker down (the green arrow), right click on it and change the option
speed.
Q: How can I put the name of the game on the main menu?
A: You can just create your own background in Photoshop or anything else and put the name on the left or
right upper corner of the image (make sure the image is 800x600 or 1024x768...) In your settings when you
click build game, use that picture as background on your title screen.
Replace the gametitle with your new image (make sure to copy over to the files folder).
FPS Creator Hint’s ‘n’ Tips Guide – Revision 8 Page 175
Q: How do you make platforms move horizontally, like across chasms or acid?
A: Use the "antigravplatform" in the Entity Library. You'll find in the scifi/scenery/lifts folder. You have to use
waypoints for it, else it will not move. Use the following script and the platform won’t move until the player
actually steps upon it:
;Artificial Intelligence Script
; by xplosys
;Header
desc = Wait for Player and Follow Waypoints with no rotation
(platform)
;Triggers
:state=0,plrdistwithin=20:state=1,norotate=1
:state=1,waypointstate=0:animate=2,waypointstart
:state=1,waypointstate=3:animate=2,waypointnext
:state=1,waypointstate=4:animate=2,waypointrandom
:state=1,waypointstate=5:animate=2,waypointreverse
;End of Script
Q: How do I get rid of all the blood from the enemies?
A: First of all, to turn off blood, you need to do it on every single character that uses blood. I'm going to walk
you through one of them only, the rest you have to locate and do on your own.
1. Choose the character you want the blood to be turned off. For this example we’ll use the aiko (sniper)
character found in entity library -- scifi – characters.
2. On your hard disk locate the folder where FPSC is installed into.
3. Now open the files\entitybank\scifi\characters folder
4. Locate the file called Aiko (Assault).fpe and open it with notepad or whatever editor you use to open
txt files.
5. In this file you see a lot of text, the script file for this character. Locate the section called ;decals
6. Under decal you see this:
decalmax = 2
decal0 = red
decal1 = blood
This character has 2 decals called red and blood. Remove the red and the blood and save the file and
you're done.
decalmax = 2
decal0 =
decal1 =
7. You can also replace the blood with other effects. The list of effects can be found in the folder:
files\gamecore\decals. All of the folders in there are a decal effect. Just replace the red and blood
with decals of your choice for example fire and smoke1. If you shoot at the character now, smoke will
appear.
Follow all of these steps with the characters you want to change. You may want to back up the original fpe files
before editing.
FPS Creator Hint’s ‘n’ Tips Guide – Revision 8 Page 176
Q: Is there is a way to let an entity spawn when another is dead?
A: Part One:
Yes, In the "destroy" script of Entity "A"
include the command Activateifused=1
In the properties of Entity "A" place the name of Entity "B" in the "ifused" box.
Part Two:
In the properties of Entity "B" set the "Spawn at start" to NO!
**Remember this will only work when Entity "A" is destroyed, not if the entity is an item you pick up.**
Q: I can’t get my teleporter to work, why?
A: There can be a number of things:
1. Make sure your teleporters are facing the right direction. If you face one toward a wall it might look
like you are entering it but you are not.
2. In the properties of teleporter out, make sure it says "Teleporter OUT" (no quotes)
Q: How do I have a flickering light?
A: In the Main AI of the light, select “light2.fpi” and change your light marker from static to dynamic.
Q: How do I make an object transparent?
A: A transparent background in FPSC is a true black (R=0, B=0, G=0). Just set the image background to 0,0,0 or
true black.
Q: How can my enemies have low gravity?
A: There is an "appearnogravitylogic.fpi" script for the entities.
Q: How do I align something with the ceiling, like a light?
A: Right click on the light to edit it, now move up a level by pressing the plus (+) key so you now see the ceiling,
click and drag with the right mouse button down to move your view point down, you will now see the ceiling
so you can align your light.
Q: How do I make a door start open / broken?
A: There are a number of ways you can manipulate a door:
1. Place a door segment down, then right click on it and press the ’Delete’ key. You won’t notice any
different (the green door segment will still show) but the door will have disappeared when playing the
game (the door frame will still be there).
2. Place a door segment down, right click on it and set ‘Respawn > Spawn at start?’ to no (this is handy if
you want the door to appear again for some reason)
3. Use this script:
;Artificial Intelligence Script

FPS Creator Hint’s ‘n’ Tips Guide – Revision 8 Page 177
;Header
desc = Use Door (Push Open and Push Closed)
;Triggers
:state=0:state=1,setframe=0,sound=$0
:state=1:incframe=0
:state=1,frameatend=0:state=2,coloff
;End of Script
4. Broken door: Follow number 1 and then place a false door over the gap, you’ll have to play around
with the positioning to get it just right (this ‘door’ won’t open so the player can see into the room but
can’t enter).
Q: How can I play a sound when the player picks up ammo?
A: You need to edit the fpi for the ammo / ammoglow. Make a copy of both of these and add the following line
to the script
sound=<path and filename of sound>
Here is the full script, the bit in red is the added bit and you can change the sound to whatever you want:
;Artificial Intelligence Script
;Header
desc = Ammo Pickup [with sound]
;Triggers
:state=0:hudreset,hudx=50,hudy=90,hudimagefine=gamecore\text\pickedup
ammo.tga,hudname=ammoprompt,hudhide=1,hudmake=display,state=10
:state=10,plrdistwithin=40,cantake:state=1,playertake,coloff,sound=au
diobank\misc\talkping.wav,plrsound=audiobank\items\pickup.wav,hudshow
=ammoprompt,hudfadeout=ammoprompt
;End of Script
Q: How do you make a character start with a weapon in multiplayer?
A: Here’s an example, but the same applies to all characters.
If you put the Tommy (machinegun) character into your level, you will notice that choosing him starts you with
a machine gun (it won't pop up straight away, but scroll the scroll button or press 1 and you'll see it.) But if
you change the "has weapon" property in his properties on the right, when you build game, he will still have
the machine gun, not the new gun you selected. That is because when you build game the character's .bin file
is carried across, and this still contains the original machinegun reference.
So how do you solve this?
Go to the
"entitybank\WW2\characters."
FPS Creator Hint’s ‘n’ Tips Guide – Revision 8 Page 178
copy a file such as: "tommy (machinegun).fpe" and rename it to "tommyMultiplayer1"
now open the FPE in notepad and change the description to read "tommyMultiplayer1" instead of "Tommy
(machinegun)"
now scroll down the FPE. You will see a section that contains the line
"hasweapon = ww2tommygun"
(or something)
This is the starting weapon reference. If for example you wanted to change this so that he started with the
MP5 from model pack 5 you would alter the line so it read:
"hasweapon=model pack 5\mp5"
There you have it. You open the editor and go to WW2 then characters in the "add new entity" window, there
should be a glass bell jar icon with "tommyMultiplayer1" underneath (you get that weird icon because you
didn't create an icon, don't worry it's not a problem). If you place tommyMultiplayer1 in your level, he will
start with the MP5.
So if you have 4 characters in your level, you'll need to create 4 new FPEs in the entity bank, one for each of
the new characters.
Q: Whenever I run my game, the characters are all black, like shadows, why?
A: In File > Build Game > Level Settings edit the ‘Global Script’ and change ‘Fog Active’ to 0.
NOTE: V1.04 onwards fixes this bug.
Q: How do I put non default weapons in allocation slots when building my game?
A: Don't put anything in those slots. Instead, build your game, and then look for 'setup.ini' in the folder it was
built in. Open it up, look for slot1 to slot9, and manually type them in. (EX: "slot1=model pack 5/fist1")
Q: I need a barrel that spawns from a trigger zone and explodes straight away, how?
A: Set the spawn life to 1 and make it explodable. That way, when it spawns, it will die and explode.
Q: What image files can I use in FPSC?
A: There are a number that FPSC can read: TGA, JPG, PNG, DDS, and BMP.
Q: How do I get a weapon to lie on its side?
A: *NOTE: As of V1.06 RC3, weapons will now stay the same orientation that they were placed in the editor,
meaning a weapon placed on its side in the editor will be on its side in game.* You can’t at the moment
(V1.05 RC2). It may look like you’ve placed it on its side in the editor but when you play the game; the weapon
will be upright again. Hopefully this will be corrected in a future update.
Q: Why are the blood splat decals flickering in my game?
A: Because you have overlapping blood splat decals and FPSC is trying to figure out which one it should show.
Try not to have them overlapping. Also don’t press ENTER to align it with the floor, just place it as it otherwise
you’ll get the flickering effect.
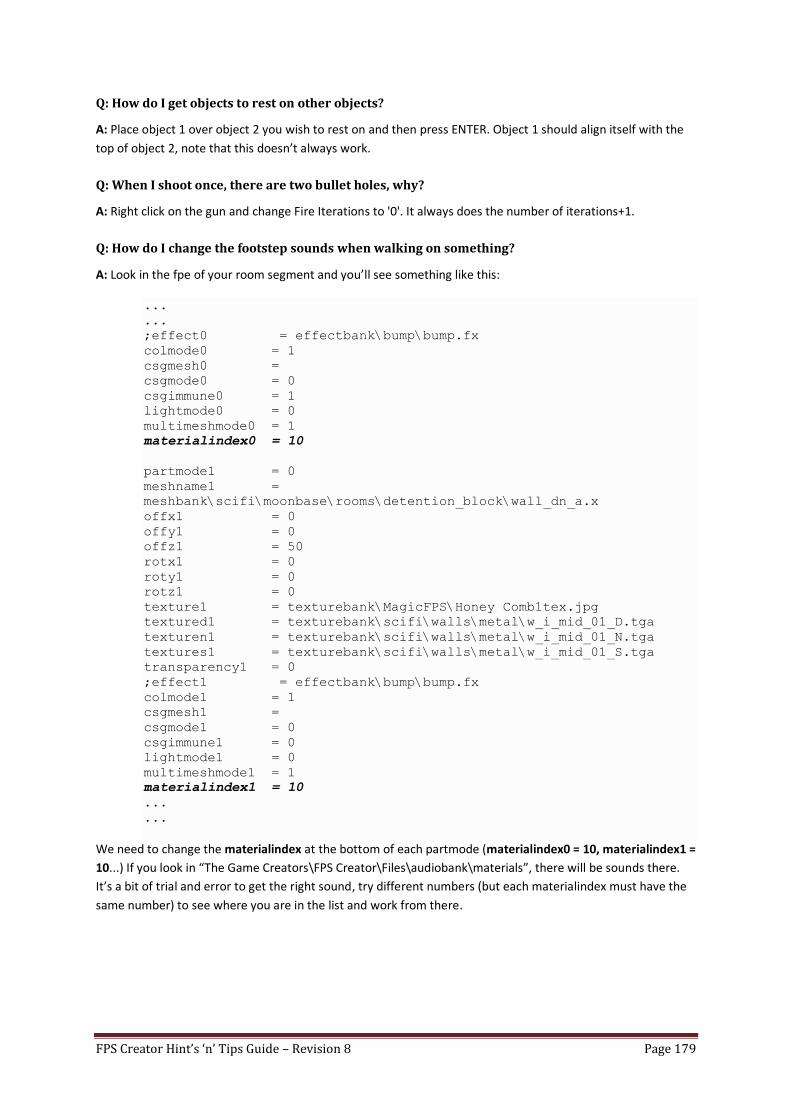
FPS Creator Hint’s ‘n’ Tips Guide – Revision 8 Page 179
Q: How do I get objects to rest on other objects?
A: Place object 1 over object 2 you wish to rest on and then press ENTER. Object 1 should align itself with the
top of object 2, note that this doesn’t always work.
Q: When I shoot once, there are two bullet holes, why?
A: Right click on the gun and change Fire Iterations to '0'. It always does the number of iterations+1.
Q: How do I change the footstep sounds when walking on something?
A: Look in the fpe of your room segment and you’ll see something like this:
...
...
;effect0 = effectbank\bump\bump.fx
colmode0 = 1
csgmesh0 =
csgmode0 = 0
csgimmune0 = 1
lightmode0 = 0
multimeshmode0 = 1
materialindex0 = 10
partmode1 = 0
meshname1 =
meshbank\scifi\moonbase\rooms\detention_block\wall_dn_a.x
offx1 = 0
offy1 = 0
offz1 = 50
rotx1 = 0
roty1 = 0
rotz1 = 0
texture1 = texturebank\MagicFPS\Honey Comb1tex.jpg
textured1 = texturebank\scifi\walls\metal\w_i_mid_01_D.tga
texturen1 = texturebank\scifi\walls\metal\w_i_mid_01_N.tga
textures1 = texturebank\scifi\walls\metal\w_i_mid_01_S.tga
transparency1 = 0
;effect1 = effectbank\bump\bump.fx
colmode1 = 1
csgmesh1 =
csgmode1 = 0
csgimmune1 = 0
lightmode1 = 0
multimeshmode1 = 1
materialindex1 = 10
...
...
We need to change the materialindex at the bottom of each partmode (materialindex0 = 10, materialindex1 =
10...) If you look in “The Game Creators\FPS Creator\Files\audiobank\materials”, there will be sounds there.
It’s a bit of trial and error to get the right sound, try different numbers (but each materialindex must have the
same number) to see where you are in the list and work from there.
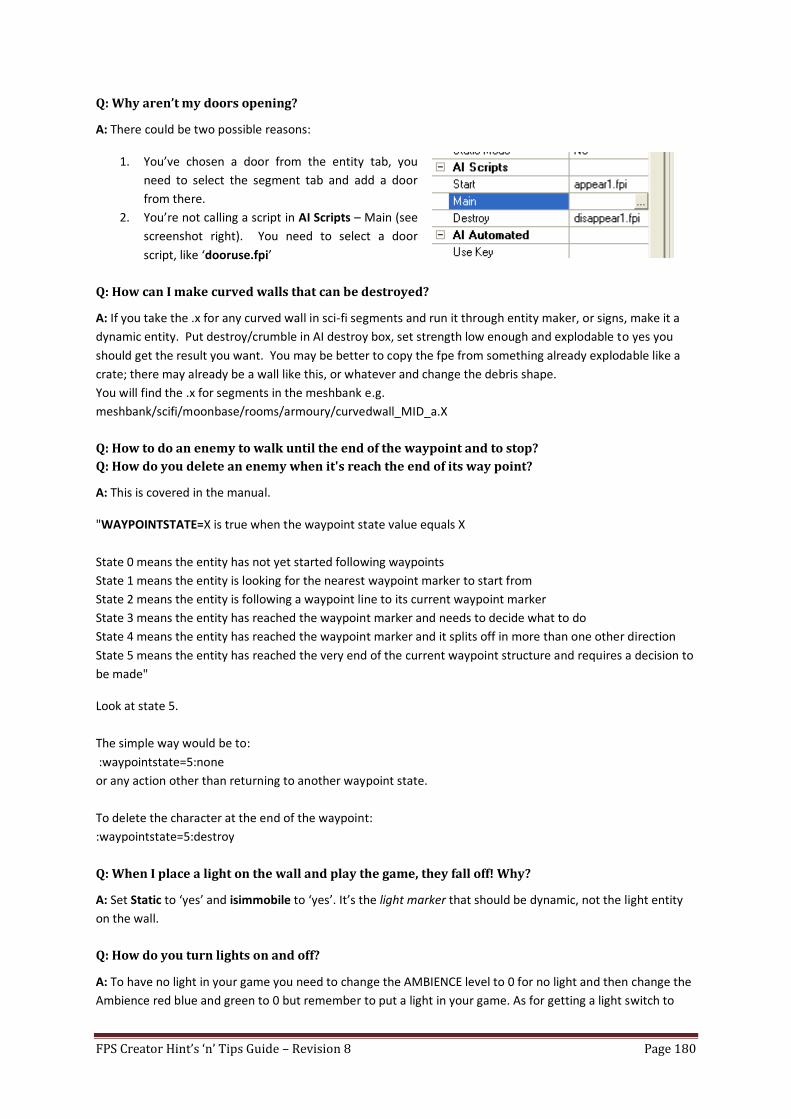
FPS Creator Hint’s ‘n’ Tips Guide – Revision 8 Page 180
Q: Why aren’t my doors opening?
A: There could be two possible reasons:
1. You’ve chosen a door from the entity tab, you
need to select the segment tab and add a door
from there.
2. You’re not calling a script in AI Scripts – Main (see
screenshot right). You need to select a door
script, like ‘dooruse.fpi’
Q: How can I make curved walls that can be destroyed?
A: If you take the .x for any curved wall in sci-fi segments and run it through entity maker, or signs, make it a
dynamic entity. Put destroy/crumble in AI destroy box, set strength low enough and explodable to yes you
should get the result you want. You may be better to copy the fpe from something already explodable like a
crate; there may already be a wall like this, or whatever and change the debris shape.
You will find the .x for segments in the meshbank e.g.
meshbank/scifi/moonbase/rooms/armoury/curvedwall_MID_a.X
Q: How to do an enemy to walk until the end of the waypoint and to stop?
Q: How do you delete an enemy when it's reach the end of its way point?
A: This is covered in the manual.
"WAYPOINTSTATE=X is true when the waypoint state value equals X
State 0 means the entity has not yet started following waypoints
State 1 means the entity is looking for the nearest waypoint marker to start from
State 2 means the entity is following a waypoint line to its current waypoint marker
State 3 means the entity has reached the waypoint marker and needs to decide what to do
State 4 means the entity has reached the waypoint marker and it splits off in more than one other direction
State 5 means the entity has reached the very end of the current waypoint structure and requires a decision to
be made"
Look at state 5.
The simple way would be to:
:waypointstate=5:none
or any action other than returning to another waypoint state.
To delete the character at the end of the waypoint:
:waypointstate=5:destroy
Q: When I place a light on the wall and play the game, they fall off! Why?
A: Set Static to ‘yes’ and isimmobile to ‘yes’. It’s the light marker that should be dynamic, not the light entity
on the wall.
Q: How do you turn lights on and off?
A: To have no light in your game you need to change the AMBIENCE level to 0 for no light and then change the
Ambience red blue and green to 0 but remember to put a light in your game. As for getting a light switch to
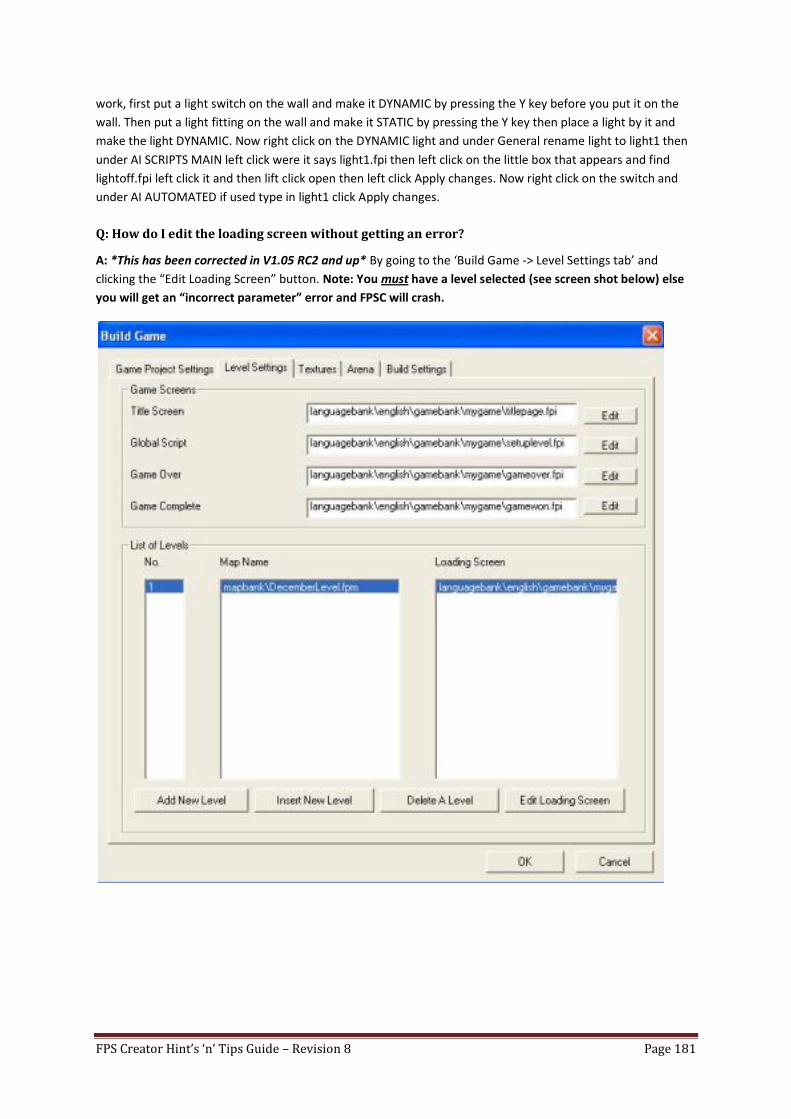
FPS Creator Hint’s ‘n’ Tips Guide – Revision 8 Page 181
work, first put a light switch on the wall and make it DYNAMIC by pressing the Y key before you put it on the
wall. Then put a light fitting on the wall and make it STATIC by pressing the Y key then place a light by it and
make the light DYNAMIC. Now right click on the DYNAMIC light and under General rename light to light1 then
under AI SCRIPTS MAIN left click were it says light1.fpi then left click on the little box that appears and find
lightoff.fpi left click it and then lift click open then left click Apply changes. Now right click on the switch and
under AI AUTOMATED if used type in light1 click Apply changes.
Q: How do I edit the loading screen without getting an error?
A: *This has been corrected in V1.05 RC2 and up* By going to the ‘Build Game -> Level Settings tab’ and
clicking the “Edit Loading Screen” button. Note: You must have a level selected (see screen shot below) else
you will get an “incorrect parameter” error and FPSC will crash.
FPS Creator Hint’s ‘n’ Tips Guide – Revision 8 Page 182
Q: Why won’t my barrels explode when I shoot them?
A: There are three things that need changing in the barrels properties:
Explodable?: Change this to yes
Strength: Change it from 0 [invulnerable] to a different number
In the Main AI – Destroy: “destroy/crumble.fpi”
Q: How do I change the radius of a grenade explosion?
A: In the "physics" property, set explode range to whatever you like. Just be cautious.
Q: Is it possible to turn a decal (like steam) on / off?
A: Yes, it is, just put the following in a script:
:state=0,activated=1:state=1,rundecal=3
:state=1,activated=0:state=2,rundecal=-1
Q: How do I change the resolution of a build game?
A: Open the Setup.ini, type this under [GAMEDEBUG]:
width=
height=
depth=
like this:
[GAMEDEBUG]
debugreport=0
showentitygameinfo=0
showdebugtextingame=0
debugreportstepthrough=0
usesky=1
usefloor=0
useenvsounds=1
useweapons=1
includeonlyvideo=0
includeonlyname=gamecore
width=1024
height=768
depth=32
Q: Why are there gaps around my doors when place them on a wall?
A: You’ll need to paint the wall back in by going into “wall mode (‘M’)” and clicking where the door is.
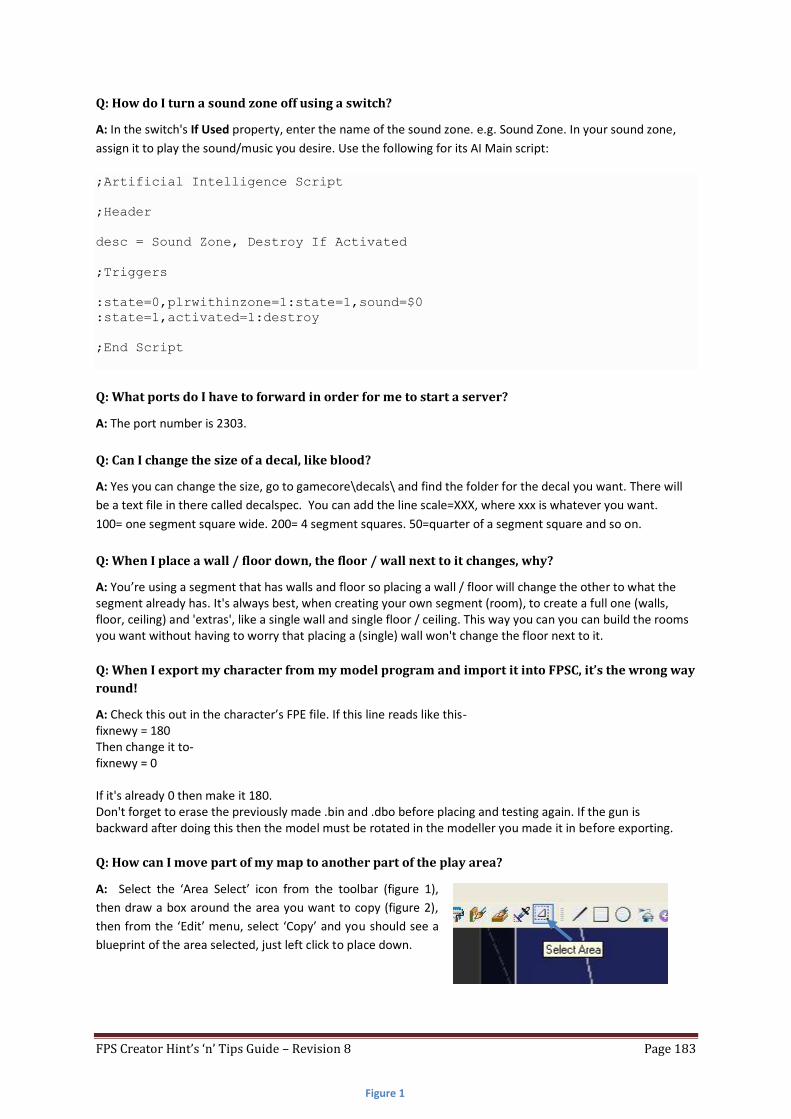
FPS Creator Hint’s ‘n’ Tips Guide – Revision 8 Page 183
Q: How do I turn a sound zone off using a switch?
A: In the switch's If Used property, enter the name of the sound zone. e.g. Sound Zone. In your sound zone,
assign it to play the sound/music you desire. Use the following for its AI Main script:
;Artificial Intelligence Script
;Header
desc = Sound Zone, Destroy If Activated
;Triggers
:state=0,plrwithinzone=1:state=1,sound=$0
:state=1,activated=1:destroy
;End Script
Q: What ports do I have to forward in order for me to start a server?
A: The port number is 2303.
Q: Can I change the size of a decal, like blood?
A: Yes you can change the size, go to gamecore\decals\ and find the folder for the decal you want. There will
be a text file in there called decalspec. You can add the line scale=XXX, where xxx is whatever you want.
100= one segment square wide. 200= 4 segment squares. 50=quarter of a segment square and so on.
Q: When I place a wall / floor down, the floor / wall next to it changes, why?
A: You’re using a segment that has walls and floor so placing a wall / floor will change the other to what the segment already has. It's always best, when creating your own segment (room), to create a full one (walls, floor, ceiling) and 'extras', like a single wall and single floor / ceiling. This way you can you can build the rooms you want without having to worry that placing a (single) wall won't change the floor next to it.
Q: When I export my character from my model program and import it into FPSC, it’s the wrong way
round!
A: Check this out in the character’s FPE file. If this line reads like this- fixnewy = 180 Then change it to- fixnewy = 0 If it's already 0 then make it 180. Don't forget to erase the previously made .bin and .dbo before placing and testing again. If the gun is backward after doing this then the model must be rotated in the modeller you made it in before exporting.
Q: How can I move part of my map to another part of the play area?
A: Select the ‘Area Select’ icon from the toolbar (figure 1),
then draw a box around the area you want to copy (figure 2),
then from the ‘Edit’ menu, select ‘Copy’ and you should see a
blueprint of the area selected, just left click to place down.
Figure 1
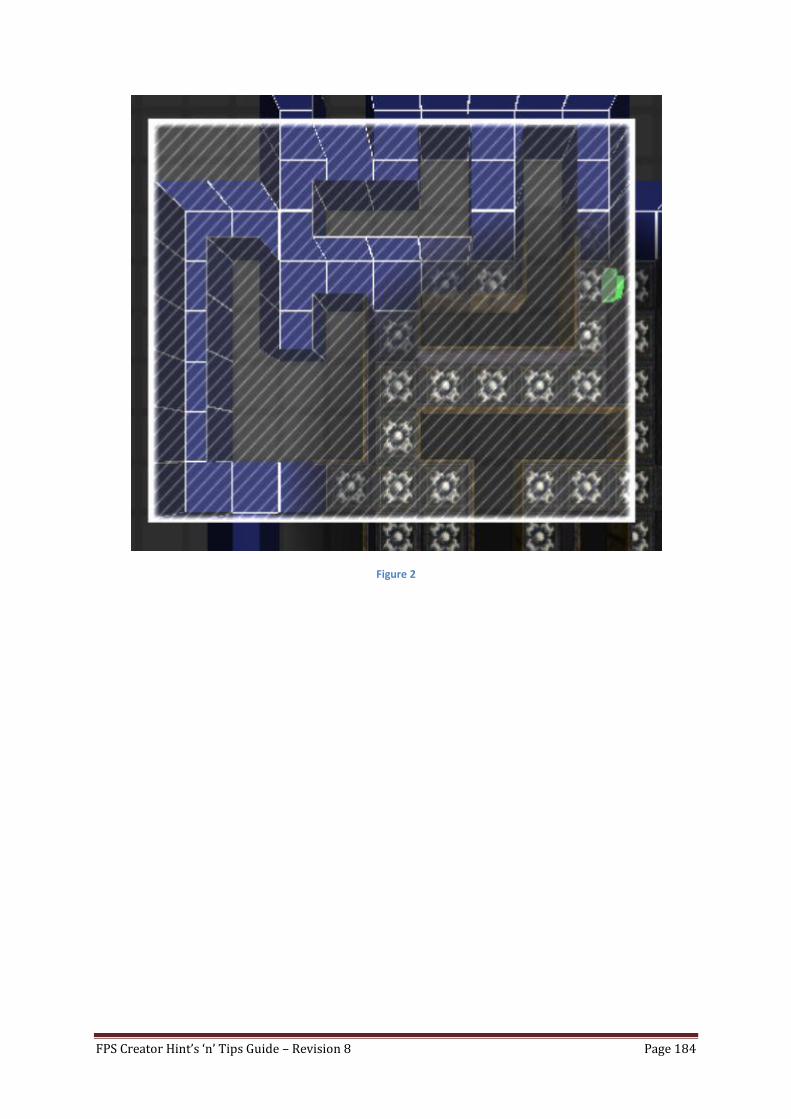
FPS Creator Hint’s ‘n’ Tips Guide – Revision 8 Page 184
Figure 2
FPS Creator Hint’s ‘n’ Tips Guide – Revision 8 Page 185
OUTRO and Thanks I'd like to take this opportunity to thank all members of the FPSC forum for their help, guidance and support to
keep the guide going, and all those who’ve contributed throughout the various revisions as well as Storm 6000
for placing the Hints & Tips banner in his signature, and last but by no means least, to The Game Creators for
creating such an easy-to-use product that can only get better.