four armed men from the renaissance! · leonardo da vinci, ... students will investigate what...
TRANSCRIPT

2008 Core Knowledge® National Conference, Grades 5th/6th, (Four Armed Men from the Renaissance) 1
Four Armed Men from the Renaissance! Grade level or subject area: 5th or 6th grade art Written by: Matt Wilkinson, Excel Academy, Arvada, Colorado (K-8)
Length of Unit: Six lessons approximately 45min. each
I. ABSTRACT A. Students will develop an overview of the Renaissance. Lessons will be directed at types of
painting, importance of the figure, and works of art from the period. This unit culminates with students observing and learning about Da Vinci’s Vitruvian Man, then creating their own “Vitruvian Thing”, based on creativity, their ideals, and Da Vinci’s use of proportion. The final steps will involve students making their own paint and using it to aesthetically enhance their creations!
II. OVERVIEW
A. Concepts 1. Students will understand how to relate the visual arts to various historical, cultural,
and personal contexts and traditions. (Colorado Visual Arts Content Standard 4) 2. Students will recognize how to apply and develop visual arts materials, tools,
techniques, and processes. (Colorado Visual Arts Content Standard 3) 3. Students will appreciate the visual arts as a form of communication. (Colorado Visual
Arts Content Standard 1) 4. Students will understand how to use geometric concepts, properties, and relationships
in problem-solving situations and communicate the reasoning used in solving these problems. (Colorado Mathematics Content Standard 4)
5. Students will recognize how to apply the elements of art and principles of design. (Colorado Visual Arts Content Standard 2)
6. Students will understand how to analyze and evaluate the characteristics, meaning, and merit of works of art. (Colorado Visual Arts Content Standard 5)
B. Content from the Core Knowledge Sequence 1. Sandro Botticelli, The Birth of Venus (Image), CK Sequence pg. 119 2. Leonardo da Vinci, Mona Lisa, CK Sequence pg. 119 3. Leonardo da Vinci, The Last Supper, CK Sequence pg. 119 4. Michelangelo, Creation of Adam, CK Sequence pg. 119 5. Michelangelo, David, CK Sequence pg. 144 6. Raphael, The School of Athens, CK Sequence pg. 144 7. Leonardo da Vinci, The Proportions of Man (The Vitruvian Man), CK Sequence pg.
119 C. Skill Objectives
1. Students can identify and describe elements of Renaissance painting. 2. Students will briefly review content from the middle ages and early Renaissance.
(CKC: Grade 4: Pg. 97, CKC: Grade 5: pg. 119) 3. Students will briefly review the influence of Greek and Roman art on the
Renaissance artist’s works. (CKC: Grade 5: pg. 119) 4. Students will observe and discuss works from different genres – such as portrait,
fresco, and Madonna. (CKC: Grade 5: pg. 119) 5. Students will develop knowledge and language to effectively communicate in the
terms of the Renaissance. 6. Students can identify and describe perspective in artworks.

2008 Core Knowledge® National Conference, Grades 5th/6th, (Four Armed Men from the Renaissance) 2
7. Students demonstrate the ability to use vanishing point perspective in a drawing. 8. Students can describe and use proportions to draw a face or hand. 9. Students will have a basic understanding of Leonardo da Vinci, his art, and his life.
(CKC: Grade 5: pg 119) 10. Students will become familiar with classical proportions and measurements. (CKC:
Grade 5 & 6: pgs 119 & 144) 11. Students will extract information from a magazine article about Leonardo da Vinci. 12. Students will develop an understanding of the Vitruvian Man. (CKC: Grade 5: pg.
119) 13. Students can create 10 examples of what their ideal “Vitruvian Thing” would be. 14. Students can draw a perfect circle using a protractor. 15. Students will review and understand the concepts radius, diameter, circumference,
and locating the middle of a circle. 16. Students will synthesize their own ideas with the work the Vitruvian Man. 17. Students will use a ruler to draw straight lines and form a box. 18. Students will create and draw a character in pencil to mimic the Vitruvian Man
composition. 19. Students develop a way to write on their piece backwards (light-box, window, mirror,
rubbing, etc.) 20. Students create their own proportion system for their Vitruvian Thing. (i.e. A body =
x amount of heads, an arm = x amount of hands, etc.) 21. Students will investigate what pigment is and how light and colors react on our eyes. 22. Students will understand the concept how pigment and binder react to form a paint. 23. Students will begin to understand the use of egg tempera paint as it applied to
Renaissance painting. 24. Students will make their own pigment from chalk. 25. Students will blend pigment and binder to form a paint. 26. Student will paint their Vitruvian Things to match either an old style look, or to
aesthetically enhance their piece. III. BACKGROUND KNOWLEDGE
A. For Teachers: Easy to use information from the web and print 1. Brommer, G. F. Discovering art history. Worcester, MA: Davis Publications,
Inc., 1997. ISBN: 0-87192-299-1. 2. Wikipedia. “Vitruvian Man,” Wikipedia [On-Line] Available URL:
http://en.wikipedia.org/wiki/Vitruvian_Man. 2008. 3. Wikipedia. “Renaissance,” Wikipedia [On-Line] Available URL:
http://en.wikipedia.org/wiki/Renaissance. 2008. 4. Knowledge of drawing methods (pen, ink, perspective), proportion, and
painting techniques B. For Students (Identify topics introduced in previous units or grade levels that provide students
with necessary prior knowledge.) 1. Students should have an understanding of how the elements of art work together
(Core Knowledge Sequence Grade 3-1C) specifically figure and ground. 2. Students should have an understanding of how Renaissance art was derived from the
prior history of the Middle Ages in Europe (Core Knowledge Sequence Grade 4-1) 3. Students should have an understanding of the influence of Greek and Roman art on
Renaissance artists (classical subject matter, idealization of the human form) (Core Knowledge Sequence Grade 5-1)

2008 Core Knowledge® National Conference, Grades 5th/6th, (Four Armed Men from the Renaissance) 3
IV. RESOURCES
A. Image List (You may use posters, handouts, overheads, or digital versions. Most images can be found on Wikipedia or through Google image search)
1. Sandro Botticelli, The Birth of Venus (Lesson 1) 2. Leonardo da Vinci, Mona Lisa (Lesson 1) 3. Leonardo da Vinci, The Last Supper (Lesson 1) 4. Michelangelo, Creation of Adam (Lesson 1) 5. Michelangelo, Pieta (Lesson 1) 6. Michelangelo, David (Lesson 1) 7. Raphael, The School of Athens (Lesson 1) 8. Howlett, M (Ed.). Scholastic art: Leonardo da Vinci, Working with line. New
York, NY: Scholastic Inc., 2007 ISBN: 1060-832X. (Lesson 2) 9. Leonardo da Vinci, The Vitruvian Man (Lesson 3) 10. Leonard da Vinci, Madonna Vitta (Lesson 6) 11. Botticelli, The Allegory of Spring (Lesson 6) 12. Wikipedia (General Resource for all Lessons) 13. Video –Getting to Know the Artist: Leonardo da Vinci (Culminating Activity)
V. LESSONS Lesson One: The Renaissance Introduction (Approximately 45 min.)
A. Daily Objectives 1. Concept Objective(s)
a. Students will understand how to relate the visual arts to various historical, cultural, and personal contexts and traditions. (Colorado Visual Arts Content Standard 4)
2. Lesson Content a. Sandro Botticelli, The Birth of Venus (Image) b. Leonardo da Vinci, Mona Lisa, the Last Supper(Image) c. Michelangelo, Ceiling of the Sistine Chapel including the Creation of
Adam(Image) d. Michelangelo, David(Image) e. Raphael, The School of Athens(Image) f. Perspective, Vanishing Point g. Idealistic Forms, use of figures h. The Role of Religion
3. Skill Objective(s) a. Students will briefly review content from the middle ages and early
Renaissance. (CKC: Grade 4: Pg. 97, CKC: Grade 5: Pg, 119) b. Students will briefly review the influence of Greek and Roman art on the
Renaissance artist’s works. (CKC: Grade 5: Pg. 119) c. Students will observe and discuss works from different genres – such as
portrait, fresco, and Madonna. (CKC: Grade 5: Pg. 119) d. Students will develop knowledge and language to effectively communicate in
the terms of the Renaissance. e. Students can identify and describe elements of Renaissance painting. f. Students can identify and describe perspective in artworks.

2008 Core Knowledge® National Conference, Grades 5th/6th, (Four Armed Men from the Renaissance) 4
g. Students demonstrate the ability to use vanishing point perspective in a drawing.
B. Materials 1. Copies for each student of Introduction Sheet (Appendix A) 2. Copies for each student of Vocabulary Sheet (Appendix B) 3. Copies for each student of Image Sheet (Appendix C) 4. Copies for each student of Renaissance Assessment (Appendix D) 5. Key for Vocabulary Sheet (Appendix E) 6. Sketchbooks for each student 7. Pencils for each student 8. Posters, overheads, or digital projections of images 9. Whiteboard 10. Whiteboard markers
C. Key Vocabulary 1. Renaissance – The period of revival beginning in Italy and spreading through
Europe transferring from medieval to modern times. 2. Perspective – The technique of representing three-dimensional objects on a two-
dimensional surface. 3. Oil Paint – A paint in which pigment is suspended in linseed oil which dries upon
contact with the air. 4. Fresco – The technique of applying water-based pigment to wet plaster. A painting
made in this technique is also called a Fresco. 5. Ideal/Idealization – Being the best possible, perfect, flawless. 6. Vanishing Point - The point at which parallel lines receding from an observer seem
to converge. 7. Genres – A kind or a stylistic category. 8. Portrait – A picture of a person. 9. Madonna – The Virgin Mary, the mother of Jesus. 10. Pieta – An artwork depicting the Virgin Mary cradling the dead body of Jesus.
D. Procedures/Activities 1. Begin by introducing that we will be starting a new unit. We will be looking at a
great period of history called the Renaissance! I will be handing out a few sheets. Some have images and one is vocabulary. As we come across a vocabulary word I will point it out!
2. Briefly discuss the black plague and the role of religion in the Renaissance. 3. Pass out the Renaissance introduction sheet (Appendix A) and the Renaissance
Vocabulary Sheet (Appendix B). – Have a student read the first paragraph 4. So our first vocabulary word is Renaissance. Look at and read the first entry on your
vocabulary sheet. 5. One at a time go over each image and give students a few minutes to answer the
questions. Have a few students share their answers. Move onto the second image and repeat.
6. Now let’s take a closer look at some artworks. Something that was truly refined and developed in the Renaissance was the use of perspective. Let’s look at the definition of the word perspective on the vocabulary sheet. Would someone like to read it?
7. Good, as we look at these next works of art keep the term perspective in mind and see if you can find examples of it.
8. Pass out the Renaissance Image Sheet (Appendix C)

2008 Core Knowledge® National Conference, Grades 5th/6th, (Four Armed Men from the Renaissance) 5
9. We should be able to find examples of each of the remaining vocabulary words in these works of art.
10. Ask a student to read the next vocabulary word and see if they can find an example from the image sheet.
11. After going through the remaining words, have the students work independently and quietly answering the question on the image sheet.
12. If you wish give the Vocabulary assessment if there is time, use it as a pre-assessment, or give it to the students on the next class period.
13. Finally, use one point perspective (vanishing point) to draw a 3-D cube. If they have extra time, student may try to draw additional shapes with a vanishing point. They complete this drawing in their sketchbook.
E. Assessment/Evaluation 1. Renaissance Vocabulary Assessment (Appendix D) 2. Renaissance Vocabulary Assessment Key (Appendix E) 3. Vanishing Point Drawing in their Sketchbook
Lesson Two: Leonardo da Vinci and Body Math (Approximately 45 min.) A. Daily Objectives
1. Concept Objective(s) a. Students will understand how to relate the visual arts to various historical,
cultural, and personal contexts and traditions. (Colorado Visual Arts Content Standard 4)
b. Students will understand how to use geometric concepts, properties, and relationships in problem-solving situations and communicate the reasoning used in solving these problems. (Colorado Mathematics Content Standard 4)
2. Lesson Content a. Leonardo da Vinci, Mona Lisa, the Last Supper(Image) b. Face math, body math c. Classical proportions d. History of Da Vinci and his work
3. Skill Objective(s) a. Students will have a basic understanding of Leonardo da Vinci, his art, and
his life. (CKC: Grade 5: Pg 119) b. Students will become familiar with classical proportions and measurements.
(CKC: Grade 5 & 6: Pgs 119 & 144) c. Students will extract information from a magazine article about Leonardo da
Vinci. d. Students can describe and use proportions to draw a face or hand.
B. Materials 1. Copies for each student of the Face/Body Math Proportion Sheet (Appendix F) 2. Copies for each student of Howlett, M (Ed.). Scholastic art: Leonardo da Vinci,
Working with line. New York, NY: Scholastic Inc., 2007 ISBN: 1060-832X. 3. Sketchbooks for each student 4. Pencils for each student 5. Rulers for each student 6. Posters, overheads, or digital projections of images 7. Whiteboard

2008 Core Knowledge® National Conference, Grades 5th/6th, (Four Armed Men from the Renaissance) 6
8. Whiteboard markers C. Key Vocabulary
1. Leonardo da Vinci (1452-1519) – An artist, philosopher, writer, scientist, botanist, musician, and architect of the Renaissance. Best known for his artworks and inventions, and as the creator of the Mona Lisa.
2. Proportion – The relationship between different parts of the body to the rest of the body as a whole.
3. Ideal - Being the best possible, perfect, flawless D. Procedures/Activities
1. Start by displaying images and prepare magazines and handouts. 2. Begin the lesson by telling the students that today we are going to learn a great deal
about one of the most important artists in history, Leonardo da Vinci. 3. Remind the students of the works we have already looked at. Today we are going to
focus on the human body, one of Da Vinci’s favorite subjects. 4. Review the return to classical ideals and proportions. Describe that proportions are
how parts of the body relate to the body as a whole. We will be discussing this more soon, but first, let’s learn more about Leonardo da Vinci.
5. Pass out a copy of the magazine to each student. 6. We are going to read the first article together. Pick a student to read aloud. Have a
few students read a couple paragraphs each. 7. Great, now we are going to read the second article, silently to our selves. As you
finish, come up front and take a copy of the handout. 8. After everyone is finished, go over the proportion hand out. Ask for one volunteer to
come to the front to be a model. 9. Go through the handout and use a ruler to show the class how the proportions work
on the model. 10. Next, describe the drawing assignment. We will use the rest of class to create a
drawing like Da Vinci would. You can use a ruler and the proportion sheet to help you.
11. Show how to measure parts of the body. They can draw a partners face, their own face (with a mirror), or their hand, in their sketchbooks.
12. Collect the sketchbooks and preview the next day’s lesson. Tomorrow we will be working more with Leonardo Da Vinci’s ideas but we are going to get really creative!
E. Assessment/Evaluation 1. Proportion drawing in their sketchbook.
Lesson Three: The Vitruvian Man! (Approximately 45min.)
A. Daily Objectives 1. Concept Objective(s)
a. Students will understand how to relate the visual arts to various historical, cultural, and personal contexts and traditions. (Colorado Visual Arts Content Standard 4)
b. Students will appreciate the visual arts as a form of communication, specifically through a “Vitruvian Thing” (Colorado Visual Arts Content Standard 1)
c. Students will recognize how to apply the elements of art and principles of design. (Colorado Visual Arts Content Standard 2)
2. Lesson Content

2008 Core Knowledge® National Conference, Grades 5th/6th, (Four Armed Men from the Renaissance) 7
a. Leonardo da Vinci, The Vitruvian Man b. Various examples of “Vitruvian Things” from history and pop culture. There
are tons of examples, many of which have copyrights and are not included here. Two public domain examples are the Euro Coin featuring the Vitruvian Man, and the SkyLab Logo showing a type of Vitruvian Thing.
c. Teacher examples of “Vitruvian Things” (Appendix G) d. Student examples of “Vitruvian Things” (Appendix H & I) e. Ideal Proportions f. Idea Generation
3. Skill Objective(s) a. Students will develop an understanding of the Vitruvian Man (CKC: Grade
5: Pg. 119) b. Students will examine various examples of “Vitruvian Things”. c. Students can create 10 examples of what their ideal “Vitruvian Thing” would
be. B. Materials
1. Copies for each student of Vitruvian Man Info Sheet (Appendix J) 2. Copies for each student of Creating a Vitruvian Thing Sheet (Appendix K) 3. Copy, overhead, poster, etc. of Leonardo da Vinci’s Vitruvian Man 4. Professional, Teacher, and Student Examples of works (Appendix G,H,I,) 5. Sketchbooks for each student 6. Pencils for each student 7. Whiteboard 8. Whiteboard markers
C. Key Vocabulary 1. Vitruvian Man – The period of revival beginning in Italy and spreading through
Europe transferring from medieval to modern times. 2. Ideal Proportion – The technique of representing three-dimensional objects on a
two-dimensional surface 3. Vitruvian Thing – A paint in which pigment is suspended in linseed oil which dries
upon contact with the air. 4. Generate Ideas – The technique of applying water-based pigment to wet plaster. A
painting made in this technique is also called a Fresco. 5. Creativity – Being the best possible, perfect, flawless
D. Procedures/Activities 1. Begin by telling students that we are going to begin a project that you know they will
love! It is based on one of the most famous images from all of history. They will get a chance to be very creative, write in code, and even do a little bit of math.
2. First, we must look at a special work of art by our dear friend Leonardo da Vinci called the Vitruvian Man.
3. Pass out the Vitruvian Man Info Sheet. 4. Reveal the Vitruvian man poster, overhead, etc. 5. Ask students what their thoughts are about this work of art. Take a few students to
share their ideas. 6. Next, ask if they know what all that strange writing is about? 7. Tell them the story of the Vitruvian Man. How it is based off of the work of the
architect Vitruvius who was attempting to find the ideal human form. The writing is in Italian but not only that, it is written backwards. Da Vinci was afraid of people

2008 Core Knowledge® National Conference, Grades 5th/6th, (Four Armed Men from the Renaissance) 8
stealing his ideas so he wrote backwards. The words actually say what we learned last time about the ideal human form and proportions. This is a picture of the ideal man.
8. Soon we will begin a project based on this artwork. Start thinking about what is important to you, what do you like, what are your passions?
9. Next, Pass out the Creating a Vitruvian Thing Info Sheet 10. Go over the information, talk about examples. Ask the students if they have ever
seen the Vitruvian Man transformed else where. 11. Talk about creativity and idea generation. Before they can start their final version,
they need to try to come up with 10 different small sketches of ideas for Vitruvian Things, then we will work together to pick the best one.
12. Go over the Professional, Teacher, and Student Examples of works (Appendix G,H,I,) Let students see various examples passed around.
13. Give students the rest of the period to work on their 10 ideas in their sketchbooks. E. Assessment/Evaluation
1. 10 Ideas sketched in their sketchbook
Lesson Four: Vitruvian Math and Creation (Approximately two 45min. periods) A. Daily Objectives
1. Concept Objective(s) a. Students will understand how to use geometric concepts, properties, and
relationships in problem-solving situations and communicate the reasoning used in solving these problems. (Colorado Mathematics Content Standard 4)
b. Students will understand how to analyze and evaluate the characteristics, meaning, and merit of works of art. (Colorado Visual Arts Content Standard 5)
2. Lesson Content a. Circles and Squares in the Vitruvian Man b. Circumference c. Radius d. Diameter e. Measuring f. Leonardo Da Vinci, Vitruvian Man Image g. Professional, Teacher, and Student examples of Vitruvian Things
3. Skill Objective(s) a. Students can draw a perfect circle using a protractor. b. Students will review and understand the concepts radius, diameter,
circumference, and locating the middle of a circle. c. Students will synthesize their own ideas with the work the Vitruvian Man d. Students will use a ruler to draw straight lines and form a box. e. Students will create and draw a character in pencil to mimic the Vitruvian
Man composition. B. Materials
1. Pieces of high quality white drawing paper for each student 2. 6” Protractors for each student 3. Rulers for each student 4. Pencils for each student 5. Sketchbooks for each student

2008 Core Knowledge® National Conference, Grades 5th/6th, (Four Armed Men from the Renaissance) 9
6. Posters, overheads, or digital projections of images 7. Whiteboard 8. Whiteboard markers 9. Professional, Teacher, and Student Examples of works (Appendix G,H,I,)
C. Key Vocabulary 1. Circle – A simple geometric shape without corners or right angles 2. Circumference – The perimeter of a circle 3. Diameter – The width of a circle measured in a straight line 4. Radius – Half the distance of the diameter 5. Centered – Two objects that are aligned by their center measurement
D. Procedures/Activities 1. Begin by discussing the geometry of the Vitruvian Man. Today we will begin our
final versions of our artworks. To begin, we need to have a nice circle and square upon which to build our character.
2. Review the examples of Vitruvian Things (Appendix G,H,I,) 3. Da Vinci used a perfect circle and square in his artwork. That is very difficult to
draw by hand, but we want a clean precise look for this artwork. We are going to use 6” protractors to help us.
4. Does anyone know what the 6” refers to? (Diameter) 5. Students, please observe on the white board how to design the initial part of this
picture. 6. I am going to center the protractor on the page and gently trace around it with a
pencil. I want to try my best to keep the pencil on the edge of the protractor and not to let anything slip. When I am finished I will have a nice clean perfect circle, without any breaks or slips.
7. Next, we want to add the square. Here students make a common mistake. They always want to make the box the same height as the circle. If you look closely at the Vitruvian Man you will notice that the box is a ratio compared to the circle and is actually a bit smaller. We want a 5” square for our box. The hard part is lining it up right. To do that we need to find the center of the circle.
8. How do we find the center of a circle (Radius) 9. Demonstrate how to find the center. Next we use our ruler. We want to line the box
and the circle up in a centered method. With both of the shapes aligned on the bottom as well. To do this we find the radius and then with our ruler, make a mark in the center but on the bottom edge of the circle.
10. Next, if we have a 5” box, how do I find the center? (2.5, half way). 11. Now, to draw the box we need to line the ruler up with the hash-mark on the circle.
Where am I going to place the hash-mark in line with the ruler? (2.5 inches). 12. Good, now that we are lined up right, I will draw from 0 to 5 and I will have the
bottom of my box. 13. How tall are the sides and the top? 5” each. Try your best to keep everything at 90
degree angels and you will have the start of your artwork. 14. Pass out paper, rulers, protractors, and pencils. 15. Give students some time to draw their circle and square for their piece. 16. Next, take a break to review how the proportions in the Vitruvian Man work. Talk
about how 6 heads is the height of the body, etc.

2008 Core Knowledge® National Conference, Grades 5th/6th, (Four Armed Men from the Renaissance) 10
17. Tell students that they can draw their thing as they wish. It doesn’t have to fit the Vitruvian Proportions but they should try their best and draw with their greatest amount of effort.
18. Don’t forget to multiply the appendages; there should be eight appendages in most cases.
19. Give students the rest of the class time to draw their characters. If they finish allow them to color it in with color pencil (this is very important, do not use markers or other materials, color pencil only)
20. This lesson will most likely span more than one class period. I usually give two to three days for the initial drawing. You could add elements from the next lesson on an individual basis as students finish their initial drawing.
21. Leave time to put supplies away, clean-up, and collect work. E. Assessment/Evaluation
1. Student observation while working and their final drawing. Lesson Five: Vitruvian Writing (Approximately two 45min. periods)
A. Daily Objectives 1. Concept Objective(s)
a. Students will appreciate the visual arts as a form of communication, (Colorado Visual Arts Content Standard 1)
b. Students will recognize how to apply, and develop visual arts materials, tools, techniques, and processes. (Colorado Visual Arts Content Standard 3)
c. Students will recognize how to apply the elements of art and principles of design. (Colorado Visual Arts Content Standard 2)
2. Lesson Content a. Backwards Writing b. Self developed proportions
3. Skill Objective(s) a. Students develop a way to write on their piece backwards (light-box,
window, mirror, rubbing, etc.) b. Students create their own proportion system for their Vitruvian Thing. (i.e.
A body = x amount of heads, an arm = x amount of hands, etc.) B. Materials
1. Students unfinished products 2. Mirrors, Windows, Light-box, some sort of illuminating method 3. scrap paper 4. Black Sharpie Markers, Ultra-Fine Point for each student 5. Rulers for each student 6. Pencils for each student 7. Posters, overheads, or digital projections of images 8. Whiteboard 9. Whiteboard markers 10. Professional, Teacher, and Student Examples of works (Appendix G,H,I
C. Key Vocabulary 1. Proportion – The relationship between different parts of the body to the rest of the
body as a whole. 2. Backwards– Reversed. 3. Code – A set of rules for converting information into another form or representation.

2008 Core Knowledge® National Conference, Grades 5th/6th, (Four Armed Men from the Renaissance) 11
D. Procedures/Activities 1. Begin by passing out the final copies of their artworks. 2. Review how Leonardo da Vinci wrote backwards to hide his ideas from people who
might try to steal them. 3. We are going to write backwards on our artworks as well, but first we have to
develop what we are going to write. 4. Remember that Da Vinci also used a set of proportions for his Vitruvian Man. You
do not need to use the same set of proportions, in fact, I rather you develop your own. 5. Start by using a ruler and measure your character’s head and jot that number down on
a scrap piece of paper. Next measure your character’s body. If its body is five inches tall then you would write “one body = 5 heads”. That is your first proportion.
6. Try to generate four or more different proportions about your Vitruvian Thing. 7. Once you have your proportions, nicely write them down on a separate sheet of
paper. Try to use your best writing and accurate spelling. 8. Next, take your scrap paper with the proportions and lay it on a light-box or tape it to
a window backwards. You can also use a mirror to see what the letters look like backwards. Place your final copy on top and trace the words onto it so that they appear backwards. You can also use the mirror and try to do it in a freehand manner.
9. We also need to add a title. Your title does not need to be backwards but could be if you wish. It should be big and have a nice design. Look through some books about typography if you need some ideas.
10. Allow students to continue working on their project. They may need more than one class period to complete today’s and yesterday’s tasks. If they finish their proportions and title, have them color with color pencil and then outline everything with a black sharpie. (NOTE: This is very important, you must use a permanent black marker, not a Crayola or water-based marker or it will smear on a later step.
11. Leave a few minutes at the end of class to collect papers and clean-up. E. Assessment/Evaluation
1. Student observation while working and their final drawing. Lesson Six: Renaissance Painting (Approximately 45 min.)
A. Daily Objectives 1. Concept Objective(s)
a. Students will understand how to analyze and evaluate the characteristics, meaning, and merit of works of art. (Colorado Visual Arts Content Standard 5)
b. Students will recognize how to apply, and develop visual arts materials, tools, techniques, and processes. (Colorado Visual Arts Content Standard 3)
c. Students will recognize how to apply the elements of art and principles of design. (Colorado Visual Arts Content Standard 2)
2. Lesson Content a. Egg Tempera in Renaissance Painting b. Pigments and Binders c. Color wheel d. Botticelli, The Allegory of Spring e. Leonardo da Vinci, Madonna Litta
3. Skill Objective(s) a. Students will investigate what pigment is and how light and colors react on
our eyes.

2008 Core Knowledge® National Conference, Grades 5th/6th, (Four Armed Men from the Renaissance) 12
b. Students will understand the concept how pigment and binder react to form a paint
c. Students will begin to understand the use of egg tempera paint as it applied to Renaissance painting.
d. Students will make their own pigment from chalk e. Students will blend pigment and binder to form a paint f. Student will paint their Vitruvian Things to match either an old style look, or
to aesthetically enhance their piece B. Materials
1. Students unfinished products 2. Copies for each student of the “Experience in Renaissance Painting Sheet”
(Appendix L) 3. Overheads, handouts, posters, digital projections, etc. of images for the lesson 4. Scrap paper 5. Bowls (for mixing), for each student 6. Mortar (Cups) (for breaking pigment), for each student 7. Pestle (piece of wood, or anything to pound with) for every two students 8. Liquid Acrylic Mat Medium (NOTE: you may also use real eggs to make egg
tempera, more on this in procedures), 32 oz. Or more 9. Plastic Easter Eggs, one for each student 10. Chalk (for crushing into pigment. You can also use dried flowers or plants, true
pigment, or any other item of your choice), one or two boxes 11. Popsicle sticks (for blending) for each student 12. Paintbrushes for each student 13. Tubs for each table to hold all of the materials 14. Drying-rack, or drying area
C. Key Vocabulary 1. Pigment – A material that changes the color of light it reflects as it absorbs all other
colors. Can be manmade or natural. 2. Binder– A colorless liquid emulsion that forms a film when dried. 3. Paint – A combination of pigment and binder. Comes in various colors. 4. Egg Tempera Paint – A type of paint using natural pigments and egg yolk as a
binder 5. Acrylic – A type of paint or binder that is made of liquid plastic. 6. Color – Is the visual perceptive property derived from the spectrum of light. 7. Light – Is electromagnetic radiation that is visible to the human eye. 8. Mortar – A concave instrument used for hold materials to be pounded into a dust 9. Pestle – A instrument for pounding materials into a dust within a mortar
D. Procedures/Activities 1. Begin by preparing all of the needed materials into a tub for each of your tables. This
should be done before class begins. 2. You will also need to fill enough plastic Easter eggs for your class with Liquid
Acrylic Mat Medium (Binder). 3. When the students enter introduce the lesson. Today we will be learning about
painting and will even get to make our own paint! First let’s look at some examples of Egg Tempera Painting from the Renaissance.
4. Pass out “An Experience in Renaissance Painting Sheet” (Appendix L)

2008 Core Knowledge® National Conference, Grades 5th/6th, (Four Armed Men from the Renaissance) 13
5. Discuss the images from the handout and talk about how egg tempera paint was made.
6. Include information about pigment and binder. In egg tempera paint the pigment was made from dried and crushed things from nature and egg yolk separated from the whites as a binder.
7. Today we will get to make our own paint. We are not going to make egg tempera but something similar. (NOTE: you can make egg tempera paint. It is fun and not all that difficult. The thing to remember is that it is much messier, some students may be allergic to eggs, some students don’t like to crack eggs, and your classroom will smell a little off for a few days, but it is a much more accurate representation of how painters used to work. I will include an info sheet on making tempera as Appendix N).
8. Have a student come up and get a tub for each table. 9. Go over each piece in the tub and what they are for. The chalk is our pigment. We
will be mixing it with a binder. The mortar is a cup and is used for pounding the chalk. The pestle is a wooden dowel and will be used to crush the pigment. The bowl is for adding the pigment and binder together. The popsicle-stick is for stirring the paint. And the paint brush is for painting your picture.
10. I usually look for yellows, oranges, and browns to make an old fashioned look on my piece. You can use what ever color you want though.
11. You only need the smallest amount of chalk and you want to pound it into a very, very fine powder.
12. Once everyone has mortared their pigment, pass out the Easter eggs. Tell them to “crack” the eggs and release the pigment. Then stir and they will have their paint.
13. Allow students time to paint their picture. They could share the colors they make for a more interesting look. They should paint the whole thing and go right over their character if they wish.
14. Once the whole thing is painted they should set it on the drying-rack to dry. 15. After it is dry, if the paper curls, flip it over and brush it with water to flatten it out. 16. Leave at least 10 minutes for clean-up. 17. This work of art is now complete!
E. Assessment/Evaluation 1. Student observation while working and their final drawing. 2. Final Product Rubric (Appendix M)
VI. CULMINATING or DIFFERENTIATION ACTIVITIES (Optional) A. Sharing/Art Show – Teachers could have a sharing period where students present their
Vitruvian Thing to the rest of the class. Talk about how they created it, why it is important/ideal, how they painted and drew it, etc. Students love to share their work. After sharing the student’s pieces could be hung or displayed for all to see in the school.
B. Show the Get to Know the Artist Film: Leonardo da Vinci by Mike Venezia: This is a wonderful cartoon that the students love. It shows many actual examples of his work and the information is accurately presented in a fun way for students to enjoy.
C. Game – The Black Plague: Students love to move and play games. This game could be used at the end of the unit or dispersed within lessons for differentiation and movement activities. To play, have everyone close their eyes. Tell the students that you are going to tap one student on the shoulder and they have been infected with the black plague. The person with the plague then “spreads” the disease amongst the other students. Students walk around

2008 Core Knowledge® National Conference, Grades 5th/6th, (Four Armed Men from the Renaissance) 14
shaking each others hands. If the person with the plague tickles the palm of the student he/she is shaking hands with, they are now infected. The newly infected student must wait 30 seconds then they can scream and wail in a horrible death. The original person with the plague wants to spread it to everybody. At any moment though, a non-infected person may raise their hand and declare a heretic. The teacher then pauses the game. They can guess who started the plague. If they are right, the person with the plague is banished from the village. If they are wrong, they are banished for false accusations. You play the game until someone guesses correctly or until the black plague has spread throughout the village. Students love this game and it could be used as a reward, culminating activity, or differentiation activity.
VII. HANDOUTS/WORKSHEETS (Please include copies of all handouts, worksheets, teacher-
made tests, etc., needed to teach this unit.) IMPORTANT: Copyrighted material should only be cited by source, not photocopied.
A. Appendix A – Introduction to the Renaissance B. Appendix B – Renaissance Vocabulary Sheet C. Appendix C – Renaissance Image Sheet D. Appendix D – Renaissance Vocabulary Assessment E. Appendix E – Renaissance Vocabulary Assessment Key F. Appendix F – Face/Body Proportions Handout G. Appendix G – Vitruvian Blender example H. Appendix H – Vitruvian Monster student example I. Appendix I – Vitruvian PB&J Man student example J. Appendix J – Vitruvian Man Info Sheet K. Appendix K – Creating A Vitruvian Thing Sheet L. Appendix L – An Experience in Renaissance Paint Sheet M. Appendix M – Final Product Rubric N. Appendix N – How to Make Egg Tempera Paint
VIII. BIBLIOGRAPHY
A. Brommer, G. F. Discovering art history. Worcester, MA: Davis Publications, Inc., 1997. ISBN: 0-87192-299-1.
B. Copplestone, T. Michelangelo. New York, NY: Random House, 1999. ISBN: 0-517-16058-7. C. Fichner-Rathus, l.Understanding art. Toronto, Ontario, Canada: Wadsworth Thomson
Learning, 2001. ISBN: 0-534-16702-0. D. Howlett, M (Ed.). Scholastic art: Leonardo da Vinci, Working with line. New York, NY:
Scholastic Inc., 2007 ISBN: 1060-832X. E. Larmann, R. “Techniques for organizing the figure,” The Figure Drawing Lab [On-line] Available URL: http://drawinglab.evansville.edu/. 1998. F. Wikipedia. “Acrylic Paint,” Wikipedia [On-Line] Available URL:
http://en.wikipedia.org/wiki/Acrylic_paint. 2008. G. Wikipedia. “Leonardo da Vinci,” Wikipedia [On-Line] Available URL:
http://en.wikipedia.org/wiki/Leonardo_da_Vinci. 2008. H. Wikipedia. “Renaissance,” Wikipedia [On-Line] Available URL:
http://en.wikipedia.org/wiki/Renaissance. 2008. I. Wikipedia. “Tempera,” Wikipedia [On-Line] Available URL:
http://en.wikipedia.org/wiki/Egg_tempera. 2008.

2008 Core Knowledge® National Conference, Grades 5th/6th, (Four Armed Men from the Renaissance) 15
J. Wikipedia. “Vitruvian Man,” Wikipedia [On-Line] Available URL: http://en.wikipedia.org/wiki/Vitruvian_Man. 2008.

2008 Core Knowledge® National Conference, Grades 5th/6th, (Four Armed Men from the Renaissance) 16
Appendix A – Introduction to the Renaissance
Introduction to Renaissance Unit: The Renaissance was a fabulous time in history that gave birth to some of the world’s most famous art images, such as the Mono Lisa, the Sistine Chapel, and David. Artists who lived through the time period had a new found interest in humanity, especially ideal human form, light representation, and perspective (drawing in three dimensions). Let’s take a few moments to look at and discuss some images from the time period: Michelangelo’s David: What do you think the artist was trying to depict with this great marble sculpture? What is the size of this sculpture? Who is David?
Raphael’s the School of Athens: Can you see the use of perspective in this painting? What does perspective mean? Who are all those people? What do you notice about the border in this work?

2008 Core Knowledge® National Conference, Grades 5th/6th, (Four Armed Men from the Renaissance) 17
Appendix B – Renaissance Vocabulary Sheet
Renaissance Vocabulary: Review the vocabulary words/terms and their meanings while going through the lecture. I will be pointing each one out as it comes up. Vocabulary Words: Definition: Renaissance
The period of revival beginning in Italy and spreading through Europe transferring from
medieval to modern times.. Perspective
The technique of representing three-dimensional objects on a two-dimensional
surface Oil Paint
A paint in which pigment is suspended in linseed oil which dries upon contact with the
air. Fresco
The technique of applying water-based pigment to wet plaster
Ideal
Being the best possible, perfect, flawless
Vanishing Point
The point at which parallel lines receding from an observer seem to converge.
Genres
A kind or a stylistic category
Portrait
A picture of a person
Madonna
The Virgin Mary, the mother of Jesus
Pieta
An artwork depicting the Virgin Mary cradling the dead body of Jesus
2008 Core Knowledge® National Conference, Grades 5th/6th, (Four Armed Men from the Renaissance) 18
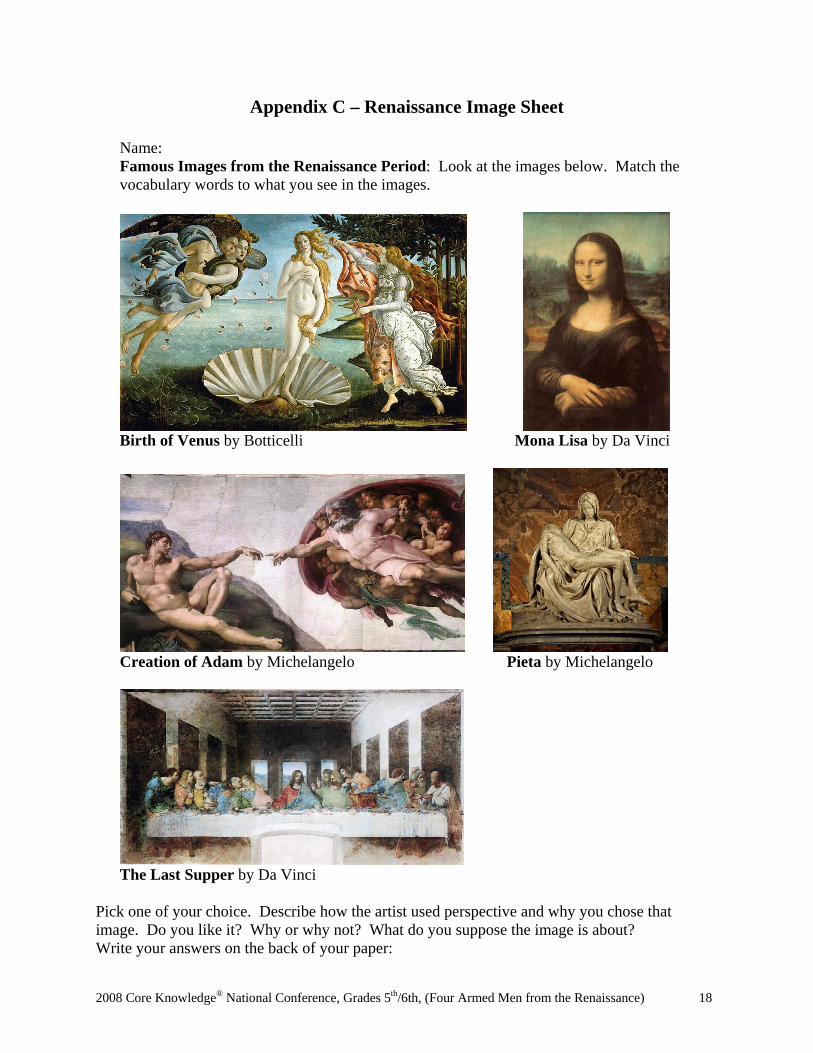
Appendix C – Renaissance Image Sheet
Name: Famous Images from the Renaissance Period: Look at the images below. Match the vocabulary words to what you see in the images.
Birth of Venus by Botticelli Mona Lisa by Da Vinci
Creation of Adam by Michelangelo Pieta by Michelangelo
The Last Supper by Da Vinci Pick one of your choice. Describe how the artist used perspective and why you chose that image. Do you like it? Why or why not? What do you suppose the image is about? Write your answers on the back of your paper:

2008 Core Knowledge® National Conference, Grades 5th/6th, (Four Armed Men from the Renaissance) 19
Appendix D – Renaissance Vocabulary Assessment
Renaissance Vocabulary Assessment: Use a pencil to match the vocabulary word with its meaning. Write the corresponding letter from the definition next to the vocabulary word in the answer box: Vocabulary Words: Answer: Definition:Renaissance
(A) The technique of applying water-based pigment to wet plaster. A painting made in this
technique is also called a Fresco.Perspective
(B) A picture of a person
Oil Paint
(C) the Virgin Mary, the mother of Jesus
Fresco
(D) A kind or a stylistic category
Ideal
(E) The period of revival beginning in Italy and spreading through Europe transferring from
medieval to modern times.Vanishing Point
(F) The technique of representing three-dimensional objects on a two-dimensional
surfaceGenres
(G) An artwork depicting the Virgin Mary cradling the dead body of Jesus
Portrait
(H) A paint in which pigment is suspended in linseed oil which dries upon contact with the air.
Madonna
(I) Being the best possible, perfect, flawless
Pieta
(J) The point at which parallel lines receding from an observer seem to converge.

2008 Core Knowledge® National Conference, Grades 5th/6th, (Four Armed Men from the Renaissance) 20
Appendix E – Renaissance Vocabulary Assessment Key
KEY Renaissance Vocabulary Assessment KEY: Use a pencil to match the vocabulary word with its meaning. Write the corresponding letter from the definition next to the vocabulary word in the answer box: Vocabulary Words: Answer: Definition:Renaissance E (A) The technique of applying water-based
pigment to wet plaster.
Perspective F (B) A picture of a person
Oil Paint H (C) the Virgin Mary, the mother of Jesus
Fresco A (D) A kind or a stylistic category
Ideal I (E) The period of revival beginning in Italy and
spreading through Europe transferring from medieval to modern times.
Vanishing Point J (F) The technique of representing three-
dimensional objects on a two-dimensional surface
Genres D (G) An artwork depicting the Virgin Mary
cradling the dead body of Jesus
Portrait B (H) A paint in which pigment is suspended in
linseed oil which dries upon contact with the air.
Madonna C (I) Being the best possible, perfect, flawless
Pieta G (J) The point at which parallel lines receding
from an observer seem to converge.

2008 Core Knowledge® National Conference, Grades 5th/6th, (Four Armed Men from the Renaissance) 21
Appendix F – Face/Body Proportions Handout
Face and Body Math: Classical Proportions for Artists: Use these proportions and a ruler to draw a face or hand. You can draw your partners face, your own face with a mirror, or your own hand. Some of the proportions are “idealistic” meaning the perfect proportions. We all know that not everyone is perfect. Use the ruler to develop your own set of proportions. Classical Head Proportions:
• The eyes are halfway between the top of the head and the chin.
• The bottom of the nose is halfway between the eyes and the chin.
• The mouth is halfway between the nose and the chin.
• The corners of the mouth line up with the centers of the eyes.
• The top of the ears line up above the eyes, on the eyebrows.
• The bottom of the ears line up with the bottom of the nose.
• There is a space the width of one eye, in between the eyes.
Classical Body Proportions: • The human figure is an average of 7 heads high.
• The width from shoulder to shoulder is 3 heads width.
• The distance from the hip to the toes is 4 heads.
• The distance from the top of the head to the bottom of the chest is 2 heads.
• The distance from the wrist to the end of the outstretched fingers of the hand is 1 head.
• The length from top to bottom of the buttocks is 1 head.
• The distance from the elbow to the end of outstretched fingers is 2 heads.
Use the ruler to develop your own proportions of your hand… how long is a joint compared to a finger…etc.

2008 Core Knowledge® National Conference, Grades 5th/6th, (Four Armed Men from the Renaissance) 22
Appendix G – Vitruvian Blender Example
Vitruvian Blender Teacher Example by Matt Wilkinson

2008 Core Knowledge® National Conference, Grades 5th/6th, (Four Armed Men from the Renaissance) 23
Appendix H – Vitruvian Monster Student Example
Vitruvian Monster Student Example by Devin D.

2008 Core Knowledge® National Conference, Grades 5th/6th, (Four Armed Men from the Renaissance) 24
Appendix I – Vitruvian PB&J Man Student Example
Vitruvian PB & J Man Student Example by Hannah J.

2008 Core Knowledge® National Conference, Grades 5th/6th, (Four Armed Men from the Renaissance) 25
Appendix J – Vitruvian Man Info Sheet
The Vitruvian Man by Leonardo Da Vinci: Soon we will begin our first picture from the Renaissance. Before we start it is important to look at a wonderful masterpiece of Renaissance Art, the Vitruvian Man! This is one of the worlds most famous and most used images in history. Let us try to find out what Da Vinci was saying with this image.
Da Vinci scrawled notes all along this piece of art about human proportions. Much of the text is about how to draw the “ideal human body”. Here are some of his observations on the body: - A palm is 4 fingers wide and a foot is 4 palms long - A man’s height is 8 heads tall. - The length of a man’s outspread arms is equal to a man’s height. - The length of a man’s hand is equal to 1/10 of man’s height. - The distance from the bottom of the chin to the tip of the nose is one third of a man’s head Of coarse there is no “ideal man”. Remember in the Renaissance, people were obsessed with ideals and the human form. This image is a blend of art and science, technique and anatomy. Next, you will get a chance to create your own “Vitruvian Thing”. What will it be? Let’s move on…

2008 Core Knowledge® National Conference, Grades 5th/6th, (Four Armed Men from the Renaissance) 26
Appendix K – Creating A Vitruvian Thing Sheet
Creating your “Vitruvian Thing”! Remember that Leonardo Da Vinci’s Vitruvian Man is an idealistic person, completely proportionate as a whole. This is one of the world’s most famous images and has been used and transformed many times. We are going to do some transforming ourselves. Look at these examples of “Vitruvian Things”:
Italian Coin Skylab II logo Your Vitruvian thing should be important to you and show some kind of “ideal” you hold. What are your “ideals”? Does it have to be a person? Does it have 8 parts? Why is it important to you? Steps to start your “Vitruvian Thing”:
1. We will begin by practicing and developing ideas in our sketchbooks 2. You need to try 10 different sketches and ideas. 3. Get your final idea approved and a final piece of paper 4. Use a protractor to draw a circle 5. Use a ruler to draw a square starting at the bottom of the circle 6. Begin by drawing your “thing” as you normally would 7. Think about the appendages and what they will represent.
2008 Core Knowledge® National Conference, Grades 5th/6th, (Four Armed Men from the Renaissance) 27
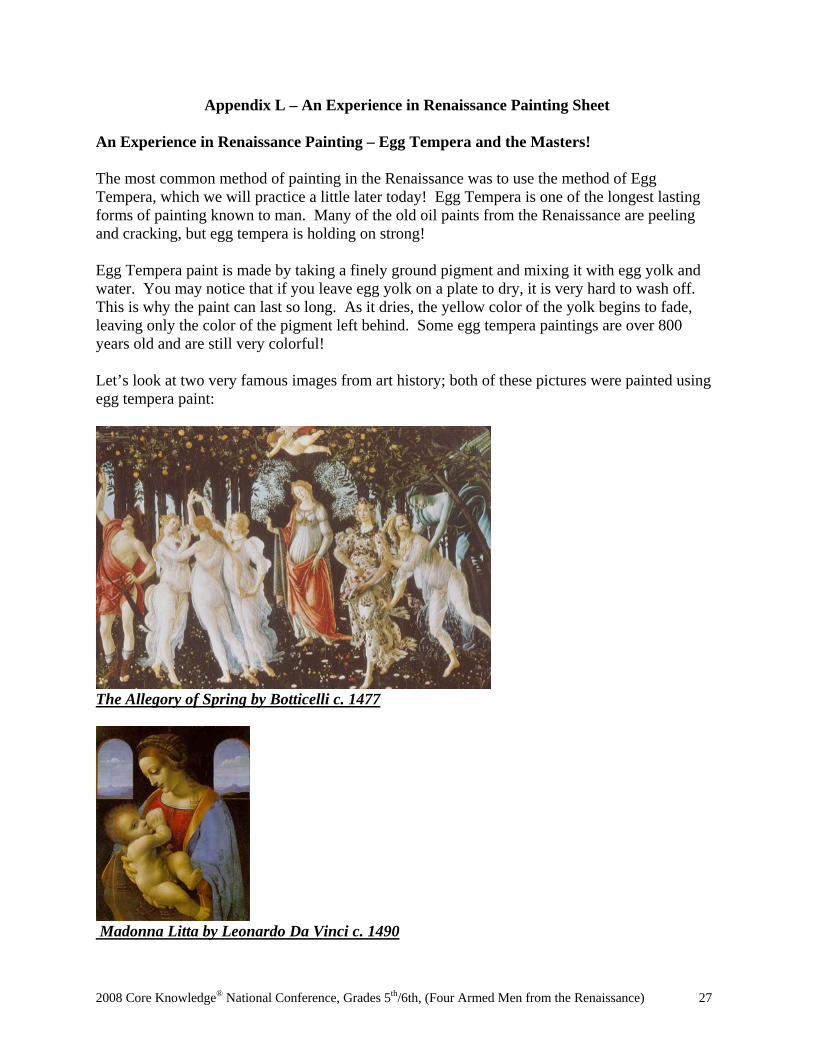
Appendix L – An Experience in Renaissance Painting Sheet
An Experience in Renaissance Painting – Egg Tempera and the Masters! The most common method of painting in the Renaissance was to use the method of Egg Tempera, which we will practice a little later today! Egg Tempera is one of the longest lasting forms of painting known to man. Many of the old oil paints from the Renaissance are peeling and cracking, but egg tempera is holding on strong! Egg Tempera paint is made by taking a finely ground pigment and mixing it with egg yolk and water. You may notice that if you leave egg yolk on a plate to dry, it is very hard to wash off. This is why the paint can last so long. As it dries, the yellow color of the yolk begins to fade, leaving only the color of the pigment left behind. Some egg tempera paintings are over 800 years old and are still very colorful! Let’s look at two very famous images from art history; both of these pictures were painted using egg tempera paint:
The Allegory of Spring by Botticelli c. 1477
Madonna Litta by Leonardo Da Vinci c. 1490

2008 Core Knowledge® National Conference, Grades 5th/6th, (Four Armed Men from the Renaissance) 28
Appendix M – Final Product Rubric
Final Product Grading Rubric: This is a general rubric I use for most assignments
Content: Student Uses Art As A Form of Communication No Attempt = Student did not express any ideas or complete the project
Introduced = Student begins to express ideas
Practicing = Student is expressing with art but not in the most effective ways
Competent = Communication is clear and understandable
Mastery = Communication is very clear and understandable and the student synthesizes new information
Creativity: Student Understands Elements of Art and Principles of Design
No Attempt = No attempt to be original, copy of someone else’s work, or work does not exist.
Introduced = Work is a copy of my example or very close to peers. Little personal expression
Practicing = Ideas are expressive but may be similar to others.
Competent = Ideas are unique or executed in a unique and expressive way. Student utilizes the Elements and Principles effectively.
Mastery = Ideas are unlike anything else done in class. Expression is evident and impacting.
Craftsmanship: Student Uses Art Making Tools, Techniques, and Processes
No Attempt = No attempt to color nicely, inappropriate use of materials, no attention to details, or work is missing.
Introduced = work is incomplete or in a sloppy manner
Practicing = Use of color work looks nice but use of materials is not fully understood
Competent = Excellent job coloring, appropriate use of materials, clean edges.
Mastery = Product is completely finished without over coloring. Materials were used to the highest standards and in appropriate ways.
Connections: Student Relates Art to Various Cultural and Historical Traditions
No Attempt = No relationship to art history or culture. Hard to tell if there is personal experience involved. Or work is missing.
Introduced = Little relationship to art history or culture.
Practicing = Beginning to connect to history or culture
Competent = Strong connection to art history or culture. Personal experience is evident.
Mastery = Historical and cultural ideals are held throughout the piece and connect to other parts of the work. Personal experience is evident.
Completion: Student Analyses and Evaluates Art
No Attempt = work Does not exist.
Introduced = student is able to verbalize ideas about art
Practicing = Student can begin to write about art.
Competent = Student can write about their work and others.
Mastery = student can write about their work and others at a high level complete with outside connections
Commitment: Student Actively and Appropriately Participates in Art Class
No Attempt = No attempt to use class time appropriately, excessive talking, lack of or drop in progress, or work does not exist. Student does not perform to their ability.
Introduced = Moderately uses class effectively. work looks rushed or as if very little time was put into it. Student has ability but shows a negative attitude.
Practicing = Uses class effectively but there is little progress in the work. Student has ability but does not always perform to their potential.
Competent = Very good use of class time. Progress is slight but evident. Student performs to their ability.
Mastery = Extremely effective use of time. Progress is very evident. Student reaches ability levels and experiments to exceed it.
2008 Core Knowledge® National Conference, Grades 5th/6th, (Four Armed Men from the Renaissance) 29
Appendix N – How to Make Egg Tempera Paint
Making Egg Tempera Paint! Today we will make out own Egg Tempera! We are going to need a few things to do this: 1. Large Eggs 2. Ground Pigment -A pigment is a chemical or mineral that reflects a specific color of light. All paint is made by using a pigment. Pigments are found in nature or made in labs. Today we will be using a mixture of ground chalk as our pigment. 3. Water 4. Spoons 5. Forks 6. Grinder 7. Plastic Cups – One with Water, the rest with Pigment 8. Paper Bowls 9. Paint Brushes 10. Container for trash Please watch me as I demonstrate how to make Egg Tempera Paint. There are many different parts so as a table group, allow each person to do one part of the process. Let’s work together to make our fabulous paints. Remember that this can get a little messy so please take your time, work hard, and no messing around! Step One: Use the grinder to crush up the chalk pigment into a fine powder. Place a small amount of pigment in a small plastic cup and crush. Step Two: Crack an egg into a bowl and drain off all of the white into a separate bowl. This will be thrown away, we only need the yolk. Be careful cracking the egg. We need to be gentle so we don’t break the yolk. Step Three: Break open the yolk with your fork. Add three spoonfuls of water to the yolk and mix up them together with the fork. Step Four: Pour a small amount of the egg and water mixture into a cup with pigment and stir with a paint brush. If the consistency is too thick, add a little more until it is just barely thicker than a watercolor paint. Step Five: Paint your picture! It is ok if there are some chunks of pigment in the paint; it gives your piece a nice texture. Try mixing colors, or gently splattering your piece to give it an old look and feel. Step Six: Clean up! Remember that in some other grades, people may be allergic to egg so we need to spray down and wipe up every table very well. I will take care of the egg whites and shells to be thrown away. Place your piece on the drying rack.