forms authentication, authorization, user accounts, and...
TRANSCRIPT

Forms Authentication, Authorization, User Accounts, and Roles :: An Overview of Forms Authentication
Introduction In the preceding tutorial we discussed the various authentication, authorization, and
user account options provided by ASP.NET. In this tutorial we will turn from mere
discussion to implementation; in particular, we will look at implementing forms
authentication. The web application we start constructing in this tutorial will continue
to be built upon in subsequent tutorials, as we move from simple forms
authentication to membership and roles.
This tutorial begins with an in-depth look at the forms authentication workflow, a
topic we touched upon in the previous tutorial. Following that, we will create an
ASP.NET website through which to demo the concepts of forms authentication. Next,
we will configure the site to use forms authentication, create a simple login page,
and see how to determine, in code, whether a user is authenticated and, if so, the
username they logged in with.
Understanding the forms authentication workflow, enabling it in a web application,
and creating the login and logoff pages are all vital steps in building an ASP.NET
application that supports user accounts and authenticates users through a web page.
Because of this – and because these tutorials build upon one another - I would
encourage you to work through this tutorial in full before moving on to the next one
even if you already have had experience configuring forms authentication in past
projects.
Understanding the Forms Authentication Workflow When the ASP.NET runtime processes a request for an ASP.NET resource, such as an
ASP.NET page or ASP.NET Web service, the request raises a number of events during
its lifecycle. There are events raised at the very beginning and very end of the
request, ones raised when the request is being authenticated and authorized, an
event raised in the case of an unhandled exception, and so forth. To see a complete
listing of the events, refer to the HttpApplication object’s events.
HTTP Modules are managed classes whose code is executed in response to a
particular event in the request lifecycle. ASP.NET ships with a number of HTTP
Modules that perform essential tasks behind the scenes. Two built-in HTTP Modules
that are especially relevant to our discussion are:

FormsAuthenticationModule – authenticates the user by inspecting the
forms authentication ticket, which is typically included in the user’s cookies
collection. If no forms authentication ticket is present, the user is anonymous.
UrlAuthorizationModule – determines whether or not the current user is
authorized to access the requested URL. This module determines the
authority by consulting the authorization rules specified in the application’s
configuration files. ASP.NET also includes the FileAuthorizationModule that
determines authority by consulting the requested file(s) ACLs.
The FormsAuthenticationModule attempts to authenticate the user prior to the
UrlAuthorizationModule (and FileAuthorizationModule) executing. If the user
making the request is not authorized to access the requested resource, the
authorization module terminates the request and returns an HTTP 401 Unauthorized
status. In Windows authentication scenarios, the HTTP 401 status is returned to the
browser. This status code causes the browser to prompt the user for their credentials
via a modal dialog box. With forms authentication, however, the HTTP 401
Unauthorized status is never sent to the browser because the
FormsAuthenticationModule detects this status and modifies it to redirect the user
to the login page instead (via an HTTP 302 Redirect status).
The login page’s responsibility is to determine if the user’s credentials are valid and,
if so, to create a forms authentication ticket and redirect the user back to the page
they were attempting to visit. The authentication ticket is included in subsequent
requests to the pages on the website, which the FormsAuthenticationModule uses
to identify the user.

Figure 1: The Forms Authentication Workflow
Remembering the Authentication Ticket Across Page Visits After logging in, the forms authentication ticket must be sent back to the web server
on each request so that the user remains logged in as they browse the site. This is
typically accomplished by placing the authentication ticket in the user’s cookies
collection. Cookies are small text files that reside on the user’s computer and are
transmitted in the HTTP headers on each request to the website that created the
cookie. Therefore, once the forms authentication ticket has been created and stored

in the browser’s cookies, each subsequent visit to that site sends the authentication
ticket along with the request, thereby identifying the user.
Note: The demo web application used in each tutorial is available as a
download. This downloadable application was created with Visual Web
Developer 2008 targeted for the .NET Framework version 3.5. Since the
application is targeted for .NET 3.5, its Web.config file includes additional,
3.5-specific configuration elements. Long story short, if you have yet to install
.NET 3.5 on your computer then the downloadable web application will not
work without first removing the 3.5-specific markup from Web.config.
One aspect of cookies is their expiration, which is the date and time at which the
browser discards the cookie. When the forms authentication cookie expires, the user
can no longer be authenticated and therefore become anonymous. When a user is
visiting from a public terminal, chances are they want their authentication ticket to
expire when they close their browser. When visiting from home, however, that same
user might want the authentication ticket to be remembered across browser restarts
so that they do not have to re-log in each time they visit the site. This decision is
often made by the user in the form of a “Remember me” checkbox on the login page.
In Step 3 we will examine how to implement a “Remember me” checkbox in the login
page. The following tutorial addresses the authentication ticket timeout settings in
detail.
Note: It is possible that the user agent used to log on to the website may not
support cookies. In such a case, ASP.NET can use cookieless forms
authentication tickets. In this mode, the authentication ticket is encoded into
the URL. We will look at when cookieless authentication tickets are used and
how they are created and managed in the next tutorial.
The Scope of Forms Authentication The FormsAuthenticationModule is managed code that is part of the ASP.NET
runtime. Prior to version 7 of Microsoft’s Internet Information Services (IIS) web
server, there was a distinct barrier between IIS’s HTTP pipeline and the ASP.NET
runtime’s pipeline. In short, in IIS 6 and earlier, the FormsAuthenticationModule
only executes when a request is delegated from IIS to the ASP.NET runtime. By
default, IIS processes static content itself – like HTML pages and CSS and image files
– and only hands off requests to the ASP.NET runtime when a page with an
extension of .aspx, .asmx, or .ashx is requested.
IIS 7, however, allows for integrated IIS and ASP.NET pipelines. With a few
configuration settings you can setup IIS 7 to invoke the
FormsAuthenticationModule for all requests. Furthermore, with IIS 7 you can
define URL authorization rules for files of any type. For more information, see
Changes Between IIS6 and IIS7 Security, Forms Authentication in IIS7, and
Understanding IIS7 URL Authorization.

Long story short, in versions prior to IIS 7, you can only use forms authentication to
protect resources handled by the ASP.NET runtime. Likewise, URL authorization rules
are only applied to resources handled by the ASP.NET runtime. But with IIS 7 it is
possible to integrate the FormsAuthenticationModule and
UrlAuthorizationModule into IIS’s HTTP pipeline, thereby extending this
functionality to all requests.
Step 1: Creating an ASP.NET Website for this Tutorial Series In order to reach the widest possible audience, the ASP.NET website we will be
building throughout this series will be created with Microsoft’s free version of Visual
Studio 2008, Visual Web Developer 2008. We will implement the
SqlMembershipProvider user store in a Microsoft SQL Server 2005 Express Edition
database. If you are using Visual Studio 2005 or a different edition of Visual Studio
2008 or SQL Server, don’t worry - the steps will be nearly identical and any non-
trivial differences will be pointed out.
Before we can configure forms authentication, we first need an ASP.NET website.
Start by creating a new file system-based ASP.NET website. To accomplish this,
launch Visual Web Developer and then go to the File menu and choose New Web
Site, displaying the New Web Site dialog box. Choose the ASP.NET Web Site
template, set the Location drop-down list to File System, choose a folder to place the
web site, and set the language to VB. This will create a new web site with a
Default.aspx ASP.NET page, an App_Data folder, and a Web.config file.
Note: Visual Studio supports two modes of project management: Web Site
Projects and Web Application Projects. Web Site Projects lack a project file,
whereas Web Application Projects mimic the project architecture in Visual
Studio .NET 2002/2003 – they include a project file and compile the project’s
source code into a single assembly, which is placed in the /bin folder. Visual
Studio 2005 initially only supported Web Site Projects, although the Web
Application Project model was reintroduced with Service Pack 1; Visual Studio
2008 offers both project models. The Visual Web Developer 2005 and 2008
editions, however, only support Web Site Projects. I will be using the Web
Site Project model. If you are using a non-Express edition and want to use
the Web Application Project model instead, feel free to do so but be aware
that there may be some discrepancies between what you see on your screen
and the steps you must take versus the screen shots shown and instructions
provided in these tutorials.

Figure 2: Create a New File System-Based Web Site
Adding a Master Page Next, add a new Master Page to the site in the root directory named Site.master.
Master pages enable a page developer to define a site-wide template that can be
applied to ASP.NET pages. The main benefit of master pages is that the site’s overall
appearance can be defined in a single location, thereby making it easy to update or
tweak the site’s layout.

Figure 3: Add a Master Page Named Site.master to the Website
Define the site-wide page layout here in the master page. You can use the Design
view and add whatever Layout or Web controls you need, or you can manually add
the markup by hand in the Source view. I structured my master page’s layout to
mimic the layout used in my Working with Data in ASP.NET 2.0 tutorial series (see
Figure 4). The master page uses cascading style sheets for positioning and styles
with the CSS settings defined in the file Style.css (which is included in this
tutorial’s associated download). While you cannot tell from the markup shown below,
the CSS rules are defined such that the navigation <div>’s content is absolutely
positioned so that it appears on the left and has a fixed width of 200 pixels.
<%@ Master Language="VB" CodeFile="Site.master.vb" Inherits="Site" %>
<!DOCTYPE html PUBLIC "-//W3C//DTD XHTML 1.0 Transitional//EN"
"http://www.w3.org/TR/xhtml1/DTD/xhtml1-transitional.dtd">
<html xmlns="http://www.w3.org/1999/xhtml" >
<head id="Head1" runat="server">
<title>Forms Authentication, Authorization, and User
Accounts</title>
<link href="Styles.css" rel="stylesheet" type="text/css" />
</head>

<body>
<div id="wrapper">
<form id="form1" runat="server">
<div id="header">
<span class="title">User Account Tutorials</span>
</div>
<div id="content">
<asp:contentplaceholder id="MainContent"
runat="server">
<!-- Page-specific content will go here... -->
</asp:contentplaceholder>
</div>
<div id="navigation">
TODO: Menu will go here...
</div>
</form>
</div>
</body>
</html>
A master page defines both the static page layout and the regions that can be edited
by the ASP.NET pages that use the master page. These content editable regions are
indicated by the ContentPlaceHolder control, which can be seen within the content
<div>. Our master page has a single ContentPlaceHolder (MainContent), but master
page’s may have multiple ContentPlaceHolders.
With the markup entered above, switching to the Design view shows the master
page’s layout. Any ASP.NET pages that use this master page will have this uniform
layout, with the ability to specify the markup for the MainContent region.

Figure 4: The Master Page, When Viewed Through the Design View
Creating Content Pages At this point we have a Default.aspx page in our website, but it does not use the
master page we just created. While it is possible to manipulate the declarative
markup of a web page to use a master page, if the page doesn’t contain any content
yet it is easier to just delete the page and re-add it to the project, specifying the
master page to use. Therefore, start by deleting Default.aspx from the project.
Next, right-click on the project name in the Solution Explorer and choose to add a
new Web Form named Default.aspx. This time, check the “Select master page”
checkbox and choose the Site.master master page from the list.

Figure 5: Add a New Default.aspx Page Choosing to Select a Master Page
Figure 6: Use the Site.master Master Page

Note: If you are using the Web Application Project Model the Add New Item
dialog box does not include a “Select master page” checkbox. Instead, you
need to add an item of type “Web Content Form.” After choosing the “Web
Content Form” option and clicking Add, Visual Studio will display the same
Select a Master dialog box shown in Figure 6.
The new Default.aspx page’s declarative markup includes just a @Page directive
specifying the path to the master page file and a Content control for the master
page’s MainContent ContentPlaceHolder.
<%@ Page Language="VB" MasterPageFile="~/Site.master"
AutoEventWireup="false" CodeFile="Default.aspx.vb" Inherits="_Default"
Title="Untitled Page" %>
<asp:Content ID="Content1" ContentPlaceHolderID="MainContent"
Runat="Server">
</asp:Content>
For now, leave Default.aspx empty. We will return to it later in this tutorial to add
content.
Note: Our master page includes a section for a menu or some other
navigation interface. We will create such an interface in a future tutorial.
Step 2: Enabling Forms Authentication With the ASP.NET website created, our next task is to enable forms authentication.
The application’s authentication configuration is specified through the
<authentication> element in Web.config. The <authentication> element contains
a single attribute named mode that specifies the authentication model used by the
application. This attribute can have one of the following four values:
Windows – as discussed in the preceding tutorial, when an application uses
Windows authentication it is the web server’s responsibility to authenticate
the visitor, and this is usually done through Basic, Digest, or Integrated
Windows authentication.
Forms – users are authenticated via a form on a web page.
Passport – users are authenticated using Microsoft’s Passport Network.
None – no authentication model is used; all visitors are anonymous.
By default, ASP.NET applications use Windows authentication. To change the
authentication type to forms authentication, then, we need to modify the
<authentication> element’s mode attribute to Forms.

If your project does not yet contain a Web.config file, add one now by right-clicking
on the project name in the Solution Explorer, choosing Add New Item, and then
adding a Web Configuration file.
Figure 7: If Your Project Does Not Yet Include Web.config, Add It Now
Next, locate the <authentication> element and update it to use forms
authentication. After this change, your Web.config file’s markup should look similar
to the following:
<configuration>
<system.web>
... Unrelated configuration settings and comments removed for
brevity ...
<!--
The <authentication> section enables configuration
of the security authentication mode used by
ASP.NET to identify an incoming user.
-->
<authentication mode="Forms" />
</system.web>

</configuration>
Note: Since Web.config is an XML file, casing is important. Make sure that
you set the mode attribute to Forms, with a capital “F”. If you use a different
casing, such as “forms”, you’ll receive a configuration error when visiting the
site through a browser.
The <authentication> element may optionally include a <forms> child element that
contains forms authentication-specific settings. For now, let’s just use the default
forms authentication settings. We will explore the <forms> child element in more
detail in the next tutorial.
Step 3: Building the Login Page In order to support forms authentication our website needs a login page. As
discussed in the “Understanding the Forms Authentication Workflow” section, the
FormsAuthenticationModule will automatically redirect the user to the login page if
they attempt to access a page that they are not authorized to view. There are also
ASP.NET Web controls that will display a link to the login page to anonymous users.
This begs the question, “What is the URL of the login page?”
By default, the forms authentication system expects the login page to be named
Login.aspx and placed in the root directory of the web application. If you want to
use a different login page URL, you can do so by specifying it in Web.config. We will
see how to do this in the subsequent tutorial.
The login page has three responsibilities:
1. Provide an interface that allows the visitor to enter their credentials.
2. Determine if the submitted credentials are valid.
3. “Log in” the user by creating the forms authentication ticket.
Creating the Login Page’s User Interface Let’s get started with the first task. Add a new ASP.NET page to the site’s root
directory named Login.aspx and associate it with the Site.master master page.

Figure 8: Add a New ASP.NET Page Named Login.aspx
The typical login page interface consists of two textboxes – one for the user’s name,
one for their password – and a button to submit the form. Websites oftentimes
include a “Remember me” checkbox that, if checked, persists the resulting
authentication ticket across browser restarts.
Add two TextBoxes to Login.aspx and set their ID properties to UserName and
Password, respectively. Also set Password’s TextMode property to Password. Next,
add a CheckBox control, setting its ID property to RememberMe and its Text property
to “Remember Me”. Following that, add a Button named LoginButton whose Text
property is set to “Login”. And finally, add a Label Web control and set its ID
property to InvalidCredentialsMessage, its Text property to “Your username or
password is invalid. Please try again.”, its ForeColor property to Red, and its
Visible property to False.
At this point your screen should look similar to the screen shot in Figure 9, and your
page’s declarative syntax should like the following:
<%@ Page Language="VB" MasterPageFile="~/Site.master"
AutoEventWireup="false" CodeFile="Login.aspx.vb" Inherits="Login" %>

<asp:Content ID="Content1" ContentPlaceHolderID="MainContent"
Runat="Server">
<h1>
Login</h1>
<p>
Username:
<asp:TextBox ID="UserName" runat="server"></asp:TextBox></p>
<p>
Password:
<asp:TextBox ID="Password" runat="server"
TextMode="Password"></asp:TextBox></p>
<p>
<asp:CheckBox ID="RememberMe" runat="server" Text="Remember Me"
/> </p>
<p>
<asp:Button ID="LoginButton" runat="server" Text="Login"
OnClick="LoginButton_Click" /> </p>
<p>
<asp:Label ID="InvalidCredentialsMessage" runat="server"
ForeColor="Red" Text="Your username or password is invalid. Please try
again."
Visible="False"></asp:Label> </p>
</asp:Content>

Figure 9: The Login Page Contains Two TextBoxes, a CheckBox, a Button, and a Label
Finally, create an event handler for the LoginButton’s Click event. From the
Designer, simply double-click the Button control to create this event handler.
Determining If the Supplied Credentials are Valid We now need to implement task 2 in the Button’s Click event handler – determining
whether the supplied credentials are valid. In order to do this there needs to be a
user store that holds all of the users’ credentials so that we can determine if the
supplied credentials match up with any known credentials.

Prior to ASP.NET 2.0, developers were responsible for implementing both their own
user stores and writing the code to validate the supplied credentials against the
store. Most developers would implement the user store in a database, creating a
table named Users with columns like UserName, Password, Email, LastLoginDate,
and so forth. This table, then, would have one record per user account. Verifying a
user’s supplied credentials would involve querying the database for a matching
username and then ensuring that the password in the database corresponded to the
supplied password.
With ASP.NET 2.0, developers should use one of the Membership providers to
manage the user store. In this tutorial series we will be using the
SqlMembershipProvider, which uses a SQL Server database for the user store.
When using the SqlMembershipProvider we need to implement a specific database
schema that includes the tables, views, and stored procedures expected by the
provider. We will examine how to implement this schema in the Creating the
Membership Schema in SQL Server tutorial. With the Membership provider in place,
validating the user’s credentials is as simple as calling the Membership class’s
ValidateUser(username, password) method, which returns a Boolean value
indicating whether the validity of the username and password combination. Seeing
as we have not yet implemented the SqlMembershipProvider’s user store, we
cannot use the Membership class’s ValidateUser method at this time.
Rather than take the time to build our own custom Users database table (which
would be obsolete once we implemented the SqlMembershipProvider), let’s instead
hard-code the valid credentials within the login page itself. In the LoginButton’s
Click event handler, add the following code:
Protected Sub LoginButton_Click(ByVal sender As Object, ByVal e As
System.EventArgs) Handles LoginButton.Click
' Three valid username/password pairs: Scott/password,
Jisun/password, and Sam/password.
Dim users() As String = {"Scott", "Jisun", "Sam"}
Dim passwords() As String = {"password", "password", "password"}
For i As Integer = 0 To users.Length - 1
Dim validUsername As Boolean = (String.Compare(UserName.Text,
users(i), True) = 0)
Dim validPassword As Boolean = (String.Compare(Password.Text,
passwords(i), False) = 0)
If validUsername AndAlso validPassword Then
' TODO: Log in the user...
' TODO: Redirect them to the appropriate page
End If
Next

' If we reach here, the user's credentials were invalid
InvalidCredentialsMessage.Visible = True
End Sub
As you can see, there are three valid user accounts – Scott, Jisun, and Sam – and all
three have the same password (“password”). The code loops through the users and
passwords arrays looking for a valid username and password match. If both the
username and password are valid, we need to login the user and then redirect them
to the appropriate page. If the credentials are invalid, then we display the
InvalidCredentialsMessage Label.
When a user enters valid credentials, I mentioned that they are then redirected to
the “appropriate page.” What is the appropriate page, though? Recall that when a
user visits a page they are not authorized to view, the FormsAuthenticationModule
automatically redirects them to the login page. In doing so, it includes the requested
URL in the querystring via the ReturnUrl parameter. That is, if a user attempted to
visit ProtectedPage.aspx, and they were not authorized to do so, the
FormsAuthenticationModule would redirect them to:
Login.aspx?ReturnUrl=ProtectedPage.aspx
Upon successfully logging in, the user should be redirected back to
ProtectedPage.aspx. Alternatively, users may visit the login page on their own
volition. In that case, after logging in the user they should be sent to the root
folder’s Default.aspx page.
Logging In the User Assuming that the supplied credentials are valid, we need to create a forms
authentication ticket, thereby logging in the user to the site. The
FormsAuthentication class in the System.Web.Security namespace provides
assorted methods for logging in and logging out users via the forms authentication
system. While there are several methods in the FormsAuthentication class, the
three we are interested in at this juncture are:
GetAuthCookie(username, persistCookie) – creates a forms authentication
ticket for the supplied name username. Next, this method creates and returns
an HttpCookie object that holds the contents of the authentication ticket. If
persistCookie is True, a persistent cookie is created.
SetAuthCookie(username, persistCookie) – calls the
GetAuthCookie(username, persistCookie) method to generate the forms
authentication cookie. This method then adds the cookie returned by
GetAuthCookie to the Cookies collection (assuming cookies-based forms

authentication is being used; otherwise, this method calls an internal class
that handles the cookieless ticket logic).
RedirectFromLoginPage(username, persistCookie) – this method calls
SetAuthCookie(username, persistCookie), and then redirects the user to
the appropriate page.
GetAuthCookie is handy when you need to modify the authentication ticket before
writing the cookie out to the Cookies collection. SetAuthCookie is useful if you want
to create the forms authentication ticket and add it to the Cookies collection, but do
not want to redirect the user to the appropriate page. Perhaps you want to keep
them on the login page or send them to some alternate page.
Since we want to log in the user and redirect them to the appropriate page, let’s use
RedirectFromLoginPage. Update the LoginButton’s Click event handler, replacing
the two commented TODO lines with the following line of code:
FormsAuthentication.RedirectFromLoginPage(UserName.Text,
RememberMe.Checked)
When creating the forms authentication ticket we use the UserName TextBox’s Text
property for the forms authentication ticket username parameter, and the checked
state of the RememberMe CheckBox for the persistCookie parameter.
To test the login page, visit it in a browser. Start by entering invalid credentials, such
as a username of “Nope” and a password of “wrong”. Upon clicking the Login button
a postback will occur and the InvalidCredentialsMessage Label will be displayed.

Figure 10: The InvalidCredentialsMessage Label is Displayed When Entering Invalid Credentials
Next, enter valid credentials and click the Login button. This time when the postback
occurs a forms authentication ticket is created and you are automatically redirected
back to Default.aspx. At this point you have logged in to the website, although
there are no visual cues to indicate that you are currently logged in. In Step 4 we will
see how to programmatically determine whether a user is logged in or not as well as
how to identify the user visiting the page.
Step 5 examines techniques for logging a user out of the website.
Securing the Login Page When the user enters her credentials and submits the login page form, the
credentials – including her password – are transmitted over the Internet to the web
server in plain text. That means any hacker sniffing the network traffic can see the
username and password. To prevent this, it is essential to encrypt the network traffic
by using Secure Socket Layers (SSL). This will ensure that the credentials (as well as
the entire page’s HTML markup) are encrypted from the moment they leave the
browser until they are received by the web server.

Unless your website contains sensitive information, you will only need to use SSL on
the login page and on other pages where the user’s password would otherwise be
sent over the wire in plain text. You do not need to worry about securing the forms
authentication ticket since, by default, it is both encrypted and digitally signed (to
prevent tampering). A more thorough discussion on forms authentication ticket
security is presented in the following tutorial.
Note: Many financial and medical websites are configured to use SSL on all
pages accessible to authenticated users. If you are building such a website
you can configure the forms authentication system so that the forms
authentication ticket is only transmitted over a secure connection. We will
look at the various forms authentication configuration options in the next
tutorial, Forms Authentication Configuration and Advanced Topics.
Step 4: Detecting Authenticated Visitors and Determining Their Identity At this point we have enabled forms authentication and created a rudimentary login
page, but we have yet to examine how we can determine whether a user is
authenticated or anonymous. In certain scenarios we may wish to display different
data or information depending on whether an authenticated or anonymous user is
visiting the page. Moreover, we oftentimes need to know the identity of the
authenticated user.
Let’s augment the existing Default.aspx page to illustrate these techniques. In
Default.aspx add two Panel controls, one named AuthenticatedMessagePanel and
another named AnonymousMessagePanel. Add a Label control named
WelcomeBackMessage in the first Panel. In the second Panel add a HyperLink control,
set its Text property to “Log In” and its NavigateUrl property to “~/Login.aspx”. At
this point the declarative markup for Default.aspx should look similar to the
following:
<%@ Page Language="VB" MasterPageFile="~/Site.master"
AutoEventWireup="false" CodeFile="Default.aspx.vb" Inherits="_Default"
Title="Untitled Page" %>
<asp:Content ID="Content1" ContentPlaceHolderID="MainContent"
Runat="Server">
<asp:Panel runat="server" ID="AuthenticatedMessagePanel">
<asp:Label runat="server" ID="WelcomeBackMessage"></asp:Label>
</asp:Panel>
<asp:Panel runat="Server" ID="AnonymousMessagePanel">
<asp:HyperLink runat="server" ID="lnkLogin" Text="Log In"
NavigateUrl="~/Login.aspx"></asp:HyperLink>

</asp:Panel>
</asp:Content>
As you have probably guessed by now, the idea here is to display just the
AuthenticatedMessagePanel to authenticated visitors and just the
AnonymousMessagePanel to anonymous visitors. To accomplish this we need to set
these Panels’ Visible properties depending on whether the user is logged in or not.
The Request.IsAuthenticated property returns a Boolean value indicating whether
the request has been authenticated. Enter the following code into the Page_Load
event handler code:
Protected Sub Page_Load(ByVal sender As Object, ByVal e As
System.EventArgs) Handles Me.Load
If Request.IsAuthenticated Then
WelcomeBackMessage.Text = "Welcome back!"
AuthenticatedMessagePanel.Visible = True
AnonymousMessagePanel.Visible = False
Else
AuthenticatedMessagePanel.Visible = False
AnonymousMessagePanel.Visible = True
End If
End Sub
With this code in place, visit Default.aspx through a browser. Assuming that you
have yet to log in, you will see a link to the login page (see Figure 11). Click this link
and log in to the site. As we saw in Step 3, after entering your credentials you will be
returned to Default.aspx, but this time the page shows the “Welcome back!”
message (see Figure 12).

Figure 11: When Visiting Anonymously, a Log In Link is Displayed
Figure 12: Authenticated Users are Shown the “Welcome back!” Message
We can determine the currently logged on user’s identity via the HttpContext
object’s User property. The HttpContext object represents information about the
current request, and is the home for such common ASP.NET objects as Response,

Request, and Session, among others. The User property represents the security
context of the current HTTP request and implements the IPrincipal interface.
The User property is set by the FormsAuthenticationModule. Specifically, when the
FormsAuthenticationModule finds a forms authentication ticket in the incoming
request, it creates a new GenericPrincipal object and assigns it to the User
property.
Principal objects (like GenericPrincipal) provide information on the user’s identity
and the roles to which they belong. The IPrincipal interface defines two members:
IsInRole(roleName) – a method that returns a Boolean value indicating if
the principal belongs to the specified role.
Identity – a property that returns an object that implements the IIdentity
interface. The IIdentity interface defines three properties:
AuthenticationType, IsAuthenticated, and Name.
We can determine the name of the current visitor using the following code:
Dim currentUsersName As String = User.Identity.Name
When using forms authentication, a FormsIdentity object is created for the
GenericPrincipal’s Identity property. The FormsIdentity class always returns
the string “Forms” for its AuthenticationType property and True for its
IsAuthenticated property. The Name property returns the username specified when
creating the forms authentication ticket. In addition to these three properties,
FormsIdentity includes access to the underlying authentication ticket via its Ticket
property. The Ticket property returns an object of type
FormsAuthenticationTicket, which has properties like Expiration, IsPersistent,
IssueDate, Name, and so on.
The important point to take away here is that the username parameter specified in
the FormsAuthentication.GetAuthCookie(username, persistCookie),
FormsAuthentication.SetAuthCookie(username, persistCookie), and
FormsAuthentication.RedirectFromLoginPage(username, persistCookie)
methods is the same value returned by User.Identity.Name. Moreover, the
authentication ticket created by these methods is available by casting
User.Identity to a FormsIdentity object and then accessing the Ticket property:
Dim ident As FormsIdentity = CType(User.Identity, FormsIdentity)
Dim authTicket As FormsAuthenticationTicket = ident.Ticket

Let’s provide a more personalized message in Default.aspx. Update the Page_Load
event handler so that the WelcomeBackMessage Label’s Text property is assigned the
string “Welcome back, username!”
WelcomeBackMessage.Text = "Welcome back, " & User.Identity.Name & "!"
Figure 13 shows the effect of this modification (when logging in as user Scott).
Figure 13: The Welcome Message Includes the Currently Logged In User’s Name
Using the LoginView and LoginName Controls Displaying different content to authenticated and anonymous users is a common
requirement; so is displaying the name of the currently logged on user. For that
reason, ASP.NET includes two Web controls that provide the same functionality
shown in Figure 13, but without the need to write a single line of code.
The LoginView control is a template-based Web control that makes it easy to display
different data to authenticated and anonymous users. The LoginView includes two
predefined templates:
AnonymousTemplate – any markup added to this template is only displayed to
anonymous visitors.
LoggedInTemplate – this template’s markup is shown only to authenticated
users.
Let’s add the LoginView control to our site’s master page, Site.master. Rather than
adding just the LoginView control, though, let’s add both a new ContentPlaceHolder
control and then put the LoginView control within that new ContentPlaceHolder. The
rationale for this decision will become apparent shortly.
Note: In addition to the AnonymousTemplate and LoggedInTemplate, the
LoginView control can include role-specific templates. Role-specific templates
show markup only to those users that belong to a specified role. We will
examine the role-based features of the LoginView control in a future tutorial.
Start by adding a ContentPlaceHolder named LoginContent into the master page
within the navigation <div> element. You can simply drag a ContentPlaceHolder
control from the Toolbox onto the Source view, placing the resulting markup right
above the “TODO: Menu will go here…” text.
<div id="navigation">
<asp:ContentPlaceHolder ID="LoginContent" runat="server">
</asp:ContentPlaceHolder>
TODO: Menu will go here...
</div>
Next, add a LoginView control within the LoginContent ContentPlaceHolder. Content
placed into the master page’s ContentPlaceHolder controls are considered default
content for the ContentPlaceHolder. That is, ASP.NET pages that use this master
page can specify their own content for each ContentPlaceHolder or use the master
page’s default content.
The LoginView and other login-related controls are located in the Toolbox’s Login tab.

Figure 14: The LoginView Control in the Toolbox
Next, add two <br /> elements immediately after the LoginView control, but still
within the ContentPlaceHolder. At this point, the navigation <div> element’s markup
should look like the following:
<div id="navigation">
<asp:ContentPlaceHolder ID="LoginContent" runat="server">
<asp:LoginView ID="LoginView1" runat="server">
</asp:LoginView>
<br /><br />
</asp:ContentPlaceHolder>
TODO: Menu will go here...
</div>
The LoginView’s templates can be defined from the Designer or the declarative
markup. From Visual Studio’s Designer, expand the LoginView’s smart tag, which
lists the configured templates in a drop-down list. Type in the text “Hello, stranger”
into the AnonymousTemplate; next, add a HyperLink control and set its Text and
NavigateUrl properties to “Log In” and “~/Login.aspx”, respectively.
After configuring the AnonymousTemplate, switch to the LoggedInTemplate and
enter the text, "Welcome back, ". Then drag a LoginName control from the Toolbox
into the LoggedInTemplate, placing it immediately after the "Welcome back, " text.

The LoginName control, as its name implies, displays the name of the currently
logged in user. Internally, the LoginName control simply outputs the
User.Identity.Name property
After making these additions to the LoginView’s templates, the markup should look
similar to the following:
<div id="navigation">
<asp:ContentPlaceHolder ID="LoginContent" runat="server">
<asp:LoginView ID="LoginView1" runat="server">
<LoggedInTemplate>
Welcome back,
<asp:LoginName ID="LoginName1" runat="server" />.
</LoggedInTemplate>
<AnonymousTemplate>
Hello, stranger.
<asp:HyperLink ID="lnkLogin" runat="server"
NavigateUrl="~/Login.aspx">Log In</asp:HyperLink>
</AnonymousTemplate>
</asp:LoginView>
<br /><br />
</asp:ContentPlaceHolder>
TODO: Menu will go here...
</div>
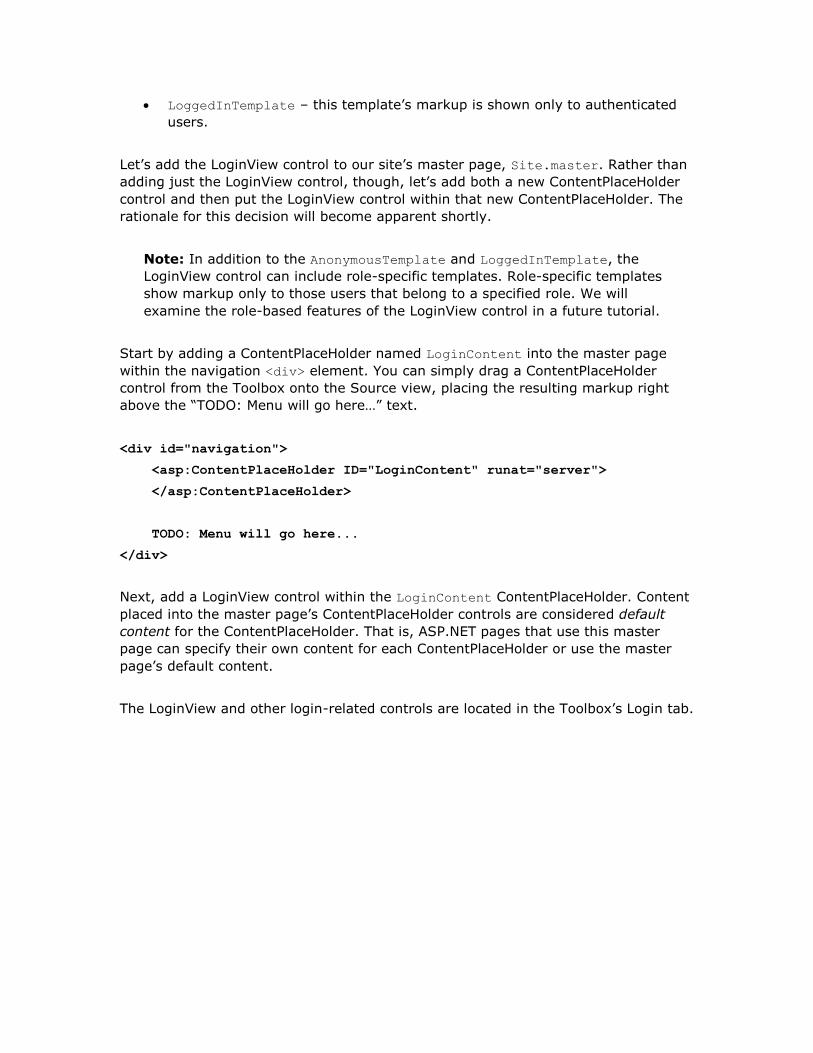
With this addition to the Site.master master page, each page in our website will
display a different message depending on whether the user is authenticated. Figure
15 shows the Default.aspx page when visited through a browser by user Jisun. The
“Welcome back, Jisun” message is repeated twice: once in the master page’s
navigation section on the left (via the LoginView control we just added) and once in
the Default.aspx’s content area (via Panel controls and programmatic logic).

Figure 15: The LoginView Control Displays “Welcome back, Jisun.”
Because we added the LoginView to the master page, it can appear in every page on
our site. However, there may be web pages where we don’t want to show this
message. One such page is the login page, since a link to the login page seems out
of place there. Since we placed the LoginView control in a ContentPlaceHolder in the
master page, we can override this default markup in our content page. Open
Login.aspx and go to the Designer. Since we have not explicitly defined a Content
control in Login.aspx for the LoginContent ContentPlaceHolder in the master page,
the login page will show the master page’s default markup for this
ContentPlaceHolder. You can see this through the Designer – the LoginContent
ContentPlaceHolder shows the default markup (the LoginView control).

Figure 16: The Login Page Shows the Default Content for the Master Page’s LoginContent ContentPlaceHolder
To override the default markup for the LoginContent ContentPlaceHolder, simply
right-click on the region in the Designer and choose the Create Custom Content
option from the context menu. (When using Visual Studio 2008 the
ContentPlaceHolder includes a smart tag that, when selected, offers the same
option.) This adds a new Content control to the page’s markup and thereby allows us
to define custom content for this page. You could add a custom message here, such
as “Please log in…”, but let’s just leave this blank.
Note: In Visual Studio 2005, creating custom content creates an empty
Content control in the ASP.NET page. In Visual Studio 2008, however,
creating custom content copies the master page’s default content into the
newly created Content control. If you are using Visual Studio 2008, then,
after creating the new Content control make sure to clear out the content
copied over from the master page.

Figure 17 shows the Login.aspx page when visited from a browser after making this
change. Note that there is no “Hello, stranger” or “Welcome back, username”
message in the left navigation <div> as there is when visiting Default.aspx.
Figure 17: The Login Page Hides the Default LoginContent ContentPlaceHolder’s Markup
Step 5: Logging Out In Step 3 we looked at building a login page to log a user in to the site, but we have
yet to see how to log a user out. In addition to methods for logging a user in, the
FormsAuthentication class also provides a SignOut method. The SignOut method
simply destroys the forms authentication ticket, thereby logging the user out of the
site.
Offering a log out link is such a common feature that ASP.NET includes a control
specifically designed to log a user out. The LoginStatus control displays either a
“Login” LinkButton or a “Logout” LinkButton, depending on the user’s authentication
status. A “Login” LinkButton is rendered for anonymous users, whereas a “Logout”
LinkButton is displayed to authenticated users. The text for the “Login” and “Logout”
LinkButtons can be configured via the LoginStatus’s LoginText and LogoutText
properties.

Clicking the “Login” LinkButton causes a postback, from which a redirect is issued to
the login page. Clicking the “Logout” LinkButton causes the LoginStatus control to
invoke the FormsAuthentication.SignOff method and then redirects the user to a
page. The page the logged off user is redirected to depends on the LogoutAction
property, which can be assigned to one of the three following values:
Refresh – the default; redirects the user to the page they were just visiting.
If the page they were just visiting does not allow anonymous users, then the
FormsAuthenticationModule will automatically redirect the user to the login
page.
You may be curious as to why a redirect is performed here. If the user wants
to remain on the same page, why the need for the explicit redirect? The
reason is because when the “Logoff” LinkButton is clicked, the user still has
the forms authentication ticket in their cookies collection. Consequently, the
postback request is an authenticated request. The LoginStatus control calls
the SignOut method, but that happens after the
FormsAuthenticationModule has authenticated the user. Therefore, an
explicit redirect causes the browser to re-request the page. By the time the
browser re-requests the page, the forms authentication ticket has been
removed and therefore the incoming request is anonymous.
Redirect – the user is redirected to the URL specified by the LoginStatus’s
LogoutPageUrl property.
RedirectToLoginPage – the user is redirected to the login page.
Let’s add a LoginStatus control to the master page and configure it to use the
Redirect option to send the user to a page that displays a message confirming that
they have been signed out. Start by creating a page in the root directory named
Logout.aspx. Don’t forget to associate this page with the Site.master master page.
Next, enter a message in the page’s markup explaining to the user that they have
been logged out.
Next, return to the Site.master master page and add a LoginStatus control beneath
the LoginView in the LoginContent ContentPlaceHolder. Set the LoginStatus
control’s LogoutAction property to Redirect and its LogoutPageUrl property to
“~/Logout.aspx”.
<div id="navigation">
<asp:ContentPlaceHolder ID="LoginContent" runat="server">
<asp:LoginView ID="LoginView1" runat="server">
<LoggedInTemplate>
Welcome back,
<asp:LoginName ID="LoginName1" runat="server" />.

</LoggedInTemplate>
<AnonymousTemplate>
Hello, stranger.
<asp:HyperLink ID="lnkLogin" runat="server"
NavigateUrl="~/Login.aspx">Log In</asp:HyperLink>
</AnonymousTemplate>
</asp:LoginView>
<br />
<asp:LoginStatus ID="LoginStatus1" runat="server"
LogoutAction="Redirect" LogoutPageUrl="~/Logout.aspx" />
<br /><br />
</asp:ContentPlaceHolder>
TODO: Menu will go here...
</div>
Since the LoginStatus is outside of the LoginView control, it will appear for both
anonymous and authenticated users, but that’s OK because the LoginStatus will
correctly display a “Login” or “Logout” LinkButton. With the addition of the
LoginStatus control, the “Log In” HyperLink in the AnonymousTemplate is
superfluous, so remove it.
Figure 18 shows Default.aspx when Jisun visits. Note that the left column displays
the message, “Welcome back, Jisun” along with a link to log out. Clicking the log out
LinkButton causes a postback, signs Jisun out of the system, and then redirects her
to Logout.aspx. As Figure 19 shows, by the time Jisun reaches Logout.aspx she has
already been signed out and is therefore anonymous. Consequently, the left column
shows the text “Welcome, stranger” and a link to the login page.
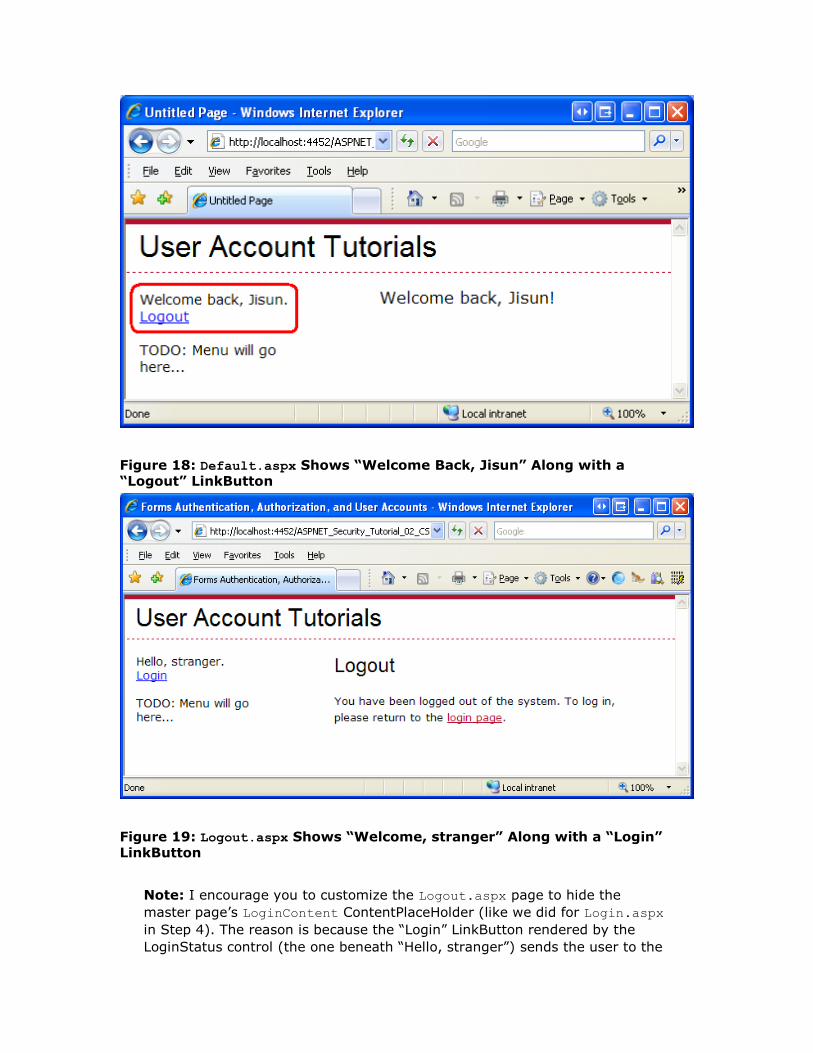
Figure 18: Default.aspx Shows “Welcome Back, Jisun” Along with a “Logout” LinkButton
Figure 19: Logout.aspx Shows “Welcome, stranger” Along with a “Login” LinkButton
Note: I encourage you to customize the Logout.aspx page to hide the
master page’s LoginContent ContentPlaceHolder (like we did for Login.aspx
in Step 4). The reason is because the “Login” LinkButton rendered by the
LoginStatus control (the one beneath “Hello, stranger”) sends the user to the

login page passing the current URL in the ReturnUrl querystring parameter.
In short, if a user who has logged out clicks this LoginStatus’s “Login”
LinkButton, and then logs in, they will be redirected back to Logout.aspx,
which could easily confuse the user.
Summary In this tutorial we started with an examination of the forms authentication workflow
and then turned to implementing forms authentication in an ASP.NET application.
Forms authentication is powered by the FormsAuthenticationModule, which has two
responsibilities: identifying users based on their forms authentication ticket, and
redirecting unauthorized users to the login page.
The .NET Framework’s FormsAuthentication class includes methods for creating,
inspecting, and removing forms authentication tickets. The
Request.IsAuthenticated property and User object provide additional
programmatic support for determining whether a request is authenticated and
information about the user’s identity. There are also the LoginView, LoginStatus, and
LoginName Web controls, which give developers a quick, code-free way for
performing many common login-related tasks. We will examine these and other
login-related Web controls in greater detail in future tutorials.
This tutorial provided a cursory overview of forms authentication. We did not
examine the assorted configuration options, look at how cookieless forms
authentication tickets work, or explore how ASP.NET protects the contents of the
forms authentication ticket. We will discuss these topics and more in the next
tutorial.
Happy Programming!
Further Reading For more information on the topics discussed in this tutorial, refer to the following
resources:
Changes Between IIS6 and IIS7 Security
Login ASP.NET Controls
Professional ASP.NET 2.0 Security, Membership, and Role Management
(ISBN: 978-0-7645-9698-8)
The <authentication> Element
The <forms> Element for <authentication>

About the Author Scott Mitchell, author of multiple ASP/ASP.NET books and founder of
4GuysFromRolla.com, has been working with Microsoft Web technologies since 1998.
Scott works as an independent consultant, trainer, and writer. His latest book is
Sams Teach Yourself ASP.NET 2.0 in 24 Hours. Scott can be reached at
[email protected] or via his blog at http://ScottOnWriting.NET.
Special Thanks To… This tutorial series was reviewed by many helpful reviewers. Lead reviewers for this
tutorial include Alicja Maziarz, John Suru, and Teresa Murphy. Interested in
reviewing my upcoming MSDN articles? If so, drop me a line at