ford ecosport owner's manual (cby) rayong (thailand)/haiduong (vietnam), enphi introduction...
TRANSCRIPT

FORD ECOSPORT Owner's Manual

The information contained in this publication was correct at the time of going to print. In the interest ofcontinuous development, we reserve the right to change specifications, design or equipment at any timewithout notice or obligation. No part of this publication may be reproduced, transmitted, stored in aretrieval system or translated into any language in any form by any means without our written permission.Errors and omissions excepted.© Ford Motor Company 2014
All rights reserved.Part Number: 20140822061110

IntroductionAbout This Manual...........................................5Symbols Glossary.............................................5Data Recording..................................................7Replacement Parts
Recommendation........................................8Mobile Communications
Equipment......................................................8
At a GlanceAt a Glance..........................................................9
Child SafetyInstalling Child Seats.....................................14Child Seat Positioning...................................16Child Safety Locks..........................................18
Safety BeltsFastening the Safety Belts..........................19Safety Belt Height Adjustment.................20Safety Belt Minder.........................................20
Supplementary RestraintsSystem
Principle of Operation...................................22Driver Airbag.....................................................22Passenger Airbag............................................23Side Airbags.....................................................23Driver Knee Airbag..........................................23Side Curtain Airbags.....................................24
Keys and Remote ControlsGeneral Information on Radio
Frequencies..................................................25Remote Control...............................................25Replacing a Lost Key or Remote
Control............................................................27
LocksLocking and Unlocking.................................28
Keyless Entry...................................................30Tailgate...............................................................32
SecurityPassive Anti-Theft System.........................33Anti-Theft Alarm............................................33
Steering WheelAdjusting the Steering Wheel....................35Audio Control...................................................35Voice Control...................................................36
Wipers and WashersWindshield Wipers.........................................37Autowipers........................................................37Windshield Washers.....................................38Rear Window Wiper and Washers...........38
LightingLighting Control..............................................40Autolamps........................................................40Headlamp Exit Delay.....................................41Front Fog Lamps.............................................41Rear Fog Lamps...............................................41Direction Indicators........................................41Interior Lamps.................................................42
Windows and MirrorsPower Windows..............................................43Exterior Mirrors................................................44Interior Mirror...................................................45Moonroof..........................................................46
Instrument ClusterGauges................................................................47Warning Lamps and Indicators................48Audible Warnings and Indicators..............51
1
Ecosport (CBY) Rayong (Thailand)/Haiduong (Vietnam), enPHI
Table of Contents
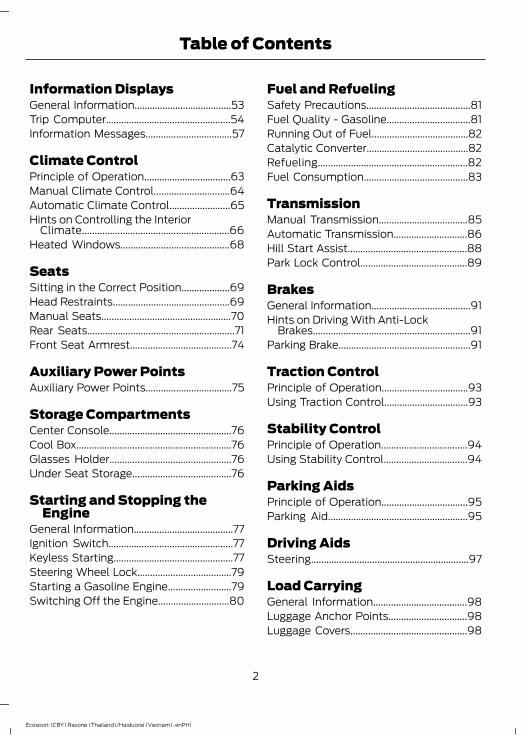
Information DisplaysGeneral Information......................................53Trip Computer.................................................54Information Messages..................................57
Climate ControlPrinciple of Operation..................................63Manual Climate Control..............................64Automatic Climate Control........................65Hints on Controlling the Interior
Climate..........................................................66Heated Windows...........................................68
SeatsSitting in the Correct Position...................69Head Restraints..............................................69Manual Seats...................................................70Rear Seats..........................................................71Front Seat Armrest........................................74
Auxiliary Power PointsAuxiliary Power Points..................................75
Storage CompartmentsCenter Console................................................76Cool Box.............................................................76Glasses Holder................................................76Under Seat Storage.......................................76
Starting and Stopping theEngine
General Information.......................................77Ignition Switch.................................................77Keyless Starting...............................................77Steering Wheel Lock.....................................79Starting a Gasoline Engine.........................79Switching Off the Engine............................80
Fuel and RefuelingSafety Precautions.........................................81Fuel Quality - Gasoline.................................81Running Out of Fuel......................................82Catalytic Converter........................................82Refueling...........................................................82Fuel Consumption.........................................83
TransmissionManual Transmission...................................85Automatic Transmission.............................86Hill Start Assist...............................................88Park Lock Control..........................................89
BrakesGeneral Information.......................................91Hints on Driving With Anti-Lock
Brakes..............................................................91Parking Brake....................................................91
Traction ControlPrinciple of Operation..................................93Using Traction Control.................................93
Stability ControlPrinciple of Operation..................................94Using Stability Control.................................94
Parking AidsPrinciple of Operation..................................95Parking Aid.......................................................95
Driving AidsSteering..............................................................97
Load CarryingGeneral Information.....................................98Luggage Anchor Points...............................98Luggage Covers..............................................98
2
Ecosport (CBY) Rayong (Thailand)/Haiduong (Vietnam), enPHI
Table of Contents

Roof Racks and Load Carriers..................98
TowingTowing a Trailer.............................................100Recommended Towing Weights............100Towing Points.................................................101Transporting the Vehicle............................101Towing the Vehicle on Four Wheels......102
Driving HintsBreaking-In.....................................................103Cold Weather Precautions........................103Driving Through Water...............................103Floor Mats.......................................................103
Roadside EmergenciesHazard Warning Flashers..........................105Warning Triangle..........................................105Jump Starting the Vehicle.........................105
FusesFuse Box Locations.....................................108Fuse Specification Chart...........................109Changing a Fuse.............................................115
MaintenanceGeneral Information.....................................116Opening and Closing the Hood................116Under Hood Overview - 1.5L Duratec-16V
Ti-VCT (81kW/110PS) - Sigma............118Engine Oil Dipstick - 1.5L Duratec-16V
Ti-VCT (81kW/110PS) - Sigma............119Engine Oil Check............................................119Engine Coolant Check................................120Brake and Clutch Fluid Check...................121Washer Fluid Check......................................121Changing the 12V Battery...........................121Checking the Wiper Blades.......................122Changing the Wiper Blades......................123Removing a Headlamp...............................124
Changing a Bulb............................................124Bulb Specification Chart............................129Changing the Engine Air Filter.................129Technical Specifications............................130
Vehicle CareCleaning the Exterior...................................132Cleaning the Engine.....................................132Repairing Minor Paint Damage................133
Wheels and TiresGeneral Information....................................134Tire Care...........................................................134Using Snow Chains......................................134Changing a Road Wheel............................134Technical Specifications............................138
Capacities and Specific-ations
Vehicle Identification Plate......................140Vehicle Identification Number..................141Technical Specifications............................142
Audio SystemGeneral Information....................................143Audio Unit - Vehicles With: AM/FM/
CD...................................................................144Audio Unit.......................................................149Compact Disc Player...................................153Audio Input Jack............................................157USB Port..........................................................158Audio Troubleshooting...............................158
AppendicesElectromagnetic Compatibility...............159
3
Ecosport (CBY) Rayong (Thailand)/Haiduong (Vietnam), enPHI
Table of Contents

4
Ecosport (CBY) Rayong (Thailand)/Haiduong (Vietnam), enPHI

ABOUT THIS MANUALThank you for choosing Ford. Werecommend that you take some time toget to know your vehicle by reading thismanual. The more that you know aboutit, the greater the safety and pleasure youwill get from driving it.
WARNINGDriving while distracted can result inloss of vehicle control, crash andinjury. We strongly recommend that
you use extreme caution when using anydevice that may take your focus off theroad. Your primary responsibility is the safeoperation of your vehicle. We recommendagainst the use of any hand-held devicewhile driving and encourage the use ofvoice-operated systems when possible.Make sure you are aware of all applicablelocal laws that may affect the use ofelectronic devices while driving.
Note: This manual describes productfeatures and options available throughoutthe range of available models, sometimeseven before they are generally available. Itmay describe options not fitted to thevehicle you have purchased.Note: Some of the illustrations in thismanual may show features as used indifferent models, so may appear differentto you on your vehicle.Note: Always use and operate your vehiclein line with all applicable laws andregulations.Note: Pass on this manual when sellingyour vehicle. It is an integral part of yourvehicle.This manual may qualify the location of acomponent as left-hand side or right-handside. The side is determined when facingforward in the seat.
E154903
Right-hand side.ALeft-hand side.B
SYMBOLS GLOSSARYThese are some of the symbols you maysee on your vehicle.
Safety alert
See Owner's Manual
E162384
Air conditioning system
Anti-lock braking system
Avoid smoking, flames or sparks
Battery
Battery acid
Brake fluid - non petroleumbased
5
Ecosport (CBY) Rayong (Thailand)/Haiduong (Vietnam), enPHI
Introduction

Brake system
Cabin air filter
Check fuel cap
Child safety door lock or unlock
Child seat lower anchor
Child seat tether anchor
E71340
Cruise control
Do not open when hot
Engine air filter
Engine coolant
Engine coolant temperature
Engine oil
Explosive gas
Fan warning
Fasten safety belt
Front airbag
Front fog lamps
Fuel pump reset
Fuse compartment
Hazard warning flashers
Heated rear window
E91392
Heated windshield
Interior luggage compartmentrelease
Jack
E161353
Keep out of reach of children
Lighting control
Low tire pressure warning
Maintain correct fluid level
Note operating instructions
6
Ecosport (CBY) Rayong (Thailand)/Haiduong (Vietnam), enPHI
Introduction

Panic alarm
E139213
Parking aid
Parking brake
Power steering fluid
Power windows front/rear
Power window lockout
Service engine soon
Side airbag
E167012
Shield the eyes
Stability control
Windshield wash and wipe
DATA RECORDINGA large number of electronic componentsof your vehicle contain data storagemodules temporarily or permanentlystoring technical data about the conditionof the vehicle, events and errors.
In general, this technical informationdocuments the condition of parts,modules, systems or the environment:• Operating conditions of system
components (e.g. filling levels).• Status messages of the vehicle and its
individual components (e.g. number ofwheel revolutions/rotational speed,deceleration, lateral acceleration).
• Malfunction and defects in importantsystem components (e.g. lighting andbrake system).
• Vehicle reactions in particular drivingsituations (e.g. inflation of an airbag,activation of the stability regulationsystem).
• Environmental conditions (e.g.temperature).
These data are exclusively technical andhelp identification and correction of errorsas well as optimisation of vehiclefunctions. Motion profiles indicatingtravelled routes cannot be created withthese data.If services are used (e.g. repair works,service processes, warranty cases, qualityassurance), employees of the servicenetwork (including manufacturers) areable to read out this technical informationfrom the event and error data storagemodules using special diagnostic devices.If required, you will receive furtherinformation. After an error has beencorrected, these data are deleted from theerror storage module or they are constantlyoverwritten.When using the vehicle, situations mayoccur in which these technical data relatedto other information (accident report,damages on the vehicle, witnessstatements etc.) may be associated witha specific person - possibly, with theassistance of an expert.
7
Ecosport (CBY) Rayong (Thailand)/Haiduong (Vietnam), enPHI
Introduction

Additional functions contractually agreedupon with the client (e.g. vehicle locationin emergency cases) allow thetransmission of particular vehicle datafrom the vehicle.
REPLACEMENT PARTSRECOMMENDATIONYour vehicle has been built to the higheststandards using quality parts. Werecommend that you demand the use ofgenuine Ford and Motorcraft partswhenever your vehicle requires scheduledmaintenance or repair. You can clearlyidentify genuine Ford and Motorcraft partsby looking for the Ford, FoMoCo orMotorcraft branding on the parts or theirpackaging.
Scheduled Maintenance andMechanical RepairsOne of the best ways for you to make surethat your vehicle provides years of serviceis to have it maintained in line with ourrecommendations using parts thatconform to the specifications detailed inthis Owner’s Manual. Genuine Ford andMotorcraft parts meet or exceed thesespecifications.
Collision RepairsWe hope that you never experience acollision, but accidents do happen. GenuineFord replacement collision parts meet ourstringent requirements for fit, finish,structural integrity, corrosion protectionand dent resistance. During vehicledevelopment we validate these partsdeliver the intended level of protection asa whole system. A great way to know forsure you are getting this level of protectionis to use genuine Ford replacementcollision parts.
Warranty on Replacement PartsGenuine Ford and Motorcraft replacementparts are the only replacement parts thatbenefit from a Ford Warranty. Damagecaused to your vehicle as a result of thefailure of non-Ford parts may not becovered by the Ford Warranty. Foradditional information, refer to the termsand conditions of the Ford Warranty.
MOBILE COMMUNICATIONSEQUIPMENTUsing mobile communications equipmentis becoming increasingly important in theconduct of business and personal affairs.However, you must not compromise yourown or others’ safety when using suchequipment. Mobile communications canenhance personal safety and security whenappropriately used, particularly inemergency situations. Safety must beparamount when using mobilecommunications equipment to avoidnegating these benefits. Mobilecommunication equipment includes, butis not limited to, cellular phones, pagers,portable email devices, text messagingdevices and portable two-way radios.
WARNINGDriving while distracted can result inloss of vehicle control, crash andinjury. We strongly recommend that
you use extreme caution when using anydevice that may take your focus off theroad. Your primary responsibility is the safeoperation of your vehicle. We recommendagainst the use of any hand-held devicewhile driving and encourage the use ofvoice-operated systems when possible.Make sure you are aware of all applicablelocal laws that may affect the use ofelectronic devices while driving.
8
Ecosport (CBY) Rayong (Thailand)/Haiduong (Vietnam), enPHI
Introduction

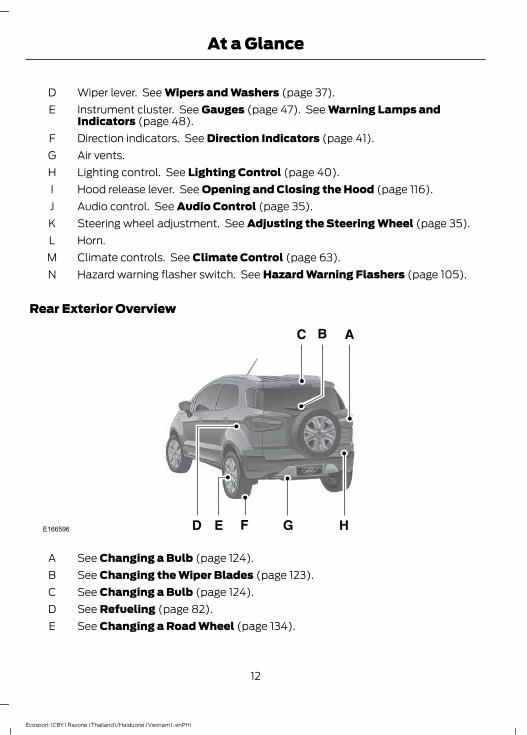
Front Exterior Overview
E147752E147752
See Locking and Unlocking (page 28).ASee Interior Mirror (page 45).BSee Changing the Wiper Blades (page 123).CSee Under Hood Overview (page 118).DSee Towing Points (page 101).ESee Changing a Bulb (page 124).FTire pressures. See Technical Specifications (page 138).GSee Changing a Road Wheel (page 134).H
9
Ecosport (CBY) Rayong (Thailand)/Haiduong (Vietnam), enPHI
At a Glance

Vehicle Interior Overview
C
GF
AB
E159198
H
E D
See Manual Transmission (page 85). See Automatic Transmission (page86).
A
See Power Windows (page 43). See Exterior Mirrors (page 44).BSee Head Restraints (page 69).CSee Fastening the Safety Belts (page 19).DSee Rear Seats (page 71).ESee Manual Seats (page 70).FSee Parking Brake (page 91).GSee Opening and Closing the Hood (page 116).H
10
Ecosport (CBY) Rayong (Thailand)/Haiduong (Vietnam), enPHI
At a Glance

Instrument Panel Overview - Left-Hand Drive
ABCD E FG
H
I JK L
M
N
E174232
Instrument Panel Overview - Right-Hand Drive
A B C D E F G
H
IL JK
M
N
E159197
Door lock button. See Locking and Unlocking (page 28).AAudio unit. See Audio System (page 143).BInformation display. See Information Displays (page 53).C
11
Ecosport (CBY) Rayong (Thailand)/Haiduong (Vietnam), enPHI
At a Glance
Wiper lever. See Wipers and Washers (page 37).DInstrument cluster. See Gauges (page 47). See Warning Lamps andIndicators (page 48).
E
Direction indicators. See Direction Indicators (page 41).FAir vents.GLighting control. See Lighting Control (page 40).HHood release lever. See Opening and Closing the Hood (page 116).IAudio control. See Audio Control (page 35).JSteering wheel adjustment. See Adjusting the Steering Wheel (page 35).KHorn.LClimate controls. See Climate Control (page 63).MHazard warning flasher switch. See Hazard Warning Flashers (page 105).N
Rear Exterior Overview
E166596
See Changing a Bulb (page 124).ASee Changing the Wiper Blades (page 123).BSee Changing a Bulb (page 124).CSee Refueling (page 82).DSee Changing a Road Wheel (page 134).E
12
Ecosport (CBY) Rayong (Thailand)/Haiduong (Vietnam), enPHI
At a Glance

Tire pressures. See Technical Specifications (page 138).FSee Towing Points (page 101).GSee Warning Triangle (page 105). Spare wheel. See Changing a Road Wheel(page 134). Jack. See Changing a Road Wheel (page 134).
H
13
Ecosport (CBY) Rayong (Thailand)/Haiduong (Vietnam), enPHI
At a Glance

INSTALLING CHILD SEATS
E133140
E68916
WARNINGSUse an approved child restraint tosecure children less than 150centimeters (59 inches) tall in the
rear seat.Extreme Hazard! Do not use arearward facing child restraint on aseat protected by an air bag in front
of it!Read and follow the manufacturer’sinstructions when you are fitting achild restraint.Do not modify child restraints in anyway.Do not hold a child on your lap whenthe vehicle is moving.
WARNINGSDo not leave unattended children inyour vehicle.If your vehicle has been involved inan accident, have the child restraintschecked by an authorized dealer.
Note: Children should be properlyrestrained in a rear seating positionwhenever possible. When using a childsafety seat ensure that the rear seat backis in the most upright position.
Child Restraints for Different MassGroupsUse the correct child restraint as follows:
Baby Safety Seat
E68918
Secure children that weigh less than 13kilograms (29 pounds) in a rearward facingbaby safety seat (Group 0+) in the rearseat.
14
Ecosport (CBY) Rayong (Thailand)/Haiduong (Vietnam), enPHI
Child Safety

Child Safety Seat
E68920
Secure children that weigh between 13 and18 kilograms (29 and 40 pounds) in a childsafety seat (Group 1) in the rear seat.
Booster SeatsWARNINGS
Do not install a booster seat or abooster cushion with only the lapstrap of the safety belt.Do not install a booster seat or abooster cushion with a safety beltthat is slack or twisted.Do not put the safety belt under yourchild’s arm or behind its back.Do not use pillows, books or towelsto boost your child’s height.Make sure that your children sit in anupright position.Secure children that weigh morethan 15 kilograms (33 pounds) butare less than 150 centimeters (59
inches) tall in a booster seat or a boostercushion.
Note: When using a child seat on a rearseat, make sure that the child seat reststightly against the vehicle seat. It may benecessary to lift or remove the headrestraint. See Head Restraints (page 69).
Booster Seat (Group 2)
E70710
We recommend that you use a boosterseat that combines a cushion with abackrest instead of a booster cushion only.The raised seating position will allow youto position the shoulder strap of the adultsafety belt over the center of your child’sshoulder and the lap strap tightly acrossits hips.
15
Ecosport (CBY) Rayong (Thailand)/Haiduong (Vietnam), enPHI
Child Safety

Booster Cushion (Group 3)
E68924
ISOFIX Anchor PointsWARNING
Use an anti-rotation device whenusing the ISOFIX system. Werecommend the use of a top tether
or support leg.
Note: When you are purchasing an ISOFIXrestraint, make sure that you know thecorrect mass group and ISOFIX size classfor the intended seating locations. SeeChild Seat Positioning (page 16).Your vehicle is fitted with ISOFIX anchorpoints that accommodate universallyapproved ISOFIX child restraints.The ISOFIX system comprises two rigidattachment arms on the child restraint thatattach to anchor points on the outboardrear seats, where the cushion and backrestmeet.
E87145
Push the child seat back firmly to engagethe ISOFIX lower anchor points.
CHILD SEAT POSITIONING
WARNINGSPlease consult your dealer for thelatest details relating to Fordrecommended child seats.Extreme Hazard! Do not use arearward facing child restraint on aseat protected by an air bag in front
of it!When using a child seat with asupport leg, the support leg mustrest securely on the floor.When using a child seat with a safetybelt, make sure that the safety beltis not slack or twisted.The child seat must rest tightlyagainst the vehicle seat. It may benecessary to lift or remove the head
restraint. See Head Restraints (page 69).
16
Ecosport (CBY) Rayong (Thailand)/Haiduong (Vietnam), enPHI
Child Safety

Mass group categories
Seating positions3210+0
22 - 36 kg(46 - 79
lbs)
15 - 25 kg(33 - 55
lbs)
9 - 18 kg(20 - 40
lbs)Up to 13 kg
(29 lbs)Up to 10 kg
(22 lbs)
UUUUURear seats
U Suitable for universal category child seats approved for use in this mass group.
ISOFIX Child Seats
Mass group categories
Seating positions10+
Forward facingRear facing
9 - 18 kg (20 - 40 lbs)13 kg (Up to 29 lbs)
A, B, B1*C, D, E*Size classRear outboard seat ISOFIX
IL, IUFILSeat type
IL Suitable for particular ISOFIX child restraints systems of the semi-universal category.Please consult child restraints systems suppliers' vehicle recommendation lists.IUF Suitable for ISOFIX forward facing child restraints systems of universal categoryapproved for use in this mass group and ISOFIX size class.*The ISOFIX size class for both universal and semi-universal child restraints systems isdefined by the capital letters A to G. These identification letters are displayed on ISOFIXchild restraints.
17
Ecosport (CBY) Rayong (Thailand)/Haiduong (Vietnam), enPHI
Child Safety

CHILD SAFETY LOCKS
WARNINGYou cannot open the rear doors frominside if you have put the child safetylocks on.
E155301
Rear Left-Hand DoorTurn anti-clockwise to lock and clockwiseto unlock.
Rear Right-Hand DoorTurn clockwise to lock and anti-clockwiseto unlock.
18
Ecosport (CBY) Rayong (Thailand)/Haiduong (Vietnam), enPHI
Child Safety

FASTENING THE SAFETYBELTS
WARNINGSInsert the tongue into the buckle untilyou hear a distinct click. You havenot fastened the safety belt properly
if you do not hear a click.Make sure that your safety belt issecurely stored and is not outside thevehicle when closing the door.
Note: Fasten the safety belt only with thevehicle at a standstill, and never when thevehicle is moving.Always use the safety belts and childrestraint systems.The upper belt strap should rest on theshoulder, never over the neck. The lowerbelt strap should be placed over the pelvicarea, never over the stomach.Never use one belt for more than oneperson. Make sure the belts are not twistedor loose, nor obstructed by otherpassengers or packages.Do not recline the front seat backrestsexcessively, as the safety belts only providemaximum protection when the backrestsare in a nearly vertical position.Retractable-inertial three-point safetybeltsThis belt type is available with the frontseats of all models, and with the rear seatof some versions. Keep the belt retentionbuckle on the rear floor free from luggageor objects.Buckling the safety beltPull the belt with a steady movement toavoid a block. Insert the buckle tab into thebelt lock until your hear a click, and makesure it is locked in place.Releasing the safety belt
Press the red button on the buckle, thenlet the belt roll up smoothly andcompletely.
E74124
Fixed rear center lap belt
E85817
When buckling, make sure you hear a clickconfirming that the tab is latched into thebelt lock. To tighten it, pull the loose endthrough the buckle until the belt iscomfortably adjusted around the hips.
19
Ecosport (CBY) Rayong (Thailand)/Haiduong (Vietnam), enPHI
Safety Belts

Pull the belt out steadily. It may lock if youpull it sharply or if the vehicle is on a slope.Note: Some models have a rear center lapbelt.Press the red button on the buckle torelease the belt. Let it retract completelyand smoothly.
Using Safety Belts DuringPregnancy
E68587
WARNINGPosition the safety belt correctly foryour safety and that of your unbornchild. Do not use only the lap strap
or the shoulder strap.
Position the lap strap comfortably acrossyour hips and low beneath your pregnantabdomen. Position the shoulder strapbetween your breasts, above and to theside of your pregnant abdomen.
SAFETY BELT HEIGHTADJUSTMENT (If Equipped)
WARNINGPosition the safety belt heightadjuster so that the belt rests acrossthe middle of your shoulder. Failure
to adjust the safety belt properly couldreduce the effectiveness of the safety beltand increase the risk of injury in a crash.
Adjust the height of the shoulder belt sothe belt rests across the middle of yourshoulder.
E145664
To adjust the shoulder belt height:1. Pull the button and slide the height
adjuster up or down.2. Release the button and pull down on
the height adjuster to make sure it islocked in place.
SAFETY BELT MINDER
WARNINGThe system will only provideprotection when you use the safetybelt correctly.
The warning lamp illuminates and anaudible warning will sound when thefollowing conditions have been met:• The front safety belts have not been
fastened.• Your vehicle exceeds a relatively low
speed.It will also illuminate and sound if a frontsafety belt is unfastened when your vehicleis moving.If you do not fasten your safety belt thewarning switches off automatically afterapproximately five minutes.
20
Ecosport (CBY) Rayong (Thailand)/Haiduong (Vietnam), enPHI
Safety Belts

Turning the Safety Belt Minder OffContact an authorized dealer.
21
Ecosport (CBY) Rayong (Thailand)/Haiduong (Vietnam), enPHI
Safety Belts

PRINCIPLE OF OPERATION
WARNINGSDo not modify the front of yourvehicle in any way. This couldadversely affect deployment of the
airbags.Never use a child or baby seat in thefront seat on the passenger side.Maximum airbag efficiency isobtained with the correct seat andseat backrest adjustment. Adjust
them so that the steering wheel can beheld with the arms slightly bent, and placethe seat backrest almost in the verticalposition (30° at most). Fasten the seatbeltand keep a distance of at least 25centimeters between the steering wheeland the driver's chest to reduce the risk ofinjury for being much too close to theairbag when it is inflated. The same appliesto the front passenger.
Have repairs to the steering wheel,steering column, seats, airbags andsafety belts carried out only by an
authorized dealer.Do not place anything over theairbag. Objects placed over theairbag inflation area may be
projected on your face and torso when theairbag is triggered, causing serious injury.Failure to follow these instructions mayincrease the risk of injury in case of a crash.
Do not puncture the seat with pins,needles or other pointed objects.This could cause damage and
adversely affect deployment of theairbags.
Use seat covers designed for seatswith side airbags. Have theminstalled by an authorized dealer.
WARNINGSMany airbag system componentsbecome hot after triggering. Avoidtouching any component of the
airbag system soon after triggering as thismay result in serious injury.
Note: You will hear a loud bang and see acloud of harmless powdery residue if anairbag deploys. This is normal.Note: Only wipe airbag covers with a dampcloth.Note: Do not allow passengers in the frontseat to ride with their feet, knees or anyother body part touching or too close to theairbag cover. There is a risk of serious injuryif the airbag is triggered.Note: Never place your arm over the airbagas a deploying airbag can result in seriousarm fractures or other injuries.Note: Modifying or adding equipment tothe front part of the vehicle (includingchassis, bumper, front body structures andtowing hooks) may affect the performanceof the airbag system, increasing the risk ofinjury. Do not modify the front part of yourvehicle.
DRIVER AIRBAG
E74302
22
Ecosport (CBY) Rayong (Thailand)/Haiduong (Vietnam), enPHI
Supplementary Restraints System

The airbag will deploy during significantfrontal collisions or collisions that are upto 30 degrees from the left or the right. Theairbag will inflate within a few thousandthsof a second and deflate on contact withthe occupant, thus cushioning forwardbody movement. During minor frontalcollisions, overturns, rear collisions andside collisions, the airbag will not deploy.
PASSENGER AIRBAG
E151127
The passenger airbag will deploy duringsignificant frontal or near-frontal collisions.The airbag will inflate within a fewthousandths of a second and deflate oncontact with the occupant, thus cushioningforward body movement. During minorfrontal collisions, overturns, rear collisionsand side collisions, the front passengerairbag will not deploy.
SIDE AIRBAGS (If Equipped)
WARNINGUse seat covers designed for seatswith side airbags. Have these fittedby an authorized dealer.
E72658
The airbags are located inside theseatback of the front seats. There is a labelattached to the side of the seatback toindicate this.The airbag will deploy during significantlateral collisions. The airbag will not deployin minor lateral and frontal collisions, rearcollisions, or overturns.
DRIVER KNEE AIRBAG
WARNINGDo not attempt to open the airbagcover.
The airbag will deploy during frontalcollisions or collisions that are up to 30degrees from the left or the right. Theairbag will inflate within a few thousandthsof a second and deflate on contact withthe occupants, thus providing a cushionbetween the driver’s knees and the steeringcolumn. During overturns, rear collisionsand side collisions, the knee airbag will notdeploy.For item location: See At a Glance (page9).Note: The airbag has a lower deploymentthreshold than the front airbags. During aminor collision, it is possible that only theknee airbag will deploy.
23
Ecosport (CBY) Rayong (Thailand)/Haiduong (Vietnam), enPHI
Supplementary Restraints System
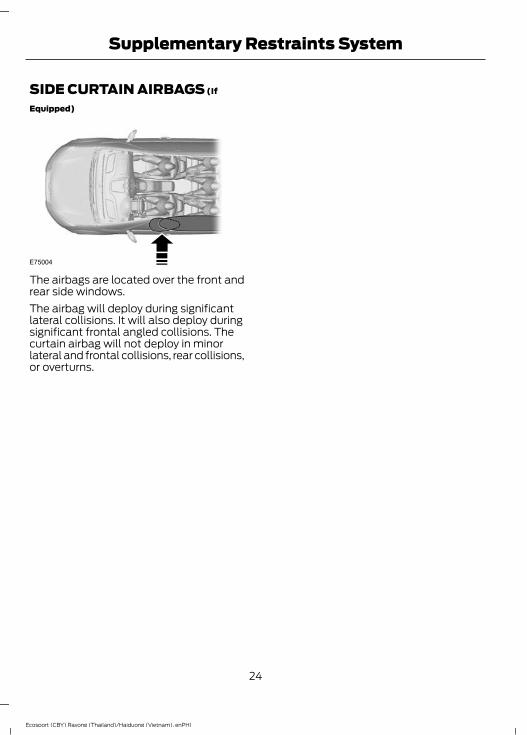
SIDE CURTAIN AIRBAGS (If
Equipped)
E75004
The airbags are located over the front andrear side windows.The airbag will deploy during significantlateral collisions. It will also deploy duringsignificant frontal angled collisions. Thecurtain airbag will not deploy in minorlateral and frontal collisions, rear collisions,or overturns.
24
Ecosport (CBY) Rayong (Thailand)/Haiduong (Vietnam), enPHI
Supplementary Restraints System

GENERAL INFORMATION ONRADIO FREQUENCIESNote: Changes or modifications notexpressly approved by the party responsiblefor compliance could void the user’sauthority to operate the equipment.The typical operating range for yourtransmitter is approximately 10 m.A decrease in operating range could becaused by:• weather conditions• nearby radio towers• structures around your vehicle• other vehicles parked next to your
vehicle.The radio frequency used by your remotecontrol can also be used by other shortdistance radio transmissions (e.g. amateurradios, medical equipment, wirelessheadphones, remote controls and alarmsystems). If the frequencies are jammed,you will not be able to use your remotecontrol. You can lock and unlock the doorswith the key.Note: Make sure your vehicle is lockedbefore leaving it unattended.Note: If you are in range, the remote controlwill operate if you press any buttonunintentionally.Note: The remote control contains sensitiveelectrical components. Exposure to moistureor impact may cause permanent damage.
REMOTE CONTROLYou can program a maximum of eightremote controls to your vehicle. Thisincludes any that were supplied with yourvehicle. See an authorized dealer.
Reprogramming the UnlockingFunctionNote: When you press the unlock buttoneither all the doors are unlocked or only thedriver’s door is unlocked. Pressing the unlockbutton again unlocks all the doors.Press and hold the unlock and lock buttonson the remote key simultaneously for atleast four seconds with the ignition off. Thedirection indicators will flash twice toconfirm the change.To return to the original unlocking function,repeat the process.
Changing the Remote ControlBattery
E107998
Make sure that you dispose ofold batteries in anenvironmentally friendly way.
Seek advice from your local authorityregarding recycling.
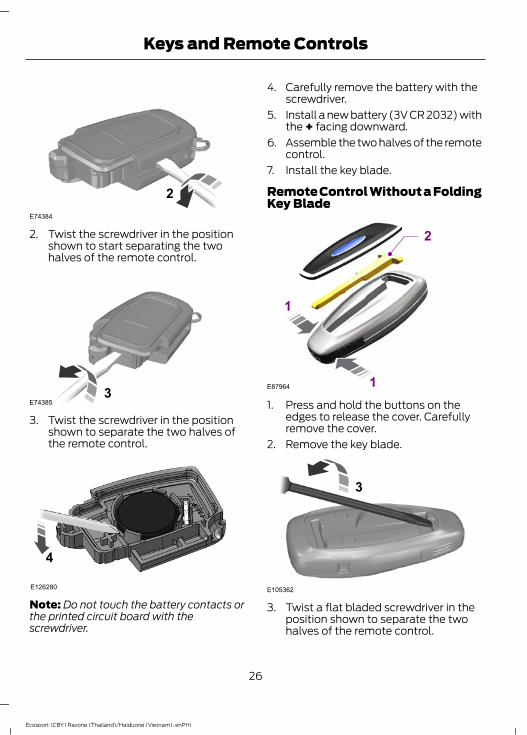
Remote Control With a Folding KeyBlade
1
E74383
1. Insert a screwdriver as far as possibleinto the slot on the side of the remotecontrol, push it toward the key bladeand remove the key blade.
25
Ecosport (CBY) Rayong (Thailand)/Haiduong (Vietnam), enPHI
Keys and Remote Controls
E74384
2
2. Twist the screwdriver in the positionshown to start separating the twohalves of the remote control.
E743853
3. Twist the screwdriver in the positionshown to separate the two halves ofthe remote control.
4
E126280
Note: Do not touch the battery contacts orthe printed circuit board with thescrewdriver.
4. Carefully remove the battery with thescrewdriver.
5. Install a new battery (3V CR 2032) withthe + facing downward.
6. Assemble the two halves of the remotecontrol.
7. Install the key blade.
Remote Control Without a FoldingKey Blade
E87964
2
1
11. Press and hold the buttons on the
edges to release the cover. Carefullyremove the cover.
2. Remove the key blade.
E105362
3
3. Twist a flat bladed screwdriver in theposition shown to separate the twohalves of the remote control.
26
Ecosport (CBY) Rayong (Thailand)/Haiduong (Vietnam), enPHI
Keys and Remote Controls

E119190
4
4. Carefully insert the screwdriver in theposition shown to open the remotecontrol.
E125860
5
Note: Do not touch the battery contacts orthe printed circuit board with thescrewdriver.5. Carefully remove the battery with the
screwdriver.6. Install a new battery (3V CR 2032) with
the + facing downward.7. Assemble the two halves of the remote
control.8. Install the key blade.
REPLACING A LOST KEY ORREMOTE CONTROLReplacement keys or remote controls canbe purchased from an authorized dealer.Authorized dealers can program remotecontrols for your vehicle. See PassiveAnti-Theft System (page 33).To re-program the passive anti-theftsystem see an authorized dealer.
27
Ecosport (CBY) Rayong (Thailand)/Haiduong (Vietnam), enPHI
Keys and Remote Controls

LOCKING AND UNLOCKINGNote: All doors will be automaticallyunlocked when the airbag deploys due toimpact and following this the hazardwarning flashers will flash.
Power Door Locks (If Equipped)
E146263
The power door lock control is located onthe instrument panel near the radio.• Press the button once. The doors will
lock.• Press the button again. The doors will
unlock.For item location. See At a Glance (page9).
AutolockThe autolock feature will lock all the doorswhen:• all doors and tailgate are closed,• the ignition is on,• you shift into any gear putting the
vehicle in motion, and• the vehicle attains a speed greater than
20 km/h.If one or more doors are opened, theautolock feature will repeat when:• the vehicle speed has been 15 km/h for
at least two seconds; and• the conditions for autolock are met
again.
Deactivating and Activating AutolockNote: Your authorized dealer can performthis procedure, or you can do the procedureyourselfTo enable or disable these features, do thefollowing:Note: Make sure all the doors are closedbefore starting the procedure.Note: You will have 30 seconds tocomplete the procedure.1. Switch the ignition on.2. Press the power door lock button three
times.3. Switch the ignition off.4. Press the power door lock button three
times.5. Switch the ignition on.6. Press the power door lock button three
times.7. Switch the ignition off.8. Switch the ignition on. A chime will
sound indicating the programmingmode has been entered.
Once in programming mode, eachsubsequent short press (less than 1second) of the power door lock button willtoggle autolock between on and off.
Remote ControlThe remote control can be used any timethe vehicle is not running.
Unlocking the DoorsNote: You can unlock the driver's door withthe key. Use the key when the remotecontrol is not functioning.
28
Ecosport (CBY) Rayong (Thailand)/Haiduong (Vietnam), enPHI
Locks

Note: When you lock your vehicle forseveral weeks, the remote control will beswitched off. Your vehicle must be unlockedand the engine started using the key.Unlocking and starting your vehicle once willenable the remote control.
Press the button to unlock thedriver’s door. The turn signals willflash once.
Press the button again within threeseconds to unlock all doors. The turnsignals will flash once.
Reprogramming the UnlockingFunctionYou can reprogram the unlocking functionso that all doors will unlock when you pressthe button once. See Remote Control(page 25).
Locking the DoorsPress the button to lock all thedoors. The turn signals will flashonce.
Press the button again within threeseconds to confirm that all the doors areclosed. The doors will lock again and theturn signals will flash once if all the doorsand the luggage compartment are closed.Note: If any door or the luggagecompartment is not closed, or if the hood isnot closed on vehicles equipped with ananti-theft alarm, the lamps will not flash.
Automatic Relocking (If Equipped)The doors will relock automatically if youdo not open a door within 45 seconds ofunlocking the doors with the remotecontrol. The door locks and the alarm willreturn to their previous state.
Locking and Unlocking the Doorsfrom Inside
E102566
Press the button. For itemlocation. See At a Glance (page9).
Locking and Unlocking the Doorswith the KeyNote: Do not leave your keys in your vehicle.
Locking with the KeyTurn the top of the key toward the front ofyour vehicle and rotate the key a clockwisedirection.
Unlocking with the keyNote: If the child safety locks are on andyou pull the interior handle, you will onlyswitch off the emergency locking, not thechild safety lock. You can only open thedoors using the external door handle.Note: If the doors have been unlocked usingthis method, the doors must be lockedindividually until the central locking functionhas been repaired.Unlock the driver's door using the key. Youcan unlock all other doors individually bypulling the interior door handles.Note: When the central locking functionfails to operate, lock the doors individuallyusing the key in the position shown.
29
Ecosport (CBY) Rayong (Thailand)/Haiduong (Vietnam), enPHI
Locks
E130124
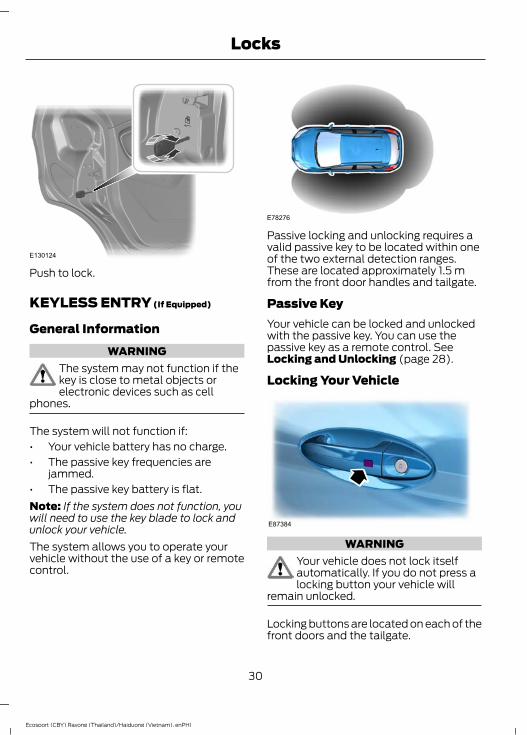
Push to lock.
KEYLESS ENTRY (If Equipped)
General InformationWARNING
The system may not function if thekey is close to metal objects orelectronic devices such as cell
phones.
The system will not function if:• Your vehicle battery has no charge.• The passive key frequencies are
jammed.• The passive key battery is flat.Note: If the system does not function, youwill need to use the key blade to lock andunlock your vehicle.The system allows you to operate yourvehicle without the use of a key or remotecontrol.
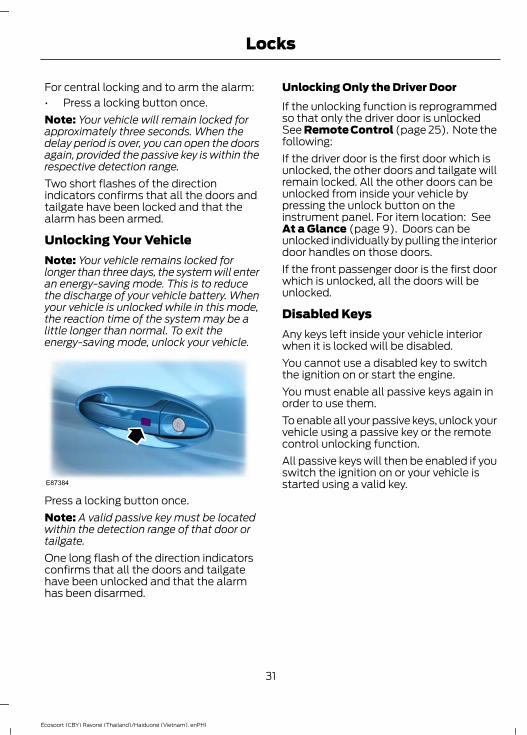
E78276
Passive locking and unlocking requires avalid passive key to be located within oneof the two external detection ranges.These are located approximately 1.5 mfrom the front door handles and tailgate.
Passive KeyYour vehicle can be locked and unlockedwith the passive key. You can use thepassive key as a remote control. SeeLocking and Unlocking (page 28).
Locking Your Vehicle
E87384
WARNINGYour vehicle does not lock itselfautomatically. If you do not press alocking button your vehicle will
remain unlocked.
Locking buttons are located on each of thefront doors and the tailgate.
30
Ecosport (CBY) Rayong (Thailand)/Haiduong (Vietnam), enPHI
Locks
For central locking and to arm the alarm:• Press a locking button once.Note: Your vehicle will remain locked forapproximately three seconds. When thedelay period is over, you can open the doorsagain, provided the passive key is within therespective detection range.Two short flashes of the directionindicators confirms that all the doors andtailgate have been locked and that thealarm has been armed.
Unlocking Your VehicleNote: Your vehicle remains locked forlonger than three days, the system will enteran energy-saving mode. This is to reducethe discharge of your vehicle battery. Whenyour vehicle is unlocked while in this mode,the reaction time of the system may be alittle longer than normal. To exit theenergy-saving mode, unlock your vehicle.
E87384
Press a locking button once.Note: A valid passive key must be locatedwithin the detection range of that door ortailgate.One long flash of the direction indicatorsconfirms that all the doors and tailgatehave been unlocked and that the alarmhas been disarmed.
Unlocking Only the Driver DoorIf the unlocking function is reprogrammedso that only the driver door is unlockedSee Remote Control (page 25). Note thefollowing:If the driver door is the first door which isunlocked, the other doors and tailgate willremain locked. All the other doors can beunlocked from inside your vehicle bypressing the unlock button on theinstrument panel. For item location: SeeAt a Glance (page 9). Doors can beunlocked individually by pulling the interiordoor handles on those doors.If the front passenger door is the first doorwhich is unlocked, all the doors will beunlocked.
Disabled KeysAny keys left inside your vehicle interiorwhen it is locked will be disabled.You cannot use a disabled key to switchthe ignition on or start the engine.You must enable all passive keys again inorder to use them.To enable all your passive keys, unlock yourvehicle using a passive key or the remotecontrol unlocking function.All passive keys will then be enabled if youswitch the ignition on or your vehicle isstarted using a valid key.
31
Ecosport (CBY) Rayong (Thailand)/Haiduong (Vietnam), enPHI
Locks
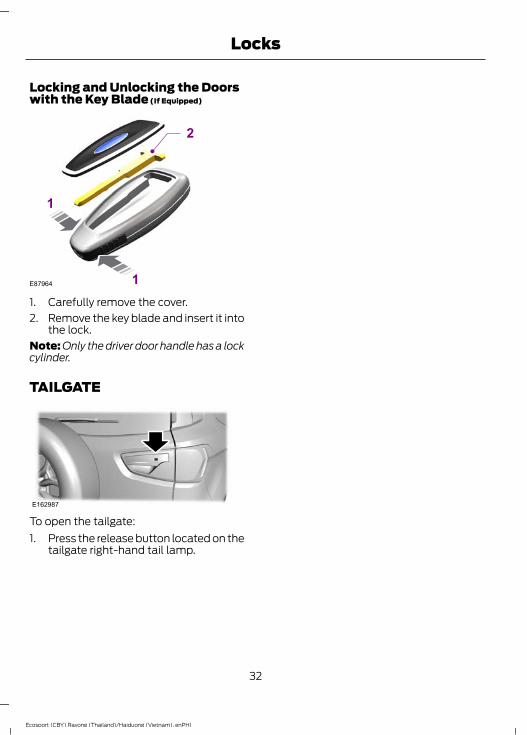
Locking and Unlocking the Doorswith the Key Blade (If Equipped)
E87964
2
1
11. Carefully remove the cover.2. Remove the key blade and insert it into
the lock.Note: Only the driver door handle has a lockcylinder.
TAILGATE
E162987
To open the tailgate:1. Press the release button located on the
tailgate right-hand tail lamp.
32
Ecosport (CBY) Rayong (Thailand)/Haiduong (Vietnam), enPHI
Locks

PASSIVE ANTI-THEFTSYSTEMPrinciple of OperationThe system prevents someone fromstarting the engine with an incorrectlycoded key.
Coded KeysIf you lose a key, you can obtain areplacement from an authorized dealer. Ifpossible, provide them with the keynumber from the tag provided with theoriginal keys. You can also obtain extrakeys from an authorized dealer.Note: Have all of your remaining keyserased and recoded if you lose a key. Havereplacement keys coded together withrecoding your remaining keys. See anauthorized dealer for further information.Note: Do not shield your keys with metalobjects. This may prevent the receiver fromrecognizing a coded key.
Arming the Engine ImmobilizerWhen you switch the ignition off the engineimmobilizer will arm automatically after ashort time.
Disarming the Engine ImmobilizerWhen you switch the ignition on the engineimmobilizer will disarm automatically if acorrectly coded key is used.If you are unable to start the engine with acorrectly coded key, have your vehiclechecked by an authorized dealer.
ANTI-THEFT ALARM (If Equipped)
Alarm SystemYour vehicle have the following alarmsystem:• Perimeter alarm.
Perimeter AlarmThe perimeter alarm is a deterrent againstunauthorised access to your vehiclethrough the doors and the hood.
Triggering the AlarmOnce armed, the alarm is triggered:• If someone opens a door, the liftgate
or the hood without a valid key orremote control.
If the alarm is triggered, the alarm horn willsound for 30 seconds and the hazardwarning flasher will flash for five minutes.Any further attempts to perform one of theabove will trigger the alarm again.
Arming the AlarmTo arm the alarm, lock your vehicle. SeeLocks (page 28).
Disarming the AlarmVehicles Without Keyless Entry
Perimeter AlarmDisarm and silence the alarm by unlockingthe doors with the key and switching theignition on with a correctly coded key orunlocking the doors with the remotecontrol.
Vehicles with Keyless EntryNote: A valid passive key must be locatedwithin the detection range of that door forkeyless entry. See Keyless Entry (page 30).
33
Ecosport (CBY) Rayong (Thailand)/Haiduong (Vietnam), enPHI
Security
Perimeter AlarmDisarm and silence the alarm by unlockingthe doors and switching the ignition on orunlocking the doors with the remotecontrol.
34
Ecosport (CBY) Rayong (Thailand)/Haiduong (Vietnam), enPHI
Security
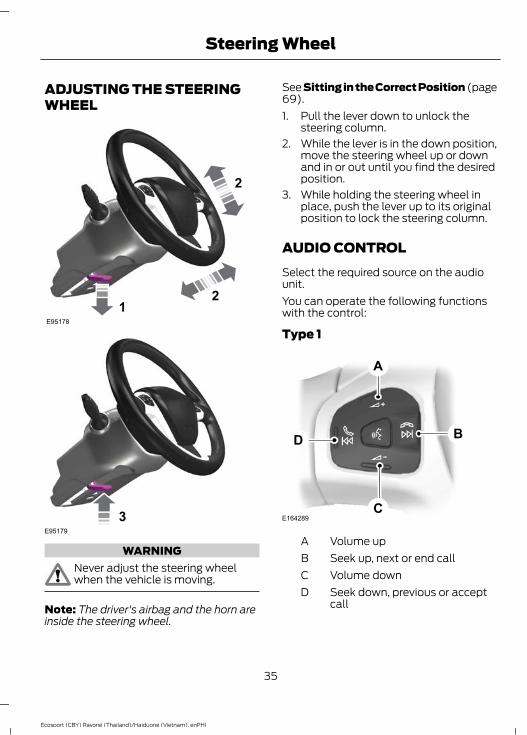
ADJUSTING THE STEERINGWHEEL
12
2
E95178
3E95179
WARNINGNever adjust the steering wheelwhen the vehicle is moving.
Note: The driver's airbag and the horn areinside the steering wheel.
See Sitting in the Correct Position (page69).1. Pull the lever down to unlock the
steering column.2. While the lever is in the down position,
move the steering wheel up or downand in or out until you find the desiredposition.
3. While holding the steering wheel inplace, push the lever up to its originalposition to lock the steering column.
AUDIO CONTROLSelect the required source on the audiounit.You can operate the following functionswith the control:
Type 1
E164289
A
B
C
D
Volume upASeek up, next or end callBVolume downCSeek down, previous or acceptcall
D
35
Ecosport (CBY) Rayong (Thailand)/Haiduong (Vietnam), enPHI
Steering Wheel

Type 2
A
B
C
D
E
M
E164290
Volume upASeek up or nextBVolume downCSeek down or previousDModeE
Press M to select the audio source.
Seek, Next or PreviousPress the seek button to:• tune the radio to the next or previous
stored preset.• play the next or the previous track.Press and hold the seek button to:• tune the radio to the next station up or
down the frequency band.• seek through a track.
VOICE CONTROL (If Equipped)
E141533
Push the control to switch on or off thevoice control.
36
Ecosport (CBY) Rayong (Thailand)/Haiduong (Vietnam), enPHI
Steering Wheel

WINDSHIELD WIPERSNote: Fully defrost the windshield beforeswitching on the windshield wipers.Note: Make sure you switch off thewindshield wipers before entering a carwash.Note: Install new wiper blades as soon asthey begin to leave bands of water andsmears on the windshield.Note: Do not operate the wipers on a drywindshield. This may scratch the glass,damage the wiper blades or cause the wipermotor to burn out. Always use thewindshield washers before wiping a drywindshield.
E102032
B
A
CD
Single wipeAIntermittent wipeBNormal wipeCHigh speed wipeD
Intermittent Wipe
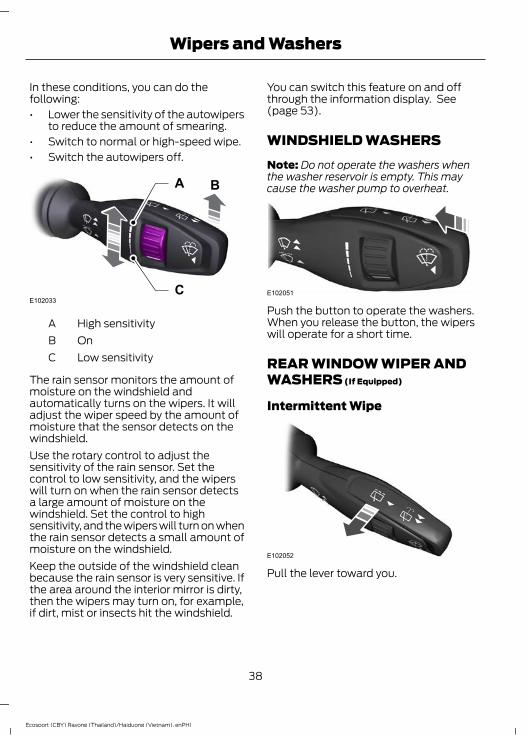
E102033
A B
C
Short wipe intervalAIntermittent wipeBLong wipe intervalC
Use the rotary control to adjust theintermittent wipe interval.
Speed Dependent Wipers (If Equipped)
When your vehicle speed increases, theinterval between wipes will decrease.
AUTOWIPERSNote: Make sure you switch off thewindshield wipers before entering a carwash.Note: Install new wiper blades as soon asthey begin to leave bands of water andsmears on the windshield.Note: When the autowipers detect enoughmoisture on the windshield for normal speedwipe and you have the autolamps featureswitched on, the low-beam headlamps willalso turn on automatically.Note: During wet or winter drivingconditions with ice, snow or a salty roadmist, inconsistent or unexpected wiping orsmearing may occur.
37
Ecosport (CBY) Rayong (Thailand)/Haiduong (Vietnam), enPHI
Wipers and Washers
In these conditions, you can do thefollowing:• Lower the sensitivity of the autowipers
to reduce the amount of smearing.• Switch to normal or high-speed wipe.• Switch the autowipers off.
E102033
A B
C
High sensitivityAOnBLow sensitivityC
The rain sensor monitors the amount ofmoisture on the windshield andautomatically turns on the wipers. It willadjust the wiper speed by the amount ofmoisture that the sensor detects on thewindshield.Use the rotary control to adjust thesensitivity of the rain sensor. Set thecontrol to low sensitivity, and the wiperswill turn on when the rain sensor detectsa large amount of moisture on thewindshield. Set the control to highsensitivity, and the wipers will turn on whenthe rain sensor detects a small amount ofmoisture on the windshield.Keep the outside of the windshield cleanbecause the rain sensor is very sensitive. Ifthe area around the interior mirror is dirty,then the wipers may turn on, for example,if dirt, mist or insects hit the windshield.
You can switch this feature on and offthrough the information display. See(page 53).
WINDSHIELD WASHERSNote: Do not operate the washers whenthe washer reservoir is empty. This maycause the washer pump to overheat.
E102051
Push the button to operate the washers.When you release the button, the wiperswill operate for a short time.
REAR WINDOW WIPER ANDWASHERS (If Equipped)
Intermittent Wipe
E102052
Pull the lever toward you.
38
Ecosport (CBY) Rayong (Thailand)/Haiduong (Vietnam), enPHI
Wipers and Washers

Reverse Gear Wipe (If Equipped)
The rear wiper will turn on automaticallywhen selecting reverse gear if:• the rear wiper is not already switched
on• the wiper lever is in position A, B, C or
D• the front wiper is operating (when set
to position B).The rear wiper will follow the front wiperinterval (at intermittent or normal speed).
Rear Window WasherNote: Do not operate the washers whenthe washer reservoir is empty. This maycause the washer pump to overheat.
E102053
Pull the lever toward you to operate thewashers. They will operate for a maximumof 10 seconds. When you release the lever,the wiper will operate for a short time.
39
Ecosport (CBY) Rayong (Thailand)/Haiduong (Vietnam), enPHI
Wipers and Washers

LIGHTING CONTROLLighting Control Positions
E70718
A B C
OffAParking lamps, instrument panellamps, license plate lamps andtail lamps
B
HeadlampsC
Parking LampsNote: Prolonged use of the parking lampswhen the ignition is off will cause the batteryto run out of charge.To operate the parking lamps turn thelighting control to position B. The parkinglamps operate with the ignition on or off.
High Beams
E101829
Pull the lever fully toward you to switchthe high beams on.Pull the lever fully toward you again toswitch the high beams off.
Headlamp FlasherPull the lever toward you slightly andrelease it to flash the headlamps.
AUTOLAMPS (If Equipped)
E70719
Note: If you switch autolamps on, you canonly switch the high beam headlamps ononce autolamps has turned the headlampson.Note: If you switch autolamps andautowipers on, the low-beam headlampswill automatically turn on when thewindshield wipers continuously operate.
40
Ecosport (CBY) Rayong (Thailand)/Haiduong (Vietnam), enPHI
Lighting
The headlamps will come on and go offautomatically depending on the ambientlight.
HEADLAMP EXIT DELAYAfter you switch the ignition off, you canswitch the headlamps on by pulling thedirection indicator lever toward you. Youwill hear a short tone. The headlamps willswitch off automatically after threeminutes with any door open or 30 secondsafter the last door has been closed. Youcan cancel this feature by pulling thedirection indicator toward you again orswitching the ignition on.
FRONT FOG LAMPS (If Equipped)
E70721
WARNINGOnly use the front fog lamps whenvisibility is considerably restricted byfog, snow or rain.
REAR FOG LAMPS (If Equipped)
E70720
Note: Only use the rear fog lamps whenvisibility is restricted to less than 50 meters(164 feet).Note: Do not use the rear fog lamps whenit is raining or snowing and visibility is morethan 50 meters (164 feet).
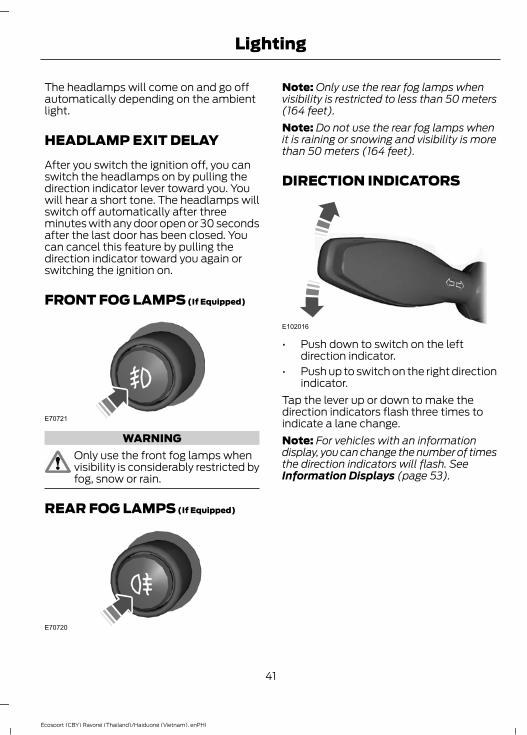
DIRECTION INDICATORS
E102016
• Push down to switch on the leftdirection indicator.
• Push up to switch on the right directionindicator.
Tap the lever up or down to make thedirection indicators flash three times toindicate a lane change.Note: For vehicles with an informationdisplay, you can change the number of timesthe direction indicators will flash. SeeInformation Displays (page 53).
41
Ecosport (CBY) Rayong (Thailand)/Haiduong (Vietnam), enPHI
Lighting

INTERIOR LAMPSCourtesy lamp
E112207
B CA
OffADoor contactBOnC
If you set the switch to position B, thecourtesy lamp will come on when youunlock or open a door or the luggagecompartment lid. If you leave a door openwith the ignition switch off, the courtesylamp will go off automatically after sometime to prevent the vehicle battery fromdischarging. To switch it back on, switchon the ignition for a short time.The courtesy lamp will also come on whenyou switch off the ignition. It will go offautomatically after a short time or whenyou start or restart the engine.If you set the switch to position C with theignition switch off, the courtesy lamp willcome on. It will go off automatically aftera short time to prevent the vehicle batteryfrom discharging. To switch it back on,switch on the ignition for a short time.
Reading lamps
E112208
If you switch off the ignition, the readinglamps will go off automatically after sometime to prevent the vehicle battery fromdischarging. To switch them back on,switch on the ignition for a short time.
42
Ecosport (CBY) Rayong (Thailand)/Haiduong (Vietnam), enPHI
Lighting

POWER WINDOWS
WARNINGSDo not leave children unattended inyour vehicle and do not let them playwith the power windows. They may
seriously injure themselves.When closing the power windows,you should verify they are free ofobstructions and make sure that
children and pets are not in the proximityof the window openings.
E70848
Note: You may hear a rumbling noise whenjust one of the windows are open. Lower theopposite window slightly to reduce thisnoise.Press the switch to open the window.Lift the switch to close the window.
One-Touch Down (If Equipped)
Press the switch fully and release it. Pressagain or lift it to stop the window.
One-Touch Up (If Equipped)
Lift the switch fully and release it. Press orlift it again to stop the window.
Window Lock
E70850
Press the control to lock or unlock the rearwindow controls. It will illuminate whenthe rear window controls are locked.
Bounce-Back (If Equipped)
The window will stop automatically whileclosing. It will reverse some distance ifthere is an obstacle in the way.
Overriding the Bounce-Back Feature
WARNINGWhen you override the bounce-backfeature the window will not reverseif it detects an obstacle. Take care
when closing the windows to avoidpersonal injury.
Proceed as follows to override thisprotection feature when there is aresistance, for example in winter:1. Close the window twice until it reaches
the point of resistance and let itreverse.
43
Ecosport (CBY) Rayong (Thailand)/Haiduong (Vietnam), enPHI
Windows and Mirrors

2. Close the window a third time to thepoint of resistance. The bounce-backfeature is now disabled and you canclose the window manually. Thewindow will go past the point ofresistance and you can close it fully.
See an authorized dealer as soon aspossible if the window does not close afterthe third attempt.
Resetting the Bounce-Back Feature
WARNINGThe bounce-back feature remainsturned off until you reset thememory.
If you have disconnected the battery, youmust reset the bounce-back memoryseparately for each window.1. Lift and hold the switch until the
window is fully closed.2. Release the switch.3. Lift the switch again for one more
second.4. Press and hold the switch until the
window is fully open.5. Release the switch.6. Lift and hold the switch until the
window is fully closed.7. Open the window and then try to close
it automatically.8. Reset and repeat the procedure if the
window does not close automatically.
EXTERIOR MIRRORSPower Exterior Mirrors (If Equipped)
WARNINGDo not adjust the mirrors when yourvehicle is moving.
E71280
BC
A
Left-hand mirrorAOffBRight-hand mirrorC
E71281
Move in the direction of the arrows to tiltthe mirror.
Fold-Away Exterior Mirrors (If
Equipped)
Push the mirror toward the door windowglass. Make sure that you fully engage themirror in its support when returning it to itsoriginal position.
Integrated Blind Spot Mirrors (If
Equipped)
WARNINGObjects in the blind spot mirror arecloser than they appear.
44
Ecosport (CBY) Rayong (Thailand)/Haiduong (Vietnam), enPHI
Windows and Mirrors

Blind spot mirrors have the outboardsection of the mirror that curves aspheric.They are designed to increase your visibilityalong the side of your vehicle.Check the main mirror first before a lanechange, then check the blind spot mirror.If no vehicles are present in the blind spotmirror and the traffic in the adjacent laneis at a safe distance, signal that you intendto change lanes. Glance over your shoulderto verify traffic is clear and carefullychange lanes.
B
A
C
E151232
The image of the approaching vehicle issmall and near the inboard edge of themain mirror when it is at a distance. Theimage becomes larger and begins to moveoutboard across the main mirror as thevehicle approaches (A). The image willtransition from the main mirror and beginto appear in the blind spot mirror as thevehicle approaches (B). The vehicle willtransition to your peripheral field of viewas it leaves the blind spot mirror (C).
INTERIOR MIRROR
WARNINGDo not adjust the mirror when yourvehicle is moving.
Note: Do not clean the housing or glass ofany mirror with harsh abrasives, fuel or otherpetroleum or ammonia-based cleaningproducts.You can adjust the interior mirror to yourpreference. Some mirrors also have asecond pivot point. This lets you move themirror head up or down and from side toside.Pull the tab below the mirror toward youto reduce glare at night.
Auto-Dimming Mirror (If Equipped)
Note: Do not block the sensors on the frontand back of the mirror. Mirror performancemay be affected. A rear center passenger orraised rear center head restraint may alsoblock light from reaching the sensor.The mirror will dim automatically to reduceglare when bright lights are detected frombehind your vehicle. It will automaticallyreturn to normal reflection when you selectreverse gear to make sure you have a clearview when backing up.
45
Ecosport (CBY) Rayong (Thailand)/Haiduong (Vietnam), enPHI
Windows and Mirrors

MOONROOF (If Equipped)
WARNINGSDo not let children play with themoonroof or leave them unattendedin the vehicle. They may seriously
hurt themselves.When closing the moonroof, youshould verify that it is free ofobstructions and make sure that
children and pets are not in the proximityof the roof opening.
The sunscreen can be manually opened orclosed when the glass panel is closed.The moonroof control is located on theoverhead console.The moonroof has a one-touch open andclose feature. To stop it during one-touchoperation, press the control a second time.
Opening and Closing the Moonroof
E147756
Press and release the rear of the controlto open the moonroof.Press and release the front of the controlto close the moonroof.
Venting the MoonroofPress and release the rear of the switch tovent the moonroof. Press and release thefront of the control to close the moonroof.
46
Ecosport (CBY) Rayong (Thailand)/Haiduong (Vietnam), enPHI
Windows and Mirrors

GAUGES
E144826
TachometerAInformation displayBSpeedometerCFuel gaugeD
TachometerIndicates the engine speed in revolutionsper minute. Driving with your tachometerpointer continuously at the top of the scalemay damage the engine.
Information Display• Odometer/Trip
odometer/Instantaneous FuelConsumption
• Outside Air Temperature (if equipped)• Trip Computer See Trip Computer
(page 54).• Automatic Transmission Display
(automatic transmission vehicles only)
Automatic Transmission Display
E151137
When the gearshift lever is moved into theS (Sport) position, the manually selectedgears will be displayed. See AutomaticTransmission (page 86).
47
Ecosport (CBY) Rayong (Thailand)/Haiduong (Vietnam), enPHI
Instrument Cluster

Fuel GaugeSwitch the ignition on. The fuel gauge willindicate approximately how much fuel isleft in the fuel tank. The fuel gauge mayvary slightly when your vehicle is movingor on a gradient. The arrow adjacent to thefuel pump symbol indicates on which sideof the vehicle the fuel filler door is located.
Maximum Engine SpeedThe electronic management system, undercertain conditions, limits the engine speed(fuel cut-off) below a preset value, in orderto avoid engine damage. This speed limitcan occur when the vehicle is stopped orduring speeds less than 10 km/h, not beingconsidered as an engine failure.
WARNINGWhen the engine is running, keepclothing, such as neckties, and anyother objects away from the rotating
engine components in order to avoidserious injuries.
WARNING LAMPS ANDINDICATORSThe following warning lamps andindicators will alert you to a vehiclecondition that may become serious. Somelamps will illuminate when you start yourvehicle to make sure they work. If anylamps remain on after starting your vehicle,refer to the respective system warninglamp for further information.Note: Some warning indicators appear inthe information display and function thesame as a warning lamp but do not displaywhen you start your vehicle.
Anti-lock Braking System (If Equipped)
If it illuminates when you aredriving, this indicates amalfunction. You will continue
to have normal braking (without Anti-lockbraking system). Have the system checkedby an authorized dealer as soon aspossible.
Automatic High Beam Lamp (If
Equipped)
It will illuminate when thisfeature is on. See Autolamps(page 40).
Anti-theft System Indicator (If
Equipped)
E144845
Flashes when the Anti-theftSystem (PATS) has beenactivated.
Airbag (If Equipped)
If it illuminates when driving, thisindicates a malfunction. Havethe system checked by an
authorized dealer.
Battery Charge SystemIf it illuminates when driving, thisindicates a malfunction. Switchoff all unnecessary electrical
equipment. Have the system checked byan authorized dealer immediately.
Brake SystemIt illuminates when you apply theparking brake or when the brakefluid level is low or if the
anti-lock braking system (if equipped) ismalfunctioning .
48
Ecosport (CBY) Rayong (Thailand)/Haiduong (Vietnam), enPHI
Instrument Cluster

WARNINGReduce your speed gradually andstop your vehicle as soon as it is safeto do so. Use your brakes with care.
If it illuminates when you are driving, checkthat the parking brake is not applied. If theparking brake is not applied, this indicatesa malfunction. Have the system checkedby an authorized dealer immediately.
Coolant TemperatureWARNING
Do not resume your journey if itilluminates in red color despite thelevel being correct. Have the system
checked by an authorized dealerimmediately.
If the blue lamp stays on orilluminates after starting theengine or while driving, this
indicates that the engine is cold and itsperformance can be reduced. If you keepthe engine running this lamp should switchoff after a few minutes, this indicates thatthe engine has reached its normal workingtemperature.If the red lamp stays on or illuminates afterstarting the engine or while driving, thisindicates an engine coolant malfunction.Stop your vehicle as soon as it is safe todo so and switch the engine off. Check thecoolant level. See Engine Coolant Check(page 120).
Cruise Control (If Equipped)
E71340
It will illuminate when you haveset a speed using the cruisecontrol system.
Direction IndicatorFlashes during operation. Asudden increase in the rate offlashing warns of a failed
indicator bulb. See Changing a Bulb(page 124).
Doors Open (If Equipped)
Illuminates when the ignition isswitched on and any door , thehood or the luggage
compartment is not closed properly.
DPF (Diesel Particulate Filter) (If
Equipped)
E153612
If this illuminates, have thesystem checked by a properlytrained technician as soon as
possible.
Engine warning lampsMalfunction indicator lamp
Powertrain warning lamp
All vehiclesIf either lamp illuminates when the engineis running, this indicates a fault. The enginewill continue to run but it may have limitedpower. If it flashes when you are driving,reduce the speed of your vehicleimmediately. If it continues to flash, avoidheavy acceleration or deceleration. Havethe system checked by a properly trainedtechnician immediately.
49
Ecosport (CBY) Rayong (Thailand)/Haiduong (Vietnam), enPHI
Instrument Cluster

WARNINGHave this checked immediately.
If both lamps illuminate together, stop yourvehicle as soon as it is safe to do so(continued use may cause reduced powerand cause the engine to stop). Turn theignition off and attempt to restart theengine. If the engine restarts have thesystem checked by a properly trainedtechnician immediately. If the engine doesnot restart the vehicle must be checkedbefore continuing your journey.
Front Fog Lamp (If Equipped)
It will illuminate when you switchthe front fog lamps on.
Glow Plug (If Equipped)
If it illuminates, wait until thelight goes off before starting.
HeadlampIt will illuminate when you switchthe headlamp beam or theparking lamps on.
Hill Start Assist (If Equipped)
E95339
If it illuminates when you aredriving this indicates amalfunction.
Low Fuel LevelIf it illuminates when driving,refuel as soon as possible.
Main BeamIt will illuminate when you switchthe headlamp main beam on. Itwill flash when you use the
headlamp flasher.
Oil Dilution (If Equipped)
It will illuminate when the Oil hasbeen diluted by fuel. Have thesystem checked by an
authorized dealer as soon as possible. SeeEngine Oil Check (page 119).
Oil PressureWARNING
Do not resume your journey if itilluminates despite the level beingcorrect. Have the system checked by
an authorized dealer immediately.
If it stays on after starting orilluminates when driving, thisindicates a malfunction. Stop
your vehicle as soon as it is safe to do soand switch the engine off. Check the engineoil level. See Engine Oil Check (page 119).
Over Speed Warning (If Equipped)
E165368
It will illuminate if the vehicleexceeds 120km/h.
Power SteeringIf it illuminates when driving, thisindicates a malfunction of thepower steering system. You will
continue to have full steering but will needto exert greater force on the steeringwheel. Have the system checked by anauthorized dealer as soon as possible.
50
Ecosport (CBY) Rayong (Thailand)/Haiduong (Vietnam), enPHI
Instrument Cluster

Rear Fog Lamp (If Equipped)
It will illuminate when you switchthe rear fog lamps on.
Safety Belt Minder (If Equipped)
See Safety Belt Minder (page20).
Stability Control (If Equipped)
E138639
While driving, it flashes duringactivation of the system. Afterswitching on the ignition, if it
does not illuminate or illuminatescontinuously while driving, this indicates amalfunction. During a malfunction, thesystem switches off. Have the systemchecked by an authorized dealer as soonas possible.
Stability Control Off (If Equipped)
It will illuminate when you switchthe system off. It will go outwhen you switch the system
back on or when you switch the ignitionoff.
Water-In-Fuel (If Equipped)
It will illuminate if there is excesswater in the fuel filter. Drain offthe water immediately. See
Fuel Quality (page 81).
AUDIBLE WARNINGS ANDINDICATORSAnti-theft Alarm (If Equipped)
Category One AlarmSounds when you unlock and open thedriver door using the key in the door lock.The chime will stop when the ignition isturned on with a valid key. The chime willsound for 12 seconds before the vehiclealarm is triggered.
Door Ajar (If Equipped)
Sounds if the vehicle's speed exceeds thepre-determined limit and any of the doorsare open or ajar. The chime will only soundonce per ignition key cycle.
Headlamps On (If Equipped)
Sounds when you turn the key to off andopen the driver's door and you have leftthe headlamps or parking lamps on.
Headlight Exit Delay (If Equipped)
Sounds when the headlight exit delay hasbeen activated.
Ignition Left On (Keyless VehiclesOnly) (If Equipped)
Sounds if the ignition is left on and thevehicle driver's door is ajar or opened. Thechime will stop once the door is closed orthe ignition is turned off.
Low Fuel Level (If Equipped)
A low fuel level reminder sounds when thefuel gauge needle is at one-sixteenthabove empty. The reminder sounds onceper ignition key cycle.
51
Ecosport (CBY) Rayong (Thailand)/Haiduong (Vietnam), enPHI
Instrument Cluster

Message Center Display (If Equipped)
Sounds every time that the messagecenter displays a warning message.
Parking BrakeSounds if the vehicle's speed exceeds thepre-determined limit with the parkingbrake engaged. It will stop as soon as thevehicle is stopped or the parking brake isreleased.
Safety Belt Minder (If Equipped)
WARNINGSThe safety belt minder remains instand-by mode when the driver andthe front passenger (if equipped)
safety belts have been fastened. It will bereactivated if the driver or front passenger(if equipped) safety belt is unfastened.
Do not sit on top of a fastened safetybelt to prevent the safety belt minderfrom coming on. The occupant
protection system will only provideoptimum protection when you use thesafety belt properly.
Sounds when the vehicle’s speed exceedsthe pre-determined limit, and the driver orfront passenger (if equipped) safety beltsare unfastened. The chime will stop afterfive minutes.
Speed Alarm (If Equipped)
When the speed alarm is active, every timethe vehicle reaches the selected speed awarning will be sounded and the displaywill flash.If the vehicle speed is at least 5 km/habove the selected speed, a double beepwill be sounded every 10 seconds.
Vehicle Not in ParkSounds if the vehicle is out of P park anddriver's door is ajar or opened. The chimewill stop once the vehicle is put in P parkor if the driver's door is closed properly.
52
Ecosport (CBY) Rayong (Thailand)/Haiduong (Vietnam), enPHI
Instrument Cluster

GENERAL INFORMATION
WARNINGDriving while distracted can result inloss of vehicle control, accident,damages to the vehicle and injury to
passengers. Ford strongly recommendsthat drivers use extreme caution whenusing any device or feature that may directtheir focus elsewhere. Your primaryresponsibility is the safe operation of thevehicle. We recommend against the useof any handheld device while driving andthat you comply with all applicable laws.
Various systems on your vehicle can becontrolled using the information displaycontrols on your audio unit (if equipped).Corresponding information is displayed inthe information display (if equipped).
Information Display Controls (If
Equipped)
E103626
• Press the up and down arrow buttonsto scroll through and highlight theoptions within a menu.
• Press the right arrow button to enter asub-menu.
• Press the left arrow button to exit amenu.
• Press and hold the left arrow button atany time to return to the main menudisplay (escape button).
• Press the OK button to choose andconfirm settings or messages.
Press the MENU button on the radio toaccess some configurable features. Usethe control arrow to the following features:• SYNC-config; access general SYNC
configurations. See separate SYNCmanual.
• SYNC-applications; access SYNCapplications (if equipped). Seeseparate SYNC manual.
• Audio configuration; defines the audioconfigurations. See Audio Unit (page149).
• Vehicle configurations; allow you toconfigure these features:• Traction control -- you can switch
on or off the traction control. See(page 53).
• Park lock control -- you can switchon or off the park lock control. SeePark Lock Control (page 89).
• Lane change indicator -- you canset the lane change indicator toblink once or three times whenchanging lanes while driving. SeeDirection Indicators (page 41).
• Chimes -- you can set if an audiblewarning will be sound for someinformation messages. SeeInformation Messages (page 57).
• Clock; allows you to adjust the timeand date.
• Display; allows you to set the languageon the display and in the voicerecognition system.
• System; allows you to see currentactive information messages.
Adjusting the Clock1. Press the MENU button on the radio.2. Select Clock then press OK.3. Select Adjust Clock then press OK.4. Use the up or down arrows to increase
or decrease the hour and minutes.
53
Ecosport (CBY) Rayong (Thailand)/Haiduong (Vietnam), enPHI
Information Displays

5. Use the left or right arrows to alternatebetween hour or minute adjustment.
6. Press OK when done.or1. Press the # symbol on the radio to
access the clock adjustment.2. Use the up or down arrows to increase
or decrease the hour and minutes.3. Use the left or right arrows to alternate
between hour or minute adjustment.4. Press OK when done.
Adjusting the Date1. Press the MENU button on the radio.2. Select Clock then press OK.3. Select Adjust Date then press OK.4. Use the up or down arrows to increase
or decrease the day, month and year.5. Use the left or right arrows to alternate
between day, month and yearadjustment.
6. Press OK when done.
24 Hour Mode1. Press the MENU button on the radio.2. Select Clock then press OK.3. Choose 24h Mode.4. Check the selection box with the OK
button to enable 24h Mode or uncheckto enable 12h mode.
INSTANTANEOUS FUELCONSUMPTION
E174001
Indicates the current fuel consumption.
E174002
The symbol + is activated whenthe value to be displayed ishigher than the maximum scale
value. For applications that use km/l itmeans low fuel consumption. Forapplications that use l/100km it meanshigh fuel consumption.
TRIP COMPUTER (If Equipped)
STANDARD
E146272
Press the button to scroll through thedisplays:• total distance odometer• trip odometer
Total Distance Odometer
E146273
Registers the total distance ofthe vehicle.
54
Ecosport (CBY) Rayong (Thailand)/Haiduong (Vietnam), enPHI
Information Displays

Trip Odometer
E146274
Registers the distance traveledof individual journeys.
When on this screen, press and hold thetrip button until the screen appearscompletely full with dashes (from: currentmileage to: _ _ _ _ _ ) to reset this function.
TRIP COMPUTER OPTIONAL
E146272
Press the button to scroll through thedisplays:• total distance odometer• trip odometer• average fuel economy• speed alarm• average speed• distance to empty• outside ambient temperature (always
displayed)You can reset the trip odometer, averagefuel economy and average speed. To dothis, scroll to the required display, thenpress and hold the button until the screenappears completely full with dashes.The trip computer includes the followinginformation displays:
Total Distance Odometer
E146273
Registers the total distance ofthe vehicle.
Trip Odometer
E146274
Registers the distance traveledof individual journeys.
Average Fuel Consumption
E146275
Indicates the average fuelconsumption since the functionwas last reset.
Speed Alarm
E146278
To set the desired speed valuefor the speed warning, select thespeed alarm screen.
The speed alarm can be set to work withthe following speeds: 30, 40, 50, 60, 70,80, 90, 100, 110, 120, 130, 140 km/h.The process to switch the speed alarm ONwhen the system is switched OFF.From:
E148860
To:
E148859
1. Press the reset button with a long press(for at least two seconds) until thedisplay of the speed alarm symbol andthe OFF indicator begins to blink. Thisindicates that the screen is now in editmode.
55
Ecosport (CBY) Rayong (Thailand)/Haiduong (Vietnam), enPHI
Information Displays

2. Release the button.3. Press the button with short presses
(less than two seconds) several timesuntil the desired speed appears in thedisplay.
4. To save, wait five seconds on thisscreen or press the button for at leasttwo seconds. You will hear a beep andthe display will stop blinking indicatingthat your selection has been saved.This step must be followed for all threesections (OFF to ON, ON to OFF andON to ON) that describes the speedalarm save process.
Note: The maximum selectable speed forthe alarm is 140 km/h. If you continue topress the reset button with short pressesthe display will go back to the OFF modeand so the multiples of 10 speeds will bedisplayed again.Note: In set mode, the selectable speeddisplayed after the OFF screen will alwaysbe the next multiple of 10 in speed from thespeedometer (i.e. if your speedometerindicates 63 km/h, the speed alarm will giveyou option from 70 to 140 km/h. Ifspeedometer indicates 100 km/h, the speedalarm will give you options from 110 to 140km/h. If speedometer indicates 30 km/h,the options will be from 40 to 140 km/h).The process to switch the speed alarm Off.From:
E148858
To:
E148860
1. Press the reset button with a long press(for at least two seconds) until thedisplay of the speed alarm symbol andthe speed unit begins to blink. Thisindicates that the screen is now in editmode.
2. Release the button.3. Press the button with a short press
(less than two seconds) once, thedisplay will change to OFF.
4. To save this speed, wait five secondson this screen or press the button afterat least two seconds. You will hear abeep and the display will stop blinkingindicating that your selection has beensaved.
The process to set a new speed when thespeed alarm is active.From:
E148859
To:
E148858
56
Ecosport (CBY) Rayong (Thailand)/Haiduong (Vietnam), enPHI
Information Displays

1. Press the reset button with a long press(for at least two seconds) until thedisplay of the speed alarm symbol andthe speed unit begins to blink. Thisindicates that the screen is now in editmode.
2. Release the button.3. Press the button with short presses
(less than two seconds) several timesuntil the desired speed displays. Thefirst screen after the first short presswill be the OFF option. Continue withshort presses to see the next speedalarm option.
4. To save this speed, wait five secondson this screen or press the buttonduring for at least two seconds. Youwill hear a beep and the display willstop blinking indicating that yourselection has been saved.
Average Speed
E146277
Indicates the average speedcalculated since the functionwas last reset.
Distance to Empty
E146276
Indicates the approximatedistance the vehicle will travelon the fuel remaining in the tank.
Change in driving pattern may cause thevalue to vary.
Outside Ambient TemperatureIndication
E148857
This will display the outside ambienttemperature in degrees Celsius.
INFORMATION MESSAGESNote: Depending on the vehicle optionsequipped with your vehicle, not all of themessages will display or be available.Certain messages may be abbreviated orshortened depending upon which clustertype you have.
E103626
Press the OK button to acknowledge andremove some messages from theinformation display. Other messages willbe removed automatically after a shorttime.Certain messages need to be confirmedbefore you can access the menus.
57
Ecosport (CBY) Rayong (Thailand)/Haiduong (Vietnam), enPHI
Information Displays

The message indicatorilluminates to supplement somemessages. It will be red or amber
depending on the severity of the messageand will remain on until the cause of the
message has been rectified.Some messages will be supplemented bya system specific symbol with a messageindicator.
Airbag
ActionMessageindicatorMessage
Have the system checked by aauthorized dealer as soon aspossible.
amberAirbag malfunction service now
Alarm
ActionMessageindicatorMessage
See Security (page 33).amberAlarm triggered check vehicle
Have the system checked by aauthorized dealer.-Alarm system malfunction service
required
Doors Open
ActionMessageindicatorMessage
Vehicle is moving. Stop your vehicleas soon as safely possible andclose.
redDriver door open
Vehicle is moving. Stop your vehicleas soon as safely possible andclose.
redDriver side rear door open
Vehicle is moving. Stop your vehicleas soon as safely possible andclose.
redPassenger door open
Vehicle is moving. Stop your vehicleas soon as safely possible andclose.
redPassenger side rear door open
58
Ecosport (CBY) Rayong (Thailand)/Haiduong (Vietnam), enPHI
Information Displays

ActionMessageindicatorMessage
Vehicle is moving. Stop your vehicleas soon as safely possible andclose.
redBoot open
Vehicle is moving. Stop your vehicleas soon as safely possible andclose. See Opening and Closingthe Hood (page 116).
redBonnet open
Vehicle not moving. Close.amberDriver door open
Vehicle not moving. Close.amberDrivers side rear door open
Vehicle not moving. Close.amberPassenger door open
Vehicle not moving. Close.amberPassenger side rear door open
Vehicle not moving. Close.amberBoot open
Vehicle not moving. Close. SeeOpening and Closing the Hood(page 116).
amberBonnet open
Engine Immobilizer
ActionMessageindicatorMessage
Have the system checked by aauthorized dealer as soon aspossible.
redImmobilizer malfunction servicenow
Keyless System
ActionMessageindicatorMessage
See Remote Control (page 25).-Key battery low replace battery
See Keyless Starting (page 77).-Turn ignition off use POWER button
See Keyless Starting (page 77).-Press brake to start
See Keyless Starting (page 77).-Press clutch to start
59
Ecosport (CBY) Rayong (Thailand)/Haiduong (Vietnam), enPHI
Information Displays

Lighting
ActionMessageindicatorMessage
See Changing a Bulb (page 124).-Left indicator malfunction changebulb
See Changing a Bulb (page 124).-Right indicator malfunction changebulb
Maintenance
ActionMessageindicatorMessage
See Brake and Clutch Fluid Check(page 121).redBrake fluid level low service now
Have the system checked by aauthorized dealer immediately.redBrake system malfunction stop
safely
See Engine Oil Check (page 119).redEngine oil pressure low stop safely
Have the system checked by aauthorized dealer as soon aspossible.
amberEngine malfunction service now
Have the system checked by aauthorized dealer.amberAuto wiper/lights malfunction
service required
Have the system checked by aauthorized dealer.-Engine oil change due service
required
Steering
ActionMessageindicatorMessage
Have the system checked by aauthorized dealer immediately.redSteering lock malfunction stop
safely
Full steering will be maintained butyou will need to exert greater forceon the steering wheel. Have thesystem checked by a authorizeddealer as soon as possible.
amberPower steering malfunction servicenow
60
Ecosport (CBY) Rayong (Thailand)/Haiduong (Vietnam), enPHI
Information Displays

Transmission
ActionMessageindicatorMessage
Have the system checked by aauthorized dealer immediately.redTransmission malfunction service
now
Under certain driving conditions it ispossible that the clutches in thetransmission can overheat. In thesecircumstances it is necessary topress the brake pedal and stop yourvehicle to prevent damage to thetransmission. Select N or P andapply the parking brake until thetransmission has cooled and themessage disappears from thedisplay.
redTransmission overtemperature stopsafely
See Automatic Transmission(page 86). See Starting andStopping the Engine (page 77).
-Vehicle not in park select P
See Automatic Transmission(page 86). See Starting andStopping the Engine (page 77).
-To start select N or P
See Starting and Stopping theEngine (page 77).-Press brake to start
See Automatic Transmission(page 86). See Starting andStopping the Engine (page 77).
-To start select N
See Automatic Transmission(page 86). See Starting andStopping the Engine (page 77).
-Door open apply brake
See Starting a Gasoline Engine(page 79).Cranking time exceeded
See Hill Start Assist (page 88).Hill start assist active
See Hill Start Assist (page 88).Hill start assist off
61
Ecosport (CBY) Rayong (Thailand)/Haiduong (Vietnam), enPHI
Information Displays
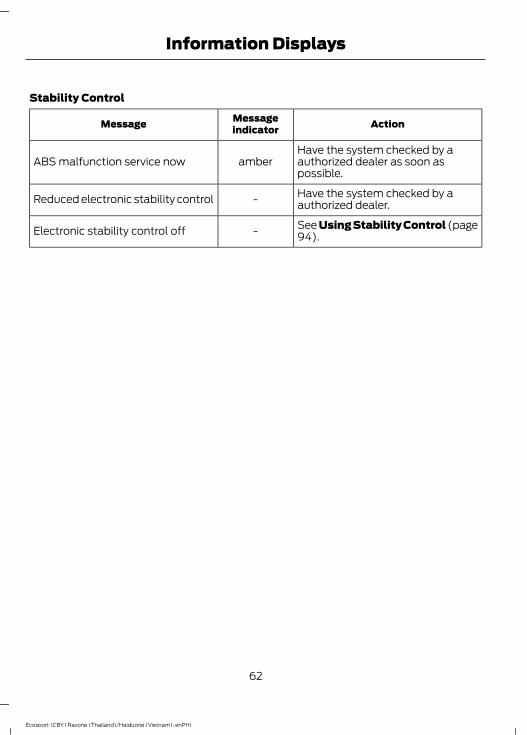
Stability Control
ActionMessageindicatorMessage
Have the system checked by aauthorized dealer as soon aspossible.
amberABS malfunction service now
Have the system checked by aauthorized dealer.-Reduced electronic stability control
See Using Stability Control (page94).-Electronic stability control off
62
Ecosport (CBY) Rayong (Thailand)/Haiduong (Vietnam), enPHI
Information Displays

PRINCIPLE OF OPERATIONOutside AirKeep the air intakes in front of thewindshield free from obstruction (such assnow or leaves) to allow the climatecontrol system to function effectively.
Recirculated AirWARNING
Prolonged use of recirculated air maycause the windows to mist up. If thewindows mist up, follow the settings
for demisting the windshield.
The air currently in the passengercompartment recirculates. Outside air doesnot enter your vehicle.
HeatingHeating performance depends on thetemperature of the engine coolant.
General Information on Controllingthe Interior ClimateFully close all the windows.
Warming the InteriorDirect the air toward your feet. In cold orhumid weather conditions, direct some ofthe air toward the windshield and the doorwindows.
Cooling the InteriorDirect the air toward your face.
Air ConditioningThe system directs air through theevaporator for cooling. The evaporatorextracts humidity from the air to help keepthe windows free of mist. The systemdirects the resulting condensation to theoutside of your vehicle, which may causea small pool to form under your vehicle.This is normal.Note: The air conditioning operates onlywhen the temperature is above 4°C.Note: When you use air conditioning, yourvehicle uses more fuel.
63
Ecosport (CBY) Rayong (Thailand)/Haiduong (Vietnam), enPHI
Climate Control
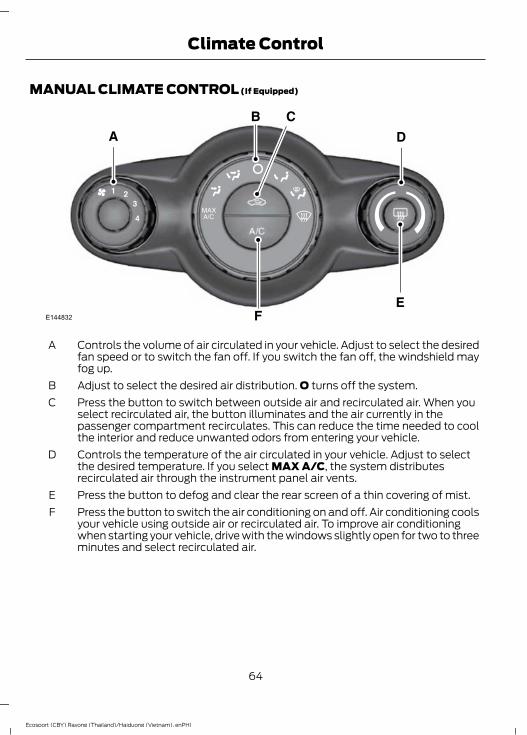
MANUAL CLIMATE CONTROL (If Equipped)
E144832
Controls the volume of air circulated in your vehicle. Adjust to select the desiredfan speed or to switch the fan off. If you switch the fan off, the windshield mayfog up.
A
Adjust to select the desired air distribution. O turns off the system.BPress the button to switch between outside air and recirculated air. When youselect recirculated air, the button illuminates and the air currently in thepassenger compartment recirculates. This can reduce the time needed to coolthe interior and reduce unwanted odors from entering your vehicle.
C
Controls the temperature of the air circulated in your vehicle. Adjust to selectthe desired temperature. If you select MAX A/C, the system distributesrecirculated air through the instrument panel air vents.
D
Press the button to defog and clear the rear screen of a thin covering of mist.EPress the button to switch the air conditioning on and off. Air conditioning coolsyour vehicle using outside air or recirculated air. To improve air conditioningwhen starting your vehicle, drive with the windows slightly open for two to threeminutes and select recirculated air.
F
64
Ecosport (CBY) Rayong (Thailand)/Haiduong (Vietnam), enPHI
Climate Control

AUTOMATIC CLIMATE CONTROL (If Equipped)
E144831
Controls the volume of air circulated in your vehicle. Rotate the control to selectthe desired fan speed. The setting appears in the display.
A
Adjust to select the desired air distribution. OFF turns off the system. Press therecirculated air button to switch between outside air and recirculated air. Whenyou select recirculated air, the button illuminates and the air currently in thepassenger compartment recirculates. This can reduce the time needed to coolthe interior and reduce unwanted odors from entering your vehicle.
B
Controls the temperature of the air circulated in your vehicle. Adjust to selectthe desired temperature. The setting appears in the display.
C
Press the button to switch the air conditioning on and off. Air conditioning coolsyour vehicle using outside air or recirculated air. To improve air conditioningwhen starting your vehicle, drive with the windows slightly open for two to threeminutes and select recirculated air.
D
Press the button to defog and clear the rear screen of a thin covering of mist.EPress the button to select automatic operation. The system automaticallycontrols the temperature, amount and distribution of the air to reach andmaintain your previously selected temperature.
F
65
Ecosport (CBY) Rayong (Thailand)/Haiduong (Vietnam), enPHI
Climate Control

HINTS ON CONTROLLING THEINTERIOR CLIMATEGeneral HintsNote: Prolonged use of recirculated air maycause the windows to fog up.Note: You may feel a small amount of airfrom the footwell air vents regardless of theair distribution setting.Note: To reduce humidity build-up insideyour vehicle, do not drive with the systemswitched off or with recirculated air alwaysswitched on.Note: Do not place objects under the frontseats as this may interfere with the airflowto the rear seats.
Note: Remove any snow, ice or leaves fromthe air intake area at the base of thewindshield.To minimize humidity in the air conditioningsystem and reduce unpleasant odors,switch off the air conditioning and keepthe fan going for at least two minutesbefore switching off the engine. Do thefollowing:1. Keep the engine running.2. Switch off the air conditioning by
pressing the A/C button.3. Keep the fan switched on.4. Set the temperature to the full hot
position.5. Use outside air, not recirculated air.6. Wait one to two minutes, and then
switch off the engine.
Heating the Interior Quickly
Vehicle with automatic climate controlVehicle with manual climate control
Adjust the fan speed to the highestspeed setting.
Adjust the fan speed to the highestspeed setting.
1
Adjust the temperature control to thehighest setting.
Adjust the temperature control to thehighest setting.
2
Press the footwell button to distributeair to the footwell air vents.
Adjust the air distribution control to thefootwell air vents position.
3
Recommended Settings for Heating
Vehicle with automatic climate controlVehicle with manual climate control
Press the AUTO button.Adjust the fan speed to the secondspeed setting.
1
Adjust the temperature control settingto the desired setting.
Adjust the temperature control to themidway point of the hot settings.
2
Adjust the air distribution control to thefootwell and windshield air vents posi-tion.
3
66
Ecosport (CBY) Rayong (Thailand)/Haiduong (Vietnam), enPHI
Climate Control

Cooling the Interior Quickly
Vehicle with automatic climate controlVehicle with manual climate control
Press the AUTO button.Adjust the fan speed to the highestspeed setting.
1
Adjust the temperature control settingto low.
Adjust the temperature control to theMAX A/C position.
2
Adjust the air distribution control to theinstrument panel air vents position.
3
Recommended Settings for Cooling
Vehicle with automatic climate controlVehicle with manual climate control
Press the AUTO button.Adjust the fan speed to the secondspeed setting.
1
Adjust the temperature control to thedesired setting.
Adjust the temperature control to themidway point of the cold settings.
2
Open all instrument panel air vents anddirect as desired.
Adjust the air distribution control to theinstrument panel air vents position.
3
Vehicle Stationary for Extended Periods during Extreme High AmbientTemperatures
Vehicle with automatic climate controlVehicle with manual climate control
Apply the parking brake.Apply the parking brake.1
Move the transmission selector lever toposition P (automatic transmission) orneutral (manual transmission).
Move the transmission selector lever toposition P (automatic transmission) orneutral (manual transmission).
2
Press the AUTO button.Adjust the fan speed to the desiredsetting.
3
Adjust the temperature control settingto low.
Adjust the temperature control to theMAX A/C position.
4
Adjust the air distribution control to theinstrument panel air vents position.
Adjust the air distribution control to theinstrument panel air vents position.
5
67
Ecosport (CBY) Rayong (Thailand)/Haiduong (Vietnam), enPHI
Climate Control
Windshield and Side Window Defrosting or Defogging in Cold Weather
Vehicle with automatic climate controlVehicle with manual climate control
Press the maximum windshielddefrosting and defogging button.
Press the windshield defrosting anddefogging button.
1
Adjust the temperature control to thedesired setting.
Adjust the temperature control to thedesired setting.
2
Direct the outboard instrument panel airvents toward the side windows.
Direct the outboard instrument panel airvents toward the side windows.
3
Adjust the fan speed to the highestsetting.
4
HEATED WINDOWSUse the heated windows to demist the rearwindow.Note: The heated windows operate onlywhen the engine is running.
Heated Rear Window (If Equipped)
E72507
68
Ecosport (CBY) Rayong (Thailand)/Haiduong (Vietnam), enPHI
Climate Control

SITTING IN THE CORRECTPOSITION
WARNINGSSitting improperly, out of position orwith the seat back reclined too farcan take weight off the seat cushion
and affect the decision of the passengersensing system, resulting in serious injuryor death in the event of a collision. Alwayssit upright against your seat back, with yourfeet on the floor.
Do not recline the seat back as thiscan cause the occupant to slideunder the safety belt, resulting in
serious injury in the event of a collision.Do not place objects higher than theseat back to reduce the risk ofserious injury in the event of a
collision or during heavy braking.
E68595
The correct use of these componentsprovide better protection for the occupantsin case of accident.
WARNINGNever adjust the seats when thevehicle is moving.
Note: The seat belt must be used properlyto hold the body in a position to allow theairbag to achieve maximum effect.Correct Driving Position• Sit in the most vertical position
possible, and with the seat backrestnot reclined by more than 30 degrees.
• Adjust the head restraints.• Do not place the front seat much too
close to the dashboard. The sameapplies to the front passenger.
• The driver should hold the steeringwheel with the arms slightly bent, aswell as the legs, so that the pedals canbe fully pressed.
• Position the shoulder strap of thesafety belt over the center of yourshoulder and position the lap straptightly across your hips.
Make sure that your driving position iscomfortable and that you can maintain fullcontrol of your vehicle.
HEAD RESTRAINTS
WARNINGSRaise the rear head restraint whenthe rear seat is occupied by apassenger.When front seats are in use the headrestraints must not be removed.
Adjusting the head restraintsAdjust the head restraint so that the topof it is level with the top of your head.
69
Ecosport (CBY) Rayong (Thailand)/Haiduong (Vietnam), enPHI
Seats

Removing the head restraintsFront head restraints
E140447
21
Press locking button 1 and at the sametime release the retaining clip 2 using asuitable implement.
Rear outer head restraints
E151804
Pull to move the head restraint upward.Press the locking button 1 to lower thehead restraint or to remove the headrestraint.
MANUAL SEATS
WARNINGSDo not place any objects behind theseat back before returning it to theoriginal position. Pull on the seat
back to make sure that it has fully latchedafter returning the seat back to its originalposition. An unlatched seat may becomedangerous if you stop suddenly or have acollision.
Rock the seat backward and forwardafter releasing the lever to make surethat it is fully engaged in its catch.
Moving the Seat Backward andForward
E149153
70
Ecosport (CBY) Rayong (Thailand)/Haiduong (Vietnam), enPHI
Seats
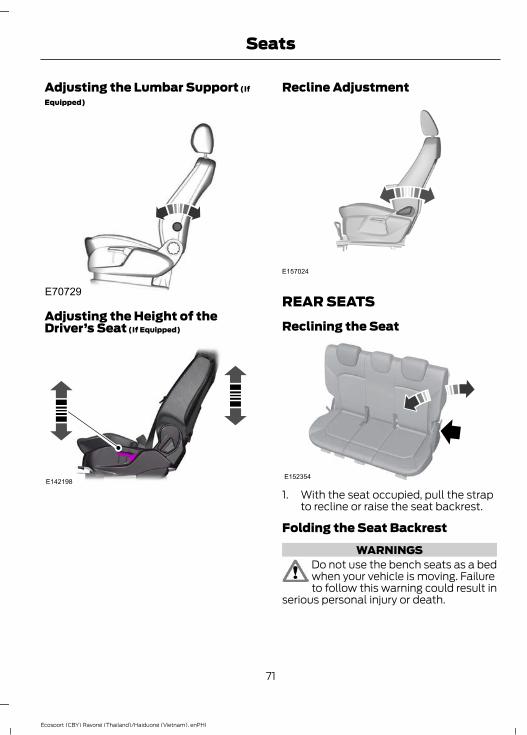
Adjusting the Lumbar Support (If
Equipped)
E70729
Adjusting the Height of theDriver’s Seat (If Equipped)
E142198
Recline Adjustment
E157024
REAR SEATSReclining the Seat
E152354
1. With the seat occupied, pull the strapto recline or raise the seat backrest.
Folding the Seat BackrestWARNINGS
Do not use the bench seats as a bedwhen your vehicle is moving. Failureto follow this warning could result in
serious personal injury or death.
71
Ecosport (CBY) Rayong (Thailand)/Haiduong (Vietnam), enPHI
Seats

WARNINGSWhen folding or unfolding the seats,take care not to get your fingerscaught between the seat backrest
and seat frame. Failure to follow thiswarning could result in serious personalinjury.
Do not place any objects on a foldedseat. Hard objects may becomeprojectiles in a crash or sudden stop,
which may increase the risk of seriouspersonal injury.
Do not attempt to fold the rear seatcushion forward before folding theseat backrest.
Do not attempt to fold the rear seatcushion forward before folding the seatbackrest. See Head Restraints (page 69).
E1511581
2
1. Pull the strap on the side of the seatstraight up.
2. Fold the seat backrest forward.
Unfolding the Seat Backrest
WARNINGSMake sure that the seat backrestsare secure and fully locked in theircatches.When unfolding the seat backrests,make sure that the safety belts arenot trapped behind the seat.
E151160
1. Unfold the seat backrest and lock itinto position.
Folding the Seat Forward
E151159
1
1. With the seat backrest in the foldedposition, pull the strap on the side ofthe seat straight up and lift the seat.
72
Ecosport (CBY) Rayong (Thailand)/Haiduong (Vietnam), enPHI
Seats

E181630
2
2. Fold the seat forward.
E151172
3
3. Attach the tether straps to the fronthead restraint post to hold the seat inthe folded position.
Unfolding the Seat
WARNINGSWhen unfolding the seat, make surethat the safety belts are not trappedbehind the seat.Make sure that the seats and theseat backrests are secure and fullylocked in their catches.
E1511611
1. Detach the tether straps and lower theseat.
E1463552
73
Ecosport (CBY) Rayong (Thailand)/Haiduong (Vietnam), enPHI
Seats
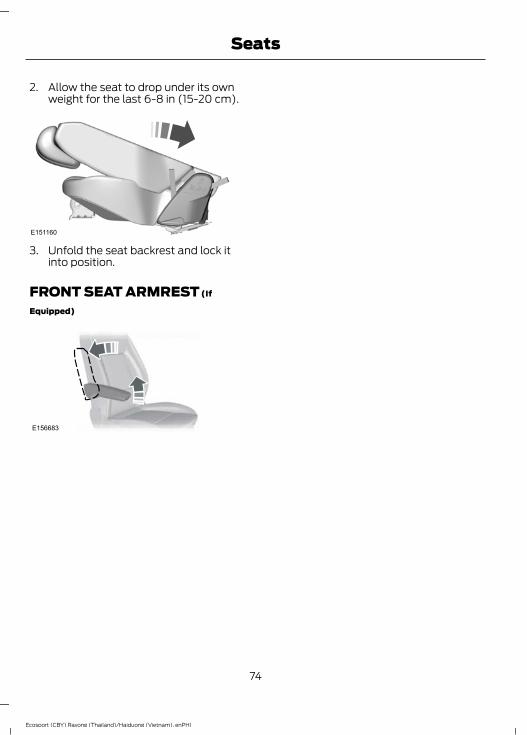
2. Allow the seat to drop under its ownweight for the last 6-8 in (15-20 cm).
E151160
3. Unfold the seat backrest and lock itinto position.
FRONT SEAT ARMREST (If
Equipped)
E156683
74
Ecosport (CBY) Rayong (Thailand)/Haiduong (Vietnam), enPHI
Seats
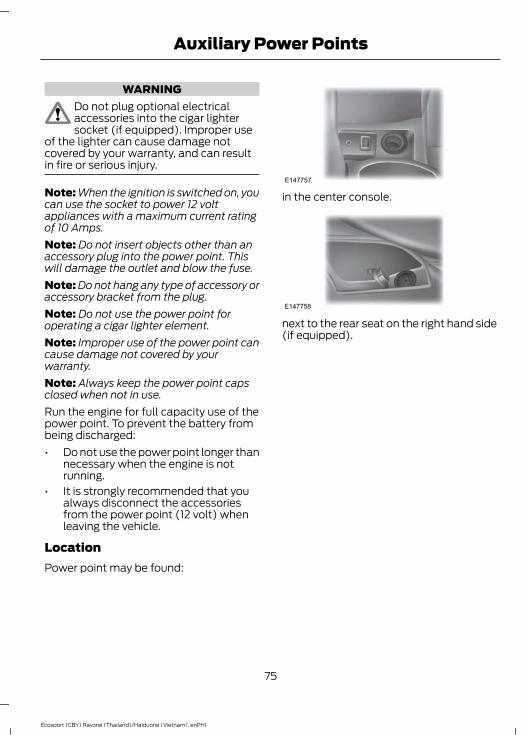
WARNINGDo not plug optional electricalaccessories into the cigar lightersocket (if equipped). Improper use
of the lighter can cause damage notcovered by your warranty, and can resultin fire or serious injury.
Note: When the ignition is switched on, youcan use the socket to power 12 voltappliances with a maximum current ratingof 10 Amps.Note: Do not insert objects other than anaccessory plug into the power point. Thiswill damage the outlet and blow the fuse.Note: Do not hang any type of accessory oraccessory bracket from the plug.Note: Do not use the power point foroperating a cigar lighter element.Note: Improper use of the power point cancause damage not covered by yourwarranty.Note: Always keep the power point capsclosed when not in use.Run the engine for full capacity use of thepower point. To prevent the battery frombeing discharged:• Do not use the power point longer than
necessary when the engine is notrunning.
• It is strongly recommended that youalways disconnect the accessoriesfrom the power point (12 volt) whenleaving the vehicle.
LocationPower point may be found:
E147757
in the center console.
E147758
next to the rear seat on the right hand side(if equipped).
75
Ecosport (CBY) Rayong (Thailand)/Haiduong (Vietnam), enPHI
Auxiliary Power Points

CENTER CONSOLE
WARNINGUse only soft cups in the cup holders.Hard objects can injure you in acollision.
Your vehicle may be equipped with avariety of console features. These include:• front cup holders• rear cup holders• auxiliary input jack (if equipped)• USB (if equipped)• auxiliary power point.
COOL BOX
E170526
Use the rotary control to open and closethe air vent.
GLASSES HOLDER (If Equipped)
E150040
The glasses must be placed in the glassesholder with the lenses facing downwardas shown in the picture. If not, the glassescan fall down when the glasses holder isopen.
UNDER SEAT STORAGE
E170488
To open, hold the storage box handle andpress to release the latch. Pull forward.
76
Ecosport (CBY) Rayong (Thailand)/Haiduong (Vietnam), enPHI
Storage Compartments
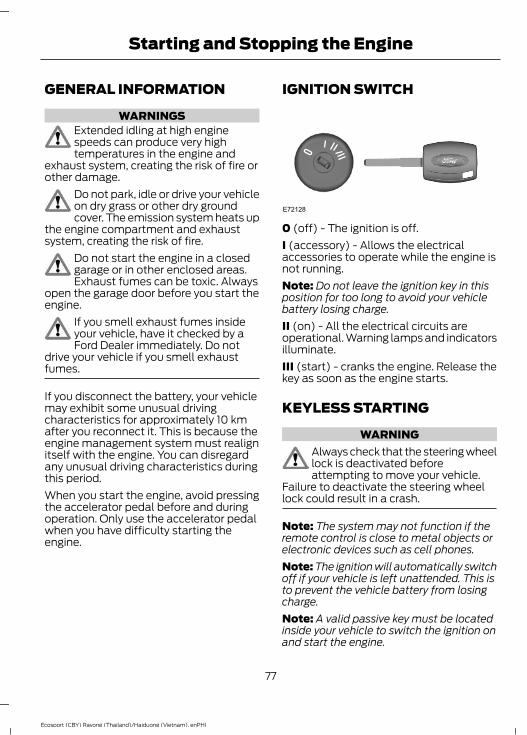
GENERAL INFORMATION
WARNINGSExtended idling at high enginespeeds can produce very hightemperatures in the engine and
exhaust system, creating the risk of fire orother damage.
Do not park, idle or drive your vehicleon dry grass or other dry groundcover. The emission system heats up
the engine compartment and exhaustsystem, creating the risk of fire.
Do not start the engine in a closedgarage or in other enclosed areas.Exhaust fumes can be toxic. Always
open the garage door before you start theengine.
If you smell exhaust fumes insideyour vehicle, have it checked by aFord Dealer immediately. Do not
drive your vehicle if you smell exhaustfumes.
If you disconnect the battery, your vehiclemay exhibit some unusual drivingcharacteristics for approximately 10 kmafter you reconnect it. This is because theengine management system must realignitself with the engine. You can disregardany unusual driving characteristics duringthis period.When you start the engine, avoid pressingthe accelerator pedal before and duringoperation. Only use the accelerator pedalwhen you have difficulty starting theengine.
IGNITION SWITCH
E72128
0 (off) - The ignition is off.I (accessory) - Allows the electricalaccessories to operate while the engine isnot running.Note: Do not leave the ignition key in thisposition for too long to avoid your vehiclebattery losing charge.II (on) - All the electrical circuits areoperational. Warning lamps and indicatorsilluminate.III (start) - cranks the engine. Release thekey as soon as the engine starts.
KEYLESS STARTING
WARNINGAlways check that the steering wheellock is deactivated beforeattempting to move your vehicle.
Failure to deactivate the steering wheellock could result in a crash.
Note: The system may not function if theremote control is close to metal objects orelectronic devices such as cell phones.Note: The ignition will automatically switchoff if your vehicle is left unattended. This isto prevent the vehicle battery from losingcharge.Note: A valid passive key must be locatedinside your vehicle to switch the ignition onand start the engine.
77
Ecosport (CBY) Rayong (Thailand)/Haiduong (Vietnam), enPHI
Starting and Stopping the Engine

Switching the Ignition On(Accessory Mode)
E142318
Press the button once without your footon the brake or clutch pedal. It is locatedon the instrument panel near the steeringwheel. All electrical circuits andaccessories are operational and thewarning lamps and indicators illuminate.Press the button again without your footon the brake or clutch pedal to turn yourvehicle off completely.
Starting Your VehicleManual Transmission1. Fully depress the clutch pedal.2. Briefly press the button.Note: Releasing the clutch pedal duringengine start will stop the engine crankingand return to ignition on.
Automatic Transmission1. Move the transmission selector lever
to park.2. Fully depress the brake pedal.3. Briefly press the button.Note: Releasing the brake pedal duringengine start will stop the engine crankingand return to ignition on.
Diesel EngineNote: Engine cranking will not commenceuntil the engine glow plug cycle has beencompleted. This may take several secondsin extremely cold conditions.
Failure to StartThe system does not function if:• The passive key frequencies are
jammed.• The passive key battery has no charge.If you are unable to start your vehicle, dothe following.
E99666
1. Hold the passive key next to thesymbol on the steering column.
2. With the passive key in this position,you can use the button to switch theignition on and start your vehicle.
Manual TransmissionIf the engine does not crank when theclutch pedal has been fully depressed andthe button is pressed:1. Fully depress both the clutch and brake
pedals.2. Press the button until the engine has
started.Note: Releasing the clutch pedal duringengine start will stop the engine crankingand return to ignition on. A message will beshown in the display.
78
Ecosport (CBY) Rayong (Thailand)/Haiduong (Vietnam), enPHI
Starting and Stopping the Engine

Stopping the Engine When YourVehicle is StationaryNote: The ignition, all electrical circuitswarning lamps and indicators will beswitched off.
Manual TransmissionBriefly press the button.
Automatic Transmission1. Move the transmission selector lever
to park.2. Press the button.
Stopping the Engine When YourVehicle is Moving
WARNINGIf you switch the engine off whenyour vehicle is moving it will result ina loss of brake and steering
assistance. The steering will not lock, buthigher effort will be required. With theengine switched off some electricalcircuits, warning lamps and indicators mayalso be off.
1. Press and hold the button for amoment, or press it three times withintwo seconds to switch the ignition off.
2. Move the transmission selector leverto neutral and use the brakes to bringyour vehicle to a safe stop.
3. When your vehicle has stopped, movethe transmission selector lever to park.
STEERING WHEEL LOCK
WARNINGAlways check that the steering isunlocked before attempting to moveyour vehicle.
Vehicles without Keyless StartingTo lock the steering wheel:1. Remove the key from the ignition
switch.2. Rotate the steering wheel slightly to
engage the lock.
Vehicles with Keyless StartingNote: The steering wheel lock does notengage when the ignition is on or if yourvehicle is moving.Your vehicle has an electronicallycontrolled steering wheel lock. Thisoperates automatically.The steering wheel lock engages after ashort period after you have parked yourvehicle and the passive key is outside ofyour vehicle.
Unlocking the Steering Wheel
Vehicles with Automatic TransmissionSwitch the ignition on or press the brakepedal.
Vehicles with Manual TransmissionSwitch the ignition on or press the clutchpedal.
STARTING A GASOLINEENGINENote: You can only operate the starter 10seconds. The number of start attempts islimited to approximately six. If you exceedthis limit, the system does not allow you totry again for about 30 minutes.
Cold or Hot EngineVehicles with Manual TransmissionNote: Do not touch the accelerator pedal.
79
Ecosport (CBY) Rayong (Thailand)/Haiduong (Vietnam), enPHI
Starting and Stopping the Engine
Note: Releasing the clutch pedal while theengine is starting stops the engine crankingand returns the ignition to on.1. Fully depress the clutch pedal.2. Start the engine.
Vehicles with Automatic TransmissionNote: Do not touch the accelerator pedal.1. Depress the brake pedal.2. Move the transmission selector lever
to position P or N.3. Start the engine.
All VehiclesIf the engine does not start within 10seconds, wait for a short period and tryagain.If the engine does not start after threeattempts, wait 10 seconds and follow theflooded engine procedure.If you have difficulty starting the enginewhen the temperature is below -13°F(-25°C), press the accelerator pedal to themid-way point of its travel and try again.
Flooded EngineVehicles with Manual Transmission1. Fully depress the clutch pedal.2. Fully depress the accelerator pedal and
hold it there.3. Start the engine.
Vehicles with Automatic Transmission1. Depress the brake pedal.2. Move the transmission selector lever
to position P or N.3. Fully depress the accelerator pedal and
hold it there.4. Start the engine.
All VehiclesIf the engine does not start, repeat the coldor hot engine procedure.
Engine Idle Speed after StartingThe speed at which the engine idlesimmediately after starting minimizesvehicle emissions and maximizes cabincomfort and fuel economy.The idle speed varies depending on certainfactors. These include vehicle componentand ambient temperatures as well aselectrical and climate system demands.
Failure to StartVehicles with Manual TransmissionIf the engine does not crank when you fulldepress the clutch pedal with the ignitionkey in position III, follow this procedure:1. Fully depress the clutch and brake
pedals.2. Turn the key to position III until the
engine has started.
SWITCHING OFF THE ENGINEVehicles With a Turbocharger
WARNINGDo not switch the engine off when itis running at high speed. If you do, theturbocharger will continue running
after the engine oil pressure has droppedto zero. This will lead to prematureturbocharger bearing wear.
Release the accelerator pedal. Wait untilthe engine has reached idle speed and thenswitch it off.
80
Ecosport (CBY) Rayong (Thailand)/Haiduong (Vietnam), enPHI
Starting and Stopping the Engine
SAFETY PRECAUTIONS
WARNINGSDo not overfill the fuel tank. Thepressure in an overfilled tank maycause leakage and lead to fuel spray
and fire.Automotive fuels can cause seriousinjury or death if misused ormishandled.The flow of fuel through a fuel pumpnozzle can produce static electricity,which can cause a fire if fuel is
pumped into an ungrounded fuel container.Gasoline may contain benzene,which is a cancer-causing agent.When refueling always shut theengine off and never allow sparks oropen flames near the filler neck.
Never smoke while refueling. Fuel vapor isextremely hazardous under certainconditions. Care should be taken to avoidinhaling excess fumes.
The fuel system be under pressure.If you hear a hissing sound near thefuel filler door, do not refuel until the
sound stops. Otherwise, fuel may sprayout, wich could cause serious personalinjury.
Observe the following guidelines whenhandling automotive fuel:• Extinguish all smoking materials and
any open flames before refueling yourvehicle.
• Always turn off the vehicle beforerefueling.
• Automotive fuels can be harmful orfatal if swallowed. Fuel such asgasoline is highly toxic and ifswallowed can cause death orpermanent injury. If fuel is swallowed,call a physician immediately, even if nosymptoms are immediately apparent.The toxic effects of fuel may not bevisible for hours.
• Avoid inhaling fuel vapors. Inhaling toomuch fuel vapor of any kind can leadto eye and respiratory tract irritation.In severe cases, excessive or prolongedbreathing of fuel vapor can causeserious illness and permanent injury.
• Avoid getting fuel liquid in your eyes. Iffuel is splashed in the eyes, removecontact lenses (if worn), flush withwater for 15 minutes and seek medicalattention. Failure to seek propermedical attention could lead topermanent injury.
• Fuels can also be harmful if absorbedthrough the skin. If fuel is splashed onthe skin, clothing or both, promptlyremove contaminated clothing andwash skin thoroughly with soap andwater. Repeated or prolonged skincontact with fuel liquid or vapor causesskin irritation.
FUEL QUALITY - GASOLINE
WARNINGSDo not mix gasoline with oil, dieselor other liquids. This could cause achemical reaction.Do not use leaded gasoline orgasoline with additives containingother metallic compounds (e.g.
manganese-based). They could damagethe emission system.
Note: We recommend that you use onlyhigh quality fuel.
81
Ecosport (CBY) Rayong (Thailand)/Haiduong (Vietnam), enPHI
Fuel and Refueling

Note: We do not recommend the use ofadditional additives or other enginetreatments for normal vehicle use.Use minimum 91 octane unleaded gasolinethat meets the specification defined by EN228 or the equivalent nationalspecification.Your vehicle is suitable for use with ethanolblends up to 20% (E20).
Long-Term StorageMost gasoline contains ethanol. Werecommend that you fill the fuel tank withfuel that does not contain ethanol if youintend to store your vehicle for more thantwo months. Alternatively, we recommendthat you seek advice from an authorizeddealer.
RUNNING OUT OF FUELAvoid running out of fuel because thissituation may have an adverse effect onengine components.If you have run out of fuel:• You may need to cycle the ignition from
off to on several times after refuelingto allow the fuel system to pump thefuel from the tank to the engine. Onrestarting, cranking time will take a fewseconds longer than normal. Withkeyless ignition, just start the engine.Crank time will be longer than usual.
• Normally, adding 4 L of fuel is enoughto restart the engine. If the vehicle isout of fuel and on a steep grade, morethan 4 L may be required.
CATALYTIC CONVERTER
WARNINGDo not park or idle your vehicle overdry leaves, dry grass or othercombustible materials. The exhaust
will radiate a considerable amount of heatduring use, and after you have switchedthe engine off. This is a potential firehazard.
Driving with a Catalytic ConverterWARNINGS
Avoid running out of fuel.
Do not crank the engine for longperiods.Do not run the engine when a sparkplug lead is disconnected.Do not push-start or tow-start yourvehicle. Use booster cables. SeeJump Starting the Vehicle (page
105).Do not switch the ignition off whendriving.
REFUELING
WARNINGSDo not attempt to start the engine ifyou have filled the fuel tank with theincorrect fuel. This could damage the
engine. Have the system checkedimmediately by a Ford Dealer.
Do not use any kind of flames or heatnear the fuel system. The fuel systemis under pressure. There is a risk of
injury if the fuel system is leaking.
82
Ecosport (CBY) Rayong (Thailand)/Haiduong (Vietnam), enPHI
Fuel and Refueling

WARNINGSIf you use a high pressure spray towash your vehicle, only spray the fuelfiller flap briefly from a distance not
less than 20 centimeters.
Note: Flex fuel vehicles can be fueled withgasoline, ethanol or a mixture of both.If you are refueling with a different fuelthan that used previously, we recommendthat you drive the vehicle immediately afterrefueling for at least 10 minutes. This isnecessary because the engine controlmodule needs to adapt itself to the fuelpresent in the tank. This procedure isespecially important when the fuel levelgauge indicates less than half beforerefueling.If your vehicle stopped due to lack of fuel(empty tank) you should refuel preferablywith gasoline.
Fuel Filler CapYour fuel tank filler cap has a regular turnstyle design, with two to three turns on oroff.When fueling your vehicle:1. Turn the engine off.2. Carefully turn the filler cap
counterclockwise two to three turns,until it opens.
3. Hang the fuel cap tether cord on thefiller door hook.
4. After refueling, to install the cap, alignit with the filler pipe.
5. Turn the filler cap clockwise two tothree turns until it clicks twice.
If you must replace the fuel filler cap,replace it with a fuel filler cap that isdesigned for your vehicle. The customerwarranty may be void for any damage tothe fuel tank or fuel system if the correctgenuine Ford fuel filler cap is not used.
FUEL CONSUMPTIONNote: The amount of usable fuel in theempty reserve varies and should not berelied upon to increase driving range. Whenrefueling your vehicle after the fuel gaugeindicates empty, you might not be able torefuel the full amount of the advertisedcapacity of the fuel tank due to the emptyreserve still present in the tank.Indicated capacity is the difference in theamount of fuel in a full tank and a tankwhen the fuel gauge indicates empty.Empty reserve is the amount of fuel in thetank after the fuel gauge indicates empty.Your dealer can give you advice onimproving your fuel consumption.
Filling the TankFor consistent results when filling the fueltank:• Turn the ignition off before fueling; an
inaccurate reading results if the engineis left running.
• Use the same fill rate(low-medium-high) each time the tankis filled.
• The maximum tank capacity, duringfueling, is reached when the pump isautomatically cut off for the secondtime.
Results are most accurate when the fillingmethod is consistent.
Calculating Fuel EconomyDo not measure fuel economy during thefirst 1600 kilometers of driving (this is yourengine’s break-in period); a more accuratemeasurement is obtained after 3200kilometers - 4800 kilometers. Also, fuelexpense, frequency of fill ups or fuel gaugereadings are not accurate ways to measurefuel economy.
83
Ecosport (CBY) Rayong (Thailand)/Haiduong (Vietnam), enPHI
Fuel and Refueling

1. Fill the fuel tank completely and recordthe initial odometer reading.
2. Each time you fill the tank, record theamount of fuel added.
3. After at least three to five tank fill ups,fill the fuel tank and record the currentodometer reading.
4. Subtract your initial odometer readingfrom the current odometer reading.
5. Calculate fuel economy by multiplyingliters used by 100, and then dividing itby the traveled kilometers.
Keep a record for at least one month andrecord the type of driving (city or highway).This provides an accurate estimate of thevehicle’s fuel economy under currentdriving conditions. Additionally, keepingrecords during summer and winter showhow temperature impacts fuel economy.In general, lower temperatures mean lowerfuel economy.
84
Ecosport (CBY) Rayong (Thailand)/Haiduong (Vietnam), enPHI
Fuel and Refueling

MANUAL TRANSMISSION5-Speed Manual TransmissionUsing the ClutchNote: Failure to fully press the clutch pedalto the floor may cause increased shiftefforts, prematurely wear transmissioncomponents or damage the transmission.Note: Do not drive with your foot resting onthe clutch pedal or use the clutch pedal tohold your vehicle at a standstill whilewaiting on a hill. These actions will reducethe life of the clutch.
E144905
Manual transmission vehicles have astarter interlock that prevents cranking theengine unless the clutch pedal is fullypressed.To start the vehicle:1. Make sure the parking brake is fully set.2. Press the clutch pedal to the floor, then
put the gearshift lever in the neutralposition.
3. Start the engine.4. Press the brake pedal and move the
gearshift lever to the desired gear; 1(First) or R (Reverse).
5. Release the parking brake, then slowlyrelease the clutch pedal while slowlypressing on the accelerator.
Recommended Shift SpeedsNote: Do not downshift into 1 (First) whenyour vehicle is moving faster than 24 km/h.This will damage the clutch.The engine is designed to operate at aminimum of 1250 RPM for optimal power,fuel economy, and durability. When drivinga vehicle equipped with a manualtransmission, do not operate the enginebelow 1250 RPM while driving with thetransmission in any gear. This does notapply while starting or idling the enginewhile the transmission is in neutral and/orthe clutch pedal is pressed. Lugging theengine below 1250 RPM may result indamage to the vehicle engine, poor fueleconomy, poor acceleration, andundesirable noise, vibration, and harshness.Choose the next lowest gear until a properengine RPM is reached.
1.5L
Recommended upshifts (for best fueleconomy) when accelerating
Shift from:
23 km/h1 - 2
39 km/h2 - 3
51 km/h3 - 4
71 km/h4 - 5
ReverseNote: Make sure that your vehicle is at acomplete stop before you shift into R(Reverse). Failure to do so may damage thetransmission.
85
Ecosport (CBY) Rayong (Thailand)/Haiduong (Vietnam), enPHI
Transmission
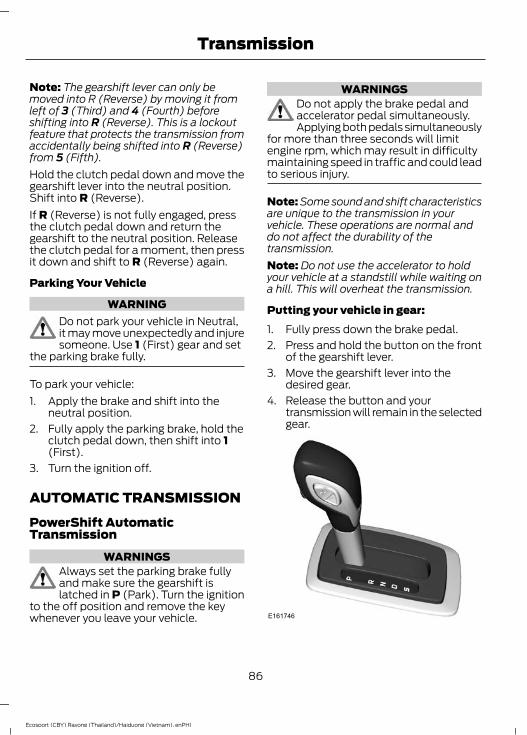
Note: The gearshift lever can only bemoved into R (Reverse) by moving it fromleft of 3 (Third) and 4 (Fourth) beforeshifting into R (Reverse). This is a lockoutfeature that protects the transmission fromaccidentally being shifted into R (Reverse)from 5 (Fifth).Hold the clutch pedal down and move thegearshift lever into the neutral position.Shift into R (Reverse).If R (Reverse) is not fully engaged, pressthe clutch pedal down and return thegearshift to the neutral position. Releasethe clutch pedal for a moment, then pressit down and shift to R (Reverse) again.
Parking Your Vehicle
WARNINGDo not park your vehicle in Neutral,it may move unexpectedly and injuresomeone. Use 1 (First) gear and set
the parking brake fully.
To park your vehicle:1. Apply the brake and shift into the
neutral position.2. Fully apply the parking brake, hold the
clutch pedal down, then shift into 1(First).
3. Turn the ignition off.
AUTOMATIC TRANSMISSIONPowerShift AutomaticTransmission
WARNINGSAlways set the parking brake fullyand make sure the gearshift islatched in P (Park). Turn the ignition
to the off position and remove the keywhenever you leave your vehicle.
WARNINGSDo not apply the brake pedal andaccelerator pedal simultaneously.Applying both pedals simultaneously
for more than three seconds will limitengine rpm, which may result in difficultymaintaining speed in traffic and could leadto serious injury.
Note: Some sound and shift characteristicsare unique to the transmission in yourvehicle. These operations are normal anddo not affect the durability of thetransmission.Note: Do not use the accelerator to holdyour vehicle at a standstill while waiting ona hill. This will overheat the transmission.
Putting your vehicle in gear:1. Fully press down the brake pedal.2. Press and hold the button on the front
of the gearshift lever.3. Move the gearshift lever into the
desired gear.4. Release the button and your
transmission will remain in the selectedgear.
E161746
86
Ecosport (CBY) Rayong (Thailand)/Haiduong (Vietnam), enPHI
Transmission

P (Park)This position locks the transmission andprevents the front wheels from turning.Come to a complete stop before puttingyour vehicle into and out of P (Park).
R (Reverse)With the gearshift lever in R (Reverse), thevehicle will move backward. Always cometo a complete stop before shifting into andout of R (Reverse).
N (Neutral)With the gearshift lever in N (Neutral), youhave the ability to start your vehicle and itis free to roll. Hold the brake pedal downwhile in this position.
D (Drive)The normal driving position for the bestfuel economy.
S (Sport)With the gearshift lever in S (Sport), youhave the ability to select gears quicker andat higher engine speeds.Sport mode will remain on until you eithershift manually up or down the gears usingthe + or - buttons on the side of thegearshift lever or you move thetransmission selector lever to D (Drive).
SelectShift Automatic™TransmissionYour SelectShift Automatic transmissionallows you the ability to change gearsmanually.To use SelectShift, move the gearshiftlever into S (Sport). Use the + or - buttonson the side of your gearshift lever tomanually change gears.• Press the (+) button to upshift.• Press the (-) button to downshift.
Note: After you have assumed manualcontrol with SelectShift, your vehicle willremain in this mode until you return thegearshift lever from S (Sport), back to D(Drive).Upshift to the recommended shift speedsaccording to the following chart:
Recommended upshift speed whenaccelerating using SelectShift mode (for
optimum fuel economy)
mph (km/h)Gear Upshift
ToFrom
15 mph (24km/h)
21
25 mph (40km/h)
32
40 mph (64km/h)
43
45 mph (72km/h)
54
50 mph (80km/h)
65
The instrument cluster will display yourcurrently selected gear.Note: The transmission will automaticallyupshift if your engine speed is too high ordownshift if your engine speed is too low.
Brake-Shift Interlock OverrideWARNINGS
Do not drive your vehicle until youverify that the brake lamps areworking.
87
Ecosport (CBY) Rayong (Thailand)/Haiduong (Vietnam), enPHI
Transmission

WARNINGSWhen doing this procedure, you willbe taking your vehicle out of P (park),which means your vehicle can roll
freely. To avoid unwanted vehiclemovement, always fully set the parkingbrake prior to doing this procedure. Usewheel chocks if appropriate.
If the parking brake is fully released,but the brake warning lamp remainsilluminated, the brakes may not be
working properly. See your authorizeddealer.
Use the brake shift override to move thegearshift lever from the park position in theevent of an electrical malfunction or if yourvehicle has a dead battery.Apply the parking brake and turn theignition off before performing thisprocedure.
E1421933 2
1. Apply the parking brake and switch theignition off before carrying out thisprocedure.
2. Remove the retaining screw.3. Remove the right side center console
side panel.
E142214
4
4. Press the brake pedal. Using a suitabletool rotate the lever forward whilepulling the transmission selector leverout of the P (park) position and intothe N (neutral) position.
5. Install the console cover.6. Apply the brake pedal, start your
vehicle and release the parking brake.
HILL START ASSIST (If Equipped)
WARNINGSThe hill start assist feature does notreplace the parking brake. When youleave the vehicle, always apply the
parking brake.You must remain in the vehicle onceyou have activated the hill startassist feature.During all times, you are responsiblefor controlling the vehicle,supervising the hill start assist
system and intervening, if required.If the engine is revved excessively, orif a malfunction is detected when thehill start assist feature is active, the
hill start assist feature will be deactivated.
88
Ecosport (CBY) Rayong (Thailand)/Haiduong (Vietnam), enPHI
Transmission

This feature makes it easier to pull awaywhen the vehicle is on a slope without theneed to use the parking brake.When this feature is active, the vehicle willremain stationary on the slope for two tothree seconds after you release the brakepedal. This allows you time to move yourfoot from the brake to the acceleratorpedal. The brakes are releasedautomatically once the engine hasdeveloped sufficient drive to prevent thevehicle from rolling down the slope. Thisis an advantage when pulling away on aslope, (for example from a car park ramp,traffic lights or when reversing uphill intoa parking space).This feature is activated automatically onany slope that can result in significantvehicle rollback.Note: Use the brake and hill start assist tohold your vehicle at a standstill whilewaiting on a hill.Note: Do not drive with your foot resting onthe clutch pedal or use the clutch pedal tohold your vehicle at a standstill whilewaiting on a hill.These actions will reducethe life of the clutch.Note: Do not use the accelerator to holdyour vehicle at a standstill while waiting ona hill. This will overheat the transmission.
Activating Hill Start AssistNote: If the engine is revved excessively, hillstart assist will be deactivated.1. Press the brake pedal to bring the
vehicle to a complete standstill. Keepthe brake pedal pressed.
2. If the sensors detect that the vehicle ison a slope, the hill start assist featurewill be activated automatically.
3. When you remove your foot from thebrake pedal, the vehicle will remain onthe slope without rolling away forapproximately two or three seconds.This hold time will automatically beextended if you are in the process ofdriving off.
4. Drive off in the normal manner. Thebrakes will be released automatically.
Deactivating Hill Start AssistPerform one of the following:• To deactivate hill start assist, Drive off
uphill without reapplying the brake.• Wait for two to three seconds until the
hill start assist system deactivatesautomatically.
• If a forward gear was selected whenthe system is active on, select reversegear.
• If reverse gear was selected when thesystem is active, select a forward gear.
PARK LOCK CONTROL (If Equipped)
Park lock control allows you to shift theautomatic transmission selector lever fromP (Park) to N (Neutral) after you haveswitched the ignition off. You can use thisfeature when double parking your vehicle.Parking your vehicle parallel to an alreadyparked vehicle is double parking.
E169792
Note: This feature can be switched on oroff in the information display. See GeneralInformation (page 53).
89
Ecosport (CBY) Rayong (Thailand)/Haiduong (Vietnam), enPHI
Transmission

Note: For vehicles without an informationdisplay, see an authorized dealer.Note: You must switch the ignition on whenswitching on or off the park lock control.To use this feature, carry out the followingsteps within 30 seconds after you switchthe ignition off and before the driver's dooris opened.1. Select park and switch off the vehicle.2. Remove the key.3. Press and hold the brake pedal.4. Select neutral.Note: Opening the driver's door or 30seconds after you switch the ignition off willdeactivate the park lock control, until thenext ignition cycle.
90
Ecosport (CBY) Rayong (Thailand)/Haiduong (Vietnam), enPHI
Transmission

GENERAL INFORMATIONDisc BrakesWet brake discs result in reduced brakingefficiency. Dab the brake pedal whendriving from a car wash to remove the filmof water.
Emergency Brake AssistWARNING
The system does not relieve you ofyour responsibility to drive with duecare and attention.
The system will detect when you brakeheavily by measuring the rate at which youpress the brake pedal. It will providemaximum braking efficiency as long as youpress the pedal.
Anti-lock Brakes (If Equipped)
WARNINGThe system does not relieve you ofyour responsibility to drive with duecare and attention.
The system helps you to maintain steeringand directional stability when you brakeheavily in an emergency, by preventing theroad wheels from locking.
HINTS ON DRIVING WITHANTI-LOCK BRAKESNote: When the system is operating, thebrake pedal will pulse and may travelfurther. Maintain pressure on the brakepedal. You may also hear a noise from thesystem. This is normal.
The anti-lock braking system will noteliminate the risks when:• You drive too closely to the vehicle in
front of you.• Your vehicle is hydroplaning.• You take corners too fast.• The road surface is poor.
PARKING BRAKEVehicles With AutomaticTransmission
WARNINGAlways set the parking brake fullyand leave your vehicle with thetransmission selector lever in
position P.
Note: If you park your vehicle on a hill andfacing uphill move the transmission selectorlever to position P and turn the steeringwheel away from the curb.Note: If you park your vehicle on a hill andfacing downhill move the transmissionselector lever to position P and turn thesteering wheel toward the curb.
Vehicles With ManualTransmission
WARNINGAlways set the parking brake fully.
Note: If you park your vehicle on a hill andfacing uphill select first gear and turn thesteering wheel away from the curb.Note: If you park your vehicle on a hill andfacing downhill select reverse gear and turnthe steering wheel toward the curb.
91
Ecosport (CBY) Rayong (Thailand)/Haiduong (Vietnam), enPHI
Brakes

All VehiclesNote: Do not press the release button whilepulling the lever up.To apply the parking brake:1. Press the foot brake pedal firmly.2. Pull the parking brake lever up to its
fullest extent.To release the parking brake:1. Press the brake pedal firmly.2. Pull the lever up slightly.3. Press the release button and push the
lever down.
92
Ecosport (CBY) Rayong (Thailand)/Haiduong (Vietnam), enPHI
Brakes

PRINCIPLE OF OPERATIONThe traction control system helps avoiddrive wheel spin and loss of traction.If your vehicle begins to slide, the systemapplies the brakes to individual wheelsand, when needed, reduces engine powerat the same time. If the wheels spin whenaccelerating on slippery or loose surfaces,the system reduces engine power in orderto increase traction.
USING TRACTION CONTROLIn certain situations for example, stuck insnow or mud, turning the traction controloff may be beneficial as this allows thewheels to spin with full engine power.Depending on the type of system you haveon your vehicle, you can either turn thesystem off using the information displayor by pressing the button.
Switching the System Off Usingthe Information Display Controls(If Equipped)
Your vehicle comes with this featurealready enabled. If required, you can switchthis feature off using the informationdisplay controls. See Principle ofOperation (page 93).
Switching the System Off Using aSwitch (If Equipped)
The button is located in the instrumentpanel.Press the button. You will see a messagein conjunction with an illuminated icon inthe display. Press the button again toreturn the system to normal mode.When you switch the traction controlsystem off, stability control remains fullyactive.
System Indicator Lights andMessages
WARNINGIf a failure has been detected withinthe AdvanceTrac system, thestability control light will illuminate
steadily. Verify that the AdvanceTracsystem was not manually disabled throughthe information display. If the stabilitycontrol light still illuminates steadily, havethe system serviced by an authorizeddealer immediately. Operating your vehiclewith AdvanceTrac disabled could lead toan increased risk of loss of vehicle control,vehicle rollover, personal injury and death.
E138639
The stability control lighttemporarily illuminates onengine start-up and flashes
when a driving condition activates thestability system.
The stability control off lighttemporarily illuminates onengine start-up and stays on
when you turn the traction control systemoff.
When you turn the traction control systemoff or on, a message appears in theinformation display showing system status.
93
Ecosport (CBY) Rayong (Thailand)/Haiduong (Vietnam), enPHI
Traction Control (If Equipped)

PRINCIPLE OF OPERATIONElectronic Stability Program
WARNINGThe system does not relieve you ofyour responsibility to drive with duecare and attention. Failure to do so
could result in loss of vehicle control,personal injury or death.
E72903
A A
AB
B
B
B
Without ESPAWith ESPB
The system supports stability when yourvehicle starts to slide away from yourintended path. The system performs thisby braking individual wheels and reducingengine torque as required.The system also provides an enhancedtraction control function by reducingengine torque if the wheels spin when youaccelerate. This improves your ability topull away on slippery roads or loosesurfaces, and improves comfort by limitingwheel spin in hairpin bends.
Stability Control Warning LampWhile driving, it flashes when the systemis operating. See Warning Lamps andIndicators (page 48).
USING STABILITY CONTROLNote: The system is automaticallyactivated when you start the engine.The traction control portion of the systemcan be turned off through the informationdisplay. See Using Traction Control(page 93).
94
Ecosport (CBY) Rayong (Thailand)/Haiduong (Vietnam), enPHI
Stability Control (If Equipped)

PRINCIPLE OF OPERATION
WARNINGSThe parking aid does not relieve youof your responsibility to drive withdue care and attention.The sensors may not detect objectsin heavy rain or other conditions thatcause disruptive reflections.The sensors may not detect objectswith surfaces that absorb ultrasonicwaves.The parking aid does not detectobstacles moving away from thevehicle. They will only be detected
shortly after they start to move towardsthe vehicle again.
Take particular care when reversingwith rear fitted accessories e.g. abicycle carrier, as the rear parking aid
will only indicate the distance from thebumper to the obstacle.
If you use a high pressure spray towash your vehicle, only spray thesensors briefly from a distance not
less than 8 inches (20 centimeters).
Note: Keep the sensors free from dirt, iceand snow. Do not clean with sharp objects.Note: The parking aid may emit false tonesif it detects a signal using the samefrequency as the sensors or if the vehicle isfully laden.Note: The outer sensors may detect theside walls of a garage. If the distancebetween the outer sensor and the side wallremains constant for three seconds, thetone will switch off. As you continue, theinner sensors will detect rearward objects.
PARKING AID
WARNINGSTo help avoid personal injury, pleaseread and understand the limitationsof the system as contained in this
section. Sensing is only an aid for some(generally large and fixed) objects whenmoving in reverse on a flat surface atparking speeds. Traffic control systems,inclement weather, air brakes, and externalmotors and fans may also affect thefunction of the sensing system; this mayinclude reduced performance or a falseactivation.
To help avoid personal injury, alwaysuse caution when in R (Reverse) andwhen using the sensing system.This system is not designed toprevent contact with small or movingobjects. The system is designed to
provide a warning to assist the driver indetecting large stationary objects to avoiddamaging the vehicle. The system may notdetect smaller objects, particularly thoseclose to the ground.
Certain add-on devices such as largetrailer hitches, bike or surfboard racksand any device that may block the
normal detection zone of the system, maycreate false beeps.
Note: Keep the sensors located on thebumper or fascia free from snow, ice andlarge accumulations of dirt. If the sensorsare covered, the system’s accuracy can beaffected. Do not clean the sensors withsharp objects.Note: If your vehicle sustains damage tothe bumper or fascia, leaving it misalignedor bent, the sensing zone may be alteredcausing inaccurate measurement ofobstacles or false alarms.
95
Ecosport (CBY) Rayong (Thailand)/Haiduong (Vietnam), enPHI
Parking Aids (If Equipped)

The sensing system warns the driver ofobstacles within a certain range of thebumper area. The system turns onautomatically whenever the ignition isswitched on.When receiving a detection warning, theradio volume is reduced to apredetermined level. After the warninggoes away, the radio volume returns to theprevious level.
Rear Sensing SystemThe rear sensors are only active when thetransmission is in R (Reverse). As thevehicle moves closer to the obstacle, therate of the audible warning increases.When the obstacle is fewer than 25centimeters away, the warning soundscontinuously. If a stationary or recedingobject is detected farther than 25centimeters from the side of the vehicle,the tone sounds for only three seconds.Once the system detects an objectapproaching, the warning sounds again.
E130178
Coverage area of up to 2 metersfrom the rear bumper (with adecreased coverage area at theouter corners of the bumper).
A
The system detects certain objects whilethe transmission is in R (Reverse):• and moving toward a stationary object
at a speed of 5 km/h or less• but not moving, and a moving object is
approaching the rear of the vehicle ata speed of 5 km/h or less
• and moving at a speed of less than 5km/h and a moving object isapproaching the rear of the vehicle ata speed of less than 5 km/h.
If a fault is present in the system, a warningmessage appears in the informationdisplay and does not allow the driver toswitch the faulted system on.
96
Ecosport (CBY) Rayong (Thailand)/Haiduong (Vietnam), enPHI
Parking Aids (If Equipped)
STEERINGElectric Power Steering
WARNINGObtain immediate service if a systemerror is detected. You may not noticeany difference in the feel of your
steering, but a serious condition may exist.Failure to do so may result in loss ofsteering control.
Note: Your vehicle is equipped with anelectric power-assisted steering system.There is no fluid reservoir to check or fill.The electric power steering systemoperates by an electric motor, whichreduces the effort on the driver's steeringwheel.The system operates progressively andduring maneuvers, the system leaves theeffort lighter. As the vehicle speedincreases, it reduces its action to improvethe control of the vehicle.The electric power steering system hasdiagnostic checks that continuouslymonitor the system to ensure properoperation. When a system error occurs, amessage will appear in the informationdisplay. If this happens, stop the vehicle ina safe place, and switch off the engine.After at least 10 seconds, reset the systemby restarting the engine, and watch theinformation display for a steering message.If a steering message returns, or returnswhile driving, take the vehicle to anauthorized dealer to have it checked.If your vehicle loses electrical power whileyou are driving (or if the ignition is turnedoff), you can steer the vehicle manually,but it takes more effort. Extremecontinuous steering may increase the effortit takes for you to steer. This occurs toprevent internal overheating andpermanent damage to your steering
system. If this should occur, you will notlose the ability to steer the vehiclemanually nor will it cause permanentdamage. Typical steering and drivingmaneuvers will allow the system to cooland steering assist will return to normal.
Steering TipsAvoid sudden movements with the steeringwheel. The force required to change thevehicle direction is lower, compared to avehicle with mechanical steering.If the steering wanders or pulls, check for:• An improperly inflated tire• Uneven tire wear• Loose or worn suspension components• Loose or worn steering components• Improper vehicle alignmentA high crown in the road or high crosswindsmay also make the steering seem towander or pull.
97
Ecosport (CBY) Rayong (Thailand)/Haiduong (Vietnam), enPHI
Driving Aids

GENERAL INFORMATION
WARNINGSUse only load securing straps thatmeet your needs, and that preventthe load from turning loose and
causing an accident.Make sure that you secure all looseitems properly.Place luggage and other loads as lowand as far forward as possible withinthe luggage or loadspace.Do not drive with the liftgate or reardoor open. Exhaust fumes may enteryour vehicle.Do not exceed the maximum frontand rear axle loads for your vehicle.See Vehicle Identification Plate
(page 140).Do not allow items to contact therear windows.
LUGGAGE ANCHOR POINTS
E142324
LUGGAGE COVERS
WARNINGDo not place objects on the luggagecover.
E156538
Pull out the cover and secure it in theretaining points.Release it from the retaining points and letit roll back into the case.
ROOF RACKS AND LOADCARRIERS
WARNINGWhen loading the roof rail crossbars,it is recommended to evenlydistribute the load, as well as
maintain a low center of gravity. Loadedvehicles, with higher centers of gravity, mayhandle differently than unloaded vehicles.Extra precautions, such as slower speedsand increased stopping distance, shouldbe taken when driving a heavily loadedvehicle.
The maximum recommended load, evenlydistributed on the crossbars, is:• 45 kg.
98
Ecosport (CBY) Rayong (Thailand)/Haiduong (Vietnam), enPHI
Load Carrying

Note: Loads should never be placed directlyon the roof panel. The roof panel is notdesigned to directly carry a load.For proper function of the roof rack system,loads must be placed directly on crossbarsaffixed to the roof rack side rails. Yourvehicle may be equipped withfactory-installed crossbars. Ford GenuineAccessory crossbars, designed specificallyfor your vehicle, are also recommended foruse with your roof rack system.Make sure that the load is securelyfastened. Check the tightness of the loadbefore driving and at each fuel stop.
Adjusting the Crossbar (If Equipped)
Note: Wind noise can be minimized byeither removing or repositioning the crossbarwhen not is use. Position the front crossbarin the intermediate position to minimizewind noise. The crossbar can be adjustedor removed using the steps below.
E142448
1. Remove the crossbar thumbwheels atboth sides of the crossbar by turningthem counterclockwise.
2. Remove the crossbar by rotating itclockwise and sliding the ends off ofthe shoulder bolts in the side rails.
3. Move the front crossbar to the new siderail position and slide the crossbar ontothe shoulder bolt at that position.
4. Replace and tighten the thumbwheelsat both sides of the crossbar by turningthem clockwise until tight.
Make sure to check that the thumbwheelsare tight each time load is added orremoved from the roof rack, andperiodically while traveling. Make sure thatthe load is secure before traveling.
99
Ecosport (CBY) Rayong (Thailand)/Haiduong (Vietnam), enPHI
Load Carrying
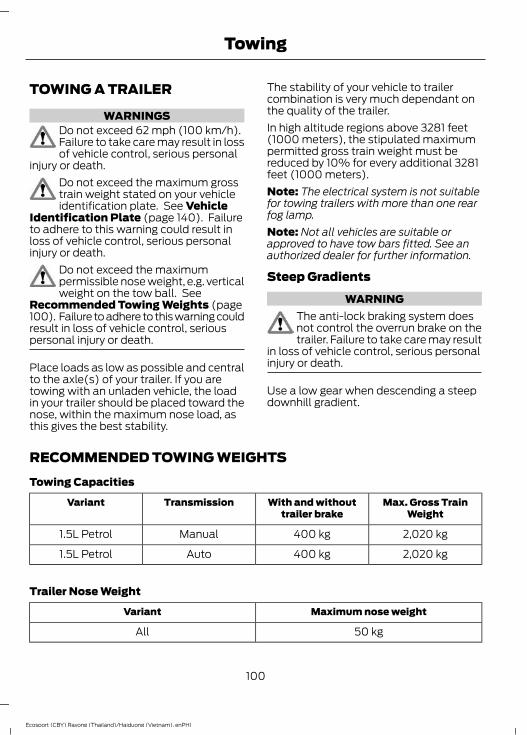
TOWING A TRAILER
WARNINGSDo not exceed 62 mph (100 km/h).Failure to take care may result in lossof vehicle control, serious personal
injury or death.Do not exceed the maximum grosstrain weight stated on your vehicleidentification plate. See Vehicle
Identification Plate (page 140). Failureto adhere to this warning could result inloss of vehicle control, serious personalinjury or death.
Do not exceed the maximumpermissible nose weight, e.g. verticalweight on the tow ball. See
Recommended Towing Weights (page100). Failure to adhere to this warning couldresult in loss of vehicle control, seriouspersonal injury or death.
Place loads as low as possible and centralto the axle(s) of your trailer. If you aretowing with an unladen vehicle, the loadin your trailer should be placed toward thenose, within the maximum nose load, asthis gives the best stability.
The stability of your vehicle to trailercombination is very much dependant onthe quality of the trailer.In high altitude regions above 3281 feet(1000 meters), the stipulated maximumpermitted gross train weight must bereduced by 10% for every additional 3281feet (1000 meters).Note: The electrical system is not suitablefor towing trailers with more than one rearfog lamp.Note: Not all vehicles are suitable orapproved to have tow bars fitted. See anauthorized dealer for further information.
Steep GradientsWARNING
The anti-lock braking system doesnot control the overrun brake on thetrailer. Failure to take care may result
in loss of vehicle control, serious personalinjury or death.
Use a low gear when descending a steepdownhill gradient.
RECOMMENDED TOWING WEIGHTSTowing Capacities
Max. Gross TrainWeight
With and withouttrailer brake
TransmissionVariant
2,020 kg400 kgManual1.5L Petrol
2,020 kg400 kgAuto1.5L Petrol
Trailer Nose Weight
Maximum nose weightVariant
50 kgAll
100
Ecosport (CBY) Rayong (Thailand)/Haiduong (Vietnam), enPHI
Towing
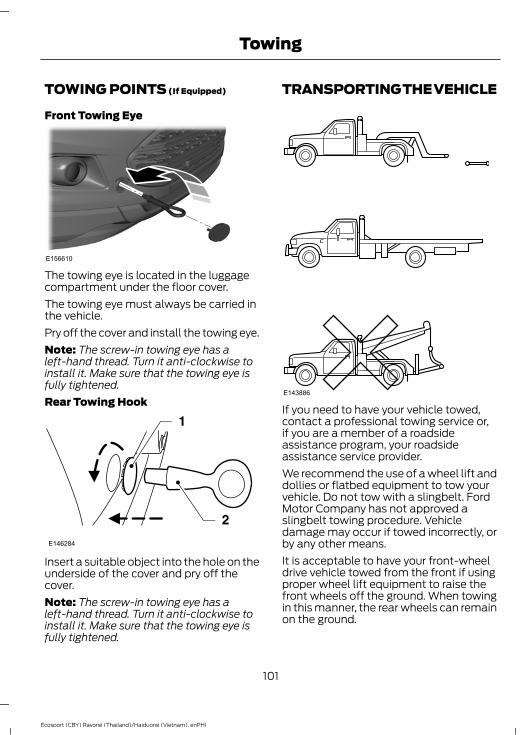
TOWING POINTS (If Equipped)
Front Towing Eye
E156610
The towing eye is located in the luggagecompartment under the floor cover.The towing eye must always be carried inthe vehicle.Pry off the cover and install the towing eye.Note: The screw-in towing eye has aleft-hand thread. Turn it anti-clockwise toinstall it. Make sure that the towing eye isfully tightened.Rear Towing Hook
E146284
Insert a suitable object into the hole on theunderside of the cover and pry off thecover.Note: The screw-in towing eye has aleft-hand thread. Turn it anti-clockwise toinstall it. Make sure that the towing eye isfully tightened.
TRANSPORTING THE VEHICLE
E143886
If you need to have your vehicle towed,contact a professional towing service or,if you are a member of a roadsideassistance program, your roadsideassistance service provider.We recommend the use of a wheel lift anddollies or flatbed equipment to tow yourvehicle. Do not tow with a slingbelt. FordMotor Company has not approved aslingbelt towing procedure. Vehicledamage may occur if towed incorrectly, orby any other means.It is acceptable to have your front-wheeldrive vehicle towed from the front if usingproper wheel lift equipment to raise thefront wheels off the ground. When towingin this manner, the rear wheels can remainon the ground.
101
Ecosport (CBY) Rayong (Thailand)/Haiduong (Vietnam), enPHI
Towing

Front-wheel drive vehicles must have thefront wheels placed on a tow dolly whentowing your vehicle from the rear usingwheel lift equipment. This preventsdamage to the transmission.
TOWING THE VEHICLE ONFOUR WHEELSAll Vehicles
WARNINGSYou must switch the ignition on whenyour vehicle is being towed.If your vehicle has a steering wheellock make sure the ignition is in theaccessory or on position when being
towed.The brake and steering assistancewill not operate unless the engine isrunning. Press the brake pedal harder
and allow for increased stopping distancesand heavier steering.
Too much tension in the tow ropecould cause damage to your vehicleor the vehicle that is towing.Do not use a rigid tow bar on thefront towing eye.When towing your vehicle you mustselect neutral.
Drive off slowly and smoothly withoutjerking the towed vehicle.
Vehicles with AutomaticTransmission
WARNINGSIf a speed of 12 mph (20 km/h) anda distance of 12 miles (20 kilometers)is to be exceeded the drive wheels
must be lifted clear of the ground.
WARNINGSIt is recommended not to tow withthe drive wheels on the ground.However, if it is required to move your
vehicle from a dangerous location, do nottow your vehicle faster than 12 mph (20km/h) or further than 12 miles (20kilometers).
Do not tow your vehicle backward.
In the event of a mechanical failureof the transmission the drive wheelsmust be lifted clear of the ground.Do not tow your vehicle if theambient temperature is below 32°F(0°C).
102
Ecosport (CBY) Rayong (Thailand)/Haiduong (Vietnam), enPHI
Towing
BREAKING-INTires
WARNINGNew tires need to be run-in forapproximately 500 kilometers.During this time, you may experience
different driving characteristics.
Brakes and ClutchWARNING
If possible, avoid hard braking andclutching during the first 150kilometers in the city, and the first
1,500 kilometers in highways.
EngineWARNING
Avoid driving too fast during the first1500 kilometers. Vary your speedfrequently and change up through
the gears early. Do not labor the engine.
COLD WEATHERPRECAUTIONSThe functional operation of somecomponents and systems can be affectedat temperatures below -25°C.
DRIVING THROUGH WATER
WARNINGSDrive through water in an emergencyonly and not as part of normaldriving.Engine damage can occur if waterenters the air filter.
In an emergency, you can drive your vehiclein water to a maximum depth of 20centimeters, and at a maximum speed of10 km/h. You must take extra care whendriving through flowing water.When driving in water, maintain a lowspeed and do not stop your vehicle. Afterdriving through water and as soon as it issafe to do so:• Depress the brake pedal lightly to
check that the brakes are functioningcorrectly.
• Check that the horn works.• Check that your vehicle's lamps are
fully operational.• Check the power assistance
of the steering system.
FLOOR MATS
E142666
Always use floor mats that are designedto fit the footwell of your vehicle. Only usefloor mats that are firmly secured toretention posts.
103
Ecosport (CBY) Rayong (Thailand)/Haiduong (Vietnam), enPHI
Driving Hints

WARNINGMake sure that the floor mat issecured properly using theappropriate fixings, and do not
position the floor mat so that it interfereswith the operation of the pedals.
Pedals that cannot move freely can causeloss of vehicle control and increase the riskof serious personal injury.
Always make sure that the floor mats areproperly attached to the retention postsin the carpet that are supplied with yourvehicle. Floor mats must be properlysecured to both retention posts to ensuremats do not shift out of position.
Never place floor mats or any othercovering in the vehicle footwell that cannotbe properly secured to prevent them frommoving and interfering with the pedals orthe ability to control the vehicle.
Never place floor mats or any othercovering on top of already installed floormats. Floor mats should always rest ontop of the vehicle carpeting surface andnot another floor mat or other covering.Additional floor mats or any other coveringwill reduce the pedal clearance andpotentially interfere with pedal operation.
Check attachment of floor mats on aregular basis. Always properly reinstall andsecure floor mats that have been removedfor cleaning or replacement.
Failure to properly follow floor matinstallation or attachment instructions canpotentially cause interference with pedaloperation causing loss of control of vehicle.
1. To install floor mats, position the floormat so that the eyelets are over theretention posts and press down to lockthe floor mat in.
2. To remove the floor mat, place yourhands under the floor mat by theeyelets and pull upward.
104
Ecosport (CBY) Rayong (Thailand)/Haiduong (Vietnam), enPHI
Driving Hints
HAZARD WARNING FLASHERS
E71943
The hazard warning button is located onthe instrument panel. Use it when yourvehicle is creating a safety hazard for othermotorists.Press the button to turn on the hazardwarning function, and the front and reardirection indicators will flash.Press the button again to turn them off.Note: If used when the engine is notrunning, the battery will lose charge. Theremay be insufficient power to restart yourengine.Note: Depending on applicable laws andregulations in the country for which yourvehicle was originally built, the hazardwarning flashers may flash if you brakeheavily.
WARNING TRIANGLESpace is provided in the luggagecompartment.
JUMP STARTING THE VEHICLE
WARNINGSThe gases around the battery canexplode if exposed to flames, sparks,or lit cigarettes. An explosion could
result in injury or vehicle damage.Batteries contain sulfuric acid whichcan burn skin, eyes and clothing, ifcontacted.
Do not attempt to push-start yourautomatic transmission vehicle. Automatictransmissions do not have push-startcapability. Attempting to push-start avehicle with an automatic transmissionmay cause transmission damage.
Preparing Your VehicleNote: Use only a 12-volt supply to start yourvehicle.Note: Do not disconnect the battery of thedisabled vehicle as this could damage thevehicle's electrical system.1. Park the booster vehicle close to the
hood of the disabled vehicle makingsure the two vehicles do not touch. Setthe parking brake on both vehicles andstay clear of the engine cooling fan andother moving parts.
2. Check all battery terminals and removeany excessive corrosion before youattach the battery cables. Ensure thatvent caps are tight and level.
3. Turn the heater fan on in both vehiclesto protect from any electrical surges.Turn all other accessories off.
CN15-10881-AA
E146271
Refer to the label located above thebattery cover; the arrow on the label isshowing the correct location to make thejump start connection.
105
Ecosport (CBY) Rayong (Thailand)/Haiduong (Vietnam), enPHI
Roadside Emergencies

Connecting the Jumper CablesNote: In the illustration, the vehicle on thebottom is used to designate the assisting(boosting) battery.
E149169
1. Connect the positive (+) jumper cableto the positive (+) terminal of thedischarged battery.
2. Connect the other end of the positive(+) cable to the positive (+) terminalof the assisting battery.
3. Connect the negative (-) cable to thenegative (-) terminal of the assistingbattery.
4. Make the final connection of thenegative (-) cable to an exposed metalpart of the stalled vehicle's engine,away from the battery and thecarburetor or fuel injection system.
Note: Do not attach the negative (-) cableto fuel lines, engine rocker covers, the intakemanifold or electrical components asgrounding points.
WARNINGDo not connect the end of thesecond cable to the negative (-)terminal of the battery to be jumped.
A spark may cause an explosion of thegases that surround the battery.
Ensure that the cables are clear of fanblades, belts, moving parts of both engines,or any fuel delivery system parts.
Jump Starting1. Start the engine of the booster vehicle
and run the engine at moderatelyincreased speed.
2. Start the engine of the disabled vehicle.Note: For vehicles with a manualtransmission, if the battery goes flat or youinstall a new battery, the engine will notstart until you press and hold the clutchpedal down for two seconds then releasethe clutch pedal and wait two seconds withthe key turned to the on position and theengine is off.3. Once the disabled vehicle has been
started, run both engines for anadditional three minutes beforedisconnecting the jumper cables.
Removing the Jumper CablesRemove the jumper cables in the reverseorder that they were connected.Note: In the illustration, the vehicle on thebottom is used to designate the assisting(boosting) battery.
106
Ecosport (CBY) Rayong (Thailand)/Haiduong (Vietnam), enPHI
Roadside Emergencies

E149170
1. Remove the jumper cable from theground metal surface.
2. Remove the jumper cable on thenegative (-) terminal of the boostervehicle's battery.
3. Remove the jumper cable from thepositive (+) terminal of the boostervehicle's battery.
4. Remove the jumper cable from thepositive (+) terminal of the disabledvehicle's battery.
After the disabled vehicle has been startedand the jumper cables removed, allow itto idle for several minutes so the enginecomputer can relearn its idle conditions.
107
Ecosport (CBY) Rayong (Thailand)/Haiduong (Vietnam), enPHI
Roadside Emergencies
FUSE BOX LOCATIONSEngine Compartment Fuse Box
E174531
This fuse box is located in the enginecompartment.
Passenger Compartment Fuse Box
E159184
This fuse box is located behind the glovebox. To access the fuse box, do thefollowing:1. Open the glove box and empty the
contents.2. Remove the four screws and then
remove the shelf in the glove box.3. Remove the side cover.4. Remove the glove box assembly.Note: Any improper modification to theelectrical system can compromise thesafety of the vehicle, implying risk of fire orengine damage. For any clarifications orquestions, contact a Ford Distributor.
Battery Fuse Box
E146270
This fuse box in attached to the batterypositive terminal.
108
Ecosport (CBY) Rayong (Thailand)/Haiduong (Vietnam), enPHI
Fuses

FUSE SPECIFICATION CHARTEngine Compartment Fuse Box
E174529
Circuits protectedFuse ratingFuse
Engine compartment fuse box supply (battery)60 A1
Anti-lock braking system, electronic stability programmodule40 A2
Engine compartment fuse box supply (battery), powetraincontrol module60 A3
Heater blower relay40 A4
Passenger compartment fuse box supply (battery)60 A5
Power door locks (body control module), Alarm horn30 A6
109
Ecosport (CBY) Rayong (Thailand)/Haiduong (Vietnam), enPHI
Fuses

Circuits protectedFuse ratingFuse
Passenger compartment fuse box supply (ignition relay)60 A7
Starter relay30 A8
Cooling system fan high speed60 A9
Automatic transmission module30 A10
Not used-11
Not used-12
Cooling system fan low speed30 A13
Not used-14
Exterior lighting right-hand side (low beam)15 A15
Exterior lighting left-hand side (low beam)15 A16
High beam relay15 A17
Horn20 A18
Not used-19
Automatic transmission module, powertrain controlmodule (1.5L petrol)7.5 A20
Fuel pump relay (petrol)20 A21
Turn signals15 A22
Horn15 A23
Rear window defroster20 A24
Air conditioning clutch relay7.5 A25
Anti-lock Braking System (electronic stability program)20 A26
Fog lamp relay15 A27
Not used-28
Ignition coil15 A29
110
Ecosport (CBY) Rayong (Thailand)/Haiduong (Vietnam), enPHI
Fuses

Circuits protectedFuse ratingFuse
Cooling fan relay, powertrain control module, canisterpurge valve (petrol)15 A30
Heated oxygen sensors (petrol), variable camshaft timing(1.5L petrol), catalyst monitoring sensor (1.5L petrol), massair flow sensor (1.5L petrol), vehicle speed sensor
15 A31
Not used-32
Circuits switchedRelay
Cooling fan motor - high speedR1
Not usedR2
Front fog lampR3
Not usedR4
Reversing lampR5
High beamR6
Air conditioningR7
HornR8
Cooling fan motor - low speedR9
Starter motorR10
Fuel pumpR11
Heater fan/blowerR12
Powertrain control moduleR13
Not usedR14
Not usedR15
111
Ecosport (CBY) Rayong (Thailand)/Haiduong (Vietnam), enPHI
Fuses

Passenger Compartment Fuse Box
E144835
Circuits protectedFuse ratingFuse
Air conditioning clutch, rain sensor, electro chromaticmirror7.5 A1
Stop lamps10 A2
Reversing lamp7.5 A3
Headlamp leveling7.5 A4
Windshield wipers20 A5
Rear window wiper15 A6
Washer pump15 A7
Sun roof10 A8
Not used-9
112
Ecosport (CBY) Rayong (Thailand)/Haiduong (Vietnam), enPHI
Fuses

Circuits protectedFuse ratingFuse
Ignition switch or keyless ignition relay, keyless accessoryrelay15 A10
Instrument cluster3 A11
Data link connector15 A12
Heating control head (manual A/C), electronic auto-matic temperature control, receiver remote (vehicleswith keyless system), integrated control panel, multi-function display
7.5 A13
Audio, SYNC15 A14
Power exterior mirrors, power windows3 A15
Keyless vehicle module20 A16
Keyless vehicle module20 A17
Sun roof20 A18
Instrument cluster7.5 A19
Not used-20
Not used-21
Not used-22
Not used-23
Not used-24
Air conditioning control module, heater blower relay,front fog lamp relay7.5 A25
Airbag control module3 A26
Body control module (ignition), passive anti-theftsystem (for vehicles without keyless system), anti-lockbrake system, ignition (for vehicles without keylesssystem), cluster (ignition), electrical power assiststeering (ignition)
10 A27
Accelerator pedal, fuel pump, powertrain control module(ignition), automatic transmission module7.5 A28
Not used-29
Brake switch10 A30
113
Ecosport (CBY) Rayong (Thailand)/Haiduong (Vietnam), enPHI
Fuses

Circuits protectedFuse ratingFuse
Front power point20 A31
Rear power point20 A32
Not used-33
Power driver and passenger window switches30 A34
Power rear window switches30 A35
Not used-36
Circuits switchedRelay
IgnitionR1
Keyless system ignitionR2
Keyless system accessoryR3
Battery Fuse Box
6
1
E163706
114
Ecosport (CBY) Rayong (Thailand)/Haiduong (Vietnam), enPHI
Fuses
Circuits protectedFuse ratingFuse
Starter450 A1
Electric power assist steering60 A2
Engine junction box200 A3
Not used-4
Not used-5
Not used-6
CHANGING A FUSE
WARNINGSDo not modify the electrical systemof your vehicle in any way. Haverepairs to the electrical system and
the replacement of relays and high currentfuses carried out by an authorized dealer.
Switch the ignition and all electricalequipment off before attempting tochange a fuse.Always replace a fuse with one thathas the specified amperage rating.Using a fuse with a higher amperage
rating can cause severe wire damage andcould start a fire.
E142430
If electrical components in your vehicle arenot working, a fuse may have blown. Abreak in the fuse wire will indicate a blownfuse. Check the appropriate fuses beforereplacing any electrical components.
115
Ecosport (CBY) Rayong (Thailand)/Haiduong (Vietnam), enPHI
Fuses

GENERAL INFORMATIONHave your vehicle serviced regularly to helpmaintain its roadworthiness. There is alarge network of Ford Dealers that arethere to help you with their professionalservicing expertise. We believe that theirspecially trained technicians are bestqualified to service your vehicle properlyand expertly, with a wide range of highlyspecialized tools.In addition to regular servicing, werecommend that you carry out thefollowing checks.
WARNINGSSwitch the ignition off beforetouching or attempting adjustmentof any kind.Do not touch the electronic ignitionsystem parts after you have switchedthe ignition on or when the engine is
running. The system operates at highvoltage.
Keep your hands and clothing clearof the engine cooling fan. Undercertain conditions, the fan may
continue to run for several minutes afteryou have switched the engine off.
Make sure that you fit filler capssecurely after carrying outmaintenance checks.
Daily Checks• Exterior lamps.• Interior lamps.• Warning lamps and indicators.
Check When Refueling• Engine oil level. See Engine Oil Check
(page 119).• Brake fluid level. See Brake and
Clutch Fluid Check (page 121).
• Washer fluid level. See Washer FluidCheck (page 121).
• Tire pressures (when cold). SeeTechnical Specifications (page 142).
• Tire condition. See Wheels and Tires(page 134).
Monthly Checks• Engine coolant level (engine cold). See
Engine Coolant Check (page 120).• Pipes, hoses and reservoirs for leaks.• Air conditioning operation.• Parking brake operation.• Horn operation.• Tightness of lug nuts. See Technical
Specifications (page 142).
OPENING AND CLOSING THEHOODOpening the Hood
E102165
116
Ecosport (CBY) Rayong (Thailand)/Haiduong (Vietnam), enPHI
Maintenance

E154746
Move the catch to the right.
E158140
Open the hood and support it with thehood prop rod. Attach the prop rod to thehood, the correct location is indicated byan arrow.
Closing the HoodNote: You must secure the hood propcorrectly after use.Note: Make sure that the hood is closedproperly.Lower the hood and allow it to drop fromunder its own weight for the last 20-30centimeters.
117
Ecosport (CBY) Rayong (Thailand)/Haiduong (Vietnam), enPHI
Maintenance

UNDER HOOD OVERVIEW - 1.5L DURATEC-16V TI-VCT (81KW/110PS) - SIGMA
E151696
Engine coolant reservoir*: See Engine Coolant Check (page 120).ABrake and clutch fluid reservoir (right-hand drive)*: See Brake and ClutchFluid Check (page 121).
B
Engine oil filler cap*: See Engine Oil Check (page 119).CBrake and clutch fluid reservoir (left-hand drive)*: See Brake and Clutch FluidCheck (page 121).
D
Battery: See Changing the 12V Battery (page 121).EEngine compartment fuse box. See Fuses (page 108).FWindshield and rear window washer fluid reservoir: See Washer Fluid Check(page 121).
G
Air cleaner: No maintenance necessary.HEngine oil dipstick*: See Engine Oil Check (page 119).I
* The filler caps and the engine oil dipstick are colored for easy identification.
118
Ecosport (CBY) Rayong (Thailand)/Haiduong (Vietnam), enPHI
Maintenance

ENGINE OIL DIPSTICK - 1.5LDURATEC-16V TI-VCT (81KW/110PS) - SIGMA
E95540
BA
MinimumAMaximumB
ENGINE OIL CHECK
WARNINGSDo not use oil additives or otherengine treatments. Under certainconditions, they could damage the
engine and it is not covered underwarranty.
Empty engine oil containers shouldnot be disposed of in domestic trashbins. Use only proper containers to
dispose of this type of waste.When changing your oil, ensure thatthe oil used is the same as specifiedand the correct amount. Do not use
unknown types of oil or from alreadyopened containers.
Note: The oil consumption of new enginesreaches its normal level after approximately5,000 km.
Checking the Oil LevelNote: Check the level before starting theengine.
Note: Make sure that the level is betweenthe MIN and the MAX marks.Note: Level measurement will not beaccurate if this procedure is not followed.1. Make sure that your vehicle is on level
ground.2. If the engine is running turn it off and
wait 15 minutes for the oil to drain intothe oil pan.
3. Remove the dipstick and wipe it witha clean, lint free cloth. Replace thedipstick and remove it again to checkthe oil level.
If the level is at the MIN mark, top upimmediately.
Topping UpWARNINGS
Only top up when the engine is cold.If the engine is hot, wait 15 minutesfor the engine to cool down.Do not remove the filler cap whenthe engine is running.
Remove the filler cap.WARNING
Do not top up further than the MAXmark.
Note: Oil expands when it is hot. Checkingthe oil level when hot will be above the MAXmark.Note: Soak up any spillage with anabsorbent cloth immediately.Top up with fluid that meets the Fordspecification. See TechnicalSpecifications (page 142).Replace the filler cap. Turn it until you feela strong resistance.
119
Ecosport (CBY) Rayong (Thailand)/Haiduong (Vietnam), enPHI
Maintenance

Engine severe usage conditionsIn case of vehicle severe usage, engine oilshould be changed every 5,000 km or 3months, whichever occurs first.Severe usage conditions:• Short distances (less than 5 km), in
which the engine does not reachnormal operating temperature,
• Frequent usage of vehicle on dustyroads or in mountain areas,
• Usage in heavy urban traffic,• Usage as driving instructors vehicle,
taxi vehicle, ambulance, military usageor similar activities,
• Extended usage with contaminatedfuel.
Oil ConsumptionIn the first 5,000 km (run-in period) the oilconsumption is higher, and therefore theoil level should be checked morefrequently. Maximum acceptableconsumption in this period is one liter. Afterthe break-in period the engine canconsume up to one liter every 10,000 km.If the consumption is higher, go to yourFord Dealer.Oil consumption also depends on drivingstyle and vehicle use. Special operatingconditions such as, operating your vehiclefrequently at high speeds, could increaseoil consumption.
Oil FilterThe oil filter's function is to filter outharmful particles without obstructing theflow of oil to vital parts. Use of oil filtersnot meeting Ford specifications coulddamage the engine.
ENGINE COOLANT CHECK
WARNINGDo not allow the fluid to touch yourskin or eyes. If this happens, rinse theaffected areas immediately with
plenty of water and contact your physician.
Note: Make sure that the level is betweenthe MIN and the MAX marks.Note: Coolant expands when it is hot. Thelevel may therefore extend beyond the MAXmark.If the level is at the MIN mark, add coolantimmediately.
Adding Engine CoolantWARNINGS
Only add coolant when the engine iscold. If the engine is hot, wait 10minutes for the engine to cool down.Do not remove the filler cap whenthe engine is running.Do not remove the filler cap whenthe engine is hot. Wait for the engineto cool down.Undiluted coolant is flammable andmay ignite if spilt on a hot exhaust.
Note: Inspect or replace the lid with the carturned off and the engine cold, to avoidinjuries or burns.Note: In an emergency, you can add justwater to the cooling system to reach avehicle service station. Have the systemchecked by a Ford Dealer as soon aspossible.Note: Prolonged use of incorrect dilutionof the coolant can cause engine damagefrom corrosion, overheating or freezing.
120
Ecosport (CBY) Rayong (Thailand)/Haiduong (Vietnam), enPHI
Maintenance

Note: Do not add coolant further than theMAX mark.Note: If coolant levels are outside thestandard operational range, theperformance of the system may becompromised; seek a Ford Dealerimmediately.Note: The cooling system expansionreservoir lid should be inspected andcleaned every 3 years approximately. If thereare any evidences of deterioration of thesealing ring, the lid should be replaced.Note: It is normal to see some air bubblesin the coolant reservoir fluid.1. Remove the filler cap. Any pressure will
escape slowly as you unscrew the cap.2. Add a mixture of 50% coolant and
50% water using fluid that meets theFord specifications. See TechnicalSpecifications (page 130).
3. Replace the filler cap. Turn it until youfeel a strong resistance.
BRAKE AND CLUTCH FLUIDCHECK
WARNINGSUse of any fluid other than therecommended brake fluid mayreduce brake efficiency and not meet
Ford's performance standards.Do not allow the fluid to touch yourskin or eyes. If this happens, rinse theaffected areas immediately with
plenty of water and contact your doctor.Clean the filler cap before removing.Use only fluid that meets Fordspecifications and from a sealed
container.
Note: Keep brake fluid clean and dry.Contamination with dirt, water, petroleumproducts or other materials may result inbrake system damage and possible failure.Note: The brake and the clutch systems aresupplied from the same reservoir.The fluid level will drop slowly as thebrakes wear, and will rise when the brakecomponents are replaced.Fluid levels between the MIN and MAXlines are within the normal operating range;there is no need to add fluid.If the fluid levels are outside of the normaloperating range, the performance of thesystem could be compromised; seekservice from you authorized dealerimmediately.Top up with fluid that meets the Fordspecification. See TechnicalSpecifications (page 142).
WASHER FLUID CHECKNote: The reservoir supplies the front andrear washer systems.When adding fluid, use a mixture of washerfluid and water to help prevent freezing incold weather and improve the cleaningcapability. We recommend that you useonly high quality washer fluid.For information on fluid dilution, refer tothe product instructions.
CHANGING THE 12V BATTERY
E107998
Make sure that you dispose ofold batteries in anenvironmentally friendly way.
Seek advice from your local authorityregarding recycling.
121
Ecosport (CBY) Rayong (Thailand)/Haiduong (Vietnam), enPHI
Maintenance
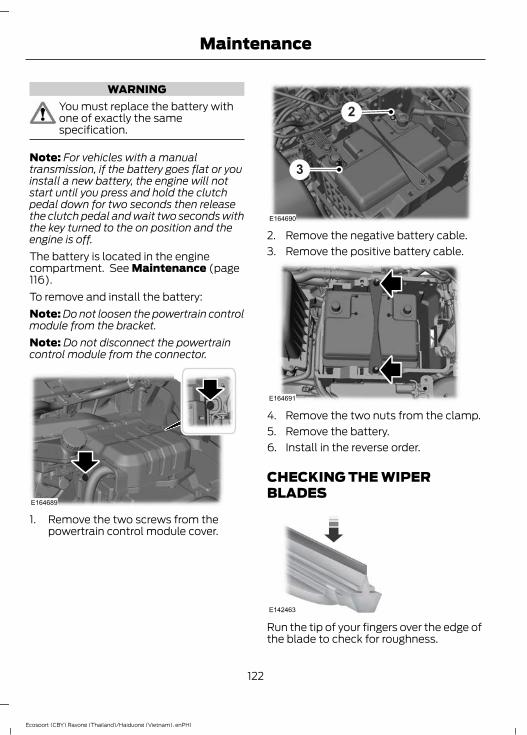
WARNINGYou must replace the battery withone of exactly the samespecification.
Note: For vehicles with a manualtransmission, if the battery goes flat or youinstall a new battery, the engine will notstart until you press and hold the clutchpedal down for two seconds then releasethe clutch pedal and wait two seconds withthe key turned to the on position and theengine is off.The battery is located in the enginecompartment. See Maintenance (page116).To remove and install the battery:Note: Do not loosen the powertrain controlmodule from the bracket.Note: Do not disconnect the powertraincontrol module from the connector.
E164689
1. Remove the two screws from thepowertrain control module cover.
E164690
2
3
2. Remove the negative battery cable.3. Remove the positive battery cable.
E164691
4. Remove the two nuts from the clamp.5. Remove the battery.6. Install in the reverse order.
CHECKING THE WIPERBLADES
E142463
Run the tip of your fingers over the edge ofthe blade to check for roughness.
122
Ecosport (CBY) Rayong (Thailand)/Haiduong (Vietnam), enPHI
Maintenance

Clean the wiper blades with washer fluidor water applied with a soft sponge orcloth.
CHANGING THE WIPERBLADESWindshield Wiper BladesNote: The windshield wiper blades aredifferent in length. If you install wiper bladesof the wrong length, the rain sensor may notwork correctly.
Changing the Windshield Wiper Blades
E170913
1. Lift the wiper arm up to its serviceposition (close to a 90 degree angle).
2. Firmly hold the wiper arm tip with onehand and disassemble the old wiperblade with your other hand.
E147761
3. To remove the wiper blade, press theplastic adaptor (1) and pull (2) thewiper blade.
E147762
1. To assemble the wiper blade, slide (3)the new blade onto the wiper arm untilyou here a snap (4).
2. Lower the wiper arm back to it'sworking position.
Changing the Rear Window WiperBlade
E170914
1. Lift the wiper arm up to its serviceposition (close to a 90 degree angle).
2. Firmly hold the wiper arm tip with onehand and disassemble the old wiperblade with your other hand.
E147761
123
Ecosport (CBY) Rayong (Thailand)/Haiduong (Vietnam), enPHI
Maintenance
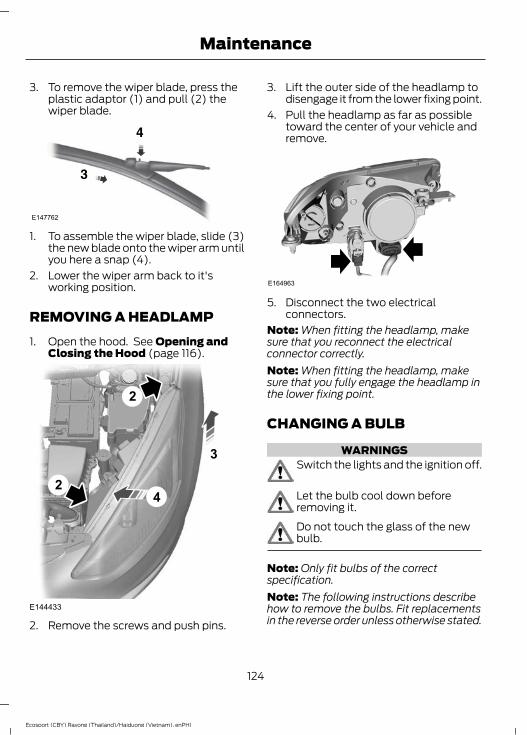
3. To remove the wiper blade, press theplastic adaptor (1) and pull (2) thewiper blade.
E147762
1. To assemble the wiper blade, slide (3)the new blade onto the wiper arm untilyou here a snap (4).
2. Lower the wiper arm back to it'sworking position.
REMOVING A HEADLAMP1. Open the hood. See Opening and
Closing the Hood (page 116).
E144433
24
2
3
2. Remove the screws and push pins.
3. Lift the outer side of the headlamp todisengage it from the lower fixing point.
4. Pull the headlamp as far as possibletoward the center of your vehicle andremove.
E164963
5. Disconnect the two electricalconnectors.
Note: When fitting the headlamp, makesure that you reconnect the electricalconnector correctly.Note: When fitting the headlamp, makesure that you fully engage the headlamp inthe lower fixing point.
CHANGING A BULB
WARNINGSSwitch the lights and the ignition off.
Let the bulb cool down beforeremoving it.Do not touch the glass of the newbulb.
Note: Only fit bulbs of the correctspecification.Note: The following instructions describehow to remove the bulbs. Fit replacementsin the reverse order unless otherwise stated.
124
Ecosport (CBY) Rayong (Thailand)/Haiduong (Vietnam), enPHI
Maintenance

HeadlampNote: Disconnect the bulb electricalconnectors and remove the covers to gainaccess to the bulbs.
E144837
Direction indicatorAHeadlamp main beamB
Direction Indicator1. Open the hood.
E144838
2. Turn the bulb holder anti-clockwiseand remove it.
3. Gently press the bulb into the bulbholder, turn it anti-clockwise andremove it.
Headlamp Main BeamNote: Do not touch the glass of the bulb.
E144839
1. Open the hood.2. Remove the cover.3. Disconnect the electrical connector.4. Release the clip and remove the bulb.
Side Lamp1. Remove the headlamp. See
Removing a Headlamp (page 124).
E144840
2. Remove the cover.3. Remove the bulb holder.4. Remove the bulb.
Approach LampNote: For replacing bulbs, see yourauthorized dealer.
Side Mounted Turn Signal LampNote: For replacing bulbs, see yourauthorized dealer.
125
Ecosport (CBY) Rayong (Thailand)/Haiduong (Vietnam), enPHI
Maintenance
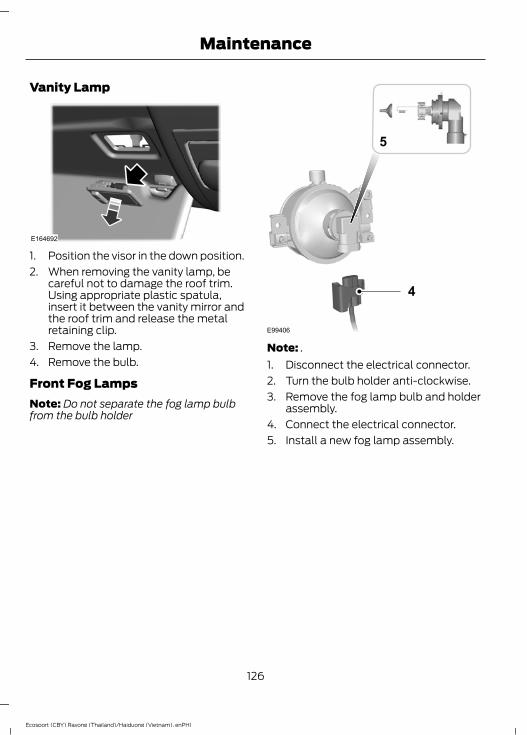
Vanity Lamp
E164692
1. Position the visor in the down position.2. When removing the vanity lamp, be
careful not to damage the roof trim.Using appropriate plastic spatula,insert it between the vanity mirror andthe roof trim and release the metalretaining clip.
3. Remove the lamp.4. Remove the bulb.
Front Fog LampsNote: Do not separate the fog lamp bulbfrom the bulb holder
4
E99406
5
Note: .1. Disconnect the electrical connector.2. Turn the bulb holder anti-clockwise.3. Remove the fog lamp bulb and holder
assembly.4. Connect the electrical connector.5. Install a new fog lamp assembly.
126
Ecosport (CBY) Rayong (Thailand)/Haiduong (Vietnam), enPHI
Maintenance
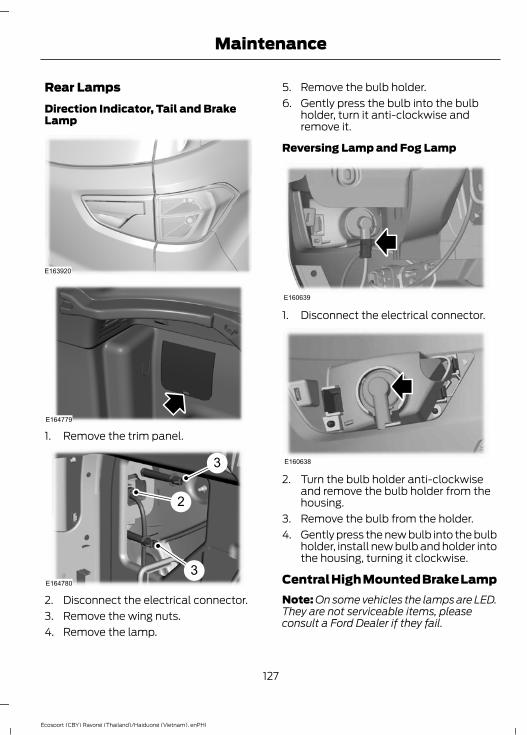
Rear LampsDirection Indicator, Tail and BrakeLamp
E163920
E164779
1. Remove the trim panel.
E1647803
3
2
2. Disconnect the electrical connector.3. Remove the wing nuts.4. Remove the lamp.
5. Remove the bulb holder.6. Gently press the bulb into the bulb
holder, turn it anti-clockwise andremove it.
Reversing Lamp and Fog Lamp
E160639
1. Disconnect the electrical connector.
E160638
2. Turn the bulb holder anti-clockwiseand remove the bulb holder from thehousing.
3. Remove the bulb from the holder.4. Gently press the new bulb into the bulb
holder, install new bulb and holder intothe housing, turning it clockwise.
Central High Mounted Brake LampNote: On some vehicles the lamps are LED.They are not serviceable items, pleaseconsult a Ford Dealer if they fail.
127
Ecosport (CBY) Rayong (Thailand)/Haiduong (Vietnam), enPHI
Maintenance
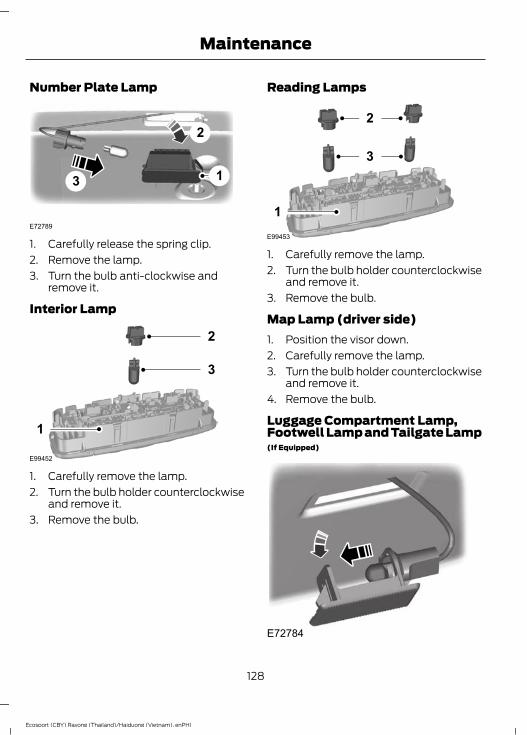
Number Plate Lamp
3
2
1
E72789
1. Carefully release the spring clip.2. Remove the lamp.3. Turn the bulb anti-clockwise and
remove it.
Interior Lamp
E99452
2
3
1
1. Carefully remove the lamp.2. Turn the bulb holder counterclockwise
and remove it.3. Remove the bulb.
Reading Lamps
E99453
2
3
1
1. Carefully remove the lamp.2. Turn the bulb holder counterclockwise
and remove it.3. Remove the bulb.
Map Lamp (driver side)1. Position the visor down.2. Carefully remove the lamp.3. Turn the bulb holder counterclockwise
and remove it.4. Remove the bulb.
Luggage Compartment Lamp,Footwell Lamp and Tailgate Lamp(If Equipped)
E72784
128
Ecosport (CBY) Rayong (Thailand)/Haiduong (Vietnam), enPHI
Maintenance

1. Carefully remove the lamp. 2. Remove the bulb.
BULB SPECIFICATION CHART
Power (watt)SpecificationLamp
21PY21WFront direction indicator
55 / 60WH4Headlamp main beam / dipped beam
55H11Front fog lamp
5WY5WSide repeater
21PY21WRear direction indicator
21/5P21/5WBrake and tail lamp
21P21WRear fog lamp
21P21WReversing lamp
5W5WNumber plate lamp
5W5WLuggage compartment lamp
5W5WVanity lamp
Note: On some vehicles the lamps are LED.These are not serviceable items, pleaseconsult your dealer if they fail.
CHANGING THE ENGINE AIRFILTER
WARNINGTo reduce the risk of vehicle damageand/or personal burn injuries do notstart your engine with the air cleaner
removed and do not remove it while theengine is running.
Note: Failure to use the correct air filterelement may result in severe enginedamage.
Changing the Air Filter Element1. Remove the four screws that secure
the air filter housing cover.2. Carefully separate the two halves of
the air filter housing.3. Remove the air filter element from the
air filter housing.4. Wipe the air filter housing and cover
clean to remove any dirt or debris andto ensure good sealing.
5. Install a new air filter element. Becareful not to crimp the filter elementedges between the air filter housingand cover. This could cause filterdamage and allow unfiltered air toenter the engine if not properly seated.
6. Replace the air filter housing cover andinstall the screws.
129
Ecosport (CBY) Rayong (Thailand)/Haiduong (Vietnam), enPHI
Maintenance
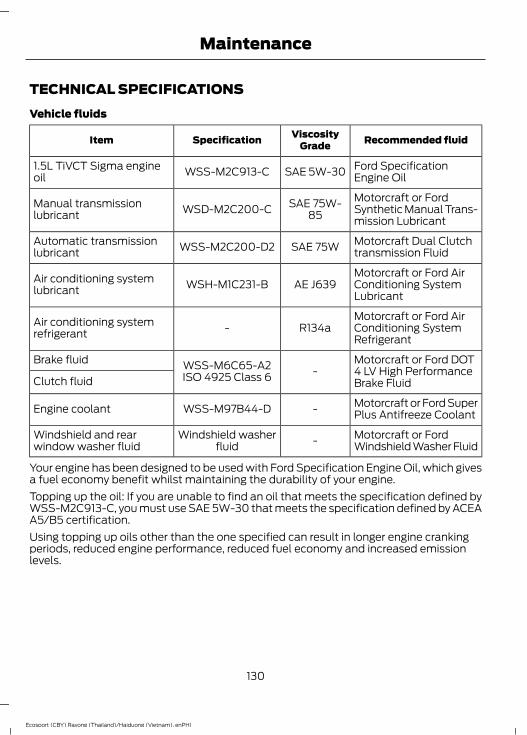
TECHNICAL SPECIFICATIONSVehicle fluids
Recommended fluidViscosityGradeSpecificationItem
Ford SpecificationEngine OilSAE 5W-30WSS-M2C913-C1.5L TiVCT Sigma engine
oil
Motorcraft or FordSynthetic Manual Trans-mission Lubricant
SAE 75W-85WSD-M2C200-CManual transmission
lubricant
Motorcraft Dual Clutchtransmission FluidSAE 75WWSS-M2C200-D2Automatic transmission
lubricant
Motorcraft or Ford AirConditioning SystemLubricant
AE J639WSH-M1C231-BAir conditioning systemlubricant
Motorcraft or Ford AirConditioning SystemRefrigerant
R134a-Air conditioning systemrefrigerant
Motorcraft or Ford DOT4 LV High PerformanceBrake Fluid
-WSS-M6C65-A2ISO 4925 Class 6
Brake fluid
Clutch fluid
Motorcraft or Ford SuperPlus Antifreeze Coolant-WSS-M97B44-DEngine coolant
Motorcraft or FordWindshield Washer Fluid-Windshield washer
fluidWindshield and rearwindow washer fluid
Your engine has been designed to be used with Ford Specification Engine Oil, which givesa fuel economy benefit whilst maintaining the durability of your engine.Topping up the oil: If you are unable to find an oil that meets the specification defined byWSS-M2C913-C, you must use SAE 5W-30 that meets the specification defined by ACEAA5/B5 certification.Using topping up oils other than the one specified can result in longer engine crankingperiods, reduced engine performance, reduced fuel economy and increased emissionlevels.
130
Ecosport (CBY) Rayong (Thailand)/Haiduong (Vietnam), enPHI
Maintenance

Capacities
CapacityItemVariant
4 LEngine oil with filter1.5L TiVCT Sigma engine
3.8 LEngine oil withoutfilter
1.5L TiVCT Sigma engine
0.8 LEngine oil top up1.5L TiVCT Sigma engine
Between the MIN lineand the MAX line
Clutch fluidManual transmission
2.1 LManual transmis-sion lubricant
Manual transmission
1.2 LAutomatic transmis-sion lubricant
Automatic transmission
0.12 kgAir conditioningsystem lubricant
Air conditioning
0.625 ± 0.03 kgAir conditioningsystem refrigerant
Air conditioning
Between the MIN lineand the MAX line
Brake fluidAll
5.5 LEngine coolant1.5L TiVCT Sigma engine
2.7 LWindshield washerfluid
All
52 LFuel tankVehicles with a petrol engine
131
Ecosport (CBY) Rayong (Thailand)/Haiduong (Vietnam), enPHI
Maintenance

CLEANING THE EXTERIORNote: If you use a car wash with a waxingcycle, make sure that you remove the waxfrom the windshield and the wiper blades.Note: Prior to using a car wash facilitycheck the suitability of it for your vehicle.Note: Some car washes use water at highpressure. Due to this, water droplets mayenter inside your vehicle and could alsodamage certain parts of your vehicle.Note: Remove the aerial before using anautomatic car wash.Note: Switch the heater blower off toprevent contamination of the fresh air filter.We recommend that you wash your vehiclewith a sponge and lukewarm watercontaining a car shampoo.
Cleaning the HeadlampsNote: Do not scrape the headlamp lensesor use abrasives, alcoholic solvents orchemical solvents to clean them.Note: Do not wipe the headlamps whenthey are dry.
Cleaning the Rear WindowNote: Do not scrape the inside of the rearwindow or use abrasives or chemicalsolvents to clean it.Use a clean, lint free cloth or a dampchamois leather to clean the inside of therear window.
Cleaning the Chrome TrimNote: Do not use abrasives or chemicalsolvents. Use soapy water.Note: Do not apply cleaning product to hotsurfaces and do not leave cleaning producton chrome surfaces for a period of timeexceeding that which is recommended.
Note: Industrial-strength (heavy-duty)cleaners, or cleaning chemicals, may causedamage over a period of time.
Body Paintwork PreservationWARNINGS
Do not polish your vehicle in strongsunshine.Do not allow polish to touch plasticsurfaces. It could be difficult toremove.Do not apply polish to the windshieldor rear window. This could cause thewipers to become noisy and they
may not clear the window properly.
We recommend that you wax thepaintwork once or twice a year.
CLEANING THE ENGINE
WARNINGDue to the different materials foundin the engine compartment, avoidusing chemical cleaning products,
aggressive detergents, degreasers, andacid and alkaline products that, due to theircorrosive action, may be aggressive tocertain components. Water steam cleaningshould also be avoided.
Note: During the engine compartmentwash, do not remove the transparent labelthat protects the VIN code. Engine oil, brakefluid, radiator additive, batteries and tiresshould be packed and stored in facilitiesespecially prepared for handling industrialwaste. Do not dispose of these items inpublic sewer systems or with domesticgarbage. Environment preservation is aresponsibility shared by all. You too shoulddo your share.
132
Ecosport (CBY) Rayong (Thailand)/Haiduong (Vietnam), enPHI
Vehicle Care

It is recommended to avoid frequentengine washes. However, when you dowash the engine, be careful not to usestrong jets of water on the engine. Neverwash a hot or running engine with coldwater, because the thermal shock on warmsurfaces may damage the engine. The airconditioned condenser and the radiatorhave aluminum fins that may be deformedwhen washed with high-pressure waterjets. To avoid damages, wash only withlow-pressure water jets.Note: Do not spill water, soap, or any otherproduct on the generator and the startermotor. They may be damaged from thecontact with liquids.When washing:• Take care when using a power washer
to clean the engine. The high-pressurefluid could penetrate the sealed partsand cause damage.
• Do not spray a hot engine with coldwater to avoid cracking the engineblock or other engine components.
• Never wash or rinse the engine while itis hot or running; water in the runningengine may cause internal damage.
• Never wash or rinse any ignition coil,spark plug wire or spark plug well, orthe area in and around these locations.
• Cover the battery, power distributionbox and air filter assembly to preventwater damage when cleaning theengine.
REPAIRING MINOR PAINTDAMAGERemove any apparently harmless lookingsubstances from the paintworkimmediately (e.g. bird droppings, treeresins, insect remains, tar spots, road saltand industrial fall out.
You should repair paintwork damagecaused by stones from the road or minorscratches as soon as possible.
133
Ecosport (CBY) Rayong (Thailand)/Haiduong (Vietnam), enPHI
Vehicle Care

GENERAL INFORMATIONYour vehicle may have an adhesive labelwith tire pressure data, located in thedriver’s door opening.Check and set the tire pressure when thetires are cold.Note: Check your tire pressures regularly tooptimize fuel economy.Note: Use only approved wheel and tiresizes. Using other sizes could damage yourvehicle.Note: If you change the diameter of the tiresfrom the tires fitted at the factory, thespeedometer may not display the correctspeed.Note: If you intend to change the diameterof the tires from the tires fitted at thefactory, ask your authorized dealer aboutthe fit.
TIRE CARE
E70415
To make sure the front and rear tires ofyour vehicle wear evenly and last longer,we recommend that you swap the tiresfrom front to rear and vice versa at regularintervals of between 3000 and 6000 miles(5000 and 10000 kilometers).
WARNINGDo not scrub the sidewalls of thetires when you are parking.
If you have to mount a curb, do so slowlyand approach it with the wheels atright-angles to the curb.Examine the tires regularly for cuts, foreignobjects and uneven wear of the tread.Uneven wear could mean that the wheelalignment is outside specification.Check the tire pressures (including thespare) when cold, every two weeks.
USING SNOW CHAINS
WARNINGSDo not exceed 40 km/h (25 mph).
Do not use snow chains on snow-freeroads.The snow chains must be fitted inthe front axle only with tire size195/65R15.
If your vehicle is fitted with wheel trims,remove them before fitting snow chains.
CHANGING A ROAD WHEELVehicles with a Spare WheelIf the spare wheel is exactly the same typeand size as the other fitted road wheels,you can replace the existing road wheelwith the spare wheel and continue to drivein the normal manner.If the spare wheel is different to the otherroad wheels, it will carry a yellow label withthe appropriate speed limit.See the following information beforechanging the wheel.
WARNINGSDrive the shortest possible distances.
134
Ecosport (CBY) Rayong (Thailand)/Haiduong (Vietnam), enPHI
Wheels and Tires
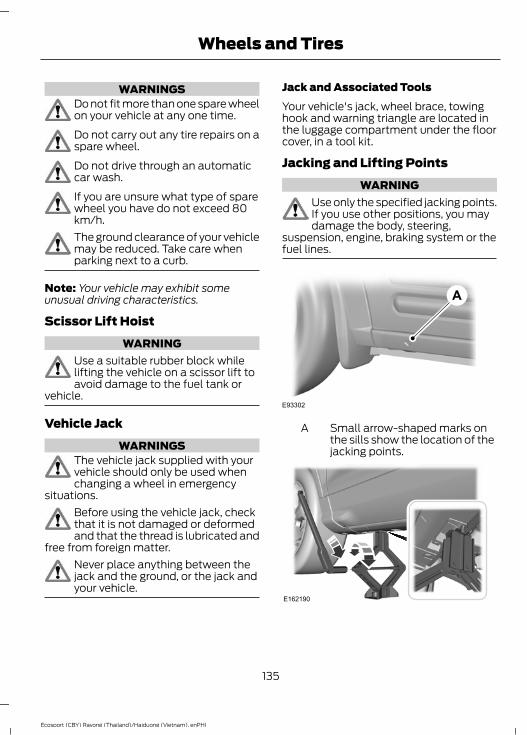
WARNINGSDo not fit more than one spare wheelon your vehicle at any one time.Do not carry out any tire repairs on aspare wheel.Do not drive through an automaticcar wash.If you are unsure what type of sparewheel you have do not exceed 80km/h.The ground clearance of your vehiclemay be reduced. Take care whenparking next to a curb.
Note: Your vehicle may exhibit someunusual driving characteristics.
Scissor Lift HoistWARNING
Use a suitable rubber block whilelifting the vehicle on a scissor lift toavoid damage to the fuel tank or
vehicle.
Vehicle JackWARNINGS
The vehicle jack supplied with yourvehicle should only be used whenchanging a wheel in emergency
situations.Before using the vehicle jack, checkthat it is not damaged or deformedand that the thread is lubricated and
free from foreign matter.Never place anything between thejack and the ground, or the jack andyour vehicle.
Jack and Associated ToolsYour vehicle's jack, wheel brace, towinghook and warning triangle are located inthe luggage compartment under the floorcover, in a tool kit.
Jacking and Lifting PointsWARNING
Use only the specified jacking points.If you use other positions, you maydamage the body, steering,
suspension, engine, braking system or thefuel lines.
E93302
A
Small arrow-shaped marks onthe sills show the location of thejacking points.
A
E162190
135
Ecosport (CBY) Rayong (Thailand)/Haiduong (Vietnam), enPHI
Wheels and Tires

Removing a Wheel TrimThe wheel trim fitted to your wheel isretained by three of the lug nuts. The fourthlug nut passes through the larger of theholes and holds the wheel in position.Thisallows you to remove the trim without theneed to raise your vehicle.
E186441
1. Remove the three lug nuts as shown.2. Remove the wheel trim.Note: Do not loosen the lug nut diagonallyopposite to the valve stem.
Installing a Wheel TrimWARNING
Make sure there is no grease or oil onthe threads or the surface betweenthe wheel lugs and nuts. This can
cause the lug nuts to loosen while driving.
1. Install in the reverse order.Note: Tighten the lug nuts to 133 Nm.
Removing a Road WheelWARNINGS
Park your vehicle in such a positionthat neither the traffic nor you arehindered or endangered.Set up a warning triangle.
Make sure that your vehicle is on firm,level ground with the wheels pointingstraight ahead.Switch the ignition off and apply theparking brake.If your vehicle has a manualtransmission, select first or reversegear. If it has an automatic
transmission, select park.Have the passengers leave yourvehicle.Secure the diagonally oppositewheel with an appropriate block orwheel chock.Do not work underneath your vehiclewhen it is supported only by a jack.Make sure that the jack is vertical tothe jacking point and the base is flaton the ground.Do not lay alloy wheels face downon the ground, this will damage thepaint.
1. Loosen each wheel lug nuts one-halfturn counterclockwise, but do notremove them.
2. Jack up your vehicle until the tire isclear of the ground.
3. Remove the lug nuts and the wheel.
136
Ecosport (CBY) Rayong (Thailand)/Haiduong (Vietnam), enPHI
Wheels and Tires
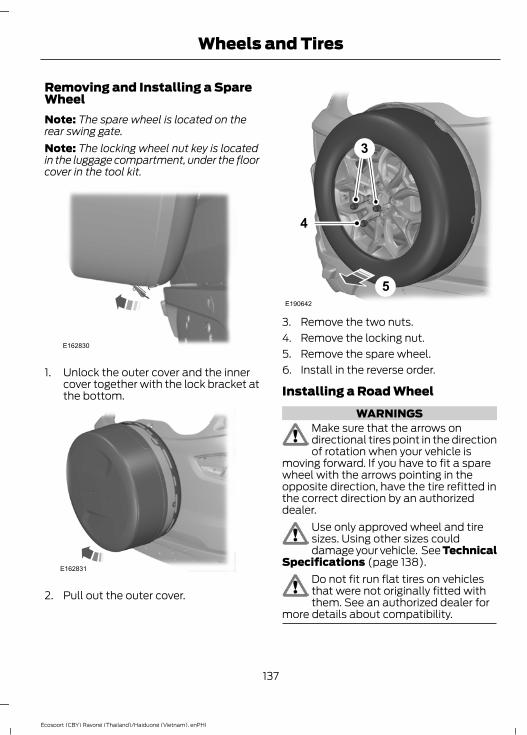
Removing and Installing a SpareWheelNote: The spare wheel is located on therear swing gate.Note: The locking wheel nut key is locatedin the luggage compartment, under the floorcover in the tool kit.
E162830
1. Unlock the outer cover and the innercover together with the lock bracket atthe bottom.
E162831
2. Pull out the outer cover.
5
4
3
E190642
3. Remove the two nuts.4. Remove the locking nut.5. Remove the spare wheel.6. Install in the reverse order.
Installing a Road WheelWARNINGS
Make sure that the arrows ondirectional tires point in the directionof rotation when your vehicle is
moving forward. If you have to fit a sparewheel with the arrows pointing in theopposite direction, have the tire refitted inthe correct direction by an authorizeddealer.
Use only approved wheel and tiresizes. Using other sizes coulddamage your vehicle. See Technical
Specifications (page 138).Do not fit run flat tires on vehiclesthat were not originally fitted withthem. See an authorized dealer for
more details about compatibility.
137
Ecosport (CBY) Rayong (Thailand)/Haiduong (Vietnam), enPHI
Wheels and Tires
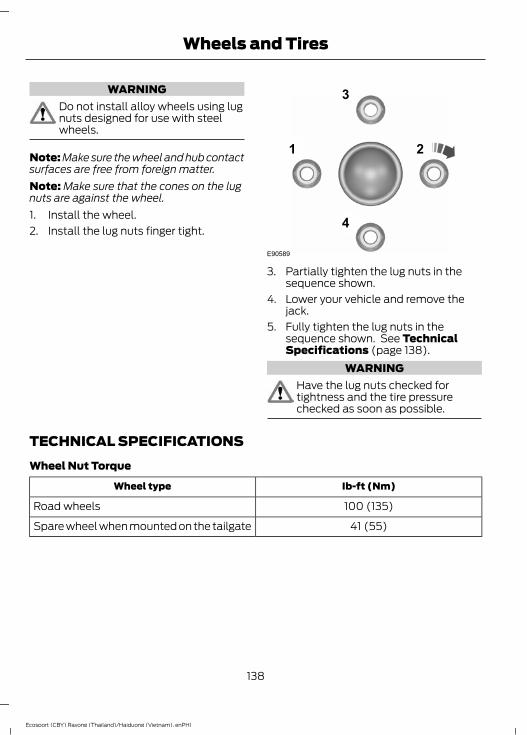
WARNINGDo not install alloy wheels using lugnuts designed for use with steelwheels.
Note: Make sure the wheel and hub contactsurfaces are free from foreign matter.Note: Make sure that the cones on the lugnuts are against the wheel.1. Install the wheel.2. Install the lug nuts finger tight.
1 2
3
4
E90589
3. Partially tighten the lug nuts in thesequence shown.
4. Lower your vehicle and remove thejack.
5. Fully tighten the lug nuts in thesequence shown. See TechnicalSpecifications (page 138).
WARNINGHave the lug nuts checked fortightness and the tire pressurechecked as soon as possible.
TECHNICAL SPECIFICATIONSWheel Nut Torque
Ib-ft (Nm)Wheel type
100 (135)Road wheels
41 (55)Spare wheel when mounted on the tailgate
138
Ecosport (CBY) Rayong (Thailand)/Haiduong (Vietnam), enPHI
Wheels and Tires

Tire Pressures (Cold Tires)
Full loadNormal load
Tire sizeVariant RearFrontRearFront
lbf/in²(bar)
lbf/in²(bar)
lbf/in²(bar)
lbf/in²(bar)
40 (2.7)35 (2.4)30 (2.1)30 (2.1)195/65 R15All engines
40 (2.7)35 (2.4)30 (2.1)30 (2.07)205/60 R16All engines
139
Ecosport (CBY) Rayong (Thailand)/Haiduong (Vietnam), enPHI
Wheels and Tires

VEHICLE IDENTIFICATIONPLATE
Note: Your vehicle identification platedesign may vary to that shown.Note: The information shown on the vehicleidentification plate is dependent uponmarket requirements.
E135662
B C ED
F
G
H
I
A
ModelAVariantBEngine designationCEngine power and emission levelDVehicle identification numberEGross vehicle weightFGross train weightGMaximum front axle weightHMaximum rear axle weightI
Your vehicle identification number andmaximum weights are shown on a plate,located at the bottom of the lock side ofthe right-hand door aperture.
140
Ecosport (CBY) Rayong (Thailand)/Haiduong (Vietnam), enPHI
Capacities and Specifications

VEHICLE IDENTIFICATIONNUMBER
E87496
The vehicle identification number isstamped into the floor panel on theright-hand side, beside the front seat. It isalso shown on the left-hand side of theinstrument panel.
141
Ecosport (CBY) Rayong (Thailand)/Haiduong (Vietnam), enPHI
Capacities and Specifications

TECHNICAL SPECIFICATIONSVehicle dimensions
E147763
Dimension in mmDimension description
4241Maximum length
2054Overall width including exterior mirrors
1658Overall height
2521Wheelbase
1519Front track
1518Rear track
142
Ecosport (CBY) Rayong (Thailand)/Haiduong (Vietnam), enPHI
Capacities and Specifications

GENERAL INFORMATIONRadio Frequencies and Reception Factors
Radio reception factors
The further you travel away from an FM station, the weakerthe signal and the weaker the reception.
Distance and Strength
Hills, mountains, tall buildings, bridges, tunnels, freewayoverpasses, parking garages, dense tree foliage andthunderstorms can interfere with the reception.
Terrain
When you pass near a radio transmission tower, a strongersignal can override a weaker signal and can cause interfer-ence in the audio system.
Station overload
CD and CD Player InformationNote: CD units play commercially pressed4.75-inch (12 centimeter) audio compactdiscs only. Due to technical incompatibility,certain recordable and re-recordablecompact discs may not function correctlywhen used in Ford CD players.Note: Do not insert CDs with homemadepaper (adhesive) labels into the CD playeras the label may peel and cause the CD tobecome jammed. You should use apermanent felt tip marker rather thanadhesive labels on your homemade CDs.Ballpoint pens may damage CDs. Pleasecontact an authorized dealer for furtherinformation.Note: Do not use any irregularly shapeddiscs or discs with a scratch protection filmattached.Always handle discs by their edges only.Clean the disc with an approved CDcleaner only. Wipe it from the center of thedisc toward the edge. Do not clean in acircular motion.Do not expose discs to direct sunlight orheat sources for extended periods.
MP3 and WMA Track and FolderStructureAudio systems capable of recognizing andplaying MP3 and WMA individual tracksand folder structures work as follows:• There are two different modes for MP3
and WMA disc playback: MP3 andWMA track mode (system default) andMP3 and WMA folder mode.
• MP3 and WMA track mode ignores anyfolder structure on the MP3 and WMAdisc. The player numbers each MP3and WMA track on the disc (noted bythe MP3 or WMA file extension) fromT001 to a maximum of T255. Themaximum number of playable MP3 andWMA files may be less depending onthe structure of the CD and exactmodel of radio present.
143
Ecosport (CBY) Rayong (Thailand)/Haiduong (Vietnam), enPHI
Audio System

• MP3 and WMA folder mode representsa folder structure consisting of onelevel of folders. The CD player numbersall MP3 and WMA tracks on the disc(noted by the MP3 or WMA fileextension) and all folders containingMP3 and WMA files, from F001 (folder)T001 (track) to F253 T255.
• Creating discs with only one level offolders helps with navigation throughthe disc files.
If you are burning your own MP3 and WMAdiscs, it is important to understand howthe system reads the structures you create.While various files may be present, (fileswith extensions other than MP3 andWMA), only files with the MP3 and WMAextension are played; other files areignored by the system. This enables you touse the same MP3 and WMA disc for avariety of tasks on your work computer,home computer and your in-vehiclesystem.In track mode, the system displays andplays the structure as if it were only onelevel deep (all MP3 and WMA files play,regardless of being in a specific folder). Infolder mode, the system only plays theMP3 and WMA files in the current folder.
AUDIO UNIT - VEHICLES WITH:AM/FM/CD
WARNINGSRadio sound levels can go above85dB. Listening to sounds about 85decibels can harm the human
auditory system.Driving while distracted can result inloss of vehicle control, crash andinjury. We strongly recommend that
you use extreme caution when using anydevice that may take your focus off theroad. Your primary responsibility is the safeoperation of your vehicle. We recommendagainst the use of any hand-held devicewhile driving and encourage the use ofvoice-operated systems when possible.Make sure you are aware of all applicablelocal laws that may affect the use ofelectronic devices while driving.
Note: Some systems do not have a CDplayer.
144
Ecosport (CBY) Rayong (Thailand)/Haiduong (Vietnam), enPHI
Audio System
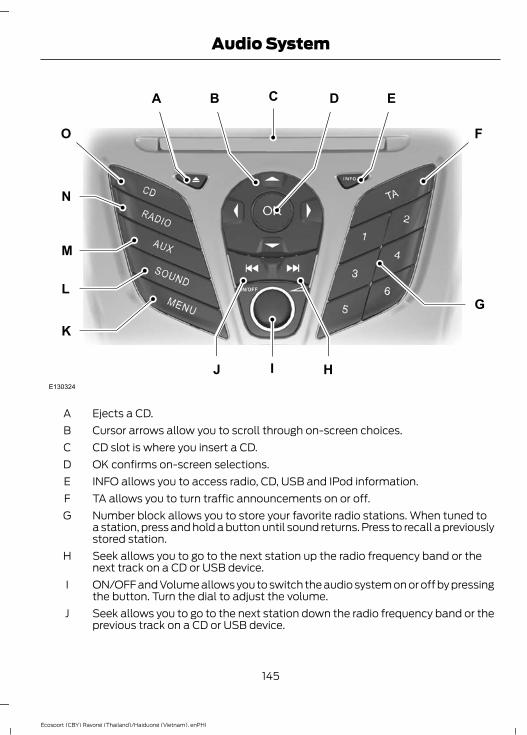
A B ED
FO
G
K
L
M
N
J HI
C
E130324
Ejects a CD.ACursor arrows allow you to scroll through on-screen choices.BCD slot is where you insert a CD.COK confirms on-screen selections.DINFO allows you to access radio, CD, USB and IPod information.ETA allows you to turn traffic announcements on or off.FNumber block allows you to store your favorite radio stations. When tuned toa station, press and hold a button until sound returns. Press to recall a previouslystored station.
G
Seek allows you to go to the next station up the radio frequency band or thenext track on a CD or USB device.
H
ON/OFF and Volume allows you to switch the audio system on or off by pressingthe button. Turn the dial to adjust the volume.
I
Seek allows you to go to the next station down the radio frequency band or theprevious track on a CD or USB device.
J
145
Ecosport (CBY) Rayong (Thailand)/Haiduong (Vietnam), enPHI
Audio System
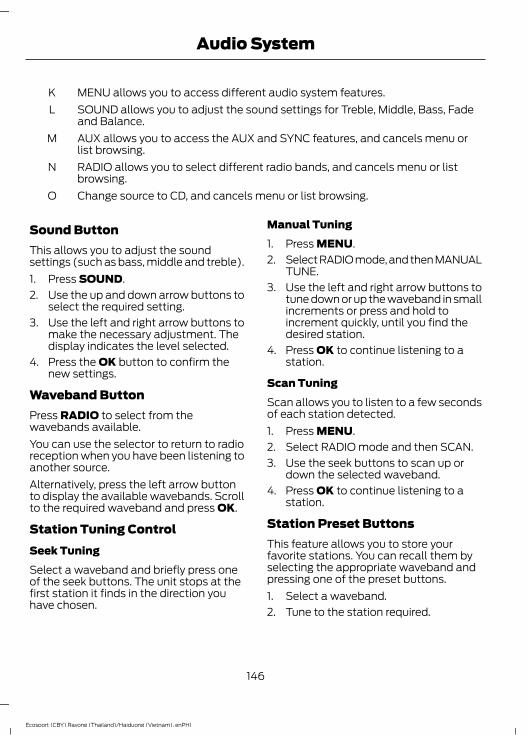
MENU allows you to access different audio system features.KSOUND allows you to adjust the sound settings for Treble, Middle, Bass, Fadeand Balance.
L
AUX allows you to access the AUX and SYNC features, and cancels menu orlist browsing.
M
RADIO allows you to select different radio bands, and cancels menu or listbrowsing.
N
Change source to CD, and cancels menu or list browsing.O
Sound ButtonThis allows you to adjust the soundsettings (such as bass, middle and treble).1. Press SOUND.2. Use the up and down arrow buttons to
select the required setting.3. Use the left and right arrow buttons to
make the necessary adjustment. Thedisplay indicates the level selected.
4. Press the OK button to confirm thenew settings.
Waveband ButtonPress RADIO to select from thewavebands available.You can use the selector to return to radioreception when you have been listening toanother source.Alternatively, press the left arrow buttonto display the available wavebands. Scrollto the required waveband and press OK.
Station Tuning ControlSeek TuningSelect a waveband and briefly press oneof the seek buttons. The unit stops at thefirst station it finds in the direction youhave chosen.
Manual Tuning1. Press MENU.2. Select RADIO mode, and then MANUAL
TUNE.3. Use the left and right arrow buttons to
tune down or up the waveband in smallincrements or press and hold toincrement quickly, until you find thedesired station.
4. Press OK to continue listening to astation.
Scan TuningScan allows you to listen to a few secondsof each station detected.1. Press MENU.2. Select RADIO mode and then SCAN.3. Use the seek buttons to scan up or
down the selected waveband.4. Press OK to continue listening to a
station.
Station Preset ButtonsThis feature allows you to store yourfavorite stations. You can recall them byselecting the appropriate waveband andpressing one of the preset buttons.1. Select a waveband.2. Tune to the station required.
146
Ecosport (CBY) Rayong (Thailand)/Haiduong (Vietnam), enPHI
Audio System

3. Press and hold one of the presetbuttons. A progress bar and messageappear. When the progress barcompletes the station has been stored.The audio unit briefly mutes asconfirmation.
You can repeat this on each waveband andfor each preset button.Note: When you drive to another part of thecountry, stations that broadcast onalternative frequencies, and are stored onpreset buttons, may update with the correctfrequency and station name for that area.
Autostore ControlNote: This stores up to a maximum of the10 strongest signals available, either fromthe AM or the FM waveband, and overwritethe previously stored stations. You can alsostore stations manually in the same way asother wavebands.• Press MENU, select RADIO mode, then
press AUTOSTORE.• When the search is complete, sound
returns and the strongest signals arestored on the autostore presets.
Traffic Information ControlMany stations that broadcast on the FMwaveband have a TP code to signify thatthey carry traffic program information.
Turning Traffic Announcements On andOffBefore you can receive trafficannouncements, you must press either theTA or TRAFFIC button. A TA displayappears to show the feature is on.If you are listening to a station thatbroadcasts traffic information, TP alsodisplays. Otherwise, the unit searches fora traffic program.
When traffic information broadcasts, itautomatically interrupts normal radio orCD playback and Traffic announcementappears in the display.If you select a non-traffic station using apreset button, the audio unit remains onthat station unless you turn TA or TRAFFICoff, then on again.Note: If traffic announcement is on and youselect a preset or manually tune to anon-traffic announcement station, you donot hear traffic announcements.Note: When you are listening to anon-traffic announcement station and turntraffic announcement off and on again, aTP seek occurs.
Traffic Announcement VolumeTraffic announcements interrupt normalbroadcasts at a preset minimum level thatis usually louder than normal listeningvolumes.To adjust the preset volume:• Use the volume control to make the
necessary adjustment during anincoming traffic announcementbroadcast. The display shows theselected level.
Ending Traffic AnnouncementsThe audio unit returns to the previoussettings at the end of each trafficannouncement. To end a trafficannouncement early, press any button.Note: If you press TA or TRAFFIC at anyother time, it switches all announcementsoff.
Automatic Volume ControlWhen available, automatic volume controladjusts the volume level to compensatefor engine noise and road speed noise.
147
Ecosport (CBY) Rayong (Thailand)/Haiduong (Vietnam), enPHI
Audio System
1. Press MENU, and then select AUDIOor AUDIO SETTINGS.
2. Select AVC LEVEL or ADAPTIVE VOL.3. Use the left or right arrow button to
adjust the setting.4. Press OK to confirm your selection.5. Press MENU to return.
News BroadcastsYour audio unit may interrupt normalreception to broadcast news bulletins fromstations on the FM waveband, radio datasystem or other enhanced network linkedstations.The display indicates there is an incomingannouncement during news broadcasts.When the audio unit interrupts for a newsbroadcast, the preset volume level is thesame as traffic announcements.1. Press MENU.2. Select AUDIO or AUDIO SETTINGS.3. Scroll to NEWS and turn on or off by
pressing OK.4. Press MENU to return.
Alternative FrequenciesThe majority of programs that broadcaston the FM waveband have a programidentification code that audio units canrecognize.When your vehicle moves from onetransmission area to another with thealternative frequencies tuning switchedon, this function searches for the strongeststation signal.Under certain conditions, however,alternative frequencies tuning maytemporarily disrupt normal reception.
When selected, the unit continuallyevaluates signal strength and if a bettersignal becomes available, the unit switchesto that alternative. It mutes while it checksa list of alternative frequencies and ifnecessary, it searches once across theselected waveband for a genuinealternative frequency.It restores radio reception when it finds oneor, if it cannot find one, returns to theoriginal stored frequency.When selected, AF appears in the display.1. Press MENU.2. Select AUDIO or AUDIO SETTINGS.3. Scroll to ALTERNAT FREQ. or
ALTERNATIVE FREQ. and turn on or offby pressing OK.
4. Press MENU to return.
Regional ModeRegional mode controls the behavior ofalternative frequencies switching betweenregionally related networks of a parentbroadcaster. A broadcaster may run a largenetwork across a large part of the country.At various times of the day this largenetwork may be broken down into anumber of smaller regional networks,typically centered on major towns or cities.When not split into these smaller variants,the whole network carries the sameprogramming.Regional mode ON: This prevents randomalternative frequency switches whenneighboring regional networks are notcarrying the same programming.Regional mode OFF: This allows a largercoverage area if neighboring regionalnetworks carry the same programming,but it can cause random alternativefrequency switches if they are not.1. Press MENU.2. Select AUDIO or AUDIO SETTINGS.
148
Ecosport (CBY) Rayong (Thailand)/Haiduong (Vietnam), enPHI
Audio System
3. Scroll to RDS REGIONAL and turn onor off by pressing OK.
4. Press MENU to return.
AUDIO UNIT
WARNINGSRadio sound levels can go above85dB and listening to sounds above85 decibels can harm the human
auditory system. Law 11.291/2006.
WARNINGSDriving while distracted can result inloss of vehicle control, crash andinjury. We strongly recommend that
you use extreme caution when using anydevice that may take your focus off theroad. Your primary responsibility is the safeoperation of your vehicle. We recommendagainst the use of any hand-held devicewhile driving and encourage the use ofvoice-operated systems when possible.Make sure you are aware of all applicablelocal laws that may affect the use ofelectronic devices while driving.
A B EDT
H
F
G
P
Q
R
S
MO N J IKL
C
E130142
Ejects a CD.AArrow keys let you navigate through the options displayed on the display.BOpening access for CD.C
149
Ecosport (CBY) Rayong (Thailand)/Haiduong (Vietnam), enPHI
Audio System
OK confirms the selections shown on the display.DINFO let you access information from CD, USB and iPod.ETA allows you to turn traffic announcements on or off.FSOUND lets you adjust the sound settings for Treble, Mid, Low, Fade, Balance,Equalizer Settings and DSP.
G
Number block can store your favorite radio stations. When turned to a station,press and hold the button until the station is memorized. Press to go to a stationpreviously stored. In CD mode, press a number to select a track. In phone mode,use the buttons to dial a phone number.
H
Function button allows you to mute the radio or pause a CD. You can also selectfour different functions of the audio system depending on the listening mode.
I
Function button allows you to select three different functions of the audiosystem depending on the listening mode.
J
Seek allows you to go to the next station up the radio frequency band, or to thenext track on a CD, USB, iPod and Bluetooth audio (if your device supportsBluetooth).
K
ON/OFF and Volume allows you to turn on or off the audio system by pressingthe button. Turn the knob to adjust the volume.
L
Seek allows you to go to the next station down the radio frequency band or theprevious track on a CD, USB, iPod and Bluetooth audio (if your device supportsBluetooth).
M
Function button allows you to select two different functions of the audio systemdepending on the listening mode.
N
Function button allows you to select different functions of the audio systemdepending on the listening mode.
O
MENU allows you to access different audio system features.PPHONE allows you to access the phone features of the SYNC system. Seeseparate manual.
Q
AUX allows you to access the AUX, USB, iPod, Bluetooth Audio, SYNC and alsocancels the scrolling menu or list. See separate manual.
R
RADIO lets you select different radio bands and will also cancel the scrollingmenu or list.
S
Change source to CD, will also cancel menu or list browsing.T
Sound ButtonThis will allow you to adjust the soundsettings (for example bass, middle andtreble).
1. Press the sound button.2. Use the up and down arrow buttons to
select the required setting.
150
Ecosport (CBY) Rayong (Thailand)/Haiduong (Vietnam), enPHI
Audio System

3. Use the left and right arrow buttons tomake the necessary adjustment. Thedisplay indicates the level selected.
4. Press the OK button to confirm the newsettings.
Frequency Band ButtonPress RADIO to select one of the frequencybands available: AM, AM AST, FM, FM AST.You can use the selector to return to radioreception when you have been listening toanother source.Alternatively, press the left arrow buttonto display the available frequency bands.Scroll to the required frequency band andpress OK.
Station Tuning ControlSeek TuningSelect a frequency band and briefly pressone of the seek buttons. The unit will stopat the first station it finds in the directionyou have chosen.
Manual Tuning1. Press function button 2.2. Use the left and right arrow buttons to
tune down or up the frequency band insmall increments or press and hold toincrement quickly, until you find astation you want to listen to.
3. Press OK to continue listening to astation.
Scan TuningScan allows you to listen to a few secondsof each station detected.1. To activate, press the function button
3.2. Use the seek buttons to scan up or
down the frequency band.
3. To deactivate, press the functionbutton 3 again or OK to continuelistening to a station.
Station Preset ButtonsThis feature allows you to store yourfavorite stations, they can be recalled byselecting the appropriate frequency bandand pressing one of the preset buttons.1. Select a frequency band.2. Tune to the station required.3. Press and hold one of the preset
buttons. A progress bar and messagewill appear. When the progress barcompletes the station has been stored.The audio unit will also mutemomentarily as confirmation.
You can repeat this on each frequencyband and for each preset button.Note: When you drive to another part of thecountry, stations that broadcast onalternative frequencies, and are stored onpreset buttons, may be updated with thecorrect frequency and station name for thatarea.
Autostore ControlNote: Stores the 10 strongest signalsavailable in the frequency band AM AST orFM AST, and overwrites the previouslystored stations. You can also manual storea station in the same manner as otherfrequency bands.• Press and hold the function button 1. A
progress bar and a message will bedisplayed.
• When the search is complete, sound isrestored and the strongest signals arestored on the autostore presets.
151
Ecosport (CBY) Rayong (Thailand)/Haiduong (Vietnam), enPHI
Audio System

Traffic Information Control (If
Equipped)
To receive alerts about traffic, you mustpress the TA button. A TA symbol isdisplayed to show that the feature wasactivated.
Turning Traffic Announcements On andOffBefore you can receive trafficannouncements, you must press either theTA button. A TA display will appear toshow the feature is switched on.If you are already tuned to a station thatbroadcasts traffic information, TP will alsobe displayed. Otherwise the unit will searchfor a traffic program.When traffic information is broadcast, itwill automatically interrupt normal radioor CD playback and Traffic announcementwill appear in the display.If a non-traffic station is selected orrecalled using a preset button, the audiounit will remain on that station unless TAis turned off, then on again.Note: If traffic announcement is on and youselect a preset or manual tune to a nontraffic announcement station no trafficannouncement will be heard.Note: When you are listening to a nontraffic announcement station and turntraffic announcement off and on again a TPseek will occur.
Traffic Announcement VolumeTraffic announcements interrupt normalbroadcasts at a preset minimum level thatis usually louder than normal listeningvolumes.To adjust the preset volume:
• Use the volume control to make thenecessary adjustment during anincoming traffic announcementbroadcast. The display will show thelevel selected.
Ending Traffic AnnouncementsThe audio unit returns to the previoussettings at the end of each trafficannouncement. To end a trafficannouncement early, press any button.Note: If you press TA or TRAFFIC at anyother time, it switches all announcementsoff.
Automatic Volume ControlWhen available, automatic volume controladjusts the volume level to compensatefor engine noise and road speed noise.1. Press the MENU button and AUDIO
SETTINGS.2. Select VOL. ADJUSTABLE.3. Use the arrow button, left or right, to
adjust the setting.4. Press the OK button to confirm your
selection.5. Press the MENU button to return.
News BroadcastsYour audio unit may interrupt normalreception to broadcast news bulletins fromstations on the FM frequency band, radiodata system or other enhanced networklinked stations.The display will indicate there is anincoming announcement, during newsbroadcasts. When the audio unit interruptsfor a news broadcast the preset volumelevel will be the same as trafficannouncements.1. Press the MENU button.2. Select AUDIO SETTINGS.
152
Ecosport (CBY) Rayong (Thailand)/Haiduong (Vietnam), enPHI
Audio System

3. Scroll to NEWS and turn on or off withthe OK button.
4. Press the MENU button to return.
Alternative FrequenciesThe majority of programs that broadcaston the FM frequency band have a programidentification code, it can be recognized byaudio units.When your vehicle moves from onetransmission area to another with thealternative frequencies tuning switchedon, this function will search for thestrongest station signal.Under certain conditions, however,alternative frequencies tuning maytemporarily disrupt normal reception.When selected, the unit continuallyevaluates signal strength and, if a bettersignal becomes available, the unit willswitch to that alternative. It mutes whileit checks a list of alternative frequenciesand if necessary, it will search once acrossthe selected frequency band for a genuinealternative frequency.It will restore radio reception when it findsone or if one is not found, the unit willreturn to the original stored frequency.When selected, AF will be shown in thedisplay.1. Press the MENU button.2. Select AUDIO SETTINGS.3. Scroll to ALTERNAT FREQ. or
ALTERNATIVE FREQ. and turn on or offwith the OK button.
4. Press the MENU button to return.
Regional ModeThe regional mode controls the behaviorof switching between alternativefrequencies list of regional networks of astation. The station can maintain a fairlywide network coverage over a large partof the country. At various times of the daythis large network can be separated intoseveral smaller regional networks, typicallycentralized in major cities or areas. Whenthe network is not divided into regionalvariants, the entire network broadcasts thesame programming.Regional mode ON: This prevents randomalternative frequency switches whenneighboring regional networks are notcarrying the same programming.Regional mode OFF: This allows a largercoverage area if neighboring regionalnetworks are carrying the sameprogramming, but can cause randomalternative frequency switches if they arenot.1. Press the MENU button.2. Select AUDIO SETTINGS.3. Scroll to RDS REGIONAL and turn on
or off with the OK button.4. Press the MENU button to return.
COMPACT DISC PLAYERCompact Disc PlaybackNote: During playback, the display indicatesthe disc, track and time that have elapsedsince the start of the track.During radio reception, press CD once tostart CD playback.After a disc is loaded, playback startsimmediately.
153
Ecosport (CBY) Rayong (Thailand)/Haiduong (Vietnam), enPHI
Audio System

Track Selection• Press the seek down button once to
replay the current track. If pressedwithin two seconds of the start of atrack, the previous track plays.
• Press the up or down arrow buttons toselect the required track, then pressOK.
You can select a track by using the numerickeypad. Dial the required track numberuntil complete (for example, 1 then 2 fortrack 12), or dial the number and directlypress OK.
Fast Forward and ReversePress and hold the seek down or upbuttons to search backward or forwardwithin the tracks on the disc.
Shuffle and RandomRandom track playback, also known asshuffle, plays all tracks on the CD inrandom order.Press function button 2.Note: When an MP3 CD is playing, you canhave the system shuffle tracks for the wholeCD, or within the current folder. Pressingfunction button 2 toggles these options.Use the seek up or down button to selectthe next track to shuffle, if required.
Repeat Compact Disc TracksPress function button 1.Note: When an MP3 or WMA CD is playing,you can have the system repeat the currenttrack or all tracks within the current folder.Pressing function button 1 toggles theseoptions.
Compact Disc Track ScanningPress function button 3.
Note: When an MP3 CD is playing, you canhave the system shuffle tracks for the wholeCD or within the current folder. Pressingfunction button 3 toggles these options.
MP3 and WMA File PlaybackMP3 (MPEG 1 Audio Layer-3) or WMA(Windows media audio) is a standardtechnology and format for compressingaudio data. This allows a more efficientuse of the media.You can play MP3 files recorded onCD-ROM, CD-R and CD-RW formats. Thedisc must be in the ISO 9660 level 1 or level2 format, or Joliet or Romeo in theexpansion format. You can also use a discrecorded in multi session.
ISO 9660 FormatThis is the most common internationalstandard for the logical format of files andfolders on a CD-ROM.There are several specification levels. InLevel 1, file names must be in the 8.3format (no more than eight characters inthe name, no more than three charactersin the extension MP3 and WMA) and incapital letters.Folder names can be no longer than eightcharacters. There can be no more thaneight folder levels (trees). Level 2specifications allow file names up to 31characters long.Each folder can have up to eight trees.For Joliet or Romeo in the expansionformat, consider these restrictions whenconfiguring your CD writing software.
Multi SessionThis recording method enables adding ofdata using the track-at-once method.
154
Ecosport (CBY) Rayong (Thailand)/Haiduong (Vietnam), enPHI
Audio System
Conventional CDs begin at a CD controlarea called the lead-in and end at an areacalled lead-out. A multi session CD is a CDhaving multiple sessions, with eachsegment from lead-in to lead-out regardedas a single session.CD-Extra: The format that records audio(audio CD data) as tracks on session 1, andrecords data as tracks on session 2.Mixed CD: In this format, data records astrack 1 and audio (audio CD data) recordsas track 2.
File FormatsWith formats other than ISO 9660 level 1and level 2, folder names or file names maynot display correctly.When naming, be sure to add the fileextension MP3 or WMA to the file name.If you put the extension MP3 or WMA to afile other than MP3 or WMA, the unitcannot recognize the file correctly andgenerates random noise that coulddamage your speakers.The following discs take a longer time tostart playback.• A disc recorded with complicated tree
structure.• A disc recorded in multi session.• A non-finalized disc, where you can add
more data.
Playing a Multi Session DiscWhen the first track of the first session isaudio CD data only, the audio CD data ofthe first session plays. Non-audio CD data,MP3 or WMA file information (such astrack number and time) displays with nosound.When the first track of the first session isnot audio CD data:
• If an MP3 or WMA file is on the disc, thesystem skips these file and other data.Audio CD data is not recognized.
• If no MP3 or WMA file is in the disc,nothing plays. Audio CD data is notrecognized.
MP3 and WMA Files Playback OrderThe playback order of the folders and filesare as shown.Note: The system skips any folder that doesnot include an MP3 or WMA file.To specify a desired playback order beforethe folder or file name, input the order bynumber (for example, 01 or 02) then recordthe contents onto a disc. The order differsdepending on the writing software.
E104206
ID3 Tag Version 2The following occurs when an MP3 orWMA file containing a tag plays:
155
Ecosport (CBY) Rayong (Thailand)/Haiduong (Vietnam), enPHI
Audio System
• When skipping a portion of a tag (atthe beginning of the track) there is nosound output. Skip time changesdepending on the tag capacity.Example: At 64 kbytes, it is about 2seconds (with RealJukebox).
• The displayed elapsed playing timewhen skipping a portion of the tag isinaccurate. For MP3 files of a bit rateother than 128 kbps, time does notdisplay accurately during playback.
• When an MP3 file is created with MP3conversion software (such asRealJukebox - a registered trademarkof RealNetworks Inc.), the taggenerates automatically.
MP3 or WMA NavigationYou can record MP3 tracks on the CD inseveral ways. You can place them in theroot directory like a conventional audio CD,or in folders that may represent categories,such as album, artist, or genre.The normal playing sequence on CDs withmultiple folders is:• Play the tracks within the root (top
level) first.• Then the tracks in any folder(s) within
the root.• Then move to the second folder, and
so forth.To navigate to a track:1. Press the up or down arrow buttons to
enter the track list.2. Navigate the hierarchy using the arrow
buttons to select another folder ortrack (file).
3. Press OK to select a highlighted track.
MP3 and WMA Display OptionsWhen an MP3 or WMA disc is playing,certain information encoded in each trackcan display. Such information normallyincludes:• The file name.• The folder name.• ID3 information, which might be the
album or artist name.The unit normally shows the file name thatis playing. To select one of the other itemsof information, press INFO repeatedly untilthe required item appears in the display.Note: If the ID3 information selected isunavailable, NO MP3 or WMA TAG appearsin the display.
CD Text Display OptionsWhen an audio disc with CD text is playing,limited information encoded in each trackcan display. Such information normallyincludes:• The disc name.• The artist name.• The track name.Note: You can select these display optionsin the same way as MP3 displays. NO DISCNAME or NO TRACK NAME appears in thedisplay if there is no encoded information.
Ending Compact Disc PlaybackTo restore radio reception on all units,press RADIO.Note: The CD does not eject. The discpauses at the point where radio receptionreturned.To resume CD playback, press CD again.
156
Ecosport (CBY) Rayong (Thailand)/Haiduong (Vietnam), enPHI
Audio System

AUDIO INPUT JACK
WARNINGSDriving while distracted can result inloss of vehicle control, accident andinjury. We strongly recommend that
you use extreme caution when using anydevice or feature that may take your focusoff the road. Your primary responsibility isthe safe operation of your vehicle. Werecommend against the use of anyhandheld device while driving andencourage the use of voice-operatedsystems when possible. Make sure thatyou are aware of applicable state and locallaws that may affect use of electronicdevices while driving.
For safety reasons, do not connector adjust the settings on yourportable music player while your
vehicle is moving.Store the portable music player in asecure location, such as the centerconsole or the glove box, when your
vehicle is moving. Hard objects maybecome projectiles in a collision or suddenstop, which may increase the risk of seriousinjury. The audio extension cable must belong enough to allow the portable musicplayer to be safely stored while yourvehicle is moving.
Note: You cannot index songs using theauxiliary input jack.
E146367
The auxiliary input jack allows you toconnect and play music from your portablemusic player through your vehicle speakers.You can use any portable music playerdesigned for use with headphones. Youraudio extension cable must have male1/8th-inch (3.5 millimeter) connectors ateach end.1. Switch off the engine, radio and
portable music player. Set the parkingbrake and put the transmission inposition P (vehicle with an automatictransmission) or neutral (vehicle witha manual transmission).
2. Plug the extension cable from theportable music player into the auxiliaryinput jack.
3. Switch the radio on. Select either atuned FM station or a CD.
4. Adjust the volume as desired.5. Switch your portable music player on
and adjust its volume to half itsmaximum level.
6. Press AUX until LINE or LINE INappears in the display. You should hearmusic from your device even if it is low.
7. Adjust the volume on your portablemusic player until it reaches the volumelevel of the FM station or CD. Do thisby switching back and forth betweenthe AUX and FM or CD controls.
157
Ecosport (CBY) Rayong (Thailand)/Haiduong (Vietnam), enPHI
Audio System

USB PORT (If Equipped)
E170843
The USB port allows you to plug in mediaplaying devices, memory sticks and chargedevices (if supported).
AUDIO TROUBLESHOOTING
RectificationAudio unit display
General error message for CD fault conditions, forexample cannot read the CD, data-CD inserted, etc.Make sure the disc is loaded correctly. Clean and re-try,or replace disc with known music disc. If error persistscontact an authorized dealer.
Please check CD
General error message for CD fault conditions. Forexample a mechanism fault.
CD drive malfunction
Ambient temperature too hot – unit will not work untilit has cooled down.
CD drive high temp.
158
Ecosport (CBY) Rayong (Thailand)/Haiduong (Vietnam), enPHI
Audio System

ELECTROMAGNETICCOMPATIBILITY
WARNINGSYour vehicle has been tested andcertified to legislations relating toelectromagnetic compatibility
(72/245/EEC, UN ECE Regulation 10 orother applicable local requirements). It isyour responsibility to make sure that anyequipment you have fitted complies withapplicable local legislations. Have anyequipment fitted by an authorized dealer.
WARNINGSThe radio frequency transmitterequipment (e.g. cellular telephones,amateur radio transmitters etc.) may
only be fitted to your vehicle if they keepto the parameters shown in the tablebelow. There are no special provisions orconditions for installations or use.
Do not mount any transceiver,microphones, speakers, or any otheritem in the deployment path of the
airbag system.Do not fasten antenna cables tooriginal vehicle wiring, fuel pipes andbrake pipes.Keep antenna and power cables atleast 4 inches (10 centimeters) fromany electronic modules and airbags.
E85998
1 2 3 4
Antenna PositionsMaximum output power Watt (PeakRMS)
Frequency BandMHz
3, 450 W1 – 30
1, 2, 350 W30 – 54
1, 2, 350 W68 – 87.5
159
Ecosport (CBY) Rayong (Thailand)/Haiduong (Vietnam), enPHI
Appendices

Antenna PositionsMaximum output power Watt (PeakRMS)
Frequency BandMHz
1, 2, 350 W142 – 176
1, 2, 350 W380 – 512
1, 2, 310 W806 – 940
1, 2, 310 W1200 – 1400
1, 2, 310 W1710 – 1885
1, 2, 310 W1885 – 2025
Note: After the installation of radiofrequency transmitters, check fordisturbances from and to all electricalequipment in your vehicle, both in thestandby and transmit modes.Check all electrical equipment:• with the ignition ON• with the engine running• during a road test at various speeds.Check that electromagnetic fieldsgenerated inside your vehicle cabin by thetransmitter installed do not exceedapplicable human exposure requirements.
160
Ecosport (CBY) Rayong (Thailand)/Haiduong (Vietnam), enPHI
Appendices
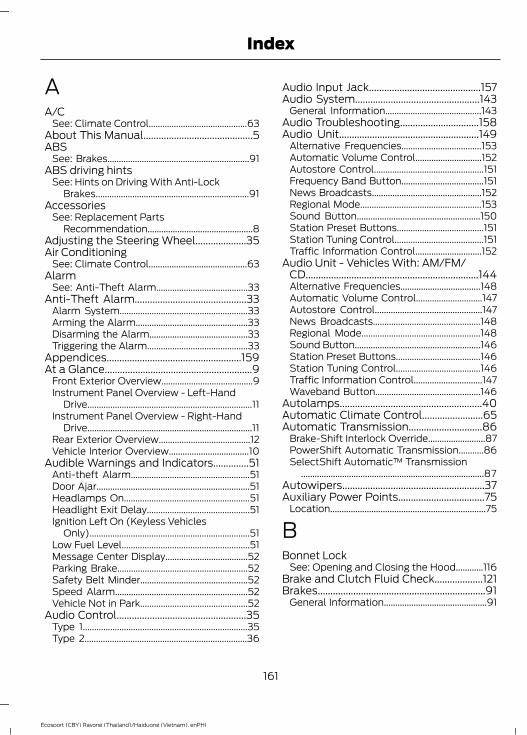
AA/C
See: Climate Control...........................................63About This Manual...........................................5ABS
See: Brakes..............................................................91ABS driving hints
See: Hints on Driving With Anti-LockBrakes...................................................................91
AccessoriesSee: Replacement Parts
Recommendation..............................................8Adjusting the Steering Wheel....................35Air Conditioning
See: Climate Control...........................................63Alarm
See: Anti-Theft Alarm........................................33Anti-Theft Alarm............................................33
Alarm System........................................................33Arming the Alarm.................................................33Disarming the Alarm...........................................33Triggering the Alarm............................................33
Appendices.....................................................159At a Glance..........................................................9
Front Exterior Overview........................................9Instrument Panel Overview - Left-Hand
Drive........................................................................11Instrument Panel Overview - Right-Hand
Drive........................................................................11Rear Exterior Overview........................................12Vehicle Interior Overview...................................10
Audible Warnings and Indicators..............51Anti-theft Alarm....................................................51Door Ajar...................................................................51Headlamps On.......................................................51Headlight Exit Delay.............................................51Ignition Left On (Keyless Vehicles
Only)......................................................................51Low Fuel Level........................................................51Message Center Display....................................52Parking Brake.........................................................52Safety Belt Minder...............................................52Speed Alarm..........................................................52Vehicle Not in Park...............................................52
Audio Control...................................................35Type 1........................................................................35Type 2.......................................................................36
Audio Input Jack............................................157Audio System.................................................143
General Information..........................................143Audio Troubleshooting...............................158Audio Unit.......................................................149
Alternative Frequencies...................................153Automatic Volume Control.............................152Autostore Control................................................151Frequency Band Button....................................151News Broadcasts................................................152Regional Mode.....................................................153Sound Button......................................................150Station Preset Buttons......................................151Station Tuning Control.......................................151Traffic Information Control.............................152
Audio Unit - Vehicles With: AM/FM/CD....................................................................144Alternative Frequencies...................................148Automatic Volume Control.............................147Autostore Control...............................................147News Broadcasts...............................................148Regional Mode....................................................148Sound Button.......................................................146Station Preset Buttons.....................................146Station Tuning Control.....................................146Traffic Information Control..............................147Waveband Button..............................................146
Autolamps........................................................40Automatic Climate Control........................65Automatic Transmission.............................86
Brake-Shift Interlock Override.........................87PowerShift Automatic Transmission...........86SelectShift Automatic™ Transmission
................................................................................87Autowipers........................................................37Auxiliary Power Points..................................75
Location....................................................................75
BBonnet Lock
See: Opening and Closing the Hood............116Brake and Clutch Fluid Check...................121Brakes..................................................................91
General Information.............................................91
161
Ecosport (CBY) Rayong (Thailand)/Haiduong (Vietnam), enPHI
Index
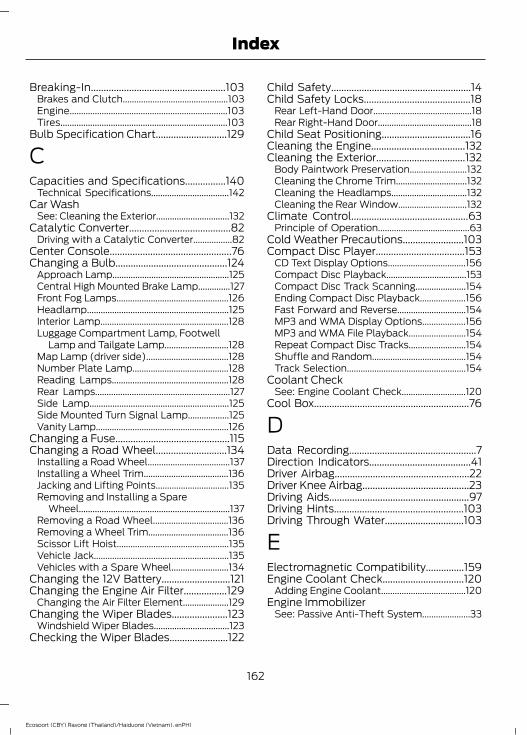
Breaking-In.....................................................103Brakes and Clutch..............................................103Engine.....................................................................103Tires.........................................................................103
Bulb Specification Chart............................129
CCapacities and Specifications................140
Technical Specifications..................................142Car Wash
See: Cleaning the Exterior................................132Catalytic Converter........................................82
Driving with a Catalytic Converter.................82Center Console................................................76Changing a Bulb............................................124
Approach Lamp...................................................125Central High Mounted Brake Lamp..............127Front Fog Lamps.................................................126Headlamp..............................................................125Interior Lamp........................................................128Luggage Compartment Lamp, Footwell
Lamp and Tailgate Lamp............................128Map Lamp (driver side)....................................128Number Plate Lamp..........................................128Reading Lamps...................................................128Rear Lamps...........................................................127Side Lamp.............................................................125Side Mounted Turn Signal Lamp..................125Vanity Lamp..........................................................126
Changing a Fuse.............................................115Changing a Road Wheel............................134
Installing a Road Wheel....................................137Installing a Wheel Trim.....................................136Jacking and Lifting Points................................135Removing and Installing a Spare
Wheel..................................................................137Removing a Road Wheel.................................136Removing a Wheel Trim...................................136Scissor Lift Hoist.................................................135Vehicle Jack...........................................................135Vehicles with a Spare Wheel.........................134
Changing the 12V Battery...........................121Changing the Engine Air Filter.................129
Changing the Air Filter Element....................129Changing the Wiper Blades......................123
Windshield Wiper Blades.................................123Checking the Wiper Blades.......................122
Child Safety.......................................................14Child Safety Locks..........................................18
Rear Left-Hand Door...........................................18Rear Right-Hand Door.........................................18
Child Seat Positioning...................................16Cleaning the Engine.....................................132Cleaning the Exterior...................................132
Body Paintwork Preservation.........................132Cleaning the Chrome Trim...............................132Cleaning the Headlamps.................................132Cleaning the Rear Window..............................132
Climate Control..............................................63Principle of Operation........................................63
Cold Weather Precautions........................103Compact Disc Player...................................153
CD Text Display Options..................................156Compact Disc Playback...................................153Compact Disc Track Scanning......................154Ending Compact Disc Playback....................156Fast Forward and Reverse..............................154MP3 and WMA Display Options...................156MP3 and WMA File Playback.........................154Repeat Compact Disc Tracks.........................154Shuffle and Random.........................................154Track Selection....................................................154
Coolant CheckSee: Engine Coolant Check............................120
Cool Box.............................................................76
DData Recording..................................................7Direction Indicators........................................41Driver Airbag.....................................................22Driver Knee Airbag..........................................23Driving Aids.......................................................97Driving Hints...................................................103Driving Through Water...............................103
EElectromagnetic Compatibility...............159Engine Coolant Check................................120
Adding Engine Coolant.....................................120Engine Immobilizer
See: Passive Anti-Theft System.....................33
162
Ecosport (CBY) Rayong (Thailand)/Haiduong (Vietnam), enPHI
Index
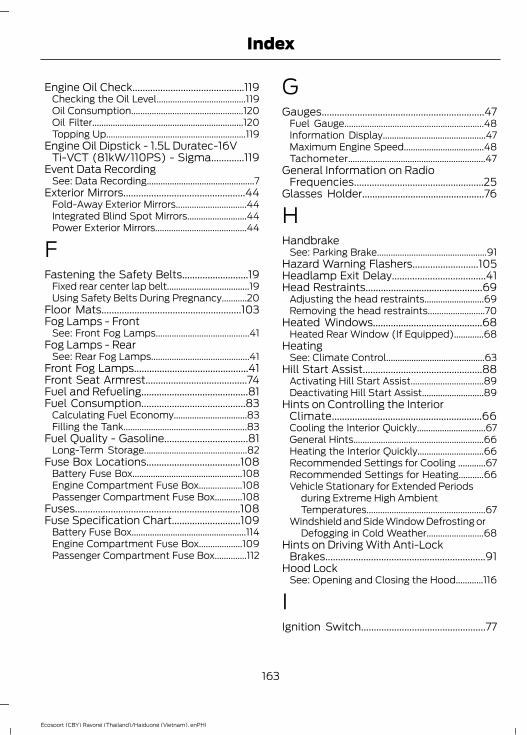
Engine Oil Check............................................119Checking the Oil Level.......................................119Oil Consumption.................................................120Oil Filter..................................................................120Topping Up.............................................................119
Engine Oil Dipstick - 1.5L Duratec-16VTi-VCT (81kW/110PS) - Sigma.............119
Event Data RecordingSee: Data Recording...............................................7
Exterior Mirrors................................................44Fold-Away Exterior Mirrors...............................44Integrated Blind Spot Mirrors..........................44Power Exterior Mirrors........................................44
FFastening the Safety Belts..........................19
Fixed rear center lap belt....................................19Using Safety Belts During Pregnancy...........20
Floor Mats.......................................................103Fog Lamps - Front
See: Front Fog Lamps.........................................41Fog Lamps - Rear
See: Rear Fog Lamps...........................................41Front Fog Lamps.............................................41Front Seat Armrest........................................74Fuel and Refueling..........................................81Fuel Consumption.........................................83
Calculating Fuel Economy................................83Filling the Tank......................................................83
Fuel Quality - Gasoline.................................81Long-Term Storage.............................................82
Fuse Box Locations.....................................108Battery Fuse Box................................................108Engine Compartment Fuse Box...................108Passenger Compartment Fuse Box............108
Fuses.................................................................108Fuse Specification Chart...........................109
Battery Fuse Box..................................................114Engine Compartment Fuse Box...................109Passenger Compartment Fuse Box..............112
GGauges................................................................47
Fuel Gauge.............................................................48Information Display.............................................47Maximum Engine Speed...................................48Tachometer............................................................47
General Information on RadioFrequencies...................................................25
Glasses Holder................................................76
HHandbrake
See: Parking Brake................................................91Hazard Warning Flashers..........................105Headlamp Exit Delay.....................................41Head Restraints..............................................69
Adjusting the head restraints..........................69Removing the head restraints.........................70
Heated Windows...........................................68Heated Rear Window (If Equipped).............68
HeatingSee: Climate Control...........................................63
Hill Start Assist...............................................88Activating Hill Start Assist................................89Deactivating Hill Start Assist...........................89
Hints on Controlling the InteriorClimate...........................................................66Cooling the Interior Quickly..............................67General Hints.........................................................66Heating the Interior Quickly.............................66Recommended Settings for Cooling ............67Recommended Settings for Heating...........66Vehicle Stationary for Extended Periods
during Extreme High AmbientTemperatures....................................................67
Windshield and Side Window Defrosting orDefogging in Cold Weather.........................68
Hints on Driving With Anti-LockBrakes...............................................................91
Hood LockSee: Opening and Closing the Hood............116
IIgnition Switch.................................................77
163
Ecosport (CBY) Rayong (Thailand)/Haiduong (Vietnam), enPHI
Index

Information Displays.....................................53General Information............................................53
Information Messages..................................57Installing Child Seats.....................................14
Booster Seats.........................................................15Child Restraints for Different Mass
Groups..................................................................14ISOFIX Anchor Points..........................................16
Instrument Cluster.........................................47Interior Lamps.................................................42
Courtesy lamp.......................................................42Reading lamps......................................................42
Interior Mirror...................................................45Auto-Dimming Mirror..........................................45
Introduction........................................................5
JJump Starting the Vehicle.........................105
Connecting the Jumper Cables....................106Jump Starting......................................................106Preparing Your Vehicle.....................................105Removing the Jumper Cables.......................106
KKeyless Entry...................................................30
Disabled Keys..........................................................31General Information............................................30Locking and Unlocking the Doors with the
Key Blade............................................................32Locking Your Vehicle...........................................30Passive Key.............................................................30Unlocking Your Vehicle........................................31
Keyless Starting...............................................77Failure to Start.......................................................78Starting Your Vehicle...........................................78Stopping the Engine When Your Vehicle is
Moving.................................................................79Stopping the Engine When Your Vehicle is
Stationary...........................................................79Switching the Ignition On (Accessory
Mode)..................................................................78Keys and Remote Controls.........................25
LLighting Control..............................................40
Headlamp Flasher...............................................40High Beams............................................................40Lighting Control Positions................................40Parking Lamps......................................................40
Lighting..............................................................40Load Carriers
See: Roof Racks and Load Carriers...............98Load Carrying..................................................98
General Information...........................................98Locking and Unlocking.................................28
Autolock...................................................................28Locking and Unlocking the Doors from
Inside....................................................................29Locking and Unlocking the Doors with the
Key........................................................................29Power Door Locks................................................28Remote Control....................................................28
Locks...................................................................28Luggage Anchor Points...............................98Luggage Covers..............................................98Lug Nuts
See: Changing a Road Wheel........................134
MMaintenance...................................................116
General Information...........................................116Technical Specifications..................................130
Manual Climate Control..............................64Manual Seats...................................................70
Adjusting the Height of the Driver’sSeat........................................................................71
Adjusting the Lumbar Support.........................71Moving the Seat Backward and
Forward...............................................................70Recline Adjustment..............................................71
Manual Transmission...................................855-Speed Manual Transmission......................85
Message CenterSee: Information Displays.................................53
MirrorsSee: Windows and Mirrors................................43
Mobile Communications Equipment........8
164
Ecosport (CBY) Rayong (Thailand)/Haiduong (Vietnam), enPHI
Index

Moonroof..........................................................46Opening and Closing the Moonroof.............46Venting the Moonroof........................................46
OOil Check
See: Engine Oil Check........................................119Opening and Closing the Hood................116
Closing the Hood..................................................117Opening the Hood...............................................116
PParking Aid.......................................................95
Rear Sensing System.........................................96Parking Aids.....................................................95
Principle of Operation........................................95Parking Brake....................................................91
All Vehicles.............................................................92Vehicles With Automatic
Transmission......................................................91Vehicles With Manual Transmission..............91
Park Lock Control..........................................89Passenger Airbag............................................23
.....................................................................................23Passive Anti-Theft System.........................33
Arming the Engine Immobilizer.......................33Coded Keys.............................................................33Disarming the Engine Immobilizer.................33Principle of Operation.........................................33
PATSSee: Passive Anti-Theft System.....................33
Power Door LocksSee: Locking and Unlocking.............................28
Power Windows..............................................43Bounce-Back.........................................................43One-Touch Down.................................................43One-Touch Up.......................................................43Window Lock.........................................................43
RRear Fog Lamps...............................................41Rear Seats..........................................................71
Folding the Seat Backrest..................................71Folding the Seat Forward..................................72Reclining the Seat.................................................71
Rear Window Wiper and Washers...........38Intermittent Wipe.................................................38Rear Window Washer.........................................39Reverse Gear Wipe..............................................39
Recommended Towing Weights............100Refueling...........................................................82
Fuel Filler Cap........................................................83Remote Control...............................................25
Changing the Remote Control Battery.........25Remote Control With a Folding Key
Blade....................................................................25Remote Control Without a Folding Key
Blade....................................................................26Reprogramming the Unlocking
Function..............................................................25Removing a Headlamp...............................124Repairing Minor Paint Damage................133Replacement Parts
Recommendation.........................................8Collision Repairs......................................................8Scheduled Maintenance and Mechanical
Repairs...................................................................8Warranty on Replacement Parts......................8
Replacing a Lost Key or RemoteControl.............................................................27
Roadside Emergencies..............................105Roof Racks and Load Carriers..................98
Adjusting the Crossbar......................................99Running-In
See: Breaking-In..................................................103Running Out of Fuel......................................82
SSafety Belt Height Adjustment.................20Safety Belt Minder.........................................20
Turning the Safety Belt Minder Off.................21Safety Belts.......................................................19Safety Precautions.........................................81Seats...................................................................69Security..............................................................33Side Airbags.....................................................23Side Curtain Airbags.....................................24Sitting in the Correct Position...................69Snow Chains
See: Using Snow Chains..................................134Stability Control.............................................94
Principle of Operation........................................94
165
Ecosport (CBY) Rayong (Thailand)/Haiduong (Vietnam), enPHI
Index

Starter SwitchSee: Ignition Switch..............................................77
Starting a Gasoline Engine.........................79Cold or Hot Engine...............................................79Engine Idle Speed after Starting....................80Failure to Start......................................................80Flooded Engine.....................................................80
Starting and Stopping the Engine............77General Information.............................................77
Steering..............................................................97Electric Power Steering......................................97
Steering Wheel Lock.....................................79Vehicles with Keyless Starting........................79Vehicles without Keyless Starting..................79
Steering Wheel................................................35Storage Compartments...............................76Sunroof
See: Moonroof.......................................................46Supplementary Restraints System.........22
Principle of Operation.........................................22Switching Off the Engine............................80
Vehicles With a Turbocharger.........................80Symbols Glossary.............................................5
TTailgate...............................................................32Technical Specifications
See: Capacities and Specifications.............140Tire Care...........................................................134Tires
See: Wheels and Tires......................................134Towing a Trailer.............................................100
Steep Gradients.................................................100Towing Points.................................................101Towing the Vehicle on Four
Wheels...........................................................102All Vehicles............................................................102Vehicles with Automatic
Transmission...................................................102Towing..............................................................100Traction Control..............................................93
Principle of Operation........................................93Transmission...................................................85Transmission
See: Transmission................................................85Transporting the Vehicle............................101
Trip Computer.................................................54STANDARD.............................................................54TRIP COMPUTER OPTIONAL.........................55
UUnder Hood Overview - 1.5L Duratec-16V
Ti-VCT (81kW/110PS) - Sigma.............118Under Seat Storage.......................................76USB Port..........................................................158Using Snow Chains......................................134Using Stability Control.................................94Using Traction Control.................................93
Switching the System Off Using aSwitch..................................................................93
Switching the System Off Using theInformation Display Controls......................93
System Indicator Lights andMessages............................................................93
VVehicle Care....................................................132Vehicle Identification Number..................141Vehicle Identification Plate......................140Ventilation
See: Climate Control...........................................63VIN
See: Vehicle Identification Number..............141Voice Control...................................................36
166
Ecosport (CBY) Rayong (Thailand)/Haiduong (Vietnam), enPHI
Index

WWarning Lamps and Indicators................48
Airbag.......................................................................48Anti-lock Braking System.................................48Anti-theft System Indicator.............................48Automatic High Beam Lamp...........................48Battery Charge System......................................48Brake System........................................................48Coolant Temperature.........................................49Cruise Control........................................................49Direction Indicator...............................................49Doors Open............................................................49DPF (Diesel Particulate Filter)........................49Engine warning lamps........................................49Front Fog Lamp....................................................50Glow Plug................................................................50Headlamp...............................................................50Hill Start Assist.....................................................50Low Fuel Level......................................................50Main Beam.............................................................50Oil Dilution..............................................................50Oil Pressure............................................................50Over Speed Warning...........................................50Power Steering.....................................................50Rear Fog Lamp.......................................................51Safety Belt Minder................................................51Stability Control.....................................................51Stability Control Off.............................................51Water-In-Fuel.........................................................51
Warning Triangle..........................................105Washer Fluid Check......................................121Washers
See: Cleaning the Exterior................................132See: Wipers and Washers..................................37
Wheel NutsSee: Changing a Road Wheel........................134
Wheels and Tires..........................................134General Information..........................................134Technical Specifications..................................138
Windows and Mirrors....................................43Windshield Washers.....................................38Windshield Wipers.........................................37
Intermittent Wipe.................................................37Speed Dependent Wipers.................................37
Wipers and Washers.....................................37
167
Ecosport (CBY) Rayong (Thailand)/Haiduong (Vietnam), enPHI
Index

168
Ecosport (CBY) Rayong (Thailand)/Haiduong (Vietnam), enPHI
