for the mbrick versaliner - thin brick linersmbrick.com/pdf/thin-brick-installation.pdf · is a...
TRANSCRIPT

Proprietary
1
Technical Design and Installation Guide for the
MBrick™ VersaLiner®
Embedded Thin Brick System
Innovative Brick Systems, LLC 11625 Reed Court Broomfield, Colorado, U.S.A. 80020 phone:1-800-413-4588 fax: 720-890-6038 www.innovativebrick.com
Rev. 5 – October, 2007
Includes: Design criteria ♦ technical data (including thin brick specifications) ♦ installation and cleaning tips ♦ brick pattern details ♦ quick-installation guide

Proprietary
2
Table of Contents ________________________________________________________________________ I. MBrick™ VersaLiner® -- Product Description and Specifications............................Pg. 3 A. Material Specifications 3 B. Brick Sizes and Patterns 4 C. Sheet Indexing 4 D. Re-use 5 E. Liner Storage 5 F. Brick Coursing – Liner Properties and Coursing 5 G. Adjust-A-Liner 5 H. Easy Liner Removal 6 I. Corner Methodology 6 II. Thin Brick..............................................................................................................................7 A. ASTM Standards 7 B. Thin Brick Color(s) 7 C. Storage of Thin Brick 8 III. Engineering and Designing the Brick Panel....................................................................8 A. Shop Drawings 8 B. Engineering Considerations 10 Pullout Tests, Prestress or Post Tensioning, Freeze thaw tests, Module openings, corners & quirk joints
C. Designing with Brick 12 Quick reference, Avoiding sliver brick cuts D. Recesses 12 E. Brick Arches 13 F. Bounding Rustications 13 G. Integrating Multiple Patterns 14 H. Irregularity of Brick 14 I. Cracked and Tilted Brick 15
IV. Preparing Thin Brick for Installation................................................................................15
A. Blending Brick 15 B. Cutting Brick 15 C. Protective Coatings 16 1. Wax 2. Brick Release 3. Retarders D. Adhesive Coatings 17 E. Corner Brick 17 F. Undersized Brick 18
V. Installation...........................................................................................................................18 A. Installation Tools 18 B. Trimming Liners 18 C. Preparing the Form 18 D. Applying VersaLiner 19 E. Installing Thin Brick 20 Brick blending; Walking on brick; Pre-wetting brick F. Placing Concrete 21 Concrete placement; Self consolidating; Vibrating; Re-bar chairs; Slump G. Cleaning the Bricked Panel 22
Appendix A: VersaLiner Patterns Appendix B: Quick Installation Guide

Proprietary
3
I. VersaLiner® -- Product Description and Specifications
The VersaLiner® is a thin-brick liner that enables precast and tilt-up contractors to create the closest look to masonry that is available on a brick panel. Its unique, seamless joint design provides a realistic coved joint and fully embeds the thin brick unit for superior bonding and weatherproofing. Each liner is designed with a unique indexing feature that makes setting up the panel easy and fast.
A. Material Specifications
All VersaLiner® sheets are composed of high impact polystyrene -- a rigid, yet flexible material optimally suited for easy setup and teardown. Thermo Form High Impact Polystyrene recyclable material number 6 PS Features of VersaLiner® are protected by U.S. patent # Thickness 20 MIL. Weight .142 LBS PER S.F. Tensile 4080 psi at yield Izod Impact 3.3 @73 degrees F Vicat Softening 220 degrees F Color White-primary; color can vary Patterns and Sizes: (Generally available; Custom patterns made on order)
VersaLiner® Thin Brick cross section
The VersaLiner’s single use design optimizes bed utilization, lowers costs, and ensures a quality brick panel from the first cast, to the last.

Proprietary
4
Specifications (cont.) Width Ht. Sheet Area Item # Description Inches Inches (if applicable)
For more up to date patterns contact Innovative Brick Systems B. Brick Sizes and Patterns
VersaLiner® can be ordered to accommodate a variety of brick sizes including modular, utility, closure/economy, and norman. All common patterns are available, including running bond, 1/3 bond, soldier and stack bonds, and rowlock. Special patterns are available on a custom order basis such as basket weave, flemish bond, arched patterns, etc. Accents such as stone, fractured block textures, and reliefs are available as well. See appendix A for details.
For views of the primary VersaLiner® patterns please refer to Appendix A C. Sheet Indexing – for easy installation
The VersaLiner® sheets have unique embossed markings (plus and minus signs) around each perimeter. These markings act as guides as they refer to the slight size distinction between the molded mortar joints that form the perimeter of each sheet. The joints near the minus signs are slightly smaller in order to fit properly underneath the larger joints. The difference is 20/1000ths of an inch and is hardly visible to the eye. The difference, however, provides proper overlapping of each adjoining liner for enhanced stability and performance.
MODULAR
Brick size: 2 ¼” x 7 5/8”
100 Modular Running Bond 32 26.66 5.92 sf 105 Mod. R.B. 3 5/8” coped return 3 5/8 26.66 110 Mod. R.B. 7 5/8’ coped return 7 5/8 26.66 115 Mod. R.B. 7 5/8” x 7 5/8” folding return 16 26.66 120 Mod. Stack Bond 32 8 125 Mod. Soldier Course 32 8 130 Mod. 4-wide Stack Bond 32 26.66 5.92 sf 140 Mod. Flemish Bond Strip 24 2 1/4 150 Mod. Rowlock Strip 32 3 5/8 CLOSURE*
3 5/8” x 7 5/8” *often called “Economy”
200 Closure Running Bond 32 24 5.33 lf 220 Closure Stack Bond (4” saddles) 32 8 225 Closure Soldier Bond (8” saddles) 32 8 UTILITY**
3 5/8” x 11 5/8” **often called “Jumbo”
400 Utility 1/2 Bond 36 24 6.0 sf 402 Utility 1/3 Running Bond 36 24 6.0 sf 420 Utility Stack Bond 28 12 425 Utility Soldier Course 28 12 215 Utility Corner (8” ret. for Utility and Closure) 16 24 NORMAN
2 ¼” x 11 5/8”
300 Norman 1/3 Running Bond 36 26.66 6.67 sf 320 Norman Soldier/Stack Bond 32 12

Proprietary
5
D. Re-use
VersaLiners® are a balanced combination of durability and economy. They are designed to be applicable to a variety of creative panel designs, and to assure that they will hold up under even the most extreme conditions for a single cast. However, considering the designed-in safety factor, some contractors may find the sheets to be useable more than once. I.B.S. warrants only a single use of each VersaLiner™ sheet.
E. VersaLiner™ Liner Storage
VersaLiner® is relatively impervious to hot and cold weather conditions. However, prolonged exposure to direct sunlight will damage them. It is recommended to store them in the packaging provided until they are ready for use. Avoid top-loading or crushing them in their packages. While they may remain useable, the resulting distortion may make them more time consuming to install.
F. Brick Coursing – Liner properties and coursing
The VersaLiner® is a flexible plastic which reacts to hot and cold conditions by slightly expanding or contracting. These slight variations in size may be compensated for by simply compressing or stretching the elastic joints as the bricks are being installed. Once the bricks are nested, their weight will hold the liner in the proper position. Thus, one of the most important procedures is to check the coursing frequently as the brick is being installed. Brick may be on course at the top and bottom but still may vary in the center. This can be easily avoided by marking and referring to storey lines on the edges of each form as the bricks are installed. Storey poles are useful as well.
G. Adjust-A-Liner
Occasionally the brick may be too long for the standard liner pocket, or there needs to be an adjustment to the brick module in order to fit properly. This can be attained by using the Adjust-A-Liner sheet. Adjust-A-Liner is a 4’ wide liner containing only the horizontal bed joints. The head joints are installed separately (and individually) as the brick is installed. This feature allows for a great deal of flexibility in adjusting for areas that require irregular spacing. While this method takes more time to install, it is also an excellent solution for areas where the brick joints must be compressed in order to fit, thereby avoiding unsightly “sliver-brick” cuts.
“3 = 8” Rule: The height dimensions of modular brick (by far the most common brick size) are such that 3 courses and their bed joints add up to 8 inches. Thus, the distance from the bottom of course #1 to the bottom of course #4 measures 8 inches. This is a handy measurement to use when installing the liner and bricks.

Proprietary
6
H. Easy Liner Removal
The VersaLiner® is made from plastic with a slightly oily microfilm on the surface. This film resists sticking to concrete so they can be removed extremely easily. This is generally done by hand with the aid of a small screwdriver or chisel for areas where concrete may have leaked underneath the liners. The labor to strip the VersaLiner™ Liner is a negligible component of the job. We recommend that a small percentage of liners be carefully removed, to avoid tearing and distortion, and stored for an emergency source should they be needed at the end of the job (cleaning of these liners is generally not required).
I. Corner Methodology
Corner, or return, brick can be easily installed with the VersaLiner® System. Return liners are available as foldable corner liners; separate, factory coped sheets; or can be prepared on the jobsite from the standard liners. It is not necessary to adhere or fasten the vertical liner to the form’s bulkhead. One or more of the mechanical methods of holding brick against the form will sandwich the liner at the top. A common method for holding brick in place along a return edge is to use a ‘horseshoe clip’. This is a simple ‘u’ type bend in a heavy (approx. 1/8th”) wire that slips over the form edge and clamps the brick to the side. These can be fashioned to any width of form edge or bulkhead, and multiple lengths in order to clamp the corner brick and intermittent half brick. Once the concrete has been placed and vibrated, and begins its initial set, the clips can be easily removed. Another commonly used method is a temporary bond utilizing an adhesive such as MBrick™ PSA adhesive. This method is simple and fast, requiring no hammering or clip materials. PSA works best in moderate temperatures (between 45 and 85 degrees F.), and washes off easily within the normal pressure wash process. For backer rod, use 1 ½” aluminum nails, and avoid pinning the backer rod directly against the liner’s joints.
Clips method Adhesive Method Backer rod method

Proprietary
7
II. Thin Brick Thin bricks are just that -- real, fired clay units that bear all of the quirky and yet durable and timeless characteristics of their masonry cousins, face brick. In fact, it is not uncommon to extract a thin brick from the front ½ inch of a face brick. However, most thin brick is extruded and baked independently of face brick. A. ASTM Standards
As the precast requirements for thin brick tolerances are stricter than what is acceptable in laid-up masonry, more care is often taken in the manufacturing process to produce a quality thin brick. ASTM International, a not-for-profit organization that provides a global forum for the development and publication of voluntary consensus standards for materials, products, systems, and services, has issued a standard specification for “Thin Brick Veneer Units Made from Clay or Shale.” This specification, identified as Designation: C1088, addresses such product dynamics as absorption, warpage, freeze/thaw, weight loss, durability, and size dimensions. (Contact IBS for a copy of specification C1088) Size dimensions are particularly important to the proper embedment of thin brick in any liner system. Certain thin brick manufacturers now warrant their products to tolerances of, in the case of modular, +0, -1/16th inch – a stricter requirement than the Type-TBX standard found in the ASTM specifications. See Section III.C “Designing with Brick” for brick specifications
B. Thin Brick Color
As with face brick, thin brick shades can vary substantially within any color selection. Because it is a baked, or kilned, product these variations of color are inevitable and have been part of the nature of brick for centuries. These variations in color may be found in individual cartons, pallets or even truckload shipments. When installing thin brick it is advisable to follow the practice of conventional masonry and draw product from different sources randomly. Thin brick sample boards offer a general example of available colors and finishes. Sample boards are available from most manufacturers. Most companies strive to show a range of shades within each color selection. It is extremely important that an additional and more substantial sampling of the actual brick to be reviewed for approval before installation begins. A mock up panel of at least sixteen square feet is also recommended. Often, these mock up panels must be produced prior to manufacture of the brick, so it must be understood that they are only a ‘close’ representation of the actual product. It is also important to use the same method of cleaning and sealing of the brick that will be used in production. Waxes, acids, and sealers may have a slight impact on color and shade. In many projects there are multiple truckloads of brick required. These may also vary in shade. It is advisable to make an attempt to schedule production of walls on an elevation by elevation basis. The objective is to minimize the visual effect of two adjacent walls with distinctly varying shades of brick in each. Beginning at the corner of a building and working around is one example.(for more information see also Blending brick)

Proprietary
8
Corner brick are manufactured separately from the flat brick. This increases the likelihood that they will vary in color. Caution must be taken in installing the corner brick. It is the installer’s responsibility to confirm the appropriateness of the corner brick provided. The brick manufacturer and its agents cannot make the decision as to whether or not the corner brick is acceptable. As a general design consideration solid corner units are best avoided whenever possible. Other options include mitered corners and epoxied flat brick corners. (More discussion of this subject may be found in the Corner Brick section.)
C. Storage of Thin Brick
Thin brick is generally cartoned, palletized, and wrapped in protective plastic for transportation. The brick itself is relatively impervious to the elements. However the protective coatings that are often applied to the face of the brick may weather or age. In the case of wax coatings, which are recommended for the VersaLiner® system, wax will begin to melt and begin to wick into the brick at temperatures around 130 degrees Fahrenheit. If this happens, its effectiveness as a bond-breaker and release agent is diminished. It is advisable to protect the brick from extreme heat until it is installed and cast. In addition, excessive dust and dirt may affect the brick’s ability to bond to the concrete properly. Care should be taken to keep the brick covered and protected from the sun prior to its installation. Keep brick relatively dry prior to installation. Although quality thin brick has low absorption qualities (7% by ASTM boiling test) it will become saturated if left exposed to water for a prolonged period. Part of the concrete to brick bond depends on concrete being absorbed into the brick surface. If the brick is saturated with water the concrete absorption is hindered. It is best to have relatively dry brick when casting
_______________________________________________________________________________ III. Engineering and Designing the Brick Panel A. Shop Drawings
Shop cards, sometimes called ‘mark sheets’ are crucial for most projects. Most jobs require a complete set, taking into account each panel. Brick should be considered as a primary modeling criteria when sizing panels and openings. This can speed installation immensely. Too often the focus turns to brick after panel sizes have been established. Last minute adjustments and changes can cause chaos on the job and certainly contribute to tension between the design team and installers. These drawings are traditionally the responsibility of the installing contractor or general contractor. In some cases they are prepared by the engineer or draftsman responsible for panel and reinforcement design. Sometimes the material supplier will produce them. In these cases it is the responsibility of both general contractor to review them thoroughly for accuracy and the architect that they reflect his intent. It is not uncommon while preparing these drawings to offer recommendations as to dimensional changes of panels and openings. These changes are usually minor -- less than 2”. These recommendations should be considered carefully as to their impact on other elements. They must also be acted upon quickly whenever they affect the structural element of a project.
For thin brick color options and details we recommend visiting the following web sites: www.summitville.com www.endicott.com www.metrothinbrick.com
Proprietary
9
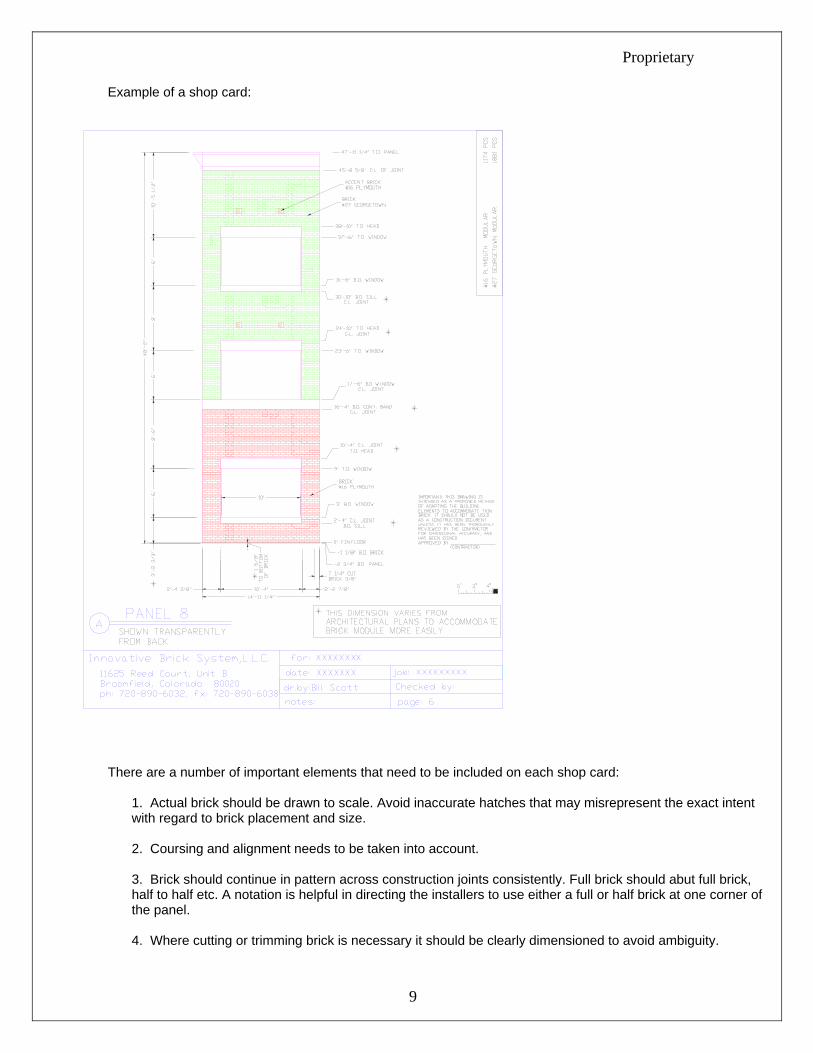
Example of a shop card:
There are a number of important elements that need to be included on each shop card:
1. Actual brick should be drawn to scale. Avoid inaccurate hatches that may misrepresent the exact intent with regard to brick placement and size. 2. Coursing and alignment needs to be taken into account. 3. Brick should continue in pattern across construction joints consistently. Full brick should abut full brick, half to half etc. A notation is helpful in directing the installers to use either a full or half brick at one corner of the panel. 4. Where cutting or trimming brick is necessary it should be clearly dimensioned to avoid ambiguity.

Proprietary
10
5. Coursing heights are one of the more critical elements of the drawings. Dimensions such as bottom of brick (B.O. BRICK), top of brick (T.O. BRICK), or header, sill and panel heights, can be established from datums set at the finished floor or bottom of panels. These are easy for the installer to interpret and help avoid cumulative errors in establishing coursing heights. It is also useful to include partitioned dimensions whenever possible. Although this redundancy may clutter the drawing somewhat, the advantage of being able to establish framing sizes for openings, bands, etc. much more easily makes them worth it. 6. In panels with more than a few courses it is important to give intermediate coursing height check points. These are helpful to the installer. Without them he is left to establish his own control lines. When course heights are critical they should be gauged at least every 4’ vertically. Horizontally; a check every 8’ will do. 7. A bill of materials on each card is often helpful but certainly not necessary. If one is used it should at least include the complete brick count.
B. Engineering Considerations
1. Pullout tests
Ongoing testing has shown that the embedded thin brick’s performance is far superior to hand-laid or post-adhered applications. Pullout tests typically generate tensile strengths in excess of the concrete alone. This is due to the contribution of the enhanced bond produced by the coved joints acting in shear. The various grooved and dovetail configurations of some brick ad to their adhesion as would be expected, but are not necessary in order to achieve satisfactory results. In tests, pullout resistance has been achieved beyond 2,500 lbs/ modular size brick.
2. Prestress or post tensioning, (deflection criteria)
VersaLiner® panels as long as 60’ have been prestressed with no effect to the brick. Nominal deflection will not cause brick to ‘pop’ out or crack. The brick will not crack without the concrete structure behind it failing. We do not recommend taking any extraordinary precautions in handling large panels other than those that would normally be employed.
3. Freeze thaw tests
Freeze thaw testing, though rare, is generally undertaken by the panel producer when required by the customer. Testing has commonly shown that the brick decomposes prior to any bond failure between brick and concrete. Clay brick is slightly permeable and varies in weathering durability from producer to producer. Embedded brick that has been exposed to harsh freeze thaw environments since as early 1970s can be observed today in its original state of integrity in many areas of the US.
4. Module openings, corners & quirk joints.
These drawings show various common details used in the VersaLiner® system. They are helpful as guidelines when working with the brick module. See examples, next page.

Proprietary
11
Sample Joint Details

Proprietary
12
C. Designing with Brick
1. For quick reference here are some rules of thumb regarding brick layout: • Modular brick dimensions: 7 5/8” x 2 ¼”
o Head (vertical) joint: .375 inch (3/8ths) width o Bed (horizontal) joint: .416666... inch height
• Jumbo (Utility) brick: 11 5/8” x 3 5/8”; The head and bed joints are 3/8” • Closure brick: 7 5/8” x 3 5/8”; The head and bed joints are 3/8”
2. Avoiding “sliver brick” cuts
Occasionally an area to brick is fixed by other factors and cannot be modified to fit a brick module. The joints may be compressed or expanded in order to attain small adjustments in the brick width. This can be attained by using the Adjust-A-Liner. Adjust-A-Liner is a liner with only the horizontal bed joints in it. The head joints are installed separately with the brick. This allows for a great deal of flexibility in adjusting for areas that require irregular spacing. While this method takes more time to install, it is an excellent solution for areas where the brick joints must be compressed in order to fit an area and avoid an unsightly ‘sliver-brick cut’. It is recommended that the adjustment area be kept to a minimum and that the coursing return to the standard module as soon as possible. Joints are commonly compressed to ¼” without being aesthetically objectionable. They can be expanded as far as ¾” if necessary.
In laying out vertical coursing dimensions it is advisable to establish 3 full courses (brick height and bed joint each) then use this 8” module as reference.
In various parts of North America the terms “Jumbo” and “Utility” are often mixed.
D. Recesses Recessed areas can add an element of depth and interest to the appearance of a wall. They can be combined with color changes or patterns for an even more dramatic set-off.
A cautionary note about dimensions: A common oversight in laying out wall and opening sizes is to fail to remove one of the head joints from the dimension string. E.g., a wall three modular brick wide is not 24”. It is, in fact, 23 5/8” wide (3 brick @7 5/8” and two joints at 3/8”). Conversely, door and window openings require one more joint width than brick. E.g., an opening 4 modular brick wide is not 32”. It is 32 3/8” wide, or 4 brick @ 7 5/8” and five joints @ 3/8”.

Proprietary
13
E. Brick Arches Arches are a common feature on brick structures. Special VersaLiners® are available that are customized for your particular arch design. The liners are similar in material to the standard VersaLiners®. They are used in much the same way. However, arched liners are more flexible and can be manipulated and customized. F. Bounding Rustications
Transitions between brick and smooth concrete should be considered carefully. There are many advantages to having a rustication or embossment in the concrete between the brick and smooth surfaces. They frame the brick area much like window jambs and sills do with windows. Brick ending directly into concrete looks awkward and untrimmed. A rustication leaves a sharp crisp line which looks much more professional. The bounding rustication also helps contain the brick prior to casting. Installing a rustication takes less time than securing the liner to the form and dealing with mortar joints and uneven brick. It is advisable to completely remove the end joint from the VersaLiner, abutting the brick directly to the rustication. Most of these rustications are small, 3/8” to 1” wide. They need to be at least ¼” deep, but are usually 3/8” to ½”. Typically they will have a 90 degree edge against the brick and a small amount of taper on the outside. Often a ½” radius quarter-round is used. This is one of the simplest types and is readily available at most lumber yards. IBS offers easy-to-use VersaLiner edge accessories. These simulate a smooth mortar joint and may be attached to the form.
MBrick™ Edge Strip 3/8” rustication

Proprietary
14
G. Integrating Multiple Patterns
The variety of liner patterns that are available are engineered to integrate with one another – offering the widest variety of design options in an easy-to-setup manner. As an example of common design options, soldier courses -- which nest into running bond patterns -- are available in both an aligned and offset pattern.
H. Irregularity of Brick
Brick is a clay-baked product that regularly varies in size during production. For this reason it is cost prohibitive to produce ‘perfect’ sized and shaped units. Though grinding will ensure that the brick are not oversized, undersized bricks have to be dealt with as they are. This undersizing will produce a condition called an ‘eyebrow’, which is a frame of concrete around the brick. As it is, the eyebrow look is not uncommon in hand laid masonry as well. The coved, or rounded, joints built into the VersaLiner blend the eyebrow into the joint more effectively than what flat, recessed can accomplish. If undersize brick are expected in a job some should be included in the mock up panel.

Proprietary
15
I. Cracked and Tilted Brick (see also: Mock-up Panel)
When possible, cracked bricks should be replaced prior to pouring, for obvious reasons. The cracked brick, however, poses no structural concern once it is embedded, and should be judged for aesthetics after the panels have been cleaned. In some cases removal and replacement may be warranted.
Tilted bricks pose a dilemma. They are rarely noticed unless it is a severe tilt (over 3/16”) or in a sensitive area (e.g., window head of the penthouse corner office). The ultimate orientation of the wall is a factor as well. An east-west oriented wall may cast long shadows at times, magnifying imperfections. These are inherent in masonry construction but often go unnoticed by people who are not in the industry. They tend to bring unrealistic expectations to bear on the first few jobs they are involved in. This is true for tilted brick as well as color and shade differences, and coursing irregularities.
____________________________________________________________________________ IV. Preparing Thin Brick for Installation A. Blending brick
Blending of two or more colors of brick is a common practice. Specifications of proportions of various color brick units are precise. However, although the ratio may be exact the blending must be random. Patterns produced by poor blending techniques are often noticeable in the finished product. Measures should be taken at every level of installation to insure as random a dispersion as possible. Pallets from as many truckloads as possible should be used at the same time. Boxes should be drawn from as many pallets as possible and given to the installers. The installers should draw from multiple boxes and fill the VersaLiners in a random, non-systematic fashion. In many cases it will be necessary to pre-blend the brick in a separate operation as well. The brick manufacturers offer this service, or it can be done on site.
B. Cutting brick
Almost every project requires brick that is cut in some fashion. Half brick are available from some manufacturers which can lighten the load for installers considerably. Brick are easily cut with common masonry saws that are readily available in most areas. For optimum efficiency the saw should be fairly powerful. At least ¾ horse power. This will cut multiple brick fairly rapidly. A water system is highly recommended. While most diamond blade these days are the ‘wet-dry’ type the dust problem can be severe without water. A closed system is fine (re-circulating water via the pump), however, a constant clean water supply will keep the brick cleaner and reduce wear on the pump parts. The brick usually chips slightly on the edge where the blade exits. If this presents a problem position the brick so that the blade cuts down into its face. This limits most of the chipping to the back edge. Blades with solid cutting edges of diamond impregnated steel work fine, but segmented blades have the added advantage of dispersing heat more rapidly and generally make more aggressive cuts.
A mock-up wall should include a small sampling of as many irregularities as possible so they can be discussed prior to panel production.

Proprietary
16
Occasionally it is necessary to shorten brick in order to fit properly into the liner. The VersaLiner does accommodate oversize and irregular shaped brick to a degree. When brick must be trimmed it is often less than 1/8”. In these cases the saw blade swill tend to slip off to one side during the cut. One solution to this is to cut multiple brick at once, positioning them alternately on both sides of the blade. This puts pressure on the blade from both sides and reduces the deflection. Six or eight brick can be cut at once in this manner. It may also be helpful to double-up or triple the blades, side by side on the arbor. This widens the cut and helps resist deflection. Check to be sure this is not a safety concern on your particular saw.
C. Brick protective coatings
Applying a concrete bond-breaker or retardant to the thin brick’s face prior to installation is an important step in creating a successful brick panel job. The retardant will act as a bond-breaker against concrete residue that leaks around the joints of the liner and settles underneath the face of the thin bricks. Without this coating cleaning the brick panel of the concrete residue may be difficult if not impossible. The following are the most common bond-breaker applications.
1. Wax
A thin layer of wax can be factory applied to the face of the brick to act as a bond breaker for concrete residue and leakage. This wax can be removed with hot water. Typically about 1/3 of the face of the brick will be covered with concrete leakage once the VersaLiner is removed. This concrete varies in thickness from 1/8” to a thin cloudy stain. The wax in conjunction with high pressure hot water will in almost all cases remove the latent concrete. Wax that has melted prior to concrete placement usually wicks into the brick. This reduces its effectiveness but will still aid greatly in the cleaning. As with any protective coating, the brick should be cleaned as soon as possible.
2. Brick Release
Brick Release is manufactured by a number of reputable companies. It is an economical method of reducing cleaning time. Although not generally as effective as wax its advantages are the ease of application low cost. In some cases when cleaning, a mild concrete remover solution may be necessary to completely eliminate all cloudiness from the face of the brick Brick release can be applied with sprayer, brush or roller. It is a thin liquid that dries rapidly. Adequate ventilation is necessary. The brick are generally laid out near the installers and coated, then placed directly into the VersaLiner.
3. Retarders
Concrete retarders work well in many situations. They can be applied as liquids or as thin pieces of impregnated paper. While they do a superb job of aiding in concrete removal there are some conditions to be wary of. If the reterder gets wet prior to concrete placement it may give unexpected results. It is also a time sensitive procedure. The concrete should be cleaned within a few days of casting. The effected areas of the concrete will continue to cure and will eventually attain full strength. Certain additives may effect the action of the retarder as well. It is absolutely imperative with this method that a test pour be done with similar conditions as will be used in production. Care should also be taken when cleaning the concrete residue that the joints are not eroded where they may have been affected by retarder seepage. This can be done by reducing the water pressure and using a brush to break down the concrete on the face of the brick without disrupting the joints. Retarders ,when appropriate, can be the most cost effective method of protecting the brick but, they must be used in a highly controlled environment.

Proprietary
17
D. Adhesive Coatings (For adhering thin brick units to vertical return form rails)
IBS’ Pressure Sensitive Adhesive (PSA) is a water base adhesive that softens with water and can be removed with high pressure hot water. It is designed to aid in placing brick in the vertical areas of forms and will adhere to the VersaLiner and brick. It is an air dry material that acts like a contact adhesive. PSA can be applied in one of the following two manners: (1) Apply adhesive to brick and liner pocket (use a brush; or a cardboard edge will work as well). Once applied to the brick, allow adhesive to dry until tacky (approx. 5 – 30 minutes, depending on air temperature; the cooler, the longer) and then place into the VersaLiner pocket. Concrete can be placed within one hour after applying the adhered corner bricks. (2) Apply adhesive to brick and liner pocket and immediately bond the two. Let dry for 18 – 20 hours. Care should be taken during this time to ensure that the brick is undisturbed until the adhesive is cured enough to hold it adequately. This method will provide a more complete bond. The PSA is ideal for vertical wall casting applications where there is adequate cycle time for the forms to be prepared. In vertical form applications form is first laid horizontally. Next the VersaLiner is attached to the form face with staples and the coated brick is then placed into it. Once cured, the form is raised into vertical position and the concrete is cast. Removal of the adhesive is relatively simple if it is attempted soon after the concrete is cured and immediately after the VersaLiners are removed. The Adhesive continues to strengthen as it dries, making it more difficult to remove over time. Cleaning rates of about 50 square feet per hour can be expected if the panel is being cleaned within 30 hours of casting. Yields decrease the more time elapses. A worse case of 25 square feet per hour may occur if the adhesive is left for a prolonged time to cure.
E. Corner brick
. Corner brick units may vary slightly from true 90 degrees due to unavoidable shrinkage and distortion during the manufacturing process. Each unit is factory checked for tolerances of plus or minus 2 degrees. While this is not a great amount of distortion, care should be exercised in installing these units so as to minimize the visual impact. Corners can be shimmed as they are placed into the forms if needed to balance the effects of angled units that are less than 90 degrees. Epoxied corner units are available from some manufacturers. Any thin brick can be epoxy adhered into a corner unit with relative ease. The major advantage is that a color match is assured. Onsite epoxying may prove to be less expensive to the installer as well. The flat brick are simply mite- cut and adhered together with a clear or paint-able adhesive that is mixed with the cutting dust from that brick. The resulting seam is hardly noticeable, especially beyond a few feet. Quirk and mitered joints are good choices whenever possible. They save valuable installation time and cost considerably less. (See IV.B.4: Module Openings, Corners and Quirk Joints)
Corner brick Corner brick are available for the thin brick system. These bricks are produced separately from the flat brick and have been known to vary in shade from the flat brick of the same color range. These differences are usually too minor to be concerned with however notice must be taken to insure the appropriateness of each batch of corner brick as it is being installed.

Proprietary
18
F. Undersized Brick Thin brick may me undersized by as much as 1/8” in length or width. This does not present a problem as to the liner’s ability to hold the brick for casting. Brick will not move or ‘float’ out of place if concrete is properly placed and vibrated.
____________________________________________________________________________ V. Installation The VersaLiner is designed to be easy to install and tear down. And its single use design enables a producer to utilize multiple beds concurrently for even the most complex brick jobs. The following are important installation procedures and tips that will help ensure a smooth and successful panel cast. A. Installation tools – specific to VersaLiner Liner and thin brick in a form Tool Purpose
Utility knife and/or scissors for trimming single sheets of VersaLiner™ Liner Band saw for trimming multiple sheets of VersaLiner™ Liner
(nested) Wet saw for cutting thin brick Tape measure for marking 8” story line/pole Pallet jack or fork lift for transporting thin brick pallets High Pressure water sprayer for cleaning panel (min. 180 deg.; 4,000 psi)
B. Trimming liners
VersaLiner liners are made of a thin, rigid, non-brittle plastic that can easily be trimmed on the jobsite using scissors or a utility knife. For cutting multiple liners at once a band saw is advantageous. A sharp 4-8 tpi blade works well. Care should be taken not to compress the liners before gang-cutting them as this may spread some joints and produce unexpected results.
C. Preparing the form
The form surface should be swept or blown clean. Debris or unevenness will transfer into the brick surface. It is a good idea to use a base coat of bond breaker or release agent under the area where the VersaLiner will lay. There is usually very little leakage of concrete through the VersaLiner joints. However, some leakage is likely to occur at the edges.
As always, a mock-up panel should be produced before casting begins in order to assess the appropriateness of the brick to be installed. The coved joint is the most natural looking type available. One of its benefits is in the way it blends smoothly into the face edge of brick. This blending can visually absorb the thin concrete band or ‘eyebrow’ that is usually present around the perimeter of embedded brick.

Proprietary
19
Reference marks which are sometimes called ‘story lines’ are a necessity for most jobs. These help keep the courses lined up so as to match adjacent panels and properly space brick in their designated areas. The VersaLiner, as with any brick template system, is prone to expand, contract, and in general display elastic tendencies when installed. Reference marks along the side rails and bottom of form give the installer a visual check point to lay to. Brick rarely move or shift as long as they are properly placed, bounded with a fixed element such as rustication or form-edge, and care is taken during the concrete placement.
Adhering liners to the form or bed is generally unnecessary. The bounding rustication and edges of the form will hold the liner from moving laterally, and proper concrete placement and vibration will keep the brick and liner from rising. If the brick area is not bounded by some rustication or form element then it may need to be secured to the form face. A two sided tape or adhesive will work well for this. Staples or nails may be used with care. They may have a tendency to cause the brick to fit irregularly into the pockets. Once the brick is properly assembled into the liner it is extremely unlikely to move. Care must be taken during this assembly to check coursing as the installation moves along. Liners may have to be compressed or expanded slightly in order to
stay on course, but when the brick is fully installed its weight will hold them in place.
All panel features such as openings, steps, and rustications should be in place prior to applying VersaLiner. It is strongly recommended that a rustication be attached along the perimeter of thin brick areas whenever possible. Rustications at the edges of brick aid in properly spacing it, and give a sharp clean transitional boundary. These rustications or ‘feature strips’, are generally not less than 3/8” wide and at least 1/4” deep, and are firmly secured to the form face. Various methods of attachment can be used: nailing, tape, hot-glue, and magnetism to name a few. It is good to also calk both the inside and outside of the rustication prior to installing liner and brick.
D. Applying VersaLiner™ Liner
Take care to note whether the first course of brick requires a full or half unit. It is desirable to match brick edges to those of the adjacent panels, both in alignment and spacing consistency. A spacer or ‘full’ brick should abut another like unit. The exception to this is at inside corner junctions, or overlaps, where it is irrelevant. Properly prepared shop drawings which are drawn transparently from the back of the panel, should display which brick to start with (e.g., half or full). Full mortar joints are usually removed from the perimeters of the brick areas. This is easily accommodated by cutting or sawing the VersaLiner prior to installation. A utility knife will easily cut through the liner. Trimming in this way is the most common and simplest. However, if time and planning allow, it is often more efficient to saw multiple liners at one time. A band saw is ideal for this operation. For any repetitive cutting this is a great time saver

Proprietary
20
Each piece of running bond VersaLiner has embossed plus and minus signs around its perimeter. The joints near the minus signs are slightly smaller in order to fit properly underneath the larger, plus joints. The difference, so minor it is hardly noticeable, enables the liners to adjoin without buckling. Avoid walking on the liners before the brick is placed in them. Once brick is installed it can be walked on, however caution and care is advised in doing so.
E. Installing thin brick
Measure and lay-out coursing lines. This is an important step. Where panels are adjacent with one another it is imperative that brick align across their construction joints. Layout lines often referred to as ‘story lines’ should be drawn or snapped periodically along the edges of the brick perimeter. The liners may be stretched or compressed manually to accommodate the varying conditions encountered at times. This flexibility must be considered when installing the brick. When installing, it is wise to mark vertical story lines at 2-feet increments (9 complete courses). Horizontally, 8 feet would be sufficient as there is less flexibility between liners in that direction. Check to establish whether a particular course, (top for instance) should begin with a full or half brick. While this is not critical, it adds to the professional appearance of the finished product if brick are properly matched as the pattern crosses construction joints, e.g., a full brick adjacent to another full brick -- and halves adjacent to halves. Well prepared shop drawings will have taken this into consideration and will note it in some fashion. Be sure to install brick face down in the form. While incorrectly installed brick is an uncommon mistake it certainly is an embarrassing one. Brick Blending: Brick should be drawn from the various stock piles on the job. If a blend is required, the precise ratio should be assembled near the pour bed. The various colors should be numerically staged by boxes. Next, they should be blended together as sets in order to maintain the ratio. At this point the brick should be randomly mixed into the sets. Do not line up the colors or group them. Deliver to the installers randomly blended brick. The installer should then fill the VersaLiner pockets randomly. They should avoid laying brick in some sequential order such as in a row from left to right etc. This is an important practice whether installing a blended or monochrome brick, due to the natural variation between the pallets and boxes of factory brick.
Walking on brick. Prior to concrete placement foot traffic over the installed brick is often necessary. This can be done without incurring a great deal of damage to the brick. Brick are prone to breaking, or become dislodged if overstressed. If some care is taken to walk ‘softly’, ‘set’ reinforcing bars, (not drop them), and not ‘whip’ strands while pulling them, then breakage may be kept to an acceptable minimum. An acceptable number would be somewhere in the vicinity of 1 per 1,000 brick. These brick should be immediately removed and replaced. It’s not always obvious to everyone on the job how critical this is, so a general pre-job

Proprietary
21
briefing should stress this important point to everyone who might need to work in the form. This should include the concrete placement team. While there is a very low likelihood of breaking brick once the concrete has been placed, there is the possibility that the suction of someone removing their foot from the sticky concrete will lift brick out of their pockets. Placers and vibrator operators should only step in the concrete when absolutely necessary and then only on top of the reinforcing. Pre-wetting brick. Pre-wetting thin brick prior to casting is unnecessary and not recommended.
F. Placing Concrete
1. Concrete Placement. When placing concrete, care should be taken not to create currents with the concrete that could disturb the brick. Placement should be done in such a way that there is little or no forceful impact of concrete onto the brick. Ideally the discharge hose or trough should be approx. 6 inches above the brick. It is also preferable to pour the concrete onto itself into a small ‘buffer’ pile and follow it across the brick to fill the bricked areas. This minimizes the chance of brick lifting, or tilting. Never use vibration to move the concrete over embedded brick, and be careful when screeding not to drag heavy piles of concrete. The weight of the concrete produces a sticky current over the back of the bricks that can easily dislodge them.
2. Self consolidating concrete. Self consolidating, sometimes called ‘self compacting’ or ‘self leveling’ concrete, is by far the easiest to place. It requires little or no vibration, and rarely disturbs the brick. One thing however that must be considered is that some of the same properties that give these cements their elastic properties also tend to inhibit them from attaining the ‘feather edges’ that otherwise surround each brick. To compensate for this, some mild vibration may be necessary. Producing a mock-up panel would be advisable as a way to find the method that will give you the best results. 3. Vibration. Consolidating the concrete through vibration rarely causes brick to become dislodged from the liner. Brick will not ‘float’ into the concrete under normal conditions. However, excessive vibrating that causes segregation may affect both the brick and joints. If interior vibration is used it is best to insert the vibrator into the concrete perpendicularly to the panel. Do not lay the vibrator horizontal and drag it into, or along the surface of, the concrete. When the vibrator is properly inserted the energy affects a broader area and does not induce strong concentrated currents that may tilt brick. Care should of course be taken not to touch the brick with the head of the vibrator. A tennis ball or tape on the head is handy for marking the maximum depth of insertion.
When exterior vibration is used it should be done sparingly. Never use the vibration to level the concrete, instead utilize hoes or screeds. High frequency vibration is preferred to high impact shock tables. Whatever method is used it is advisable to try it on the mock-up test panel first. 4. Re-bar chairs. Adhere to rule of thumb of minimum of 1.5 times the diameter of the re-bar from the surface to the steel (surface is back of brick). 5. Slump of concrete. It is not necessary to adjust the slump from the normal setting in order to accommodate the thin brick. The same batch design that gives satisfactory results to the smooth casting surfaces will work for the thin brick in VersaLiner.

Proprietary
22
F. Cleaning the Bricked Panel (See Also: Protective coatings, Sec. IV.C.)
The cleaning operation is often the most overlooked component of the embedded brick system, and can be the most frustrating. Inadequate cleaning machinery or protective coatings on the brick may drastically increase cleaning time. It is important to realize that there will be a substantial amount of water involved as
well.
Clean concrete residue from the face of the brick once concrete is properly cured. Protective elements on the face of the brick make cleaning much easier. Wax, brick release, or retarders, are some of the materials used to diminish the bond between the brick’s face and leakage.
It is important to consider the cleaning method most suited for each project. A properly chosen pressure washer is extremely important. The optimum capacity machine is about 4000psi. and around 6gpm at 180+ degrees in temperature. Smaller units will work, but they may slow down cleaning speeds. Among most hot water pressure washer manufacturers there is a substantial difference between a 3500psi machine and a 4000psi machine. Hoses, pumps, nozzles, and many other components are considerably more robust in the 4000psi units. It is also good to consider that the tip pressure diminishes over time so that a unit that originally put out 3500psi may after a few months be as low as 3000 or less. There is a noticeable threshold of increased performance with the 4000psi machines. Pressure tips are important to consider as well. A 15 degree tip is excellent for concentrating cleaning and breaking action on the concrete residue, but is still a wide enough angle to cover a reasonable area. ‘Bell’ or ‘articulating’ nozzles spread the cleaning action over a greater area and are useful when there is light residue on the face. These nozzles make it difficult to focus pressure on specific areas. Both types have their uses and it doesn’t hurt to have both on hand.
As a rule, the sooner a panel is cleaned after it is cured, the easier the cleaning process will be.
Prior to spray cleaning of the panel, it is recommended to a metal scraper to scrape off any significant pieces of concrete that may have leaked on to the underneath portions of the liner during casting.
Cleaning time can often exceed installation time in man hours per square foot required. For this reason it is wise to balance the expense of various types of brick protective coatings with the cost of cleaning. Each project and methodology is unique so it is advisable to consult a VersaLiner representative for input on your decision in this area.

Appendix A – MBrick™ VersaLiner® Data Sheets 11625 Reed Ct. Broomfield, CO 80020 1-800-413-4588 www.mbrick.com
October 2007
__________________________________________________________ The following data sheets are of our most common VersaLiner patterns. It is not intended to be a complete list. For additional patterns, please contact your VersaLiner representative.

This information is proprietary and can be used only by permission from:
Innovative Brick Systems, L.L.C. 11625 Reed Ct. Broomfield, Co. 80020
800-413-4588 www.mbrick.com
Data Sheet VersaLiner®
Type: Modular Running Bond PRODUCT SPECIFICATIONS:
PART #: 100 M-VLRB COURSING TYPE: RUNNING BOND SQUARE FOOT COVERAGE: 5.92 SF/ SHEET BRICK PER SHEET: 40 BRICK TYPE: MODULAR BRICK SIZE: 7 5/8” X 2 1/4” X 1/2” BRICK TOLERANCES: +0,-1/16” FULL SHEET SIZE: W32 3/8”, H27” INSTALLED SHEET SIZE: W32” X H26.67” MATERIAL: POLYSTYRENE (.020”) RECYCLING CODE: 6 COLOR: VARIES
SHIPPING INFO: CARTON SIZE: 7” X 28” X 33” SHEETS / CARTON: 50 SHIPPING WEIGHT: 37 LBS. /CARTON

This information is proprietary and can be used only by permission from:
Innovative Brick Systems, L.L.C. 11625 Reed Ct. Broomfield, Co. 80020
800-413-4588 www.mbrick.com
Data Sheet VersaLiner®
Type: Modular Stack Bond PRODUCT SPECIFICATIONS:
PART #: 120 M-VLSB COURSING TYPE: STACK BOND SQUARE FOOT COVERAGE: 1.55 SF/ SHEET LINEAR FOOT COVERAGE: 2 2/3 LF/ SHEET BRICK PER SHEET: 12 BRICK TYPE: MODULAR BRICK SIZE: 7 5/8” X 2 1/4” X 1/2” BRICK TOLERANCES: +0,-1/16” FULL SHEET SIZE: H32 3/8” X W8 3/8” INSTALLED SHEET SIZE: H32” X W8” MATERIAL: POLYSTYRENE (.020”) RECYCLING CODE: 6 COLOR: VARIES
SHIPPING INFO: CARTON SIZE: 7” X 28” X 33” SHEETS / CARTON: 150 SHIPPING WEIGHT: 37 LBS. /CARTON

This information is proprietary and can be used only by permission from:
Innovative Brick Systems, L.L.C. 11625 Reed Ct. Broomfield, Co. 80020
800-413-4588 www.mbrick.com
Data Sheet VersaLiner®
Type: Modular Soldier Bond PRODUCT SPECIFICATIONS:
PART #: 125 M-VLSRB COURSING TYPE: SOLDIER BOND SQUARE FOOT COVERAGE: 1.55 SF/ SHEET LINEAR FOOT COVERAGE: 2 2/3 LF/ SHEET BRICK PER SHEET: 12 BRICK TYPE: MODULAR BRICK SIZE: 7 5/8” X 2 1/4” BRICK TOLERANCES: +0,-1/16” FULL SHEET SIZE: W32 3/8” X H8 3/8” INSTALLED SHEET SIZE: W32” X H8” MATERIAL: POLYSTYRENE (.020”) RECYCLING CODE: 6 COLOR: VARIES
SHIPPING INFO: CARTON SIZE: 7” X 28” X 33” SHEETS / CARTON: 150 SHIPPING WEIGHT: 37 LBS. /CARTON

This information is proprietary and can be used only by permission from:
Innovative Brick Systems, L.L.C. 11625 Reed Ct. Broomfield, Co. 80020
800-413-4588 www.mbrick.com
Data Sheet VersaLiner®
Type: Modular Row Lock PRODUCT SPECIFICATIONS:
PART #: 150 M-VLRWL COURSING TYPE: ROW LOCK SQUARE FOOT COVERAGE: .9 SF/ SHEET LINEAR FOOT COVERAGE: 2 2/3 LF/ SHEET BRICK PER SHEET: 12 BRICK TYPE: MODULAR END PIECE BRICK SIZE: 3 5/8” X 2 1/4” X 1/2” BRICK TOLERANCES: +0,-1/16” FULL SHEET SIZE: W32 3/8” X H4 3/8” INSTALLED SHEET SIZE: W32” X H4” MATERIAL: POLYSTYRENE (.020”) RECYCLING CODE: 6 COLOR: VARIES
SHIPPING INFO: CARTON SIZE: 7” X 28” X 33” SHEETS / CARTON: 300 SHIPPING WEIGHT: 37 LBS. /CARTON
... ...

This information is proprietary and can be used only by permission from:
Innovative Brick Systems, L.L.C. 11625 Reed Ct. Broomfield, Co. 80020
800-413-4588 www.mbrick.com
Data Sheet VersaLiner®
Type: Modular Folding Corner PRODUCT SPECIFICATIONS:
PART #: 115 M-VLRB-V8 COURSING TYPE: RUNNING BOND RETURN SQUARE FOOT COVERAGE: 3 SF/ SHEET LINEAR FOOT COVERAGE: 2.22 LF/ SHEET BRICK PER SHEET: 10 CORNERS BRICK TYPE: MODULAR RETURN BRICK SIZE: 7 5/8” X 2 ¼”” X 3 5/8” BRICK TOLERANCES: +0,-1/16” FULL SHEET SIZE: W16”, H27” INSTALLED SHEET SIZE: W15 5/8” X H26.667” MATERIAL: POLYSTYRENE (.020”) RECYCLING CODE: 6 COLOR: VARIES
SHIPPING INFO: CARTON SIZE: 7” X 28” X 33” SHEETS / CARTON: 100 SHIPPING WEIGHT: 37 LBS. /CARTON

This information is proprietary and can be used only by permission from:
Innovative Brick Systems, L.L.C. 11625 Reed Ct. Broomfield, Co. 80020
800-413-4588 www.mbrick.com
Data Sheet VersaLiner®
Type: Closure Running Bond
PRODUCT SPECIFICATIONS:
PART #: 200 C-VLRB COURSING TYPE: RUNNING BOND SQUARE FOOT COVERAGE: 6 SF/ SHEET BRICK PER SHEET: 24 BRICK TYPE: CLOSURE BRICK SIZE: 7 5/8” X 3 5/8” X 1/2” BRICK TOLERANCES: +0,-1/16” FULL SHEET SIZE: W32 3/8”, H24 3/8” INSTALLED SHEET SIZE: W32” X H24” MATERIAL: POLYSTYRENE (.020”) RECYCLING CODE: 6 COLOR: VARIES
SHIPPING INFO: CARTON SIZE: 7” X 28” X 33” SHEETS / CARTON: 50 SHIPPING WEIGHT: 37 LBS. /CARTON

This information is proprietary and can be used only by permission from:
Innovative Brick Systems, L.L.C. 11625 Reed Ct. Broomfield, Co. 80020
800-413-4588 www.mbrick.com
Data Sheet VersaLiner®
Type: Closure Stack Bond PRODUCT SPECIFICATIONS:
PART #: 220 C-VLSB COURSING TYPE: STACK BOND SQUARE FOOT COVERAGE: 1.77 SF/ SHEET LINEAR FOOT COVERAGE: 2.667 LF/ SHEET BRICK PER SHEET: 8 BRICK TYPE: CLOSURE BRICK SIZE: 7 5/8” X 3 5/8” BRICK TOLERANCES: +0,-1/16” FULL SHEET SIZE: H32 3/8” X W8 3/8” INSTALLED SHEET SIZE: H32” X W8” MATERIAL: POLYSTYRENE (.020”) RECYCLING CODE: 6 COLOR: VARIES
SHIPPING INFO: CARTON SIZE: 7” X 28” X 33” SHEETS / CARTON: 150 SHIPPING WEIGHT: 37 LBS. /CARTON

This information is proprietary and can be used only by permission from:
Innovative Brick Systems, L.L.C. 11625 Reed Ct. Broomfield, Co. 80020
800-413-4588 www.mbrick.com
Data Sheet VersaLiner®
Type: Closure Soldier Course –Offset Joint PRODUCT SPECIFICATIONS:
PART #: 225 C-VLSRB COURSING TYPE: SOLDIER BOND SQUARE FOOT COVERAGE: 1.77 SF/ SHEET LINEAR FOOT COVERAGE: 2.667 LF/ SHEET BRICK PER SHEET: 8 BRICK TYPE: CLOSURE BRICK SIZE: 7 5/8” X 3 5/8” X 1/2” BRICK TOLERANCES: +0,-1/16” FULL SHEET SIZE: W32 3/8” X H8 3/8” INSTALLED SHEET SIZE: W32” X H8” MATERIAL: POLYSTYRENE (.020”) RECYCLING CODE: 6 COLOR: VARIES
SHIPPING INFO: CARTON SIZE: 7” X 28” X 33” SHEETS / CARTON: 150 SHIPPING WEIGHT: 37 LBS. /CARTON

This information is proprietary and can be used only by permission from:
Innovative Brick Systems, L.L.C. 11625 Reed Ct. Broomfield, Co. 80020
800-413-4588 www.mbrick.com
Data Sheet VersaLiner BrickTrays™ June 2004
Type: Closure Folding Corner PRODUCT SPECIFICATIONS:
PART #: 215 C-VLRB-V8 COURSING TYPE: RUNNING BOND RETURN SQUARE FOOT COVERAGE: 2.66 SF/ SHEET LINEAR FOOT COVERAGE: 2 LF/ SHEET BRICK PER SHEET: 6 CORNERS BRICK TYPE: CLOSURE BRICK SIZE: 7 5/8” X 3 5/8” X 3 5/8” BRICK TOLERANCES: +0,-1/16” FULL SHEET SIZE: W16”, H24 3/8” INSTALLED SHEET SIZE: W15 5/8” X H24” MATERIAL: POLYSTYRENE (.020”) RECYCLING CODE: 6 COLOR: VARIES
SHIPPING INFO: CARTON SIZE: 7” X 28” X 33” SHEETS / CARTON: 100 SHIPPING WEIGHT: 37 LBS. /CARTON

This information is proprietary and can be used only by permission from:
Innovative Brick Systems, L.L.C. 11625 Reed Ct. Broomfield, Co. 80020
800-413-4588 www.mbrick.com
Data Sheet VersaLiner®
Type: Jumbo 1/2 Bond PRODUCT SPECIFICATIONS:
PART #: 400 J-VLRB1/2 COURSING TYPE: RUNNING BOND SQUARE FOOT COVERAGE: 6 SF/ SHEET BRICK PER SHEET: 18 BRICK TYPE: JUMBO BRICK SIZE: 11 5/8” X 3 5/8” X 9/16” BRICK TOLERANCES: +0,-1/16” FULL SHEET SIZE: W: 36 3/8”, H:24 3/8” INSTALLED SHEET SIZE: W36” X H24” MATERIAL: POLYSTYRENE (.020”) RECYCLING CODE: 6 COLOR: VARIES
SHIPPING INFO: CARTON SIZE: 7” X 28” X 33” SHEETS / CARTON: 50 SHIPPING WEIGHT: 37 LBS. /CARTON

This information is proprietary and can be used only by permission from:
Innovative Brick Systems, L.L.C. 11625 Reed Ct. Broomfield, Co. 80020
800-413-4588 www.mbrick.com
Data Sheet VersaLiner®
Type: Jumbo 1/3 Bond PRODUCT SPECIFICATIONS:
PART #: 402 J-VLRB1/3 COURSING TYPE: 1/3 BOND SQUARE FOOT COVERAGE: 6 SF/ SHEET BRICK PER SHEET: 18 BRICK TYPE: JUMBO BRICK SIZE: 11 5/8” X 3 5/8” X 9/16” BRICK TOLERANCES: +0,-1/16” FULL SHEET SIZE: W36 3/8”, H24 3/8” INSTALLED SHEET SIZE: W36” X H24” MATERIAL: POLYSTYRENE (.020”) RECYCLING CODE: 6 COLOR: VARIES
SHIPPING INFO: CARTON SIZE: 7” X 28” X 33” SHEETS / CARTON: 50 SHIPPING WEIGHT: 37 LBS. /CARTON

This information is proprietary and can be used only by permission from:
Innovative Brick Systems, L.L.C. 11625 Reed Ct. Broomfield, Co. 80020
800-413-4588 www.mbrick.com
Data Sheet VersaLiner®
Type: Jumbo Stack Bond PRODUCT SPECIFICATIONS:
PART #: 420 J-VLSB COURSING TYPE: STACK BOND SQUARE FOOT COVERAGE: 2 1/3 SF/ SHEET LINEAR FOOT COVERAGE: 2 1/3 LF/ SHEET BRICK PER SHEET: 7 BRICK TYPE: JUMBO BRICK SIZE: 11 5/8” X 3 5/8” X 9/16” BRICK TOLERANCES: +0,-1/16” FULL SHEET SIZE: W12 3/8”, H28 3/8” INSTALLED SHEET SIZE: W12” X H28” MATERIAL: POLYSTYRENE (.020”) RECYCLING CODE: 6 COLOR: VARIES
SHIPPING INFO: CARTON SIZE: 7” X 28” X 33” SHEETS / CARTON: 100 SHIPPING WEIGHT: 37 LBS. /CARTON

Proprietary
1
Appendix B – Easy Installation Guide
Innovative Brick Systems, LLC 11625 Reed Court Broomfield, CO 80020 1-800-413-4588 www.mbrick.com
VersaLiner™ Easy Installation Guide Rev: Oct ‘07
For sample panels and other non-complex casts. (For a more detailed installation guide contact Innovative Brick Systems) For our Sample Panel Kits: (If applicable) Each liner sheet has been pre-cut for your convenience. Please see enclosed panel drawing for details.
Note: It is important that you review your panel and form specifications for dimensions and bordering requirements prior to installing the VersaLiner embedded thin brick system. 1. Measure and Cut: Review the panel dimensions for the portion to be bricked. Trim any VersaLiner
sheets as required. a. For end sheets that abut to the form’s edge (including a reveal, rustication, continuous joint, or
other type of border) remove the mortar joint in the VersaLiner that meets the edge of the border. You may use a band saw, scissors, or utility knife with a straight edge. (See figure 1)
b. For dimensions that require cutting substantial portions of the VersaLiner, always make the cut on the inside of the joint-line. (See figure 2)
Figure 1
Figure 2

Proprietary
2
VersaLiner™ Easy Installation Guide
Innovative Brick Systems, LLC
2. Setting up the edge strip: One popular
method for creating an attractive continuous joint where the brick meets exposed concrete is by using the Edge Strip Perimeter Joint, supplied by IBS (see Figure 3). Merely trim this piece to the correct length and adhere to the form using double sided tape, spray adhesive or caulking. Once it is set in place, apply a narrow bead of silicone along the outside edge.
Figure 3
3. Sheet laying: Lay your first VersaLiner sheet on the form. If you are abutting the liner to an edge strip
or rustication, make sure you have trimmed off the joint-row along that sheet’s edge. Take a 2nd VersaLiner sheet and overlap the outer edge joint-row marked with a plus sign (+) on to the outer joint-row of the first sheet marked with a minus sign (-). Press down on the overlapped joints to “snap” the liners together. (See Figures 4 and 5) a. This “plus over minus” method is the same for joining sheets horizontally and vertically.
Figure 4
Figure 5
4. Setting Corners: Folding corner liners are
our most popular method for returns. These liners integrate into the running bond liners as described above -- then fold to form a precisely aligned 90º return. (See Figure 6)
Figure 6

Proprietary
3
VersaLiner™ Easy Installation Guide
Innovative Brick Systems, LLC
5. Tips for Easy Installation and Brick Nesting: a. For best results with large panels lay out and join no more than four VersaLiner sheets prior
to nesting the thin brick units into the liners. At that time, begin nesting the bricks (face down). Stop prior to nesting bricks in the final course of the liners that is adjacent to the next liners to be laid out. Once the next liners are laid out and joined, finish nesting the previous liners’ final course and begin nesting bricks onto the new sheets. Repeat these steps as you go. (See figure 5)
b. As you nest the bricks, watch to maintain an exact 8 inch length per every 3 courses (keep
track by using chalk lines or story poles). The sheets may want to spread vertically a small amount during the nesting process and can be gently pushed back throughout that process. DO NOT WAIT UNTIL YOU NEST ALL OF THE BRICKS BEFORE ATTEMPTING TO ADJUST THE LINER.
c. For nesting the final 35/8ths bricks (and the tall standing corner pieces) into the return
liner, follow these steps:
CastBond Adhesive Method: 1. Make sure the return liner pockets are clean and dry.
2. Coat the 35/8ths brick faces and their corresponding liner pockets with the CastBond pressure sensitive adhesive (provided by IBS). Spread thin and evenly over the majority of each surface using a brush or roller (a straight-edged piece of cardboard works well). 3. Let both surfaces dry to tacky before nesting (30 minutes is typical but can be as long as 60 minutes in colder air temperatures). 4. Nest bricks firmly into pockets.
Clips Method: 1/8th” wire works well for clipping the suspended and tall standing units. Cut the strand into approximate lengths as shown in Figure 8. Bend to a “squared U” shape such that they will pinch the brick to the form. Clip over the upper edges of both the brick and the form.
Figure 7
Figure 8
Once you check each of the bricks for a flat fit into the liner you are ready for the reinforcement and the concrete. Pg. 3 of 3