for smart review system - kodak configuring mac computer preferences before configuring your mac...
TRANSCRIPT

Matchprint VirtualTechnology
Version 6.6
for Smart Review System
Quick Start GuideEnglish
2013-07-23


Copyright© Kodak, 2013. All rights reserved.
Some documentation is distributed in Portable Document Format (PDF). You may reproduce such documentation fromthe PDF file for internal use. Copies produced from the PDF file must be reproduced in whole.
TrademarksKodak, Creo, Connect, Darwin, eCentral, Evo, InSite, Matchprint, NexPress, Powerpack, PressProof, and Prinergy aretrademarks of Kodak.
Acrobat, Adobe, Distiller, Illustrator, Photoshop, and PostScript are trademarks of Adobe Systems Incorporated. Apple,AppleShare, AppleTalk, iMac, ImageWriter, LaserWriter, Mac OS, Power Macintosh, and TrueType are registeredtrademarks of Apple Inc. Macintosh is a trademark of Apple Inc., registered in the U.S.A. and other countries.Hexachrome, PANTONE, PANTONE Goe, PANTONE Hexachrome, and PANTONE MATCHING SYSTEM are theproperty of Pantone, Inc. PEARL, PEARLdry, PEARLgold, PEARLhdp, and PEARLsetter are registered trademarks ofPresstek, Inc. XEROX is a trademark of XEROX CORPORATION.
FCC complianceAny Kodak equipment referred to in this document complies with the requirements in part 15 of the FCC Rules for aClass A digital device. Operation of the Kodak equipment in a residential area may cause unacceptable interference toradio and TV reception, requiring the operator to take whatever steps are necessary to correct the interference.
Equipment recycling
In the European Union, this symbol indicates that when the last user wishes to discard this product, it mustbe sent to appropriate facilities for recovery and recycling.
Contact your local Kodak representative or refer to http://www.kodak.com/go/recycle/ for additionalinformation on the collection and recovery programs available for this product.
REACHPlease consult http://www.kodak.com/go/REACH for information about the presence of substances included on thecandidate list according to article 59(1) of Regulation (EC) No. 1907/2006 (REACH).
http://graphics.kodak.com/
Revised 2013-07-23


Contents
1 Introduction..........................................................................................................................................1
Software and hardware requirements......................................................................................................................................1Related documents........................................................................................................................................................................1
2 Configuring Mac computer preferences......................................................................................3
Configuring the Energy Saver feature......................................................................................................................................3Configuring screen savers..........................................................................................................................................................4Disabling fast user switching.....................................................................................................................................................4Enabling opening of safe files.....................................................................................................................................................4
3 Installing and setting up...................................................................................................................5
About installing and setting up..................................................................................................................................................5Installing Matchprint Virtual......................................................................................................................................................5Setting monitor luminance level, light source, and measuring device............................................................................6Lowering the luminance level.....................................................................................................................................................7Calibrating the color monitors...................................................................................................................................................8Monitor calibration reminder.....................................................................................................................................................8
4 About monitor proofing using Matchprint Virtual....................................................................9
5 Troubleshooting.................................................................................................................................11

vi Matchprint Virtual Technology Quick Start Guide

1 Introduction
The Kodak Matchprint Virtual technology allows users who run Apple Mac OS X systems with an approved, calibrated color monitor toperform color-accurate virtual proofing of files in the Kodak SmartReview proofing client. After the monitor is calibrated against a colortarget, a file can be checked in Smart Review for color accuracy andthen approved, rejected, or marked for corrections.
This document explains how to set up your system for colormanagement of files in Smart Review.
Perform the following actions to set up your system:
1. Configure the Mac computer preferences.
2. Install the Matchprint Virtual monitor calibration software on yourMac computer and connect the measuring device.
3. Set monitor luminance levels.
4. Calibrate the color monitor.
Software and hardware requirementsYou must use a Mac system and an approved, calibrated monitor toensure color-accurate viewing.
For the latest hardware and software requirements, see the MatchprintVirtual Monitor Selection Guide, and for supported configurations forMac computers that will be used to access the Kodak InSite software,see the InSite Client Configuration technical bulletin.
Related documentsThis guide refers to other Matchprint Virtual documents, including theMatchprint Virtual Monitor Selection Guide, Matchprint Virtual BestViewing Practices Guide, and InSite Client Configuration technical bulletin.You can download these documents from the Support tab on theMatchprint Virtual Web site at http://graphics.kodak.com/US/en/Product/printing_workflow/Online_Collaboration_and_Proofing/Matchprint_Virtual/default.htm .

2 Chapter 1—Introduction

2 Configuring Maccomputer preferences
Before configuring your Mac preferences, ensure that you are logged into the Mac computer with the user account that will normally be usedfor proofing color.
Note: If the lock at the bottom of the Energy Saver window is closed, click the lockand then enter the administrator user name and password to unlock the account.
Configuring the Energy Saver featureThe Energy Saver feature puts your computer and monitor into sleepmode whenever they are inactive for a defined period of time. However,if the monitor is in sleep mode for more than five minutes, you mustwait 30 minutes for the monitor to warm up before you can calibrate it.
To avoid this delay, disable sleep mode. You can use the Energy Saverfeature to automatically start the computer each day, at least thirtyminutes before you expect to calibrate the monitor.
1. Choose Apple > System Preferences.
2. Click Energy Saver.
3. Under Computer Sleep, set the sliding scale to Never.
4. Under Display Sleep, set the sliding scale to Never.
5. Clear the Put the hard disk(s) to sleep if possible check box.
6. Click Schedule.
7. Select the Start up or wake check box, select the day or days andtype the time of day when you want the computer to automaticallystart.
Note: Ensure that the time you select is at least 30 minutes before the timewhen the monitor will be used for proofing color.
8. Click OK.
9. Click the lock to prevent additional changes to the settings.
10. Close the Energy Saver window.

Configuring screen saversYou must prevent your screen saver from launching during calibrationand interfering with measurement.
1. Choose Apple > System Preferences.
2. Click Desktop & Screen Saver.
3. Click the Screen Saver tab.
4. Select a screen saver.
5. Under Start screen saver, set the sliding scale to 30 minutes orlonger.
6. Close the Desktop & Screen Saver window.
Disabling fast user switching1. Choose Apple > System Preferences.
2. Click Accounts.
3. Click the account whose settings you want to change.
4. Click Login Options.
5. Clear the Enable fast user switching check box.
6. Click the lock to prevent additional changes to the settings.
7. Close the Accounts window.
Enabling opening of safe filesThe Mac operating system must recognize files as safe fordownloading in order for you to open files in Smart Review.
1. Start the Apple Safari Web browser.
2. Choose Safari > Preferences.
3. On the General tab, select Open “safe” files after downloading.
4 Chapter 2—Configuring Mac computer preferences

3 Installing and setting up
About installing and setting upTo view and approve color-accurate pages, you must install theMatchprint Virtual software on your qualified Mac computer that usesan approved monitor.
The Matchprint Virtual software calibrates and profiles the monitor andcompares the results against an “ideal” profile for that monitor type.
For information about approved monitors, see the Matchprint VirtualMonitor Selection Guide.
Installing Matchprint VirtualInstall the latest version of the Matchprint Virtual calibration softwareon each Mac computer that will be used for virtual proofing in SmartReview.
Requirements: You must obtain the Administrator password beforestarting the installation.
Note: You can upgrade only from Matchprint Virtual version 6.x to version 6.6.
Important: If your Matchprint Virtual version is prior to 6.5, you must record allcurrent configuration settings, including monitor luminance settings and thecustom monitor white point (if used). If you upgrade from version 6.5, the settingsare automatically ported to the 6.6 installation. However, it is still recommended torecord your settings.
1. Go to the Matchprint Virtual Web site at http://graphics.kodak.com/US/en/Product/printing_workflow/Online_Collaboration_and_Proofing/Matchprint_Virtual/default.htm .
2. On the Support tab, click View MATCHPRINT Virtual Softwaredownloads.
3. Download the Matchprint Virtual 6.6 software to a temporarylocation on your computer. In addition, download any supportingMatchprint Virtual documentation for the latest installationinstructions.
Tip: You can also download a quick reference card that shows how to useMatchprint Virtual.
4. Double-click the installer icon, and follow the instructions.

5. Restart the computer.
6. Connect the measuring device to a USB port on the computer or themonitor.
Note: With HP monitors connect the iOne measuring device only to the Macand not to the monitor.
Note: Do not use a self-powered USB hub.
Important: Do not use the USB port located on the keyboard. This port doesnot have sufficient power for the measuring device.
Setting monitor luminance level, light source, andmeasuring device
1. At the Dock, click the Matchprint Virtual folder icon .
2. Select MV Preferences and click the Settings tab.
3. Double-click your monitor type.
a. Select the monitor.
b. Select Fixed Luminance Method, and set the luminance level to200 or 10% below the maximum luminance value (If you haveupgraded the software, confirm or set the luminance level to thelevel in your previous setting.)
c. Click Save.
4. Double-click General Settings.
a. In the Measuring Device list, select either the MVP Colorimeter(Default) or the Eye-One measuring device.
b. Click Save.
5. Double-click Light Source Selection.
a. In the Light Source Selection list, select either GTI - GraphicTechnology, Inc (default) or JN - Just Normlicht.
b. Click Save.A message appears, notifying you that the change willuncalibrate your system.
c. In the Message window, click Yes to continue.
6. If you applied the white point adjustment option, check the valuesin MV Preferences.
Note: For information about setting the white point adjustment, see theAdjusting the White Point of Your Monitor document.
6 Chapter 3—Installing and setting up

7. Calibrate the monitor.When calibration is complete, the following message appears:
Calibrate System on this monitor passedColor Verification (dE ICE 1994):Luminance:
8. If you have a viewing booth, you must set the viewing boothluminance to match the monitor luminance.Failure to do so may result in a poor color match between hardcopy and virtual proofs.
Note: Replace the monitor when it can no longer achieve a luminance level of120.
For information about setting the viewing booth luminance, see theMatchprint Virtual Best Viewing Practices Guide.
Once you have confirmed that the monitor and the Kodak referenceproof match, you can use your own reference proof and profiles forcolor qualification.
Lowering the luminance levelIf your monitor can no longer calibrate because it is unable to achievethe set luminance, you can lower the luminance level.
1. At the Dock, click the Matchprint Virtual folder icon .
2. Select MV Preferences.
3. On the Settings tab, perform the following actions:
a. Double-click the monitor type.
b. Select the monitor.
c. Select Maximum Luminance Method.
4. Calibrate the monitor, and record the luminance value from thecalibration results.
5. On the Settings tab, perform the following actions:
a. Double-click the monitor type.
b. Select the monitor.
c. Select Fixed Luminance Method.
d. Enter a luminance value that is 90% of the maximum luminanceobtained when you calibrated the monitor.Kodak recommends using 90% of the maximum luminance toavoid dealing with varying (or decaying) maximum luminance.For more information, see the Matchprint Virtual Best ViewingPractices Guide.
6. Recalibrate the monitor.
Lowering the luminance level 7

7. If you have a viewing booth, you must set the viewing boothluminance to match the monitor luminance.Failure to do so may result in a poor color match between hardcopy and virtual proofs.
Note: Replace the monitor when it can no longer achieve a luminance level of120.
For information about setting the viewing booth luminance, see theMatchprint Virtual Best Viewing Practices Guide.
Calibrating the color monitorsYou must calibrate your monitors every 24 hours to ensure accuratecolor viewing. Monitors must be turned on for at least 30 minutesbefore they can be calibrated.
1. At the Dock, click the Matchprint Virtual folder icon .
2. Select MV Calibrate System.
During calibration, Matchprint Virtual checks the monitor’s color andluminance and compares it to a reference profile for that monitor type.If the monitor cannot achieve the specified luminance or achieveexcellent color match, the calibration fails.
Monitor calibration reminderThere are several reasons why a calibration reminder might appear.
In the calibration reminder, you can select Dismiss for 24 hours orCalibrate.
8 Chapter 3—Installing and setting up

4 About monitor proofingusing Matchprint Virtual
With the Matchprint Virtual technology, you can perform color-accurate monitor proofing on files in Smart Review.
You can review files in Smart Review for color accuracy if:
● Your workflow provider has enabled the Matchprint Virtualtechnology.
● Your workflow provider has set the files to be color-managed.
● You view the files using an approved Mac computer and Mac OS,including a qualified color monitor.
● You have calibrated your monitor using the Matchprint Virtualsoftware, and the calibration has not expired.
File formats supported by Matchprint Virtual
Matchprint Virtual accepts the following file types:
● Composite EPS, PS, and PDF, including files that contain spot colors,transparency, and source profiles assigned to CMYK or RGB imageor graphic components
● DCS, including files that use spot colors
● JPEG and TIFF, including files that contain source profiles assignedto CMYK or RGB image or graphic components (Other color spacesare not supported.)
Note: JPEG and TIFF files that use spot colors are not supported.

10 Chapter 4—About monitor proofing using Matchprint Virtual
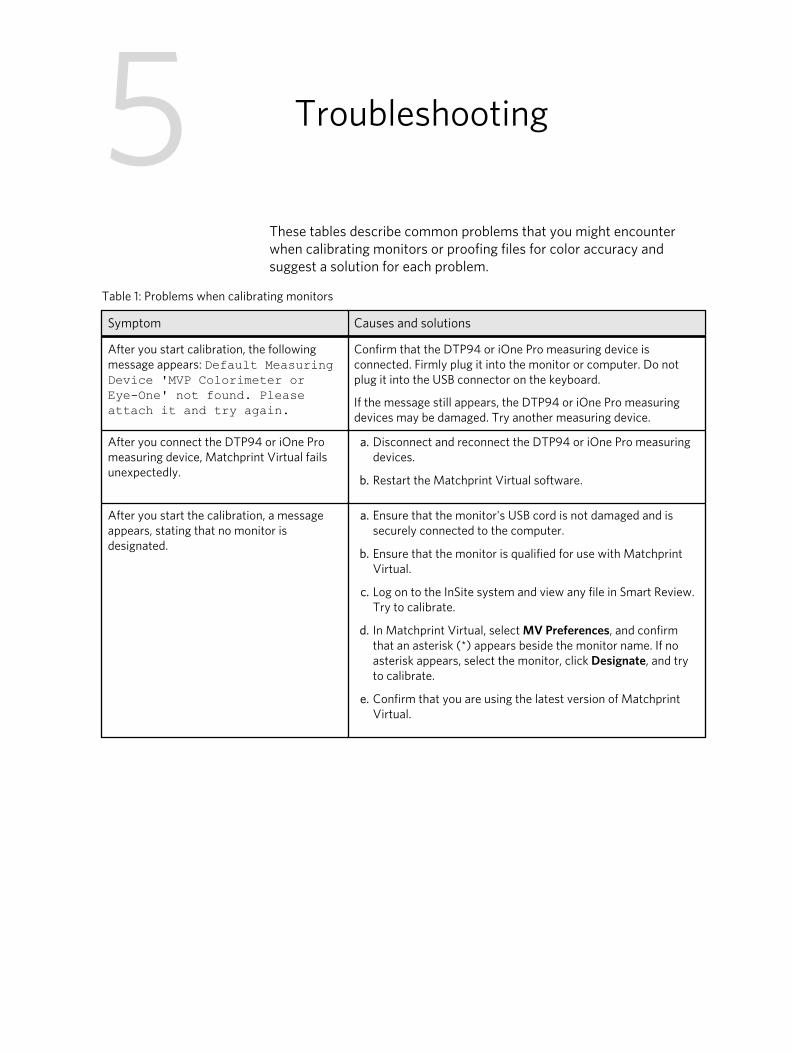
5 Troubleshooting
These tables describe common problems that you might encounterwhen calibrating monitors or proofing files for color accuracy andsuggest a solution for each problem.
Table 1: Problems when calibrating monitors
Symptom Causes and solutions
After you start calibration, the followingmessage appears: Default MeasuringDevice 'MVP Colorimeter orEye-One' not found. Pleaseattach it and try again.
Confirm that the DTP94 or iOne Pro measuring device isconnected. Firmly plug it into the monitor or computer. Do notplug it into the USB connector on the keyboard.
If the message still appears, the DTP94 or iOne Pro measuringdevices may be damaged. Try another measuring device.
After you connect the DTP94 or iOne Promeasuring device, Matchprint Virtual failsunexpectedly.
a. Disconnect and reconnect the DTP94 or iOne Pro measuringdevices.
b. Restart the Matchprint Virtual software.
After you start the calibration, a messageappears, stating that no monitor isdesignated.
a. Ensure that the monitor's USB cord is not damaged and issecurely connected to the computer.
b. Ensure that the monitor is qualified for use with MatchprintVirtual.
c. Log on to the InSite system and view any file in Smart Review.Try to calibrate.
d. In Matchprint Virtual, select MV Preferences, and confirmthat an asterisk (*) appears beside the monitor name. If noasterisk appears, select the monitor, click Designate, and tryto calibrate.
e. Confirm that you are using the latest version of MatchprintVirtual.

Symptom Causes and solutions
You start the calibration, but the monitordoes not calibrate successfully.
a. Ensure that the monitor's image data cable and USB controlcable are securely connected.
b. Ensure that the DTP94 or iOne Pro measuring device cable issecurely connected.
c. Check the fixed luminance setting. The monitor may beunable to achieve the set value. If so, lower the setting andrecalibrate.
Note: Replace the monitor when it can no longer achieve aluminance level of 160.
d. Ensure that you "zero" the DTP94 or iOne Pro measuringdevice on a flat, opaque surface. Any light leakage will causeproblems. Many plastic surfaces are not suitable because theyare translucent or painted on the back side.
e. Check the DTP94 or iOne Pro measuring device for damage. Ifit is damaged, try a different measuring device.
Table 2: Problems when performing monitor proofing
Symptom Causes and solutions
The monitor appears to have poor coloruniformity.
Poor color uniformity indicates an imperfection in the monitor.
For information about the color uniformity of your monitor, seethe Matchprint Virtual Monitor Selection Guide.
The monitor appears to have a ghosted orburned-in image.
A burned-in image indicates an imperfection in the monitor. If themonitor is under warranty, replace it.
Note: Ensure that you use a screen saver when the monitor is notin use.
12 Chapter 5—Troubleshooting

Symptom Causes and solutions
Color alignment is poor between the virtualproof and the hard copy proof.
a. Ensure that the correct light source is selected in MatchprintVirtual > Preferences. See the Matchprint Virtual Best ViewingPractices Guide.
b. Ensure that you are viewing the image at actual size (1:1).
c. Ensure that the monitor is calibrated. In Smart Review, checkthe lower-right corner of the window to ensure that themonitor's status is Calibrated.
d. Ensure that the correct color target is assigned to the file.Contact your printer for assistance.
e. Ensure that the correct luminance values are set on themonitor and that your viewing booth is adjusted correctly.See the Matchprint Virtual Best Viewing Practices Guide.
f. Use the Matchprint Virtual reference proof to verify that thevirtual system is working correctly. Contact your printer toobtain the reference proof.If the reference proof matches, your hard copy reference maybe incorrect.
If your virtual proof still does not match your hard copy proof,you may need to adjust the white point because your monitor isaging. Contact your printer for assistance.
A message appears, stating that you mustrecalibrate.
The status of monitor calibration is set to uncalibrated, andyou must recalibrate the monitor under any of the followingconditions:
● You last calibrated more than 24 hours ago.
● The temperature sensor in the colorimeter has detectedvariations in room temperature greater than +/- 5°C.
● The contrast or brightness of the monitor was manuallyadjusted.
Tip: For Apple monitors, disable the brightness buttons andset the contrast to Normal.
● Energy saver settings are incorrect.
● You are not logged on as the user who last calibrated themonitor.
Tip: Disable fast user switching.
13

14 Chapter 5—Troubleshooting

Eastman Kodak Company343 State StreetRochester, NY 14650 U.S.A.© Kodak, 2013. All Rights Reserved.TM: Kodak
To learn more about solutions from Kodak, visit http://graphics.kodak.com.
Subject to technical change without notice.