for learning to airbrush! airbrushing? - iwata medea -...
TRANSCRIPT

IN THIS ISSUE:• Why Teach Airbrushing?• What an Airbrush Can Do• Simple Steps to Get Started Airbrushing • Basic Handling and Care of the Airbrush• Lesson Plan One - Freehand Shapes• Workshop Program for Schools
Why Teach Airbrushing?Never has an artistic tool so captivated a student audience – frankly any audience for that matter. What an airbrush can do is eye opening! Seeing this pen-like instrument in action atomizing paint with a very soft spray really can capture the imagination. The airbrush can inspire your students and open them up to many creative options that they never would have thought possible before seeing how an airbrush works.
Winter 2013 | Issue No. 1 | www.AIRBRUSHtalk.com
The Iwata Eclipse CS Gravity-Feed Airbrush
“Kite Flying” by Robert Paschal40"x50" Acrylic On Canvas
Robert Paschal holds a Master of Fine Arts Degree in painting and has taught airbrush technique, acrylic painting techniques, watercolor and pastel workshops throughout the U.S. He has taught thousands of people the fundamentals of airbrush technique in his classes that are geared to artists at all levels.
Besides all that, the airbrush is really fun to use! And when a tool is fun & exciting, in addition to taking some concentration to operate, you get a very engaged student.
Students will see progress in their abilities in just a single session and this builds their confidence and increases their desire to try new techniques and learn different airbrush strokes. Kids are amazed at what they can create and it shows up in their enthusiasm for learning to airbrush!
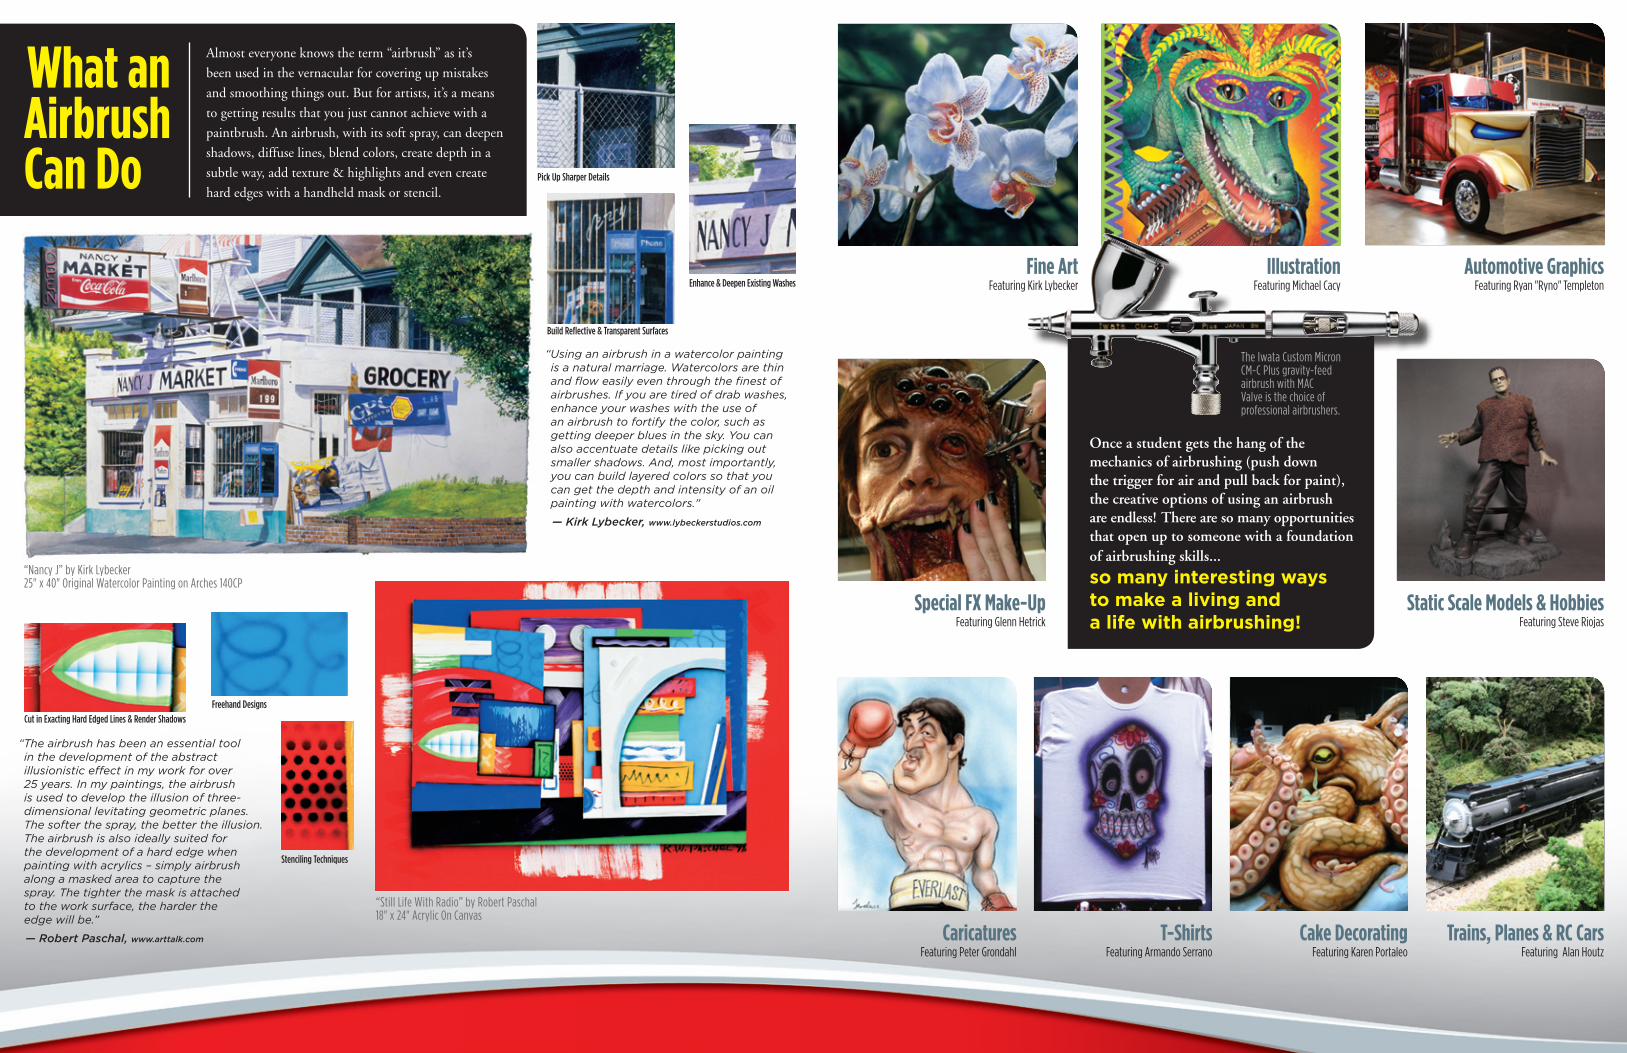
Almost everyone knows the term “airbrush” as it’s
been used in the vernacular for covering up mistakes
and smoothing things out. But for artists, it’s a means
to getting results that you just cannot achieve with a
paintbrush. An airbrush, with its soft spray, can deepen
shadows, diffuse lines, blend colors, create depth in a
subtle way, add texture & highlights and even create
hard edges with a handheld mask or stencil.
Enhance & Deepen Existing Washes
Build Reflective & Transparent Surfaces
Pick Up Sharper Details
“Nancy J” by Kirk Lybecker25" x 40" Original Watercolor Painting on Arches 140CP
“Still Life With Radio” by Robert Paschal18" x 24" Acrylic On Canvas
Cut in Exacting Hard Edged Lines & Render Shadows
Freehand Designs
Stenciling Techniques
What an Airbrush Can Do
Automotive Graphics Featuring Ryan "Ryno" Templeton
T-ShirtsFeaturing Armando Serrano
CaricaturesFeaturing Peter Grondahl
Special FX Make-Up Featuring Glenn Hetrick
Trains, Planes & RC CarsFeaturing Alan Houtz
Static Scale Models & Hobbies Featuring Steve Riojas
Cake DecoratingFeaturing Karen Portaleo
“Using an airbrush in a watercolor painting is a natural marriage. Watercolors are thin and flow easily even through the finest of airbrushes. If you are tired of drab washes, enhance your washes with the use of an airbrush to fortify the color, such as getting deeper blues in the sky. You can also accentuate details like picking out smaller shadows. And, most importantly, you can build layered colors so that you can get the depth and intensity of an oil painting with watercolors."
— Kirk Lybecker, www.lybeckerstudios.com
“The airbrush has been an essential tool in the development of the abstract illusionistic effect in my work for over 25 years. In my paintings, the airbrush is used to develop the illusion of three- dimensional levitating geometric planes. The softer the spray, the better the illusion. The airbrush is also ideally suited for the development of a hard edge when painting with acrylics – simply airbrush along a masked area to capture the spray. The tighter the mask is attached to the work surface, the harder the edge will be.”
— Robert Paschal, www.arttalk.com
Illustration Featuring Michael Cacy
Once a student gets the hang of the mechanics of airbrushing (push down the trigger for air and pull back for paint), the creative options of using an airbrush are endless! There are so many opportunities that open up to someone with a foundation of airbrushing skills...
so many interesting ways to make a living and a life with airbrushing!
Fine Art Featuring Kirk Lybecker
The Iwata Custom Micron CM-C Plus gravity-feed airbrush with MAC Valve is the choice of professional airbrushers.

Simple Steps toGet Started Airbrushing
1. Choose an AirbrushThere are 2 main feed styles of airbrush: gravity-feed and bottom-feed (or siphon-feed). The gravity-feed models have their paint receptacles on top of the airbrush while the bottom-feed models have a bottle attached to the underside of the airbrush. The gravity-feed model is great for details and the bottom-feed model is great for larger areas and thicker paints. Both of the models shown are "dual-action" (pressing down on the trigger delivers air and drawing the trigger back releases paint). A dual-action airbrush is best for achieving the greatest control. A great choice for beginners is a gravity feed, dual-action airbrush. Iwata offers several models that are great for getting started: the NEO CN, Eclipse CS and Revolution CR.
For teaching airbrush technique, it is highly recommended that you work with a gravity-feed airbrush. Why? There are fewer parts to lose or misplace; it is easy to clean; it’s very durable; and because it is gravity fed, it can be used left- or right-handed.
2. Choose an Air SourceIwata offers compact, quiet and reliable compressors for every airbrushing need. The Iwata Studio Series are great because they are oil-less and piston driven, so there is no pulsation to affect your spray pattern. The models below work for general use with both gravity- and bottom-feed models.
3. Learn the Basic Airbrush Techniques and Paint Like a ProIwata-Medea can supply you with instructional videos and books along with any airbrush accessory you may want. Visit them at www.iwata-medea.com for information or turn the page and get started with the airbrush freehand exercise.
OR GET STARTED WITH A BEGINNER AIRBRUSH SETIwata makes it easy to start airbrushing with sets that include everything you need to start airbrushing now!
Airbrush Needle
All internal mix airbrushes have needles that
run through the body to control the flow
of paint. These are honed to an extremely
sharp elongated tip that, if bent, will result
in an undesirable spray pattern. The harder
the material of which the needle is made,
the harder it is to bend the tip. (The most
durable needles are made of stainless steel.)
Damage can occur to the needle during the
cleaning process when it is removed from
the airbrush. Upon replacement, it can
accidentally press against metal parts,
thereby "hooking" the very fine tip. This may
be remedied by rolling it between two flat
metal objects, gently twisting the needle to
straighten it. Be aware that if straightened too
many times, the result will be tip breakage
and replacement will be necessary.
Nozzle/Head Assembly
If this part, which controls the atomization
of the spray, becomes dented the performance
of the airbrush will be compromised. This
can occur if dropped onto a hard surface
(and this will bend the needle, too). If
dented, it must be replaced, and the parts
are readily available at art supply stores.
When the nozzle is replaced, it must be seated
properly and tightly. Years ago airbrush
nozzles were sealed with beeswax, and then
they were sealed with metal "O" rings and
after that with PTFE "O" rings. Today there
are self-seating nozzles and head assemblies.
No matter which type is being replaced, it
must be seated tightly so there is no air leak,
otherwise the airbrush will have a pulsating
spray. Be careful not to over-tighten a nozzle
or the threads might break off inside the
body of the airbrush. If this happens, you
can call our repair department for guidance:
503-253-7308 (PST).
Threads/Cross-Threads
Anywhere that objects are threaded together
on the airbrush you must be cautious of
cross threading, e.g., where the air hose
attaches to the airbrush and where the head
assembly screws into the body of the
airbrush. Otherwise, an air leak may occur.
Cleaning
For optimum performance, an airbrush
must be kept clean; and there are two times
when cleaning is required: (1) between color
changes and (2) at the end of a work period.
The airbrush requires cleaning only in those
areas that come in contact with paint: the
paint reservoir or color cup or jar, the tip of
the airbrush and the needle. To clean your
airbrush, flush it out with the appropriate
cleaner for your medium (such as airbrush
cleaner) or use water (good for water-based
mediums) and spray airbrush until it
sprays clear.
Hold the airbrush like a pen and with your pointer finger push the trigger down for air and back for paint.
Basic Handling and Care of the AirbrushTo most artists, airbrush maintenance basically means keeping the airbrush clean so that paint flow is uninterrupted. But another aspect of maintaining the airbrush deals with proper handling and care to prevent damaging the components of this highly sensitive tool. This can occur when the airbrush is dropped, mishandled, or sometimes lent to a friend. Let's look at the parts of the airbrush and how they apply to its proper performance.
It doesn't take much to get started airbrushing. Whether you're setting up a classroom* or just want an airbrush for yourself, getting started has never been easier!
Iwata Revolution BCR Bottom-Feed Airbrush
* See back cover to learn more about FREE airbrush equipment for your classroom with Iwata's Workshop Equipment Program for Schools
Iwata Eclipse CS Gravity-Feed Airbrush
Iwata Studio Series Smart JetIwata Studio Series Ninja Jet
Iwata Studio Series Power Jet Pro
Iwata Beginner Airbrush Set with NEO for Iwata with Gravity-Feed CN Airbrush or Bottom-Feed BCN Airbrush
Iwata Deluxe Airbrush Set with Gravity-Feed Eclipse CS Airbrush and Smart Jet Compressor
Iwata Watercolor Airbrush Set with Gravity-Feed HP-C Plus Airbrush and Smart Jet Compressor

2
L E S S O N P L A N O N E
Freehand Exercise
Using a blank sheet, we will learn how to use the airbrush through some simple freehand exercises. Pour some paint into the color cup of the airbrush but never more than 1/4 full. You can always add more paint, but too much will tend to splash or spill. We will assume that you are working with a dual action, internal mix, gravity-feed airbrush like the Iwata Revolution CR or Eclipse CS. Once you have learned with a dual-action airbrush, you can use any type of airbrush. When you press straight down on the trigger, only air should come out. After you have the trigger pressed down, pull back on the trigger and paint is sprayed. The further back you pull, the more paint comes out. It is always down for air; and then, while holding the trigger down, pull back for paint. TRIGGERING IS ALWAYS DOWN AND THEN BACK, not back and then down.
The control of airbrush spray is based on how much paint is coming from the airbrush and how close you are to the work surface. If you are very close to the surface and have a small amount of paint coming from a moving airbrush it will result in a really fine line. Conversely, if you are close to the work surface and have a lot of paint being sprayed, the result will be a “mistake” (image A — too much paint, too close to the work).
S p r a y i n g P a i n t w i t h t h e A i r b r u s h
image A
EXERCISE ONE
S M A L L D O T SWe will now begin to spray small dots. Hold the airbrush very close to the work surface and while keeping the trigger depressed, pull the trigger back ever so slightly and make a dot with a quick “blast” of paint, turning the airbrush quickly on and off. Keep doing this by keeping your air “on”. Practice making small, consistent dots.
If you see little “spiders” appearing in the dots as in image A, you are spraying too much paint and are dispersing the wet paint from the center of the dot with air.
EXERCISE THREE
G R A D A T I O NNow that you are comfortable spraying dots and lines, let’s move on to a soft gradation. This soft spray is used to give airbrush work a three-dimensional effect. It’s achieved by spraying back and forth across the page in overlapping passes, holding the airbrush about 6” from the surface, so the spray mists onto the surface. This mist of spray, when done properly, has no dots or lines in it and can be described as resembling fog.
EXERCISE TWO
L I N E SNext, let’s practice spraying a line. This is done by starting the same as the dot, then continuing to move your hand across the page while the trigger is depressed and pulled back. One of the problems that can happen here is the “barbell effect.” The barbell, referring to more paint at both the beginning and end of the line, is caused by hesitation with your hand while spraying.
To spray a line without a barbell, begin to move your hand before you start spraying and continue to move it when you are done. This will eliminate the buildup of paint at the beginning and end of a pass.
Practice spraying thin lines. Anyone can spray a wide line! Remember, the closer you are to the surface of the work in conjunction with a small amount of paint being sprayed, the finer the line.
1
3
EXERCISE FOUR
H A R D E D G E L I N E SThe dot, line and gradation are three basic types of spray that can be achieved with an airbrush. You will notice that in each instance the appearance is soft and somewhat out of focus. To achieve a hard edge when developing a shape, you must spray through a template, stencil, mask or frisket (image 1). By spraying mist through a template, you can develop an instant three-dimensional shape. When spraying through the circular opening, the template captures the over-spray (the spray that drifts away from the area that you are painting). When you remove the template, you see a hard edge (image 2). It is this mist of spray that gives you the three-dimensional look, but you must always use caution: Make sure that surrounding areas are covered so that overspray does not appear where you don’t want it (image 4).
As you can see in image 3, airbrush paint is being sprayed along the edge of a template that has other openings. In image 4, when the template is removed there is a ghost image of other shapes because paint drifted and the shapes not being used were not covered.
4image 1
image 2
image 3
image 4
From the book, “Basic Airbrush Techniques: A Complete Course” by Robert Paschal
Learn more fundamentals of airbrushing from Robert Paschal in a foolproof, easy and straightforward method. The Basic Airbrush Techniques Exercise Kit has the necessary materials needed to complete the exercises in Robert Paschal’s book, Basic Airbrush Techniques (book sold separately).

Iwata's Workshop Equipment Program for Schools Iwata-Medea, Inc. is committed to extending the opportunity for students to learn about an amazingly creative tool not normally available to them in school art programs: the airbrush. This is our way of helping enhance the skill set of students, getting them engaged and creating the awareness of airbrushing. Iwata is the premier brand widely known for quality, performance and durability, which makes it the best choice for student use.
• Do you have the classroom space for airbrushing? It only takes a desk or a corner.
• Do you have the time to feature airbrushing in your curriculum or allow students to incorporate it into their projects?
If so, then ask for an information packet with details and application for the 2013-2014 school year.
ANEST Iwata-Medea, Inc.1336 N. Mason St., Portland, OR 97217 tel 503-253-7308 • fax [email protected] • iwata-medea.com
In the next issue of Airbrushtalk for Art Educators:• The History of the Airbrush• More Student Exercises for Gaining Airbrush Control • Working Artist Interviews• And Much More!
This publication is made possible by:
We want to outfit your classroom with Iwata! Call or email for details and an application.
[email protected] • 503-253-7308
Iwata-Medea Wants to Give Students a Chance to Airbrush by Choosing Classrooms to be Outfitted with Iwata!