fool everyone with machine appliqu that looks hand-done on
TRANSCRIPT

Project: Winter Berries
Pattern may be downloaded for personal use only. No electronic or printed reproduction permitted without the prior written consent of Meredith Corporation. ©Meredith Corporation 2015. All rights reserved. 1
American Patchwork & Quilting | Quilt Sampler | Quilts and More
Fool everyone with machine appliqué that looks hand-done on this simple but festive piece.
DESIGNER: KARLA MENAUGH OF SUNFLOWER PATTERN CO-OPERATIVE

Project: Winter Berries
Pattern may be downloaded for personal use only. No electronic or printed reproduction permitted without the prior written consent of Meredith Corporation. ©Meredith Corporation 2015. All rights reserved. 2
American Patchwork & Quilting | Quilt Sampler | Quilts and More
Materials• 13⁄4 yards solid black (appliqué
foundations, borders, binding)• 18×22" piece (fat quarter) solid
green (stem, branch, and vine appliqués)
• 1⁄8 yard solid gold (vase appliqués)
• 1⁄2 yard solid red (middle border, berry appliqués)
• 15⁄8 yards backing fabric• 57×30" batting• Freezer paper• Glue stick
Finished quilt: 501⁄2×231⁄2"Finished Block: 12×9"
Quantities are for 44⁄45"-wide, 100% cotton fabrics. All measurements include a 1⁄4" seam allowance. Sew with right sides together unless otherwise stated.
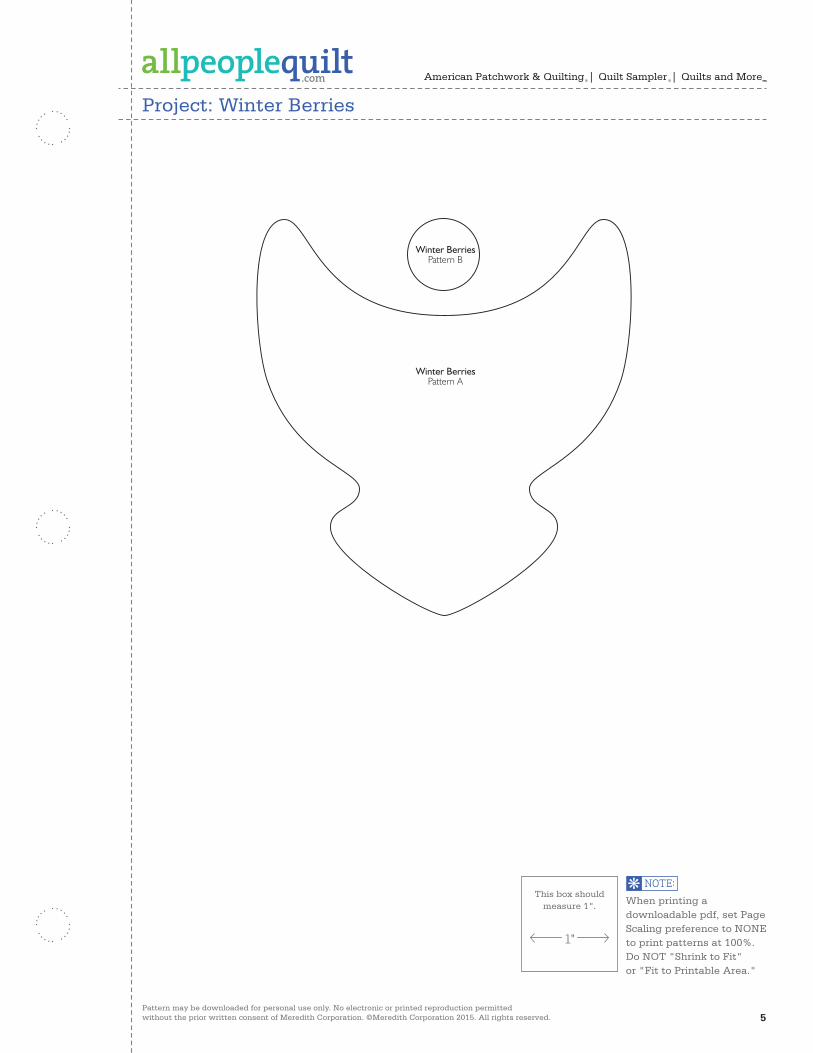
Cut Fabrics To make the best use of your fabrics, cut pieces in the following order. Patterns are on page 5. To use freezer paper for cutting appliqué shapes, complete the following steps.
1. Lay freezer paper, shiny side down, over patterns. Trace pattern A three times and Pattern B 45 times. Cut out freezer-paper shapes on drawn lines.
2. Using a hot, dry iron, press freezer-paper shapes, shiny sides down, onto the designated fabrics’ wrong side; let cool. Cut out each shape, adding a 3⁄16" seam allowance to all edges. Cut seam allowances slightly narrower at points on A vases, and clip inner curves as necessary.
3. On each appliqué shape, run glue stick along seam allowance wrong side, then finger-press seam allowances to back of freezer paper; let dry.
From solid black, cut:• 4—41⁄2×42" strips for outer
border• 4—21⁄2×42" binding strips• 2—2×361⁄2" inner border strips• 3—14×11" rectangles• 2—2×121⁄2" inner border strips• 36—23⁄8" squares, cutting
each in half diagonally for 72 triangles total
From solid green, cut:• 1—15" square, cutting it into
enough 3⁄4"-wide bias strips to total 250" for vine, branch, and stem appliqués
From solid gold, cut:• 3 of Pattern AFrom solid red, cut:• 36—23⁄8" squares, cutting
each in half diagonally for 72 triangles total
• 45 of Pattern B
Prepare Stem Appliqués1. Using diagonal seams, piece
solid green 3⁄4"-wide bias strips together to make a 250"-long bias strip.
2. Turn long edges of solid green 250"-long strip under 1⁄4" and press. (To speed the process, Karla used a 1⁄4" bias tape maker to prepare bias strips.)
3. Cut solid green 250"-long strip to make:
• 2—52"-long vine appliqués• 9—43⁄4"-long branch appliqués• 6—33⁄4"-long branch appliqués• 6—3"-long branch appliqués• 8—13⁄4"-long stem appliqués• 16—11⁄4"-long stem appliqués
Appliqué Blocks1. Referring to Quilt Assembly
Diagram, lay out a solid gold A vase, three 43⁄4"-long branches, two 33⁄4"-long branches, two 3"-long branches, and seven solid red B berries on each solid black 14×11" rectangle; baste. (Karla recommends using basting glue.)
2. Using a narrow zigzag stitch and threads that match the appliqué pieces, machine-appliqué pieces to foundation to make three appliquéd blocks total.
3. Soak blocks in cold water to remove glue. Machine-dry with dry towel to help absorb excess water. Trim excess foundation fabric from behind appliqués, leaving 1⁄4" seam allowances. Peel away freezer paper.
4. Press each block from wrong side. With appliquéd designs centered, trim blocks to 121⁄2×91⁄2" including seam allowances.
Assemble Quilt Center and Add Inner and Middle Borders1. Sew together appliquéd blocks
in a horizontal row to make quilt center (Quilt Assembly Diagram). Press seams in one direction. The quilt center should be 361⁄2×91⁄2" including seam allowances.
2. Sew long inner border strips to top and bottom edges of quilt center. Add short inner border strips to remaining edges. Press all seams toward border.
3. Join a solid black triangle and a solid red triangle to make a triangle-square (Triangle-Square Diagram). Press

Project: Winter Berries
Pattern may be downloaded for personal use only. No electronic or printed reproduction permitted without the prior written consent of Meredith Corporation. ©Meredith Corporation 2015. All rights reserved. 3
American Patchwork & Quilting | Quilt Sampler | Quilts and More
seam toward black triangle. The triangle-square should be 2" square including seam allowances. Repeat to make 72 triangle-squares total.
4. Referring to Quilt Assembly Diagram, sew together 26 triangle-squares to make a long middle border strip. Press seams in one direction. Repeat to make a second long middle border strip.
5. Join 10 triangle-squares to make a short middle border strip (Quilt Assembly Diagram). Press seams in one direction. Repeat to make a second short middle border strip.
6. Sew long middle border strips to top and bottom edges of quilt center. Add short middle border strips to remaining edges. Press all seams toward inner border. The quilt center now should be 421⁄2×151⁄2" including seam allowances.
Appliqué and Add Outer Border 1. Cut and piece solid black
41⁄2×42" strips to make:• 2—41⁄2×501⁄2" outer border
strips• 2—41⁄2×151⁄2" outer border
strips
2. Referring to Quilt Assembly Diagram, lay out a 52"-long vine, 12 solid red B berries, four 13⁄4"-long stems, and eight 11⁄4"-long stems on each solid black 41⁄2×501⁄2" outer border strip; baste. Machine-appliqué all pieces to each strip. Referring to Appliqué Blocks, Step 3, soak, dry, and trim foundations behind appliqués. Remove freezer paper and discard.
3. Sew short outer border strips to short edges of quilt center. Add appliquéd long outer border strips to remaining edges to complete quilt top. Press all seams toward outer border.
Finish Quilt 1. Layer quilt top, batting, and
backing; baste.
2. Quilt as desired. Pam Mayfield machine-quilted around each appliqué, spacing her quilting lines 1⁄4" apart. (This is called echo quilting.) In the inner border, she stitched a leaf-and-vine motif.
3. Use solid black binding strips to bind quilt.

Project: Winter Berries
Pattern may be downloaded for personal use only. No electronic or printed reproduction permitted without the prior written consent of Meredith Corporation. ©Meredith Corporation 2015. All rights reserved. 4
American Patchwork & Quilting | Quilt Sampler | Quilts and More
TRIANGLE-SQUAREDIAGRAM
Quilts and More Winter 2006Winter Berries (Abiding Joy Tablerunner)Triangle-square DiagramC. Neubauer 8-23-06100223139
A
B
B
41⁄2×501⁄2"
2×361⁄2"
121⁄2×91⁄2"
2×12
1 ⁄2"
41 ⁄2×
151 ⁄2
"
QUILT ASSEMBLY DIAGRAM
Quilts and More Winter 2006Winter Berries (Abiding Joy Tablerunner)Quilt Assembly DiagramC. Neubauer 8-23-06100234536
Project: Winter Berries
Pattern may be downloaded for personal use only. No electronic or printed reproduction permitted without the prior written consent of Meredith Corporation. ©Meredith Corporation 2015. All rights reserved. 5
American Patchwork & Quilting | Quilt Sampler | Quilts and More
When printing a downloadable pdf, set Page Scaling preference to NONE to print patterns at 100%. Do NOT "Shrink to Fit" or "Fit to Printable Area."
This box should measure 1".
Winter BerriesPattern A
Winter BerriesPattern B
Quilts and More Winter 2006Winter Berries (Abiding Joy Tablerunner)Full-Size PatternsC. Neubauer 8-23-06100234535

6Pattern may be downloaded for personal use only. No electronic or printed reproduction permitted without the prior written consent of Meredith Corporation. ©Meredith Corporation 2014. All rights reserved.
Make TemplatesA template is a pattern made from extra-sturdy material so you can trace around it many times without wearing away the edges. Acrylic templates for many common shapes are available at quilt shops. Or you can make your own by duplicating printed patterns on template plastic. To make permanent templates, purchase easy-to-cut template plastic, available at quilt shops and crafts supply stores. Lay the plastic over a printed pattern. Trace the pattern onto the plastic using a ruler and a permanent marker to ensure straight lines, accurate corners, and permanency. For hand piecing and appliqué, make templates the exact size finished pieces will be (without seam allowances). For piecing, this means tracing the patterns’ dashed lines. For machine piecing, make templates that include seam allowances by tracing the patterns’ solid and dashed lines onto the template plastic. For easy reference, mark each template with its letter designation, grain line (if noted on the pattern), and block name. Cut out the traced shapes on their outside lines. Verify each template’s shape and size by placing it over its printed pattern. Templates must be accurate; errors, however small, will compound many times as you assemble a quilt. To check templates’ accuracy, make a test block before cutting the fabric pieces for an entire quilt.
Use TemplatesTo mark on fabric, use a pencil, white dressmaker’s pencil, chalk, or a special fabric marker that makes a thin, accurate line. Do not use a ballpoint or ink pen; it may bleed if washed. Test all marking tools on a fabric scrap before using them. To make pieces for hand piecing or appliqué, place a template facedown on the wrong side of the fabric and trace. Then reposition the template at least 1⁄2" away from the previous tracing (Diagram 1), trace again, and repeat. The lines you trace on the fabric are sewing lines. Mark cutting lines 1⁄4" away from the sewing lines, or estimate the distance by eye when cutting out the pieces with scissors. For hand piecing, add a 1⁄4" seam allowance; for hand appliqué, add a 3⁄16" seam allowance. Because templates used to make pieces for machine piecing have seam allowances included, you can use common tracing lines for efficient cutting. Place a template facedown on the wrong side of the fabric and trace. Then reposition the template without a space between it and the previous tracing (Diagram 2); trace again and repeat. Using a rotary cutter and ruler, cut pieces out, cutting precisely on the drawn lines.
A
DIAGRAM 1
B
DIAGRAM 2
Make and Use Templates
American Patchwork & Quilting | Quilt Sampler | Quilts and More