food dehydrator vkp1006 - victorio
TRANSCRIPT
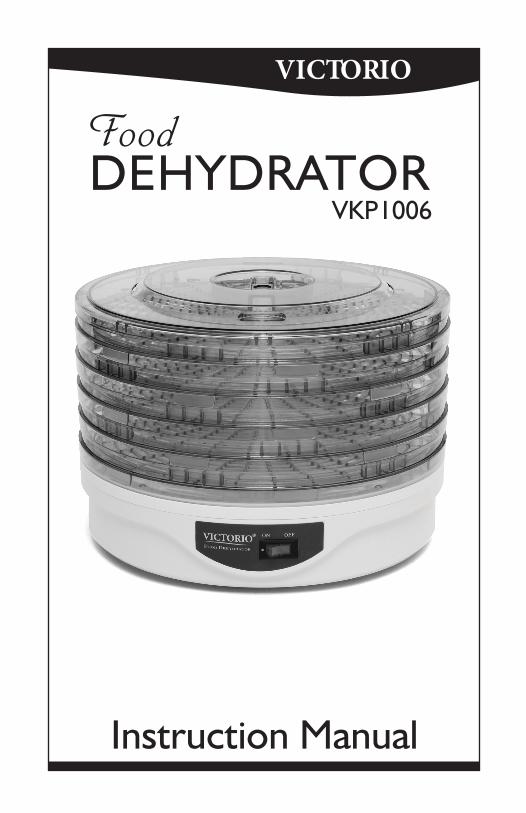
VICTORIO
FoodDEHYDRATOR
Instruction Manual
VKP1006
Table of Contents
Parts Diagram ...........................................................................................1Important Safety Instructions ................................................................2Operating Precautions .............................................................................2Product Overview ....................................................................................3Care Instructions ......................................................................................3Product Specifications .............................................................................4Assembly & Use Instructions ................................................................4Drying Fruits ............................................................................................5Drying Vegetables ....................................................................................7Drying Herbs ............................................................................................9Drying Meats ............................................................................................9Making Fruit Leathers .......................................................................... 11Helpful Tips ........................................................................................... 12Troubleshooting Guide ........................................................................ 13Recipes .................................................................................................... 14Notes ....................................................................................................... 17Warranty/Contact Info ........................................................ Back Cover
*For the most up-to-date manual, or for more information regarding this product, visit our website: www.Victorio.info.
Copyright © 2013 Victorio Kitchen Products. All Rights Reserved.
1
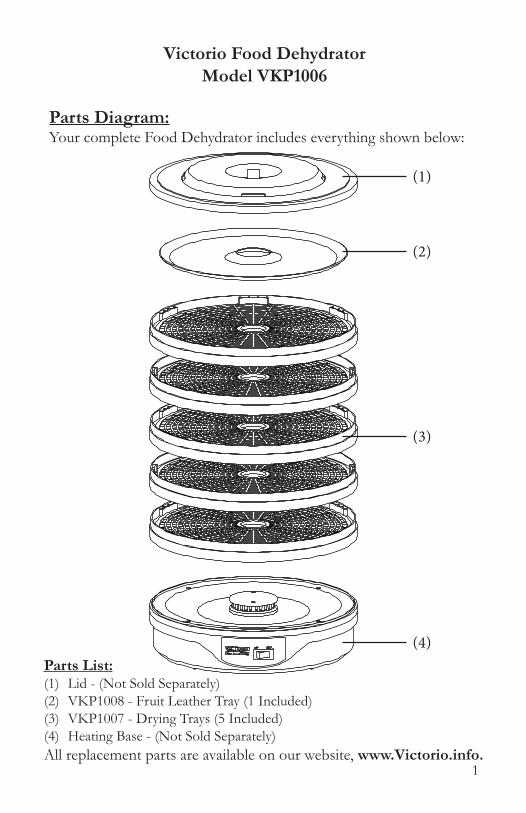
Victorio Food DehydratorModel VKP1006
Parts Diagram:Your complete Food Dehydrator includes everything shown below:
Parts List:(1) Lid - (Not Sold Separately)(2) VKP1008 - Fruit Leather Tray (1 Included)(3) VKP1007 - Drying Trays (5 Included)(4) Heating Base - (Not Sold Separately)All replacement parts are available on our website, www.Victorio.info.
(1)
(2)
(3)
(4)
2
IMPORTANT SAFETY INSTRUCTIONSWARNING! - Failure to follow these safety instructions correctly will lead to a risk of fire, electric shock or personal injury.
SAVE THESE INSTRUCTIONSWhen using electric appliances, basic precautions should always be followed, including the following:• Read and follow all instructions before operating the motor. • Do not use electrical outlet adapters with this appliance.• Do not operate if the cord or plug is damaged, or after the appliance
malfunctions, or is dropped or damaged in any way. Return the appliance to the manufacturer for examination, repair, or electrical or mechanical adjustment.
• Do not disassemble. The motor must be serviced by qualified technicians only.
• To disconnect the motor, turn all controls to the off (“O”) position, then remove the plug from the outlet.
• Do not unplug by pulling on the cord. To unplug, grasp the plug, not the cord.
• Do not leave the motor plugged in when not in use and before cleaning.
• To reduce the risk of electric shock, do not immerse the motor in water or other liquid. Do not place or store the motor where it can fall or be pulled into a tub or sink.
• Not for use by or near children.• Do not cover the motor ventilation holes. • Do not use outdoors.• This appliance is for household use only.
Operating PrecautionsRead and follow ALL instructions and warnings before operating your Food Dehydrator for the first time. If certain precautions are not taken, damage to the Food Dehydrator and/or personal injury could result.• Never operate the Food Dehydrator if any parts are missing or
damaged.
3
• Always make sure the Food Dehydrator heating base is placed on a sturdy, flat surface before using.
• Do not use on carpeted areas or rugs• Do not use for drying anything other than food items.• Do not turn on the heating base until the drying trays are securely in
place.• Use caution when near the working dehydrator, as it can get very hot
and could cause a serious burn injury.• Do not put the heating base in a dishwasher.
Product Overview:Congratulations on your purchase of the Victorio Food Dehydrator! You will find it to be a very valuable tool to have on hand. You’ll enjoy the natural flavors of dried foods, prepared fresh and free from all the preservatives and additives contained in commercially processed foods. Your Victorio Food Dehydrator will serve you well for years to come. Caring properly for your Food Dehydrator will help it last, so be sure to read through all the instructions contained in this manual before using it for the first time.
Care Instructions:To ensure your Food Dehydrator works properly at all times, please follow the care and handling instructions below:1. When you receive your Food Dehydrator, remove the trays and heating
base from the packaging. Wash all trays in warm, soapy water to remove any residue from manufacturing. Using a damp cloth, wipe down the heating base. Never submerse the heating base in water or let puddles form on the top of the base. The motor and heating unit can be damaged if water gets inside.
2. After each use, and before storage, wash the Dehydrator as instructed above to keep your product functioning properly.
3. Drying trays are dishwasher safe.4. Do not clean fruit leather trays in a dishwasher.5. For long term storage, place the Food Dehydrator in the original
product packaging and store in a cool, dry place, away from moisture and extreme temperatures.
4
Product Specifications:The drying trays and fruit leather tray and heating base are made with BPA free plastic. The motor specifications are as follows:• 120V• 60Hz• 250W
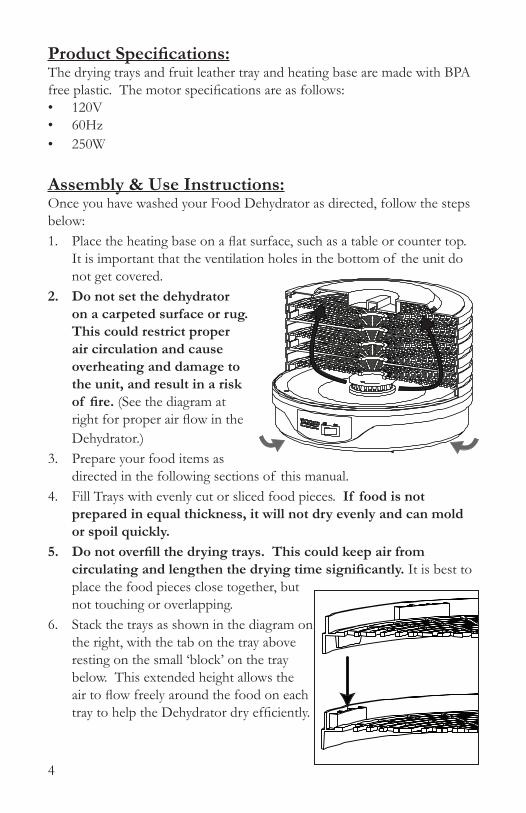
Assembly & Use Instructions:Once you have washed your Food Dehydrator as directed, follow the steps below:1. Place the heating base on a flat surface, such as a table or counter top.
It is important that the ventilation holes in the bottom of the unit do not get covered.
2. Do not set the dehydrator on a carpeted surface or rug. This could restrict proper air circulation and cause overheating and damage to the unit, and result in a risk of fire. (See the diagram at right for proper air flow in the Dehydrator.)
3. Prepare your food items as directed in the following sections of this manual.
4. Fill Trays with evenly cut or sliced food pieces. If food is not prepared in equal thickness, it will not dry evenly and can mold or spoil quickly.
5. Do not overfill the drying trays. This could keep air from circulating and lengthen the drying time significantly. It is best to place the food pieces close together, but not touching or overlapping.
6. Stack the trays as shown in the diagram on the right, with the tab on the tray above resting on the small ‘block’ on the tray below. This extended height allows the air to flow freely around the food on each tray to help the Dehydrator dry efficiently.

5
7. Place the lid on top of the stacked drying trays.8. Plug in the heating base and turn the switch to the ‘On’ position. Air
will begin to circulate throughout the dehydrator.9. For best results, rotate the bottom tray to the top of the stack once
during each hour of drying time. This will help food dry more evenly.10. When drying wet foods like meat, moisture can drip down through
the trays and collect on the heating base. Wipe off any puddles that form to keep liquid from overflowing into the heating base.
Drying Fruits:The following information was adapted from the University of Georgia’s So Easy to Preserve, pp. 324-329.
Preparing FruitBegin by washing the fruit and coring it, if needed. For drying, fruits can be cut in half or sliced. Thin, uniform, peeled slices dry the fastest. The peel can be left on the fruit, but unpeeled fruit takes longer to dry.Fruits dried whole take the longest to dry. Before drying small fruits like grapes or blueberries, skins need to be “checked” or cracked to speed drying.
Check Fruit Skins - To crack the fruit skins, place the fruit in boiling water briefly. Then quickly plunge it into cold water to keep it from cooking. This step allows the moisture inside to escape during the drying process.
Pretreating the FruitPretreatments prevent fruits from darkening. Many light-colored fruits, such as apples, darken rapidly when cut and exposed to air. If not pretreated, these fruits will continue to darken after they have dried.
• Ascorbic Acid - Ascorbic acid (vitamin C) mixed with water is a safe way to prevent fruit browning. However, its protection does not last as long as sulfuring or sulfiting. Ascorbic acid is available in the powdered or tablet form, from drugstores or grocery stores. One teaspoon of powdered ascorbic acid is equal to 3000 mg of ascorbic acid in tablet form. (If you buy 500 mg tablets, this would be six tablets).
6
Directions for Use - Mix 1 teaspoon of powdered ascorbic acid (or 3000 mg of ascorbic acid tablets, crushed) in 2 cups water. Place the fruit in the solution for 3 to 5 minutes. Remove fruit, drain well and place on dryer trays. After this solution is used twice, add more acid.
• Ascorbic Acid Mixtures - Ascorbic acid mixtures are a mixture of ascorbic acid and sugar sold for use on fresh fruits and in canning or freezing. It is more expensive and not as effective as using pure ascorbic acid.
Directions for Use - Mix 1 1⁄2 tablespoons of ascorbic acid mixture with one quart of water. Place the fruit in the mixture and soak 3 to 5 minutes. Drain the fruit well and place on dryer trays. After this solution is used twice, add more ascorbic acid mixture.
• Fruit Juice Dip - A fruit juice that is high in vitamin C can also be used as a pretreatment, though it is not as effective as pure ascorbic acid. Juices high in vitamin C include orange, lemon, pineapple, grape and cranberry. Each juice adds its own color and flavor to the fruit.
Directions for Use - Place enough juice to cover the fruit in a bowl. Add cut fruit. Soak 3 to 5 minutes, remove fruit, drain well and place on dryer trays. This solution may be used twice, before being replaced. (The used juice can be consumed.)
For more information about pretreating fruits visit the USDA’s website, nchfp.uga.edu.
Drying the Prepared FruitBecause fruits contain sugar and are sticky, spray the drying trays with nonstick cooking spray before placing the fruit on the trays. Put fruit pieces on the drying trays, making sure they do not touch or overlap. After the fruit dries for one to two hours, lift each piece gently with a spatula and turn. Since drying times vary widely due to many factors make sure you never leave your dehydrator unattended for long periods of time. Food dries much faster at the end of the drying period and can easily burn, so monitor it closely.
7
Determining Dryness of FruitsSince dried fruits are generally eaten without being rehydrated, they should not be dehydrated to the point of brittleness. Most fruits should have about 20 percent moisture content when dried.
To test for dryness, cut several cooled pieces in half. There should be no visible moisture and you should not be able to squeeze any moisture from the fruit. Some fruits may remain pliable, but are not sticky or tacky. If a piece is folded in half, it should not stick to itself. Berries should be dried until they rattle when shaken.
After drying, cool fruit 30 to 60 minutes before packaging. Packaging food warm can lead to sweating and moisture buildup. However, excessive delays in packaging could allow moisture to re-enter food.
Conditioning FruitsWhen dried fruit is taken from the dehydrator, the remaining moisture may not be distributed equally among the pieces because of their size or their location in the dehydrator. Conditioning is a process used to equalize the moisture and reduce the risk of mold growth.
To condition the fruit, take the dried fruit that has cooled and pack it loosely in plastic or glass jars. Seal the containers and let them stand for seven to ten days. The excess moisture in some pieces will be absorbed by the drier pieces. Shake the jars daily to separate the pieces and check for moisture condensation. If condensation develops in the jar, return the fruit to the dehydrator for more drying. After conditioning, package and store the fruit.
Drying Vegetables:The following information was adapted from the University of Georgia’s So Easy to Preserve, pp. 334-335.
Preparing VegetablesTo prepare vegetables for drying, wash in cool water to remove soil and chemical residues. Trim, peel, cut or slice the vegetables. Remove any fibrous or woody portions and core when necessary, removing all decayed and bruised areas. Keep pieces uniform in size so they will dry at the same rate. A food slicer or food processor can be used. Prepare only as many pieces as can be dried at one time.

8
Pretreating VegetablesBlanching is a necessary step in preparing vegetables for drying. Blanching is the process of heating vegetables to a temperature high enough to destroy enzymes present in tissue. Blanching stops the enzyme action which could cause loss of color and flavor during drying and storage. It also shortens the drying and rehydration time by relaxing the tissue walls so moisture can escape and later re-enter more rapidly.
Vegetables can be water blanched or steam blanched. Water blanching usually results in a greater loss of nutrients, but it takes less time than steam blanching.• Water Blanching - Fill a large pot 2/3 full of water, cover and bring
to a rolling boil. Place the vegetables in a wire basket or a colander and submerge them in the water. Cover and blanch (for blanching times on specific vegetables, visit our website www.Victorio.info). Begin timing when the water returns to boiling. If it takes longer than one minute for the water to come back to boiling, too many vegetables were added. Reduce the amount in the next batch.
• Steam Blanching - Use a deep pot with a tight fitting lid and a wire basket, colander or sieve placed so the steam will circulate freely around the vegetables. Add water to the pot and bring to a rolling boil. Place the vegetables loosely in the basket no more than 2 inches deep. Place the basket of vegetables in the pot, making sure the water does not come in contact with the vegetables. Cover and steam (for steaming times on specific vegetables, visit our website www.Victorio.info).
Cooling and Drying the Prepared VegetablesAfter blanching, dip the vegetables briefly in cold water. When they feel only slightly hot to the touch, drain the vegetables by pouring them directly onto the drying tray held over the sink. Wipe the excess water from underneath the tray and arrange the vegetables in a single layer. Then place the tray immediately on the dehydrator. The heat left in the vegetables from blanching will cause the drying process to begin more quickly. Watch the vegetables closely at the end of the drying period. They dry much more quickly at the end and could scorch.
Determining Dryness of VegetablesVegetables contain less acid than fruits. Because of this, vegetables are dried until they are brittle. At this stage, only 10% moisture remains and no microorganism can grow. Because they are so dry, they do not need conditioning like fruits.

9
Drying Herbs:The following information was taken from the University of Georgia’s So Easy to Preserve, pp. 347-348.
The best time to harvest most herbs for drying is just before the flowers first open when they are in the bursting bud stage. Gather the herbs in the early morning after the dew has evaporated to minimize wilting. Avoid bruising the leaves. They should not lie in the sun or unattended after harvesting. Rinse herbs in cool water and gently shake to remove excess moisture. Discard all bruised, soiled or imperfect leaves and stems.
After rinsing under cool, running water and shaking to remove excess moisture, place the herbs in a single layer on the dehydrator trays. Drying times may vary from 1 to 4 hours. Check periodically. Herbs are dry when they crumble, and stems break when bent.
Drying Meats:The following information was taken from the University of Georgia’s So Easy to Preserve, pp. 343-346, and Colorado State University Extension’s Fact Sheet, No. 9.311.
Meat Choice & PreparationJerky can be made from almost any lean meat, including beef, pork, venison or smoked turkey breast. (Raw poultry is generally not recommended for use in making jerky because of the texture and flavor of the finished product.)
Use only lean meats in excellent condition. Round, flank and chuck steak, rump roast, brisket and cross rib are good choices. Highly marbled and fatty cuts do not work as well. When preparing jerky products, keep raw meats and their juices away from other foods. Remove any thick connective tissue and gristle from the meat. Trim off visible fat with a sharp knife. Fat becomes rancid quickly and causes the development of off-flavors during drying or storage. Freeze meat in moisture-proof paper or plastic wrap until firm but not solid to make slicing easier. Slice meat no thicker than ¼ inch. If a chewy jerky is desired, slice with the grain.
10
Slice across the grain if a more tender, brittle jerky is preferred. The meat can be marinated for flavor and tenderness. Marinade recipes may include oil, salt, spices and acid ingredients such as vinegar, lemon juice, teriyaki, soy sauce or wine.
Place strips of meat in a shallow pan and cover with marinade. Cover pan and refrigerate 1-2 hours or overnight. Products marinated for several hours may be more salty than some people prefer. If you choose to heat the meat prior to drying to decrease the risk of food borne illness, do so at the end of the marination time. To heat, bring strips and marinade to a boil and boil for 5 minutes before draining and drying. If strips are more than ¼ inch thick, the length of time may need to be increased. If possible, check the temperature of several strips with a metal stem-type thermometer to determine that 160ºF has been reached.
Food SafetyRaw meats can be contaminated with microorganisms that cause disease. These harmful bacteria can easily multiply on moist, high protein foods like meat and poultry and can cause illness if the products are not handled correctly. If pork or wild game is used to make jerky, the meat should be treated to kill the trichinella parasite before it is sliced and marinated. This parasite causes the disease trichinosis. To treat the meat, freeze a portion that is 6 inches or less thick at 0ºF or below for at least 30 days. Freezing will not eliminate bacteria from the meat.
Follow these recommendations for safe handling of meat and poultry:
• Always wash hands thoroughly with soap and running water for at least 20 seconds before and after handling raw meats.
• Use clean equipment and utensils. • Keep meat and poultry refrigerated at 40ºF or below. Use ground beef
and poultry within 2 days, red meats within 3 to 5 days or freeze for later use.
• Thaw frozen meat in the refrigerator, not on the kitchen counter. • Marinate meat in the refrigerator. Do not save and re-use marinade.
Drying MeatsRemove meat strips from the marinade and drain on clean, absorbent towels. Arrange strips on dehydrator trays. Place the slices close together, but not touching or overlapping. Place the racks on the dehydrator heating base.
11
Dry until a test piece cracks but does not break when it is bent (10 to 24 hours for samples not heated in marinade). Samples heated in marinade will dry faster. Begin checking samples after 3 hours. Once drying is completed, pat off any beads of oil with clean, absorbent towels and cool.
If the strips were not heated in marinade prior to drying, they can be heated in an oven after drying as an added safety measure. Place strips on a baking sheet, close together, but not touching or overlapping. For strips originally cut 1/4 inch thick or less, heat 10 minutes in an oven preheated to 275ºF. (Thicker strips may require longer heating to reach 160ºF.)
Storing JerkyPlace cooled jerky strips in an airtight plastic food bag or jar with a tight fitting lid. Pack jerky with the least possible amount of air trapped in the container. Too much air causes off-flavors and rancidity to develop. Label and date packages. Store containers of jerky in a cool, dry, dark place or the refrigerator or freezer.
Properly dried jerky will keep for approximately two weeks in a sealed container at room temperature. It will keep for 3 to 6 months in the refrigerator and up to one year in the freezer. Check occasionally to be sure no mold is forming.
Making Fruit Leathers:The following information was adapted from the University of Georgia’s So Easy to Preserve, pp. 340-342.
The advantages of making your own fruit leathers are saving money, using less sugar and mixing fruit flavors. Leftover fruit pulp from making jelly can be blended and made into fruit rolls.
Leathers From Fresh Fruit• Select ripe or slightly overripe fruit. • Wash fresh fruit or berries in cool water. Remove peel, seeds and stem. • Cut fruit into chunks. Use 2 cups of fruit per tray. Puree fruit until
smooth. • Add 2 teaspoons of lemon juice or 1/8 teaspoon ascorbic acid (375
mg) for each 2 cups light colored fruit to prevent darkening.
12
• Optional: To sweeten, add corn syrup, honey or sugar. Corn syrup or honey is best for longer storage because it prevents crystals. Sugar is fine for immediate use or short storage. Use ¼ to ½ cup sugar, corn syrup or honey for each 2 cups of fruit.
Leathers From Canned or Frozen Fruit• Home preserved or store-bought canned or frozen fruit can be used. • Drain fruit, save liquid. • Use 1 pint of fruit per tray.• Puree fruit until smooth. If thick, add liquid. • Add 2 teaspoons of lemon juice or 1/8 teaspoon ascorbic acid (375
mg) for each 2 cups of light colored fruit to prevent darkening. • Applesauce can be dried alone or added to any fresh fruit pureé as an
extender. It decreases tartness and makes the leather smoother and more pliable.
Drying Fruit LeatherFruit leather trays can be sprayed lightly with a cooking spray, to keep the fruit leather from sticking.
Spread pureé evenly, about 1/8 - 1/4 inch thick, onto fruit leather trays. Avoid overfilling the trays.
Leather dries from the outside edge toward the center. Test for dryness by touching the center of the leather; no indentation should be evident. While warm, peel from the trays and place on plastic wrap. Roll up the leather in the plastic wrap, allow to cool, then tightly rewrap the roll in plastic.
Storing Fruit LeatherThe leather will keep up to 1 month at room temperature. It will keep 3-6 months in the refrigerator and up to one year in the freezer. In all cases, be sure to wrap the leather tightly in plastic wrap before storage as recommended in the previous section.
13
Helpful Tips:• When dehydrating fruits or fruit leathers, spray the drying trays or fruit
leather trays with non-stick cooking spray to prevent sticking.• For more information regarding specific fruit and vegetable preparation
and estimated drying times, visit the USDA’s website, nchfp.uga.edu. • To make sure all dried fruit pieces have the same moisture content you
can condition the fruit before storage. See p. 7 for more information.• Cookie cutters can be used to cut out fun shapes in fruit leather for
kids. Roll cut shapes in plastic wrap for storage.
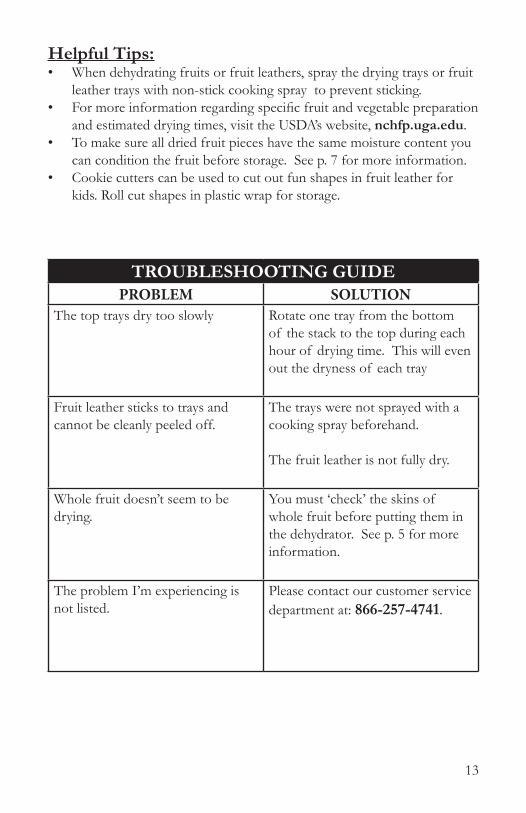
TROUBLESHOOTING GUIDEPROBLEM SOLUTION
The top trays dry too slowly Rotate one tray from the bottom of the stack to the top during each hour of drying time. This will even out the dryness of each tray
Fruit leather sticks to trays and cannot be cleanly peeled off.
The trays were not sprayed with a cooking spray beforehand.
The fruit leather is not fully dry.
Whole fruit doesn’t seem to be drying.
You must ‘check’ the skins of whole fruit before putting them in the dehydrator. See p. 5 for more information.
The problem I’m experiencing is not listed.
Please contact our customer service department at: 866-257-4741.
14
Recipes:
Mango Leather(Yields about 2 dryer trays or 8 fruit rolls)
4 cups mango puree (from about 4 large, unripe mangoes) 1 cup clover honey ½ teaspoon ground cinnamon ¼ teaspoon ground nutmeg ¼ teaspoon ground cloves
Directions1. Wash and peel mangoes, chop roughly into chunks. Puree in blender
until smooth. Pass puree through a food mill or sieve; discard any coarse fiber extracted in food mill. Add honey and spices to the puree and mix thoroughly.
2. Lightly spray two fruit roll trays with vegetable oil cooking spray. Spread mango mixture evenly to ¼-inch thickness on the trays.
3. Position fruit roll liners on dryer trays and place in dehydrator. Dry continuously for about 10 hours. Remove trays from dehydrator when puree is dry, with no sticky areas (about 10 hours - this will be highly dependent on the relative humidity of the drying room). Test for dryness by touching gently in several places near center of leather; no indentation should be evident.
4. Peel leather from trays while still warm. Leave the second tray on the dehydrator while you peel the first leather, or re-warm leathers slightly in the dehydrator if they cool too much prior to peeling. Cut into quarters, lay on a piece of clean plastic food storage wrap about 1 to 2 inches longer at each end of the leather and roll together into fruit leather rolls. When cool, twist the ends of the plastic wrap tightly to close.
5. Store fruit rolls in freezer-quality zippered plastic bags or airtight plastic container for short-term storage, up to about 1 month. Leathers should be stored in a cool, dark, dry place. For longer storage up to 1 year, place tightly wrapped rolls in the freezer.
Adapted from the University of Georgia’s So Easy to Preserve, p. 342.
15
Pumpkin Leather2 cups canned pumpkin or 2 cups fresh pumpkin, cooked and pureed 1/2 cup honey 1/4 teaspoon cinnamon 1/8 teaspoon nutmeg 1/8 teaspoon powdered cloves
Blend ingredients well. Lightly spray two fruit roll trays with vegetable oil cooking spray. Spread puree mixture evenly to ¼-inch thickness on the trays.
Follow steps 3-5 on the previous page for drying instructions.
Taken from the USDA’s website, nchfp.uga.edu.
Jerky Marinade:1 1/2 - 2 pounds of lean meat (beef, pork or venison) 1/4 cup soy sauce 1 tablespoon Worcestershire sauce 1/4 teaspoon each of black pepper and garlic powder 1/2 teaspoon onion powder 1 teaspoon hickory smoke-flavored salt
Combine all ingredients. Place strips of meat in a shallow pan and cover with marinade. Cover and refrigerate 1-2 hours or overnight. Products marinated for several hours may be more salty than some people prefer. If you choose to heat the meat prior to drying to decrease the risk of food borne illness, do so at the end of the marination time. To heat, bring strips and marinade to a boil and boil for 5 minutes before draining and drying. If strips are more than ¼ inch thick, the length of time may need to be increased. If possible, check the temperature of several strips with a metal stem-type thermometer to determine that 160ºF has been reached.
Taken from the University of Georgia’s So Easy to Preserve, p. 345.
16
Home-Dried Raisins
You will need 5 pounds of seedless grapes. Wash the fruit thoroughly and remove from stems. Leave the grapes whole.
Bring 4 quarts of water to a boil in a medium saucepan. Dip one pound of grapes at a time into the boiling water for 30-60 seconds to ‘check’ the skins (see p. 5 for more information about ‘checking fruit skins’). Then, place the grapes in cold water to keep them from cooking. Repeat this process for each pound of grapes.
Remove the grapes from the cold water and dry off any excess liquid with clean paper towels or a kitchen cloth. Add 1 pound of fruit to each drying tray. Dry the grapes until they are pliable, with no moisture pockets remaining.
Once the raisins are dry, condition the fruit according to the instructions on p. 7.

17
Notes
Product Warranty
Model VKP1006 - Food Dehydrator Warranty: 2 yearsWe are confident in the quality of our products and back each one with a limited warranty for the length of time specified above. Should you experience any problems with your product, please contact our Customer Service Department.
All warranty claims must be accompanied by a proof of purchase and are only valid if the appliance has been operated within the U.S. or Canada and used for its intended purposes. These products are for household use only.
Items Not Covered:• Return shipping costs or returned items lost in transit.• Damages to the product due to accident, misuse, abuse,
negligence, or if the appliance has been altered in any way.• Products used outside of the United States or Canada.
Victorio Kitchen Products1804 Sandhill RdOrem UT, 84058
By Phone: 866-257-4741By Email: [email protected]
www.Victorio.info
© Copyright 2013 Victorio Kitchen Products, Inc. All rights reserved.