fomrhi comm. 2074 jan bouterse making woodwind … · which is the common abbreviation for...
TRANSCRIPT
FoMRHI Comm. 2074 Jan Bouterse
Making woodwind instruments 9c:
9.10 Baroque traversos, an introduction
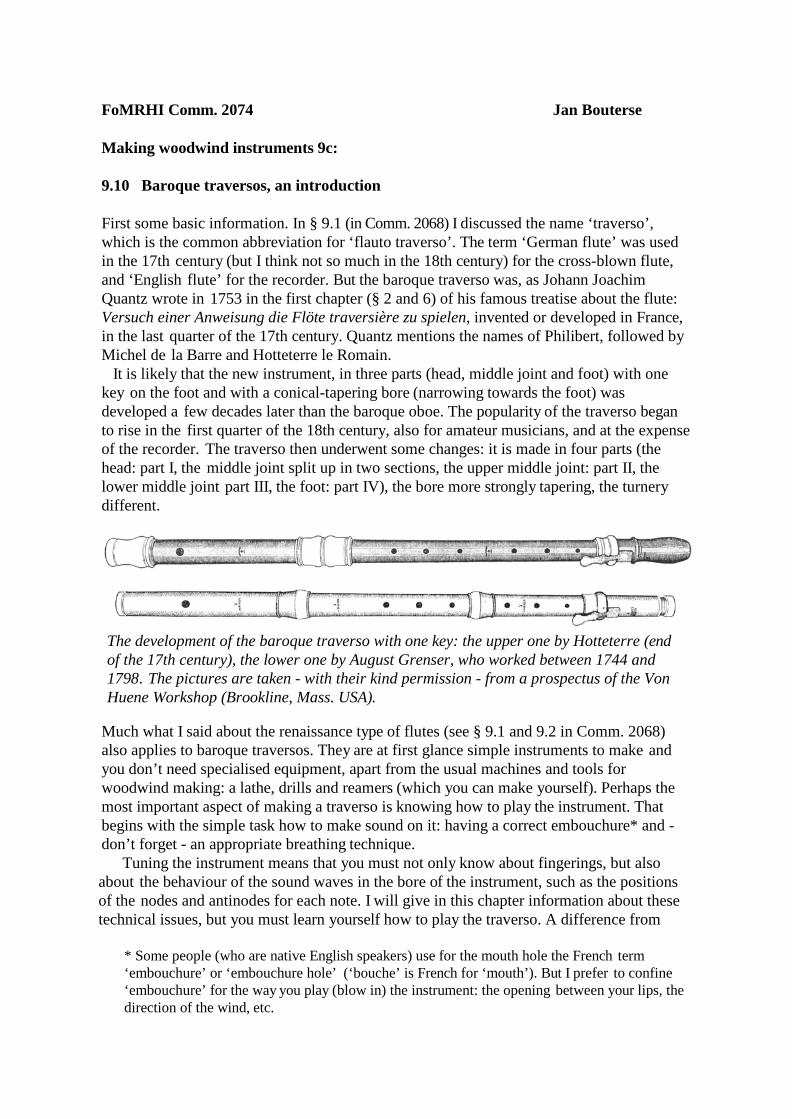
First some basic information. In § 9.1 (in Comm. 2068) I discussed the name ‘traverso’, which is the common abbreviation for ‘flauto traverso’. The term ‘German flute’ was used in the 17th century (but I think not so much in the 18th century) for the cross-blown flute, and ‘English flute’ for the recorder. But the baroque traverso was, as Johann Joachim Quantz wrote in 1753 in the first chapter (§ 2 and 6) of his famous treatise about the flute: Versuch einer Anweisung die Flöte traversière zu spielen, invented or developed in France, in the last quarter of the 17th century. Quantz mentions the names of Philibert, followed by Michel de la Barre and Hotteterre le Romain. It is likely that the new instrument, in three parts (head, middle joint and foot) with one key on the foot and with a conical-tapering bore (narrowing towards the foot) was developed a few decades later than the baroque oboe. The popularity of the traverso began to rise in the first quarter of the 18th century, also for amateur musicians, and at the expense of the recorder. The traverso then underwent some changes: it is made in four parts (the head: part I, the middle joint split up in two sections, the upper middle joint: part II, the lower middle joint part III, the foot: part IV), the bore more strongly tapering, the turnery different.
The development of the baroque traverso with one key: the upper one by Hotteterre (end of the 17th century), the lower one by August Grenser, who worked between 1744 and 1798. The pictures are taken - with their kind permission - from a prospectus of the Von Huene Workshop (Brookline, Mass. USA).
Much what I said about the renaissance type of flutes (see § 9.1 and 9.2 in Comm. 2068) also applies to baroque traversos. They are at first glance simple instruments to make and you don’t need specialised equipment, apart from the usual machines and tools for woodwind making: a lathe, drills and reamers (which you can make yourself). Perhaps the most important aspect of making a traverso is knowing how to play the instrument. That begins with the simple task how to make sound on it: having a correct embouchure* and - don’t forget - an appropriate breathing technique. Tuning the instrument means that you must not only know about fingerings, but also about the behaviour of the sound waves in the bore of the instrument, such as the positions of the nodes and antinodes for each note. I will give in this chapter information about these technical issues, but you must learn yourself how to play the traverso. A difference from
* Some people (who are native English speakers) use for the mouth hole the French term ‘embouchure’ or ‘embouchure hole’ (‘bouche’ is French for ‘mouth’). But I prefer to confine ‘embouchure’ for the way you play (blow in) the instrument: the opening between your lips, the direction of the wind, etc.
thirty to fourty years ago is that there are nowadays many more experienced people who can help you as a teacher on this beautiful instrument. And further: there are many more plans of instruments available. That, however, leads to a problem. The variety of baroque traversos is enormous and there have been fashion trends: I have seen over the past decades how copies after Bressan were popular, followed by a fashion for copies after Rottenburgh or Grenser (both families of instrument makers rather than just individuals), and in recent years, for instance, copies of a particular traverso (only one) by the Italian maker Carlo Palanca. These traversos are all different, some of them have more restrictions than others so that you can’t play all types of baroque music on all of them.
Instrument plans, articles and websites For this series of articles I have used data from plans which I made of a selection of inter- esting traversos. It is not ideal or satisfactory to publish these complete plans with their full measurements, graphs and additional colour photos in the printed FoMRHI Quarterlies. So I have compiled these plans in a digital supplement, which will be be distributed separately. This supplement includes colour photos to the instruments in this article and plans of others by I.Deppe, Richard Haka, D.Lot*, F.G.A.Kirst*, Naust, W.Oberlender Senior, R.Wijne* and W. Wijne* (*means: traverso with several corps de rechange). There are some restrictions in publishing the results of measurements (etc.) of instruments.
- In the first place: I can only give complete measurements, pictures and other inform- ation of instruments which I have investigated myself and as far they are (or were at that time) in private collections. - Secondly: I have decided to do the same for instruments in public collections as long they don’t have their own plans (these collections are of course not responsible for any errors or omissions in the plans). - In the third place: where I was involved in measuring instruments in public collections (for instance the Gemeentemuseum in Den Haag/The Hague), I can present here only excerpts or summarised data from the published plans of those instruments. - A special category: plans of traversos which I have built after measurements made by other people, but where I changed some aspects (for instance to tune the instrument in a different pitch). I can give here only the main data.
I will add here some important advice: always make your own working drawing from the information in the plans (and it helps sometimes to discover errors in those plans). That will help you very much in understanding the construction of the instrument. And do what I have done: measuring instruments where ever you find them, not only originals, but also copies by other makers. That will give you much insight in the general design of the traversos, for instance at which pitch they can be played.
When I made my first attempt to make a traverso (around 1980), it was hard to find plans with measurements of original instruments. Much has changed since then and you can find comprehensive information about the traverso and its history, for instance on websites of woodwind makers who have done research into historical instruments. As this is not a scientific article and as I mainly stick to my own experiences of woodwind making, I will give here only two references (with apologies to all people who are not mentioned here). At first an article by Ardal Powell: ‘Science, technology and the art of flute making in the eighteenth century’, which first appeared in 1994 in The Flutist Quarterly 19.3. A revised version of this article is on the internet at : (http://www.flutehistory.com/Resources/Documents/technology.php3). There is a long list with historical and modern publications at the end of this article. At
www.flutehistory.com you will find more interesting information about what it says: the history of the flute (not only baroque traversos). Secondly at: http://www.earlyflute.com the experienced Dutch flute maker Simon Polak gives his opinions about making and playing baroque traversos, such as temperament (tuning), fingerings and other aspects. Also interesting are the descriptions of the character of several original traversos which are copied by him.
Http://homepages.ed.ac.uk/am/iwd.html gives a list of about 90 drawings of flutes (renaissance and baroque traversos) which can be ordered from 26 museums and public collections. But I must give a warning: I have seen many of these drawings, and they are not always of the most useful quality. Much better are the drawings of baroque traversos by Jean-François Beaudin, see his website, http://www.flute-beaudin.com/Plans.html. In the English translation of my own dissertation ‘Dutch woodwind instruments and their makers, 1660-1760’ (Utrecht 2005) you will find in Appendix C a lot of data (descriptions, photos and measurements) of Dutch traversos. But these data are not presented as plans for making copies. A better alternative: the catalogue of the instruments in the Gemeentemuse- um in Den Haag (‘Dutch traversos and clarinets of the 18th century’), by Rob van Acht, Jan Bouterse en Vincent van den Ende (Frankfurt 2004). But also a warning here: there are only a few instruments in this expensive book which are interesting subjects for making copies.
9.11 Sizes and characteristics of baroque traversos
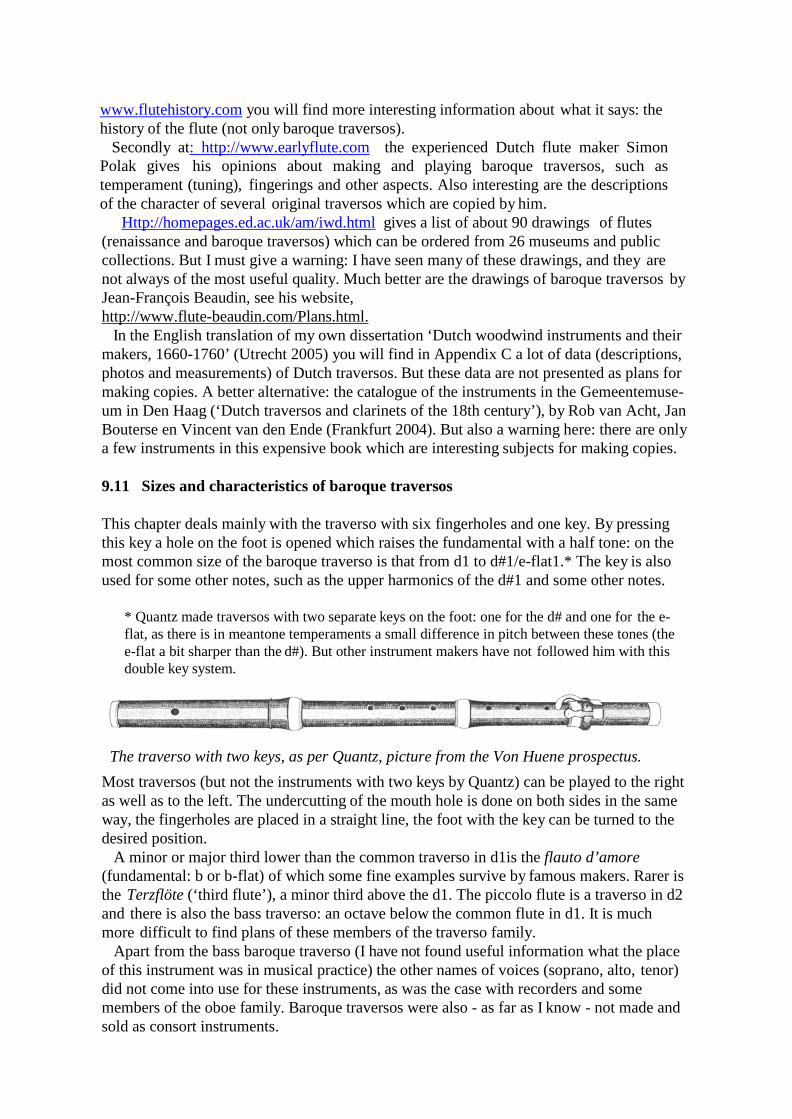
This chapter deals mainly with the traverso with six fingerholes and one key. By pressing this key a hole on the foot is opened which raises the fundamental with a half tone: on the most common size of the baroque traverso is that from d1 to d#1/e-flat1.* The key is also used for some other notes, such as the upper harmonics of the d#1 and some other notes.
* Quantz made traversos with two separate keys on the foot: one for the d# and one for the e-flat, as there is in meantone temperaments a small difference in pitch between these tones (the e-flat a bit sharper than the d#). But other instrument makers have not followed him with this double key system.
The traverso with two keys, as per Quantz, picture from the Von Huene prospectus.
Most traversos (but not the instruments with two keys by Quantz) can be played to the right as well as to the left. The undercutting of the mouth hole is done on both sides in the same way, the fingerholes are placed in a straight line, the foot with the key can be turned to the desired position. A minor or major third lower than the common traverso in d1is the flauto d’amore (fundamental: b or b-flat) of which some fine examples survive by famous makers. Rarer is the Terzflöte (‘third flute’), a minor third above the d1. The piccolo flute is a traverso in d2 and there is also the bass traverso: an octave below the common flute in d1. It is much more difficult to find plans of these members of the traverso family. Apart from the bass baroque traverso (I have not found useful information what the place of this instrument was in musical practice) the other names of voices (soprano, alto, tenor) did not come into use for these instruments, as was the case with recorders and some members of the oboe family. Baroque traversos were also - as far as I know - not made and sold as consort instruments.
Traversos (I omit the adjective ‘baroque’ henceforth ) from the 18th century were generally made of European boxwood (Buxus sempervirens), ebony (or other black tropicalwoods) or ivory. Quantz mentions also lignum sanctum (‘sacred wood’), possibly a member of the genus Guaiacum of which we also know lignum vitae. I found in the Oekonomische Encyklopädie by J. G. Krünitz (published between 1773 and 1858 in 242 volumes, (you can find it on internet: http://www.kruenitz1.uni-trier.de/) interesting information about this tree and its wood: the scientific name is Guajacum sanctum, it is in found on Puerto Rico and other Caribbean islands. The wood is very dense and heavy, but not so dark as lignum vitae, almost identical to boxwood. But I must say I have never seen this wood mentioned in descriptions or catalogues of woodwind instruments. It is, of course, possible to make traversos from many other types of wood.
9.12 Bore profiles: some remarks
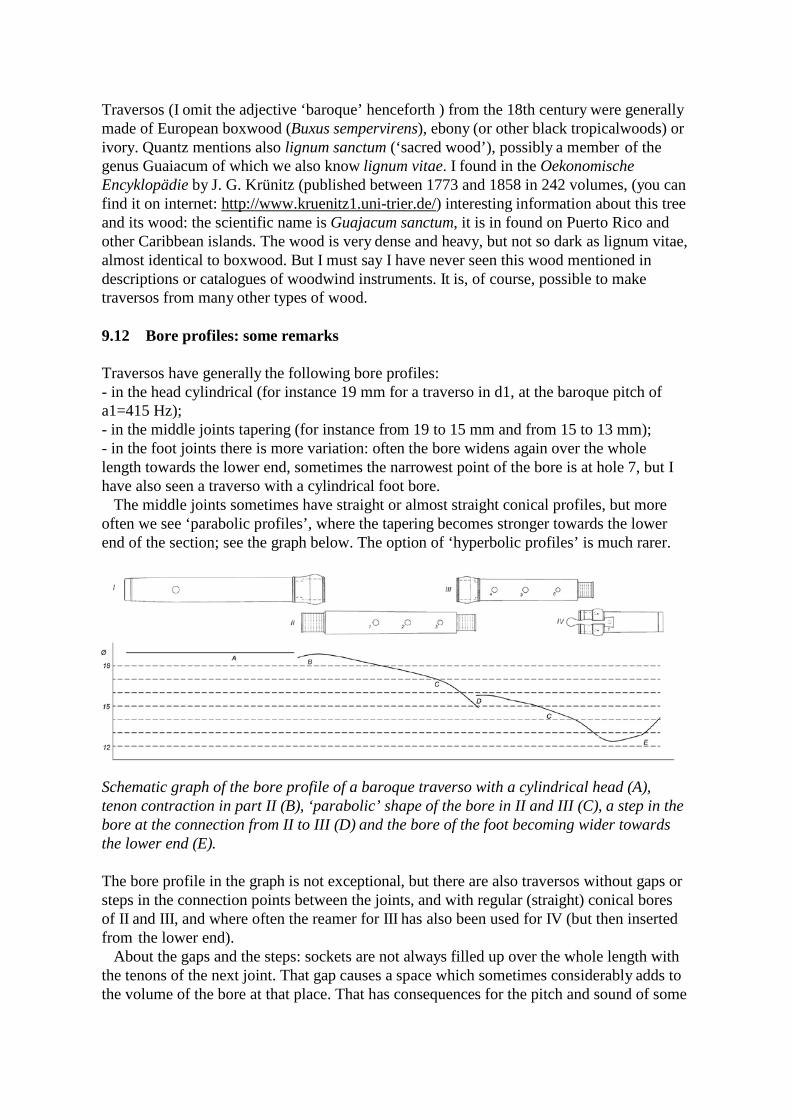
Traversos have generally the following bore profiles: - in the head cylindrical (for instance 19 mm for a traverso in d1, at the baroque pitch of a1=415 Hz); - in the middle joints tapering (for instance from 19 to 15 mm and from 15 to 13 mm); - in the foot joints there is more variation: often the bore widens again over the whole length towards the lower end, sometimes the narrowest point of the bore is at hole 7, but I have also seen a traverso with a cylindrical foot bore. The middle joints sometimes have straight or almost straight conical profiles, but more often we see ‘parabolic profiles’, where the tapering becomes stronger towards the lower end of the section; see the graph below. The option of ‘hyperbolic profiles’ is much rarer.
Schematic graph of the bore profile of a baroque traverso with a cylindrical head (A), tenon contraction in part II (B), ‘parabolic’ shape of the bore in II and III (C), a step in the bore at the connection from II to III (D) and the bore of the foot becoming wider towards the lower end (E).
The bore profile in the graph is not exceptional, but there are also traversos without gaps or steps in the connection points between the joints, and with regular (straight) conical bores of II and III, and where often the reamer for III has also been used for IV (but then inserted from the lower end). About the gaps and the steps: sockets are not always filled up over the whole length with the tenons of the next joint. That gap causes a space which sometimes considerably adds to the volume of the bore at that place. That has consequences for the pitch and sound of some
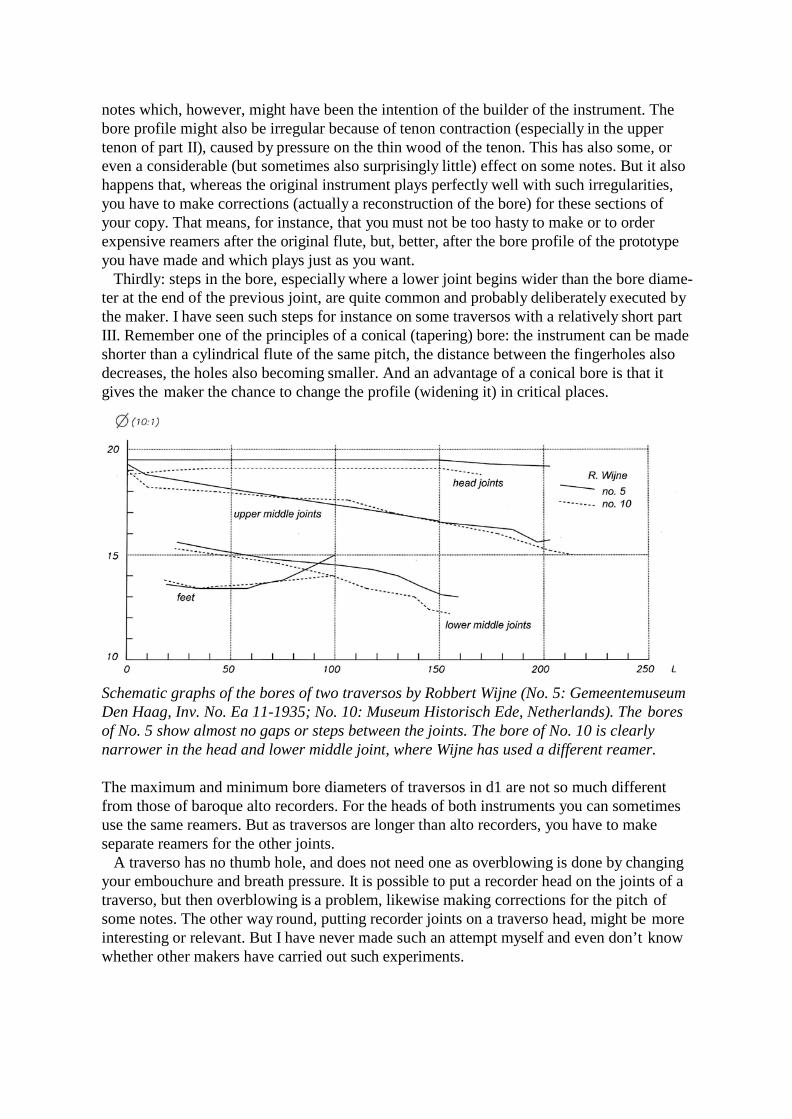
notes which, however, might have been the intention of the builder of the instrument. The bore profile might also be irregular because of tenon contraction (especially in the upper tenon of part II), caused by pressure on the thin wood of the tenon. This has also some, or even a considerable (but sometimes also surprisingly little) effect on some notes. But it also happens that, whereas the original instrument plays perfectly well with such irregularities, you have to make corrections (actually a reconstruction of the bore) for these sections of your copy. That means, for instance, that you must not be too hasty to make or to order expensive reamers after the original flute, but, better, after the bore profile of the prototype you have made and which plays just as you want. Thirdly: steps in the bore, especially where a lower joint begins wider than the bore diame- ter at the end of the previous joint, are quite common and probably deliberately executed by the maker. I have seen such steps for instance on some traversos with a relatively short part III. Remember one of the principles of a conical (tapering) bore: the instrument can be made shorter than a cylindrical flute of the same pitch, the distance between the fingerholes also decreases, the holes also becoming smaller. And an advantage of a conical bore is that it gives the maker the chance to change the profile (widening it) in critical places.
Schematic graphs of the bores of two traversos by Robbert Wijne (No. 5: Gemeentemuseum Den Haag, Inv. No. Ea 11-1935; No. 10: Museum Historisch Ede, Netherlands). The bores of No. 5 show almost no gaps or steps between the joints. The bore of No. 10 is clearly narrower in the head and lower middle joint, where Wijne has used a different reamer.
The maximum and minimum bore diameters of traversos in d1 are not so much different from those of baroque alto recorders. For the heads of both instruments you can sometimes use the same reamers. But as traversos are longer than alto recorders, you have to make separate reamers for the other joints. A traverso has no thumb hole, and does not need one as overblowing is done by changing your embouchure and breath pressure. It is possible to put a recorder head on the joints of a traverso, but then overblowing is a problem, likewise making corrections for the pitch of some notes. The other way round, putting recorder joints on a traverso head, might be more interesting or relevant. But I have never made such an attempt myself and even don’t know whether other makers have carried out such experiments.
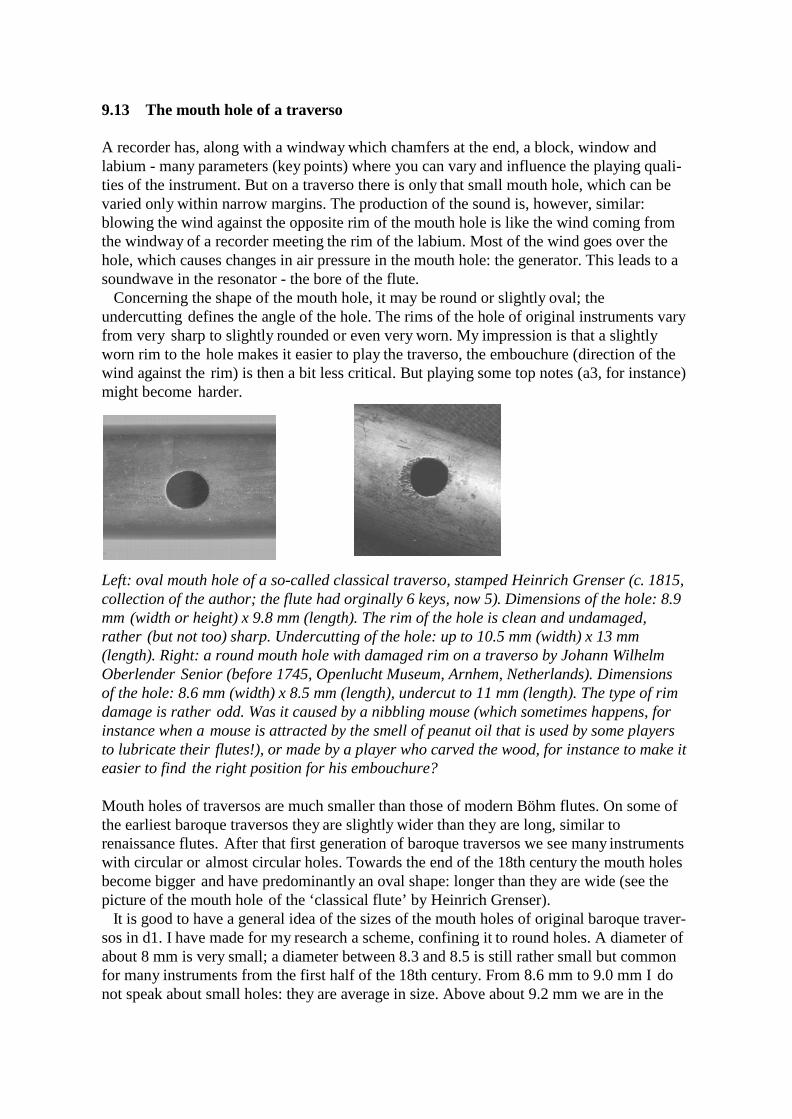
9.13 The mouth hole of a traverso A recorder has, along with a windway which chamfers at the end, a block, window and labium - many parameters (key points) where you can vary and influence the playing quali- ties of the instrument. But on a traverso there is only that small mouth hole, which can be varied only within narrow margins. The production of the sound is, however, similar: blowing the wind against the opposite rim of the mouth hole is like the wind coming from the windway of a recorder meeting the rim of the labium. Most of the wind goes over the hole, which causes changes in air pressure in the mouth hole: the generator. This leads to a soundwave in the resonator - the bore of the flute. Concerning the shape of the mouth hole, it may be round or slightly oval; the undercutting defines the angle of the hole. The rims of the hole of original instruments vary from very sharp to slightly rounded or even very worn. My impression is that a slightly worn rim to the hole makes it easier to play the traverso, the embouchure (direction of the wind against the rim) is then a bit less critical. But playing some top notes (a3, for instance) might become harder.
Left: oval mouth hole of a so-called classical traverso, stamped Heinrich Grenser (c. 1815, collection of the author; the flute had orginally 6 keys, now 5). Dimensions of the hole: 8.9 mm (width or height) x 9.8 mm (length). The rim of the hole is clean and undamaged, rather (but not too) sharp. Undercutting of the hole: up to 10.5 mm (width) x 13 mm (length). Right: a round mouth hole with damaged rim on a traverso by Johann Wilhelm Oberlender Senior (before 1745, Openlucht Museum, Arnhem, Netherlands). Dimensions of the hole: 8.6 mm (width) x 8.5 mm (length), undercut to 11 mm (length). The type of rim damage is rather odd. Was it caused by a nibbling mouse (which sometimes happens, for instance when a mouse is attracted by the smell of peanut oil that is used by some players to lubricate their flutes!), or made by a player who carved the wood, for instance to make it easier to find the right position for his embouchure?
Mouth holes of traversos are much smaller than those of modern Böhm flutes. On some of the earliest baroque traversos they are slightly wider than they are long, similar to renaissance flutes. After that first generation of baroque traversos we see many instruments with circular or almost circular holes. Towards the end of the 18th century the mouth holes become bigger and have predominantly an oval shape: longer than they are wide (see the picture of the mouth hole of the ‘classical flute’ by Heinrich Grenser). It is good to have a general idea of the sizes of the mouth holes of original baroque traver- sos in d1. I have made for my research a scheme, confining it to round holes. A diameter of about 8 mm is very small; a diameter between 8.3 and 8.5 is still rather small but common for many instruments from the first half of the 18th century. From 8.6 mm to 9.0 mm I do not speak about small holes: they are average in size. Above about 9.2 mm we are in the
range of moderately big holes, and above 9.5 mm the diameters are very big (and often for baroque traversos a sign that holes have been enlarged). Small mouth holes generally give a small sound*, perfect for chamber music and these flutes I find often - and perhaps surprisingly - easier to play than those with bigger holes. I myself prefer moderately small holes and I find it sometimes rather difficult to play instru- ments with other holes.
* See however the remarks given by Simon Polak to his copy of a flute by Robbert Wijne (www.earlyflute.com/pages/robert_wijne.html): It has a very small mouth hole and carries extremely well. It even has a really big sound when played well. Polak mentions here an interesting difference: between how loud a sound is, and how it carries!
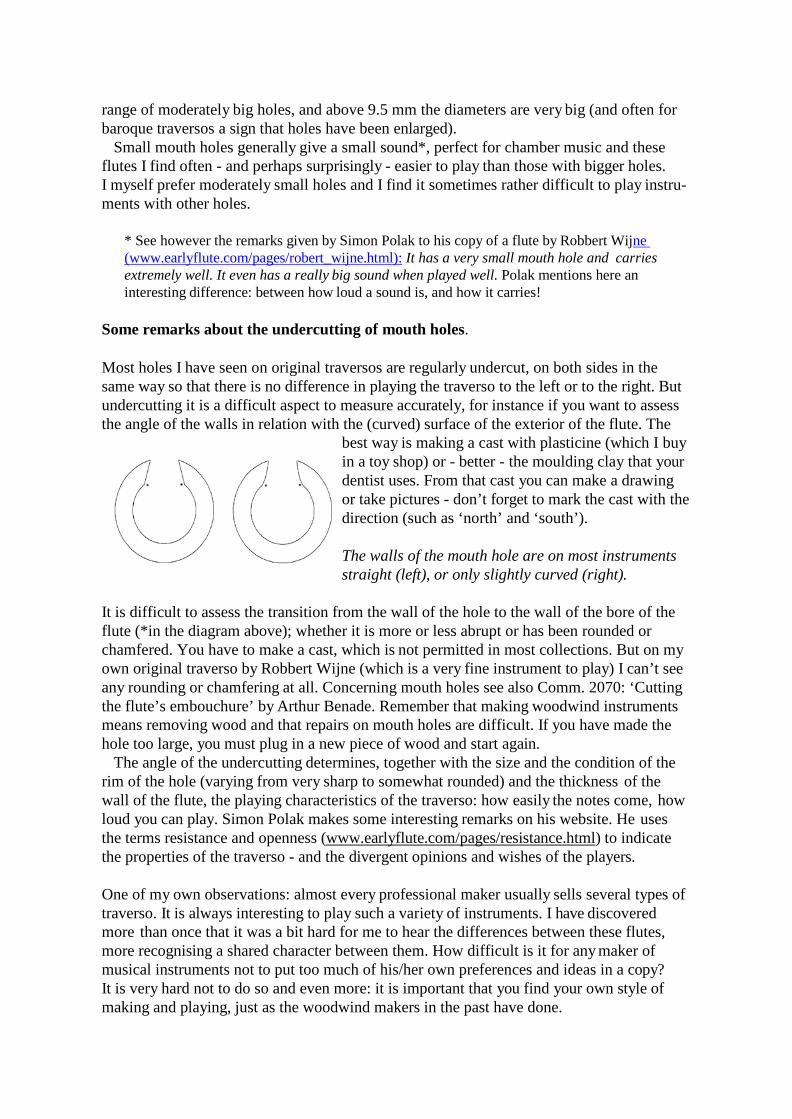
Some remarks about the undercutting of mouth holes. Most holes I have seen on original traversos are regularly undercut, on both sides in the same way so that there is no difference in playing the traverso to the left or to the right. But undercutting it is a difficult aspect to measure accurately, for instance if you want to assess the angle of the walls in relation with the (curved) surface of the exterior of the flute. The
best way is making a cast with plasticine (which I buy in a toy shop) or - better - the moulding clay that your dentist uses. From that cast you can make a drawing or take pictures - don’t forget to mark the cast with the direction (such as ‘north’ and ‘south’).
The walls of the mouth hole are on most instruments straight (left), or only slightly curved (right).
It is difficult to assess the transition from the wall of the hole to the wall of the bore of the flute (*in the diagram above); whether it is more or less abrupt or has been rounded or chamfered. You have to make a cast, which is not permitted in most collections. But on my own original traverso by Robbert Wijne (which is a very fine instrument to play) I can’t see any rounding or chamfering at all. Concerning mouth holes see also Comm. 2070: ‘Cutting the flute’s embouchure’ by Arthur Benade. Remember that making woodwind instruments means removing wood and that repairs on mouth holes are difficult. If you have made the hole too large, you must plug in a new piece of wood and start again. The angle of the undercutting determines, together with the size and the condition of the rim of the hole (varying from very sharp to somewhat rounded) and the thickness of the wall of the flute, the playing characteristics of the traverso: how easily the notes come, how loud you can play. Simon Polak makes some interesting remarks on his website. He uses the terms resistance and openness (www.earlyflute.com/pages/resistance.html) to indicate the properties of the traverso - and the divergent opinions and wishes of the players.
One of my own observations: almost every professional maker usually sells several types of traverso. It is always interesting to play such a variety of instruments. I have discovered more than once that it was a bit hard for me to hear the differences between these flutes, more recognising a shared character between them. How difficult is it for any maker of musical instruments not to put too much of his/her own preferences and ideas in a copy? It is very hard not to do so and even more: it is important that you find your own style of making and playing, just as the woodwind makers in the past have done.

I am writing these pages not so much for skilled professional traverso makers (I hope nevertheless that they will pick up some useful information), but for amateur woodwind makers, young or old, who have probably never made a traverso before. I have some advice for you, especially if you are not an experienced player: try to find a traverso with a mouth hole that suits you well and take that as a starting point for your first copy. And do not be afraid to deviate a little from the size or shape of the mouth hole of the original instrument: many makers from the past made also variations; it is always good to compare several instruments by the same maker! The ‘perfect mouth hole’ is not the hole that is copied from the original instrument in the most precise way, but the hole that gives you the best feeling when you play the traverso. That feeling or impression may change as you get more playing experience, but it is also likely that as a better player you will become more flexible in your approach to the instruments. And that brings me to a problem with the relations between the woodwind maker and the flute player: some players have very strict ideas about their instruments, how they have to be voiced and tuned. And that clashes sometimes with that flexibility which is also needed to play freely and to give the instrument as well as the music a chance. It is of course the task and a challenge for the flute maker to reproduce an instrument in the most accurate way to satisfy himself and the customer. That is not easy and you need perfect tools and skills to use them. But in making a copy there will always be an element of discovery and surprise, just as there is when you play an original old traverso.
9.14 Toneholes: positions, sizes and undercuttings
On all toneholes of a baroque traverso you can play two tones: the first harmonic and by overblowing with the same (or almost the same) fingering the second harmonic (which gives the interval of an octave). That means that each hole must be drilled exactly in the right place of the flute: a hole too low on the flute gives an octave interval which is too wide. This is because the hole has to be made bigger to get the first harmonic in tune, resulting in the second harmonic becoming too sharp as the pitch of this tone responses more strongly to the size of a hole than the first harmonic. Mutatis mutandis: a hole too close to the mouth hole has the opposite effect. You might change the position of one or more holes, but then you must alter the profile of the bore of the instrument. But on a traverso the position of the cork also matters: moving the cork towards the mouth hole means that the intervals between first and second register become wider, and that is also or even more the case for the intervals between second and third register .
The general pattern of the holes on the upper middle joint is that hole 1 and hole 2 are about the same size and that hole 3 is a bit smaller. A similar pattern on the lower middle joint: hole 4 and 5 do not differ very much, hole 6 is the smallest of all holes on the baroque traverso. Hole 7 is the hole on the foot that is covered by the key. The size of that hole varies very much: it is - surprisingly - often rather small on longer traversos (with a lower pitch) and much bigger on shorter instruments which have a higher pitch. I always drill the holes initially 0.5 to 1 mm too small. At first I put a piece of writable adhesive tape on the middle joints, draw with a pencil a centre line, mark the positions of the fingerholes, and make small dents in the wood there with a sharp punch. To avoid splintering it is sometimes better to fill the joints with a piece of wood that perfectly fits into the bore. But I don’t do that normally with boxwood traversos, as that wood has short fibres and because I must undercut the holes, which removes all irregularities.
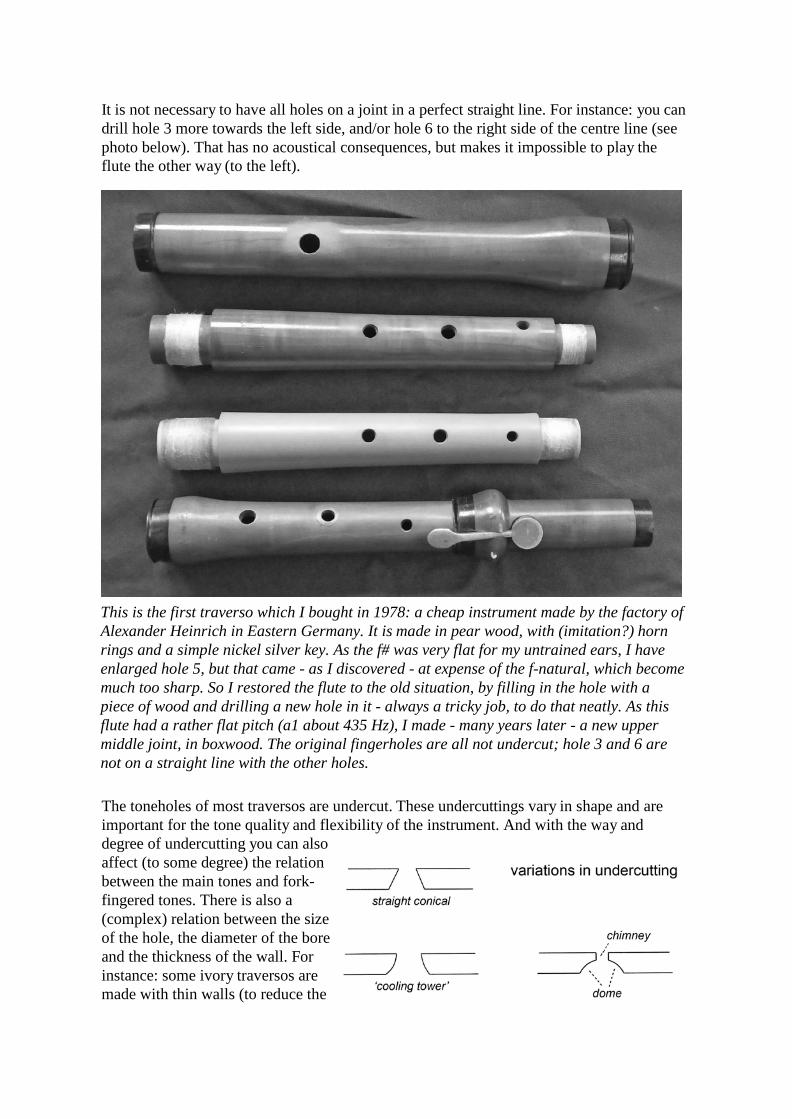
It is not necessary to have all holes on a joint in a perfect straight line. For instance: you can drill hole 3 more towards the left side, and/or hole 6 to the right side of the centre line (see photo below). That has no acoustical consequences, but makes it impossible to play the flute the other way (to the left).
This is the first traverso which I bought in 1978: a cheap instrument made by the factory of Alexander Heinrich in Eastern Germany. It is made in pear wood, with (imitation?) horn rings and a simple nickel silver key. As the f# was very flat for my untrained ears, I have enlarged hole 5, but that came - as I discovered - at expense of the f-natural, which become much too sharp. So I restored the flute to the old situation, by filling in the hole with a piece of wood and drilling a new hole in it - always a tricky job, to do that neatly. As this flute had a rather flat pitch (a1 about 435 Hz), I made - many years later - a new upper middle joint, in boxwood. The original fingerholes are all not undercut; hole 3 and 6 are not on a straight line with the other holes.
The toneholes of most traversos are undercut. These undercuttings vary in shape and are important for the tone quality and flexibility of the instrument. And with the way and degree of undercutting you can also affect (to some degree) the relation between the main tones and fork- fingered tones. There is also a (complex) relation between the size of the hole, the diameter of the bore and the thickness of the wall. For instance: some ivory traversos are made with thin walls (to reduce the
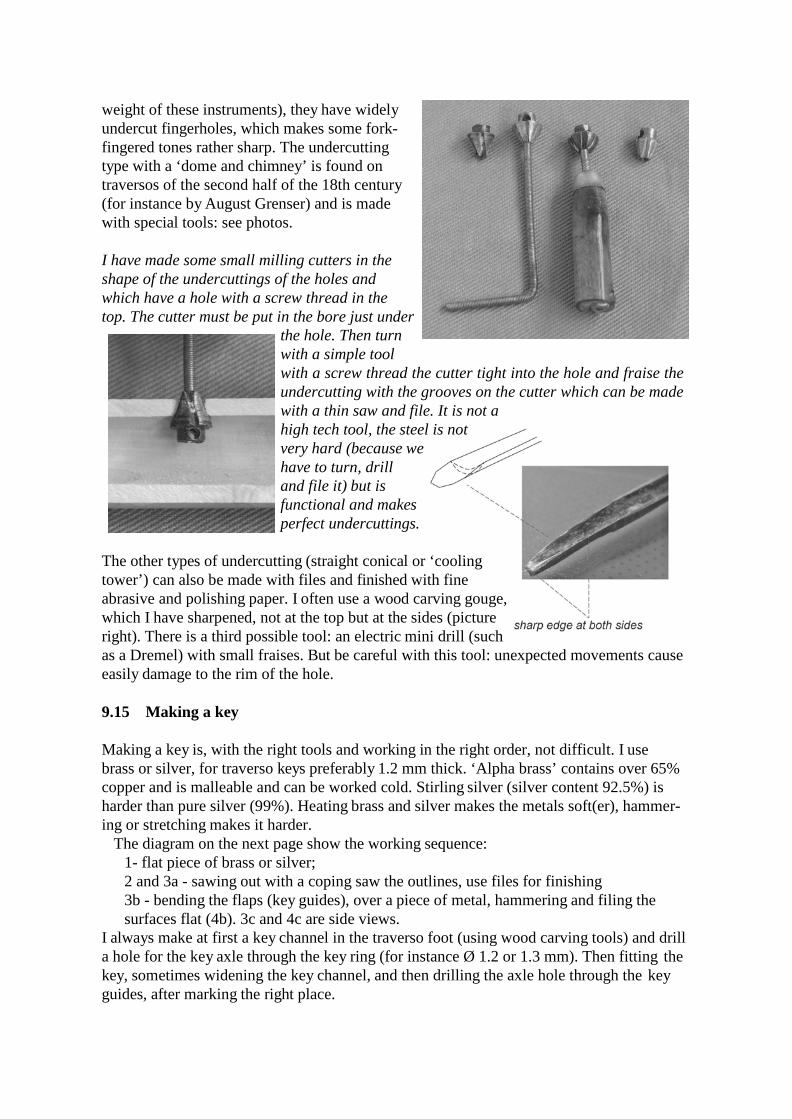
weight of these instruments), they have widely undercut fingerholes, which makes some fork- fingered tones rather sharp. The undercutting type with a ‘dome and chimney’ is found on traversos of the second half of the 18th century (for instance by August Grenser) and is made with special tools: see photos.
I have made some small milling cutters in the shape of the undercuttings of the holes and which have a hole with a screw thread in the top. The cutter must be put in the bore just under
the hole. Then turn with a simple tool with a screw thread the cutter tight into the hole and fraise the undercutting with the grooves on the cutter which can be made with a thin saw and file. It is not a high tech tool, the steel is not very hard (because we have to turn, drill and file it) but is functional and makes perfect undercuttings.
The other types of undercutting (straight conical or ‘cooling tower’) can also be made with files and finished with fine abrasive and polishing paper. I often use a wood carving gouge, which I have sharpened, not at the top but at the sides (picture right). There is a third possible tool: an electric mini drill (such as a Dremel) with small fraises. But be careful with this tool: unexpected movements cause easily damage to the rim of the hole.
9.15 Making a key
Making a key is, with the right tools and working in the right order, not difficult. I use brass or silver, for traverso keys preferably 1.2 mm thick. ‘Alpha brass’ contains over 65% copper and is malleable and can be worked cold. Stirling silver (silver content 92.5%) is harder than pure silver (99%). Heating brass and silver makes the metals soft(er), hammer- ing or stretching makes it harder. The diagram on the next page show the working sequence:
1- flat piece of brass or silver; 2 and 3a - sawing out with a coping saw the outlines, use files for finishing 3b - bending the flaps (key guides), over a piece of metal, hammering and filing the surfaces flat (4b). 3c and 4c are side views.
I always make at first a key channel in the traverso foot (using wood carving tools) and drill a hole for the key axle through the key ring (for instance Ø 1.2 or 1.3 mm). Then fitting the key, sometimes widening the key channel, and then drilling the axle hole through the key guides, after marking the right place.
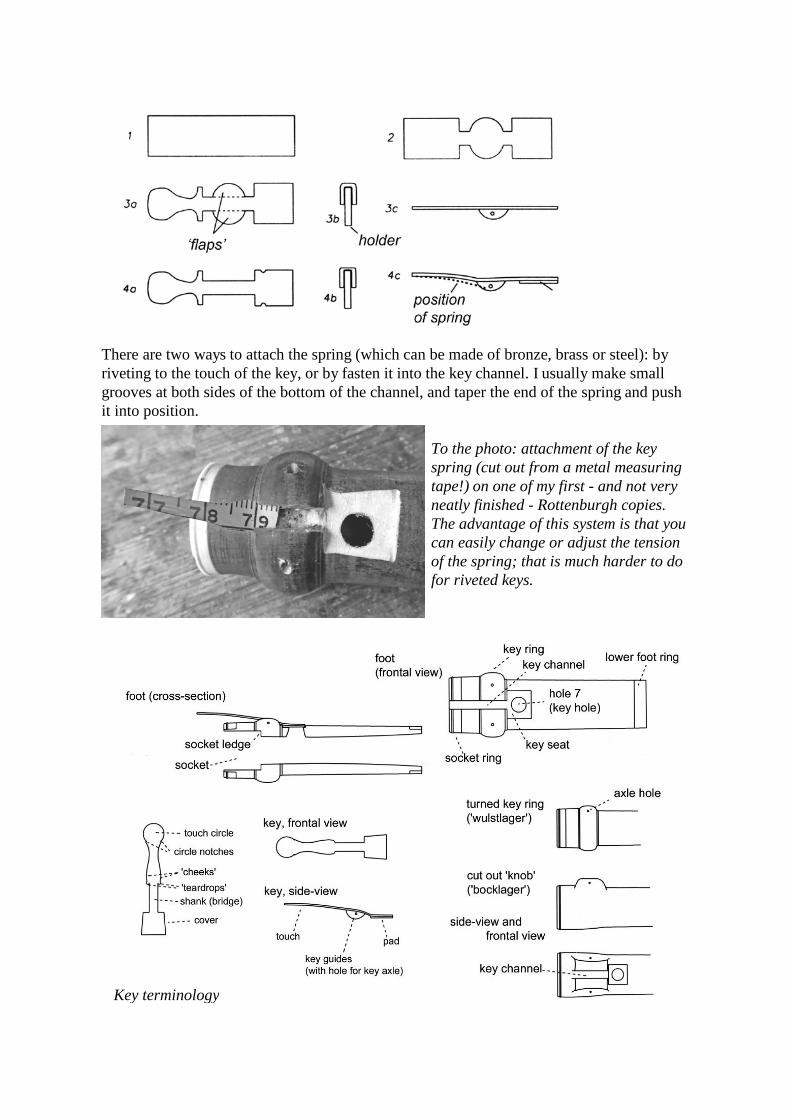
There are two ways to attach the spring (which can be made of bronze, brass or steel): by riveting to the touch of the key, or by fasten it into the key channel. I usually make small grooves at both sides of the bottom of the channel, and taper the end of the spring and push it into position.
To the photo: attachment of the key spring (cut out from a metal measuring tape!) on one of my first - and not very neatly finished - Rottenburgh copies. The advantage of this system is that you can easily change or adjust the tension of the spring; that is much harder to do for riveted keys.
Key terminology
9.16 Tuning the traverso
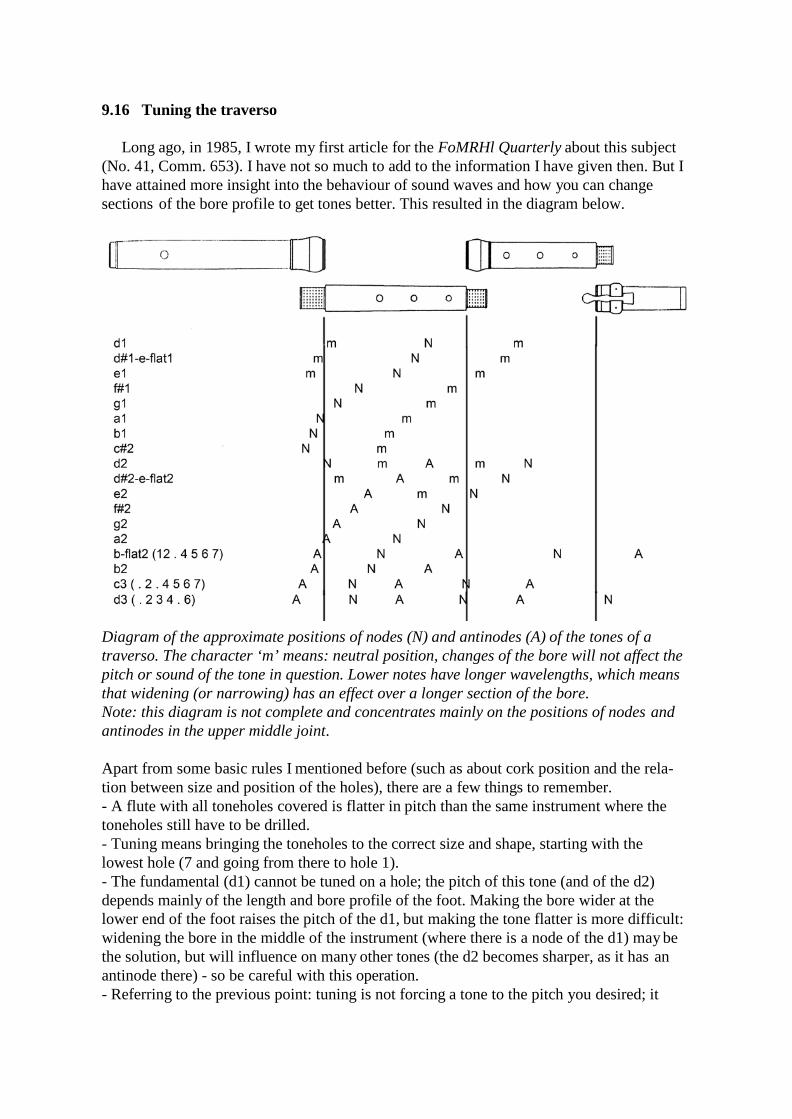
Long ago, in 1985, I wrote my first article for the FoMRHl Quarterly about this subject (No. 41, Comm. 653). I have not so much to add to the information I have given then. But I have attained more insight into the behaviour of sound waves and how you can change sections of the bore profile to get tones better. This resulted in the diagram below.
Diagram of the approximate positions of nodes (N) and antinodes (A) of the tones of a traverso. The character ‘m’ means: neutral position, changes of the bore will not affect the pitch or sound of the tone in question. Lower notes have longer wavelengths, which means that widening (or narrowing) has an effect over a longer section of the bore. Note: this diagram is not complete and concentrates mainly on the positions of nodes and antinodes in the upper middle joint.
Apart from some basic rules I mentioned before (such as about cork position and the rela- tion between size and position of the holes), there are a few things to remember. - A flute with all toneholes covered is flatter in pitch than the same instrument where the toneholes still have to be drilled. - Tuning means bringing the toneholes to the correct size and shape, starting with the lowest hole (7 and going from there to hole 1). - The fundamental (d1) cannot be tuned on a hole; the pitch of this tone (and of the d2) depends mainly of the length and bore profile of the foot. Making the bore wider at the lower end of the foot raises the pitch of the d1, but making the tone flatter is more difficult: widening the bore in the middle of the instrument (where there is a node of the d1) may be the solution, but will influence on many other tones (the d2 becomes sharper, as it has an antinode there) - so be careful with this operation. - Referring to the previous point: tuning is not forcing a tone to the pitch you desired; it

is much more trying to find the optimal result in pitch and sound for the tone on that tone hole. - A traverso is a rather flexible instrument; a tone is never tuned on its own, it must always be compared with surrounding tones. That means: you have to play intervals and runs, and at the end of the operation playing real music in various keys. - Changing the size or internal shape of a hole means that you alter also a bit of the bore profile, which may have some influence of the pitch and colour of the tones which are already tuned by you. - Do not always try to tune the instrument in one single operation; it is sometimes better to leave some tones initially a bit flat, especially when you are not sure about the next one or when you think that the size of the tuning hole is becoming rather wide. - Finally: you must know the fingerings on a baroque traverso, and the problematical cha- racter of some tones.
Example of a problem: the f and f# in the first and second register. Just as on the renais- sance traverso in d1 the f with 1 2 3 4 . 6 is always a bit sharp, and f# with 1 2 3 4 a bit flat - on the baroque traverso hole 7 can be opened to raise the f# a bit. The result is that we can play easily a pure minor third from d to f, which is 16 cents smaller wider than the same interval in equal temperament. And for the interval d-f#: that is a major third, as a pure interval sounding 14 cents smaller than in equal temperament. As a result: the interval from f to f# is very small: only 70 cents. But actually, playing f and f# without any corrections (by turning the flute out- or inwards, so making more or less open space at the mouth hole), there is an even smaller interval than 70 cents. Quantz mentions the problems in § 23 of his book: The flute has the natural fault that some notes with a ‘#’ are a bit flat and others a bit sharp, which leads to the recommendations mentioned above. It is not possible, or only to a very limited degree, to solve these problems with the f and f# by changing the bore profile, the thickness of the wall at the fingerholes or whatever else. On some traversos is the relation between these tones a bit better (with fewer corrections required), but I can't tell you exactly why that is so.
Fingerings and tuning holes
These are also the fingerings I generally use on my traversos. There are more options, you can find fingering tables on several sites on the internet. I left out the fingerings for most fork-fingered flat tones (such as g-flat).
tone fingering tuning hole d1 1 2 3 4 5 6 length and bore profile of the foot d2 . 2 3 4 5 6 length and bore profile of the foot, cork position d#1/e-flat1 1 2 3 4 5 6 7 hole 7 d#2/e-flat2 . 2 3 4 5 6 7 hole 7 e1 + e2 1 2 3 4 5 hole 6 f1 + f2 1 2 3 4 . 6 hole 5 f#1 + f#2 1 2 3 4 . . 7 hole 5 g1 + g2 1 2 3 . . . (7) hole 4 g#1 1 2 . 4 5 6 hole 3 g#2 1 2 . 4 . 6 7 hole 3 a1 + a2 1 2 . . . . (7) hole 3 a#1 1 . 3 4 5 hole 2
a#2 1 . 3 hole 2 b-flat2 1 2 . 4 5 6 7 hole 7 b1 + b2 1 . . . . . (7) hole 2 (b2 also with 1 . . 4 5 6 or 1 . 3 4 5 6 7) c2 . 2 3 hole 1 (c2 also with . 2 . 3 4 5 6 7) c3 . 2 . 4 5 6 7 hole 1 (c3 also as 1 . 3 4 . 6 7 or . 2 3 4 5 . 7) c#2 . . . (4 5 6 7) hole 1 c#3 . 2 3 4 . . 7 there is no actual tuning hole for this tone d3 . 2 3 . . . 7 hole 4, cork position (this is an upper harmonic from g1) d3 . 2 3 4 . 6 bore profile, cork position (upper harmonic from d1) d#3/e-flat3 1 2 3 . 5 6 7 hole 7, cork position e3 1 2 . . 5 6 7 hole 4, cork position f3 1 2 . 4 . . 7 there is no actual tuning hole for this tone f#3 1 2 3 4 or: 1 . 3 4 5 6; there is no actual tuning hole for this tone g3 1 . 3 hole 4 and cork position a3 . 2 3 4 5 cork position Explanation: 1 (to 6) means the corresponding hole is covered; 7: key is in action, thus key hole is opened; a dot means that hole is open. Brackets: closing is optional; sometimes (as on c#2) closing some lower holes gives more stability in holding the flute.
Tuning a woodwind instrument means that you must know the relations between the tones:
- Harmonic series as d1 - d2 - d3; e-flat1 - e-flat2 - b-flat2 - e-flat3, g1 - g2 - d3 - g3; the tones in each series share the same tuning hole. - Main tones to fork-fingered tones, for instance f#1 to f1 or c#2 to c2. The tones in such combinations are tuned together. Fork-fingered tones in the lower register of a traverso are not ‘critical’, which means that you can often add - or drop - a finger down in the fork for pitch adjustments. You can’t normally do that in the second (and ‘critical’) register. For instance with the a#2 with 1 . 3: closing hole 4 doesn’t lower this tone, but has an opposite effect. - ‘Shifts by leaking’ in the upper registers such as e-flat3 to e3 (by opening hole 3), and b-flat2 to c3 (with . 2 . 4 5 6 7, by opening hole 1). Opening these holes causes a shift in the position of the antinodes and nodes, which lead to a change in pitch. But it is as a rule not possible to tune these tones by altering the size or shape of undercutting of the ‘leaking holes’: they are much more important for the main tones in the first and second register.
The first issue when tuning a traverso is finding the right cork position. It begins with com- paring the harmonics of the d1. A problem occurs if d1 and d3 are correct, but d2 too sharp. You can’t solve that with the cork. Widening the bore in the lower middle joint (section of hole 4 and 5) may help, sometimes: over there is a node for the d2, and an antinode for d3. Reaming at a node has the result that the tone becomes flatter, there is the opposite effect at an antinode. Of course you must reposition the cork after this operation, and might to do that again after tuning the next tones, especially the g-series when you can compare both fingerings for d3 ( . 2 3 . . . 7 and . 2 3 4 . 6). Pulling out the foot a little bit from the lower middle joint, or the lower middle from the upper middle joint, sometimes improves the balance between tones. Important is the bore section in the top section of the upper middle joint: here are the nodes of several tones of the first register and the antinodes of the corresponding tones of the second register. It is an easily accessible section for making bore corrections: a wider bore means wider octave intervals. It is generally easier to solve problems with tones which are too flat than tones which are too sharp!