folders in proloquo2go 2 -...
TRANSCRIPT
Folders in Proloquo2Go 2Understanding Folder Views
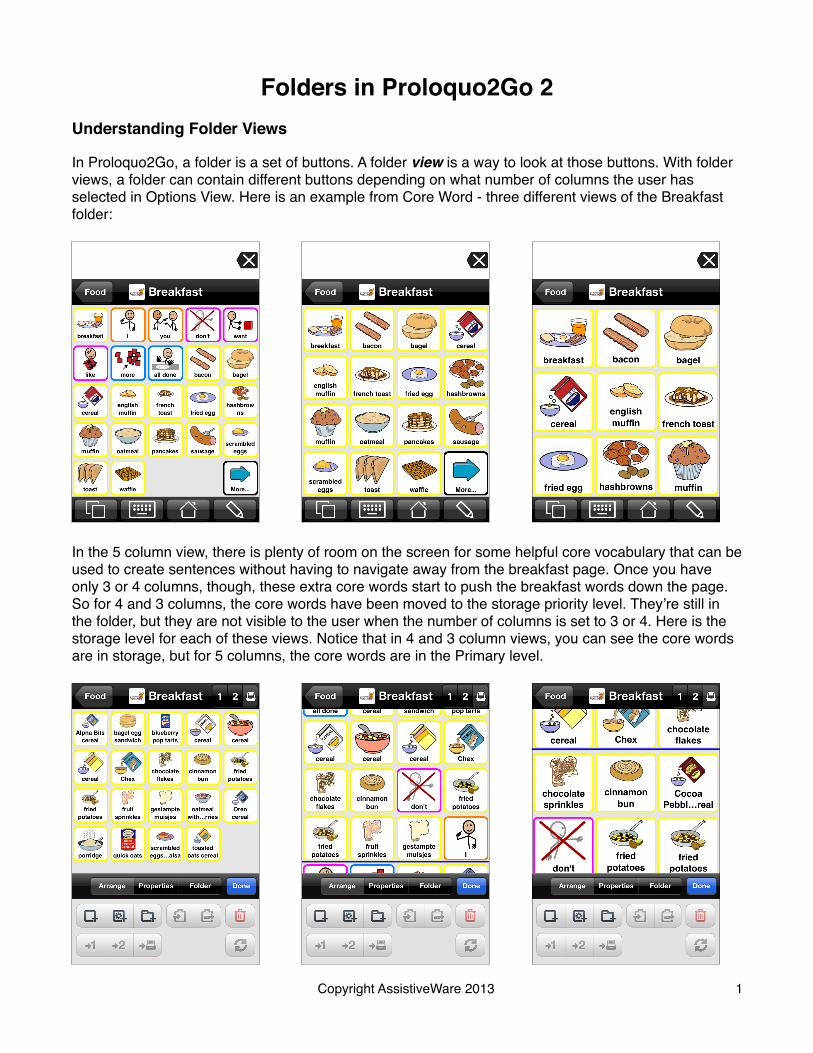
In Proloquo2Go, a folder is a set of buttons. A folder view is a way to look at those buttons. With folder views, a folder can contain different buttons depending on what number of columns the user has selected in Options View. Here is an example from Core Word - three different views of the Breakfast folder:
In the 5 column view, there is plenty of room on the screen for some helpful core vocabulary that can be used to create sentences without having to navigate away from the breakfast page. Once you have only 3 or 4 columns, though, these extra core words start to push the breakfast words down the page. So for 4 and 3 columns, the core words have been moved to the storage priority level. They’re still in the folder, but they are not visible to the user when the number of columns is set to 3 or 4. Here is the storage level for each of these views. Notice that in 4 and 3 column views, you can see the core words are in storage, but for 5 columns, the core words are in the Primary level.
Copyright AssistiveWare 2013 1
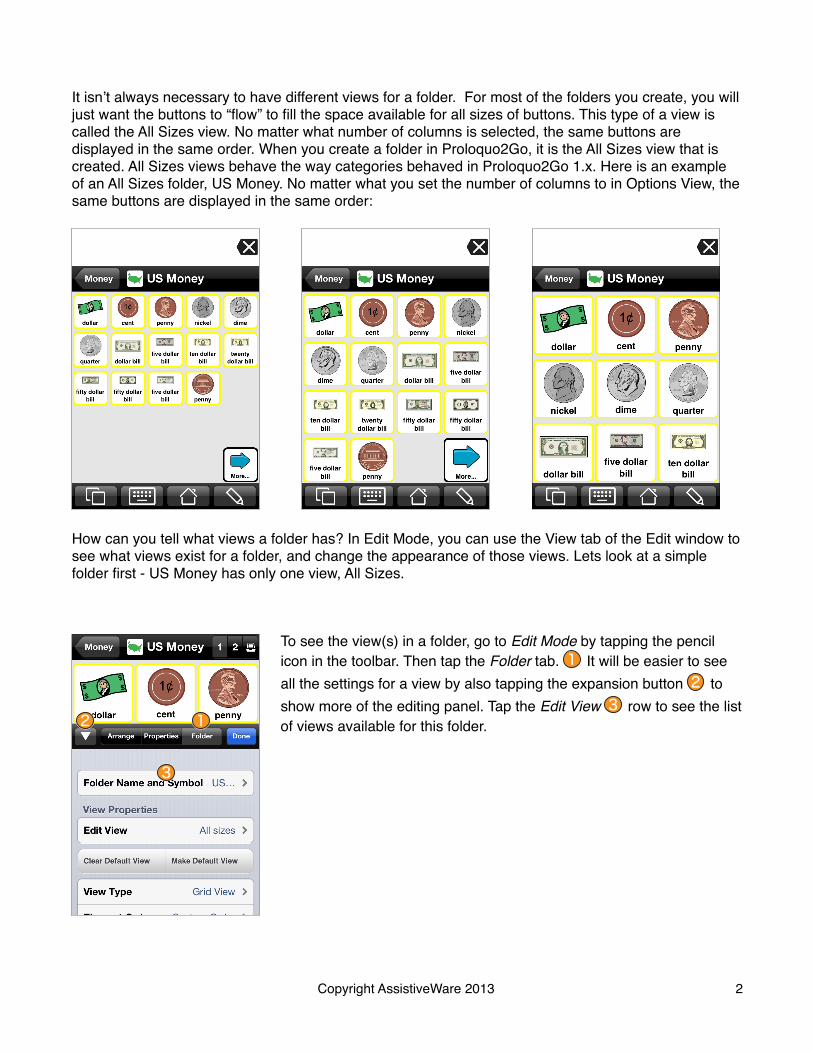
It isn’t always necessary to have different views for a folder. For most of the folders you create, you will just want the buttons to “flow” to fill the space available for all sizes of buttons. This type of a view is called the All Sizes view. No matter what number of columns is selected, the same buttons are displayed in the same order. When you create a folder in Proloquo2Go, it is the All Sizes view that is created. All Sizes views behave the way categories behaved in Proloquo2Go 1.x. Here is an example of an All Sizes folder, US Money. No matter what you set the number of columns to in Options View, the same buttons are displayed in the same order:
How can you tell what views a folder has? In Edit Mode, you can use the View tab of the Edit window to see what views exist for a folder, and change the appearance of those views. Lets look at a simple folder first - US Money has only one view, All Sizes.
To see the view(s) in a folder, go to Edit Mode by tapping the pencil icon in the toolbar. Then tap the Folder tab. It will be easier to see all the settings for a view by also tapping the expansion button to show more of the editing panel. Tap the Edit View row to see the list of views available for this folder.
Copyright AssistiveWare 2013 2
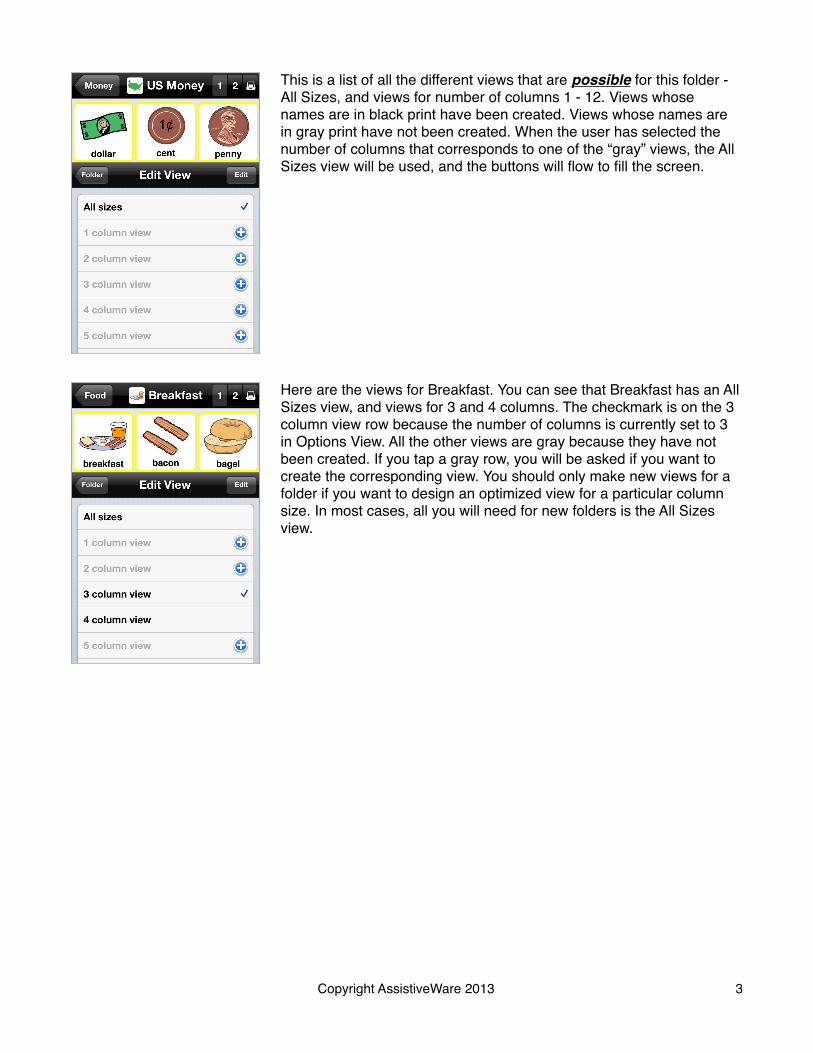
This is a list of all the different views that are possible for this folder - All Sizes, and views for number of columns 1 - 12. Views whose names are in black print have been created. Views whose names are in gray print have not been created. When the user has selected the number of columns that corresponds to one of the “gray” views, the All Sizes view will be used, and the buttons will flow to fill the screen.
Here are the views for Breakfast. You can see that Breakfast has an All Sizes view, and views for 3 and 4 columns. The checkmark is on the 3 column view row because the number of columns is currently set to 3 in Options View. All the other views are gray because they have not been created. If you tap a gray row, you will be asked if you want to create the corresponding view. You should only make new views for a folder if you want to design an optimized view for a particular column size. In most cases, all you will need for new folders is the All Sizes view.
Copyright AssistiveWare 2013 3
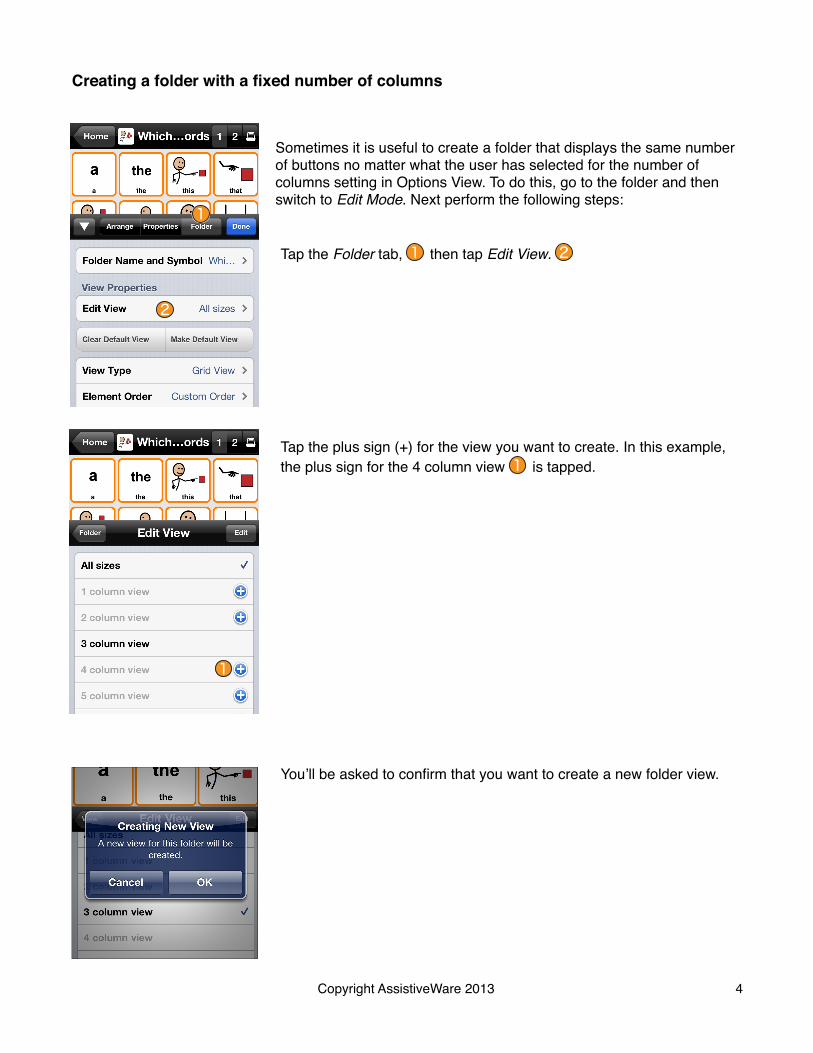
Creating a folder with a fixed number of columns
Sometimes it is useful to create a folder that displays the same number of buttons no matter what the user has selected for the number of columns setting in Options View. To do this, go to the folder and then switch to Edit Mode. Next perform the following steps:
Tap the Folder tab, then tap Edit View.
Tap the plus sign (+) for the view you want to create. In this example, the plus sign for the 4 column view is tapped.
You’ll be asked to confirm that you want to create a new folder view.
Copyright AssistiveWare 2013 4
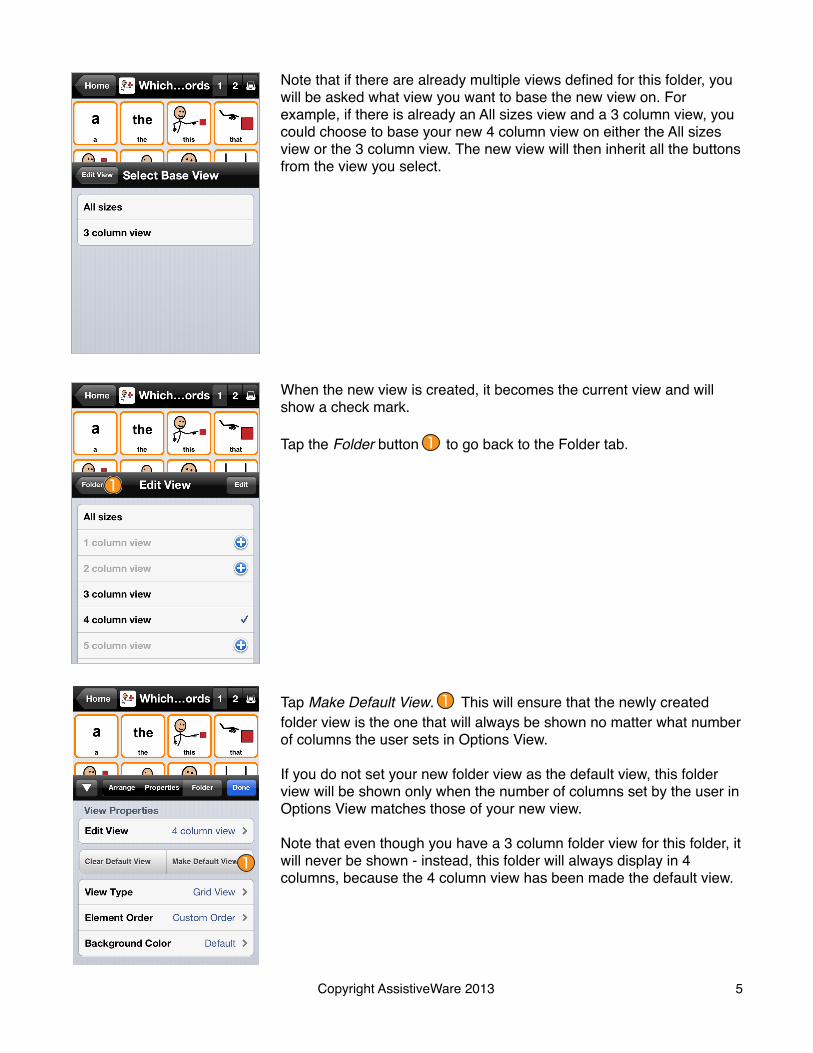
Note that if there are already multiple views defined for this folder, you will be asked what view you want to base the new view on. For example, if there is already an All sizes view and a 3 column view, you could choose to base your new 4 column view on either the All sizes view or the 3 column view. The new view will then inherit all the buttons from the view you select.
When the new view is created, it becomes the current view and will show a check mark.
Tap the Folder button to go back to the Folder tab.
Tap Make Default View. This will ensure that the newly created folder view is the one that will always be shown no matter what number of columns the user sets in Options View.
If you do not set your new folder view as the default view, this folder view will be shown only when the number of columns set by the user in Options View matches those of your new view.
Note that even though you have a 3 column folder view for this folder, it will never be shown - instead, this folder will always display in 4 columns, because the 4 column view has been made the default view.
Copyright AssistiveWare 2013 5
Creating optimized versions of a folder for each number of columns
Sometimes you are using Proloquo2Go on more than one kind of device and want to use, for example, a 4-column layout on your iPhone and 7-column layout on your iPad. It is possible to create optimized folder views showing just those buttons that are most important on a 4-column view, while exposing more vocabulary on the 7-column view that has more space for buttons. Similarly buttons can be in different locations in different folder views. For our Core Word vocabulary, we have already made optimized versions of many folders. You can do something similar for your own folders by creating multiple views for the same folder and then optimizing the buttons and/or order of the buttons to best fit a specific number of columns.
The previous section explained how to create a folder with a fixed number of columns. To create a folder with multiple views optimized for a specific number of columns, the process is quite similar, except that you do not make any of the views Default.
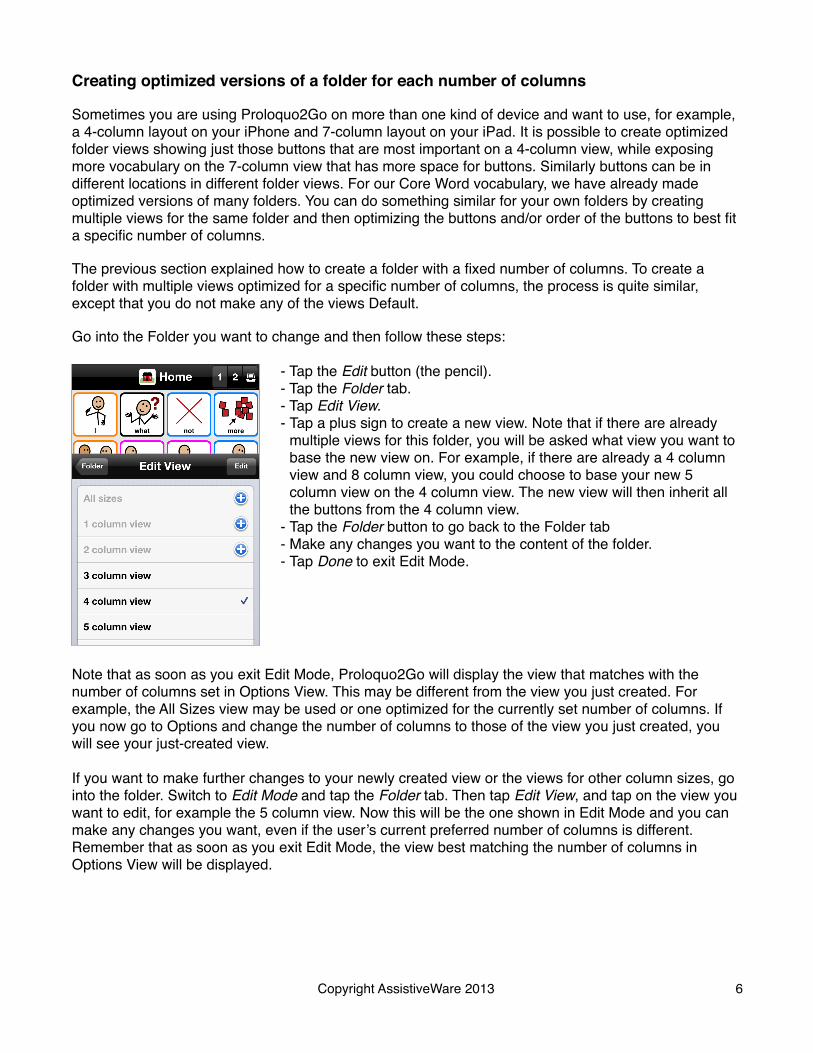
Go into the Folder you want to change and then follow these steps:
- Tap the Edit button (the pencil).- Tap the Folder tab.- Tap Edit View.- Tap a plus sign to create a new view. Note that if there are already
multiple views for this folder, you will be asked what view you want to base the new view on. For example, if there are already a 4 column view and 8 column view, you could choose to base your new 5 column view on the 4 column view. The new view will then inherit all the buttons from the 4 column view.
- Tap the Folder button to go back to the Folder tab- Make any changes you want to the content of the folder.- Tap Done to exit Edit Mode.
Note that as soon as you exit Edit Mode, Proloquo2Go will display the view that matches with the number of columns set in Options View. This may be different from the view you just created. For example, the All Sizes view may be used or one optimized for the currently set number of columns. If you now go to Options and change the number of columns to those of the view you just created, you will see your just-created view.
If you want to make further changes to your newly created view or the views for other column sizes, go into the folder. Switch to Edit Mode and tap the Folder tab. Then tap Edit View, and tap on the view you want to edit, for example the 5 column view. Now this will be the one shown in Edit Mode and you can make any changes you want, even if the user’s current preferred number of columns is different. Remember that as soon as you exit Edit Mode, the view best matching the number of columns in Options View will be displayed.
Copyright AssistiveWare 2013 6