fm5 qrm rev-1 2-17-11 - xante.com · 6921 re duiven the netherlands tel.: +31 26 3193 210 fax: +31...
TRANSCRIPT


2
Xanté® is a registered trademark of Xanté Corporation.
Adobe®; Adobe® PostScript®, the PostScript®, and Adobe® logos are registered trademarks of Adobe Systems Incorporated. Adobe® Acrobat™ is a trademark of Adobe Systems Incorporated which may be registered in certain jurisdictions.
Macintosh® and Mac® are registered trademarks of Apple Computer, Inc.
Microsoft®, Windows®, and Windows NT® are registered trademarks of Microsoft Corporation.
QuarkXPress® and Quark® are registered trademarks of Quark, Inc.
Ethernet® is a registered trademark of Xerox Corporation.
Preps® is a registered trademark and ScenicSoft™ is a trademark of ScenicSoft, Inc.
All other brand and product names are trademarks, registered trademarks, or service marks of their respective holders.
CopyrightThis manual is Copyrighted © 2011 by Xanté Corporation. All Rights Reserved. Printed in the USA. This manual may not be copied in whole or in part, nor transferred to any other media or language without the express written permission of Xanté Corporation.
Manual NoticeXanté Corporation reserves the right to make changes to this manual and to the equipment described herein without notice. Every effort has been made to ensure that this manual is free of inaccuracies and omissions. However, Xanté Corporation makes no warranty of any kind including, but not limited to, any implied warranties of merchantability and fi tness for a particular purpose with regard to this manual.
Xanté Corporation assumes no responsibility for, or liability for, errors contained in this manual or for incidental, special, or consequential damages arising out of the furnishing of this manual, or the use of this manual in operating the equipment, or in connection with the

3
performance of the equipment when so operated.
Xanté Corporation2800 Dauphin StreetMobile, AL 36606-2400Phone: 800-926-8393, 251-473-4920Fax: 251-473-6503xante.com
Xanté EuropeMarketing 16921 RE DuivenThe NetherlandsTel.: +31 26 3193 210Fax: +31 26 3193 211Internet: xante.com
SAFETY INFORMATION
• Always use the FilmMaker in a well ventilated area. Allow enough room around the platemaker for adequate ventilation and easy access to the paper trays. If you place the FilmMaker in an enclosure, ensure it is properly ventilated.
• Do not use the FilmMaker near water. Do not spill any type of liquid into it.
• Be certain that your power source matches the rating listed on the back of the FilmMaker. If you are unsure, contact your dealer or local power company.
• Do not insert anything into the ventilation slots on the FilmMaker. You could cause an electrical shock or electrical arcing, which could cause a fi re.
• Aside from the routine maintenance described in the documentation, do not try to service the FilmMaker yourself. Removing the cover may expose you to shocks or other electrical hazards.
• For more information, please refer to the USER'S GUIDE.

4
Table of ContentsFilmMaker Set-up............................. 5
Removing the FilmMaker ............... 5Installing the Imaging Unit .............. 5Standard Cassette ......................... 7Multipurpose Feeder ...................... 8Media Types ................................... 9Connecting the Power Cord ........... 9Cable Connections ....................... 10Confi guring the IP Address ........... 10
Windows Installation ..................... 11Installing Windows Printer Driver . 11Confi guring PPD Defaults ............ 12
Macintosh OS X ............................. 14Web Interface ................................. 18Service and Support...................... 18

5
FilmMaker Set-upRemoving the FilmMaker
Removing the FilmMaker.
Note: Always use two people to lift the FilmMaker. There are recessed grips on the FilmMaker’s sides.
Your package contains the following items:
• Your Xanté FilmMaker
• 500 sheet cassette
• Power cord
• Quick Reference Manual and
Utilities CD-ROM
• Imaging Unit
Note: If you do not receive your full shipment or if anything is damaged, call Xanté Customer Support at 1-800-926-8393 (US and Canada) or your Xanté dealer.
Installing the Imaging Unit
Release Top Cover Latch.
Open Top Cover and MP Feeder.
6
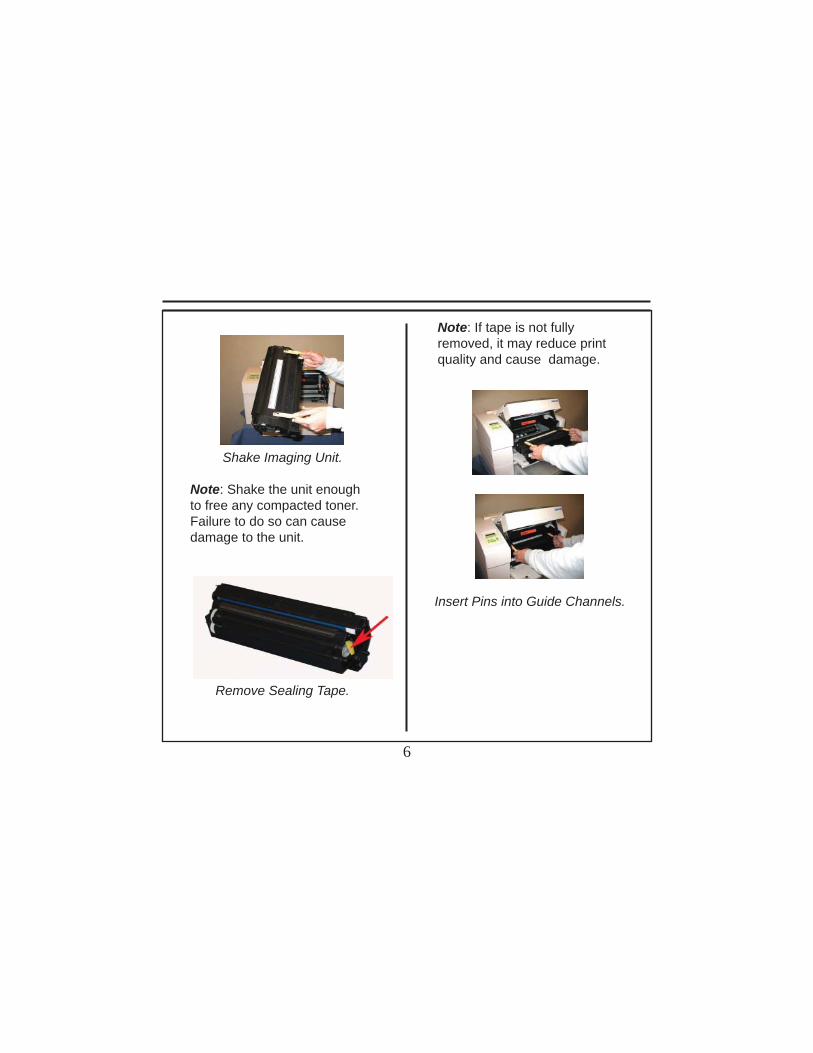
Shake Imaging Unit.
Note: Shake the unit enough to free any compacted toner. Failure to do so can cause damage to the unit.
Remove Sealing Tape.
Note: If tape is not fully removed, it may reduce print quality and cause damage.
Insert Pins into Guide Channels.

7
Insert Imaging Unit.
Close Top Cover.
Standard CassetteThe standard universal paper cassette holds up to 500 sheets of 20 lb bond/60 lb text weight (65 g/m2) paper
to a stack height of 2.13” (54 mm). This cassette can handle media weights from 16 - 28 lb (60 to 105 g/m2).
Pull Out Paper Cassette.
Remove Cassette Cover and load paper.

8
Adjust Width Guide.
Adjust Length Guide.
Load paper tray.
Note: To prevent paper jams, make sure the paper fits between the paper guides and under the cassette’s retaining clips.
Note: Pull out the output tray extension and pull up the paper stop for paper sizes larger than letter/A4 sizes.
Adjust Output Tray Extension.
Multipurpose FeederThe FilmMaker’s multipurpose feeder holds up to 150 sheets of 20 lb bond/60 lb text weight (75 g/m2) paper.

9
The multipurpose feeder supports nonstandard size media from 3.94” x 5.83” (100 mm x 148 mm) to 13” x 35.5” (330 mm x 902 mm) and can handle media weights from 16 - 36 lb (60 - 135 g/m2).
Pull Out the Tray Extension.
Load Media and Adjust the Media Guides.
Media Types• Plain Paper
• Heavy Paper
• Cover Stock
• Labels and Transparencies
• Myriad Films
Connecting the Power CordWARNING: Always use a properly
grounded, surge protected AC power outlet to prevent damage to the FilmMaker.
1. Make sure the FilmMaker's power switch is off.
2. Connect the power cable to the back of the FilmMaker and to the power outlet.

10
Power Cord for the FilmMaker.WARNING: Never use a damaged
power cord. Check it monthly and replace immediately if damage is found.
Cable ConnectionsYour FilmMaker has a 10/100Ba-
seT Ethernet port.
Ethernet port
Ethernet cable
1. Turn off your FilmMaker.
2. Connect the desired cable to your FilmMaker and to the appropriate port on your network or computer (if you are using a crossover cable).
Confi guring the IP Address
Note:If you are using the DHCP on your computer, turn off the FilmMaker, then restart it for the new IP address to take effect.
To set the IP address, network class, and net mask, do the following:
1. Turn on the FilmMaker then press the MENU key until [Setup: Net-work] appears.
2. Press the ENTER key to enter the Network menu.
3. Set the IP address, network class, and network mask settings.
a. Press the MENU key until the appropriate menu appears.

11
b. Press the ENTER key to access the selected menu.
c. Use the RESET, MENU, NEXT, and ENTER keys to change and accept the new settings.
4. Reboot your FilmMaker and go to DOS (Command). Prompt to ping the FilmMaker.
For example, if your IP address is 192.9.200.204, type PING 192.9.200.204 (at the DOS prompt). PING<IP ADDRESS>
Note: If you are using LPR printing on OSX, use the Network Utility to ping the FilmMaker.
Windows InstallationInstalling Windows Printer Driver 1. Insert Xante Utility CD-ROM.
2. The FilmMaker Setup window appears, click the button
3. Select again and the Choose Destination Location window appears. Select again.

12
4. The window to enter the IP Ad-dress will appear. Enter the Printer’s IP Address now and select . When the Hardware Installation window appears click
5. The properties window will open.
6. Change the Output Protocol to Binary and the Send CTRL-D After Each Job to No
7. Select the Installable Options such as the Resolution and RAMinstalled.
8. Click and then c l i ck .
Confi guring PPD Defaults1. Select [Start] - [Settings] - [Printers
and Faxes]
2. Select your FilmMaker's icon; select

13
[File] - [Properties]
3. Select available options; close Printers and Faxes window.
4. Select the Device Settings tab and confi gure the Installable Options at this time. Click [Device Options] tab

14
Macintosh OS X
This section takes you through the installation process on a Macintosh OS X. You should have the latest OS X version to properly install this FilmMaker.
You must type in your name and password to begin, then click [OK].
Click [Continue].

15
Select the location for the installation then click [Continue].
Choose [OS X only] or click [Include Classic] for the full installation.
Then click [Install].

16
Your installation was successful. Click [Quit] to exit or [Continue] to add
choices.
Click [Add] to add the FilmMaker to your list of printers.
Printer List window.
Enter the IP address for the FilmMaker and query the name. Select the FilmMaker
from the menu list and click [Add].

17
The FilmMaker is added to your printer list.
When the Main Screen reappears, you can register your FilmMaker (if on-line).
Complete the Registration Form.

18
Web Interface
Once your FilmMaker has been installed onto your system, you can check its status, rename it, align paper, and much more by simply entering the IP address in the address bar of your web browser.
Note:The web browser window and all links within it are the same for both Macintosh and PC environments.
Refer to the User’s Guide for more information and specifi cs about the features of the FilmMaker.
Service and Support •Tech Support
1-800-926-8393 (US and Canada) Other areas, call your Xanté vendor.
•Fax(251)-473-6503
•Hours of Operation7 a.m. - 6 p.m. Mon. - Fri. CST
•[email protected]@xante.com
For more information about Xanté products, please visit our website:
www.xante.com