fluorescent protein purification · protein purification using fluorescent proteins in order to...
TRANSCRIPT
Fluorescent Protein Purification
Teacher Guide
sciencebridge
ScienceBridge/UC San Diego
© 2011
All rights reserved.
Content written/prepared by the following:
UCSD - ScienceBridge
Jeremy Babendure
Alegra Bartzat
Maarten Chrispeels
Heather Gastil
Shelley Glenn Lee
Heather Liwanag
Johnnie Lyman
James Short
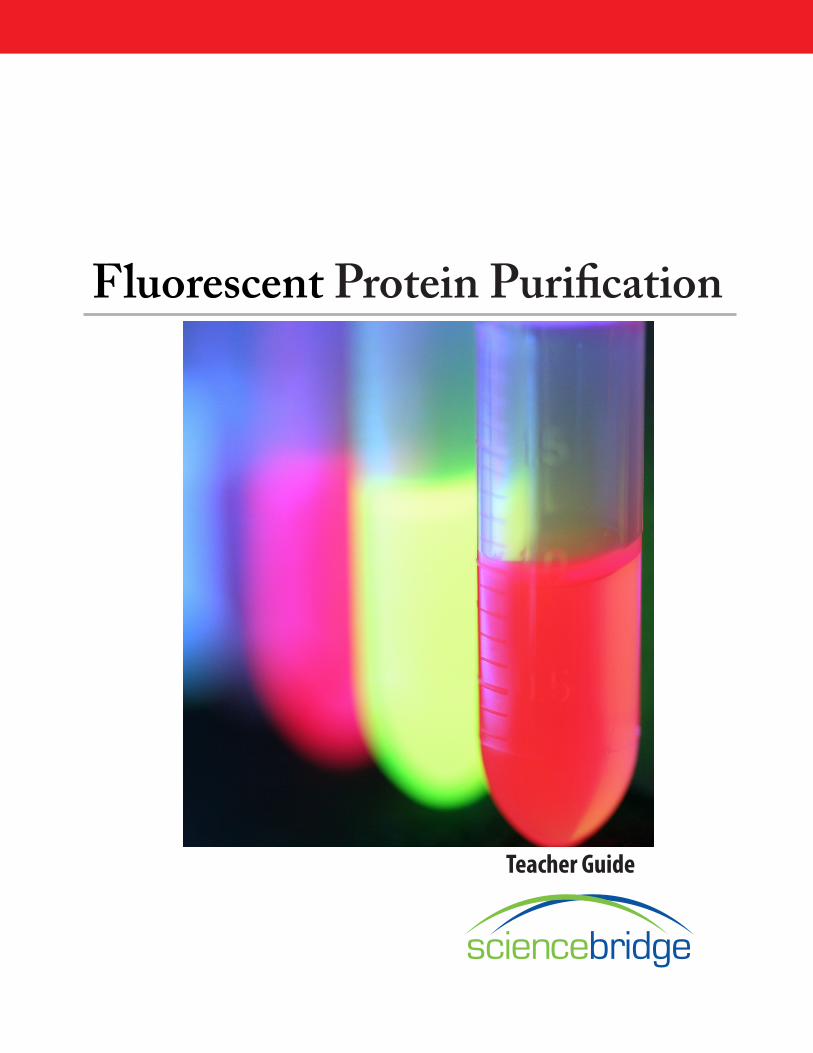
Cover Art: Purified fluorscent proteins under UV light. From left to right: blue fluorescent protein, mCherry, green fluorescent protein, and mTangerine.
TABLEOFCONTENTS
TableofContents 1 Program and Lab Overview 5
ScienceBridge Program . . . . . . . . . . . . . . . . . . . . . . . . . . . 5
Lab Description . . . . . . . . . . . . . . . . . . . . . . . . . . . . . . . 6
2 Biology Curriculum 7
Lab Goals and Objectives . . . . . . . . . . . . . . . . . . . . . . . . . . 7
CA State Standards Addressed . . . . . . . . . . . . . . . . . . . . . . . . 7
Content Information . . . . . . . . . . . . . . . . . . . . . . . . . . . . 8
Research Applications . . . . . . . . . . . . . . . . . . . . . . . . . . . . 10
Implementation . . . . . . . . . . . . . . . . . . . . . . . . . . . . . . 12
Glossary . . . . . . . . . . . . . . . . . . . . . . . . . . . . . . . . . . 14
Implementation Strategies . . . . . . . . . . . . . . . . . . . . . . . . . . 14
PowerPoint Notes . . . . . . . . . . . . . . . . . . . . . . . . . . . . . . 15
Assessment Strategies . . . . . . . . . . . . . . . . . . . . . . . . . . . 15
BP1 Biology Protocol 1 19
BP1 Biology Protocol 2 24
APP Appendices 47

PROGRAMANDLABOVERVIEW| 5
1 ProgramandLabOverview
ScienceBridge Program
About ScienceBridge
ScienceBridge is a Science Outreach Initiative based at the University of California, San Diego (UCSD) that serves secondary school teachers and students by connecting students to current and relevant scientific research through classroom activities, university experiences and community events. The foundation of the ScienceBridge program is our Teacher Profes-sional Development program, from which the following activity was developed at UCSD in collaboration with local science teachers and is now offered as a training and implementation package for the high school classroom.
One primary goal of ScienceBridge is to create very affordable and accessible labs that engage students with authentic science experiences. We work to optimize each activity to minimize the dependency on expensive equipment and other resources sometimes lacking at a school site. In doing so, we have created activities that can be implemented in virtually ANY class-room, but are also able to be “ramped up” or have added complexity to challenge more advanced students or to utilize avail-able classroom resources. ScienceBridge also supports and is helping to optimize student-run biotechnology sites within specific school districts that will allow materials to be available and sustainable over time, eliminating dependency on external resources.
Professional development & curriculaScienceBridge’s Teacher Professional Development strives to create connections between teachers and scientists, increase teachers’ and students’ access to current scientific information and resources, and encourage the engagement of students as leaders in the classroom. Each ScienceBridge teacher is trained to use the materials and lab protocol created at UCSD and brings a handful of students from his or her science classroom. These student leaders will learn to use the resources and serve as teaching assistants and resident “experts” in the classroom during activity implementation. All student and teacher input is encouraged and considered at all times, such that our training sessions, curriculum, and resources are the most effective and useful to the audience.
We are very pleased to offer these resources to you and hope you have a great experience with this lab activity!
For more information and program updates, visit:
http://sciencebridge.ucsd.edu
6 |
Lab DescriptionProtein purification using fluorescent proteinsIn order to study protein structure and function, scientists must be able to produce a large quantity of a particular protein and be able to collect it from solutions that contain other material. Most proteins are not visible to the naked eye, nor are they eas-ily distinguished from other types of proteins, so scientists must rely on unique properties of the protein to engineer methods of separation and purification. In this ScienceBridge lab activity, students will utilize the Nobel Prize winning technology of fluorescent proteins to study how proteins are produced by living organisms and isolated and purified by scientists. The fluorescent proteins originate from gene sequences engineered in the lab of Nobel Prize winner Roger Tsien at UCSD and are widely used in scientific research to “tag” proteins of interest inside living cells in order to visualize cellular processes. These proteins have also been engineered to have unique chemical properties that allow for separation through the use of nickel beads and the technique of column chromatography.
Students will have the opportunity to identify and purify up to six different proteins of different colors and visualize how sci-entists produce, study, and characterize proteins. After completing this lab activity, students will have a better understanding of key biological and chemical processes such as transcription and translation, protein structure and function, and methods of protein separation. Students will also gain important laboratory and technical skills while engaging in experimental design, data collection and analysis, communication of findings and sources of experimental error. Students and teachers alike will benefit from learning about and utilizing cutting edge fluorescent protein technology in their very own classroom.
The ScienceBridge Protein Purification activity can be used in the Biology, Chemistry or Environmental Science classroom. This activity can be implemented with our without the preface activity, Bacterial Transformation of Fluorescent Proteins, in which wild type E. coli bacteria are given the genetic information to create the protein of interest (fluorescent proteins). Stu-dents will learn how the proteins and genes encoding for the proteins have been engineered and how scientists use bacteria as “factories” for protein production. Applications of transformation, protein purification and fluorescent proteins are easily and simply demonstrated and discussed using the resources provided in this lab kit.
FLUORESCENTPROTEINPURIFICATION
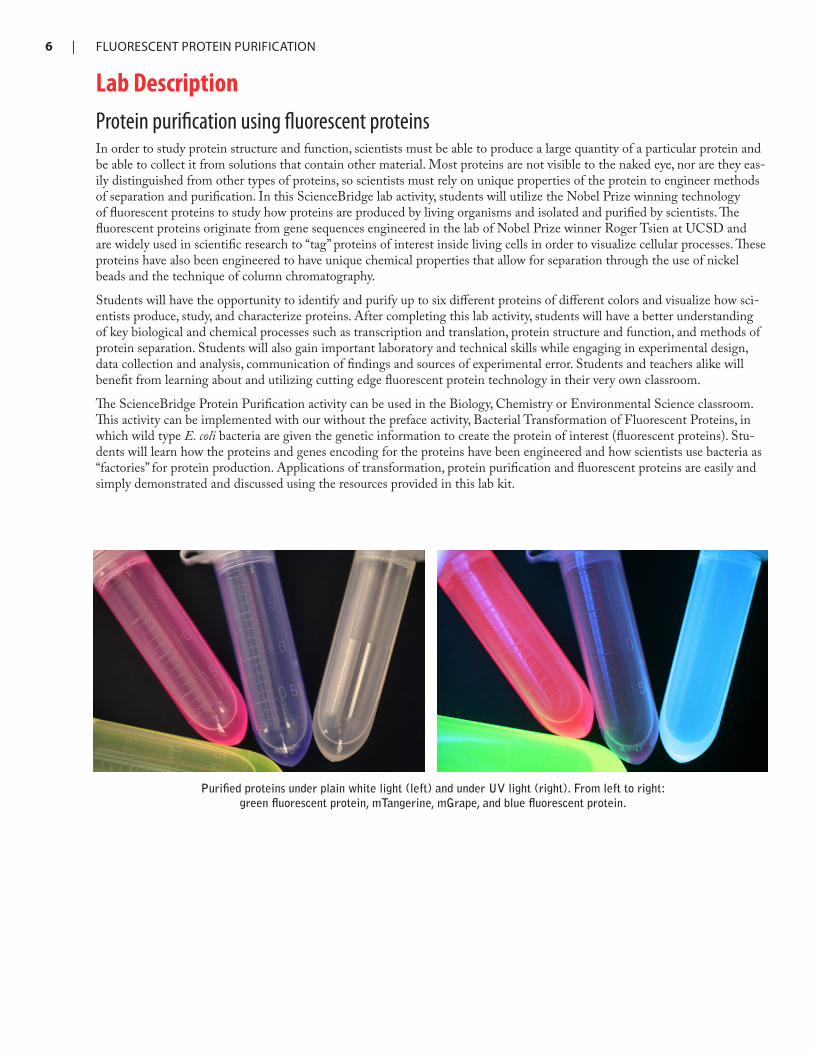
Purified proteins under plain white light (left) and under UV light (right). From left to right: green fluorescent protein, mTangerine, mGrape, and blue fluorescent protein.
| 7
2 BiologyCurriculum
Lab Goals and Objectives
In this lab, students will start with E. coli bacterial cells that have been transformed with fluorescent protein DNA, that was created by Nobel Prize winning scientist Roger Tsien. Students will use lysozyme and dry ice to break open the cells and using nickel bead chromatography, they will separate the fluorescent proteins from the bacteria’s cellular proteins. Students will understand that all protein research requires the purification of the desired protein to study the structure, function and interactions as well as to engineer vaccines.
CA State Standards AddressedThe following CA state science standards are addressed in the Fluorescent Protein Purification lab.
GeneticsGenes are a set of instructions encoded in the DNA se-quence of each organism that specify the sequence of amino acids in proteins characteristic of that organism. As a basis for understanding this concept:
• Students know proteins can differ from one another in the number and sequence of amino acids.
• Students know why proteins having different amino acid sequences typically have different shapes and chemical properties.
The genetic composition of cells can be altered by incorpora-tion of exogenous DNA into the cells. As a basis for under-standing this concept:
• Students know the general structures and functions of DNA, RNA, and protein.
• Students know how genetic engineering (biotechnology) is used to produce novel biomedical and agricultural products.
• Students know how basic DNA technology (restriction digestion by endonucleases, gel electrophoresis, ligation, and transformation) is used to construct recombinant DNA molecules.
• Students know how exogenous DNA can be inserted into bacterial cells to alter their genetic makeup and sup-port expression of new protein products.
Investigation and ExperimentationScientific progress is made by asking meaningful questions and conducting careful investigations. As a basis for under-standing this concept and addressing the content in the other four strands, students should develop their own questions and perform investigations. Students will:
• Select and use appropriate tools and technology (such as computer-linked probes, spreadsheets, and graphing cal-culators) to perform tests, collect data, analyze relation-ships, and display data.
• Identify and communicate sources for unavoidable experimental error.
• Identify possible reasons for inconsistent results, such as sources of error or uncontrolled conditions.
• Formulate explanations by using logic and evidence.
• Recognize the issues of statistical variability and the need for controlled tests.
BIOLOGYCURRICULUM

8 |
Content InformationThe central dogma of molecular biologyEvery protein is produced through a series of processes called transcription and translation, in which a gene within a strand of DNA is “read” and transcribed into a strand of RNA, which is then “read” and translated into a protein using a col-lection of amino acids. The protein product serves some sort of function, which manifests as an observable characteristic or trait in the organism. This is known as the central dogma of molecular biology (DNA --> RNA --> protein --> trait). The central dogma applies to all living cells, from the smallest bacteria to the largest animals.
What is a protein?Proteins are chains of amino acids linked through chemical bonds (peptide bonds). Proteins are the building blocks of living organisms, and serve many functions, including struc-tural support (e.g., cytoskeleton), catalysis (i.e., enzymes), movement of molecules from place to place (e.g., trans-membrane proteins), and cell-to-cell communication (e.g., neurotransmitters, hormones).
There are twenty different amino acids that make up es-sentially all proteins on earth. Each of these amino acids has a specific design, composed of a central carbon bonded to pieces of other organic molecules. The structures of all twenty amino acids can be viewed at http://www.vivo.colostate.edu/hbooks/molecules/aminoacids.html
Amino acids are covalently bonded together in chains by peptide bonds. Long chains of amino acids are called polypeptides or proteins. The unique side chains give unique chemical properties to amino acids, and dictate how each amino acid interacts with the others in a protein. Amino acids can be classified as being either hydrophobic (being repelled by water) or hydrophilic (attracted to water), and grouped according to their charge (uncharged, positively-charged, or negatively-charged). Ultimately, the three-dimen-sional conformation of a protein —and thus its activity—is determined by complex interactions among amino acids.
Levels of Protein StructureStructural features of proteins are usually described at four levels of complexity:
• Primary structure: the linear sequence of amino acids in a protein.
• Secondary structure: areas of folding or coiling within a protein, held together by hydrogen bonding; examples in-clude alpha helices and beta pleated sheets.
• Tertiary structure: the final three-dimensional structure of a protein, which results from a large number of interactions between amino acids.
• Quaternary structure: interaction of two or more tertiary proteins (called subunits). Hemoglobin has quaternary struc-ture due to association of several different globin proteins.
The primary structure of a protein can be determined from the nucleotide sequence of the corresponding messenger RNA (mRNA). Based on primary structure, many features of secondary structure can be predicted with the aid of com-puter programs. Predicting protein tertiary structure remains a very tough problem, although some progress has been made in this important area. For more information, go to http://www.pdb.org to check out protein structures.
FLUORESCENTPROTEINPURIFICATION
| 9
Recall that protein function is based primarily on three di-mensional shape. Within any one cell, there are thousands of different proteins. They vary by size, shape, electrical charge, hydrophobicity/hydrophilicity (affinity to water molecules), and their attraction to other molecules. Any or all of these properties of proteins can be used to separate them from one another in order to isolate the protein of interest for further studies or use.
In order to harvest proteins from the cells that make them, we first have to break open the bacterial cells to release the products inside them. In this activity, we use two methods to lyse (break open) the cells: lysozyme and freezing. Lysozyme
BIOLOGYCURRICULUM
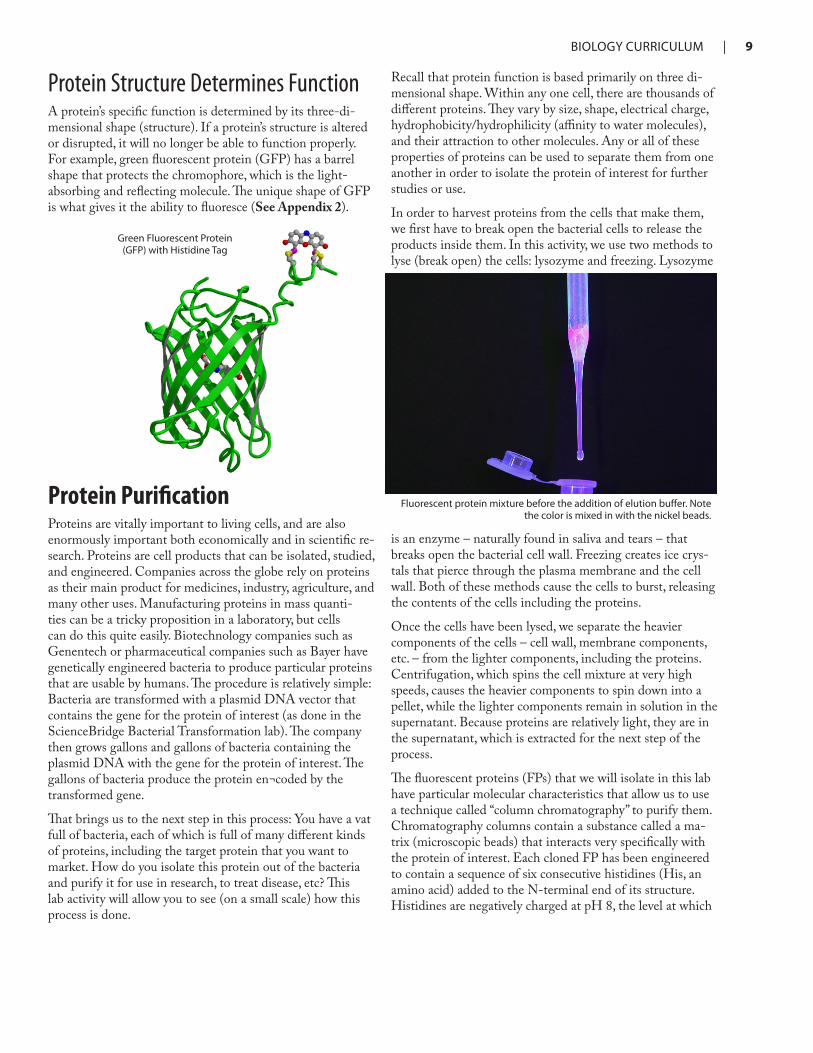
Protein Structure Determines Function A protein’s specific function is determined by its three-di-mensional shape (structure). If a protein’s structure is altered or disrupted, it will no longer be able to function properly. For example, green fluorescent protein (GFP) has a barrel shape that protects the chromophore, which is the light-absorbing and reflecting molecule. The unique shape of GFP is what gives it the ability to fluoresce (See Appendix 2).
is an enzyme – naturally found in saliva and tears – that breaks open the bacterial cell wall. Freezing creates ice crys-tals that pierce through the plasma membrane and the cell wall. Both of these methods cause the cells to burst, releasing the contents of the cells including the proteins.
Once the cells have been lysed, we separate the heavier components of the cells – cell wall, membrane components, etc. – from the lighter components, including the proteins. Centrifugation, which spins the cell mixture at very high speeds, causes the heavier components to spin down into a pellet, while the lighter components remain in solution in the supernatant. Because proteins are relatively light, they are in the supernatant, which is extracted for the next step of the process.
The fluorescent proteins (FPs) that we will isolate in this lab have particular molecular characteristics that allow us to use a technique called “column chromatography” to purify them. Chromatography columns contain a substance called a ma-trix (microscopic beads) that interacts very specifically with the protein of interest. Each cloned FP has been engineered to contain a sequence of six consecutive histidines (His, an amino acid) added to the N-terminal end of its structure. Histidines are negatively charged at pH 8, the level at which
GreenFluorescentProtein(GFP)withHistidineTag
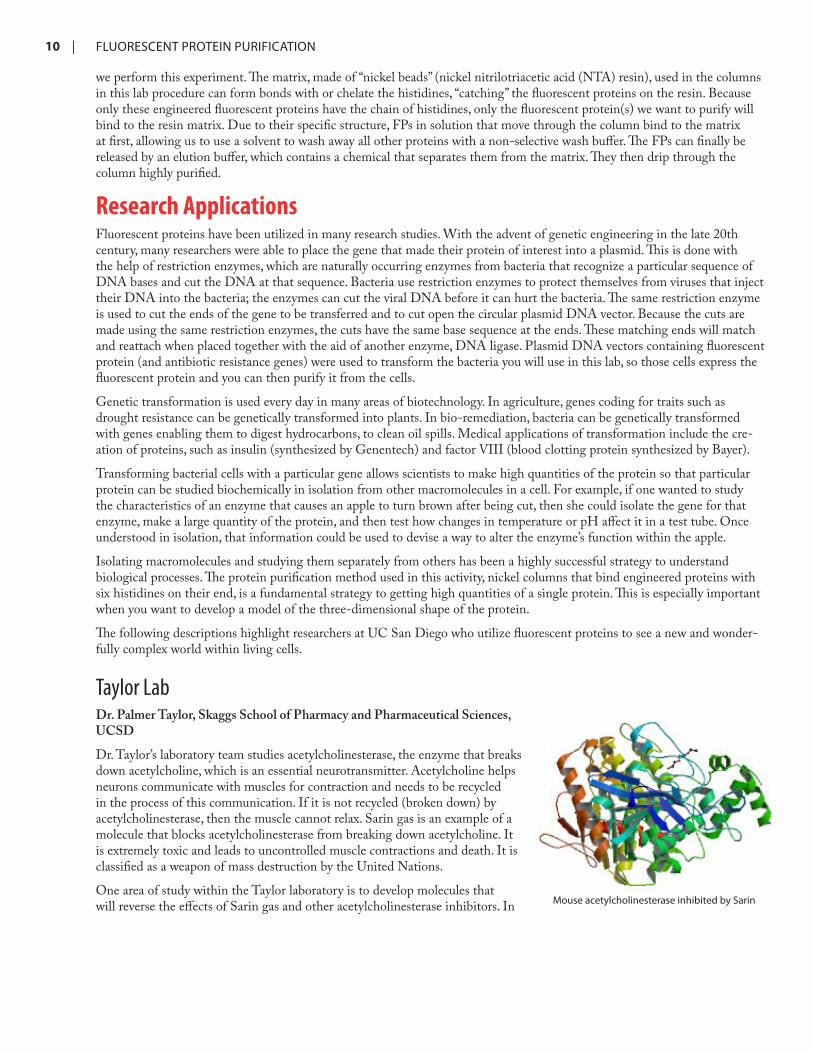
Fluorescentproteinmixturebeforetheadditionofelutionbuffer.Notethecolorismixedinwiththenickelbeads.
Protein PurificationProteins are vitally important to living cells, and are also enormously important both economically and in scientific re-search. Proteins are cell products that can be isolated, studied, and engineered. Companies across the globe rely on proteins as their main product for medicines, industry, agriculture, and many other uses. Manufacturing proteins in mass quanti-ties can be a tricky proposition in a laboratory, but cells can do this quite easily. Biotechnology companies such as Genentech or pharmaceutical companies such as Bayer have genetically engineered bacteria to produce particular proteins that are usable by humans. The procedure is relatively simple: Bacteria are transformed with a plasmid DNA vector that contains the gene for the protein of interest (as done in the ScienceBridge Bacterial Transformation lab). The company then grows gallons and gallons of bacteria containing the plasmid DNA with the gene for the protein of interest. The gallons of bacteria produce the protein en¬coded by the transformed gene.
That brings us to the next step in this process: You have a vat full of bacteria, each of which is full of many different kinds of proteins, including the target protein that you want to market. How do you isolate this protein out of the bacteria and purify it for use in research, to treat disease, etc? This lab activity will allow you to see (on a small scale) how this process is done.
10 |
we perform this experiment. The matrix, made of “nickel beads” (nickel nitrilotriacetic acid (NTA) resin), used in the columns in this lab procedure can form bonds with or chelate the histidines, “catching” the fluorescent proteins on the resin. Because only these engineered fluorescent proteins have the chain of histidines, only the fluorescent protein(s) we want to purify will bind to the resin matrix. Due to their specific structure, FPs in solution that move through the column bind to the matrix at first, allowing us to use a solvent to wash away all other proteins with a non-selective wash buffer. The FPs can finally be released by an elution buffer, which contains a chemical that separates them from the matrix. They then drip through the column highly purified.
Research Applications Fluorescent proteins have been utilized in many research studies. With the advent of genetic engineering in the late 20th century, many researchers were able to place the gene that made their protein of interest into a plasmid. This is done with the help of restriction enzymes, which are naturally occurring enzymes from bacteria that recognize a particular sequence of DNA bases and cut the DNA at that sequence. Bacteria use restriction enzymes to protect themselves from viruses that inject their DNA into the bacteria; the enzymes can cut the viral DNA before it can hurt the bacteria. The same restriction enzyme is used to cut the ends of the gene to be transferred and to cut open the circular plasmid DNA vector. Because the cuts are made using the same restriction enzymes, the cuts have the same base sequence at the ends. These matching ends will match and reattach when placed together with the aid of another enzyme, DNA ligase. Plasmid DNA vectors containing fluorescent protein (and antibiotic resistance genes) were used to transform the bacteria you will use in this lab, so those cells express the fluorescent protein and you can then purify it from the cells.
Genetic transformation is used every day in many areas of biotechnology. In agriculture, genes coding for traits such as drought resistance can be genetically transformed into plants. In bio-remediation, bacteria can be genetically transformed with genes enabling them to digest hydrocarbons, to clean oil spills. Medical applications of transformation include the cre-ation of proteins, such as insulin (synthesized by Genentech) and factor VIII (blood clotting protein synthesized by Bayer).
Transforming bacterial cells with a particular gene allows scientists to make high quantities of the protein so that particular protein can be studied biochemically in isolation from other macromolecules in a cell. For example, if one wanted to study the characteristics of an enzyme that causes an apple to turn brown after being cut, then she could isolate the gene for that enzyme, make a large quantity of the protein, and then test how changes in temperature or pH affect it in a test tube. Once understood in isolation, that information could be used to devise a way to alter the enzyme’s function within the apple.
Isolating macromolecules and studying them separately from others has been a highly successful strategy to understand biological processes. The protein purification method used in this activity, nickel columns that bind engineered proteins with six histidines on their end, is a fundamental strategy to getting high quantities of a single protein. This is especially important when you want to develop a model of the three-dimensional shape of the protein.
The following descriptions highlight researchers at UC San Diego who utilize fluorescent proteins to see a new and wonder-fully complex world within living cells.
FLUORESCENTPROTEINPURIFICATION
MouseacetylcholinesteraseinhibitedbySarin
Taylor LabDr. Palmer Taylor, Skaggs School of Pharmacy and Pharmaceutical Sciences, UCSD
Dr. Taylor’s laboratory team studies acetylcholinesterase, the enzyme that breaks down acetylcholine, which is an essential neurotransmitter. Acetylcholine helps neurons communicate with muscles for contraction and needs to be recycled in the process of this communication. If it is not recycled (broken down) by acetylcholinesterase, then the muscle cannot relax. Sarin gas is an example of a molecule that blocks acetylcholinesterase from breaking down acetylcholine. It is extremely toxic and leads to uncontrolled muscle contractions and death. It is classified as a weapon of mass destruction by the United Nations.
One area of study within the Taylor laboratory is to develop molecules that will reverse the effects of Sarin gas and other acetylcholinesterase inhibitors. In
| 11
order to do this, one must have large quantities of purified acetylcholinesterase available. By transforming cells to produce the protein, laboratory members can grow large quantities of the acetylcholinesterase by growing the cells in culture and then harvesting the protein by breaking the cells open. Utilizing a specially designed acetylcholinesterase gene, one with a specific tag at the end of the protein, researchers can efficiently purify the enzyme from all other naturally occurring cellular enzymes. Conceptually, this is the same strategy that is used in this protein purification kit. A specific tag (in our case, the six histidines at the end of a fluorescent protein) is used to bind the protein of interest to a column of beads (the histidines bind to the nickel beads in this lab activity).
The NMR ResourceDirector Dr. Stanley J. Opella, Center for NMR Spectros-copy and Imaging of Proteins, UCSD
A collaborative effort by many laboratory team members, the NMR Resource is led by Dr. Opella and consists of research staff and students who provide a service to both on and off-campus scientists who wish to create a three-dimensional model of the molecule(s) they study.
Many researchers study complex molecules like proteins. In order to develop a three-dimensional model of these mol-ecules, large magnets and very precise detecting devices are combined to form a nuclear magnetic resonance (NMR) machine. Essentially, each nucleus of the protein is affected differently by NMR machine, because of its local chemical environment. Those differences are measured and a three-dimensional model is developed. The image of acetylcho-linesterase from the description of the Taylor lab is one such model.
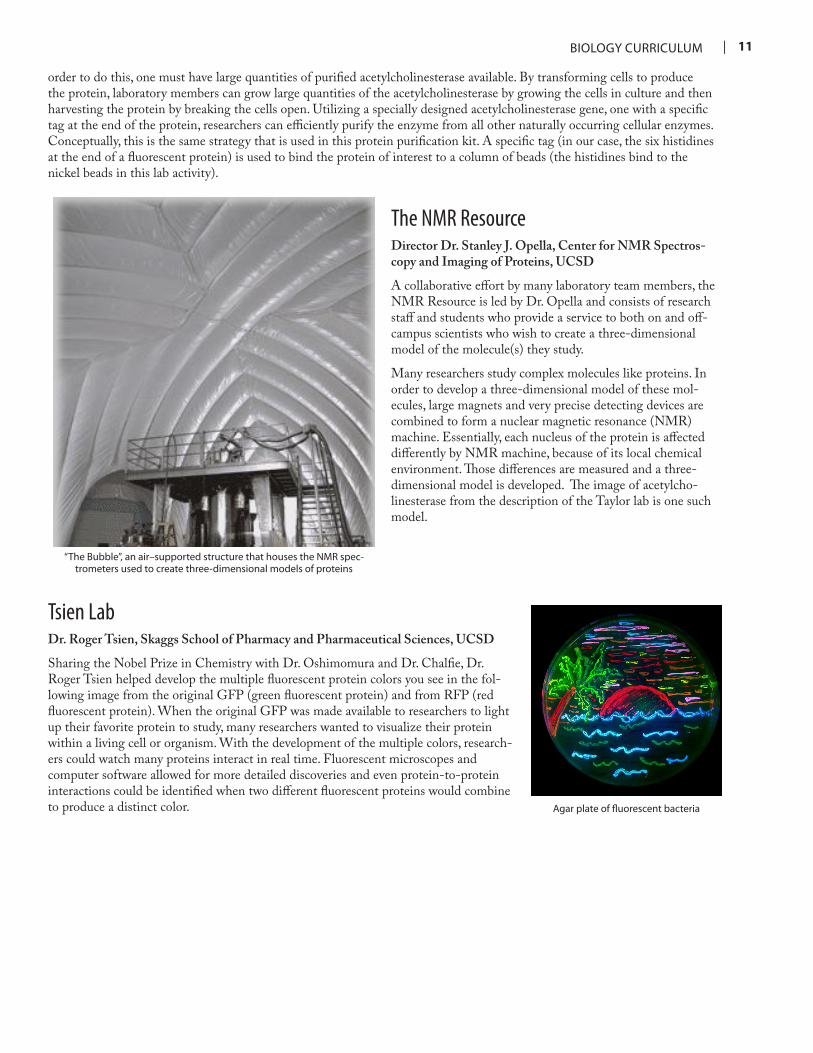
BIOLOGYCURRICULUM
“TheBubble”,anair–supportedstructurethathousestheNMRspec-trometersusedtocreatethree-dimensionalmodelsofproteins
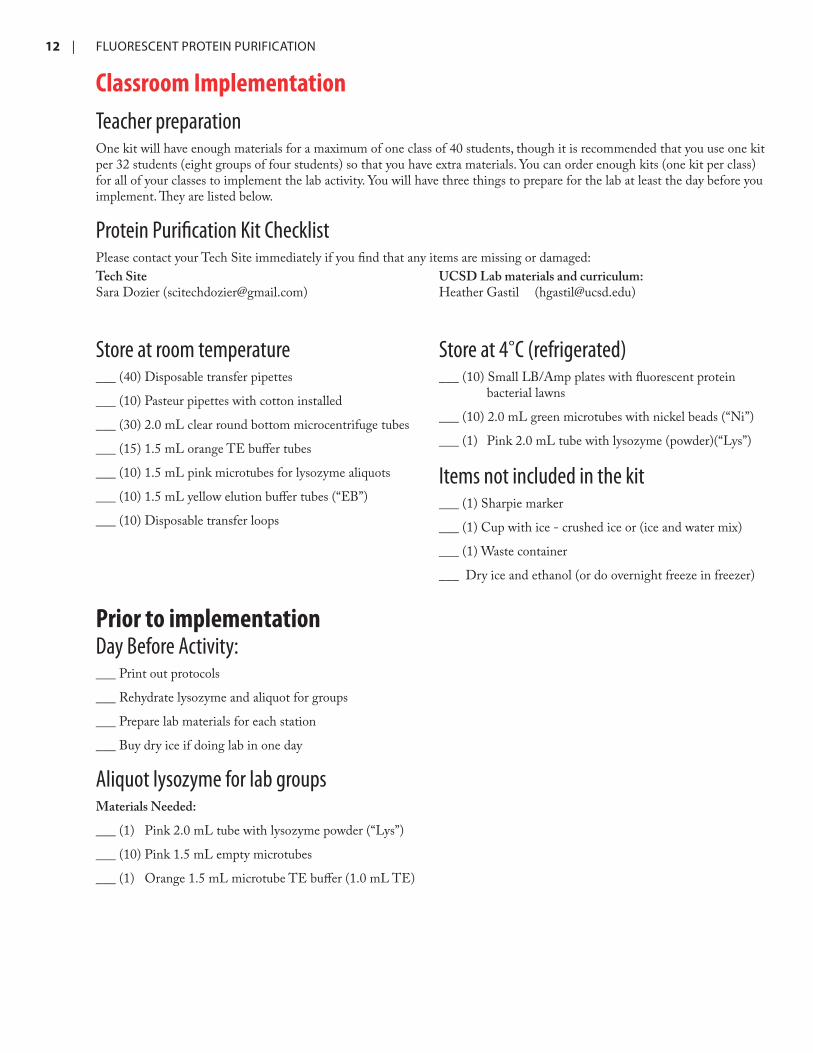
Tsien LabDr. Roger Tsien, Skaggs School of Pharmacy and Pharmaceutical Sciences, UCSD
Sharing the Nobel Prize in Chemistry with Dr. Oshimomura and Dr. Chalfie, Dr. Roger Tsien helped develop the multiple fluorescent protein colors you see in the fol-lowing image from the original GFP (green fluorescent protein) and from RFP (red fluorescent protein). When the original GFP was made available to researchers to light up their favorite protein to study, many researchers wanted to visualize their protein within a living cell or organism. With the development of the multiple colors, research-ers could watch many proteins interact in real time. Fluorescent microscopes and computer software allowed for more detailed discoveries and even protein-to-protein interactions could be identified when two different fluorescent proteins would combine to produce a distinct color. Agarplateoffluorescentbacteria
12 |
Classroom ImplementationTeacher preparationOne kit will have enough materials for a maximum of one class of 40 students, though it is recommended that you use one kit per 32 students (eight groups of four students) so that you have extra materials. You can order enough kits (one kit per class) for all of your classes to implement the lab activity. You will have three things to prepare for the lab at least the day before you implement. They are listed below.
Protein Purification Kit ChecklistPlease contact your Tech Site immediately if you find that any items are missing or damaged:
FLUORESCENTPROTEINPURIFICATION
Tech SiteSara Dozier ([email protected])
Store at room temperature___ (40) Disposable transfer pipettes
___ (10) Pasteur pipettes with cotton installed
___ (30) 2.0 mL clear round bottom microcentrifuge tubes
___ (15) 1.5 mL orange TE buffer tubes
___ (10) 1.5 mL pink microtubes for lysozyme aliquots
___ (10) 1.5 mL yellow elution buffer tubes (“EB”)
___ (10) Disposable transfer loops
Store at 4°C (refrigerated)
___ (10) Small LB/Amp plates with fluorescent protein bacterial lawns
___ (10) 2.0 mL green microtubes with nickel beads (“Ni”)
___ (1) Pink 2.0 mL tube with lysozyme (powder)(“Lys”)
Items not included in the kit___ (1) Sharpie marker
___ (1) Cup with ice - crushed ice or (ice and water mix)
___ (1) Waste container
___ Dry ice and ethanol (or do overnight freeze in freezer)
UCSD Lab materials and curriculum:Heather Gastil ([email protected])
Prior to implementationDay Before Activity: ___ Print out protocols
___ Rehydrate lysozyme and aliquot for groups
___ Prepare lab materials for each station
___ Buy dry ice if doing lab in one day
Aliquot lysozyme for lab groupsMaterials Needed:
___ (1) Pink 2.0 mL tube with lysozyme powder (“Lys”)
___ (10) Pink 1.5 mL empty microtubes
___ (1) Orange 1.5 mL microtube TE buffer (1.0 mL TE)
| 13
1. Using the provided 10 pink 1.5 mL microcentrifuge tubes, label the cap of each “LYS”
2. Add 1 mL of TE to the lysozyme powder. Gently pipet up and down and then firmly close the tube and invert several times to ensure all powder is dissolved.
3. Aliquot 0.1 mL into your labeled LYS tubes. You should have a total of (10) aliquots.
4. Store in the refrigerator until lab day then distribute one tube per group into the cup of ice.
Day of Activity:
Assembly of station materialsHave students label and assemble their group’s materials into a plastic bag. (This acquaints them with the materials and helps expedite setup.)
Distribute station materials___ (1) Small plate with colored lawn
___ (3) 2.0 mL clear round bottom microcentrifuge tubes
___ (4) Disposable transfer pipettes
___ (1) Pasteur pipette with cotton installed
___ (1) Disposable transfer loop
___ (1) Yellow elution buffer microtube “EB”
___ (1) Orange TE buffer microtube “TE”
BIOLOGYCURRICULUM
Place the following on ice___ (1) Pink lysozyme microtube “Lys”
___ (1) Green 2.0 mL nickel bead microtube “Ni”
Items not included in kit___ (1) Sharpie marker
___ (1) Cup with ice - crushed ice or (ice and water mix)
___ (1) Waste container
___ (1) Centrifuge (shared)
(use extra TE buffer for balancing)
___ (1) Cup dry ice with ethanol (optional overnight freeze in freezer)
For class waste:
Prepare a 10% bleach solution in a tub or sink to soak all waste materials. Soak materials (pipets, plates etc) for about 20 min. in the solution and then they will be fine to throw in your regular trash.
CentrifugeA microcentrifuge is needed for separating the fluorescent protein in the cytoplasm from the rest of the bacterium after lysing the cell.
OptionalThe activity may be re-scheduled to be carried out in two days instead of one. To do so, an overnight freeze in the freezer may be done instead of the quick freeze (dry ice + ethanol).
14 | FLUORESCENTPROTEINPURIFICATION
GlossaryAmino AcidThe monomer (building block) of proteins. Every amino acid includes an amine group (-NH) and a carboxylic acid group (-COOH), with a side chain that differentiates each amino acid from the others. There are twenty amino acids coded by the universal genetic code.
Ampicillin (Amp)An antibiotic (chemically similar to penicillin) that works by inhibiting the synthesis (building) of bacterial cell walls. Mixed into the bacterial growth medium, it is used in this lab to select for trans¬formed bacteria expressing the fluorescent protein gene.
ChromatographyThe collective term for a family of laboratory techniques for the separation of mixtures. In the ScienceBridge protein purification activity, metal chelating (ion-exchange) column chromatography is used. The nickel beads act as chelat-ing agents and the pasteur pipette with cotton acts as the column.
ChromophoreThe part of a molecule that is responsible for its color. The chromophore is typically a region of a molecule in which the energy difference between two molecular orbitals falls within the range of the visible spectrum. The fluorescent proteins in the ScienceBridge protein purification lab are barrel-shaped molecules with a chromophore region located in the middle of the barrel.
Central DogmaThe central dogma of molecular biology. This idea, first put forth by Francis Crick in 1958, states that information in living cells flows from DNA to RNA to protein, and never in the reverse direction. This is the basis for a fundamental understanding of molecular biology.
CentrifugeA piece of equipment that spins samples at high speeds. The centrifuge works using the sedimentation principle, for which the centripetal acceleration causes more dense substances to separate along the radial direction (toward the bottom of the tube). The heavy substances usually condense into a pellet at the bottom of the sample tube, whereas the lighter substances remain in solu-
tion in the supernatant. In the ScienceBridge protein purification lab, a centrifuge is used to separate the heavier cell components (e.g., cell wall, plasma membrane) from the lighter components (e.g., proteins).
Elution BufferSolution with imidazole (250 mM) buffered in TE. Used to elute (release) the fluorescent proteins from the column (pasteur pipette) so they can be collected. This is the reagent used in the final step of the ScienceBridge protein purification procedure.
Escherichia coliA gram-negative, rod-shaped bacterium that is commonly found in the lower intestine of endothermic (warm-blooded) animals. Commonly used as a model organism and more commonly known as E. coli, this bacteria can also be found outside the human body among fecally contaminated environments. Most strains of E. coli are not harmful. The laboratory strain of E. coli has had its genome sequenced. This is the species of bacterium from which you will harvest a fluorescent protein.
FluorescenceThe absorption of electromagnetic radiation (light) by an atom at a higher energy and the re-emission of electromag-netic radiation at a lower energy. See Appendix 3.
GeneA stretch of DNA that codes for a particular product (usually a protein) that serves a function inside or outside the cell.
HistidineAn essential amino acid, often abbreviated His, with an imid-azole functional group as its side chain. This functional group is typically positively charged at biological pH levels (e.g., the pH of your blood), but becomes negatively charged at pH 8, the pH level at which the ScienceBridge protein purification procedure is performed.
ImidazoleAn organic compound with the formula C3H4N2. Its structure is a 5-member aromatic ring with the two nitrogens as part of the ring. In the ScienceBridge protein purification protocol, imidazole helps to elute (release) the fluorescent proteins from the nickel beads by interacting more strongly with the nickel beads and thus causing the fluorescent proteins to “let go” of the nickel beads.
| 15
LysisThe breaking open of a cell, releasing its contents.
LysozymeAn enzyme that catalyzes the hydrolysis of the 1,4-beta link-ages in bacterial cell walls. Lysozyme is used to help “lyse” the cells to release the fluorescent proteins.
Nickel BeadsAgarose beads with nickel chelated to nitrilotriacetic acid (NTA). These beads bind the histidine (6xHis) tag on the fluorescent proteins, thus separating the fluorescent proteins from the other proteins in the supernatant.
PelletA term referring to the gathering of heavy components at the bottom of a tube during centrifugation. In the Science-Bridge protein purification procedure, the pellet formed during centrifugation contains heavy cell components such as cell wall and plasma membrane fragments.
ProteinA biological macromolecule comprised of amino acids, which serves a function inside or outside of the cell. Proteins are considered gene products because their synthesis (construc-tion) is coded by the DNA (genes) of an organism.
BIOLOGYCURRICULUM
PurificationThe process of rendering something pure (free of other substances). Scientists purify proteins for many reasons, including studying their structure and creating vaccines or medicines.
SupernatantA term referring to the liquid part of a sample remaining after centrifugation. The supernatant typically contains the lighter components of a sample, which do not condense into the pellet but instead remain in solution. In the Science-Bridge protein purification procedure, the supernatant con-tains all of the proteins produced by the cells that were lysed.
TE bufferA buffer containing Tris base [10 mM], a common pH buf-fer, and EDTA [1 mM], a molecule that chelates cations. It is used in this lab to help collect the bacteria and maintain the pH at the appropriate level to facilitate the interaction of the fluorescent proteins with the nickel beads.
TranscriptionThe process by which RNA is synthesized (made) by copying a sequence of an organism’s DNA (a gene).
TranslationThe process by which a protein is synthesized (made). Dur-ing translation, messenger RNA (mRNA) is decoded by a ribosome, which coordinates the binding of transfer RNA (tRNA) to bring together amino acids in the correct se-quence.
Implementation StrategiesWe suggest that you organize students in groups of four and have no more than eight lab groups. We give you enough materi-als for ten groups, but to have extra materials using only eight groups is best.
We have found that if you have the time, giving the protocol to the students before the day of implementation to read over the steps and to assign roles is highly beneficial for having the lab run smoothly.
The curriculum is designed to be completed in three 50-minute periods.
• Day 1 – Prepare the students with the PowerPoint, pre-lab material, organize lab groups and prepare station materials
• Day 2 – Lab protocol
• Day 3 – Results, analysis and conclusion
16 | FLUORESCENTPROTEINPURIFICATION
Student leader preparation• Meet with your student leaders before the implementation to answer any questions and review the lab procedure with
them.
• Also discuss how to guide their fellow classmates rather than just taking over the step or telling them the answer.
• If you are not having your classes prepare their station materials, this a good task for your student leaders to assist you with.
• If you have student leaders assisting you in the classroom for implementation, we suggest assigning them to certain lab stations in order to guide those students through the protocol.
ProtocolsThere are two versions of the biology purification protocol.
• P1: This protocol is adapted to have illustrations alongside the protocol to help students follow the protocol and under-stand what is happening in each step. This guide is also designed to aid students for which English is a second language.
• P2: This protocol is text-only, for more advanced classes and easy printing.
PowerPoint NotesThe PowerPoint presentations that were given at both the teacher and student ScienceBridge trainings are available on our website for your use in the classroom.
Embedded in the notes section of the student PowerPoint presentation are talking points for the presentation that can printed out to use for your classroom lecture.
Download the files at sciencebridge.ucsd.edu. Log on and then select Programs=>ScienceBridge Labs=>Content Areas=>Protein Purification.
On the Protein Purification page, click on the link that says Teacher Guide, PowerPoints, videos and other classroom materials=>PowerPoints.
Assessment StrategiesConstructive feedback is essential for learning. It is also essential for you to best understand what your students know and do not know in regard to science content and processes. We have provided pre-lab questions so that students can explain how each step of the lab works toward purification of proteins. We recommend you work with your students together or provide it as homework after the introduction to the lab has been made.
Post-lab questions are designed to have students reflect on their learning through this activity and can be completed together after the lab, or given as a homework assignment individually.

| 17
Biology
TeacherKey
Student pre-lab questions1. How are the bacteria able to produce the fluorescent proteins you are going to collect?
The bacteria were transformed with a plasmid with the gene for the fluorescent protein. Because they have the gene (DNA), they can transcribe and translate that gene into a protein.
2. What is lysozyme? What is the purpose of using lysozyme in this experiment?
Lysozyme is an enzyme that breaks apart bacterial cell walls. We use lysozyme in this experiment to break open the bacterial cells to release the proteins.
3. What is the purpose of freezing the tube? What happens to the cells when they are frozen?
The purpose of freezing the tube is to break open the cells. (This has the same purpose as the lysozyme.) When cells freeze, the water inside them forms ice crystals, which break through the plasma membrane and cell wall.
4. Centrifugation separates heavier components from lighter ones. The heavy materials form a pellet at the bottom of the tube, while the lighter components remain in solution (in the supernatant). Where are the proteins (in the pellet or in the supernatant) after centrifugation in this lab?
Proteins are lighter than most cell components, and are thus found in the supernatant after centrifugation.
5. How do the nickel beads help to separate the fluorescent proteins from the other proteins?
The fluorescent proteins have been engineered to have a “tag” of six histidines. The positively charged nickel beads attract the positively charged histidines, so the fluorescent proteins bind to the nickel beads.
6. How does the cotton help to separate the fluorescent proteins from the other proteins?
The cotton filters by size. The nickel beads are too big to pass through the cotton, so they stay on top. Proteins are small and will pass through the cotton, unless they are bound to the nickel beads. Since the fluorescent proteins bind to the nickel beads, they stay on top of the cotton.
7. What happens to the fluorescent protein when you add the elution buffer?
The elution buffer contains imidazole, which binds to the nickel beads more strongly than the histidine tag. The elution buffer causes the fluorescent proteins to “let go” of the nickel beads, so they can be collected.
Post lab questions
1. What characteristic(s) of the fluorescent proteins allowed you to purify them?
The fluorescent proteins were specifically engineered with a histidine “tag” that caused them to attach to the nickel beads for the purpose of purification. The proteins were separated by a charge interaction (negative histidines with positive nickel beads).
2. Did your waste tube contain any colored proteins? Why would that be, and what might allow you to collect those pro-teins? Did your final tube contain any other proteins other than the fluorescent proteins?
The waste tube often contains some fluorescent proteins, because there are so many FPs that the nickel beads become saturated. One way to collect those proteins would be to pass the waste tube through the column a second time (or through a fresh column). However, the final collection tube should contain only fluorescent proteins, since those are the only proteins that will bind to the nickel beads.
BIOLOGYTEACHERKEY

18 |
3. Now that you have successfully performed protein purification, reflect on the central question. What enables scientists to separate a protein of interest from all the other proteins in a cell? Think about what steps in the protocol were important for this process.
Answers will vary. Lysozyme and freezing are important for breaking open the cells, to have access to the proteins inside. Centrifuga-tion separates the proteins from the heavier cell components. The column chromatography procedure (nickel beads and elution buffer) is the critical step for actually separating the fluorescent protein from all of the other proteins.
FLUORESCENTPROTEINPURIFICATION
| 19
Central questionHow do scientists separate a protein of interest from a mix of other proteins produced in a cell?
Overview of experimentIn this lab, you will use lysozyme and freezing techniques to break open bacterial cells and collect fluorescent proteins that were produced by the bacteria. You will use centrifugation to separate the heavy and light materials. Nickel beads are added to bind to the fluorescent protein, which differentiates it from the other proteins in the mix. You will then use a technique called column chromatography to isolate and purify the fluorescent protein.
Student pre-lab questions1. How are the bacteria able to produce the fluorescent proteins you are going to collect?
2. What is lysozyme? What is the purpose of using lysozyme in this experiment?
3. What is the purpose of freezing the tube? What happens to the cells when they are frozen?
4. Centrifugation separates heavier components from lighter ones. The heavy materials form a pellet at the bottom of the tube, while the lighter components remain in solution (in the supernatant). Where are the proteins (in the pellet or in the supernatant) after centrifugation in this lab?
5. How do the nickel beads help to separate the fluorescent proteins from the other proteins?
Biology
Protocol1
BIOLOGYPROTOCOL1
Group #
Role in Group Student NameMaterialsReaderTimerTechnician
20 |
Material Checklist___ (1) ScienceBridge Protein Purification Protocol
___ (1) Plate with single color fluorescent bacterial lawn
___ (1) Transfer loop
___ (4) Disposable plastic transfer pipettes
___ (1) Pasteur pipette w/installed cotton
___ (3) 2 mL clear microtubes
___ (1) 1.5 mL orange microtube with TE buffer (“TE”)
___ (1) 1.5 mL pink microtube with Lysozyme (“Lys”)
___ (1) 1.5 mL yellow microtube with Elution buffer (“EB”)
___ (1) 2 mL Green microtube with Nickel beads (“Ni”)
___ Black Sharpie Marker
___ Timer/Watch
___ Waste container (Styrofoam cup)
Teacher monitored
___ Dry Ice and Ethanol in Styrofoam Cup (or overnight
freeze)
___ Mini centrifuge
___ UV lamp
Protocol1. Find your agar plate that has the single color bacterial
lawn.
FLUORESCENTPROTEINPURIFICATION
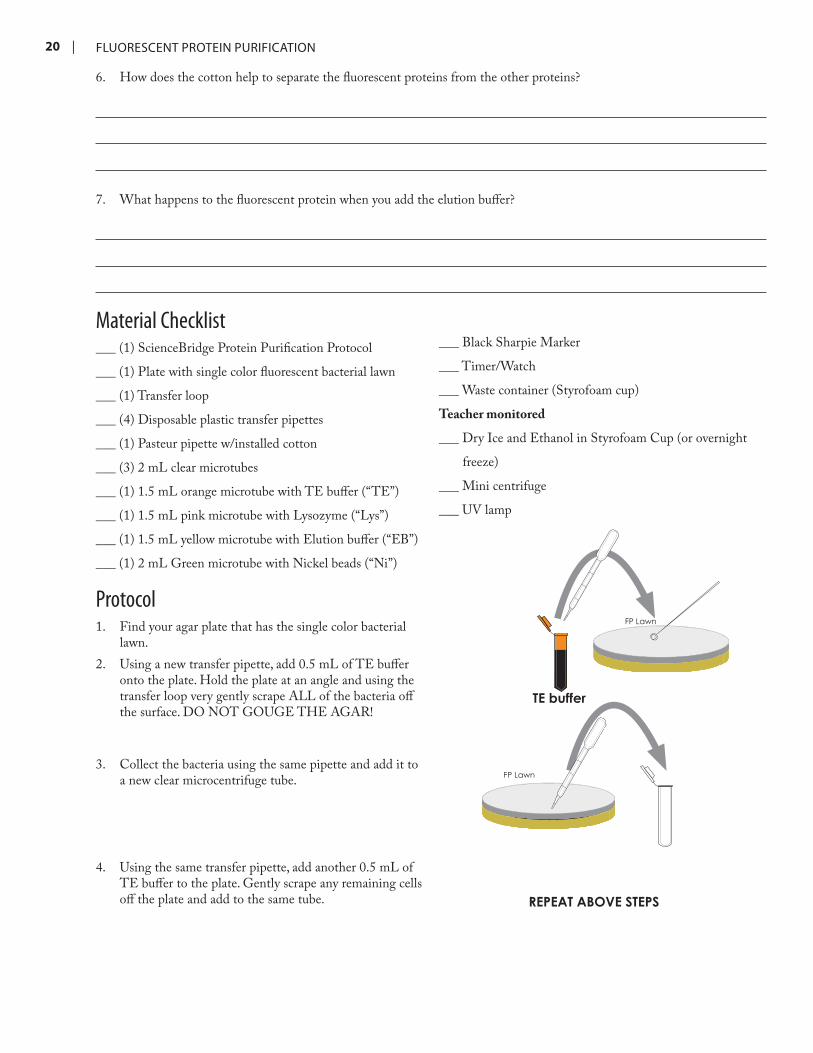
2. Using a new transfer pipette, add 0.5 mL of TE buffer onto the plate. Hold the plate at an angle and using the transfer loop very gently scrape ALL of the bacteria off the surface. DO NOT GOUGE THE AGAR!
3. Collect the bacteria using the same pipette and add it to a new clear microcentrifuge tube.
4. Using the same transfer pipette, add another 0.5 mL of TE buffer to the plate. Gently scrape any remaining cells off the plate and add to the same tube.
FP Lawn
TE buffer
FP Lawn
REPEAT ABOVE STEPS
6. How does the cotton help to separate the fluorescent proteins from the other proteins?
7. What happens to the fluorescent protein when you add the elution buffer?

| 21
5. Resuspend the bacteria by gently pipetting up and down. Put the cap on the tube and flick the tube to mix.
6. Using a new transfer pipette add the entire contents of lysozyme solution to the tube. Cap the tube and invert gently several times for 7 minutes.
BIOLOGYPROTOCOL1
7. Label the cap of the tube with your initials and class period.
• Give the tube to your teacher who will snap-freeze in dry ice for 10 minutes.
OR
• Freeze overnight at -20°C (freezer).
8. When your teacher returns your tube to you, defrost the tube by holding it in your hand.
Lysozyme
Label tube and freeze
9. Give your tube to your teacher to load into the mini centrifuge. Make sure your tubes are balanced with the other tubes. Spin for 10 min.
10. Using a new transfer pipette collect the supernatant (liquid surrounding the pellet) and add it to the tube that has the Ni2+ beads. Be careful not to disturb the pel-let when removing the supernatant! Rock the Ni2+ tube back and forth to mix for 3 minutes.
Defrost tube
Pellet
Supernatant
Ni2+
10 min
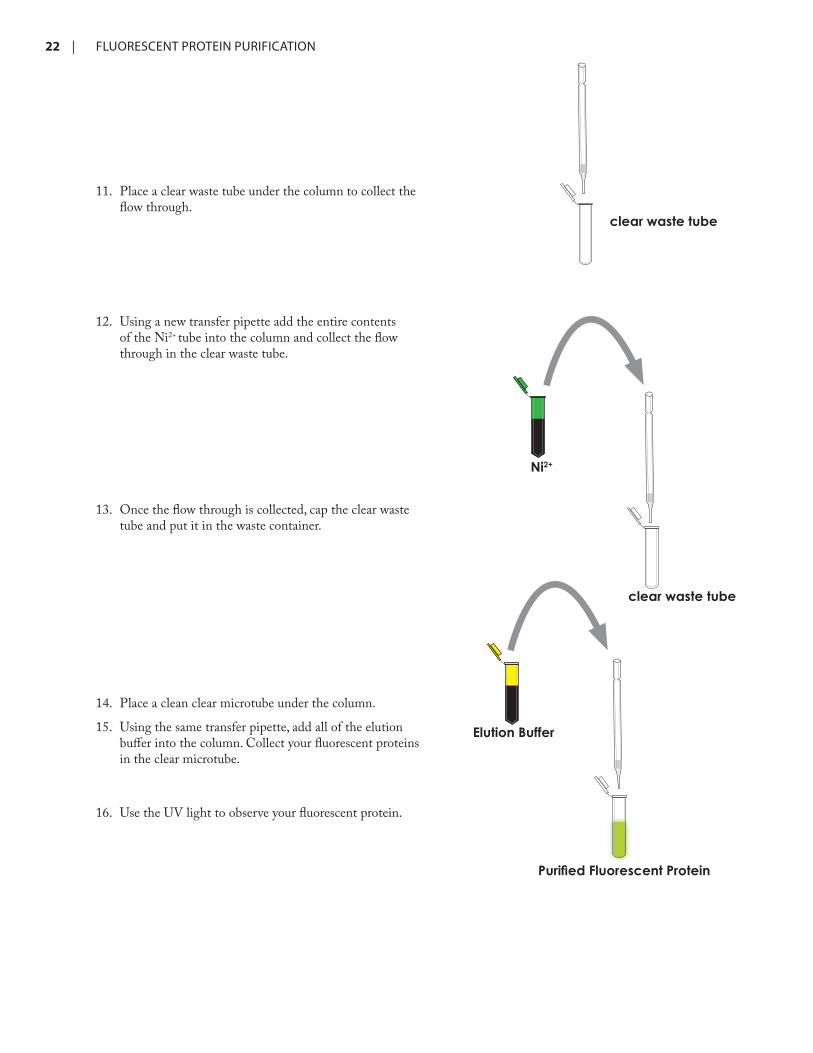
22 |
12. Using a new transfer pipette add the entire contents of the Ni2+ tube into the column and collect the flow through in the clear waste tube.
13. Once the flow through is collected, cap the clear waste tube and put it in the waste container.
14. Place a clean clear microtube under the column.
15. Using the same transfer pipette, add all of the elution buffer into the column. Collect your fluorescent proteins in the clear microtube.
16. Use the UV light to observe your fluorescent protein.
clear waste tube
Elution Buffer
Purified Fluorescent Protein
Ni2+
11. Place a clear waste tube under the column to collect the flow through.
clear waste tube
FLUORESCENTPROTEINPURIFICATION
| 23
Post lab questions1. What characteristic(s) of the fluorescent proteins allowed you to purify them?
2. Did your waste tube contain any colored proteins? Why would that be, and what might allow you to collect those pro-teins? Did your final tube contain any other proteins other than the fluorescent proteins?
3. Now that you have successfully performed protein purification, reflect on the central question. What enables scientists to separate a protein of interest from all the other proteins in a cell? Think about what steps in the protocol were important for this process.
BIOLOGYPROTOCOL1
24 | FLUORESCENTPROTEINPURIFICATION
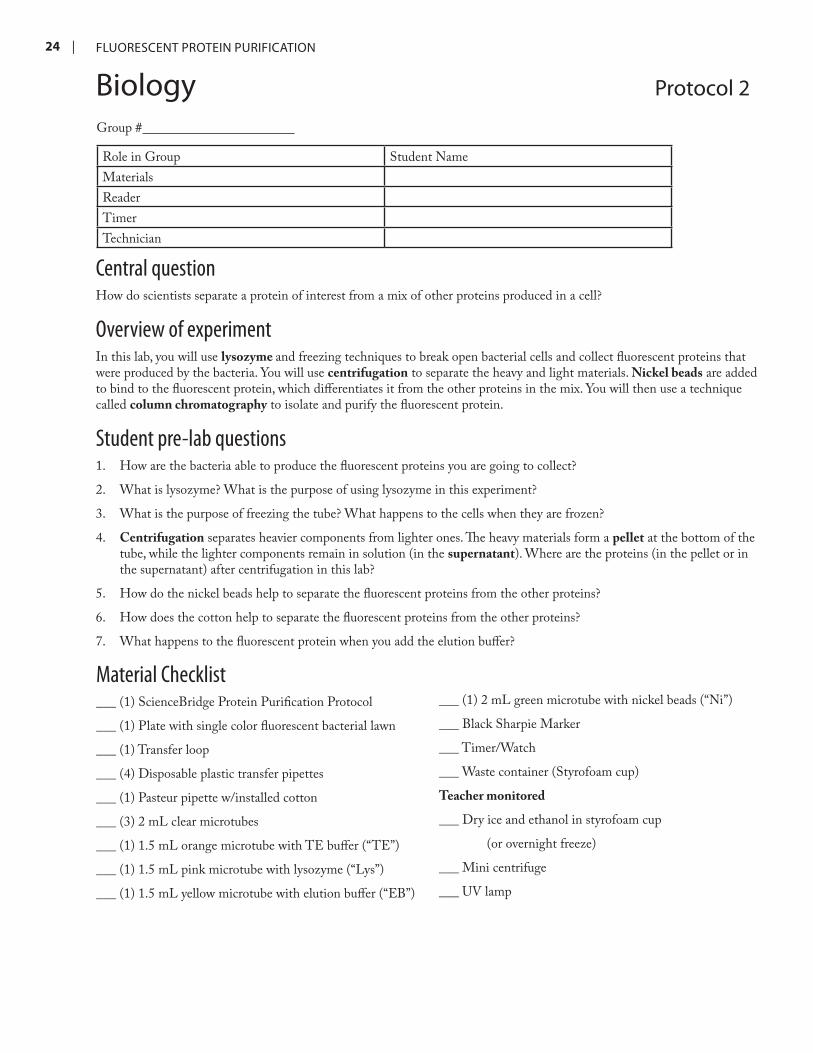
Biology
Protocol2
Group #
Role in Group Student NameMaterialsReaderTimerTechnician
Central questionHow do scientists separate a protein of interest from a mix of other proteins produced in a cell?
Overview of experimentIn this lab, you will use lysozyme and freezing techniques to break open bacterial cells and collect fluorescent proteins that were produced by the bacteria. You will use centrifugation to separate the heavy and light materials. Nickel beads are added to bind to the fluorescent protein, which differentiates it from the other proteins in the mix. You will then use a technique called column chromatography to isolate and purify the fluorescent protein.
Student pre-lab questions1. How are the bacteria able to produce the fluorescent proteins you are going to collect?
2. What is lysozyme? What is the purpose of using lysozyme in this experiment?
3. What is the purpose of freezing the tube? What happens to the cells when they are frozen?
4. Centrifugation separates heavier components from lighter ones. The heavy materials form a pellet at the bottom of the tube, while the lighter components remain in solution (in the supernatant). Where are the proteins (in the pellet or in the supernatant) after centrifugation in this lab?
5. How do the nickel beads help to separate the fluorescent proteins from the other proteins?
6. How does the cotton help to separate the fluorescent proteins from the other proteins?
7. What happens to the fluorescent protein when you add the elution buffer?
Material Checklist___ (1) ScienceBridge Protein Purification Protocol
___ (1) Plate with single color fluorescent bacterial lawn
___ (1) Transfer loop
___ (4) Disposable plastic transfer pipettes
___ (1) Pasteur pipette w/installed cotton
___ (3) 2 mL clear microtubes
___ (1) 1.5 mL orange microtube with TE buffer (“TE”)
___ (1) 1.5 mL pink microtube with lysozyme (“Lys”)
___ (1) 1.5 mL yellow microtube with elution buffer (“EB”)
___ (1) 2 mL green microtube with nickel beads (“Ni”)
___ Black Sharpie Marker
___ Timer/Watch
___ Waste container (Styrofoam cup)
Teacher monitored
___ Dry ice and ethanol in styrofoam cup
(or overnight freeze)
___ Mini centrifuge
___ UV lamp
| 25
Protocol1. Find your agar plate that has the single color bacterial lawn.
2. Using a new transfer pipette, add 0.5 mL of TE buffer onto the plate. Hold the plate at an angle and using the transfer loop very gently scrape ALL of the bacteria off the surface. DO NOT GOUGE THE AGAR!
3. Collect the bacteria using the same pipette and add it to a new clear microcentrifuge tube.
4. Using the same transfer pipette, add another 0.5 mL of TE buffer to the plate. Gently scrape any remaining cells off the plate and add to the same tube.
5. Resuspend the bacteria by gently pipetting up and down. Put the cap on the tube and flick the tube to mix.
6. Using a new transfer pipette add the entire contents of lysozyme solution to the tube. Cap the tube and invert gently several times for seven minutes.
7. Label the cap of the tube with your initials and class period.
• Give the tube to your teacher who will snap-freeze in dry ice for 10 minutes.
OR
• Freeze overnight at -20°C (freezer).
8. When your teacher returns your tube to you, defrost the tube by holding it in your hand.
9. Give your tube to your teacher to load into the mini centrifuge. Make sure your tubes are balanced with the other tubes. Spin for 10 min.
10. Using a new transfer pipette collect the supernatant (liquid surrounding the pellet) and add it to the tube that has the Ni2+ beads. Be careful not to disturb the pellet when removing the supernatant! Rock the Ni2+ tube back and forth to mix for 3 minutes.
11. Place a clear waste tube under the column to collect the flow through.
12. Using a new transfer pipette add the entire contents of the Ni2+ tube into the column and collect the flow through in the clear waste tube.
13. Once the flow through is collected, cap the clear waste tube and put it in the waste container.
14. Place a clean clear microtube under the column.
15. Using the same transfer pipette, add all of the elution buffer into the column. Collect your fluorescent proteins in the clear microtube.
16. Use the UV light to observe your fluorescent protein.
Post-lab Questions1. What characteristic(s) of the fluorescent proteins allowed you to purify them?
2. Did your waste tube contain any colored proteins? Why would that be, and what might allow you to collect those pro-teins? Did your final tube contain any other proteins other than the fluorescent proteins?
3. Now that you have successfully performed protein purification, reflect on the central question. What enables scientists to separate a protein of interest from all the other proteins in a cell? Think about what steps in the protocol were important for this process.
BIOLOGYPROTOCOL2

26 |
The discovery of fluorescent proteins has been revolutionary in its applications for medical and biological research (bio-technology). But where did the original proteins come from? Why do they exist? How do they work in nature? And what organisms use fluorescence and why?
The many-colored fluorescent proteins used in the purifica-tion activity all originated from one of two proteins found in nature: the green fluorescent protein (GFP)— discovered in and isolated from a marine jellyfish (Aequorea victoria), and red fluorescent protein (dsRed), a protein more recently discovered in a particular group of corals (“mushroom” corals, Discosoma spp.). These fluorescent proteins are light harness-ing and light emitting molecules whose function in nature remains a mystery. Meanwhile, fluorescent proteins have been and continue to be extensively studied and engineered in the research lab as powerful molecular markers.
While studying the bioluminescence of the crystal jelly, Shimomura found it odd that the light created by the jelly was blue, yet the color being expressed by the jelly was green! How and why does this jelly convert its blue light to green? The answer to “how” is that the jelly was producing a protein that absorbed the blue light and emitted green light. Shi-momura discovered this protein and named it “GFP” (green fluorescent protein). He described its structure and func-tion which provided the foundation for decades of scientific progress in molecular research. However, no scientist has yet figured out why the jelly prefers green light to blue, or how the jelly uses its light in the ocean.
Fluorescence vs . bioluminescenceIn the deep sea, more than 90% of organisms are capable of producing their own light through bioluminescence. From bacteria to squid to fish, bioluminescence is an adaptation for survival and is used for either finding food by locating or attracting prey (e.g. lure of anglerfish, below), for protection against predators (e.g. counter-illumination in the hatchet-fish), or for communication between individuals of a given species (e.g. light patterns in firefly squid.)
Discovery of GFPIn the 1960’s, a marine biologist named Osamu Shimomura was interested in the bioluminescent behavior of the crystal jellyfish Aequorea victoria. Bioluminescence is the ability of a living organism to create its own light through a chemical reaction. In the sea, this adaptation (a behavior or structure that is passed from one generation to another and allows an organism to better survive within a particular environ-ment) is prominent in the sea, especially the deep sea, where fish, shrimp, and other organisms use light to attract mates, find food, or protect themselves from harm. The crystal jelly studied by Shimomura is not a deep sea organism, but is abundant in the waters of the Pacific Northwest.
Aequorea victoria
In most cases of bioluminescence, the light is created through a chemical reaction between a substrate (“luciferin”) and an enzyme (“luciferase”) in the presence of oxygen. The light is produced in an organ called the photophore and one or more photophores are strategically located on the body of an organism depending on how the light is used.
Appendix 1 - Ecology of Fluorescent Proteins
Femaleanglerfish
FLUORESCENTPROTEINPURIFICATION
| 27APPENDIX1
Although organisms are seemingly capable of producing different colors of light, blue is the most common color used by marine organisms. Blue light (short wavelength light) tends to scatter in water and penetrate farther than colors such as red and orange (long wavelength light), which tend to be absorbed by water rather quickly. If you take a red object under water with you, the deeper you go the less red it will appear. This happens because there is a decreasing amount of red light available to reflect back to your eye. (Remember that a red apple appears red because it absorbs all other colors and reflects red light. If there is no red light available, the apple will look gray or black). To take advantage of this phenomenon, many deep sea organ-isms are red in color, as there is no red light available to reflect off of them, thus they “blend” into the darkness rather well. In the sea, the blue light created by bioluminescence is definitely meant to be seen!
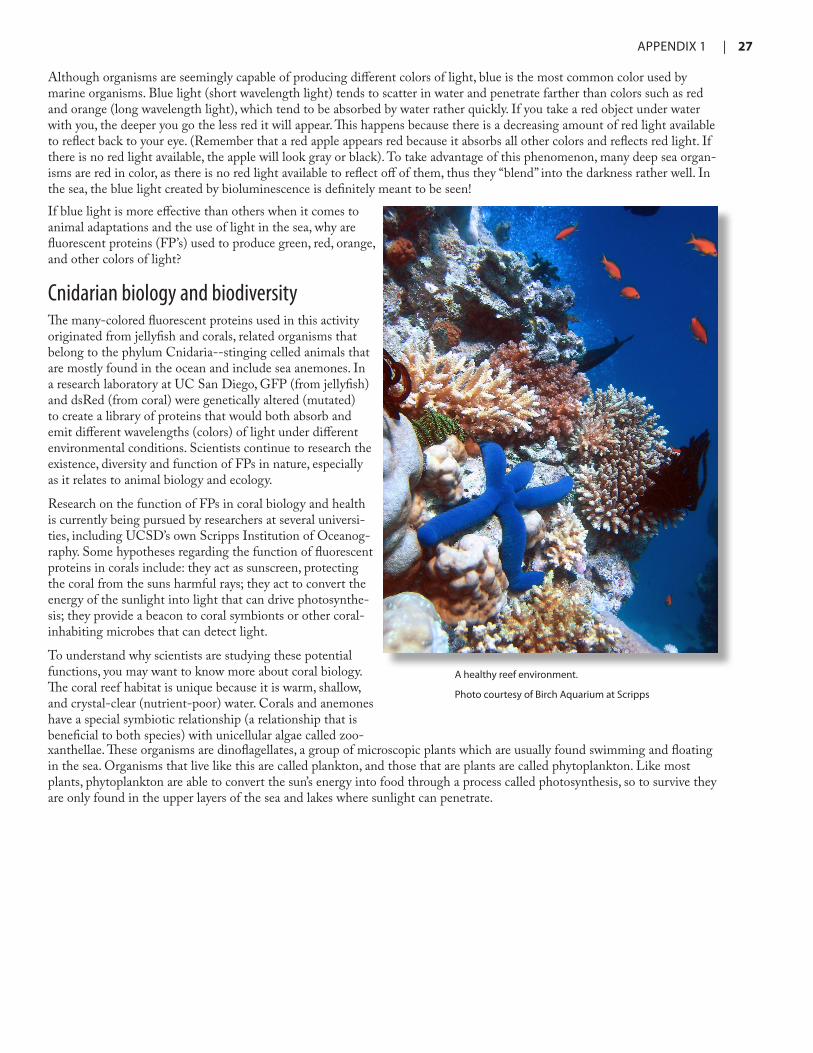
Ahealthyreefenvironment.
PhotocourtesyofBirchAquariumatScripps
If blue light is more effective than others when it comes to animal adaptations and the use of light in the sea, why are fluorescent proteins (FP’s) used to produce green, red, orange, and other colors of light?
Cnidarian biology and biodiversityThe many-colored fluorescent proteins used in this activity originated from jellyfish and corals, related organisms that belong to the phylum Cnidaria--stinging celled animals that are mostly found in the ocean and include sea anemones. In a research laboratory at UC San Diego, GFP (from jellyfish) and dsRed (from coral) were genetically altered (mutated) to create a library of proteins that would both absorb and emit different wavelengths (colors) of light under different environmental conditions. Scientists continue to research the existence, diversity and function of FPs in nature, especially as it relates to animal biology and ecology.
Research on the function of FPs in coral biology and health is currently being pursued by researchers at several universi-ties, including UCSD’s own Scripps Institution of Oceanog-raphy. Some hypotheses regarding the function of fluorescent proteins in corals include: they act as sunscreen, protecting the coral from the suns harmful rays; they act to convert the energy of the sunlight into light that can drive photosynthe-sis; they provide a beacon to coral symbionts or other coral-inhabiting microbes that can detect light.
To understand why scientists are studying these potential functions, you may want to know more about coral biology. The coral reef habitat is unique because it is warm, shallow, and crystal-clear (nutrient-poor) water. Corals and anemones have a special symbiotic relationship (a relationship that is beneficial to both species) with unicellular algae called zoo-xanthellae. These organisms are dinoflagellates, a group of microscopic plants which are usually found swimming and floating in the sea. Organisms that live like this are called plankton, and those that are plants are called phytoplankton. Like most plants, phytoplankton are able to convert the sun’s energy into food through a process called photosynthesis, so to survive they are only found in the upper layers of the sea and lakes where sunlight can penetrate.
28 |
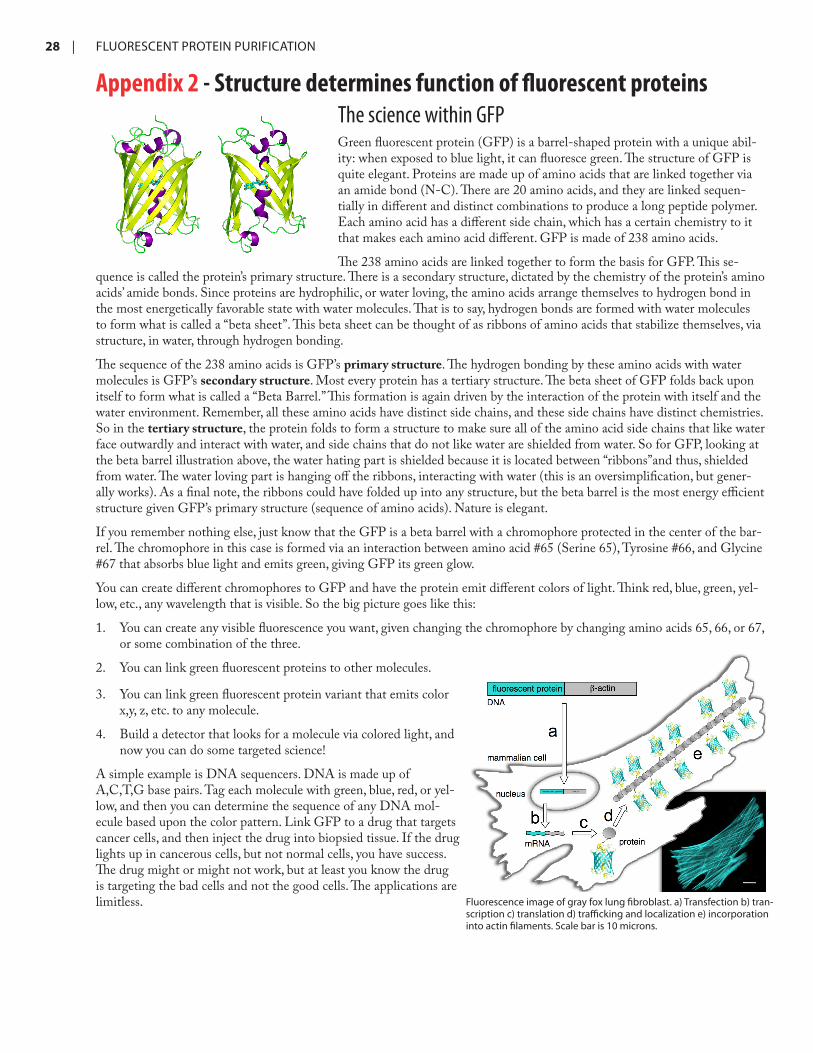
Appendix 2 - Structure determines function of fluorescent proteinsThe science within GFPGreen fluorescent protein (GFP) is a barrel-shaped protein with a unique abil-ity: when exposed to blue light, it can fluoresce green. The structure of GFP is quite elegant. Proteins are made up of amino acids that are linked together via an amide bond (N-C). There are 20 amino acids, and they are linked sequen-tially in different and distinct combinations to produce a long peptide polymer. Each amino acid has a different side chain, which has a certain chemistry to it that makes each amino acid different. GFP is made of 238 amino acids.
The 238 amino acids are linked together to form the basis for GFP. This se-quence is called the protein’s primary structure. There is a secondary structure, dictated by the chemistry of the protein’s amino acids’ amide bonds. Since proteins are hydrophilic, or water loving, the amino acids arrange themselves to hydrogen bond in the most energetically favorable state with water molecules. That is to say, hydrogen bonds are formed with water molecules to form what is called a “beta sheet”. This beta sheet can be thought of as ribbons of amino acids that stabilize themselves, via structure, in water, through hydrogen bonding.
The sequence of the 238 amino acids is GFP’s primary structure. The hydrogen bonding by these amino acids with water molecules is GFP’s secondary structure. Most every protein has a tertiary structure. The beta sheet of GFP folds back upon itself to form what is called a “Beta Barrel.” This formation is again driven by the interaction of the protein with itself and the water environment. Remember, all these amino acids have distinct side chains, and these side chains have distinct chemistries. So in the tertiary structure, the protein folds to form a structure to make sure all of the amino acid side chains that like water face outwardly and interact with water, and side chains that do not like water are shielded from water. So for GFP, looking at the beta barrel illustration above, the water hating part is shielded because it is located between “ribbons”and thus, shielded from water. The water loving part is hanging off the ribbons, interacting with water (this is an oversimplification, but gener-ally works). As a final note, the ribbons could have folded up into any structure, but the beta barrel is the most energy efficient structure given GFP’s primary structure (sequence of amino acids). Nature is elegant.
If you remember nothing else, just know that the GFP is a beta barrel with a chromophore protected in the center of the bar-rel. The chromophore in this case is formed via an interaction between amino acid #65 (Serine 65), Tyrosine #66, and Glycine #67 that absorbs blue light and emits green, giving GFP its green glow.
You can create different chromophores to GFP and have the protein emit different colors of light. Think red, blue, green, yel-low, etc., any wavelength that is visible. So the big picture goes like this:
1. You can create any visible fluorescence you want, given changing the chromophore by changing amino acids 65, 66, or 67, or some combination of the three.
2. You can link green fluorescent proteins to other molecules.
3. You can link green fluorescent protein variant that emits color x,y, z, etc. to any molecule.
4. Build a detector that looks for a molecule via colored light, and now you can do some targeted science!
A simple example is DNA sequencers. DNA is made up of A,C,T,G base pairs. Tag each molecule with green, blue, red, or yel-low, and then you can determine the sequence of any DNA mol-ecule based upon the color pattern. Link GFP to a drug that targets cancer cells, and then inject the drug into biopsied tissue. If the drug lights up in cancerous cells, but not normal cells, you have success. The drug might or might not work, but at least you know the drug is targeting the bad cells and not the good cells. The applications are limitless. Fluorescenceimageofgrayfoxlungfibroblast.a)Transfectionb)tran-
scriptionc)translationd)traffickingandlocalizatione)incorporationintoactinfilaments.Scalebaris10microns.
FLUORESCENTPROTEINPURIFICATION
| 29APPENDIX3
Appendix 3 - Fluorescence
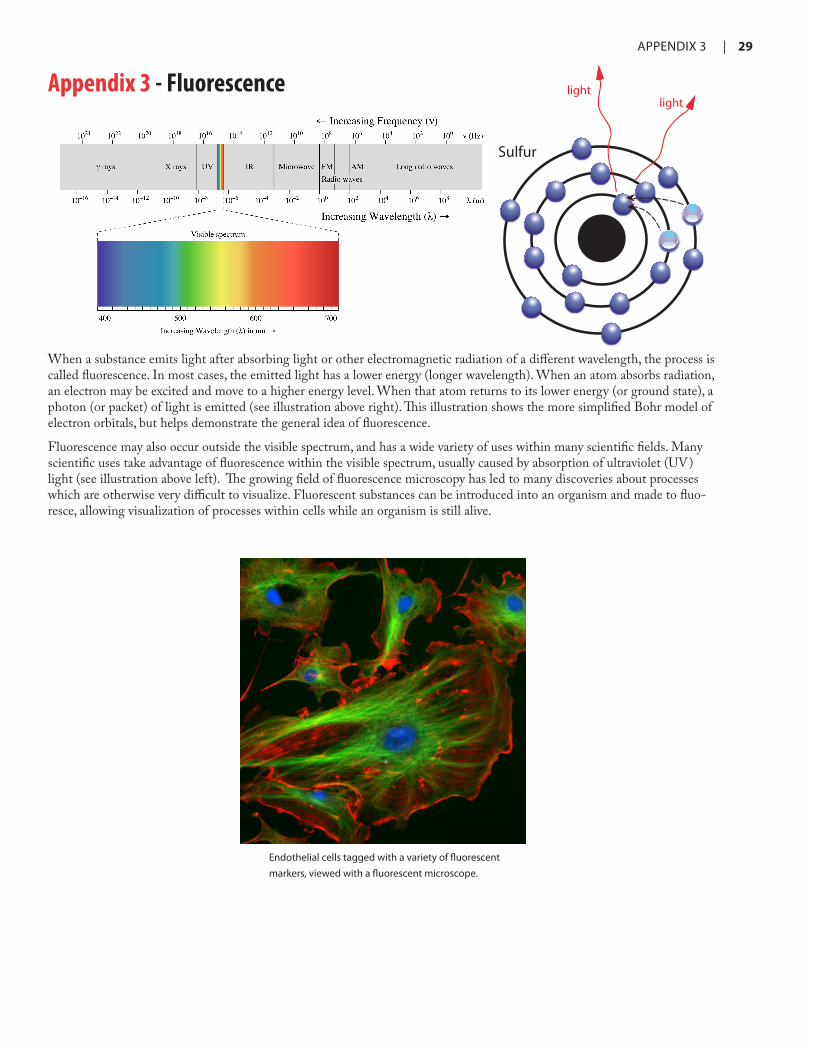
When a substance emits light after absorbing light or other electromagnetic radiation of a different wavelength, the process is called fluorescence. In most cases, the emitted light has a lower energy (longer wavelength). When an atom absorbs radiation, an electron may be excited and move to a higher energy level. When that atom returns to its lower energy (or ground state), a photon (or packet) of light is emitted (see illustration above right). This illustration shows the more simplified Bohr model of electron orbitals, but helps demonstrate the general idea of fluorescence.
Fluorescence may also occur outside the visible spectrum, and has a wide variety of uses within many scientific fields. Many scientific uses take advantage of fluorescence within the visible spectrum, usually caused by absorption of ultraviolet (UV) light (see illustration above left). The growing field of fluorescence microscopy has led to many discoveries about processes which are otherwise very difficult to visualize. Fluorescent substances can be introduced into an organism and made to fluo-resce, allowing visualization of processes within cells while an organism is still alive.
lightlight
Sulfur
Endothelialcellstaggedwithavarietyoffluorescentmarkers,viewedwithafluorescentmicroscope.
30 |
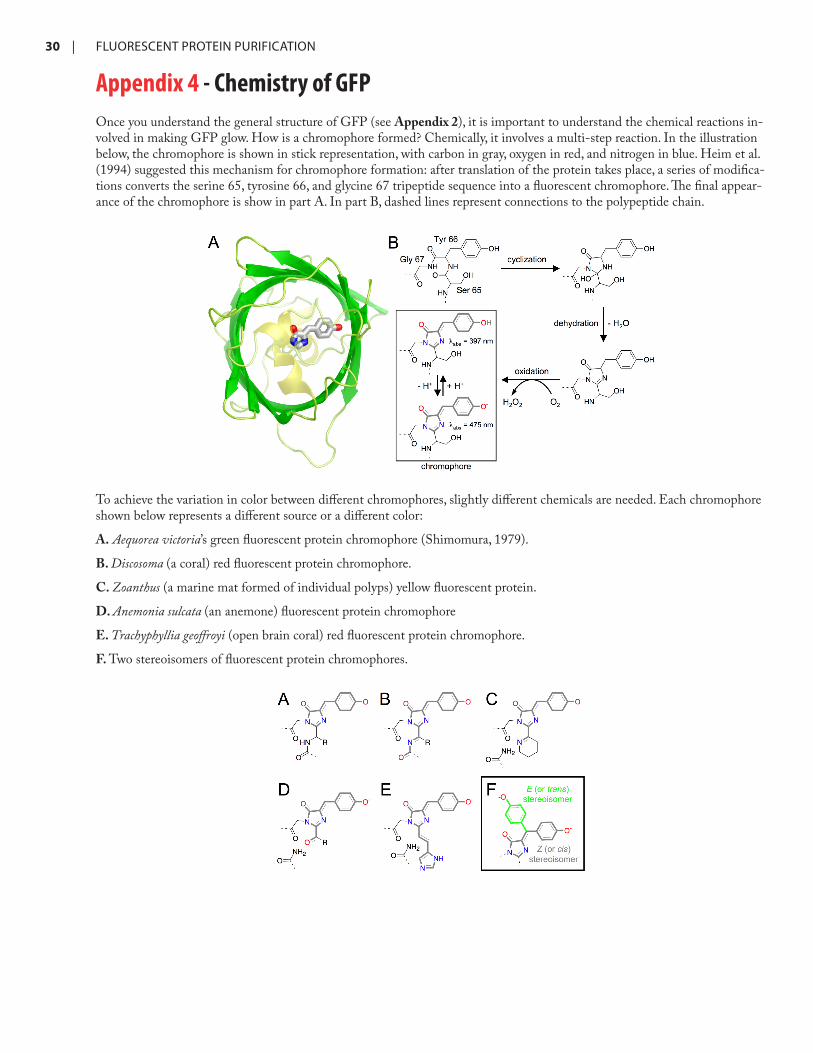
Appendix 4 - Chemistry of GFPOnce you understand the general structure of GFP (see Appendix 2), it is important to understand the chemical reactions in-volved in making GFP glow. How is a chromophore formed? Chemically, it involves a multi-step reaction. In the illustration below, the chromophore is shown in stick representation, with carbon in gray, oxygen in red, and nitrogen in blue. Heim et al. (1994) suggested this mechanism for chromophore formation: after translation of the protein takes place, a series of modifica-tions converts the serine 65, tyrosine 66, and glycine 67 tripeptide sequence into a fluorescent chromophore. The final appear-ance of the chromophore is show in part A. In part B, dashed lines represent connections to the polypeptide chain.
To achieve the variation in color between different chromophores, slightly different chemicals are needed. Each chromophore shown below represents a different source or a different color:
A. Aequorea victoria’s green fluorescent protein chromophore (Shimomura, 1979).
B. Discosoma (a coral) red fluorescent protein chromophore.
C. Zoanthus (a marine mat formed of individual polyps) yellow fluorescent protein.
D. Anemonia sulcata (an anemone) fluorescent protein chromophore
E. Trachyphyllia geoffroyi (open brain coral) red fluorescent protein chromophore.
F. Two stereoisomers of fluorescent protein chromophores.
FLUORESCENTPROTEINPURIFICATION