flexreport for uwp - grapecityhelp.grapecity.com/componentone/pdf/uwp/uwp_flexreport.pdf ·...
TRANSCRIPT

ComponentOne
FlexReport for UWP

GrapeCity US
GrapeCity201 South Highland Avenue, Suite 301Pittsburgh, PA 15206Tel: 1.800.858.2739 | 412.681.4343Fax: 412.681.4384Website: https://www.grapecity.com/en/E-mail: [email protected]
Trademarks
The ComponentOne product name is a trademark and ComponentOne is a registered trademark of GrapeCity, Inc. Allother trademarks used herein are the properties of their respective owners.
Warranty
ComponentOne warrants that the media on which the software is delivered is free from defects in material andworkmanship, assuming normal use, for a period of 90 days from the date of purchase. If a defect occurs during thistime, you may return the defective media to ComponentOne, along with a dated proof of purchase, andComponentOne will replace it at no charge. After 90 days, you can obtain a replacement for the defective media bysending it and a check for $2 5 (to cover postage and handling) to ComponentOne.
Except for the express warranty of the original media on which the software is delivered is set forth here,ComponentOne makes no other warranties, express or implied. Every attempt has been made to ensure that theinformation contained in this manual is correct as of the time it was written. ComponentOne is not responsible for anyerrors or omissions. ComponentOne’s liability is limited to the amount you paid for the product. ComponentOne isnot liable for any special, consequential, or other damages for any reason.
Copying and Distribution
While you are welcome to make backup copies of the software for your own use and protection, you are notpermitted to make copies for the use of anyone else. We put a lot of time and effort into creating this product, and weappreciate your support in seeing that it is used by licensed users only.

Table of ContentsFlexReport for UWP Overview 2
Help with UWP Edition 2
FlexReport Key Features 3-4
FlexReport Dissection 5
Components and Controls 5
Object Model Summary 5-7
Sections of FlexReport 7-8
FlexReport Quick Start 9
Step 1 of 2: Creating a Report Definition 9
Step 2 of 2: Loading and Rendering the Report 9-11
Working with FlexReport 12
Data Binding in FlexReport 12
Data Binding using SQLite 12-13
Data Binding using External Objects 13-16
Exporting 16-19
Printing 19
About FlexReportDesigner 20
FlexViewer for UWP 21
FlexViewer Key Features 21-22
FlexViewer Toolbar 22-23
Rotate View of Reports 23-24
Binding FlexReport with FlexViewer 24-25
FlexReport Samples 26
FlexReport for UWP 1

FlexReport for UWP OverviewComponentOne Studio introduces FlexReport for UWP that adds reporting capabilities to your UWP applications.FlexReport for UWP is a comprehensive reporting tool which provides complete reporting solution - from buildingcomplex reports to previewing and exporting. A rich object model, previewing pane, high quality rendering, modernuser interfaces in its previewing control, and ease of use make FlexReport a must have control for advanced as well asbasic level report designers.
FlexReport for UWP uses same overall approach as FlexReport for WinForms – the report is generated locallywithin a UWP application (as opposed to being generated on a server). The application is self-contained, so you don'thave to write a separate web service to provide the reports.
Help with UWP EditionFor information on installing ComponentOne Studio UWP Edition, licensing, technical support, namespaces andcreating a project with the control, please visit Getting Started with UWP Edition.
FlexReport for UWP 2

FlexReport Key FeaturesThe key features of FlexReport for UWP are as follows:
Light-weight and FastFlexReport is light-weight and fast in particular for smaller reports.
Enhanced RenderingFlexReport uses modern rendering with DirectWrite/DirectX technology to draw and generate highperformance report content. This makes text, shapes and borders rendering better and increases the accuracyalong with the quality.
Preview control with Modern UIFlexViewer control has report previewing capabilities and can load and view FlexReport. It allows you tonavigate through the report pages, change the page settings before printing reports, print reports, and exportreport to multiple formats.
Supported Data ProvidersFlexReport for UWP currently supports the following data sources:
SQLiteAn object in an external DLL supporting IC1FlexReportExternalRecordsetAn object that supports either IC1FlexReportRecordset or IList (needs to be assigned toDataSource.RecordSet in code)
Exporting CapabilitiesFlexReport for UWP can be exported to PDF, HTML, DOCX, RTF, XLSX, TIFF, BMP, PNG, JPEG and GIF formats.
Changes in Public Properties and Methods
Certain properties and methods are changed in the UWP version of FlexReport to make its use easier:
The type of C1FlexReport.BasePath and C1FlexReport.DefaultBasePath properties in the UWP version isStorageFolder.Method overloads C1FlexReport.Save(…), C1FlexReport.Load(…) were added that accept a StorageFile as theargument.
Limitations of FlexReport
Loading a ReportFlexReport for UWP cannot directly load legacy C1Report report definition files (.xml). To use suchreport definitions, you need to first convert them to the FlexReport format (e.g. using the FlexReportdesigner app for WinForms), and then use the converted .flxr report definitions instead.
Features not supported till nowMetafiles (if a report uses a metafile as an image, it will not be displayed).Chart Field, RTFField and Legacy Field having Field.RTF=True.
Data Providers not supportedAs there is no ADO.NET in UWP, the following data providers are not supported in UWP:
OLEDBODBCSQLServerCe3_5SQLServerCe4_0XMLFile data provider.
FlexReport for UWP 3

Printing a ReportThe C1FlexReport.Print(…) methods are not supported. Instead, C1DocumentSource.ShowPrintUIAsync()method is provided.
FlexReport for UWP 4

FlexReport DissectionIt is important to know about the components and controls shipped along with FlexReport, the object model ofFlexReport and sections or bands available in FlexReport, before you start exploring and working with FlexReportcontrol. The following sections walk you through these details.
Components and ControlsFlexReport consists of the following assemblies:
C1.UWP.FlexReport dll
It provides the report generating and rendering functionality through the following component:
C1FlexReport:The C1FlexReport is a report generating component that generates band-oriented reports. You can renderreports directly to the preview control, or export them to various portable formats (including PDF, XLSX, HTML,and DOCX).
C1.UWP.FlexViewer dll
It includes the following report viewing/UI components:
C1FlexViewer:The C1FlexViewer control is a full-featured report and document viewing control with a rich UI providing accessto the various capabilities such as zooming, exporting, and printing the report.C1FlexViewerPane:The C1FlexViewerPane is a bare-bones preview control that allows programmatic manipulation of the viewsuch as zooming, rotating and so on.
Included Applications
In addition to the reporting components and controls, FlexReport also includes the following stand-alone application:
C1FlexReportDesignerC1FlexReportDesigner is a desktop application, used to create and edit C1FlexReport report definition files(.FLXR). It can also convert legacy C1Report report definitions (.XML) to the new .FLXR format.C1FlexReportDesigner can design reports compatible with both UWP and WinForms versions of the product.The designer app comes shipped in two flavors - C1FlexReportDesigner.4.exe, built for 'Any CPU' target andwill run in 64-bit mode on a x64 system, and C1FlexReportDesigner32.4.exe, built for x86 target, and willalways run in 32 bit mode. You can find the application located at the following path:C:\Program Files (x86)\ComponentOne\Apps\v4.0
Note that C1FlexReportDesigner application is installed with ComponentOne Studio WinForms Edition and thisdirectory reflects the default installation path installed with the WinForms Edition.
Object Model SummaryFlexReport has a rich object model. The objects, collections, and the associated properties and methods togetherprovide an ease and flexibility in generating FlexReport. The following table lists objects and their main properties andmethods:
C1FlexReport
Properties: Credential, DataSource, Document, FileName, Layout, MaxPages, OnClose, OnError, OnOpen, Page,
FlexReport for UWP 5

Parameters, ReportDefinition, ReportInfo, ReportName, SectionsMethods: Evaluate, Execute, GetReportList, Load, Render, Save, Clear
Layout
Properties: Width, MarginLeft, MarginTop, MarginRight, MarginBottom, PaperSize, Orientation, Columns,ColumnLayout, PageHeader, PageFooter
DataSource
Properties: CalculatedFields, ConnectionString, Filter, RecordSource, SortDefinitions
DataSourceCollection
Properties: ReportMethods: Add, RemoveAt
SortDefinition
Properties: Direction, Expression, Owner
SortDefinitionCollection
Properties: Owner, Report
CalculatedField
Properties: DataSource, Expression, Type
CalculatedFieldCollection
Properties: Owner, Report
Group
Properties: GroupBy, KeepTogether, SectionHeader, SectionFooter, Sort, SortExpression
GroupCollection
Properties: ReportMethods: Add, Clear, RemoveAt
ReportParameter
Properties: AllowedValuesDefinition, DisplayText, ParentReportMethods: SetName
ReportParameterCollection
Properties: Item, ReportMethods: InsertItem, RemoveItem, SetItem
AllowedValuesDefinition
Properties: Binding, ValuesMethods: AssignFrom
Section
Properties: Calculated, Fields, Height, SplitBehavior, SubSections
SectionCollection
Properties: Detail, Footer, Header, PageFooter, PageHeader
SubSection
FlexReport for UWP 6

Properties: Calculated, Fields, Height, ParentReport, ParentSection, SplitBehavior, Visible
SubSectionCollection
Properties: ReportMethods: Add, Remove, RemoveAt
FieldBase
Properties: Anchor, Height, ForcePageBreak, MarginBottom, MarginLeft, MarginRight, MarginTop, Section,SplitHorzBehavior, SplitVertBehavior
FieldCollection
Methods: Add, Remove, RemoveAt
BarCodeField
Properties: BarCode, BarCodeOptions, Font, Text
CheckBoxField
Properties: CheckAlign, CheckMark, Text, ThreeState, Value
DataField
Properties: Calculated, Name, Type, Value
ImageField
Properties: Picture, PictureAlign, PictureScale
ShapeField
Properties: Line, Shape, ShapeBackground, ShapeType
SubreportField
Properties: ParameterValues, Subreport, SubreportFilter
TextField
Properties: Format, Text
VisualReportObject
Properties: Background, Border, BordersSplitHorzMode, BordersSplitVertMode, OutlineLabel
BehaviorOptions
Properties: AllowHorizontalSplitting, EnableAggregatesOnReportFields, IgnoreInvisibleFieldsInGrowShrinkSectionsMethods: AssignFrom, Reset
Sections of FlexReportEach FlexReport includes at least the following five mandatory sections:
Section Description
Detail The Detail section contains fields that are rendered once for each record in the sourcerecordset.
Header The Report Header section is rendered at the beginning of the report.
FlexReport for UWP 7

Footer The Report Footer section is rendered at the end of the report.
Page Header The Page Header section is rendered at the top of every page (except optionally for pagesthat contain the Report Header).
Page Footer The Page Footer section is rendered at the bottom of every page.
Group Header and a Group Footer are two additional sections for each group. For example, a report with 3 groupinglevels will have 11 sections.
Each section consists of sub-sections, where the actual report content is shown. A section always contains at least onesub-section. Additional sub-sections can be added to enhance functionality, e.g. the visibility of a sub-section can betoggled by a script depending on some condition, and so on.
Note that sections can be made invisible, but they cannot be added or removed, except by adding or removinggroups.
You can find the details of all the sections in FlexReport Section.
Section Description
FlexReport for UWP 8

FlexReport Quick StartAlthough you can use C1FlexReport in various scenarios, on the desktop and the Web, the basic sequence in mostcases probably remains the same as discussed below:
1. Create a report definition
Report Definition can be created using the FlexReportDesigner application. Reports can be designed fromscratch, converted from legacy C1Report report definitions, or imported from existing Microsoft Access Reportsand Crystal Reports. You can also do it through code using the rich object model provided by C1FlexReport.The result of this step is a .FLXR file containing the report definition.
2. Load the report definition into the C1FlexReport component
Make the .FLXR report definition file created in step 1 available to your app's code, as a resource file or as anembedded resource. At runtime, use any of the Load or LoadAsync method overloads of C1FlexReport, to loadthe report definition into the C1FlexReport component.
3. Render the report
To preview the report, add a C1FlexViewer control to your app, and at runtime assign the C1FlexReportcomponent to the viewer's DocumentSource property. This will generate the report and show it inC1FlexViewer control.
The detailed steps in the following topics will show you how to create a report definition, load and render the reportin the FlexViewer control.
Step 1 of 2: Creating a Report DefinitionCreate a report definition using the FlexReportDesigner application or code. You can simply load an existingdefinition and render it in the FlexViewer control. The easiest way to create a report definition is to use the stand-alone C1FlexReportDesigner desktop application that ships with FlexReport.
The C1FlexReportDesigner.4.exe for 64 bit platform and C1FlexReportDesigner32.4.exe for 32 bit platform arelocated in C:\Program Files (x86)\ComponentOne\Apps\v4.0 folder on your computer.
You can create a Report Definition using FlexReportDesigner app available with ComponentOne Studio WinFormsEdition. The steps to create a Report Definition are as follows:
1. Run the FlexReportDesigner app and select New from the File Menu.2. Click New Report drop down in the Reports tab located on the extreme left of designer and select Report
Wizard.3. Select SQLite Data Provider from the Data provider dropdown and click the ellipsis button next to the
Connection string textbox to select the C1NWind.db file.4. Select a table from Data source tab and Click Next. In our case, we have selected Products table.5. Select the fields, layout, and style for the report after connecting the reports to a data source, give a suitable
Title to the Report, and click Finish.
Note that the path to C1NWind.db is specified using the ?(SpecialFolder.SystemDefault) syntax. FlexReportconnection strings support a special syntax that points to the Application.Current.LocalFolder in case ofFlexReport for UWP. With this syntax, the connection string in the report can be specified as:Data Source=?(SpecialFolder.SystemDefault)\C1NWind.db
Step 2 of 2: Loading and Rendering the Report
FlexReport for UWP 9
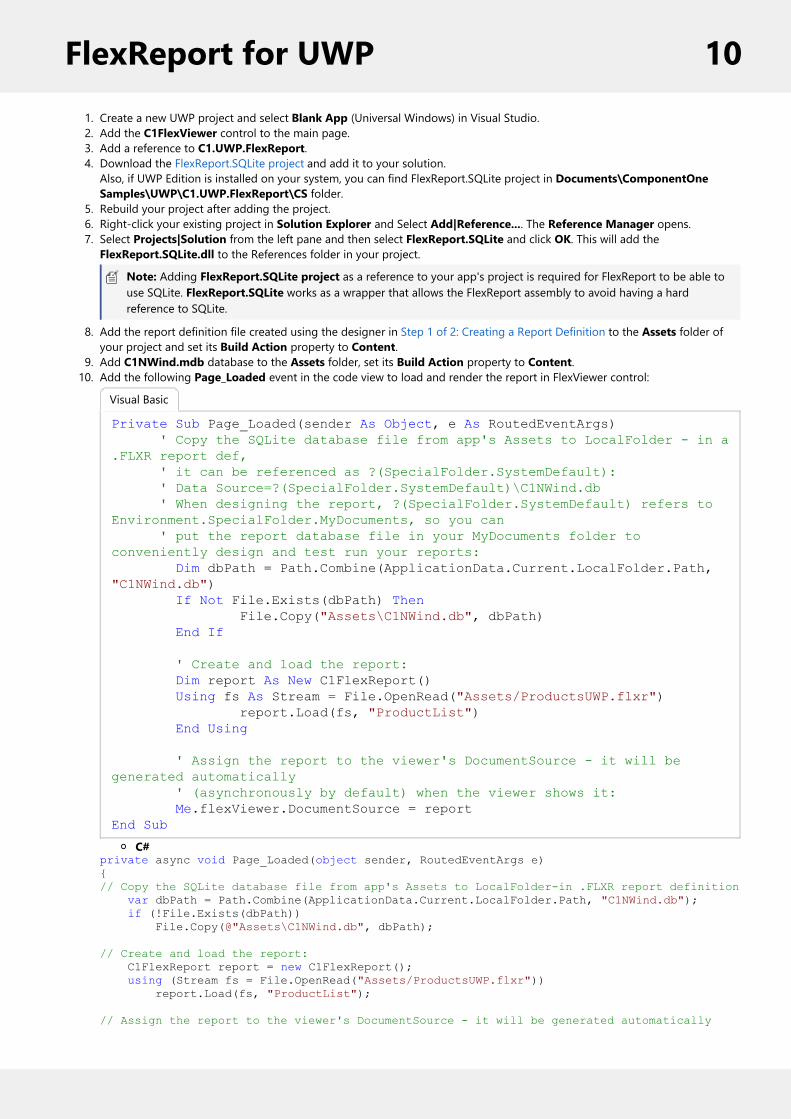
1. Create a new UWP project and select Blank App (Universal Windows) in Visual Studio.2. Add the C1FlexViewer control to the main page.3. Add a reference to C1.UWP.FlexReport.4. Download the FlexReport.SQLite project and add it to your solution.
Also, if UWP Edition is installed on your system, you can find FlexReport.SQLite project in Documents\ComponentOneSamples\UWP\C1.UWP.FlexReport\CS folder.
5. Rebuild your project after adding the project.6. Right-click your existing project in Solution Explorer and Select Add|Reference.... The Reference Manager opens.7. Select Projects|Solution from the left pane and then select FlexReport.SQLite and click OK. This will add the
FlexReport.SQLite.dll to the References folder in your project.
Note: Adding FlexReport.SQLite project as a reference to your app's project is required for FlexReport to be able touse SQLite. FlexReport.SQLite works as a wrapper that allows the FlexReport assembly to avoid having a hardreference to SQLite.
8. Add the report definition file created using the designer in Step 1 of 2: Creating a Report Definition to the Assets folder ofyour project and set its Build Action property to Content.
9. Add C1NWind.mdb database to the Assets folder, set its Build Action property to Content.10. Add the following Page_Loaded event in the code view to load and render the report in FlexViewer control:
Private Sub Page_Loaded(sender As Object, e As RoutedEventArgs) ' Copy the SQLite database file from app's Assets to LocalFolder - in a .FLXR report def, ' it can be referenced as ?(SpecialFolder.SystemDefault): ' Data Source=?(SpecialFolder.SystemDefault)\C1NWind.db ' When designing the report, ?(SpecialFolder.SystemDefault) refers to Environment.SpecialFolder.MyDocuments, so you can ' put the report database file in your MyDocuments folder to conveniently design and test run your reports: Dim dbPath = Path.Combine(ApplicationData.Current.LocalFolder.Path, "C1NWind.db") If Not File.Exists(dbPath) Then File.Copy("Assets\C1NWind.db", dbPath) End If
' Create and load the report: Dim report As New C1FlexReport() Using fs As Stream = File.OpenRead("Assets/ProductsUWP.flxr") report.Load(fs, "ProductList") End Using
' Assign the report to the viewer's DocumentSource - it will be generated automatically ' (asynchronously by default) when the viewer shows it: Me.flexViewer.DocumentSource = reportEnd Sub
C#private async void Page_Loaded(object sender, RoutedEventArgs e){ // Copy the SQLite database file from app's Assets to LocalFolder-in .FLXR report definition var dbPath = Path.Combine(ApplicationData.Current.LocalFolder.Path, "C1NWind.db"); if (!File.Exists(dbPath)) File.Copy(@"Assets\C1NWind.db", dbPath);
// Create and load the report: C1FlexReport report = new C1FlexReport(); using (Stream fs = File.OpenRead("Assets/ProductsUWP.flxr")) report.Load(fs, "ProductList");
// Assign the report to the viewer's DocumentSource - it will be generated automatically
Visual Basic
FlexReport for UWP 10

// (asynchronously by default) when the viewer shows it: this.flexViewer.DocumentSource = report;}
FlexReport for UWP 11

Working with FlexReportWhile FlexReport for UWP can be used in various scenarios, the key steps relevant in most of those scenarios are:
1. Creating a report definition - This can be done using the C1FlexReportDesigner desktop application. The.FLXR report definition file created by the designer needs to be made available to the application's runtime, sothat it can be loaded into the C1FlexReport component. Alternatively, the report definition can be createdcompletely at runtime in code, using the rich object model of the C1FlexReport component.
2. Providing data for the report - The report definition must be created keeping in mind the data sourcesavailable to the UWP version. At runtime, once the report definition has been loaded into the C1FlexReportcomponent, the data must be accessible so the report can generate. Note that the report is generatedcompletely on the client. See below for details on the available data sources.
3. Render and output the report - Typically, the report will be generated for one of the following targets:Preview: Simply assigning the C1FlexReport to the C1FlexViewer.DocumentSource property willgenerate the report and show it in the FlexViewer. Also, the UI of the FlexViewer control allows to printor export the report interactively.Print: The report can be rendered and then printed directly usingthe C1DocumentSource.ShowPrintUIAsync method.Export: The report can be rendered directly into one of the supported formats such as PDF, HTML etc.using C1FlexReport.RenderToFilter, C1FlexReport.RenderToFilterAsyncor C1FlexReport.RenderToFilterAsyncEx method.
Data Binding in FlexReportIn addition to a report definition, FlexReport needs the actual data to create the report. In most cases, the datacomes from a database, but there are other options. The following topics explore how to retrieve data from SQLiteand other sources.
Data Binding using SQLiteFlexReport supports data binding using SQLite. SQLite is a software library and widely used SQL database engine. Itdoes not have a separate server process so it can read and write directly to different files in ordinary disks.
For binding data using SQLite, you are required to use FlexReport.SQLite project, which is available inDocuments\ComponentOne Samples\UWP\C1.UWP.FlexReport\CS folder. You need to add FlexReport.SQLiteproject to the solution of your app's project, as it is required for FlexReport to be able to use SQLite.
The following code illustrates the use of SQLite for data binding:
1. Add the following code to create a database connection:
' Copy the SQLite database file from app's Assets to LocalFolder - in a .FLXR report definitionDim dbPath = Path.Combine(ApplicationData.Current.LocalFolder.Path, "C1NWind.db")If Not File.Exists(dbPath) Then File.Copy("Assets\C1NWind.db", dbPath)End If
// Copy the SQLite database file from app's Assets to LocalFolder -
Visual Basic
C#
FlexReport for UWP 12

in a .FLXR report definitionvar dbPath = Path.Combine(ApplicationData.Current.LocalFolder.Path, "C1NWind.db");if (!File.Exists(dbPath)) File.Copy(@ "Assets\C1NWind.db", dbPath);
2. Add the following code to create and load a report:
' Create and load the report:Dim report As New C1FlexReport()Using fs As Stream = File.OpenRead("Assets/ProductsUWP.flxr") report.Load(fs, "ProductList")End Using
// Create and load the report:C1FlexReport report = new C1FlexReport();using(Stream fs = File.OpenRead("Assets/ProductsUWP.flxr"))report.Load(fs, "ProductList");
3. Render the report in FlexViewer control using the following code:
Me.flexViewer.DocumentSource = report
this.flexViewer.DocumentSource = report;
Visual Basic
C#
Visual Basic
C#
Data Binding using External ObjectsYou can easily use external objects for data binding in FlexReport. Here, we discuss data binding using Open DataProtocol (OData) client library. The OData allows you to access data in the same style as in Representational StateTransfer (REST) resources. The use of Simple.OData.Client library for data binding is illustrated below.
Create a Report Definition
Create a report definition using code to bind the data using OData client library.
1. Add the following namespace in code view:using Simple.OData.Client;
2. Create an object of FlexReport using the following code:
Dim _report As New C1FlexReport()
Visual Basic
FlexReport for UWP 13

C1FlexReport _report = new C1FlexReport();
3. Add following code to request data from OData service:
' request data from OData serviceDim client = New ODataClient(ODataUri)' select all categries and products of each categoryDim categories = (Await client.[For](Of Category)().Expand(Function(x) New From { _ x.Products _}).FindEntriesAsync()).ToList()Dim products = (From c In categoriesFrom p In c.ProductsNew With { _ Key .CategoryID = c.ID, _ Key .CategoryName = c.Name, _ Key .ID = p.ID, _ Key .Name = p.Name, _ Key .Description = p.Description, _ Key .ReleaseDate = p.ReleaseDate, _ Key .DiscontinuedDate = p.DiscontinuedDate, _ Key .Rating = p.Rating, _ Key .Price = p.Price _}).ToList()
// request data from OData servicevar client = new ODataClient(ODataUri);// select all categries and products of each categoryvar categories = (await client.For<Category>().Expand(x => new { x.Products }).FindEntriesAsync()).ToList();var products = (from c in categoriesfrom p in c.Productsselect new{ CategoryID = c.ID, CategoryName = c.Name, ID = p.ID, Name = p.Name, Description = p.Description, ReleaseDate = p.ReleaseDate, DiscontinuedDate = p.DiscontinuedDate, Rating = p.Rating, Price = p.Price,}).ToList();
4. Add a new folder named Resources to your application and add a report to it. In our case, we are usingReports.flxr report.
C#
Visual Basic
C#
FlexReport for UWP 14

5. Load the report definition from Resources folder using the following code:
' load report definition from resourcesDim asm As Assembly = GetType(MainPage).GetTypeInfo().AssemblyUsing stream As Stream = asm.GetManifestResourceStream("Binding.Resources.Reports.flxr") _report.Load(stream, "Products")End Using
' assign dataset to the report_report.DataSource.Recordset = products
// load report definition from resourcesAssembly asm = typeof(MainPage).GetTypeInfo().Assembly;using (Stream stream = asm.GetManifestResourceStream("Binding.Resources.Reports.flxr"))_report.Load(stream, "Products");
// assign dataset to the report_report.DataSource.Recordset = products;
6. Use the following code to build your report and view it in FlexViewer control after loading the report definition:
Try ' build report prMain.IsActive = True Await BuildProductsReport() prMain.IsActive = False
' assign report to the preview pane flxViewer.DocumentSource = Nothing flxViewer.DocumentSource = _reportCatch ex As Exception Dim md As New MessageDialog(String.Format("Failed to show ""{0}"" report, error:" & vbCr & vbLf & "{1}", reportName, ex.Message)) Await md.ShowAsync()End Try
try{ // build report prMain.IsActive = true; await BuildProductsReport(); prMain.IsActive = false;
// assign report to the preview pane
Visual Basic
C#
Visual Basic
C#
FlexReport for UWP 15

flxViewer.DocumentSource = null; flxViewer.DocumentSource = _report;}catch (Exception ex){ MessageDialog md = new MessageDialog(string.Format("Failed to show \"{0}\" report, error:\r\n{1}", reportName, ex.Message)); await md.ShowAsync();}
The report appears similar to the following:
ExportingFlexReport allows you to export reports to different files and distribute them electronically. It supports the followingexport formats and respective export filters for exporting the report:
Format Description
RTF (*.rtf) RtfFilter export filter is used to export the reports into RTF streams or files.
Microsoft Excel XlsFilter export filter is used to export the reports into XLSX/XLS streams or files.
FlexReport for UWP 16

(*.xlsx/*.xls)
TIFF (*.tiff), BMP, PNG,JPEG, GIF images
TiffFilter, BmpFilter, PngFilter, JpegFilter, and GifFilter export filters are used to export thereports into different image format filles or streams.
PDF (*.pdf) PdfFilter export filter is used to export the reports into PDF streams or files.
HTML(*.html) HtmlFilter export filter is used to export the reports into HTML streams or files.
Exporting a report to XLSX format
You can export the report created in Quick Start section to XLSX format using the following steps.
1. Add the following namespace in the code view.
Imports C1.Xaml.Document.Export
using C1.Xaml.Document.Export;
2. Add the following code to export the report to XLSX format using XlsFilter class.Note that the same class can be used to export the report to XLS format.
' request target file from the userDim fileSavePicker As New FileSavePicker()fileSavePicker.FileTypeChoices.Add("XLSX files", New String() {".xlsx"})Dim storageFile As StorageFile = Await fileSavePicker.PickSaveFileAsync()If storageFile Is Nothing Then ' export cancelled by the user ReturnEnd If' initialize XlsFilterDim filter As New XlsFilter()filter.UseZipForMultipleFiles = Truefilter.StorageFile = storageFile
' render report to the filterAwait report.RenderToFilterAsync(filter)
' launch the exported fileAwait Windows.System.Launcher.LaunchFileAsync(storageFile)
C#// request target file from the user
Visual Basic
C#
Visual Basic
Format Description
FlexReport for UWP 17

FileSavePicker fileSavePicker = new FileSavePicker();fileSavePicker.FileTypeChoices.Add("XLSX files", new string[] { ".xlsx" });StorageFile storageFile = await fileSavePicker.PickSaveFileAsync();if (storageFile == null) // export cancelled by the user return;
// initialize XlsFilterXlsFilter filter = new XlsFilter();filter.UseZipForMultipleFiles = true;filter.StorageFile = storageFile;
// render report to the filterawait report.RenderToFilterAsync(filter);
// launch the exported fileawait Windows.System.Launcher.LaunchFileAsync(storageFile);
Similarly, you can export your reports to RTF, HTML, and PDF formats.
Exporting a report to an image file format
The above code can be used for exporting a report to an image file but exporting a multi-paged report to an imagefile only exports the first page of the report at a time as the image format filters do not directly support a multiplepaged report in a single file. However, it is possible to generate multiple image files corresponding to each page of areport in a ZIP file. The following code uses one of the image format filter class, JpegFilter, to export the multi-pagedreport to JPEG format and creates a single ZIP file of the exported images.
' request target file from the userDim fileSavePicker As New FileSavePicker()fileSavePicker.FileTypeChoices.Add("ZIP files", New String() {".zip"})Dim storageFile As StorageFile = Await fileSavePicker.PickSaveFileAsync()If storageFile Is Nothing Then ' export cancelled by the user ReturnEnd If
' initialize JpegFilterDim filter As New JpegFilter()filter.UseZipForMultipleFiles = Truefilter.StorageFile = storageFile
' render report to the filterAwait report.RenderToFilterAsync(filter)
' launch the exported fileAwait Windows.System.Launcher.LaunchFileAsync(storageFile)
// request target file from the user FileSavePicker fileSavePicker = new FileSavePicker(); fileSavePicker.FileTypeChoices.Add("ZIP files", new string[] {
Visual Basic
C#
FlexReport for UWP 18

".zip" }); StorageFile storageFile = await fileSavePicker.PickSaveFileAsync(); if (storageFile == null) // export cancelled by the user return; // initialize JpegFilter JpegFilter filter = new JpegFilter(); filter.UseZipForMultipleFiles = true; filter.StorageFile = storageFile; // render report to the filter await report.RenderToFilterAsync(filter); // launch the exported file await Windows.System.Launcher.LaunchFileAsync(storageFile);
PrintingFlexReport allows you to print a report using ShowPrintUIAsync method of C1DocumentSource class. The followingcode implements the ShowPrintUIAsync method for printing a report. The example uses the sample created in QuickStart.
' show print UIreport.ShowPrintUIAsync()
C#
// show print UIreport.ShowPrintUIAsync();
Besides using ShowPrintUIAsync method, you can also print a report using FlexViewer UI. The FlexViewercontrol provides an option to print a report directly from its UI using the Print icon. On clicking the icon, you areprovided with the standard printer settings, such as selecting a printer and selecting orientation, size, and number ofpages to print.
Visual Basic
FlexReport for UWP 19

About FlexReportDesignerThe FlexReportDesigner application is a tool used for creating and editing C1FlexReport report definition files. TheDesigner allows you to create, edit, load, and save files with .flxr extension. It also allows you to import C1Report (.xml)and report definitions from Microsoft Access files (.mdb) and Crystal Reports (.rpt).
To run the Designer, double-click the C1FlexReportDesigner.4.exe (for 64-bit platform) orC1FlexReportDesigner32.4.exe (for 32-bit platform) file located by default in the following path for .NET 4.0:
C:\Program Files (x86)\ComponentOne\Apps\v4.0 for 64 bit platformC:\Program Files\ComponentOne\Apps\v4.0 for 32 bit platform
Note that the given location reflects the default installation path. It might differ if you make changes to the installationpath.
Here's how the Designer looks like with the FlexCommonTasks.flxr file opened:
You can find the detailed description about the components of the Designer window in FlexReportDesignerapplication for WinForms.
FlexReport for UWP 20

FlexViewer for UWPFlexViewer is a previewing control which can be used to view FlexReport and PDF documents. The FlexViewercontrol comes with a modern, interactive and user-friendly User Interface(UI). Using FlexViewer control, you cannavigate through the report pages using Page navigation option and jump to a specific page by entering the pagenumber in Page textbox.
You can easily export a report to multiple formats from within the FlexViewer control. You can also change the pagesettings of the report by clicking on the Page Settings icon from the FlexViewer control. You can also use theFlexViewer control to print your reports using the Print icon which provides the standard printer settings.
FlexViewer Key FeaturesThe key features of FlexViewer are as follows:
Modern User-friendly UIFlexViewer has an interactive and user friendly UI that helps preview different document types such asFlexReport, SSRS, and PDF document. It follows standard practices used to design UWP Apps and its designmakes it well suited for any device – Windows 10 PC, Windows Phone etc.
Page NavigationPage navigation is available at the top of the FlexViewer control, with which you can navigate through thereport pages and if you want to jump to a specific page number then you can type the page number in thepage number textbox.
FlexReport for UWP 21

View ModesFlexViewer supports different views of the reports/documents:
Continuous - Shows the pages in continuity.Actual Size – Shows the pages in their actual size.Page Width - Fits the page to the width of the preview window.Whole Page - Fits the whole page in the preview window.Rotate Clockwise - Rotates the view clockwise.Rotate Counter-Clockwise - Rotates the view counter-clockwise.One Page – Shows report pages page by page in a single page view.Facing Pages – Shows report pages side by side.Two Pages – Shows Two page view of pages.Four pages – Shows pages in 4x4 mode.Eight pages – Shows pages in 8x8 mode.
Use/Reset ParametersThe FlexViewer control adds interactivity, by letting you enter data parameters you require to display in yourreport. The control supports String, Boolean, Date, Integer and Float type parameters.
View Thumbnails and HierarchyFlexViewer allows you to view the thumbnails of the report pages and if your report contains Document Map,FlexViewer includes the Outlines panel, which helps you choose the required location to jump to.
Page SettingsThe FlexViewer control allows you to change the page settings according to your requirements before printingyour reports. You can just click on Page Settings icon in the left panel and set the following options:
Orientation - Potrait/LandscapeSizeMargins - Top margin, Bottom margin, Left margin, and Right margin
PrintFlexViewer allows you to print your reports using the Print icon, which provides the standard printer settings.
ExportFlexViewer allows you to export your reports and documents to various formats, such as HTML, PDF, RTF, GIF,JPEG, PNG, BMP, TIFF, Open XML Excel, and Open XML Word. You can also choose to open the exporteddocument automatically after export.
RightToLeftApart from all the above features which are directly accessible from the UI, the FlexViewer allows you to set thedirection of FlexViewer Tool panel by setting the FlowDirection property to RightToLeft or LeftToRight.
FlexViewer ToolbarThe toolbar appears on the left side of the FlexViewer control. It consists of the following command buttons:
CommandButton
Command ButtonName Description
Tools Shows the list of tools available in the FlexViewer control
FlexReport for UWP 22

Thumbnails Displays thumbnails of all the pages available in the displayed report
Outlines Displays the outline of report pages
Parameters Displays the parameters set for the report pages
Export Allows user to export the report to different formats
Page Settings Allows you to set the orientation, size, and margins of the reportpages
Print Allows user to print a report
Few other commands are also available in FlexViewer control which are visible at the top of the control.
CommandButton
Command ButtonName Description
Pages Displays the current page number and the total number of pages in areport
View Allows you to view the report pages in different views
Search Allows you to search text in report
Rotate View of ReportsFlexViewer provides you the flexibility to rotate the view of reports to different angles according to yourrequirements. To rotate view of a report to various degrees of rotation, you can set the RotateView propertyof C1FlexViewer class. The RotateView property accepts the following values from the FlexViewerRotateView enumdescribing the rotation angle of the view:
NoRotation: Rotation is not applied to the view.Rotation180: Allows rotation of the view by 180 degrees.Rotation90Clockwise: Allows rotation of the view by 90 degrees in clockwise direction.Rotation90CounterClockwise: Allows rotation of the view by 90 degrees in counter-clockwise direction.
Rotate View of Report at Runtime
You can rotate the view of a report at runtime by selecting one of the rotate views from the View dropdown list onthe top right corner of the FlexViewer control.
Rotate View of Report Programmatically
To rotate view of a report, you can use FlexViewerRotateView enum to rotate view of a report. The following codeillustrates the use of FlexViewerRotateView enum:
Visual Basic
FlexReport for UWP 23

flxViewer.RotateView = C1.Xaml.FlexViewer.FlexViewerRotateView.Rotation90Clockwise
C#
flxViewer.RotateView = C1.Xaml.FlexViewer.FlexViewerRotateView.Rotation90Clockwise;
Visual Basic
Binding FlexReport with FlexViewerTo render a report, you need to load the report first. Once the report definition has been created, a data source is defined, andthe report definition is loaded, you can render the report to the FlexViewer control.
To preview the report in FlexViewer control, use the following code:
Try ' load from resource stream Using stream As Stream = asm.GetManifestResourceStream("BindingApp.Resources.TelephoneBillReport.flxr")
rpt.Load(stream, "TelephoneBillReport")End UsingCatch ex As Exception
Visual Basic
FlexReport for UWP 24

Dim md As New MessageDialog(String.Format("Failed to Load Report", rpt.ReportName, ex.Message), "Error") Await md.ShowAsync() ReturnEnd Try
Flxviewer.DocumentSource = rpt
try{ // load from resource stream using (Stream stream = asm.GetManifestResourceStream("BindingApp.Resources.TelephoneBillReport.flxr"))
rpt.Load(stream, "TelephoneBillReport");}catch (Exception ex){ MessageDialog md = new MessageDialog(string.Format("Failed to Load Report", rpt.ReportName, ex.Message), "Error"); await md.ShowAsync(); return;} Flxviewer.DocumentSource = rpt;
C#
FlexReport for UWP 25

FlexReport SamplesWith the C1Studio installer, you get FlexReport samples that help you understand the implementation of the product.The C# and VB samples are available at the default installation folder - Documents\ComponentOneSamples\UWP\C1.UWP.FlexReport.
The list of C# samples available at the default installation location are as follows:
Sample Description
Binding This sample uses the Simple.OData.Client library which is installed automatically as a Nugetpackage.
FlexReportSamples This sample allows to select a report from a .flxr FlexReport report definition file, or pick areport from the list of predefined reports, and generates the report. The report then can beexported to any of the supported external formats.
FlexReportExplorer The application features industry standard reports for domains like Finance, Medical, Enterpriseand Telecom. It demonstrates the major features of FlexReport for UWP.
FlexPdfViewer This sample loads a PDF document into C1PdfDocumentSource, then uses FlexViewer control toshow the document in UWP application.
The list of available VB samples are as follows:
Sample Description
Binding This sample uses the Simple.OData.Client library which is installed automatically as a Nugetpackage.
FlexReportSamples This sample allows to select a report from a .flxr FlexReport report definition file, or pick areport from the list of predefined reports, and generates the report. The report then can beexported to any of the supported external formats.
FlexReportExplorer The application features industry standard reports for domains like Finance, Medical, Enterpriseand Telecom. It demonstrates the major features of FlexReport for UWP.
FlexPdfViewer This sample loads a PDF document into C1PdfDocumentSource, then uses FlexViewer control toshow the document in UWP application.
FlexReport for UWP 26