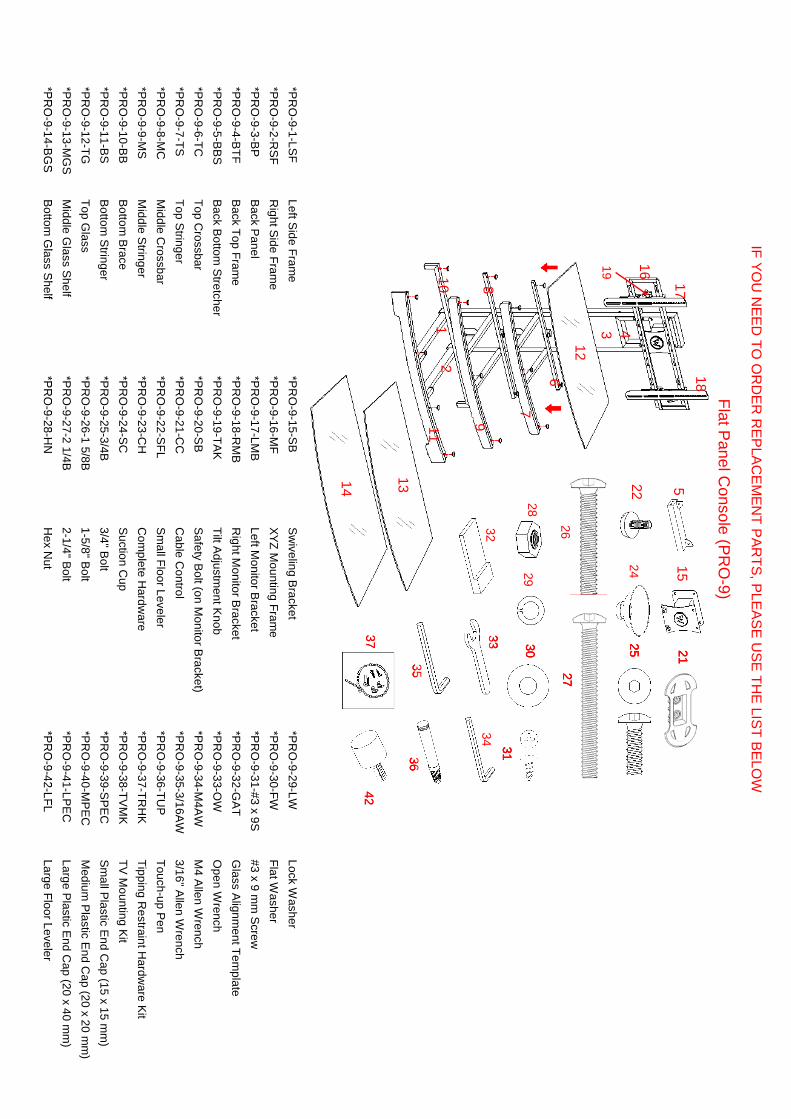
flat panel console (pro-9) - whalen style · flat panel console (pro-9) ... restraint hardware...
TRANSCRIPT

THIS INSTRUCTION BOOKLET CONTAINS IMPORTANT SAFETY INFORMATION. PLEASE READ AND KEEP FOR FUTURE REFERENCE. Whalen Furniture Mfg. Inc. Page 1 Factory No. 33- 10944
Flat Panel Console (PRO-9)
ADULT ASSEMBLY REQUIRED
If you have any questions regarding assembly or if parts are missing, DO NOT return this item to the store where it was purchased. Please call our customer service number and have your instructions and parts list ready to provide the model name, part name or factory number:
(52) 55 5899 1200 8:30 a.m. - 4:30 p.m. PST, Monday - Friday ONLINE: www.whalenstyle.com EMAIL: [email protected]
Video Instruction Guides Go to http://whalen.showuhow.com to view step-by-step instructional videos for assembling and installing your product. Enter the following product number on the ShowUhow homepage.
LOT NUMBER: DATE PURCHASED: / /
PRO-9
Entertainment Center
MADE IN CHINA Model: PRO-9
IMPORTER: COMERCIALIZADORA MÉXICO
AMERICANA, S. DE R.L. DE C.V. AV. NEXTENGO NO. 78 COL. SANTA CRUZ ACAYUCÁN.
DELEGACIÓN AZCAPOTZALCO, MÉXICO, D.F. C.P. 02770 R.F.C. CMA9109119L0
TEL. (52) 55 5899 1200

Model # PRO-9
Whalen Furniture Mfg. Inc. Page 2 Factory No. 33- 10944
MANUFACTURER: Whalen Furniture CATALOG: Flat Panel Console (PRO-9) DATE OF MANUFACTURE: August 2012 MADE IN CHINA
1. Please read the Assembly Instructions prior to assembling this product. 2. Remove all hardware from box and sort by size. 3. Check to see that all hardware and parts are present BEFORE assembling. 4. Ask a friend to assist you with the assembly of this furniture. 5. To avoid damage, assemble the product on a sturdy, level and protective surface. 6. Please wait until all steps are completed before fully tightening bolts. 7. Make sure all bolts are tightly fastened before the unit is used.
M A X I M U M R E C O M M EN D E D W E I G H T L O A D S
GE NERAL INFORMATION, T IPS & TRICKS
This product is sold with a Tipping Restraint Hardware Kit. You must install the Tipping Restraint Hardware between the wall and the TV console to prevent any accidents or damages. When properly installed, this restraint can provide protection against the unexpected tipping of the unit due to small tremors, bumps or climbing. The restraint is only a deterrent and is not a substitute for proper adult supervision. Use of tip-over restraints may only reduce, but not eliminate, the risk of tip-over.
FITS UP TO MOST 47” FLAT PANEL TVs MAXIMUM LOAD 135 lb. (61.2 kg)
MAXIMUM LOAD 50 lb. (22.7 kg)
THIS UNIT IS NOT INTENDED FOR USE WITH CRT TVS. USE ONLY WITH FLAT PANEL TVS AND AUDIO/VIDEO EQUIPMENT MEETING RECOMMENDED SIZE AND WEIGHT LIMITS. NEVER USE WITH LARGER/HEAVIER THAN RECOMMENDED FLAT PANEL TVS OR EQUIPMENT. TO AVOID INSTABILITY, PLACE FLAT PANEL TV IN CENTRE OF THE UNIT; CRT TVS, IMPROPERLY POSITIONED FLAT PANEL TVS, OR FLAT PANEL TVS OR OTHER EQUIPMENT THAT EXCEED RECOMMENDED SIZE AND WEIGHT LIMITS COULD FALL OFF OR BREAK THE UNIT, CAUSING POSSIBLE SERIOUS INJURY.

Model # PRO-9
Whalen Furniture Mfg. Inc. Page 3 Factory No. 33- 10944
Parts List
Please read completely through the instructions and verify that all parts listed are present before beginning assembly.
A- Left Side Frame (1) B- Right Side Frame (1) C- Back Panel (1)
D - Back Top Frame (1) E- Back Bottom Stretcher (1) F- Top Crossbar (1)
G- Top Stringer (1) H- Middle Crossbar (1) I- Middle Stringer (1)
J- Bottom Brace (1) K- Bottom Stringer (1) L- Top Glass (1) M- Middle Glass Shelf (1) N- Bottom Glass Shelf (1) O- Swiveling Bracket (1)
P- Mounting Frame (1) Q- Monitor Bracket (L/R) (2) R- Cable Control (2)
QR
QL

Model # PRO-9
Whalen Furniture Mfg. Inc. Page 4 Factory No. 33- 10944
Hardware List
(1) Suction Cup (2) 3/4” Bolt (3) 1-5/8” Bolt
(19+1 extra) (8+1 extra) (16+1 extra)
(4) 2-1/4” Bolt (5) Hex Nut (6) Lock Washer (7) Flat Washer (8+1 extra) (8+1 extra) (32+1 extra) (36+1 extra)
(8) #3 x 9 mm Screw (9) Glass Alignment Template (10) Large Floor Leveler Touch-up Pen (4+1 extra) (1) (2) (1)
Open Wrench M4 Allen Wrench 3/16” Allen Wrench Tipping Restraint Hardware Kit (1) (1) (2) (1) (Inside Plastic Bag)
TV Mounting Kit
M4 x 12 Bolt (4) M4 x 30 Bolt (4) M5 x 12 Bolt (4) M5 x 30 Bolt (4)
M6 x 12 Bolt (4) M6 x 35 Bolt (4) M8 x 16 Bolt (4) M8 x 40 Bolt (4)
M4 Lock Washer (4) M5 Lock Washer (4) M6 Lock Washer (4) M8 Lock Washer (4)
Large Spacer (4) Small Spacer (4) M4/M5 Flat Washer (8) M6/M8 Flat Washer (4)
Tools required: Allen Wrench & Open Wrench (provided) and Phillips screwdriver (not provided).

Model # PRO-9
Whalen Furniture Mfg. Inc. Page 5 Factory No. 33- 10944
Assembly Instructions
Note: Please do not fully tighten all bolts until you finish assembling all parts. Once assembled, go back and fully tighten all bolts. This will make it easier during assembly of unit.
1. Attach Back Top Frame (D) and Back Bottom Stretcher (E) between Left and Right Side Frame (A & B) by inserting the 1-5/8” Bolts (3) with Lock Washers and Flat Washers (6 & 7) through the pre-drilled holes of side frame into place. Make sure the metal brackets on Back Bottom Stretcher (E) facing up and pointing forward. Tighten the bolts with the enclosed M4 Allen Wrench. See detail #1.
Required hardware in this step
Description (3) 1-5/8” Bolt (6) Lock Washer (7) Flat Washer
Sketch Qty. (8 pcs) (8 pcs) (8 pcs) Tools required: M4 Allen Wrench

Model # PRO-9
Whalen Furniture Mfg. Inc. Page 6 Factory No. 33- 10944
Assembly Instructions
2. Pick up Back Panel (C) and fit it between the front of Left and Right Side Frames (A & B). Insert and screw four #3 x 9 mm Screws (8) through the corner brackets to secure the Back Panel in place. Tighten the screws with a Phillips screwdriver. See detail #2.
Required hardware in this step Description (8) #3 x 9mm Screw Sketch Qty. (4 pcs)
Tools required: Phillips Screwdriver

Model # PRO-9
Whalen Furniture Mfg. Inc. Page 7 Factory No. 33- 10944
Assembly Instructions
3. Lay the unit down on a level and protective surface as shown in detail #3.
4. Attach Bottom Brace (J) and Bottom Stringer (K) to the bottom rail of Left & Right Side Frame (A & B) with four 2-1/4” Bolts (4) and Washers (6 & 7) as shown in detail #3.
5. Screw the Large Floor Levelers (10) into the front sockets underneath the bottom rail
of Left and Right Side Frame (A & B). Set the Levelers to the correct height.
Required hardware in this step
Description (4) 2-1/4” Bolt (6) Lock Washer (7) Flat Washer (10) Large Floor Leveler
Sketch Qty. (4 pcs) (4 pcs) (4 pcs) (2 pcs) Tools required: M4 Allen Wrench

Model # PRO-9
Whalen Furniture Mfg. Inc. Page 8 Factory No. 33- 10944
Assembly Instructions
6. Attach Middle Crossbar (H) and Middle Stringer (I) to the middle rail of Left & Right Side Frame (A & B) using 1-5/8” Bolts (3) with Washers (6 & 7) through the pre-drilled holes on middle rails into place. Tighten the bolts with the enclosed M4 Allen Wrench. See detail #4.
7. Repeat the last step to attach Top Crossbar (F) and Top Stringer (G) to the top rail of Left & Right Side Frame (A & B).
Required hardware in this step
Description (3) 1-5/8” Bolt (6) Lock Washer (7) Flat Washer
Sketch Qty. (8 pcs) (8 pcs) (8 pcs) Tools required: M4 Allen Wrench

Model # PRO-9
Whalen Furniture Mfg. Inc. Page 9 Factory No. 33- 10944
Assembly Instructions
8. Stand the unit upright. Adjust the Large Floor Levelers (10) installed and the small floor levelers pre-attached at the bottom of Bottom Stringer (K) to level the unit. As shown in detail #5.
Hardware provided Tools required
Floor Levelers No tool required

Model # PRO-9
Whalen Furniture Mfg. Inc. Page 10 Factory No. 33- 10944
Assembly Instructions
9. Attach Swiveling Bracket (O) to the top of Back Top Frame (D) with the pivoting bolt head up, using four 2-1/4” Bolts (4) with Washers (6 & 7) through the bracket holes and Back Top Frame and then secure with Hex Nuts (5). Securely tighten with the Open Wrench and M4 Allen Wrench provided. See detail #6.
Note: The Back Top Frame can provide three height options for your TV set. Refer to your TV size and adjust the Swiveling Bracket at your desired height for optimum viewing.
Required hardware in this step
Description: (4) 2-1/4” Bolt (5) Hex Nut (6) Lock Washer (7) Flat Washer
Sketch Qty. (4 pcs) (4 pcs) (8 pcs) (8 pcs) Tools required: M4 Allen Wrench and Open Wrench

Model # PRO-9
Whalen Furniture Mfg. Inc. Page 11 Factory No. 33- 10944
Assembly Instructions
10. Orient the Mounting Frame (P) and attach to the Swiveling Bracket (O) using four 3/4” Bolts (2) with Washers (6 and 7) and then secure with Hex Nuts (5). Make sure the slots on the Mounting Frame bottom. Securely tighten with the Open Wrench and Allen Wrench provided. See detail #7.
Required hardware in this step Description: (2) 3/4” Bolt (5) Hex Nut (6) Lock Washer (7) Flat Washer
Sketch Qty. (4 pcs) (4 pcs) (4 pcs) (8 pcs) Tools required: M4 Allen Wrench and Open Wrench

Model # PRO-9
Whalen Furniture Mfg. Inc. Page 12 Factory No. 33- 10944
Mounting the Monitor Bracket to a television with a flat back
Note: For televisions with a curved back or recessed back proceed directly to step #13.
11. Determine the correct diameter of the bolt your TV requires by hand threading them into the threaded inserts on the back of the TV. If you encounter any resistance, stop immediately. If you are unable to find the correct bolt consult a local hardware store.
12. Follow the appropriate diagram below to attach Monitor Brackets (QL/QR) to the back of
your TV with selected fasteners. Make sure the Monitor Brackets are centered and level with each other. Secure the bolts with a Phillips Screwdriver. DO NOT over tighten the bolts. Note: Lean the TV up against a wall or other solid surface when attaching with the Monitor Brackets. DO NOT place the TV face down on the glass this may cause permanent damage.

Model # PRO-9
Whalen Furniture Mfg. Inc. Page 13 Factory No. 33- 10944
Mounting the Monitor Bracket to a television with a curved / recess back
13. Determine the correct diameter of the bolt your TV requires by hand threading them into the threaded insert on the back of the TV. If you encounter any resistance, stop immediately. If you are unable to find the correct bolt consult a local hardware store.
14. Follow the appropriate diagram below to attach Monitor Brackets (QL/QR) to the back of
your TV with selected fasteners. Make sure the Monitor Brackets are vertically centered and level with each other. Secure the bolts with a Phillips Screwdriver. DO NOT over tighten the bolts.

Model # PRO-9
Whalen Furniture Mfg. Inc. Page 14 Factory No. 33- 10944
Assembly Instructions
15. Once the Monitor Brackets (QL/QR) are attached onto the back of television, ask for assistance to lift the television up to attach the Monitor Brackets onto the Mounting Frame (P). Set the hooks on Monitor Brackets over the Mounting Frame then lower them onto the bars of Mounting Frame. Loosen the Safety Bolt pre-attached on the Monitor Brackets to ensure an easy fit at the bottom hooks. Proceed to center the television.
16. If you want to adjust the tilt, ask for help from your friends to hold the TV steady before you
start to adjust. Simply turn the both Tilt Adjustment Knobs on Monitor Brackets (QL/QR) to adjust your TV to provide optimum viewing and minimize glare. When the TV is in its intended position, tighten both safety bolts with a long Phillips Screwdriver until they hit the underside of the Mounting Frame (P) to ensure your TV is safe and secure on the wall. See detail #10.

Model # PRO-9
Whalen Furniture Mfg. Inc. Page 15 Factory No. 33- 10944
Assembly Instructions
17. The Monitor Brackets (QL/QR) can tilt up to 11˚ downward and 5˚ upward, depending on your optimum viewing position. Have your assistant hold the TV steady before you start to adjust the tilt. Simply reach behind the TV and turn the both Tilt Adjustment Knobs with enclosed 3/16” Allen Wrench to adjust your TV to provide optimum viewing and minimize glare. When the TV is in its intended position, tighten both safety bolts to secure it in place. See detail #11.
Note: If you need to remove the TV, make sure both Safety Bolts are disengaged fully.

Model # PRO-9
Whalen Furniture Mfg. Inc. Page 16 Factory No. 33- 10944
Assembly Instructions
18. Attach 2 Cable Controls (R) onto the backside of assembled unit with the 3/4” Bolts (2). Tighten the bolts with M4 Allen Wrench provided. See detail #12.
19. The Cable Controls (R) enable you to shorten, separate and route cables and cords. Using the Cable Controls you can create a system for routing cables through channels, between components and to power sources without tangled mess or annoying signal interference. As shown in detail #12.
Required hardware in this step Description: (2) 3/4” Bolt (R) Cable Control
Sketch Qty. (4 pcs) (2 pcs)
Tools required: M4 Allen Wrench

Model # PRO-9
Whalen Furniture Mfg. Inc. Page 17 Factory No. 33- 10944
Assembly Instructions
20. Put the Suction Cups (1) firmly into the top holes on Crossbars & Stringers (F, G, H, I, J & K) as shown in detail #13.
21. Set Top Glass (L) & Glass Shelves (M & N) in place starting with Bottom Glass Shelf (N) as shown in detail #13. Make sure the black side of glass is down. Using the provided Glass Alignment Template (9) to ensure each glass is centered properly. Push each glass all the way back against the post of Left & Right Side Frame.
Note: If glass is scratched you can minimize the damage by using a BLACK marker and filling in scratched area from underneath.
Required hardware in this step
Description: (1) Suction Cup (9) Glass Alignment Template
Sketch Qty. (19 pcs) (1 pce)
Tools required: No tools required
Model # PRO-9
Whalen Furniture Mfg. Inc. Page 18 Factory No. 33- 10944
Assembly Instructions
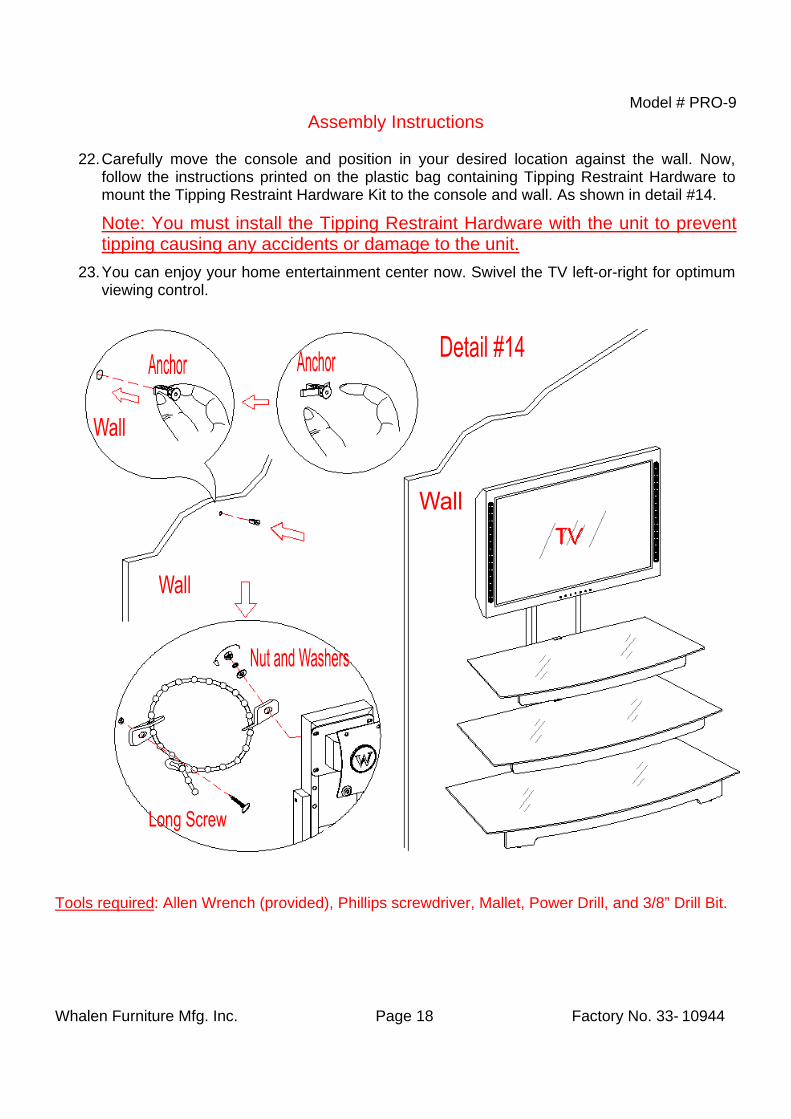
22. Carefully move the console and position in your desired location against the wall. Now, follow the instructions printed on the plastic bag containing Tipping Restraint Hardware to mount the Tipping Restraint Hardware Kit to the console and wall. As shown in detail #14.
Note: You must install the Tipping Restraint Hardware with the unit to prevent tipping causing any accidents or damage to the unit.
23. You can enjoy your home entertainment center now. Swivel the TV left-or-right for optimum viewing control.
Tools required: Allen Wrench (provided), Phillips screwdriver, Mallet, Power Drill, and 3/8” Drill Bit.

Model # PRO-9
Whalen Furniture Mfg. Inc. Page 19 Factory No. 33- 10944
Care and Maintenance
Use a soft, clean cloth that will not scratch the surface when dusting. Use of furniture polish is not necessary. Should you choose to use polish, test first in an
inconspicuous area. Using solvents of any kind on your furniture may damage the finish. Never use water to clean your furniture as it may cause damage to the finish. Always use coasters under beverage glasses and flowerpots. Liquid spills should be removed immediately. Using a soft clean cloth, blot the spill gently.
Avoid rubbing. Always use protective pads under hot dishes and plates. Heat can cause chemical changes
that may create spotting within the furniture finish. Stains or marks from crayons or ink markers will be difficult to remove. In the event that your furniture is stained or otherwise damaged during use, we recommend
that you call a professional to repair your furniture. Check bolts/screws periodically and tighten them if necessary.
Further advice about furniture care It is best to keep your furniture in a climate-controlled environment. Extreme temperature and humidity changes can cause fading, warping, shrinking and splitting of wood. It is advised to keep furniture away from direct sunlight as sun may damage the finish. Proper care and cleaning at home will extend the life of your purchase. Following these important and helpful tips will enhance your furniture as it ages.
A Touch-up Pen has been provided to repair any small nicks or scratches that may occur during assembly or shipping.
We hope you enjoy your purchase for many years.
Thank you for your purchase!
IF YOU
NEED
TO O
RD
ER R
EPLACEM
ENT PAR
TS, PLEASE USE TH
E LIST BELOW
Flat Panel C
onsole (PRO
-9)
412
3
5
6
7
89
10
12
13
11
15
16
1718
19
2224
26
2829
30
3132
3334
21
25
35 27
36
*PR
O-9-1-LS
FLeft S
ide Frame
*PR
O-9-15-S
BS
wiveling B
racket*P
RO
-9-29-LWLock W
asher*P
RO
-9-2-RS
FR
ight Side Fram
e*P
RO
-9-16-MF
XYZ Mounting Fram
e*P
RO
-9-30-FWFlat W
asher*P
RO
-9-3-BP
Back P
anel*P
RO
-9-17-LMB
Left Monitor B
racket*P
RO
-9-31-#3 x 9S#3 x 9 m
m S
crew*P
RO
-9-4-BTF
Back Top Fram
e*P
RO
-9-18-RM
BR
ight Monitor B
racket*P
RO
-9-32-GA
TG
lass Alignm
ent Template
*PR
O-9-5-B
BS
Back B
ottom S
tretcher*P
RO
-9-19-TAK
Tilt Adjustm
ent Knob
*PR
O-9-33-O
WO
pen Wrench
*PR
O-9-6-TC
Top Crossbar
*PR
O-9-20-S
BS
afety Bolt (on M
onitor Bracket)
*PR
O-9-34-M
4AW
M4 A
llen Wrench
*PR
O-9-7-TS
Top Stringer
*PR
O-9-21-C
CC
able Control
*PR
O-9-35-3/16A
W3/16" A
llen Wrench
*PR
O-9-8-M
CM
iddle Crossbar
*PR
O-9-22-S
FLS
mall Floor Leveler
*PR
O-9-36-TU
PTouch-up P
en*P
RO
-9-9-MS
Middle S
tringer*P
RO
-9-23-CH
Com
plete Hardw
are*P
RO
-9-37-TRH
KTipping R
estraint Hardw
are Kit
*PR
O-9-10-B
BB
ottom B
race*P
RO
-9-24-SC
Suction C
up*P
RO
-9-38-TVM
KTV
Mounting K
it*P
RO
-9-11-BS
Bottom
Stringer
*PR
O-9-25-3/4B
3/4" Bolt
*PR
O-9-39-S
PE
CS
mall P
lastic End C
ap (15 x 15 mm
)*P
RO
-9-12-TGTop G
lass*P
RO
-9-26-1 5/8B1-5/8" B
olt*P
RO
-9-40-MP
EC
Medium
Plastic E
nd Cap (20 x 20 m
m)
*PR
O-9-13-M
GS
Middle G
lass Shelf
*PR
O-9-27-2 1/4B
2-1/4" Bolt
*PR
O-9-41-LP
EC
Large Plastic E
nd Cap (20 x 40 m
m)
*PR
O9
14B
GS
Btt
Gl
Sh
lf*P
RO
928
HN
HN
t*P
RO
942
LFLL
FlL
l
412
3
5
6
7
89
10
12
1314
11
15
16
1718
19
2224
26
2829
30
3132
3334
21
25
35
37
27
36
42
*PR
O-9-14-B
GS
Bottom
Glass S
helf*P
RO
-9-28-HN
Hex N
ut*P
RO
-9-42-LFLLarge Floor Leveler
412
3
5
6
7
89
10
12
1314
11
15
16
1718
19
2224
26
2829
30
3132
3334
21
25
35
37
27
36
42