flat epdm rubber roof installation instructions · pdf filenatural lighting by monodraught...
TRANSCRIPT

Natural Lighting by Monodraught
Preparation and Safety Information
Flat EPDM Rubber Roof Installation Instructions
ScaffoldingFor flat roofs and single storey buildings not exceeding 10 ft. (3 m) in height, access to the roof can be gained by ladder, but caution should be taken to prevent any falling materials. For two-storey buildings and pitched roofs a tower scaffold or similar should be provided to gain access to the roof if it is greater than 10 ft. (3 m) in height from ground level and not more than 20 ft. (6 m) in height. For access to roofs greater than 20 ft. (6 m) in height a professionally installed scaffold access should be provided. All scaffolding and ladders must be properly fixed to the building and all necessary precautions must be taken to prevent falling materials and provide a safe working environment for personnel.
ElectricityNormal safety precautions should always be followed. A low voltage power supply should be used when appropriate. Care should be taken to ensure there are no wires, cables, leads, water or gas pipes near the work area. Suitable eye protection and protective gloves must be worn.
CuttingSUNPIPE tubes can be sharp after their ends are cut with tin snips, protective gloves must be worn.
DustA safety mask should be worn to ensure you don’t inhale dust when carrying out the installation of a SUNPIPE system.
Other safety recommendationsDon’t fit SUNPIPE when it is raining or the roof area is wet or slippery.
You will need the following equipmentProtective eye-wear, protective gloves, protective breathing mask, ladders, tin snips, power drill, power jig-saw, dispensing gun to dispense the silicone sealant supplied, pad saw, stanley knife, miscellaneous other tools.
Building RegulationsAlways check with your local council that your installation complies with all local Building Authority requirements.

1. Diamond DomeHigh impact acrylic roof dome.
[email protected] / +44 (0)1494 [email protected] / +44 (0)1494 897700 32
Flat Rubber Roof SUNPIPEComponents for a Standard Kit installation of a Flat Roof SUNPIPE System
Optional Additional Components
Installation Pack
• 6 x 35 mm or 45 mm Screws (depending on SUNPIPE size)
• 10 x Black Washers• Silver Aluminium Tape• Silicone Sealant• 0.5 Litre Quick Prime Plus• 3” Seam Tape• 8 x V-Plate Washers• 5 x 16 mm Stainless Steel Screws• 5 x 13 mm Zinc Plated Steel Screws
Alternative Components
610 mm Extension length with crimped end.
300 Adjustable ElbowUsed where a small offset is required.
450 Adjustable ElbowUsed where a large offset is required.
Green Roof ApplicationHeight of cone will vary according to each build.
2. EcoShield
3. Composite EPDM Flashing PlateFlashing plate with integrated skirt for Rubber Roofs.
4. Plain end SUNPIPE 610 mmStraight length of SUNPIPE SUPER-SILVER Aluminium Tubing. Must be used to terminate above ceiling level.
5. 3 mm Plywood Backing PlateTemplate for marking ceiling opening and additional ceiling support.
6. Fixing RingHousing for diffuser components secured to the ceiling.
7. SUNPIPE Slip LengthFinal length of SUNPIPE at ceiling level.
8. Micro Prism Ceiling diffuserDouble glazed ceiling diffuser designed for best dispersion of natural daylight.
9. Clip on Diffuser TrimWhite ABS diffuser fascia.
Use the 3 mm plywood backing panel as a marking out template (see diagram above). Carefully check there are no adjacent power or other services nearby, then enlarge hole as necessary.
Cutting Sizes
Enlarge the hole to the sizes shown in the table below.
Note: The plywood backing panel is not provided for 750 mm, 1000 mm and 1500 mm.
Exterior Preparation
Nominal [mm]
SUNPIPE Diameter
Actual Diameter
Hole Size to Cut Ø
230 9” 230 mm 240 mm300 12” 305 mm 315 mm450 18” 458 mm 470 mm530 21” 536 mm 550 mm
Nominal [mm]
SUNPIPE Diameter
Actual Diameter
Hole Size to Cut Ø
750 30” 762 mm 780 mm1000 40” 1000 mm 1030 mm1500 60” 1500 mm 1530 mm
Insufficient Space Between Joists
If there isn’t sufficient space, as a guide, on a ‘cut roof’, one rafter and ceiling joist may be cut to allow installation of your SUNPIPE. However, cross trimmers between adjacent rafters or ceiling joists must be installed at each side of the openings to support the ‘cut’ ends.
Cut Joist Cross Trimmer
Establish whether your flat roof is safe to walk on
If it isn’t, prepare your ‘duck boards’ so that you can work safely
Marking out your SUNPIPE Entrance
Drive a screw from the internal void through the roof membrane to mark the centre point or roof opening.
Place the flashing plate centrally over the pilot hole. Mark the perimeter of the square skirt on the roof with chalk.
Creating Your SUNPIPE Entrance
Use plywood template to mark at roof level and cut a circular hole through the roofing board material (see diagram above). Ensure the hole aligns with the hole in the ceiling below.
Interior Preparation
Tips for Finding Joists
Some flat roofs have a ventilation gap, just behind the fascia board running along the edge of the roof. The joist positions can be seen through the gap. Use a stud finder if possible.
Marking Out Your SUNPIPE Exit
Drill a small pilot hole in the centre of the position of your SUNPIPE. Use this to determine whether there is sufficient clearance within the ceiling space. You may have to adjust the centre point of the SUNPIPE so there is no need to cut the joists.
Under no circumstances should any element of a structured timber or beam be cut without prior clearance from a structural engineer.
[email protected] / +44 (0)1494 [email protected] / +44 (0)1494 897700
Flat EPDM /Rubber Roof SUNPIPE
54
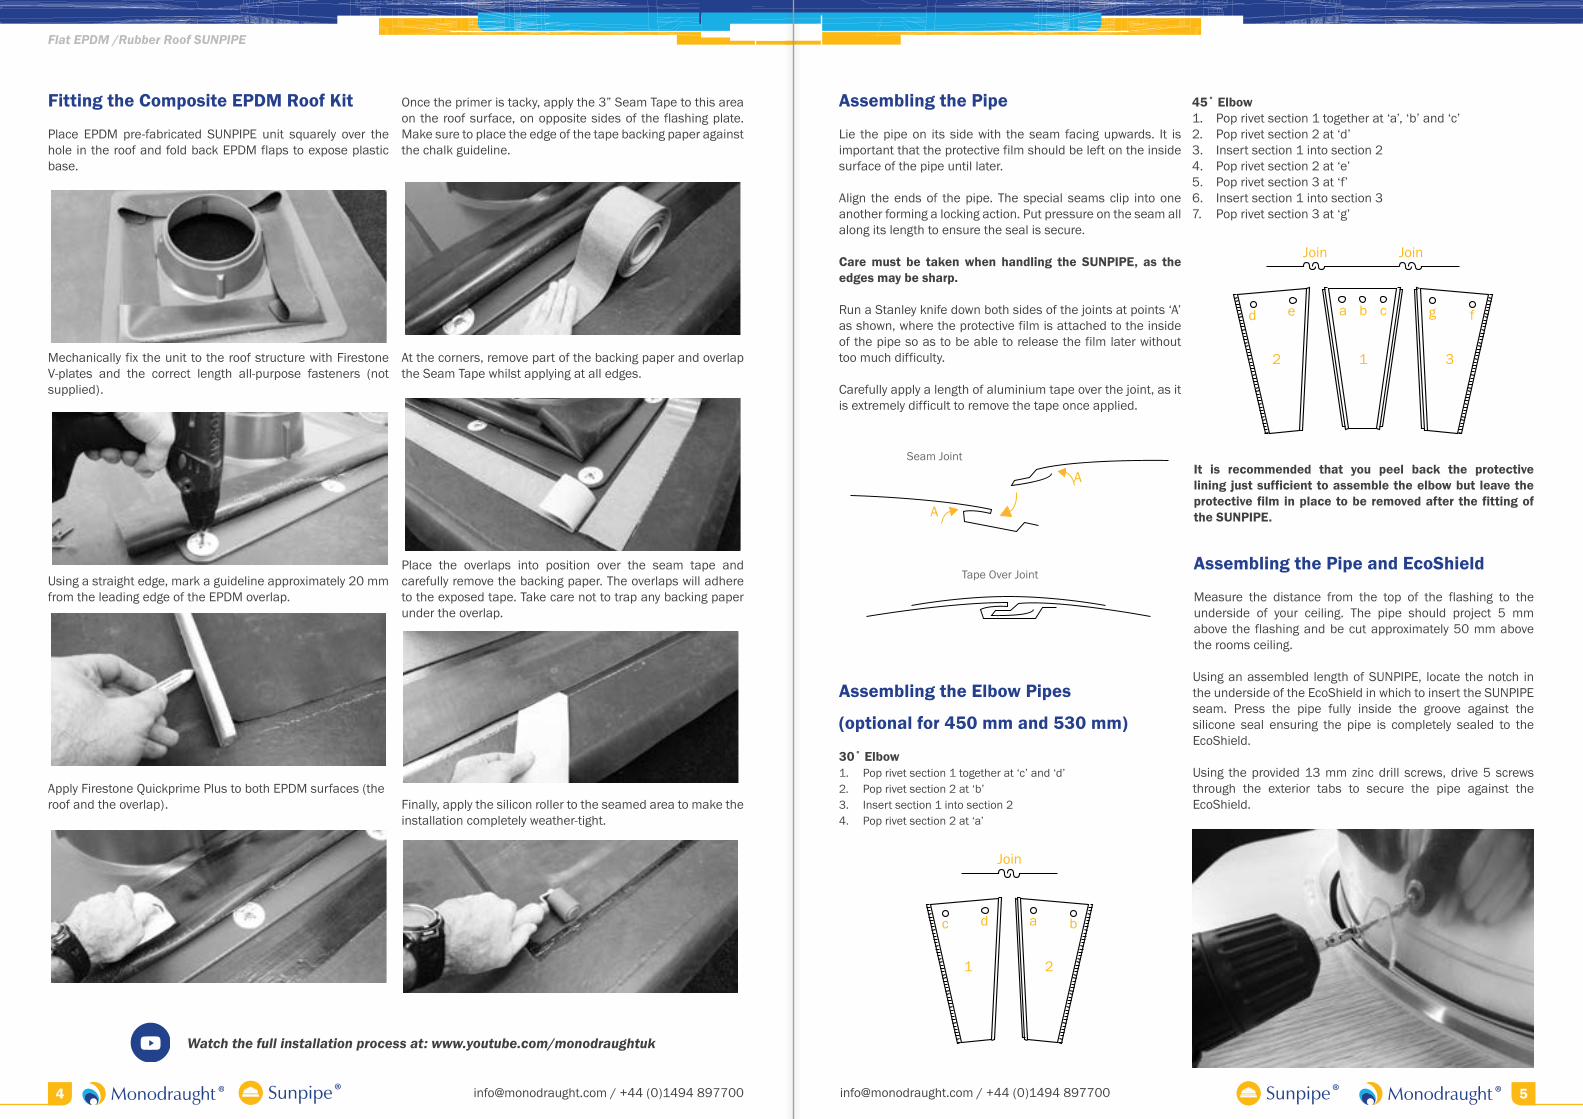
Fitting the Composite EPDM Roof Kit
Place EPDM pre-fabricated SUNPIPE unit squarely over the hole in the roof and fold back EPDM flaps to expose plastic base.
Mechanically fix the unit to the roof structure with Firestone V-plates and the correct length all-purpose fasteners (not supplied).
Using a straight edge, mark a guideline approximately 20 mm from the leading edge of the EPDM overlap.
Apply Firestone Quickprime Plus to both EPDM surfaces (the roof and the overlap).
Once the primer is tacky, apply the 3” Seam Tape to this area on the roof surface, on opposite sides of the flashing plate. Make sure to place the edge of the tape backing paper against the chalk guideline.
At the corners, remove part of the backing paper and overlap the Seam Tape whilst applying at all edges.
Place the overlaps into position over the seam tape and carefully remove the backing paper. The overlaps will adhere to the exposed tape. Take care not to trap any backing paper under the overlap.
Finally, apply the silicon roller to the seamed area to make the installation completely weather-tight.
Assembling the Pipe and EcoShield
Measure the distance from the top of the flashing to the underside of your ceiling. The pipe should project 5 mm above the flashing and be cut approximately 50 mm above the rooms ceiling.
Using an assembled length of SUNPIPE, locate the notch in the underside of the EcoShield in which to insert the SUNPIPE seam. Press the pipe fully inside the groove against the silicone seal ensuring the pipe is completely sealed to the EcoShield.
Using the provided 13 mm zinc drill screws, drive 5 screws through the exterior tabs to secure the pipe against the EcoShield.
Assembling the Elbow Pipes
(optional for 450 mm and 530 mm)
30˚ Elbow1. Pop rivet section 1 together at ‘c’ and ‘d’2. Pop rivet section 2 at ‘b’3. Insert section 1 into section 24. Pop rivet section 2 at ‘a’
Join
a bc d
1 2
Join Join
2 1 3
a cb g fd e
45˚ Elbow1. Pop rivet section 1 together at ‘a’, ‘b’ and ‘c’2. Pop rivet section 2 at ‘d’3. Insert section 1 into section 24. Pop rivet section 2 at ‘e’5. Pop rivet section 3 at ‘f’6. Insert section 1 into section 37. Pop rivet section 3 at ‘g’
It is recommended that you peel back the protective lining just sufficient to assemble the elbow but leave the protective film in place to be removed after the fitting of the SUNPIPE.
Assembling the Pipe
Lie the pipe on its side with the seam facing upwards. It is important that the protective film should be left on the inside surface of the pipe until later.
Align the ends of the pipe. The special seams clip into one another forming a locking action. Put pressure on the seam all along its length to ensure the seal is secure.
Care must be taken when handling the SUNPIPE, as the edges may be sharp.
Run a Stanley knife down both sides of the joints at points ‘A’ as shown, where the protective film is attached to the inside of the pipe so as to be able to release the film later without too much difficulty.
Carefully apply a length of aluminium tape over the joint, as it is extremely difficult to remove the tape once applied.
Seam Joint
Tape Over Joint
A
A
Watch the full installation process at: www.youtube.com/monodraughtuk

[email protected] / +44 (0)1494 [email protected] / +44 (0)1494 897700
Flat EPDM /Rubber Roof SUNPIPE
76
Fitting Additional Extension Pipes and
Bends
Fit additional straight lengths to suit your particular roof void. If there is a large roof void between your room and flat roof, you may need to connect additional pipes together. These additional pipes have crimped ends and therefore fit tightly into the plain ends of the pipe.
Alternatively you may want to create an offset. This is when the SUNPIPE has two elbow sections. This can enable the SUNPIPE to enter the room in a location which is not directly underneath where it exits through your roof.
Ensure all protective film is removed from the previous pipe before attaching the next section.
Ensure the final pipe has two plain ends as the slip length needs to fit over the bottom of the pipe.
When all connections are correct, drill small pilot holes on each side of the SUNPIPE tube to elbow joints and screw the joints together with self tapping screws.
The silver aluminium tape should be used to seal all the joints and seams against dust and dirt.
Fitting the Diamond Dome and Pipe
Attach any additional lengths of SUNPIPE to the assembly and lower the pipe through the flashing plate. Press down gently on the EcoShield against the flashing plate to engage snap fits. Note the 5 cut away sections of the flashing plate to allow the screw heads to pass into the roof void.
Connect the diamond dome to the EcoShield using the snap fits then use the 16 mm stainless steel drill screws to secure the diamond dome and EcoShield to the up-stand.
Fitting the Ceiling Diffuser
To avoid any possibility of eye damage, be careful not to look upwards through the SUNPIPE.
Screw the fixing ring through ceiling and into the plywood backing template using five of the 45 mm screws supplied.
Remove the protective film from the assembled slip length. Pass this through the fixing ring and slide over the trimmed plain end pipe.
Remove any remaining of the protective lining.
The ceiling diffuser is designed to push fit into the bottom of the slip length pipe. Twist the turn buttons, which securely hold the diffuser in place. You can then clip the diffuser trim in place, making sure the lugs on the inside of the trim do not align with any of the screw position cut-outs on the fixing ring.
If the ceiling is not perfectly flat, such as an Artex ceiling or similar, apply a thin bead of a proprietary sealant, such as decorators mate, around the external edge of the white trim to seal any gap between the ceiling trim and the ceiling itself. Lugs must not align with the central ring diffuser clips.
If it is ever necessary to remove the ceiling trim at a later date, clean off proprietary filler and remake the joint.
Seal all joints and seams of slip length.
Dust may enter the SUNPIPE during installation, which may settle on the ceiling diffuser over a period of time. Simply remove the trim and diffuser and clean with a dry lint-free cloth, then replace and reseal if necessary.
No further cleaning or maintenance should be required but if flies or other insects appear in the diffuser, these should be removed. Some insects are attracted to strong light so carefully check to ensure that silver tape covers every possible gap or small hole.
InformationFrequently Asked Questions
How long can a SUNPIPE be?
A SUNPIPE can be almost any length that you wish, but loses 6% of light for every metre of SUNPIPE. For very long SUNPIPES, a larger diameter should be used. There is a 12% light reduction for every 450 bend. On smaller sizes the total effective maximum length is 8m, and up to 20m on larger sizes.
What spacing should I use for SUNPIPES?
In general terms we recommend 230 mm diameter SUNPIPES at 2 m, 300 mm diameter at 3 m intervals, 450 mm diameter SUNPIPES at 4 m intervals and 530 mm diameter SUNPIPES at 5 m spacings.
Do I need planning permission?
No, normally it is not necessary to apply for planning permission for the installation of a SUNPIPE. However, if your property is situated in Scotland or a Conservation Area then specific permission must be obtained from your Listed Building Officer.
Are SUNPIPES suitable for use in a bedroom?
Yes, but bear in mind that in summer months, due to the efficiency of the SUNPIPE, your bedroom will be flooded with natural day light first thing in the morning. For this reason, installations in bedrooms or hospital wards can have a motorised light shut off damper.
Does the SUNPIPE require maintenance?
Due to the shape of the dome, the SUNPIPE is self-cleaning. The ceiling diffuser fits snugly into the base of the fixing ring to prevent dust or dirt entering the system and as a result the interior mirror finish surface never requires any maintenance. If however you are fitting a light kit, the bottom ceiling diffuser can be removed but care must be taken not to leave fingermarks on the internal mirror finish of the SUNPIPE.
Will the top dome discolour over time?
No, because our domes are manufactured from acrylic, therefore there is no discolouration to our domes over the life of your SUNPIPE system. This has been tested and verified by the Building Research Establishment (BRE). Full test reports available at www.monodraught.com
How much light output will I achieve?
The light output will vary accordingly to the time of the year, the position of the SUNPIPE on your roof, the size of SUNPIPE and the internal finishes of your room.
[email protected] / +44 (0)1494 897700
Flat EPDM /Rubber Roof SUNPIPE
8
Addendum
Caution Safety Hazard
Failure to follow this addendum may result in personal injury or damage to property
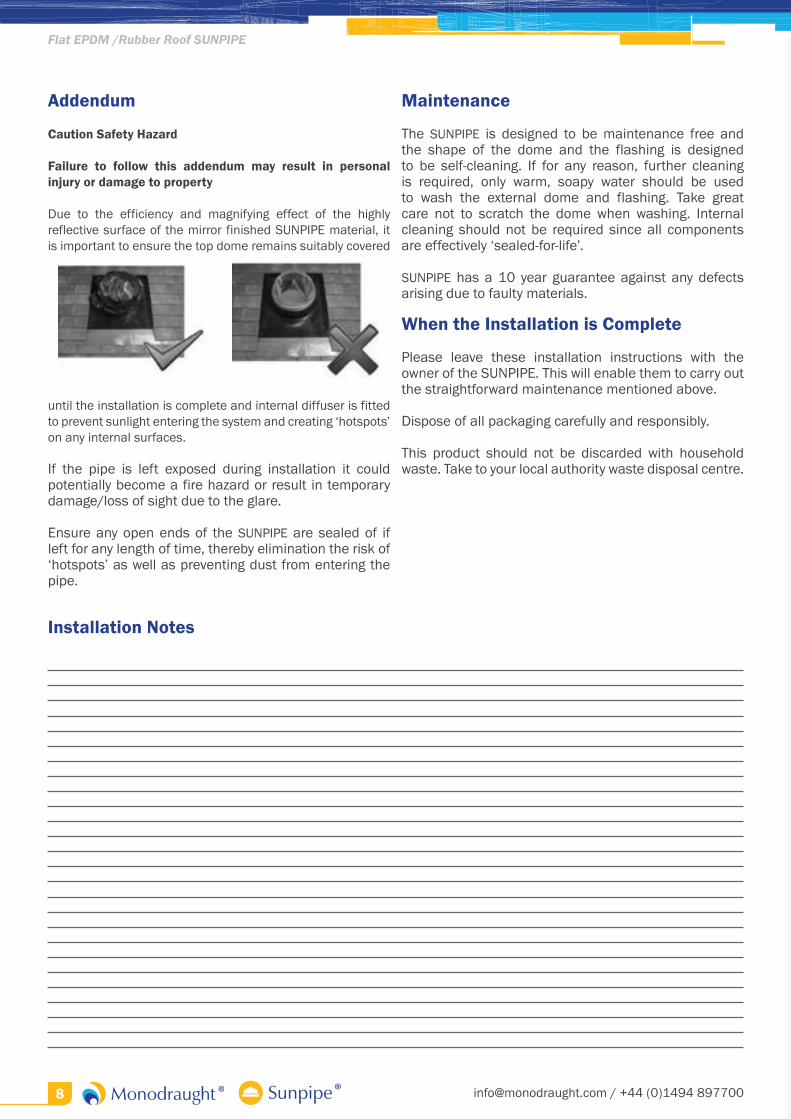
Due to the efficiency and magnifying effect of the highly reflective surface of the mirror finished SUNPIPE material, it is important to ensure the top dome remains suitably covered
until the installation is complete and internal diffuser is fitted to prevent sunlight entering the system and creating ‘hotspots’ on any internal surfaces.
If the pipe is left exposed during installation it could potentially become a fire hazard or result in temporary damage/loss of sight due to the glare.
Ensure any open ends of the SUNPIPE are sealed of if left for any length of time, thereby elimination the risk of ‘hotspots’ as well as preventing dust from entering the pipe.
Maintenance
The SUNPIPE is designed to be maintenance free and the shape of the dome and the flashing is designed to be self-cleaning. If for any reason, further cleaning is required, only warm, soapy water should be used to wash the external dome and flashing. Take great care not to scratch the dome when washing. Internal cleaning should not be required since all components are effectively ‘sealed-for-life’.
SUNPIPE has a 10 year guarantee against any defects arising due to faulty materials.
When the Installation is Complete
Please leave these installation instructions with the owner of the SUNPIPE. This will enable them to carry out the straightforward maintenance mentioned above.
Dispose of all packaging carefully and responsibly.
This product should not be discarded with household waste. Take to your local authority waste disposal centre.
Installation Notes