fixture editor - lsc
TRANSCRIPT

Fixture Editor
Clarity
Page 268 User Manual
Page 268
41 Fixture Editor
41.1 OVERVIEW
There are thousands of different types of lighting fixtures available and new types of fixtures
are constantly being introduced. The lighting controller (Clarity) needs to know the DMX
assignments and ranges for every different type of fixture that you might use. The controller
gets this information for each fixture from a fixture template when that fixture is patched. This
allows the controller to assign control channels to the different parts of the controller, intensity
to faders, Pan and Tilt to the position controls etc. It also tells the controller the range for each
function, its default value and can include thumbnails of gobos and effects.
Clarity contains a fully integrated fixture library comprising of many thousands of fixture
templates supplied by Carallon, a UK based specialist company producing fixture templates for
a wide variety of console manufacturers. The Carallon library is regularly updated (about once
every three months) and the updates can be downloaded from the LSC web site. The latest
library is also included in any new releases of Clarity.
If you have a new fixture that is not in the library you can either request a fixture template file
from LSC or use the Clarity fixture editor (described below) to create your custom fixture
template.
41.2 FIXTURE EDITOR
To create your custom fixture template, start the fixture editor. From Clarity’s Show tab
select…. Switch to fixture editor.
The fixture editor opens……
Fixture Editor
The screen is divided into 4 main panes:
x Channels… shows the DMX channels and their functions for the fixture. x Slots…shows the divisions of the fixture’s wheels (if any) such as gobo, effect or colour. x Ranges…shows the ranges for the channel selected in the Channels pane. x Fixture Details…shows the details of the range selected in the Ranges pane.
There are two methods that you can use to create a new fixture template:
x Write a new template from scratch.
Channels
Slots
Ranges Fixture
Details

Clarity
Fixture Editor
User Manual V2.0 Page 269
Page 269
x Modify an existing template from a similar fixture and use “Save as” to create your new template.
The easiest method is to modify a similar template because most of the decision making has
already been done for you.
41.3 QUICK TOUR
Let’s examine the settings for an existing fixture to gain a basic understanding of the Fixture Editor. This section also describes how to alter the settings of a template and hence how to
create a new template based on an existing template.
For this exercise we will look at the template of a simple fixture, the Geni© Shiva 250R.
The chart showing the DMX channels for the Shiva is….
This fixture uses 6 DMX channels to control its functions. From the above chart we can see the
DMX levels that determine the settings of each channel.
x Channel 1. Dimmer/shutter. 0 to 159 dims from 0 to full intensity, 160 to 254 strobes the shutter from slow to fast,
254 to 255 is full open.
x Channel 2. Colour wheel. 0 to 15 is white, 16 to 31 is pink, 32 to 47 is yellow, 48 to 63 is light blue, 64 to 79 is
green, 80 to 95 is orange, 96 to 111 is purple, 112 to 127 is red, 128 to 143 is dark
blue, 144 to 174 is indigo, 175 to 255 spins the colour wheel from slow to fast.
x Channel 3. Gobo wheel. 0 to 42 is gobo 1, 43 to 85 is gobo 2, 86 to 127 is gobo 3, 128 to 170 is gobo 4, 171 to
213 is gobo 5, 214 to 255 is gobo 6.
x Channel 4. Gobo index rotate. 0 to 7 is stationary, 8 to 83 rotates the gobo from slow to fast in the clockwise direction.
84 to 255 rotates the gobo from slow to fast in the counter-clockwise direction.
x Channel 5. Pan. 0 to 255 pans the beam.
x Channel 6. Tilt. 0 to 255 tilts the beam.
To open the template for the Shiva Geni click Open and select the fixture. Fixtures are
organised by manufacturer and model.

Fixture Editor
Clarity
Page 270 User Manual
Page 270
Select the fixture/model and click Open.
The “Channels” pane shows the 6 DMX channels used by this fixture.
Clicking on any channel in the “Channels” pane shows the DMX ranges and features for that
channel in the “Ranges” pane. Then, in the “Ranges” pane, clicking on any range allows the
DMX values to be altered and clicking on any Feature name shows the details of that feature in
the “Feature Details” pane.
The “Slots” pane shows the slots for the colour wheel and gobo wheel. Only fixtures with gobo, colour, animation or effects wheels or a scroller will have values in the “Slots” pane.
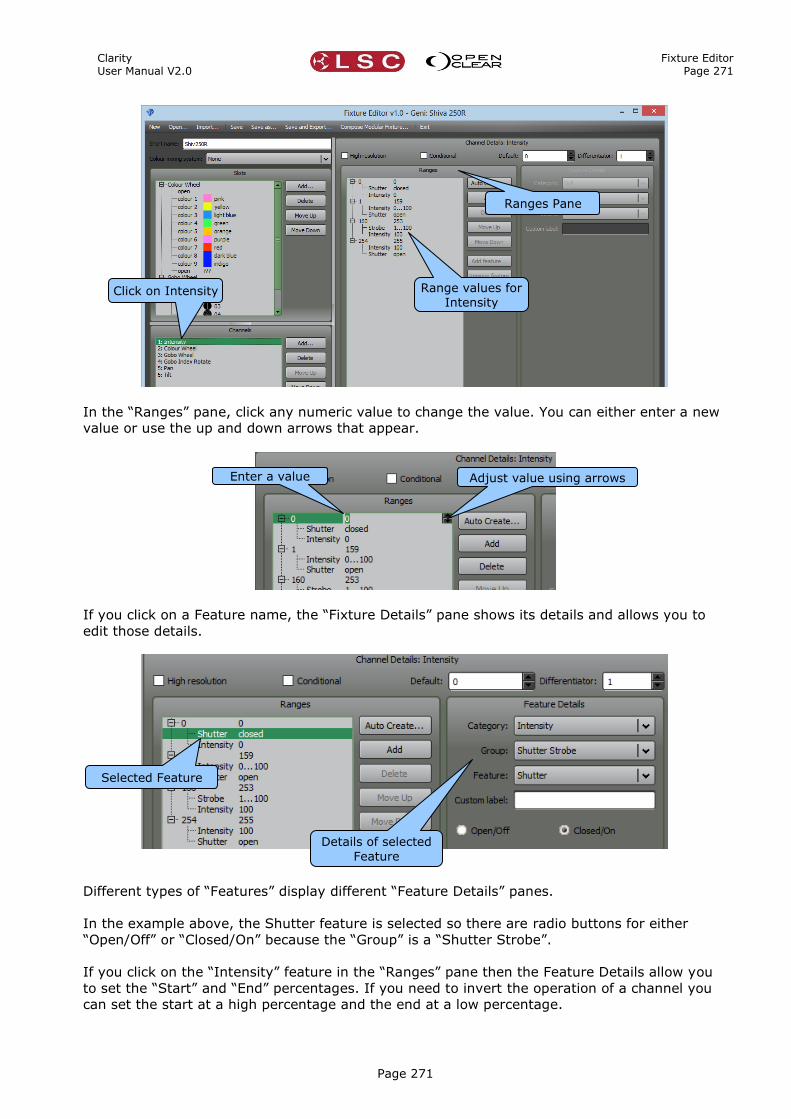
Let’s examine the channels of the Geni Shiva. In the “Channels” pane, click on “1: Intensity”. The “Ranges” pane now shows the DMX levels for the intensity channel.
Channels Pane
Slots Pane Ranges Pane Feature
Details Pane
Clarity
Fixture Editor
User Manual V2.0 Page 271
Page 271
In the “Ranges” pane, click any numeric value to change the value. You can either enter a new value or use the up and down arrows that appear.
If you click on a Feature name, the “Fixture Details” pane shows its details and allows you to edit those details.
Different types of “Features” display different “Feature Details” panes.
In the example above, the Shutter feature is selected so there are radio buttons for either
“Open/Off” or “Closed/On” because the “Group” is a “Shutter Strobe”.
If you click on the “Intensity” feature in the “Ranges” pane then the Feature Details allow you
to set the “Start” and “End” percentages. If you need to invert the operation of a channel you
can set the start at a high percentage and the end at a low percentage.
Click on Intensity Range values for
Intensity
Enter a value Adjust value using arrows
Details of selected
Feature
Selected Feature
Ranges Pane

Fixture Editor
Clarity
Page 272 User Manual
Page 272
Any of the other “Channels” can be viewed and modified by clicking on them in the “Channels” pane. Click on “2: Colour Wheel”. The “Ranges” pane now shows the DMX levels for the Colour
Wheel channel.
Once again in the “Ranges” pane you can click on any numeric value to change the value or click on any feature to edit the “Feature Details”.
41.4 WRITING A NEW FIXTURE TEMPLATE
To write a new fixture template you will need the DMX channel details for the fixture. These are
usually supplied with the fixture or can be downloaded from the manufacturer’s web site.
The easiest method of creating a new fixture is to load an existing fixture that has similar
functions to that of the new fixture and then edit the attributes to match those of the new
fixture. Most new fixtures will have many similarities to an existing fixture. The differences
might be in the DMX channel numbers that are used for each function or in the colours or
gobos. If you can’t find a similar fixture from a manufacturer you might be able to use one of the templates listed under “Generic” as a starting point. When you have made the edits, click Save as… and enter the new fixtures name.
See also the “Quick Tour” above for basic information on how to interpret an existing fixture in the fixture editor.
If you can’t find an existing template on which to base your new template then you must create your new template from scratch. To create a template from scratch, in the Fixture Editor menu
bar click New.
Start and End
percentages of
selected range
Intensity selected
Click on
Colour Wheel
Range values for
Colour Wheel

Clarity
Fixture Editor
User Manual V2.0 Page 273
Page 273
In the “Channels” pane click Add. The “Channel Chooser” opens…..
Select the appropriate tab for the “Category” of the first DMX channel of the fixture.
The category choices are:
x Null x Intensity
x Position
x Colour x Beam Content x Beam shape
x Media Server Intensity
x Media Server Colour x Media Server Content x Media Server Geometry
x Media Server Effects
x Media Server Control x Media Server Audio
x Projector x Camera
x Control x Effects
x Pixel Source
x Open Clear
Every category offers a selection of group types specific to that category. Select the
appropriate group type from that category.
For example, the Intensity category offers the following groups…..
Add
Category
Tabs
New

Fixture Editor
Clarity
Page 274 User Manual
Page 274
Add the channel by either double clicking the name, dragging the name to the Fixture Editor or
selecting the name and clicking Add.
There are a large amount of category/group combinations available to choose from, however
the vast majority of fixtures use only a small selection of groups as listed below.
The most commonly used categories and groups are:
Category Most Common Groups
Intensity Intensity. Shutter Strobe.
Position Pan. Tilt
Colour Cyan. Magenta. Yellow. Red. Green. Blue. Amber. White. CTO. Colour Wheel
(for 2 colour wheels add a second colour wheel. See “Differentiator” below) Beam Content Gobo wheel. Gobo Index Rotate.
Beam Shape Focus. Iris. Zoom. Frost. Effect Wheel (use for a prism or similar effect).
Control Lamp Control.
For example, to create an intensity channel:
In the “Channels” pane click Add. Select the Intensity tab then select the Intensity group
then click Add.
“1:Intensity” now appears in the channels pane. Click on “1:Intensity” and the “Ranges” pane shows the ranges for this Intensity channel.
In the “Ranges” pane click on “Intensity 0…100” and the “Feature Details” pane shows the details of the range.
Click on
Intensity
Shows
Intensity
ranges

Clarity
Fixture Editor
User Manual V2.0 Page 275
Page 275
The Fixture Editor has assigned the DMX values of 0 to 255 to represent intensity from 0 to
100%. If your new fixture uses this channel for additional purposes (such as a shutter) then, in
the Ranges pane, click Add to create the range for the shutter. This new range is created as
another Intensity group. To change it to a “Shutter” click on its name in the Ranges pane and then select Shutter Strobe from the Group: drop down box.
If the channel operates as intensity from DMX 0 to 128 and as a shutter from 129 to 255, enter
128 in the upper intensity range. The other ranges automatically adjust.
Repeat the above procedure for all of the channels of your fixture.
See below for additional information on other channel conditions such as Gobo wheels, high
resolution channels, colour mixing, etcetera.
41.4.1 Slots If you add a channel that is a gobo wheel, colour wheel, animation wheel, effects wheel or a
scroller, then it will be automatically added to the Slots” pane. The Slots pane allows you to create the slots that can be selected with this DMX channel.
Note: The terms “Effects Wheel” is used to describe a wheel that can contain Prisms, Frost,
Lenses and whatever else gets invented in the future.
Upper
Intensity
Click on
new range
Select
Group
Click on
Intensity
Shows
Feature
Details

Fixture Editor
Clarity
Page 276 User Manual
Page 276
When a slots channel is added it automatically has the first slot created as an “Open” slot. To create the other slots for this channel, in the “Slots” pane, click on the name of the wheel or scroller then click Add. The “Slot Chooser” opens…….
Select the appropriate tab for the type of channel you are adding. Each tab has colours or
gobos or effects as appropriate, listed under manufacturer and model or range. Select the
colour or gobo or effect for this slot then either double click it or click Add.
If you can’t find the exact match for your fixture then choose the closest match.
The colours that you choose are used by Clarity to allow colour selection from the “Colour Picker” in the “Programmer”. The more accurate you are, the better the fixture will work. If you
do not add colour slots, then it will not be possible to control the colour wheel via the “Colour Picker”.
Add all off the slots for the channel of your fixture.
Ensure that the channel containing the slots is selected in the Channels pane then in the
Ranges pane click Auto Create…
Tabs

Clarity
Fixture Editor
User Manual V2.0 Page 277
Page 277
The “Auto Create Ranges” dialogue opens……………..
Ensure that the “Use corresponding slots group” box is ticked then click OK. The ranges will be
automatically generated based on the slots that you created.
If the automatically generated DMX values for the range of each slot are not correct you can
manually edit them by clicking in them and entering the correct value or using the
increment/decrement arrows that automatically appear when you click on a value.
Repeat the above process for all of the DMX channels of the fixture that use slots.
41.4.2 Colour Mixing System If the new fixture has individual colour channels, select the appropriate colour mixing scheme for
those channels. LED fixtures produce colours by adding individual colours. Single source fixtures
produce colours by subtracting colours using dichroic filters or gels.
For example, a led fixture that has red, green and blue channels will be set to “Additive/RGB”.
Auto
Create
Selected
Channel

Fixture Editor
Clarity
Page 278 User Manual
Page 278
41.4.3 High Resolution If a parameter of the fixture uses high resolution (two DMX channels to control course and fine
respectively), add the course channel first then with that channel selected in the Channels
pane, tick the “High Resolution” box in the Channel Details pane. The “Fine” channel is automatically added to the next DMX number. If the fixture’s fine channel is located at a different DMX slot (for example, at the end of the channel assignments) select the fine channel
and click “Move Up” or “Move Down” or drag and drop to change the order
41.4.4 Conditional Channel Some fixtures use the values of one DMX channel to determine the functions of another DMX
channel. This is known as a Conditional channel.
To make the selected channel conditional upon the values of another channel tick the
“Conditional” box. When the “Conditional” box is ticked, the “Conditions” pane opens. In this pane you type in the channel number that sets the conditions and the DMX values of this
channel for each condition. The format is…. #(channel number that sets the conditions):#...#(DMX values for the condition)
In the Ranges pane you enter the definitions for the conditional channel. Each entry in the
“Conditions” pane leads to a different definition for the conditional channel in the Ranges pane.
For example, on the High End Systems Studio Color 575, channel 7 (Cyan) is conditional upon
the value of channel 5 (Colour Wheel Mode).
Click on a line in the Conditions pane to see the ranges for that condition in the Ranges pane.
In the example above, the second line of Conditions is selected so the ranges pane shows that
the Cyan channel is split into two ranges. When channel 5 is either 64..79, 112..127, 192..207,
240..255, the Cyan channel maps DMX 0..128 to Cyan 100..0 and maps DMX 129..255 also to
Cyan 100..0.
If you click on the other two conditions for channel 7 you will see in the ranges pane that:
x When channel 5 is either 0..15, 48..63, 128..143 or 176..192, the Cyan maps DMX
0..255 to Cyan 100..0.
Conditional
tick box
Selected
Condition
Ranges for
selected Condition

Clarity
Fixture Editor
User Manual V2.0 Page 279
Page 279
x When channel 5 is either 16..31, 32..47, 80..85, 96..111, 144..159, 160..175, 208, 223,
224..239, the Cyan channel maps DMX 0..255 to “No Feature”
41.4.5 Default Value You can enter a “Default” value for each channel in the Channel Details pane. This is the value that Clarity will use when a parameter is “Reset to Default” or sent to its “Home” position on an LX console.
41.4.6 Differentiator If a fixture has two or more channels of the same “Category” then each channel is differentiated by adding a number after the channel name.
The default differentiator number is 1. If you add another channel of the same category then the
differentiator is automatically set to 2. A third channel of the same category would be set to 3
etcetera. You can manually set the differentiator number if desired.
For example, a Martin Mac 500 has 2 “Colour Wheel” channels. The second channel is named “Colour Wheel#2”.
41.4.7 Virtual Intensity Some fixtures require a “virtual intensity” channel. The Clarity fixture editor cannot create a
“virtual intensity” however you can still create a template for your new fixture by opening and modifying a “Generic/LED RGB (No I)” fixture template which already has a virtual intensity.
41.4.8 Compose Modular Fixtures Modular fixtures are an array of fixtures within a fixture. These type of fixtures are also known
in the industry as “Compound Fixtures”. For example:
x A simple modular fixture might be a 4 x 4 RGB LED array. x A complex modular fixture might be moving head containing multiple pan/tilt RGB
arrays. For example, a High End Systems “Shape Shifter”© has a pan and tilt yoke that contains a central static RGB LED array that is surrounded by 6 RGB LED arrays with individual pan and tilt.
To compose a modular fixture, from the main menu bar select Compose Modular Fixture…
The “Compose Modular Fixture” dialogue box opens…….
Differentiator
Compose Modular Fixture…

Fixture Editor
Clarity
Page 280 User Manual
Page 280
A modular fixture consists of one or more “modules”. Each module can be a single fixture or
multiple fixtures.
Click on the + symbol to add a module then select the fixture type to be added.
Most modular fixtures consist of an array of LED fixtures but the array could consist of any type
of fixture. Most types of LED fixtures used in arrays can be found under the “Generic” listing. If the type of fixture that you need to add is not already listed then you will need to create that
fixture (using the Fixture editor) and then use that new fixture to compose the new compound
fixture. For example, if your new compound fixture has a pan and tilt mechanism and an array
of RGB LEDs you will need to create a new fixture that contains only pan and tilt then use this
as a module of your new compound fixture.
You will be prompted to enter the quantity of fixtures in the module.
Next, enter a name for the module.
Enter your name and click OK. The default name is “Module #”.
If the module has more than one fixture and the fixtures are arranged in an array you need to
specify the arrangement of those fixtures in the array by entering X and Y values in the
“Compound Structure” box. For example, if your module contains 12 fixtures that are arranged
in a matrix that is 4 fixtures wide by 3 fixtures high you would enter “X Count = 4” and “Y Count = 3”. When you patch this modular fixture in Clarity it will be displayed in the correct shape on the “Rig View” screen and also in the Programmer’s “Matrix” view.
If the modular fixture that you create has 2 or more modules you need to select which module
is to be the “Root Item”.
Add
Module

Clarity
Fixture Editor
User Manual V2.0 Page 281
Page 281
Select the module that is to be the “Root Item” by clicking on the drop down arrow. The root
item is the module that affects all of the other modules in the compound fixture. For example,
if your new compound fixture has a pan and tilt module with an array of RGB LEDs attached to
it then the pan and tilt module is selected as the root item because when you pan or tilt this
module it moves the LED module.
To save the new compound fixture click OK then give the fixture a name. Next give the fixture
a short name and click OK. The compound fixture channels now appear in the channels pane.
To save this compound fixture in the library click Save as described in the next section.
41.4.9 Short Name, Save and Export Fixture You can give your new fixture a “Short Name”. This name will be used by Clarity in the “Group” tab for this type of fixture.
To save the new fixture select Save. Fixtures are organised by manufacturer and model. In the
Manufacturer list you can select an existing manufacturer or choose “Generic” or “Custom”. In the model pane enter the model name for the new fixture and select Save.
When you switch back to Clarity and patch your new fixture, you select it by the manufacturer
and model that you used to save it.
For example, if we gave the new fixture a “short name” of “Specials” and a model name of “Amazing”, then those names would appear in the Programmer as shown below……...
If you want to also use your new template on another Clarity platform choose Save and Export.
Root
Item
Enter a
“Short Name” Item

Fixture Editor
Clarity
Page 282 User Manual
Page 282
All fixture templates that you create will appear in BOLD font in the fixture editor to distinguish
them from original “Library” templates.
Note: If you edit a “library” fixture template you must save it with a different name. If your edited
version had the same name it would be overwritten whenever the library is updated.
For example, if you edit a “Mac700” you might save the edited version as “Mac700 (Mine)”.