final top ten manual
DESCRIPTION
top ten manualTRANSCRIPT
Top ten manual for
second try issu.indd 1 22/11/2011 12:35
ContentsPrefaceAn evolution of an industry and processesPaper sizes and weightsColour modesPreparation for print CostingGlossary
second try issu.indd 2 22/11/2011 12:35

‘For the past twenty years or so, I have worked extensively in the commercial printing industry and also as a graphic designer, both in the US and in England. I am constantly running into graphic designers who have a three-year degree course, or similarly extensive training, behind them, but who nevertheless have little or no idea about the actual require-ments of the printing process. As a re-sult, every time they send a job to their printers, they experience nail-biting anxi-ety because they don’t know exactly how it’s going to turn out’
Mark Gatter (2004) ‘Getting it right in print’
With the knowledge gained from our seminars with Lorenzo and mac work-shops with Mike I have learnt a consid-erable amount of knowledge regarding design production specifically for print. I have also researched these issues with further reading. I found Mark Gat-ter’s ‘Getting it right in print’ ridiculously useful and relevant when creating this manual. I have used several quotes from this book, particularly within the first chapter ‘The Evolution of an Indus-try’ due to his words being exactly what I want to say in the most effective way, ‘if it ain’t broke why fix it?’.
Preface
second try issu.indd 3 22/11/2011 12:35
For a long time the printing industry was divided into two separate areas, those who run the presses and dealt with ‘finishing’ and those who supplies the the jobs. The printers and the graphic designers. Through the evolution of equipment the graphic designers now have the control to deal with both the type and image digitally. Digitalisation has been a major development. The traditional separation of the traditional graphic designers/printers have stayed within their expertise.
Despite the progression with technology, the knowledge on the graphic designers part stayed limited on the considerations of the printer. Therefore, the outcomes they received from printers were usually not what they were expecting, colours changing, images looking miserable or the outcome just looking nothing like the screen based image.
In the early 2000s, printers started to request PDF (prtable document format) files rather than in the original software. PDF files are hard – often impossible - to edit. Leaving the printers with no control in changing the mistakes and leaving the responsibility with the designers.
Precise image calibraton, dot gain, RGB vs. CMYK, screen clash and trappingare some f
the typical grey areas encountered by graphic designers pre-press today. These issues are not that difficult to sort out, but due to the lack of teaching within this area, but result in expensive, time consuming problems.
Graphic designers that understand and manage these areas save time and money in everything they do.
Please note: Leeds College of Art teach design production for print as a module, so students don’t find themselves panicking at 3am mentally reviewing the production process several times, hopefully!
From letterpress to litho
For centuries, the only kind of commercial printing was letterpress, a process in which a number of ordered metal type characters were linked then pressed against a sheet of paper, transferring the image. In the early 1930s photography was invented, paving the way for changes in ways of creating images used in letterpress then later in offset litho.
An evolution of an industry and processes
second try issu.indd 4 22/11/2011 12:35

Filmless technology Computer to plate (CTP)
The spread of new technology within printing tends to be slow and cautious rather than quick and possibly disappointing, so the film-based offset-litho system is still the most common printing method.
However, CTP workflow consists of digital files being used to make plates instead of generating film as the first stage. Positive points to this technique are reduced image faults due to there being no film.
Direct imaging (DI)
Direct imaging takes CTP further again, the film is cut out of the process, and the plates themselves are imaged right onto the press by a series of lasers. The images generated hold ink in the same way as on a conventional offset litho machine. For this process, everything required for the job arrives on-press perfectly positioned- i.e. registered. The main advantage of this technique is reduced set-up time, attracting short – run work requiring a fast turnaround.
Digital printing
Digital printing presses are much closer to laser printers than to the varius offset litho printing methods. The image printed is electrostatically generated n a drum trather than on a removable plate, and with each revolution o the drum the image is generated again. Resulting in the cost of each page is not reduced with volume and also allowing each time the drum revolves the image can be changed.
This option is attractive for a graphic designer that wants to produce a high-quality proof for a client.
Web offset litho
Web offset litho relies on the same kind of process used by sheet-fed offset litho with one notable difference – instead of printing sheets, it prints a continuous roll, or web. Resulting in
incredible speeds and it commonly prints both sides of the sheet in the same pass, a process called perfecting.
Flexography
A method mainly used for packaging. The plates usually made of a rubber compound, usually made in a mould. Because of their flexibility and three dimensional surface the plates tend to ‘squish’ somewhat under the pressure of transferring the ink to the page. This leading to the small dots getting considerably bigger – and dot-gain levels can be serious. Registration tends to be looser than with offset litho.
If you are going to use this method, talk to your printer about the kinds of images you want to use within this job. Definitely ask about dot gain, screen density and registration tolerances, which will vary with the printers.
Screenprinting
A sheet of canvas stretched across a wooden frame that has been placed on a table. Pretty much the idea of screen printing. More likely to be made of a metal frame and the screen is more likely to be very fine polyester or metal mesh…but the basic idea is correct.
This process does not allow fine detail. Screen printing is also not always a manual operation, automated systems are used that provide a much faster and more consistent result.
Gravure
Gravure (or rotogravure) is the printing method that makes banknotes so hard to forge, using either a diamond-etched copper plate or a laser-etched polymer resin plate, but either way the process is the same. Gravure plates are thick in comparison to those of sheet and web offset. Because thinner ink is used, it spreads when it hits the page, thus producing the appearance of a continuous tone, resulting in the highest quality option for image reproduction – but a lower quality for type, which will also be made up of the same kind of cells as the image.
second try issu.indd 5 22/11/2011 12:35
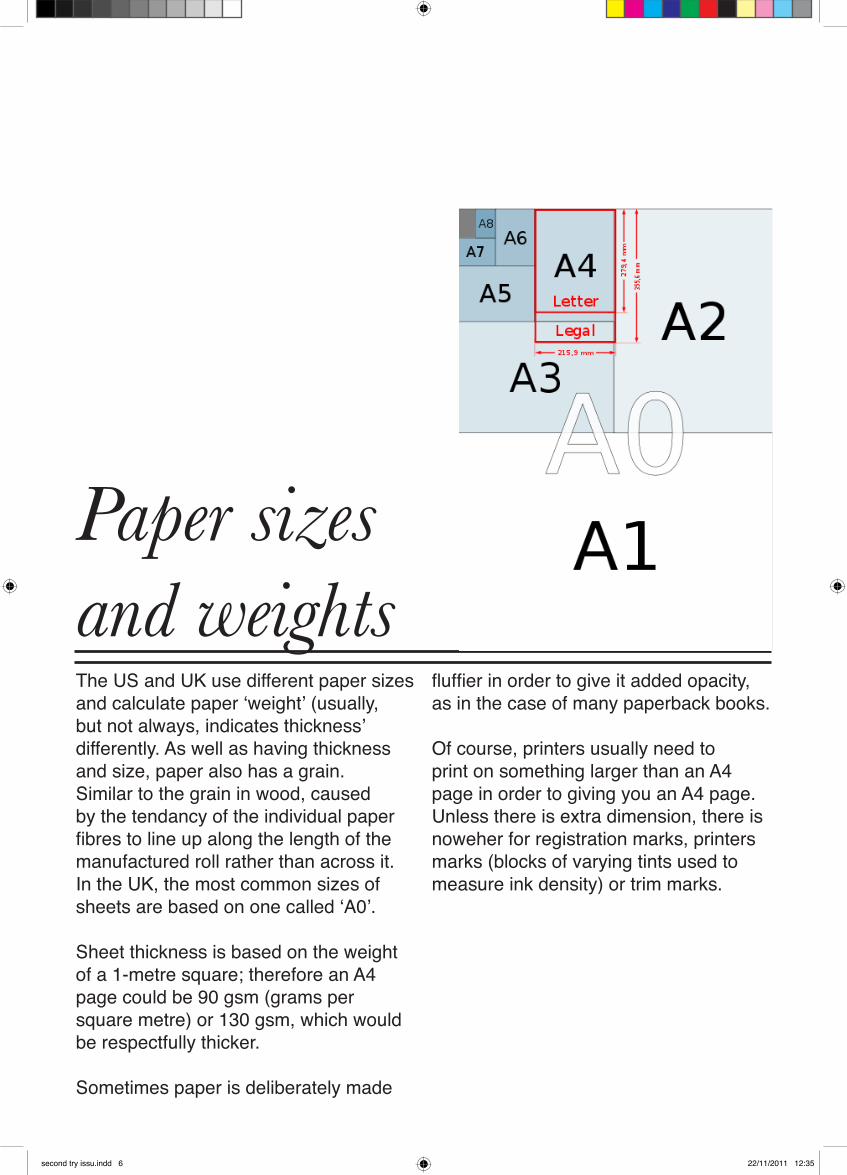
The US and UK use different paper sizes and calculate paper ‘weight’ (usually, but not always, indicates thickness’ differently. As well as having thickness and size, paper also has a grain. Similar to the grain in wood, caused by the tendancy of the individual paper fibres to line up along the length of the manufactured roll rather than across it. In the UK, the most common sizes of sheets are based on one called ‘A0’.
Sheet thickness is based on the weight of a 1-metre square; therefore an A4 page could be 90 gsm (grams per square metre) or 130 gsm, which would be respectfully thicker.
Sometimes paper is deliberately made
Paper sizes and weights
fluffier in order to give it added opacity, as in the case of many paperback books.
Of course, printers usually need to print on something larger than an A4 page in order to giving you an A4 page. Unless there is extra dimension, there is noweher for registration marks, printers marks (blocks of varying tints used to measure ink density) or trim marks.
second try issu.indd 6 22/11/2011 12:35

Imposition is very important when you are printing a multiple-page piece. Impo-sition is the name given to the configura-tion in which the pages are positioned on the larger press sheet.
If you know the basic rules of imposition, configuring your work will be considerably more effective. For example, each side of a sheet of paper counts as a page. Therefore a single sheet would be a 2-page insert in a book – but there is no way to include a single sheet other than by long and tedious
methods. Therefore multiple page jobs should always be calculated to generate a page count which is a multiple of 4 or 8 or (best of all if possible) 16. As each signature (i.e. each separate sheet which, when printed and folded, will be bound together as a book/magazine/newsletter) requires individual handling if you can end up with 16-page signatures it is a more effective way of producing a book.
Imposition
second try issu.indd 7 22/11/2011 12:35
CMYK: Cyan, Magenta, Yellow and Key (black)
Process colour: A colour that is printed using a combination of the four standard process inks: CMYK. By default, Illustrator defines new swatches as process colours.
RGB: Red, Green and Blue.
The RGB color model is an additive color model in which red, green, and blue light is added together in various ways to reproduce a broad array of colors. The name of the model comes from the initials of the three additive primary colors, red, green, and blue.
The main purpose of the RGB color model is for the sensing, representation, and display of images in electronic systems, such as televisions and computers, though it has also been used in conventional photography.
Hexachrome: 6 colours
Duotone: Two colour verson of greyscale with no black
Spot colour: is a premixed ink that is used instead of or in addition to CMYK process inks. You can identify spot - colour swatches by the spot - colour icon. ( when the panel is in list view) or
Colour modesThe way colour is generated in print.
second try issu.indd 8 22/11/2011 12:35

a triangle in the lower corner (when the panel is in the thumbanail view).
Why are they useful?
-Possible to print colours that aren’t able to print with cmyk eg fluorescent-They are cheaper - one printing plate rather than 4 -Branding: can achieve concistently - no variation
Pantone Matching system: unique reference number
Colour books (Pantone - UK standard)
When using adobe suite, never changed
name of swatch.
!!!Tints allow you to vary when only limited stock!!!
Global process colours: a global colour is automatically updates throughout your artowkr when you edit it.
All spot colours are global; however, process colours can be either global or local. You can identify global colour swatches by the global colour icon (when the panel is in list view) or a triangle in the lower corner (when the panel is in the thumbnail view).
second try issu.indd 9 22/11/2011 12:35

With regards to costing, getting an early quote is great for both you and your client. By getting three you can get an average with the power of making an informed decision. As you grow in experience you will become more knowledgable about rough costs for jobs.
When talking to designers from Generation Press, however, one of them said about the way they work with printers. That they never argue down a price, because their customers want the best, so are willing do pay for the best so they do not compromise the quality. If the budget can’t reach, they change something within the designing to reduce costs.
Costing
I thought this was very interesting, but of course, the more informed you are the more power and knowledge you have to make these sort of opinions/decisions.
Another great thing to ensure is that there are no other author corrections, as these will cost you/the customer both time and money, so anticipating or preparing for these will help you.
second try issu.indd 10 22/11/2011 12:35
It is important when dealing with both clients and printers that communication is key. A lack of understanding or poor communication could lead to some embarrassing and expensive mistakes.
TIP: Always ask the printers questions, they are the experts!
Communication
second try issu.indd 11 22/11/2011 12:35
Preparationsfor print
When preparing the file to go to print there are several things that need to be double checked.
Image checklist
All images must be CMYK- TIFF or JPEG files. No RGB, GIF’s, BMP’s (win-dows bitmaps) or PSD’s. No clipping paths, except where they are really needed. If you do need them, check that the pages in your document which contain such images print suc-cessfully on a PostScript printer before you send the job out. Bleeds: images that need to run off the page should extend at least 3mm be-yond the page boundaries, except on
the binding where they should end at the edge of the page.
If the images are linked rather than em-bedded, make sure that you send the images to the printer as seperate files.
Even if the images are embedded rather than linked, it is still a good idea to send them. If something corrupts an embed-ded image, haing to send out a new copy will hold everything up.
Check that the images that appear in the final file are the correct high-resolutopm versions, and not low resolution ‘for posi-tion only’ copies.
second try issu.indd 12 22/11/2011 12:35

Text checklist
Make sure, beforehand, that the printer has all the fonts needed to print the job.
Make sure that the required fonts are listed in the information you send with the job.
Proofs
Decide what kind of proof you need. Re-member, the better the proof, the more it will cost. Most printers will only offer one or two of the following alternatives:
Preflight on indesign
FILE>PackagePrinting instructions for sending to a printer. Commercial print: PDF: (print quality)
When you click ‘save pdf’ on indesign you may see no progress.
Window>Utilities>Background tasks.
Allows you to see it changing to PDF.
Best Next Best Digital Proofs
Inkjet ProofsColour laser print
second try issu.indd 13 22/11/2011 12:35

second try issu.indd 14 22/11/2011 12:35

second try issu.indd 15 22/11/2011 12:35

second try issu.indd 16 22/11/2011 12:35

second try issu.indd 17 22/11/2011 12:35

second try issu.indd 18 22/11/2011 12:35

second try issu.indd 19 22/11/2011 12:35

second try issu.indd 20 22/11/2011 12:35