final safety manual draft.docx - technokats robotics … · web viewthis safety manual is an...
TRANSCRIPT

Team Safety Manual
Prepared byCameron Ellison
Kyle HeatonMr. Kirk Davis
Mrs. Robin Townsend
In Cooperation withMr. Robert McIntire and Duke Energy
Edited by Dr. Joy Dewing
Updated December 13, 2016By Robin Townsend

Table of Contents
Purpose 4Scope 4Team Roles and Responsibilities 4
Section 1: Shop Safety 6General Safety Protocol in the Shop 6Basic Rules for Entering and Working in the Shop 6Personal Protective Equipment (PPE) 6General Safety Training Requirements 7First Aid Requirements 7
Section 2: Specific Safety Rules by Work Area 8Meeting Area 8Mechanical Area 8Mentor Area 9Eyewash Station 9Battery Storage 9Electrical Area 10Software Area 10Practice Field 10Robot Parking 10Supply Area 10Robot Museum 10
Section 3: The Robot 11Robot Operation and Repair 11Relief of Stored Energy 11
Section 4: Appendices 12Appendix A: General Safety 12
A.1 PPE 12A.2 Eyewash Station 12A.3 Battery Storage and Safety 13A.4 Hand Tools 15
Appendix B: Shop Layout 16Appendix C: Mechanical Stationary Machines 17
C.1 Machine and Trainer List 17C.2 Arbor Press 17C.3 Band Saw (Horizontal) 18C.4 Band Saw (Vertical) 19C.5 Bench Grinder 20C.6 Combination Belt/ Disc & Edge Belt Sanders 22C.7 Drill Press 22
2
C.8 Lathe 23C.9 Milling Machine 25C.10 Miter Saw 26C.11 Portable Air Compressor 27C.12 Sheet Metal Shear 28C.13 Sheet Metal Straight Brake and Roller 28C.14 Table Saw 29
Appendix D: Other Shop Safety 31D. 1 Chemical Safety 31D.2 Soldering Safety 31
Appendix E: Robot Lifting 32
Shop User Safety Agreement 33
3
PurposeThe TechnoKats Robotics Team embraces a culture of safety, both inside and outside our workshop. On our team, safety is a priority. Those who are in the team shop or competition pit area are expected to follow the team’s safety procedures at all times.
ScopeThis safety manual is an easy-to-use guide for important safety information, and provides FRC participants with a basic set of requirements to maintain a safe environment during the build season, off-season, and at competition events.
This manual applies to those involved with the FIRST Robotics Competition including all student team members, mentors, parents, and guests.
Team Roles and ResponsibilitiesEveryone is responsible for safety. All team members are expected to read and be familiar with this manual before working in the shop or traveling with the team.
StudentsAll TechnoKats student team members are expected to:
Read and be familiar with this manual, as well as with the safety requirements for each work area.
Work in a safe and responsible manner. Use personal protective equipment (PPE), safeguards, and other safety equipment when
required. Identify and report any unsafe or hazardous conditions to a mentor. This includes work
practices that may cause an accident. Avoid “horseplay” and running in the shop. Encourage safe behaviors in others.
Mentor(s)All TechnoKats mentors are expected to:
Read and be familiar with this manual, as well as the safety requirements for each work area.
Lead by example. Practice the same safety behaviors that are expected of the students. Provide leadership and guidance for proper tool usage and safety as outlined throughout
the manual.
4

Offer safety design considerations to the team so the robot is designed and constructed in a safe manner.
Train and approve students on the use of tools and machines. Ensure that students are trained on any tools or machines that they are using.
Supervise students who are using machines.
Lead Safety Mentor(s) Be familiar with relevant event safety and restrictions by reading the web posted “At
the Events” section of the FRC Manual and “Site Info” for your event(s). Review it with the team and work with the Safety Captain to monitor safety behaviors.
Coach the student Safety Captain to ensure that he/she understands and adequately fulfills the position’s responsibilities.
Work with Mr. McIntire to collect and store Material Safety Data Sheets (MSDS) for all chemicals, paint, and batteries, etc. the team uses. Become familiar with them, and with the related emergency procedures.
Inform the Safety Captain and team members of the MSDS storage location.
Mentor RolesTeacher Mentors – Teacher Mentors are employed by Kokomo School CorporationTechnical Mentors – Volunteer mentors with an expertise in a specific work area in the shopMentors – Parents and volunteers who work with the team regularlyParent Volunteers – Parent volunteers are always welcome in the shop and at team events, but do not necessarily have a specified lead role with the team.
For machine usage, at least 2 adults, including at least 1 Technical Mentor or Teacher Mentor must be present.
5

SECTION 1: SHOP SAFETY
General Safety Protocol in the ShopThe TechnoKats shop is located in the Duke Energy facility in Kokomo, Indiana. Duke Energy abides by very strict safety guidelines, and TechnoKats, by extension, must adhere to the same rules.
Basic Rules for Entering and Working in ShopIn an effort to ensure student safety at all times, no students are allowed to enter the shop for any reason without at least one mentor present. At least two mentors must be present for students to go beyond the meeting area to enter the “Shop Work Areas”.
The “Shop Work Areas” are defined as all areas of the shop beyond the yellow and black caution tape, including the software area and practice field. Specific requirements for these areas are included below:
Safety glasses must be worn at all times in work areas.
Long and loose hair must be contained.
Sturdy footwear (closed toe) must be worn at all times in work areas.
Close fitting/ protective clothing must be worn.
Rings and jewelry must not be worn when operating machines.
Hearing protection may be required for some operations.
No food or drinks are permitted in the Work Areas, including the practice field and software area.
The shop will be inspected at the end of each work session to ensure that all tools and supplies are properly stored, stationary equipment is cleaned, and the tables and floor are swept. A sign-out sheet is located on the fence near the exit. A mentor and a veteran student must both inspect the shop, and then sign the sheet before leaving the shop.
Personal Protective Equipment (PPE)Safety glasses and closed-toe shoes are required for any person (student, mentor, or visitor) to advance beyond the yellow and black caution tape that separates the Meeting Area from the Work Areas in the shop. Long hair must be tied back before entering the Work Areas.
6

General Safety Training RequirementsStudents are not allowed to work in the TechnoKats Shop until they have received basic training by an approved mentor on Personal Protective Equipment (PPE), use of the Eye Wash Station, Hand Tool, and Battery Safety. Appendix A includes basic safety training for PPE, Eye Wash, Hand Tools, and Batteries. Additional training is required before operating any of the stationary mechanical or electrical equipment as described below.
Updated safety training for PPE, Eye Wash, Hand Tool Safety and Battery Safety is required every year. The master list will be updated and posted each time training has been completed.
First Aid Any injury requiring first aid must be reported to a mentor or parent immediately. First Aid supplies are located in the marked file drawer in Mentor Area of the shop. A First Aid kit will travel on the bus with the team to all competitions and major events. The First Aid Kit is maintained by the Safety Captain and Lead Safety Mentor.
Shop Layout The TechnoKATS shop is laid out in sections as designated in the Shop Diagram (see Appendix B). While the general safety rules apply to all areas of the shop, some work zones have more stringent requirements as listed below.
7

Section 2: Specific Safety Rules by Work Area
Meeting AreaThe meeting area is located at the front of the shop. This is the only area of the shop where safety glasses are not required. This is also the only area where food and drinks are permitted.
During the build season, students may complete homework in this area. This area is not intended for any type of build activity involving tools or robotics materials, or any activities requiring safety glasses.
Students and mentors are expected to clean up after themselves by disposing of trash and leftover food each day. No food may be stored in the shop. Trash cans must be emptied at the end of each work session.
Meals are provided on Saturdays during build season. All students and mentors must wash their hands in a restroom when finishing work in the shop and before eating meals or snacks.
All backpacks should be left in the Meeting Area while in the shop. Coats should be hung on the provided coat rack and not left in any other areas of the shop.
Mechanical Area Students must be trained by a qualified mentor before using ANY tools or equipment in the Mechanical Area of the shop. A list of qualified mentor trainers for each piece of equipment is included in Appendix C. The training will include a demonstration of safe operation for each piece of equipment by the mentor trainer. The student must then demonstrate competency on the equipment before having his/her name added to the “certified user list”. There will be a master list containing names of students trained on all machines, as well as a list at each machine indicating which students are qualified to operate that piece of equipment. Individual training is required every year.
Instructions for safe operation will be posted at each piece of equipment. These instructions are included in Appendix C for reference.
Students who have completed the training for hand tools will be allowed to use these tools independently, as long as there are at least two mentors present in the shop. Anyone using hand tools must inspect them prior to first use of the day. If there is a problem, such as a frayed cord or a bulging battery, the tool must be taken to a mentor to be placed out of service until the issue can be resolved. These tools will be tagged and placed near the front of the shop until repaired or properly disposed of.
Students who have completed training for stationary machines (lathes, band saws, etc.) are allowed to work on those respective machines ONLY with a trained mentor’s direct supervision.
8

Those who have NOT completed training on hand tools or equipment need to complete that training prior to working in the mechanical area. All students must also complete PPE, Eyewash Station, and Battery Safety training prior to working in the mechanical area.
All tools must be put away after use and before leaving the shop each evening. All work surfaces must be cleared, floor, tables, and machines swept, materials returned to the storage area, and the robot returned to the Robot Parking area.
Mentor Area The Mentor Area is a place for the mentors to work. This area is off limits to students unless a mentor requests to meet with one or more students in that location. This area should not be used for homework or other activities, including robot build initiatives.
The First Aid Kit and MSDS sheets are located in a file cabinet in the Mentor Area. Students may enter the Mentor Area for the First Aid Kit at any time. When using the First Aid Kit, report any injuries (even minor) to a mentor on duty. Clean up after yourself and put the First Aid Kit and materials away when finished.
Eyewash StationThe Eyewash Station is located in the Work Area of the shop. It should be used only for emergencies. Mentors must complete a Kokomo School Corporation incident report if the Eyewash Station is used, must contact the student’s parent/ guardian, and seek proper medical treatment for the student. The Eyewash Station uses a saline solution, which is replaced every six months. Team members must be trained on proper usage of the Eyewash Station before working in the shop.
Battery Use and StorageRobot batteries are stored on a movable cart. All Team members must be trained on safe battery usage before working in the shop. The batteries used for the robot are 12 volt, spill-proof batteries. They should always be carried with two hands. Batteries should be plugged in to charge after each use, and tagged appropriately when removed from the charger. Never use a battery with a red tag. Safe, fully charged batteries should be marked with a yellow tag.
A battery spill kit is located near the Eyewash Station. Damaged batteries should only be handled by someone wearing appropriate PPE. The damaged battery must be placed in the plastic bucket that is part of the spill kit, and should be covered in baking soda.
Electrical AreaElectrical supplies, pneumatics, and soldering materials are kept in the Electrical Area. Working in the Electrical Area requires training in specialty tools (wire strippers, soldering
9

stations, heat guns, etc.). Students must be trained and approved by a mentor before using tools in this area. All trained students will be listed on a chart in the electrical area. Students must have direct mentor supervision when soldering. When using the soldering station, students and mentors must have cross ventilation. Safety glasses and closed-toe shoes are required in this area.
Software AreaThe Software Area is near the practice field, and where students will program and work with the robot control systems. Outlets in the area are for computer and robot dashboard computer use only. No other machinery or cell phones should be plugged into the sockets. Safety glasses and closed-toe shoes are required in this area.
Practice FieldThe TechnoKats are fortunate to have a full sized competition field in our shop. The field is approximately 27 x 54 feet, and is to be used for robot practice and development, human player practice, and software development. Use of the field for any other purpose without mentor permission is prohibited. No horseplay should occur on the field. Safety glasses and closed-toe shoes are required in this area. Students and mentors generally should not be on the field while the robot is enabled.
Robot ParkingThe Robot Parking area is against the fence and near the practice field. This is an area of the shop where the current year’s robot is stored when not in use. The robot is covered with a tarp while parked. During build season, there will be a shelf available for storing parts of the robot that are in the process of being assembled, in order to clear all work surfaces at the end of each evening.
Supply AreaSupplies and building materials are stored on shelves against the wall, west of the practice field. Materials stored there will be inventoried by the Tech Lead or other student leader, who will be responsible for alerting the Lead Mentor when materials need to be ordered or purchased. Materials in this area are for robot use, and not for any personal projects. Safety glasses and closed toe shoes are required in this area.
Robot Museum This is an area where robots from previous years are stored. Anyone wishing to remove a robot from this area must do so with a mentor present. Safety glasses and closed toed shoes are required in this area.
10
Section 3: The RobotRobot Operation and Repair The optimal place to operate any robot is on the practice field. The robot must be on the practice field whenever it is going to actually move across the floor. If necessary, some robot testing can be completed in the software or mechanical areas provided the robot is elevated so that the wheels are not touching the floor.
FIRST Robotics requires use of one 12VDC non-spill, lead acid battery. Use of any other battery is STRICTLY prohibited. When using a battery to test a robot, the battery must be securely mounted inside of the robot, OR firmly mounted outside of the robot with no potential for accidental disconnection.
During build and competition season, the drive team will be the only drivers of the robot, unless permission is granted by the Drive Coach or Technical Mentor for other students to operate the robot. In order to operate any robot, a mentor/student with prior operating experience MUST be present.
RELIEF of STORED ENERGY When working on the robot in the shop or in a competition pit, the robot MUST be turned OFF, this is in accordance with the FIRST rule book. Other stored energy must also be released as described below.
Electrical Energy: Disconnect the electric power source. Best Practice - Always de-energize the robot before working on it by unplugging
batteries and opening the main circuit breaker (“reset” lever is released).Pneumatic Energy: Always vent any compressed air to the atmosphere.
This applies to all parts of the pneumatic system. Open the main vent valve and verify that all pressure gauges on the robot indicate zero pressure.
Miscellaneous Energy Sources: Relieve energy stored in any compressed or stretched springs or tubing. Lower all raised robot arms or devices that could drop down to a lower position on the
robot.
11

Section 4: APPENDICES
APPENDIX A: General Safety
A.1: PERSONAL PROTECTIVE EQUIPMENT (PPE)The proper use of personal protective equipment (PPE) is an important element to help ensure FRC participants are protected from hazards in the work area. The following describes the common PPE that team members are required to wear as part of constructing a robot. All PPE must be ANSI-approved, UL-Listed, or CSA rated as applicable.
Safety Glasses Safety glasses must include side guards. Prescription glasses that are safety glasses may be worn in the shop as long as side guards are present. If the prescription glasses are not safety glasses, safety goggles must be worn over them. Tinted glasses are not FIRST approved.
Safety glasses must be worn when soldering, disposing of damaged batteries, or other times when a risk is present, including:
Flying particles Chemical exposure (such as splashes, splatters, and sprays) When doing any work on the robot including, grinding, drilling, soldering, cutting,
welding, etc.
At FIRST events: Anywhere in the pit area, including walkways and pit stations On the Playing Field On the Practice Field Any area posted with signs requiring the use of eye protection
Hand ProtectionHand protection is designed to protect against heat, electrical, chemical and mechanical hazards. Use proper gloves and mechanical tool guards.
Gloves Gloves should be worn when hand protection is necessary. Gloves should be the proper size, flexible, and be free from cracks or holes.
Chemical resistant gloves should be work when handling chemicals or damaged batteries.
Gloves should be worn when moving the robot between the robot cart and field, both in the shop and at competitions.
Gloves should not be worn when operating tools or machines.
12

Mechanical GuardsMechanical Guards provide safety guards for power tools where required. Never use any equipment without safety guards in place. Notify a Technical Mentor of any broken or defective equipment, and take it out of service until repairs are made.
Hearing ProtectionHearing protection is available in the shop. Earmuffs hang on the east fence near the mechanical equipment. Earplugs are available in the First Aid kit in the shop and at competitions. Hearing protection should be worn when operating machinery at high sound levels or whenever there are questionable sound levels.
Foot ProtectionProper footwear should be worn in the shop at all times. Shoes must have closed-toes and heels. Sandals, mules, Crocs, etc. are never permitted in the shop or at competitions.
Other PreventivesIn the shop, avoid wearing ties, scarves, loose clothing, jewelry, etc. when working on or around the robot or when working on or around machines. Long hair must be tied back when working on or around machines.
Preventing accidents before they occur is the best method of ensuring a safe working environment.
A.2: EYEWASH STATIONThe Eyewash Station is located in the Work Area of the shop. It should be used only for emergencies. Mentors must complete a Kokomo School Corporation incident report if the Eyewash Station is used, must contact the student’s parent/ guardian, and seek proper medical treatment for the student. The Eyewash Station uses a saline solution, which is replaced every six months.
If a hazardous substance comes in contact with a person’s eye, he or she should go to the Eyewash Station, lean his or her head over the basin, and pull the black handle to release the saline solution. The station is gravity fed, and will operate for apx. 10-15 minutes. The injured team member should allow the solution to rise his or her eyes for this full amount of time. After rinsing the eye, proper medical treatment should be sought.
The saline eyewash station is not a toy. The fluid is expensive and improper use will result in being charged for the decontamination and refilling of the unit.
13

A.3: BATTERY STORAGE AND SAFETYIn order to handle batteries in the shop or in the pit environment team members MUST be trained in safe handling and cleanup of a spilled battery, and also must be trained in proper and safe use of the saline eye wash station.
Batteries should always be carried by the base with 2 hands. Never carry a battery by the cables. Alert a technical mentor if a battery has been dropped. The battery may be damaged internally, with no visible damage on the outside. The dropped battery should be set aside and not used until it has been properly inspected by a technical mentor.
If a battery is visibly damaged (cracked, bulging, etc.), set it aside and red-tag it. A damaged battery can leak electrolyte, which can burn the skin, or it can short circuit and possibly explode. A battery that is damaged should never be plugged in.
A damaged battery should be handled only by a technical mentor wearing PPE (safety glasses, rubber gloves, rubber apron). The battery should be placed in a plastic bucket and covered in baking soda, and then disposed of properly. The battery spill kit is located near the Eyewash Station and is taken to all team competitions.
Battery DisposalThe Interstate Batteries Company http://www.interstatebatteries.com has volunteered to accept and properly dispose of any FRC team's batteries. Most retailers of automotive batteries will accept and properly dispose of them at no cost.
Battery Charging and Handling Keep the battery-charging area clean and orderly. Place your battery charger in an area where cooling air can freely circulate around the
charger. Battery chargers can fail without proper ventilation. Do not short out the battery terminals. If metal tools/parts contact the terminals
simultaneously, it will create a direct short circuit. This may cause high heat to develop in the battery terminal/part/tool area and the battery could explode.
If a quick disconnect is not available and you must use tools to disconnect the battery, make sure metal tools don’t contact both terminals at the same time.
Do not charge battery at greater than the manufacturer’s maximum recommended rate.
Ongoing Battery Inspection Periodically, a technical mentor or the technical lead will inspect the batteries for any
evidence of damage, such as a cracked case or leaking electrolyte. Bent terminals can also be a potential leak source. After each competition round, inspect the battery. Check your battery prior to competing in each round.
14
A.4: HAND TOOLSConstructing a robot requires the use of hand tools. Hand tools include such items as wrenches, screwdrivers, chisels, crimpers, hammers, etc. The term hand tools also refers to electric and battery powered tools such as drills and power screwdrivers. Always use the proper tool for the job. Example: DO NOT use a wrench for a hammer or a screwdriver as a chisel.
Tool Rules Before using any tool, check to see if it is in good condition. Don’t use defective, dull,
or broken tools. Don’t put them back on the shelf; remove them from service and notify the safety captain and a technical mentor so the tool can be replaced or sent for repair.
When using a screwdriver or other tools, place the work on the bench or hard surface rather than in the palm of your hand.
When using knives/blades, direct your cutting strokes away from your hand and body and be aware of those around you. Wear gloves when appropriate. If using a box cutter, retract the blade before storage or carrying around.
Tool StorageAll tools should be put away in the toolbox when not in use. When carrying tools, cover the point or any sharp edges with shields. The following website will be used for team safety training on hand tools: https://www.youtube.com/watch?v=tiXyDM-eJNI
15
APPENDIX B: SHOP LAYOUT(not to scale)
16
Main Entrance
Robot MuseumArea
Team Meeting Area
Computers / Button Making
Mentor Area & First Aid
Electrical Area
Software Area
Materials Storage
Storage
Practice Field & Driver’s Stations
Gate to Duke Area
Gate to Duke Area
Machine Area
Build Area
Painting Area
Battery Charging & Eyewash Stations
Robot Parking Area
Parent Supplies
APPENDIX C: MECHANICAL STATIONARY MACHINES
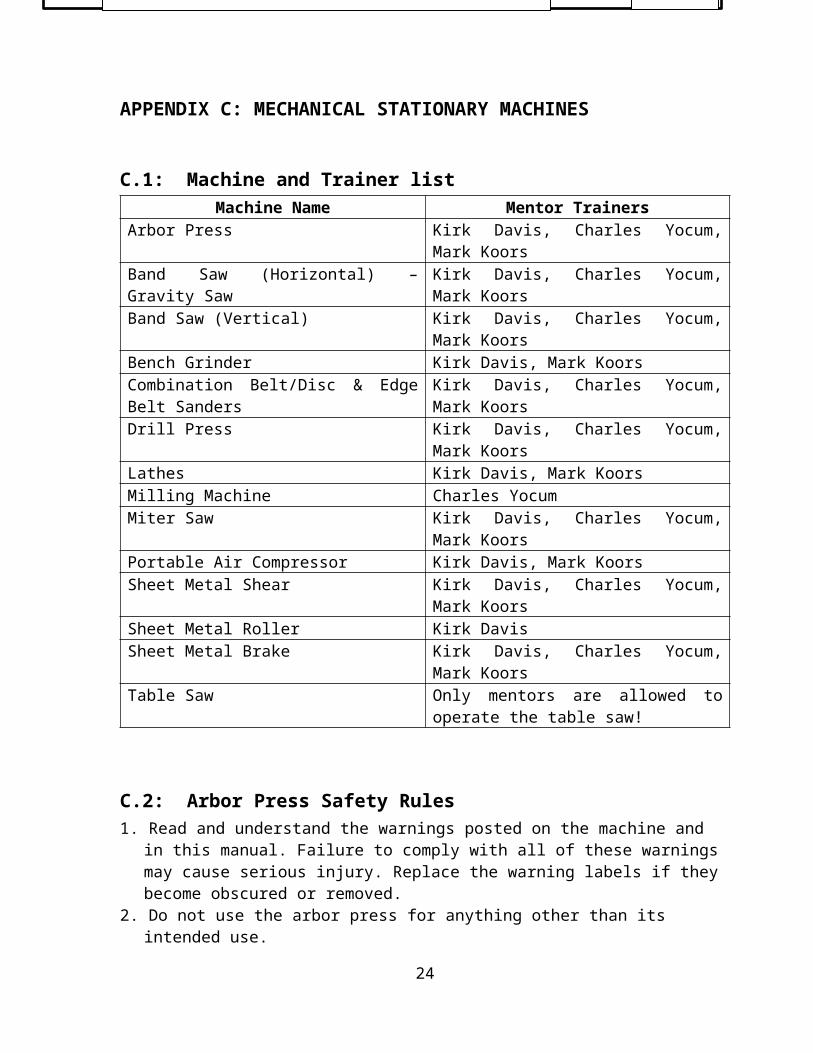
C.1: Machine and Trainer listMachine Name Mentor Trainers
Arbor Press Kirk Davis, Charles Yocum, Mark KoorsBand Saw (Horizontal) – Gravity Saw Kirk Davis, Charles Yocum, Mark KoorsBand Saw (Vertical) Kirk Davis, Charles Yocum, Mark KoorsBench Grinder Kirk Davis, Mark KoorsCombination Belt/Disc & Edge Belt Sanders Kirk Davis, Charles Yocum, Mark KoorsDrill Press Kirk Davis, Charles Yocum, Mark KoorsLathes Kirk Davis, Mark KoorsMilling Machine Charles YocumMiter Saw Kirk Davis, Charles Yocum, Mark KoorsPortable Air Compressor Kirk Davis, Mark KoorsSheet Metal Shear Kirk Davis, Charles Yocum, Mark KoorsSheet Metal Roller Kirk DavisSheet Metal Brake Kirk Davis, Charles Yocum, Mark KoorsTable Saw Only mentors are allowed to operate the
table saw!
C.2: Arbor Press Safety Rules1. Read and understand the warnings posted on the machine and in this manual. Failure to
comply with all of these warnings may cause serious injury. Replace the warning labels if they become obscured or removed.
2. Do not use the arbor press for anything other than its intended use.3. Always wear approved safety glasses while using this arbor press. 4. Check for damaged parts. Before further use of the arbor press, a part that is damaged should
be carefully checked to determine that it will operate properly and perform its intended function. Check for alignment of moving parts, binding of moving parts, breakage of parts, mounting and any other conditions that may affect its operation. A guard or other part that is damaged should be properly repaired or replaced.
5. Give your work undivided attention. Looking around, carrying on a conversation and “horse-play” are careless acts that can result in serious injury.
6. Maintain a balanced stance at all times so that you do not fall into the arbor press. Do not overreach or use excessive force to perform any machine operation.
7. Use only recommended accessories; improper accessories may be hazardous.8. Do not overload the arbor press by using extension (cheater) bars.9. Use steel collars to support parts when pressing on bearings to prevent damage to the
bearings.10. Follow the safety instructions from training.
17

C.3: Gravity Saw Safety Rules:
PRE-OPERATIONAL SAFETY CHECKS1. Ensure no slip/trip hazards are present in workspaces and walkways.2. Check that all guards are in position.3. Ensure that the hydraulic damping mechanism functions.4. Check that the blade is in good condition.5. Ensure that blade speed, blade tension, and blade tracking are properly adjusted.6. Faulty equipment must not be used. Immediately report suspect machinery. 7. Complete other safety checks as instructed in training.
OPERATIONAL SAFETY CHECKS1. Lift the head of unit up and lock it in the upward position.2. Set the angle of the vice, or check it to ensure that is it square.3. Clamp work piece firmly into the vice. Long material must be supported.4. Adjust blade guards to cover unused portion of blade.5. Ensure hands are away from the blade, and then turn the machine on.6. Allow the upper head assembly to come down slowly until the teeth are cutting the
material.7. Keep hands away from the point of operation during cutting.8. Turn off the machine and bring it to a complete standstill if the blade is to be lifted out of
an uncompleted or jammed cut.9. Stop the machine and bring it to a complete standstill before removing scrap pieces from
the vice area or making adjustments.10. Stop the saw immediately if the blade develops a ‘click’. Report it to a mentor.11. Ensure that the cutting head is locked in the upward position before removing work piece
from vice.
Gravity Saw Safety BasicsStart with a Risk Assessment to ensure a safe work area.1. A two foot perimeter around the saw should be kept clear of people, debris, and sawdust.2. Safety glasses with side shields must be worn. Hearing protection should be worn.3. Remove loose fitting clothing, jewelry, and tie back long hair.4. Give the work your undivided attention.
HOUSEKEEPING1. Switch off the saw and reset all guards to a fully closed position.2. Clean the work surface and sweep around the machine when finished.
FORBIDDEN Pushing down on the cutting head while it is cutting Leaving the machine running unattended
18
C.4: Band Saw (Vertical) Safety Rules:1. Follow the 3” rule: always keep fingers 3” from the blade.2. Check the blade tension and tracking before starting.3. Don’t cut stock that is not flat on the bottom without a jig.4. Keep a balanced stance at the band saw.5. Never clear small pieces while the blade is moving.6. Never use your thumbs to push material toward the blade.7. Never back out of a curve cut while the machine is running.
Band Saw Safety BasicsStart with a Risk Assessment to ensure a safe work area.1. A two foot perimeter around the saw should be kept clear of people, debris, and sawdust.2. Safety glasses with side shields must be worn. Hearing protection should be worn.3. Remove loose fitting clothing, jewelry, and tie back long hair.4. Give the work your undivided attention.
Operational Safety Rules:1. Approach your work in the shop and on the band saw with a safe attitude.2. The teeth of the band saw blade should point down toward the table.3. The blade should be 1/32” from the rear roller bearing behind the blade.4. The blade alignment tracking should be at the center of the wheels.5. Make sure that the upper and lower wheel guard doors are closed when running.6. Keep the blade guard & guide only 1/4” above your stock.7. Keep bystanders away from the right hand area of the saw. Broken blades have a tendency to
fly out to the right.8. Always keep your fingers and hands away from the path of the blade.9. To control the stock, use push sticks or feather boards when cutting small or short stock. 10. Use a “V” block when cutting cylindrical stock.11. Cut at a moderate feed rate into the blade. Do not force a cut.12. Cut relief cuts prior to cutting long or tight curves. The relief cuts will free the blade of the
tension of the tight curve and the wood will fall away. The blade size will dictate the radius of the cut.
13. If you need to back out of a cut, shut the machine off. After blade stops, then back out.14. If a blade breaks, shut the machine off and stand clear until everything stops moving.15. If the work is too large for one person to handle, get help holding the stock.16. When cutting with the table at an angle, clamp a block to the table to prevent your stock
from slipping off the table.17. Always disconnect the power before changing the blade or performing any other
maintenance operation.18. Turn off the band saw and wait until the blade comes to a complete stop. Never stick an
object into the blade to stop the machine quicker. Let it stop on its own or use the foot brake.19. Follow all instructions from machine training.
19

C.5: Bench Grinder Safety RulesA bench grinder is a machine used to drive an abrasive wheel or wheels. Depending on the grade of the grinding wheel, it may be used for sharpening cutting tools. To avoid accidents, the following operational safety rules must be observed by everyone working on the bench grinder.
1. Before working with a bench grinder, make sure the tool and its accessories are in the proper working order.2. Work with a mentor to perform a “Ring Test” grinding wheels before mounting. Suspend the wheel on a pencil held horizontally through the center of the hole. Tap the wheel lightly with a plastic screwdriver handle, in spots 45 degrees from vertical. If it produces a clear ringing tone it is in good condition. If it sounds dull, REPLACE it.3. Inspect the wheels for hairline cracks before using. DO NOT USE A CRACKED WHEEL.4. Make sure the wheel housing guards are in place.5. New grinding wheels should be balanced by dressing and truing to eliminate vibration.6. Used wheels should be trued and dressed when worn out of round, or the surface face is clogged or worn smooth. This provides a clean sharp grinding surface and rebalancing of the wheel. Dress the wheel on the face only. Dressing the side of the wheel would cause it to become too thin for safe use.7. Don’t operate a grinder unless it is securely mounted to the workbench.8. Do not heavy grind on the side of the wheel.
Bench Grinder Safety BasicsStart with a Risk Assessment to ensure a safe work area.1. A two foot perimeter around the grinder should be kept clear of people, debris that impairs traction or footing to avoid slips and falls.2. Safety glasses with side shields must be worn. Hearing protection should be worn.3. Remove loose fitting clothing, jewelry, and tie back long hair.4. Give the work your undivided attention.
Operational Safety Rules:1. Approach your work in the Shop & on the bench grinder with a safe attitude.2. Adjustments need to be made when the grinder is unplugged & stopped. Adjust tool rests 1/8” from the wheels and slightly below center and spark or shatter guards (at the top of the wheel housing guards) 1/16”away from the wheels. Re-adjust these as the wheels wear down to a smaller diameter.3. Stand to one side of the wheel when turning ON power. Allow the grinding wheel to run at full operating speed for one minute. DO NOT use a wheel that vibrates.4. Bring the object into contact with the grinding wheel slowly and smoothly, avoiding impact or bumping motions.5. Move the object being ground, back and forth across the face of the wheel only, as this prevents "ruts" or grooves from forming.6. Never grind small stock. Do not attempt to grind or sharpen anything that cannot be adequately supported by the tool rest. Use clamping pliers when grinding parts that cannot be held easily by hand.7. Do not touch the ground portion of the work piece until cooled.
20
9. Turn off grinder and wait until comes to a complete stop. Never stick an object into the wheel to stop the grinder quicker. Let it stop on its own.10. Clean the machine, including sweeping the floor in the area when finished each time you use the machine.11. Follow all instructions from machine training.
C.6: Combination Belt/Disc & Edge Belt SandersThese sanders are for surface or edge sanding of nonmetallic materials only. Both machines may be used for many types of rough, end grain sanding and simple shaping.
Sander Safety BasicsStart with a Risk Assessment to ensure a safe work area.1. Always wear safety glasses with side shields or safety goggles while operating this machine.2. A sanding disc or belt will cut very quickly; failure to anticipate this may cause injury to the finger and hands.3. Precautions should be taken for loose hair, clothing, jewelry and other items so that they are NOT caught in the machine.4. Sanding on wood or plastic will cause heat buildup due to friction and may cause the material to burn rapidly.5. All power driven sanders can cause serious abrasive skin burns with incorrect use or from accidental contact with the abrasive belt.6. A dust collector may be connected to the unit, but a filtering face piece mask is also recommended for those with respiratory issues.7. Check the integrity of the sanding belt tracking of the machine as well as the integrity of the disc. Any ripped belts or discs should be reported.8. Do not wear gloves while operating the sander.9. Allow the machine to reach full speed before feeding material. Similarly, it takes time for the disc or belt to stop moving. There is no way to stop the machine on short notice. Do not leave the machine unattended while any parts are moving.
Operational Safety Rules:1. Approach your work in the shop and on the Combination Belt/Disc Sander with a safe attitude.2. Ensure that the gap between the sander’s table and the moving disc or belt is kept as small as possible.3. The distance between your fingertips and the moving disc or belt shall be no closer than 3”.4. Do not sand pieces of material that are too small to be safely supported.5. Always hold the work firmly when sanding.6. Always hold the work firmly on the downward rotation side of the table when sanding with the disc.8. Avoid awkward hand positions in which a sudden slip could cause a hand to move into the sanding belt or disc.9. Do not sand with the work piece unsupported. Support the work piece with the backstop or table.
21
10. Always remove scrap pieces and other objects from the table, backstop, or belt before turning the machine on.11. Do not push hard on the sanding media. The sander performs best and safest when it is allowed to remove material at the rate for which it was designed.12. Never make belt adjustments while the sander is on.13. Always turn the machine off and disconnect the power cord before installing or removing belts or discs or when making repairs.14. Never leave the machine work area when the machine is running or before the machine has come to a complete stop.15. Shut off power, clean the sander and work area, including sweeping the floor, before leaving the area.16. Follow other instructions from machine training.
C.7: Drill Press Safety RulesThe drill press comes in a floor or bench-mounted model. The TechnoKats shop has the floor-mounted model. It has a motor driven head that has a chuck that accepts bits or cutters. It also has an adjustable table on which the work is mounted. It is operated by pulling a rotary lever which lowers the drill bit into the material. To avoid accidents, the following operational safety rules must be observed by everyone working on the drill press.
Drill Press Safety BasicsStart with a Risk Assessment to ensure a safe work area.1. A two foot perimeter around the drill press should be kept clear of people, debris and sawdust.2. Safety glasses with side shields must be worn. Hearing protection should be worn.3. Remove loose fitting clothing, jewelry, and tie back long hair.4. Give the work your undivided attention.5. Do not wear gloves or anything that would allow a hand, fingers or clothing to be wrapped around the revolving bit.
Operational Safety Rules:1. Approach your work in the Shop and on the drill press with a safe attitude. 2. Make all drill press adjustments with the power OFF.3. Keep all guards and covers on the machine when it is on and running.4. Make sure the size of the bit is equal to or less than the capacity of the drill press.5. Do not exceed the recommended speeds for the type and size of drill bit being used or composition of the stock being drilled.6. Center punch the drill-hole location into the stock.7. Insert bit into drill chuck and tighten with the chuck key. Remove chuck key from the drill chuck before starting the drill press.8. Use a clamp or vise to securely fasten the stock to the drill press table. Never attempt to handhold stock while drilling.
22

9. Drill into cylindrical stock using a “V” block.10. Long stock should be drilled with the excess to the left of the operator. If the stock rotates it will hit the post, not the operator.11. Support the underside of the stock to be drilled with a backer board secured to the drill press table.12. Never start the machine without the table clear of everything except the stock you are drilling.13. Keep hands and fingers at least 3” from rotating drill bits.14. When drilling deep holes, frequently raise the drill bit from the hole to remove cuttings and cool the bit.15. When you begin to break through the underneath side of the stock, ease up on the feed as to not tear the wood from the underneath side.16. If a drill bit binds, turn off the drill press and carefully turn drill chuck backwards by hand to free the drill bit.17. Never reach around or under a rotating drill bit or grab the chuck to stop a drill press. This can result in hand puncture or other serious injury.18. Turn the drill press off before looking up or walking away from the machine.19. Never stop the rotation of the drill chuck, spindle, or stock rotating on bit with your hands or fingers.20. Don’t touch the drill bit or shavings since they are hot immediately after drilling.21. Always clean the drill press table and work area upon completion of the drilling task. Do not use your hands or blow the drill shavings, use a bench brush.22. Clean the machine, including sweeping the floor in the area when finished each time you use the machine.23. Follow other instructions from machine training.
C.8: Lathe Safety RulesLathes rotate wood stock between the headstock and tailstock to permit carving. Rotating speeds range from 200 to 4,000 rpm. A block of wood that is not secured can fly off with enough force to cause serious injury to the operator or someone standing nearby. To avoid accidents, the following operational safety rules must be observed by everyone working on the shop lathes. Failure to follow the safety rules will result in a loss of shop privileges.
Lathe Safety Rules:1. Select stock carefully and inspect it closely before undertaking a project. Avoid using wood with knots or splits.2. Rotate the stock by hand to be sure that it clears the tool rest.3. Before turning on the power to the lathe, make sure the lathe is in the lowest possible speed. Mechanical speed controls can only be changed while running, and if the work is out of balance, you may not have a chance to lower the speed.4. Never adjust the position of the tool rest while the lathe is running.5. Position the tool rest a little below center of the work-piece and no further than1/8 inch from the work as work-piece diameter decreases.
23
6. Confirm the stock is secure before starting. Stand to the side of the machine on the initial start-up to ensure that the stock is secured.7. Never leave the lathe running unattended.8. Disconnect the power source before making repairs.9. Safety glasses with side shields must be worn when using the lathe.
Lathe Safety BasicsStart with a Risk Assessment to ensure a safe work area:1. A minimum of a two foot perimeter in the back and front of the lathe should be kept clear of people, due to the rotating shaft.2. Remove loose fitting clothing, jewelry, and tie back long hair and dangling objects that may catch in rotating parts.3. Give the work your undivided attention.4. Keep the tools off the lathe bed. Keep the woodturning tools on the same side as the operator, so there is no need to reach over the lathe to get tools or have them fall.
Operational Safety Rules:1. Approach your work in the shop and on the lathe with a safe attitude.2. Rough out your work-piece on a band-saw before mounting it on the lathe.3. Snug the tailstock center against the work and lock it. Lubricate the tailstock center if it is not a ball-bearing center.4. Hold turning chisels securely on the tool-rest, and hold the tool firmly. Always use a slower speed when starting until the work-piece is cylindrical. This helps avoid the possibility of an unbalanced piece jumping out of the lathe and striking the operator.5. Keep the woodturning tools sharp. A dull chisel requires that you apply excessive feed pressure.6. Make contact with the work cautiously, and then slowly progress the cut more aggressively.7. Never use your fingers to check the work for roundness while the lathe is running, especially during roughing operations. Stop the lathe to check the progress, or rest the blade of the tool lightly against the work as it turns.8. Clean up wood shavings and sawdust often. Sawdust can create a slipping hazard. Remove the tool rest before sanding or polishing on the lathe. 10. When sanding, remember that the spinning stock will cause the sand paper to heat up from the friction of sanding. Sanding should be done on low speed, on the back side of the stock on the down stroke.11. Clean the machine, including sweeping the floor in the area when finished each time you use the machine.12. Follow all instructions from machine training.
C.9: Milling Machine Safety Guidelines
Milling Machine Safety BasicsStart with a Risk Assessment to ensure a safe work area:
24

1. A two foot perimeter around the miter saw should be kept clear of people, debris that impairs traction or footing to avoid slips and falls.2. Safety glasses with side shields must be worn. Hearing protection should be worn.3. Remove loose fitting clothing, jewelry, and tie back long hair.4. Give the work your undivided attention.
1. When setting up work, move the table as far as possible from the cutter to avoid any injury. 2. Be sure that the cutter and machine parts will clear the work before making any cut. 3. Make sure that the work and cutter are mounted securely before taking a cut. 4. When mounting or removing milling cutters, always hold them with a cloth to avoid the
sharp edges. 5. Make sure cutter is rotating in the proper direction before cutting material. 6. Before running machine the spindle should be rotated by hand to make sure it is clear for
cutting. 7. Make sure the power is off before changing cutters.8. Always use the proper cutting fluid for the material being cut.9. Never run the machine faster than the correct cutting speed.10. Never attempt to mount, measure, or adjust work until the cutter is completely stopped.11. Do not attempt to stop the cutter with your hand.12. Keep hands, brushes, and rags away from the revolving milling cutter at all times. 13. Always use cutters which are sharp and in good condition.14. Don't place anything on the milling machine table such as wrenches, hammers, or other
tools.15. Always stay at the machine while it is running.16. Always use a brush, never a rag, to remove the cuttings after the cutter has stopped
revolving. 17. Don't take too heavy a cut or use too rapid a feed. This can cause the cutter to break and
the resulting flying pieces may cause injury. 18. Never reach over or near or around a revolving cutter; keep hands at least 12 inches from
the revolving cutter.19. Remove the collet tightening wrench immediately after using it.20. Use the milling machine spindle brake to stop the spindle after the power has been turned
off.22. Before cleaning the mill remove cutting tools from the spindle to avoid cutting yourself.23. Keep the floor around the machine free of chips, oil, and cutting fluid.24. Clean the machine, including sweeping the floor in the area when finished each time you use the machine.25. Follow all instructions from machine training.
C.10: Miter Saw Safety RulesThe Miter Saw is a power tool used to make a quick, accurate crosscuts, miters or bevels. These saws cut at a set miter angle. Some also can cut at both miter and a beveled angle. To
25

avoid accidents, the following operational safety rules must be observed by everyone working on the miter saw.
Power Miter Saw Safety Rules:1. Never alter a guard or use the tool with a guard missing. Be sure all guards are in place and working properly before each use.2. Never force a blade onto an arbor or alter the size of an arbor. If your blade does not have the proper size and shape arbor hole for the arbor, do not use it!3. Make sure the arbor and blade are both clean. Buildup on the surface of the arbor and blade will increase excessive friction.4. Use sharp blades. Damaged or dull blades could throw teeth, causing a serious injury.5. When installing or changing a blade, make sure the blade has adequate set (blade set provides clearance between the sides of the blade and the work piece, thus minimizing the probability of binding). Match the direction of the arrow on the blade with the direction of the arrow on the tool casting to be sure of proper installation. The blade teeth at the bottom of the blade point down and toward the fence.6. Be sure the arbor nut is tight to prevent slipping or loosening of the blade.7. Set the saw securely on a flat, level surface.
Power Miter Safety BasicsStart with a Risk Assessment to ensure a safe work area:1. A two foot perimeter around the miter saw should be kept clear of people, debris that impairs traction or footing to avoid slips and falls.2. Safety glasses with side shields must be worn. Hearing protection should be worn.3. Remove loose fitting clothing, jewelry, and tie back long hair.4. Give the work your undivided attention.
Operational Safety Rules:1. Approach your work in the shop & on the miter saw with a safe attitude.2. Concentrate on what you are doing and be aware of kickback.3. Always place the work piece securely on the table & against the fence when making cuts.4. Support long work pieces at the same height as the saw table.5. Use clamps to secure the work piece to the table and avoid injuries.6. Never make freehand cuts. Holding the work piece by hand is unstable and may lead to loss of control.7. Never cut small pieces that would require you to put fingers within 3” of the cutting blade without a clamping device.8. Never reach under the saw blade or perform “cross handed” operation.9. When starting the saw, allow the blade to reach full speed before cutting; do not force the blade, and always start the cut gently.10. Don’t raise the blade from the work piece until the blade has come to a complete stop.11. Never try to remove or clamp the work piece to the saw while the blade is rotating.12. Lock the miter saw in the down position when you are finished using it.13. Clean the machine, including sweeping the floor in the area when finished each time you use it.
26

14. Follow all instructions from machine training.
C.11: Portable Air Compressor
Air Compressor Safety Basics1. Compressed air is not to be used to blow off skin or clothing. 2. Safety glasses with side shields must be worn. Hearing protection should be worn.3. Remove loose fitting clothing, jewelry, and tie back long hair.4. Give the work your undivided attention.
PRE-OPERATIONAL SAFETY CHECKS 1. Ensure no slip/trip hazards are present in workspaces and walkways. 2. Locate the compressor in a suitable location for safe operation. 3. Lock/block the wheels on the base of the compressor to prevent movement. 4. Check that all fittings and connections are in good condition prior to starting. 5. Drain the moisture from the tank after use. 6. Check that the hoses are not cracked or cut. 7. Check that the pressure valve is set no higher than 80 psi. 8. Faulty equipment must not be used. Immediately report suspect machinery to a mentor.
OPERATIONAL SAFETY 1. Start the compressor and adjust the regulator setting to suit the work task. 2. Listen for any air leaks from any flexible hoses and discontinue use if air leaks are detected. Report problems to a mentor. 3. Check the compressor at regular intervals. 4. Pneumatic nailers, or other similar tools, are never to be pointed at a person. 5. Shop air used for cleaning equipment is to be regulated to 15 psi, unless using a diffuser nozzle to provide a lesser pressure. 6. Follow all instructions from machine training.
HOUSEKEEPING 1. Switch off the machine after using and store the machine and hoses in the proper location. 2. Leave the machine, hose, and work area safe, clean and tidy. Sweep the area around where you were working when finished using the machine.
C.12: Sheet Metal Shear Safety
Metal Shear Safety Basics1. Always wear safety clothing, including eye protection and protective footwear, while operating or servicing the machine.
27
2. Keep all body parts and any foreign objects away from the shear blade assembly while in operation. 3. All guards and covers must be in place before operating the machine. 4. Keep the work area around the shear clear and clean to avoid slipping or tripping. 5. Do not operate the machine if it has been damaged or is not operating properly. 6. Do not wear jewelry (watches, rings, necklaces, etc.), or loose fitting clothing while operating or servicing the machine. 7. Replacement parts should have the same specification and operation as the original parts on the machine. 8. Before operating the machine, be sure it is set up properly.9. Follow all instructions from machine training.
C.13: Sheet Metal Straight Brake and Roller Safety
Straight Brake and Roller Safety Basics1. Always wear safety clothing, including eye protection and protective footwear, while operating or servicing the machine. 2. Keep all body parts and any foreign objects away from the nose bar and clamping area of the brake while in operation. 4. Never use a pipe or bar on the clamp handles for additional leverage. 5. Keep clear of the counterweight and apron swing area while operating the brake. 6. Keep the work area around the brake clear and clean to avoid slipping or tripping. 5. Do not operate the machine if it has been damaged or is not operating properly. 6. Do not wear jewelry (watches, rings, necklaces, etc.), or loose fitting clothing while operating or servicing the machine. 7. Replacement parts should have the same specification and operation as the original parts on the machine. 8. All guards and covers must be in place before operating the machine. 9. Be sure brake is set on smooth, level floor & is set up properly. 10. Follow all instructions from machine training.
C.14: Table Saw Safety RulesNote: Students are not permitted to operate the table saw.The Table Saw should not be used as a table. No materials should be placed on the saw, and the table should not be used as a work surface.
Table saws are designed to rip, cross cut, bevel, and cut angles with precision. To avoid accidents, the following operational safety rules must be observed by everyone working on the Table Saw. 1. Follow the 3” rule from the blade; always keep fingers 3” from the blade.2. Never “free hand” on the table saw.3. Check alignment of the splitter, fence, and miter gauge.4. Be aware of your position at the saw.
28

5. Always use your splitter and guard on through cuts.6. Make adjustments when the machine is off.7. Never clear small pieces while the blade is moving.8. Do not over reach behind or over the blade unless the blade has stopped turning.9. Never use the miter gauge and fence together while cross cutting without a stop block.10. Keep the blade only 1/8” to 1/4” above the stock.
Table Saw Safety BasicsStart with a Risk Assessment to ensure a safe work area1. A two foot perimeter around the saw should be kept clear of people, debris and sawdust that impair traction or footing to avoid slips and falls.2. Safety glasses with side shields must be worn. Hearing protection should be worn.3. Secure loose fitting clothing, jewelry, and tie back long hair while operating a table saw.4. Give the work your undivided attention.
Operational Safety Rules:1. Approach your work in the shop and on the table saw with a safe attitude.2. Always disconnect the power before changing the blade or performing any other maintenance operation.3. Make sure that the blade is turning free before you turn on the power: this is especially helpful after making changes or adjustments.4. Always loosen and tighten the wheel nuts before and after adjusting the blade. Be sure that the locking nut on the blade-tilting hand wheel is secure for angle cuts so the blade does not move.5. Never operate a table saw with the throat insert removed. Use zero clearance inserts when appropriate.6. The Biesemeyer Blade Guard must be used for all cross cut and rip operations, unless using the crosscut sled (which has its own guard). Adjust prior to cutting.7. When cutting across the grain of the stock use a miter gauge or a crosscut sled.8. When cutting with the crosscut sled, make sure the out feed table guide slots are in alignment with the sled.9. Use a stop block clamped to the rip fence when you crosscut multiple pieces to short lengths.10. When ripping, use the kerf splitter.11. When ripping, keep the area in back of the saw free of people in case of kickback.12. When ripping long stock, make sure that you have help, use the out feed table, or use a stand to support the work.13. Use a push stick to rip stock that is 3" or less in width.14. Stand comfortably, with your feet far enough apart for good balance.15. Position your body to the left of the blade, so that it is NOT in line with the blade orkick-back alley.16. Make sure that the blade has stopped turning before you remove scrap pieces from the table or adjust for another operation.17. Always turn off the saw and wait for it to stop moving before leaving the area. Clean up the saw, including sweeping the table area and the floor around the saw after use.
29

APPENDIX D: Other Shop Safety
D.1: Chemical Safety
1. Ensure that chemical containers in good condition.2. Make sure all chemical containers have labels placed by the manufacturer.3. Ensure all labels are legible.4. Become familiar with the chemicals that may be used as part of the FRC. Read safety
precautions and instructions for use located on the chemical’s label.5. Store all chemicals in the flammable container. 6. MSDS sheets for each chemical are near the First Aid Kit in the Mentor Area. A
second copy of MSDS sheets should be brought to all competitions.7. If you are exposed to a chemical, notify a Mentor immediately and consult the MSDS
for proper care.8. Flammable chemicals should not be brought to or used at FIRST events.
D.2: Soldering SafetySoldering can be dangerous because of the heat from the iron and the chemical fumes and vapors released from the solder and flux, respectively.
When soldering, observe the following points:1. Use lead-free solder only and solder with electrically heated soldering iron/gun only.2. No torches or open flames of any kind are allowed in event venues, except by
authorized personnel (for example, machine shop personnel).3. Wear eye.4. Solder in well-ventilated areas.5. Never touch the iron/gun. It heats to extreme temperatures that will cause severe burns.6. Prevent burns by wearing cotton clothing that covers your arms and legs.7. Always wash your hands with soap and water after handling solder.8. Work on a fire resistant surface.9. Keep your soldering iron in its protective holder when not actually being used.10. Do not leave any hot tools where someone can accidentally contact the hot element.11. Follow all instructions from training.
30
APPENDIX E: SAFE ROBOT LIFTING, HANDLING, AND TRANSPORTING
Pre-Lift:1. Ensure all transporters are wearing PPE (safety glasses, gloves, etc.).2. Make sure the robot is safe to move:
Are all parts of the robot secured? Is the robot powered off? Is anyone still working on the robot?
3. Always lift with a partner.4. Before lifting, determine the direction and path you will be lifting.5. Before moving the robot, ensure that the areas and paths are clear of debris and hazards.
During the Lift:1. Each lifter should place his/her feet close to the robot and adopt a balanced position.2. All persons should lift at the same time using proper body mechanics. These
include: Lift with the legs, keeping your back straight. Do not twist your body - use your feet to turn your entire body if you need to
turn. Use proper hand holds to grasp the robot and make sure you have a safe, secure
lift point before starting the lift. Bend your knees to a comfortable degree and get a good handhold. Maintain normal spinal curves. Tighten your stomach muscles and commence lifting the robot, using your leg muscles if you are lifting the robot up from the floor. Keep the robot close to your body, and coordinate lift speed with the others.
3. Make sure the cart is stable and will not roll. Coordinate correct placement of robot on the cart.
4. Use the gate opening to enter the playing field. Climbing over the railing isprohibited.
31

SHOP USER SAFETY AGREEMENT As a TechnoKats team member, I, ______________________________________________ (printed name) agree to follow all team and shop safety rules and procedures, and agree to the statements below:
I have successfully completed basic safety training for hand tools, battery storage and safety, and Personal Protective Equipment (PPE).
I have had shop policies and procedures explained to me. I understand that I am only permitted to use machines for which I have received demonstration and training by an approved mentor. I will only use machines with a mentor supervising me. I have been instructed to ask for help on any machine with which I am not trained. I will not operate any machine without training and mentor supervision.
I have received a pair of safety glasses. I understand that I am responsible for wearing eye protection at all times in the shop facilities.
I understand that there are certain risks associated with the use of this equipment and if I have any questions or think that a piece of equipment is not functioning properly, I will ask one of the mentors in charge.
I will avoid running, horseplay, and potentially unsafe behaviors in the shop and while involved in team events and demonstrations.
Date: ____________________________________________
Signed: ________________________________________________________________________
Mentor Signature: __________________________________________________________
32

33