final cut pro - pearsoncmg.comptgmedia.pearsoncmg.com/.../downloads/finalcut/fcp/... · using the...
TRANSCRIPT
Final Cut ProTrimming: The Fine Points
Part 1: Trimming Two Edit Points
Part 2: Slipping One Clip
Part 3: Rolling Two Edit Points
uPart 4: Sliding Clips to Refine Positiono
Part 5: Shuffling Clips to New Locations
Part 6: Keeping Linked Clips in Sync
Copyright © 2010. Used with permission of Pearson Education, Inc. and Peachpit Press.

2
Part 4
NOTE P This is the fourth part in a series of tutorials that build upon each other.
Before beginning this part, make sure you’ve completed the exercises in Parts 1–3.
If you like a clip’s length and content but want to adjust its position—maybe a little to
the left or right between its neighbors—then you’ll want to use the Slide tool. This third
method of adjusting two edit points affects three clips. Sliding the middle clip maintains
its content and duration but adjusts its placement between the bordering clips. This alters
the duration of the two neighbors but not the overall sequence length.
Sliding is a fine-tuning adjustment that doesn’t change the general location of a clip in
the sequence but finesses its placement. The Slide tool shares the same location as the Slip
tool in the Tool palette.
1 To access the Slide tool in the Tool palette, click and hold down the Slip tool until
the Slide button appears, then choose it. You can also press SS to make the Slide tool
active.
Slide tool in Tool palette Slide tool button
Sliding Clips to Refine Position
Copyright © 2010. Used with permission of Pearson Education, Inc. and Peachpit Press.

Part 4: Sliding Clips to Refine Position 3
2 In the Promo_v1 Rough sequence, play the area around the purple Slide marker.
Shots without sound, such as the computer screen shot, are flexible. In this case, you
can slide the clip earlier to allow Parker more time to walk to the rail, or you can slide
it a little later so that the Parker clip starts with the Promo Music clip.
3 Using the Slide tool, hold down the 83-1 MOS clip. Notice the brown outlines in the
Timeline, then release the clip.
This time brown outlines appear around all three clips involved with the adjustment. As
you slide the middle clip, you will be making the clips on either side longer or shorter.
4 Slide the 83-1 MOS clip to the left about 13 frames, but don’t release the mouse button.
Look at the clip in the sequence and then at the two-up display in the Canvas image area.
As you slide the middle clip, the outside edges of the adjacent two clips do not move;
only the inner edges bordering the middle clip move to show how the clips are com-
pensating for the adjustment.
Copyright © 2010. Used with permission of Pearson Education, Inc. and Peachpit Press.
4 Final Cut Pro
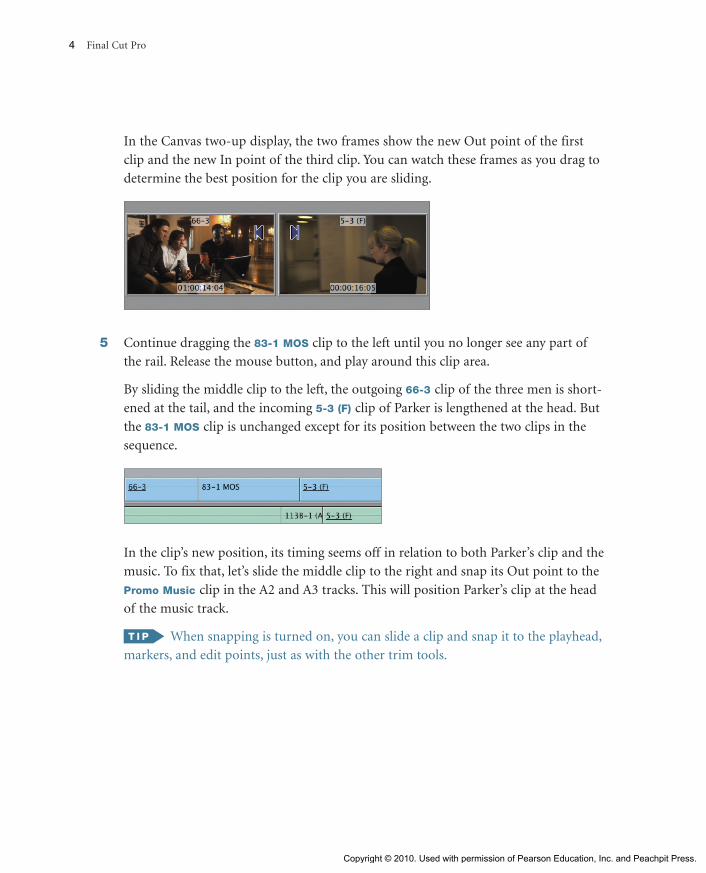
In the Canvas two-up display, the two frames show the new Out point of the first
clip and the new In point of the third clip. You can watch these frames as you drag to
determine the best position for the clip you are sliding.
5 Continue dragging the 83-1 MOS clip to the left until you no longer see any part of
the rail. Release the mouse button, and play around this clip area.
By sliding the middle clip to the left, the outgoing 66-3 clip of the three men is short-
ened at the tail, and the incoming 5-3 (F) clip of Parker is lengthened at the head. But
the 83-1 MOS clip is unchanged except for its position between the two clips in the
sequence.
In the clip’s new position, its timing seems off in relation to both Parker’s clip and the
music. To fix that, let’s slide the middle clip to the right and snap its Out point to the
Promo Music clip in the A2 and A3 tracks. This will position Parker’s clip at the head
of the music track.
When snapping is turned on, you can slide a clip and snap it to the playhead,
markers, and edit points, just as with the other trim tools.
Copyright © 2010. Used with permission of Pearson Education, Inc. and Peachpit Press.

Part 4: Sliding Clips to Refine Position 5
6 Using the Slide tool, drag the 83-1 MOS clip to the right and snap its Out point to the
Promo Music clip’s In point. Then, release the mouse button and play these clips.
7 To finesse the position of the 83-1 MOS clip, Shift-click the clip to select it. Press the <
and > (angle bracket) keys to finesse its position frame by frame.
You can also press Shift to select the clip and enter an amount for a slide,
or press Shift-[ and Shift-] or Shift-< and Shift-> to make multi-frame slide adjust-
ments, just as you did with the Slip tool.
Copyright © 2010. Used with permission of Pearson Education, Inc. and Peachpit Press.