file sharing - mrs. cogburn's roost -...
TRANSCRIPT

FILE SHARING
OVERVIEW
File Sharing enables students to quickly and easily share documents, files, and information, right from the LMS home screen. Students can upload files like homework and assignments, and share the files with as many teachers as they’d like, all from a single tool. Once the files are shared, teachers can add comments for students to view. File Sharing will be conveniently accessible from the menu at the top of the screen, the left panel of the home page, and Quick Links.
HOW DO I ACCESS FILE SHARING?
Students and Learning Coaches can access File Sharing from the top right menu of the LMS. This menu, which also contains links for My Account, New Log In, and Log Out, will always be displayed at the top of the screen.
.
.
Click on the File Sharing link to access File Sharing.
.
NAVIGATION
When you access File Sharing, you’ll automatically be taken to the My Files screen. This screen displays all the files you’ve uploaded, and important information about each one, like the file size and upload date.

.
.
1. Above the list of shared files, you’ll see the Upload button. Clicking Upload will allow you to share a new file with teachers.
2. To the left above the file list, you’ll see a display of how much space your files currently take up on File Sharing. You have a storage limit of 1GB, and will always be able to see what percentage of space you have left.
3. You can change how the file list is sorted by clicking the Sort By drop-down and selecting new sorting parameters. You can also change between descending order and ascending order by clicking the arrows next to the Sort By menu.
4. Each file will display a Comments link if the file is shared. The number in parentheses next to the Comments link will indicate the number of comments on the file. The Comments link will be blue when there are unread comments on that file.
5. To the left of the file list is a navigation menu with links to the My Files page and the Shared with me page. If the Shared with me link shows a number in parenthesis next to it, you have new shared files to view.
.
FOLDERS
In the left-side navigation panel of any page in File Sharing, you will see folders you’ve created, as well as the option to create new folders.
To create a new folder, click on Create Folder and enter a name for the folder.

To access a folder, simply click on the folder’s name. The folder will expand to show any sub-folders, and the file viewer in the middle of the page will display any files that are in the selected folder. A stacked folder icon will indicate a folder that has sub folder(s).
.
.
Above the file viewer, the current folder directory is displayed, so you never lose track of where you are in the folder navigation.
To access further navigation for a folder, click the arrow to the right of the selected folder’s name.
.
.
A menu will display, allowing you to create a new subfolder, rename the folder, or delete the folder.
.
FILES
Uploading files
Uploading files from your hard drive to share with teachers is quick and convenient. The Upload button will always be available above the file list, no matter where you are in File Sharing.
.

Click Upload to begin the file uploading process. Your web browser will open a pop-up prompt where you can choose from your hard drive the file you’d like to upload. Select the file, and it will automatically upload to the Upload tool.
.
.
While the file is uploading, you can click Add another file to upload another one. You can also click Cancel to stop the upload for any reason. Once the file has completed uploading, you can either add another file to upload, share the file with others, or click Close to exit the file uploading window.
.
Troubleshooting
Not enough space
When you click Upload, File Sharing will check to see you if you have enough available space for new files. If your File Sharing is full, you will see an error pop-up. Simply delete old or unwanted files to make room for new ones and then continue with the uploading process.
File type
You may experience an error if you attempt to upload a disallowed file type. You will see the error in red on the File Upload page. You can change the file type on your hard drive to match the allowed file types; then, try uploading again by clicking Add Another File.
File size

If the size of the file you’re uploading is greater than the upload limit, you will see an error message. Either reduce the size of the file on your hard drive and re-upload, or clear space on File Sharing by deleting old or unwanted files.
Virus
File Sharing will also check uploaded files for viruses. If a virus is detected, you will receive the error message, “Upload failed. Virus detected.”
.
DOWNLOADING FILES
You can download files from File Sharing to your computer’s hard drive to allow offline access at any time. First, select the file you wish to download by clicking the check box next to the file name.
.
.
Once you’ve checked a file, the Download button will appear above the file list. Click Download to save the file to your hard drive; a pop-up box will appear allowing you to choose the file location on your computer.
.
SHARING FILES
You can share any files you’ve uploaded; however, you cannot share files that teachers have shared with you.
.

.
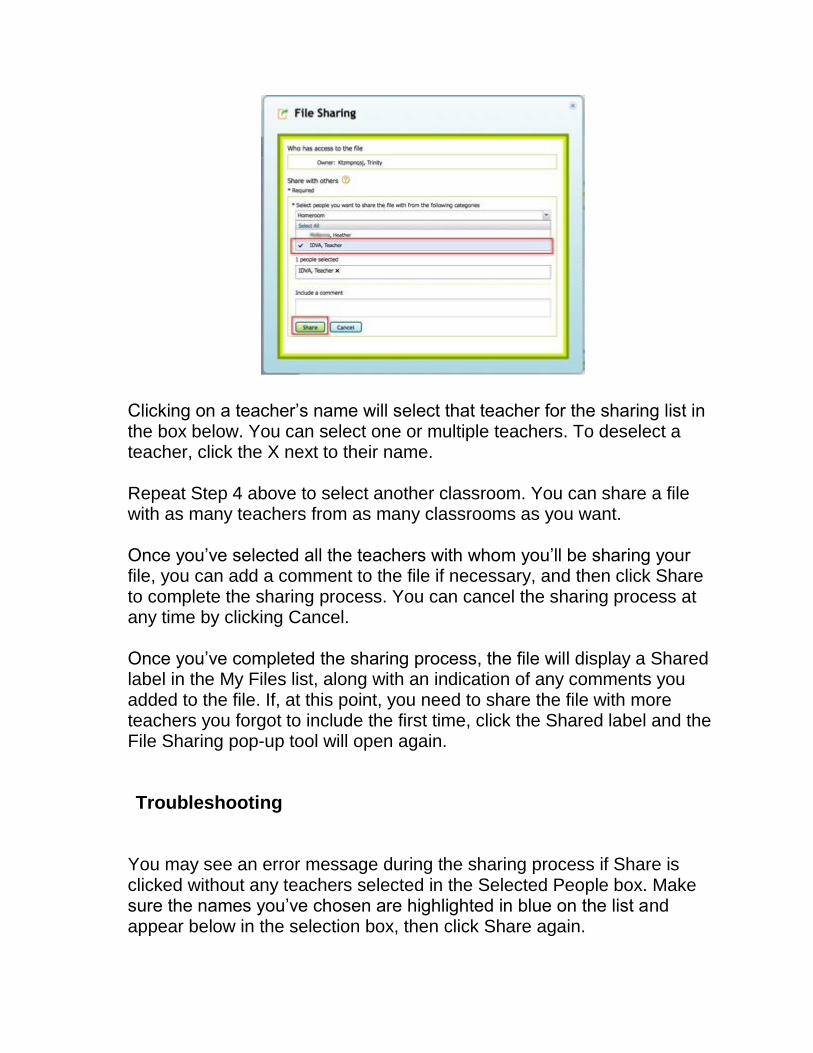
Select the file you’d like to share by checking the box next to the file name. Once the box is checked, the Share button will appear next to the Upload button above the file list. Clicking Share will open a pop-up box. You can add people to the sharing list by clicking the Select From menu.
.
.
This drop-down menu will show you a list of your classrooms. Choose the classroom whose teacher(s) you want to share your file with. The menu will now display all the teachers associated with the classroom you chose.
.
.
Clicking on a teacher’s name will select that teacher for the sharing list in the box below. You can select one or multiple teachers. To deselect a teacher, click the X next to their name. Repeat Step 4 above to select another classroom. You can share a file with as many teachers from as many classrooms as you want. Once you’ve selected all the teachers with whom you’ll be sharing your file, you can add a comment to the file if necessary, and then click Share to complete the sharing process. You can cancel the sharing process at any time by clicking Cancel. Once you’ve completed the sharing process, the file will display a Shared label in the My Files list, along with an indication of any comments you added to the file. If, at this point, you need to share the file with more teachers you forgot to include the first time, click the Shared label and the File Sharing pop-up tool will open again.
.
Troubleshooting
.
You may see an error message during the sharing process if Share is clicked without any teachers selected in the Selected People box. Make sure the names you’ve chosen are highlighted in blue on the list and appear below in the selection box, then click Share again.
.
DELETING FILES
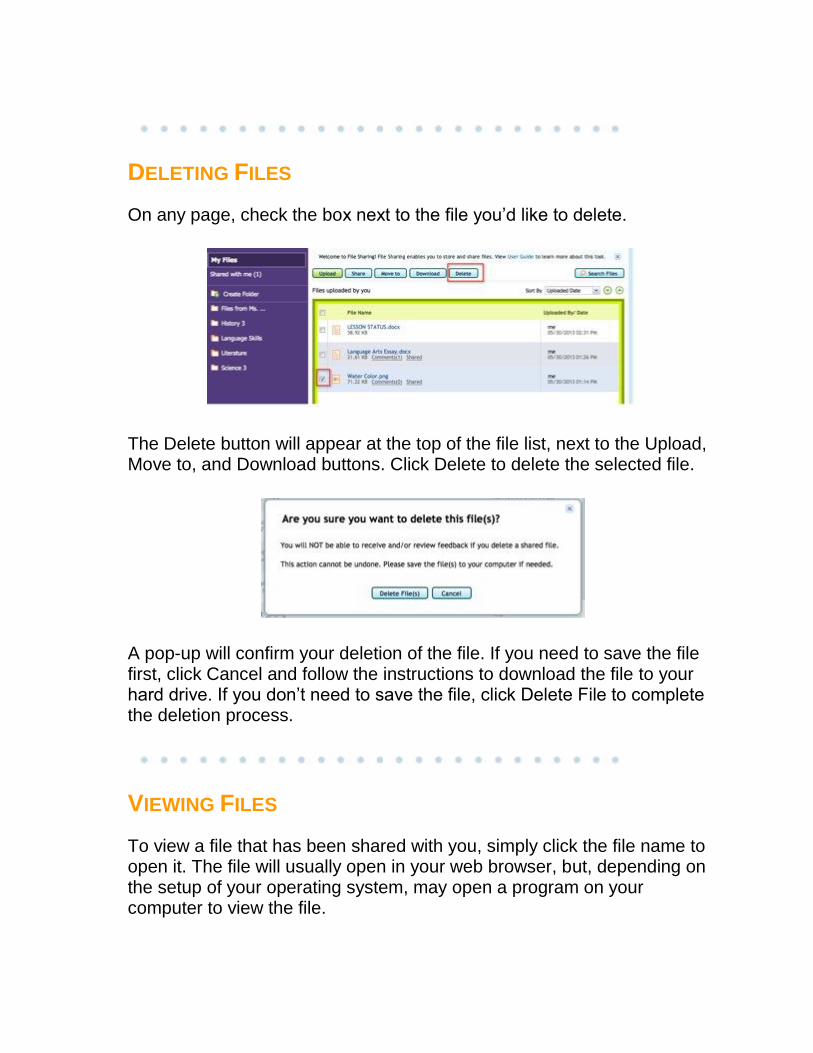
On any page, check the box next to the file you’d like to delete.
.
.
The Delete button will appear at the top of the file list, next to the Upload, Move to, and Download buttons. Click Delete to delete the selected file.
.
.
A pop-up will confirm your deletion of the file. If you need to save the file first, click Cancel and follow the instructions to download the file to your hard drive. If you don’t need to save the file, click Delete File to complete the deletion process.
.
VIEWING FILES
To view a file that has been shared with you, simply click the file name to open it. The file will usually open in your web browser, but, depending on the setup of your operating system, may open a program on your computer to view the file.

The Comments link next to a file name will be blue when there are unread comments on that file. To view comments, click Comments. A Comments pop-up will open, displaying all comments on the selected file. You can also add a comment of your own in this pop-up. Click Close when you’re finished with the comments.
.
SEARCHING
On any page in File Sharing, you’ll find the Search Files tool above the file viewer.
.
.
Click Search Files to find the file you need. A dropdown box will display, where you can enter parameters for your search, including the file name, owner name, or files shared by students/teachers from a certain classroom.
.

.
As you type, the tool will auto-complete any files that match the parameter you’re typing. Click Clear All to clear any parameters you’ve set and start again. Click Submit to run the search using the parameters you entered. The dropdown box will close, and your search results will display in the file viewer. The search will only return an exact match to your search string.
.
FOLDERS
Files you’ve uploaded and shared can be organized into folders. You can create, rename, and delete folders.
.
Creating a Folder
In the left-side navigation, click Create Folder. A pop-up will open in the middle of the page. Enter a name for your new folder, and click Create. You can always rename the folder later if you choose.
.
Sub-Folders
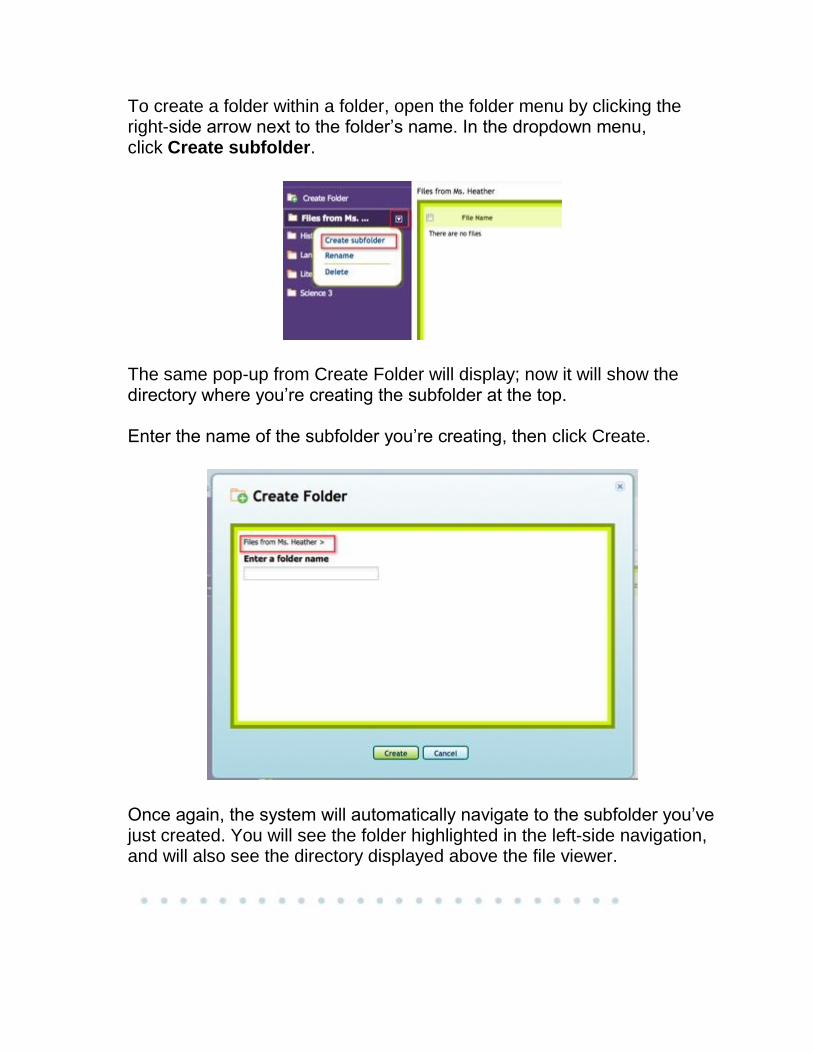
To create a folder within a folder, open the folder menu by clicking the right-side arrow next to the folder’s name. In the dropdown menu, click Create subfolder.
.
.
The same pop-up from Create Folder will display; now it will show the directory where you’re creating the subfolder at the top. Enter the name of the subfolder you’re creating, then click Create.
.
.
Once again, the system will automatically navigate to the subfolder you’ve just created. You will see the folder highlighted in the left-side navigation, and will also see the directory displayed above the file viewer.
.

MOVING FILES BETWEEN FOLDERS
You can organize your files by moving them into different folders as needed; you can move both your own files and files other people have shared with you into one folder. However, you cannot move a file from Shared with me to My Files—these files will always reflect ownership through their organization. To move a file between folders, first navigate to the folder containing the file you want to move. Once you’ve found the file you want to move, click the check box to the left of the filename.
.
.
The file will be highlighted, and the Move to button will be displayed above the file list. Click Move to.
.
.
A pop-up will open; in the folder viewer within, select the destination folder for the highlighted file. You can also create a new folder directly within the Move to pop-up.

Once you’ve selected the desired destination, click Move. To exit without moving the file, click Cancel. You can also create a subfolder as your destination directly within the Move to pop-up. When you’ve highlighted a folder, an arrow will appear to the right. Click the arrow to display the Create Subfolder drop-down option.
.
.
Once you’ve moved your file, you’ll see a confirmation message. You can then navigate to the folder where you moved your file using the left-side navigation, or by clicking the folder link in the confirmation message.
.
RENAMING A FOLDER
You can rename a folder directly within the left-side navigation. Click the name of the folder you want to rename; then, click the arrow to the right to display the drop-down options menu. Click Rename.
.
.
A pop-up will open with the Rename Folder tool. Enter the new name of your folder in the text box and click Submit.
The pop-up will close automatically and the file viewer will now display the contents of your renamed folder. The left-side navigation will reflect the changes.
.
DELETING A FOLDER
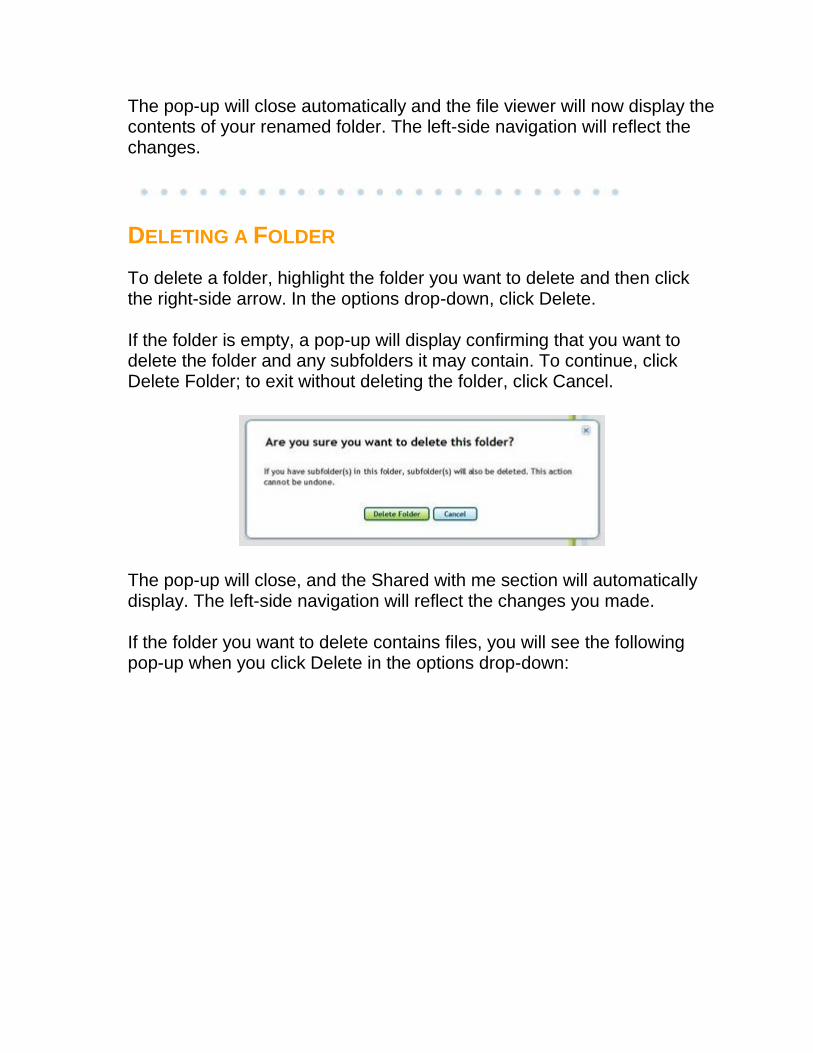
To delete a folder, highlight the folder you want to delete and then click the right-side arrow. In the options drop-down, click Delete. If the folder is empty, a pop-up will display confirming that you want to delete the folder and any subfolders it may contain. To continue, click Delete Folder; to exit without deleting the folder, click Cancel.
.
.
The pop-up will close, and the Shared with me section will automatically display. The left-side navigation will reflect the changes you made. If the folder you want to delete contains files, you will see the following pop-up when you click Delete in the options drop-down:
.

.
You can choose to save the files by moving them to the My Files or Shared with me sections. If you don’t need the files, you can choose to delete them along with the folder. When you’ve made your choice, click Delete Folder. Once you’ve deleted the folder, the system will automatically navigate to the parent folder of the deleted folder. If the deleted folder does not have a parent folder, the system will navigate to Shared with me. The left-side navigation will reflect the changes you made.
.
ALLOWED FILE TYPES
File types that may be uploaded to File Sharing include:
Word document
.doc and .docx
Spreadsheet
.xls, .xlsx and .ods
Image
.jpg, .psd, .gif, .png, .eps, .tif and .raw
Powerpoint
.ppt and .pptx
Whiteboard

.wbd
Open Office
.odf